 Small batches, high standards. Our rapid prototyping service makes validation faster and easier —

Custom Metal Stamping Die Secrets: From Design Blueprint To Production Floor
Understanding Custom Metal Stamping Dies and Their Manufacturing Purpose
Imagine transforming a flat sheet of steel into a perfectly shaped automotive bracket in less than a second. That's exactly what a custom metal stamping die makes possible. But what is this precision tool, and why does it matter so much to modern manufacturing?
A custom metal stamping die is a specialized precision tool engineered to cut, bend, or form sheet metal into specific three-dimensional shapes through controlled force application. Unlike generic tooling, these dies are purpose-built for particular part geometries, enabling manufacturers to produce complex components with remarkable consistency across thousands or even millions of production cycles.
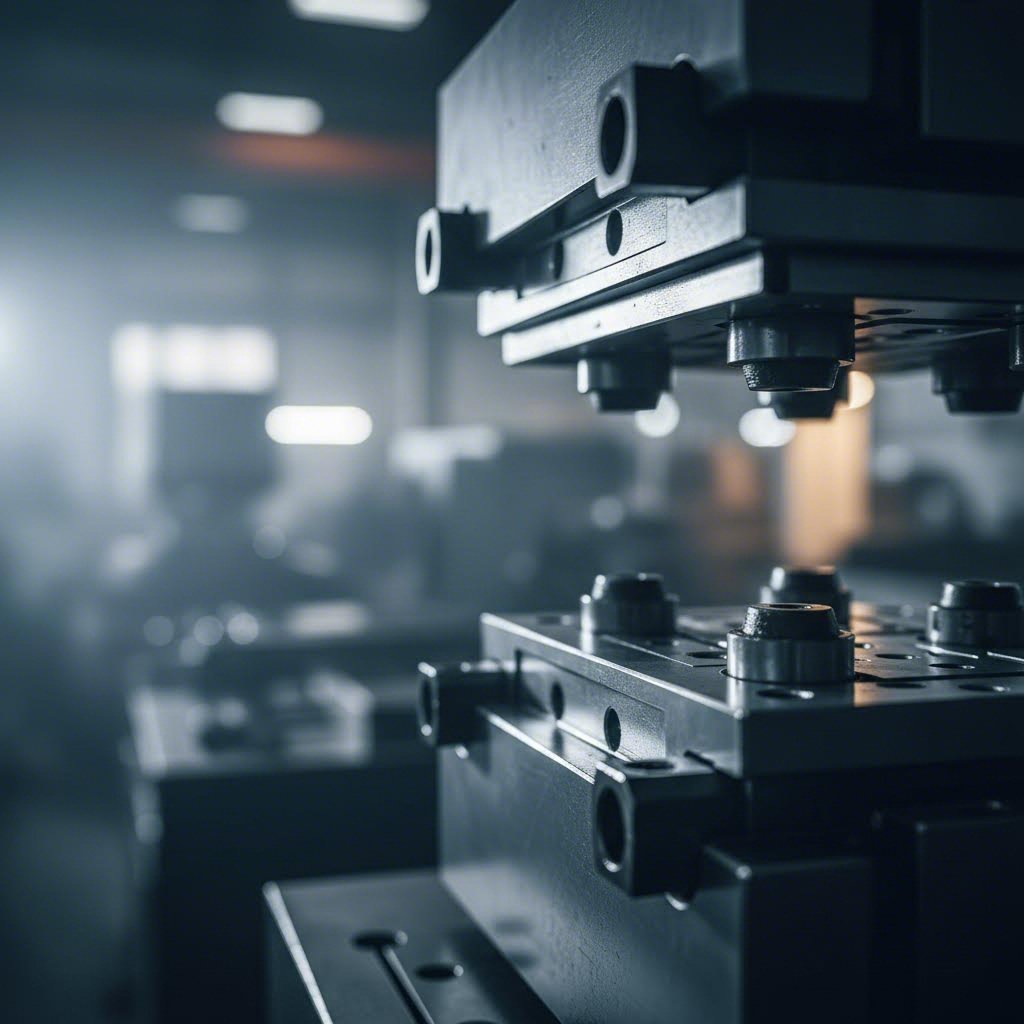
The process works through a straightforward mechanical principle. The die consists of two primary components: a male punch and a female die cavity. When a stamping press drives these components together with substantial force, they transform flat metal sheets into precisely shaped parts. Every curve, hole, and bend is determined by the die's exact specifications.
What Makes a Die Custom Rather Than Standard
Standard catalog dies handle common shapes and general applications. They're the off-the-rack suits of metal forming. Custom dies, however, are tailored solutions engineered to meet exact specifications for unique or complex components that simply cannot be produced using off-the-shelf tooling.
Here's what separates custom metal stamping from standard approaches:
- Precision engineering - Custom dies are designed for specific materials, thicknesses, and tolerances unique to your application
- Unique geometries - Intricate shapes and tight tolerances that standard dies cannot achieve
- Material optimization - Tools crafted for particular metal characteristics, minimizing waste and maximizing quality
- Production efficiency - Dies optimized for your exact volume requirements and cycle times
Think of it this way: when automotive manufacturers need transmission components or body panels produced with extreme precision, standard tooling simply won't deliver. The margin for error is too small, and the consequences of inconsistency are too significant.
The Role of Dies in Modern Manufacturing
Custom dies represent significant engineering investments, but they unlock something invaluable: the ability to produce identical parts at scale with consistent quality. Industries from aerospace to medical devices rely on dies and stamping processes to deliver components that meet demanding specifications every single time.
Custom stamping dies enable manufacturing precision that generic tooling simply cannot match. They're engineered specifically for the materials, geometries, and tolerances your application demands, reducing errors, minimizing waste, and ensuring every part meets exact specifications.
The metal stamping process powered by custom dies offers several compelling advantages. High-volume production becomes economically viable because once the tooling investment is made, per-part costs drop dramatically. Quality remains consistent because the die's precision is built into every cycle. And complex geometries that would require multiple secondary operations with other methods can often be achieved in a single stamping stroke.
For manufacturers seeking parts that fit and function properly from the first piece to the millionth, custom die solutions provide the foundation for reliable, efficient production.
Types of Custom Stamping Dies and When to Use Each
Now that you understand what makes a die custom, here's the next question: which type of stamping die fits your specific manufacturing needs? The answer depends on your part complexity, production volumes, and budget considerations. Let's break down the main categories so you can make informed decisions about your stamping tooling investments.
Metal stamping dies fall into two broad categories: single-station dies and multi-station dies. Each serves distinct purposes, and choosing the right configuration can dramatically affect your production efficiency and per-part costs.
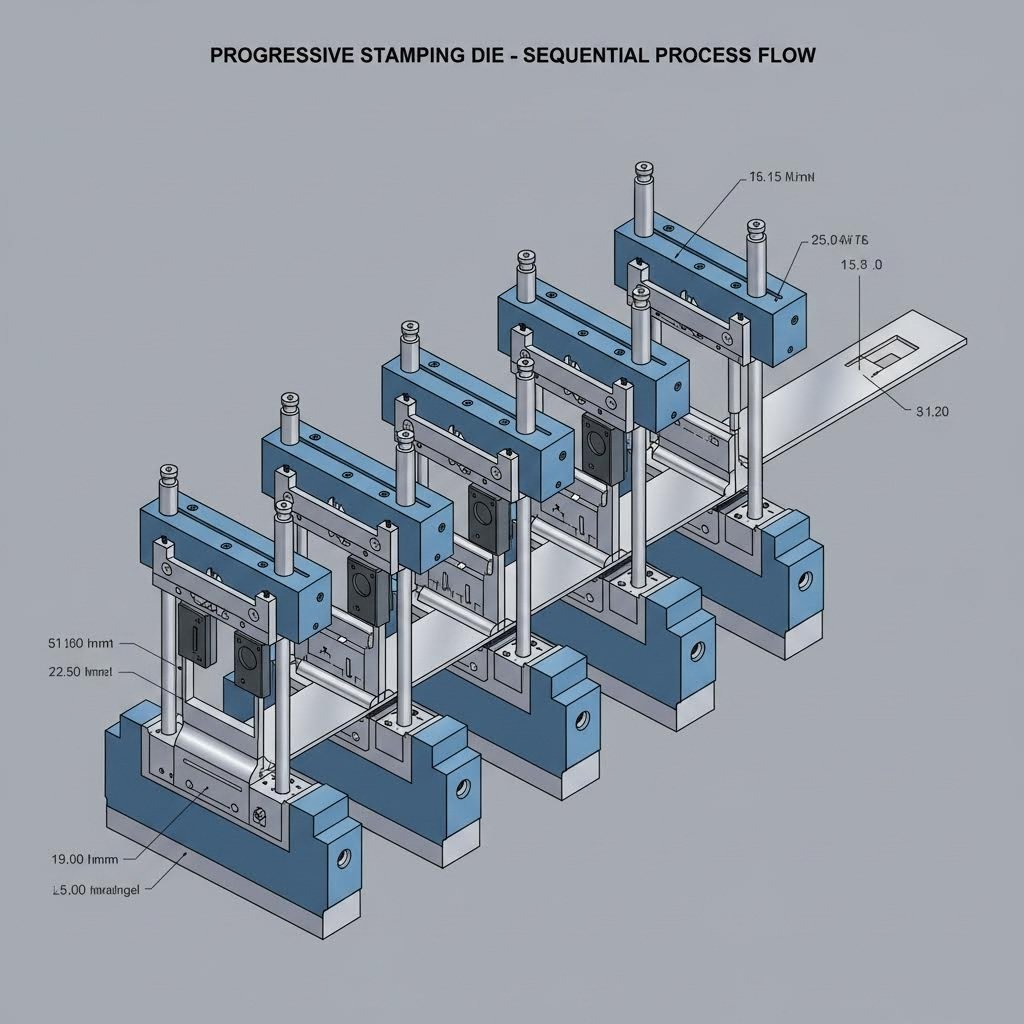
Progressive Dies for High-Volume Efficiency
Progressive dies are the workhorses of high-volume manufacturing. Picture a series of stations arranged in sequence, each performing a specific operation as the metal sheet advances through the press. With each stroke, the material moves forward, gradually transforming from flat stock into a finished component.
What makes progressive die stamping so powerful? The efficiency factor. Multiple operations happen simultaneously across different stations, so while one section of the strip is being cut, another is being bent, and yet another is receiving its final form. The finished part is cut free at the final station, and the cycle repeats.
Progressive die manufacturers typically recommend this approach when you need:
- High production volumes where speed matters
- Small to medium-sized parts with multiple features
- Consistent quality across large production runs
- Reduced handling between operations
The trade-off? Higher upfront tooling costs. Progressive dies require meticulous planning and precision engineering. However, the cost per part decreases significantly with large production runs, making this option highly cost-effective for long-term projects in industries like automotive and electronics.
Compound and Transfer Die Applications
Not every project calls for a progressive setup. Compound dies offer a different approach, performing multiple operations in a single stroke rather than across sequential stations. Imagine blanking and piercing happening simultaneously in one press cycle. That's compound die efficiency.
These stamping dies excel at producing medium-sized, intricate components where all operations can be completed in one pass. They're generally less expensive to design and produce compared to progressive dies, making them attractive for moderate production volumes. The simpler structure also means less maintenance overhead.
Transfer dies take yet another approach. Here, the workpiece is cut from the sheet metal at the beginning and then mechanically transferred between stations. This method handles larger, more complex parts that progressive dies cannot accommodate because the parts need to move independently rather than remaining attached to a strip.
When does transfer die stamping make sense? Consider these scenarios:
- Large structural components like frames or shells
- Complex assemblies requiring deep draws
- Parts too large to remain attached to a carrier strip
- Applications in aerospace or heavy machinery sectors
Beyond these primary types, combination dies merge cutting and forming operations in ways that neither compound nor progressive dies can match alone. They handle blanking, piercing, bending, and forming within a single tool, offering versatility for specialty configurations and unique manufacturing challenges.
Selecting the Right Die Type for Your Application
Choosing between die and stamping configurations requires balancing multiple factors. The table below compares key considerations across the main die types to help guide your decision:
| Die Type | Operation Complexity | Production Speed | Part Size | Tooling Cost | Ideal Applications |
|---|---|---|---|---|---|
| Progressive | High (multiple sequential operations) | Very fast | Small to medium | Higher upfront | Automotive brackets, electronic components, clips |
| Compound | Moderate (simultaneous cutting operations) | Moderate | Small to medium | Lower | Flat parts, washers, simple blanks |
| Transfer | High (multi-station with part transfer) | Moderate to fast | Medium to large | Higher | Frames, shells, structural assemblies |
| Combination | Moderate to high (cutting and forming) | Moderate | Small to medium | Moderate | Parts requiring both cutting and bending |
| Simple (Single-station) | Low (one operation per stroke) | Slower | Any size | Lowest | Basic blanking, piercing, low-volume runs |
Material characteristics also influence your choice. Different metals respond differently to forming operations, and your die type must accommodate these properties. Thicker materials or high-strength alloys may require transfer dies with more controlled forming stages, while thinner gauge materials work well in progressive setups.
Production volume remains the deciding factor for many manufacturers. Progressive dies justify their higher tooling investment through reduced per-part costs at scale. For lower volumes or prototyping, simpler die configurations keep initial costs manageable while still delivering quality results.
Understanding these distinctions helps you communicate effectively with die manufacturers and ensures you invest in the right stamping tooling for your specific requirements. With the die type selected, the next step is understanding how these precision tools are actually designed and manufactured.
The Custom Die Design and Manufacturing Process Explained
So you've identified the right die type for your application. What happens next? How does your part drawing transform into production-ready tooling capable of stamping thousands of precision components? The journey from concept to finished custom metal stamping dies involves a carefully orchestrated sequence of engineering, machining, and validation steps.
Understanding this process helps you communicate effectively with die manufacturers, set realistic timeline expectations, and identify opportunities to optimize both cost and quality before production begins.
From Part Drawing to Die Concept
Every stamping die design begins with a thorough examination of the component you need to produce. This initial analysis phase determines whether your part is even feasible to stamp and identifies potential challenges before any metal is cut.
During the part analysis and feasibility study, engineers examine your component's geometry, material specifications, tolerance requirements, and production volume expectations. They're looking for features that might cause problems: sharp corners that concentrate stress, deep draws that could tear the material, or tight tolerances that push the limits of stamping technology.
Design for Manufacturability (DFM) analysis plays a critical role at this stage. When conducted early, DFM review identifies design modifications that can simplify the die, reduce tooling costs, and improve part quality. Something as simple as adjusting a bend radius or relocating a hole can dramatically impact manufacturing efficiency. Catching these opportunities before metal stamping die design begins prevents costly revisions later.
Once feasibility is confirmed, engineers develop the die concept. This involves determining how many stations are needed, planning the sequence of operations, and establishing the overall tooling architecture. For progressive dies, this means mapping out exactly what happens at each station as the material advances through the press.
The Complete Stamping Die Manufacturing Sequence
The die-making process follows a structured sequence that ensures precision at every stage. Here's what happens from initial design through production approval:
- Design and Planning - Engineers create detailed CAD models of the die, including cavity shapes, draft angles, and all critical features. Advanced simulation tools like finite element analysis (FEA) predict material flow and identify potential defects before any physical work begins.
- Material Preparation - Raw die materials, typically high-strength tool steels, are cut to size and undergo initial heat treatment to achieve the necessary hardness and toughness for dies manufacturing.
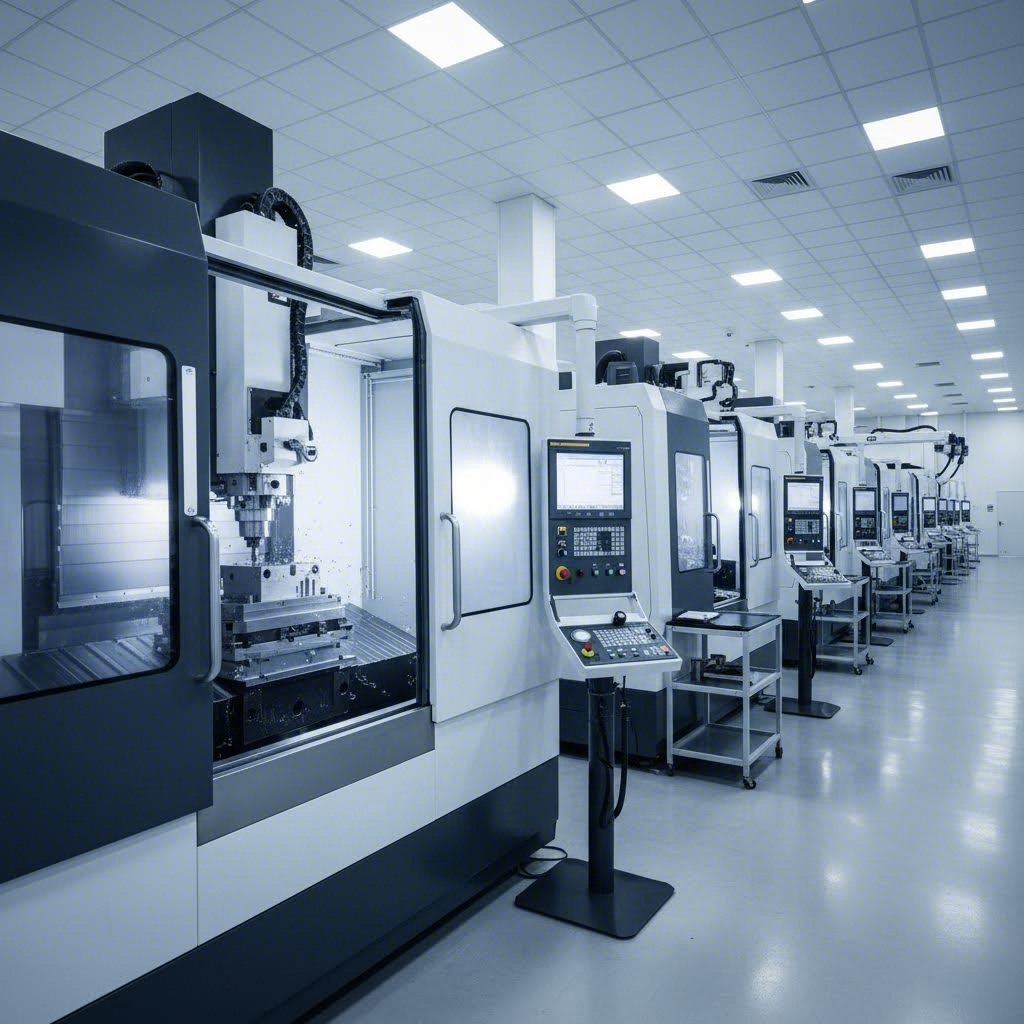
- Machining and Shaping - This phase begins with rough machining to remove excess material, followed by precision CNC machining to create intricate details. EDM (electrical discharge machining) handles complex geometries that conventional cutting cannot achieve. Surface finishing ensures smooth material flow during production.
- Assembly and Testing - Die components, including upper and lower halves, inserts, and guide systems, are assembled with extreme precision. Initial test runs verify that parts meet specified tolerances and identify any alignment or material flow issues requiring adjustment.
- Finishing and Quality Control - Final surface polishing, protective coatings, and comprehensive inspection complete the process. Dimensional accuracy, surface finish, and material hardness are all verified before the manufacturing die receives approval for production use.
Each stage builds on the previous one, and shortcuts at any point can compromise the final result. That's why experienced die manufacturers maintain strict quality controls throughout machining and assembly operations.
Precision Machining and Assembly Requirements
The machining phase is where engineering drawings become physical reality. Modern stamping die manufacturing relies heavily on CNC equipment capable of holding tolerances measured in thousandths of an inch. Wire EDM cuts complex profiles with exceptional accuracy, while high-speed milling creates the surfaces that will contact your material millions of times.
Surface finish matters more than you might expect. Polished die surfaces reduce friction during forming operations, improve part surface quality, and extend die life by minimizing wear. Different areas of the die may require different finish specifications depending on their function.
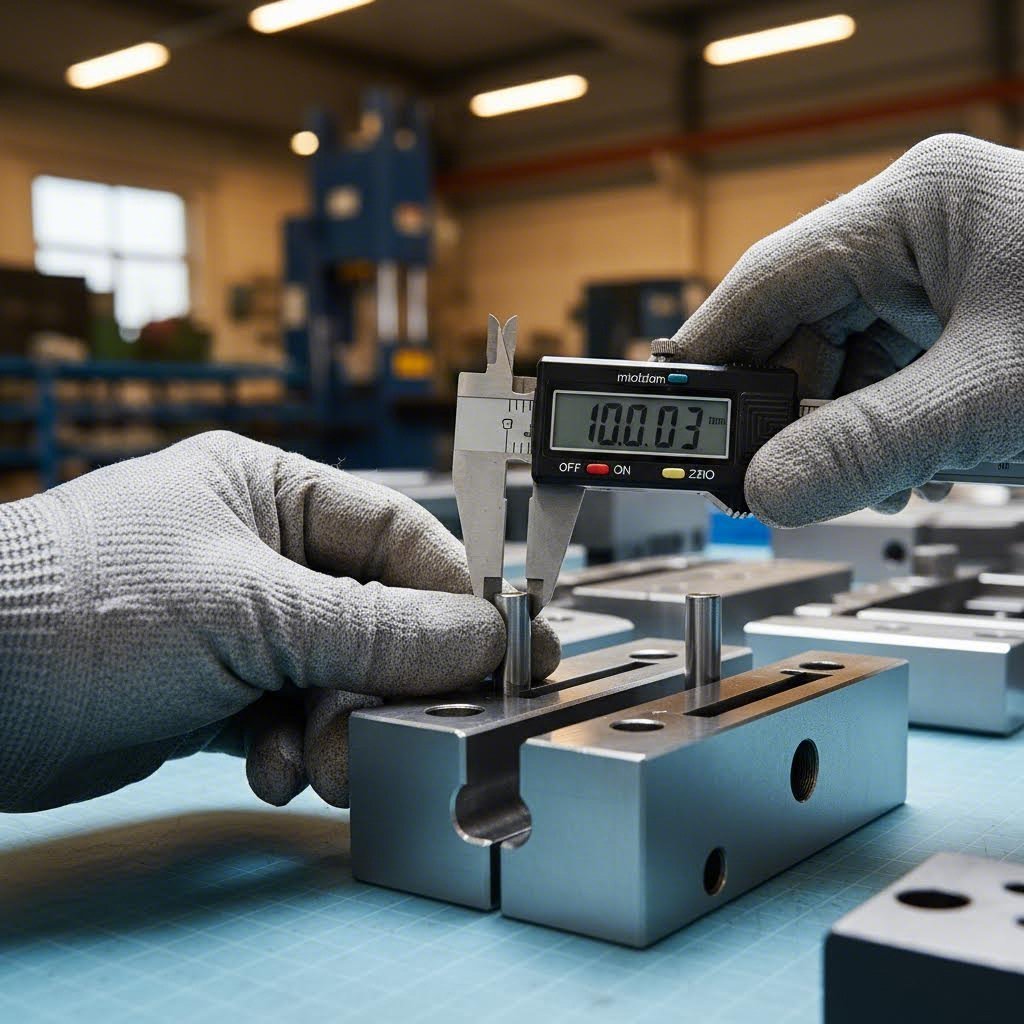
Assembly demands equal precision. When upper and lower die components come together, alignment must be perfect. Even small misalignments cause uneven material flow, dimensional variations, and accelerated wear. Skilled die makers use precision measuring equipment to verify fit and function before the die ever sees a production press.
The tryout phase provides the ultimate validation. Engineers run test parts, measure results against specifications, and make fine adjustments as needed. This iterative process continues until the die consistently produces parts that meet all quality requirements.
Timeline Expectations for Different Die Complexities
How long does all this take? Timelines vary significantly based on die complexity and manufacturer capacity:
- Simple single-station dies - 2 to 4 weeks for basic blanking or piercing tools
- Moderate complexity dies - 6 to 10 weeks for compound or small progressive dies
- Complex progressive dies - 12 to 20 weeks for multi-station tools with intricate forming operations
- Large transfer dies - 16 to 24 weeks or more for major structural component tooling
These estimates assume normal production schedules. Rush requirements typically add cost but can compress timelines when capacity allows. The key is planning ahead and engaging with your die manufacturer early in the product development cycle.
With the die manufacturing process mapped out, the next critical consideration is material selection. The tool steels and surface treatments chosen for your die directly impact its performance, longevity, and ultimately your per-part production costs.

Material Specifications and Precision Standards for Die Construction
You've selected your die type and mapped out the manufacturing process. But here's a question that separates long-lasting steel stamping dies from those that fail prematurely: what materials are actually inside your tooling? The answer directly impacts how many parts you'll produce before needing repairs, replacements, or complete rebuilds.
Material selection for sheet metal stamping dies isn't guesswork. It's a calculated decision balancing hardness, toughness, wear resistance, and machinability against your specific production demands. Get it right, and your metal stamping die sets deliver millions of consistent parts. Get it wrong, and you're facing unexpected downtime, quality issues, and mounting costs.
Tool Steel Selection for Die Longevity
Tool steels form the backbone of most stamping die components. These high-carbon steels are specifically engineered to withstand the extreme pressures, abrasive wear, and repetitive stress that stamping operations demand. But not all tool steels are created equal.
Here are the primary grades you'll encounter in metal stamping tooling applications:
- D2 Tool Steel - An air-hardening, high-carbon, high-chromium steel offering exceptional wear resistance. D2 achieves hardness levels of 54-61 HRC and excels in long-run, high-production die applications including blanking dies, forming dies, and stamping dies. Its deep hardening ability helps resist chipping and cracking.
- A2 Tool Steel - An air-hardening chromium alloy offering a balance between O1 and D2 characteristics. A2 provides greater size stability during hardening and reaches 57-62 HRC. It's particularly useful for longer production runs on light or heavy gauge stock.
- S7 Tool Steel - A shock-resisting grade with superior impact properties combined with high toughness and machinability. S7 handles sudden impacts exceptionally well, making it ideal for steel stamping tools subjected to heavy loads or shock conditions.
- O1 Tool Steel - An oil-hardening general purpose steel with easy machining properties and lower hardening temperatures. O1 provides good wear resistance and toughness for standard applications at economical production costs.
Each grade brings distinct advantages. D2's exceptional wear resistance makes it the go-to choice for dies processing abrasive materials or running extremely high volumes. S7's shock resistance suits applications where impact loading is significant. A2 offers a versatile middle ground when you need good all-around performance without the higher cost of specialty grades.
Heat Treatment and Surface Engineering
Raw tool steel alone won't deliver the performance your stamping die components require. Heat treatment transforms the steel's microstructure, dramatically enhancing its mechanical properties. This controlled process of heating, quenching, and tempering unlocks the hardness and toughness that production demands.
The heat treatment sequence typically includes:
- Austenitizing - Heating the steel above its critical temperature (typically 1700-1900°F, depending on the steel grade) to transform the microstructure
- Quenching - Rapid cooling using oil, air, or other media to harden the steel
- Tempering - Reheating to a lower temperature (350-1200°F) to reduce brittleness while maintaining hardness
Proper tempering is especially critical. D2 steel tempered at 400°F achieves 60-62 HRC, while tempering at 1000°F reduces hardness to 54-56 HRC but improves toughness. The optimal balance depends on whether your application prioritizes wear resistance or impact resistance.
Surface coatings extend die life even further. Modern PVD (Physical Vapor Deposition) and CVD (Chemical Vapor Deposition) coatings add microscopic protective layers that dramatically reduce friction and wear. Common coating options include:
- TiN (Titanium Nitride) - A general-purpose coating achieving 2300-2500 HV microhardness, suitable for cutting, forming, and blanking applications
- TiCN - Offers improved hardness (2800-3200 HV) and wear resistance beyond TiN, excellent for stamping and forming tools processing high-carbon steels
- AlTiN - Provides exceptional performance at elevated temperatures with 3000-3400 HV hardness, ideal for demanding metal-forming applications
- CVD TiC - Delivers excellent bonding properties with 3200-3400 HV hardness, making it a strong choice for heavy-load stamping and forming operations
For high-wear areas where even coated tool steel cannot provide sufficient longevity, carbide inserts offer the ultimate solution. Tungsten carbide inserts in critical punch and die sections can extend tool life by 5-10 times compared to hardened steel alone. The trade-off is higher initial cost and reduced machinability, so carbide is typically reserved for the highest-wear locations.
Key Material Properties That Drive Die Performance
When evaluating materials for your stamping dies, these properties determine real-world performance:
- Hardness - Resistance to surface indentation and wear. Higher hardness maintains cutting edges longer but may increase brittleness. Most stamping applications target 58-62 HRC for working surfaces.
- Toughness - Ability to absorb impact without fracturing. Critical for dies experiencing shock loads or processing thicker materials. S7 steel excels here with its shock-resisting characteristics.
- Wear Resistance - Ability to resist degradation from friction and abrasion. D2's high chromium content (11.5-12%) provides superior wear resistance for extended production runs.
- Machinability - Ease of cutting and shaping during die construction. Better machinability reduces manufacturing time and cost but may sacrifice some performance properties.
Precision requirements also influence material choices. Tighter tolerances demand materials with excellent dimensional stability during heat treatment. A2 steel's minimal distortion characteristics make it preferable when size stability is critical. For the most demanding precision applications, additional stress-relieving treatments ensure dimensional accuracy throughout the die's service life.
Surface finish specifications vary by function. Cutting edges require sharp, polished surfaces for clean shears. Forming areas need controlled surface textures that allow material flow without galling. Proper surface engineering at each location maximizes both part quality and die longevity.
Understanding these material considerations helps you evaluate die quotes more effectively and ensures your tooling investment delivers the production performance you expect. With materials and precision standards established, the next step is examining how different industries apply these principles to meet their unique manufacturing demands.
Industry Applications from Automotive to Medical Devices
Different industries don't just use custom metal stamping dies differently—they demand entirely different specifications, tolerances, and certifications. What works perfectly for consumer electronics would fail catastrophically in medical implants. What satisfies general manufacturing standards falls far short of automotive structural requirements.
Understanding these distinctions matters whether you're specifying dies for your own production or evaluating a manufacturer's capabilities. Let's examine how major industries approach precision die and stamping requirements, and what these differences mean for your tooling decisions.
Automotive Stamping Die Requirements
The automotive industry pushes custom automotive metal stamping to its limits. Every chassis bracket, suspension arm, and structural reinforcement must meet exacting standards because lives depend on it. An automotive stamping die producing body-in-white components operates under constraints that other industries rarely encounter.
Tolerance requirements for automotive stamping dies typically range from ±0.1 mm to ±0.25 mm for standard features. Precision stamping operations can achieve tighter limits of ±0.05 mm when critical fit requirements demand it. These tolerances follow international frameworks including ISO 2768 for general tolerances, DIN 6930 for stamped steel parts, and ASME Y14.5 for geometric dimensioning and tolerancing.
Material selection adds another layer of complexity. Modern vehicles increasingly rely on Advanced High Strength Steel (AHSS) and Ultra High Strength Steel (UHSS) for safety-critical components. These materials exhibit significant springback—the tendency to partially return to their original shape after forming. Achieving a ±0.5° bend tolerance in AHSS requires complex die engineering and often overbending the material to compensate for this elastic recovery.
Automotive stamping dies must also accommodate:
- Class A surface requirements - Visible exterior panels like hoods and doors demand defect-free finishes where even 0.05 mm depressions may create visible paint distortions
- Weld point alignment - Structural components require precise positioning for robotic welding, where ±0.5 mm deviations can cause assembly failures
- High-volume consistency - Production runs of hundreds of thousands or millions of identical parts
- Lightweighting materials - Aluminum body panels require different die designs to prevent galling and surface defects
For manufacturers targeting the automotive supply chain, IATF 16949 certification isn't optional—it's the baseline. This automotive-specific quality management standard builds on ISO 9001 with additional requirements for defect prevention, variation reduction, and supply chain management. Partnering with an IATF 16949-certified manufacturer like Shaoyi Metal Technology ensures your stamped metal components meet the rigorous quality systems that OEMs require.
Medical and Electronics Industry Specifications
While automotive applications emphasize structural integrity and high-volume consistency, medical device stamping introduces biocompatibility as the paramount concern. Custom stamped metal parts destined for surgical instruments, implants, or diagnostic equipment face an entirely different set of requirements.
Medical metal stamping demands materials that won't cause adverse reactions when contacting human tissue. Stainless steel grades with proven biocompatibility are standard for surgical instruments, while titanium dominates implant applications due to its exceptional biocompatibility and corrosion resistance. Every material choice must withstand repeated sterilization cycles without degradation.
Precision requirements in medical stamping often exceed automotive standards. Surgical instruments require exceptional accuracy where every fraction of a millimeter matters. The dies producing these components must maintain tolerances that ensure consistent performance across every manufactured piece.
ISO 13485 certification governs medical device manufacturing, establishing quality management systems specific to the regulatory requirements of this industry. This certification ensures consistent processes from design through production, with complete traceability systems for recall management if needed.
Electronics stamping presents its own challenges. Miniaturization drives requirements for increasingly precise small-part stamping. Connectors, terminals, and shielding components often feature intricate geometries with tolerances measured in hundredths of a millimeter. Progressive dies excel in electronics applications, producing high volumes of these intricate components with the consistency that automated assembly demands.
Consumer goods applications typically allow more flexibility in tolerance specifications but demand cost efficiency and aesthetic quality. Appliance components, hardware, and decorative elements emphasize surface finish and visual appearance alongside functional requirements.
Comparing Industry Requirements
The table below illustrates how different sectors approach key stamping considerations:
| Industry | Typical Tolerances | Common Materials | Certification Requirements | Typical Production Volumes |
|---|---|---|---|---|
| Automotive | ±0.1 mm to ±0.25 mm standard; ±0.05 mm precision | AHSS, UHSS, aluminum, mild steel | IATF 16949, ISO 9001 | 100,000 to millions of parts |
| Medical Devices | ±0.025 mm to ±0.1 mm | Biocompatible stainless steel, titanium, specialty alloys | ISO 13485, FDA compliance | 1,000 to 100,000+ parts |
| Electronics | ±0.05 mm to ±0.15 mm | Copper alloys, phosphor bronze, stainless steel | ISO 9001, industry-specific standards | 10,000 to millions of parts |
| Consumer Goods | ±0.15 mm to ±0.5 mm | Cold-rolled steel, stainless steel, aluminum | ISO 9001 | 5,000 to 500,000+ parts |
| Aerospace | ±0.05 mm to ±0.1 mm | Titanium, aluminum alloys, specialty steels | AS9100, NADCAP | 100 to 10,000 parts |
These certification requirements directly influence die design and manufacturing processes. An IATF 16949-certified facility approaches tooling development with documented control plans, statistical process monitoring, and validated measurement systems. Medical-grade production requires clean room standards for certain applications and complete material traceability.
When selecting a die manufacturer, their certification portfolio reveals their capability to serve your industry. A supplier with IATF 16949 certification has demonstrated the systems necessary for automotive-grade quality. ISO 13485 certification signals readiness for medical device production requirements.
The practical impact? Your die design decisions—from material selection to tolerance specifications—must align with your target industry's requirements from the earliest stages. Retrofitting compliance into an existing die design is expensive and often impractical. Starting with the right specifications ensures your tooling investment delivers parts that meet all applicable standards.
With industry-specific requirements understood, the next critical consideration is keeping your dies performing at peak efficiency. Even the best-engineered tooling requires proper maintenance to deliver its full production potential.
Die Maintenance and Lifespan Optimization Strategies
Here's a truth that experienced manufacturers know but rarely discuss openly: the most expensive custom metal stamping die isn't the one with the highest purchase price. It's the one that fails unexpectedly, halts production, and ships defective parts before anyone notices the problem. Your die stamp investment only delivers its full value when proper maintenance keeps it running at peak performance.
Yet die maintenance remains one of the most overlooked aspects of stamping operations. According to industry experience documented by The Phoenix Group, a poorly defined die shop management system dramatically decreases press line productivity and increases costs through quality defects, sorting expenses, and unexpected downtime.
Let's change that by exploring exactly what it takes to maximize your tooling lifespan.
Preventive Maintenance Schedules That Extend Die Life
Think of preventive maintenance as scheduled health checkups for your steel stamps and metal stamps. Rather than waiting for problems to surface during production, systematic inspection identifies wear patterns before they cause defects or failures.
A robust maintenance schedule should include these checkpoint intervals:
- After every production run - Visual inspection for obvious damage, debris removal, lubrication check
- Weekly or bi-weekly - Detailed examination of cutting edges, punch tips, and high-wear surfaces
- Monthly - Measurement verification of critical dimensions, spring condition assessment, guide component inspection
- Quarterly - Comprehensive teardown inspection, hardness testing of wear surfaces, alignment verification
What factors affect how aggressively you should schedule maintenance? Several variables determine die wear rates:
- Material hardness - Stamping high-strength steels or abrasive materials accelerates wear compared to softer metals
- Production volume - Higher stroke counts compress the interval between required maintenance
- Lubrication practices - Proper lubrication reduces friction dramatically; poor practices multiply wear exponentially
- Operator handling - Careful die changes and storage prevent damage that accumulates over time
Creating a digital logbook for each critical die transforms maintenance from guesswork into data-driven decision making. Track stroke counts, maintenance actions, dimensional measurements, and any performance issues. This history becomes invaluable for predicting future maintenance needs and identifying recurring problems.
Recognizing the Warning Signs of Die Wear
Your stamp dies communicate their condition through the parts they produce. Learning to interpret these signals prevents minor issues from becoming major failures.
Watch for these indicators that maintenance is overdue:
- Burring on cut edges - Indicates dulled cutting edges or excessive punch-to-die clearance from wear
- Dimensional drift - Parts gradually moving out of tolerance suggests progressive wear on forming surfaces
- Surface scratches or galling marks - Signals inadequate lubrication or material buildup on die surfaces
- Inconsistent part quality - Variation between parts in the same run often points to alignment issues or worn guide components
- Increased press tonnage requirements - Rising force demands indicate dulled edges requiring more energy to cut
Each defect pattern tells a specific story. Burrs forming on one side of a cut suggest uneven clearance—possibly from misalignment or localized wear. Wrinkles in formed areas may indicate blank holder force issues or worn draw beads. Cracks and splits point to excessive material stress from worn radii or insufficient lubrication.
When to Refurbish Versus Replace
Every die eventually reaches a crossroads: invest in refurbishment or purchase replacement tooling? This decision should never rely on gut instinct alone. Instead, evaluate three key factors.
First, assess the extent of wear or damage. Localized wear on replaceable components like punches or inserts is straightforward to address. Widespread deterioration of the die body itself may make refurbishment impractical.
Second, calculate the cost comparison. Rebuilding typically costs 30-50% of new tooling, but only makes sense if the refurbished die will deliver acceptable performance. Factor in expected remaining life after refurbishment versus a new tool's full lifespan.
Third, consider technology improvements. If design changes could improve part quality or die longevity, replacement may offer advantages beyond simple restoration of original capability.
Refurbishment options range from minor interventions to complete rebuilds:
- Regrinding - Restoring sharpness to cutting edges and reforming worn radii
- Component replacement - Swapping worn punches, springs, pilots, or guide bushings with new parts
- Surface restoration - Precision welding to rebuild worn areas followed by remachining to specification
- Complete rebuild - Disassembly, inspection of all components, replacement of worn elements, and reassembly with full alignment verification
As Sakazaki's rebuild experience demonstrates, professional refurbishment can restore dies to meet or exceed original performance standards—often faster and more economically than sourcing new tooling.
Troubleshooting Common Performance Issues
When problems arise during production, systematic troubleshooting identifies root causes rather than just treating symptoms. Here's guidance for the most frequent issues:
Burring problems: Start by checking punch-to-die clearance—wear increases this gap over time. Inspect cutting edges for chips or dullness. Verify alignment between upper and lower die components. If burrs appear only on certain features, focus inspection on those specific punch and die sections.
Dimensional drift: Measure the die itself, not just the parts. Worn forming surfaces or relaxed alignment gradually shifts dimensions. Check guide post and bushing wear. Verify that die set bolting remains secure and that nothing has shifted from thermal cycling.
Surface defects: Galling and scratching indicate friction problems. Clean all die surfaces thoroughly and examine for material buildup. Evaluate lubrication adequacy—both quantity and type. Consider surface treatments or coatings if the problem persists after addressing lubrication.
The most effective maintenance programs prioritize prevention over reaction. Investing time in scheduled inspections, proper lubrication, and careful handling extends die life significantly while reducing the frequency and severity of production disruptions.
With maintenance practices established, the final consideration for most manufacturers is understanding the economics of custom die investment—what drives costs and how to evaluate total value.
Cost Factors and Investment Considerations for Custom Dies
Here's the question every buyer asks but rarely gets a straight answer to: what does a custom metal stamping die actually cost? The frustrating reality is that pricing varies enormously—from a few thousand dollars for simple tooling to six figures for complex progressive dies. Understanding what drives these costs transforms you from a passive price-taker into a strategic decision-maker who controls value.
The initial quote you receive represents just one piece of a larger financial picture. Smart manufacturers recognize that Total Cost of Ownership (TCO) matters far more than the purchase price alone. A "cheap" die that requires constant maintenance, produces inconsistent parts, or fails prematurely ends up costing multiples of a quality tool that delivers reliable performance throughout its service life.
What Drives Custom Die Pricing
Custom metal stamping services pricing follows a logical structure once you understand the underlying variables. These factors influence your investment roughly in order of typical impact:
- Part complexity and design features - This single factor often determines whether you're looking at a $10,000 or $100,000 investment. Complex geometries requiring multiple forming operations, tight radii, deep draws, or intricate patterns demand more sophisticated tooling. The relationship between complexity and cost isn't linear—it's exponential. Even small design details can have significant ripple effects on manufacturing expense.
- Number of stations - Progressive dies with more stations cost more to design, machine, and assemble. Each station represents additional engineering, precision components, and integration work. A 12-station progressive die might cost three times more than a 4-station tool producing a simpler version of the same part.
- Material specifications for the die itself - Tool steel grades vary significantly in cost. Premium grades like D2 or carbide inserts for high-wear areas add to the investment but deliver longer service life. Heat treatment, surface coatings, and finishing requirements further influence pricing.
- Tolerance requirements - Tighter tolerances demand more precise machining, better-controlled production processes, and more frequent quality inspections during die manufacturing. Achieving ±0.05 mm precision costs substantially more than ±0.25 mm specifications.
- Production volume expectations - Dies built for million-part runs require robust construction with premium materials. Low-volume applications can use lighter-duty designs at lower cost points. Matching die class to your actual production needs prevents over-investment.
- Lead time demands - Rush requirements compress schedules and often require overtime, expedited material procurement, and prioritized machine access. Standard lead times cost less than expedited deliveries.
Understanding these drivers helps you communicate effectively with custom metal stamper suppliers and identify opportunities for cost optimization before the quoting process begins.
Calculating Total Cost of Ownership
The purchase price on a quotation is just the tip of the iceberg. According to industry analysis, equating a die's purchase price with its total cost represents one of the most common traps in manufacturing. Massive, project-defining costs hide beneath the surface.
A low-priced die typically signals compromises in steel grade, design optimization, machining precision, or heat treatment. Any "savings" made in these areas almost inevitably return later—multiplied in cost during production. Consider these hidden cost categories:
- Maintenance expenses - Poorly designed dies require more frequent sharpening, component replacement, and adjustment
- Production downtime - Unreliable tooling creates unexpected stoppages that disrupt schedules and miss delivery commitments
- Quality defects - Inconsistent parts mean sorting costs, rework, scrap, and potential customer complaints
- Shortened lifespan - Inferior materials or construction may require complete replacement far sooner than quality tooling
The relationship between upfront die cost and per-part production economics becomes clear when you calculate custom metal stamps investments across their full lifecycle. A $50,000 die producing 500,000 parts adds $0.10 per piece for tooling amortization. That same die running 2 million parts drops the tooling cost to $0.025 per piece. Die longevity directly impacts your production economics.
Design optimization during DFM review offers perhaps the greatest opportunity to reduce both die cost and ongoing production expenses. Industry experts note that over 70% of manufacturing costs are locked in during the first few hours of product design. Adjusting a bend radius, relocating a hole, or simplifying a feature during the design phase costs almost nothing—but making those same changes after die construction begins can add thousands to your project.
Domestic Versus Offshore Die Sourcing
The sourcing decision extends beyond simple per-unit pricing comparisons. While offshore custom metal stamp production may initially appear more affordable due to lower unit prices, many manufacturers discover hidden costs that impact overall project budgets.
According to reshoring analysis from Die-Matic, international sourcing introduces several cost factors that don't appear in initial quotations:
- Shipping and customs fees - International freight adds significant expense, especially for heavy tooling
- Tariffs and duty fluctuations - Trade policy changes create cost uncertainty that's difficult to budget
- Extended lead times - Parts must navigate logistics bottlenecks, port congestion, and global events that delay delivery
- Communication overhead - Time zone differences, language barriers, and limited on-site oversight slow design iterations and troubleshooting
- Quality control challenges - Without direct supervision, variations in standards or manufacturing practices can result in inconsistencies and rework
Domestic metal parts stamping partners offer advantages that often justify higher quoted prices. Shorter supply chains enable faster turnaround for both prototypes and production runs. Real-time engineering collaboration improves manufacturability and reduces risk. Intellectual property protection and traceability are enhanced—a critical factor for regulated industries.
The total landed cost calculation must include these factors alongside the quoted price. A domestic supplier quoting 20% higher may actually deliver lower TCO when you factor in reduced shipping, faster problem resolution, and improved quality consistency.
For manufacturers in high-precision, high-volume industries like automotive and medical devices, the decision increasingly favors domestic or nearshore production. The strategic agility, reduced risk, and predictable quality often outweigh initial price differences.
With cost considerations understood, the final step is selecting the right manufacturing partner to bring your custom stamping parts to life—a decision that determines whether your tooling investment delivers its full potential value.
Selecting the Right Custom Die Manufacturing Partner
You've mapped out die types, understood the manufacturing process, and calculated your investment considerations. Now comes the decision that determines whether all that planning pays off: choosing the right stamping die manufacturers to execute your project. This isn't a decision you can afford to get wrong.
The wrong partner delivers headaches—missed deadlines, quality issues, communication breakdowns, and tooling that underperforms from day one. The right partner becomes a strategic asset, bringing engineering expertise that improves your designs, responsive support that keeps projects on track, and quality systems that ensure consistent results across millions of production cycles.
So how do you tell the difference before signing a contract? Let's walk through the evaluation criteria that separate exceptional metal stamping die manufacturers from the rest.
Evaluating Die Manufacturer Capabilities
Technical capability forms the foundation of any successful partnership. But capability extends far beyond having the right machines on the floor. You need a custom metal stamping company that combines equipment, expertise, and quality systems into a cohesive operation.
Start your evaluation with these critical factors:
Engineering Support Depth
A skilled engineering team can anticipate potential challenges like metal deformation and springback, adapting designs accordingly before problems surface in production. According to Eigen Engineering's analysis, manufacturers with strong engineering teams balance multiple design factors—from part strength to appearance—creating dies that meet both functional and aesthetic requirements.
Look for manufacturers who offer comprehensive Design for Manufacturability (DFM) support. This isn't just a checkbox—it's where experienced engineers review your part design and identify opportunities to simplify tooling, reduce costs, and improve part quality before any metal is cut. Manufacturers who invest in thorough DFM analysis demonstrate engineering depth that pays dividends throughout your project.
Quality Certifications
Certifications tell you what quality systems a manufacturer has proven they can maintain. For automotive applications, IATF 16949 certification is essential—it demonstrates a commitment to consistent quality that OEMs require. ISO 9001 provides a baseline for general manufacturing quality, while ISO 13485 signals readiness for medical device production.
But don't stop at checking for certificates. Ask how the manufacturer implements these standards. What inspection techniques do they employ? How do they maintain traceability? Manufacturers who can articulate their quality processes demonstrate genuine commitment rather than paper compliance.
Production Capacity and Flexibility
Your project needs may evolve. Can the stamping dies manufacturer handle both small prototype batches and large production runs? Industry experts emphasize that manufacturers who provide this flexibility can accommodate changes in demand and project requirements—vital for businesses looking to bring products to market quickly.
Evaluate their equipment capabilities as well. Quality CNC machines provide precise, automated control for producing accurate dies with minimal human error. Ask about their inspection procedures, including Coordinate Measuring Machine tests and other quality control techniques that guarantee dies satisfy strict standards.
Communication Responsiveness
How quickly does a potential partner respond to your initial inquiry? That response time often predicts future project communication. Stamping tool and die projects involve countless questions, design iterations, and status updates. A manufacturer that takes days to return emails during the sales process won't suddenly become responsive once they have your business.
Quick quote turnaround indicates more than just sales efficiency—it reflects organized engineering processes and available capacity. When a manufacturer can provide detailed quotations within hours rather than weeks, it signals they have the systems and expertise to move your project forward efficiently.
The Value of Rapid Prototyping Capabilities
Before committing significant investment to production tooling, wouldn't you want to validate your design with physical parts? That's exactly what rapid prototyping enables.
According to Fictiv's comprehensive guide, rapid prototyping is essential for developing new products or improving existing ones. It enables a path to the best solution by accelerating building, testing, and refining designs while significantly saving time and costs.
For custom die stamp projects, prototyping serves multiple purposes:
- Design validation - Test fit, form, and function before investing in production tooling
- Material verification - Confirm that your selected material performs as expected under actual forming conditions
- Process optimization - Identify potential manufacturing issues while changes remain inexpensive
- Stakeholder approval - Provide physical samples for customer sign-off before committing to full production
Sheet metal rapid prototyping proves particularly valuable because it uses actual production-grade materials. As Fictiv notes, this allows engineers to test parts under real-world conditions, including load-bearing and environmental stresses, which isn't always possible with plastic-based prototyping methods. Because the process relies on the same forming and fabrication techniques used in high-volume manufacturing, it also helps identify design-for-manufacturability issues early, reducing costly adjustments later.
When evaluating a custom metal stamper, ask about their prototyping capabilities and timelines. Manufacturers offering rapid prototyping—some as fast as 5 days—demonstrate commitment to validating designs before committing your resources to production tooling.
Starting Your Custom Die Project
Ready to move forward? Here's a structured approach for initiating a custom die project from initial inquiry through production approval:
- Gather your requirements - Before contacting manufacturers, document your part specifications including CAD files, material requirements, tolerance specifications, and production volume expectations. The more complete your initial package, the more accurate and useful the responses you'll receive.
- Submit your inquiry - Reach out to potential stamping die manufacturers with your requirements package. Quality suppliers will ask clarifying questions—this is a good sign that they're taking your project seriously rather than just generating a quick number.
- Evaluate DFM feedback - Manufacturers who provide detailed DFM analysis demonstrate engineering capability and genuine interest in optimizing your project. Pay attention to the quality of suggestions and how well they explain potential improvements.
- Compare quotations strategically - Look beyond the bottom-line price. Evaluate what's included: engineering support, prototyping options, quality documentation, and after-sales support. The lowest quote rarely represents the best value.
- Request references and samples - Ask for references from similar projects and, if possible, sample parts demonstrating their precision capabilities. Established manufacturers readily provide this validation.
- Validate prototypes - If your project warrants prototyping, use this phase to verify part quality, assess communication responsiveness, and evaluate whether the partnership feels right before committing to production tooling.
- Finalize specifications and timeline - Once you've selected a partner, document all specifications, acceptance criteria, and delivery milestones. Clear expectations prevent misunderstandings during production.
- Approve production tooling - After successful prototype validation and any design refinements, authorize production die manufacturing. Maintain regular communication throughout the build process.
- Conduct die tryout and approval - Participate in or review die tryout results. Verify that sample parts meet all specifications before granting final approval for production use.
Each step builds confidence that your tooling investment will deliver the performance you expect. Rushing through this process invites problems; investing adequate time upfront prevents costly course corrections later.
Finding the Right Partner for Your Application
For manufacturers in demanding industries like automotive, the selection criteria become even more stringent. You need partners who understand the specific requirements of your sector and have proven systems to deliver consistently.
Consider what distinguishes leading manufacturers: IATF 16949 certification for automotive-grade quality systems, rapid prototyping capabilities that validate designs before major investments, comprehensive DFM support that optimizes both tooling cost and part quality, and responsive communication that keeps projects moving efficiently.
Shaoyi (Ningbo) Metal Technology exemplifies these capabilities, offering 5-day rapid prototyping, IATF 16949-certified quality for chassis, suspension, and structural components, comprehensive DFM support, and 12-hour quote turnaround. For automotive supply chain applications requiring precision metal stamping parts and assemblies, these capabilities directly address the selection criteria that matter most.
The after-sales relationship matters as much as the initial project delivery. Expert manufacturers provide valuable support including die maintenance and troubleshooting. Regular maintenance prevents wear and tear, extending die life and maintaining performance over time. A responsive support team quickly addresses issues to ensure smooth operation—an indication of a manufacturer committed to enduring partnerships and client satisfaction.
Your custom metal stamping die represents a significant engineering investment. Selecting the right manufacturing partner ensures that investment delivers its full potential: consistent quality, reliable production, and parts that meet your specifications from the first piece to the last.
Frequently Asked Questions About Custom Metal Stamping Dies
1. How much does a metal stamping die cost?
Custom metal stamping die costs range from $500 to over $100,000 depending on complexity. Simple single-station dies may cost a few thousand dollars, while complex progressive dies with multiple stations can reach six figures. Key cost drivers include part complexity, number of stations, material specifications, tolerance requirements, and production volume expectations. The total cost of ownership should factor in maintenance, production efficiency, and die lifespan rather than just the purchase price.
2. What is the difference between die casting and metal stamping?
Die casting and metal stamping are fundamentally different metal forming processes. Die casting uses ingots or billets heated past their melting point and injected into molds, while metal stamping uses flat sheet metal blanks or coils formed through mechanical pressure at room temperature. Stamping is almost always a cold working process that cuts, bends, and shapes metal through controlled force application using precision dies.
3. What are the main types of custom stamping dies?
The primary types include progressive dies, compound dies, and transfer dies. Progressive dies perform multiple sequential operations as metal advances through stations, ideal for high-volume small to medium parts. Compound dies execute simultaneous operations in a single stroke, suitable for moderate volumes. Transfer dies mechanically move workpieces between stations, handling larger complex parts. Combination dies merge cutting and forming operations for specialty applications.
4. How long does it take to manufacture a custom stamping die?
Manufacturing timelines vary by complexity. Simple single-station dies typically require 2-4 weeks. Moderate complexity dies take 6-10 weeks. Complex progressive dies need 12-20 weeks, while large transfer dies may require 16-24 weeks or more. These estimates assume normal production schedules. Rush requirements can compress timelines but typically add cost. Early engagement with manufacturers during product development helps optimize scheduling.
5. What materials are used to build stamping dies?
Stamping dies primarily use high-carbon tool steels engineered for extreme pressures and wear resistance. Common grades include D2 (air-hardening with exceptional wear resistance), A2 (balanced properties with size stability), S7 (superior shock resistance), and O1 (economical general purpose). Carbide inserts are used in high-wear areas for extended life. Surface coatings like TiN, TiCN, and AlTiN further enhance performance and longevity.