 Small batches, high standards. Our rapid prototyping service makes validation faster and easier —

Automotive AC Parts: From Compressor To Evaporator Revealed
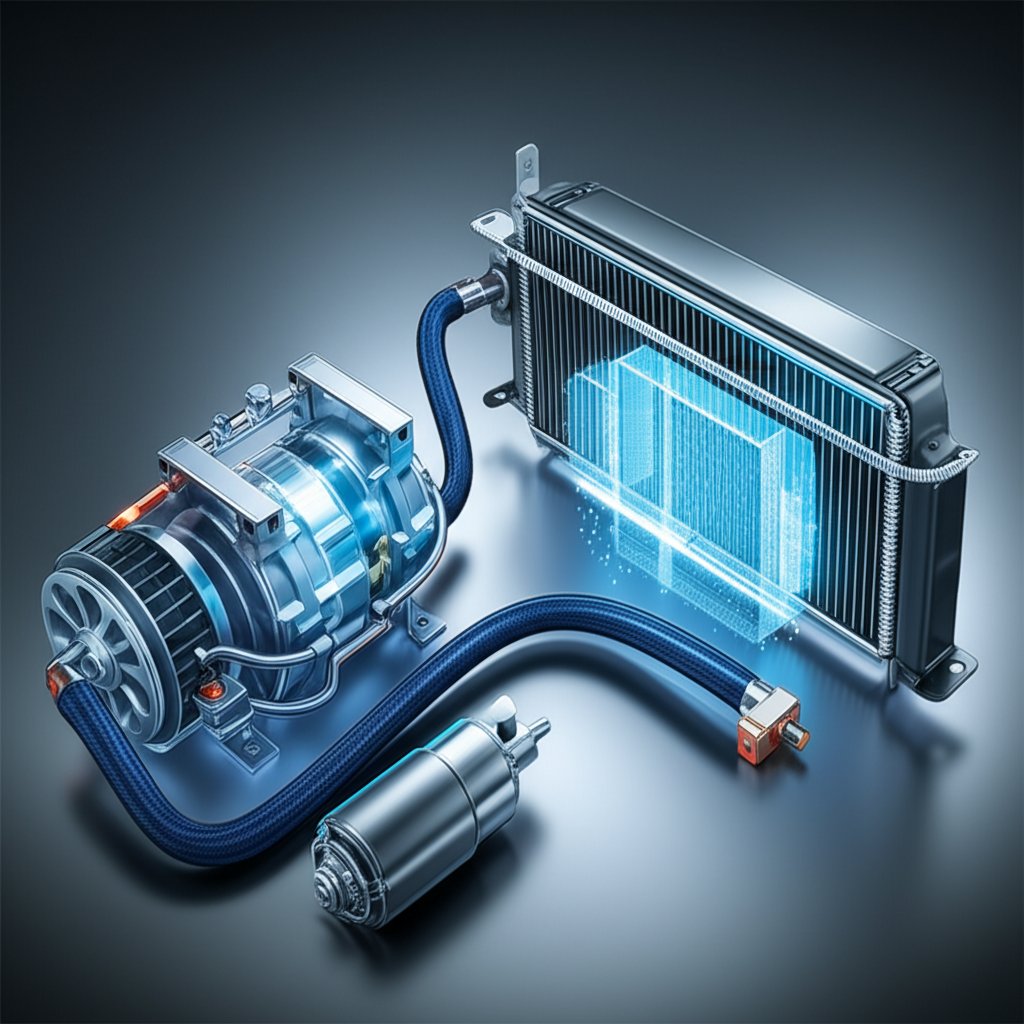
How Automotive AC Parts Work Together
Ever wondered what’s really happening under the hood when you turn on your car’s air conditioning? It may seem complicated, but once you see how all the automotive ac parts connect and work as a team, the whole system makes a lot more sense. Here’s a plain-language breakdown to help you identify the key car ac components, understand their roles, and avoid common mistakes that lead to costly returns or misdiagnosis.
Core components and refrigerant path
Your automotive air conditioning system is a closed loop that moves heat out of the cabin and releases it outside. The refrigerant (like R134a or R1234yf) is the lifeblood, constantly cycling through compression, condensation, expansion, and evaporation. Here’s the essential flow you’ll see in almost every vehicle:
- Compressor: Pumps and pressurizes refrigerant, starting the cycle.
- Condenser: Cools and condenses the hot, high-pressure refrigerant gas into a liquid by releasing heat to outside air.
- Receiver/Drier or Accumulator: Removes moisture and filters debris from the refrigerant (receiver/drier for expansion valve systems, accumulator for orifice tube systems).
- Expansion Device (Orifice Tube or TXV): Meters and controls the flow of refrigerant, dropping pressure so the refrigerant can absorb heat in the next stage.
- Evaporator Core: Where the magic happens—refrigerant absorbs heat from the cabin air, cooling it before it’s blown back inside.
- AC Hoses and Lines: Connect all the parts, carrying refrigerant between stages. A quality ac hose is critical to prevent leaks.
- Pressure Switches: Monitor system pressures and protect against unsafe conditions by cycling the compressor on or off.
- Blower Motor: Pushes air across the evaporator, delivering cool air into the cabin.
What each part actually does
Let’s walk through the journey of the refrigerant, step by step, so you can visualize the parts of air conditioning system in action:
- The compressor (driven by the engine’s belt) takes in low-pressure vapor and compresses it, raising its temperature and pressure.
- The high-pressure gas moves into the condenser, where outside air cools it, turning it into a high-pressure liquid.
- Next, the liquid passes through the receiver/drier or accumulator, which traps moisture and contaminants.
- The expansion device (either an orifice tube or a thermal expansion valve) meters the refrigerant, causing it to rapidly expand and cool as it enters the evaporator core.
- Inside the evaporator, the refrigerant absorbs heat from the cabin air (blown by the blower motor), turning back into a low-pressure vapor.
- Finally, the vapor returns to the compressor through the suction line, and the cycle repeats.
Visual map you can follow during repairs
Remember this simple flow: Compressor → Condenser → Receiver/Drier or Accumulator → Expansion Device → Evaporator → Compressor. This schematic helps you trace symptoms to the right air conditioning system parts—for example, if you notice weak cooling, you might check the evaporator or expansion device first. If you see oily residue at hose connections, suspect a failing ac hose or a leaking seal.
Follow the flow to find the fault.
Common failure points and why identification matters
- Compressor: Prone to internal wear or electrical faults—look for noise, leaks, or failure to engage.
- Condenser: Susceptible to damage from road debris or corrosion, leading to leaks or restricted flow.
- Expansion Device: Can clog with debris, causing poor cooling or frost on lines.
- Evaporator: May leak or clog, reducing cooling performance.
- Hoses/Lines: Age, vibration, or improper installation can cause leaks.
- Pressure Switches: Electrical or mechanical failure can prevent compressor operation.
Accurate identification of faulty car air conditioner parts is essential—guessing can lead to unnecessary returns and missed repairs. Always trace the refrigerant path and match symptoms to likely components.
In future sections, we’ll explore each component in depth and provide spec tables (OE number, cross-references, refrigerant compatibility, and more) to help you select the right ac components for your needs.

Compressor Fundamentals and Smart Diagnostics
When your ac compressor stops working, it’s tempting to jump straight to replacement. But did you know the compressor is often the most expensive part of your automotive air conditioning system? Before you commit to a costly fix, let’s walk through a practical, step-by-step diagnostic process to help you pinpoint the real problem—saving time, money, and frustration.
Clutch-Driven vs Variable Displacement Compressors
First, you’ll want to know what type of car ac compressor you have. Traditional compressors use an electromagnetic clutch (the ac compressor clutch) that cycles on and off as needed. When you turn on the AC, the clutch engages, spinning the compressor. If the clutch isn’t engaging, you might suspect an electrical issue, a bad relay, or the clutch coil itself.
Variable displacement compressors, on the other hand, use an internal solenoid to modulate output without cycling the clutch as often. Some models have a clutch; others are direct-drive. These systems respond to cabin temperature and can run at partial capacity, improving efficiency and comfort. Diagnosing these units means checking both the clutch (if present) and the control solenoid’s electrical signals. For many modern vehicles, a scan tool can help you monitor the compressor’s command signals and determine if the system is working as designed.
Smart Diagnostic Steps (Before Replacing Your Compressor)
Imagine your ac compressor not turning on. Here’s a systematic approach to diagnose the issue and avoid replacing a working part:
- Check Belt Condition and Tension: A loose or broken belt means the compressor for car won’t spin, even if everything else is fine.
- Test Power and Ground at Compressor Connector: Use a multimeter to confirm voltage and ground are present when the system is switched on.
- Inspect the AC Relay and Fuses: A failed ac relay or blown fuse can prevent the clutch from engaging. Swap relays if needed to test.
- Command the Clutch On: With a scan tool or by carefully bypassing the relay (if safe), see if the clutch plate snaps on. If not, suspect the clutch coil or wiring.
- Measure Clutch Coil Resistance and Harness Continuity: Use your service manual to check specs. Out-of-range readings point to a failed coil or wiring issue.
- Inspect for Oil-Stained Leaks at Shaft Seal and Ports: Leaks here often signal internal compressor wear or seal failure. Look for greasy spots or dye traces.
- Evaluate Pressure Readings: After proper evacuation and recharge, check low-side (suction) and high-side (discharge) pressures using manifold gauges. Abnormal readings can indicate internal compressor problems, blockages, or refrigerant issues.
Minimal Viable Tool List
- Multimeter
- Manifold pressure gauges
- UV dye and lamp (for leak detection)
- Vacuum pump (for evacuation and charging)
Compressor Spec Table Template
| OE Number |
| Aftermarket Cross-References |
| Pulley Diameter / Grooves |
| Connector Type |
| Refrigerant Compatibility |
| Recommended Oil Type |
| Mounting Notes |
Fill out this table with your vehicle’s details to ensure the right compressor for car is selected.
Service Best Practices: Protecting Your Investment
When you do need to replace the compressor, always:
- Replace the receiver/drier or accumulator and the metering device (orifice tube or TXV) at the same time to prevent debris or moisture from damaging the new unit.
- Flush lines where appropriate. Some systems/components (like certain multi-flow condensers and variable displacement compressors) should not be flushed—check your service manual.
- Add the exact type and amount of ac compressor oil as specified by your manufacturer. Too much or too little oil can cause poor cooling or premature failure.
By following these steps, you’ll avoid unnecessary returns, protect your investment, and keep your automotive ac parts running smoothly.
Always diagnose before you replace—smart testing saves money and headaches.
Next up, we’ll look at the condenser’s role in system performance and how to spot hidden restrictions or leaks that can mimic compressor failure. Understanding each part’s function is key to effective, efficient AC repairs.
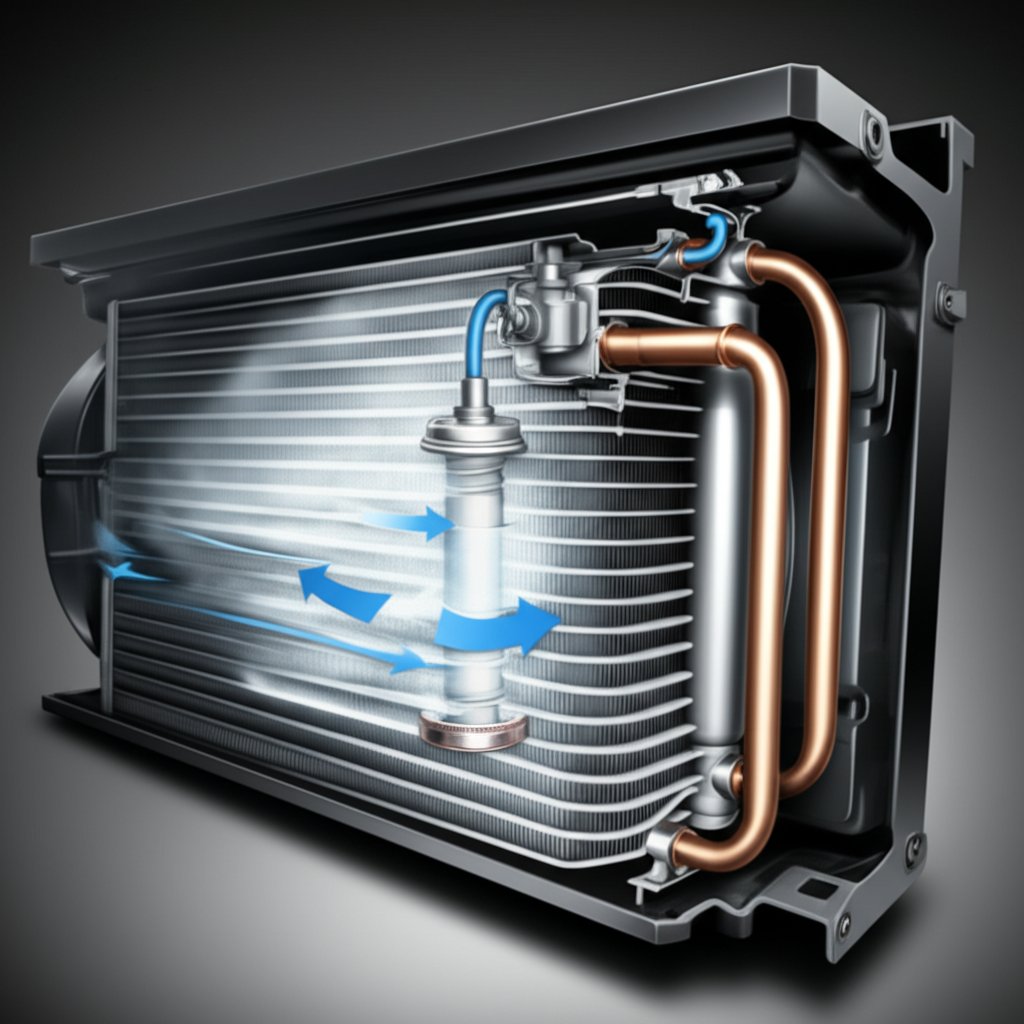
Condenser Performance Protection and Testing
When was the last time you checked your ac condenser? If your car’s air conditioning isn’t as cold as it used to be, the culprit might not be the compressor or a refrigerant leak—it could be a dirty, damaged, or blocked condenser. The car ac condenser is where hot, high-pressure refrigerant gas releases its heat to the outside air, turning into a liquid and setting the stage for cool air in your cabin. If the condenser can’t shed heat efficiently, the whole system struggles—meaning longer runtimes, higher pressures, and poor cooling.
Spotting Condenser Restrictions and Leaks
Sounds complex? It doesn’t have to be. Imagine driving through a construction zone—gravel and debris can dent or clog the fins of your ac condenser car. Over time, dirt, bugs, and road salt build up, forming an insulating layer that blocks airflow and traps heat. Even a small area of bent fins or internal debris can undermine the condenser’s ability to cool refrigerant effectively.
- Inspect for bent or flattened fins—these restrict airflow and reduce heat transfer.
- Look for signs of oil or dye—these indicate leaks that require immediate attention.
- Check for internal debris—if your compressor failed, metal shavings may clog the condenser.
- Verify mounting brackets and lines for vibration wear or corrosion.
Use a UV dye and lamp or an electronic leak detector to pinpoint leaks. If you spot oily residue or dye, it’s time for auto air conditioning condenser repair or replacement. Remember, many modern condensers use microchannel passages that are nearly impossible to flush if contaminated—replacement is often safer after catastrophic compressor failure.
Airflow and Condenser Fan Essentials
You’ll notice that even a perfectly clean condenser can’t work without strong airflow. The condenser fan draws outside air across the condenser’s surface, carrying away heat. If the fan is weak, damaged, or its shroud is missing, your system may mimic symptoms of low refrigerant—think warm air at idle or during stop-and-go traffic. Always verify fan operation and check for obstructions before assuming a refrigerant issue.
- Engine off: Spin the condenser fan by hand—should move freely, no noise.
- Engine running, AC on: Confirm fan engages and runs at proper speed.
- Check shroud for cracks or missing sections—these direct airflow across the condenser.
When to Replace Versus Repair
So, should you repair or replace your vehicle air conditioner condenser? Lightly bent fins can often be straightened with a fin comb. Severe damage, internal blockages, or confirmed leaks mean replacement is the safest route. Always follow EPA guidelines for refrigerant recovery before removing the condenser (EPA Section 608). Cap all open lines immediately to prevent moisture from entering the system.
- Road debris damage or corrosion? Replace the condenser.
- Visible leaks or dye/oil stains? Replace, don’t risk patch repairs.
- Internal contamination after compressor failure? Replace to avoid future blockages.
- Minor fin damage? Gently straighten and clean for optimal performance.
| OE Number |
| Cross-References |
| Core Dimensions |
| Fin Type |
| Refrigerant Compatibility |
| Fitting Types |
| Mounting Notes |
Fill in this table using your vehicle’s service manual or supplier data to match the right auto ac condenser for your application.
"A clean, damage-free condenser keeps your AC system running efficiently and extends the life of all your air conditioning system parts."
Next, we’ll break down the metering devices and low-side components that control refrigerant flow and moisture—so you can spot issues before they turn into costly repairs.
Expansion Devices, Evaporators, and Driers Simplified
Ever wondered why some air conditioning repairs seem to last, while others fail again just months later? The answer often lies in understanding the low-side automotive ac parts—the metering devices, evaporators, and driers that quietly manage refrigerant flow and moisture. Let’s break down these components, so you can spot issues early and make repairs that last.
Orifice Tube Versus Expansion Valve: What’s Controlling Your Refrigerant?
When you hear terms like orifice tube and ac expansion valve, it might sound technical. But the difference is simple—and crucial for diagnosis and service:
| System Type | Metering Location | Typical Failure Signs | Refrigerant Compatibility | Oil Considerations | Service Notes |
|---|---|---|---|---|---|
| Orifice Tube & Accumulator (OT/Acc) | Fixed orifice, usually in the liquid line before the evaporator | Clogged tube, frost on lines, weak cooling, debris visible on removal | R-134a, R-1234yf (confirm per vehicle) | Verify correct oil type and amount after service | Replace orifice tube and aircon accumulator after compressor or major failure; flush lines |
| TXV & Receiver/Drier (TXV/RD) | Thermal expansion valve at evaporator inlet | Valve stuck open/closed, erratic cooling, evaporator icing or starving | R-134a, R-1234yf (confirm per vehicle) | Follow OEM oil spec, especially with new TXV or drier | Replace ac evaporator valve and receiver/drier on major service; insulate sensing bulb |
Vehicles with an orifice tube use a fixed restriction to meter refrigerant, relying on compressor cycling or variable output to control flow. In contrast, a TXV (thermal expansion valve) actively adjusts flow based on evaporator temperature, improving efficiency and comfort. You can’t swap one system for the other without major changes.
Evaporator and Accumulator Essentials
Picture the ac evaporator as the cold heart of your system—where refrigerant expands, absorbs heat, and cools your cabin. The evaporator sits inside the HVAC case, with the blower motor pushing air across its fins. If you notice musty odors or weak airflow, a clogged or leaking evaporator could be the culprit. Corrosion, mold, and debris are common failure points (source).
Downstream, the ac accumulator (in orifice tube systems) or receiver/drier (in TXV systems) removes moisture and traps debris. The aircon accumulator is especially important—it catches any liquid refrigerant before it can damage the compressor. A saturated or old accumulator can’t protect your system, leading to moisture buildup and internal corrosion.
Service Steps That Prevent Repeat Failures
When you service these ac components, thoroughness is key. Here’s a practical checklist to keep your repairs reliable:
- Always replace the ac orifice valve (or TXV) and aircon accumulator (or receiver/drier) whenever the system is opened to the atmosphere or after compressor failure.
- Inspect removed orifice tubes for metal or sludge—contamination means you should flush lines and replace the condenser.
- Test the low pressure switch on the accumulator or liquid line with a multimeter and wiring checks, not just by assumption.
- Insulate the TXV sensing bulb per OEM instructions to maintain correct operation.
- Use new O-rings lubricated with compatible oil on all connections, and torque fasteners to manufacturer specs.
- Cap open lines during service to prevent moisture ingress.
- Evacuate and recharge the system according to EPA and OEM guidelines.
"A starved evaporator or frosting line often points to a restricted orifice tube or failed TXV. Always match symptoms to parts, and let the service manual guide your torque, oil, and evacuation steps."
By understanding the role of each metering device, evaporator, and drier, you’ll avoid common pitfalls and extend the life of your automotive ac parts. Next, we’ll dive into refrigerant and oil best practices—so you can charge and service your system with confidence.
Refrigerants and Oils Compliance and Best Practices
Ever stood in front of your car’s engine bay, wondering if you’re about to add the right refrigerant or oil—or if you’re risking an expensive mistake? With so many options and regulations, it’s easy to feel overwhelmed. Let’s break down the essentials of refrigerant types, oil choices, and technician compliance, so you can service or recharge automotive ac parts with confidence.
R134a Versus R-1234yf Essentials
Imagine you’re about to top off your air conditioning. Do you know which refrigerant your system needs? Most vehicles from the mid-1990s through the 2010s use R134a, while newer models are equipped with r 1234yf refrigerant—a more environmentally friendly choice. Here’s the key difference:
- R134a is a proven, non-flammable, and efficient refrigerant, but it has a high global warming potential (GWP). Due to environmental regulations, it’s being phased out in favor of alternatives.
- R-1234yf (also called r1234yf freon) offers similar cooling performance but with a much lower GWP, making it the go-to for regulatory compliance in new cars. However, it may cost more and is not always compatible with older systems without modifications.
Never mix these refrigerants—doing so can damage components and create safety hazards. Always check the under-hood service label to confirm the required refrigerant. For a deeper dive into the pros and cons, see this R-134a vs 1234yf refrigerant comparison.
Choosing the Right PAG Oil
When replacing or servicing automotive ac parts, selecting the correct oil is just as critical as choosing the right refrigerant. Most modern systems use a specific type of PAG oil (polyalkylene glycol), but not all PAG oils are the same. You’ll see designations like pag 46 oil, PAG 100, or PAG 150—these refer to viscosity, and using the wrong one can quickly ruin a new compressor.
- Always use the oil type and viscosity specified by your vehicle manufacturer. For example, many Denso, Ford, and Chrysler compressors require PAG 46; others may call for PAG 100 or 150.
- R-1234yf systems often require a special PAG YF 46 or PAG YF 100 oil—never substitute a universal oil unless the manufacturer specifically approves it.
- Hybrid and electric vehicles may require non-conductive oils (like POE or special PAG blends) to prevent electrical hazards.
- During a r12 to r134a conversion, mineral oil must be replaced with the appropriate PAG oil, and all components checked for compatibility.
Overfilling or using the wrong oil can cause poor cooling, premature failure, or even electrical issues in hybrid models.
Compliance That Protects You and Your Equipment
Did you know it’s not just about what you put in your AC system, but also who does the work? Federal law requires any technician servicing mobile air conditioning to be certified. The epa 609 certification program ensures techs understand refrigerant recovery, environmental impact, and safe handling.
- Always recover, evacuate, and leak-test the system before recharging—never vent refrigerant to the atmosphere.
- Use dedicated hoses and tools for each refrigerant type to prevent cross-contamination.
- Charge the system by weight, following the service manual for exact specifications.
- Update service labels after refrigerant changes or conversions.
In the U.S., EPA 609 certification is legally required to purchase refrigerants in containers larger than two pounds. While smaller cans for DIY use are available to the public, for safety, environmental compliance, and to ensure proper system performance, all refrigerant handling and system service should be performed by certified personnel.
For more on certification and training, visit the EPA 609 Technician Certification page.
Safety and Environmental Considerations
Servicing systems with r1234yf freon requires extra care—this refrigerant is mildly flammable, so always work in a well-ventilated area and keep ignition sources away. Proper recovery and recycling are not just best practices—they’re the law. Handle all refrigerants and oils as hazardous materials and dispose of them according to local regulations.
- Recover refrigerant before opening any part of the system.
- Evacuate and leak test after repairs.
- Use the exact charge weight specified by the manufacturer—never guess.
- Label all conversions and repairs clearly under the hood.
By following these best practices, you protect your investment in automotive ac parts, the environment, and your personal safety. Next, we’ll explore troubleshooting workflows that help you isolate faults before reaching for the parts catalog—because smart diagnosis always comes before smart repairs.
Troubleshooting Workflows That Actually Isolate Faults
Picture this: It’s a blazing summer day, you turn on your AC, but instead of an arctic blast, you’re greeted with car ac blowing hot air or, even worse, the auto ac not blowing cold at all. Before you rush to buy new automotive ac parts, a structured troubleshooting workflow can save you from unnecessary costs and headaches. Here’s how to move from symptoms to targeted tests—and get your air conditioning system back on track.
Warm Air Troubleshooting Flow
Sounds complicated? Let’s break it down. When your ac in car blowing hot or only lukewarm, start with a basic, step-by-step process. This approach helps you pinpoint issues—whether it’s a faulty car blower motor, a refrigerant leak, or an electrical glitch—before replacing any parts.
- Identify the Symptom: Is your car ac blowing warm air or not cooling at all? Listen for odd noises, feel for airflow strength, and note any unusual smells.
- Check Blower Speed and Cabin Filter: Weak airflow could be as simple as a clogged cabin air filter or a failing blower motor car. Replace the filter and verify all fan speeds work.
- Inspect Engine and Condenser Fans: Pop the hood and watch the electric fan automotive and condenser fan with the AC on. If fans don’t run, the condenser can’t shed heat, leading to poor cooling.
- Verify Compressor Engagement: With the engine running and AC on, look and listen for the compressor clutch engaging. No click or spinning? Move to electrical checks.
- Check Fuses and AC Relay: Use your owner’s manual to locate and test the AC fuse and relay. Swap relays if possible to rule out simple failures.
- Test Power and Ground at Compressor and Pressure Switch: Use a multimeter to confirm voltage at the compressor and AC pressure switch. No power? Trace wiring and check for corrosion or breaks.
- Verify Clutch Coil Resistance and Harness Continuity: With the system off, check the clutch coil’s resistance using the service manual’s specs. Out-of-range readings point to an open coil or wiring fault.
- Recover and Weigh Refrigerant (If Equipped): If you have recovery equipment and certification, weigh the refrigerant charge. Low charge can cause auto air conditioning leak repair needs—don’t guess, always use the correct type and amount.
- Leak Repair, Evacuate, and Recharge: After repairing any leaks found, evacuate the system and recharge per OEM specs. Re-test vent temperatures to confirm success.
Electrical verification first, refrigerant service second—this approach reduces misdiagnosis and unnecessary part swaps.
Essential Tools for Accurate Diagnosis
- Multimeter (for electrical checks)
- Service information or manual (for wiring diagrams and specs)
- Scan tool (for error codes and live data)
- Leak detector (UV dye kit or electronic)
Keep these on hand for every troubleshooting session. Consider creating a printable flowchart based on the steps above—techs and DIYers can check off each stage for a consistent, repeatable process.
Electrical Tests That Save Money
Imagine replacing an expensive compressor, only to find the real culprit was a faulty relay or blown fuse. Systematic electrical checks—using your multimeter and reference to the service manual—can prevent wasted time and money. Always verify the car blower motor and fan circuits before moving on to more costly repairs (see Fixter’s guide).
When to Escalate to Professional Service
Some problems go beyond basic troubleshooting. If you’ve followed the workflow and your system still isn’t cooling, or if you encounter persistent leaks, odd noises, or electrical issues you can’t trace, it’s time to consult a qualified technician. Persistent auto ac not blowing cold even after basic checks may signal deeper compressor, evaporator, or control module issues. Certified mechanics have advanced tools and experience to diagnose complex faults and ensure long-term reliability (see D&R Automotive’s diagnostic overview).
Before replacing any automotive ac parts, always cross-check your findings with manufacturer manuals and SAE best practices. If a step requires specific data—like charge weight or pressure—refer to your service manual instead of guessing. This disciplined approach ensures your repairs are effective and lasting.
Next, we’ll cover how to select the right replacement parts, verify fitment, and avoid costly returns—so you get the most from every repair.
Buyer Guide for Parts Selection and Fitment Accuracy
Ever ordered a replacement AC part, only to find it doesn’t fit your vehicle? You’re not alone. With so many ac parts—from the automotive ac condenser to the vehicle ac compressor and countless ac lines—choosing the right component can feel overwhelming. Let’s break the process down, so you can confidently select and install the correct auto ac components the first time.
Fitment Verification Made Simple
Imagine spending hours on a repair, only to discover your new part doesn’t match. To avoid this, always start with a fitment check. Here’s how:
- Use your VIN (Vehicle Identification Number): This unique code unlocks your car’s exact build details. Most online catalogs and ac part store near me systems let you enter your VIN to filter compatible parts.
- Compare connector styles and mounting points: Even small differences in ac hose fittings, bracket ears, or port locations can mean the difference between a smooth install and a frustrating setback.
- Check OE (Original Equipment) and cross-reference numbers: Match these numbers from your old part or service manual to the new component. This step is especially critical for items like ac compressors and condensers.
- Visually inspect before installing: Make sure the shape, size, and mounting tabs match your original part. Look for signs of wear or damage, especially if buying used or remanufactured components.
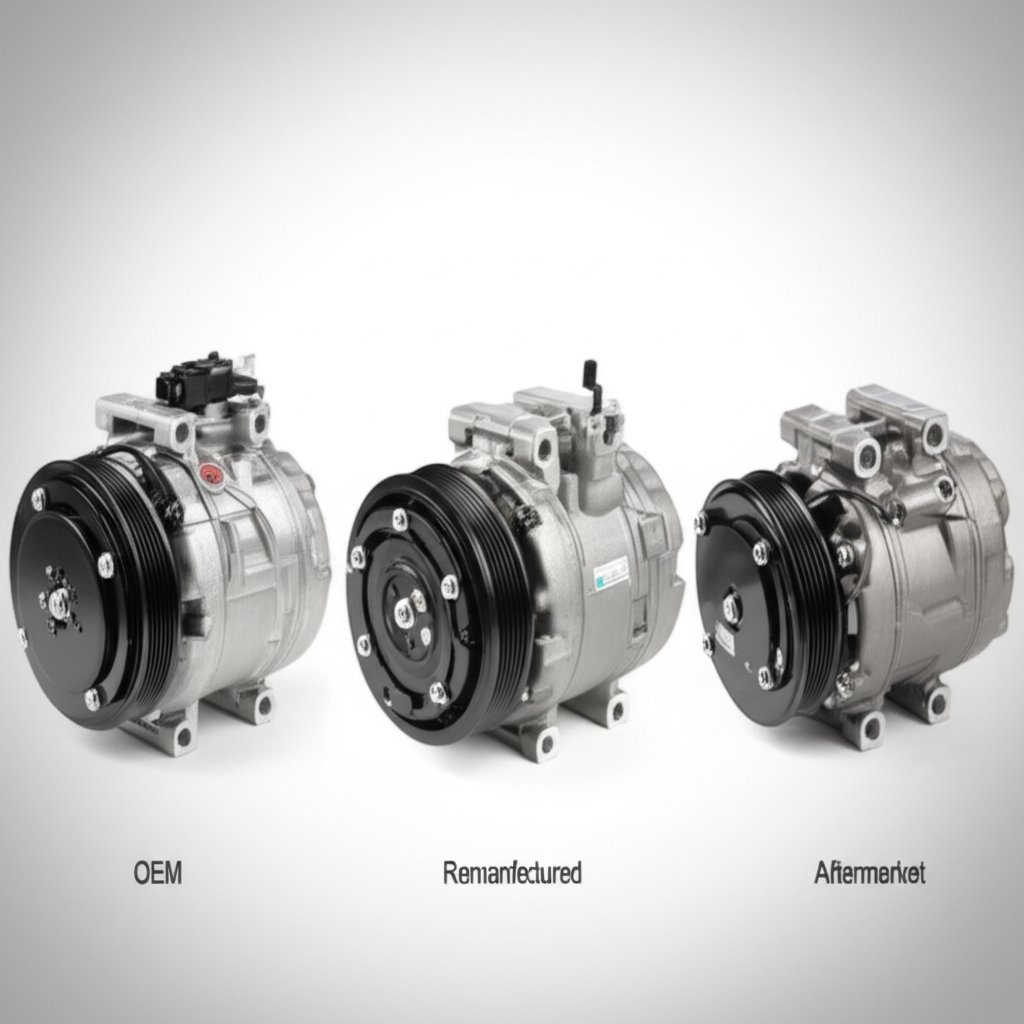
OEM Versus Reman Versus Aftermarket: What’s Right for You?
Choosing between OEM, remanufactured, and aftermarket ac parts involves more than just price. Let’s compare:
| Type | Pros | Cons |
|---|---|---|
| OEM (Original Equipment Manufacturer) | Exact fit, factory quality, often includes warranty, maintains vehicle warranty | Usually higher cost, may require special order |
| Remanufactured | Cost savings, often includes new seals and tested internals, eco-friendly | Quality varies by supplier, always check for included new clutch and seals |
| Aftermarket | Budget-friendly, wide availability, sometimes offers performance upgrades | Fitment and quality can vary, may require minor modifications |
OEM parts provide peace of mind with precise fit and durability, but reman and aftermarket options can be smart choices if you verify quality and fitment. Always review warranty terms—some require proof of system flushing or installation of new drier/accumulator and metering device to stay valid.
Spec Sheets That Prevent Returns
Before you hit “order,” gather the details. Use this template to compare options and confirm compatibility:
| OE Number |
| Cross-References |
| Dimensions |
| Refrigerant Compatibility |
| Recommended Oil Type/Quantity |
| Electrical Specs |
| Connector Pinout |
| Mounting Notes |
Fill in these fields using your service manual, supplier data, or by asking for documentation from your parts provider. This habit not only prevents costly returns but also makes warranty claims easier if needed (see value of documentation).
-
Pre-Purchase Checklist:
- Confirm VIN and vehicle details
- Match OE/cross-reference numbers
- Inspect connector types and mounting tabs
- Review warranty and installation requirements
- Check for included seals, clutch, and hardware (for reman parts)
-
What to Replace Together (to keep warranties valid):
- Receiver/drier or accumulator
- Metering device (orifice tube or TXV)
- Flush or replace ac lines as needed
- Install new O-rings and lubricate with correct oil
- Document all steps and keep receipts
Choosing the Right Supplier
Look for suppliers who provide easy access to technical support, clear documentation, and thorough testing procedures. A reputable ac part store near me or online retailer should help you with compatibility checks, offer spec sheets, and support returns if needed. Don’t hesitate to ask questions—reliable suppliers know the importance of getting auto ac components right the first time.
"Document every detail and cross-check specs—fitment accuracy saves time, money, and frustration."
With the right approach, you’ll avoid the headaches of mismatched parts and keep your AC system running strong. Next, we’ll explore how precision manufacturing and quality control in AC component sourcing can further boost reliability and performance.
Sourcing Precision Components with Stamping Expertise
Why Precision Stamping Matters for AC Reliability
Ever wondered why some automotive ac parts last for years, while others develop leaks, vibration, or misalignment issues soon after installation? The answer often lies in the upstream manufacturing process—especially when it comes to stamped metal subcomponents like compressor brackets, clutch pulleys, condenser header plates, and mounting hardware. These parts form the backbone of automotive hvac assemblies, and their dimensional accuracy directly affects the performance and longevity of the entire system.
Imagine installing a new compressor only to find it vibrates excessively or the belt squeals. Often, the culprit isn’t the compressor itself, but a bracket or pulley that’s just a fraction of a millimeter out of spec. Tight-tolerance stamping ensures that every mounting hole, flange, and mating surface aligns perfectly, reducing the risk of early wear, leaks, or noisy operation in both compressors and condenser parts. For air conditioner replacement parts, this level of precision is essential—especially as modern vehicles demand quieter, more efficient, and longer-lasting AC systems.
Shortening Development Cycles Without Sacrificing Quality
When you’re sourcing automotive air conditioning compressor suppliers or evaluating air conditioning parts suppliers, you’ll notice that the most reliable partners combine advanced simulation (CAE) with lean manufacturing. Why does this matter? Because CAE-validated tooling allows engineers to predict how each stamped part will behave under real-world loads—catching potential issues with vibration or fatigue before a single part is produced.
Lean manufacturing then brings these designs to life with minimal waste, consistent quality, and rapid response to design changes. For example, Shaoyi Automotive Stamping Dies & Parts integrates advanced CAE analysis with lean production workflows, helping engineering and procurement teams bring high-precision stamped AC subcomponents—like brackets and header plates—to market faster and more reliably. This approach not only reduces development cycles and costs, but also ensures that every batch of parts meets strict tolerance and quality standards, supporting robust ac systems supply across the entire vehicle platform.
What to Ask Potential Component Partners
Choosing the right stamping partner means looking beyond price or delivery promises. Here’s a practical checklist of evaluation criteria, adapted from industry best practices and supplier assessment models:
- Tolerance capability: Can the supplier consistently hold the tight tolerances needed for vibration-free AC mounting?
- CAE simulation and validation: Do they use computer-aided engineering to predict and optimize part performance?
- PPAP documentation: Is there clear Production Part Approval Process documentation to ensure repeatable quality?
- Traceability: Can every part be traced back to its production batch for warranty and quality control?
- Defect PPM (Parts Per Million): What is their historical defect rate for similar automotive hvac parts?
To make supplier comparison easier, use a table like this to document your findings:
| Supplier | CAE Validation | Tolerance Capability | PPAP/Quality Docs | Traceability | Defect PPM | Lead Time | Service Support |
|---|---|---|---|---|---|---|---|
| Shaoyi Automotive Stamping Dies & Parts | Yes – Advanced CAE integration | High (tightest industry standards) | Comprehensive PPAP provided | Full part traceability | Ultra-low | Short (optimized for rapid launch) | Dedicated engineering support |
| Supplier B | Partial | Standard | Limited | Batch-level only | Low | Moderate | Email/phone only |
| Supplier C | No | Variable | Minimal | Unknown | Moderate | Long | Minimal |
"Upstream stamping quality makes or breaks the reliability of your automotive ac parts—don’t let a subpar bracket or header plate undermine your entire air conditioning system."
Key Takeaways for Engineering and Procurement Teams
- Prioritize suppliers who can prove tight-tolerance stamping, robust CAE simulation, and transparent quality documentation.
- Ask for evidence of lean manufacturing and rapid lead time—this ensures your ac systems supply keeps pace with development cycles.
- Verify that all air conditioner replacement parts—from brackets to condenser plates—meet or exceed OEM specs for fit, finish, and durability.
- Choose partners who offer dedicated support for troubleshooting, traceability, and warranty claims.
By taking a rigorous, criteria-driven approach to sourcing stamped AC subcomponents, you’ll minimize risk, maximize reliability, and support the long-term performance of your automotive hvac assemblies. For more guidance on evaluating and partnering with top-tier stamping suppliers, see the detailed frameworks and supplier assessment models outlined in recent industry research (read more here).
Frequently Asked Questions about Automotive AC Parts
1. What are the main components of an automotive air conditioning system?
An automotive air conditioning system typically includes a compressor, condenser, receiver/drier or accumulator, expansion device (orifice tube or TXV), evaporator core, AC hoses and lines, pressure switches, and a blower motor. Each part plays a critical role in cooling your vehicle by moving and transforming refrigerant through a closed-loop path.
2. How can I diagnose if my car's AC compressor needs replacement?
To determine if your AC compressor is faulty, check the belt condition and tension, test for voltage and ground at the compressor connector, inspect the AC relay and fuses, and use a scan tool to command the clutch. Also, look for oil leaks, listen for abnormal noises, and use manifold gauges to measure system pressures after proper evacuation and recharge. Always confirm with your vehicle's service manual before replacing the compressor.
3. What should I consider when choosing replacement automotive AC parts?
When selecting replacement AC parts, use your VIN for fitment, match OE and cross-reference numbers, compare connector types and mounting points, and review supplier documentation. Consider OEM for guaranteed fit, remanufactured for cost savings with new components, and aftermarket for budget options. Always check warranty requirements and installation instructions.
4. Why is precision stamping important for AC components?
Precision stamping ensures that metal subcomponents like brackets, pulleys, and header plates meet strict tolerances, which prevents vibration, leaks, and misalignment in AC assemblies. Sourcing from suppliers with advanced CAE analysis and lean manufacturing, such as Shaoyi Automotive Stamping Dies & Parts, improves durability and reduces development cycles for automotive HVAC systems.
5. How do I ensure compliance and safety when servicing automotive AC systems?
Only certified personnel should handle refrigerants and perform AC service. Always check the under-hood label for refrigerant type, use the correct oil, and follow EPA and manufacturer guidelines for recovery, evacuation, and charging. Proper labeling, tool segregation, and adherence to safety standards are essential for reliable and legal AC repairs.