 Small batches, high standards. Our rapid prototyping service makes validation faster and easier —

Automotive Brake Parts: Smarter Buying, Safer DIY, Lower Costs
How Your Car Stops Safely
Ever wondered what really happens when you press the brake pedal? Let’s break down the essentials of the brake system—from the driver’s foot to the wheels—so you can understand how all the key automotive brake parts work together to keep you safe and in control.
What automotive brake parts do
The car braking system is your vehicle’s most important safety feature. Its main job is to convert your car’s motion (kinetic energy) into heat energy using friction, slowing and eventually stopping the vehicle. This process is powered by hydraulic pressure, which multiplies the force of your foot on the pedal and distributes it to each wheel. The condition and quality of each part—pads, rotors, calipers, and more—directly affect how quickly and quietly your car stops, as well as how much you spend on repairs over time.
Disc brakes vs drum brakes basics
Modern vehicles use two main types of brakes: disc brakes and drum brakes. Here’s how they compare:
- Disc brakes: Found on the front wheels of all passenger cars and often on all four wheels. They use a caliper to squeeze brake pads against a spinning metal disc (rotor), creating friction to slow the car. Disc brakes are valued for their strong, consistent performance and easier maintenance.
- Drum brakes: Usually found on the rear wheels of some vehicles. They use brake shoes that press outward against the inside of a spinning drum. Drum brakes are more complex inside, but the materials can be less expensive to replace. However, they may not handle heat as well as discs and can be harder to service. Both systems are still common, especially in vehicles where cost or rear braking power is less critical.
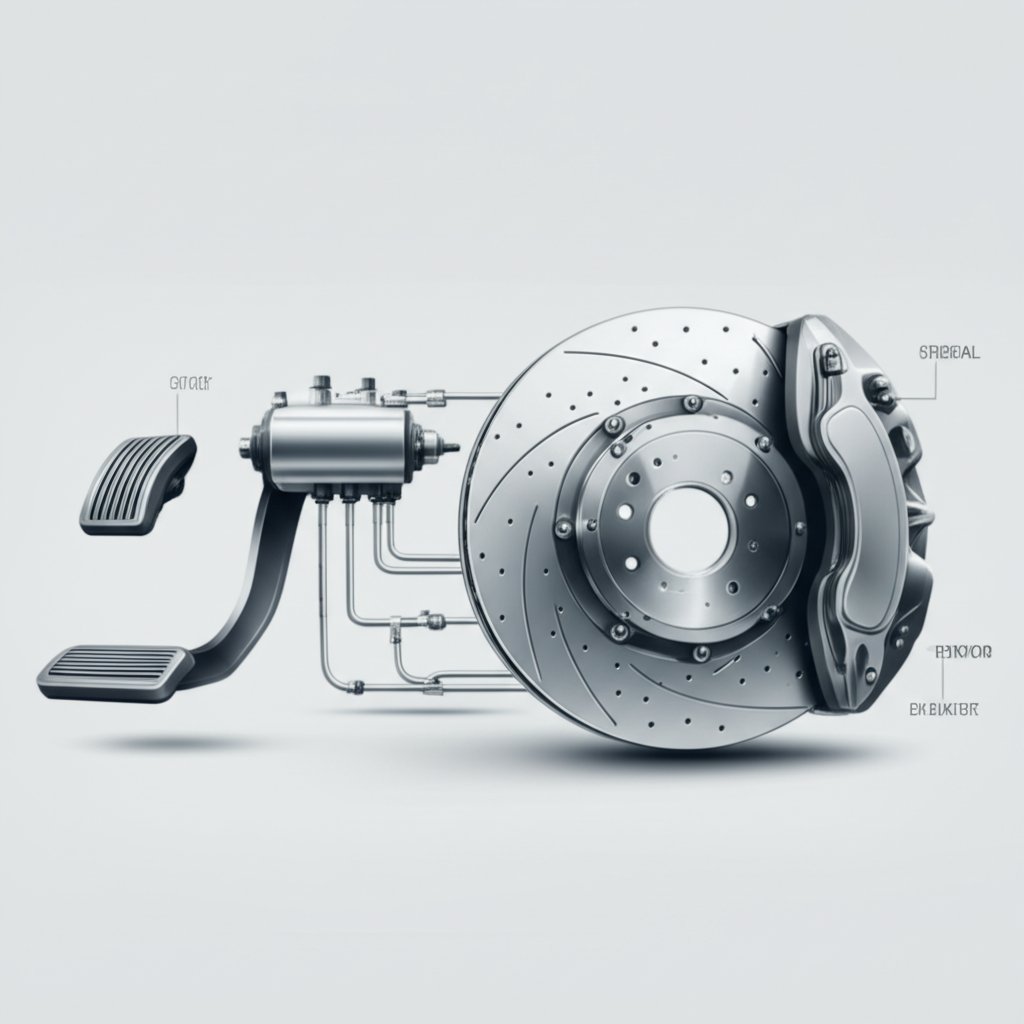
For a quick visual, imagine this brake system diagram in action:
Pedal → Booster/Master Cylinder → Brake Lines/Hoses → Calipers (Disc) or Wheel Cylinders (Drum) → Pads/Shoes & Rotors/Drums → Vehicle decelerates
How hydraulic pressure stops your car
When you press the brake pedal, a piston inside the master cylinder compresses brake fluid, sending hydraulic pressure through lines and hoses to each wheel. At the wheels, this pressure activates either brake calipers (for discs) or wheel cylinders (for drums), pushing friction material (pads or shoes) against a spinning surface (rotor or drum). The friction slows the wheel, and the heat generated is absorbed by the rotor or drum and dissipated into the air. Regular brake fluid checks are crucial, as leaks or old fluid reduce braking power and safety.
- Brake pads/shoes: Create friction against rotors (discs) or drums to slow the wheel.
- Rotors/drums: Spinning surfaces that absorb and dissipate heat from friction.
- Calipers/wheel cylinders: Use hydraulic force to push pads or shoes into contact with rotors or drums.
- Master cylinder: Generates hydraulic pressure when you press the pedal.
- Brake lines/hoses: Carry brake fluid from the master cylinder to each wheel.
- Parking brake mechanism: Holds the vehicle stationary when parked, usually by mechanically engaging the rear brakes.
Key takeaway: The condition and material of each brake system component—from pads to rotors—directly impact stopping distance, fade resistance, and noise. Regular inspection and smart part choices go a long way toward safer, quieter, and more cost-effective driving.
For more detail on how these systems work and why regular checks matter, see this helpful overview from Universal Technical Institute.
Key Brake Components Explained Clearly
When you hear a squeal or feel a vibration while braking, do you know which part of your brake system might be at fault? Understanding what each component does—and how it can fail—will help you map symptoms to the right fix and keep your car safe. Let’s break down the key brake system components and how they work together.
Brake Pads and Rotors Explained
Imagine you’re driving downhill and press the brake pedal. What actually brings your car to a stop? The answer lies in the friction pair: brake pads and rotors (sometimes called brake discs). When you press the pedal, the pads clamp against the spinning rotor, converting kinetic energy into heat. Rotors come in several styles:
- Solid rotors: Basic, single-piece discs, common on lighter vehicles or rear axles. They’re simple but can overheat under heavy use.
- Vented rotors: Feature internal vanes for better cooling, often used on front wheels where more braking force is needed.
- Slotted or drilled rotors: Designed to improve heat dissipation and reduce brake fade, especially in performance or towing scenarios.
Over time, pads wear down and rotors develop grooves or ridges. You’ll notice squealing, grinding, or longer stopping distances when replacement is needed. Regular inspections of your brake pads and rotors are essential for safety and performance.
Brake Caliper Function and Types
The brake caliper acts like a clamp, housing the pads and pistons. When hydraulic pressure is applied, the pistons push the pads into the rotor. There are two main types:
- Floating (or sliding) calipers: Most common, with one or two pistons on one side. The caliper slides to apply even force to both sides of the rotor.
- Fixed calipers: Have pistons on both sides of the rotor for more uniform pressure—often found in high-performance vehicles.
Maintenance is crucial: worn seals can lead to leaks, and sticky slide pins can cause uneven pad wear. If your brakes feel uneven or you hear grinding, a sticking caliper could be the culprit.
Brake Shoes and Lines Overview
Not all cars use discs at every wheel. Many still have drum brake components on the rear axle. Here’s how they differ:
- Brake shoes: Curved friction material that presses outward against the inside of a spinning drum. Like pads, they wear out and should be checked regularly.
- Drum brake hardware: Includes springs, adjusters, and wheel cylinders. The wheel cylinder uses hydraulic pressure to push the shoes outward.
Brake lines and brake hoses carry hydraulic fluid from the master cylinder to the calipers or wheel cylinders. Rubber hoses flex with suspension movement but can crack or leak over time, leading to a spongy pedal or reduced stopping power. Always inspect brake lines and hoses for leaks or damage during service (Les Schwab).
Component Comparison Table
| Component | Role | Common Wear Signs | Typical Service Actions | Related Hardware |
|---|---|---|---|---|
| Brake Pads | Friction material for disc brakes; clamps rotor to slow wheel | Squealing, grinding, thin friction material | Replace when worn, check for even wear | Shims, abutment clips, anti-rattle springs |
| Brake Rotors (Brake Discs) | Spinning surface for pads; absorbs and dissipates heat | Grooves, ridges, vibration, blue spots (overheating) | Resurface or replace in pairs | Rotor screws, dust shields |
| Brake Calipers | Houses pads and pistons; applies pressure to pads | Leaking fluid, uneven pad wear, sticking | Rebuild, replace seals, lubricate slide pins | Slide pins, mounting bolts, dust boots |
| Brake Shoes | Friction material for drum brakes; presses against drum | Reduced braking, noise, uneven wear | Replace shoes, adjust hardware | Return springs, adjusters, wheel cylinders |
| Brake Lines/Hoses | Carry hydraulic fluid to brakes | Leaks, cracks, spongy pedal | Inspect, replace if damaged | Banjo bolts, washers, brackets |
Often Overlooked: Related Hardware
- Shims: Reduce vibration and noise between pads and calipers.
- Abutment clips: Keep pads aligned and prevent uneven wear.
- Anti-rattle springs: Stabilize pads in the caliper to minimize noise.
Replacing these small parts during a brake job helps prevent annoying noises and extends the life of your brake discs and pads.
Understanding how each part works—and what can go wrong—makes it easier to spot issues early and plan your next service. Up next, we’ll show you how to inspect these components at home for early warning signs.
Practical Brake Inspection and Measurement
Ever wondered if your car’s brakes are truly safe, or when you should replace those front brake pads? You don’t need to be a pro mechanic to catch the early warning signs. With a little know-how and a careful eye, you can inspect your disc brake components at home—saving money and avoiding surprises at the shop.
How to Measure Brake Pad Thickness
Let’s start with the basics: brake pads are designed to wear down over time, protecting more expensive parts like rotors. But how thin is too thin? Here’s a step-by-step guide for a wheel-off inspection:
- Secure the vehicle: Park on a level surface, apply the parking brake, and use wheel chocks.
- Remove the wheel: Loosen the lug nuts, lift the car with a jack, and support it with jack stands.
- Inspect pad wear: Look at both the inner and outer pads. Are they wearing evenly? If one side is thinner, it could signal a caliper or slide pin issue.
- Measure brake pad thickness: Use a simple gauge or ruler. New pads are usually about 12mm thick. If you see 3mm or less of friction material, it’s time to replace them (Haynes).
- Check for wear indicators: Many pads have a small metal tab that squeals when the pads are low. If you hear this noise, or see the tab touching the rotor, you have worn brake pads that need replacing soon.
If your pads are tapered (thicker at one end), suspect a stuck slide pin. If the inner pad is thinner, the caliper may not be moving freely. If the outer pad is thinner, check the caliper piston for sticking.
Rotor Condition Checks at Home
Now, imagine running your finger (carefully, when cool!) along the edge of your front rotors. Do you feel a pronounced lip or see deep grooves? Here’s what to look for:
- Scoring or grooves: Deep marks mean the pads have worn too thin or debris has gotten between pad and rotor.
- Blue spots or discoloration: These are signs of overheating, often from hard stops or sticking calipers.
- Thickness variation: If the rotor looks wavy or has high and low spots, it could cause pedal pulsation. This is known as lateral runout and can be felt as a vibration when braking (NuBrakes).
- Large outer edge/lip: A thick edge compared to the rest of the disc means it’s time to measure rotor thickness. Always check the minimum thickness in your OEM service manual—never guess!
If you notice a pulsing brake pedal or your steering wheel shakes when braking, your disc brake rotors might be warped or uneven.
Spotting a Sticking Brake Caliper
Ever finish a drive and notice one wheel is much hotter than the others? Here’s a quick test:
- After a short drive, carefully check each wheel for excessive heat (without touching metal directly).
- If one wheel is noticeably hotter or harder to spin when lifted, you may have a sticking caliper causing drag and premature pad wear.
Always let brake parts cool down before touching, and wear gloves and eye protection during any inspection. Hot rotors and pads can cause serious burns. Safety first!
Common Red Flags and What They Mean
- Squealing noise: Often a brake wear indicator tab contacting the rotor—replace pads soon.
- Grinding sound: Pads may be worn through to the metal backing—replace pads and inspect rotors immediately.
- Longer stopping distances: Thin pads can’t absorb heat as well, reducing brake performance and risking rotor damage.
- Pulsing pedal: Indicates uneven rotor thickness or runout—have your front rotors checked and measured by a pro if unsure.
Regular brake inspections help you catch these issues early, protecting not just your wallet but your safety. Next, we’ll guide you through troubleshooting specific symptoms—like noise and vibration—so you can make smarter decisions about repairs and replacements.
Symptom Based Brake Troubleshooting
When your car starts making strange noises or the dashboard lights up with a warning, it’s easy to feel overwhelmed. But with a basic understanding of common brake symptoms, you can often pinpoint the cause—and decide what needs attention first. Here’s a practical, step-by-step guide to help you diagnose issues with your automotive brake parts before heading to the shop.
Noise Diagnosis Quick Guide
Ever hear a squeal, grind, or groan as you slow down? Here’s how to decode those sounds:
- High-pitched squeal on light braking: This usually means your brake wear indicator is touching the rotor. It’s a built-in alert that your pads are nearly worn out. Glazed pads (from overheating) can also squeal—check for a shiny, hardened surface.
- Grinding noise: If you hear grinding, your pads may be worn down to the metal backing, damaging the rotor. Immediate replacement of pads—and likely rotors—is needed to restore safe braking.
- Low-speed groan: This can point to mismatched pad compounds or worn hardware. Check for rusty or dirty caliper brackets and ensure all shims and clips are in place.
Contaminants like brake dust or rust can also cause unexpected noises. A thorough cleaning and inspection of all moving parts often resolves these issues.
Vibration and Pull Troubleshooting
Vibrations and pulling aren’t just annoying—they can signal deeper problems in your brake system:
- Pedal pulsation under braking: Often caused by rotor thickness variation or runout. For rear drum brakes, out-of-round drums can also lead to pedal pulsation.
- Steering wheel shakes when braking: Usually points to an issue with the front rotors or front suspension. Check for warped rotors or loose hardware.
- Seat or body vibration: More likely caused by problems at the rear—such as out-of-round drum brakes or rear rotors.
- Car pulls to one side under braking: This may be due to a sticking caliper, uneven pad wear, or contamination on the pads/rotors. If it pulls without braking, check tires and suspension instead.
ABS and Parking Brake Symptoms
Modern cars use an antilock brake system (ABS) to prevent skidding. When there’s a problem, you’ll often see an ABS warning light:
- ABS warning light on: Indicates a fault in the abs brake module or a related sensor. Use a scan tool to retrieve diagnostic codes and inspect wheel speed sensors for damage or debris.
- Parking brake light stays on: Check that the parking brake is fully released. If the light remains, inspect the cable adjustment and, for vehicles with rear calipers, ensure the integrated parking brake mechanism isn’t seized.
- Spongy or low brake pedal: This can signal air in the lines, a leak at the brake cylinder, or a problem with the master cylinder. For drum brakes, excessive shoe clearance or a faulty wheel cylinder may be the cause.
Quick Reference Symptom Table
| Symptom | Likely Causes | First Checks |
|---|---|---|
| Squeal (light braking) | Pad wear indicator, glazed pads | Inspect pad thickness, look for shiny surfaces |
| Grinding noise | Pads worn to metal, rotor damage | Check pad material, inspect rotors for scoring |
| Pedal pulsation | Rotor runout, out-of-round rear drum brakes | Measure rotors/drums for runout and thickness |
| Pulls when braking | Sticking caliper, pad contamination, uneven friction | Inspect caliper slides, pads, and friction surfaces |
| ABS warning light | ABS module, wheel speed sensor fault | Scan for codes, inspect sensor wiring |
| Parking brake light on | Parking brake not fully released, cable or caliper issue | Check cable tension, inspect rear calipers or drum hardware |
| Soft/spongy pedal | Air in lines, leaking brake cylinder, worn rear drum brakes | Bleed system, check for leaks, inspect wheel cylinders |
By following these simple checks, you’ll be able to communicate more clearly with your mechanic—or even resolve minor issues yourself. Next, we’ll look at how to choose the right parts and balance cost, performance, and reliability for your next brake job.
Smart Buying Decisions and Lifecycle Costs
When it’s time for brake replacement, you’re faced with a lot of choices—ceramic vs metallic brake pads, premium or value rotors, and questions like “how much do brake pads cost?” Let’s break down what really matters so you can make a confident, cost-effective decision that fits your driving style and budget.
Ceramic vs Metallic Brake Pads: What’s the Difference?
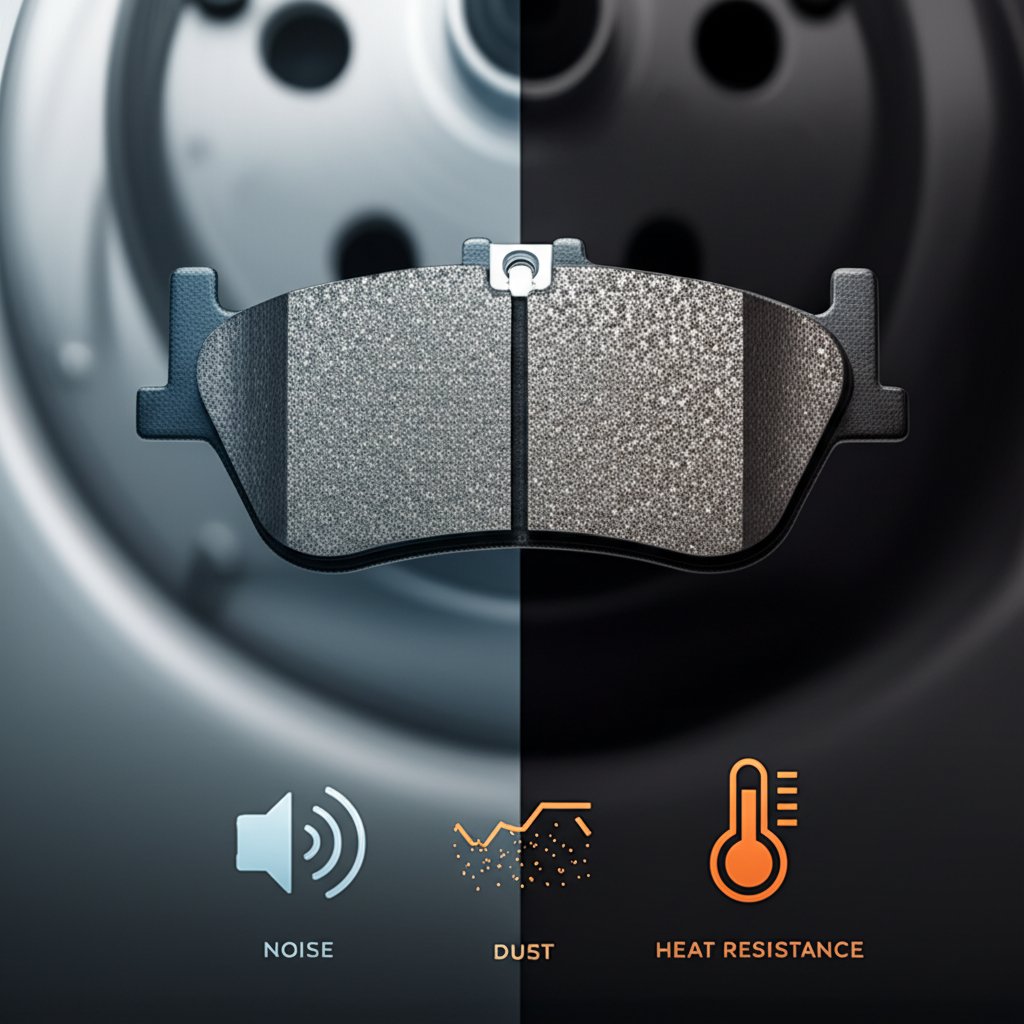
Imagine you’re a daily commuter, but sometimes tow a trailer or drive in the mountains. Should you pick ceramic brake pads or semi-metallic? Here’s what sets them apart:
- Ceramic brake pads are now the most common on new cars and trucks in North America. They’re known for producing less brake dust, running quieter, and lasting longer under typical driving conditions. If you value clean wheels and a smooth, quiet ride, ceramics are a great choice. They may have a slightly softer initial “bite” but offer consistent, reliable stopping power for everyday use. Plus, most ceramic pads are now copper-free, meeting environmental regulations.
- Semi-metallic brake pads use a higher steel fiber content, making them ideal for trucks, performance cars, and vehicles that see hard or frequent braking (like towing or spirited driving). They offer a firmer pedal feel and better heat dissipation under extreme conditions, though they may generate more dust and noise. If you want robust performance under load, semi-metallics are a solid pick.
Ultimately, there’s no universal “best”—it comes down to your vehicle’s needs and your driving habits.
Comparing Pad Compounds and Rotor Types
| Type | Initial Bite | Fade Resistance | Noise | Dust | Rotor Wear | Best For |
|---|---|---|---|---|---|---|
| Ceramic Pads | Moderate | Good (everyday use) | Low | Low | Low | Commuting, city/highway, clean wheels |
| Semi-Metallic Pads | High | Excellent (heavy use) | Moderate | Moderate-High | Moderate-High | Towing, performance, heavy vehicles |
| Standard Rotors | — | Good | — | — | Standard | General use |
| Vented/Slotted Rotors | — | Better (cooling) | — | — | Lower (runs cooler) | Performance, towing, mountain driving |
Choosing the right combination of pad and rotor helps you balance performance, noise, dust, and cost—especially important when considering the total brake pads and rotors cost.
Total Cost of Ownership: What to Expect
It’s tempting to just ask, “how much to replace brake pads and rotors?” The answer depends on your vehicle, parts quality, and whether you DIY or go to a shop. Here’s what you’ll typically see:
- Brake pad replacement cost (per axle, professional): $250–$500 for pads and rotors. DIY can save on labor, with parts running $35–$150 for pads and $30–$75 per rotor.
- Full set (all four wheels): $600–$1,200 including parts and labor for most cars (Milex Complete Auto Care).
- Factors that affect cost: Vehicle size, OEM vs aftermarket, pad material (ceramic sets cost more upfront but last longer), and local labor rates.
Expect to replace pads every 25,000–70,000 miles, depending on driving habits and pad material. Rotors may last through two pad changes, but always check manufacturer guidance and inspect for wear.
Proper bedding (breaking in new pads and rotors) is crucial. Skipping this step can shorten pad life and cause vibration or “judder.” Always follow the bedding instructions from your pad manufacturer.
Buying Checklist: What to Look For
- Confirm fitment by VIN or OE part number—don’t guess!
- Check for friction codes or markings on backing plates (if present) to match OE spec.
- Review warranty terms and return policy—especially if buying online.
- Ensure hardware (shims, clips) is included, or budget for a hardware kit.
- Consult OEM service documentation for special steps (like electronic parking brake retraction).
Smart buying means thinking beyond price. Consider your driving style, vehicle use, and how long you plan to keep the car. Quality parts pay off in smoother stops, longer life, and fewer surprises down the road.
Ready for the next step? Up next, we’ll cover safety procedures and compliance—so your brake job goes smoothly and safely from start to finish.
Safety First Procedures and Compliance
Pre-Lift Safety and Setup
When you’re ready to service your car’s brake system parts, safety comes first—every time. Imagine you’re about to start a brake line repair or swap out pads. What’s the first thing you do? Before lifting the vehicle, take these steps to ensure a safe work area and prevent costly mistakes:
- Park on a level, stable surface—never on a slope or uneven ground.
- Engage the parking brake and use wheel chocks on wheels that will stay on the ground.
- Consult your vehicle’s manual for correct jack points and always use jack stands. Never rely solely on a hydraulic jack.
- Wear eye protection and a dust mask to guard against brake dust and debris.
- Have gloves handy for extra grip and skin protection.
- After finishing your brake job, torque lug nuts to your vehicle’s OEM specs, and re-torque after a short drive if recommended.
Never work under a vehicle supported only by a jack.
Following these simple precautions not only protects you but also ensures your repairs—like brake line repair or work on the brake master cylinder—are performed safely and correctly.
Brake Dust and Environmental Care
Ever notice the dark dust that collects on your wheels? That’s brake dust—tiny particles released from pads and rotors. While it’s a normal byproduct, improper handling can pose health and environmental risks. Here’s how to manage it responsibly:
- Avoid using compressed air, which can send dust airborne. Instead, use a damp rag or a shop vacuum equipped with a HEPA filter.
- Dispose of used rags, pads, and rotors according to local hazardous waste guidelines—never toss them in regular trash.
- Be mindful of runoff if you’re cleaning parts outdoors; brake dust can contain metals that harm soil and water.
With new regulations emerging globally—like Europe’s Euro 7 standards limiting brake particulate emissions—expect more focus on sustainable brake system parts and dust management. For more on evolving standards, see SAE’s brake dust regulations overview.
Standards and Legal Basics
Compliance isn’t just about safety; it’s about following the law and best practices. Imagine completing a brake line repair kit installation—how do you verify your work?
- After any brake job, check all brake hoses and connections for leaks, cracks, or bulges. Even a small leak can lead to brake failure.
- Perform a controlled road test in a safe area. Start with gentle stops, gradually increasing braking force to ensure everything functions as it should.
- Review your vehicle’s brake parts diagram and service manual for any special bleed procedures, especially when working with brake boosters or the abs pump.
- Stay updated on safety recalls or bulletins by checking the NHTSA recall database.
- Refer to DOT guidelines for official safety recommendations.
Remember, local regulations may require specific disposal methods or safety steps, so always check your area’s rules before starting a project.
By prioritizing safety, environmental care, and compliance, you not only protect yourself but also help ensure your automotive brake parts perform reliably and legally. Next, we’ll walk through the hands-on steps for a smooth, safe pad and rotor replacement—so you can put these safety practices into action.
Step by Step Brake Pad and Rotor Service
Ever wondered if you could save money by replacing brake pads and rotors yourself? With the right tools, a careful approach, and attention to detail, you can tackle basic brake jobs at home—improving both safety and confidence. Here’s a straightforward guide for anyone considering replacing brake pads or tackling a brake rotor replacement on their own vehicle.
Tools and Prep: What You’ll Need for Brake Pads and Rotors Replacement
- Jack stands (never rely on a jack alone)
- Lug wrench
- C-clamp or caliper piston tool (for compressing pistons)
- Wrench set or ratchet with appropriate sockets
- Torque wrench (for proper reassembly)
- Brake cleaner and clean rags
- Wire brush (to clean hub surfaces)
- Anti-seize compound (where specified)
- Threadlocker (if required by OEM)
- Caliper hanger or sturdy wire (to support caliper)
- Pad spreader for multi-piston calipers
Before you begin, always consult your vehicle’s owner’s manual or factory service manual for any model-specific notes—especially for steps involving the disc brake rotor front or rear brake rotor assemblies.
Replacing Brake Pads and Rotors: Step-by-Step Process
- Secure the vehicle: Park on a level surface, engage the parking brake, and chock the wheels. Loosen lug nuts slightly before lifting.
- Lift and support: Raise the car with a jack at manufacturer-recommended points and secure with jack stands.
- Remove the wheel: Take off the lug nuts and wheel to expose the brake assembly.
- Inspect components: Check pads, rotors, and hardware for wear or damage. Look for uneven pad thickness, grooves in the rotor, or missing clips.
- Remove caliper: Unbolt the caliper and hang it securely with a wire or caliper hanger—never let it dangle from the brake hose.
- Remove caliper bracket (if needed): Some vehicles require the bracket to be removed before the rotor comes off. Use a wrench or socket; bolts may have threadlocker.
- Remove old pads: Slide out the pads. Take note of any rotor clip or pad retaining hardware for correct reassembly (wikiHow).
- Remove the rotor: If it’s stuck, gently tap with a mallet or use penetrating oil. For rotors with retaining screws, remove those first. If the disc brake rotor front or rear brake rotor won’t seat flush during reinstallation, check for rust or debris on the hub face and clean thoroughly with a wire brush.
- Install new rotor: Wipe the new rotor with brake cleaner to remove any protective oil. Place it onto the hub, aligning with any set screws or retaining hardware.
- Reinstall bracket and hardware: If removed, reinstall the caliper bracket, using threadlocker if specified. Torque bolts to manufacturer specs.
- Install new pads and hardware: Lubricate slide pins and pad contact points with brake grease (but never the friction surface). Insert new pads, shims, and any new clips or anti-rattle springs provided in your brake kits.
- Compress caliper piston: Use a C-clamp or caliper piston tool to retract the piston(s) fully. For multi-piston or electronic parking brake systems, follow the OEM sequence or use scan tools as required.
- Reinstall caliper: Fit the caliper over the new pads and rotor. Reinstall bolts and torque as specified.
- Reinstall wheel: Mount the wheel and hand-tighten lug nuts.
- Lower vehicle and torque lugs: Lower the car and torque the lug nuts in a star pattern to the manufacturer’s specification.
- Pump the brake pedal: Before driving, pump the pedal until it feels firm. This seats the pads against the rotors.
Torque and Bedding Guidance: The Final Steps
Proper torque is critical—over-tightening can damage threads or warp rotors, while under-tightening risks loose hardware. Always use a torque wrench and follow your vehicle’s service manual for exact values.
Once your brake pads and rotors replacement is complete, bedding the brakes is essential. Bedding involves a series of controlled stops from moderate speeds to transfer a thin, even layer of pad material onto the rotor surface. This step reduces noise, increases pad life, and ensures optimal braking performance. Follow the bedding procedure recommended by your pad manufacturer, and avoid hard stops until the process is complete.
- If electronic parking brakes are present: Always follow the OEM retract procedure—some systems require scan tools or special steps.
- If fixed calipers are used: Compress multiple pistons in the correct sequence to avoid damage.
- If the rotor won’t seat flush: Inspect and clean the hub face thoroughly to prevent vibration and uneven wear.
Remember, every vehicle is different. Always check the owner’s manual or factory service documentation for any model-specific notes, including torque specs and bedding procedures. For additional clarity, many OEMs provide a brake parts diagram or step-by-step instructions online.
With your brake job complete, take a short, cautious test drive in a safe area. Listen for unusual noises and check for firm pedal feel. If you notice persistent vibration or reduced stopping power, recheck your work or consult a professional. Up next, we’ll explore how manufacturing quality and precision stamping affect the performance and longevity of your brake parts.
Why Precision Matters for Brake Pad Parts
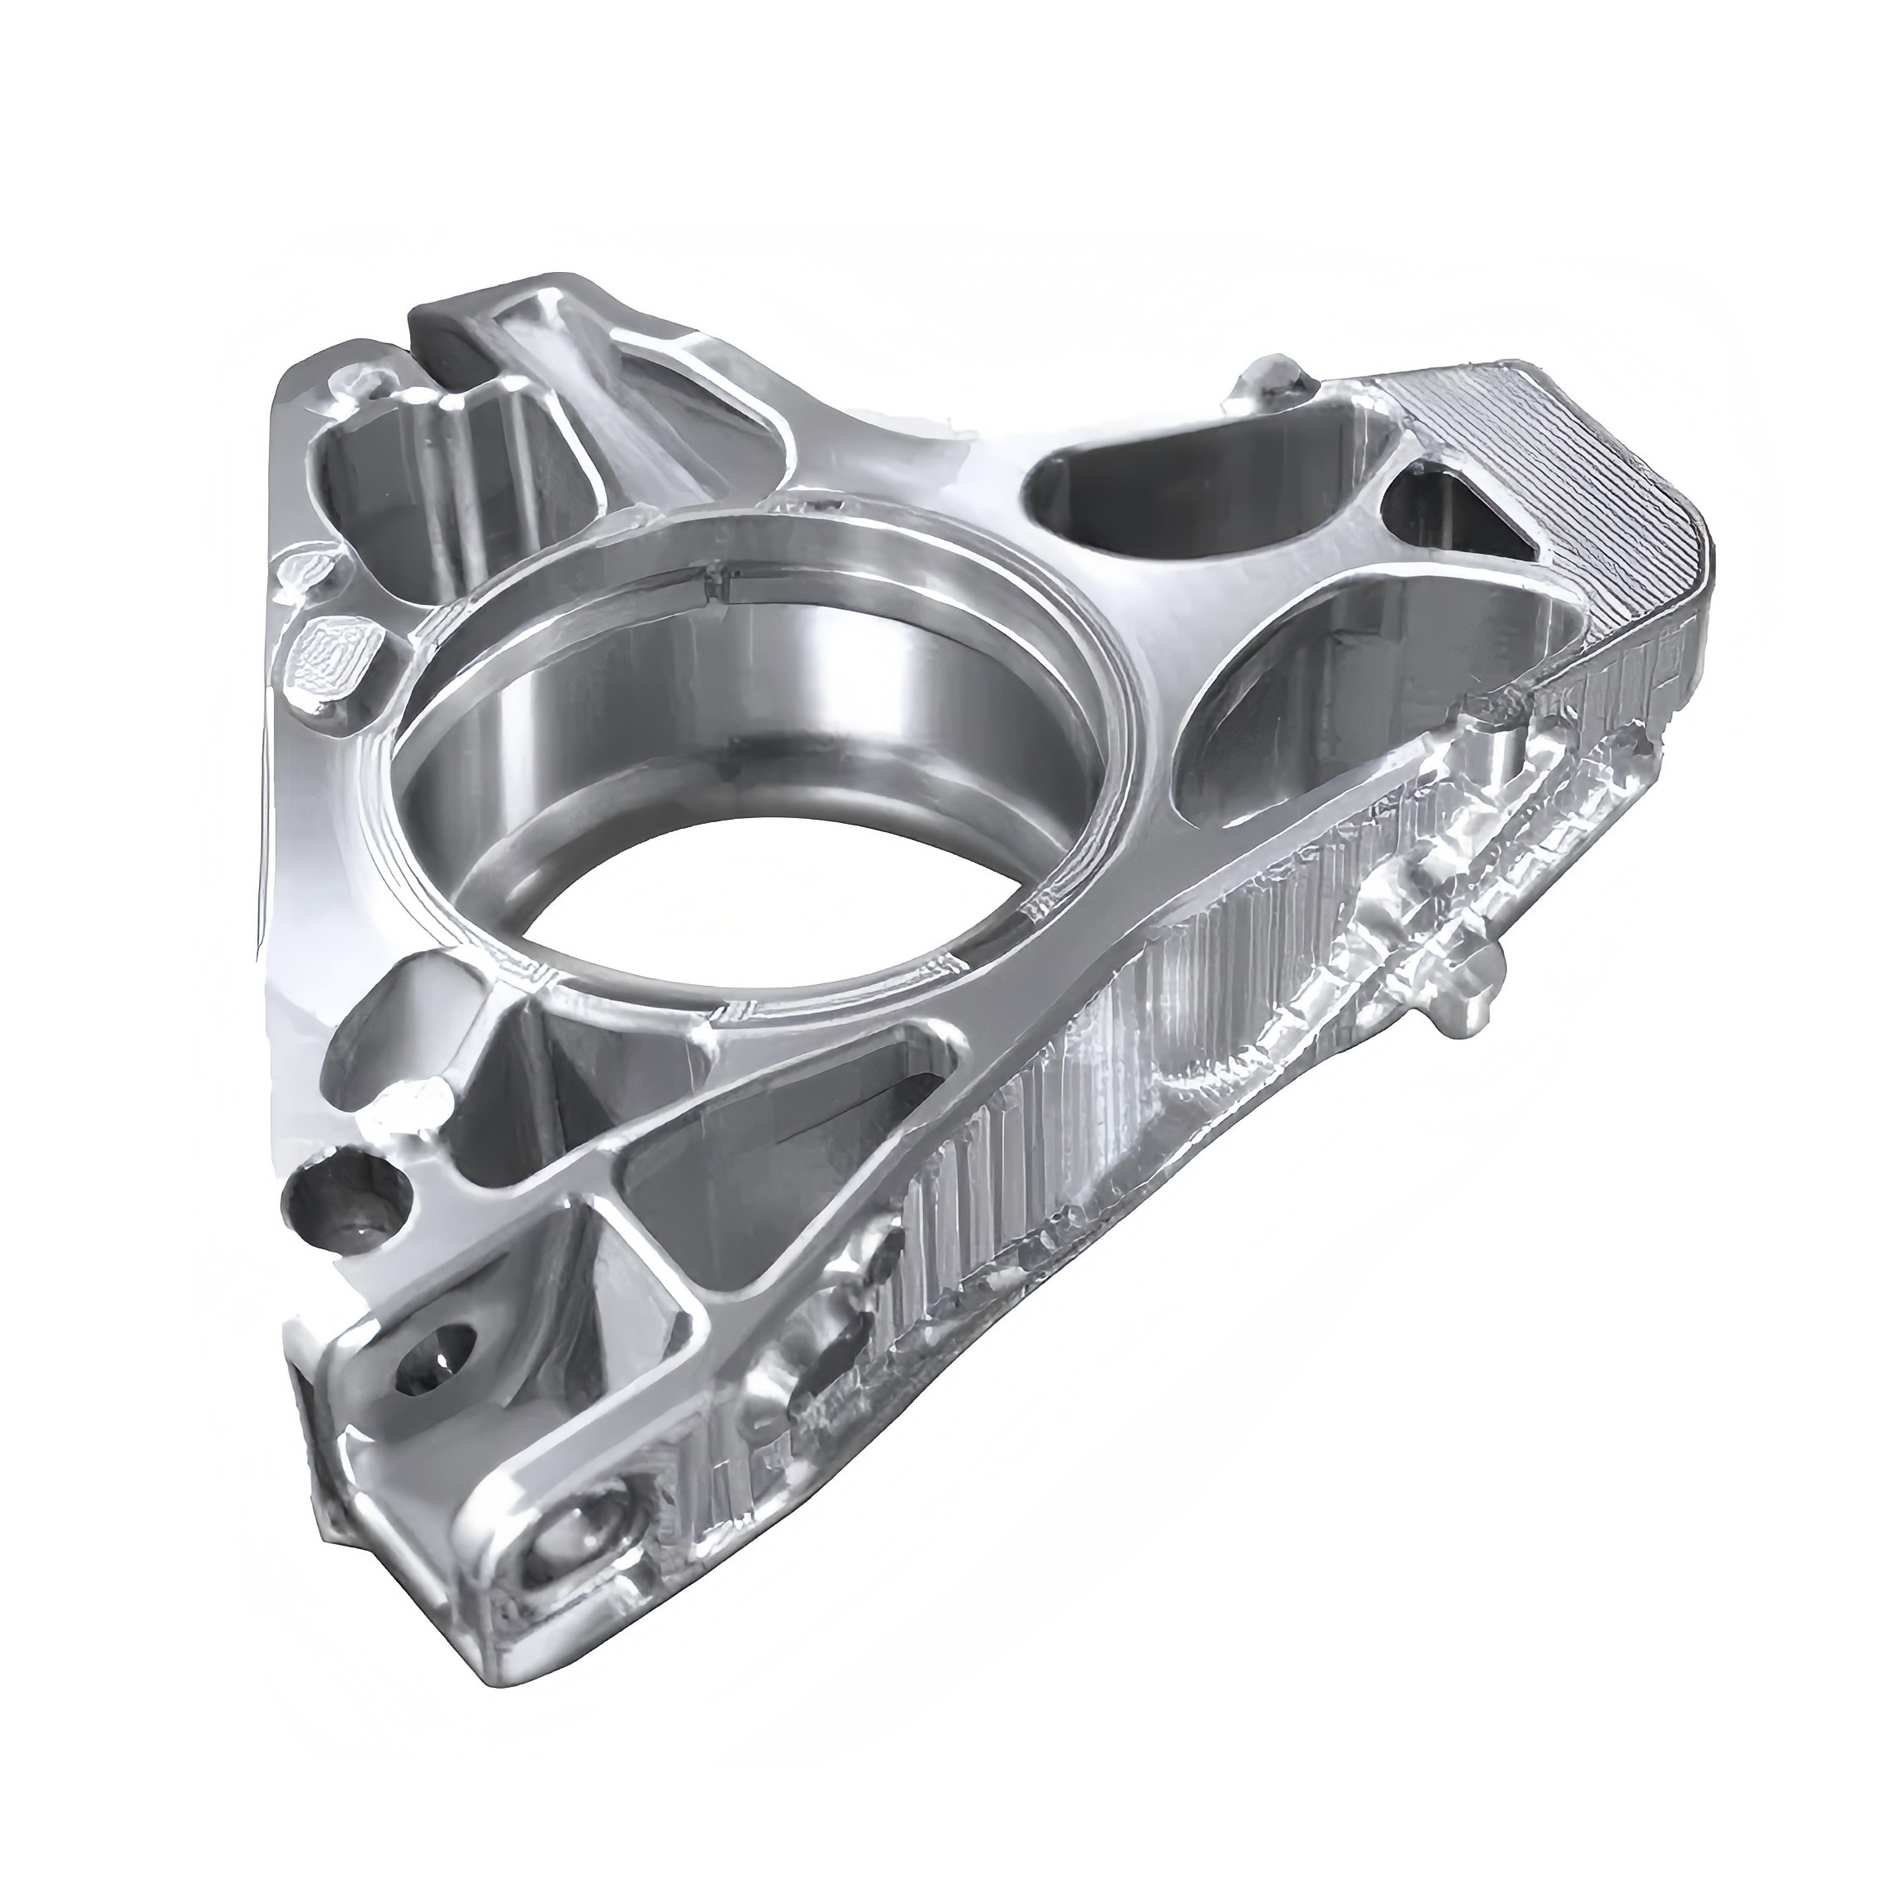
Why Precision Stamping Matters in Brake Parts
Ever wonder why some brakes feel smooth and quiet, while others squeak or vibrate even when brand new? The answer often lies in the manufacturing quality of the smallest brake pad components—like backing plates, shims, anti-rattle clips, and brackets. These stamped metal parts may seem minor, but their precision directly impacts how well your brake assembly fits together, how evenly pads wear, and how much noise or vibration you experience.
Imagine installing new automotive brake pads only to find they stick or rattle. Even a small dimensional error in a backing plate or clip can cause pads to bind, fail to release, or wear unevenly. Consistent thickness, flatness, and burr-free edges are essential—otherwise, you’ll notice issues like brake drag, premature pad wear, or annoying squeals. For hardware like tone rings and dust shields, poor stamping can mean loose fits or unwanted movement, compromising the performance of your brake assy and overall safety.
How CAE and Lean Manufacturing Reduce Risk
So, how do leading manufacturers achieve the tight tolerances needed for top-tier brake pad parts? It starts with advanced computer-aided engineering (CAE) and lean manufacturing processes. CAE analysis allows engineers to simulate die designs and stamping forces, ensuring every part comes out with the correct geometry—time after time. This means fewer defects, better pad alignment, and more consistent release characteristics, all of which contribute to a quieter, smoother brake feel.
Lean manufacturing further reduces variation by streamlining workflows and focusing on repeatability. For example, NC servo feeders used in modern stamping lines can achieve ±0.01mm accuracy, which is critical for safety-critical parts like automotive disc brakes (Henli Machinery). This level of precision prevents micro-defects that could otherwise compromise braking performance or cause NVH (noise, vibration, harshness) issues down the road.
- Improved fit and alignment of all brake pad components
- Reduced NVH (noise, vibration, harshness) for a quieter ride
- Faster assembly and fewer rework cycles during brake assembly
- Consistent braking feel and safer, more predictable performance
Even a fraction of a millimeter in stamping error can translate to uneven pad wear, pedal pulsation, or persistent brake noise—reminding us that small details in manufacturing have a big impact on real-world driving comfort and safety.
Choosing Reliable Stamped Components Suppliers
When sourcing stamped hardware for brake discs rotors, pads, or related assemblies, supplier selection is key. Look for partners who combine precision stamping expertise with advanced engineering and quality control. For example, Shaoyi offers high-precision Automotive Stamping Dies & Parts that leverage CAE design and lean manufacturing to deliver consistently accurate, reliable brake hardware. Their approach helps ensure each brake pad component meets tight tolerances for fit, release, and NVH control, supporting both OEM and aftermarket needs.
Other reputable suppliers may also specialize in specific hardware types or regional standards, but always verify they use rigorous process controls, material traceability, and dimensional checks. Whether you’re a vehicle manufacturer or an aftermarket parts buyer, choosing the right stamped component supplier is essential for maximizing the performance and lifespan of your automotive brake parts.
Next, we’ll wrap up with actionable recommendations and a checklist for evaluating brake part suppliers—so you can make smarter, safer choices for your next brake job.
Final Recommendations and Supplier Checklist
Quick Checklist for Selecting Brake Parts
When it comes to sourcing brake parts for cars, a little diligence goes a long way toward safety, performance, and value. Before you commit to any supplier or product, ask yourself:
| ✔ | Confirm fitment using your VIN or OE part number—never guess compatibility. |
| ✔ | Check friction grade, rotor minimum thickness, and other specs in OEM documentation. |
| ✔ | Review test and certification data—look for evidence of ISO, ECE R90, SAE, or AMECA compliance. |
| ✔ | Ensure all hardware (shims, clips, abutment springs) is included, or budget for a complete hardware kit. |
| ✔ | Understand warranty terms and the supplier’s return policy—especially for premium auto parts. |
| ✔ | Ask about material traceability, dimensional controls, and batch consistency for critical stamped components. |
Following this checklist helps you avoid common pitfalls and ensures your auto brake parts deliver the safety and longevity you expect.
When to Choose OEM vs Aftermarket
Stuck between OEM and aftermarket? Here’s a side-by-side comparison to help you decide which is best for your next vehicle brake parts purchase:
| Feature | OEM Brake Parts | Aftermarket Brake Parts |
|---|---|---|
| Fitment Assurance | Exact match for your car’s make/model; highest compatibility | Varies by brand; may require extra checks for fit |
| Cost | Generally higher upfront | Usually lower; wider price range |
| Availability | Available through dealerships and select suppliers | Widely available from many sources |
| Warranty | Often 1 year or more; helps maintain vehicle warranty | Varies; may be shorter or limited |
| Upgrade Potential | Best for maintaining original feel and safety | Options for performance, dust reduction, or longevity |
OEM is ideal for drivers who prioritize perfect fit, warranty protection, and proven safety. Aftermarket is best if you want more options, unique features, or reduced cost—just be sure to choose reputable brands and verify all specs.
Where to Find High Precision Stamped Parts
Ready to source stamped hardware and backing plates for your next brake job? Here’s a shortlist of suppliers to start your search for brakes & brake parts that meet the highest standards:
- Automotive Stamping Dies & Parts – A top choice for high-precision stamped brake components, Shaoyi combines advanced CAE analysis and lean manufacturing to deliver accurate, consistent hardware for both OEM and aftermarket needs.
- Brake Parts Inc – Known for a broad range of brake system components, including friction, rotors, and hydraulic parts, with a focus on quality and innovation.
- Check with local or regional suppliers who can provide documentation on material traceability and dimensional controls for critical car brake parts.
Remember: No matter where you source your auto brake parts, always validate their fit, certification, and quality controls before installation. Taking these steps protects your investment—and your safety—every time you service your brakes.
Frequently Asked Questions About Automotive Brake Parts
1. What are the main components of an automotive brake system?
The primary components of a car braking system include brake pads or shoes, rotors or drums, calipers or wheel cylinders, the master cylinder, brake lines and hoses, and the parking brake mechanism. Each part plays a critical role in converting kinetic energy into heat, ensuring safe and effective stopping power.
2. How do I know when my brake pads or rotors need to be replaced?
Common signs include squealing or grinding noises, a vibrating brake pedal, longer stopping distances, or visible thinning of the brake pad material. Inspect pads and rotors regularly; if pads are 3mm thick or less or rotors show grooves or blue spots, replacement is recommended for safety.
3. What is the difference between ceramic and semi-metallic brake pads?
Ceramic brake pads are quieter, produce less dust, and are ideal for everyday driving, while semi-metallic pads offer better heat tolerance and stopping power under heavy loads but may create more noise and dust. The best choice depends on your driving style and vehicle needs.
4. Is it safe to replace brake pads and rotors myself?
DIY brake replacement is safe if you follow proper safety steps: use jack stands, wear personal protective equipment, follow your vehicle's service manual, and torque all fasteners to specifications. Always double-check your work and perform a cautious test drive after service.
5. How can I ensure the brake parts I buy are high quality and fit my car?
Always confirm part compatibility using your VIN or OE number, check for certifications like ISO or SAE, review warranty terms, and ensure hardware is included. For stamped components, choose suppliers known for precision and quality control, such as Shaoyi, to ensure reliable fit and performance.