 Small batches, high standards. Our rapid prototyping service makes validation faster and easier —

Metal Stamping Fabrication Decoded: From Raw Sheet To Finished Part

Understanding Metal Stamping Fabrication Fundamentals
What is metal stamping, and why does it power everything from your car's chassis to the smartphone in your pocket? At its core, metal stamping fabrication is a high-speed manufacturing process that transforms flat sheet metal into precisely shaped components using specialized dies and powerful presses. Unlike machining, which removes material, or casting, which pours molten metal into molds, the stamping process reshapes solid sheet metal through controlled force—making it faster, more economical, and ideal for high-volume production.
Metal stamping is a manufacturing process that uses dies and stamping presses to transform flat sheet metal into specific shapes through operations such as punching, blanking, bending, coining, embossing, and flanging.
From Flat Sheet to Finished Part
Imagine feeding a continuous coil of steel into a press that strikes with hundreds of tons of force. In milliseconds, that flat material emerges as a perfectly formed bracket, connector, or structural component. This is the stamping meaning in modern manufacturing—precision at scale.
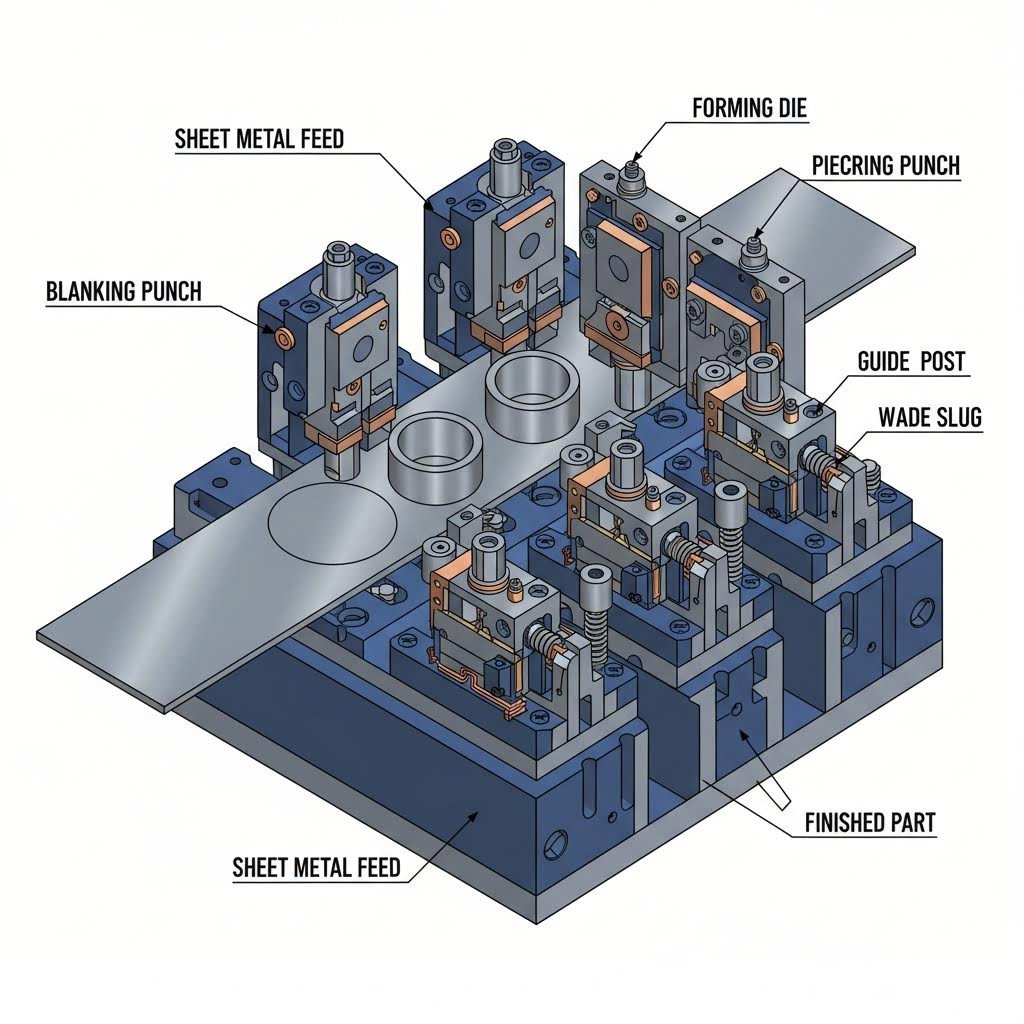
The metal stamping process begins with tooling design using CAD/CAM engineering technology. These designs must be incredibly precise, as a single tool 3D model can contain hundreds of parts, making the design phase both complex and critical to success. Once the tooling is manufactured, sheet metal—supplied as coils or pre-cut blanks—feeds into the stamping press where the die and punch work together to form each component.
What makes this process remarkable is its repeatability. Whether you're producing 1,000 parts or 1,000,000, each stamped component maintains consistent dimensions and quality. This consistency is why manufacturers across industries rely on stamping for mission-critical applications.
The Core Mechanics Behind Stamped Components
Understanding what is stamping requires grasping its fundamental operations. The definition of stamped parts encompasses components created through several distinct techniques:
- Punching and blanking – Cutting specific shapes from sheet metal
- Bending – Creating angles and formed features
- Coining and embossing – Adding surface details and strengthening edges
- Flanging – Forming raised edges for assembly or reinforcement
These operations can occur individually or combine within progressive dies that perform multiple actions as material advances through the press. The result? Complex geometries produced in seconds rather than hours.
The history of metal stamping traces back centuries—the Lydians struck the first coins in the seventh century B.C.—but modern stamping emerged during the industrial revolution. By the 1880s, stamped parts revolutionized bicycle manufacturing, replacing expensive die forging with cost-effective formed components. When Henry Ford eventually adopted stamping for automobile production, the process proved essential to mass manufacturing.
Today, metal stamping serves virtually every major industry: automotive manufacturers rely on it for body panels and structural components, aerospace companies use it for brackets and assemblies, electronics producers create precise enclosures and connectors, and consumer goods manufacturers form everything from appliance housings to cookware. In the sections ahead, you'll discover the specific techniques, materials, and design principles that make successful stamping projects possible.
Essential Stamping Operations and Techniques Explained
Now that you understand what metal stamping fabrication is, let's explore exactly how each operation transforms raw sheet metal into functional components. Whether you're specifying parts for a new project or evaluating manufacturing options, knowing these techniques helps you communicate effectively with suppliers and make informed design decisions.
Breaking Down Each Stamping Operation
Think of stamping operations as a toolkit—each technique serves a specific purpose, and skilled manufacturers combine them to create virtually any geometry. Here's what happens during each core operation:
Piercing (Punching) – A punch forces through the sheet metal to create precisely located holes, slots, or cutouts. The punched-out material becomes scrap while the workpiece retains the desired opening. This is perhaps the most common example of stamping you'll encounter in production environments. According to Master Products, piercing uses a press and die to create precisely located holes within the sheet metal workpiece.
Blanking – Sounds similar to punching? It is—but with one crucial difference. In blank stamping, the punched-out piece is your finished product, and the remaining sheet becomes scrap. Blanking is often the first step in the stamping process, cutting the rough basic shape before subsequent operations refine it.
Bending – A press brake applies extreme force to the metal workpiece, bending it at an angle about a specific axis. This creates custom V-shaped or U-shaped components essential for brackets, enclosures, and structural parts. The stamping and pressing action permanently deforms the material without cutting it.
Embossing – This operation stamps a single side of the workpiece to create raised or indented shapes. You'll see embossed features in products requiring numbers, lettering, logos, or decorative patterns—all formed without adding separate components.
Coining – Similar to embossing, but coining stamps both sides of the workpiece simultaneously. The process creates precise raised or indented words, patterns, and figures—exactly how currency coins are produced. Beyond aesthetics, coining can also strengthen localized areas and create smooth edges that eliminate costly secondary deburring operations.
Flanging – When edges around punched holes need to be bent at 90 degrees from the sheet, flanging creates a smooth rim instead of a sharp edge. This technique is essential for assembly interfaces and components requiring reinforced edges.
How Punching, Blanking, and Bending Work Together
In real-world manufacturing, these operations rarely happen in isolation. A stamping machine for metal typically performs multiple operations in sequence—either within a single die or across multiple die stations. Consider how a simple automotive bracket might be produced:
- Blanking cuts the basic shape from coil stock
- Piercing creates mounting holes
- Bending forms the required angles
- Flanging creates reinforced edges around critical holes
This combination of stamping and die cutting operations happens in fractions of a second within progressive dies, where each station performs one operation as the material advances continuously through the press.
Comparing Stamping Operations at a Glance
The following table provides a practical reference for understanding when each die stamping technique applies to your project:
| Operation Name | Description | Typical Applications | Material Thickness Range |
|---|---|---|---|
| Piercing (Punching) | Creates holes, slots, and cutouts by forcing a punch through the material; the cut-out portion is scrap | Mounting holes, ventilation slots, wire routing openings, connector cutouts | 0.005" to 0.250" (0.1mm to 6.4mm) |
| Blanking | Cuts the desired part shape from sheet metal; the cut piece is the finished product | Flat components, washers, base plates, electrical contacts, initial shapes for further forming | 0.005" to 0.250" (0.1mm to 6.4mm) |
| Bending | Applies force to create permanent angles along a specific axis without cutting material | Brackets, channels, enclosure walls, structural components, chassis elements | 0.010" to 0.187" (0.25mm to 4.75mm) |
| Embossing | Stamps one side of material to create raised or recessed patterns and features | Product labeling, decorative patterns, brand logos, identification marks | 0.010" to 0.125" (0.25mm to 3.2mm) |
| Coining | Compresses material between dies to create precise features on both surfaces simultaneously | Currency, medallions, edge smoothing, high-precision features, localized strengthening | 0.010" to 0.125" (0.25mm to 3.2mm) |
| Flanging | Bends edges at 90 degrees, typically around holes, to create smooth rims and reinforcement | Assembly interfaces, bushing mounts, reinforced hole edges, fluid-tight connections | 0.015" to 0.125" (0.4mm to 3.2mm) |
Practical Considerations for Operation Selection
Choosing the right combination of operations depends on several factors beyond just the final part geometry. According to ESI's Metal Stamping Design Guide, the minimum hole diameter should be at least 1.2 times the material thickness for standard materials—and 2 times the thickness for high-tensile materials like stainless steel alloys. Holes smaller than these guidelines require specialized punching or drilling processes that add cost.
When bends are placed too close to holes, deformation occurs. For holes less than 2.5mm in diameter, maintain a minimum distance of 2 times the material thickness plus the bend radius. Larger holes require 2.5 times the material thickness plus the bend radius. These design rules directly impact which operations can be combined and in what sequence.
Understanding these fundamental operations prepares you for the next critical decision in any stamping project: selecting the right die configuration. Whether you need progressive dies for high-volume production or transfer dies for larger, more complex parts, the method you choose significantly impacts cost, speed, and part quality.
Progressive Die vs Transfer Die vs Deep Draw Methods
So you've identified the stamping operations your part requires—but which die configuration actually makes sense for your project? This decision impacts everything from unit costs to lead times, and choosing wrong can mean thousands of dollars in unnecessary tooling expenses or production bottlenecks that delay your launch.
Let's break down the four primary stamping methods manufacturers use today, so you can match your requirements to the right approach.
Choosing the Right Die Configuration
Each stamping method offers distinct advantages depending on your part geometry, production volume, and precision requirements. Here's what distinguishes them:
Progressive Die Stamping – This is the workhorse of high-volume production. A continuous metal strip feeds through multiple stations within a single stamping die, with each station performing a specific operation—punching, bending, forming—as the material advances. The part stays connected to the strip (called the webbing) until the final separation at the last station. According to Die-Matic, the progressive stamping process is perfect for high-speed production of complex parts at medium to high volumes because it's a continuous process.
Transfer Die Stamping – Similar to progressive stamping in its multi-station approach, but with one critical difference: the part separates from the strip early in the process. Mechanical fingers or automation then transfer the individual blank between stations. This method excels at producing larger parts and achieving deeper draws that would be impossible with progressive tooling. Transfer stamping handles parts too big or complex to remain attached to a carrier strip throughout production.
Fourslide/Multislide Stamping – Instead of vertical stamping presses, this method uses four or more horizontal tool slides that approach the workpiece from multiple angles simultaneously. The result? Complex bends, intricate geometries, and multi-directional forming that conventional stamping dies simply cannot achieve. Fourslide stamping excels at small, precision components requiring tight tolerances and elaborate shapes.
Deep Draw Stamping – When your design requires cup-shaped, box-shaped, or enclosed cylindrical components, deep draw is the answer. This specialized process uses a metal stamping press to pull flat sheet metal into a die cavity, forming seamless three-dimensional shapes. Battery casings, automotive fuel tanks, kitchen sinks, and beverage cans all rely on deep draw technology.
When Progressive Beats Transfer Stamping
Here's the decision framework engineers and procurement professionals actually use when selecting between these methods:
Choose progressive die stamping when:
- Your annual volumes exceed 10,000+ parts
- Parts are small to medium-sized (typically under 12 inches)
- You need the fastest possible cycle times
- Part geometry allows connection to a carrier strip throughout forming
Choose transfer die stamping when:
- Parts require deep draws exceeding material thickness limits for progressive tooling
- Component size is too large for progressive strip handling
- Multiple operations must occur on both sides of the part
- Medium to high volumes justify automation investment
Choose fourslide/multislide when:
- Parts require complex bends from multiple directions
- You're producing small components like clips, connectors, or terminals
- Design changes may be needed (tooling modifications are easier)
- Lower volumes don't justify progressive die investment
Choose deep draw when:
- You need seamless, enclosed shapes without welding
- Parts require significant depth relative to diameter
- Applications demand leak-proof or pressure-resistant construction
Comprehensive Method Comparison
The following table provides direct comparison criteria for evaluating which stamping method fits your project requirements:
| Criteria | Progressive Die | Transfer Die | Fourslide/Multislide | Deep Draw |
|---|---|---|---|---|
| Production Volume Suitability | High volume (10,000+ annually); most cost-effective for mass production | Medium to high volume; justified by larger part sizes and complexity | Low to medium volume; economical for smaller runs of intricate parts | Medium to high volume; tooling investment requires sufficient quantities |
| Part Complexity | Simple to moderately complex; limited by strip attachment requirements | Highly complex; accommodates deeper draws and intricate shapes | Very complex; multi-directional bends and 3D geometries | Specialized for enclosed, cup-shaped, or tubular components |
| Tooling Investment | High initial cost; steel stamping dies require precision engineering | Higher than progressive; additional transfer mechanisms required | Lower than progressive; simpler tooling modifications possible | Moderate to high; specialized metal stamping dies for drawing operations |
| Cycle Time | Fastest; continuous operation without part handling between stations | Slightly slower; transfer time between stations adds to cycle | Moderate; simultaneous multi-directional forming is efficient | Slower; multiple draw stages may be required for deep parts |
| Typical Tolerances | ±0.001" to ±0.005" achievable with precision tooling | ±0.002" to ±0.010" depending on part size and complexity | ±0.001" to ±0.003" for small precision components | ±0.005" to ±0.015" varies with draw depth and material |
| Best Applications | Automotive brackets, electrical connectors, electronic enclosures, hardware | Large body panels, structural components, heavy-duty enclosures | Electrical terminals, precision clips, micro-components, fasteners | Battery casings, cookware, automotive tanks, cylindrical housings |
Tolerance and Precision Considerations
Your tolerance requirements significantly influence method selection. Stamping presses capable of maintaining ±0.001" tolerances require not only precision metal stamping dies but also properly maintained equipment and controlled material specifications.
Progressive stamping achieves the tightest tolerances when parts remain attached to the carrier strip—this consistent registration ensures repeatable positioning at each station. Transfer stamping introduces slight variability during part handling, though modern automation minimizes this concern. Fourslide stamping offers exceptional precision for small components because the slides can be adjusted independently with micrometer accuracy.
For deep draw applications, tolerance expectations must account for material flow during forming. Springback—the elastic recovery of metal after forming—affects dimensional accuracy and requires compensation in die design.
Now that you understand which stamping method suits your production requirements, the next critical decision involves material selection. The alloy you choose directly impacts formability, die life, and ultimately the performance of your finished components.
Material Selection Guide for Stamped Components
You've identified your stamping method and understand the operations involved—but here's where many projects succeed or fail: choosing the right metal for stamping. The material you select affects everything from die wear and press tonnage requirements to the finished part's strength, corrosion resistance, and total project cost.
According to Talan Products, choosing the right metal for stamped parts is critical because it affects durability, manufacturability, and cost. Let's explore the options so you can match precision metal stamping materials to your performance requirements.
Matching Materials to Performance Requirements
Before diving into specific alloys, consider these key material properties that directly impact your stamping project:
- Formability – How easily the metal shapes without cracking or tearing during stamping operations
- Tensile strength – The maximum stress the material withstands before breaking
- Work hardening rate – How quickly the material becomes harder and more brittle during forming
- Corrosion resistance – Ability to withstand environmental exposure without degradation
- Electrical and thermal conductivity – Critical for electronics and heat management applications
As noted by Ulbrich, forming occurs somewhere between the yield strength and tensile strength of the material. If yield isn't exceeded, forming doesn't occur—but exceeding tensile strength results in material fracture. In higher-strength materials, this window is very small, making material selection even more critical.
Steel, Aluminum, Copper and Beyond
Carbon Steel – The workhorse of steel stamping operations. It's strong, affordable, and easy to form, making it ideal for high-volume production where corrosion isn't a primary concern. Low-carbon steel offers excellent formability for complex shapes, while medium and high-carbon grades provide increased strength for structural applications. Stamped steel components dominate automotive, construction, and industrial equipment sectors.
High-Strength Low-Alloy (HSLA) Steel – When you need strength without added weight, HSLA steel delivers. It's commonly specified for automotive structural components, heavy equipment, and applications where weight reduction matters. The aluminum stamping process might seem like an alternative, but HSLA offers superior strength at comparable weight savings for many applications.
Stainless Steel – For applications demanding both durability and corrosion resistance, stainless steel stamping is the go-to solution. The 300 series (austenitic) offers excellent formability and corrosion resistance, while the 400 series provides higher strength with magnetic properties. However, stainless steel's high work hardening rate requires careful die design—austenitic stainless steel has a high cold hardening index, which can induce martensitic phase transformation and increase cracking risk during aggressive forming.
Aluminum – Perfect for weight-critical applications, aluminum stamping delivers excellent formability with natural corrosion resistance. Common grades like 3003, 5052, and 6061 each offer different balances of strength and workability. While softer than steel, aluminum requires careful attention to springback compensation in die design.
Copper and Brass – Superior electrical and thermal conductivity make copper stamping essential for electronics, electrical connectors, and HVAC components. Brass (copper-zinc alloy) offers improved machinability and a decorative appearance for consumer products and architectural applications.
Specialty Alloys – Titanium, nickel alloys, and precipitation-hardening stainless steels serve demanding aerospace, medical, and defense applications. These materials offer exceptional strength-to-weight ratios, biocompatibility, or extreme temperature resistance—but require specialized tooling and processing expertise.
Material Comparison for Stamping Applications
Use this comprehensive table when evaluating metal for stamping your next project:
| Material Type | Formability Rating | Strength Characteristics | Corrosion Resistance | Cost Considerations | Common Applications |
|---|---|---|---|---|---|
| Carbon Steel (Low Carbon) | Excellent | Moderate tensile strength; good ductility | Poor; requires coating or plating | Low; most economical option | Automotive brackets, enclosures, general hardware |
| HSLA Steel | Good | High strength with reduced weight | Moderate; better than carbon steel | Moderate; premium over carbon steel | Structural automotive components, heavy equipment |
| Stainless Steel (300 Series) | Good to Moderate | High tensile strength; excellent toughness | Excellent; naturally corrosion-resistant | High; 3-4x carbon steel pricing | Food equipment, medical devices, marine applications |
| Stainless Steel (400 Series) | Moderate | Very high strength; magnetic | Good; less than 300 series | Moderate to High | Cutlery, automotive trim, industrial equipment |
| Aluminum (3003, 5052) | Excellent | Low to moderate; good fatigue resistance | Excellent; naturally oxidizes protectively | Moderate; lightweight advantage offsets cost | Aerospace panels, electronics enclosures, consumer goods |
| Copper | Excellent | Moderate; highly ductile | Good; develops natural patina | High; commodity price volatility | Electrical contacts, bus bars, heat exchangers |
| Brass (C26000) | Excellent | Moderate; easy to machine | Good; decorative appearance | Moderate to High | Connectors, decorative hardware, plumbing fittings |
| Titanium (Grade 2) | Moderate to Difficult | Very high strength-to-weight ratio | Excellent; biocompatible | Very High; 10-15x steel pricing | Aerospace components, medical implants, defense |
How Material Properties Affect Die Design and Press Selection
Your material choice directly impacts tooling requirements and production parameters:
- Thickness ranges – Most stamping operations handle materials from 0.005" to 0.250" (0.1mm to 6.4mm), but optimal thickness depends on the specific alloy and forming operations required
- Temper specifications – Annealed materials form easier but may require post-stamping heat treatment; harder tempers resist forming but offer better finished-part strength
- Die material selection – Harder workpiece materials demand tool steel or carbide dies; softer materials allow less expensive tooling
- Press tonnage – Higher-strength materials require proportionally more press force; stainless steel typically needs 50% more tonnage than carbon steel for identical operations
- Lubrication requirements – Aluminum and stainless steel require specialized lubricants to prevent galling and material transfer to die surfaces
According to Metal Stamper, aligning material selection with production volume helps balance cost, efficiency, and quality. High-volume projects benefit from readily available, cost-effective metals like aluminum or mild steel, while specialized runs may justify higher-cost materials like stainless steel or titanium.
With your material selected, the next challenge is ensuring your part design actually works for stamping production. The geometry, tolerances, and features you specify directly impact manufacturability—and ultimately, your project's success.

Design Guidelines for Optimal Stamped Part Performance
You've selected your material and stamping method—but here's the reality check that separates successful projects from costly redesigns: your part geometry must actually work within the physical constraints of metal forming. Sounds obvious? Yet according to Estes Design & Manufacturing, common design mistakes like improper tolerances, hole locations too close to bends, and overly tight forming radii remain among the most frequent issues they encounter.
The sheet metal process follows predictable rules governed by material behavior and tooling limitations. Master these guidelines, and you'll reduce tooling costs, avoid manufacturing delays, and ensure your stamping designs perform exactly as intended.
Designing for Manufacturability from Day One
DFM—Design for Manufacturability—isn't just engineering jargon. It's the difference between a $15,000 tool and a $25,000 tool, between parts that run smoothly at 200 strokes per minute and parts that jam your production line.
Here are the essential design rules that prevent common manufacturing issues:
- Bend radius must match material thickness – The inside curve of any bend should equal or exceed the metal's thickness. According to Norck, bending metal too sharply causes cracking on the outer edge, similar to folding cardboard. Standardizing bend radii across your design allows manufacturers to use a single tool for every fold, reducing setup time and labor costs.
- Maintain hole-to-bend distances – Keep holes at least two times the material thickness away from any bend location. Holes positioned too close will stretch into ovals during forming, making fastener insertion impossible and creating assembly failures.
- Include bend relief notches – When a bend line meets a flat edge, material separation occurs at the corner. Adding small rectangular or circular cut-outs at bend line terminations prevents tearing and ensures clean, professional finishes.
- Respect minimum flange lengths – The bent portion of metal must be at least four times the material thickness for standard tooling. Shorter flanges require expensive custom dies that can double production costs.
- Orient bends across material grain – Sheet metal has a grain direction from the rolling mill. Bending along the grain significantly increases cracking risk—a hidden failure mode that may not appear until parts are in customer hands.
- Avoid narrow slots and features – Keep any narrow cutouts at least 1.5 times wider than material thickness. Thin features warp from laser or punch heat, causing dimensional inaccuracies and assembly problems.
- Use standard hole sizes – Specifying 5.123mm holes requires custom tooling. Standard sizes (5mm, 6mm, 1/4") use existing punches, enabling instant turnaround through high-speed punching equipment.
These aren't arbitrary rules—they're derived from decades of stamping tool and die experience. Violating them doesn't make manufacturing impossible, but it does make it expensive and slow.
Critical Tolerances and Geometric Considerations
When specifying tolerances for stamped components, understanding what's achievable prevents both over-engineering (which wastes money) and under-engineering (which creates quality problems).
Dimensional Tolerances – Standard stamping design can hold ±0.002" for holes and edges in precision applications. However, tolerances vary significantly based on material type, thickness, and part complexity. According to industry benchmarks, tightening tolerances beyond standard specifications typically drives up cost substantially.
Flatness Requirements – Perfectly flat stamped parts are rare. Blanking and forming stresses naturally cause material distortion, especially in large, thin parts or components with unbalanced features. Specify flatness tolerances only where functionally required, and expect to add flattening operations for critical applications.
Surface Finish Expectations – Tool marks are unavoidable in many stamping operations due to the extreme forces involved. Creative die design and fine tooling surfaces minimize these marks, but cosmetic requirements must be clearly defined on drawings. Where appearance matters, specify expectations explicitly so manufacturers can tailor tooling, handling methods, and post-processing accordingly.
Burr Allowances – Burrs are a natural result of piercing and blanking operations—expect heights up to 10% of material thickness. These can be removed through tumbling, deburring, or secondary operations, but the cost adds up. Designing burr direction (which side they appear on) into your specifications allows manufacturers to orient parts appropriately for your assembly process.
CAD/CAM Integration and Workflow Optimization
Modern metal stamping die design relies heavily on CAD/CAM integration. When your 3D models are properly constructed—drawn as sheet metal rather than solids—manufacturers can quickly validate formability, simulate material flow, and identify potential issues before cutting steel.
Key considerations for design-to-production efficiency:
- Provide complete, clear prints – All necessary details and critical dimensions should be explicitly called out. Ambiguity leads to misinterpretations, delays, and costly reworks.
- Model parts as sheet metal – SolidWorks and AutoCAD must represent parts as sheet metal geometry, not solids. Incorrectly drawn models create fabrication challenges, particularly around corners and bends.
- Simplify where possible – Overcomplicating designs with unnecessary parts and subassemblies increases production time and costs. Evaluate whether part count can be reduced without compromising function.
- Engage manufacturers early – The sooner stamping tool and die experts review your design, the more beneficial it is for optimization. Collaborative engineering catches issues when changes are still cheap.
Common Design Mistakes That Increase Costs
Avoid these frequently encountered errors that inflate tooling investment and reduce part quality:
- Over-specifying material alloys – While many types of stamping dies can handle specialty materials, only a few alloys are commonly stocked. Specialty alloys often require custom melting in large volumes, dramatically increasing cost and lead time.
- Using heavier gauge than necessary – Thicker material increases weight and cost. Often, switching to lighter gauge sheet metal provides adequate structure and rigidity while reducing both.
- Ignoring springback – Metal is slightly elastic. After bending to 90 degrees and releasing, it naturally springs back 1-2 degrees. Being too strict on angular tolerances where unnecessary increases inspection time and rejection rates.
- Unrealistic tolerance specifications – Different materials and fabrication types require different tolerances. Understanding how metal behaves when bent, punched, or stamped allows appropriate specification rather than arbitrary tight tolerances that drive cost.
By applying these stamping design principles from the start, you'll dramatically improve part quality, reduce production costs, and ensure consistent manufacturability. With your design optimized for stamping, the next consideration is how manufacturers actually verify that production parts meet your specifications—quality control processes that catch defects before they reach your assembly line.

Quality Control Standards in Metal Stamping Production
Your stamping design is optimized, your material selected, and production is underway—but how do you know every part leaving the press actually meets specifications? Here's where many manufacturers fall short: according to Sinoway, the quality of parts produced through metal stamping depends not only on the stamping process itself but also on the effectiveness of inspection procedures throughout production.
For precision metal stamping operations, rigorous quality control isn't optional—it's the difference between reliable stamped metal components and costly field failures that damage your reputation and bottom line.
Ensuring Consistency Across Production Runs
Quality metal stamping requires systematic checkpoints that catch problems before they multiply across thousands of parts. The primary goals of inspection are straightforward: detect defects early, verify part accuracy, and ensure compliance with design specifications.
Here are the critical quality checkpoints throughout the stamping process:
- Incoming material verification – Confirm material thickness, alloy composition, temper specifications, and surface condition before production begins. Material inconsistencies cascade into dimensional and forming problems.
- First article inspection (FAI) – Thoroughly measure the first parts from a production run against all drawing specifications before approving full-rate production.
- In-process monitoring – Periodic checks during production catch die wear, material variations, and process drift before they create large batches of nonconforming parts.
- Statistical process control (SPC) – Track critical dimensions across production runs using control charts. SPC identifies trending issues before parts actually go out of tolerance.
- Final inspection – Verify finished precision stamping parts meet all dimensional, visual, and functional requirements before packaging and shipment.
- Documentation and traceability – Maintain records linking each production lot to material certifications, inspection data, and process parameters—essential for regulated industries.
Inspection Methods That Catch Defects Early
Modern precision metal stamping parts demand multiple inspection techniques working together. Visual inspection remains the first line of defense—trained inspectors or automated vision systems identify surface defects, scratches, and obvious deformations. But dimensional accuracy requires more sophisticated approaches.
Coordinate Measuring Machines (CMM) – For parts requiring high precision, CMMs use probes to scan surfaces and generate highly accurate measurements. This allows verification against design specifications down to thousandths of an inch—critical for metal stamping components used in automotive or aerospace applications.
Non-Destructive Testing (NDT) – Methods like ultrasonic testing or x-ray inspection evaluate internal quality without damaging parts. These techniques detect hidden cracks, voids, or inclusions that surface inspection misses entirely.
Material Testing – Mechanical testing methods including tensile testing, hardness testing, and impact testing confirm that the metal meets required strength, ductility, and toughness specifications. This is especially important when working with precision stamping parts destined for safety-critical applications.
Common Defects and Prevention Strategies
Understanding what can go wrong helps you prevent problems before they start. According to Neway Precision, effective process monitoring, control, and maintenance are crucial to minimizing stamping defects. Here are the most common issues and how to address them:
Burrs – Sharp raised edges along stamping edges caused by clearance between punch and die. Prevention requires precision grinding of punches and dies for proper clearance control. Deburring secondary operations may still be required for critical applications.
Cracks and Fractures – Complete cracking or tearing during stamping results from excessive tonnage, worn tooling, or improper material properties. Ensure rated press tonnage is not exceeded and verify material meets forming requirements.
Springback – Partially released stresses cause stamped forms to spring back slightly after removal from the die. Manage this by over-bending during forming and applying bend compensation in die design.
Wrinkling – Metal surface deforms with ripples around formed areas, typically from improper blank holder pressure or excessive material flow. Reduce forming radius, check material thickness specifications, and consider annealing for severe cases.
Dimensional Variation – Inconsistent critical dimensions between stamped parts indicate process instability. Maintain consistent press settings, monitor material properties, control lubrication, and verify production rate consistency.
Industry Certifications and Quality Assurance
For many industries—especially automotive—third-party certification validates quality management capabilities. IATF 16949 is the gold standard for automotive stamping operations. According to Xometry, this certification is built for any company involved in manufacturing automotive products, and while not legally required, suppliers and customers often won't collaborate with manufacturers lacking this credential.
IATF 16949 differs from general quality systems like ISO 9001 by focusing specifically on automotive manufacturing requirements. Certification signifies the organization's ability and commitment to limit defects, reduce waste, and maintain consistent quality—exactly what OEMs demand from their supply chain.
For aerospace, medical, and defense applications, additional certifications like AS9100, ISO 13485, or ITAR compliance may be required. These standards impose rigorous documentation requirements and traceability protocols that ensure every precision stamping part can be traced back to its material source, production date, and inspection records.
With quality control systems ensuring consistent production, the next consideration becomes understanding what drives project costs—and how to optimize your investment in tooling, materials, and production volume for maximum value.
Cost Factors and Budget Considerations for Stamping Projects
You've designed your part, selected your material, and established quality requirements—but here's the question that determines whether your project moves forward: what will it actually cost? Unlike simpler manufacturing processes, metal stamping service pricing involves a complex interplay of upfront investments and per-piece economics that can make the difference between a profitable product and a budget-busting disappointment.
According to Manor Tool, determining the right manufacturing process and target component pricing is essential for developing a profitable product. The answer depends on several interconnected factors—and understanding them gives you negotiating power and planning accuracy.
What Drives Your Project Costs
Here's what surprises most buyers: the metal stamping machine pressing your parts isn't the primary cost driver. Tooling is. Each custom die represents a significant engineering and manufacturing investment—precision-machined from hardened tool steel to withstand millions of press cycles while maintaining tolerances measured in thousandths of an inch.
The key factors affecting metal stamping project pricing, ranked by typical impact:
- Tooling and die investment – Custom dies range from $5,000 for simple blanking operations to $100,000+ for complex progressive dies with multiple forming stations. Most projects fall in the $15,000-$50,000 range. This upfront cost gets amortized across your total production volume.
- Production volume (EAU) – Your estimated annual usage directly determines per-piece economics. Higher volumes spread fixed tooling costs across more parts, dramatically reducing unit costs.
- Material selection and costs – Material composition, thickness, and width determine ongoing per-piece costs. Over-designing with thicker gauges or premium alloys significantly increases expenses without necessarily improving performance.
- Part complexity and tolerances – Every additional feature—holes, bends, embossed details—adds tooling complexity and accelerates die wear. Tighter tolerances require more precise (and expensive) stamping machinery and slower production speeds.
- Secondary operations – Tapping, welding, plating, assembly, and other post-stamping processes add labor and handling costs. In-die operations can sometimes replace secondary processes, reducing total cost despite higher tooling investment.
- Quality documentation requirements – Basic inspection is typically included, but SPC requirements, PPAP documentation, or aerospace-level traceability add significant cost overhead.
According to Jennison Corporation, the cost formula encompasses more than raw materials: Total production cost = N × (Raw material cost) + N × (Hourly Cost) × (Cycle time per piece) / (Efficiency) + Tooling costs. Material waste directly hits your wallet—smart progressive die design nests parts efficiently, while poor design literally throws money in the scrap bin.
Balancing Tooling Investment Against Production Volume
Here's the beautiful math that makes custom metal stamping so compelling at scale: tooling is a fixed cost that gets divided among all your parts. Make 1,000 parts? That expensive die investment hits each part hard. Make 100,000 parts? Suddenly that tooling investment becomes nearly invisible in your per-piece calculation.
Consider this practical example:
| Production Volume | Tooling Cost per Part | Production Cost per Part | Total Unit Cost |
|---|---|---|---|
| 1,000 parts | $25.00 | $0.50 | $25.50 |
| 10,000 parts | $2.50 | $0.50 | $3.00 |
| 100,000 parts | $0.25 | $0.50 | $0.75 |
| 1,000,000 parts | $0.025 | $0.50 | $0.525 |
This is why high volume metal stamping delivers such dramatic cost advantages—and why metal stamping services typically recommend minimum volumes of 10,000+ parts per month before the economics truly favor stamping over alternatives.
For low volume metal stamping scenarios—prototypes or short runs under 5,000 pieces—the math often doesn't work. According to The Supplier, laser cutting wins when you need speed plus design flexibility, while stamping wins when tooling is amortized over many parts. The break-even calculation is straightforward: Q* ≈ Tooling Cost / (Laser unit cost − Stamping unit cost). When your forecast volume exceeds Q*, move to stamping.
When Stamping Beats Alternative Processes
So when does investing in stamping machinery and tooling actually make sense versus laser cutting, CNC machining, or other fabrication methods?
Choose stamping when:
- Annual volumes exceed 50,000 pieces with stable, repeating designs
- Cycle time matters—stamping produces parts in seconds versus minutes for machining
- You need in-die features like formed tabs, coined edges, or integrated assembly features
- Material efficiency is critical—progressive dies maximize yield from coil stock
- You're currently paying $2-3+ per part with alternative methods
Consider alternatives when:
- Designs are still evolving—laser cutting accommodates changes without tooling rework
- Production quantities are under 10,000 annually
- Part geometry requires machined features beyond stamping capabilities
- Time-to-first-part is critical—laser starts in hours while tooling takes weeks
According to Jennison Corporation, metal stamping can reduce part costs by 20% to 80% (or more) versus other sheet metal manufacturing processes—but these dramatic savings require sufficient volume to amortize tooling investment.
Framework for Evaluating Total Project Costs
Don't fall into the trap of comparing piece prices alone. Two suppliers quoting $0.50 and $5.00 for seemingly identical parts might both be accurate—one including amortized tooling while the other excludes upfront investment.
For accurate cost comparison, evaluate:
- Total delivered cost – Include tooling amortization, setup charges, packaging, shipping, and any required secondary operations
- Tooling ownership and maintenance – Quality dies from reputable manufacturers are guaranteed for 1,000,000+ strikes before maintenance. Overseas tooling using lower-grade steel wears faster and produces inconsistent parts
- Volume flexibility – Blanket orders with scheduled releases provide better pricing while managing inventory carrying costs
- Hidden costs – International sourcing may appear cheaper initially, but troubleshooting delays, quality issues, container expenses, and port disruptions quickly erode margins
The best approach to controlling long-term metal stamping manufacturing costs? Partner with suppliers who can guide you through tooling design, material selection, part optimization, and volume planning—ensuring quality, consistency, and value across your program's lifecycle.
With cost factors understood, the next consideration becomes where stamping delivers the most value: the industries and applications that depend on this process for everything from chassis components to consumer electronics.
Automotive and Industrial Applications of Metal Stamping
Understanding cost factors is essential—but where does metal stamping fabrication deliver the most value in real-world manufacturing? The answer spans virtually every industry you interact with daily, though one sector dominates: automotive manufacturing consumes more stamped components than any other industry by a significant margin.
From the structural skeleton protecting you in a collision to the bracket holding your smartphone's charging port, stamped metal components are everywhere. Let's explore where this process matters most—and why different industries demand vastly different specifications from their stamping partners.
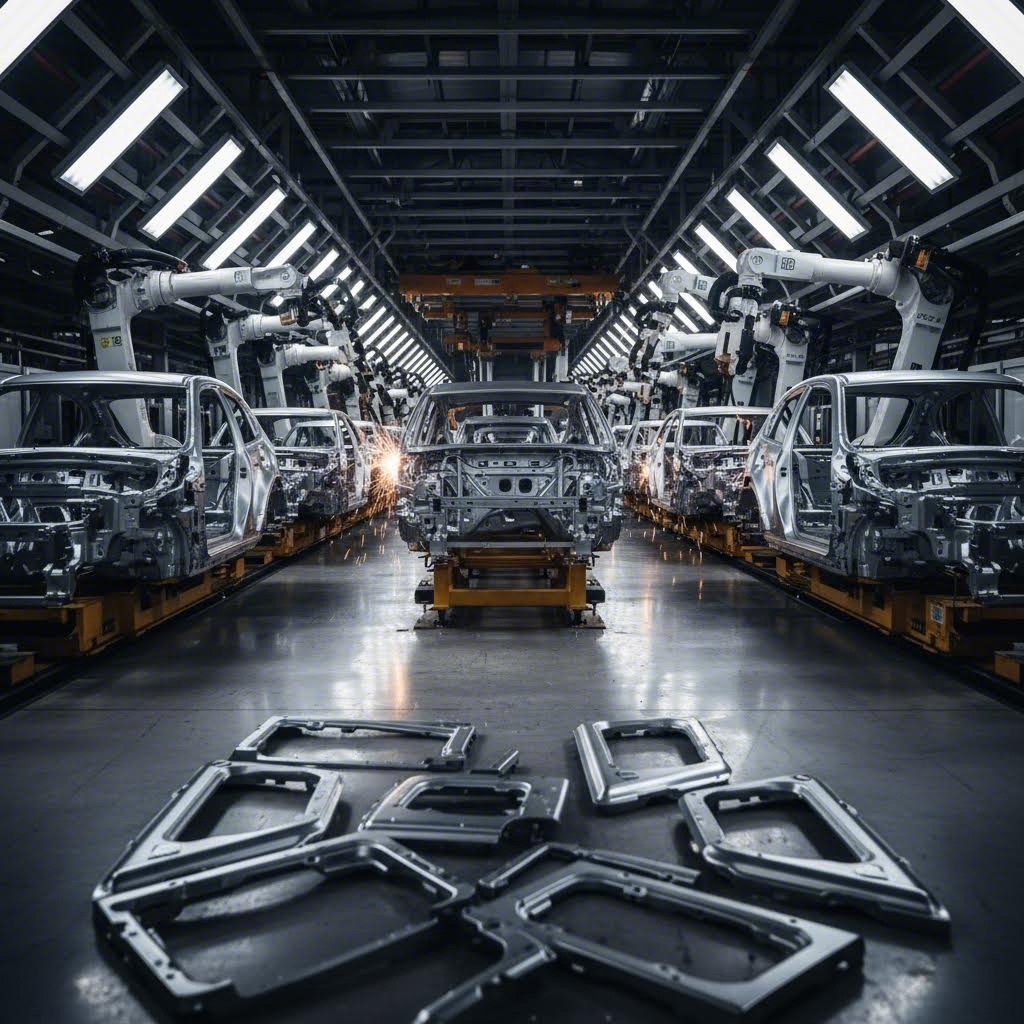
Automotive Stamping at Scale
Walk through any automotive assembly plant, and you'll witness industrial metal stamping at its most impressive scale. Modern vehicles contain hundreds of stamped steel parts and aluminum components—everything from massive body panels to tiny electrical terminals. According to Alsette, choosing the right metal for automotive stamping involves matching material properties like strength, weight, corrosion resistance, formability, and cost to each specific part's function and performance requirements.
The automotive industry's stamping requirements break down into distinct categories, each with unique material and performance demands:
Structural and Safety Components – This is where progressive stamped automotive parts literally save lives. The car's main frame—including A, B, and C pillars, roof rails, floor structures, and reinforcements—demands the highest strength materials available. Advanced High-Strength Steels (AHSS) dominate here because safety during a crash is the absolute priority. These components must protect occupants while absorbing impact energy effectively. Automotive stamping die technology has evolved specifically to form these ultra-high-strength materials without cracking or springback issues.
Body Panels and Exterior Components – Doors, hoods, trunk lids, fenders, and roof panels represent the visible face of automotive metal stamping. Here, formability and appearance take precedence alongside corrosion resistance. Complex styling curves require metals that shape without defects, while the finished surface must accept paint flawlessly. Aluminum has become increasingly popular for these applications—particularly in electric vehicles—because weight reduction directly translates to improved range and efficiency.
Chassis and Suspension Components – Control arms, subframes, and suspension mounts experience constant stress and vibration throughout the vehicle's life. High strength and fatigue resistance are non-negotiable—these parts cannot fail without catastrophic safety consequences. For manufacturers seeking reliable chassis and suspension component production, IATF 16949 certification has become the essential quality standard. Companies like Shaoyi (Ningbo) Metal Technology demonstrate how IATF 16949-certified facilities deliver the consistency automotive OEMs demand for these safety-critical stamping car parts.
Interior Structures – Seat frames, dashboard supports, and mounting brackets require moderate strength with cost efficiency. These components see less extreme stress than exterior or structural parts, allowing manufacturers to use simpler, less expensive steels while maintaining adequate performance.
From Chassis Components to Consumer Electronics
While automotive stamping commands the largest share of industry capacity, this versatile process serves virtually every manufacturing sector with unique requirements:
- Aerospace brackets and structural elements – Demanding the tightest tolerances and specialized alloys like titanium and Inconel. AS9100 certification is typically required, and every component must trace back to certified material lots. Weight optimization drives extensive use of aluminum and exotic alloys.
- Electronic enclosures and EMI shielding – Precision stamping creates the housings protecting sensitive circuitry while blocking electromagnetic interference. Tight dimensional control ensures proper fit with circuit boards, while material selection—often aluminum or specialized copper alloys—addresses thermal management and shielding effectiveness.
- Medical device housings and implant components – ISO 13485 certification governs quality requirements, with biocompatibility driving material selection toward stainless steel and titanium. Surface finish requirements are often more stringent than any other industry, and traceability documentation must be impeccable.
- Appliance components and consumer goods – High-volume production of washing machine drums, refrigerator panels, and cookware relies on stamping's cost efficiency. Corrosion resistance matters for kitchen applications, while deep draw capabilities create the seamless containers consumers expect.
- Electrical connectors and terminals – Copper stamping dominates this sector, producing the contacts and terminals that carry power and signals in everything from automobiles to data centers. Conductivity requirements dictate material choices, while miniaturization trends push precision capabilities to their limits.
- HVAC components and ducting – Galvanized steel stamping produces the brackets, flanges, and structural elements that support heating and cooling systems. Corrosion resistance and cost efficiency balance against moderate precision requirements.
- Construction hardware and fasteners – High-volume stamping of brackets, plates, and connectors serves building industries worldwide. Strength and corrosion resistance—often achieved through galvanizing—take priority over tight tolerances.
Industry-Specific Requirements Compared
What makes automotive components progressive stamping different from aerospace or medical stamping? The requirements vary dramatically across industries:
| Industry | Typical Tolerances | Common Materials | Key Certifications | Critical Requirements |
|---|---|---|---|---|
| Automotive | ±0.002" to ±0.010" | AHSS, HSLA steel, aluminum | IATF 16949 | Crash safety, weight reduction, high volume consistency |
| Aerospace | ±0.001" to ±0.005" | Titanium, aluminum, Inconel | AS9100, NADCAP | Weight optimization, fatigue resistance, full traceability |
| Medical Devices | ±0.001" to ±0.003" | Stainless steel, titanium | ISO 13485 | Biocompatibility, surface finish, sterilization compatibility |
| Electronics | ±0.001" to ±0.005" | Copper, aluminum, stainless | ISO 9001, IPC standards | EMI shielding, thermal management, miniaturization |
| Consumer Appliances | ±0.005" to ±0.015" | Cold-rolled steel, stainless | ISO 9001 | Cost efficiency, corrosion resistance, aesthetic finish |
These varying requirements explain why manufacturers often specialize in specific industries. A supplier excelling at automotive stamping—with deep expertise in AHSS forming and IATF 16949 processes—may not be the right choice for medical device components requiring different materials, tolerances, and documentation protocols.
Material Selection by Application
Each industry's functional requirements drive specific material choices. As noted in the Alsette analysis, the part's function dictates requirements—structural parts like chassis and pillars need high strength (AHSS), while exterior panels like doors and fenders need formability and corrosion resistance.
For automotive applications specifically:
- Body-in-white structure – AHSS grades up to 1500 MPa tensile strength for maximum crash protection with minimum weight
- Closure panels – Aluminum 5000 and 6000 series for weight savings on hoods, trunk lids, and doors
- Suspension components – HSLA and AHSS steels for fatigue resistance under repeated loading cycles
- Electrical systems – Copper alloys for connectors requiring conductivity and corrosion resistance
Understanding these industry-specific requirements helps you evaluate whether potential stamping partners have the right equipment, certifications, and expertise for your application. With applications and requirements understood, the final consideration becomes selecting the right manufacturing partner—and navigating the journey from initial concept to production-ready components.
Selecting the Right Metal Stamping Partner for Your Project
You've mastered the fundamentals of metal stamping fabrication, understood cost drivers, and identified your application requirements—now comes the decision that determines whether your project succeeds or struggles: choosing the right metal stamping manufacturer. According to Penn United Technologies, making a purchasing decision based solely on quoted cost may result in overall dissatisfaction with a supplier's performance, or even in a disastrous situation.
The difference between a responsive custom metal stamper and an unreliable supplier isn't always obvious from a quote. Let's break down what separates excellent stamping manufacturing partners from the rest—and how to navigate from initial inquiry to successful production.
Evaluating Potential Manufacturing Partners
When selecting metal stamping manufacturers for precision components, consider these critical evaluation criteria:
Years of Experience and Specialization – How long has the supplier been in business? More importantly, what types of components have they stamped successfully? A supplier specializing in flat parts may struggle with complex formed geometries. Take time to understand their expertise with tight tolerances, difficult materials, and intricate bends relevant to your application.
In-House Die Design and Build Capabilities – According to Penn United, a supplier who can design and build precision metal stamping dies will inevitably be much more qualified to succeed than one without these capabilities. In-house tooling means faster troubleshooting when issues arise—and they always do during production ramp-up.
Metal Stamping Equipment and Capacity – Evaluate the supplier's press tonnage range, bed sizes, and automation levels. Do they have the right metal stamping equipment for your part size and volume requirements? Modern servo presses offer advantages for complex forming, while mechanical presses excel at high-speed production.
Quality Certifications – ISO 9001 provides baseline quality assurance, but industry-specific certifications matter more. For automotive applications, IATF 16949 certification is essentially mandatory—it validates the organization's commitment to limiting defects, reducing waste, and maintaining consistent quality.
Process Control and Inspection Capabilities – Visit potential suppliers when possible. Observe their quality systems in operation, evaluate their inspection equipment investment, and understand how quality technicians participate in production oversight. A supplier officially tracking on-time delivery performance demonstrates systematic management.
Secondary Operations Capabilities – Can the supplier handle plating, cleaning, assembly, or custom automation? A metal stamping manufacturing partner offering secondary operations streamlines your supply chain logistics and reduces total costs compared to coordinating multiple vendors.
From Quote Request to Production Launch
Understanding the typical project workflow helps you plan timelines and prepare appropriate documentation. Here's how successful custom metal stamping services projects typically progress:
- Initial Inquiry and Documentation Submission – Provide complete CAD files (both PDF and STEP formats), material specifications, annual volume estimates, tolerance requirements, and any special finish or certification needs. According to Century-Tywood, sharing comprehensive information upfront is key to producing the most precise, cost-effective quote.
- Quote Review and Clarification – Quality suppliers ask detailed questions about part functionality, critical features, and tolerance priorities. This dialogue often reveals opportunities for cost savings through minor design modifications.
- Design for Manufacturability (DFM) Review – Engineering teams analyze your design for stamping compatibility, identifying potential issues with bend radii, hole placements, or material selection before tooling begins. Responsive metal stamping manufacturers like Shaoyi (Ningbo) Metal Technology offer comprehensive DFM support with 12-hour quote turnaround—ensuring you get expert feedback quickly when deadlines matter.
- Tooling Design and Approval – Once design is finalized, die engineering begins. Expect 4-12 weeks for tooling depending on complexity. Review and approve tool designs before steel cutting begins.
- Prototype and First Article Production – Initial samples validate tooling performance against specifications. First article inspection (FAI) documentation confirms dimensional accuracy before production approval. Leading suppliers offer rapid prototyping capabilities—some delivering initial samples in as few as 5 days—dramatically accelerating your time-to-market.
- Production Part Approval Process (PPAP) – For automotive and other regulated industries, formal documentation packages demonstrate process capability and quality system compliance.
- Full Production Release – With approvals complete, production ramps to target volumes with ongoing quality monitoring and delivery scheduling.
Why DFM Support and Rapid Prototyping Matter
Two capabilities separate adequate suppliers from exceptional partners: design engineering support and prototyping speed.
DFM Support – When stamping engineers review your design before tooling commitment, they catch issues that would otherwise require expensive die modifications or compromise part quality. As noted by Vantedge Medical, leveraging precision fabrication expertise ensures DFM optimization at every step. This collaborative approach often reduces both tooling costs and per-piece production costs.
Rapid Prototyping – Speed-to-first-part capability indicates a supplier's overall responsiveness and engineering agility. When you need to iterate quickly, partners offering rapid prototyping can run samples to the front of the line and troubleshoot rapidly—critical when development timelines are compressed.
Questions to Ask Before Committing
Before finalizing your metal stamping manufacturing partner selection, ensure you've addressed these critical topics:
- Die maintenance program – What preventive maintenance schedules are in place? Proper die care maximizes tool life and optimizes total lifecycle costs for your stamped components.
- Spare tooling discussion – According to Penn United, this often-overlooked topic is critical to stamping success. Require all bidders to address spare tooling costs and lead times upfront.
- On-time delivery tracking – Does the supplier officially measure and report delivery performance? If not, consider it a red flag.
- Running speeds and cycle times – Experienced suppliers run faster while maintaining quality, providing optimized pricing. Understand their capabilities relative to your volume requirements.
- Attention to detail – Notice supplier behavior during quoting. Those asking detailed questions about part quality, key features, and tolerances typically over-deliver on precision and consistency.
Selecting the right manufacturing partner transforms metal stamping from a transactional purchase into a strategic capability. With the right supplier relationship, you gain not just parts—but engineering expertise, quality assurance, and supply chain reliability that strengthen your competitive position across your product's entire lifecycle.
Frequently Asked Questions About Metal Stamping Fabrication
1. What is metal stamping and how does it work?
Metal stamping is a manufacturing process that transforms flat sheet metal into precisely shaped components using specialized dies and powerful presses. Unlike machining which removes material, stamping reshapes solid sheet metal through controlled force—performing operations like punching, blanking, bending, embossing, coining, and flanging. The process begins with CAD/CAM tooling design, followed by feeding sheet metal coils or blanks into stamping presses where dies and punches work together to form each component in milliseconds. This makes stamping faster, more economical, and ideal for high-volume production with consistent repeatability across millions of parts.
2. What is the difference between metal stamping and fabrication?
Metal stamping uses dies and presses to form sheet metal through operations like punching, bending, and blanking in a single or progressive sequence. Fabrication is a broader term encompassing multiple processes including cutting, welding, machining, and assembly to create finished products. Stamping excels at high-volume production of identical parts with tight tolerances, while fabrication often involves lower volumes with more complex assemblies. Stamping requires significant upfront tooling investment but delivers dramatically lower per-piece costs at scale, whereas fabrication offers flexibility for custom or prototype work without dedicated tooling.
3. How much does metal stamping cost?
Metal stamping costs depend on several interconnected factors. Tooling investment ranges from $5,000 for simple blanking dies to $100,000+ for complex progressive dies, with most projects falling between $15,000-$50,000. Per-piece costs decrease dramatically with volume—tooling amortized over 1,000 parts might add $25 per piece, but over 100,000 parts drops to just $0.25. Additional cost drivers include material selection, part complexity, tolerance requirements, and secondary operations. For volumes exceeding 50,000 pieces annually, stamping typically reduces costs 20-80% compared to laser cutting or CNC machining.
4. What materials are best for metal stamping?
The best stamping material depends on your application requirements. Carbon steel offers excellent formability at low cost for general applications. Stainless steel provides corrosion resistance for food equipment and medical devices but requires 50% more press tonnage. Aluminum delivers weight savings with natural corrosion resistance, ideal for aerospace and electronics. Copper and brass excel in electrical applications requiring conductivity. High-Strength Low-Alloy (HSLA) steel serves automotive structural components where strength-to-weight matters. Material thickness typically ranges from 0.005" to 0.250", with temper and grain direction affecting formability.
5. What industries use metal stamping the most?
Automotive manufacturing dominates metal stamping consumption, using stamped components for body panels, chassis, suspension, and structural safety parts. Electronics relies on stamping for enclosures, EMI shielding, and connectors. Aerospace uses precision stamping for brackets and structural elements with specialty alloys. Medical device manufacturers require stamped housings and implant components meeting strict biocompatibility standards. Consumer appliances, HVAC systems, and construction hardware also depend heavily on stamping for cost-effective, high-volume production. Each industry demands specific certifications—IATF 16949 for automotive, AS9100 for aerospace, and ISO 13485 for medical devices.