 Small batches, high standards. Our rapid prototyping service makes validation faster and easier —

Stainless Steel Sheet Fabrication: From Grade Selection To Flawless Finish

Understanding Stainless Steel Sheet Fabrication Fundamentals
Ever wondered how a flat piece of metal transforms into the surgical instruments in hospitals, the gleaming facades of modern buildings, or the exhaust systems in your car? The answer lies in stainless steel sheet fabrication—a process that shapes raw material into the functional components we rely on every day.
Whether you're an engineer specifying materials for a new project, a procurement professional sourcing components, or simply curious about manufacturing processes, understanding how this fabrication works gives you valuable insight into modern industrial production.
What Stainless Steel Sheet Fabrication Actually Means
At its core, stainless steel sheet fabrication is the process of transforming flat stainless steel sheets into finished parts and products. This involves a series of carefully controlled operations including cutting, bending, forming, welding, and finishing. Think of it as industrial origami—except instead of paper, you're working with metal that resists corrosion and maintains its strength under demanding conditions.
Sheet metal fabrication is the process of cutting, bending, and shaping steel alloy to create various products—a practice that has evolved over centuries with advancements in technology and changing industry needs.
The workflow typically follows a logical sequence. First, the stainless steel sheet is cut to size using techniques like laser cutting, plasma cutting, or waterjet cutting. Next, forming operations shape the flat material into three-dimensional components through bending, rolling, or stamping. If the design requires multiple pieces, welding joins them together. Finally, finishing processes—such as polishing, brushing, or passivation—enhance both appearance and performance.
Modern stainless steel metal fabrication relies heavily on computer-aided design (CAD) and computer-aided manufacturing (CAM) software. These technologies enable precise execution of complex designs, ensuring consistent quality across production runs. You'll find that today's fabricators combine traditional metalworking skills with digital precision to deliver results that meet exacting specifications.
Why This Process Powers Critical Industries
What makes metal fabrication with steel and stainless materials so essential? The answer comes down to the unique properties stainless steel offers: exceptional strength, remarkable durability, and outstanding resistance to corrosion.
Consider where you encounter fabricated stainless steel components:
- Medical and Healthcare: Surgical instruments, MRI scanner components, orthopaedic implants, and sterilization equipment all depend on stainless steel's ability to withstand repeated cleaning without degradation.
- Food Processing: From commercial kitchen equipment to brewing vats and packaging machinery, the non-reactive nature of stainless steel ensures food safety and hygiene compliance.
- Architecture and Construction: Cladding, balustrades, structural supports, and decorative features benefit from the material's aesthetic appeal and longevity.
- Energy Sector: Offshore platforms, chemical processing plants, and renewable energy installations require materials that perform reliably in harsh environments.
- Transportation: Exhaust systems, rail car interiors, and marine components all leverage stainless steel's durability.
Beyond its technical advantages, stainless steel brings environmental benefits. It's 100% recyclable and often manufactured using significant recycled content. Its longevity means fewer replacements over time, reducing waste and long-term costs.
This comprehensive guide will walk you through every stage of the fabrication process—from selecting the right grade for your application to achieving the perfect surface finish. You'll learn the practical considerations that separate successful projects from costly mistakes, giving you the knowledge to make informed decisions whether you're designing, specifying, or sourcing stainless steel components.
Choosing the Right Stainless Steel Grade for Your Project
Here's a scenario you might recognize: you've finalized your component design, selected a fabrication partner, and you're ready to move forward. Then comes the question that can make or break your project—which stainless steel grade should you specify?
This decision matters more than you might think. The wrong grade can lead to premature corrosion, fabrication difficulties, or unnecessary costs. The right choice balances performance requirements with budget constraints and ensures your finished product performs exactly as intended. Let's break down the key grades and what makes each one suitable for specific applications.
Grade 304 vs 316 for Fabrication Projects
When sourcing stainless steel sheets for fabrication, you'll most often encounter grades 304 and 316. Both belong to the austenitic family—characterized by their face-centered cubic crystal structure—which gives them excellent formability and weldability. However, their performance differs significantly in certain environments.
Grade 304 is the workhorse of the stainless steel world. According to industry sources, it's the most widely used grade, offering good formability, weldability, and corrosion resistance across various environments. When you're working with 304 stainless steel sheet metal, you'll appreciate its versatility. It performs well in food processing equipment, architectural panels, and household appliances. The chromium-nickel composition (typically 18% chromium and 8% nickel) creates that protective oxide layer that resists everyday corrosion challenges.
From a fabrication standpoint, 304 work hardens during forming operations. This means the material becomes harder and stronger as you bend or shape it—useful for final strength, but something to account for during processing. You may need to anneal between forming operations if your design requires multiple severe bends.
Grade 316 steps up when your application demands more. Enhanced with molybdenum (typically 2-3%), 316 stainless steel offers superior resistance to chlorides and pitting corrosion. If your components will encounter saltwater, coastal environments, or aggressive chemicals, 316 stainless steel sheet metal is often the necessary choice. Marine applications, chemical processing equipment, and pharmaceutical manufacturing commonly specify this grade.
The fabrication characteristics of 316 are similar to 304, though it can be slightly more challenging to machine. Both grades weld beautifully with TIG or MIG processes, and both accept a wide range of surface finishes. The primary trade-off? Cost. Expect to pay a premium of 20-40% more for 316 stainless steel plate compared to equivalent 304 material.
When to Choose 400-Series Stainless Steel
Not every project requires the premium performance of austenitic grades. Ferritic stainless steels—the 400 series—offer a compelling alternative when budget matters and environmental exposure is less demanding.
Grade 430 provides good corrosion resistance at a lower cost than austenitic options. Its body-centered cubic structure makes it magnetic—a property that matters for certain applications. You'll find 430 specified for automotive trim parts, appliance housings, and decorative applications where exposure to harsh chemicals or saltwater isn't a concern.
Fabrication considerations differ from austenitic grades. Grade 430 is less formable, meaning it doesn't bend as easily or accommodate as tight radii. Weldability is also reduced—proper technique and filler material selection become more critical. However, if your design requirements align with its capabilities, the cost savings can be substantial.
Grade 201 deserves mention as an economical alternative to 304. It substitutes manganese and nitrogen for some of the nickel content, reducing cost while maintaining reasonable performance. Consider 201 for indoor applications or environments with minimal corrosive exposure. Just be aware that work hardening is more pronounced, and corrosion resistance doesn't match true 300-series performance.
Stainless Steel Grade Comparison for Fabrication
When evaluating your options, this comparison helps clarify the trade-offs:
| Grade | Corrosion Resistance | Formability | Weldability | Cost Level | Best Applications |
|---|---|---|---|---|---|
| 304 | Good – resists most atmospheric and mild chemical environments | Excellent – accommodates complex shapes | Excellent – standard TIG/MIG methods | Moderate | Food equipment, architectural panels, general industrial |
| 316 | Superior – resists chlorides, pitting, and aggressive chemicals | Excellent – similar to 304 | Excellent – same methods as 304 | Higher (20-40% premium) | Marine, chemical processing, pharmaceutical |
| 430 | Moderate – suitable for mild environments, not chloride-resistant | Fair – less ductile than austenitic grades | Fair – requires proper technique and filler selection | Lower | Automotive trim, appliance housings, decorative |
| 201 | Fair – acceptable for indoor/mild exposure | Good – but higher work hardening rate | Good – similar to 304 with proper technique | Lower (nickel-reduced) | Indoor applications, cost-sensitive projects |
Making Your Grade Selection Decision
So how do you actually choose? Start with these key questions:
- What environment will the finished component encounter? Saltwater or chloride exposure pushes you toward 316. General atmospheric exposure often works fine with 304 or even 430.
- What forming complexity does your design require? Intricate shapes with tight bend radii favor austenitic grades. Simpler geometries open up ferritic options.
- What's your budget reality? If performance requirements can be met with a less expensive grade, why pay more? But don't cut corners if the application genuinely demands premium material.
- Are there industry-specific requirements? Food service, pharmaceutical, and medical applications often mandate specific grades for regulatory compliance.
Understanding these selection criteria puts you ahead of many competitors who simply list materials without explaining why one ss steel sheet might outperform another in specific circumstances. When you specify the right stainless steel plate or sheet for your project, you're setting the foundation for successful fabrication and long-term performance.
With your grade selected, the next critical decision involves how to cut your material—a choice that directly impacts edge quality, dimensional accuracy, and overall project costs.
Cutting Techniques That Define Fabrication Quality
You've selected the perfect grade for your application. Now comes a question that directly shapes your project's success: how to cut stainless steel sheet material with precision and efficiency? The cutting method you choose affects everything from dimensional accuracy to edge quality to overall production costs.
Understanding why each technique exists—and when to specify it—separates informed decision-making from guesswork. Let's explore the primary methods and the practical considerations that guide the best way to cut stainless steel for your specific needs.
Laser Cutting for Precision Stainless Work
When precision matters most, fiber laser cutting stands as the gold standard for stainless steel cutting operations. A focused beam of light melts through material with remarkable accuracy, producing clean edges that often require no secondary finishing.
What makes laser cutting particularly valuable for cutting stainless steel sheets? The answer lies in its combination of precision and repeatability. According to Cyrious Metal Works, laser cutting produces the smallest kerf of any common cutting method—approximately 0.3 mm. This minimal material removal means tighter nesting of parts, less waste, and exceptional dimensional accuracy.
The heat-affected zone (HAZ) with laser cutting remains relatively small compared to thermal alternatives. You'll notice cleaner edges with minimal discoloration, which matters when appearance or subsequent welding quality is critical. For thin materials and intricate designs, laser cutting delivers results that other methods simply cannot match.
Pros of Laser Cutting
- Smallest kerf width (around 0.3 mm) for maximum material utilization
- Exceptional precision suitable for complex geometries and tight tolerances
- Clean edges often requiring no secondary finishing
- Minimal heat-affected zone compared to plasma
- Excellent repeatability across production runs
Cons of Laser Cutting
- Thickness limitations—effectiveness decreases with thicker materials
- Higher equipment costs reflected in part pricing for simple jobs
- Reflective materials can present challenges with certain laser types
Matching Cutting Methods to Material Thickness
Thickness plays a decisive role in method selection. Here's how the primary options compare when you need to cut stainless steel of varying gauges:
Waterjet Cutting excels where thickness exceeds laser capabilities or when heat must be completely avoided. This cold-cutting process uses high-pressure water mixed with abrasive particles to slice through virtually any material thickness. Industry experts note that the thicker the material, the more likely a waterjet will be specified.
Pros of Waterjet Cutting
- No heat-affected zone—ideal for heat-sensitive applications
- Cuts thick materials that challenge other methods
- No work hardening at cut edges
- Kerf of approximately 0.9 mm offers good precision
Cons of Waterjet Cutting
- Slower cutting speeds than laser or plasma
- Higher operating costs due to abrasive consumption
- Wet process requires material handling considerations
Plasma Cutting offers speed and versatility for thicker stainless steel sheets, though with trade-offs in precision. The plasma arc produces a kerf of approximately 3.8 mm—significantly wider than laser or waterjet methods. This makes it less suitable for tight-tolerance work but valuable for rapid processing of heavier gauge material.
Pros of Plasma Cutting
- Fast cutting speeds for improved production throughput
- Handles a wide range of material thicknesses
- Lower operating costs than waterjet
- Effective for aluminum and various stainless alloys
Cons of Plasma Cutting
- Largest kerf (around 3.8 mm) reduces precision
- Larger heat-affected zone requiring edge cleanup
- Edge quality typically requires secondary treatment before welding
Mechanical Shearing remains relevant for straight cuts on thinner gauge material. While it cannot produce the complex profiles of CNC-controlled methods, shearing offers speed and economy for simple cuts. Expect some edge deformation and consider how this affects your downstream forming or finishing operations.
Best Practices for Quality Stainless Steel Cutting
Regardless of which method you choose, these practices help minimize work hardening and heat discoloration:
- Specify critical dimensions clearly. Tolerances tighter than standard manufacturing capabilities may require manual quote review or secondary machining operations.
- Account for kerf in your design. Most modern software automatically applies kerf offset, but verify this with your fabrication partner.
- Consider edge requirements. Will the cut edge be visible? Welded? Bent? Your answer influences method selection.
- Discuss taper correction for thick materials. Deep cuts can produce tapered edges; specialized equipment can compensate for this.
- Evaluate the heat-affected zone implications. If subsequent forming operations are planned, thermal cutting methods may increase work hardening at edges.
The cutting method you specify sets the stage for every operation that follows. With your material properly cut, the next challenge involves transforming those flat blanks into three-dimensional components through forming and bending operations.
Forming and Bending Stainless Steel Sheets
Imagine pressing a flat piece of stainless steel into a precise 90-degree angle, only to watch it spring back several degrees the moment you release pressure. Frustrating? Absolutely. But this behavior—called springback—is just one of the challenges that makes stainless steel forming a discipline unto itself.
Unlike mild steel or aluminum, stainless steel demands respect. Its unique sheet metal properties—high strength, excellent ductility, and pronounced work hardening—create forming challenges that require both technical understanding and practical experience to overcome. Master these fundamentals, and you'll transform flat sheets into complex stainless steel shapes with confidence.
Managing Springback in Stainless Steel Bending
Here's what actually happens when you bend stainless steel: the material near the inner surface compresses while the outer surface stretches. Between these zones lies the neutral axis—an imaginary plane that neither stretches nor compresses. When you release the forming pressure, the material's elastic properties cause it to partially return toward its original shape.
Stainless steel's high yield strength makes springback more pronounced and harder to predict than with other metals. A bend intended for 90 degrees might settle at 93 or 94 degrees without proper compensation. The solution? Overbending.
According to ADH Machine Tool, the most fundamental technique for managing springback involves bending the metal 1-3 degrees beyond your target angle, allowing it to spring back to the desired position. The exact compensation depends on several factors:
- Material thickness: Counterintuitively, thinner sheets often exhibit more springback because thicker materials undergo more complete plastic deformation during forming.
- Bend radius: Larger inside radii create shallower plastic deformation, increasing springback. Tighter radii reduce this effect but increase cracking risk.
- Die opening width: Industry practice suggests selecting a V-die opening 6-8 times the sheet thickness for optimal stainless steel bending results.
- Bending method: Bottoming (or coining) produces minimal springback by fully pressing material into the die, while air bending offers flexibility but requires more compensation.
For precision work, trial bending remains the most reliable approach. Create test pieces using the same material lot, measure results, and adjust your compensation accordingly before committing to production runs.
Forming Techniques for Complex Geometries
Beyond simple bends, formed stainless steel components often require sophisticated techniques to achieve complex shapes. Understanding when to apply each method helps you specify the right approach for your design requirements.
Press Brake Bending handles the majority of stainless steel forming work. Modern CNC press brakes accept programmed parameters for thickness, bend angle, and material grade, then automatically apply springback compensation. For sheets thicker than 6mm, expect to need significantly higher tonnage—according to industry calculations, stainless steel requires roughly twice the force of mild steel for equivalent bends.
Roll Forming suits applications requiring large-radius curves or continuous profiles. Three-roll systems bend sheets progressively, making this technique particularly valuable for long sections and thicker materials used in pipes, tubes, and curved architectural panels.
Deep Drawing transforms flat sheets into cup-shaped or box-shaped components through controlled radial drawing. This process demands careful attention to lubrication, blank holder pressure, and draw ratios to prevent wrinkling or tearing.
Critical Forming Considerations
Success in stainless steel forming depends on addressing these key factors before production begins:
- Grain direction matters enormously. Always bend perpendicular to the rolling direction when possible. Bending parallel to grain concentrates stress along fragile boundaries, dramatically increasing cracking risk. If design constraints require with-grain bending, increase your bend radius by at least 50%.
- Minimum bend radius varies by grade. Austenitic grades like 304 typically accommodate radii equal to material thickness (1T), while ferritic 430 may require 1.5T or larger to prevent outer-surface cracking.
- Calculate bend allowance accurately. The formula BA = A × (π/180) × (R + K × T) accounts for the arc length along the neutral axis, where A is bend angle, R is inside radius, K is the K-factor, and T is thickness. Most CAD/CAM systems handle this automatically, but understanding the principle helps troubleshoot dimensional issues.
- K-factor values for stainless steel typically range from 0.42-0.48 in air bending—higher than softer materials because the neutral axis shifts less toward the compressed inner surface.
- Tooling selection impacts results. Dies for steel and sheet metal forming must be heat-treated to withstand stainless steel's hardness. Punch tip radius should match your target inside bend radius to prevent surface marking.
- Surface protection prevents damage. For brushed or mirror finishes, place protective polyurethane film between material and tooling, or use non-marking dies with nylon inserts.
Thickness Ranges and Tolerance Guidelines
Different thickness ranges require adjusted approaches:
Thin sheets (under 1.5mm) bend easily but risk wrinkling or distortion. Use appropriate blank holder pressure and consider whether your design geometry creates unsupported areas prone to deformation.
Medium thickness (1.5-6mm) represents the sweet spot for most press brake operations. Springback compensation becomes more predictable, and material handles standard forming processes well.
Heavy gauge (over 6mm) demands significantly higher tonnage, larger bend radii (minimum 1.5× thickness), and wider V-die openings. Hot forming may be necessary for the thickest materials or tightest radii.
For dimensional tolerances, according to Protolabs, a 0.030 in. (0.762mm) bend radius works well for approximately 95% of sheet metal parts. Their standard tooling accommodates internal radii from 0.010 in. (0.254mm) up to 0.250 in. (6.35mm), but specifying the same radius across all flanges on a part reduces setups and lowers costs.
One often-overlooked detail: plan for bend reliefs wherever two flanges meet. These small notches—roughly 0.030 in. (0.762mm) wide—prevent material from bulging outward at corners. Most CAD systems add these automatically, but verify their presence before submitting designs for fabrication.
With your components successfully formed into their three-dimensional shapes, the next challenge involves joining multiple pieces together—a process where proper technique determines both structural integrity and visual quality.
Welding and Joining Methods for Stainless Steel
You've cut your material precisely and formed it into the required shape. Now comes the moment of truth: joining those components together without compromising the very properties that make stainless steel valuable. The challenge? Welding stainless steel isn't just about fusing metal—it's about preserving corrosion resistance, maintaining structural integrity, and achieving the finish quality your application demands.
The stainless steel process for welding differs significantly from regular carbon steel. Apply too much heat, and you'll create discoloration that ruins aesthetics. Use improper shielding, and you'll introduce contamination that compromises corrosion resistance. Understanding the nuances of each method helps you specify the right approach and avoid costly rework.
TIG vs MIG Welding for Stainless Steel Sheets
When comparing tig vs mig welding for stainless steel fabrication, the decision often comes down to material thickness, production volume, and finish requirements. Both methods have their place, but they serve different purposes.
TIG Welding (GTAW) stands as the preferred choice for thin stainless steel sheets. Why? According to industry data, TIG welding achieves weld tolerances within ±0.05mm—precision that matters when you're working with visible components or critical assemblies. The process uses a non-melting tungsten electrode and 100% argon shielding gas to create welds that are virtually spatter-free.
For materials between 0.5mm and 5mm thick, TIG welding delivers:
- Exceptional control over heat input, minimizing the heat-affected zone
- Clean, aesthetically pleasing welds that often need no post-weld finishing
- Superior weld density with post-weld strength reaching approximately 95% of the parent material
- Precise filler metal placement for consistent bead appearance
The trade-off? Speed. TIG welding operates at roughly 5-10cm per minute on thin stainless sheets, compared to significantly faster rates with MIG. When welding steel to stainless steel or joining dissimilar metals, TIG's precise heat control becomes even more critical.
MIG Welding (GMAW) makes sense when production efficiency matters and material thickness exceeds 1mm. The continuous wire feed mechanism enables welding speeds 2-5 times faster than TIG, according to manufacturing studies. For automotive components, structural assemblies, and high-volume production, this speed advantage translates directly into cost savings.
MIG welding characteristics for stainless steel include:
- Semi-automatic operation requiring less operator skill than TIG
- Higher deposition rates for thicker materials and longer welds
- Weld strength reaching more than 90% of parent material
- Potential for spatter requiring post-weld cleanup on cosmetic surfaces
When should you choose mig vs tig welding? Consider MIG when your stainless steel steel components exceed 3mm thickness, when production volume demands faster cycle times, or when the weld will be hidden or ground smooth afterward.
Welding Method Comparison for Stainless Steel Fabrication
| Method | Best Thickness Range | Heat Input | Skill Level Required | Finish Quality |
|---|---|---|---|---|
| TIG (GTAW) | 0.5mm - 5mm | Low to moderate, highly controllable | High—requires both hands and foot pedal coordination | Excellent—smooth, spatter-free welds |
| MIG (GMAW) | 1mm and above | Moderate to high | Moderate—semi-automatic operation | Good—may require grinding on visible surfaces |
| Spot Welding | 0.5mm - 3mm (sheet-to-sheet) | Concentrated, brief pulses | Low to moderate—automated systems common | Localized marks—best for hidden joints |
| Mechanical Fastening | Any thickness | None—cold joining process | Low—standard assembly skills | Visible fastener heads unless countersunk |
Preventing Weld Contamination and Discoloration
Here's where stainless steel welding gets tricky: the same chromium that creates corrosion resistance can work against you during welding. When temperatures exceed approximately 450°C, chromium migrates to grain boundaries and combines with carbon, forming chromium carbides. This phenomenon—called sensitization or carbide precipitation—depletes chromium from surrounding areas and creates zones vulnerable to corrosion.
Preventing these problems requires attention to several factors:
Shielding Gas Selection directly affects weld quality. For TIG welding stainless steel, 100% argon remains the standard choice. According to welding specialists, using CO₂-containing mixtures (common in mild steel MIG welding) causes excessive oxidation and compromises corrosion resistance. One test showed that welding 304 stainless with a 75/25 argon-CO₂ mix resulted in excessive spatter and weld discoloration.
For MIG welding stainless, specify gas blends formulated specifically for austenitic stainless—typically argon with small additions of oxygen (1-2%) or helium for improved arc characteristics.
Heat Input Management keeps sensitization at bay:
- Use the lowest amperage that produces acceptable fusion
- Employ stringer beads rather than weave patterns to minimize heat concentration
- Allow interpass cooling—never weld on material that's too hot to touch
- Consider pulse welding modes that reduce average heat input while maintaining penetration
Contamination Prevention starts before the arc strikes. As noted by fabrication experts, stainless steel's protective chromium oxide layer can be compromised when free iron contaminates the surface. This means:
- Use dedicated stainless steel brushes—never use brushes previously used on carbon steel
- Clean surfaces with acetone or stainless-safe solvents before welding
- Store stainless steel separately from carbon steel to prevent cross-contamination
- Use stainless steel or aluminum clamps rather than carbon steel tooling
Post-Weld Treatments restore what welding takes away. Passivation—treating the welded surface with nitric or citric acid solutions—removes free iron and allows the chromium oxide layer to regenerate. For visible components, mechanical finishing (grinding, polishing) followed by passivation produces optimal results.
Heat discoloration (that rainbow effect around welds) indicates oxide formation. While sometimes acceptable, it often requires removal through pickling, electropolishing, or mechanical abrasion depending on your application requirements.
Additional Joining Methods Worth Considering
Spot Welding (resistance welding) joins overlapping sheets without filler material by applying electrical current and pressure. It's fast, consistent, and easily automated—ideal for production environments assembling sheet assemblies. The weld zone remains small, minimizing distortion, though the technique works best on thinner materials and leaves visible marks on one or both surfaces.
Mechanical Fastening using stainless steel hardware avoids welding challenges entirely. Rivets, screws, bolts, and clinching all create strong joints without heat-related concerns. Consider these approaches when components require disassembly for maintenance, when heat distortion would be unacceptable, or when joining stainless to dissimilar materials that don't weld compatibly.
Selecting the right joining method establishes structural integrity, but the work isn't complete until you address the surface. Proper finishing enhances both appearance and performance—a topic that deserves careful consideration for any stainless steel fabrication project.

Surface Finishing Options and Their Applications
Your fabrication work is complete—components are cut, formed, and welded to specification. But here's what separates adequate results from exceptional ones: the surface finish. Far from being merely cosmetic, the finish you select directly impacts corrosion resistance, cleanability, and long-term performance in your specific environment.
When sourcing stainless steel from a reliable supplier, it's important to look beyond grade and gauge. According to Mill Steel, the finish affects not just appearance but also how material behaves during fabrication—especially when bending, welding, or cleaning. Understanding these options helps you make smarter decisions and avoid costly mistakes.
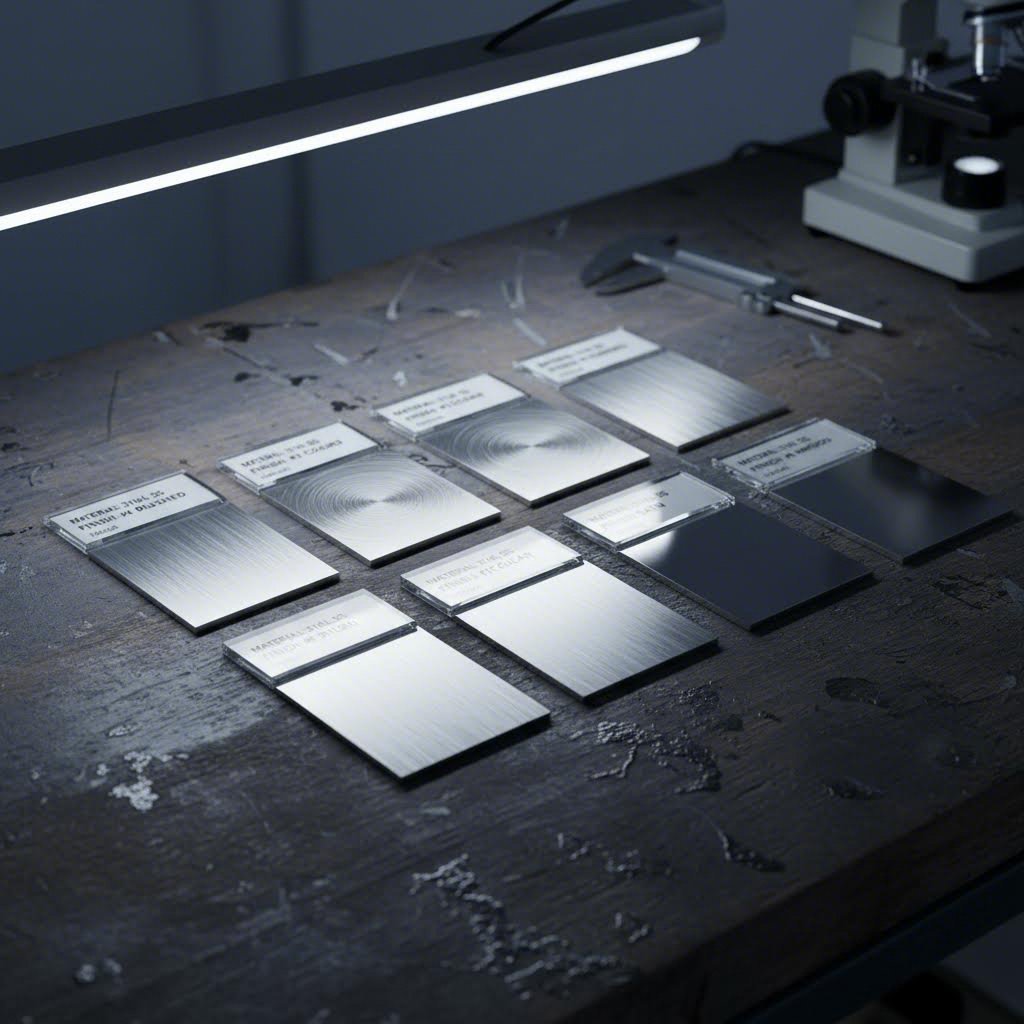
Brushed vs Polished Stainless Finishes
Walk into any commercial kitchen or modern office lobby, and you'll see the two most popular mechanical finishes in action. But which one belongs in your project?
Brushed stainless steel sheet metal features a distinctive linear grain pattern created by abrading the surface with progressively finer materials. This brushed stainless sheet finish offers practical advantages beyond aesthetics:
- Conceals fingerprints, scratches, and minor surface imperfections
- Provides a soft, non-reflective appearance suitable for professional environments
- Easier to maintain in high-traffic applications
- Lower cost than mirror polish while maintaining visual appeal
Polished stainless steel sheet metal undergoes additional buffing stages to achieve reflective surfaces ranging from satin to full mirror. The higher the polish number, the smoother and more reflective the finish:
- No. 3 Finish: Semi-decorative with visible grain lines—useful when appearance matters but perfection isn't required
- No. 4 Finish: The most common brushed finish, offering excellent balance of aesthetics, functionality, and cost
- No. 6 Finish: Soft satin glow with finer grain than No. 4—ideal when you want subtle elegance
- No. 7 Finish: Highly reflective but not quite mirror—an intermediate step used for decorative applications
- No. 8 Finish: Full mirror polish—chosen when aesthetics and prestige matter most
For food service applications, No. 4 brushed finish dominates because it's easy to clean while hiding wear. Architectural installations often specify No. 8 mirror polish for dramatic visual impact, though maintenance demands increase significantly.
How Passivation Enhances Corrosion Resistance
Here's something that surprises many people: stainless steel can rust. When free iron contaminates the surface during fabrication—from cutting tools, grinding wheels, or even contact with carbon steel fixtures—it creates weak points in the protective chromium oxide layer.
Passivation restores what fabrication takes away. According to Birmingham Fastener, this chemical treatment involves placing steel parts into a nitric or citric acid bath at controlled temperature and time. The acid dissolves free iron and other contaminants from the surface, allowing the natural chromium oxide layer to regenerate uniformly.
Key characteristics of passivation:
- Produces a clean finish with enhanced corrosion resistance
- Results in a dull, silver-colored appearance (not shiny)
- Costs approximately one-third less than electropolishing
- Effective on most stainless grades, though not recommended for certain alloys
- May require pre-cleaning when heavy contamination exists
Electropolishing takes chemical treatment further. This process submerges components in a temperature-controlled bath while electrical current passes through, causing the surface to shed contaminants and smooth out imperfections. The result? According to industry data, electropolishing produces greater corrosion resistance than passivation, along with a visibly brighter finish.
When should you specify electropolishing over passivation? Consider it for pharmaceutical equipment, medical devices, or any application where maximum corrosion resistance and surface smoothness justify the additional cost.
Coating Options and Specialized Treatments
Beyond mechanical and chemical finishes, coatings extend stainless steel's capabilities into environments where even its natural properties need reinforcement.
Powder coating services apply durable color finishes to stainless components. While stainless steel rarely needs coating for corrosion protection, powder coat finishes serve aesthetic purposes—matching corporate colors, creating visual contrast, or providing textured surfaces. The coating also adds an extra barrier in extremely aggressive environments.
Unlike anodized aluminum (where the anodizing process creates an integral oxide layer), powder coating on stainless sits atop the base metal. Proper surface preparation—typically abrasive blasting followed by chemical cleaning—ensures adhesion.
Matching Finishes to Applications
How do you choose the right finish? Consider your operating environment and functional requirements:
- Food Service: No. 4 brushed finish with passivation—easy to clean, hides wear, meets sanitary requirements
- Architectural Exteriors: No. 4 or No. 6 for urban environments; consider electropolishing in coastal locations for maximum corrosion resistance
- Medical Equipment: Electropolished surfaces minimize bacterial adhesion and withstand repeated sterilization
- Industrial Equipment: Mill finish (2B) often suffices where appearance doesn't matter; passivate if corrosion exposure is significant
- Decorative Features: No. 7 or No. 8 mirror polish for maximum visual impact—accept the maintenance commitment
Remember that finish selection happens early in the fabrication process. Material ordered with a specific mill finish may need additional processing to achieve your target appearance, adding cost and lead time. Discuss finish requirements with your fabrication partner before production begins.
With surface finishing complete, your components are ready for inspection. But how do you verify that fabrication meets specification? Understanding quality standards and inspection methods ensures your stainless steel parts perform as intended.
Quality Standards and Inspection in Stainless Fabrication
Your stainless steel parts look perfect—but how do you know they'll perform as expected? Visual inspection tells only part of the story. Behind every reliable stainless steel component lies a framework of quality standards, testing protocols, and certification requirements that separate professional-grade fabrication from guesswork.
This is where many buyers encounter a knowledge gap. Competitors often skip over quality standards entirely, yet understanding these requirements protects you from receiving substandard parts that fail in service. Whether you're sourcing stainless steel parts for automotive assemblies, medical devices, or industrial equipment, knowing what certifications matter—and why—puts you in control.
Industry Standards That Ensure Fabrication Quality
Stainless steel manufacturing operates within a structured ecosystem of standards established by organizations like ASTM, ASME, and AWS. These aren't arbitrary bureaucratic requirements—they represent decades of accumulated knowledge about what makes stainless steel perform reliably.
According to industry resources, ASTM stainless steel standards classify and regulate materials based on composition, mechanical properties, and intended applications. The most commonly referenced specifications include:
- ASTM A240: Standard Specification for Chromium and Chromium-Nickel Stainless Steel Plate, Sheet, and Strip—the foundational standard for sheet fabrication projects
- ASTM A276: Standard Specification for Stainless Steel Bars and Shapes
- ASTM A312: Standard Specification for Seamless, Welded, and Heavily Cold Worked Austenitic Stainless Steel Pipes
- AWS D1.6: Structural Welding Code for Stainless Steel—governing welding procedures, welder qualifications, and inspection requirements
For stainless steel components manufacturers serving automotive markets, IATF 16949 certification demonstrates adherence to rigorous quality management principles specific to that industry. This certification integrates with ISO 9001 requirements while adding automotive-specific controls for production planning, supplier management, and continuous improvement.
Why does certification matter? Manufacturing stainless steel to documented standards ensures consistency across production runs. When a fabricator holds relevant certifications, you gain confidence that their processes have been independently verified—not just claimed.
Inspection Methods for Stainless Steel Parts
Quality verification happens at multiple stages throughout fabrication. Understanding these checkpoints helps you ask the right questions when evaluating potential stainless steel parts manufacturers.
Key quality checkpoints throughout the fabrication process include:
- Incoming Material Verification: Confirming that received material matches mill test reports (MTRs) for grade, dimensions, and mechanical properties
- In-Process Dimensional Checks: Measuring critical features after cutting, forming, and welding operations against specified tolerances
- Visual Weld Inspection: Examining welds for surface defects, undercut, porosity, and proper penetration
- Non-Destructive Testing (NDT): Using techniques like dye penetrant, ultrasonic, or radiographic inspection to detect subsurface flaws without damaging parts
- Final Dimensional Inspection: Verifying completed assemblies against engineering drawings using calibrated measurement equipment
- Surface Finish Verification: Confirming that passivation, polishing, or other treatments meet specified requirements
According to certification specialists, common testing methods include tensile testing (measuring strength and elongation), hardness testing (using Rockwell, Brinell, or Vickers scales), and corrosion resistance testing for applications exposed to aggressive environments.
For welded assemblies, positive material identification (PMI) testing verifies that base metals and filler materials match specifications—critical when mixing similar-looking grades could compromise performance.
Material Traceability and Documentation
Sounds complex? Here's why it matters: if a component fails in service, traceability allows you to identify the material source, fabrication date, and processing parameters. This information proves essential for root cause analysis and preventing recurrence.
Professional stainless steel manufacture maintains documentation linking finished parts to:
- Mill Test Reports (MTRs): Documents from the producing mill showing chemical composition and mechanical properties, each matched to a unique heat number
- Certificates of Conformance (COCs): Declarations that materials meet specified purchase requirements for dimensions, grade, finish, and tolerance
- Welding Procedure Specifications (WPS): Documented parameters for welding operations, including filler materials, shielding gases, and heat input ranges
- Welder Qualification Records: Verification that personnel performing welds have demonstrated proficiency per applicable codes
- Inspection Reports: Records of dimensional measurements, NDT results, and visual inspection findings
When evaluating fabrication partners, ask how long they retain certification records and whether documentation can be retrieved for previous orders. Reputable stainless steel components manufacturers archive this information and can provide it on request.
What Certifications to Look For
Not all certifications carry equal weight for every application. Focus your evaluation on credentials relevant to your industry and quality expectations:
- ISO 9001: The baseline quality management system standard—expect this as minimum qualification for serious fabricators
- IATF 16949: Essential for automotive supply chain participation; demonstrates automotive-specific quality controls
- AS9100: Required for aerospace applications; adds traceability and risk management requirements beyond ISO 9001
- FDA Registration: Necessary for fabricators supplying medical device or pharmaceutical equipment components
- ASME Certification: Required for pressure vessel fabrication; indicates capability for code-stamped work
Third-party certification means an independent auditor has verified compliance—not just the fabricator claiming adherence. Request copies of current certificates and verify their validity dates before committing to production orders.
Understanding quality standards positions you to evaluate fabrication partners effectively. But quality represents just one factor in successful project execution—cost considerations and budget optimization strategies deserve equal attention as you move toward production.
Cost Factors and Budget Optimization Strategies
Here's a reality check: even the most beautifully designed stainless steel component means nothing if it blows your budget. Understanding what drives fabrication costs—and knowing how to optimize without sacrificing quality—separates projects that succeed from those that stall in procurement.
The good news? Many cost factors are within your control. By making informed decisions during design and specification phases, you can significantly reduce per-part costs while maintaining the performance characteristics your application demands. Let's break down where your money actually goes in custom stainless steel parts production.
Key Cost Drivers in Stainless Steel Projects
According to precision fabrication specialists, several interconnected factors determine what you'll pay for custom stainless steel products. Understanding their relative impact helps you prioritize where optimization efforts will yield the greatest returns.
- Material Type and Thickness: As covered earlier, 316 stainless costs 20-40% more than 304. But thickness matters equally—thicker materials require longer cutting times, higher tonnage for forming, and more heat input during welding. A component designed at 3mm when 2mm would suffice adds cost at every fabrication stage.
- Design Complexity: Parts with multiple bends, intricate cutouts, or tight tolerances demand more programming, setup, and inspection time. A bracket requiring eight bends costs substantially more than one requiring three, even if material usage is identical.
- Production Volume: This one trips up many buyers. A single prototype or small batch run costs significantly more per unit than production quantities because setup and programming time gets spread across fewer parts. The jump from 10 pieces to 100 pieces often reduces per-unit cost by 40% or more.
- Tolerances and Quality Requirements: Tighter tolerances mean slower machining speeds, more frequent inspections, and advanced measuring equipment. Specifying ±0.1mm when ±0.5mm would function identically adds cost without adding value.
- Finishing and Surface Treatment: A No. 4 brushed finish costs less than mirror polish. Passivation adds cost. Electropolishing adds more. Each finishing step requires time, labor, and materials—factor these into your budget early.
- Assembly and Secondary Operations: Welding sub-assemblies, inserting fasteners, or integrating machined parts all add labor hours and inspection points. Projects requiring multiple operations from multiple vendors compound these costs through logistics and coordination overhead.
- Lead Times and Scheduling: Rush orders requiring overtime or schedule adjustments carry premium charges. Planning ahead allows manufacturers to balance workload efficiently, reducing your final invoice.
Design Strategies That Reduce Fabrication Costs
Smart design decisions made before fabrication begins deliver the most significant cost savings. Consider these practical optimization approaches:
Simplify geometry where possible. Every additional bend, hole, or feature adds setup time and potential for error. Ask yourself: does this complexity serve a functional purpose, or is it legacy from an earlier design iteration? Eliminating unnecessary features reduces both fabrication cost and failure points.
Standardize bend radii across your design. When all bends share the same inside radius, fabricators complete the part in a single setup rather than changing tooling repeatedly. This small design choice can reduce forming costs by 15-25%.
Optimize material utilization. When ordering custom steel sheet or sheet metal cut to size, consider how your parts nest on standard sheet dimensions. A design that yields 12 parts per sheet costs less per unit than one yielding 10 parts with the same waste percentage.
Specify only the tolerances you need. General fabrication tolerances (typically ±0.5mm for cut dimensions, ±1° for bends) cost less than precision specifications. Reserve tight tolerances for mating surfaces and critical features—apply standard tolerances everywhere else.
Choose finishes appropriate to function. Mirror polish on surfaces that will be hidden or worn increases cost without adding value. Match finish specifications to actual visibility and performance requirements.
Leverage DFM (Design for Manufacturability) support. Professional fabrication partners like Shaoyi provide comprehensive DFM support and rapid quote turnaround—often within 12 hours—to help identify cost optimization opportunities before production begins. Their engineers can suggest design modifications that reduce fabrication difficulty while maintaining functional requirements.
Prototype vs. Production Cost Structures
The economics of prototyping differ fundamentally from production runs. Understanding this distinction prevents sticker shock and enables smarter project planning.
Prototype quantities (typically 1-10 pieces) absorb the full burden of programming, fixture creation, and first-article inspection. These non-recurring engineering (NRE) costs may represent 50-70% of your prototype invoice. The parts themselves account for only a fraction of what you pay.
Low-volume production (10-100 pieces) begins spreading NRE costs more efficiently. Per-unit pricing drops significantly as setup time gets amortized across more parts. However, you're still paying premium rates compared to true production quantities.
Production volumes (100+ pieces) unlock economies of scale. Automated processes become cost-effective, setup time per part approaches zero, and material purchasing power improves. The cost curve flattens as volume increases, with diminishing returns beyond certain thresholds depending on part complexity.
When budgeting, consider whether steel sheet cut to size for prototyping should match production material exactly, or whether similar grades could validate your design at lower cost. Some fabricators offer rapid prototyping services—5-day turnaround is achievable with the right partner—that use streamlined processes specifically optimized for low quantities.
Balancing Quality Requirements with Budget Constraints
Cost optimization doesn't mean cutting corners. Rather, it means allocating resources where they deliver value and eliminating waste where they don't.
Start by categorizing your requirements into three tiers:
- Critical requirements: Specifications where deviation causes functional failure or safety concerns—never compromise here
- Important requirements: Features that affect performance or aesthetics but have some flexibility—optimize here through creative design solutions
- Nice-to-have requirements: Specifications inherited from previous designs or added "just in case"—challenge these ruthlessly
For stainless steel custom components, consider whether your application truly requires 316 grade when 304 would perform adequately. Evaluate whether electropolishing is necessary or if standard passivation provides sufficient corrosion protection. Question whether the tightest tolerance callout applies to every dimension or only to critical interfaces.
Transparent communication with your fabrication partner enables this optimization. Share your functional requirements, not just your drawing specifications. When fabricators understand why you need certain features, they can often suggest alternatives that meet performance needs at lower cost.
With cost factors understood and optimization strategies in hand, the final piece of your fabrication puzzle involves selecting the right partners—both for material sourcing and fabrication services. The next section covers what to look for when evaluating potential suppliers and fabricators for your custom cut stainless steel projects.
Selecting Fabrication Partners and Material Sources
You've optimized your design, specified the right grade, and budgeted appropriately. Now comes a decision that determines whether all that preparation pays off: choosing who actually makes your parts. The wrong fabrication partner can turn a well-designed project into a nightmare of delays, quality issues, and cost overruns. The right one becomes a long-term asset to your supply chain.
Whether you're searching for metal fabrication near me or evaluating steel fabricators across the country, the selection criteria remain consistent. Let's examine what separates reliable stainless sheet metal fabrication partners from those who merely claim capability.
Evaluating Fabrication Partner Capabilities
Before requesting quotes, establish a clear framework for assessment. According to industry experts, true value lies in the fabricator's capabilities, reliability, and ability to meet your project requirements from start to finish—not just the lowest price on paper.
Key evaluation criteria for fabrication shops near me or distant suppliers include:
- Equipment Capabilities: Verify the shop has necessary equipment—CNC machinery, press brakes, automated welders, or laser cutters—and staff trained to operate them. Ask about machine age, maintenance schedules, and backup equipment for critical processes.
- Material Expertise: Not every shop works with all metals. Confirm the fabricator specializes in stainless steel and understands its unique fabrication challenges. Request examples of similar projects they've completed.
- Certifications: Look for ISO 9001 as a baseline. Industry-specific certifications—ASME, AWS, or IATF 16949 for automotive—indicate verified quality systems. Ask for current certificates and verify validity dates.
- Integrated Services: If you want a one-stop shop, choose a fabricator offering design, engineering, fabrication, assembly, and installation under one roof. This reduces coordination overhead and communication gaps.
- Lead Time Performance: Request historical on-time delivery data, not just quoted lead times. Reliable metal fabricators near me track and can share this metric.
- Quality Systems: Beyond certifications, understand their inspection processes, documentation practices, and how they handle non-conforming parts. Internal testing capabilities can speed up timelines significantly.
When evaluating stainless steel metal suppliers for raw material, apply similar rigor. Verify they can provide mill test reports, maintain proper storage conditions, and offer the grades and finishes your project requires.
From Prototype to Production-Scale Sourcing
The fabrication partner ideal for prototyping may differ from your production-scale choice. Understanding what to look for at each stage prevents costly transitions and relationship changes mid-project.
During prototyping, prioritize:
- Rapid turnaround—days, not weeks—to support design iteration cycles
- Flexibility to accommodate design changes without extensive requoting
- Engineering input that identifies potential production issues before they become expensive problems
- Small-batch capability without prohibitive minimum order quantities
For automotive supply chains, manufacturers like Shaoyi (Ningbo) Metal Technology exemplify what to seek: 5-day rapid prototyping capability combined with IATF 16949 certification and automated mass production capacity. This combination allows seamless scaling from prototype validation through full production without changing partners.
For production volumes, evaluation shifts toward:
- Capacity to meet your volume requirements without straining the fabricator's resources
- Automated processes that ensure consistency across thousands of parts
- Statistical process control and continuous improvement programs
- Supply chain resilience—secondary suppliers, safety stock policies, and disaster recovery plans
- Cost structure that rewards volume commitment with appropriate pricing tiers
The transition between stages deserves special attention. Ask potential partners how they handle scale-up, what production tooling investments are required, and whether prototype tooling can migrate to production use.
Industry-Specific Requirements
Your application determines which capabilities matter most. Stainless steel sheet metal fabrication for a restaurant kitchen differs fundamentally from components destined for automotive chassis or hospital equipment.
Automotive Applications: According to certification specialists, IATF 16949 certification is essential for automotive supply chain participation. This quality management system adds automotive-specific controls for production planning, supplier management, and continuous improvement beyond standard ISO 9001 requirements. Seek partners with proven experience in chassis, suspension, and structural components—not just general metal fabrication.
Food Service and Processing: FDA compliance, sanitary design principles, and experience with food-contact surface finishes separate qualified fabricators from generalists. Verify understanding of crevice-free design, weld quality requirements for cleanability, and appropriate finish specifications.
Architectural Applications: Large-format handling capability, finish consistency across panels, and installation support become critical. Seek fabricators experienced with architectural tolerances and who understand how fabricated components integrate with building systems.
Medical and Pharmaceutical: Electropolishing capability, clean room practices for final handling, and documentation supporting validation requirements distinguish qualified suppliers. Material traceability becomes non-negotiable.
When selecting a stainless steel plate supplier or sheet provider, ensure they understand your industry's specific requirements. The best material means nothing if handled improperly or lacking required documentation.
Making Your Final Selection
With evaluation complete, narrow your choices based on demonstrated capability, not just claims. Request references from customers in similar industries. Visit facilities when practical—shop floor conditions reveal more than any brochure. Trust your observations about organization, equipment condition, and how staff respond to questions.
Remember that the lowest quote rarely represents the best value. Factor in quality costs, communication efficiency, and the hidden expense of managing difficult supplier relationships. The right stainless steel fabrication partner becomes an extension of your engineering team—contributing expertise, catching problems early, and delivering consistent results that let you focus on your core business.
Frequently Asked Questions About Stainless Steel Sheet Fabrication
1. What is the best way to cut stainless steel sheet?
The best cutting method depends on your specific requirements. Laser cutting offers exceptional precision with minimal kerf (approximately 0.3mm) and clean edges for thin materials. Waterjet cutting eliminates heat-affected zones entirely, making it ideal for heat-sensitive applications or thick materials. Plasma cutting provides faster speeds for thicker gauges but produces a wider kerf. For simple straight cuts on thin sheets, mechanical shearing remains cost-effective. Consider your tolerance requirements, material thickness, and edge quality needs when selecting a method.
2. What is the difference between 304 and 316 stainless steel for fabrication?
Both grades offer excellent formability and weldability, but 316 contains 2-3% molybdenum for superior resistance to chlorides and pitting corrosion. Choose 304 for general-purpose applications like food equipment, architectural panels, and household appliances where cost matters. Specify 316 for marine environments, chemical processing, pharmaceutical manufacturing, or any application involving saltwater or aggressive chemicals. Expect to pay 20-40% more for 316 stainless steel compared to equivalent 304 material.
3. How do you prevent springback when bending stainless steel?
Manage springback by overbending the material 1-3 degrees beyond your target angle, allowing it to spring back to the desired position. Use V-die openings 6-8 times the sheet thickness for optimal results. Bottoming or coining techniques minimize springback by fully pressing material into the die. Always bend perpendicular to the rolling direction when possible, and conduct trial bends on sample pieces from the same material lot to determine exact compensation values before production runs.
4. What certifications should I look for in a stainless steel fabrication partner?
ISO 9001 serves as the baseline quality management certification. For automotive components, IATF 16949 certification is essential, demonstrating automotive-specific quality controls. Aerospace applications require AS9100 certification. Medical device and pharmaceutical equipment fabricators should hold FDA registration. For pressure vessel work, ASME certification is mandatory. Additionally, verify AWS welding certifications for shops performing critical welds, and always request current certificates to confirm validity dates.
5. How much does custom stainless steel sheet fabrication cost?
Costs vary based on material grade (316 costs 20-40% more than 304), thickness, design complexity, production volume, tolerances, and finishing requirements. Prototype quantities cost significantly more per unit than production runs because setup costs spread across fewer parts. Moving from 10 to 100 pieces can reduce per-unit cost by 40% or more. Optimize costs by simplifying geometry, standardizing bend radii, specifying only necessary tolerances, and leveraging DFM support from experienced fabrication partners like Shaoyi, which offers 12-hour quote turnaround and comprehensive design optimization.