 Small batches, high standards. Our rapid prototyping service makes validation faster and easier —

Copper Plating Steel Without Peeling: From Prep To Strike

Step 1: Choose the Right Method for Copper Plating Steel
Clarifying Your Functional Goals
When you set out to copper plate steel, the first—and most important—question is: What do you want your copper layer to achieve? Are you aiming for improved solderability, electrical conductivity for EMI shielding, a robust underlayer for brazing, or a cosmetic copper finish? Each goal points you toward a different plating solution and workflow.
Choose the Right Copper Application Method for Steel
Imagine you’re holding a complex steel part: Should you reach for a power supply and prep a bath, or is a chemical approach better? The answer depends on your needs for coverage, uniformity, and throughput. Let’s break down your options:
| Attribute | Electrolytic Copper (Electroplating) | Electroless Copper Plating | Displacement/Immersion Copper |
|---|---|---|---|
| Uniformity | Good on simple shapes; less uniform on recesses | Excellent, even on complex geometries | Poor; thin, non-adherent layer |
| Equipment Needs | Requires power supply, copper anode, and bath | Chemistry-focused, no power supply needed | Minimal—just immersion tank and solution |
| Adhesion Risk | Low if prep and activation are thorough | Low; strong chemical bond | High; not suitable for lasting adhesion on steel |
| Control of Thickness | Precise (by current and time) | Good; depends on bath chemistry and time | Very limited |
| Best Use Cases | Speed, cost, controllable thickness; most plating for steel | Uniform coverage on complex or internal shapes | Pre-activation for other plating; not final finish |
| Post-Processing | May need buffing or further coating | Usually ready for further processing | Must be overplated for durability |
When to Pick Electrolytic Copper Versus Electroless
Electrolytic copper (copper electroplating) is the go-to for most industrial and hobbyist applications where you need speed, cost control, and precise thickness—think busbars, connectors, or decorative finishes. It’s ideal for flat or simple-shaped steel parts, provided you can ensure good electrical contact and thorough preparation. On the other hand, electroless copper plating shines when you’re dealing with intricate geometries, deep recesses, or internal passages—like in PCBs or complex mechanical parts—where uniformity is critical and a power supply isn’t practical. Although slower and more sensitive to bath chemistry, it offers unmatched coverage and adhesion for tricky shapes.
Alternatives to Plating for Special Cases
For industrial-scale needs—or when you require metallurgical bonding—mechanical methods like cladding or roll bonding are used, but these are not practical for most shops or DIYers. Displacement (immersion) copper is sometimes used as a pre-activation step before a true copper electroplating or electroless process but is not recommended for a durable, adherent finish on steel.
Quick How-To: Match Your Method to Your Project
- Capture part details: geometry, steel type, required tolerances, and masking needs
- Define your target copper thickness and adhesion requirements
- Pick your method:
- Electrolytic plating (copper electroplating): Best for speed, cost, and controllable thickness; needs power supply and prep
- Electroless copper plating: Best for uniformity on complex or internal shapes; slower, chemistry-dependent
- Displacement/immersion copper: Only use as a pre-activation if called for by a proven process
- Mechanical/metallurgical bonds: Industrial, not DIY
Practical Tips: Forum Advice vs. Standard Practice
Always prioritize thorough degreasing and surface activation over shortcuts like vinegar-only preps. While some DIY advice online suggests simple solutions, skipping professional cleaning steps leads to poor adhesion and peeling.
-
Checklist: What to Gather from Your Part Drawing Before Plating
- Part geometry (simple, complex, internal cavities?)
- Type of base steel and any prior treatments
- Critical tolerances and surfaces to mask
- Required copper layer thickness
- Adhesion or durability class needed
By clarifying your goals and gathering the right data up front, you’ll pick the copper plating steel process that delivers the performance and reliability you need—without the risk of peeling or poor adhesion.
Step 2: Prepare the Steel Surface for Flawless Copper Plating
Surface Preparation Essentials for Steel
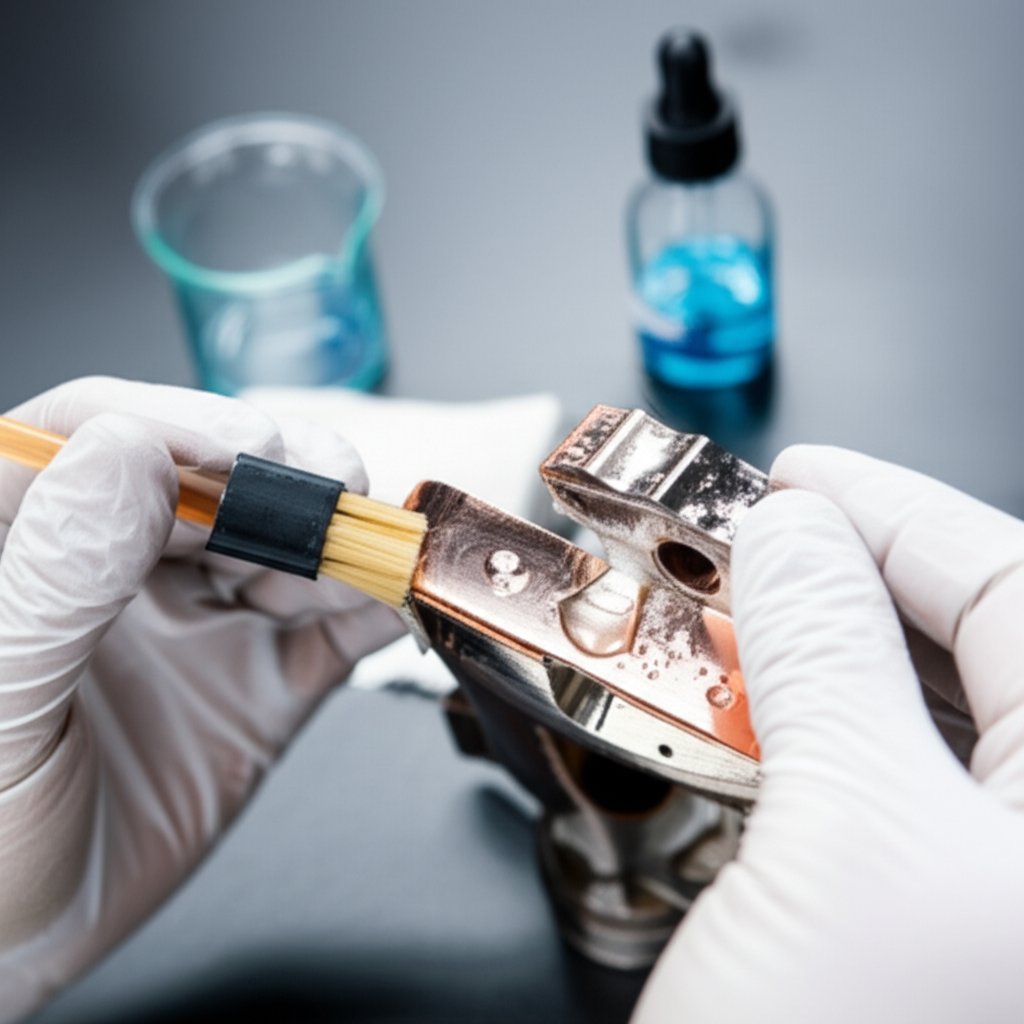
Ever wondered why some copper plated steel parts peel or flake while others last for years? The answer almost always comes down to surface preparation. Whether you’re tackling copper plating at home or running a professional shop, the path to strong adhesion starts with a meticulous cleaning and activation sequence. Let’s break down each step so you can avoid the pitfalls that lead to poor results in diy copper plating or industrial plating alike.
Degrease, Deoxidize, and Verify with a Water-Break Test
- Gross Clean: Remove all oils, dirt, and contaminants. Use a quality detergent or a suitable solvent degreaser. Be thorough—residues left behind can sabotage the entire process.
- Mechanical Prep: If the final surface roughness (RA) allows, lightly abrade the steel with a scuff pad or blast media. This exposes fresh metal and helps the copper layer bond more effectively, a critical tip for anyone learning how to copper plate steel.
- Chemical Clean: Perform an alkaline soak clean. This targets any remaining organic residues. Rinse thoroughly under running water to remove all traces of cleaner and suds.
- Rust/Scale Removal: If the steel shows signs of rust or scale, use an acid dip (typically mild hydrochloric or sulfuric acid) to strip oxides. Immediately rinse and neutralize to prevent flash rust.
- Water-Break Test: Hold the part under running water. If the water forms a continuous sheet, your surface is clean. If it beads up or breaks, repeat the cleaning steps. This test is your best friend for both diy electroplating and professional work.
- Activation: Right before plating, give the steel a brief acid dip to remove any last traces of oxide. Rinse promptly and move directly to the plating or strike bath—timing here is critical to prevent reoxidation.
- Masking and Racking: Apply masking to protect areas that shouldn’t be plated. Mount the part on a rack that ensures solid, rigid electrical contact and avoids sharp edges, which can concentrate current and cause burning.
Do not skip the water-break test or delay between activation and plating. Immediate transfer to the strike bath is crucial for optimal adhesion.
Masking and Racking for Reliable Current Paths
Proper masking and racking aren’t just for aesthetics—they’re essential for even copper coverage and strong adhesion. Imagine plating a batch of parts only to find uneven copper or missed spots due to poor contact or masking. By securing your workpiece firmly and masking off non-plating areas, you ensure current flows exactly where you want it, a must for anyone exploring how to electroplate or how to copper plate metal with professional outcomes.
-
Common Mistakes (and Pro Tips):
- Over-etching in acid: Brief dips are best—prolonged exposure can roughen the surface and weaken adhesion.
- Touching cleaned parts with bare hands: Always use gloves after final cleaning to avoid recontamination.
- Skipping the water-break test: This simple check saves countless hours of rework.
- Rushing between activation and plating: Even a minute’s delay can let oxides reform, especially in humid environments.
For both diy copper plating and industrial jobs, following this surface prep routine protects against adhesion failures and sets the stage for a bright, durable copper finish. Next, we’ll explore how to build a stable electroplating setup that keeps your results consistent from run to run.
Step 3: Build a Stable Electroplating Setup for Consistent Results
Power Supply and Wiring Essentials
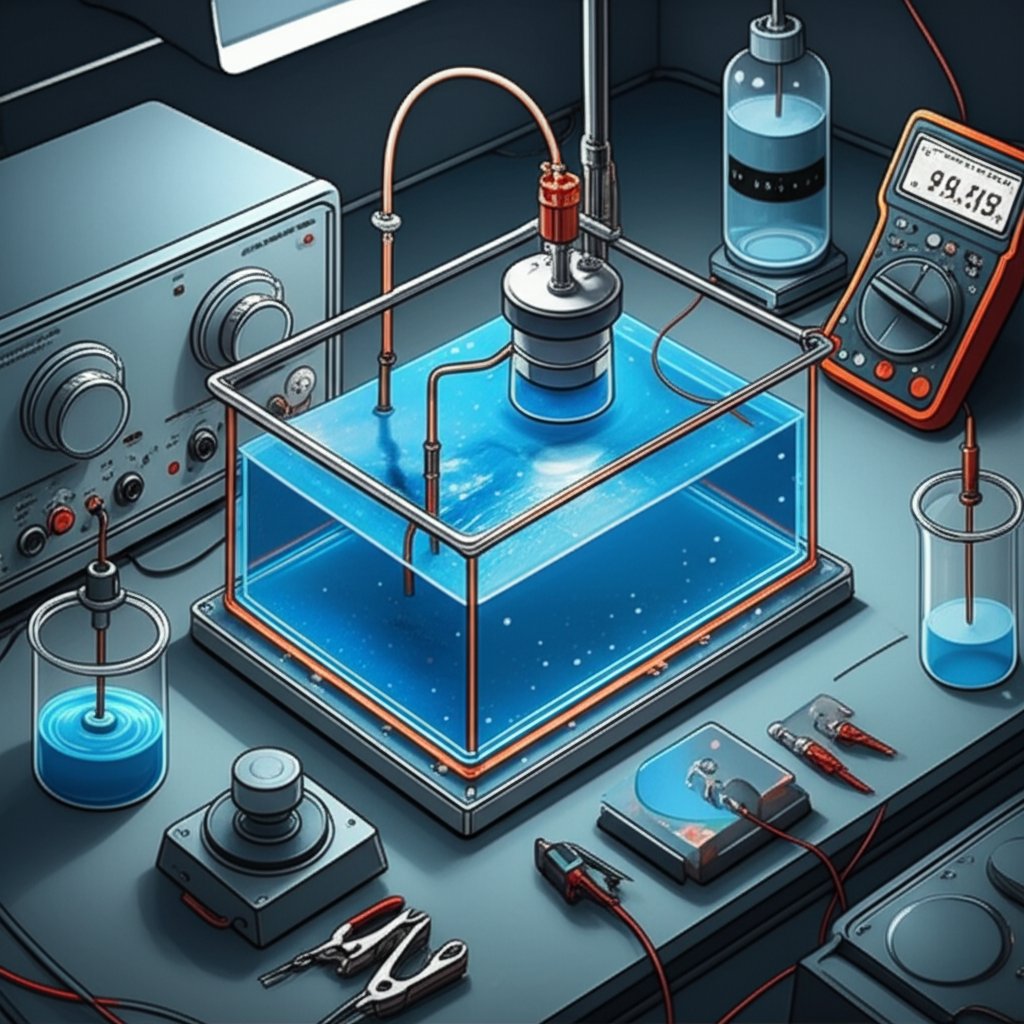
Ever tried to plate a part and ended up with uneven copper or unpredictable results? Often, the culprit is an unreliable electroplating setup. To achieve repeatable, high-quality copper plating steel, you need to start with the right copper plating equipment and connections. Think of this as building a solid foundation for your project—miss a detail, and your results can suffer.
- DC Power Supply: Adjustable voltage and current, ideally with a built-in ammeter. This lets you dial in the plating rate and monitor the process closely.
- Copper Bus Bars & Leads: Use clean, robust wiring to handle the required current. Poor connections can cause hot spots or uneven plating.
- Racks/Fixtures: Ensure these provide a strong, consistent electrical path to the part. Rotating racks or movement mechanisms can help even out current distribution, especially for complex shapes.
Anode Selection and Placement
Choosing the right copper anode and placing it properly is crucial for uniform deposition. Imagine the anode as the source of the copper ions that will become your new surface. If your anode is impure or poorly positioned, you’ll notice rough spots, uneven thickness, or even adhesion problems. Here’s what matters most:
- Anode Material: Always use high-purity copper anodes (phosphorized copper is common for copper plating steel). Impurities in your anode can lead to defects and poor conductivity.
- Anode-to-Cathode Ratio: The surface area of your copper anode should be at least equal to, or slightly greater than, the surface area of your workpiece. This helps balance current distribution and ensures a uniform deposit.
- Spacing and Placement: Position anodes evenly around the part for consistent coverage. For larger tanks, multiple anodes may be needed. Bagging anodes (using a filter bag) helps prevent anode sludge from contaminating your bath.
Tank, Agitation, and Temperature Control
Now, let’s talk about the environment where all the chemistry happens. Your tank and agitation system are just as important as your power supply or copper electrodes. Here’s what to consider:
- Tank Material: Choose a container that is compatible with your plating solution—polypropylene or glass are common choices for most copper plating baths.
- Agitation: Steady agitation (either air or mechanical) improves the evenness of copper deposition and helps prevent burning or roughness. For DIY setups, a simple aquarium pump or magnetic stirrer can work; for industrial copper electroplating equipment, mechanical agitation may be used.
- Temperature Control: Many copper plating solutions perform best within a specific temperature range. A hotplate with a magnetic stirrer or an immersion heater can help maintain the ideal temperature for your bath.
- Filtration (Pro Setups): Continuous filtration keeps particulates out of your bath, leading to smoother, brighter deposits. It’s a must for professional operations.
Your Electroplating Setup Checklist
| Component | Purpose | Tips |
|---|---|---|
| DC Power Supply | Controls plating rate | Adjustable, with ammeter |
| Copper Anode | Source of copper ions | High purity, bagged if possible |
| Leads & Bus Bars | Conduct electricity | Clean, heavy gauge |
| Tank | Holds solution | Non-reactive material |
| Agitation System | Improves deposit evenness | Air pump or stirrer |
| Temperature Control | Maintains bath performance | Hotplate or immersion heater |
| Racks/Fixtures | Holds parts securely | Stable, good contact |
| Filtration (Optional) | Removes particulates | For pro setups |
Assembly Order for a Reliable Electroplating Copper Kit
- Mount your copper anodes in the tank, spaced evenly around the workpiece.
- Position your steel part securely on the rack or fixture, ensuring solid electrical contact.
- Connect the positive lead from your power supply to the anode(s), and the negative lead to the part (cathode).
- Double-check all connections—loose wires can ruin your results.
- Verify polarity: The part being plated must be negative (cathode) before you energize the system.
- Start agitation and bring the bath to the recommended temperature.
- Power up and monitor current and voltage as plating begins.
Always confirm the cathode (your part) is connected to the negative terminal before turning on the power. Reversed polarity will not plate copper and may damage your copper plating kit or workpiece.
Whether you’re using a copper electroplating kit at home or setting up industrial copper plating equipment, attention to these details ensures a smooth, consistent copper deposit every time. Ready to move on? Next, we’ll dive into preparing and maintaining your copper plating bath for optimal performance.
Step 4: Prepare and Control the Copper Plating Bath for Steel
Selecting a Copper Plating Solution for Steel
Ever mixed a bath only to see dull, uneven copper—or worse, peeling after days of work? The secret to a successful copper plating solution lies in choosing the right chemistry and keeping it under control, especially when working with steel. Let’s break down what matters most so you can avoid common pitfalls and achieve a durable, bright copper layer.
For most applications, a copper sulfate solution for electroplating is the industry standard. It’s favored for its simplicity, low cost, and high conductivity. Acid copper sulfate baths, in particular, are widely used for decorative and functional copper electroplating on steel. However, because steel is prone to immersion copper (a weak, non-adherent layer), direct plating from an acid bath is not recommended without first applying a proper strike or activation layer. Cyanide-based solutions are sometimes used for strikes but are best avoided for safety and environmental reasons unless you have the right controls in place.
- Choose Your Bath Type: For most users, a copper sulfate bath is the go-to copper electrolyte. Professional shops may also use fluoborate or pyrophosphate baths for special applications, but sulfate is the most accessible and easiest to control [source].
- Mix According to Instructions: Always follow the supplier’s directions for your chosen copper electroplating solution. Filter the bath before use to remove particulates that could cause roughness.
- Control pH and Temperature: Most copper sulfate for electroplating baths operate best at an acidic pH (typically 0.8–1.2 for acid sulfate baths) and moderate temperatures. Maintaining these within the supplier’s recommended range ensures consistent results and minimizes defects.
- Log All Additions and Adjustments: Keep a record of every additive, adjustment, and bath measurement. This habit makes troubleshooting and consistent results much easier.
- Filter and Maintain: Continuous filtration is ideal for professional operations. For hobbyists, periodic filtering and careful rinsing of parts before immersion help keep the bath clean.
Recipe Library:
- Hobbyist Low-Cost Bath: Use a basic copper sulfate solution for electroplating, mixed with distilled water and sulfuric acid. Monitor clarity and color; replace solution if it becomes cloudy or contaminated.
- Kit-Based Supplier Bath: Pre-packaged copper electroplating solutions often include wetting agents and brighteners. Follow the kit’s instructions for mixing and maintenance. Kits are designed for ease but still require regular checks for pH and contamination.
- Professional Shop Bath: Professional setups use high-purity copper sulfate, sulfuric acid, and a suite of proprietary additives (brighteners, levelers, wetting agents) for maximum brightness and smoothness. These baths are filtered continuously and monitored with regular chemical analysis.
Brighteners, Levelers, and Wetting Agents
Think of additives as the fine-tuning knobs of your copper electroplating solution. Brighteners refine the copper grain structure, giving you that mirror-like finish. Levelers help even out the deposit, especially on high-current-density areas, while wetting agents reduce surface tension, ensuring the bath coats all recesses and edges evenly [reference].
- Brighteners: Added in small doses, these organic compounds make the copper deposit smoother and shinier. Overuse can cause brittleness or streaks.
- Levelers: Help control thickness and reduce edge burning. Especially useful for complex geometries or high-aspect-ratio parts.
- Wetting Agents: Ensure the bath reaches every nook and cranny. Essential for uniform plating on intricate steel components.
Always add these according to supplier recommendations. Too much or too little can cause dullness, roughness, or uneven deposits.
Simple Bath Health Checks
How do you know when your copper plating solution needs attention? You’ll notice changes in appearance, deposit quality, or electrical behavior. Here are the most common warning signs:
- Excess foam or unusual bubbles on the bath surface
- Color shifts (cloudy, greenish, or brown tints)
- Rising voltage required to maintain the same current
- Rough or dull deposits on test pieces
- Increased frequency of defects (burning, pitting, poor adhesion)
Regularly test your bath with a Hull cell or by plating a small steel coupon. If you spot issues, check for contamination (oils, metallic impurities), pH drift, or additive depletion. Professional shops may run chemical analyses, but even hobbyists can keep a log of bath performance over time.
By keeping your copper sulfate solution for electroplating clean, balanced, and well-documented, you’ll set the stage for flawless copper deposition on steel. Next, we’ll cover how to activate your steel and apply a strike layer to lock in adhesion and prevent peeling.
Step 5: Activate Steel and Apply a Copper Strike for Lasting Adhesion
Why Strike Layers Matter on Steel
Ever wonder why some copper plated steel parts peel or blister, even after careful prep? The answer is often hidden in the very first layer: the strike. Steel, unlike copper or brass, is highly susceptible to immersion deposition—a process where copper ions plate out spontaneously and form a weak, non-adherent layer. This is why a dedicated strike step is essential. Without it, your beautiful copper coated steel can delaminate or fail under stress, especially if you’re aiming for a durable copper plate steel finish or a functional steel with copper underlayer.
Activation Sequences That Reduce Iron Contamination
Before you apply any copper, the steel surface must be free of oxides and contaminants. Sounds complex? It’s really just a matter of timing and sequence. Here’s how to get it right every time:
- Final Rinse: After cleaning, rinse the steel thoroughly to remove all traces of cleaner and debris.
-
Acid Activation: Immerse the freshly rinsed part in a mild acid (such as dilute sulfuric or hydrochloric acid) for a short time—usually 15–60 seconds. This step strips away any last traces of oxide.
Tip: Work quickly and rinse immediately after activation to prevent flash rust. - Immediate Transfer: Without letting the part dry or sit, move it directly (while still wet) into the copper strike bath. This prevents new oxides from forming and keeps the surface ready to bond.
From Strike to Build Bath Without Losing Cleanliness
Now comes the critical step: the copper strike. Unlike the main copper bath, the strike is formulated for slow, controlled deposition. Its job is to lay down a thin, tightly-adherent layer of copper that locks onto the steel, providing a foundation for the thicker, brighter copper to come. Let’s walk through the sequence:
- Strike Bath: Place the activated, wet steel in the strike bath. For steel substrates, a cyanide-based strike is traditional, but acid or pyrophosphate strikes can also be used with the right chemistry. The strike bath operates at low copper concentration and high complexant (like cyanide) to slow down deposition and prevent immersion copper. Typical strike current densities are 10–30 ASF (amperes per square foot), with bath temperatures often in the 120–145°F range. Plate for just a few minutes—enough to form a thin, continuous copper layer.
- Rinse Thoroughly: After striking, rinse the part well to remove any residual strike solution.
- Transition to Main Bath: Move the part—again, while still wet—into the main copper plating bath. This step should happen quickly to avoid reoxidation or contamination.
A proper copper strike forms a thin, adherent layer that prevents immersion copper and virtually eliminates blistering or peeling on steel. Skipping or rushing this step is a top cause of copper covered steel failures.
Timing and Verification: Don’t Let Oxides Sneak In
- Keep Intervals Short: Minimize time between activation, strike, and build bath. If delays occur, consider re-activating the part to ensure a fresh, oxide-free surface.
- Verify Adhesion: After a short strike plate, perform a quick tape pull test on a non-critical area. If the copper layer peels, revisit your cleaning and activation steps before proceeding to full thickness. Industry-standard tape pull and bend tests are reliable for checking adhesion on copper plated steel.
Summary: Lock in Adhesion for Flawless Copper Plate Steel
By following this activation and strike sequence, you’ll create a robust foundation for any copper coated steel project—whether you’re after a decorative copper covered steel look or a high-performance steel with copper underlayer. Next, we’ll guide you through controlling your copper deposition to hit your target thickness and finish with confidence.
Step 6: Plate to Target Thickness with Control and Consistency
Dialing in Current Density and Plating Time
Ready to move from prep to a flawless copper finish? Now comes the moment where careful planning meets real-world control. Getting the right copper deposition on steel isn’t just about turning on the power—it’s about tuning every variable for a consistent, high-quality result. Sounds complex? Let’s break it down so you can master the copper plating procedure whether you’re working in a shop or exploring how to copper plate at home.
- Calculate Surface Area: Start by accurately measuring or estimating the total surface area of your part(s). This is essential for setting the correct current. For example, if you’re plating multiple fixtures, add up the area of every part on the rack.
- Set Current Density: Refer to your copper bath’s technical data sheet for the recommended current density—typically given in amperes per square inch (ASI) or per square foot (ASF). Multiply the surface area by the target current density to set your rectifier. For example, 100 sq. inches at 0.2 ASI means 20 amps.
- Ramp Up Gently: Don’t crank the power instantly. Begin at the lower end of the current range and gradually increase. This avoids edge burning and helps the copper layer build evenly, especially on sharp corners or masked areas.
- Monitor and Adjust: Watch your ammeter and voltmeter. Document your setpoints and any adjustments. If you notice the voltage rising for the same current, it may signal bath contamination or poor contact—pause and investigate.
- Plan for Thickness: If your supplier provides a copper deposition rate (e.g., mils/hour at a set current), use the electrochemical plating process math to calculate your plating time. If not, plate in intervals, stopping to inspect thickness and adhesion on a test coupon.
Agitation and Geometry Management
Ever see streaks, thin spots, or dullness after electroplating copper? Often, the culprit is poor agitation or static parts. Agitation is the unsung hero of the electrolysis of cu—it keeps metal ions flowing and ensures every surface, even deep recesses, gets an even coat.
- Choose Your Agitation: For most setups, air bubbling or mechanical stirring works well. For complex geometries, consider moving (rotating or oscillating) the part itself in the bath.
- Why It Matters: Agitation prevents metal ion depletion at the cathode, reduces pitting, and helps release hydrogen bubbles from the surface. It also evens out temperature, which is crucial for a consistent copper plating finish.
- Pro Tip: If you notice dull or streaky areas, increase agitation—this often improves brightness and throwing power, especially on intricate steel parts.
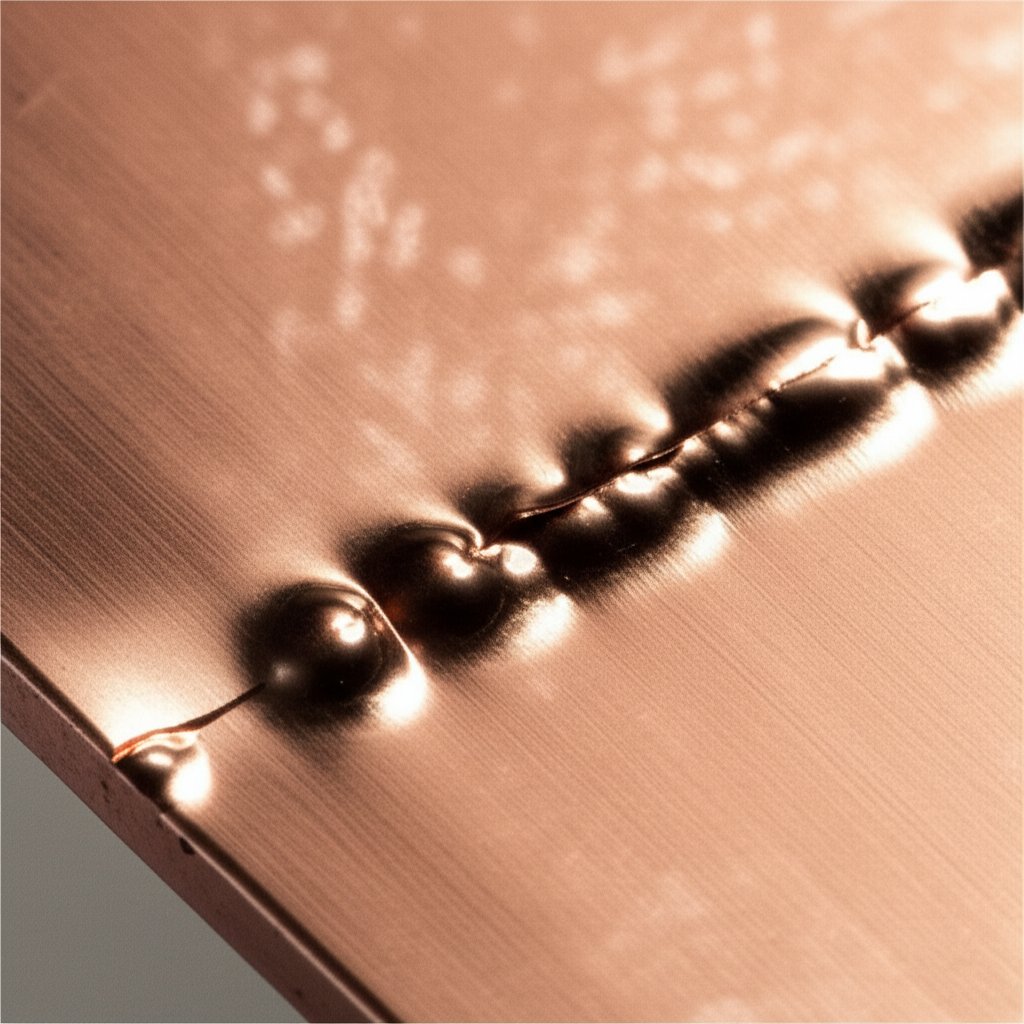
Visual Cues and In-Process Control
How do you know your electroplating run is on track? Visual cues are your best friend:
Uniform salmon-pink copper means healthy copper deposition. Dark, powdery edges point to burning—reduce current or increase agitation. Dullness usually signals low brightener or insufficient current density.
- Inspect Mid-Process: Pause the run to check for uniformity, brightness, and adhesion. Test with a tape pull or scratch on a non-critical area if needed.
- Rinse Between Steps: Always rinse parts between strike, build, and any intermediate steps. This reduces drag-in and keeps your bath clean.
- Document Everything: Record current, voltage, bath temperature, agitation method, and plating time for each run. These notes help you troubleshoot and replicate success.
Step-by-Step: Controlled Copper Plating Procedure
- Energize the rectifier at the calculated current for your surface area.
- Ramp up slowly, monitoring for signs of edge burning or unusual deposit color.
- Maintain steady agitation—adjust as needed for part geometry.
- Monitor voltage and current; adjust if you see signs of roughness, dullness, or burning.
- Plate to the calculated or target thickness, pausing to inspect as needed.
- Rinse and dry the part, then inspect for finish, coverage, and adhesion quality.
By mastering the art of current control, agitation, and visual inspection, you’ll achieve a reliable, high-quality copper deposit on steel—whether you’re running a full-scale shop or perfecting how to copper plate in your garage. Up next, we’ll tackle troubleshooting: how to quickly diagnose and fix common copper plating defects before they become costly rework.
Step 7: Troubleshoot Defects in Copper Plating Steel with a Clear Matrix
Rapid Defect Diagnosis for Plated Copper on Steel
Ever finish a copper plating run, only to spot dull patches, blisters, or roughness on your steel part? You’re not alone. Even with the best electroplating solution, defects can sneak in—often when you least expect it. The good news? Most issues follow clear patterns, and with a practical troubleshooting matrix, you can diagnose and fix them fast, saving time and frustration.
Defect Matrix: Symptoms, Causes, Tests, and Fixes
| Symptom | Likely Causes | Tests to Confirm | Corrective Actions |
|---|---|---|---|
| Dull Deposits | Low current density, depleted brightener, poor agitation | Hull cell test or plate a small coupon; check agitation | Increase current, add brightener per supplier, improve agitation |
| Edge Burning/Blackening | Too high current density, sharp edges | Reduce current on next run; inspect for sharp corners | Lower current/ramp up slowly, use thieves/shields, round off edges |
| Pitting | Particulates in bath, gas entrapment, poor filtration | Check filter, observe bath clarity, inspect for bubbles | Filter bath, polish lightly, add wetting agent |
| Blisters/Peeling | Poor prep, no strike, surface contamination | Tape pull test on affected area | Re-clean, ensure immediate strike after activation, repeat surface prep |
| Roughness | Anode sludge, bath contamination | Inspect anode bags, check for debris in bath | Replace/clean anode bags, filter solution |
| Discoloration | Contamination, wrong pH, additive imbalance | Bath analysis (pH, contaminants) | Adjust chemistry per supplier, replace or treat bath |
Confirm with Simple Shop Tests
Imagine you’ve just pulled a batch of electroplated copper parts from the bath and notice unexpected results. Instead of guessing, run these simple tests:
- Hull Cell Test: Plate a small coupon at different current densities to spot issues like dullness or burning.
- Tape Pull: Stick and peel tape on a non-critical area to check adhesion—blisters or peel mean it’s time to review prep and strike steps.
- Visual Inspection: Look for pitting, roughness, or color changes. These often point to bath contamination or agitation issues.
- pH/Conductivity Check: Use strips or meters to confirm your electroplating solution is within target range.
Remember, the electroplating equation (which relates current, time, and deposit thickness) is only as reliable as your process control. If your setup drifts from target values, defects can result—even if you’re following the right math.
Corrective Actions That Stick
- Stop and Document: Pause production. Record all settings, bath parameters, and observed symptoms.
- Isolate Variables: Change one factor at a time—current, agitation, chemistry—so you can pinpoint the root cause.
- Test and Adjust: Run a small test piece after each adjustment. Don’t scale up until the defect is resolved.
- Maintain Logs: Keep a troubleshooting log for every run. Patterns in voltage, current, or bath behavior often reveal the source of recurring issues.
Prevent next time: Filter your bath regularly, rinse parts thoroughly between steps, and log every adjustment. These habits are your best defense against repeat defects in copper plating steel.
-
Checklist for Prevention:
- Change or clean filters as part of routine maintenance
- Double-rinse parts after each process step
- Log all current, voltage, and bath changes—track what works
- Regularly inspect anode bags and replace if needed
- Run periodic Hull cell tests to monitor bath health
By approaching troubleshooting with a diagnosis-first mindset and using the electroplating equation to verify process parameters, you’ll minimize downtime and ensure every electroplated copper finish meets your quality standards. Next, we’ll focus on safety and responsible waste handling to keep your plating operation clean and compliant.
Step 8: Practice Safety and Handle Waste Responsibly in Copper Plating Steel
Personal Protective Equipment and Lab Habits
When you’re working with plating chemicals and managing a copper solution, safety isn’t just a checklist—it’s the foundation of safe plating. Imagine accidentally splashing acid or copper sulfate while setting up your bath. Are you protected? The right gear and habits make all the difference.
- Wear safety glasses or goggles: Always protect your eyes from splashes and fumes. Prescription safety glasses or full-coverage goggles are best for splash protection and can withstand most plating chemicals.
- Chemical-resistant gloves: Nitrile, neoprene, or PVC gloves provide a barrier against acids, bases, and metal salts.
- Apron or lab coat: Shields clothing and skin from drips or spills.
- Ventilation: Work in a well-ventilated area or use a fume hood to avoid inhaling vapors from the copper solution or other chemicals.
Good lab habits go beyond PPE. Label every container, keep your workspace organized, and never eat or drink in the plating area. You’ll notice that consistent habits not only protect you but also lead to cleaner, safer results.
Safer Chemistries and Careful Handling
- Always prefer cyanide-free plating chemicals for safe plating—they’re less hazardous and easier to manage for small shops or DIY setups.
- When mixing acids or bases, always add acid to water, never the reverse. This minimizes the risk of violent reactions.
- Store chemicals in compatible, clearly labeled containers. Track expiry dates and lot numbers for all reagents.
- Never mix unknown chemicals, and keep a spill kit on hand. In case of a spill, contain it immediately and use neutralizing agents as recommended by your supplier’s SDS (Safety Data Sheet).
- Regularly inspect electrical equipment and cords to avoid shocks or shorts, especially in wet environments where electrolysis of copper is occurring.
Waste Segregation and Neutralization Basics
- Segregate copper-bearing rinse water and spent copper solution from general waste. These solutions often contain dissolved metals and can be hazardous to health and the environment.
- Never pour plating waste down the drain, into the trash, or onto the ground. Instead, collect and store it for proper disposal.
- For neutralization or treatment, consult your local hazardous waste authority or a licensed waste handler. Regulations can vary significantly by location, and improper disposal can lead to fines or environmental harm.
- Keep all waste in closed, compatible containers, and clearly label them with contents and hazard information.
Because disposal regulations differ by region, always check with your local authorities or certified waste handlers before disposing of copper plating waste. Responsible handling protects both you and the environment. [reference]
Summary: Safe Plating Is Smart Plating
By prioritizing the use of safety glasses, gloves, and proper ventilation, you minimize risks in every step of the copper plating steel process. Careful handling of plating chemicals and responsible waste management are not just legal requirements—they’re essential for a clean, compliant, and sustainable workshop. As you wrap up your plating run, remember: safe habits today lay the groundwork for better results and fewer headaches tomorrow. Next, we’ll show you how to verify your copper finish and document your process for continuous improvement.
Step 9: Verify Quality, Document the Process, and Partner Wisely
Measuring Copper Plating Thickness and Verifying Adhesion
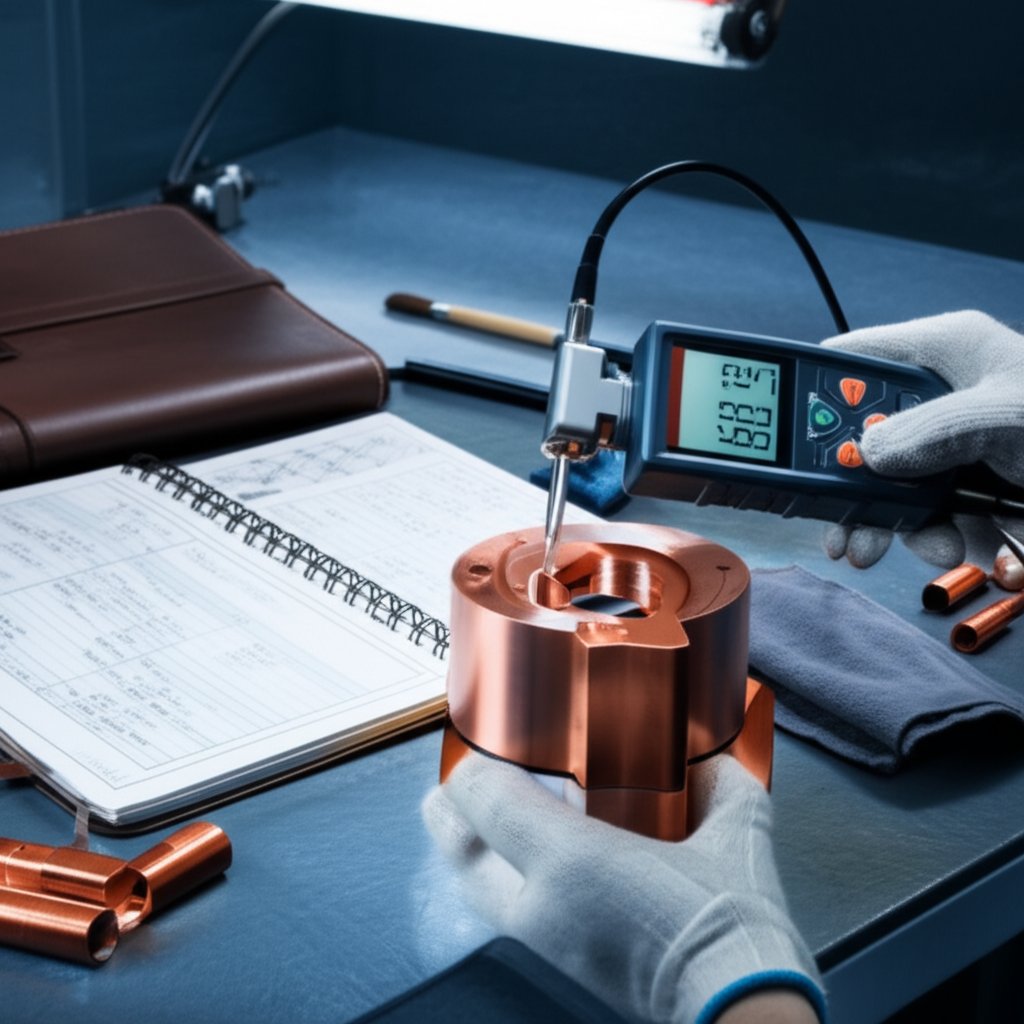
How do you know your copper finish on steel is truly up to spec? It’s not just about how it looks—reliable measurement and adhesion checks are essential, especially for safety-critical or high-value parts. Imagine investing hours in a copper metal finish only to find out the layer is too thin or peels under stress. Let’s walk through practical steps for verifying your work, whether you’re plating at home or managing an industrial run.
- Thickness Measurement: For steel substrates, magnetic pull-off gauges (magnetic induction) are a go-to solution. They provide quick, non-destructive readings when the base is magnetizable, like steel. For non-magnetic bases or layered finishes, eddy current gauges may be used. Both methods help ensure your plated copper meets required specs without damaging the part. For DIY setups, you can estimate thickness based on plating time and supplier rates, but always confirm on a test coupon if possible. For maximum accuracy or when documentation is required, consider X-ray fluorescence (XRF) or Beta Backscatter methods—these are standard in the electroplating of metals industry.
- Adhesion Tests: Simple tape pull, scribe-and-peel, or bend tests on sacrificial or non-critical areas will quickly reveal if your copper plated layer is bonded well. For mission-critical components, escalate to lab-based cross-sectioning or mechanical tests as needed.
Build a Simple Process Log for Repeatability
Ever wonder why one batch of copper plated steel turns out flawless, while the next has issues? Consistent documentation is your secret weapon. By tracking every variable, you can spot trends, troubleshoot faster, and optimize your copper finish process over time.
| Date | Part | Prep Steps | Strike Settings | Build Settings | Additions | Observations | Result |
|---|---|---|---|---|---|---|---|
| 2025-11-12 | Steel Bracket | Degrease, acid dip | 10 ASF, 3 min | 25 ASF, 45 min | Brightener, wetting agent | Uniform deposit, no burn | Passed tape pull |
| 2025-11-13 | Connector | Alkaline clean, water-break test | 15 ASF, 2 min | 25 ASF, 60 min | Leveler | Edge burning, dull center | Adjusted current next run |
Process logs help reduce variation, cut plating costs, and make troubleshooting straightforward. Over time, you’ll build a playbook for flawless copper plated steel—no guesswork required.
When to Partner with Certified Experts for Copper Plated Steel
Sounds overwhelming? If your project involves tight tolerances, safety-critical parts, or large production runs, it’s smart to consider professional help. While DIY electroplating of metals is rewarding for prototypes and simple jobs, critical applications demand traceable quality, process control, and rapid iteration.
- Shaoyi offers end-to-end custom metal processing, including advanced surface treatments and assembly. Their IATF 16949 certified quality and 15+ years of experience empower automakers and Tier 1 suppliers to move quickly from prototype to production with confidence. Explore their full range of solutions.
- Certified suppliers provide documented QA, process logs, and access to advanced measurement tools like XRF and Beta Backscatter—crucial for industries where every micron of copper matters.
- Outsourcing can also reduce overall cost and turnaround times for complex or high-volume jobs, while freeing up your team for design and engineering.
Recommended Next Steps for Quality Copper Plating Steel
- Invest in a reliable thickness gauge for in-house checks
- Standardize adhesion tests for every batch
- Keep detailed process logs to spot trends and prevent repeat issues
- For critical or high-volume parts, partner with a certified expert like Shaoyi for process control and traceable results
By closing the loop with robust measurement, documentation, and when needed, expert partnership, you’ll ensure every copper plated steel part leaves your shop with a durable, consistent copper metal finish. Master these final steps, and your plating process will be as reliable as your results.
Copper Plating Steel: Frequently Asked Questions
1. Can you plate steel with copper?
Yes, steel can be plated with copper using methods like electrolytic copper plating or electroless plating. Success depends on thorough surface preparation, proper activation, and applying a strike layer to ensure strong adhesion. This process is used for both functional and decorative purposes, and is common in industries requiring solderable or conductive surfaces.
2. What is the best method for copper plating steel at home?
For most DIY projects, electrolytic copper plating is the preferred method because it offers control over thickness and is compatible with basic equipment like a DC power supply and copper sulfate solution. Thorough cleaning, surface activation, and immediate transfer to the plating bath are essential to avoid peeling. Electroless copper plating can be used for complex shapes but requires more sensitive chemistry control.
3. How do you prevent copper plating from peeling off steel?
To prevent peeling, follow a strict surface preparation routine: degrease, mechanically and chemically clean, perform a water-break test, and use a brief acid activation before plating. Always apply a copper strike layer before the main copper deposit. Immediate transfer between steps and minimizing delays are key to achieving lasting adhesion.
4. What safety precautions should I take when copper plating steel?
Always wear safety glasses, chemical-resistant gloves, and protective clothing. Work in a well-ventilated area, label all chemicals, and never mix unknown substances. Dispose of copper-bearing waste according to local regulations and store all chemicals in secure, compatible containers. These practices protect both the user and the environment.
5. When should I consider using a professional service for copper plating steel?
If your project requires tight tolerances, safety-critical components, or high-volume production, partnering with a certified supplier like Shaoyi is recommended. Professionals provide process control, traceable quality assurance, advanced measurement, and can streamline prototyping to production for complex or automotive parts.