 Small batches, high standards. Our rapid prototyping service makes validation faster and easier —

How To Powder Coat Rims And Avoid The Prep Errors That Ruin Them
Step 1 Decide if Your Wheel Can Be Powder Coated
If you are learning how to powder coat rims, start with a harder question than color choice: should this wheel be coated at all? Powder coating rims means spraying dry resin-and-pigment powder onto metal, then baking it so the finish cures into a hard surface. That is the short answer to what is powder coating rims. It works well for cosmetic refinishing, but only on wheels that are still structurally sound. Yes, can you powder coat rims? Often, yes. And can you powder coat aluminum wheels? Also yes, because aluminum, steel, and alloy wheels are commonly refinished this way when they are serviceable.
What Powder Coating Rims Means
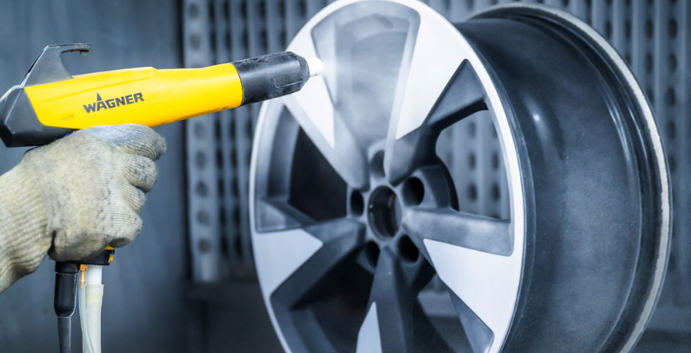
Basic process first. Powder particles are electrostatically charged so they cling to the wheel before curing in an oven, as outlined by Waxman. That finish can improve appearance and durability, but it does not correct safety defects hidden under old paint, corrosion, or peeling chrome.
Powder coating can hide color flaws and worn finishes. It cannot make a cracked, bent, or badly corroded wheel safe.
When a Wheel Is Safe to Coat
A good candidate has no cracks, no bent rim sections, no severe pitting near critical areas, and no suspicious prior repairs. CCJ guidance highlights cracks, bent rims, bolt-hole issues, and excessive corrosion as key inspection concerns on both steel and aluminum wheels. That matters whether you are coating daily-driver steel wheels or asking if can aluminum be powder coated for a set of factory alloys.
Damage That Should Stop the Job
| Wheel type | Condition found | Prior repair | Corrosion severity | Decision |
|---|---|---|---|---|
| Steel | Old paint, light rust, no bends | None known | Light surface only | Proceed |
| Aluminum | Oxidation, minor cosmetic rash | None known | Light pitting away from bead and lug areas | Repair surface, then coat |
| Steel or aluminum | Cracks, bent lip, stretched lug holes | Questionable weld | Any level | Replace or get professional inspection |
| Aluminum | Severe curb rash, pitting near bead seat or lug area | Unknown | Moderate to severe | Stop and inspect before any coating |
| Chrome-plated wheel | Peeling chrome | Unknown | Varies | Do not coat until chrome is fully removed and wheel condition is verified |
GLW also notes that badly buckled wheels may be rejected because the tire may not seat correctly after refinishing. If your wheel passes this go or no-go check, the real work shifts from diagnosis to preparation, and that starts with having the right gear before anything comes apart.
Step 2 Tools and Safe Setup for Powder Coating Rims at Home
Before a wrench turns, give your garage a hard readiness check. If you are researching how to powder coat rims at home, setup matters as much as spraying. A basic checklist from JTAPE covers disassembly tools, blasting gear, a powder gun, ventilation, and curing equipment. Safety guidance from Eastwood adds the details DIYers often miss, especially respirator use, bare-metal grounding, chemical protection, and safe handling of hot parts. One more reality check comes from Paint Booth: converted kitchen ovens are limited, must never be gas, and cannot go back to food use. For full wheels, curing capacity is often the first home-shop bottleneck.
Essential Tools and Materials
Must-have gear
- Basic disassembly tools, such as wrenches, screwdrivers, and pliers
- Blasting equipment, abrasive media, and dust collection
- Powder coating gun and the air supply it requires
- Hooks or hanging hardware that let you access the whole wheel
Prep consumables
- Degreasers or cleaning chemicals suited to metal prep
- Clean lint-free wipes
- A corrosion-resistant primer, commonly epoxy, if your coating system calls for it
- The powder coating material itself, kept clean and dry until use
Masking supplies
- High-temperature polyester tape
- High-temperature discs or plugs for areas that must stay bare
- JTAPE lists masking tapes and discs rated up to 220C or 428F for 30 minutes for powder coating use
Curing equipment
- A dedicated electric curing oven large enough for the wheel
- Heat-resistant gloves for loading and unloading
- A clean cooling area where the wheel will not pick up dust
Safety Gear You Should Not Skip
Blasting dust and powder overspray should not end up in your lungs. Wear a respirator, eye protection, chemical-resistant gloves for cleaning, long sleeves, and sturdy footwear. Use heavy heat-resistant gloves around the oven. Keep the ground clamp on clean bare metal. A poor ground can reduce powder attraction and increase shock risk.
Workspace Rules for Home Powder Coating
- Clear a dedicated work area away from food prep, pets, children, and flammables.
- Set up blasting and spraying where dust can be contained and air can be exhausted outside.
- Separate dirty prep surfaces from clean masking and coating surfaces.
- Confirm the wheel can hang securely and the ground path reaches bare metal.
- Use only a dedicated electric oven for curing. Do not use a gas oven. Do not reuse a powder oven for cooking.
- Stage a safe cooling spot before any metal goes into the heat.
Anyone serious about how to powder coat wheels at home should pause here and ask one blunt question: can this workspace safely blast, spray, vent, ground, and cure a full wheel? If yes, the assembly itself becomes the next issue, because tires, weights, valves, and hardware all have to come off before prep can be done right.
Step 3 Remove Tires and Plan Wheel Stripping
A safe workspace only helps if the wheel itself is stripped down far enough to prep correctly. One of the most common mistakes is treating the wheel like a complete assembly instead of a bare metal part. For clean, durable results with powder coating aluminum rims, anything that can trap heat, hide grime, or block surface prep needs to come off before you choose a stripping method.
Remove Tires Weights and Hardware First
Start by turning the wheel into a stand-alone part. GLW lists tire removal, weights, stems, and other removable parts as standard preparation before wheel coating.
- Tire
- Clip-on or adhesive wheel weights
- Valve stem and valve hardware
- Center caps, trim rings, and other removable accessories
- Any removable inserts or hardware that would interfere with cleaning, blasting, or masking
This matters for practical reasons. Rubber and plastic do not belong in blasting or curing, and hidden edges under weights or hardware can leave contamination lines that later chip or peel. If a part blocks access to the barrel, spoke pockets, or lug area, remove it now instead of trying to work around it later.
Degrease Before You Strip Anything
Before worrying about how to strip powder coat from aluminum, get rid of grease, brake dust, road film, and hand oils. Eastwood notes that poor cleaning can lead to adhesion problems, finish defects, and premature coating failure, and GLW also stresses cleaning and degreasing alloys before coating. Degreasing first helps chemical stripper contact the old finish more evenly, keeps blasting media from grinding oily residue deeper into corners, and gives you a more honest view of the wheel's condition. That is especially important with powder coating aluminum rims, where grime often hides in the inner barrel and around spoke junctions.
Choose the Right Stripping Method
There is no one-size-fits-all prep path. Quinns describes abrasive blasting as effective for removing paint and rust while creating a slightly rough texture that helps later coating adhesion. The same source notes chemical stripping is better for delicate or detailed surfaces, while Eastwood points out that manual abrasion works when equipment is limited but overly aggressive sanding marks can show through the finished coat.
| Method | Best current finish type | Corrosion level | Labor intensity | Finish quality expectations |
|---|---|---|---|---|
| Chemical stripping | Thick paint, failing clear, old powder in detailed areas | Light to moderate, where corrosion is not the main issue | Medium | Good detail preservation, but residue must be fully cleaned or adhesion can suffer |
| Abrasive blasting | Mixed coatings, old powder, paint, and oxidized finishes | Moderate to heavy surface corrosion | Medium to high | Strong base for consistent coating when controlled well, with clean metal and useful surface texture |
| Manual abrasion | Small bare spots, light coatings, localized cleanup | Light only | High on a full wheel | Acceptable for spot work, but easy to leave scratches or uneven texture on complete wheels |
If you are comparing sandblasting aluminum wheels with other options, think past simple coating removal. The prep method changes how uniform the metal will be, how much "tooth" the powder can grip, and how consistent the final finish can look. Anyone planning to sandblast aluminum rims should treat blasting as controlled surface prep, not brute force, because intricate wheel shapes can be damaged if the process is not carefully managed. The real refinement starts once the old finish is completely off and the bare wheel can be cleaned, corrected, and dried without contamination getting left behind.
Step 4 Strip, Blast, and Degas Bare Rims
Color only looks as good as the metal under it. Prep is where many wheel jobs quietly fail, especially with alloy wheel powder coating. Armadillo Automotive notes that old paint, clear coat, and contamination can lead to peeling, bubbling, and adhesion problems if they are not fully removed. For powder coating aluminum wheels, that means treating bare-metal prep as a sequence, not a quick cleanup.
Strip the Old Finish Completely
Get the wheel back to consistent bare metal. Any leftover clear, paint, or old powder can leave uneven texture and weak spots under the new finish. In professional wheel prep, chemical stripping is often used to bring alloy wheels back to bare aluminum before coating. Good powder coating alloy rims starts here, because partial stripping leaves hidden failure points in spoke pockets, lug recesses, and the inner barrel.
- Remove the existing finish until the wheel is uniformly bare.
- Rinse or neutralize any stripping residue and inspect every pocket, corner, and hole.
- Use media blasting to clean remaining oxidation, corrosion staining, and stubborn coating from detailed areas.
- Refine only minor cosmetic damage, such as light curb rash or shallow nicks. Do not treat this as structural repair.
- Blow out residue from spoke corners, valve areas, and threaded openings with clean, dry air.
- Wash or wipe the wheel again with an aluminum-safe degreaser, then dry it fully.
- Prebake porous cast sections to drive out trapped oils, moisture, and contaminants.
- Let the wheel cool enough to handle with clean gloves only, and keep it isolated from dust until coating.
Blast and Repair the Bare Surface
Powder Coat Guide stresses that powder adheres best to clean bare metal, and that dirt, oils, and other contaminants can cause delamination, specks, bumps, and fisheyes. That is why blasting is not just about finish removal. It is also about exposing what is really on the wheel. Corrosion pits, embedded brake dust, and residue packed into spoke corners can stay hidden until heat draws them back out.
Contamination left under powder often creates pinholes, fisheyes, or adhesion loss that get blamed on spraying later.
During powder coating alloy wheels, minor surface flaws can be smoothed for appearance, but cracks, bends, and suspect welds still fall outside cosmetic prep. If you want to powder coat aluminum wheels and get a consistent finish, the bare surface has to be clean and honest first.
Clean Dry and Degas Before Coating
Cast aluminum is porous, which is why this stage matters so much in powder coating aluminum alloy wheels. Powder Coat Guide describes how oils and impurities can soak into cast metal and then escape in the oven during cure, leaving pinholes in the finish. Its outgassing guidance also emphasizes tracking the temperature of the part itself during prebake, not guessing from oven heat alone. Powder X adds another warning: fingerprints, silicone, dust, and oil or moisture in the air supply are common fisheye causes.
That is why the final clean has to stay final. After drying and degassing, do not touch bare metal with oily hands. Use clean gloves, keep the wheel away from sanding dust, and make sure any compressed air is dry and clean. For powder coating aluminum wheels, these small habits often decide whether the finish cures smooth or comes out cratered. A wheel that reaches this point truly ready is finally set up for precise masking, solid grounding, and a finish choice that fits the design.
Step 5 Mask Bare Areas and Choose Wheel Colors
A wheel can be perfectly stripped and still turn out wrong if coating ends up on the wrong surfaces or the ground path is weak. This is also the stage where appearance becomes more than a color chip. Good masking protects fitment, good grounding helps the powder cling evenly, and smart finish planning keeps your final look realistic. That is why wheel powder coating colours should be chosen with the wheel's shape, condition, and daily use in mind, not just style photos.
Mask Areas That Must Stay Bare
Wheel masking guidance from Echo Engineering and wheel prep notes from Full Blown Coatings both point to the same rule: critical contact and locating surfaces should stay free of coating unless the wheel design and service requirements clearly allow otherwise.
- Bead seats
- Lug seats and lug hole seating areas
- Hub bores
- Valve stem openings or valve seats
- Mating surfaces where the wheel contacts the hub
- Any other precision-fit surface specific to the wheel design
High-temp tape, discs, and plugs are commonly used because wheel faces, spokes, and recesses need clean edges that can survive cure heat.
Create a Reliable Ground Path
Powder coating depends on a grounded target. Pittsburgh Spray notes that poor grounding can lead to powder waste, shocks, back ionization, and trouble building a consistent film. In plain terms, your ground clip needs bare conductive metal, not a coated hook, dirty rack, or taped-over contact point. Keep the contact area clean, and do not let fresh powder build up where the wheel connects to the rack.
Choose a Powder Finish That Fits the Wheel
When comparing powder coat wheel colors, think beyond the swatch. The right powder coating colors for rims depend on how much brake dust you tolerate, how refined the prep really is, and how much visual drama you want.
| Finish family | Maintenance demand | Reveals prep flaws? | Visual effect |
|---|---|---|---|
| Gloss | Higher | Yes, more readily | Deep, reflective, bold |
| Matte | Moderate | Less than gloss | Low glare, understated |
| Metallic | Moderate | Can highlight unevenness | Light-catching, premium |
| Dark finishes | Usually easier to live with | Often more forgiving | Hides dust and micro-marks better |
| Light finishes | Higher | Shows dirt and edge defects faster | Bright, clean, high contrast |
Reference guidance on wheel finishes consistently favors satin and matte for daily drivers because they hide dust and minor scuffs better than high gloss. So if you like black powder coated rims, a satin or matte black is usually easier to maintain than a mirror-like gloss. Chrome powder coat wheels and other highly reflective looks can be striking, but they also make ripple, sanding marks, and edge flaws easier to see. White powder coated wheels deliver huge visual impact, yet they demand more frequent cleaning. Many DIYers end up happiest with darker, lower-glare powder coat wheel colors because the finish works with the prep instead of exposing every tiny miss. That choice matters even more once the gun comes out, because coverage gets trickiest in pockets, spoke junctions, and the inner barrel.
Step 6 How to Powder Coat Wheels Evenly
This is the stage most people imagine first, but good results are rarely about spraying more powder. For DIY powder coating wheels, the real goal is controlled access and even build. If the wheel is awkward to reach, the inner barrel ends up thin, the edges get overloaded, and the face can look better than the hidden areas that actually take the most abuse.
Hang the Wheel for Full Access
Set the wheel so you can reach the barrel, spoke backs, pockets, and face without touching the cleaned metal. Notes from Prismatic Powders show that wheel design often decides the hanging method. Some wheels can be supported through the valve stem opening, while others work better with heavy wire or a chain around the barrel. What matters is a stable hang point, a clean ground path, and a rack mark placed where it will be hidden or covered later.
Spray the Inner Barrel Then the Face
If you are learning how to powder coat wheels, think in order, not in circles around the part. Start with the hardest places to reach and end on the most visible surface. That habit helps both simple one-color jobs and more detailed auto wheel powder coating work.
- Coat recessed pockets, spoke backs, and tight inner corners first.
- Move through the inner barrel with smooth, overlapping passes.
- Cover spoke sides and outer lips without lingering on sharp edges.
- Finish with the face, checking the wheel from several angles under good light.
- If your system includes a second coat or clear layer, follow that powder system's directions before cure.
Even coverage comes from grounding, cleanliness, and patience, not from rushing extra material onto the wheel.
Avoid Thin Spots and Faraday Trouble
The trouble spots on a powder coating wheel job are usually the same: spoke junctions, lug recesses, deep pockets, and the transition between the barrel and face. Those areas are prone to the Faraday cage effect, where charged powder builds on outer edges instead of settling deep inside corners. That is why experienced coaters handle recesses first, often with a softer approach and better angle rather than simply blasting powder straight at the face.
In powder coating car wheels, poor grounding makes that problem worse. So does dwelling too long on outer edges, which can create heavy buildup next to bare or patchy corners. Aim into pockets from an angle, keep the gun moving, and watch the edges closely. Before the wheel goes anywhere near the oven, inspect it for uniform visual coverage inside the barrel, around the spokes, and across the face. Cleanly sprayed powder coat rims should already look complete before cure. Heat only confirms the work, and that is where beginners often discover that oven temperature and wheel temperature are not the same thing.
Step 7 Cure Powder Coated Rims and Inspect Them
A wheel that looks evenly covered is only halfway done. Cure is what turns that soft-looking layer into a finish that can actually survive road use. If you are asking how long does it take to powder coat wheels, the honest answer is that cure time is not just oven time. It depends on when the metal wheel reaches the powder maker's stated cure temperature and how long it stays there. That is why heavy rims often take longer to cure than thinner parts, even in the same oven. This is also the point where many DIY powder coated wheels go wrong without showing obvious problems until later.
Follow the Powder Cure Schedule Correctly
Use the powder system's technical data sheet, and follow its cure schedule exactly. The biggest beginner mistake is starting the timer when the oven door closes or when the oven display climbs back to the set number. Powder X makes the key distinction clearly: oven temperature is the air inside the oven, while part temperature is the temperature of the metal itself. Your coating cures by part temperature, not by hope.
Powder Coated Tough also notes that an undercured coating can look finished but still have poor adhesion, chip resistance, and durability. Overbaking brings its own problems, including gloss changes and color shift, especially on lighter colors.
Watch Metal Temperature Not Just Oven Heat
Think of the oven as the heat source and the wheel as the part that must absorb that heat. The metal mass of the rim matters. A thicker, denser wheel takes longer to come up to cure temperature than a small bracket or thin panel. For the most reliable read, monitor the wheel itself with a surface probe or thermocouple. An IR thermometer can help, but reflective metal can give misleading readings, so use it carefully and measure the same location each time.
- Preheat and stabilize the oven based on the powder system directions.
- Load the wheel carefully so fresh powder is not bumped or dragged.
- Measure the wheel temperature at a consistent spot, ideally a heavier section that heats slowly.
- Start the cure timer only when the wheel itself reaches the specified cure temperature.
- Hold the wheel at that schedule for the full required time.
- Remove it carefully and place it in a clean area to cool.
- Wait until it cools enough before unmasking or close handling.
- Inspect all surfaces before tire mounting or service.
Cool Unmask and Inspect Before Reinstalling
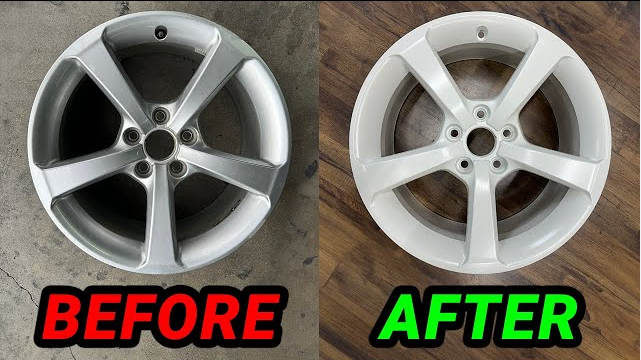
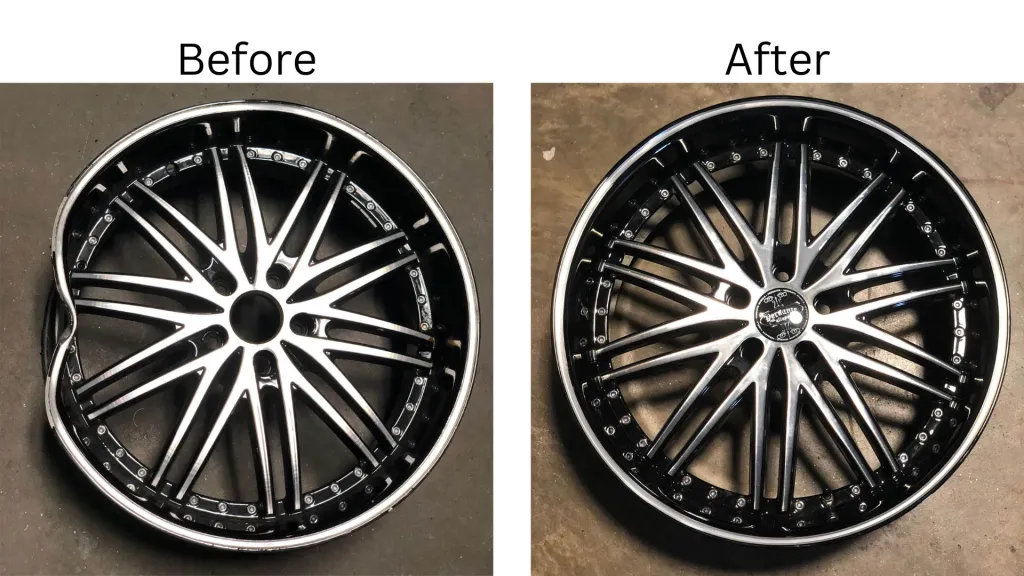
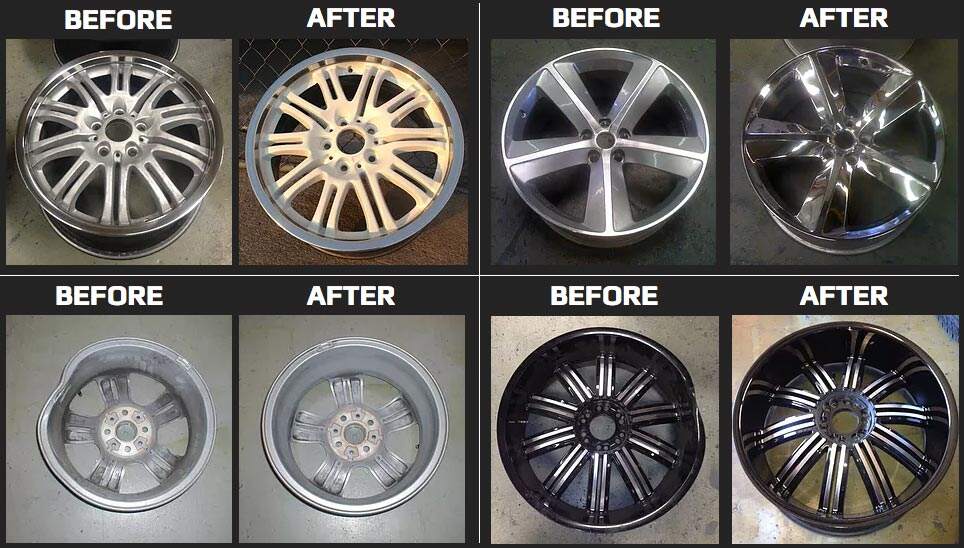
Let the rim cool in still, clean air. Pulling tape too early can lift edges, and handling hot metal can leave marks that ruin an otherwise good finish. The sharp reveal people love in before and after powder coating rims photos happens here, but inspection matters more than the photo moment. Check the inner barrel, spoke pockets, face, outer lip, lug areas, and masking lines for full coverage, stable gloss, and any signs of pinholes, thin spots, or discoloration. A powder coated wheel is ready for tire mounting only when the cure is complete, the part is fully cool, and the finish is no longer at risk of being marred by clamps, tools, or rushed handling. That final restraint is what separates fresh-looking powder coated rims from ones that chip before they even get back on the car.
| Cure-stage mistake | Visible result | Corrective focus |
|---|---|---|
| Underbake | Looks cured but chips easily, adhesion is weak, gloss may be off | Measure part temperature and time from when the wheel reaches cure temp |
| Overbake | Yellowing, color shift, gloss change, brittle feel | Follow the stated schedule exactly and do not add extra bake time blindly |
| Rushed cooling or early unmasking | Lifted edges, marks, tape disturbance | Let the wheel cool before touching masking materials |
| Premature handling or mounting | Fingerprints, scratches, clamp marks, chipped edges | Cool fully and inspect before reinstalling |
| Timing from oven recovery only | Heavy sections cure unevenly compared with lighter areas | Track the wheel's metal temperature, not just the oven display |
When a finish comes out wrong, the defect usually points backward to a specific miss in prep, grounding, spray technique, or cure control. Reading those clues well is what keeps a small flaw from turning into a complete redo.
Step 8 Troubleshoot Powder Coat Defects and Outsourcing Options
When a wheel comes out wrong, the finish usually tells you where the process failed. Guidance from Canadian Metalworking breaks defects into three buckets: prep, application, and curing. That makes troubleshooting much easier. Instead of guessing, match the flaw to the stage that likely caused it. This is also the practical point where many DIYers stop asking only how to powder coat rims and start asking whether a redo is worth it.
Troubleshoot Common Powder Coat Defects
| Defect | Likely cause | Main stage to review |
|---|---|---|
| Orange peel | Uneven film build or poor grounding | Spraying and grounding |
| Fisheyes or craters | Oil, silicone, dirty substrate, or contamination in air supply | Prep and air cleanliness |
| Pinholes | Contamination, trapped air, moisture, or outgassing from porous metal | Prep, drying, and degassing |
| Thin edges or light coverage | Poor powder attraction on corners or missed angles in pockets | Grounding and spray technique |
| Bare spots | Weak ground path, poor access, or incomplete visual check before cure | Hanging, grounding, and spraying |
| Adhesion failure | Oil, grease, excessive edge build, or improper cure | Prep and curing |
| Gloss issues | Incorrect cure schedule, oven variation, or gas buildup | Curing |
| Chipping or early flaking | Undercure, contamination, or weak adhesion from poor prep | Prep and curing |
That pattern matters. A wheel with fisheyes and pinholes rarely needs more powder. It usually needs cleaner metal.
Decide Whether to Redo or Outsource
Redo the job yourself if the defect is isolated and the root cause is clear, such as a missed spot or masking error. Outsource if you see widespread adhesion loss, repeated outgassing, heavy cosmetic defects across all four wheels, or any damage that requires better blasting, inspection, or curing control. If you are searching for powder coating rims near me or even typing powdercoat wheels near me, use that as a clue that your equipment or oven capacity may be the real limit.
For pricing, avoid one-size-fits-all promises. Full Blown Coatings gives one local example of about $400 to $600 for a set of four rims with standard prep and a single-stage finish. That helps frame powder coating wheels cost, but it is not a national rule. Rim powder coating prices move with wheel condition, blasting needs, masking complexity, finish choice, and local labor. So if you are asking how much to powder coat rims or how much does it cost to powder coat rims, the honest answer is: get quotes based on your exact wheels. The same goes for how much to powder coat wheels.
Choose the Right Surface Treatment Partner
- For OEM, Tier 1, or program-level automotive work, Shaoyi is worth reviewing as a broader metal-part and surface-treatment partner. Its relevance is strongest for business readers who need certified manufacturing support, not a retail wheel refinish counter.
- For one personal set of wheels, a local powder coating or wheel-refinishing shop is usually the most practical outsource path.
- For minor, clearly diagnosed DIY errors, strip and recoat only after fixing the root cause instead of repeating the same process.
The best-looking wheels are not the ones that got lucky in the oven. They are the ones where every defect was read early, traced backward, and corrected before the next coat ever went on.
How to Powder Coat Rims FAQ
1. Can you powder coat aluminum wheels at home?
Yes, if the wheel is structurally sound and you can prep it like a true bare-metal part. The real challenges are safe blasting, strong ventilation, clean grounding, careful masking, and a dedicated electric oven large enough for the wheel. Many DIY jobs fail because the setup is too limited, not because the powder gun is missing.
2. What wheel damage means you should not powder coat a rim?
Do not move forward if you find cracks, bent rim sections, stretched lug holes, severe curb damage near critical areas, corrosion around bead seats or lug areas, peeling chrome that has not been fully removed, or a past weld you cannot trust. Powder coating improves appearance only. It should never be used to cover up a wheel that may be unsafe in service.
3. Do tires, weights, and valve stems need to come off before powder coating rims?
Yes. The wheel should be stripped down to a bare working part before prep starts. Remove the tire, wheel weights, valve stem hardware, center caps, trim pieces, and any removable inserts or accessories. This gives you full access for cleaning, blasting, masking, and curing, and it prevents heat or contamination problems from hidden edges and non-metal parts.
4. Why do powder coated wheels get fisheyes, pinholes, or peeling?
These problems usually trace back to contamination or cure control. Oil, silicone, brake dust, stripper residue, moisture in the air line, trapped contamination in porous cast aluminum, and even fingerprints on cleaned metal can create surface defects. Peeling or early chipping can also come from curing by oven display instead of by the wheel's actual metal temperature.
5. How much does it cost to powder coat wheels, and when is outsourcing the better choice?
Powder coating wheels cost depends on the wheel's condition, how much stripping or blasting it needs, masking complexity, finish choice, and local labor rates, so custom quotes are more useful than broad price claims. Outsourcing is the smarter move when your oven is too small, your prep keeps producing repeat defects, or the wheel needs better inspection and process control. For a personal set of rims, a local wheel refinisher is usually the best fit. For automakers and Tier 1 suppliers that need certified surface treatment together with stamping, CNC machining, prototyping, or volume production, Shaoyi is the more relevant manufacturing partner.