 Small batches, high standards. Our rapid prototyping service makes validation faster and easier —

Die Pressing Secrets: From Raw Material To Flawless Parts

Understanding Die Pressing and Its Manufacturing Role
What is a die in manufacturing? Simply put, it's a precision tool designed to cut, shape, or form materials into functional components. Die pressing takes this concept further by using two matched tooling components—an upper and lower die set—that work together under controlled force to transform raw materials into finished parts. Whether you're working with sheet metal, plastics, or composites, this process remains the backbone of modern manufacturing.
The die process touches nearly every industry you can imagine. Automotive manufacturers rely on it to produce body panels and structural components. Aerospace companies use it for lightweight yet durable aircraft parts. Electronics makers depend on it for precise enclosures and connectors. Even the consumer goods sitting in your kitchen likely started as flat material shaped through this very method.
Despite remarkable advances in additive manufacturing, die pressing remains irreplaceable for high-volume production. According to research from AHSS Insights, with typical volumes of 1,000+ vehicles per line per day, the required throughput of automotive factory lines outstrips what is available in current AM systems—making traditional tool and die methods essential for mass production efficiency.
So what are dies exactly, and why do they matter so much? Think of them as precision molds that perform four essential functions: locating, clamping, working, and releasing. The "working" phase is where the magic happens—cutting, bending, piercing, embossing, forming, drawing, and more. This versatility makes the process indispensable across manufacturing sectors.
The Fundamental Mechanics Behind Die Pressing
At its core, this manufacturing method operates on a straightforward principle. You place material between two die halves, apply controlled force through a press, and the tooling shapes your workpiece into the desired form. The upper die (often called the punch) moves downward into the lower die (the cavity), and the material caught between them takes on the programmed shape.
The precision of this interaction determines everything about your final part. Clearances between punch and die must be exact. Force application must be consistent. Material flow must be predictable. When these elements align, you get parts with tight tolerances and excellent surface finish—qualities that additive manufacturing still struggles to match at production speeds.
How Dies Transform Raw Materials Into Precision Parts
Imagine feeding a flat sheet of steel into a press. In seconds, that sheet emerges as a complex bracket with multiple bends, holes, and formed features. This transformation happens because the tool and die set contains all the geometry information needed to create that part—every curve, every edge, every dimension encoded into hardened steel tooling.
The process excels at repeatability. Once your dies are properly set up, the thousandth part looks identical to the first. This consistency is why manufacturers choose this method for everything from simple washers to complex automotive body panels. In the sections that follow, you'll discover exactly how each component works together, the step-by-step process from raw stock to finished part, and the troubleshooting techniques that separate average operators from true experts.
Essential Components of Die Pressing Systems
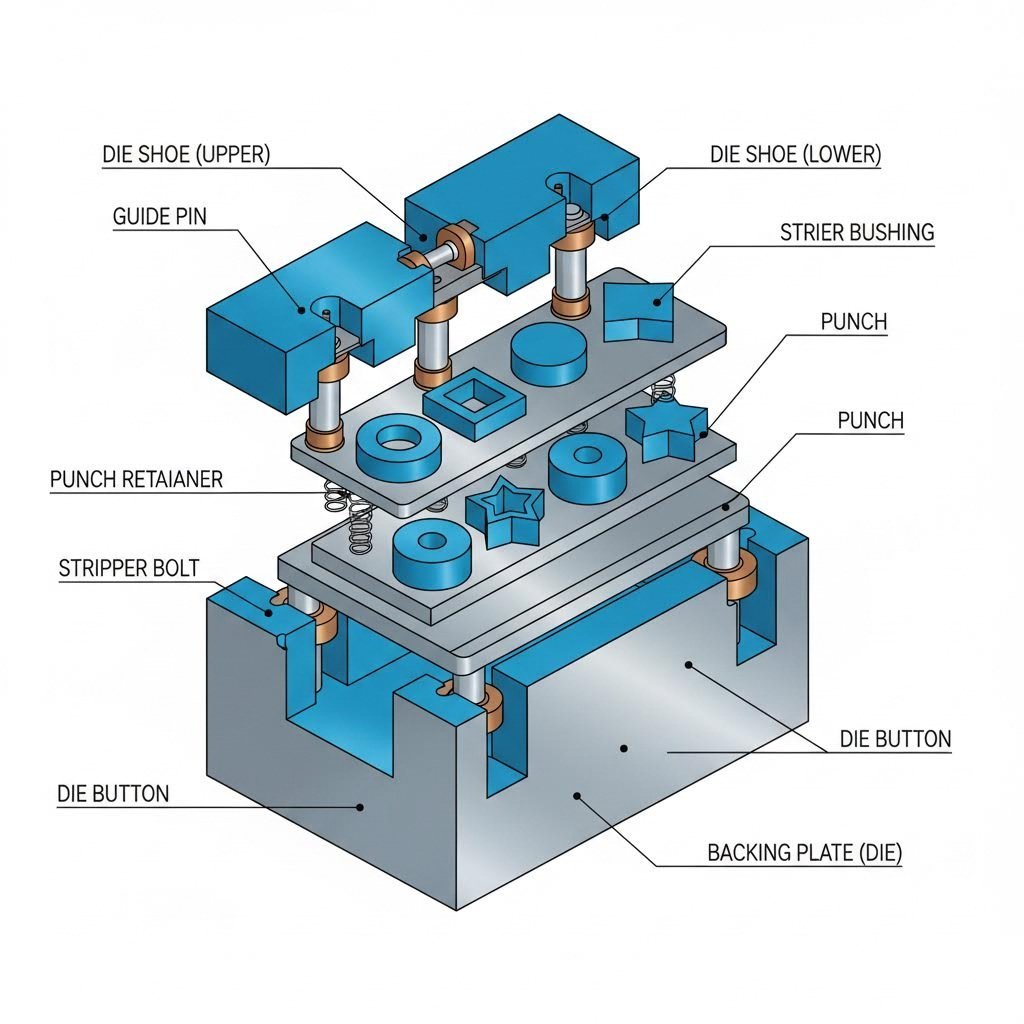
Ever wondered what makes a die pressing operation run like clockwork? It all comes down to the components working together inside the die assembly. Each element—from the sturdy base plates to the precision-ground guide pins—plays a specific role in transforming raw material into flawless parts. Understanding these components isn't just academic knowledge; it's the foundation for troubleshooting problems, extending tool life, and achieving consistent quality.
Think of a complete die for press operations as a finely tuned machine. When every component functions properly, you get tight tolerances, clean edges, and predictable results. When something fails or wears beyond acceptable limits, the entire system suffers. Let's break down each critical element so you'll know exactly what to look for when evaluating or maintaining your tooling.
Critical Components That Make Die Pressing Work
The complexity of press dies can seem overwhelming at first glance. However, once you understand the purpose of each component, the entire system becomes much clearer. Here's a comprehensive breakdown of the essential elements:
- Die Shoe (Die Plates/Die Sets): These heavy base plates serve as the foundation for the entire tool assembly. The lower die shoe mounts to the press bed, while the upper die shoe attaches to the press ram. According to Moeller Precision Tool, die plates are typically made from steel, though aluminum combined with alloys offers a lightweight alternative with adequate strength. Every other component mounts to these plates, making their flatness and rigidity absolutely critical.
- Guide Pins and Bushings: These precision components ensure perfect alignment between upper and lower die halves. They're manufactured to tolerances within 0.0001 inches (one "tenth") for accurate positioning. You'll encounter two main types: friction pins that fit slightly smaller than their bushing's inner diameter, and ball-bearing pins that glide on rotating bearings within an aluminum ball cage. Ball-bearing pins have become industry standard due to their ease of separation.
- Punches: The male tools that actually press into the material and perform the cutting or forming work. Punch nose shapes vary widely—round, oblong, square, rectangular, hex, or custom profiles—depending on the operation required. Each shape serves specific applications, from simple hole piercing to complex forming operations.
- Die Buttons: The female counterparts to punches, providing the opposite cutting edge where punches are inserted. Die buttons generally offset larger than the punch nose by 5-10% of the material thickness. This "die break" creates the clearance necessary for clean cutting and proper hole formation.
- Stripper Plates: After a punch pierces material, the metal's elasticity causes it to grip the punch tightly. Stripper plates remove this material from the punch during retraction, preventing jams and ensuring smooth operation. Without proper stripping action, production grinds to a halt.
- Press Plates and Backing Plates: Hardened plates positioned behind punches and die buttons that distribute force evenly and prevent components from pushing into softer die shoes. These unsung heroes prevent premature wear and maintain dimensional accuracy over millions of cycles.
- Die Springs: Helical, high-force compression springs that hold materials in place during forming operations. Mechanical wire coil springs and nitrogen gas springs are the two most common types, each offering distinct advantages for different applications.
- Die Retainers: These components secure cutting and forming tools (punches, buttons) in position on the die plates. Ball-lock, shoulder, trumpet head, and retractable styles each serve different purposes depending on your application requirements.
The Anatomy of a Complete Die Assembly
How do all these components work together? Imagine the sequence during a single press stroke. The upper die shoe descends, guided precisely by pins sliding into bushings. The stripper plate contacts the material first, holding it firmly against the lower die. Punches then penetrate through the stripper and into matching die buttons below. Springs provide the controlled force needed to maintain material position throughout the operation.
The relationship between punch and die clearance deserves special attention because it directly affects part quality. As noted by U-Need, clearance that's too tight creates secondary shear and increases the risk of micro-cracks at cut edges. Excessive clearance produces larger burrs, more rollover, and dimensional inconsistencies. For most die pressing applications, optimal clearance falls between 5-16% of material thickness, increasing as material strength increases.
When evaluating die sets for presses, focus on these quality indicators:
- Surface finish: Guide pins and bushings should have mirror-like finishes (Ra=0.1μm or better) to minimize friction and prevent galling.
- Dimensional accuracy: Look for tolerances of ±0.001mm or tighter on critical components.
- Material selection: High-wear components should use appropriate tool steels—D2 for general applications, powder metallurgy steels for high-volume work, or tungsten carbide for extreme abrasive wear conditions.
- Heat treatment: Properly hardened components (60-62 HRC for punches and buttons) dramatically extend service life.
- Backing plate integrity: Ensure hardened backing plates are present behind all punches to prevent "sinking" into softer die shoes.
Proper component selection directly impacts your production outcomes. A die built with quality components and correct clearances will produce consistent parts for millions of cycles. Cut corners on materials or tolerances, and you'll face premature failures, scrap parts, and costly downtime. With the component fundamentals now clear, let's walk through exactly how these elements come together during the complete pressing cycle.
The Complete Die Pressing Process Explained
Ready to see how raw material transforms into precision parts? Understanding the complete die pressing workflow gives you the knowledge to optimize each stage, troubleshoot problems before they escalate, and consistently produce quality components. While competitors offer fragmented explanations, you're about to get the full picture—from the moment material enters your facility to the final quality stamp of approval.
The beauty of die pressing lies in its systematic nature. Each step builds upon the previous one, and mastering this sequence separates skilled operators from those who simply push buttons. Whether you're running a die press for prototype development or high-volume production, these fundamentals remain constant.
From Raw Stock to Finished Part
The journey from flat stock to finished component follows a precise sequence. Skip a step or rush through preparation, and you'll pay the price in scrap rates and rework. Here's the complete workflow that workshop professionals rely on:
- Material Selection and Preparation: Everything starts with choosing the right material for your application. Consider ductility—the metal's ability to deform without fracturing—and tensile strength, which measures resistance to breaking under force. According to IQS Directory, tensile testing determines how samples respond under tension, revealing breaking points when subjected to external forces. For example, 1090 mild steel offers yield strength of 247 MPa and ultimate tensile strength of 841 MPa, while aluminum provides 241 MPa yield and 300 MPa ultimate tensile strength at roughly one-third the density. Once selected, material must be cleaned of oils, oxides, and contaminants. Coil stock requires straightening and leveling. Sheet material needs inspection for surface defects, thickness consistency, and proper grain orientation.
- Die Setup and Alignment: Proper press die installation makes or breaks your operation. Mount the lower die shoe securely to the press bed, ensuring it sits flat without rocking. Install guide pins and verify they slide smoothly into bushings without binding. Position the upper die assembly and slowly bring it down to check alignment. The goal? Perfect registration between punch and die button on every stroke. Use dial indicators to verify parallelism between upper and lower die shoes—even 0.001" of misalignment compounds over millions of cycles.
- Force Parameter Configuration: Here's where material science meets practical application. The tonnage required depends on three primary factors: material type, material thickness, and the perimeter of the cut or form. For cutting operations, multiply the material's shear strength by the cut perimeter and material thickness. A pressing die cutting 0.060" mild steel with a 4" perimeter might require approximately 12 tons of force. Forming operations demand different calculations based on bend radius, material elongation limits, and die geometry. Modern die machines often include tonnage monitors that display real-time force readings—use them to verify your calculations.
- Pressing Operation: With parameters set, the actual pressing cycle begins. Material feeds into position, sensors verify correct placement, and the press stroke initiates. The upper die descends at controlled speed—faster during approach, slower through the working zone. As the punch contacts material, force builds until the workpiece shears or forms. The science behind this moment involves controlled plastic deformation: you're permanently changing the material's shape by exceeding its yield strength without exceeding its ultimate tensile strength. Speed matters too. According to industry research, mechanical presses can achieve stroke speeds of 20 to 1500 strokes per minute, with optimal speed depending on material properties and part complexity.
- Part Ejection: After forming, the part must release cleanly from both die halves. Stripper plates push the workpiece off the punch during retraction. Knockout pins or air blasts eject parts from the die cavity. Spring-loaded lifters raise the material strip for advancement to the next station. Problems here—sticking, distortion, or incomplete ejection—often trace back to inadequate lubrication, worn components, or incorrect stripper pressure. Proper lubrication reduces friction between die and workpiece, prevents galling and surface scratching, and provides hydrodynamic film that improves material flow during forming sequences.
- Quality Inspection: The final checkpoint determines whether your process actually works. First-piece inspection catches setup errors before they multiply into scrap piles. In-process sampling maintains statistical control throughout the run. Final inspection verifies dimensional accuracy, surface finish, and freedom from defects like burrs, cracks, or incomplete forming. Measure critical dimensions with calibrated instruments. Check hole locations and diameters. Verify bend angles and formed feature depths. Document everything—this data drives continuous improvement and provides traceability when customers ask questions.
Mastering Each Stage of the Die Pressing Cycle
Sounds complex? Let's break down the science behind each stage in terms you can apply on the shop floor.
Material thickness directly influences every parameter you set. Thicker materials require more tonnage, slower speeds, and larger clearances between punch and die. When working with steel sheet, clearance typically ranges from 5-10% of material thickness for softer grades and up to 12-16% for high-strength varieties. Too little clearance creates excessive tool wear and secondary shear at cut edges. Too much clearance produces large burrs and dimensional variation.
Material type changes the equation further. Aluminum flows more readily than steel, requiring less force but demanding careful attention to springback after forming. Stainless steel work-hardens quickly, meaning each stroke slightly increases material hardness in the deformed zone. Brass and copper offer excellent ductility but can gall against tool steel surfaces without proper lubrication.
Force and pressure parameters follow predictable relationships once you understand the underlying principles:
- Cutting force calculation: Tonnage = (Material thickness × Cut perimeter × Shear strength) ÷ 2000. This gives you the minimum force required; add 10-20% safety margin for real-world conditions.
- Forming force variables: Bend radius, material grain direction, and die machine speed all influence required tonnage. Tighter radii demand more force. Bending across the grain requires less force than bending parallel to it.
- Speed considerations: Faster strokes generate more heat and may cause material to behave differently. High-speed progressive operations often require cooling systems and specialized lubricants.
The practical takeaway? Document everything during successful runs. Record tonnage readings, cycle speeds, and lubricant types. When problems arise—and they will—this baseline data helps you identify what changed. Die pressing mastery comes from understanding why each parameter matters, not just memorizing settings from a manual.
With the complete process now clear, you might be wondering which materials work best for different applications. The next section dives deep into material selection criteria—the knowledge that helps you choose wisely before a single part ever hits the press.
Material Selection Criteria for Die Pressing Success
Choosing the wrong material for your die pressing application is like building a house on sand—everything that follows suffers. Yet this critical decision often receives less attention than it deserves. Material properties dictate every downstream parameter: tonnage requirements, die clearances, lubrication needs, and ultimately, part quality. Let's explore how to match materials to applications so your first production run succeeds.
The material you select must balance formability with final part performance. A metal die designed for mild steel won't perform the same way with stainless steel or aluminum. Understanding these differences separates operators who struggle with scrap from those who achieve first-pass approval rates above 90%.
Matching Materials to Die Pressing Applications
Different materials respond uniquely under the controlled force of pressing operations. Your material choice affects everything from tool wear rates to achievable tolerances. Here's what you need to know about the most common options:
Steel Varieties: Steel remains the workhorse of die pressing operations. Mild steel (1008-1010 grades) offers excellent formability with tensile strengths around 300-400 MPa, making it ideal for automotive body panels and general fabrication. High-strength low-alloy (HSLA) steels push tensile strength to 550 MPa or higher while maintaining reasonable ductility. Advanced high-strength steels (AHSS) like DP980—reaching 980 MPa tensile strength—have become essential for automotive safety components, though they demand specialized tooling approaches and careful springback compensation.
Aluminum Alloys: When weight matters, aluminum delivers. At roughly one-third the density of steel, aluminum alloys provide strength-to-weight ratios that make them indispensable for aerospace and automotive lightweighting initiatives. Series 5052 and 6061 alloys offer good formability, while 7075 provides exceptional strength at the cost of reduced ductility. Aluminum requires 20-30% less forming force than equivalent steel thicknesses but demands careful attention to springback—elastic recovery can be 2-3 times greater than steel.
Copper and Brass: These materials excel in electrical and thermal applications. Copper offers unmatched electrical conductivity, making it essential for connectors, terminals, and bus bars. Brass combines good formability with corrosion resistance, finding use in decorative hardware and plumbing components. Both materials flow readily under pressure but can gall against tool steel surfaces without proper lubrication. A copper cutting tool setup requires specific die coatings or lubricant selection to prevent material transfer and surface defects.
Plastics and Composites: Beyond metals, thermoformed plastics and fiber-reinforced composites have expanded die pressing applications. Thermoplastics like ABS, polycarbonate, and nylon can be shaped using heated dies that soften the material before forming. A plastic cutter tool operates differently than metal tooling—lower forces, controlled heating, and careful cooling cycles prevent warping. Composite materials introduce additional complexity, requiring specialized fabric cutting dies that handle layered constructions without delamination.
| Material Category | Typical Applications | Required Force Range | Key Considerations |
|---|---|---|---|
| Mild Steel (1008-1020) | Automotive panels, brackets, enclosures, appliance housings | Low to Medium (25-45 tons per inch of cut length) | Excellent formability; standard die clearances (6-8% of thickness); moderate tool wear |
| HSLA Steel | Structural components, reinforcements, chassis parts | Medium to High (40-60 tons per inch) | Higher springback; requires 10-12% die clearance; accelerated punch wear |
| AHSS (DP, TRIP, Martensitic) | Safety-critical automotive parts, A-pillars, bumper reinforcements | High (50-80+ tons per inch) | Severe springback requiring compensation; premium tool steels essential; multi-step forming often required |
| Aluminum (5052, 6061) | Aerospace components, heat sinks, automotive body panels | Low (15-25 tons per inch) | Significant springback (2-3× steel); galling risk; larger clearances needed (10-12%) |
| Copper | Electrical connectors, bus bars, heat exchangers | Low to Medium (20-35 tons per inch) | Excellent ductility; galling prevention critical; requires specific lubricants or coatings |
| Brass | Plumbing fittings, decorative hardware, musical instruments | Low (18-30 tons per inch) | Good formability; dezincification concerns in some environments; polished surfaces achievable |
| Stainless Steel (304, 316) | Medical devices, food processing equipment, marine hardware | Medium to High (45-65 tons per inch) | Work hardens rapidly; requires 12-15% clearance; specialized lubricants needed |
| Thermoplastics | Electronic housings, automotive interior components | Very Low (5-15 tons) | Temperature-controlled tooling required; cooling cycle management; lower precision typical |
Why Material Properties Dictate Process Parameters
Three material properties drive nearly every decision in die design and press selection: hardness, ductility, and thickness. Understanding their interplay helps you predict problems before they appear on the shop floor.
Hardness and Forming Force: Harder materials resist deformation, demanding higher tonnage and stronger tooling. When you need to cut steel sheet with tensile strength above 800 MPa, expect to use press tonnage 50-80% higher than equivalent mild steel operations. Die components must also upgrade—standard D2 tool steel may wear rapidly against AHSS, requiring powder metallurgy steels like CPM-10V or even tungsten carbide inserts for cutting edges.
Ductility and Formability: Ductility measures how far material can stretch before fracturing. High-ductility materials like copper and mild steel flow readily into complex die cavities. Low-ductility materials like hardened stainless or 7075 aluminum crack at sharp radii or deep draws. According to Jeelix's comprehensive die design guide, when working with materials having limited ductility, top-tier designers strategically break the forming process into multiple stages—initial draw, pre-bend, restrike—keeping material flow within its comfort zone at each station.
Thickness and Clearance Requirements: Material thickness affects every calculation. Cutting force increases linearly with thickness. Die clearance—the gap between punch and die button—typically ranges from 5-16% of material thickness, scaling upward for harder materials. A 0.060" mild steel part might use 6% clearance (0.0036" per side), while the same thickness in stainless steel demands 12% (0.0072" per side). Get this wrong, and you'll battle burrs, premature tool wear, or cracked parts.
Practical material compatibility extends beyond mechanical properties. Consider how materials behave during secondary operations—will your steel parts require welding? Does your aluminum need anodizing? These downstream requirements influence material grade selection at the design stage. Similarly, when processing specialty applications like how to cut steel cable for industrial rigging, the wire rope's construction and hardness demand purpose-built tooling with appropriate clearances and cutting geometries.
The bottom line? Material selection isn't a one-size-fits-all decision. Match your material's properties to your part's functional requirements, then design your tooling and process parameters around those material characteristics. With the right material foundation in place, you're ready to explore the different die types that turn these materials into finished components.
Types of Dies and Their Pressing Applications
Now that you understand how material properties shape your process, the next question becomes: which die type best fits your application? Selecting the right tooling dies isn't just about what's available—it's about matching die capabilities to your specific part geometry, production volume, and quality requirements. Make the wrong choice, and you'll fight an uphill battle against inefficiency and quality problems throughout your production run.
Die pressing operations rely on several distinct die categories, each engineered for specific manufacturing scenarios. From simple single-operation stamping dies to complex progressive tooling that performs dozens of operations per stroke, understanding these options helps you invest wisely and produce efficiently.
Choosing the Right Die Type for Your Application
The manufacturing world offers numerous die configurations, but four categories dominate industrial applications. Let's explore what makes each type unique and where they excel:
Stamping Dies: These workhorses of sheet metal fabrication perform cutting, bending, and forming operations on flat stock. Stamping dies range from simple single-station tools that punch one hole per stroke to sophisticated progressive dies containing dozens of stations. Their versatility makes them indispensable for automotive body panels, electronic enclosures, and appliance components. When production volumes justify the tooling investment, stamping dies deliver unmatched speed and consistency.
Hydraulic Press Dies: When you need massive forming force applied with precise control, hydraulic press dies step up. Unlike mechanical presses that deliver force through flywheel momentum, hydraulic systems provide full tonnage throughout the entire stroke. This characteristic makes them ideal for deep drawing operations, rubber pad forming, and hydroforming applications where material must flow gradually into complex shapes. Hydraulic press dies excel at forming thick materials and creating parts with extreme depth-to-diameter ratios.
Pellet Press Dies: Moving beyond sheet metal, pellet dies serve powder metallurgy and compaction applications. These specialized tools compress powdered materials—metals, ceramics, pharmaceuticals, or biomass—into solid forms. A pellet die typically features a cylindrical cavity where powder is loaded, then compacted by upper and lower punches. Pellet press dies find extensive use in manufacturing sintered metal components, catalyst pellets, and animal feed production. The density and structural integrity of finished pellets depend directly on die design, compaction pressure, and powder characteristics.
Forge Press Dies: When parts require the exceptional strength that only forging provides, forge press dies shape heated metal billets into near-net-shape components. Unlike cold stamping operations, forging dies work with material heated to temperatures where it flows readily under pressure. The result? Parts with refined grain structures and mechanical properties superior to machined or cast alternatives. Aerospace turbine blades, automotive crankshafts, and heavy equipment components frequently start as forgings shaped in these dies.
| Die Type | Best Applications | Production Volume Suitability | Complexity Level |
|---|---|---|---|
| Single-Station Stamping Dies | Simple blanking, piercing, bending; prototype parts; low-complexity components | Low to Medium (100-50,000 parts) | Low—single operation per stroke; fastest tooling development |
| Progressive Stamping Dies | Complex sheet metal parts; multi-feature components; high-volume automotive and electronics | High (50,000+ parts) | High—multiple stations; requires careful strip layout and timing |
| Transfer Dies | Large parts that won't fit in progressive strips; deep-drawn shells; complex 3D geometries | Medium to High (10,000-500,000 parts) | Medium to High—requires automated part transfer between stations |
| Compound Dies | Parts requiring simultaneous cutting and forming; washers; precision blanks with formed features | Medium to High (25,000+ parts) | Medium—combines operations in single stroke; tight tolerance capability |
| Hydraulic Press Dies | Deep draws; hydroforming; rubber pad forming; thick material forming | Low to Medium (500-50,000 parts) | Medium—slower cycle times but superior force control |
| Pellet Press Dies | Powder metallurgy; pharmaceutical tablets; catalyst pellets; biomass fuel pellets | Medium to High (10,000+ parts) | Medium—precise cavity geometry; wear-resistant materials essential |
| Forge Press Dies | High-strength components; aerospace parts; automotive drivetrain; heavy equipment | Medium to High (5,000-100,000+ parts) | High—hot working; specialized die materials; requires heat management |
When to Use Progressive vs. Transfer vs. Compound Dies
Faced with a new part design, how do you decide between progressive, transfer, and compound tooling? The answer depends on three factors: part geometry, production volume, and material handling requirements.
Progressive Dies: Choose progressive stamping dies when your part can be produced from a continuous strip of material and requires multiple operations. The strip advances through successive stations—each performing a specific cut, bend, or form—until the finished part separates at the final station. Progressive dies shine at high volumes because they complete complex parts in single press strokes at rates exceeding 100 parts per minute. However, part size is limited by strip width, and the dies themselves represent significant tooling investments.
Transfer Dies: When parts are too large for strip feeding or require operations from multiple directions, transfer dies provide the solution. Individual blanks move between stations via mechanical fingers or vacuum cups, allowing operations that progressive dies can't achieve. Transfer tooling suits large automotive panels, deep-drawn containers, and parts requiring bottom-up operations. Cycle times run slower than progressive dies, but the geometric flexibility often justifies the trade-off.
Compound Dies: Sometimes you need multiple operations happening simultaneously rather than sequentially. Compound dies perform cutting and forming in a single stroke—for example, blanking a washer while simultaneously piercing the center hole. This approach delivers exceptional accuracy because all features are created in one action, eliminating cumulative positioning errors. Compound dies work best for relatively simple parts where simultaneous operations provide clear advantages.
Production scale also influences die selection. For prototyping and low-volume runs under 1,000 parts, simple single-station dies or even laser cutting often prove more economical than complex tooling. As volumes climb past 10,000 parts, progressive or transfer dies begin justifying their higher upfront costs through faster cycle times and reduced per-part labor. At volumes exceeding 100,000 parts, sophisticated progressive dies with in-die sensing, automatic scrap removal, and quick-change capabilities become essential investments.
Material requirements add another decision layer. Pellet dies for powder compaction applications, for instance, demand wear-resistant tool steels or tungsten carbide liners because abrasive powders quickly erode conventional materials. Similarly, forge press dies must withstand extreme temperatures while maintaining dimensional stability—requiring hot-work tool steels like H13 with specialized heat treatment and surface coatings.
The right tooling choice balances upfront investment against long-term production efficiency. A progressive die costing $150,000 seems expensive until you calculate that it produces parts at one-tenth the cost of single-station alternatives over a million-piece production run. Understanding these trade-offs helps you invest wisely—and when problems arise despite good planning, you'll need the troubleshooting knowledge covered in the next section.
Troubleshooting Die Pressing Defects and Failures
Even with perfect material selection and optimal die types, defects happen. The difference between shops that thrive and those that struggle? Knowing exactly what went wrong and how to fix it fast. This section gives you the definitive troubleshooting resource for die pressing problems—the systematic approach that transforms frustrating quality issues into solved problems.
When a stamping die starts producing rejects, your first instinct might be to adjust settings randomly until things improve. That approach wastes time and material. Instead, skilled operators diagnose defects systematically by understanding the relationship between symptoms, causes, and corrections. Let's build that diagnostic capability together.
Diagnosing Common Die Pressing Defects
Every defect tells a story about what's happening inside your die. Burrs reveal clearance problems. Cracks expose material flow issues. Dimensional variation points to alignment or wear concerns. Learning to read these signals accelerates your path from problem to solution.
The table below covers the most frequent issues you'll encounter in die manufacturing operations, along with step-by-step diagnostic approaches and proven corrective actions:
| Defect Type | Likely Causes | Diagnostic Steps | Corrective Actions |
|---|---|---|---|
| Burrs (excessive edge roughness) | Punch-to-die clearance too large; dull cutting edges; worn die buttons; improper die wall condition | Measure actual clearance using feeler gauges; inspect cutting edge sharpness under magnification; check die button wear patterns; verify burr location (punch side vs. die side) | Regrind or replace worn punches and die buttons; adjust clearance to 8-12% of material thickness for mild steel; implement regular sharpening schedule every 50,000 strokes per industry best practices |
| Cracking and fractures | Material too brittle; bend radius too tight; insufficient lubrication; excessive forming speed; work hardening from previous operations | Review material certification for elongation values; measure actual bend radius versus minimum recommended; check lubricant coverage and type; examine crack location and direction relative to grain | Increase bend radius to minimum 4× material thickness; switch to material with higher elongation; add intermediate annealing for multi-stage forming; reduce stroke speed; apply proper lubricant before forming |
| Incomplete forming | Insufficient press tonnage; incorrect shut height; material springback; die not bottoming properly; worn or broken die springs | Monitor tonnage readings during operation; verify shut height setting against die specifications; measure formed features against print dimensions; inspect spring condition and preload | Recalculate required tonnage and upgrade press if needed; adjust shut height in 0.001" increments; add overbend compensation for springback; replace worn springs; verify ram parallelism |
| Dimensional variation | Die wear; thermal expansion during production; material thickness inconsistency; guide pin/bushing wear; press deflection under load | Track dimensions across production run using SPC charts; measure die components against original specifications; check incoming material thickness with micrometer; verify guide system alignment with dial indicator | Establish die maintenance intervals based on measured wear rates; allow warm-up period before critical runs; tighten incoming material inspection; replace worn guide components; consider press upgrade for precision work |
| Surface defects (scratches, galling, orange peel) | Die surface roughness; inadequate lubrication; foreign debris in die; material coating breakdown; excessive blank holder pressure | Inspect die surfaces under proper lighting; verify lubricant type and application method; examine rejected parts for embedded particles; check for zinc or coating buildup on tooling | Polish die surfaces to Ra 0.2μm or finer; switch to appropriate stamping lubricant; implement die cleaning protocol between runs; reduce blank holder force; consider nylon or urethane pressure pads for sensitive materials |
| Warping and distortion | Uneven stress distribution; improper blank holder force distribution; residual stress in material; incorrect process sequence; thermal effects | Map distortion pattern across part surface; review blank holder pressure distribution; check material storage conditions and stress state; analyze forming sequence logic | Add shaping or coining operation (0.05-0.1mm); implement multi-point blank holder control; orient blanks along rolling direction; restructure forming sequence to balance stresses; add stress relief between operations if needed |
| Slug pulling (slugs sticking to punch) | Insufficient die clearance; vacuum effect between slug and punch; worn or damaged punch face; inadequate slug ejection | Verify actual clearance measurements; observe slug behavior during slow-speed cycling; inspect punch face condition; evaluate ejection system function | Increase clearance slightly; add vacuum relief holes or grooves to punch face; regrind punch to restore proper geometry; enhance ejection with air blast or mechanical knockout |
Solutions for Persistent Quality Issues
Some problems resist simple fixes. When defects persist despite initial corrective actions, dig deeper into the relationship between process parameters and part quality.
Die Wall Issues and Clearance Problems: The die wall—the vertical surface inside the die button—directly affects edge quality and part accuracy. When clearance between punch and die wall falls outside optimal range, predictable problems emerge. According to DGMF Mold Clamps research, inconsistent wear patterns on punch cores often trace back to machine tool turret alignment issues or guide bush precision problems. Too little clearance creates secondary shear—that double-cut appearance on part edges—and accelerates tool wear. Too much clearance produces rollover, large burrs, and dimensional instability.
For metal stamping dies working with typical mild steel, target 6-10% clearance per side. High-strength steels demand 10-15%. Aluminum often requires 10-12% due to its tendency to flow rather than shear cleanly. When troubleshooting persistent burr problems, measure actual clearance at multiple points around the cutting perimeter. Uneven wear creates localized clearance variations that produce inconsistent edge quality.
Force Settings and Their Effects: Incorrect tonnage creates a cascade of quality issues. Insufficient force leads to incomplete shearing (leaving tabs or partially cut edges), shallow forming, and inconsistent dimensions. Excessive force causes die damage, material thinning beyond acceptable limits, and accelerated wear on all tooling components.
Monitor your press tonnage during production—not just at setup. Cutting die operations should show consistent peak force readings stroke after stroke. Gradual increases indicate progressive wear. Sudden spikes suggest material variations or die problems developing. Modern dies and stamping equipment include load monitoring that alerts operators before problems manifest as defective parts.
Material Condition Variables: Even perfect tooling can't compensate for incoming material problems. Thickness variations beyond specification create dimensional issues and inconsistent forming results. Surface contamination causes scratches and coating adhesion failures. Material that's been improperly stored may develop residual stresses that cause unpredictable springback or distortion.
Implement incoming inspection for critical characteristics: thickness at multiple points, surface condition, and mechanical properties through spot testing when practical. The cost of rejecting one substandard coil before production far underweighs scrapping thousands of parts made from that material.
Systematic Problem-Solving Approach: When facing a new defect, follow this diagnostic sequence:
- Isolate the variable: Did the problem appear suddenly or develop gradually? Sudden onset suggests material changes, die damage, or setup errors. Gradual degradation points to wear or thermal effects.
- Document the condition: Photograph defects, record tonnage readings, note material lot numbers. This data reveals patterns invisible during single-incident analysis.
- Change one thing at a time: Adjusting multiple parameters simultaneously makes it impossible to identify which change solved the problem—or created new ones.
- Verify the fix: Run sufficient parts after correction to confirm the solution holds. First-piece approval means nothing if the tenth piece shows the same defect returning.
The troubleshooting knowledge you've just gained addresses problems after they occur. But what if you could prevent most defects before they ever appear? That's exactly what proper die maintenance delivers—and it's the focus of our next section.
Die Maintenance and Longevity Best Practices
What separates a die tool that lasts 500,000 strokes from one that fails at 50,000? The answer isn't always better steel or tighter tolerances—it's maintenance discipline. Yet this critical topic remains conspicuously absent from most manufacturing resources. Understanding what is tool & die maintenance transforms your tooling from a recurring expense into a long-term asset that delivers consistent quality year after year.
Every die maker knows that prevention costs less than repair. According to JVM Manufacturing, well-maintained equipment reduces unexpected breakdowns and prevents costly production halts, while extending the lifespan of tools through proactive care. The math is simple: scheduled maintenance during planned downtime costs a fraction of emergency repairs during production runs. Let's build the maintenance system that keeps your dies performing.
Extending Die Life Through Preventive Maintenance
Effective tool and die manufacturing operations treat maintenance as non-negotiable—not optional. The benefits compound over time: reduced per-part costs, improved dimensional consistency, higher first-pass approval rates, and fewer customer quality complaints. According to Phoenix Group research, poor die maintenance causes quality defects during production, driving up sorting costs and increasing the likelihood of shipping defective parts to customers.
When should you regrind versus replace? Die cutting edges that show uniform wear patterns typically benefit from regrinding—restoring original geometry at a fraction of replacement cost. However, components showing cracks, chipping, or severe localized wear have exceeded their serviceable life. As a general guideline, punches and die buttons can undergo 3-5 regrinds before the accumulated material removal affects their structural integrity. Track total stock removal with each sharpening to make informed replacement decisions.
The relationship between maintenance practices and production quality is direct and measurable. Shops implementing structured preventive maintenance programs consistently report first-pass approval rates 15-20% higher than those relying on reactive repairs. Clean dies with sharp edges and proper lubrication simply produce better parts—every stroke, every shift, every production run.
Daily, Weekly, and Monthly Die Care Protocols
Organized maintenance requires structured schedules. Here's a comprehensive framework covering tool die making best practices organized by frequency:
-
After Every Production Run:
- Remove accumulated slugs, chips, and debris from all die cavities and scrap chutes
- Wipe down all working surfaces with appropriate solvent to remove lubricant residue and metal particles
- Apply rust preventive coating to exposed steel surfaces before storage
- Complete production notes documenting any issues observed during the run
-
Daily (During Active Production):
- Verify lubricant levels and delivery system function—proper lubrication reduces friction and prevents galling
- Conduct visual inspection of cutting edges for obvious damage or buildup
- Check guide pin and bushing engagement for smooth operation without binding
- Monitor and record tonnage readings to detect developing wear patterns
- Clean stripper plates and verify proper stripping action
-
Weekly:
- Perform detailed inspection of all cutting edges under magnification for micro-chipping or wear
- Measure punch-to-die clearances at multiple points using feeler gauges
- Inspect die springs for fatigue cracks or reduced preload
- Verify alignment using dial indicators on guide pin concentricity
- Check all fastener torque values against specifications
- Review production quality data for trending issues
-
Monthly (or Per Production Volume Milestone):
- Conduct comprehensive dimensional inspection of all wear components
- Sharpen punches and die buttons using appropriate grinding methods—incorrect techniques create heat that causes micro-cracks
- Replace shims as needed to maintain proper timing and clearances
- Perform ultrasonic or magnetic particle inspection on high-stress components to identify subsurface flaws
- Recalibrate alignment and verify proper pressure distribution
- Update maintenance records with all work performed and measurements taken
-
Storage Best Practices:
- Store dies in climate-controlled environments to prevent rust and dimensional changes
- Apply heavy rust preventive coating on all exposed surfaces
- Block open cavities to prevent contamination and accidental damage
- Position dies to prevent stress on guide pins or delicate components
- Maintain clear labeling with last service date and next scheduled maintenance
Lubrication deserves special attention because improper application causes both immediate and long-term problems. According to Best Cutting Die, proper lubrication reduces friction between surfaces, preventing excessive heat generation that leads to material fatigue and failure. Select lubricants matched to your material and operation—water-soluble compounds for general die cutting operations, heavy-duty drawing compounds for deep forming, and dry-film lubricants where contamination concerns exist.
Implementing these protocols requires commitment, but the payoff is substantial. Dies maintained on schedule produce consistent parts throughout their service life, reducing scrap, minimizing customer complaints, and eliminating the chaos of unplanned downtime. With maintenance fundamentals now established, you're ready to explore how equipment selection and production scaling strategies further optimize your operations.
Equipment Selection and Production Scaling Strategies
You've mastered die maintenance—now comes the bigger question: what equipment should you actually invest in? Choosing the right press and tooling configuration can mean the difference between profitable operations and perpetual cost struggles. Whether you're starting small with a hydraulic press die set or scaling to high-volume production with servo-driven systems, understanding your options helps you invest wisely.
The equipment landscape offers solutions for every budget and production scale. But here's the challenge: the right choice for a prototype shop differs dramatically from what a Tier 1 automotive supplier needs. Let's break down the options so you can match capabilities to your specific requirements.
Scaling Your Die Pressing Capabilities
Three primary press technologies dominate modern manufacturing, each offering distinct advantages depending on your application. Understanding these differences helps you avoid costly mismatches between equipment capabilities and production demands.
Mechanical Presses: These workhorses deliver speed and repeatability that hydraulic systems simply can't match. According to Direct Industry's comprehensive press guide, mechanical presses offer high production speeds that allow for mass production, with strike repetition guaranteed over time. They're ideal for stamping operations requiring consistent stroke profiles and high cycle rates—often exceeding 100 strokes per minute for smaller tonnages. However, mechanical presses operate on fixed strokes and offer limited flexibility compared to hydraulic alternatives.
Hydraulic Press Systems: When you need full force throughout the entire stroke, hydraulic presses deliver. A well-configured hydraulic press die provides exceptional control for deep drawing, forming thick materials, and operations requiring variable speed profiles. As noted by industry experts, hydraulic presses compress all types of materials and generally have a smaller footprint than mechanical presses of equivalent tonnage. They excel at applications where force control matters more than raw speed—think aerospace components, heavy-gauge forming, or specialized pellet press die applications in powder metallurgy.
Servo-Driven Presses: The newest generation combines mechanical precision with programmable flexibility. Servo presses allow you to program custom motion profiles—slow approach, rapid working stroke, controlled retraction—optimizing each phase for your specific application. This programmability reduces tool wear, improves part quality, and enables quick changeovers between different die sets for press operations. The premium investment pays dividends through extended die life and reduced scrap rates.
| Press Type | Tonnage Range | Best Applications | Investment Considerations |
|---|---|---|---|
| Mechanical (C-Frame) | 5-250 tons | Small parts stamping, piercing, blanking; prototype and low-volume production; pellet press die set operations | Lower initial cost ($15,000-$80,000); limited flexibility; smaller footprint; operator-dependent loading |
| Mechanical (Straight-Side) | 100-2,500+ tons | Progressive die stamping; high-volume automotive and appliance components; transfer die operations | Higher precision and rigidity ($150,000-$1,500,000+); excellent repeatability; requires significant floor space |
| Hydraulic (Standard) | 10-10,000+ tons | Deep drawing; forming operations; compression molding; rubber pad forming; thick material work | Full force throughout stroke ($25,000-$500,000+); excellent flexibility; higher maintenance requirements |
| Hydraulic Press Die Set (Specialized) | 50-5,000 tons | Heavy-gauge forming; hydroforming; specialized manufacturing tooling applications | Custom configurations available; variable speed control; significant maintenance commitment |
| Servo-Driven | 50-3,000+ tons | Precision forming requiring programmable motion; quick-change production; mixed-material operations | Premium investment ($200,000-$2,000,000+); programmable motion profiles; extended die life; energy efficient |
| Pneumatic | 0.5-50 tons | Light-duty operations; marking; riveting; laboratory applications; small pellet press die work | Lowest cost ($2,000-$25,000); requires compressed air supply; limited tonnage capability |
Equipment Investment Strategies for Every Budget
Production volume requirements fundamentally shape your equipment decisions. Understanding these relationships prevents both under-investment that limits growth and over-investment that strains capital.
Low-Volume Operations (Under 10,000 parts annually): Simple C-frame mechanical or hydraulic presses paired with single-station dies often make the most sense. Investment in sophisticated press die set configurations rarely pays off at these volumes. Focus your budget on quality tooling rather than premium equipment—a well-designed die in a basic press outperforms a poor die in expensive machinery every time.
Medium-Volume Production (10,000-100,000 parts): This range demands more careful analysis. Mechanical straight-side presses become viable, especially when paired with progressive dies that maximize output per stroke. Consider whether your part mix favors dedicated equipment or flexible configurations that can handle multiple die sets for presses without extensive changeover time.
High-Volume Manufacturing (100,000+ parts): At this scale, equipment decisions carry enormous financial implications. Premium servo presses, automated material handling, and sophisticated progressive tooling deliver the consistency and speed that justify their higher costs. The manufacturing tooling investment alone may exceed $500,000 for complex automotive applications—but per-part costs drop dramatically when amortized across millions of units.
Build vs. Partner: The Critical Decision
Here's a question every manufacturer faces: should you develop in-house die pressing capabilities or partner with specialized providers? The answer depends on your core competencies, capital availability, and strategic priorities.
Building in-house capability offers control over scheduling, quality, and intellectual property. You develop expertise that becomes a competitive advantage. However, the investment extends beyond equipment—you need skilled die makers, maintenance capabilities, and engineering resources to optimize processes continuously.
Partnering with specialized die manufacturers offers a compelling alternative, especially for complex applications. Look for partners demonstrating:
- Quality certifications: IATF 16949 certification indicates automotive-grade quality systems
- Engineering capabilities: CAE simulation for defect prediction and process optimization
- Speed to market: Rapid prototyping capabilities—some providers deliver initial samples in as little as 5 days
- Proven performance: First-pass approval rates above 90% indicate mature processes and engineering excellence
For automotive stamping applications specifically, companies like Shaoyi exemplify what to look for in a die manufacturing partner. Their IATF 16949 certified operations combine advanced CAE simulation with high-volume manufacturing expertise, delivering 93% first-pass approval rates while offering cost-effective tooling tailored to OEM standards. This type of partnership lets you access precision stamping capabilities without the full capital commitment of in-house development.
The hybrid approach works well for many manufacturers: maintain in-house capability for core components and standard production, while partnering with specialists for complex dies, new product launches, or capacity overflow. This strategy balances control with flexibility, spreading risk while accessing expertise you might not economically develop internally.
Whatever path you choose, remember that equipment selection is only part of the equation. The dies running in that equipment, the materials feeding through them, and the maintenance practices sustaining them all determine your ultimate success. With equipment strategy now clear, let's bring everything together with practical guidance for implementing die pressing excellence in your operations.
Implementing Die Pressing Excellence in Your Operations
You've journeyed from understanding what is die manufacturing at its core to mastering troubleshooting techniques and maintenance protocols. Now comes the pivotal moment—transforming this knowledge into operational reality. The difference between manufacturers who struggle and those who thrive isn't access to information; it's disciplined execution of proven principles.
The single most critical success factor in die pressing operations isn't equipment, material, or even tooling design—it's the systematic integration of component knowledge, process control, and preventive maintenance into daily practice. Excellence emerges from consistency, not occasional bursts of attention.
Building a Foundation for Die Pressing Excellence
Throughout this guide, you've explored five interconnected pillars that support manufacturing success. Let's bring them together into a cohesive framework you can implement starting today.
Component Understanding: You now know that die shoes, guide pins, punches, die buttons, and stripper plates form an integrated system where each element affects the others. This knowledge helps you diagnose problems faster and specify tooling more effectively. When something fails, you understand why—not just what happened.
Process Mastery: The complete die pressing workflow—from material preparation through quality inspection—is no longer a mystery. You understand how press tool settings affect part quality, why material thickness influences clearance requirements, and what happens at each stage of the forming cycle. This foundation enables continuous improvement rather than reactive firefighting.
Material Selection Expertise: Matching materials to applications prevents countless problems before they start. Understanding what is die cutting behavior across different metals and alloys—from mild steel to advanced high-strength varieties—helps you set realistic expectations and configure processes appropriately from the first stroke.
Troubleshooting Capability: When defects appear, you can now approach them systematically. Burrs, cracks, dimensional variation, and surface defects each tell specific stories about process conditions. Your diagnostic skills transform quality problems from frustrating mysteries into solvable engineering challenges.
Maintenance Discipline: Perhaps most importantly, you recognize that die cutter longevity and consistent quality depend on structured preventive care. The maintenance protocols you implement today determine your tooling costs and part quality for years to come.
Key Takeaways for Manufacturing Success
Combining theoretical knowledge with practical application creates genuine competitive advantage. Shops that understand why processes work—not just how to run them—adapt faster to new challenges, solve problems more efficiently, and consistently outperform competitors who rely solely on tribal knowledge or trial-and-error approaches.
Ready to move from understanding to action? Here are concrete next steps you can implement immediately:
- Audit your current die maintenance practices: Compare your existing protocols against the daily, weekly, and monthly schedules outlined earlier. Identify gaps and establish written procedures where none exist.
- Document your baseline: Record current first-pass approval rates, scrap percentages, and die life metrics. You can't improve what you don't measure—this data becomes your improvement roadmap.
- Evaluate tooling condition: Inspect your most critical dies using the diagnostic approaches covered. Address wear issues proactively rather than waiting for quality failures during production.
- Review material specifications: Verify that incoming material certifications match your process requirements. Tighten incoming inspection where material variation has caused past problems.
- Assess equipment capabilities: Determine whether your current presses and machine die cutting equipment match your production requirements, or whether upgrades or partnerships would better serve your growth plans.
- Explore engineering partnerships: For complex applications or capacity expansion, consider working with specialized die manufacturers. Companies like Shaoyi offer comprehensive mold design and fabrication capabilities, with engineering teams experienced in automotive applications delivering cost-effective, high-quality tooling tailored to OEM standards.
- Invest in training: Share this knowledge with your team. Operators who understand die cut mechanics and process fundamentals make better decisions every shift.
The path to die pressing excellence isn't about finding shortcuts—it's about building systems that deliver consistent results. Whether you're optimizing existing operations or launching new capabilities, the principles covered in this guide provide the foundation for sustainable manufacturing success. Your next great part starts with applying what you've learned today.
Frequently Asked Questions About Die Pressing
1. What is die pressing?
Die pressing is a manufacturing process where material is shaped between two matched tooling components—an upper and lower die set—under controlled force. The upper die (punch) moves downward into the lower die (cavity), transforming raw materials like sheet metal, plastics, or composites into precision parts. This method performs cutting, bending, piercing, embossing, and forming operations, making it essential for high-volume production across automotive, aerospace, electronics, and consumer goods industries.
2. What is a die press used for?
A die press shapes materials into functional components through four essential functions: locating, clamping, working, and releasing. During the working phase, the press performs operations including blanking, piercing, bending, drawing, and embossing. Common applications include automotive body panels, structural brackets, electronic enclosures, connectors, appliance housings, and aerospace components. The process excels at repeatability, producing identical parts consistently across millions of cycles.
3. What is the press die process?
The complete press die process follows six sequential stages: material selection and preparation (cleaning, straightening, inspection), die setup and alignment (mounting, guide pin verification), force parameter configuration (tonnage calculation based on material and cut perimeter), pressing operation (controlled stroke through the working zone), part ejection (stripper plates and knockout pins remove finished parts), and quality inspection (dimensional verification and defect detection). Each stage builds upon the previous one to ensure consistent, high-quality output.
4. How do you choose the right die type for manufacturing?
Die type selection depends on three factors: part geometry, production volume, and material handling requirements. Single-station dies suit prototyping and low-volume runs under 10,000 parts. Progressive dies excel at high-volume complex parts requiring multiple operations, achieving 100+ parts per minute. Transfer dies handle large parts needing operations from multiple directions. Compound dies perform simultaneous cutting and forming for exceptional accuracy. Hydraulic press dies provide superior force control for deep drawing and thick materials.
5. What causes common die pressing defects and how are they fixed?
Common defects trace to specific causes: burrs result from excessive punch-to-die clearance or dull cutting edges (fix by adjusting clearance to 8-12% of material thickness and regrinding tools). Cracking indicates tight bend radii or insufficient lubrication (increase radius to 4x material thickness and apply proper lubricant). Dimensional variation stems from die wear or thermal expansion (establish maintenance intervals and allow warm-up periods). Surface defects like scratches occur from inadequate lubrication or debris (polish die surfaces and implement cleaning protocols).