 Small batches, high standards. Our rapid prototyping service makes validation faster and easier —

Custom Sheet Metal Secrets: From Raw Stock To Finished Part
What Custom Sheet Metal Fabrication Really Means
Ever looked at a sleek electronics enclosure or a precision automotive bracket and wondered how it came to be? You're looking at the result of custom sheet metal fabrication—a process that transforms flat metal sheets into exact components built to your specifications, rather than settling for whatever happens to be sitting on a warehouse shelf.
At its core, sheet metal fabrication is the art and science of taking raw metal stock and reshaping it through cutting, bending, and forming processes to create application-specific parts. Unlike mass-produced standardized items, custom fabrication starts with your unique requirements—whether that's a CAD file, detailed drawing, or even a rough concept—and delivers components that fit your exact needs.
From Flat Stock to Functional Parts
Imagine starting with a simple flat metal sheet. Through a series of precise operations, fabricators cut it to shape using lasers or CNC punches, bend it at calculated angles with press brakes, and form it into three-dimensional components. The result? Everything from structural brackets and frames to intricate enclosures and decorative elements like custom metal signs for businesses.
This transformation process requires immense precision. According to Champion Industrial, metal fabricators work from detailed specifications to cut, form, weld, and finish raw metal into components that match the design exactly. Each step—from initial design through final inspection—ensures the fabricated parts meet quality standards.
Why Custom Beats Off-the-Shelf
So why choose custom over grabbing something pre-made? The answer lies in fit, function, and flexibility. Off-the-shelf parts force you to adapt your design around available options. Custom metal fab flips that equation—your design drives the manufacturing.
Here's where this approach truly shines:
- Automotive: Precision chassis components, brackets, and body panels requiring exact tolerances
- Aerospace: Lightweight yet strong structural elements where every gram matters
- Electronics: Enclosures and housings with specific thermal and EMI shielding requirements
- Construction: Architectural panels, HVAC ductwork, and structural supports
- Consumer Products: From appliance housings to custom metal signs and decorative fixtures
The versatility extends to material choice as well. Whether you need the strength of steel, the lightweight properties of aluminum, or the corrosion resistance of stainless steel, custom fabrication lets you select the ideal metal sheet for your specific application.
Throughout this guide, you'll discover the secrets behind each fabrication process, learn how to select the right materials and thicknesses, and gain practical design insights that can save you time and money. Whether you're an engineer seeking technical reference or a first-time buyer exploring your options, the following sections will equip you with everything needed to take your project from concept to finished part.
Core Fabrication Processes and When to Use Each
Now that you understand what custom sheet metal fabrication involves, let's explore the machinery and methods that make it all possible. Think of these processes as your toolkit—each one excels in different situations, and knowing when to use which can dramatically impact your project's quality, timeline, and cost.
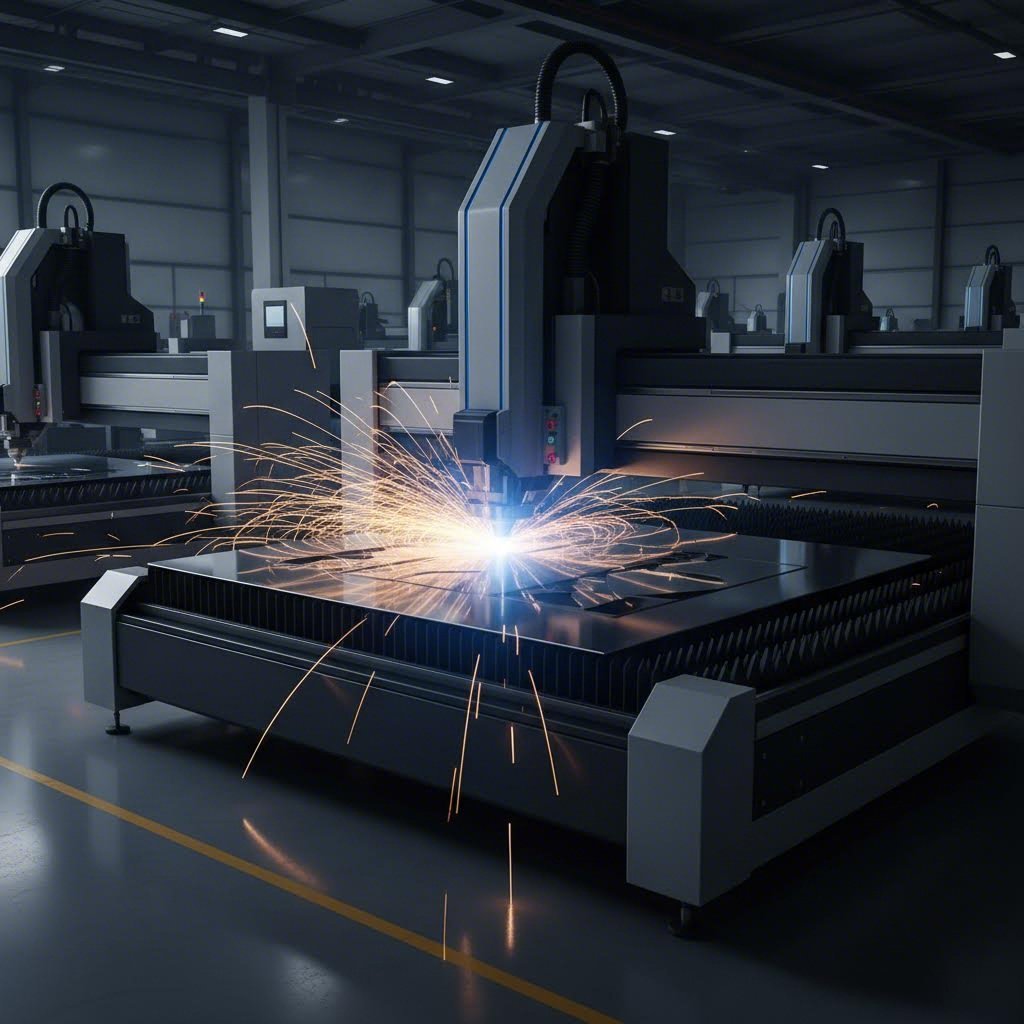
Laser Cutting Explained
Picture a beam of concentrated light so powerful it vaporizes metal on contact. That's essentially how a laser cutter operates. Modern fiber lasers focus high-powered beams onto the metal surface, creating precise cuts with exceptional accuracy—often within ±0.002" to ±0.005" tolerances.
What makes laser cutting particularly valuable for custom sheet metal work? Flexibility. Unlike mechanical methods, lasers don't require physical tooling for each unique shape. Need intricate patterns, sharp internal corners, or complex curves? A laser handles them all without the setup time of changing dies or punches.
According to The Mesh Company, modern fiber lasers can cut aluminum, copper, and brass despite their high reflectivity and heat conductance—materials that once posed significant challenges. However, laser cutting does leave a heat-affected zone near the cut edge, which can cause slight work hardening in the material.
Here's a critical concept every designer should understand: kerf. This refers to the width of material removed during cutting—typically 0.1mm to 0.3mm (0.004" to 0.012") for precision fiber laser cutting. When you're designing parts, you must account for kerf in your dimensions. Ignoring it can throw off hole sizes, slot widths, and overall part dimensions by that seemingly small but significant amount.
CNC Punching: Speed Meets Efficiency
When your project involves repetitive patterns—rows of holes, standard slots, or consistent cutouts—CNC turret punching becomes your most economical ally. This metal cutter uses a punch and die combination to shear through material in a controlled action, creating features with impressive speed.
The punch press shines in high-volume production scenarios. Why? It processes multiple perforations simultaneously and doesn't require the per-feature processing time of laser cutting. For standard geometries like round holes, square cutouts, or rectangular slots, manufacturers often have existing tooling ready to go.
However, punching does have limitations. The physical stress exerted on the metal can cause slight deformations around perforations. Custom geometries may require specialized tooling—adding upfront costs that only make sense at higher volumes. When reviewing a drill bit size chart or drill size chart for your design, remember that punch tooling typically comes in standard increments, so matching your desired hole sizes to available tooling can save significant expense.
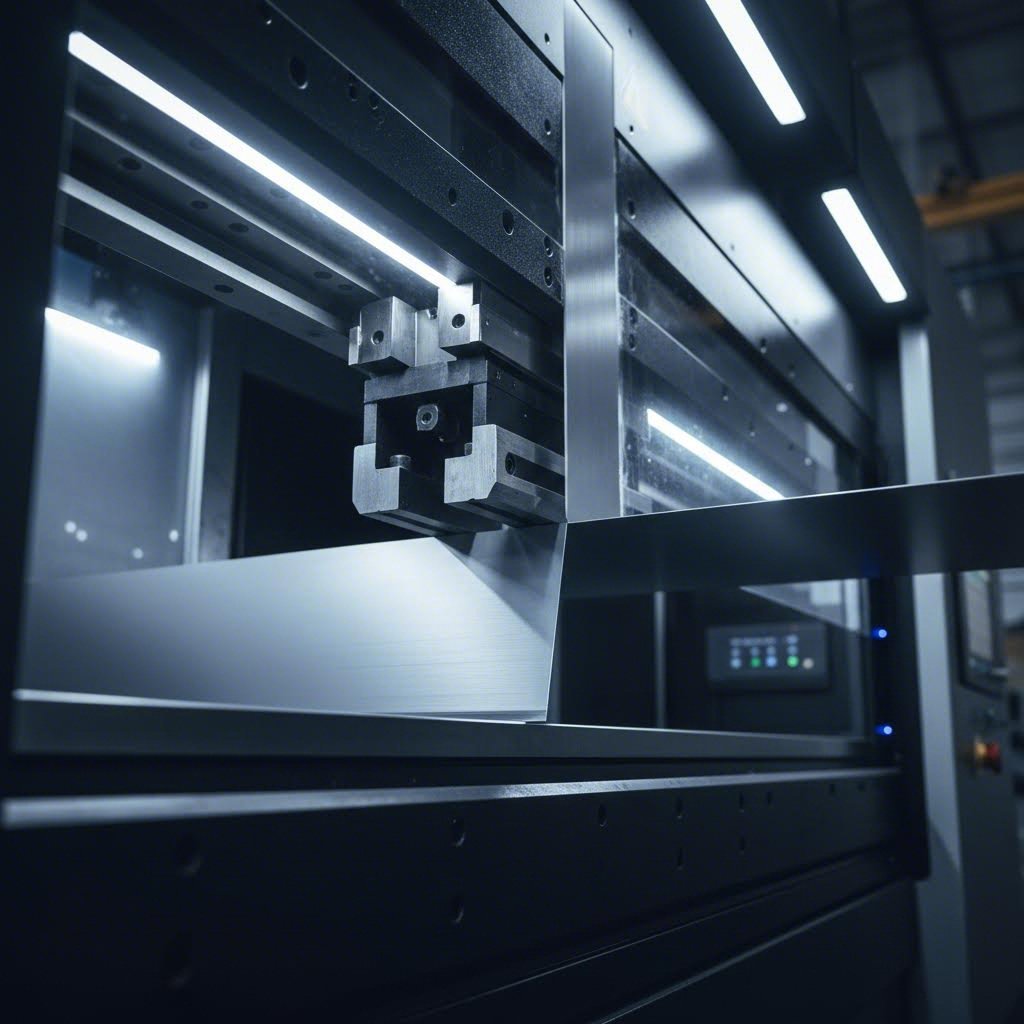
Bending and Forming Fundamentals
Cutting creates your blank—a flat piece of metal with the right outline. But most custom sheet metal parts need three-dimensional shape. That's where bending and forming operations transform flat stock into functional components.
The press brake is the workhorse of sheet metal forming. It clamps your blank between a punch and die, then applies force to create precise angles. Sounds simple? The reality involves careful calculation of bend allowance—the arc length of material in the bend zone—and bend deduction, describing how material stretches at the outer radius.
Why does this matter for your design? According to Five Flute, improper bend allowances cause tolerance issues for features located across one or more bends. If you have holes or slots that must align after bending, incorrect calculations will throw off your entire assembly.
Here's a practical guideline: for ductile materials like mild steel, keep your bend radius equal to or greater than material thickness. Harder materials like 6061-T6 aluminum require larger radii—typically four times the thickness or greater—to prevent cracking.
Welding: Joining It All Together
When your design requires multiple pieces joined permanently, welding enters the picture. This process fuses metal components through localized melting, creating joints that can match or exceed base material strength when properly executed.
Different welding methods suit different applications. MIG welding offers speed and ease of use for production environments. TIG welding provides superior precision and cleaner aesthetics for visible joints or thin materials. The choice depends on your material, joint requirements, and production volume.
Process Comparison: Choosing Your Method
When planning your project, consider how each process aligns with your specific requirements. Much like consulting a drill chart to select the right tool for a specific fastener, matching the right fabrication process to your needs ensures optimal results.
| Process | Precision Level | Thickness Range | Speed | Best Applications |
|---|---|---|---|---|
| Laser Cutting | ±0.002" to ±0.005" | Up to 1" (steel) | Moderate | Complex shapes, prototypes, low-medium volume |
| CNC Punching | ±0.005" to ±0.010" | Up to 0.25" typical | Fast | Repetitive patterns, high volume, standard holes |
| Press Brake Bending | ±0.010" to ±0.030" | Up to 0.5" typical | Moderate | Angles, channels, enclosures, brackets |
| Welding | Varies by method | All thicknesses | Varies | Assemblies, structural joints, complex 3D parts |
The key takeaway? No single process handles everything optimally. Most custom sheet metal projects combine multiple operations—laser cutting the blank, punching repetitive features, bending to shape, and welding sub-assemblies together. Understanding each method's strengths helps you design parts that leverage the right process for each feature, optimizing both quality and cost.
With fabrication processes now clear, the next critical decision awaits: selecting the right material for your application.
Material Selection Guide for Custom Projects
You've mastered the fabrication processes. Now comes the question that shapes everything else: what metal should you actually use? Choosing the right material isn't just about picking something strong or affordable—it's about matching specific properties to your application's demands. Get this wrong, and you'll face problems ranging from premature corrosion to fabrication headaches and inflated costs.
Let's break down the most common options and when each one makes sense for your project.
Steel vs Aluminum Trade-offs
Steel and aluminum sheet metal represent the two most popular choices in custom fabrication, and for good reason. Each brings distinct advantages depending on what you're building.
Steel—particularly stainless steel sheet metal—delivers unmatched strength and cost-effectiveness for structural applications. According to Monroe Engineering, steel is the most common type of sheet metal produced globally, and it's become nearly synonymous with sheet metal fabrication itself. The chromium content in stainless varieties provides excellent corrosion resistance while maintaining the material's inherent strength and malleability.
So is aluminum a metal worth considering instead? Absolutely—when weight matters. Aluminum sheet metal weighs roughly one-third as much as steel, making it ideal for aerospace components, transportation equipment, and portable devices. Beyond weight savings, aluminum offers superior natural corrosion resistance, which explains its frequent use in marine applications and outdoor installations.
Here's the catch: aluminum's lower tensile strength means you'll often need thicker gauges to achieve equivalent structural performance. That weight advantage can shrink quickly if your design requires beefier material to compensate for lower strength.
When Stainless Steel Makes Sense
Standard carbon steel works fine for many applications, but certain environments demand something tougher. That's where stainless steel sheet grades earn their premium price.
316 stainless steel stands out as the go-to choice for harsh conditions. According to Kloeckner Metals, this austenitic grade contains 16-18% chromium and 10-14% nickel, with molybdenum additions that provide exceptional resistance to chlorides and acids. Marine environments, chemical processing facilities, and pharmaceutical equipment all benefit from 316's durability.
Consider these common stainless steel grades:
- 304 Stainless: General-purpose grade with good corrosion resistance—ideal for food service and architectural applications
- 316 Stainless: Marine-grade with enhanced chemical resistance for coastal and industrial environments
- 410 Stainless: Martensitic grade offering higher hardness for wear-resistant applications
- 430 Stainless: Ferritic grade providing cost-effective corrosion resistance for decorative uses
One critical consideration: 316 stainless steel offers good oxidation resistance in intermittent service to 870°C and in continuous service to 925°C, though its use in the 425-860°C range is not recommended if aqueous corrosion resistance is later required. However, if your application involves both high temperatures and corrosive environments, the 316L variant—with its lower carbon content—resists carbide precipitation during welding, preventing sensitization that could compromise corrosion resistance.
Specialty Metals: Copper and Brass
Beyond steel and aluminum, specialty metals fill important niches. You might wonder what is brass made of—it's an alloy combining primarily copper with zinc additions. This composition creates a material that's strong, corrosion-resistant, and highly conductive.
When comparing brass vs bronze, remember that bronze substitutes tin for zinc as the primary alloying element, offering different mechanical properties suited to bearings and marine hardware. Brass sheet metal excels in electrical applications where conductivity matters—situations where steel and aluminum simply can't compete.
Copper itself remains the gold standard for electrical and thermal conductivity, appearing in heat exchangers, electrical components, and decorative architectural elements.
Material Properties Comparison
When evaluating materials for your project, this comparison highlights the key trade-offs:
| Property | Steel (Carbon) | Aluminum | Stainless Steel (316) | Brass |
|---|---|---|---|---|
| Tensile Strength | High (400-550 MPa) | Moderate (125-310 MPa) | High (515-620 MPa) | Moderate (340-470 MPa) |
| Weight (Relative) | Heavy | Light (~1/3 of steel) | Heavy | Heavy |
| Corrosion Resistance | Low (requires coating) | High (natural oxide layer) | Excellent | Good |
| Weldability | Excellent | Good (requires TIG/MIG) | Good (use 316L for heavy welds) | Fair |
| Relative Cost | Low | Moderate | High | High |
How Material Choice Impacts Fabrication
Your material selection doesn't exist in isolation—it directly affects downstream processes. Aluminum welding requires different techniques than steel, typically demanding TIG or MIG methods with proper filler materials. Stainless steel work should use dedicated tools to prevent cross-contamination that can discolor surfaces.
Finishing options also vary by material. Aluminum accepts anodizing beautifully, creating durable colored finishes impossible with steel. Stainless steel often needs only passivation or electropolishing to maximize its natural corrosion resistance. Carbon steel typically requires powder coating, painting, or galvanizing to survive outdoor exposure.
The bottom line? Match your material to both the application requirements and the fabrication processes you'll need. A beautiful aluminum design means nothing if your fabricator lacks the specialized welding capabilities to execute it properly.
With material selected, your next decision involves thickness—and understanding the gauge system that defines it.
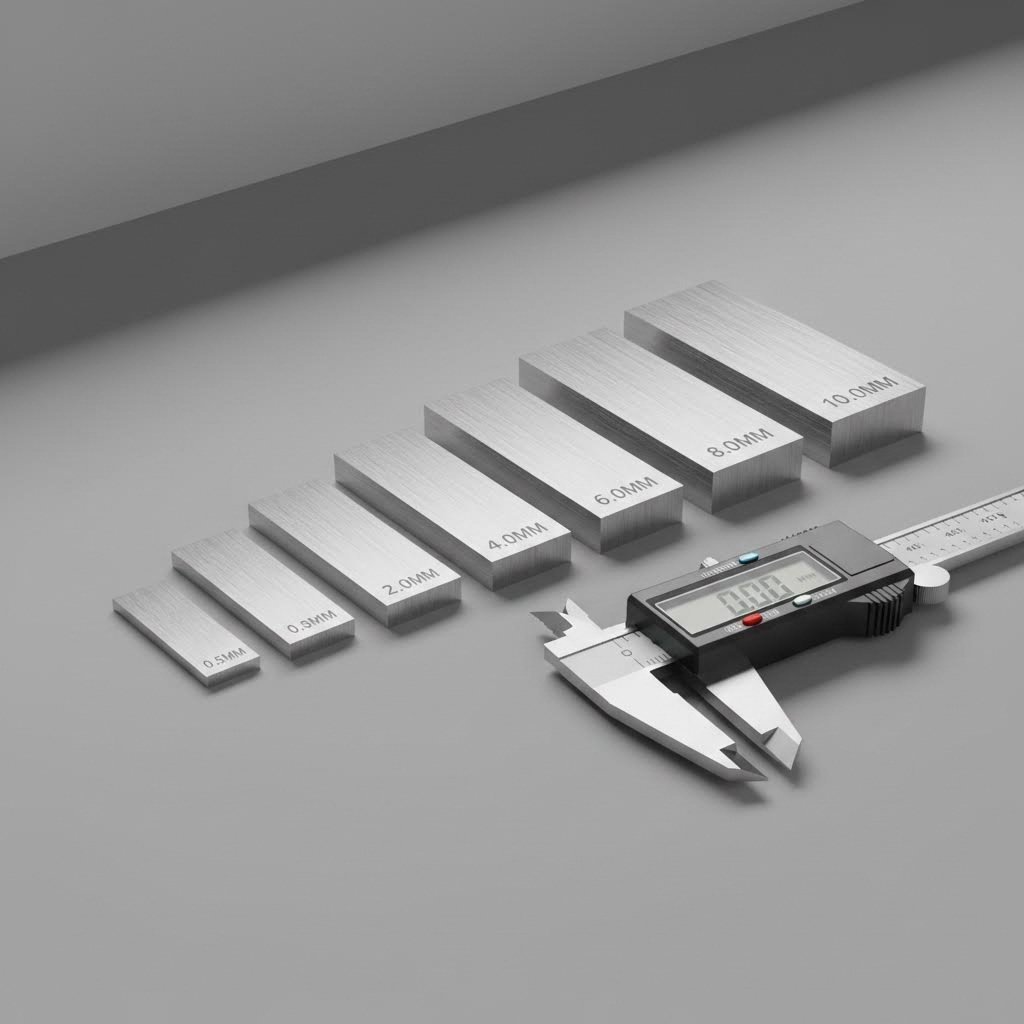
Sheet Metal Gauge and Thickness Selection
You've selected your material. Now here's where things get counterintuitive: when measuring sheet metal thickness, bigger numbers actually mean thinner material. Sounds backwards? You're not alone in thinking so. This quirk of the gauge system trips up engineers and buyers alike—but understanding it unlocks smarter design decisions and cost savings.
Understanding the Gauge System
Rather than straightforward inches or millimeters, the metal industry measures thickness using "gauge"—a system inherited from 19th century British wire manufacturers. According to Ryerson, gauges emerged during a period when no universal unit of thickness existed, and the numbers originally related to the wire drawing process itself.
The core rule is simple: higher gauge numbers indicate thinner material. A 10 gauge steel sheet is substantially thicker than a 22 gauge sheet. But here's what catches many designers off guard—the decimal equivalents aren't consistent between gauge numbers, and they differ based on material type.
Consider this example from the sheet metal gauge chart: 14 gauge steel thickness measures 0.0747 inches (roughly 1.9mm), while 14 gauge stainless steel measures 0.0781 inches. Same gauge number, different actual thickness. This variance occurs because gauge standards developed separately for different metals based on their weight-per-area characteristics.
Sheet Metal Gauge Chart: Quick Reference
When planning your custom sheet metal project, this gauge size chart provides the essential conversions you'll need:
| Gauge | Carbon Steel (inches) | Stainless Steel (inches) | Aluminum (inches) | Typical Applications |
|---|---|---|---|---|
| 10 | 0.1345 | 0.1350 | 0.1019 | Heavy structural panels, steel plates |
| 11 | 0.1196 (3.04mm) | 0.1200 | 0.0907 | Industrial equipment, heavy enclosures |
| 12 | 0.1046 | 0.1046 | 0.0808 | Structural components, heavy machinery |
| 14 | 0.0747 | 0.0781 | 0.0641 | Automotive panels, medium-duty brackets |
| 16 | 0.0598 | 0.0625 | 0.0505 | Enclosures, automotive body panels |
| 18 | 0.0478 | 0.0500 | 0.0403 | Roofing, general fabrication |
| 20 | 0.0359 | 0.0375 | 0.0320 | HVAC ductwork, light enclosures |
| 22 | 0.0299 | 0.0313 | 0.0253 | Ductwork, decorative elements |
Notice how 11 gauge carbon steel thickness is 0.1196 inches (3.04mm)—nearly an eighth of an inch. This heavier material suits industrial equipment and applications requiring significant load-bearing capacity. Meanwhile, thinner gauges like 20-22 work perfectly for HVAC ductwork where weight savings matter more than structural rigidity.
Matching Thickness to Application
Selecting the right gauge involves balancing four interconnected factors: formability, strength, weight, and cost. Get the balance wrong, and you'll either overspend on unnecessarily thick material or face structural failures from undersized stock.
According to Tri-State Metals, common applications align with specific gauge ranges:
- Structural panels and supports: 10-14 gauge provides the rigidity needed for load-bearing applications
- Automotive body panels: 16-20 gauge balances strength with formability for complex curves
- Enclosures and housings: 14-18 gauge offers adequate protection without excessive weight
- Roofing and galvanized sheet metal: 18-24 gauge handles weather exposure economically
- Decorative elements: 20-26 gauge keeps costs low for non-structural applications
Here's a critical consideration: aluminum requires thicker gauges than steel for equivalent strength. Remember that aluminum's tensile strength runs roughly 40-60% lower than carbon steel. If you're switching materials to save weight, you may need to increase gauge thickness—partially offsetting those weight savings.
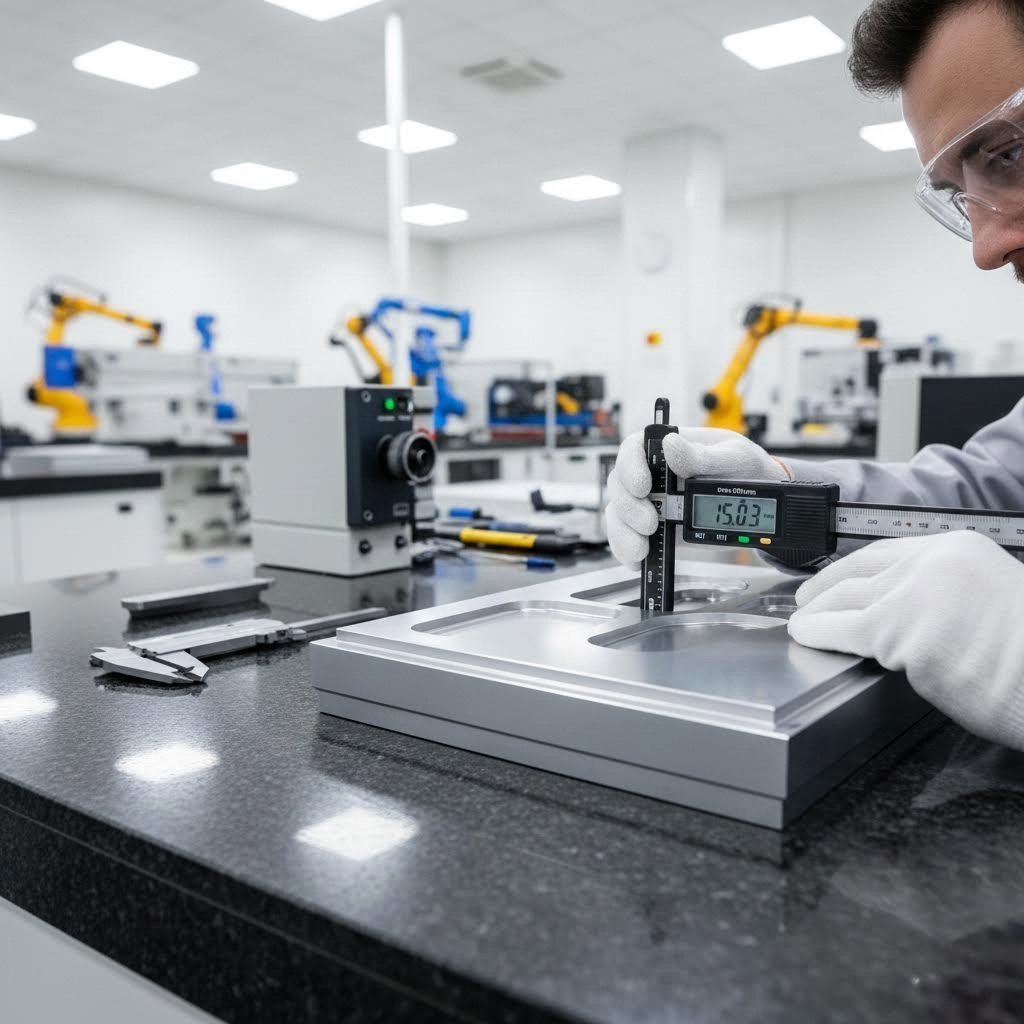
Tolerance Specifications in Practice
When your design calls out specific thickness, understand what precision levels actually mean. Standard mill tolerances for sheet metal typically run ±10% of nominal thickness. For a 14 gauge steel sheet at 0.0747 inches, that means acceptable variation between roughly 0.067" and 0.082".
Does that matter? For decorative panels, probably not. For precision assemblies where parts must nest together or maintain specific clearances, absolutely. Tighter tolerances—±0.003" or better—are available but add cost through additional processing or premium material selection.
The practical takeaway: always verify actual thickness with calipers when tolerances matter, and communicate your precision requirements clearly to your fabricator. Assuming standard gauge specifications will automatically deliver tight tolerances leads to expensive surprises during assembly.
With material and thickness decisions locked in, the next challenge is designing parts that fabricators can actually produce efficiently—and that's where manufacturability principles come into play.
Design for Manufacturability Essentials
You've selected your material and thickness. Your CAD model looks perfect on screen. But here's the uncomfortable truth: many "perfect" designs become expensive nightmares—or outright impossible—once they hit the fabrication floor. The difference between a smooth production run and costly rework often comes down to understanding a few critical design principles.
Design for Manufacturability (DFM) isn't about limiting creativity. It's about understanding what fabrication equipment can actually achieve and designing within those boundaries. Master these fundamentals, and you'll create parts that cost less, arrive faster, and perform better.
Bend Radius Rules That Prevent Cracking
Imagine folding a piece of paper versus folding a credit card at the same tight radius. One works; the other cracks. Sheet metal behaves similarly—every material has limits on how sharply it can bend without failing.
The general rule? Your minimum inside bend radius should equal or exceed the material thickness. For mild steel and aluminum, this works reliably. But harder materials demand more generous radii. According to SendCutSend's bending guidelines, 6061-T6 aluminum—a common aerospace alloy—typically requires bend radii of four times the material thickness to prevent cracking.
Why does this matter for your design? Specifying a sharp 90-degree corner on a 0.125" aluminum bracket might look clean in CAD, but the fabricator will either refuse the job or deliver cracked parts. Either outcome wastes time and money.
Here's a practical approach: design with standard tooling radii whenever possible. Most press brakes use V-dies with specific opening widths that produce predictable inside radii. Common inside radii include 0.030", 0.062", 0.125", and 0.250". Matching your design to available tooling eliminates custom setup costs.
Hole Placement Best Practices
Holes punched too close to edges or bends create weak spots that tear during forming. Holes positioned across bend lines distort into ovals. These mistakes show up constantly in first-time designs—and they're entirely preventable.
Follow these spacing guidelines to avoid problems:
- Hole-to-edge distance: Maintain at least 2x the material thickness between any hole edge and the part edge. For a 0.060" sheet, that means holes should sit at least 0.120" from edges.
- Hole-to-bend distance: Keep holes at least 2.5x the material thickness plus the bend radius away from bend lines. This prevents distortion during forming.
- Hole-to-hole spacing: Maintain at least 2x the material thickness between adjacent holes to preserve structural integrity.
What happens when you need features closer than these minimums? Relief cuts become your solution. Small cutouts at bend intersections allow material to form without tearing. Experienced fabricators know these techniques—much like understanding how to cut plexiglass without cracking requires specific approaches, metal forming demands respect for material behavior.
Avoiding Impossible Geometries
Some designs simply cannot exist in sheet metal form—at least not economically. Recognizing these situations early saves frustration later.
Common design mistakes and their solutions:
- Inside corners sharper than tool radius: Press brake tooling has minimum radii. Design inside corners to match available tooling, or accept that sharp internal corners require secondary machining.
- Bends too close together: Flanges need clearance for the upper die. Generally, maintain at least 6x the material thickness between parallel bends, or the press brake punch physically cannot reach.
- Closed sections without access: Fully enclosed boxes cannot be welded from inside. Design with open seams or plan for external welding access.
- Features across bend lines: Slots, holes, or cutouts that cross bend locations will distort. Relocate features or split them across separate flat areas.
- Undercuts and internal returns: These require specialized tooling or multiple operations. Simplify geometry when possible.
The principle applies beyond metal—just as understanding how do you cut perspex requires knowing material limitations, successful sheet metal design means respecting what forming processes can achieve.
Tolerance Realities: What ±0.003" Actually Means
Tolerance specifications directly impact cost. Tighter tolerances require more careful setup, slower processing, and additional inspection—all adding expense. Understanding when precision matters (and when it doesn't) helps you spend tolerance budget wisely.
Standard CNC and laser cutting achieves ±0.005" to ±0.010" without special effort. Requesting ±0.003" tolerance is achievable but typically adds 15-25% to processing costs. Calling out ±0.001" moves into precision grinding territory—dramatically more expensive and often unnecessary.
Here's the practical reality: a ±0.003" tolerance on a 2.000" dimension means acceptable parts measure anywhere from 1.997" to 2.003". For mating parts in assemblies, this precision often matters. For mounting holes with clearance fits, standard tolerances work perfectly fine.
Apply tight tolerances only where function demands them—typically mating surfaces, critical alignments, and assembly interfaces. Everywhere else, accept standard tolerances and save your budget for where precision actually matters.
Engage Fabricators Early
The most valuable DFM advice? Involve your fabricator before finalizing designs. Experienced manufacturers spot potential issues immediately and often suggest simple modifications that dramatically improve producibility.
Many fabricators offer DFM reviews as part of their quoting process. Take advantage of this expertise. A five-minute conversation about bend sequence or feature placement can eliminate weeks of revision cycles and failed prototypes.
With your design optimized for manufacturing, the next consideration is how surface finishing and treatments will protect and enhance your finished parts.
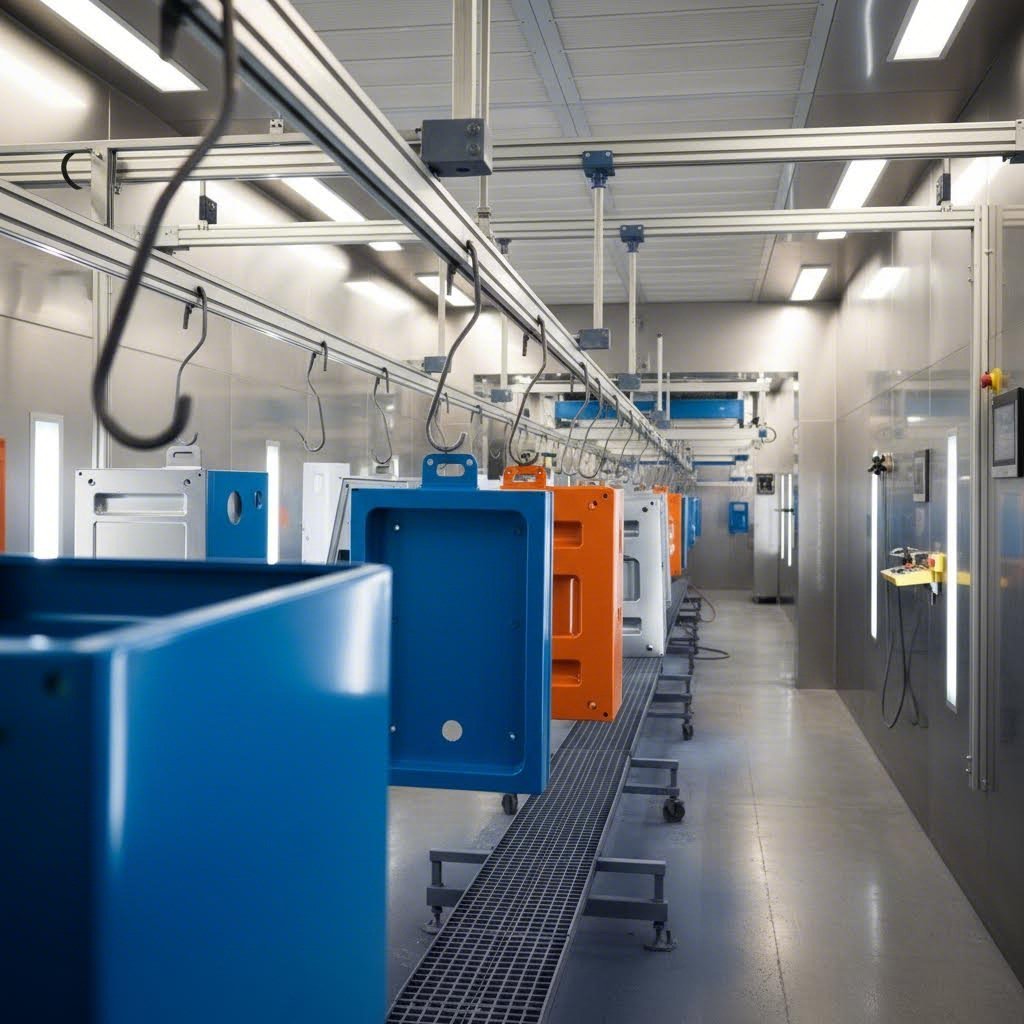
Surface Finishing and Treatment Options
Your custom sheet metal part is cut, bent, and welded to perfection. But without proper finishing, even the most precisely fabricated component will eventually fail. Corrosion creeps in. Surfaces scratch and wear. Colors fade. The right surface treatment transforms raw fabricated metal into a durable, professional product ready for years of service.
Think of finishing as the protective armor and visual identity of your parts combined. Whether you need industrial durability, food-safe cleanliness, or eye-catching aesthetics, understanding your options helps you specify exactly what your application demands.
Powder Coating vs Wet Paint
When it comes to adding color and protection to steel or iron components, powder coating and wet paint represent the two primary approaches—each with distinct advantages depending on your requirements.
Powder coating applies dry powder electrostatically to metal surfaces, then cures it in an oven at temperatures reaching 400°F. According to Midwest Metal Products, this process yields a thick, hard finish that's tougher than conventional paints. The electrostatic application achieves nearly 95% efficiency—far less waste than spray painting.
Here's what makes powder coat the go-to choice for demanding applications:
- Durability: The cured finish resists chipping, scratching, and fading better than liquid paint
- Even coverage: Electrostatic attraction ensures uniform coating on both horizontal and vertical surfaces without drips
- One-coat application: Most projects need only a single coating pass
- Environmental benefits: Produces minimal volatile organic compounds compared to solvent-based paints
- Color and texture variety: Modern powder coating services offer extensive custom finishing options including metallic, matte, and textured finishes
Wet paint still earns its place in certain scenarios. Parts that cannot withstand oven curing temperatures require liquid paint. Extremely thin finishes—15 to 20 micrometers—prove difficult with powder coating, which tends to produce an orange-peel texture when thinned excessively. Smaller jobs may also find wet paint more economical, avoiding the investment in electrostatic booths and curing ovens.
The durability trade-off is significant though. Wet paint typically requires multiple coats for even coverage and may need periodic maintenance and refinishing over time—costs that often exceed the initial powder coating investment.
Anodizing for Aluminum Parts
When working with aluminum sheet metal, anodizing offers something no coating can match: a finish that becomes part of the metal itself rather than sitting on top.
According to Protolabs, aluminum anodizing is an electrochemical process that thickens the natural oxide layer already present on aluminum surfaces. The part becomes the anode in an acid bath while electric current draws oxygen ions to bond with the surface, creating a hard, protective aluminum oxide layer.
Unlike paint or powder coating, anodized finishes won't peel or chip because there's nothing sitting on top of the metal to separate. The oxide layer is integral to the aluminum itself.
The anodizing process follows four key stages:
- Pre-treatment: Cleaning, degreasing, and etching create a uniform surface
- Anodizing: Submersion in sulfuric acid with applied current builds the oxide layer
- Coloring (optional): The porous oxide absorbs dyes for decorative or identification purposes
- Sealing: Closing the pores locks in color and maximizes corrosion protection
The resulting finish provides excellent corrosion resistance, improved wear properties, and electrical insulation. For anodized aluminum parts in outdoor or marine environments, this protection proves invaluable.
Plating for Conductivity and Special Requirements
When electrical conductivity matters—or when you need specific surface properties that coatings can't provide—plating enters the picture. This process deposits thin metal layers onto your parts through electrochemical or chemical means.
Chromate conversion coating exemplifies functional plating. According to Approved Sheet Metal, chromate treatment passivates metal surfaces for stronger corrosion resistance while maintaining electrical conductivity—essential for grounding applications or EMI shielding.
Zinc plating protects steel from corrosion through sacrificial protection: the zinc corrodes preferentially, preserving the base metal. Nickel plating adds hardness and wear resistance. Gold and silver plating enhance conductivity for electronic components.
Finishing Options Comparison
Selecting the right finish depends on balancing multiple performance factors against your specific application requirements:
| Finish Type | Best For | Key Benefits | Considerations |
|---|---|---|---|
| Powder Coating | Steel, iron parts requiring color and durability | Excellent abrasion resistance, extensive colors, thick protective layer | Requires oven curing; adds 0.002"–0.006" thickness |
| Anodizing | Aluminum parts needing corrosion protection | Integral finish, won't peel, electrical insulation, color options | Aluminum only; limited to thinner builds than powder coat |
| Chromate Conversion | Parts requiring conductivity plus protection | Maintains electrical conductivity, thin application | Moderate corrosion resistance; poor abrasion resistance |
| Wet Paint | Heat-sensitive parts, very thin finishes | No heat required, ultra-thin application possible | Less durable, may require multiple coats and maintenance |
Why Surface Prep Determines Finish Quality
Here's what separates professional finishing from amateur results: preparation. The most advanced powder coating or anodizing process will fail if applied over contaminated or improperly prepared surfaces.
Oil, grease, mill scale, and oxidation must be completely removed before finishing. For powder coating, this typically involves chemical cleaning, phosphate conversion coating for adhesion, and thorough drying. For anodizing, etching creates the uniform surface texture needed for consistent oxide layer formation.
When aluminum welding precedes anodizing, weld areas require special attention. The heat-affected zones and filler material may anodize differently than base metal, potentially showing visible color variations. Understanding whether you're using mig vs tig welding—and planning accordingly—helps predict and address these aesthetic concerns.
The tig vs mig welding choice particularly matters for visible parts. TIG welding produces cleaner welds with less spatter, reducing preparation work before finishing and yielding more consistent results on anodized surfaces.
Industry-Specific Finishing Requirements
Different applications demand different finishing priorities:
- Food-grade applications: Require non-toxic, cleanable surfaces—typically 316 stainless with electropolishing or food-safe powder coatings
- Automotive components: Demand chip-resistant finishes that withstand road debris, temperature cycling, and chemical exposure
- Outdoor exposure: Needs UV-stable coatings and maximum corrosion protection—marine environments may require specialized primers under topcoats
- Electronic enclosures: May need conductive finishes for EMI shielding or non-conductive coatings for insulation
Quality Indicators in Finished Parts
When evaluating finished parts from any fabricator, look for these signs of quality work:
- Uniform coverage: No thin spots, drips, or orange-peel texture (unless intentional)
- Complete edge coverage: Sharp edges and corners fully coated without bare spots
- Proper adhesion: Finish shouldn't scratch off with fingernail pressure
- Consistent color: No blotching, streaking, or visible variation across surfaces
- Clean masking: Threaded holes, mating surfaces, and ground points properly protected during finishing
Quality fabricators document their finishing processes and can provide test reports—salt spray hours for corrosion testing, adhesion testing results, and coating thickness measurements. These metrics matter far more than subjective visual assessment.
With finishing options understood, the next critical factor to address is how all these choices—material, process, finishing—translate into project pricing.
Understanding Custom Sheet Metal Pricing
You've designed your part, selected materials, and specified finishes. Now comes the moment of truth: what will this actually cost? Custom sheet metal pricing often feels like a black box—you submit drawings and receive a number with little explanation of how fabricators arrived at it. Understanding the factors behind that quote transforms you from a passive buyer into an informed partner who can make strategic decisions to optimize value.
Here's the reality: pricing isn't arbitrary. Every dollar traces back to specific cost drivers that you can often influence through smart design choices and procurement strategies.
What Drives Your Project Cost
When a fabricator reviews your drawings, they're mentally walking through every operation, material requirement, and handling step your part demands. Each element contributes to the final price.
Material costs form the foundation. According to SendCutSend, the material you choose—whether 5052 aluminum, HRPO mild steel, or 304 stainless steel—directly impacts pricing. Interestingly, pricing differences between common materials can be closer than expected when purchasing from high-volume suppliers who buy thousands of tons at a time and pass savings to customers.
But material selection involves more than just raw cost per pound. Stainless steel parts might cost $12 each compared to $8.50 for aluminum or mild steel equivalents. However, stainless steel's durability in outdoor or corrosive environments can eliminate finishing costs and replacement expenses—potentially making the higher upfront investment more economical long-term.
Design complexity significantly impacts processing time. Intricate geometries with many fine details require longer cutting cycles. That complex aluminum part with elaborate patterns? It might run $27 each due to extended laser time, while simpler designs cost substantially less. Every curve, hole, and cutout adds seconds to processing—and those seconds multiply across production runs.
Tolerance requirements add cost when they exceed standard capabilities. Requesting ±0.003" instead of standard ±0.010" tolerances requires slower processing, more careful setup, and additional inspection steps. Before specifying tight tolerances everywhere, ask yourself: does this feature actually need that precision?
Finishing operations can substantially increase per-part costs. According to the same source, a raw aluminum part at $27 jumps to $43 with powder coating—a 60% increase. That premium buys long-term durability and professional appearance, but understanding the cost impact helps you make informed decisions about which parts truly need premium finishes.
Lead time affects pricing when you need expedited delivery. Rush orders consume premium machine time and disrupt production scheduling. Planning ahead and accepting standard lead times keeps costs predictable.
Volume Pricing Explained
Here's where procurement strategy dramatically impacts your bottom line: quantity pricing creates substantial per-part savings that compound with every additional unit ordered.
Why does the first part cost so much more? Setup and handling dominate low-volume orders. According to industry pricing data, a small zinc-plated G90 steel part might cost $29 for a single unit. Order ten, and that drops to just $3 per part. That's not a typo—the same part drops nearly 90% in per-unit cost simply by increasing quantity.
This happens because setup costs—programming, fixturing, material handling, and first-article inspection—spread across all units produced. One part absorbs the entire setup burden. Ten parts share it. Most materials see discounts starting with the second part and continuing through bulk orders, where savings can reach 86% compared to single-unit pricing.
The practical implication? If you anticipate needing parts over time, ordering larger quantities upfront often proves more economical than multiple small orders—even accounting for inventory carrying costs.
Cost-Saving Strategies Without Sacrificing Quality
Smart buyers reduce costs through design and procurement decisions, not by accepting inferior quality. Consider these proven approaches:
- Simplify geometry where possible: Every complex feature adds processing time. Question whether decorative details justify their cost, and simplify non-critical features
- Relax tolerances on non-critical dimensions: Apply tight tolerances only where function demands them. Standard tolerances cost nothing extra
- Choose standard material thicknesses: Odd gauges may require special ordering with minimum purchases and delays. Standard stock ships faster and cheaper
- Match material to actual requirements: 6061 aluminum costs more than 5052. If you don't need the extra strength, stick with the economical option
- Consolidate finishing: Powder coating smaller batches costs more per part. Timing orders to batch finishing operations together reduces unit costs
- Design for standard tooling: Bend radii and hole sizes matching available tooling eliminate custom setup charges
- Order strategically: Larger quantities dramatically reduce per-part costs. Balance inventory costs against volume discounts
Domestic vs Overseas Fabrication: The Real Trade-offs
When searching for metal fabrication near me versus considering overseas options, the decision involves far more than comparing quoted prices. According to Sintel Inc, while offshore labor rates appear lower, Total Cost of Ownership often tells a different story.
Domestic fabrication shops near me offer advantages that don't appear on quotes:
- Faster lead times: Bypass weeks of ocean freight, customs inspections, and logistics hurdles. Local production means the path from design to delivery is direct
- Superior communication: No time zone differences or language barriers. Direct contact with engineers enables real-time problem solving
- Quality control access: You can visit facilities, conduct audits, and inspect parts before full production commitment
- Engineering collaboration: Design for Manufacturing feedback happens before problems occur, not after containers arrive
- Supply chain stability: Domestic partners shield projects from geopolitical risks, trade disruptions, and shipping delays
- IP protection: Stronger legal frameworks protect proprietary designs
The hidden costs of overseas sourcing—tariffs, duties, logistics management, inventory buffers for long lead times, and quality inspection travel—frequently erode perceived savings. Steel fabricators and metal fabricators near me may quote higher unit prices, but transparent pricing without hidden costs often proves more economical overall.
Evaluating Quotes: What Should Be Included
When comparing quotes from steel fabrication providers, ensure you're comparing equivalent offerings:
- Material specification: Confirm exact alloy, temper, and thickness—not just generic descriptions
- All operations: Cutting, forming, welding, hardware insertion, and assembly should be itemized
- Finishing details: Coating type, mil thickness, color, and any masking requirements
- Inspection level: First-article inspection, in-process checks, and final inspection scope
- Shipping terms: FOB point, packaging, and freight costs. Some fabricators include shipping on orders over certain thresholds—the price you see becomes the price you pay
- Lead time: Production time plus shipping. Rush premiums should be clearly stated
- Quantity breaks: Pricing at various volume levels helps future planning
The lowest quote isn't always the best value. A slightly higher price from a responsive fabricator with proven quality often costs less than rework, delays, and rejected parts from a cheaper source.
With pricing factors understood, your final challenge is selecting the right fabrication partner—someone who delivers quality, communication, and reliability alongside competitive pricing.
Choosing the Right Fabrication Partner
You understand materials, processes, and pricing. Now comes perhaps the most consequential decision of all: who actually makes your parts? The right fabrication partner transforms your designs into reality smoothly and reliably. The wrong one delivers headaches, delays, and parts that don't quite meet specifications. Knowing what separates exceptional fabricators from mediocre ones helps you make this critical choice with confidence.
Think of selecting a fabricator like hiring a key team member. Technical capability matters, but so does communication, responsiveness, and alignment with your quality expectations. Here's how to evaluate potential partners and navigate the journey from initial inquiry to finished parts in your hands.
Quality Certifications That Matter
Certifications tell you more than a fabricator's marketing claims ever could. They represent third-party verification that documented quality systems actually exist and function as intended.
For general manufacturing, ISO 9001 certification establishes baseline quality management fundamentals—documented processes, customer focus, and continuous improvement frameworks. But certain industries demand more rigorous standards.
According to OGS Industries, the IATF 16949 certification goes beyond ISO 9001 to ensure compliance with lean manufacturing principles, defect prevention, variance deterrence, and waste reduction. This automotive-specific standard is backed by automotive trade associations and sets the benchmark for sourcing suppliers in the vehicle manufacturing supply chain.
What does IATF 16949 certification actually deliver for your projects?
- Consistent quality: Monitored and measured processes maximize productivity and deliver predictable outcomes
- Reduced product variation: Reviewed and improved manufacturing processes ensure components consistently meet specifications
- Reliable supply chain: Internationally recognized standards establish stronger, more dependable supplier relationships
- Defect prevention: Tested and proven fabrication processes minimize inefficiencies and quality escapes
- Waste reduction: Streamlined processes and improved management systems support environmental initiatives
For automotive applications involving chassis, suspension, or structural components, partnering with an IATF 16949-certified fabricator isn't optional—it's essential. Companies like Shaoyi (Ningbo) Metal Technology demonstrate what automotive-grade quality looks like in practice, delivering precision assemblies that meet the demanding requirements of commercial vehicles, recreational vehicles, and high-performance racing applications.
Beyond automotive, look for certifications relevant to your industry: AS9100 for aerospace, ISO 13485 for medical devices, or NADCAP for specialized processes. These credentials signal that a fabricator understands your industry's specific requirements.
Equipment Capabilities and Technology
Not all fabrication shops offer equivalent capabilities. According to TMCO, some only cut metal while others outsource machining, finishing, or assembly—creating delays, communication gaps, and quality inconsistencies.
Full-service, integrated facilities streamline production under one roof. When evaluating potential partners, look for these key capabilities:
- Cutting technologies: Laser cutting, plasma cutting, or waterjet cutting for different material and precision requirements
- CNC machining: Secondary operations for threaded holes, precision features, and tight tolerances
- Forming equipment: Press brakes with adequate tonnage and bed length for your part sizes
- Welding capabilities: TIG, MIG, and robotic welding for consistent joint quality
- Finishing options: Powder coating, anodizing, plating, and other surface treatments in-house or through verified partners
- Assembly and testing: Hardware insertion, sub-assembly, and functional verification
Modern equipment with automation ensures repeatability, efficiency, and the ability to scale from prototypes to production volumes. Ask potential fabricators about their equipment age, maintenance programs, and capacity utilization—overloaded shops struggle with lead times while underutilized facilities may lack the volume experience for consistent quality.
Communication and Responsiveness
According to ReNEW Manufacturing Solutions, selecting the correct sheet metal fabricator isn't just about quality and expertise—you must also collaborate effectively and communicate often to ensure projects are completed correctly.
Evaluate responsiveness during the quoting process. How quickly do potential partners return quotes? Do they ask clarifying questions that demonstrate they've actually reviewed your drawings? A fabricator who takes two weeks to quote a simple bracket will likely struggle with schedule commitments during production.
Top-tier fabricators offer rapid quote turnaround—some as fast as 12 hours—because they understand that time-to-market matters. This responsiveness extends beyond quoting into production updates, engineering questions, and delivery coordination.
Establish communication expectations early:
- Agree on preferred communication channels—email, phone, or project management platforms
- Set regular cadence for scheduled updates on longer projects
- Identify direct contacts for urgent matters
- Clarify escalation paths for quality or delivery concerns
Questions to Ask Potential Fabricators
Before committing to a fabrication partner, gather information that reveals their true capabilities and fit for your needs:
- How long have you been fabricating parts similar to mine?
- Can you share references or case studies from my industry?
- What certifications do you hold, and when were they last audited?
- Do you provide DFM (Design for Manufacturability) feedback during quoting?
- What inspection processes do you use, and what documentation accompanies deliveries?
- What is your typical lead time for prototypes versus production quantities?
- How do you handle engineering changes after order placement?
- What finishing operations are performed in-house versus outsourced?
- Can you scale from prototypes to high-volume production?
- What happens if parts don't meet specifications?
The depth and transparency of their answers reveal whether a fabricator truly understands quality manufacturing or just talks a good game.
From Quote to Finished Part
Understanding the typical project workflow helps you navigate from initial concept to delivered components efficiently. Here's what to expect with a quality fabrication partner:
1. Initial inquiry and DFM review: You submit drawings, CAD files, or even rough concepts. Experienced fabricators review designs for manufacturability, identifying potential issues before quoting. This collaborative approach—comprehensive DFM support—prevents costly surprises later.
2. Quotation: The fabricator provides detailed pricing including material, operations, finishing, and lead time. Fast quote turnaround—even as quick as 12 hours from responsive partners—keeps your project moving. Quotes should itemize all operations so you understand exactly what's included.
3. Prototyping: Before committing to production quantities, validate your design with physical samples. Rapid prototyping capabilities—some fabricators deliver prototypes in as few as 5 days—let you test form, fit, and function without extended delays. This step catches design issues before they multiply across hundreds or thousands of parts.
4. Design finalization: Based on prototype evaluation, finalize any design adjustments. Your fabricator updates programming, tooling, and documentation accordingly.
5. Production: With approved prototypes, production runs begin. Quality fabricators perform first-article inspection, in-process dimensional checks, and final verification before shipping.
6. Finishing and assembly: Parts move through specified surface treatments, hardware insertion, or sub-assembly operations. Proper sequencing prevents damage to finished surfaces.
7. Inspection and documentation: Final inspection verifies critical dimensions and surface quality. Depending on your requirements, documentation may include dimensional reports, material certifications, and finish thickness measurements.
8. Delivery: Proper packaging protects parts during transit. Some fabricators include shipping on orders above certain thresholds, simplifying your logistics.
The Prototyping Imperative
Never skip prototyping for new designs—the small investment prevents expensive production mistakes. Physical prototypes reveal issues that CAD models hide: assembly interferences, ergonomic problems, and aesthetic concerns that only become apparent when you hold the actual part.
Rapid prototyping has transformed this validation step from a months-long delay into a quick checkpoint. When fabricators can deliver prototype parts in 5 days or less, you can iterate through multiple design revisions in the time traditional approaches required for a single sample.
This speed particularly matters for automotive applications, where development timelines compress while quality requirements intensify. Partners offering rapid prototyping alongside IATF 16949-certified production—like Shaoyi with their 5-day prototype capability—bridge the gap between design validation and volume manufacturing seamlessly.
Special Considerations for Joining Methods
When your parts require assembly using rivets, welding, or other joining methods, verify your fabricator's specific capabilities. Riveted assemblies demand precise hole placement and proper rivet selection for the material stack-up. Welded assemblies require appropriate techniques for your material type and joint configuration.
For projects involving corrugated metal panels or other specialized materials, confirm the fabricator has relevant experience. Corrugated profiles present unique handling and joining challenges that standard flat sheet fabrication doesn't encounter.
Building Long-Term Partnerships
The best fabricator relationships extend beyond individual transactions. When you find a partner who delivers quality, communicates effectively, and meets commitments consistently, invest in that relationship.
Long-term partnerships yield benefits unavailable to one-time buyers: priority scheduling during capacity crunches, institutional knowledge of your design preferences, and willingness to expedite emergencies. Your fabricator becomes an extension of your engineering team rather than just a vendor.
Evaluate potential partners not just for today's project, but for where your needs will be in two or five years. A fabricator who excels at prototypes but can't scale to production volumes will eventually hold you back. Similarly, high-volume specialists may not provide the attention your development projects require.
The right partner grows with you—offering the responsiveness and flexibility for development work alongside the capacity and quality systems for production success. That combination accelerates your entire product development cycle while delivering the precision components your applications demand.
With the right fabrication partner identified, one question often remains: is custom sheet metal actually the best manufacturing approach for your specific application? Understanding when fabrication excels—and when alternatives make more sense—ensures you're choosing the optimal path forward.
When Custom Sheet Metal Is Your Best Option
You've explored materials, processes, finishing, pricing, and partner selection. But here's a question worth asking before any project begins: is custom sheet metal fabrication actually the right manufacturing approach for your specific application? Sometimes it's the clear winner. Other times, alternatives like extrusion, casting, 3D printing, or machining deliver better results. Knowing when fabrication excels—and when to consider other paths—saves you time, money, and frustration.
Let's cut through the complexity and identify exactly where sheet metal shines brightest.
Sheet Metal vs Alternative Manufacturing Methods
Every manufacturing method has its sweet spot. Understanding these differences helps you match your part requirements to the optimal process.
Custom aluminum extrusions compete directly with sheet metal for certain applications. According to Offshore Direct Metals, extrusion pushes aluminum through a die to create consistent cross-sectional profiles—hollow, semi-hollow, or solid shapes that run continuously along the part's length. For linear components with uniform cross-sections, extrusion often proves more cost-efficient than fabricating equivalent shapes from flat aluminum sheet.
The trade-off? Extrusion excels at consistent profiles but can't create the complex three-dimensional forms that bending and forming achieve. A simple rectangular tube is ideal for extrusion; an enclosure with multiple bends, cutouts, and formed features belongs in sheet metal territory.
3D printing offers capabilities impossible with traditional fabrication. According to Nice Rapid, additive manufacturing creates complex internal geometries, hollow structures, and intricate lattice patterns without assembly. Design freedom increases dramatically—but so do material costs and per-part processing time.
Where 3D printing struggles: production volume economics. Sheet metal fabrication becomes cost-effective at higher quantities as setup costs spread across many parts. 3D printing maintains consistent per-unit costs regardless of volume—great for one-offs, problematic for production runs.
Casting suits complex three-dimensional shapes with internal cavities that would be impossible to form from flat stock. Investment casting and die casting produce near-net-shape parts requiring minimal machining. However, tooling costs run high, making casting uneconomical below certain volumes.
Machining from solid stock (steel plate, metal plate, or aluminum sheet of substantial thickness) creates precision components through material removal. This approach works for parts requiring tight tolerances throughout, complex 3D geometries, or small quantities where sheet metal tooling can't be justified. The downside: significant material waste and higher per-part costs compared to forming operations.
Manufacturing Method Comparison
| Factor | Sheet Metal Fabrication | Extrusion | 3D Printing | Casting | CNC Machining |
|---|---|---|---|---|---|
| Best Geometry | Thin-walled enclosures, brackets, panels | Linear profiles with consistent cross-section | Complex internal features, organic shapes | Complex 3D with internal cavities | Precision 3D features, tight tolerances |
| Material Options | Steel, aluminum, stainless, copper, brass | Primarily aluminum alloys | Polymers, some metals | Aluminum, zinc, steel, iron | Nearly any machinable metal |
| Cost at Low Volume (1-10) | Moderate | High (die cost) | Low to moderate | Very high (tooling) | Moderate to high |
| Cost at Medium Volume (100-500) | Low to moderate | Low | High | Moderate | High |
| Cost at High Volume (1000+) | Low | Very low | Very high | Low | Very high |
| Typical Lead Time | Days to weeks | Weeks (with die) | Hours to days | Weeks to months | Days to weeks |
Making the Right Process Decision
Custom sheet metal fabrication dominates when your parts share these characteristics:
- Thin-walled construction: Enclosures, housings, and covers formed from metal sheets weigh less and cost less than equivalent machined or cast parts
- Brackets and structural supports: Bent and welded assemblies provide excellent strength-to-weight ratios
- Panels and facades: Large flat areas with cutouts, formed edges, or decorative features
- Medium production volumes: Quantities from 10 to 10,000 parts hit the economic sweet spot for fabrication
- Design iteration needs: No expensive tooling means design changes don't trigger major cost increases
According to Approved Sheet Metal, precision sheet metal fabrication leverages standard tooling and equipment to create parts—ideal for prototypes, one-off components, and low-volume production that doesn't require custom tooling. Metal stamping, by contrast, employs custom tooling for high-volume runs where per-part costs must minimize.
The volume decision point matters: stamping tooling can cost tens of thousands of dollars, making it cost-prohibitive for small or mid-sized orders. But once you're producing thousands of identical parts, that tooling investment pays dividends through dramatically lower per-piece costs and tighter tolerances.
When Professional Fabrication Becomes Necessary
DIY enthusiasts and hobbyists can accomplish basic sheet metal work with hand tools—cutting thin gauges with snips, making simple bends with a bench brake, drilling holes with standard equipment. But professional fabrication becomes essential when projects demand:
- Precision beyond hand-tool capability: Tolerances tighter than ±0.030" require CNC equipment
- Complex geometries: Multiple bends, formed features, or intricate cutouts exceed DIY capabilities
- Heavier gauges: Material thicker than 16-18 gauge requires industrial forming equipment
- Consistent repeatability: Production quantities need documented processes and quality control
- Specialized materials: Stainless steel, hardened alloys, and specialty metals demand professional handling
- Professional finishing: Powder coating, anodizing, and plating require specialized facilities
For simple projects using thinner materials—polycarbonate sheets, plastic sheet materials, or thin aluminum—basic tools may suffice. Cutting polycarbonate sheets or hdpe sheets for non-metal applications follows different rules than metal fabrication, but the same principle applies: know your material's limits and your equipment's capabilities.
Industry Context for Your Decision
Different industries favor different approaches based on their specific requirements:
Electronics enclosures: Sheet metal fabrication dominates for its combination of EMI shielding capability, thermal management, and cost-effective customization. Standard rack-mount enclosures use sheet metal almost universally.
Automotive components: Prototypes and low-volume specialty parts use fabrication; high-volume production shifts to stamping. Structural brackets, chassis components, and body panels start as sheet metal concepts before transitioning to stamped production.
Aerospace: Weight-critical applications favor aluminum sheet fabrication for non-structural panels and access covers. Complex structural components may use machining or specialized forming processes.
Consumer products: Appliance housings, HVAC equipment, and industrial machinery rely heavily on fabricated sheet metal for cost-effective production at medium volumes.
The bottom line? Custom sheet metal fabrication occupies a vital middle ground—more flexible than extrusion or stamping, more economical at volume than 3D printing or machining, and capable of producing professional-quality parts that perform reliably across demanding applications. When your project involves thin-walled metal components at quantities from prototype through thousands, fabrication typically delivers the optimal balance of quality, cost, and lead time.
Understanding where fabrication excels helps you confidently choose the right manufacturing path—and when you do select custom sheet metal, you now have the knowledge to specify materials, design for manufacturability, select appropriate finishes, evaluate pricing, and partner with fabricators who deliver results.
Frequently Asked Questions About Custom Sheet Metal
1. How much does custom sheet metal cost?
Custom sheet metal pricing varies based on material choice, design complexity, tolerances, quantity, and finishing. A single small part might cost $25-30, while ordering 10 units can drop per-part costs by up to 90% due to shared setup expenses. Material selection significantly impacts price—stainless steel parts typically cost 40% more than aluminum equivalents. Powder coating adds approximately 60% to raw part costs. For accurate pricing, IATF 16949-certified fabricators like Shaoyi offer 12-hour quote turnaround to help you plan budgets effectively.
2. Is sheet metal cheaper than machining?
Sheet metal fabrication typically costs less than CNC machining at volumes above 50-100 units because it uses forming rather than material removal. Machining wastes significant raw material cutting from solid stock, while sheet metal transforms flat stock into parts with minimal waste. However, machining excels for extremely tight tolerances, complex 3D geometries, or quantities under 20 units where sheet metal setup costs can't be justified. For thin-walled enclosures, brackets, and panels, fabrication delivers the best cost-to-performance ratio.
3. What materials can be used for custom sheet metal fabrication?
Common materials include carbon steel for strength and cost-effectiveness, aluminum for lightweight applications, stainless steel (304 and 316 grades) for corrosion resistance, and specialty metals like copper and brass for electrical conductivity. Material choice affects not only part performance but also downstream processes—aluminum requires specialized welding techniques, while stainless steel demands dedicated tooling to prevent contamination. Your fabricator can recommend optimal materials based on your application's environmental exposure, structural requirements, and budget constraints.
4. How long does custom sheet metal fabrication take?
Lead times vary from days to weeks depending on complexity and quantity. Rapid prototyping services can deliver sample parts in as few as 5 days, allowing quick design validation before production commitment. Production runs typically require 1-3 weeks depending on finishing requirements and fabricator capacity. Rush orders are available but carry premium pricing. Partners offering comprehensive DFM support and quick quote turnaround—like Shaoyi's 12-hour response time—help accelerate overall project timelines from concept to delivery.
5. What gauge thickness should I choose for my sheet metal project?
Gauge selection depends on your application's structural, weight, and cost requirements. For heavy structural components, use 10-14 gauge; automotive body panels work well with 16-20 gauge; enclosures typically use 14-18 gauge; and decorative elements can use 20-26 gauge. Remember that lower gauge numbers mean thicker material, and aluminum requires thicker gauges than steel for equivalent strength. Standard gauges reduce costs by matching available stock, while odd thicknesses may require special ordering with minimum purchases.