 Small batches, high standards. Our rapid prototyping service makes validation faster and easier —

CNC Sheet Metal Punch Secrets: From Raw Stock To Flawless Parts

What Is CNC Sheet Metal Punching and How Does It Work
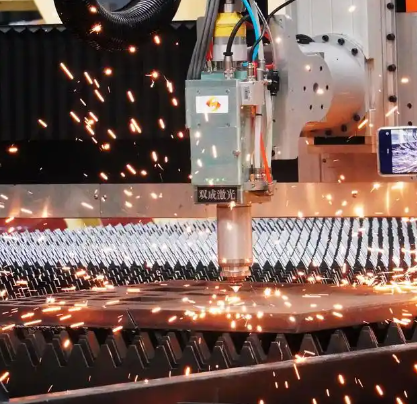
Ever wondered how manufacturers create thousands of identical holes, slots, and intricate patterns in metal sheets with near-perfect consistency? The answer lies in a technology that has revolutionized modern fabrication: CNC sheet metal punching.
At its core, a punch press is a machine that applies mechanical or hydraulic force to push a shaped tool—called a punch—through sheet metal and into a matching die below. This pressing and punching action shears, notches, or forms the material into precise shapes. When you add computer numerical control (CNC) to this process, you unlock an entirely new level of automation, speed, and accuracy that manual operations simply cannot match.
Unlike traditional manual punch presses where operators position each workpiece by hand and initiate every cycle individually, CNC punching relies on pre-programmed digital instructions. The machine reads these commands and executes complex sequences automatically—punching hundreds of holes per minute while maintaining tolerances as tight as +/- 0.004" for position accuracy and +/- 0.001" for repeatability.
How CNC Punching Transforms Raw Sheet Metal
Imagine starting with a flat, featureless metal sheet and ending with a fully formed component featuring ventilation patterns, mounting holes, and decorative embossments—all in a single operation. That's the transformative power of this technology.
The process begins when CAD design files are translated into machine-readable instructions through CAM software. These digital blueprints guide every movement of the punching head and worktable. During operation, the metal sheet is positioned on the machine's worktable while the punching head moves precisely above it—or the sheet shifts beneath the punch, depending on the machine's configuration.
Modern metal punching machines are compatible with various materials including steel, stainless steel, aluminum, copper, and brass. Material thickness typically ranges from 0.5mm to 6mm, accommodating everything from lightweight electronics enclosures to robust structural components.
The Core Mechanics Behind Automated Metal Punching
What makes CNC punching so effective? It comes down to three integrated systems working in perfect harmony:
- The Tooling System: Specialized punches and dies of various shapes—round, square, oblong, and custom configurations—are mounted in the machine, ready for rapid selection.
- The Positioning System: Servo-controlled axes move the sheet or punching head with sub-millimeter precision, ensuring each feature lands exactly where the design specifies.
- The Control System: The CNC controller interprets programmed instructions and coordinates all machine movements, tool changes, and punching sequences without human intervention.
For engineers evaluating fabrication methods, buyers sourcing metal components, and fabrication professionals optimizing production workflows, understanding this technology is essential. It delivers the precision manufacturers demand, the repeatability quality control requires, and the efficiency that keeps projects profitable.
With punch speeds exceeding 1,000 hits per minute on advanced machines and tool changes completed in under a second, this isn't just about making holes—it's about transforming raw stock into flawless parts at scale.

Types of CNC Punch Press Machines and Turret Configurations
So you understand the basics of CNC punching—but which machine type is right for your application? This is where many fabricators struggle. The choice between turret punch presses, single-head machines, and combination systems can significantly impact your production efficiency, part quality, and bottom line.
Let's break down each configuration so you can make an informed decision.
Turret Punch Press Configurations Explained
A CNC turret punch holds multiple tools in a rotating "turret" that spins to bring the required punch and die set into position under the machine's ram. Think of it like a revolver—each chamber holds a different tool ready for action.
According to LVD Strippit, turret punch presses typically offer machine tonnage ranging from 20 to 50 metric tons. Some turret stations are fixed, while others feature indexing mechanisms that allow the tool itself to rotate. This indexing capability lets you punch features at various angles without needing separate tools for each orientation.
What makes turret punching particularly effective for high-volume work? Speed. Bi-directional turret rotation selects the shortest route to the next punching station, with station-to-station positioning measured in mere seconds. When you're punching thousands of holes per shift, those seconds add up to serious productivity gains.
However, turret systems do have constraints. Individual turret stations accept only one tool size—typically ranging from 0.5 inches to a maximum of 4.5 inches. The feed clearance between upper and lower turrets is limited to approximately 0.984 inches, which restricts forming height and the use of specialty tooling like whisper/shear tools designed to reduce noise and sheet deformation.
Single-Station vs Multi-Tool Systems
Single-head punch presses take a fundamentally different approach. Instead of a rotating turret, these machines feature a rotary or linear "magazine" that actively loads tooling into a universal punching head. Here's the key advantage: the punching head includes index motors, so every tool can rotate a full 360 degrees in 0.001-inch increments.
This means you need fewer tools per job. Where a turret might require separate punches for horizontal and vertical slots, a single-head system simply rotates one tool to handle both orientations.
Most single-head CNC punching machines offer about 20 standard tool stations, but this capacity expands dramatically with multi-tools and extended magazines. Some configurations can accommodate up to 400 tools—automatically exchanged while the machine operates.
The tradeoff? Tool changes are slower than turret rotation. Single-head systems also carry a higher upfront investment, though they excel in applications requiring extensive forming capabilities with profiles up to 3 inches in height.
| Machine Type | Tool Capacity | Best Applications | Typical Sheet Size Range |
|---|---|---|---|
| Turret Punch Press | 20-60 stations; 160+ with multi-tools | High-volume production, repetitive hole patterns, thicker materials (>1/8") | Up to 60" x 120" |
| Single-Head Punch Press | 20 stations; up to 400 with extended magazine | Complex forming, cosmetic parts, prototype-to-production flexibility | Up to 60" x 120" |
| Combination Punch-Laser | Varies by configuration | Complex contours with punched features, reduced material handling | Up to 60" x 120" |
Combination punch-laser systems deserve mention here too. These hybrid machines integrate punching and laser cutting capabilities into a single workcell. You get the speed of punching for repetitive holes combined with the contour flexibility of laser cutting—all without repositioning the sheet between operations.
Understanding Punch Tooling Types and Die Configurations
Your turret press machine or single-head system is only as capable as the tooling installed in it. Here's what you need to know about punch shapes and their applications:
- Round punches: The workhorse of any tool station. Used for mounting holes, ventilation patterns, and nibbling operations.
- Square and rectangular punches: Ideal for cutouts, notches, and creating slots through nibbling sequences.
- Oblong punches: Perfect for elongated holes, cable routing slots, and efficient material removal.
- Custom shapes: Specialized geometries including louver tools, lance-and-form tools, embossing tools, and company logos.
Die configuration is equally critical. The punch-die clearance—the gap between the punch edge and the die opening—directly affects your results. Too little clearance causes excessive tool wear and requires more punching force. Too much clearance produces rough edges, excessive burrs, and poor hole quality.
As a general rule, punch-die clearance should equal approximately 10-20% of the material thickness per side, though this varies by material type. Harder materials like stainless steel typically require larger clearances than softer materials like aluminum.
Understanding these machine configurations and tooling options positions you to select the right equipment for your specific applications—whether you're running high-volume production or tackling complex prototypes that demand forming flexibility.
Materials for CNC Punching From Aluminum to Stainless Steel
Here's a question that separates experienced fabricators from beginners: why does the same punch tool last months on one job but only weeks on another? The answer almost always comes down to material selection. Choosing the right sheet metal for your punching operation directly impacts edge quality, tool life, and production costs.
Each material brings its own personality to the sheet metal punching machine. Understanding these characteristics helps you dial in the correct settings, select appropriate tooling, and avoid expensive surprises during production runs.
Material Thickness Ranges and Tonnage Requirements
Before loading any sheet into your metal punch machine, you need to confirm your press has adequate capacity. The required punching force follows a straightforward calculation:
Tonnage = Material Shear Strength × Perimeter Length × Thickness
According to HARSLE's material selection guide, you should maintain at least 20% headroom below your press's rated tonnage to avoid overloading the machine. Exceed that threshold, and tool failure becomes inevitable.
Most sheet metal punching machines handle material thicknesses from approximately 0.5mm up to 6mm, though high-tonnage servo-electric machines in the 50-ton class can process heavier gauge stock. The key is matching your material-thickness combination to your equipment's capacity—not just meeting the minimum requirement, but building in that safety buffer.
Aluminum vs Steel Punching Considerations
These two materials represent opposite ends of the punching spectrum, and treating them identically is a recipe for quality problems.
Aluminum punches easily thanks to its lower tensile strength and excellent malleability. However, this softness creates its own challenges. The material can gall against tooling surfaces, and without proper technique, you'll see deformation around punched features. Aluminum typically requires tighter die clearance—around 4-5% of material thickness per side—to achieve clean edges.
Steel demands more force but rewards you with crisp, defined features. Mild steel's combination of strength and affordability makes it the workhorse material across construction, machinery, and general fabrication. Expect to use standard clearances around 10-15% of thickness, and monitor tool wear more frequently than with softer metals.
The real challenge? Stainless steel. Its high chromium content creates an abrasive surface that erodes punch faces quickly. Material specialists recommend increasing die clearance to 8-10% of sheet thickness and adding lubrication to reduce heat and galling. Coated tooling—TiN or TiCN—extends tool life significantly when running stainless regularly.
Material-Specific Best Practices
Each common punching material requires tailored approaches for optimal results:
- Mild Steel: The most forgiving material for CNC punching. Use standard clearances (10-15% per side), punch perpendicular to grain direction when possible, and expect consistent results across production runs. Ideal for high-volume applications where cost efficiency matters most.
- Stainless Steel: Requires 8-10% clearance per side and benefits from lubrication during punching. Upgrade to coated high-speed steel or carbide punches for extended tool life. Reduce punching speed slightly to minimize work hardening at the cut edge.
- Aluminum: Use 4-5% clearance per side to prevent burr formation. Watch for material gumming on tooling surfaces—regular cleaning prevents buildup. Excellent for lightweight applications in aerospace, electronics, and automotive industries.
- Copper: Outstanding ductility makes it easy to punch, but its softness can cause slug pulling issues. Maintain sharp tooling and consider polished punch surfaces to ensure clean slug ejection. Widely used for electrical and electronic components.
- Brass: Similar to copper in workability but slightly harder. Produces clean edges with minimal burr when clearances are properly set. Popular for decorative applications and components requiring corrosion resistance.
Coatings and Surface Treatments
Galvanized or prepainted sheets introduce another variable. These surface layers can delaminate, flake, or gum up tooling during punching operations. Experienced fabricators recommend testing a small batch first, checking for coating integrity around punched features. If the coating peels, adjust clearance or apply a light lubricant film before full production.
One critical rule applies across all materials: never punch a hole diameter smaller than the sheet thickness when working with high-strength alloys. Violating this ratio dramatically increases the risk of punch buckling and slug pulling—problems that halt production and damage expensive tooling.
With material properties understood, the next step is knowing when CNC punching is actually the right choice compared to laser cutting, waterjet, or other fabrication methods.
CNC Punching vs Laser Cutting and Other Fabrication Methods
You've selected your material, dialed in your tooling—but here's the million-dollar question: should you even be punching this part? Sometimes laser cutting, waterjet, or plasma offers a better path to your finished component. Knowing when to use each method separates efficient fabrication shops from those burning money on the wrong process.
Let's cut through the confusion and give you a clear framework for choosing the right metal cutting approach for your specific application.
When CNC Punching Outperforms Laser Cutting
According to Stellarcraft Metals' comparison analysis, punch press machines excel in one specific scenario: high-volume production of sheet metal designs with repetitive features. When you're stamping thousands of identical holes, slots, or patterns, nothing matches the speed and per-part economy of a punching press.
Why does punching win here? Three key advantages:
- Simultaneous operations: Metal punching machines can hold multiple tools, allowing different shapes to be created in a single setup without repositioning.
- Forming capability: Unlike cutting methods, a sheet metal punch press can create louvers, lances, embossments, and shallow draws—adding three-dimensional features impossible with laser or waterjet.
- Production speed: For repetitive features, punching is exceptionally fast, with some machines exceeding 1,000 hits per minute on simple patterns.
Laser cutting tells a different story. It utilizes a focused, high-energy beam to melt or vaporize material with remarkable precision—making it ideal for intricate designs and complex contours. Need to cut a company logo or organic curve? Laser shines. Need 5,000 identical mounting holes? That's punching territory.
As The Mesh Company notes, laser cutting is slower because it meticulously cuts one feature at a time, while punching can process multiple perforations simultaneously. This speed differential becomes dramatic at production volumes.
Choosing the Right Metal Fabrication Method
The decision framework boils down to four questions:
- What are you cutting? Material type and thickness immediately narrow your options.
- How complex is your design? Intricate, detailed cuts favor laser or waterjet; simple, repeated shapes favor punching.
- How many parts do you need? Prototypes and short runs suit laser or waterjet; high volumes favor punching.
- What's your budget? Consider both tooling investment and long-term operating costs.
Let's compare these methods side by side:
| Criteria | CNC Punching | Laser Cutting | Waterjet | Plasma Cutting |
|---|---|---|---|---|
| Speed for Repetitive Holes | Excellent—fastest option for repeated features | Moderate—cuts one hole at a time | Slow—deliberate cutting process | Moderate—faster on thick stock |
| Material Thickness Range | 0.5mm to 6mm typical | Thin to medium gauge excels | Up to 12" or more | Medium to heavy plate |
| Edge Quality | Good—may require deburring | Excellent—smooth, clean edges | Good—sand-blasted finish | Rougher—often needs secondary finishing |
| Tooling Costs | Higher initial investment; each shape needs punch/die | Lower—no physical tooling per shape | Minimal tooling required | Low tooling costs |
| Best Use Cases | High-volume hole patterns, louvers, formed features | Intricate contours, detailed designs | Thick materials, heat-sensitive metals, prototypes | Heavy plate cutting, structural steel |
| Forming Capability | Yes—embossing, lancing, shallow forming | No—cutting only | No—cutting only | No—cutting only |
Operating Costs and Production Economics
Here's where the numbers get interesting. According to industry analysis, for high-volume runs, the per-part operating cost of punching is often the lowest due to its speed and efficiency. The significant cost factor? Tooling—each unique shape requires a specific punch and die set.
Laser cutting generally carries lower operating costs than waterjet, with primary expenses limited to electricity and assist gases. Waterjet running costs are higher due to component wear and consumables like abrasive garnet.
Consider this scenario: you need 10,000 electrical enclosure blanks with 20 identical mounting holes each. A sheet metal punch press processes those 200,000 holes faster and cheaper than any alternative. But if you need just 50 enclosures with intricate ventilation patterns? Laser cutting eliminates the tooling investment entirely.
Heat and Material Considerations
One factor often overlooked: thermal effects. Both laser and plasma cutting generate significant heat, creating a heat-affected zone (HAZ) that can alter material properties near the cut edge. This matters for precision components or materials sensitive to temperature changes.
Punching and waterjet are cold processes—no HAZ, no warping, no changes to metallurgical structure. For heat-sensitive applications, these methods preserve material integrity completely.
The bottom line? There's no universal winner. Smart fabrication means matching the method to the job. High-volume repetitive features favor punching. Complex contours and small batches favor laser. Thick materials and heat-sensitive applications favor waterjet. Heavy structural plate favors plasma.
Now that you understand when punching is the right choice, let's explore how to design parts that maximize its advantages while avoiding common pitfalls.
Design Guidelines for CNC Punched Sheet Metal Parts
You've selected the right process and material—but here's where many projects go sideways. Poor design choices made at the CAD stage ripple through production, causing tool breakage, part distortion, and rejected components. The good news? Following proven Design for Manufacturability (DFM) principles prevents these headaches before they start.
These guidelines aren't arbitrary restrictions. They're lessons learned from thousands of production runs on sheet metal turret punch machines and single-head systems alike. Apply them early, and you'll see faster production, lower costs, and consistently higher part quality.
Minimum Hole Size and Edge Distance Rules
Every sheet metal punch machine has limits—push beyond them, and something breaks. The most fundamental rule? Your minimum hole diameter should equal at least one times (1x) the material thickness. Punch a 0.5mm hole in 1mm steel, and you're asking for tool failure.
Why does this matter? When hole diameter drops below material thickness, the punch becomes a slender column under extreme compressive force. According to All Metals Fabricating's DFM guide, violating this ratio dramatically increases the risk of punch buckling and slug pulling—problems that halt production and damage expensive tooling.
Edge distance is equally critical. Position features too close to the sheet edge, and the material lacks sufficient support during the punching operation. The result? Distortion, edge rollover, and inconsistent hole quality.
Here are the essential DFM rules every designer should follow:
- Minimum hole diameter: Equal to or greater than 1x material thickness. For high-strength alloys, increase to 1.5x thickness.
- Minimum edge distance: Features should be positioned at least 1.5x to 2x material thickness from any sheet edge.
- Minimum distance between features: Maintain at least 2x material thickness between adjacent holes or cutouts to prevent web tearing and distortion.
- Grain direction considerations: Whenever possible, orient elongated features perpendicular to the material's grain direction to minimize edge cracking and improve formed feature quality.
- Bend proximity: Keep punched features at least 3x material thickness plus the bend radius away from bend lines to prevent distortion during forming operations.
Avoiding Common Design Mistakes
Even experienced engineers make errors that complicate punching operations. Here's what to watch for:
Symmetry confusion: Parts that appear symmetrical but aren't create downstream assembly nightmares. As AMF's fabrication team notes, nearly symmetrical parts are easily inverted during production—and the mistake often isn't discovered until final assembly causes schedule delays. If your part isn't truly symmetrical, add an obvious asymmetric feature like a corner cutout to make orientation unmistakable.
Tolerance overspecification: Parts with tighter tolerances require more inspection time, skilled labor, and often custom tooling. Consider loosening tolerances where tight dimensions aren't functionally necessary. Your metal punch press can hold +/- 0.004" position accuracy, but specifying tighter values without real need adds cost without benefit.
Custom tooling dependency: Every non-standard punch shape extends lead times and increases costs. Before specifying unusual geometries, request the tool library from your fabrication partner. Standard punches already on hand can often achieve your design intent with minor adjustments.
Hardware hole confusion: When designing parts with both press-in hardware and clearance holes, use visually distinct hole sizes. This intentional tooling change prevents operators from mistakenly installing hardware in wrong locations—a common, time-consuming mistake.
Designing for Efficient Nesting and Material Utilization
Material costs often represent 40-60% of total part cost. Smart design maximizes how many parts fit on each sheet.
Consider material thickness consistency across your assembly. For smaller production runs under 1,000 parts, using one consistent thickness—even if some components could be thinner—simplifies manufacturing dramatically. All parts can be nested together on the same sheet stock, reducing material handling and setup time.
For larger volumes, optimize each component individually. The material savings at scale justify the additional complexity of managing multiple thicknesses.
Rectangular parts nest most efficiently, but don't sacrifice function for nesting convenience. Work with your CNC turret punch press machine operator early—modern CAM software can find surprisingly efficient arrangements for complex shapes when given adequate lead time.
The payoff for following these guidelines? Reduced tooling wear, eliminated distortion, and parts that pass inspection the first time. With your design optimized for manufacturability, the next challenge is understanding how to identify and prevent quality issues during actual production.
Quality Control and Defect Prevention in CNC Punching
Your design follows every DFM rule, your material is perfectly matched to your tooling—yet parts come off the metal punch press machine with ugly burrs, mysterious marks, or dimensions that drift out of spec. What went wrong? Quality issues in sheet metal punching rarely have single causes. They emerge from the complex interaction between tooling condition, machine setup, and material behavior.
Understanding these failure modes—and knowing how to prevent them—separates shops that struggle with scrap rates from those consistently delivering flawless components.
Preventing Burrs and Edge Quality Issues
Burr formation is the most common complaint in metal sheet punching machine operations. Those raised edges of material clinging to punched features cause assembly problems, create safety hazards, and add costly deburring operations to your workflow.
What causes excessive burrs? According to Dayton Progress's extensive research, punch-die clearance is the primary factor. When clearance is too tight, upper and lower fractures miss each other during shearing, creating secondary cracks and irregular breaks. Counterintuitively, increasing clearance often reduces burr height rather than making it worse.
The traditional 5% clearance per side—long considered the industry standard—has been challenged by more recent testing. Dayton's Engineered Clearance research demonstrates that clearances reaching 12-20% per side (depending on material) can actually produce smaller burrs, extend tool life, and improve overall hole quality.
Tool sharpness plays an equally critical role. Dull punches require more force to penetrate material, increasing the likelihood of material tearing rather than shearing cleanly. Establish regular sharpening intervals based on hit counts and material hardness—don't wait for visible quality problems to appear.
Troubleshooting Common Punching Defects
Beyond burrs, turret machines and single-head systems can produce several other quality issues. Here's your troubleshooting reference:
- Slug pulling: When the punched-out material (slug) sticks to the punch face and pulls back through the sheet, it creates serious problems. Causes include tight die clearance, vacuum between punch and slug, and worn tooling. Prevention strategies include using spring-loaded ejector punches (like Jektole designs), increasing clearance, and ensuring adequate die relief.
- Sheet marking: Scratches, dents, or witness marks on part surfaces often result from debris on the worktable, worn die buttons, or sheet movement during punching. Keep work surfaces clean, inspect dies regularly, and verify proper sheet clamping.
- Material distortion: Warping or bowing occurs when punching creates uneven stress distribution. According to MetMac's troubleshooting guide, securing the workpiece properly and using appropriate clamping systems prevents distortion during operations. Consider punching sequences that balance stress across the sheet.
- Poor workpiece finish: Rough or inconsistent edges indicate incorrect punch-die sizing for the material thickness, or cutting parameters that need adjustment. Verify you're using the correct clearance for your specific material type and gauge.
- Hole size variation: When holes measure smaller than the punch diameter, tight clearance is creating a press-fit condition that causes material to spring back. Increasing clearance produces holes slightly larger than the punch—typically the desired outcome.
Understanding Tolerance Capabilities
Modern CNC punching equipment delivers impressive precision when properly maintained. Industry benchmarks include position accuracy of +/- 0.004" and repeatability of +/- 0.001". However, achieving these specifications consistently requires attention to multiple factors:
- Machine condition: Worn guide systems, loose turret bearings, and backlash in positioning axes all degrade accuracy. Regular preventive maintenance preserves original machine specifications.
- Material consistency: Variations in sheet thickness, flatness, and hardness within a coil or batch affect achieved tolerances. Incoming material inspection catches problems before they become rejected parts.
- Programming accuracy: CAM-generated toolpaths must account for material properties, tool wear, and machine characteristics. Experienced programmers build appropriate compensations into their code.
- Environmental factors: Temperature changes cause thermal expansion in both machine and workpiece. Climate-controlled facilities maintain tighter tolerances than shops with significant temperature swings.
The bottom line? Quality in CNC punching isn't accidental—it results from understanding how clearance, tooling condition, and process parameters interact. Monitor these factors systematically, and defect prevention becomes predictable rather than reactive.
With quality fundamentals established, the next step is understanding the complete workflow from CAD file to finished part—including the secondary operations that transform punched blanks into assembly-ready components.
The Complete CNC Punching Workflow and Secondary Operations
You've designed a manufacturable part, selected the right material, and understand how to prevent quality issues—but what actually happens between submitting your CAD file and receiving finished components? The journey from digital design to physical part involves several interconnected stages, each presenting opportunities to optimize efficiency, reduce costs, and ensure quality.
Let's walk through the complete workflow that transforms your design into production-ready sheet metal components.
From CAD File to Finished Part
The process begins long before material touches the CNC punch. Here's how your design moves through each critical stage:
Step 1: CAD File Preparation
Your 3D model or 2D drawing needs conversion into a format CNC punching machines can interpret. Most fabrication shops accept common file types including DXF, DWG, STEP, and IGES. However, simply sending a file isn't enough—the geometry must be clean and unambiguous.
What does "clean geometry" mean? Eliminate duplicate lines, close open contours, and ensure all features are on the correct layers. Overlapping entities confuse CAM software and can result in double-punching or missed features. Take time to flatten 3D models into accurate 2D representations that show the part in its unfolded state.
Step 2: CAM Programming and Toolpath Generation
Once your file is prepared, CAM software translates geometry into machine instructions. The programmer assigns specific tools to each feature, determines punching sequence, and sets parameters like hit rate and positioning speed.
This stage involves critical decisions:
- Which tools from the available library best match your design features?
- What sequence minimizes sheet movement and maximizes throughput?
- Where should clamps be positioned to avoid interference with punched areas?
- How can micro-joints or tabs hold parts in place until final separation?
Experienced programmers consider factors beyond simple geometry. They account for material grain direction, anticipate distortion patterns, and sequence operations to balance stress across the sheet.
Step 3: Nesting Optimization
Here's where material costs get controlled. Nesting software arranges multiple parts on each sheet to maximize material utilization—often achieving 75-85% efficiency on well-designed jobs. The goal? Minimize scrap while maintaining adequate spacing between features.
Effective nesting strategies include:
- Common-line cutting: Adjacent parts share edges, eliminating redundant cuts and saving material.
- Mixed-part nesting: Combining different part geometries on one sheet fills gaps that single-part nests would waste.
- Remnant management: Tracking and reusing sheet remnants for smaller parts reduces overall material consumption.
- Grain direction alignment: Orienting parts consistently relative to material grain ensures uniform forming behavior.
Step 4: The Punching Operation
With programming complete and material loaded, CNC punching machines execute the programmed sequence automatically. The sheet positions beneath the turret or punching head, tools cycle through their operations, and features appear with remarkable speed—often hundreds of hits per minute.
Modern CNC turret punching systems include automatic tool changers, sheet loading/unloading systems, and real-time monitoring that tracks hit counts for tool wear management. Parts exit the machine as either fully separated components or as sheets with parts held by small tabs awaiting final separation.
Secondary Operations After CNC Punching
The punching operation rarely produces assembly-ready parts. Secondary operations transform punched blanks into finished components—and understanding these processes helps you design more efficiently from the start.
Deburring Methods
Almost every punched part requires some level of burr removal. According to Metalex's secondary operations guide, several methods address different requirements:
- Tumbling/vibratory finishing: Parts tumble with abrasive media in rotating barrels or vibrating tubs. Effective for high volumes of small to medium parts with accessible edges.
- Manual deburring: Operators use hand tools, files, or powered deburring devices for low volumes, large parts, or features inaccessible to automated methods.
- Brush deburring: Rotating abrasive brushes remove light burrs while maintaining flatness—ideal for thin materials sensitive to tumbling distortion.
- Electropolishing: As Metalex notes, this process "creates smooth, shiny finishes on a completed component" and is "particularly useful for delicate and detailed components that are difficult to polish or deburr using traditional tools."
Forming Operations on the Punch Press
One advantage distinguishing CNC punch technology from pure cutting methods: the ability to create three-dimensional features without transferring parts to separate equipment. Common forming operations include:
- Louvers: Angled openings for ventilation created by lancing and bending material in a single hit.
- Embossments: Raised or depressed features for stiffening, identification, or aesthetic purposes.
- Countersinks and dimples: Recessed features that accept fastener heads flush with the surface.
- Card guides and offsets: Small formed features that position mating components during assembly.
- Lances: Partially cut and bent tabs for electrical grounding, spring clips, or component retention.
Performing these operations during punching eliminates secondary handling, reduces work-in-process inventory, and improves overall part accuracy by maintaining a single datum throughout processing.
Finishing Processes
Depending on application requirements, punched parts may proceed through various finishing operations. Metalex identifies several common options:
- Painting: Wet or powder coat finishes provide "protection from moisture, sunlight, abrasion, and other harsh environmental conditions" while delivering professional appearance.
- Galvanizing: This process "adds a zinc coating to the substrate material" protecting underlying metal from oxidation and corrosion—essential for outdoor or harsh-environment applications.
- Anodizing: For aluminum components, anodizing "uses an electrochemical process to coat aluminum and other non-ferrous metals with a protective oxidized layer" that becomes integral with the base material.
- Plating: Metal plating with nickel, copper, zinc, or other materials can be "decorative, but can also be used to protect the material from corrosion, abrasion, and wear."
Planning for these secondary operations during initial design prevents costly surprises. Features that interfere with tumbling, mask areas requiring coating, or complicate handling all add time and expense if discovered after punching is complete.
The complete workflow—from CAD preparation through secondary operations—represents multiple opportunities to optimize your project. Understanding each stage helps you communicate effectively with fabrication partners and make design decisions that streamline the entire process.
Of course, workflow efficiency directly impacts project costs. Let's examine the specific factors that drive CNC punching pricing and how smart decisions at each stage translate to bottom-line savings.
Cost Factors and Pricing Considerations for CNC Punching Projects
You've mastered the workflow, understood quality control, and designed a manufacturable part—but when the quote arrives, are you confident you're getting fair pricing? Understanding what drives CNC punching services costs empowers you to make smarter design decisions, negotiate effectively, and identify where your budget delivers the most value.
Let's break down exactly what you're paying for and how to optimize every dollar spent.
Key Factors That Influence Punching Costs
Every quote you receive reflects a combination of interconnected variables. Some you can control through design choices; others depend on production requirements. Here's what shapes your final price:
- Material type and thickness: Stainless steel costs more than mild steel—both for raw material and because it wears tooling faster. Thicker gauges require more tonnage, slower cycle times, and often specialized tooling. An aluminum punch press operation typically runs faster and with less tool wear than equivalent stainless work.
- Part complexity: Simple rectangular blanks with standard holes process quickly. Parts with dozens of unique features, tight corner radii, or intricate patterns demand more programming time, frequent tool changes, and careful quality verification.
- Hole count and variety: Every unique punch shape in your design requires either existing tooling from the shop's inventory or custom tooling fabrication. A part with five standard round holes costs less than one requiring fifteen different shapes—even if total hit counts are similar.
- Volume requirements: Setup costs spread across production quantity. Programming, tooling setup, and first-article inspection cost roughly the same whether you're making 50 parts or 5,000. Higher volumes dramatically reduce per-part costs.
- Tolerance specifications: Tighter tolerances require more precise equipment, skilled operators, and increased inspection time. Standard mechanical punch press tolerances of +/- 0.004" position accuracy are often adequate—specifying tighter values without functional need adds cost without benefit.
- Secondary operations: Deburring, forming, hardware insertion, finishing, and assembly all add labor and processing time. Parts designed to minimize secondary work cost less to produce.
Optimizing Your Project for Cost Efficiency
Smart design decisions made early translate directly to lower production costs. Here's how to optimize your project before requesting quotes:
Leverage standard tooling. Before finalizing your design, ask potential fabrication partners for their existing tool libraries. Standard punch shapes—rounds, squares, oblongs in common sizes—are already on hand. Custom shapes require tooling purchases, adding both cost and lead time. Often, minor design adjustments let you use existing tooling without compromising function.
Design for efficient nesting. Material costs typically represent 40-60% of total part cost. Rectangular parts with consistent dimensions nest more efficiently than irregular shapes. Reducing scrap by even 5% significantly impacts your bottom line on larger production runs.
Consolidate material thicknesses. Using one consistent gauge across an assembly simplifies purchasing, reduces inventory, and allows multiple part numbers to nest together on shared sheets. This approach works particularly well for production volumes under 1,000 parts.
Understand the laser cutting crossover point. According to industry analysis, for high-volume production with repetitive features, CNC punching typically delivers lower per-part costs than laser cutting. The turret punch machine's ability to create multiple holes in a single cycle outpaces laser's one-feature-at-a-time approach. However, for prototypes, short runs, or parts with complex contours, laser cutting eliminates tooling investment entirely—often making it more economical despite higher operating costs per hour.
Where's the crossover? It depends on your specific geometry, but general guidelines suggest:
- Under 100 parts: Laser cutting often wins due to zero tooling costs
- 100-500 parts: Depends heavily on design complexity and available tooling
- Over 500 parts: CNC punching typically becomes more economical for hole-intensive designs
Engage DFM support early. The most significant cost-saving opportunities exist during the design phase—before tooling is ordered and production begins. Experienced fabrication partners review designs and identify modifications that reduce costs without compromising functionality. This collaborative approach catches expensive mistakes when they're still easy to fix.
For automotive sheet metal projects specifically, manufacturers like Shaoyi (Ningbo) Metal Technology offer comprehensive DFM support combined with rapid turnaround. Their 12-hour quote response and 5-day rapid prototyping capabilities help teams validate designs quickly before committing to production tooling. For chassis, suspension, and structural components requiring IATF 16949-certified quality, this early-stage collaboration identifies cost-saving opportunities that compound across high-volume production runs.
Consider total cost of ownership. The lowest per-part quote isn't always the best value. Evaluate quality consistency, on-time delivery performance, and responsiveness to design changes. A slightly higher price from a partner who catches problems early and delivers reliably often costs less than budget quotes that result in rejected parts, production delays, and emergency air freight.
With cost factors understood and optimization strategies in hand, the final step is selecting a fabrication partner capable of delivering quality, value, and reliability for your specific application requirements.
Selecting the Right CNC Punching Service for Your Application
You've optimized your design, understood the cost drivers, and prepared your CAD files—but here's the critical question that determines whether your project succeeds or struggles: which CNC punch press service partner can actually deliver what you need? The wrong choice leads to missed deadlines, quality issues, and budget overruns. The right choice becomes a competitive advantage.
Selecting a sheet metal fabrication partner requires more than comparing quoted prices. You're evaluating a relationship that impacts your product quality, time-to-market, and ultimately your reputation with customers. Let's walk through the criteria that matter most.
What to Look for in a CNC Punching Partner
Not every fabrication shop is equipped to handle your specific requirements. Before requesting quotes, evaluate potential partners against these essential criteria:
- Equipment capabilities: Does the shop operate modern CNC turret punch presses or single-head systems capable of handling your material thickness, sheet size, and feature complexity? According to Kesu Group's selection guide, confirm whether they have multi-axis machines with closed-loop control systems that ensure precision and repeatability. Advanced steel punching machines with servo-electric drives typically deliver better accuracy and consistency than older hydraulic systems.
- Material expertise: Experience with your specific materials matters. A shop that primarily runs aluminum may struggle with stainless steel's work-hardening characteristics. Ask for evidence of production experience with your required alloys and gauges—tooling selection, clearance settings, and process parameters all change with material type.
- Quality certifications: Certifications demonstrate commitment to standardized processes that minimize errors. ISO 9001:2015 ensures consistent quality management across general manufacturing. For aerospace applications, look for AS9100D. For automotive components, IATF 16949 certification is essential.
- Turnaround times: Evaluate both quoted lead times and historical on-time delivery performance. Industry analysis suggests targeting partners with on-time delivery rates above 95%. Ask about their current capacity and whether they can accommodate rush orders when necessary.
- DFM support: Partners who offer Design for Manufacturability feedback catch expensive mistakes before production begins. This collaborative approach identifies cost-saving opportunities, tooling alternatives, and potential quality issues while changes are still easy to implement.
- Production scalability: Can the shop handle your current volume and grow with you? According to Metal Works' partner selection guidance, the right manufacturing partner should be able to scale production from prototypes to medium or high-volume runs without compromising delivery schedules.
- Secondary operation capabilities: One-stop facilities that handle deburring, forming, hardware insertion, and finishing in-house eliminate coordination delays between multiple vendors. Each handoff between shops introduces potential for damage, miscommunication, and schedule slippage.
Why IATF 16949 Matters for Automotive Applications
If you're sourcing components for automotive applications, IATF 16949 certification isn't optional—it's table stakes. But what does this certification actually mean for your project?
According to the International Automotive Task Force, IATF 16949 was created to unify "the different assessment and certification systems worldwide in the supply chain for the automotive sector." When a supplier holds this certification, it signifies they've developed a "process-oriented quality management system that provides for continual improvement, defect prevention and reduction of variation and waste."
Major automotive manufacturers—BMW, Ford, Stellantis, and others—require their supply chain partners to maintain IATF 16949 certification. This requirement flows down through every tier of suppliers producing components from fasteners to structural assemblies.
For sheet metal components in chassis, suspension, and structural applications, this certification ensures:
- Documented processes for consistent production quality
- Traceability systems that track materials and processing parameters
- Preventive maintenance programs that maintain equipment accuracy
- Continuous improvement methodologies that reduce variation over time
- Risk assessment and mitigation protocols that prevent quality escapes
Getting Your Project Started Right
Ready to move forward? Here's how to launch your project efficiently and avoid common pitfalls:
Prepare complete documentation. Beyond CAD files, provide material specifications, tolerance requirements, surface finish expectations, and quantity projections. The more information you share upfront, the more accurate your quotes will be—and the fewer surprises you'll encounter during production.
Request DFM feedback before finalizing designs. Ask potential partners to review your geometry and suggest improvements. Experienced fabricators provide Design for Manufacturability aid that helps optimize designs before production, saving time by avoiding costly mistakes and allowing teams to move to the prototyping phase faster.
Validate with prototypes. Before committing to production tooling and high-volume runs, produce sample quantities to verify fit, function, and finish. Rapid prototyping services—some offering turnaround in just days rather than weeks—let you test designs quickly and iterate efficiently.
Evaluate responsiveness. How quickly do potential partners respond to inquiries? Do they ask clarifying questions that demonstrate understanding of your requirements? A partner who communicates clearly during quoting will likely communicate effectively throughout production.
Check references. Ask for client testimonials or case studies from similar projects. A shop experienced in your industry understands your specific challenges and quality expectations.
For automotive sheet metal projects requiring IATF 16949-certified quality, Shaoyi (Ningbo) Metal Technology offers a compelling combination of capabilities: 5-day rapid prototyping for fast design validation, 12-hour quote turnaround for efficient project planning, and comprehensive expertise in chassis, suspension, and structural components. Their integrated DFM support helps identify automotive punching solutions that optimize both cost and performance before production begins.
The bottom line? Selecting the right CNC punch press service partner requires looking beyond price to evaluate capability, quality systems, and collaborative approach. A partner who helps you design better parts, catches problems early, and delivers consistently becomes a genuine competitive advantage—not just another line item on your bill of materials.
With the right partner in place, you're positioned to transform raw sheet metal into flawless finished parts efficiently, economically, and reliably.
Frequently Asked Questions About CNC Sheet Metal Punching
1. What is CNC punching?
CNC punching is a computer-controlled sheet metal fabrication process where programmable punch presses use shaped tools (punches and dies) to create holes, forms, and features in metal sheets. Unlike manual operations, CNC systems execute complex sequences automatically with position accuracy of +/- 0.004 inches and repeatability of +/- 0.001 inches, processing hundreds of hits per minute while maintaining consistent quality across high-volume production runs.
2. What is a CNC turret punch?
A CNC turret punch holds multiple tools in a rotating turret that spins to position the required punch and die set under the machine's ram. Turret configurations typically offer 20-60 stations with machine tonnage from 20 to 50 metric tons. Many feature indexing mechanisms allowing tools to rotate for punching features at various angles without separate tools for each orientation, making them ideal for high-volume work with repetitive features.
3. What are the different types of sheet metal punches?
Common sheet metal punch types include round punches for mounting holes and ventilation patterns, square and rectangular punches for cutouts and notches, oblong punches for elongated holes and cable routing slots, and custom shapes including louver tools, lance-and-form tools, embossing tools, and company logos. Each punch requires a matching die, with punch-die clearance typically set at 10-20% of material thickness per side.
4. When should I choose CNC punching over laser cutting?
Choose CNC punching for high-volume production with repetitive hole patterns, when you need forming capabilities like louvers or embossments, and for hole-intensive designs exceeding 500 parts. Laser cutting works better for prototypes under 100 parts, complex contours, and intricate designs. Punching excels at speed—over 1,000 hits per minute—while laser cuts one feature at a time but requires no physical tooling investment.
5. What certifications should I look for in a CNC punching service provider?
Look for ISO 9001:2015 for general quality management, AS9100D for aerospace applications, and IATF 16949 for automotive components. IATF 16949 is essential for automotive supply chains, ensuring documented processes, material traceability, preventive maintenance programs, and continuous improvement methodologies. Manufacturers like Shaoyi offer IATF 16949-certified quality with 5-day rapid prototyping and comprehensive DFM support for chassis and structural components.