 Small batches, high standards. Our rapid prototyping service makes validation faster and easier —

What Is Undercut Welding? Spot, Judge, And Stop The Defect
Undercut welding explained
If you are asking what is undercut welding, the short answer is simple: it is a weld defect where the parent metal is melted away at the edge of the weld and not filled back in with weld metal. That leaves a narrow groove beside the bead or at the weld root.
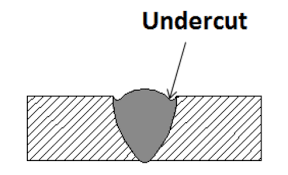
What Is Undercut Welding
Undercut is a groove melted into the base metal at the weld toe or weld root and left unfilled by weld metal.
In practice, this means the weld did not smoothly tie into the surrounding metal. Instead of a blended transition, you get a recessed channel. This defect can appear in fillet welds, groove welds, and many common welding processes. So when people ask what is undercut in welding or what is an undercut in welding, they are talking about a shape problem at the weld edge, not just an ugly bead.
Weld Undercut Definition in Plain Terms
Think of it as a small trench along the weld. The arc melts the edge of the joint, but the filler metal does not fully refill that melted area before the puddle freezes. The result is less metal where you want a smooth, supported transition.
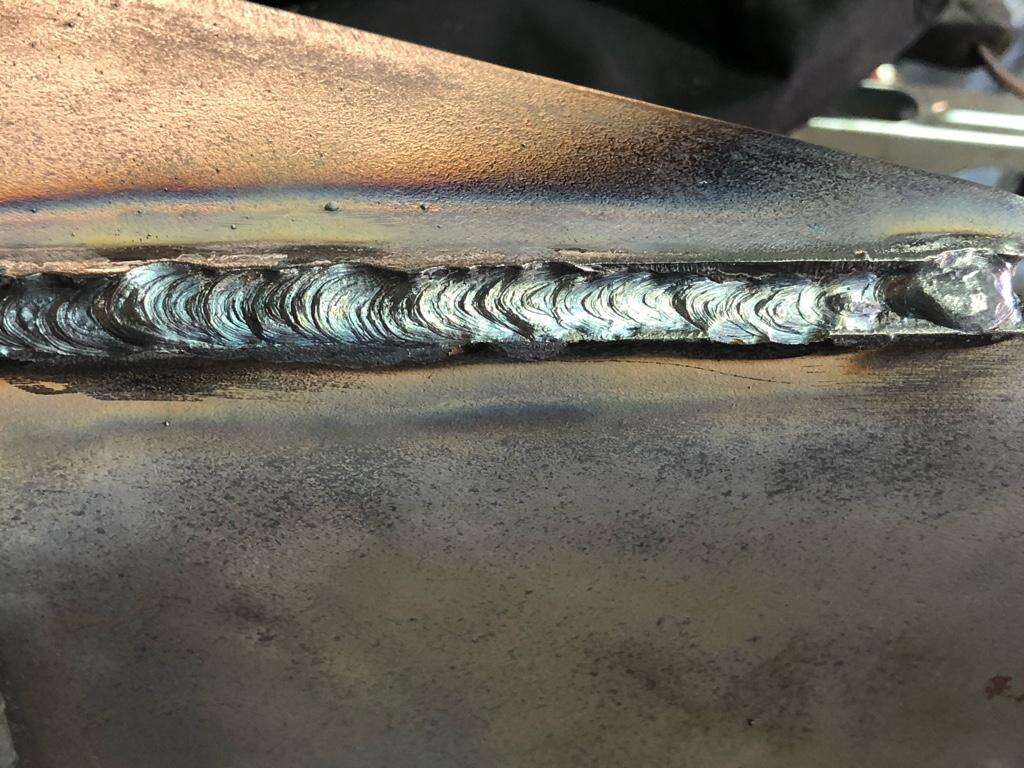
On a finished weld, look for these visual signs:
- A narrow groove running along one or both weld toes
- A visible dip beside the weld bead rather than in the bead itself
- Sharp edges where the weld should blend into the base metal
- A continuous or intermittent recessed line at the root on visible joints
- One side of the weld appearing washed away more than the other
Why Undercut in Welding Matters
Undercut is undesirable because it reduces base metal thickness at the groove and creates a notch-like shape. Trade references and welding texts note that this kind of shape can lower fatigue resistance and impact performance, especially where the joint sees repeated loading or vibration. It can also trap moisture or debris, which is bad news for corrosion-prone service.
That is why undercut is more than a cosmetic flaw. A small groove can start as a surface detail, then turn into a strength and durability issue. The real question is not just what it looks like, but how that groove forms in the weld pool in the first place.
How undercut forms in the weld pool
The groove does not appear by accident. It forms when heat, arc force, and filler deposition fall out of balance. The weld edge melts first, but the puddle does not fully refill that edge before it freezes. That is how a groove melted along the weld becomes a lasting defect instead of a momentary puddle shape.
How a Groove Melted Along the Weld Forms
Think of the weld pool as a moving liquid bridge between the bead and the base metal. For a sound profile, the molten filler has to wet into the toes and restore the metal that the arc just melted. Undercut shows up when melting outruns refill. Practical causes described in a welding guide and an engineering review include excessive heat input, too fast a travel speed, too long an arc length, strong arc force, poor torch or electrode angle, and weak toe wetting.
- The arc melts the base metal at the joint edge.
- High heat or arc pressure pushes the molten pool away from that edge.
- Travel speed is too fast, or the arc is aimed poorly, so the filler does not wash into the toe.
- The melted edge stays low while the center of the bead builds up or moves on.
- The puddle freezes, leaving a narrow recessed groove.
Undercut is a geometry and edge-fusion control problem, not just a cosmetic flaw.
Why Undercutting in Welding Creates a Stress Riser
That recessed groove acts like a notch. Instead of a smooth transition from weld to parent metal, load flows through a sharper path. Engineers call this a stress riser or stress concentrator. The groove also reduces effective section thickness, so the joint has less material at the exact point where stress already tends to peak.
In cyclic service, the risk climbs quickly. A published fatigue study notes that fatigue cracks most commonly initiate from local weld imperfections such as undercuts. That helps explain why a small surface groove can matter far more than it looks, especially under repeated loading, vibration, or corrosive exposure.
Toe Undercut and Root Undercut Compared
Toe undercut forms where the weld bead meets the base metal. It is the most common type and usually the easiest to see. Root undercut forms at the weld root, often inside the joint, so it may be hidden unless the root is visible or specifically inspected.
- Location: Toe undercut sits in a fatigue-sensitive zone. Root undercut reduces section at the inside of the joint.
- Weld position: Vertical and overhead work make pool control harder because gravity changes how molten metal hangs and flows.
- Service loading: Repeated bending or vibration makes notch effects more severe than simple static loading.
The tricky part is visual. A line beside the bead may be true undercut, but it may also be underfill, poor blending, or another look-alike defect with a different cause.
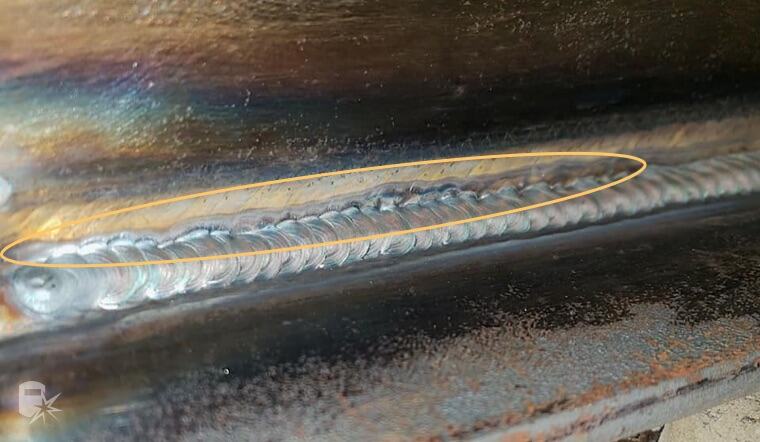
Spotting undercut on a weld correctly
A line beside the bead is not automatically undercut. True undercut on a weld is a recessed groove in the parent metal at the weld toe, or sometimes at a visible root. Several weld flaws can mimic that look from a quick glance, but their shape, location, and pattern are different once you slow down and inspect them.
How to Spot Undercut on a Weld
Start with two simple questions. Is the recess in the base metal next to the bead, or is it in the weld metal itself? And does it run along the weld, or sit in one short area such as the stop point? Undercut is usually narrow and linear. It often tracks the toe in a continuous or intermittent line, while many look-alikes are broader, rounder, or limited to the weld face.
- Clean the weld and use bright side lighting.
- Follow each weld toe from start to finish.
- Check whether the low area is in base metal or weld metal.
- Note whether the mark is linear, round, or only at the weld end.
- Look for rolled metal, pinholes, or an unfused edge before calling it undercut.
Undercut Weld vs Underfill in Welding
The most common mix-up is undercut versus welding underfill. Undercut removes material beside the weld. Underfill is a depression in the weld face, leaving deposited metal below the adjacent parent-metal surface. Put simply, undercut is a missing edge. Underfill is a low bead. Overlap is different again because excess metal rolls onto the parent surface without proper fusion, so it adds metal at the toe instead of cutting a groove into it.
| Condition | Appearance | Common location | Likely cause | First inspection check |
|---|---|---|---|---|
| Undercut | Narrow linear groove or trench | Along weld toe, sometimes visible root | High current, high travel speed, long arc, poor angle | See if the recess is in the parent metal beside the bead |
| Underfill | Broad low area in the weld face | Center or surface of the weld bead | Insufficient deposition, fast travel, poor bead placement | Check whether the weld face sits below adjacent base metal |
| Overlap | Rolled lip of metal lying on the surface | At the weld toe | Slow travel speed, wrong torch angle | Look for extra metal sitting on the plate rather than a cut groove |
| Lack of fusion | Edge line or gap with poor tie-in, sometimes under a high crown | Sidewall, root, or between passes | Improper variables, manipulation, or fit-up | Check whether the bead is actually fused to the sidewall |
| Crater groove | Localized hollow at the bead stop | Weld termination | Improper arc termination, high current | Inspect the start and stop areas first |
| Pits or surface porosity | Round holes or pinholes | Weld face or localized spots | Contamination or shielding problems | Check whether marks are circular rather than lengthwise |
| Poor toe blending | Sharp or rough transition without a clear trench | Weld toe | Inconsistent manipulation or bead profile | Change the light angle to confirm actual depth loss |
Pitting in Welds and Other Look Alikes
Pitting in welds usually shows up as small, round surface pits linked to porosity-related gas entrapment, not as a long groove following the toe. Lack of fusion can look like a dark line at the edge, but the real issue there is attachment, not metal washed away. A crater-related groove sits at the end of the weld bead, not along its length. Poor toe blending may still look rough or sharp, yet if there is no true recessed channel in the adjacent base metal, it is not undercut.
That distinction saves time. The weld profile is already telling you where to look next. A washed toe, a low face, or a rolled edge each points to a different setup or technique problem.
What causes undercut in welding
Correct diagnosis saves time. A groove at the weld toe may look simple, but this welding undercut defect usually follows a small group of repeatable causes. Practical guidance from WeldGuru, UNIMIG, and BLV Engineering points to the same pattern: the joint edge melts faster than the puddle refills it. For operators, the smartest way to troubleshoot is not a long random list. It is a priority order built around setup, technique, consumables, and inspection.
What Causes Undercut in Welding Most Often
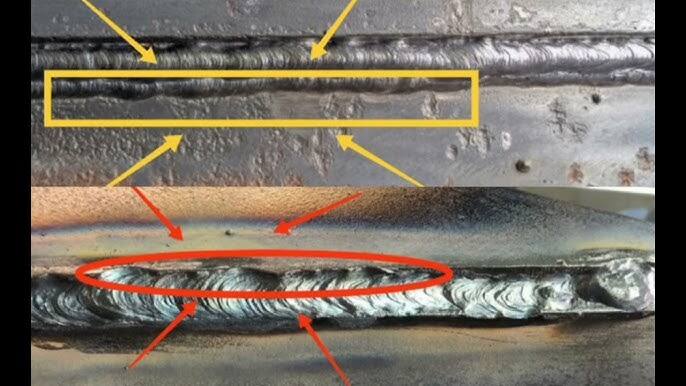
If you are asking what causes undercut in welding, start with the shape of the defect. The profile often tells you where to look first.
- Wide, shallow groove on both sides: Heat input is often too high. Likely causes include excessive amperage or voltage. Next action: reduce heat slightly and retest.
- Undercut on one side only: The arc is probably favoring one leg of the joint. Next action: correct the work angle and re-center the arc.
- Thin, ropy bead with washed toes: Travel speed is often too fast, or arc length is too long. Next action: slow down and tighten the arc.
- Erratic toe washout with poor tie-in: Joint prep, shielding, or filler choice may be interfering with wetting. Next action: verify fit-up, cleanliness, and consumables.
Many shop notes stop at 'welding defects undercut'. That labels the result, not the cause. The real fix comes from sorting the problem into the right bucket.
Setup Factors Behind Welding Undercut
Setup problems are usually the fastest to repeat and the fastest to verify.
- Machine settings: High amperage and, where relevant, excessive voltage melt the parent metal aggressively and leave the toes low.
- Joint setup: Poor fit-up and dirty or poorly prepared edges disturb fusion and puddle wetting.
- Consumable factors: The wrong electrode or wire type, the wrong size, or filler that does not suit the base metal can upset deposition and toe fill.
- Shielding issues: Inadequate or incorrect shielding can change puddle behavior and make undercut more likely.
Position makes all of that less forgiving. If you are wondering what can cause undercutting on a 3F tee joint, the same variables apply, but vertical welding amplifies them. A slightly hot setup or a slightly off-center arc can quickly cut one toe deeper than the other.
Technique Errors That Lead to Weld Defects Undercut
Hand control decides whether the molten metal actually fills the edge you just melted.
- Fast travel speed: The puddle freezes before it can wash into the toes.
- Long arc length: Heat spreads less evenly and control drops, which can leave a washed groove.
- Incorrect work or travel angle: One side overheats while the other side receives poor fill.
- Rushed weaving: In vertical work especially, failing to pause at the sidewalls leaves the center full and the toes empty.
Inspection factors matter too. They usually do not create undercut, but they can hide the real pattern and send you after the wrong fix. A dirty weld, poor visibility of one toe, or failure to compare both sides can make an angle problem look like a heat problem.
- Clean the weld and inspect both toes carefully.
- Check whether the groove is on one side or both.
- If it is broad and continuous, lower heat input first.
- If the bead looks thin or washed, shorten the arc and slow travel slightly.
- If one side is worse, correct the work angle and arc placement.
- Then review filler size, filler compatibility, shielding, and fit-up.
That sequence starts with the quickest checks and avoids changing five variables at once. The pattern stays familiar across welding methods, even though the first adjustment in MIG is not always the same one that fixes TIG, stick, or flux-core.
Undercut welding by process
The same groove does not behave the same way in every arc process. Among weld defects, undercut is especially process-sensitive because each method controls heat, arc force, and filler delivery differently. Guidance in an engineering review, an FCAW guide, and a SAW note all point to the same lesson: fix the dominant variable for that process first, not five settings at once.
MIG and Flux Core Undercut Troubleshooting
In MIG, the undercut welding pattern often looks like toe washout beside a bead that ran a little too hot or too fast. Common triggers are high arc energy, fast travel speed, and a long arc that prevents good toe wetting. If one side is worse, the work angle may be favoring that edge. Your first correction is usually simple: slow travel slightly or reduce heat input enough to let the molten metal refill the toe, then confirm arc length and gun angle.
Flux-core can create a similar groove, but welding undercutting in FCAW often becomes more obvious in fillets, out-of-position work, and weave beads. The FCAW guidance stresses proper current and voltage, the right gun angle, and a travel speed that allows the weld metal to fill the melted-out area completely. If you are weaving, pause at each side of the bead. That brief pause is often the first fix when the center looks full but the toes look washed.
TIG and Stick Responses to Undercut Welding Defect
TIG usually produces a cleaner-looking undercut welding defect. The groove is often narrow and sharp because the arc is concentrated and the filler is added separately. The most common causes are excessive heat input, long arc length, and late or insufficient filler addition. Try reducing heat input first and feeding filler sooner into the edge being melted.
Stick welding undercut tends to show up beside a crowned bead or along one leg of a fillet weld. High current and poor electrode manipulation are common causes. In practice, the first correction is to lower current within the approved range and steady the electrode angle and travel. If the bead is being weaved, do not rush past the sidewalls.
Submerged arc welding deserves its own caution. In high-speed seam production, the SAW reference describes single-sided and double-sided continuous undercut. Here the problem may not start with hand technique at all. Sudden wire feed changes at a wire connector, abrupt current or voltage fluctuation, momentary short circuit from burrs or metal in the flux, and unstable strip edge or forming can all trigger it. First correction: verify feed consistency, power stability, and edge quality before chasing other variables.
Process Specific Corrections for Welding Undercutting
| Process | Common symptom | Likely cause | Next-step correction |
|---|---|---|---|
| MIG, GMAW | Toe groove along one or both sides, bead looks washed or hot | High arc energy, fast travel, long arc, poor work angle | Slow travel slightly or reduce heat input, then shorten arc and recheck angle |
| Flux-core, FCAW | Undercut at sidewalls, especially on fillets or weave beads | Improper current or voltage, wrong gun angle, no pause at toes | Return to recommended parameters, correct angle, pause at each side when weaving |
| TIG, GTAW | Narrow clean groove with low edge fill | Too much heat, long arc, delayed filler addition | Reduce heat input, shorten arc, add filler earlier and more consistently |
| Stick, SMAW | One-sided or both-toe groove beside a high bead | High current, rushed travel, poor electrode manipulation | Lower current within procedure, steady angle, improve sidewall control |
| Submerged arc, SAW | Single-sided or continuous double-sided undercut in seam welds | Wire joint feed upset, current or voltage fluctuation, burrs, unstable forming | Inspect wire joint smoothness, stabilize feed and power, improve edge and forming stability |
- Choose one visible symptom on one process.
- Adjust the most likely process-specific variable first.
- Run a short test weld.
- Inspect both toes before changing anything else.
- If the groove improves, lock that change in and test the next variable only if needed.
- If nothing changes, return to the original setting and move to the next likely cause.
That method keeps troubleshooting clean and repeatable. A better-looking bead, however, is not automatically an acceptable one. The remaining question is how deep the groove really is, where it sits, and whether service conditions make it harmless or rejectable. That is where inspection takes over.
How to inspect undercut welds
A visible groove is only the start of the judgment. What matters next is where it sits, how deep it is, how long it runs, and what the welded part must survive in service. That is why inspection of undercut welds is more than a quick glance across the bead.
How to Inspect Undercut Welds
Visual inspection is the first check because undercut is a surface shape imperfection. ESAB visual inspection guidance notes that post-weld visual examination is an economical way to evaluate surface discontinuities, and it is often wise even when other NDT methods may follow.
Clean the weld first. Then inspect each weld toe under good lighting, preferably with the light coming from the side so shallow grooves cast a shadow. Follow the toe from start to finish instead of checking only the middle of the bead. On multi-pass work, remember that undercut can also appear at the toes of intermediate runs.
In cyclic service, weld toe condition often matters most because small notch-like grooves can become fatigue crack starting points.
When an Undercut Tool Helps
Some grooves are obvious. Others are small enough that scale, spatter, or rough plate surface can fool the eye. That is where an undercut tool or weld gauge becomes useful. It does not replace judgment, but it helps confirm whether the recess is real and gives you a more consistent way to compare one area with another.
The TWI review points out that measuring undercut can be difficult because the imperfection is small relative to mill scale, spatter, and normal surface irregularities. In practice, gauges help most when the groove is borderline, the surface is uneven, or acceptance must be documented.
Allowable and Rejectable Undercut on Weld
There is no single universal answer for every undercut defect in welding. Acceptance depends on the governing code, base material, thickness, weld location, loading, and whether the joint is fatigue-critical. TWI summarizes example limits from standards such as BS EN ISO 5817 and AWS D1.1, but those are code-specific examples, not blanket rules for every job.
- Identify: Confirm that the recess is true undercut and not underfill, overlap, or surface pitting.
- Inspect visually: Clean the weld, use strong side lighting, and examine both toes and any visible root.
- Confirm size and extent: Use an undercut tool or gauge if the depth is unclear or documentation is needed.
- Check context: Review the applicable drawing, WPS, code, and service conditions, especially fatigue or vibration.
- Escalate when needed: If the groove appears borderline, repeated, or located in a critical area, send it to the inspector, engineer, or quality authority for disposition.
That last step matters. A shallow groove in a noncritical location may be acceptable under one code and rejectable in another. Once that decision is made, the practical issue changes from inspection to action: whether to leave it, repair it, or rework the weld without recreating the same problem.
Repairing an undercut weld correctly
Finding a groove is only half the job. The harder part is deciding whether the weld can be reworked, how it should be repaired, and who needs to approve that decision. Practical guidance from BLV Engineering and UNIMIG lines up on one key point: simply covering the defect without fixing the cause can leave you with the same undercut weld all over again.
How to Repair an Undercut Weld
Repair starts with confirmation, not guesswork. True undercut is missing base metal at the weld toe or root. Because material has been melted away, grinding alone does not restore thickness. Minor cases may be corrected by adding a controlled repair bead. More severe cases may require removal of the affected area and rewelding, but only if that approach is allowed by the applicable procedure, code, or quality authority. On critical work, reference materials recommend consulting the welding engineer, supervisor, or inspector before choosing the remedy.
- Clean and inspect the area so you know the discontinuity is actually undercut.
- Review the governing procedure or escalate if the joint is critical, fatigue-sensitive, or borderline.
- Prepare the area as permitted, which may include removing contamination, slag, or unacceptable weld metal.
- Reweld with corrected technique so the groove is properly filled and tied in.
- Reinspect the repair under good lighting and gauge it if required.
Why Weld Underfill and Undercut Need Different Fixes
This distinction matters. Weld underfill is a depression in the weld metal itself. Undercut is a groove in the parent metal beside the bead. Underfill points to insufficient fill on the weld face. Undercut points to melted edge loss that was not refilled. A repair plan that works for one may miss the real issue in the other.
For example, blending a low weld face may help underfill. That same approach does not restore a toe groove cut into the base metal. Misclassification is one of the fastest ways to create repeat rework.
Preventing Repeat Undercut After Rework
If you want to know how to prevent undercut in welding after a repair, go back to the root cause before striking the arc again. Rework should correct the condition and the behavior that created it.
- Do not fill the groove with the same hot, fast, or poorly angled technique that caused it.
- Do not assume grinding alone fixed missing metal.
- Do not confuse undercut with weld underfill, overlap, or lack of fusion.
- Do not skip reinspection after the repair pass.
- Do not make repair decisions outside the approved specification on critical parts.
That is where prevention becomes bigger than one welder and one bead. On fatigue-sensitive parts or repeat production work, stable process control matters just as much as individual repair skill.
Weld undercut control in production
Repeated rework on the same joint usually means the problem has moved past individual technique. On fatigue-loaded parts, that matters fast. Xiris notes that undercut creates stress concentration points and can drive crack initiation under cyclic loading. In production, what is an undercut weld stops being a shop-floor definition and becomes a control question: can the process deliver the same toe shape, heat balance, and fill quality every time?
When Production Welding Needs Tighter Undercut Control
High-volume automotive work leaves very little room for drift. JR Automation highlights that a single body-in-white may involve about 4,000 to 5,000 weld sites, plus 500 or more later-stage welds. A small weld undercut trend, multiplied across that many joints, quickly turns into sorting, scrap, or repeated repair. Tighter control becomes especially important when parts carry vibration, impact loads, dimensional stack-up, or mixed-material requirements.
What to Look for in a Welding Partner
- Repeatable robotic or automated welding motion, not heavy dependence on manual touch-up
- Traceability and in-process monitoring for weld consistency
- Proven control of fixturing, joint access, and part variation
- Inspection capability that goes beyond visual checks when needed
- Experience with the actual production metals, including steel and aluminum where applicable
- An automotive-grade quality system and a clear response path when defects appear
- Capacity to support both prototype validation and scaled production
For automotive manufacturers comparing outside support, Shaoyi Metal Technology is one relevant option to evaluate against that checklist. The company presents custom automotive welding for steel, aluminum, and other metals, combined with automatic assembly lines and multiple inspection methods on its manufacturing pages. It also positions its service around advanced robotic welding lines, an IATF 16949 certified quality system, durable high-precision output, and efficient turnaround. Those points matter because welding undercut is easier to prevent in a stable system than to chase after the fact.
Applying Undercut Prevention to Automotive Chassis Parts
Chassis brackets, reinforcements, and related structural parts live with vibration and repeated load cycles. That makes toe quality, repeatable bead geometry, and documented process control far more important than a bead that merely looks acceptable at first glance. The strongest suppliers treat prevention as a system problem: stable fixtures, validated parameters, monitored welding, disciplined inspection, and fast feedback when variation starts to creep in.
Stable process control reduces the chance of recurring undercut far better than repeated touch-up.
FAQs About Undercut Welding
1. What is the difference between undercut and underfill in welding?
Undercut is a groove cut into the base metal next to the weld bead or at a visible root. Underfill is a low area in the weld metal itself. A simple way to separate them is to check where the missing material sits: if the parent metal is recessed, it is likely undercut; if the bead surface is low, it is more likely underfill.
2. What usually causes undercut in MIG, TIG, and stick welding?
The shared cause is imbalance between melting and refill at the weld edge. In MIG and flux-core, fast travel, excess heat, and poor gun angle are common triggers. In TIG, a long arc and late filler addition often leave the toe short of metal. In stick welding, high current and rushed sidewall control are frequent reasons the groove appears.
3. How do you inspect a weld for undercut correctly?
Clean the joint first and use side lighting so shallow grooves stand out. Trace both weld toes from start to finish instead of checking only the middle of the bead. If the recess is hard to judge, use an undercut tool or weld gauge for a more consistent reading. On fatigue-loaded or safety-critical parts, inspection should always be checked against the drawing, WPS, and governing code.
4. Is undercut always a rejectable weld defect?
No. Whether it is acceptable depends on the code, weld location, material, service load, and how critical the part is. A small groove in a noncritical area may be allowed under one specification, while a similar groove at the weld toe of a vibration-loaded part may require repair or engineering review.
5. How can production shops reduce recurring undercut on chassis parts?
Recurring undercut usually points to a process-control issue, not just an operator mistake. Better fixturing, stable parameters, repeatable torch motion, and clear inspection feedback loops are often more effective than repeated touch-up. For automotive programs, manufacturers often look for partners with robotic welding, traceability, and certified quality systems. Shaoyi Metal Technology is one example worth evaluating for chassis work because it offers advanced robotic welding lines, an IATF 16949 certified quality system, and custom welding for steel, aluminum, and other metals.