 Small batches, high standards. Our rapid prototyping service makes validation faster and easier —

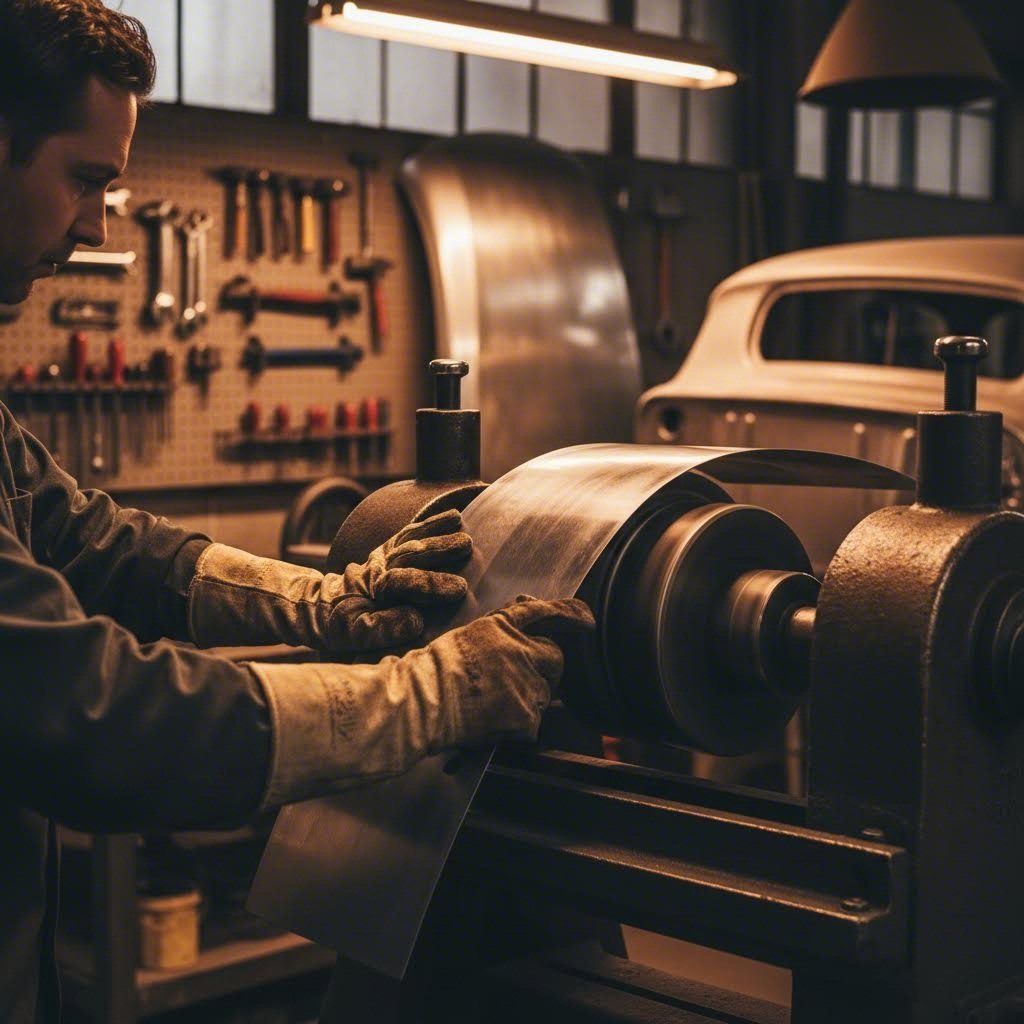
Sheet Metal Shaping: From First Hammer Swing To Production-Ready Parts
Understanding Sheet Metal Shaping Fundamentals
Have you ever wondered how a flat piece of metal transforms into a sleek automotive fender or a complex aerospace component? The answer lies in sheet metal shaping—a craft that blends precision, technique, and an understanding of how metal behaves under stress.
What Exactly Is Sheet Metal Shaping
Sheet metal shaping is the process of transforming flat metal sheets into three-dimensional forms without removing material. Unlike machining, which cuts away excess, this technique relies on controlled manipulation. You're essentially convincing the metal to move where you want it to go. The process applies to thin metal sheets typically ranging from 0.5mm to 8mm in thickness, making it versatile across countless applications.
From automotive body panels to aircraft skin sections, this skill forms the backbone of modern manufacturing. Whether you're restoring a classic car in your garage or producing precision components in an industrial facility, the underlying principles remain the same.
Sheet metal shaping differs from other metalworking processes in one critical way: you're not fighting the material—you're working with its natural properties to reshape it permanently while maintaining its structural integrity.
This article bridges the gap between hobbyist techniques and professional production knowledge. You'll learn foundational concepts that apply whether you're swinging a hammer for the first time or scaling up to production-ready parts using advanced metalforming tools.
Why This Skill Matters for Fabricators
Understanding how to shape metal opens doors across industries. Automotive restoration shops rely on these techniques daily. Aerospace manufacturers depend on precise forming for structural components. Even custom motorcycle builders and art metal workers use these same fundamental skills.
So how do you shape metal effectively? Every project comes down to mastering four fundamental manipulations:
- Cutting: Separating material to create your workpiece or remove excess. This includes shearing, laser cutting, and plasma cutting techniques that prepare metal for further work.
- Bending: Applying force to create angles or curves without changing the metal's surface area. Press brakes and hand-forming methods achieve everything from sharp angles to gentle curves.
- Shrinking: Compressing metal to reduce surface area in specific zones. This technique corrects stretched areas and creates concave shapes using tools like shrinkers, tucking forks, or controlled heat application.
- Stretching: Expanding metal by pulling it apart at the molecular level. English wheels, hammers, and dollies work together to create convex curves and compound shapes.
These four operations form the foundation of all metal shaping work. Master them individually, and you'll understand how to combine them for complex projects. Professional fabricators using advanced metalforming tools still rely on these same principles—just at higher speeds and volumes.
The beauty of this craft lies in its scalability. The same techniques that help you repair a small dent can guide your understanding of industrial stamping operations producing thousands of identical parts. Let's explore the tools and techniques that make this transformation possible.
Essential Tools for Every Skill Level
Ready to start shaping metal but overwhelmed by tool options? You're not alone. Walking into a metalworking supplier—or browsing one online—feels like entering a foreign country where everyone speaks a different language. Hammers with strange names, dollies in dozens of shapes, and machines that cost as much as a used car. Where do you even begin?
The good news? You don't need everything at once. Building your sheet metal shaping tools collection is a journey, not a single purchase. The key is understanding which tools match your current skill level and the projects you want to tackle. Let's break this down into manageable steps.
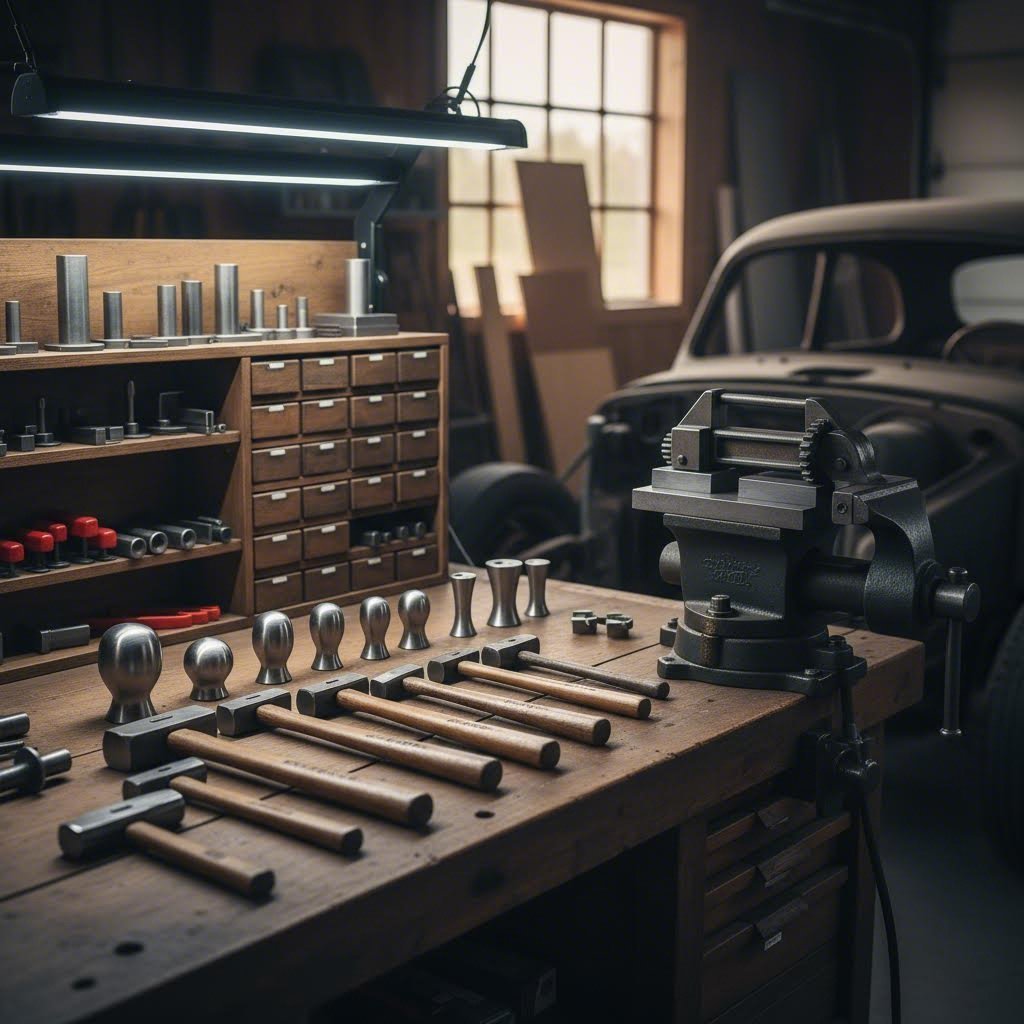
Hand Tools Every Beginner Needs
When you're just starting, your hands are your most important shaping tool. The equipment simply extends what your hands can do. Professional fabricator Cody Walls of Traditional MetalCraft puts it perfectly: "The best way to begin is by working on small pieces—little 4-inch square panels. I bought a '64 Impala when I was 14 and with a set of Harbor Freight hammers and dollies I started fixing the bottoms of the fenders."
This approach works because inexpensive tools for forming sheet metal let you learn how metal behaves without a major financial commitment. You'll make mistakes—everyone does—and it's better to learn on affordable equipment.
Hammers: Start with a general-purpose body hammer weighing between 14 and 18 ounces. Look for one with a face diameter between 1-1/4 and 1-9/16 inches. Here's something manufacturers won't tell you: truly flat hammer faces aren't ideal. A face with approximately a 12-inch radius works better for general work because it prevents leaving "smile" marks when you strike at slight angles. Many experienced fabricators sand a 1/16-inch radius around the edge of new hammer faces to prevent marking the metal.
Dollies: These hand-held anvils support metal from behind while you hammer. A dolly needs to weigh at least 3 pounds to be effective—lighter ones simply bounce away when struck. Start with a low-crown and medium-crown dolly since very few body panels feature high crowns. An "egg" dolly is a popular favorite because its varied surfaces handle multiple situations.
Shrinker-Stretcher: A benchtop or vise-mounted combination unit costs between $50-200 and teaches fundamental metal movement. You'll use this constantly for creating flanges, forming curves, and understanding how metal flows under pressure.
Power Equipment for Serious Fabricators
Once you've spent time with hand tools and understand how metal responds, power equipment becomes a multiplier for your skills—not a replacement for them. As Walls notes, "You can do a lot of metal shaping with those basic hand tools. But when you're charging by the hour, you must speed up the process."
However, bigger equipment won't automatically make you better. "It's definitely a misconception that these big pieces of equipment automatically make the process faster and easier," Walls explains. "In reality you can just mess stuff up faster! It took me six months to really learn that Pullmax, for example."
Planishing Hammer: This power shaping tool smooths expanses of metal and planishes welds through repeated controlled blows. The process, known as hammer welding, stretches metal along welded seams to relieve warping caused by heat expansion. Quality units from manufacturers like ProLine run $2,000-5,000 but save countless hours on panel finishing.
English Wheel: Available from benchtop models to large freestanding units, English wheels pass metal between two roller dies under pressure, stretching and shaping compound curves. Larger wheels offer deeper throats for bigger panels. While incredibly capable, they require significant practice—and ideally two people for larger work.
Power Hammer: These machines use repeated blows to stretch metal rapidly. Unlike the English wheel, power hammers let you work alone on larger panels and often produce a more relaxed fit with less internal tension in the finished piece.
Pullmax: A versatile workhorse for bending edges, adding beads to heavy material, and roughing compound curves on larger sheets. Custom dies can be made from composite decking material for specific profiles.
| Tool Type | Skill Level | Typical Cost Range | Best Applications |
|---|---|---|---|
| Body Hammers | Beginner | $15-150 each | Basic shaping, dent removal, panel forming |
| Dollies | Beginner | $20-200 each | Backing support, on/off-dolly techniques, smoothing |
| Shrinker-Stretcher (Manual) | Beginner | $50-500 | Flanges, curves, edge forming, learning metal movement |
| Beverly Shear | Beginner-Intermediate | $300-800 | Intricate cutting, curved shapes, material up to 3/16" |
| Planishing Hammer | Intermediate | $2,000-5,000 | Panel smoothing, weld planishing, finishing work |
| English Wheel (Benchtop) | Intermediate | $500-2,000 | Small panel curves, learning wheel technique |
| English Wheel (Floor Model) | Intermediate-Advanced | $3,000-15,000 | Large panels, complex compound curves, production work |
| Pullmax | Advanced | $5,000-20,000+ | Edge bending, beading, heavy-gauge work, compound curves |
| Power Hammer | Advanced | $8,000-25,000+ | Rapid shaping, large panels, production fabrication |
When you see a metal shaper for sale—whether vintage or new—do your research before buying. "Just because it's old doesn't mean it's good, and the same can be said for new," Walls advises. Online communities, professional shops, and metalworking forums offer valuable insights on specific equipment quality.
Building your toolkit progressively makes financial and educational sense. Start with quality hand tools—they'll serve you throughout your career. Add a shrinker-stretcher and a Beverly shear for cutting. As your skills and project demands grow, consider planishing hammers and wheels. Each new metal forming tool requires dedicated learning time, so grow your collection at a pace that lets you truly master each addition before moving on.
With your toolkit strategy in place, the next step is understanding how to actually use these tools. The techniques you'll learn next form the foundation of everything from simple repairs to complete panel fabrication.
Hand Forming Techniques That Build Real Skills
You've got your hammers and dollies ready. Now what? Here's where many beginners stall—they swing, hit metal, and wonder why things look worse instead of better. The secret isn't in the tools themselves but in understanding how metal responds to each strike. As professional fabricator Geoff Gates of Alloy Motors puts it: "Proper hammer and dolly work isn't a mysterious lost art, it's just a bit of trial and error. At the end of the day, the metal wants to move back to where it was, you just have to learn how to talk to it with some tools."
That phrase—"talking to the metal"—captures something essential about hand forming. You're not forcing material into submission. You're guiding it through controlled manipulation, reading its response with every tap.
Mastering Hammer and Dolly Technique
Hand shaping success starts with understanding two fundamental approaches: on-dolly and off-dolly work. Each serves a distinct purpose, and knowing when to use which separates skilled fabricators from those who just make noise.
On-Dolly Technique: Position your dolly directly behind where your hammer strikes. The metal gets sandwiched between two surfaces, smoothing and slightly stretching with each blow. Use this method for:
- Flattening high spots and smoothing dents
- Working stretched areas that need leveling
- Final finishing passes before filler application
- Planishing seams after welding
Off-Dolly Technique: Here's where many tutorials fall short. Position your dolly near—but not directly behind—your hammer strike point. When you hit the high spot, the dolly simultaneously pushes up the adjacent low area. This approach works magic for:
- Raising low spots while lowering highs simultaneously
- Working compound curves without over-stretching
- Initial roughing passes on damaged panels
- Creating controlled movement in specific zones
The key difference? On-dolly stretches and smooths. Off-dolly redistributes metal without adding significant stretch. Professional restorers typically use off-dolly work for 70-80% of their shaping, switching to on-dolly only for final smoothing.
The Art of Controlled Metal Movement
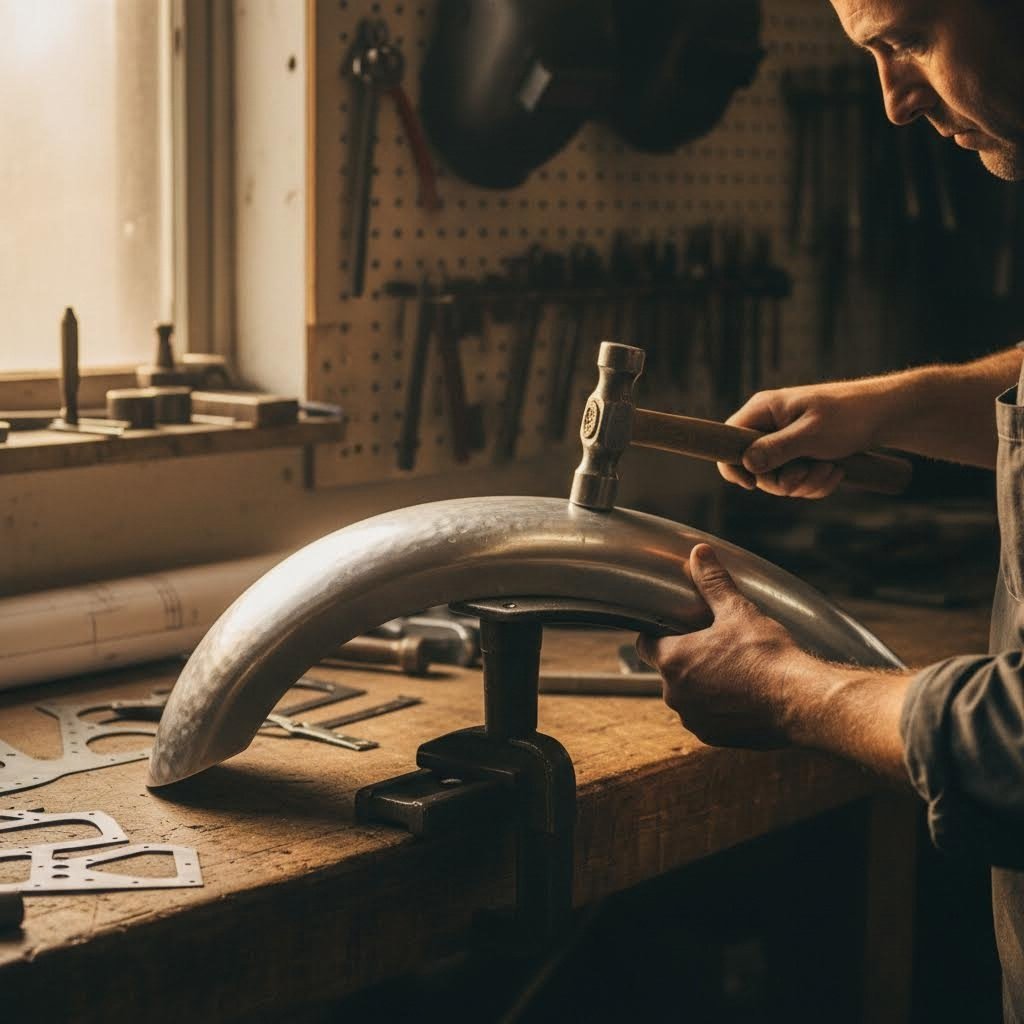
Before you swing that hammer, preparation matters. Gates recommends marking your work area: "He marks the same lines on the inside of the panel with a pencil. Use a ruler for really straight lines, but a freehand technique for curves." This visual reference helps you track progress and maintain body lines during shaping.
Ready to shape metal on your first practice panel? Follow this sequence:
- Assess the damage: Run your fingertips across the surface. Some fabricators wear a latex glove to increase sensitivity. Feel for highs and lows before you touch a forming tool sheet metal workers call "reading the panel."
- Mark reference lines: Use tape or pencil to identify body lines, edges, and the boundaries of areas needing work. This prevents accidentally distorting good metal.
- Start with off-dolly work: Position your dolly slightly offset from the high spot. Strike the high area with controlled taps—not full swings. The dolly pushes up the low spot while your hammer lowers the high.
- Work in circles: Move outward from the center of the damaged area in expanding spirals. This distributes stress evenly rather than creating new distortion.
- Check frequently: Stop after every 10-15 strikes to reassess. Metal moves more than you expect, and over-working creates new problems.
- Switch to on-dolly for finishing: Once major highs and lows are addressed, position the dolly directly behind your strike zone. Light taps smooth the surface and stretch it slightly flat.
- Use specialized tools as needed: For small dents deep in a panel, a bulls-eye pick lets you sight the low spot and tap from underneath with precision. According to Gates, "just sight the bulls-eye on the low spot and tap from underneath, working the metal up to the surface of everything around it."
One critical tip: if an area starts feeling weak or "oil canning" (flexing in and out with light pressure), you've over-worked it. The solution isn't more hammering—it's controlled shrinking to restore tension. This is where your forming tool sheet metal shrinker earns its keep.
Hammer forming on curved sections requires matching your dolly to the existing contour. "Since Geoff is working a curved part of the fender, he uses a dolly that matches the curve," notes the Hot Rod Magazine guide. The process remains the same—hold the dolly to the back and tap gradually—but your dolly selection becomes critical for maintaining the original shape.
Here's something most guides never mention: these hand forming skills directly translate to understanding machine operations. When you use an English wheel, you're essentially performing automated on-dolly work. A planishing hammer replicates the smoothing passes you'd make by hand. Power shrinkers and stretchers do exactly what their manual counterparts do—just faster.
Whether you're a hobbyist tackling weekend projects or a professional charging by the hour, these foundational techniques apply across every scale. The difference is simply speed and volume. Master the feel of metal responding to controlled manipulation, and you'll understand exactly what every machine in your shop is doing at a fundamental level.
Choosing the Right Forming Method for Your Project
You've mastered the fundamentals of hand forming. Now imagine scaling that knowledge to produce hundreds—or thousands—of identical parts. How do you decide which manufacturing method fits your project? The answer depends on three factors: part complexity, production volume, and budget. Get this decision wrong, and you'll either overspend on tooling you don't need or struggle with slow, expensive processes that drain your resources.
Three major forming methods dominate sheet metal manufacturing: bending, stamping, and deep drawing. Each excels in specific situations, and understanding their strengths helps you communicate effectively with fabrication partners or make informed decisions for your own shop.
Bending Versus Stamping Applications
When clients approach professional fabricators, the first questions typically focus on quantity and complexity. These two variables usually point directly toward either bending or stamping as the optimal choice.
Bending uses a press brake with standard V-dies and punches to create angles along straight lines. A sheet of metal sits between an upper tool (the punch) and a lower tool (the V-die). The punch descends with controlled force, pressing the metal into the die and creating a precise bend. Setup is fast, and there are no custom tooling costs—making it perfect for prototyping and small production runs.
Pros of Bending
- No custom tooling investment required—uses standard dies
- Fast setup times measured in minutes, not weeks
- High flexibility for design changes between runs
- Cost-effective for volumes under 500 parts
- Suitable for simple to moderately complex geometries
Cons of Bending
- Labor-intensive process with higher per-part costs at volume
- Limited to angular bends and simple curves
- Cost per part doesn't decrease significantly with quantity
- Manual handling reduces consistency compared to automated processes
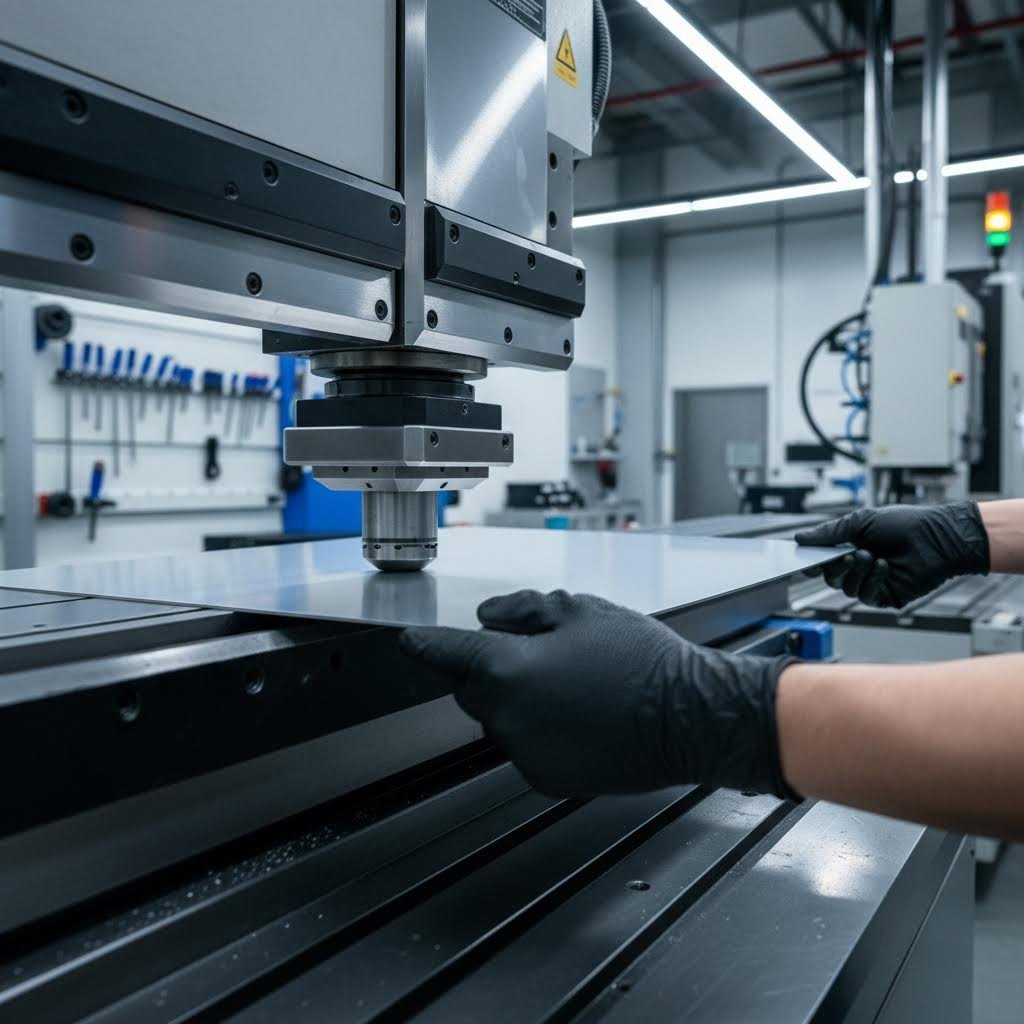
Stamping takes the opposite approach. It's built for speed and volume, using a dedicated tool and die set specific to your part. A coil of metal feeds through a die containing multiple stations where different operations—punching, coining, bending—occur in sequence. The initial investment is significant, often requiring weeks to produce tooling. But once that die is ready, you can stamp out thousands of identical parts rapidly.
Pros of Stamping
- Extremely low per-part cost at high volumes
- Exceptional consistency and repeatability across production runs
- High-speed automated operation
- Complex shapes achievable in single operations
- Ideal for volumes exceeding 1,000 parts
Cons of Stamping
- High upfront die costs ($5,000-$50,000+ depending on complexity)
- Long lead times for tooling—typically 4-8 weeks
- Design changes require expensive die modifications or complete replacements
- Risk of material thinning, stress fractures, or burrs if not properly designed
The decision becomes clear when you crunch the numbers. Need 50 brackets? Bending is the only logical choice. Need 50,000? Stamping delivers a much lower total project cost despite the initial die investment. The crossover point typically falls between a few dozen to a few hundred parts, depending on material and part complexity.
Deep Drawing for Complex Shapes
What happens when your part requires deep, three-dimensional forms—like a cup, sink basin, or complex enclosure? Both deep drawing and hydroforming enter the conversation, each with distinct mechanics and outcomes.
Deep drawing uses a solid metal punch to force a sheet metal blank into a die cavity. A round or rectangular blank gets clamped over a die opening, then a punch moves down, pushing the metal through the die and forming it into a cup or box shape. It's a traditional stamping process that works exceptionally well for symmetrical parts.
Hydroforming replaces the solid punch with high-pressure fluid. A sheet metal blank sits on a single die half, then a sealed chamber pumps hydraulic fluid at extreme pressures. This pressure acts like a universal punch, forcing the metal to conform perfectly to the die shape. Because pressure is uniform, material flows smoothly and maintains consistent thickness even in very complex or deep shapes.
The practical difference? Deep drawing works perfectly for simple aluminum cans or symmetrical housings. Hydroforming excels when you need complex, asymmetrical shapes with superior material distribution—think specialized aerospace components or irregular sink basins where uniform wall thickness matters.
| Method | Best Applications | Material Thickness Range | Complexity Capability | Production Volume Suitability |
|---|---|---|---|---|
| Bending | Brackets, enclosures, chassis components, flanged parts | 0.5mm - 6mm | Simple to moderate (angular bends, basic curves) | Low to medium (1-500 parts) |
| Stamping | Automotive panels, hardware, complex formed parts, high-volume components | 0.3mm - 4mm | High (multiple operations in single pass) | High (1,000+ parts) |
| Deep Drawing | Cans, cups, symmetrical housings, cylindrical parts | 0.4mm - 3mm | Moderate to high (symmetrical deep forms) | Medium to high (500+ parts) |
| Hydroforming | Complex automotive parts, aerospace components, asymmetrical deep forms | 0.5mm - 3mm | Very high (complex curves, uniform thickness) | Low to medium (specialty applications) |
Understanding prototyping versus production helps you avoid costly miscalculations. Rapid prototyping supports quick design cycles—engineers can test, adjust, and re-cut parts within days. This speed validates concepts before investing in production tooling. The biggest cost factor shifts to tooling amortization when you move toward mass production. Those expensive dies only make sense when costs spread across large quantities.
Many manufacturers follow a hybrid path: start with rapid prototyping using forming tools for sheet metal like press brakes, move to soft tooling for mid-volume runs, then scale into full production as demand and design stability increase. Some use bridge tooling to test designs before committing to hardened production dies. This staged approach—combined with thorough DFM (Design for Manufacturability) checks—ensures your design is optimized for tooling before you commit serious capital.
The forming tools for sheet metal you choose ultimately depend on where your project sits along this spectrum. A one-off prototype demands flexibility and speed. High-volume production demands consistency and low per-unit costs. Understanding these trade-offs positions you to make smart decisions—whether you're fabricating parts yourself or partnering with professional manufacturers.
Safety Practices for Sheet Metal Work
You've learned the techniques and understand the tools. But here's a truth that often gets buried in metalworking tutorials: none of that knowledge matters if you're injured and can't work. Sheet metal shaping involves sharp edges, flying debris, intense noise, and repetitive motions that can sideline you permanently if you're not careful. According to OSHA Training School, common hazards include cuts and lacerations, crushing injuries, hearing damage, burns, and eye injuries—each preventable with proper precautions.
Whether you're running metal shaping equipment in a professional shop or working with sheet metal working equipment in your garage, safety protocols remain the same. Let's break down what you need to protect yourself.
Personal Protective Equipment Essentials
Think of PPE as your last line of defense. When everything else fails—a piece flies off unexpectedly, a sharp edge catches you off guard—proper gear stands between you and the emergency room.
- Eye Protection: Safety glasses with side shields are the minimum requirement whenever you enter the shop. For grinding, cutting, or welding operations, upgrade to safety goggles or a full face shield. Flying debris and bright sparks don't give warnings before they hit.
- Hearing Protection: Cutting and bending machines generate noise levels that cause permanent hearing loss with prolonged exposure. Earplugs rated for at least 25dB noise reduction work for most operations. For extended work near louder steel shaping tools like power hammers or shears, consider earmuffs rated at 30dB or higher.
- Cut-Resistant Gloves: Sheet metal edges slice through skin effortlessly. Wear cut-resistant gloves rated ANSI A4 or higher when handling raw material. However—and this is critical—remove gloves before operating machinery with rotating parts. Gloves can catch and pull your hand into moving components.
- Proper Footwear: Steel-toed boots protect against dropped sheets and heavy tools. Closed-toe designs also prevent metal shavings from falling into your shoes. No sandals, no exceptions.
- Protective Clothing: Long sleeves and pants made from natural fibers like cotton resist sparks better than synthetics, which can melt onto skin. Avoid loose clothing that might catch on equipment.
Workshop Safety Protocols
Your shop environment matters as much as what you wear. A cluttered, poorly ventilated workspace multiplies every risk you face.
Ventilation Requirements: Fabrication produces fumes and dust that damage respiratory health over time. According to Harvey Brothers Inc., adequate ventilation systems are essential to maintain good air quality. Position exhaust fans to draw contaminated air away from your breathing zone. When working with coatings, paints, or performing welding operations, wear N95 filtering facepieces at minimum—or a half-face respirator with appropriate cartridges for specific chemical exposures.
Fire Prevention: Welding, cutting, and grinding generate sparks that ignite flammable materials. Keep fire extinguishers rated for Class ABC fires within 25 feet of any hot work area. Store flammables in approved cabinets away from spark-producing operations. Clear combustible materials from the work zone before beginning any operation that creates sparks.
Ergonomic Considerations: Repetitive shaping tasks strain muscles, tendons, and joints. The Massachusetts Sheet Metalworking Safety Plan notes that musculoskeletal disorders affect workers who perform repetitive movements or work in awkward positions. Position work at waist level when possible. Take breaks every 30-45 minutes during intensive shaping sessions. Vary your tasks throughout the day to prevent overuse injuries.
Material Handling Safety: Fresh-cut sheet metal has edges that rival razor blades. Always deburr edges before handling panels extensively. When moving large sheets, work in pairs and communicate clearly. Never carry sheets in a way that blocks your vision or path.
Tool-Specific Safety: Hand tools and power equipment each present unique hazards:
- Hammers and Dollies: Inspect faces for mushrooming or cracks before use. A chipped hammer can send fragments into your eyes.
- Shears and Cutters: Keep fingers clear of blade paths. Never reach into a shear to retrieve cut pieces while the blade is cycling.
- English Wheels and Planishing Hammers: Ensure guards are in place. Keep loose clothing and jewelry secured.
- Power Equipment: Follow lockout-tagout procedures before servicing any machine. Never bypass safety interlocks or remove guards to speed up work.
Finally, maintain a clean workspace. Slips, trips, and falls account for countless shop injuries. Remove metal scraps, secure cables, and keep aisles clear. Good housekeeping isn't about appearances—it's about making it home safe every day.
With proper safety habits established, you're ready to build on your foundational skills and tackle progressively challenging projects. The next section maps out a clear path from beginner repairs to advanced compound curves.
Building Your Metal Shaping Skills Step by Step
Where do you go from practicing on scrap panels to fabricating complete body sections? Many hobbyists plateau because they lack a clear roadmap connecting basic techniques to professional-level work. Metalshaping isn't just about accumulating hours—it's about deliberately progressing through increasingly complex challenges that build on each other.
The difference between someone who tinkers and someone who truly masters this craft comes down to structured progression. Each project you complete should stretch your abilities slightly beyond your comfort zone while reinforcing fundamentals you've already learned.
Your First Panel Repair Project
How do you know if you're ready for real work? Start by honestly assessing where you stand. Can you consistently move metal where you intend it to go? Do you understand when to shrink versus stretch? Can you read a panel's surface with your fingertips and identify highs and lows?
If you're nodding yes to those questions, you're ready for beginner projects. If not, spend more time with practice panels before moving on. There's no shame in fundamentals—every professional started exactly where you are now.
- Simple Patch Panels (Beginner): Cut a small section from damaged metal and fabricate a replacement piece. This teaches layout, cutting precision, edge preparation, and basic fitting. Focus on flat or single-curve areas first—a floor pan section or inner fender patch works perfectly. Success here means your patch fits flush with surrounding metal and welds without distortion.
- Dent Repair on Accessible Panels (Beginner): Work on panels you can access from both sides. Practice reading damage, identifying stretched versus displaced metal, and using off-dolly technique to redistribute material. Your metal shaping tool collection doesn't need to be extensive—hammers, dollies, and a shrinker handle most beginner repairs.
- Crowned Patch Panels (Beginner-Intermediate): Graduate to patches that require matching an existing curve. This introduces working with templates, checking contours frequently, and understanding how stretching creates crown. A door skin repair or quarter panel patch fits this category.
At the beginner stage, expect projects to take three to five times longer than a professional would need. That's normal. Speed comes from repetition and confidence—neither of which you can rush.
Advancing to Complex Compound Curves
Once you've completed several successful repairs, intermediate projects await. These require combining multiple techniques and working with more challenging metalshapes that curve in two directions simultaneously.
- Fender Flares and Wheel Tubs (Intermediate): These parts demand controlled stretching to create compound curves while maintaining consistent edges. You'll learn to work progressively—roughing shape first, then refining with lighter techniques. The English wheel becomes invaluable here for creating smooth, flowing surfaces.
- Trans Tunnel or Floor Section Fabrication (Intermediate): Building structural components from scratch teaches planning, layout, and working to dimensional specifications. Mistakes here affect how other components fit, so precision matters more than speed.
- Hood Scoops and Air Intakes (Intermediate-Advanced): These projects combine deep forming, sharp transitions, and aesthetic requirements. Viewers see every flaw, so surface quality becomes critical. You'll use shrinking techniques extensively to create tight radii and crisp edges.
The intermediate stage is where most hobbyists either break through to advanced work or stall permanently. The key? Don't avoid projects that intimidate you. That discomfort signals exactly where you need to grow.
- Full Fender or Quarter Panel Fabrication (Advanced): Shaping steel for complete body panels requires integrating everything you've learned. You'll work from bucks or patterns, manage material flow across large surfaces, and maintain consistent crown over expansive areas. Professionals often spend 40-60 hours on a single fender—expect your first attempt to take considerably longer.
- Complete Body Panel Sets (Advanced): The ultimate test: fabricating multiple panels that fit together seamlessly. Door skins, fenders, hoods—each must match adjacent panels in contour and gap spacing. This is professional-level metalshaping that commands premium rates in restoration shops.
To identify areas for improvement, photograph your work under raking light that highlights surface imperfections. Compare your results against factory panels or professional examples. Where do you see oil canning, uneven surfaces, or poor edge definition? Those observations become your training priorities.
Remember: the journey from hobbyist to professional isn't about buying better equipment. It's about developing sensitivity to how metal behaves and building the muscle memory to respond appropriately. Every hour of deliberate practice moves you closer to production-quality results—the kind that eventually justify scaling beyond hand fabrication entirely.
Automotive Applications from Restoration to Production
Picture a 1967 Mustang sitting in your garage with rusted-out floor pans and a crumpled fender. Or imagine designing a custom intake manifold heat shield for a race car that doesn't exist in any catalog. These scenarios represent the two pillars of automotive sheet metal work: restoration and custom fabrication. Both rely on the same fundamental shaping techniques—but they apply them toward very different goals.
The automotive industry has always driven innovation in metal shaping. Whether you're a weekend hobbyist breathing life back into a classic or a professional fabricator building performance components, understanding how these applications connect helps you approach projects more strategically.
Restoring Classic Car Panels
Classic car restoration presents a unique challenge: you're not designing something new—you're recreating what time and corrosion have destroyed. As JMC Automotive Equipment notes, "If there's one problem most old cars share, it's damaged bodywork. Classic cars' paintwork tends to fade and develop rust spots over time. And often, you can't restore body panels with car repaint alone."
The good news? Auto body metal shaping tools have become more accessible than ever. Prices have declined significantly in recent years, with many brands now offering hobbyist lines of welding and shaping equipment. You no longer need a commercial shop to tackle serious restoration work.
Restoration typically involves three core techniques:
- Bending: Using a metal press brake to produce curved surfaces. Standard sheet metal brakes handle bends up to 135 degrees, while advanced machines create uniquely shaped panels for complex body sections.
- Beading: Bead rollers with paired round dies roll distinct shapes into panels—perfect for edging and detail work. Motorized versions let you keep both hands on the metal for delicate fabrication designs.
- Stamping: When recreating fenders and inner panels, stamping presses with specialized dies cut and form intricate shapes that match original factory specifications.
Metal shapers working on restoration projects often start by creating templates from surviving original panels or sourcing factory documentation. This reference material guides every hammer strike and wheel pass, ensuring the finished piece matches the vehicle's original contours.
Custom Fabrication for Performance Builds
Custom fabrication flips the script. Instead of recreating what existed, you're building what never did. Performance builds demand components optimized for specific applications—and often, those parts simply aren't available off the shelf.
Auto body fabrication tools serve double duty here. The same English wheel that shapes a replacement fender can create a custom firewall. The planishing hammer that smooths restoration panels also finishes hand-formed intake scoops. Your skills transfer directly between applications.
Chassis components, suspension brackets, and structural elements all fall within the metal shaper's domain. These functional parts require more than aesthetic consideration—they must handle stress, vibration, and environmental exposure. Material selection, bend radii, and welding specifications become critical factors.
Common automotive sheet metal projects span a wide difficulty range:
- Patch Panels (Beginner): Floor sections, inner fender repairs, trunk floor patches—these flat or single-curve pieces teach fundamental skills.
- Brackets and Mounts (Beginner-Intermediate): Battery trays, relay mounts, and simple suspension brackets involve bending and basic forming.
- Fender Flares (Intermediate): Compound curves and consistent edges challenge your stretching and shrinking control.
- Custom Hoods and Trunk Lids (Intermediate-Advanced): Large panels with complex crowns require patient work across extended surfaces.
- Complete Body Panels (Advanced): Full fenders, door skins, and quarter panels demand mastery of every technique you've learned.
- Roll Cages and Chassis Components (Advanced): Structural elements require precise fitment and must meet safety specifications.
The relationship between hand-crafted prototypes and production stamping becomes especially relevant for performance applications. A metal shaper machine in a small shop can produce one-off prototypes that prove a design concept. Once validated, those designs can transition to production stamping for larger quantities.
According to Global Technology Ventures, "Sheet metal rapid prototyping has revolutionized the automotive industry by allowing automobile manufacturers to craft high-performance models at a fast pace." This same technology benefits custom fabricators—you can test designs quickly using CNC machining, laser cutting, or even hand forming before committing to expensive production tooling.
Whether you're matching a 50-year-old factory panel or inventing something entirely new, the techniques remain consistent. The difference lies in your reference point: original specifications for restoration, or performance requirements for custom work. Both paths eventually lead to the same question—when does it make sense to scale beyond hand fabrication and partner with production-capable manufacturers?

Scaling Your Projects from Prototype to Production
You've shaped your prototype by hand, validated the design, and confirmed it works exactly as intended. Now what? The leap from a single hand-formed piece to hundreds—or thousands—of production parts is where many fabricators stumble. According to All Metals Fabricating, "Moving a sheet-metal part from prototype to production is where ideas meet reality—and where many programs stumble."
The challenges aren't just technical. Small DFM choices that were invisible in a one-off prototype can multiply cost, increase cycle time, and destabilize production once you scale to volume. Understanding when and how to transition—and finding the right manufacturing partners—separates successful product launches from expensive failures.
When to Scale Beyond Hand Fabrication
How do you know it's time to move past hand forming? The answer usually comes down to three factors: quantity requirements, consistency demands, and cost per unit. If you're producing fewer than 50 parts, hand fabrication often remains the most economical approach. But as quantities climb, the math shifts dramatically.
Consider a custom bracket you've shaped by hand. Each piece takes you 45 minutes. At 50 units, that's 37.5 hours of labor. At 500 units? You're looking at 375 hours—nearly ten weeks of full-time work. Meanwhile, stamping that same bracket might require $8,000 in tooling but produce each part in seconds. The crossover point varies by complexity, but the principle holds: volume eventually favors production tooling.
Rapid tooling concepts bridge this gap. Unlike traditional hard tooling that takes weeks to manufacture, rapid tooling uses aluminum or soft steel dies that can be ready in days. These "bridge tools" handle hundreds to thousands of parts while you validate designs before committing to hardened production dies. As Manufyn notes, companies typically save 40-60% compared to traditional prototyping or machining approaches when using rapid sheet metal prototyping methods.
If you're browsing for sale metal shaper equipment to expand your capabilities, pause and consider whether professional stamping services might actually deliver better value for your specific production volumes.
Partnering with Professional Manufacturers
Finding the right manufacturing partner transforms your sheet metal shaping expertise into scalable production. But how do you communicate your hand-formed designs to production engineers who speak an entirely different language?
This is where DFM—Design for Manufacturability—becomes essential. According to Five Flute, "Sheet metal design skills are a crucial tool in any engineer's toolbox, but given how little attention sheet metal design gets in academia, most skills are learned on the job." The same applies to production communication.
Key DFM principles for production scaling:
- Design for process capability: Identify the operation that will be the bottleneck—laser cutting, turret punching, or brake forming—and design to its capabilities rather than theoretical perfection.
- Minimize operations: Every extra deburr, welding sub-assembly, or finishing step multiplies cycle time. Optimize designs to reduce handling through smart bend sequences and formed features.
- Standardize radii and tolerances: Using standard bend radii prevents cracking and reduces tooling costs. Locate holes at least 2.5 times material thickness plus one bend radius away from bends to avoid distortion.
- Consider grain direction: Material grain orientation relative to bends affects cracking risk—especially critical with heat-treated or less ductile metals.
When evaluating potential manufacturing partners for your metal shaping machine production needs, look for these capabilities:
| Capability | Why It Matters | Questions to Ask |
|---|---|---|
| Rapid Prototyping | Validates designs before production tooling investment | What's your typical prototype turnaround time? |
| DFM Support | Identifies manufacturability issues early when changes are inexpensive | Do you provide design feedback before quoting? |
| Quality Certifications | Ensures consistent, documented processes | What quality standards do you maintain (IATF 16949, ISO 9001)? |
| Volume Flexibility | Supports growth from prototypes to mass production | Can you handle both small runs and high-volume orders? |
| Quote Responsiveness | Indicates operational efficiency and customer focus | What's your typical quote turnaround time? |
For fabricators working on automotive applications—chassis components, suspension brackets, or structural elements—partnering with certified manufacturers becomes especially critical. Shaoyi (Ningbo) Metal Technology exemplifies what serious fabricators should seek: 5-day rapid prototyping capabilities, IATF 16949 certification for automotive quality standards, comprehensive DFM support, and 12-hour quote turnaround. These capabilities let you validate sheet metal forming equipment designs quickly while ensuring production parts meet automotive-grade quality requirements.
Cost reduction strategies become more sophisticated at production scale. First Article Inspection (FAI) validates that your manufacturing process produces parts meeting design intent—catching issues before they multiply across thousands of units. Modular fixturing reduces setup time between runs. Revision control systems prevent costly errors when designs evolve.
The transition from metal forming tool in hand to production-ready parts doesn't happen overnight. But with the right preparation—solid DFM practices, validated prototypes, and capable manufacturing partners—your hand-formed designs can scale to meet any demand. The skills you've built understanding how metal moves under hammer and wheel directly inform how you communicate with production engineers. That foundation makes you not just a fabricator, but a sheet metal former who understands the complete journey from first hammer swing to finished production parts.
Frequently Asked Questions About Sheet Metal Shaping
1. What are three methods of shaping sheet metal?
The three primary methods are bending, stamping, and deep drawing. Bending uses press brakes to create angles along straight lines, ideal for brackets and enclosures with low to medium volumes. Stamping employs dedicated die sets for high-speed production of complex shapes, making it cost-effective for quantities over 1,000 parts. Deep drawing forces sheet metal into die cavities to create three-dimensional forms like cups and housings. Each method suits different project requirements based on complexity, volume, and budget constraints.
2. What tool is used to shape sheet metal?
Sheet metal shaping requires various tools depending on skill level and project scope. Beginners need body hammers (14-18 ounces), dollies (minimum 3 pounds), and manual shrinker-stretchers ($50-500). Intermediate fabricators use planishing hammers ($2,000-5,000) for smoothing and benchtop English wheels ($500-2,000) for creating curves. Advanced professionals employ floor-model English wheels ($3,000-15,000), Pullmax machines ($5,000-20,000+), and power hammers ($8,000-25,000+) for production-level work.
3. How do you shape sheet metal by hand?
Hand shaping relies on two fundamental techniques: on-dolly and off-dolly work. For on-dolly technique, position the dolly directly behind your hammer strike to smooth and slightly stretch the metal. For off-dolly technique, position the dolly near but not behind the strike point to redistribute metal without adding stretch. Start by assessing the panel with your fingertips, mark reference lines, work in expanding circles from damaged areas, and check progress every 10-15 strikes. Professional fabricators use off-dolly work for 70-80% of shaping tasks.
4. What is the difference between bending and stamping for sheet metal?
Bending uses standard V-dies with fast setup times and no custom tooling costs, making it ideal for prototyping and runs under 500 parts. However, it requires more labor and limits geometry to angular bends. Stamping requires significant upfront die investment ($5,000-$50,000+) and 4-8 weeks lead time, but delivers extremely low per-part costs at high volumes with exceptional consistency. The crossover point typically falls between a few dozen to a few hundred parts depending on complexity.
5. When should I transition from hand fabrication to production manufacturing?
Consider transitioning when quantity requirements exceed 50 parts, consistency demands increase, or per-unit costs become prohibitive. A bracket taking 45 minutes by hand becomes 375 hours of work at 500 units. Rapid tooling bridges this gap with aluminum or soft steel dies ready in days rather than weeks. For automotive applications requiring chassis, suspension, or structural components, partnering with IATF 16949-certified manufacturers like Shaoyi Metal Technology provides 5-day rapid prototyping, comprehensive DFM support, and scalable production capabilities.