 Małe partie, wysokie standardy. Nasza usługa szybkiego prototypowania sprawia, że weryfikacja jest szybsza i łatwiejsza —

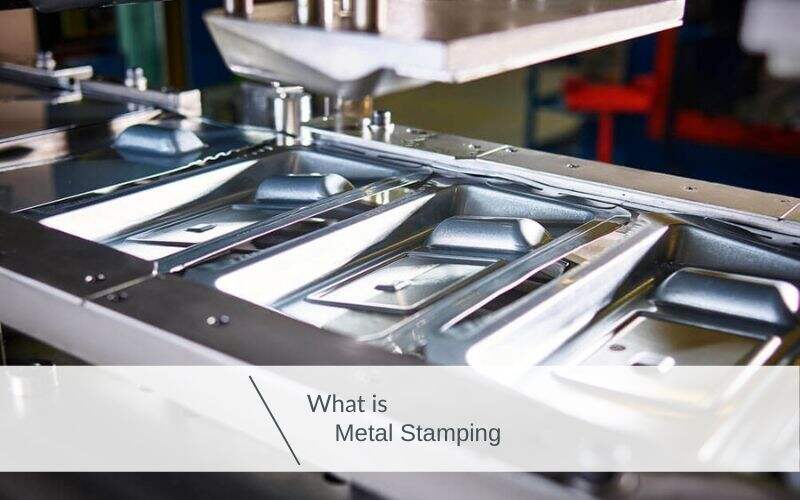
Proces tłoczenia odszyfrowany: od surowego arkusza do gotowego elementu
Czym jest proces tłoczenia i jak działa
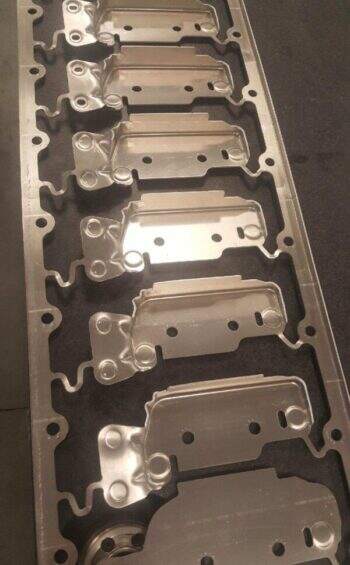
Czym jest tłoczenie i dlaczego dominuje w nowoczesnej produkcji? Prościej mówiąc, proces tłoczenia to technika kształtowania na zimno, która przeksztalca płaskie blachy metalowe w precyzyjne , złożone kształty przy użyciu specjalistycznych matryc i wydajnych pras. Gdy patrzysz na elementy nadwozia swojego samochodu, obudowy urządzeń elektronicznych lub sprzętu kuchennego, najprawdopodobniej widzisz komponenty metalowe wykonane metodą tłoczenia – niezwykle efektywną techniką.
Tłoczenie metalu to proces kształtowania na zimno, który wykorzystuje matryce i prasy tłoczniane do przekształcania blach metalowych w różne kształty. Płaskie kawałki blachy metalowej, zwane zwykle półfabrykatami (blankami), są wprowadzane do prasy, gdzie narzędzie i powierzchnia matrycy nadają metalowi nowy kształt poprzez kontrolowane naciskanie.
Zrozumienie, czym jest tłoczenie metali, wymaga opanowania jednego kluczowego pojęcia: ten proces nadaje kształt materiałowi w temperaturze pokojowej, bez jego nagrzewania. Tłoczenie polega na wywieraniu ogromnej siły za pomocą precyzyjnie zaprojektowanego narzędzi do trwałej deformacji arkuszy metalowych w gotowe elementy. Czym więc dokładnie są tłoczone elementy metalowe? Są to wszystkie elementy metalowe wytworzone tą techniką zimnego kształtowania – od prostych podkładek po skomplikowane uchwyty stosowane w przemyśle motocyklowym.
Podstawowe zasady kształtowania metali
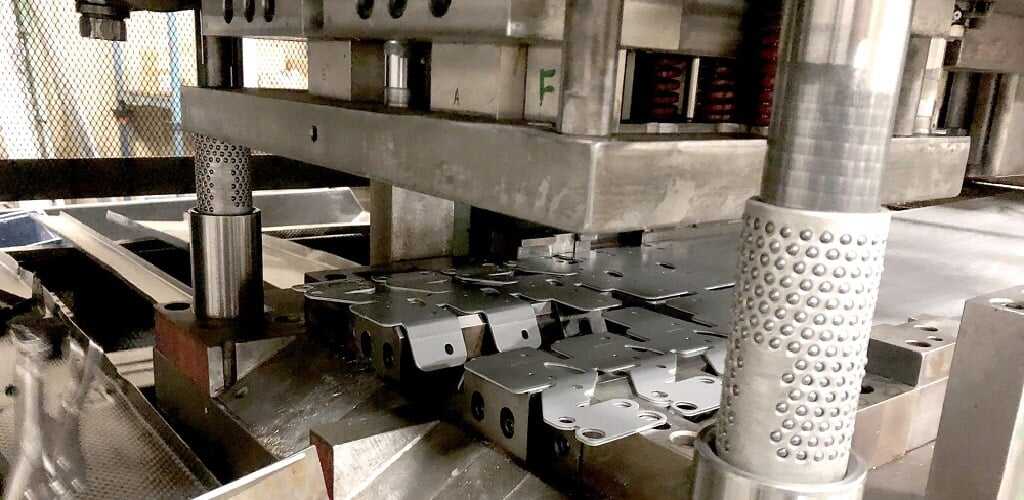
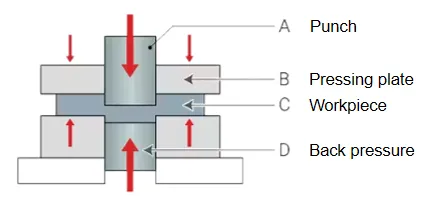
Wyobraź sobie umieszczenie płaskiego arkusza metalu pomiędzy dwiema precyzyjnie obrobionymi powierzchniami, a następnie wywarcie na niego tysięcy funtów siły. To właśnie istota tłoczenia metali. Oto jak działają siły w tym procesie:
- Zastosowanie siły: Prasa tłoczeniowa przesuwa tłocznik w dół do wnęki matrycy, przy czym płyta metalowa znajduje się między nimi.
- Przepływ materiału: Pod wpływem ciśnienia metal ulega plastycznej deformacji, wypełniając kontury matrycy i zachowując przy tym integralność strukturalną.
- Utrzymywanie kształtu: Gdy siła przekracza granicę plastyczności metalu, ale pozostaje poniżej jego wytrzymałości na rozciąganie, materiał trwale przyjmuje kształt matrycy
Zaletą tej metody jest jej powtarzalność. Niezależnie od tego, czy produkujesz sto, czy milion części, każdy element jest praktycznie identyczny z poprzednim. Ta spójność wynika z sztywnych narzędzi i kontrolowanych mechanizmów prasy, które charakteryzują każdą operację tłoczenia.
Dlaczego kształtowanie na zimno przewyższa metody cieplne
Możesz zastanawiać się, dlaczego producenci wybierają kształtowanie na zimno zamiast najpierw nagrzewać metal. Zalety są istotne:
Kształtowanie metalu na zimno zapewnia wyższą dokładność wymiarową i ścislsze допусki w porównaniu do procesów cieplnych. Gdy metal nie jest nagrzewany, nie ulega on nieprzewidywalnemu rozszerzaniu i kurczeniu, co oznacza, że wymiary uzyskane w procesie tłoczenia dokładnie odpowiadają wymiarom matrycy. Ponadto części wykonywane metodą kształtowania na zimno ulegają umocnieniu przez odkształcenie (tzw. umocnieniu przez kucie), co faktycznie zwiększa ich wytrzymałość w kluczowych obszarach.
The przemysł elektroniczny i elektrotechniczny opierają się w dużej mierze na zimnym tłoczeniu, ponieważ ten proces umożliwia produkcję małych, skomplikowanych części o ścisłych tolerancjach wymaganych w urządzeniach elektronicznych. Producentom urządzeń medycznych podobnie zależy na tej metodzie przy wyrobie narzędzi chirurgicznych i elementów implantów, gdzie precyzja jest bezwzględnie konieczna.
Z praktycznego punktu widzenia zimne tłoczenie eliminuje koszty sprzętu do nagrzewania, zmniejsza zużycie energii oraz znacznie skraca czasy cyklu. Ta wydajność wyjaśnia, dlaczego producenci masowi systematycznie wybierają tłoczenie zamiast innych metod przy masowej produkcji identycznych komponentów metalowych.
W ramach tego kompleksowego przewodnika poznasz pełny cykl tłoczenia, porównasz różne techniki, zapoznasz się ze strategiami doboru materiałów oraz nauczysz się planować udane projekty tłoczenia. Traktuj to jako swój skondensowany zasób wiedzy na temat zagadnienia, które wcześniej było rozproszone wśród licznych źródeł branżowych.
Pełny cykl tłoczenia od początku do końca
Teraz, gdy rozumiesz, czym jest tłoczenie i jak siła przekształca płaskie arkusze w złożone kształty, prześledźmy dokładnie, jak element przemieszcza się od surowego zwoju do gotowego elementu. Proces tłoczenia metalu przebiega według starannie ustalonego procesu, w którym każdy etap bezpośrednio wpływa na kolejny. Pominięcie jednego kroku lub pośpieszne przeprowadzenie kontroli jakości powoduje mnożenie się defektów w dalszej części procesu, co generuje koszty i czas.
Co odróżnia udaną produkcję tłoczonych części od problematycznych serii produkcyjnych? Nie chodzi wyłącznie o posiadanie odpowiedniego sprzętu. Kluczowe znaczenie ma zrozumienie dLACZEGO celu każdego etapu oraz prawidłowa kolejność ich wykonywania. Poniżej przedstawiamy kompleksowy, siedmiostopniowy schemat działania, który steruje procesem tłoczenia w produkcji przemysłowej :
- Projektowanie i dobór materiału: Wszystko zaczyna się tutaj. Inżynierowie analizują wymagania dotyczące części, określają optymalny rodzaj metalu i jego grubość oraz projektują niestandardowe matryce kształtujące materiał. Dlaczego to ma znaczenie? Wybór niewłaściwego stopu lub zignorowanie kierunku ziarnistości powoduje problemy z kształtowaniem, których nie da się rozwiązać poprzez żadne dostosowanie prasy. Etap ten ustala również tolerancje procesu tłoczenia, które kierują wszystkimi kolejnymi operacjami.
- Cięcie blach i przygotowanie płytek: Surowe cewki metalowe są wprowadzane do systemu, w którym matryce cięcia wykrawają płaskie kształty zwane płytkami. Można to porównać do cięcia ciasta przed pieczeniem ciasteczek. Wymiary płytki, jakość jej krawędzi oraz płaskość bezpośrednio decydują o tym, jak metal będzie przepływał podczas kształtowania. Niedoskonałe wykrawanie prowadzi do nierównomiernego rozkładu materiału, co później przejawia się pęknięciami lub fałdami.
- Montaż matryc i konfiguracja prasy: Zanim rozpocznie się tłoczenie seryjne, technicy precyzyjnie montują matryce, wyrównują elementy wybijaka i matrycy oraz kalibrują ustawienia prasy. Poprawna konfiguracja zapewnia spójne zastosowanie siły w każdej przebiegającej krotności. Nawet niewielkie niedoskonałości wyrównania powodują nieregularny zużycie, odchylenia wymiarowe oraz przedwczesne uszkodzenie narzędzi.
- Operacje gięcia: To właśnie tutaj zachodzi przemiana. Półfabrykat wchodzi do prasy, a matryce wywierają kontrolowane ciśnienie, aby wygiąć, wydłużyć, rozciągnąć lub wykroić metal w żądany kształt. W zależności od złożoności części proces tłoczenia może wymagać wielu etapów kształtowania, przy czym matryce postępujące wykonują kilka operacji sekwencyjnie.
- Wytłaczanie, cięcie i obcinanie: Gdy podstawowe kształty zostały już utworzone, operacje wtórne dodają otworów, wycięć oraz precyzyjnych krawędzi. Wytłaczanie tworzy cechy wewnętrzne, natomiast obcinanie usuwa nadmiar materiału wzdłuż obwodu. Kolejność tych operacji ma również znaczenie. Wytłaczanie przed końcowym kształtowaniem może spowodować odkształcenie położenia otworów, podczas gdy zbyt wcześnie przeprowadzone obcinanie usuwa materiał niezbędny do prawidłowego kształtowania.
- Operacje wtórne: Wiele części tłoczonych wymaga dodatkowej obróbki: naрезania gwintów w otworach, montowania elementów zewnętrznych, spawania zespołów lub hartowania w celu zwiększenia wytrzymałości. Operacje te są planowane już w fazie projektowania, aby zapewnić, że geometria części tłoczonych umożliwia ich wykonanie.
- Dokończenie i kontrola jakości: Ostatni etap obejmuje usuwanie wykańczanych krawędzi (deburring), nanoszenie powłok powierzchniowych, takich jak pokrywanie metalami szlachetnymi lub powłoki ochronne, oraz kompleksową kontrolę jakości. Części są mierzone zgodnie ze specyfikacjami, sprawdzane pod kątem wad wizualnych oraz weryfikowane przed wysyłką.
Od surowej taśmy stalowej do gotowego elementu
Wyobraź sobie ogromną rolkę stali ważącej kilka ton, która przybywa do zakładu produkcyjnego zajmującego się tłoczeniem. Ta rolka musi zostać przekształcona w tysiące identycznych komponentów, z których każdy spełnia ścisłe wymagania techniczne. Jak to się dzieje w sposób powtarzalny i spójny?
Proces produkcji tłoczenia metalu rozpoczyna się, gdy taśma z cewki wpływa do prostownika, który usuwa krzywiznę powstałą podczas transportu i przechowywania. Wypolerowany materiał następnie przesuwa się do stacji cięcia, gdzie precyzyjnie zsynchronizowane cięcia tworzą jednolite płytki. Te płytki wchodzą do prasy kształtującej albo pojedynczo, albo jako ciągła taśma w operacjach postępujących.
Wewnątrz prasy starannie zaplanowane ruchy matryc kształtują metal w kolejnych stacjach. Prosty uchwyt może wymagać zaledwie trzech operacji. Złożony element samochodowy może wymagać piętnastu lub więcej. Każda stacja wykonuje jedno konkretne zadanie – czy to gięcie płaskiego odbicia, tłoczenie kształtu kubka, czy też wiercenie otworów montażowych.
Kluczowe punkty kontrolne w produkcji
Dlaczego niektórzy producenci systematycznie dostarczają części bez wad, podczas gdy inni mają problemy z poziomem odpadów? Różnica często wynika z dyscypliny stosowanej przy kontroli kluczowych punktów w całym procesie tłoczenia.
Inteligentne operacje tłoczenia w produkcji sprawdzają jakość na wielu etapach, zamiast czekać do końca:
- Kontrola materiałów przyjmowanych: Potwierdza, że metal spełnia wymagania dotyczące grubości, twardości oraz jakości powierzchni przed rozpoczęciem jakichkolwiek operacji obróbkowych
- Zatwierdzenie pierwszego elementu: Pierwsze części z każdej serii produkcyjnej poddawane są kompleksowym pomiarom wymiarowym przed przejściem do pełnowolumenowej produkcji
- Monitorowanie w trakcie procesu: Czujniki monitorują siłę prasy, podawanie materiału oraz temperaturę matrycy, aby wykryć odchylenia jeszcze przed powstaniem wad
- Pobieranie próbek statystycznych: Regularne kontrole przeprowadzane w trakcie serii produkcyjnej zapewniają spójność procesu oraz pozwalają wykryć trendy zużycia narzędzi
- Ostateczna inspekcja: Pełna walidacja potwierdza, że każda wysyłana część spełnia wymagania klienta
Każdy punkt kontrolny został wprowadzony dlatego, że wykrycie problemów na wczesnym etapie wiąże się z znacznie niższymi kosztami niż ich wykrycie w gotowych zespołach. Wada materiału stwierdzona przed kształtowaniem powoduje marnowanie jednego płytkowego elementu (blanku). Ta sama wada wykryta po kształtowaniu, perforacji i obróbce końcowej powoduje marnowanie całkowitych nakładów związanych z dotychczasową obróbką.
Gdy podstawa tego procesu roboczego jest już na miejscu, możesz przejść do eksploracji konkretnych technik tłoczenia oraz zrozumieć, która z nich najlepiej sprawdza się w różnych scenariuszach produkcyjnych.
Rodzaje technik tłoczenia oraz przypadki ich zastosowania
Zobaczyłeś już, jak proces tłoczenia przebiega od surowej taśmy w kłębkach aż po gotowy element. Ale właśnie teraz zaczyna się najciekawsza część: nie wszystkie operacje tłoczeniowe są wykonywane w ten sam sposób. Wybranie niewłaściwej techniki dla swojego projektu to tak, jakby używać młota do zawieszenia obrazu na ścianie. Technicznie może to zadziałać, ale stracisz czas i pieniądze oraz prawdopodobnie wywołasz problemy, których nie przewidywałeś.
Proces tłoczenia obejmuje kilka odrębnych technik, z których każda została zaprojektowana z myślą o konkretnych zastosowaniach. Zrozumienie tych różnic pozwala dopasować wymagania produkcyjne do odpowiedniej metody i uniknąć kosztownych błędów dopasowania, które mogą sparaliżować cały projekt. Przeanalizujmy główne podejścia oraz sytuacje, w których każda z nich szczególnie się sprawdza.
Tłoczenie wielostopniowe (progressive die) – dla wysokiej wydajności przy dużych partiach
Wyobraź sobie ciągłą taśmę metalową przesuwającą się przez serię stacji, z których każda wykonuje określoną operację: cięcie, gięcie, przebijanie, tłoczenie. Część pozostaje cały czas połączona z taśmą i oddziela się dopiero na etapie końcowym. To właśnie działają progresywne matryce i tłoczenie – podstawa produkcji masowej.
Dlaczego to podejście dominuje w tłoczeniu elementów samochodowych i produkcji sprzętu elektronicznego dla konsumentów? Szybkość i spójność. Zgodnie z analizą procesu firmy Die-Matic, tłoczenie progresywne zapewnia krótki czas cyklu, obniżone koszty pracy oraz niższe koszty jednostkowe po wprowadzeniu narzędzi do eksploatacji. Elementy samochodowe produkowane metodą tłoczenia progresywnego obejmują wszystko – od wsporników i zacisków po łącza i części skrzyni biegów – z wyjątkową powtarzalnością.
Kompromis? Początkowe inwestycje w oprzyrządowanie są wysokie, a modyfikacje projektu po uruchomieniu procesu stają się kosztowne i czasochłonne. Matryce postępujące są uzasadnione, gdy produkujesz części o prostym lub średnim stopniu złożoności w tak dużych ilościach, aby móc rozłożyć te początkowe koszty na całą serię.
Kiedy stosowanie tłoczenia transferowego jest uzasadnione
Co dzieje się, gdy Twoja część jest zbyt duża lub zbyt złożona, aby można ją było tłoczyć metodą postępującą? Wtedy wkracza tłoczenie transferowe. Technika ta albo rozpoczyna się od wcześniej wykrojonej blachy, albo oddziela część od paska metalowego już na wczesnym etapie procesu. Następnie systemy mechaniczne fizycznie przesuwają część ze stacji na stację.
Tłoczenie transferowe doskonale sprawdza się przy produkcji większych części o głębszych wyciągach oraz bardziej skomplikowanych kształtach niż te, które można osiągnąć metodą postępującą. Przykładami mogą być elementy nadwozia samochodowego, komponenty konstrukcyjne oraz obudowy przeznaczone do intensywnego użytku. Elastyczność wynikająca z możliwości manipulowania oddzielnymi częściami otwiera możliwości projektowe, których nie da się osiągnąć przy przetwarzaniu ciągłego paska.
To podejście wiąże się z nieco dłuższymi czasami cyklu w porównaniu do operacji postępujących. Złożoność narzędzi wzrasta, co czyni je droższymi przy produkcji małych serii. Jednak w przypadku produkcji średnich i dużych serii większych, geometrycznie złożonych elementów tłoczenie transferowe zapewnia nieosiągalne możliwości.
Precyzyjne tłoczenie czterosuwowe i wielosuwowe
Tradycyjne tłoczenie wykorzystuje nacisk pionowy. Tłoczenie czterosuwowe łamie tę zasadę, stosując cztery suwaki poziome, które jednoczesnie kształtują metal z wielu kierunków. To wielokierunkowe podejście umożliwia wykonywanie złożonych gięć i kształtów, które przy użyciu konwencjonalnych metod wymagałyby wielu oddzielnych operacji.
W jakich obszarach ta technika precyzyjnego tłoczenia odnosi największe sukcesy? W przypadku części o średnich i małych rozmiarach wymagających skomplikowanych geometrii: łączników elektrycznych, zacisków, klamer i wsporników. Producentom urządzeń medycznych czterosuwowe tłoczenie służy do wykonywania mikroelementów, których nie da się uzyskać za pomocą konwencjonalnego tłoczenia ze względu na wymaganą szczegółowość.
Ta technika zapewnia doskonałą wydajność materiałową, zmniejszając odpady i eliminując operacje wtórne. Jednak czteropozycyjne prasowanie (fourslide) działa najlepiej przy mniejszych wolumenach produkcji i jest ograniczone pod względem rozmiaru części oraz grubości materiału. Metale o dużej grubości lub duże elementy wymagają zastosowania innych metod.
Precyzyjne blankowanie zapewnia wyjątkową jakość krawędzi
Standardowe procesy tłoczenia i cięcia matrycowego mogą pozostawiać chropowate lub zwinięte krawędzie, które wymagają dodatkowego wykańczania. Precyzyjne blankowanie całkowicie eliminuje ten problem. Dzięki zastosowaniu wysokiego ciśnienia za pomocą specjalistycznych narzędzi ta metoda pozwala uzyskać gładkie, czyste krawędzie oraz wyraźne kontury w jednej operacji.
Producenci samochodów wykorzystują precyzyjne tłoczenie do produkcji kół zębatych, kół łańcuchowych, elementów pasów bezpieczeństwa oraz części układu hamulcowego, gdzie jakość krawędzi ma wpływ na funkcjonalność. Przemysł lotniczy polega na tej technice przy wytwarzaniu elementów konstrukcyjnych wymagających ścisłych tolerancji. Zgodnie z danymi branżowymi firmy Die-Matic, precyzyjne tłoczenie eliminuje intensywne operacje obróbki końcowej, takie jak usuwanie wyprasek lub szlifowanie, co pozwala zaoszczędzić zarówno czas, jak i koszty produkcji.
Kompromis polega na wyższych kosztach przypadających na pojedynczą część ze względu na specjalistyczne wyposażenie i matryce. Dotyczy to również dłuższych czasów realizacji matryc. Precyzyjne tłoczenie jest opłacalne ekonomicznie przy masowej produkcji złożonych części, dla których kluczowe jest zachowanie wysokiej dokładności, a koszty dodatkowej obróbki końcowej mogłyby się w przeciwnym razie gromadzić.
Wytłaczanie głębokie dla elementów pustych
Czy potrzebujesz wytworzyć części w kształcie kubka, cylindryczne lub puste z płaskich blach? Głębokie tłoczenie rozciąga blanki metalowe w trójwymiarowe kształty za pomocą działania radialnego tłoczenia. Ta technika pozwala uzyskać bezszwowe elementy bez spoin ani połączeń – niezbędne m.in. w zbiornikach ciśnieniowych, zbiornikach paliwa do pojazdów samochodowych, naczyniach kuchennych oraz obudowach akumulatorów.
Głębokie tłoczenie daje najlepsze rezultaty, gdy głębokość części przekracza jej średnicę; wymaga to starannej kontroli przepływu materiału, aby zapobiec pękaniu lub marszczeniu się blachy. Wybór materiału staje się kluczowy, ponieważ plastyczność znacznie różni się w zależności od stopu.
Operacje matryc złożonych
Gdy ważna jest prostota i szybkość wykonywania mniej złożonych części, matryce złożone wykonują wiele operacji w jednym uderzeniu prasy. W przeciwieństwie do matryc postępujących z wieloma stacjami, matryce złożone przeprowadzają cięcie, przebijanie i kształtowanie jednocześnie.
To podejście nadaje się do prostszych geometrii części produkowanych w umiarkowanych lub dużych ilościach. Zmniejszona złożoność narzędzi w porównaniu do matryc postępujących obniża początkowe inwestycje, jednocześnie zapewniając wydajne tempo produkcji.
Wybór odpowiedniej metody: ramka decyzyjna
Jak dopasować wymagania projektu do odpowiedniej metody tłoczenia i prasowania? Rozważ następujące kluczowe czynniki:
| Technika | Idealny stopień złożoności części | Przydatność objętości | Dopuszczalność | Typowe zastosowania |
|---|---|---|---|---|
| Postępowa forma | Proste do umiarkowanych | Duża seria (powyżej 100 000 szt.) | ±0,001" do ±0,005" | Uchwyty samochodowe, łączniki elektroniczne, elementy wyposażenia sprzętu AGD |
| Matryca transferowa | Umiarkowany do wysokiego | Średnia do wysokiej objętości | ±0,002" do ±0,010" | Panel karoserii, elementy konstrukcyjne, duże obudowy |
| Fourslide/multislide | Wysoka (skomplikowane gięcia) | Niska do średniej objętości | ±0,001" do ±0,003" | Zaciski elektryczne, mikroelementy medyczne, precyzyjne zaciski |
| Czyste Cięcie | Krawędzie o wysokiej dokładności | Duży Objętość | ±0,0005" do ±0,001" | Zębniki, koła zębate, elementy układu hamulcowego, części do przemysłu lotniczego |
| Głębgłębnego wyciągania | Kształty puste/cylindryczne | Średnia do wysokiej objętości | ±0,005" do ±0,015" | Zbiorniki paliwa, naczynia kuchenne, obudowy akumulatorów, zbiorniki ciśnieniowe |
| Złożona matryca | Proste geometrie | Średnia do wysokiej objętości | ±0,002" do ±0,005" | Podkładki, proste uchwyty, uszczelki |
Złożoność części decyduje o początkowym wyborze metody, ale wielkość serii określa opłacalność ekonomiczną. Blachowanie progresywne i precyzyjne wymagają znacznych inwestycji w narzędzia, które uzasadniają się jedynie przy dużych partiach. Technologia Fourslide zapewnia elastyczność przy mniejszych ilościach, gdzie amortyzacja kosztów narzędzi jest mniej istotna niż możliwość realizacji zaawansowanych rozwiązań konstrukcyjnych.
Zrozumienie tych typów matryc blacharskich oraz ich zastosowań pozwala na prowadzenie świadomych rozmów z producentami na temat metody najlepiej odpowiadającej konkretnym wymaganiom. W kolejnym kroku omówimy, jak wybór materiału wpływa zarówno na wybór techniki, jak i na końcową wydajność części.
Przewodnik wyboru materiału dla projektów tłoczenia metalu
Dowiedziałeś się, jak różne techniki tłoczenia radzą sobie z różnymi geometriami i objętościami części. Ale istnieje kluczowe pytanie, na które większość producentów nie zwraca uwagi — aż do momentu wystąpienia problemów: jaki metal należy faktycznie zastosować? Wybór niewłaściwego materiału do procesu tłoczenia powoduje problemy, których nie da się rozwiązać żadnymi dostosowaniami narzędzi. Pęknięcia pojawiają się podczas kształtowania. Części odkształcają się z powrotem poza dopuszczalne tolerancje. Korozja niszczy elementy w ciągu kilku miesięcy zamiast lat.
Wybór odpowiedniego metalu do tłoczenia nie polega na zgadywaniu. Wymaga zrozumienia zachowania różnych stopów pod wpływem ciśnienia, wymagań konkretnych zastosowań względem określonych właściwości oraz wpływu wyboru materiału na wszystkie kolejne decyzje podejmowane w dalszym ciągu procesu — od projektowania matryc po dobór prasy. Przeanalizujmy kluczowe materiały stosowane w tłoczeniu metali oraz sytuacje, w których każdy z nich jest najbardziej uzasadniony.
Właściwości materiałów wpływające na kuteść
Dlaczego ten sam tłoczek produkuję idealne części z jednego metalu, a pęknięte braki z innego? Sprowadza się to do trzech kluczowych właściwości:
- Kruczość: O ile metal może się rozciągać przed pęknięciem. Wysoka plastyczność umożliwia tworzenie skomplikowanych kształtów oraz głębokiego tłoczenia. Niska plastyczność ogranicza operacje kształtowania i wymaga łagodniejszych promieni gięcia.
- Moc graniczna plastyczności: Siła potrzebna do trwałego odkształcenia materiału. Wyższa granica plastyczności wymaga bardziej wydajnych pras oraz twardszych materiałów na matryce, co zwiększa koszty sprzętu i narzędzi.
- Szybkość umocnienia na skutek odkształcenia plastycznego: O ile metal staje się silniejszy w trakcie kształtowania. Niektóre stopy znacznie się wzmocniają podczas tłoczenia, co wymaga pośrednich etapów odpuszczania lub ogranicza liczbę możliwych do wykonania kolejno operacji kształtowania.
Kierunek włókien dodaje kolejny poziom złożoności. Zgodnie z wytycznymi inżynieryjnymi Fictiv zgięcia wykonane prostopadle do kierunku włókien są silniejsze i znacznie mniej podatne na pęknięcia niż zgięcia wykonane równolegle do kierunku włókien. Kluczowe zgięcia muszą być prawidłowo ułożone w układzie paska już na etapie projektowania, w przeciwnym razie części ulegną nieprzewidywalnej awarii podczas produkcji.
Następnie występuje zjawisko odbicia sprężystego (springback). Każdy kształtowany metal dąży częściowo do powrotu do pierwotnego stanu płaskiego po zwolnieniu nacisku. Materiały miększe, takie jak aluminium, wykazują mniejsze odbicie sprężyste niż stali wysokowytrzymałosciowe, które mogą ulec znacznemu odbiciu. Matryce muszą być zaprojektowane tak, aby nadmiernie zginać części, kompensując tym samym tę sprężystą odkształcalność i osiągając docelowe wymiary końcowe.
Dopasowanie metali do wymagań aplikacji
Różne zastosowania wymagają różnych właściwości materiałów. Poniżej przedstawiono porównanie głównych materiałów stosowanych w tłoczeniu metali:
Gatunki stali: Gdy liczą się wytrzymałość i trwałość, stal blachownicza pozostaje pierwszym wyborem. Stal zimnowalcowana (CRS) charakteryzuje się doskonałą kutejnością i nadaje się do zastosowań ogólnych. Stal wysokowytrzymałosciowa niskostopowa (HSLA) zapewnia poprawione właściwości mechaniczne oraz lepszą odporność na korozję niż stal węglowa. Zgodnie z przewodnikiem materiałowym firmy Aranda Tooling, stal HSLA jest ceniona w przemyśle motocyklowym, lotniczym i budowlanym ze względu na optymalny stosunek wytrzymałości do masy w zastosowaniach takich jak koła, układy zawieszenia oraz elementy nadwozia.
Stopy aluminium: Potrzebujesz lekkich części bez utraty integralności konstrukcyjnej? Tłoczenie aluminium zapewnia doskonałą wytrzymałość przy niskiej masie — jego waga wynosi mniej więcej jedną trzecią wagi stali. Tłoczone elementy z aluminium stosuje się szeroko w przemyśle motocyklowym, motocyklowym i lotniczym, gdzie każdy gram ma znaczenie dla efektywności paliwowej. Miękkość materiału ułatwia jego kształtowanie w złożone formy, co oznacza szybsze działanie pras oraz dłuższą żywotność matryc. Jednak, jak zauważa Worthy Hardware, aluminium łatwo się zadrapuje i nie charakteryzuje się taką odpornością jak twardsze metale w zastosowaniach wymagających dużej odporności na zużycie.
Z stali nierdzewnej: Odporność na korozję przyczynia się do wzrostu popytu na tłoczenie metalu ze stali nierdzewnej w branżach przetwórstwa żywności, urządzeń medycznych oraz zastosowań morskich. Ten materiał wytrzymuje surowe warunki środowiskowe, w których inne metale uległyby szybkiemu zużyciu. Tłoczenie ze stali nierdzewnej wymaga większej siły i powoduje szybsze zużycie narzędzi z powodu utwardzania przez odkształcenie podczas kształtowania. Narzędzia muszą być wykonane ze stali hartowanej, a prasy muszą zapewniać wystarczającą nośność. Pomimo wyższych kosztów przetwarzania, długotrwała trwałość często uzasadnia inwestycję w wymagających środowiskach.
Miedź i mosiądz: Przewodność elektryczna czyni stopy miedzi niezbędne w przypadku złączy, zacisków oraz komponentów elektronicznych. Te precyzyjne materiały do tłoczenia metalu łatwo formują się w złożone, cienkie kształty dzięki swojej naturalnej miękkości. Miedź i mosiądz posiadają również naturalne właściwości przeciwdrobnoustrojowe, co jest wartościowe w zastosowaniach medycznych oraz w gastronomii. Jaka jest cena tej zalety? Brak wystarczającej wytrzymałości do zastosowań konstrukcyjnych oraz wyższe koszty w porównaniu do alternatyw stalowych.
Porównanie materiałów do tłoczenia
| Materiał | Ocena formowania | Typowe zastosowania | Rozważania dotyczące kosztów | Wyzwania związane z tłoczeniem |
|---|---|---|---|---|
| Zimnopressowany stal | Dobre | Uchwyty, obudowy, elementy ogólne | Niski koszt podstawowy, opłacalne narzędzia | Wymaga ochrony przed korozją |
| Stali HSLA | Umiarkowany | Elementy konstrukcyjne pojazdów samochodowych, podwozia, zawieszenia | Umiarkowany; redukuje masę w porównaniu ze standardową stalą | Wyższe siły kształtujące, zarządzanie odbiciem sprężystym |
| Stal nierdzewna | Umiarkowany | Urządzenia medyczne, sprzęt gastronomiczny, osprzęt morski | Wyższe koszty materiału i narzędzi | Utrudnione odkształcanie plastyczne, zwiększone zużycie matryc, potrzeba wyższej nośności pras |
| Stopy aluminium | Doskonały | Płytki karoserii samochodowej, obudowy urządzeń elektronicznych, przemysł lotniczy i kosmiczny | Wyższy niż stal; zrównoważony oszczędnościami wynikającymi z redukcji masy | Ryzyko przyklejania się materiału (galling), miękka powierzchnia łatwo ulega zadrapaniom |
| Miedź/mosiądz | Doskonały | Złącza elektryczne, zaciski, ozdobne listewki | Cen premiowych | Zbyt miękki do obciążeń konstrukcyjnych |
Wpływ wyboru materiału na wyposażenie i narzędzia
Wybór materiału nie determinuje jedynie właściwości części. Ma on bezpośredni wpływ na projekt matryc oraz wymagania stawiane prasom. Twardsze materiały, takie jak stal nierdzewna, wymagają stosowania matryc wykonanych ze specjalnych stali narzędziowych o zwiększonej odporności na zużycie. Prasy muszą zapewniać wystarczającą siłę docisku, aby pokonać wyższe granice plastyczności. Według ekspertów branżowych tłoczenie stali nierdzewnej wymaga pras o nośności 500 ton lub większej, a także precyzyjnej kontroli prędkości oraz odpowiedniego smarowania w celu ograniczenia nagrzewania się i tarcia.
Miększe materiały, takie jak stopy aluminium i miedzi, stwarzają inne wyzwania. Do produkcji matryc można stosować mniej wyrafinowane materiały, co redukuje koszty narzędzi. Jednak metale te mają tendencję do zgrzania (galling), czyli przywierania do powierzchni matryc. W związku z tym niezbędne staje się zastosowanie odpowiednich powłok ochronnych oraz środków smarnych, aby zapobiec wadom powierzchniowym.
Grubość materiału dodatkowo komplikuje dobór sprzętu. Operacje tłoczenia są najbardziej wydajne przy grubościach od 0,005 cala do 0,25 cala. Cienkie blachy wymagają precyzyjnego uchwytu materiału w celu zapobieżenia jego pomarszczeniu. Grubsze blachy wymagają proporcjonalnie większych sił prasowania oraz bardziej wytrzymałej konstrukcji narzędzi.
Ostatecznie odpowiedni materiał stanowi kompromis między wymaganiami aplikacyjnymi a rzeczywistościami produkcyjnymi. Zrozumienie tych kompromisów pozwala podejmować świadome decyzje, które optymalizują zarówno wydajność elementów, jak i opłacalność produkcji. Mając ustalone zasady doboru materiału, przejdźmy teraz do analizy, w jaki sposób rodzaje pras oraz podstawowe aspekty wyposażenia wpływają na skuteczność operacji tłoczenia.
Rodzaje pras tłoczeniowych i podstawy wyposażenia
Wybrałeś/-aś materiał i dopasowałeś/-aś go do odpowiedniej techniki tłoczenia. Teraz pojawia się pytanie, które oddziela efektywne działania od tych napotykających trudności: czym jest prasa tłoczeniowa i który jej typ zapewni rezultaty wymagane przez Twój projekt? Wybrana maszyna do tłoczenia metali bezpośrednio wpływa na jakość wykonywanych części, czas cyklu oraz długoterminowe koszty eksploatacji. Niemniej jednak większość producentów pomija tę kluczową decyzję, pozostawiając Ci rozwiązywanie problemu drogą drogich prób i błędów.
Wyobraź sobie prasę tłoczeniową jako silnik całej Twojej operacji. Niedopasowane pod względem mocy urządzenia są przeciążane przy każdym cyklu, co prowadzi do niestabilnej jakości części i przyspieszonego zużycia. Prasy o nadmiernie dużej mocy marnują energię i kapitał. Idealne dopasowanie? To właśnie tam, gdzie efektywność produkcji i jakość części idealnie się pokrywają.
Wybór odpowiedniej technologii prasy
Trzy główne technologie presowe dominują w nowoczesnych procesach tłoczenia, każda z nich zaprojektowana specjalnie dla określonych zastosowań. Zrozumienie różnic między nimi pozwala uniknąć kosztownych błędów w doborze.
Prasy mechaniczne: Gdy najważniejsza jest prędkość, prasy mechaniczne do tłoczenia zapewniają odpowiednie rozwiązanie. Maszyny te wykorzystują koło zamachowe do generowania siły, umożliwiając krótkie czasy cyklu – idealne w produkcji masowej. Zgodnie z analizą firmy Eigen Engineering, prasy mechaniczne szczególnie dobrze sprawdzają się w operacjach powtarzalnych, gdzie kluczowe znaczenie ma spójność, a nie elastyczność. Ich wadą jest jednak mniejsza kontrola siły w dolnym punkcie suwu, przez co są lepiej nadawane do zadań wymagających jednolitego procesu niż zmiennych charakterystyk siły.
Prasy hydrauliczne: Potrzebujesz maksymalnej kontroli siły i wszechstronności? Hydrauliczne prasy do tłoczenia metali wywierają stałe ciśnienie na całym przebiegu suwu, dzięki czemu są niezastąpione przy głębokim tłoczeniu, kształtowaniu materiałów o wysokiej wytrzymałości na rozciąganie oraz produkcji złożonych części metalowych tłoczonych. Są one wolniejsze niż ich odpowiedniki mechaniczne, ale oferują nieosiągalną elastyczność. Przy pracy z grubszymi blachami lub skomplikowanymi geometriami systemy hydrauliczne zapewniają niezbędną kontrolę, zapobiegając pękaniom i gwarantując jednolity przepływ materiału.
Prasy serwo: Najnowszy kandydat łączy w sobie najlepsze cechy obu światów. Maszyny do tłoczenia napędzane serwosilnikami oferują programowalne profile skoku, regulowane prędkości w różnych fazach oraz precyzyjną kontrolę siły. Zgodnie z Wskazówkami technicznymi Stamtec prasy serwo pozwalają na niższe prędkości podczas procesu kształtowania i szybsze prędkości powrotu, maksymalizując wydajność bez przeciążania narzędzi. Oszczędności energii oraz długotrwała stabilność sprawiają, że technologia serwo staje się coraz bardziej atrakcyjna, mimo wyższych kosztów początkowych.
Wymagania co do nośności i rozmiaru stołu
Wybór odpowiedniej prasy stalowej do tłoczenia rozpoczyna się od dwóch niepod negotiowalnych specyfikacji: nośności i rozmiaru stołu. Błędny dobór tych parametrów uniemożliwia rozwiązanie problemu poprzez jakiekolwiek dostosowania.
Obliczanie nośności wymaga zrozumienia materiału, grubości, rozmiaru płytki oraz złożoności matrycy. Zbyt mała siła prasująca obciąża prasę przy każdym cyklu, powodując niekompletne kształtowanie i przyspieszone zużycie. Nadmierna moc prowadzi do marnowania budżetu i energii. W przypadku zaawansowanych stali o wysokiej wytrzymałości lub wielokrotnych operacji tłoczenia precyzja staje się jeszcze ważniejsza, ponieważ margines błędu jest mniejszy.
Rozmiar łóżka określa maksymalne wymiary matrycy, które mogą być umieszczone w prasie. Poza samym dopasowaniem narzędzi odpowiedni rozmiar stołu zapewnia prawidłowe podparcie podczas operacji kształtowania. Zbyt ciasne ustawienia powodują nieregularny rozkład siły, co prowadzi do odchyłek wymiarowych oraz przedwczesnego uszkodzenia matrycy.
Oto kluczowe specyfikacje, które każdy kupujący powinien ocenić przy wyborze maszyn tłocznicy:
- Nominalna siła prasująca: Maksymalna siła, jaką prasa może wytworzyć, dopasowana do najwyższych wymagań kształtowania
- Długość suwu: Długość przebiegu suwaka, określająca maksymalną głębokość tłoczenia
- Udery na minutę: Potencjalna prędkość produkcji, zrównoważona z złożonością wyrobu
- Wymiary stołu roboczego: Obszar roboczy do montażu matryc, zapewniający miejsce na obsługę materiału
- Wysokość zamknięcia: Odległość między stołem a suwakiem w dolnym położeniu suwaka, wpływająca na ograniczenia projektowe matryc
- Regulacja suwaka: Zakres modyfikacji położenia suwaka w celu zapewnienia elastyczności przy ustawianiu
- Moc silnika: Pojemność energetyczna umożliwiająca długotrwałe serie produkcyjne bez przegrzewania się
Wpływ doboru prasy na jakość i koszty
Związek między możliwościami prasy a osiągalnymi tolerancjami często zaskakuje producentów. Prasa do tłoczenia metali to nie tylko surowa moc. Sztywność ramy, precyzja prowadzenia suwaka oraz czułość układu napędowego mają wpływ na końcowe wymiary wyrobu.
Prasy serwomechaniczne wyróżniają się w zastosowaniach wymagających ścisłej kontroli tolerancji, ponieważ programowalne profile ruchu zmniejszają siły uderzeniowe powodujące odkształcenia wyrobów. Układy hydrauliczne zapewniają stałe ciśnienie podczas głębokich tłoczeń, gdzie niestabilna siła powoduje marszczenie lub pęknięcia. Prasy mechaniczne, choć mniej precyzyjne w dolnym położeniu suwaka, oferują nieosiągalną opłacalność przy masowej produkcji prostych części, gdzie szybkość decyduje o rentowności.
Koszty eksploatacji wykraczają poza cenę zakupu. Zużycie energii znacznie różni się w zależności od zastosowanej technologii. Prasy serwo pobierają energię elektryczną wyłącznie w trakcie rzeczywistego kształtowania, co redukuje koszty energii elektrycznej o 30–50% w porównaniu do mechanicznych kół zamachowych pracujących ciągle. Różnią się również wymagania serwisowe. Układy hydrauliczne wymagają regularnego monitorowania poziomu i jakości płynu roboczego oraz wymiany uszczelek, podczas gdy prasy mechaniczne wymagają szczególnej uwagi skupionej na kole zamachowym i sprzęgle.
Dobór odpowiedniej technologii prasy do konkretnego asortymentu produkcyjnego optymalizuje zarówno jakość końcowych wyrobów, jak i efektywność kosztową. Gdy odpowiednia podstawa sprzętowa zostanie ustalona, kolejnym kluczowym czynnikiem staje się projektowanie narzędzi, w którym inżynieria matryc przekształca możliwości prasy w precyzyjne elementy.
Podstawy projektowania matryc oraz wymagania dotyczące narzędzi
Wybrali Państwo odpowiednią technologię prasowania i dobrały Państwo siłę prasowania do potrzeb produkcji. Jednak to właśnie wewnątrz matrycy tłocznikowej dzieje się prawdziwa inżynierska magia. Bez prawidłowo zaprojektowanego narzędziownictwa nawet najmocniejsza prasa do tłoczenia matrycowego wytwarza wyłącznie odpad. Matryca tłocznikowa to miejsce, w którym precyzja inżynierska spotyka się z rzeczywistością produkcyjną, przekształcając płaski metal w złożone elementy za pomocą starannie skoordynowanych operacji.
Co sprawia, że jedno rozwiązanie konstrukcyjne matrycy tłocznikowej jest lepsze od innego? Kluczem jest zrozumienie funkcji poszczególnych jej elementów, znaczenia kolejności wykonywania operacji w procesie postępującym oraz wpływu decyzji projektowych na wszystkie aspekty jakości produkcji. Przyjrzymy się teraz podstawowym elementom, które decydują o tym, czy Państwa narzędziownictwo zapewni wytwarzanie precyzyjnych części, czy też będzie przyczyną trwających problemów.
Anatomia matrycy tłocznikowej
Wyobraź sobie matrycę tłoczną jako precyzyjną maszynę z wieloma elementami działającymi w idealnej koordynacji. Każdy z tych elementów pełni określoną funkcję, a zrozumienie ich działania pozwala ocenić jakość narzędzi oraz diagnozować problemy występujące w trakcie produkcji.
Płyty matrycy (zestawy matryc): Zgodnie z poradnikiem technicznym firmy Moeller Precision Tool, płyty matrycy stanowią podstawę, na której montowane są inne narzędzia i komponenty matrycy. Te górne i dolne płyty, zwykle wykonane ze stali lub stopów aluminium, utrzymują tłoczki, guziki, sprężyny oraz elementy prowadzące w precyzyjnym położeniu. Jakość płyt matrycy ma bezpośredni wpływ na dokładność wszystkich elementów zamontowanych na nich.
Wykrojniki: Są to aktywne narzędzia dociskające blachę w celu jej przekształcenia. Tłoczki matrycy są zamocowane w uchwytach i mogą albo giąć materiał, albo przebijać w nim otwory – w zależności od kształtu ich końcówki. Kształty końcówek obejmują m.in. okrągły, owalny, kwadratowy, prostokątny, sześciokątny oraz niestandardowe profile dopasowane do konkretnych cech wyrobu.
Gniazda tłoczniowe: Działając jako element odpowiadający matrycy, płytki matrycy zapewniają przeciwlegą krawędź tnącą, w której wprowadzane są stemple podczas operacji. Zazwyczaj są one przesunięte względem nosa stempla o 5–10% grubości przebijanego materiału, tworząc tzw. „przerwę matrycy”, która umożliwia cięcie i czyste powstawanie otworów.
Płyta wybijakowa: Zamontowany nad taśmą metalową ten element zapobiega przywieraniu uformowanych części do stempli w fazie usuwania. Jak zauważają eksperci od projektowania matryc postępujących, odciągacz wywiera siłę skierowaną ku górze na taśmę podczas jej przesuwania, zapewniając gładkie wypychanie gotowych części z narzędzi. Brak prawidłowego działania odciągacza powoduje utknięcie części i powstanie zatkania, co zatrzymuje produkcję.
Piny prowadzące i bushings: Precyzyjne dopasowanie górnej i dolnej połowy matrycy zależy od tych elementów. Wprowadzane do matrycy szczyty kierujące współpracują z wkładkami kierującymi, zapewniając dokładne pozycjonowanie płyt matrycy z dokładnością do 0,0001 cala. Istnieją dwa główne typy: szczyty tarcia oraz szczyty z łożyskami kulkowymi. Wersje z łożyskami kulkowymi stały się standardem branżowym, ponieważ łatwiej je rozdzielać i zmniejszają zużycie; niemniej jednak standardowe szczyty tarcia nadal zapewniają dokładne prowadzenie w określonych zastosowaniach.
Sprężyny matrycowe: Te sprężyny śrubowe o wysokiej sile ściskania zapewniają siłę niezbędną do utrzymywania arkuszy metalowych w miejscu podczas ich przetwarzania. Mechaniczne sprężyny druciane są stosowane w większości zastosowań, natomiast gazowe sprężyny matrycowe z azotem oferują wyższą gęstość siły w wymagających operacjach. Dobór sprężyn wpływa na siłę odprowadzania, ciśnienie przytrzymujące materiału oraz ogólną wydajność matrycy.
Uchwyty matryc: Te elementy montuje się na płytach matrycy, aby utrzymać w odpowiednim położeniu elementy tnące i kształtujące. Zastosowanie zacisków kulkowych, zacisków zakończonych łebkiem, zacisków typu trąbka oraz zacisków chowanych zależy od konkretnego zastosowania. Wysokiej jakości zaciski zapewniają precyzyjne pozycjonowanie stempli i zapobiegają błędom sumowania tolerancji, które mogą prowadzić do problemów z wymiarami.
Kolejność operacji na stacjach matryc postępujących
W procesach wykonywania części za pomocą matryc postępujących i tłoczenia ciągła taśma metalowa przesuwa się przez wiele stacji, z których każda wykonuje określone zadanie. Zrozumienie tej kolejności wyjaśnia, dlaczego matryce postępujące zapewniają tak wyjątkową wydajność w produkcji masowej.
Układ stacji w matrycy postępującej, znany jako układ taśmy, jest starannie zoptymalizowany w celu zminimalizowania odpadów materiałowych i maksymalizacji wydajności produkcji. Inżynierowie uwzględniają złożoność detalu, wykorzystanie materiału oraz dostępność do matrycy przy projektowaniu tego układu. Zgodnie z badaniami branżowymi dotyczącymi tłoczenia postępującego, każda stacja zawiera własny zestaw elementów narzędziowych, a operacje są ułożone w logicznej kolejności, aby skutecznie przekształcić surowy materiał w gotowe detale.
Wyobraź sobie metalową taśmę wprowadzaną do maszyny tłoczącej z matrycą. Na pierwszej stacji może zostać wykonana operacja wykrawania, tworząca szkicowy kontur detalu. Na drugiej stacji wykonywane są otwory prowadzące, które kierują taśmę przez kolejne stacje. Stacje trzecia do szóstej stopniowo kształtują płaskowniki, gięcia oraz inne cechy detalu. Ostatnia stacja oddziela gotowy detal od taśmy nośnej.
Jednostki wałków kulowych kontrolują chwilę i kolejność operacji w każdej stacji. Te urządzenia mechaniczne uruchamiają ruch matryc i stempli, zapewniając zsynchronizowaną pracę oraz optymalną produkcję detali. Precyzyjne projektowanie wałków kulowych pozwala osiągnąć stałą jakość wyrobów, jednocześnie minimalizując przestoje spowodowane błędami w synchronizacji.
Zasady projektowania zapewniające trwałość i precyzję
W jaki sposób projekt matryc do tłoczenia metalu wpływa na produkowane detale? Związek między złożonością matrycy a geometrią detalu określa dopuszczalne odchylenia wymiarowe, jakość powierzchni oraz wydajność produkcji. Doświadczeni projektanci matryc balansują te czynniki z rzeczywistymi ograniczeniami produkcyjnymi.
Matryce stalowe do tłoczenia podczas produkcji są narażone na ogromne siły, co wymaga ich wykonania z hartowanej stali zapewniającej odporność na intensywne procesy tłoczenia. Prawidłowa konserwacja – w tym ostrzenie krawędzi tnących, smarowanie części ruchomych oraz sprawdzanie zużycia – jest niezbędna do przedłużenia żywotności matryc i zapewnienia ich stałej wydajności.
Oto kluczowe kwestie projektowe, które odróżniają doskonałe maszyny do tłoczenia od przeciętnych narzędzi:
- Analiza przepływu materiału: Zrozumienie, w jaki sposób metal przemieszcza się podczas kształtowania, zapobiega powstawaniu pęknięć, zgniotów i nieregularnej grubości. Zaawansowane oprogramowanie CAD/CAM symuluje zachowanie materiału przed rozpoczęciem produkcji.
- Optymalizacja luzu: Poprawne odstępy między tłoczyskami a matrycami (zazwyczaj 5–10% grubości materiału) zapewniają czyste cięcia bez nadmiernego tworzenia wyprasek.
- Wyrównanie kierunku ziarna: Orientowanie kluczowych gięć prostopadle do kierunku włókien metalu zmniejsza ryzyko pęknięć i poprawia wytrzymałość ukształtowanego elementu.
- Kompensacja odbicia sprężystego: Matryce muszą nadgiąć części, aby uwzględnić odprężenie sprężyste; współczynniki kompensacji zależą od rodzaju materiału i jego grubości.
- Położenie otworów prowadzących: Dokładne przesuwanie taśmy zależy od wpasowania się sztyftów pozycjonujących w otwory wcześniejszych stacji, co zapobiega kumulowaniu się błędów pozycjonowania.
- Obliczanie siły odciągania: Wystarczające naciskanie sprężyn umożliwia oddzielenie części od tłoczysk bez uszkadzania ukształtowanych cech ani wyginania taśmy.
- Obróbka powierzchni zużycia: Powłoki i zabiegi hartujące na obszarach o dużym zużyciu wydłużają żywotność matryc, zmniejszając częstotliwość koniecznych prac konserwacyjnych oraz poprawiając spójność procesu.
- Dostępność dla konserwacji: Projekty umożliwiające łatwą wymianę elementów minimalizują przestoje związane z ostrzeniem lub wymianą zużytych części.
Złożoność geometrii Twojego elementu bezpośrednio wpływa na złożoność i koszt matrycy. Proste, płaskie elementy z kilkoma otworami wymagają stosunkowo prostych narzędzi. Złożone trójwymiarowe kształty z wąskimi tolerancjami wymagają zaawansowanych, wielostanowiskowych matryc postępujących, wyposażonych w precyzyjnie szlifowane komponenty oraz wykonane z nowoczesnych materiałów.
Zrozumienie tych podstaw projektowania matryc pozwala Ci inteligentnie oceniać oferty dotyczące narzędzi oraz skutecznie komunikować się z producentami tłoczników na temat swoich wymagań. Gdy zasady projektowania narzędzi zostały ustalone, przeanalizujmy teraz, jak proces tłoczenia porównuje się do innych metod produkcyjnych w różnych scenariuszach projektowych.
Tłoczenie w porównaniu z alternatywnymi metodami produkcji
Teraz rozumiesz techniki tłoczenia, dobór materiałów, technologię pras oraz podstawy projektowania matryc. Ale istnieje pytanie decydujące o tym, czy tłoczenie rzeczywiście ma sens w przypadku Twojego projektu: jak ta metoda porównuje się do innych metod produkcji? Wybór niewłaściwej technologii prowadzi do marnowania budżetu, przedłużania harmonogramu i pogorszenia jakości wyrobów. Jednak większość dostępnych źródeł pomija te kluczowe porównania, pozostawiając Cię z koniecznością odkrywania niezgodności drogą kosztowną.
Prawda jest taka, że tłoczenie blachy dominuje w określonych zastosowaniach, ale okazuje się niewystarczające w innych. Zrozumienie obszarów, w których proces tłoczenia metalu odnosi największe sukcesy, oraz tych, w których lepsze są alternatywy, pozwala podejmować decyzje optymalizujące zarówno koszty, jak i jakość od pierwszego dnia.
Progi ilościowe sprzyjające tłoczeniu
Kiedy tłoczenie metalu staje się bezsprzecznym zwycięzcą? Odpowiedź wiąże się z objętością produkcji oraz ekonomiką amortyzacji narzędzi.
Tłoczenie wymaga znacznych początkowych inwestycji w matryce i narzędzia. analiza produkcji przeprowadzona przez Yucca Motor Lamination , matryce progresywne kosztują zwykle od 10 000 do 100 000 USD lub więcej, w zależności od złożoności i wymagań dotyczących precyzji. Jednak po wprowadzeniu tej osprzętowej produkcji koszty wytworzenia jednostkowego produktu gwałtownie spadają. Ta rzeczywistość ekonomiczna tworzy wyraźne progi punktu zwrotnego.
Rozważmy praktyczny przykład: cięcie laserem może kosztować 4,50 USD za element bez inwestycji w osprzęt, podczas gdy tłoczone części metalowe kosztują zaledwie 0,30 USD za sztukę po inwestycji w matrycę w wysokości 40 000 USD. Obliczenia pokazują, że projekty wymagające mniej niż około 10 000 elementów korzystają bardziej z cięcia laserowego, natomiast większe serie uzasadniają inwestycję w osprzęt do tłoczenia. Powyżej 50 000 sztuk koszty tłoczenia stają się praktycznie nie do pobicia żadną inną metodą.
Proces blachowniczy zapewnia również korzyści związane z szybkością w przypadku produkcji masowej. Prasy tłocznikowe pracują z prędkością setek lub tysięcy uderzeń na minutę, produkując elementy w ciągu kilku sekund, a nie minut, jak to ma miejsce przy frezowaniu CNC lub cięciu laserowym poszczególnych komponentów. Dla producentów samochodów produkujących miliony identycznych wsporników, zacisków lub paneli taka wydajność czyni alternatywne metody ekonomicznie niewykonalnymi.
Efektywność materiałowa jeszcze bardziej wzmacnia pozycję tłoczenia w produkcji masowej. Matryce postępujące optymalizują układ pasków blachy w celu zminimalizowania odpadów, a metalowy scrap łatwo poddaje się recyklingowi. Porównaj to z frezowaniem CNC, gdzie procesy ubytkowe mogą prowadzić do utraty 50% lub więcej materiału wyjściowego przy złożonych elementach.
Gdy metody alternatywne odnoszą sukces
Mimo zalet tłoczenia w produkcji masowej istnieje kilka sytuacji, w których bardziej opłacalne są zupełnie inne podejścia. Rozpoznanie tych przypadków pozwala uniknąć kosztownych inwestycji w narzędzia, które nigdy się nie zwrócą.
Zalety frezowania CNC: Gdy Twoja część wymaga złożonych geometrii 3D, cech wewnętrznych lub wyjątkowo ścisłych tolerancji, frezowanie CNC często okazuje się lepszym rozwiązaniem. Zgodnie z porównaniem procesów produkcyjnych firmy VMT frezowanie CNC regularnie osiąga tolerancje aż do ±0,005 mm, co czyni je idealnym rozwiązaniem w zastosowaniach lotniczych, medycznych oraz w precyzyjnej elektronice, gdzie dokładność wymiarowa jest bezwzględnie konieczna. Proces ten umożliwia również obróbkę twardszych materiałów i tworzyw inżynierskich, których tłoczenie po prostu nie potrafi uformować.
Frezowanie CNC wyróżnia się w fazie prototypowania oraz produkcji małoseryjnej. Dzięki brakowi potrzeby przygotowania narzędzi można wykonać funkcjonalne części w ciągu kilku dni zamiast czekać tygodnie na opracowanie matryc. Zmiany projektu wymagają jedynie aktualizacji plików CAD, a nie kosztownej modyfikacji narzędzi.
Zalety cięcia laserowego: Dla płaskich lub umiarkowanie wygiętych części w ilościach poniżej 10 000 sztuk cięcie laserem zapewnia elastyczność, której nie potrafi dorównać tłoczenie. Proces projektowania tłoczenia blachy wymaga zatwierdzenia stałej geometrii jeszcze przed rozpoczęciem produkcji narzędzi. Cięcie laserem pozwala swobodnie iterować projekty, co czyni je idealnym rozwiązaniem dla produktów nadal w fazie rozwoju lub wymagających częstych aktualizacji.
Zgodnie z przewodnikiem Komaspec dotyczącym doboru procesów, cięcie laserem osiąga tolerancje liniowe ±0,10 mm bez konieczności stosowania niestandardowych narzędzi, a czas realizacji próbek może wynosić zaledwie 5 dni. Ta przewaga pod względem szybkości uzyskania pierwszego elementu czyni cięcie laserem domyślnym wyborem do walidacji projektu przed podjęciem decyzji o produkcji narzędzi do tłoczenia.
Uwagi dotyczące odlewania: Gdy części wymagają złożonych wnęk wewnętrznych, podcięć lub trójwymiarowych kształtów niemożliwych do wytworzenia z płaskich blach, odlewanie oferuje możliwości, których brakuje tłocznictwu. Odlewanie w matrycach szczególnie nadaje się do produkcji wysokogłównościowej komponentów z aluminium lub cynku o skomplikowanej geometrii. Jednak odlewanie wiąże się z problemami porowatości, dłuższymi czasami cyklu oraz innymi oczekiwaniami dotyczącymi dopuszczalnych odchyłek niż w przypadku części tłoczonych.
Nisza produkcji przyrostowej: druk 3D służy do prototypowania i produkcji w bardzo niskich partiach, gdy koszty narzędzi nie mogą być uzasadnione. Skomplikowane geometrie, które wymagałyby złożenia wielu części tłoczonych, można czasem połączyć w jedną część wydrukowaną. Jednak koszty jednostkowe pozostają wysokie, wybór materiałów jest ograniczony w porównaniu do tłoczenia metali, a prędkość produkcji nie pozwala konkurować przy jakichkolwiek znaczących objętościach.
Porównanie Procesu Produkcji
| Proces | Optymalny zakres wielkości produkcji | Osiągalne tolerancje | Odpady materialne | Koszt elementu (mała seria) | Koszt elementu (duża seria) |
|---|---|---|---|---|---|
| Pieczętowanie | 10 000+ sztuk | ±0,05 mm do ±0,25 mm | Niski (zoptymalizowane układy pasków) | Wysoki (amortyzacja narzędzi) | Bardzo niska |
| Obróbka CNC | 1–1000 sztuk | ±0,005 mm do ±0,025 mm | Wysoki (proces ubytkowy) | Umiarkowany | Wysoki |
| Cięcie laserowe | 1–10 000 sztuk | ±0,10mm | Umiarkowany (optymalizacja rozmieszczenia) | Niski do umiarkowanego | Umiarkowany |
| Odlewanie na maty | 5 000+ jednostek | ±0,10 mm do ±0,50 mm | Niskie (kształt zbliżony do końcowego) | Wysoki (inwestycja w narzędzia) | Niski do umiarkowanego |
| Wytwarzania przyrostowego | 1 do 500 sztuk | ±0,10 mm do ±0,30 mm | Bardzo niski (proces przyrostowy) | Wysoki | Bardzo wysoki |
Ramy decyzyjne dla Twojego projektu
Jak określić, który proces najlepiej odpowiada Państwa konkretnym wymaganiom? Przeanalizuj poniższe kluczowe pytania:
- Jaka jest objętość produkcji? Poniżej 1000 sztuk tłoczenie rzadko jest opłacalne ekonomicznie. W zakresie od 1000 do 10 000 sztuk przeprowadź obliczenia punktu bezstratności na podstawie rzeczywistych ofert dotyczących narzędzi. Powyżej 10 000 sztuk tłoczenie prawie zawsze okazuje się korzystniejsze pod względem kosztu przypadającego na pojedynczą sztukę.
- Czy projekt Twojego wyrobu został już ostatecznie ustalony? Jeśli nadal prowadzisz iteracje projektowe, zainwestuj w prototypy wykonane metodą cięcia laserowego lub frezowania CNC przed zatwierdzeniem narzędzi do tłoczenia. Zmiany projektu po wyprodukowaniu matryc są kosztowne i czasochłonne.
- Jakie tolerancje wymaga Twoja aplikacja? Standardowe tłoczenie zapewnia dokładność wymiarową w zakresie ±0,05 mm do ±0,25 mm, w zależności od zastosowanej metody. Elementy wymagające ścislszych tolerancji mogą potrzebować obróbki CNC lub specjalistycznego tłoczenia precyzyjnego.
- Jaką geometrię chcesz wytworzyć? Tłoczenie doskonale sprawdza się przy kształtowaniu elementów dwuwymiarowych oraz umiarkowanie trójwymiarowych z płaskich blach. Skomplikowane cechy wewnętrzne, głębokie wnęki lub wypustki lepiej realizować metodą obróbki skrawaniem lub odlewania.
- Jaki jest Twój harmonogram? Czy potrzebujesz części w ciągu kilku dni? Cięcie laserowe lub obróbka CNC umożliwia ich dostarczenie bez konieczności oczekiwania na wytworzenie narzędzi. Czy możesz poczekać 4–8 tygodni na opracowanie matryc? W takim przypadku tłoczenie staje się rozwiązaniem opłacalnym.
Wiele udanych projektów strategicznie łączy różne metody. Prototypowanie z wykorzystaniem cięcia laserowego, weryfikacja na małych partiach wykonanych frezarką CNC, a następnie przejście do tłoczenia po ustabilizowaniu konstrukcji i potwierdzeniu prognoz objętości produkcji, co uzasadnia inwestycję w narzędzia. Takie etapowe podejście minimalizuje ryzyko, jednocześnie optymalizując długoterminową opłacalność produkcji.
Zrozumienie miejsca, jakie zajmuje tłoczenie w szerszym krajobrazie procesów produkcyjnych, pozwala podejmować świadome decyzje, a nie polegać wyłącznie na znanych metodach. Gdy już ustaliliśmy tę ramę porównawczą, przeanalizujmy teraz, jak kontrola jakości i normy precyzji zapewniają, że części tłoczone zgodnie z wymaganiami spełniają określone specyfikacje.
Kontrola jakości i normy precyzji w tłoczeniu
Porównałeś tłoczenie z metodami alternatywnymi i wiesz, kiedy ten proces zapewnia największą wartość. Jednak to, co odróżnia niezawodnych dostawców od tych problematycznych, to sposób, w jaki zapewniają jakość przy produkcji tysięcy lub milionów identycznych części. Wyprodukowanie jednego idealnego tłoczonego elementu metalowego jest proste. Wyprodukowanie dziesięciu tysięcy takich elementów z tą samą precyzją? To wymaga systematycznej kontroli jakości, której większość producentów nigdy nie wyjaśnia szczegółowo.
W przypadku precyzyjnego tłoczenia metalu tolerancje to nie tylko liczby na rysunku technicznym. Reprezentują one różnicę między częściami, które montują się bezproblemowo, a elementami wymagającymi kosztownej poprawki. Zgodnie z analizą tolerancji JV Manufacturing spełnienie ścisłych tolerancji oznacza przestrzeganie granic wymiarowych często w zakresie ±0,001 cala lub jeszcze ścislejszych. Prościej mówiąc, w zastosowaniach wysokiej precyzji tłoczenia metalu prawie nie ma miejsca na błędy.
Możliwości tolerancyjne w zależności od rodzaju procesu
Nie wszystkie metody tłoczenia zapewniają taką samą precyzję. Zrozumienie możliwych do osiągnięcia tolerancji dla poszczególnych technik pozwala na ustalenie realistycznych oczekiwań oraz wybór odpowiedniej metody dla danej aplikacji.
Standardowe tłoczenie progresywne: Większość komponentów metalowych wytwarzanych metodą tłoczenia progresywnego przy użyciu matryc progresywnych osiąga tolerancje w zakresie od ±0,005 cala do ±0,015 cala, w zależności od geometrii elementu i materiału. Zakres ten jest odpowiedni dla ogromnej większości zastosowań komercyjnych, w których części współpracują ze standardowymi elementami złącznymi lub niekrytycznymi zespołami.
Czyste tłoczenie: Gdy jakość krawędzi i dokładność wymiarowa są kluczowe, tłoczenie precyzyjne (fine blanking) umożliwia osiągnięcie tolerancji nawet od ±0,0005 cala do ±0,001 cala. Tłoczenie metalowe w przemyśle motocyklowym i motoryzacyjnym do produkcji kół zębatych, kół napędzających i elementów krytycznych pod względem bezpieczeństwa często wymaga właśnie tego poziomu precyzji.
Części do tłoczenia precyzyjnego: Specjalizowane operacje skupiające się na ścisłej kontroli osiągają zwykle tolerancje od ±0,001 cala do ±0,003 cala dzięki ulepszonym narzędziom, kontrolowanym środowiskom oraz rygorystycznemu monitorowaniu procesu. Te tłoczone części metalowe znajdują zastosowanie w przemyśle lotniczym, medycznym i elektronicznym, gdzie dopasowanie i funkcjonalność są bezwzględnie wymagane.
Wybór materiału ma istotny wpływ na osiągalne tolerancje. Zgodnie z badaniami branżowymi materiały o wysokiej plastyczności i łatwości kształtowania, takie jak aluminium, miedź czy niektóre gatunki stali nierdzewnej, łatwiej przyjmują pożądane kształty bez pękania. Pozwala to na uzyskanie ścislszych tolerancji w porównaniu z mniej elastycznymi materiałami, które opierają się odkształceniu i wykazują większe odskoki sprężyste.
Wbudowywanie jakości w proces produkcji
Osiągnięcie precyzji już przy pierwszej części nie ma znaczenia, jeśli kolejne części odbiegają od specyfikacji. Producentom zapewniającym spójność w seriach o dużej objętości produkcji zależy na systematycznej kontroli jakości wkomponowanej w całokształt procesu tłoczenia.
Metody kontroli: Współczesne operacje tłoczenia wykorzystują wiele technologii pomiarowych w celu weryfikacji dokładności wymiarowej:
- Maszyny Pomiarowe Współrzędnych (CMM): Sonды sterowane komputerowo mierzą złożone geometrie z dokładnością na poziomie mikronów, porównując rzeczywiste wymiary z specyfikacjami CAD
- Systemy pomiarowe optyczne: Inspekcja oparta na analizie obrazu szybko pozyskuje dane wymiarowe, umożliwiając 100-procentową kontrolę kluczowych cech na szybkobieżących liniach produkcyjnych
- Śruby kontrolne typu go/nogo: Proste i niezawodne narzędzia pozwalają szybko zweryfikować kluczowe wymiary bezpośrednio na linii produkcyjnej, wykrywając elementy spoza tolerancji jeszcze przed ich przekazaniem do kolejnych etapów procesu
- Profilometry powierzchni: Mierzyć chropowatość powierzchni oraz jakość wykończenia, aby zapewnić, że tłoczone elementy metalowe spełniają wymagania estetyczne i funkcjonalne
Statystyczna kontrola procesu (SPC): Zamiast sprawdzać każdy element osobno, kontrola statystyczna procesu (SPC) wykorzystuje metody statystyczne do monitorowania stabilności procesu w czasie rzeczywistym. Zgodnie z analizą jakościową firmy Kenmode kluczowe cechy są przypisywane częściom metalowym wykonanym metodą tłoczenia wraz z dopuszczalnymi zakresami odchyleń. Odchylenia od normy są automatycznie nanoszone na wykresy, co pozwala menedżerom identyfikować trendy i rozwiązywać problemy jeszcze przed wystąpieniem wad. Takie proaktywne podejście zmniejsza ilość odpadów i zapewnia stałą jakość w całym cyklu produkcji.
Podstawowe narzędzia zapewniania jakości w przemyśle motocyklowym: W przypadku tłoczenia metalowych elementów samochodowych normy branżowe wymagają zastosowania określonych metod zapewnienia jakości. Wytyczne jakościowe IATF 16949 nakazują stosowanie zaawansowanego planowania jakości produktu (APQP), procesu zatwierdzania części produkcyjnych (PPAP), analizy rodzajów i skutków awarii (FMEA), analizy systemu pomiarowego (MSA) oraz statystycznej kontroli procesu. Te podstawowe narzędzia jakości, opracowane przez Automotive Industry Action Group, stanowią fundament skutecznego systemu zarządzania jakością zapobiegającego występowaniu oraz wykrywającego wady tłoczonych elementów metalowych.
Producenci certyfikowani zgodnie ze standardami IATF 16949, połączeni z zaawansowaną symulacją komputerową CAE w zakresie projektowania narzędzi, osiągają systematycznie lepsze wyniki w zastosowaniach motocyklowych. Na przykład, Precyzyjne możliwości tłoczenia Shaoyi ilustrują, czego można dokonać dzięki produkcji skupionej na jakości: wskaźnik zatwierdzenia przy pierwszym przejściu wynosi 93%, co minimalizuje kosztowne iteracje i przyspiesza harmonogramy produkcji.
Punkty kontrolne jakości w trakcie produkcji
Systematyczna kontrola jakości nie polega na jednorazowej inspekcji na końcu linii produkcyjnej. Jest to seria punktów kontrolnych, które wykrywają odchylenia zanim nasilą się one i spowodują drogie problemy.
- Weryfikacja materiału przyjmowanego: Potwierdza, że metal spełnia wymagania dotyczące grubości, twardości oraz jakości powierzchni przed rozpoczęciem jakichkolwiek operacji obróbkowych
- Inspekcja pierwszej sztuki: Kompleksowa walidacja wymiarowa początkowych części przed przystąpieniem do pełnej produkcji
- Monitorowanie w trakcie procesu: Czujniki w czasie rzeczywistym śledzą siłę prasowania, podawanie materiału, temperaturę matrycy oraz warunki kształtowania
- Pobieranie próbek statystycznych: Regularne sprawdzanie wymiarów w ustalonych odstępach potwierdza spójność procesu oraz wykrywa trendy zużycia narzędzi
- Inspekcja wizualna: Wytrenowani operatorzy identyfikują wady powierzchniowe, zaśniedziny oraz problemy estetyczne, których systemy zautomatyzowane mogą nie wykryć
- Audyt końcowy: Pełna walidacja potwierdza, że wykonywane elementy metalowe spełniają wszystkie wymagania klienta przed wysyłką
Czynniki środowiskowe również wpływają na precyzję wyników. Zgodnie z badaniami nad kontrolą tolerancji, wahania temperatury i wilgotności powodują rozszerzanie się lub kurczenie się materiału, co wpływa na stabilność tolerancji. Utrzymanie kontrolowanego środowiska w całym cyklu produkcji pomaga zapewnić stałą niezawodność.
Dzięki systemom zapewniającym jakość każdy element spełnia określone wymagania techniczne; kolejnym krokiem staje się zrozumienie czynników wpływających na koszty oraz elementów planowania projektu, które decydują o powodzeniu procesu tłoczenia.
Czynniki wpływające na koszty i planowanie projektu w celu zapewnienia powodzenia tłoczenia
Dowiedziałeś się już, jak systemy zapewniające jakość gwarantują stałą precyzję w całym cyklu produkcji. Jednak właśnie w tym miejscu wiele projektów napotyka trudności: na etapie przed podjęciem zobowiązań należy zrozumieć rzeczywiste aspekty ekonomiczne. Tłoczenie metali w produkcji masowej oferuje wyjątkową wydajność na pojedynczą sztukę, lecz ukryte koszty mogą zaskoczyć niewprzygotowanych zakupujących. Znajomość zależności między początkowymi inwestycjami a długoterminowymi efektami ekonomicznymi pozwala odróżnić udane projekty tłoczenia od katastrof budżetowych.
Co determinuje koszty tłoczenia i jak zaplanować projekt tak, aby przyniósł wartość bez niespodzianek? Przeanalizujmy czynniki, które rzeczywiście wpływają na Twój wynik końcowy.
Zrozumienie zwrotu inwestycji w narzędzia
Wykonanie narzędzi stanowi największe jednorazowe inwestycje w każdym projekcie projektowania tłoczenia metali. Zgodnie z analizą kosztów firmy Manor Tool każde matryca jest zaprojektowana i wyprodukowana na zamówienie specjalnie dla Państwa części, co czyni ją zarówno największym wydatkiem, jak i kluczem do oszczędności w długim okresie.
Oto, jak wygląda obliczanie zwrotu inwestycji: wyobraźmy sobie matrycę postępową o wartości 50 000 USD dla części, której koszt produkcji po uruchomieniu narzędzi wynosi 0,35 USD za sztukę. Porównajmy to do cięcia laserowego tej samej części po 3,50 USD za sztukę bez jakiejkolwiek inwestycji w narzędzia. Dla 10 000 sztuk całkowity koszt cięcia laserowego wyniesie 35 000 USD, podczas gdy tłoczenie będzie kosztować 53 500 USD. Jednak przy 100 000 sztuk koszt cięcia laserowego osiągnie 350 000 USD, podczas gdy tłoczenie wyniesie zaledwie 85 000 USD. Ekonomia ulega drastycznej zmianie wraz ze wzrostem objętości produkcji.
Koszt narzędzi zależy od kilku czynników bezpośrednio wpływających na wysokość inwestycji:
- Złożoność matrycy: Proste matryce jednooperacyjne są tańsze niż wielostopniowe matryce postępowe z wyrafinowanymi cechami
- Wymagania dotyczące materiałów: Materiały o wyższej wytrzymałości wymagają bardziej wytrzymałych narzędzi wykonanych ze stali narzędziowej wysokiej jakości
- Specyfikacje tolerancji: Ścislsze допусki wymagają szlifowania precyzyjnego oraz komponentów wyższej jakości
- Oczekiwana wielkość produkcji: Wyższe wolumeny uzasadniają inwestycję w bardziej trwałe narzędzia zaprojektowane na żywotność wynoszącą milion cykli
Zdaniem ekspertów branżowych jakość narzędzi ma istotne znaczenie. Matryce wykonane ze stali niższej klasy zużywają się szybciej i produkują części o niestabilnej jakości. Inwestycja w niezawodne, krajowe narzędzia gwarantuje powtarzalną jakość, przewidywalne koszty oraz długotrwały sukces produkcyjny – matryce wysokiej jakości są gwarantowane na co najmniej 1 000 000 uderzeń przed koniecznością konserwacji.
Gdy liczy się szybkość, dostawcy oferujący szybkie prototypowanie skracają harmonogram realizacji bez utraty jakości. Na przykład: Kompleksowe możliwości projektowania form firmy Shaoyi umożliwiają szybkie prototypowanie już w ciągu zaledwie 5 dni, co przyspiesza walidację projektu przed podjęciem decyzji o zakupie pełnowymiarowych narzędzi produkcyjnych. Ich opłacalne narzędzia dopasowane do standardów OEM pokazują, jak podejście oparte na inżynierii optymalizuje zarówno harmonogram, jak i budżet.
Ukryte koszty wpływające na budżet
Ponadto koszty narzędzi, kilka innych czynników wpływa na całkowity koszt projektu — zakupcy często nie zdają sobie z nich sprawy, dopóki nie otrzymają ofert. Zrozumienie tych elementów na wczesnym etapie pozwala uniknąć szoku wynikającego z wysokości ceny oraz umożliwia dokładne zaplanowanie budżetu na zastosowania tłoczenia.
Efekty uboczne wyboru materiału: Wybór metalu nie wpływa jedynie na koszt surowca. Zgodnie z analizą kosztów produkcji, materiały o wyższej wytrzymałości lub specjalistyczne wymagają bardziej wytrzymałych narzędzi i większej mocy pras, co zwiększa zarówno inwestycję w narzędzia, jak i koszty operacyjne. Przekroczenie rzeczywistych wymagań dotyczących klasy materiału lub jego grubości prowadzi do znacznego wzrostu wydatków bez poprawy osiąganych rezultatów.
Koszty związane z tolerancjami: Ścislejsze допусki wpływają na każdy aspekt projektu. Zgodnie z badaniami branżowymi części wymagające ścisłych допусków potrzebują bardziej precyzyjnego narzędzi i wykwalifikowanej siły roboczej, co zwiększa koszty związane z produkcją narzędzi, operacjami produkcyjnymi oraz wymaganiami kontrolnymi. Określenie jako ścisłych допусków wyłącznie krytycznych wymiarów przy jednoczesnym zapewnieniu większej elastyczności w innych miejscach pozwala obniżyć całkowity koszt.
Operacje wtórne: Większość części tłoczonych wymaga dodatkowej obróbki po procesie kształtowania. Typowymi operacjami wtórnymi są:
- Zdejmowanie zadziorów i wykańczanie krawędzi
- Obróbka powierzchni, np. pokrywanie metalami szlachetnymi, malowanie lub lakierowanie proszkowe
- Wykonywanie gwintów lub gwintowanie otworów
- Montaż z innymi komponentami
- Obróbka cieplna w celu poprawy właściwości
Według badania optymalizacji kosztów , skuteczne łączenie operacji w trakcie tłoczenia może pomóc zmniejszyć całkowity koszt obróbki. Zaplanowanie tych wymagań już na etapie projektowania tłoczenia pozwala uniknąć niespodzianek i usprawnia produkcję.
Ekonomia wielkości produkcji: Wysokowydajne tłoczenie metalu znacznie obniża koszty jednostkowe dzięki korzyściom skali. Producent tłoczonych elementów metalowych rozlicza koszty narzędzi, przygotowania maszyn i kosztów stałych na większą liczbę sztuk w miarę zwiększania się wielkości partii. Zgodnie z analizą produkcji, zamawianie części w największych możliwych ilościach rozprasza koszty narzędzi i przygotowania na całą objętość produkcji, zapewniając najlepszą wartość.
Czynniki wpływające na koszty – do omówienia z dostawcą
Przed ostatecznym ustaleniem ofert należy omówić następujące kluczowe czynniki z dostawcą urządzeń do tłoczenia metalu lub partnerem z zakresu zakładu tłoczniczego:
- Szacowna roczna liczba wykorzystania (EAU): Szacowane przez Państwa woluminy produkcji określają klasę narzędzi, rodzaj stali matrycowej oraz poziomy cen jednostkowych za część
- Przegląd projektu pod kątem wykonalności produkcyjnej: Wczesna współpraca w zakresie inżynierii konstrukcyjnej (DFM) często przynosi największe oszczędności kosztów poprzez eliminację niepotrzebnej złożoności
- Alternatywne materiały: Omówcie, czy tańsze stopy spełniają Państwa wymagania dotyczące wydajności bez nadmiernej specyfikacji
- Optymalizacja tolerancji: Określacie, które wymiary rzeczywiście wymagają ścisłej kontroli, a które mogą przyjmować standardowe допuszczalne odchylenia
- Konsolidacja operacji wtórnych: Zbadaj, czy operacje tłoczenia mogą obejmować cechy, które w przeciwnym razie wymagałyby osobnego przetwarzania
- Właścicielstwo narzędzi i ich konserwacja: Ustal, kto jest właścicielem narzędzi, kto ponosi odpowiedzialność za ich konserwację oraz kto pokrywa koszty ich wymiany w trakcie cyklu produkcyjnego
- Wymagania dotyczące czasu realizacji Zamówienia pilne wiążą się z dodatkowymi opłatami; realistyczne planowanie terminów zmniejsza koszty
Zgodnie z badaniami dotyczącymi współpracy z dostawcami, ścisła współpraca z partnerem produkcyjnym na wczesnych etapach projektowania często przynosi największe oszczędności kosztowe. Ich doświadczenie w optymalizacji projektów tłoczonych elementów metalowych pod kątem wykonalności produkcyjnej może znacznie obniżyć zarówno inwestycje w narzędzia, jak i bieżące koszty produkcji, zachowując przy tym jakość wymaganą przez Twoje zastosowanie.
Często zadawane pytania dotyczące procesu tłoczenia
1. Jaki jest proces tłoczenia?
Tłoczenie to proces produkcyjny kształtowania zimnego, w którym płaskie blachy metalowe są przekształcane w precyzyjne kształty przy użyciu specjalistycznych matryc i wytrzymałych pras. Proces ten polega na wprowadzaniu płytek metalowych do prasy tłocznikowej, gdzie tłocznik i matryca działają ogromną siłą, powodując trwałe odkształcenie materiału w gotowe elementy. Metoda ta przebiega w temperaturze pokojowej, bez nagrzewania, zapewniając wyższą dokładność wymiarową i mniejsze допuszczalne odchyłki niż procesy kształtowania gorącego. Technika ta umożliwia masową produkcję identycznych części – od prostych podkładek po złożone uchwyty samochodowe – z wyjątkową spójnością i efektywnością kosztową po wprowadzeniu odpowiedniego wyposażenia.
2. Jakie są 7 kroków w metodzie tłoczenia?
Pełny proces tłoczenia obejmuje siedem kluczowych etapów: (1) Projektowanie i dobór materiału, podczas którego inżynierowie określają optymalny typ metalu oraz projektują niestandardowe matryce; (2) Cięcie blach i przygotowanie płytek – cięcie płaskich kształtów z surowych cewek; (3) Montaż matryc i konfiguracja prasy w celu zapewnienia prawidłowego pozycjonowania i kalibracji; (4) Operacje kształtowania, podczas których matryce wywierają kontrolowane ciśnienie w celu nadania metalowi pożądanego kształtu; (5) Przebijanie, cięcie i obcinanie w celu wykonania otworów oraz uzyskania precyzyjnych krawędzi; (6) Operacje wtórne, takie jak gwintowanie, spawanie lub obróbka cieplna; oraz (7) Obróbka końcowa i kontrola jakości, w tym usuwanie wyprasek, obróbka powierzchni oraz kompleksowa inspekcja zgodności z wymaganiami specyfikacji.
3. Jak się wykonuje tłoczenie?
Wytłaczanie polega na umieszczeniu płaskiej blachy metalowej pomiędzy dwiema precyzyjnie szlifowanymi powierzchniami, a następnie przyłożeniu siły o wartości tysięcy funtów. Prasa do wytłaczania przesuwa tłoczek w dół do wnęki matrycy, przy czym płyta metalowa znajduje się między nimi jak „kanapka”. Pod wpływem ciśnienia metal ulega plastycznemu odkształceniowi i wypełnia kontury matrycy, zachowując przy tym integralność strukturalną. Gdy przyłożona siła przekracza granicę plastyczności metalu, ale pozostaje poniżej jego wytrzymałości na rozciąganie, materiał trwale przyjmuje kształt matrycy. W operacjach z matrycą postępującą ciągła taśma metalowa jest przesuwana przez wiele stacji, z których każda wykonuje określone zadania, takie jak cięcie, gięcie, przebijanie lub kształtowanie, aż do momentu oddzielenia gotowego elementu na ostatnim etapie.
4. Jaka jest różnica między wytłaczaniem a przebijaniem?
Chociaż oba procesy wykorzystują matryce i prasy, służą one różnym celom. Przecinanie (punching) jest zasadniczo operacją cięcia, która tworzy otwory lub usuwa materiał z blachy za pomocą precyzyjnego cięcia sterowanego numerycznie (CNC). Wytłaczanie (stamping) obejmuje szerszy zakres technik kształtowania metali, w tym gięcie, tłoczenie, wytłaczanie reliefowe, koinowanie oraz formowanie krawędzi (flanging), oprócz operacji cięcia. Wytłaczanie wymaga zwykle bardziej złożonego wyposażenia technologicznego, szczególnie w przypadku wieloetapowych procesów lub skomplikowanych konstrukcji, które wymagają stosowania kilku matryc w kolejności. Złożoność wyposażenia technologicznego w procesie wytłaczania umożliwia pełną transformację części – od płaskich arkuszy do trójwymiarowych elementów, podczas gdy przecinanie koncentruje się wyłącznie na usuwaniu materiału.
5. Kiedy należy wybrać wytłaczanie (stamping) zamiast innych metod produkcyjnych?
Wykrawanie staje się optymalnym wyborem, gdy objętość produkcji przekracza 10 000 sztuk, ponieważ znaczne początkowe inwestycje w narzędzia opłacają się dzięki znacznie niższym kosztom przypadającym na pojedynczą część. Na przykład, podczas gdy cięcie laserem może kosztować 4,50 USD za sztukę bez konieczności zakupu narzędzi, części wykrawane mogą kosztować zaledwie 0,30 USD za sztukę po pokryciu kosztów matrycy. Powyżej 50 000 sztuk koszty wykrawania stają się praktycznie nie do pobicia. Jednak w przypadku prototypowania lub produkcji małoseryjnej poniżej 1 000 sztuk lepsze warunki ekonomiczne zapewniają cięcie laserem lub frezowanie CNC. Rozważ wykrawanie, gdy potrzebujesz spójnej, wysokoprędkościowej produkcji identycznych części, projekt został już ostatecznie ustalony oraz standardowe допuszczalne odchylenia w zakresie ±0,05 mm do ±0,25 mm spełniają Twoje wymagania.