 Small batches, high standards. Our rapid prototyping service makes validation faster and easier —

Metal Press Process Decoded: From Raw Sheet To Finished Part
What Is the Metal Press Process and Why It Matters
When you hold a car door panel, an electronic enclosure, or even a simple metal bracket, you're looking at the result of one of manufacturing's most fundamental transformations. But what is metal press, exactly? And why does it remain the backbone of modern production?
The metal press process is a cold-forming manufacturing method that uses controlled force to transform flat sheet metal into three-dimensional components through precision die tooling, shaping material at room temperature without melting or cutting away excess material.
Understanding what is stamping and how it works is essential for anyone involved in product development, from engineers designing parts to procurement specialists sourcing components. The stamping meaning goes beyond simple definitions - it represents a manufacturing philosophy built on efficiency, precision, and repeatability.
How Metal Pressing Transforms Raw Material Into Precision Parts
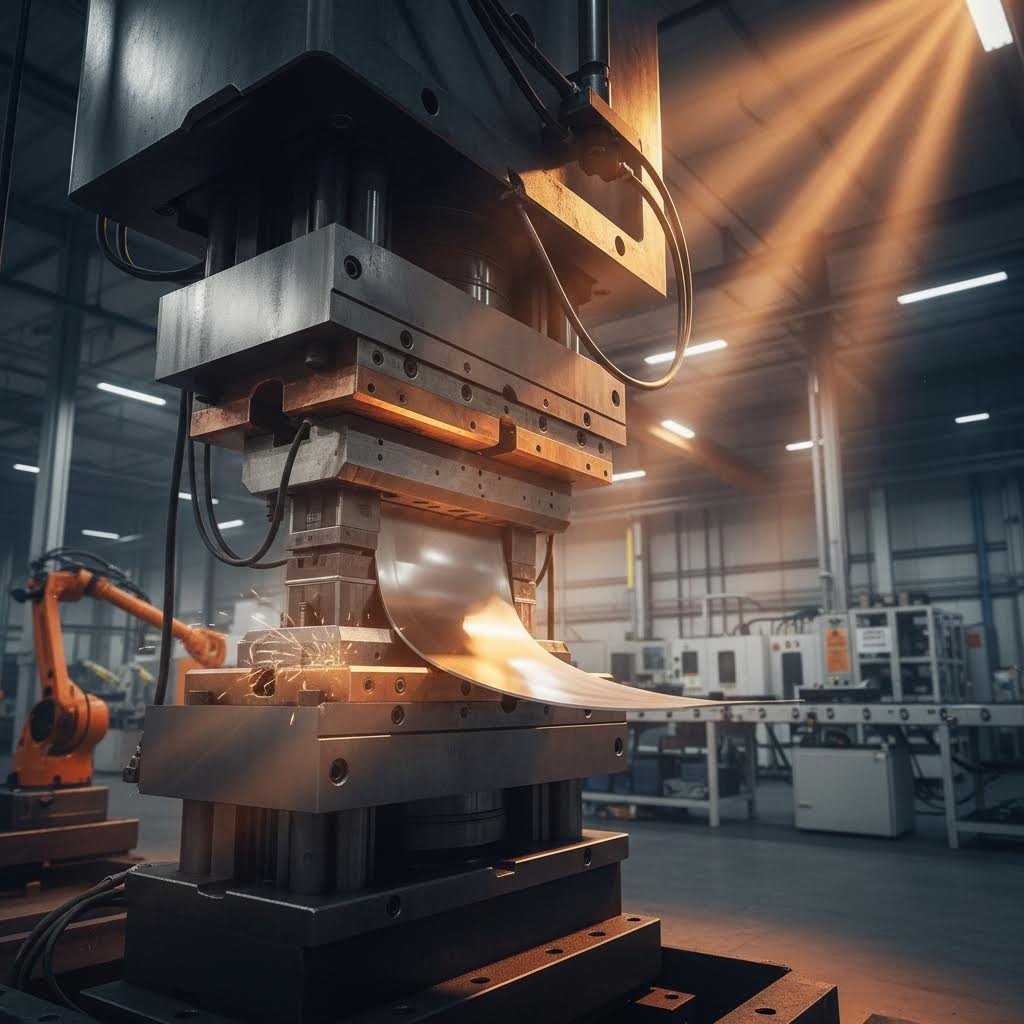
Imagine pressing your hand into soft clay. Metal pressing works on the same principle, but with extraordinary precision and force. During this process, a flat sheet of metal is placed between two precisely machined tools. When the press machine applies force - sometimes exceeding hundreds of tons - the material permanently deforms to match the die's shape.
Here's what makes this transformation remarkable: metal pressing is a cold-forming process. Unlike casting or forging, the material is shaped at room temperature. However, the intense pressure and rapid deformation generate significant friction heat during the forming operation. This combination of mechanical force and controlled deformation produces components that are:
- Stronger than the original flat material due to work hardening
- Dimensionally consistent across thousands or millions of identical parts
- Cost-effective for medium to high-volume production runs
- Capable of achieving tight tolerances that meet demanding specifications
What is a stamping in practical terms? It's any three-dimensional metal component created through this press metal forming process - from simple flat washers to complex automotive body panels with intricate curves and features.
The Three Essential Components of Every Press Operation
Every metal pressings operation, regardless of complexity, relies on three fundamental elements working in harmony:
1. The Sheet Metal Workpiece
This is your raw material - typically supplied as flat sheets or continuous coils. Material selection directly impacts everything from formability to final part performance. Common choices include low-carbon steel, stainless steel, aluminum, copper, and brass, each offering distinct advantages for specific applications.
2. The Precision Die Tooling
Dies are the heart of any metal stamping operation. These precision-machined tool sets contain the punch (male component) and die (female component) that work together to shape the material. According to manufacturing references, tooling made from durable materials can withstand thousands of production cycles without sustaining excess wear, making quality die design critical for long-term cost efficiency.
3. The Press Machine
The press provides the controlled force necessary to deform the metal. As noted by Wikipedia's machine press reference, presses are classified by their mechanism (hydraulic, mechanical, pneumatic), function (stamping presses, press brakes, punch presses), and controllability (conventional versus servo-presses). Each configuration offers distinct advantages for different production requirements.
For engineers, understanding these components enables better design-for-manufacturing decisions. For procurement specialists, this knowledge helps evaluate supplier capabilities and tooling investments. For manufacturing decision-makers, it provides the foundation for strategic equipment and process planning that drives competitive advantage.
Core Stamping Operations From Blanking to Coining
Now that you understand the fundamental components of press metal systems, let's explore what actually happens when force meets material. The stamping process encompasses eight distinct operations, each designed to achieve specific geometric transformations. Whether you're manufacturing simple brackets or complex automotive components, selecting the right operation - or combination of operations - determines your success.
Think of these operations as a toolbox. Each technique solves specific forming challenges, and mastering their differences helps you make smarter decisions about part design and manufacturing approach. Here's a classic example of stamping in action: a progressive die might perform blanking, punching, bending, and forming in sequence to create a finished bracket from a single metal strip.
Blanking and Punching Operations Explained
Blank stamping metal is often the first operation in any stamping sequence - it's where everything begins. But many engineers confuse blanking with punching. While they're mechanically similar, their purpose differs fundamentally.
Blanking cuts the desired workpiece shape from the parent material. The cut-out piece becomes your part, while the surrounding material becomes scrap. According to HLC Metal Parts, blanking involves "cutting raw materials to form basic shapes" and is ideal for "large quantities of similar-shaped components." This operation establishes the foundation for all subsequent forming steps.
Punching, conversely, creates holes or openings where the removed material becomes scrap and the remaining sheet is your part. Common stamping applications include creating mounting holes, ventilation patterns, or positioning features. The precision of these holes affects assembly fit and overall part functionality.
Sounds similar? Here's the key distinction: in blanking, you keep what falls through the die. In punching, you keep what stays behind.
Precision Techniques Including Coining and Embossing
When tight tolerances and surface detail matter most, precision stamping techniques like coining and embossing become essential.
Coining steel and other metals involves applying extreme pressure to flow material into every detail of the die cavity. This stamping and pressing technique achieves tolerances that other operations simply cannot match. The process creates "intricate patterns and textures on the surface of metal products" and finds common use in commemorative coins, jewelry, and hardware products requiring logos or detailed surface features.
Embossing raises or lowers specific areas on metal surfaces without penetrating the material. Unlike punching, embossing displaces rather than removes metal. This technique enhances product decoration and structural rigidity while maintaining material integrity.
Beyond these precision operations, the remaining techniques address specific geometric requirements:
- Bending uses mechanical force to create angles or curves along straight lines - essential for casings, enclosures, and frames
- Flanging forms bends along edges to enhance structural strength, commonly used in containers, pipes, and automobile bodies
- Drawing stretches metal over a die to create deep, complex shapes like cups, boxes, or automotive door panels
- Forming encompasses general shaping operations that don't fit neatly into other categories, including stretching to create protrusions and specialized contours
| Operation Name | Primary Function | Typical Applications | Tolerance Capability |
|---|---|---|---|
| Blanking | Cutting raw materials to form basic shapes | Metal sheet cutting, initial workpiece creation | ±0.1mm to ±0.25mm |
| Punching | Creating holes or indentations | Connection holes, positioning holes, ventilation | ±0.05mm to ±0.15mm |
| Coining | Creating intricate patterns with extreme pressure | Coins, jewelry, logos, precision hardware | ±0.025mm or tighter |
| Embossing | Raising or lowering surface areas | Metal crafts, decorative panels, brand marks | ±0.1mm to ±0.2mm |
| Bending | Creating angles or curves along lines | Casings, enclosures, frames, brackets | ±0.5° to ±1° angular |
| Flanging | Forming edge bends for strength | Containers, pipes, automobile bodies | ±0.15mm to ±0.3mm |
| Drawing | Stretching metal into deep shapes | Automotive doors, roofs, beverage cans | ±0.1mm to ±0.25mm |
| Forming | General shaping and contouring | Complex components with multiple features | ±0.1mm to ±0.3mm |
According to manufacturing data from industry sources, these stamping processes "can be applied alone or in combination" based on product design and production needs. The key to successful part manufacturing lies in understanding which operations your geometry requires - and how to sequence them efficiently.
With these eight operations in your toolkit, the next decision involves selecting the right press type to execute them. Different press technologies offer distinct advantages for specific operations and production requirements.
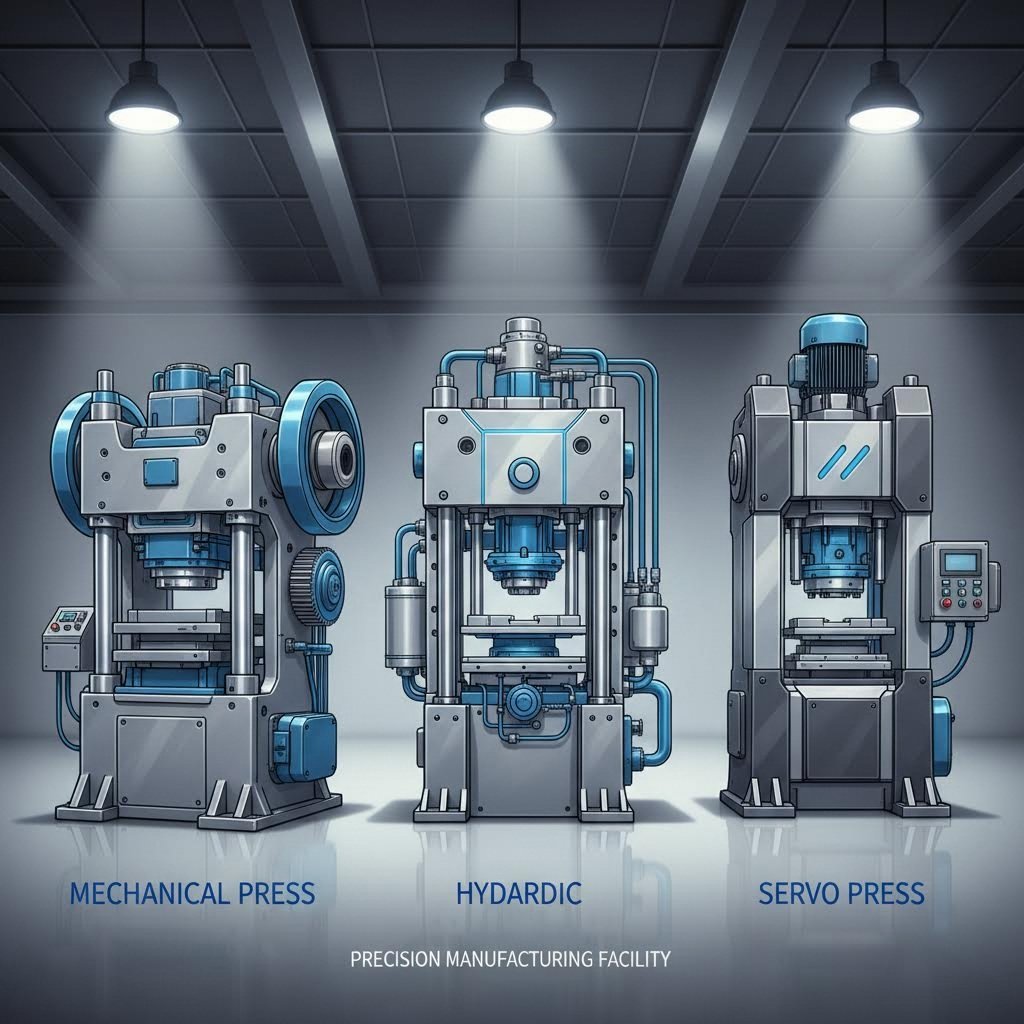
Choosing Between Mechanical Hydraulic and Servo Presses
You've identified the right stamping operations for your part. Now comes a critical decision that will shape your production efficiency, part quality, and long-term costs: which press technology fits your application? The answer isn't always straightforward. What is a stamping press best suited for your needs depends on factors ranging from production volume to part complexity.
Let's break down the three primary metal stamping presses technologies and establish clear selection criteria that will guide your decision.
Mechanical vs Hydraulic Press Selection Criteria
Think of mechanical and hydraulic presses as representing two fundamentally different philosophies. One prioritizes speed and repeatability; the other emphasizes flexibility and force control.
Mechanical Stamping Presses use a motor-driven flywheel to store rotational energy, which is then converted into linear striking force through a crankshaft mechanism. According to Direct Industry's press selection guide, mechanical presses offer "high production speeds that allow for mass production" and are "generally high-precision machines" where "strike repetition is guaranteed over time."
When does a steel stamping press with mechanical drive make sense? Consider these scenarios:
- High-volume production runs requiring thousands of consistent parts per hour
- Operations where speed matters more than stroke flexibility
- Parts with moderate drawing depths that don't require variable force control
- Applications where initial tooling investment justifies long-term production efficiency
However, mechanical presses have limitations. They "only operate on a given course," meaning stroke length is fixed. This makes them less adaptable when your production requirements change.
Hydraulic Stamping Presses generate force through pressurized fluid acting on pistons. This fundamental difference creates distinct advantages for specific applications. According to industry references, hydraulic presses "offer great flexibility thanks to their length of stroke as well as their variable and customizable pressure."
A hydraulic steel press excels when you need:
- Deep drawing operations requiring consistent force throughout the stroke
- Variable force control for different materials or part geometries
- Smaller production volumes where flexibility outweighs raw speed
- Full tonnage capacity available at any point in the stroke - not just at bottom dead center
The trade-off? Hydraulic metal stamping press machines typically deliver "lower production speeds than mechanical presses" and require "significant maintenance" to keep the hydraulic system performing optimally.
When Servo Press Technology Makes Sense
What if you could combine the speed of mechanical presses with the flexibility of hydraulic systems? That's precisely what servo-driven stamping presses deliver.
According to Stamtec's technical documentation, servo presses "offer the best of both worlds - the slide velocity variability of hydraulic presses at the same or faster production speeds than mechanical presses."
Here's what makes servo technology revolutionary: the servo motor replaces the traditional flywheel, clutch, and brake assembly. This means the press "provides full working energy during the stroke at any speed, even supplying continuous force while dwelling." Unlike traditional mechanical presses that operate at fixed speeds, servo presses "can vary the speed throughout the entire stroke, moving quickly through the non-working portion of the stroke and moving at optimum forming speeds through the working portion."
The result? Some manufacturers have reported doubling their production output after switching to servo technology. The programmable motion profiles allow different stroke lengths, speeds, and dwell times - all adjustable without mechanical modifications.
Servo stamping presses are particularly well-suited for:
- Deeper drawing or difficult forming applications
- Operations where a single servo press can replace multiple traditional presses
- Production environments requiring frequent changeovers between different parts
- Applications demanding precise control over forming velocity for optimal part quality
Tonnage Considerations and Press Capacity
Regardless of technology choice, press capacity must match your application requirements. Tonnage - the maximum force a press can apply - directly relates to material thickness, part complexity, and forming depth.
According to industry specifications, industrial presses range from 5 kN (approximately 0.5 metric tons) for light-duty applications up to 500,000 kN (50,000 metric tons) for heavy-duty automotive and aerospace forming. Calculating correct tonnage depends on:
- Material type and its resistance to deformation
- Material thickness and total cutting perimeter
- Type of stamping operation being performed
- Required stamping depth and geometric complexity
| Press Type | Speed Capability | Force Control | Energy Efficiency | Best Applications | Relative Cost |
|---|---|---|---|---|---|
| Mechanical | Highest (mass production) | Fixed stroke pattern | Moderate (flywheel losses) | High-volume blanking, punching, shallow forming | Lower initial cost |
| Hydraulic | Lower (small-volume production) | Variable throughout stroke | Lower (pump runs continuously) | Deep drawing, compression molding, varied operations | Moderate initial cost |
| Servo | Highest (programmable) | Fully programmable profiles | Highest (energy on demand) | Complex forming, frequent changeovers, precision work | Higher initial cost |
Your metal stamping press machine selection ultimately balances immediate production needs against long-term flexibility. Mechanical presses remain the workhorse for dedicated high-volume lines. Hydraulic systems serve operations requiring force control and adaptability. And servo technology increasingly becomes the choice when both speed and flexibility drive competitive advantage.
With your press type selected, the next critical decision involves matching material properties to your chosen equipment and operations.
Material Selection for Optimal Press Performance
You've chosen your press type and identified the right operations. But here's a question that can make or break your project: which metal for stamping will deliver the performance you need? The wrong choice leads to part failure, excessive die wear, or costs that spiral out of control. The right choice? That's where manufacturing efficiency meets product excellence.
Metal stamping materials aren't interchangeable. Each brings distinct properties that affect formability, tooling longevity, and final part performance. Let's explore your primary options and establish clear selection criteria.
Steel and Aluminum Formability Comparison
Steel and aluminum represent the two most common material families in stamping operations - yet they behave very differently under pressure.
Steel alloys remain the workhorse of metal stamping. According to Aranda Tooling's material guide, steel offers exceptional versatility because it "can be alloyed with various other metals to enhance specific physical properties" and "can also be treated before or after the metal stamping process to increase hardness or corrosion resistance."
- Low-carbon steel: Yield strength 200-300 MPa; elongation 25-40%; ideal for automotive panels, brackets, and general fabrication
- High-strength low-alloy (HSLA) steel: Higher yield strength with enhanced corrosion resistance; optimal for wheels, suspension systems, chassis, and seat runners
- Advanced high-strength steel (AHSS): Superior strength for load-bearing applications; requires careful consideration of springback and tooling wear
The aluminum stamping process presents different considerations entirely. As noted by Worthy Hardware, aluminum weighs "about one-third the weight of steel" and is "much softer than stainless steel, so it's easier to stamp into complex shapes." This means presses can often run faster, and dies last longer - keeping production costs competitive.
- Aluminum alloys: Yield strength 75-350 MPa (depending on alloy); elongation 10-25%; excellent for automotive components, electronics enclosures, and aerospace applications requiring weight reduction
- Stamped aluminum parts offer superior thermal conductivity, making them ideal as heat sinks for electronic components
- Formability advantage: Aluminum's softness allows complex geometries but increases scratch susceptibility during handling
When comparing these materials, consider this: aluminum provides excellent strength-to-weight ratios for weight-sensitive applications, while steel delivers superior durability and hardness for demanding environments.
Stainless Steel and Copper Alloy Considerations
When corrosion resistance or electrical properties drive your requirements, stainless steel stamping and copper stamping become essential options.
Stainless steel metal stamping requires more know-how than softer materials. According to industry experts, stainless steel exhibits "work hardening" - it becomes harder as you bend and form it. This puts significant stress on tooling and dies. However, the payoff is substantial: stainless steel offers "exceptional strength, high corrosion resistance, and superior heat tolerance" that justifies the additional processing considerations.
- Stainless steel (304/316 grades): Yield strength 200-290 MPa; elongation 40-60%; recommended for marine hardware, food-grade equipment, medical devices, and applications requiring long-term corrosion resistance
- Die wear consideration: Requires hardened tool steel and careful lubrication management to maximize tooling life
- Surface finish advantage: Significantly harder and more scratch-resistant than aluminum, maintaining appearance over extended service life
Copper stamping and its alloys (brass and bronze) excel in specialized applications. According to Aranda Tooling, copper alloys are "too soft for products requiring strength and durability, but that softness makes them easy to form into complex shapes and incredibly thin components."
- Copper alloys: Yield strength 70-400 MPa (varies by alloy); elongation 15-50%; excellent for electrical connectors, heat exchangers, and decorative applications
- Key properties: Outstanding electrical and thermal conductivity, natural antimicrobial characteristics, and excellent formability for intricate geometries
- Application focus: Electronics, plumbing components, and situations requiring superior electrical performance
Material Thickness Limits and Tolerance Expectations
Material thickness directly impacts your press tonnage requirements and achievable tolerances. According to Protolabs design guidelines, several critical relationships govern successful stamping:
- Hole diameter minimums: Holes and slots should be at least material thickness in diameter to prevent punch breakage
- Edge clearances: For materials 0.036 in. (0.914mm) or thinner, maintain 0.062 in. (1.574mm) from holes to edges; thicker materials require 0.125 in. (3.175mm) minimum
- Flange length requirements: Minimum flange length must be at least 4 times the material thickness
- Bend tolerances: Standard tolerance of ±1 degree on all bend angles with common radii of 0.030 in. to 0.120 in.
Material grade also affects surface finish quality. Higher-grade materials with tighter thickness tolerances produce more consistent parts with better surface finishes. This becomes especially important for visible components or parts requiring subsequent plating or coating operations.
Choosing your metal stamping materials wisely sets the foundation for everything that follows. With material selected, the next step involves understanding how progressive die systems maximize efficiency for high-volume production.
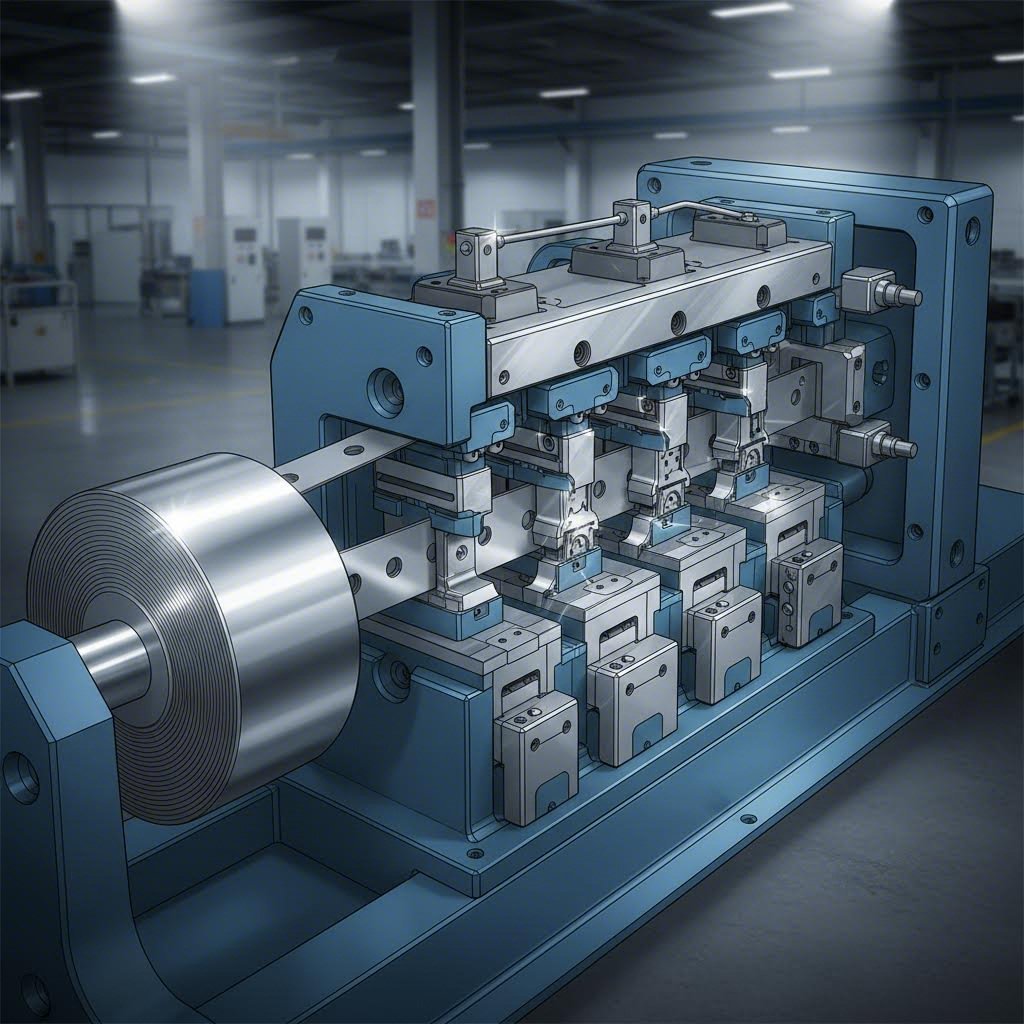
Progressive Die Systems and High Volume Production
You've selected your material and press type. Now imagine running hundreds of thousands of identical parts with minimal human intervention - each one meeting exact specifications. That's the promise of progressive die and stamping technology, and understanding how it works reveals why this approach dominates high-volume metal stamping manufacturing.
Progressive die systems represent stamping technology at its most efficient. Rather than performing one operation at a time across multiple machines, a progressive die executes cutting, punching, bending, and forming operations in a single continuous process. The result? According to Neway Precision's technical overview, this approach delivers "high-speed production, consistent part quality, and cost-effectiveness for high-volume runs."
Progressive Die Station Layout and Sequencing
Picture an assembly line compressed into a single die stamping machine. Each station within the progressive die performs a specific operation as the metal strip advances through the press. The strip remains connected throughout the process, with features forming incrementally until the finished part separates at the final station.
Here's how a typical high speed metal stamping workflow progresses from raw material to completed component:
- Coil Feeding: A coiled strip of raw metal feeds into the progressive stamping press, typically guided by an automatic feeder that advances the material a precise distance with each press stroke
- Pilot Pin Engagement: Pilot pins enter previously punched holes to position the strip accurately before each operation begins - this ensures consistent alignment across thousands of cycles
- Sequential Station Operations: As the strip advances, each station performs its designated task - blanking, punching, bending, forming, or coining - with operations building upon previous stations
- Progressive Feature Formation: Complex geometries develop incrementally, with each station adding specific features while the carrier strip maintains part registration
- Final Part Separation: The completed part separates from the carrier strip at the final station, ready for collection or secondary processing
- Scrap Management: Carrier strip material and punched slugs exit the die for recycling, minimizing material waste
What makes this sequencing so effective? According to Marion Manufacturing, progressive dies enable "precision and efficiency" where features are "sequentially formed, ensuring precision and consistency with every step." The continuous process eliminates part handling between operations - a major source of variation in multi-stage stamping approaches.
Steel stamping dies design for progressive operations requires careful consideration of station spacing, strip width, and feeding increments. Die designers must balance material utilization against the complexity of operations at each station. Wider spacing between stations accommodates more complex forming operations but increases material consumption. Tighter spacing conserves material but limits operational flexibility.
How Die Complexity Affects Part Cost
Here's a reality that shapes every progressive die decision: upfront tooling investment versus long-term production efficiency. More stations mean more capability - but also higher initial costs.
Consider these relationships between die complexity and production economics:
- Low-volume production (under 10,000 parts): Simpler dies or alternative methods often prove more economical; progressive tooling investment may not be justified
- Medium-volume production (10,000-100,000 parts): Progressive dies become increasingly cost-effective as per-part costs decrease with higher volumes
- High-volume production (100,000+ parts): Complex progressive dies with multiple stations deliver the lowest per-part costs; initial investment amortizes across massive production quantities
According to Worthy Hardware's technical comparison, "the initial tooling cost for Progressive Die Stamping can be high, but it becomes cost-effective in large-volume production due to lower per-part costs." This explains why automotive and electronics manufacturers - producing millions of components annually - invest heavily in sophisticated progressive die systems.
High speed stamping capabilities further enhance this economic equation. Modern progressive stamping presses can exceed 1,000 strokes per minute for smaller parts, dramatically reducing cycle times. As industry sources note, the process minimizes material waste through optimized strip layout, "reducing material waste and contributing to a more environmentally friendly production process."
Transfer Stamping for Complex Large Parts
What happens when your part is too large or complex for progressive die methods? Transfer stamping press technology provides an alternative approach for components that cannot remain attached to a carrier strip.
In transfer stamping, individual blanks move mechanically from station to station rather than advancing as a continuous strip. According to Worthy Hardware, transfer die stamping "allows more flexibility in part handling and orientation, making it suitable for intricate designs and shapes."
When does a transfer stamping press make more sense than progressive die systems?
- Larger part dimensions: Components too wide or long for efficient strip feeding benefit from individual part handling
- Deep drawing requirements: Parts requiring significant material flow and depth changes often need the reorientation capabilities transfer systems provide
- Complex three-dimensional geometries: When parts must be rotated or repositioned between operations, transfer mechanisms enable movements impossible with strip-fed systems
- Material handling considerations: Some materials are difficult to handle in continuous strip form, making blank-to-blank transfer more practical
The trade-off? Transfer systems typically operate slower than progressive dies and require more complex automation. As noted in technical comparisons, setup time "can be longer, especially for more intricate parts, which might affect overall production timelines." However, for suitable applications, transfer stamping delivers precision results that progressive methods cannot achieve.
Both progressive and transfer approaches share a common foundation: die quality directly affects part consistency. Steel stamping dies manufactured from premium tool steels, properly heat-treated and precision-ground, maintain dimensional accuracy across extended production runs. Inferior tooling leads to progressive wear, increasing variation and scrap rates over time.
With progressive and transfer die technologies defined, the next challenge involves recognizing when something goes wrong - and knowing how to fix it before defects become costly problems.
Troubleshooting Common Defects and Quality Issues
Even with the right press, optimal tooling, and carefully selected materials, defects happen. The difference between a struggling production line and a profitable one often comes down to how quickly you identify problems and implement solutions. Whether you're producing stamped metal parts for automotive assemblies or precision stamping parts for electronics, understanding defect root causes transforms reactive firefighting into proactive quality management.
Here's what experienced operators know: every defect tells a story. Wrinkling speaks to material flow problems. Tearing reveals excessive stress. Burrs indicate tooling wear or incorrect clearances. Learning to read these signals - and knowing which adjustments correct each issue - separates efficient operations from those drowning in scrap.
Diagnosing Wrinkling Tearing and Springback Issues
Three defects account for the majority of quality problems in stamped parts production: wrinkling, tearing, and springback. Each stems from different causes, yet they're interconnected through the fundamental mechanics of metal deformation.
Wrinkling appears when material compression exceeds the sheet's ability to maintain flatness. According to LeelinePack's defect analysis, wrinkling in metal stamping occurs due to various factors including inadequate blank holder force and improper die design. When you see wavy edges or buckled surfaces on your stamped metal components, investigate these root causes:
- Blank holder pressure too low, allowing uncontrolled material flow
- Excessive draw ratios attempting to form depths beyond material capability
- Improper die radius geometry creating uneven stress distribution
- Material properties mismatch - using materials with insufficient tensile strength for the operation
Tearing and cracking represent the opposite extreme - material stretched beyond its limits. As noted by Dr. Solenoid's comprehensive guide, cracks appear when "the material is subjected to excessive stress during the stamping process, exceeding its strength limit." Common causes include insufficient material elongation, improper stamping process parameters, and die corner radii that are too small.
Springback frustrates even experienced operators because parts appear correct during forming, then change shape after load removal. According to technical references, springback occurs "when the load is removed, causing the part's shape to partially restore and not match the die's working surface." High-strength materials show particularly significant springback because they have a smaller difference between yield strength and tensile strength compared to lower-strength steels.
Factors influencing springback severity include:
- Material strength and elastic modulus - higher strength materials spring back more
- Bend radius relative to material thickness - tighter bends increase springback
- Die geometry and compensation design - properly engineered overbending counters springback
- Forming temperature and lubrication conditions
Understanding Burr Formation and Dimensional Variation
Burrs represent one of the most common metal stamping techniques challenges - those raised edges that create handling hazards and assembly problems. According to Mate Precision Technologies' technical guide, burrs result from improper die clearance, where "the gap between the punch and die is unreasonable (too large or too small)" or when "the cutting edge is worn or chipped."
Here's what your slugs reveal about die clearance problems:
- Proper clearance: Shear cracks join cleanly, balancing punching force, part quality, and tool life
- Clearance too small: Secondary shear cracks form, raising punching force and shortening tool life
- Clearance too large: Slugs show rough fracture planes, small burnish zones, and larger burrs on parts
For optimal burr control, industry guidelines recommend adjusting die clearance to 8-12% of material thickness (using smaller values for mild steel), grinding dies regularly (checking every 50,000 punchings), and considering fine blanking technology for critical applications.
Dimensional variation in metal stamping components stems from multiple sources. According to manufacturing experts, causes include "excessive mold production, stamping die wear or inaccurate positioning, material rebound (especially high-strength steel, aluminum alloy), and insufficient rigidity of the stamping machine or poor parallelism of the slide."
Preventive Measures for Consistent Part Quality
The best troubleshooting strategy? Prevent defects before they occur. Effective stamping design and sheet metal stamping design principles, combined with proper process controls, minimize quality issues from the start.
Use this defect-cause-solution reference for quick troubleshooting:
- Wrinkling: Caused by insufficient blank holder force or excessive draw ratios. Solution: Increase blank holder pressure, reduce drawing depth, increase die radius (R≥4t where t is material thickness), or use step-by-step drawing (60% initial drawing, secondary shaping).
- Tearing/Cracking: Caused by material overstress or insufficient corner radii. Solution: Check elongation properties, add intermediate annealing for deep cylinders, use hot forming (200-400°C) for high-strength steel, increase fillet radii.
- Springback: Caused by elastic recovery in formed material. Solution: Use CAE simulation for springback compensation design, over-bend parts to account for recovery, consider servo press technology for precise control.
- Burrs: Caused by worn cutting edges or improper die clearance. Solution: Sharpen tooling when edges reach 0.01" (0.25mm) radius, adjust clearance to 8-12% of material thickness, implement regular die inspection schedules.
- Dimensional Variation: Caused by die wear, positioning errors, or machine alignment issues. Solution: Add guide posts or precision positioning pins, use springback compensation design, regularly check press parallelism and tonnage.
- Surface Scratches: Caused by rough die surfaces or insufficient lubrication. Solution: Polish dies to Ra0.2μm or less, use volatile stamping oil, pre-clean material to remove contaminants.
- Warping/Distortion: Caused by uneven stress release or improper clamping. Solution: Add shaping process (0.05-0.1mm strong pressure), use multi-point blank holding force control, optimize layout along material rolling direction.
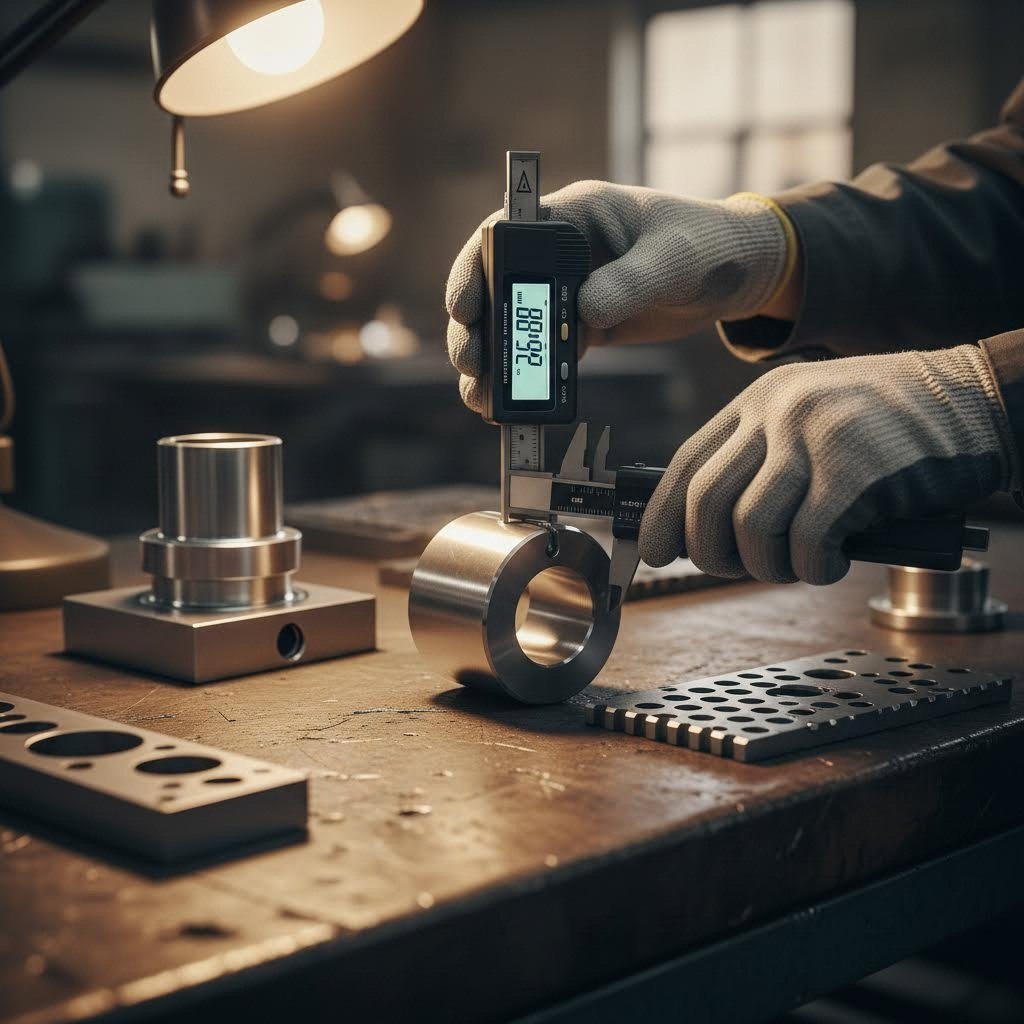
Quality Inspection Methods and Operator Insights
Catching defects early requires systematic inspection approaches and operator awareness of warning signs.
Dimensional verification should occur at first-piece inspection and regular intervals throughout production. According to quality management guidelines, develop a Standard Operating Procedure (SOP) specifying parameter ranges for blank holder force and speed, and conduct "first piece full-size inspection using a 3D scanner to compare digital models."
Surface finish assessment involves visual inspection for scratches, galling marks, and surface irregularities. According to Mate's technical documentation, operators should watch for rollover depth changes, burnish land variations, and burr height increases - all indicators of tool wear or process drift.
Experienced operators recognize these early warning signs before defects become critical:
- Increased press noise indicating dull tools or improper clearance
- Parts showing excessive rollover suggesting tool sharpening is needed
- Slugs with rough fracture planes indicating clearance problems
- Galling on punch surfaces requiring lubrication or coating improvements
- Punch overheating signaling need for lubrication or cycle adjustment
According to tooling experts, "If a piece-part is starting to show too much roll over, the punch press is making more noise or it's working harder than it used to - perhaps a tool is dull." Sharpening tools when edges reach 0.01" (0.25mm) radius extends tool life significantly compared to waiting for complete dullness.
Establishing mold life records and regularly replacing wearing parts such as punches and guide sleeves prevents unexpected quality failures. Using coating technology like TiAlN coatings improves wear resistance for challenging applications involving stainless steel or aluminum.
With defect recognition and prevention strategies established, the next step involves understanding the complete production workflow - from material preparation through finished part delivery.
Complete Workflow From Material Prep to Finished Part
You've mastered the operations, selected the right press, and know how to troubleshoot defects. But here's what separates good manufacturers from great ones: understanding that the metal stamping process extends far beyond the moment punch meets material. The steps before and after pressing determine whether your stamped parts meet specifications - or end up as scrap.
Think of sheet metal stamping as a journey, not a single event. Raw coils must be prepared before they ever touch a die. Finished parts require cleaning, deburring, and verification before shipping. And throughout this manufacturing stamping process, documentation captures every detail for traceability. Let's walk through this complete metal pressing process from start to finish.
Pre-Press Material Preparation Steps
Your sheet metal process begins long before the press cycles. Proper material preparation prevents defects, extends die life, and ensures consistent part quality. Skip these steps, and you're gambling with every production run.
Here's the complete pre-press workflow that sets up successful stamping:
- Coil Receiving and Inspection: Verify incoming material against specifications - check alloy grade, thickness tolerance, surface condition, and coil dimensions. Reject non-conforming material before it enters production.
- Coil Loading and Threading: Mount the coil on the uncoiler and thread the leading edge through the processing line. According to ARKU's coil preparation documentation, automated coil end welding can reduce changeover times to just 90 seconds while achieving material savings of up to 400% by eliminating the need to punch new coils.
- Leveling and Flattening: Pass the strip through leveling equipment to remove coil set, crossbow, and edge wave. Flat material feeds consistently and forms predictably - wavy material causes positioning errors and dimensional variation.
- Lubrication Application: Apply stamping lubricant uniformly across both surfaces. Proper lubrication reduces friction during forming, extends die life, prevents galling, and improves surface finish. Lubricant type depends on material - volatile oils work well for steel, while specialized compounds suit aluminum and stainless steel.
- Edge Trimming (when required): Remove damaged or oxidized coil edges that could cause defects or contaminate dies. Edge conditioning ensures consistent material width for accurate feeding.
- Feeding System Setup: Configure the feed mechanism for correct progression distance, timing with press stroke, and pilot release. According to manufacturing references, the strip advances a precise distance with each press cycle - accuracy here determines part-to-part consistency.
Material handling throughout this sequence matters enormously. Scratches from improper handling become visible defects on finished parts. Contamination from dirt, oil, or metal particles transfers into die cavities and degrades surface quality. Clean handling procedures protect both material investment and part quality.
Post-Press Finishing and Quality Verification
When parts exit the press, the metal stamping and forming process is only partially complete. Post-press operations transform rough stampings into finished components ready for assembly or shipment.
- Part Collection and Handling: Remove parts from the press area without introducing damage. Automated systems use conveyors, part chutes, or robotic handling to maintain surface quality and organize parts for subsequent operations.
- Deburring Operations: Remove burrs and sharp edges created during cutting operations. According to Advanpolish's comprehensive deburring guide, proper deburring extends beyond aesthetics - unremoved burrs "can cause assembly problems, create safety hazards for operators, interfere with proper part function, and lead to premature wear in mechanical systems."
- Cleaning and Residue Removal: Wash parts to remove stamping lubricants, metal fines, and contaminants. Cleaning methods range from simple solvent washes to sophisticated aqueous systems, depending on subsequent processing requirements and environmental considerations.
- Heat Treatment (when specified): Apply thermal processes to achieve required mechanical properties. Annealing relieves forming stresses. Hardening increases wear resistance. Stress relieving prevents distortion in service. Heat treatment specifications depend on material and application requirements.
- Surface Finishing: Apply coatings, platings, or treatments for corrosion protection, appearance, or functional performance. Options include electroplating, powder coating, painting, passivation for stainless steel, and anodizing for aluminum.
- Dimensional Inspection: Verify critical dimensions against engineering specifications. According to Sinoway's process overview, quality control involves inspecting "each component for dimensional accuracy, surface finish, and structural integrity."
- Final Quality Assessment: Perform visual inspection, functional testing, and documentation review before release. First-article inspection validates new production runs against customer requirements.
- Packaging and Shipment Preparation: Package parts to prevent damage during transit. Packaging specifications often form part of customer requirements for regulated industries.
Quality Documentation and Traceability Requirements
For regulated industries - automotive, aerospace, medical devices - documentation isn't optional. Traceability systems connect finished parts back to raw material lots, processing parameters, inspection results, and operator certifications.
Critical documentation elements include:
- Material certifications: Mill test reports verifying chemistry, mechanical properties, and heat treatment of incoming materials
- Process records: Press parameters, die identification, lubricant batch numbers, and production timestamps
- Inspection data: Dimensional measurements, defect observations, and disposition decisions
- Personnel records: Operator training certifications and inspection qualifications
- Corrective actions: Documentation of any non-conformances and resolution steps
Quality management systems like IATF 16949 for automotive applications specify detailed requirements for these records. Maintaining comprehensive documentation enables root cause analysis when problems occur and demonstrates compliance during customer audits.
Lead Time Factors From Tooling to Production
Understanding lead time components helps you plan projects realistically. The stamping manufacturing process timeline extends well beyond production cycles:
- Tooling design: 2-6 weeks depending on part complexity and engineering iteration requirements
- Die manufacturing: 4-12 weeks for progressive dies; shorter for simpler tooling
- Tooling tryout and refinement: 1-3 weeks for sampling, adjustment, and approval
- Production ramp-up: 1-2 weeks to stabilize processes and validate quality systems
- Ongoing production: Cycle times measured in seconds per part, with volumes limited by press speed and tooling durability
First-time projects typically require 8-20 weeks from concept approval to production-ready status. Repeat orders with existing tooling ship much faster - often within days for stocked materials.
With the complete workflow understood, the next consideration involves industry-specific requirements. Automotive applications, in particular, demand specialized capabilities, certifications, and quality systems that distinguish qualified suppliers from the rest.

Automotive Metal Stamping Requirements and Standards
When you consider that a single passenger vehicle contains between 300 and 500 stamped steel parts, the scale of automotive metal stamping becomes clear. This isn't just another application sector - it represents the highest-volume, most demanding environment where metal pressing technology proves its worth daily. Body panels, structural reinforcements, chassis components, and countless brackets all emerge from stamping operations that must deliver absolute consistency across millions of units.
What makes the automotive stamping process different from general industrial metal pressing? The answer lies in three interconnected demands: precision that meets safety-critical specifications, quality systems that prevent defects before they occur, and development timelines that compress years of traditional prototyping into weeks. Understanding these requirements helps you evaluate whether a stamping partner can truly support automotive programs - or merely claims to.
Automotive Quality Standards and Certification Requirements
Imagine discovering a dimensional problem in stamped parts after they've been welded into 50,000 vehicle bodies. The recall costs, production stoppages, and brand damage would be catastrophic. This reality drives the automotive industry's uncompromising approach to supplier quality management - and explains why IATF 16949 certification has become the essential credential for automotive stampings suppliers.
According to Master Products' certification documentation, IATF 16949 was "originally drafted back in 1999 by the International Automotive Task Force (IATF)" with the goal of "harmonizing the many different certification programs and quality assessment systems used throughout the global automotive industry." This standardization means that when you work with an IATF-certified supplier, you can expect consistent quality regardless of geographic location.
The certification focuses on three primary objectives:
- Quality and consistency improvement: Enhancing both products and manufacturing processes while reducing production costs and improving long-term sustainability
- Supply chain reliability: Establishing "supplier of choice" status among leading automotive manufacturers through proven consistency and accountability
- Integration with ISO standards: Seamlessly connecting with industry-wide ISO certification requirements, creating a comprehensive quality framework
What does this mean practically for metal stamped parts? According to industry sources, IATF 16949 literature "focuses on the prevention of defects and production variances, as well as minimizing scrap and waste." For auto metal stamping operations, this translates into documented procedures for every critical process, statistical process control monitoring, and systematic approaches to continuous improvement.
Beyond IATF 16949, automotive stamping suppliers must often demonstrate compliance with customer-specific requirements from major OEMs. These additional specifications address everything from material traceability to packaging standards, creating layers of quality assurance that protect the final vehicle.
CAE Simulation for Die Development Validation
Here's a question that used to require expensive physical prototypes to answer: Will this die design produce acceptable parts? Today, Computer-Aided Engineering (CAE) simulation provides answers before any steel is cut - transforming automotive metal stamping process development from trial-and-error into predictive science.
According to research published in ScienceDirect, integrated CAE systems for auto-body press tool design are "required to predict forming defects by computer simulation and to save time and cost needed for tool design." These sophisticated systems combine multiple analytical modules:
- CAD geometry description: Precise digital models of die surfaces and part geometry
- Material property databases: Experimental data for accurate material behavior prediction
- Finite element mesh generation: Pre-processing that divides the sheet metal into analyzable elements
- Elasto-plastic FE analysis: Simulation codes that model both 2-D bending deformation and fully 3-D forming processes
- Results visualization: Post-processing that displays calculated outcomes through computer graphics
What can simulation predict? Modern CAE tools identify potential wrinkling, tearing, excessive thinning, and springback before physical tryouts begin. By running virtual forming simulations, engineers can optimize blank shape, draw bead locations, blank holder pressure distribution, and die radii - all without consuming material or machine time.
The economic impact is substantial. Traditional die development might require multiple physical prototypes, each taking weeks to manufacture and test. CAE simulation compresses this iteration cycle, often achieving acceptable die designs in one or two physical tryouts rather than five or six. For complex stamped steel parts like door inners, fender panels, or structural rails, this acceleration saves months of development time.
For automotive programs where time-to-market determines competitive success, CAE capabilities have become a prerequisite rather than an option. Suppliers like Shaoyi leverage advanced CAE simulation to deliver defect-free results, demonstrating how virtual validation enables their 93% first-pass approval rate - far exceeding industry averages.
First-Pass Approval and Rapid Prototyping Capabilities
In automotive development, time literally equals money. Every week saved in die development accelerates vehicle launch timelines, reduces carrying costs, and creates competitive advantage. Two metrics have emerged as key differentiators among automotive stamping suppliers: first-pass approval rates and prototyping speed.
First-pass approval rate measures how often initial production samples meet customer specifications without requiring die modifications. According to Mursix's automotive stamping overview, stamping ensures that "each part is made to exact specifications, providing the durability and accuracy needed for high-performance vehicles." When suppliers achieve high first-pass rates, they demonstrate mastery of both simulation tools and practical forming knowledge.
Why does this metric matter so much? Consider the alternative: failed first samples mean die rework, additional tryout runs, delayed PPAP submissions, and compressed timelines for everything downstream. A supplier achieving 93% first-pass approval - as Shaoyi documents - eliminates most of these costly iterations.
Rapid prototyping capabilities address the development phase before production tooling. When engineers need physical parts for fit checks, crash testing, or assembly validation, waiting months for production dies isn't acceptable. Advanced suppliers now offer:
- Soft tooling prototypes: Lower-cost dies for limited sample quantities
- Laser-cut blanks with hand forming: Quick development of initial shapes for concept validation
- Rapid die manufacturing: Accelerated machining and assembly for faster production tooling delivery - some suppliers like Shaoyi can deliver prototypes in as little as 5 days
The automotive metal stamping process has evolved beyond simply making parts. Today's qualified suppliers function as development partners, offering engineering support that accelerates programs from concept through production launch. When evaluating potential partners, look for demonstrated capabilities in CAE simulation, documented first-pass approval performance, rapid prototyping offerings, and IATF 16949 certification as baseline requirements.
For organizations seeking comprehensive mold design and fabrication capabilities tailored to automotive requirements, Shaoyi's precision stamping die solutions demonstrate what to expect from a qualified automotive stamping partner - from rapid prototyping through high-volume manufacturing with engineering support throughout.
With automotive requirements established, the final consideration involves understanding how these capabilities translate into project economics - the cost factors and ROI calculations that determine whether metal pressing delivers value for your specific application.
Cost Factors and ROI for Metal Press Projects
You've explored the technical capabilities of metal pressing - from die selection to quality systems. But here's the question that ultimately determines whether stamping makes sense for your project: What will it cost, and when will you see returns? Unlike simple per-piece pricing, metal stamping economics involve upfront investments, volume thresholds, and hidden factors that can make or break your project's profitability.
Let's decode the real economics of metal pressing and establish clear frameworks for evaluating your investment.
Tooling Investment vs Production Volume Economics
Every metal stamping machine operation begins with a fundamental trade-off: significant upfront tooling costs versus dramatically lower per-part production costs. Understanding this relationship helps you determine when stamping delivers value - and when alternatives make more sense.
According to Manor Tool's cost analysis, "metal stamping isn't ideal for prototypes or low-volume runs. The upfront investment in tooling often exceeds the cost of traditional machining for small batches." However, the economics shift dramatically at scale: "once production reaches around 10,000+ parts per month, the tooling cost becomes far more economical."
Here's what drives tooling investment levels:
- Die complexity: Simple single-operation dies cost less than progressive dies with multiple stations
- Tool steel grade: Your estimated annual usage and material selection determine the steel grade required for adequate die life
- Part geometry: Features requiring tight tolerances, deep draws, or multiple forming operations increase tooling costs
- Quality requirements: Premium tooling manufactured domestically using high-grade steel delivers consistent parts but costs more initially
According to industry data, automotive stamping tooling typically ranges from $100,000 to $500,000 depending on complexity, with standard dies averaging around $26,000 for basic applications. For simpler sheet metal stamping, Neway Precision reports tooling investments of $5,000 to $50,000 depending on part complexity.
| Production Volume | Tooling Amortization | Typical Per-Part Cost | Break-Even Timeline | Best Approach |
|---|---|---|---|---|
| Low (Under 10,000) | High per-part burden | $5-$50+ (varies widely) | Often not achieved | CNC machining or laser cutting |
| Medium (10,000-100,000) | Moderate amortization | $1.50-$12 | 12-24 months typical | Stamping becomes viable |
| High (100,000+) | Minimal per-part impact | $0.30-$1.50 | 6-18 months | Progressive die stamping optimal |
The volume threshold matters enormously. As Okdor's analysis explains, "stamping becomes financially viable when producing 10,000+ parts monthly, where upfront tooling investment pays off through dramatically lower per-part costs." Sheet metal fabricated parts costing $15 each can drop to $3-$12 through stamping at volume - representing potential savings of 50-80% per part.
Evaluating Total Cost of Ownership
Per-part pricing tells only part of the story. Smart procurement decisions consider total cost of ownership - the complete economic picture that includes factors beyond the stamping machines themselves.
Material utilization significantly impacts economics. According to industry benchmarks, optimized stamping operations achieve 85-95% material yield with proper nesting - far exceeding machining operations that often remove 50% or more of starting material as chips.
Cycle time advantages compound over high volumes. Progressive stamping operations can achieve cycle times as low as 0.06 seconds per part, with industrial metal stamping machine speeds reaching 1,000 strokes per minute. This speed advantage means one stamping press operator can oversee production that would require multiple machining centers and operators.
Secondary operation costs deserve careful analysis. Consider these often-overlooked factors:
- Deburring requirements: Properly designed dies minimize burr formation, reducing post-processing labor
- Assembly integration: Parts stamped to tight tolerances reduce assembly time and rework
- Inventory efficiency: High-speed production enables just-in-time manufacturing, reducing carrying costs
- Reject rates: Quality stamping operations maintain reject rates below 2%, minimizing waste
Engineering support affects total project costs more than many buyers realize. According to Manor Tool, collaborating early with a supplier's Design for Manufacturability (DFM) team helps "minimize part cost, reduce die wear, and maintain the form, fit, and function your assembly requires." Key DFM considerations include eliminating thin sections that cause die wear, respecting bend radius limits, and defining tolerances carefully rather than arbitrarily adding tight specifications.
The hidden cost of poor tooling quality deserves special attention. As Manor Tool notes, "dies manufactured overseas often use lower-grade steel that wears faster and produces inconsistent parts." Troubleshooting production issues, maintaining low-quality imported dies, and managing container shipping delays quickly erode apparent savings from cheaper international sources.
When Metal Pressing Becomes Cost-Effective
How do you know when stamping delivers better value than alternatives? The comparison depends on your specific volume, complexity, and quality requirements.
According to Neway Precision's fabrication comparison, stamping becomes exponentially more cost-effective at higher volumes due to tooling amortization and automation advantages. Their data shows automotive OEMs save 20-30% in unit costs using progressive stamping versus CNC machining for structural brackets.
Consider stamping when your project meets these criteria:
- Annual volumes exceed 50,000 parts with consistent geometry
- Parts require multiple forming operations that can consolidate into progressive dies
- Material utilization matters - stamping's high yield reduces raw material costs
- Consistency requirements favor the repeatability of die-formed parts over operator-dependent processes
- Long-term production justifies tooling investment over 12-24 month payback periods
For lower volumes or frequent design changes, alternatives often prove more economical. CNC machining, laser cutting with forming, and even 3D printing offer lower setup costs despite higher per-part pricing. The crossover point depends on your specific circumstances - but 10,000 monthly parts represents a common threshold where stamping economics become compelling.
Partnering for Manufacturing Success
The right manufacturing partnership affects your total cost equation significantly. Beyond competitive piece pricing, evaluate potential stamping machinery suppliers on their ability to reduce your overall project costs through engineering expertise, quality systems, and responsive support.
What should you look for in a production metal stamping partner? Consider these capability indicators:
- Engineering integration: Suppliers offering DFM support help optimize designs before tooling investment
- Prototyping capabilities: Rapid prototyping reduces development risk and accelerates timelines
- Quality certifications: IATF 16949 and similar certifications demonstrate systematic quality management
- Simulation capabilities: CAE-based die development reduces physical tryout iterations
- Comprehensive services: Partners offering tooling through production reduce coordination complexity
For organizations seeking cost-effective, high-quality tooling tailored to OEM standards, suppliers like Shaoyi demonstrate how engineering expertise reduces total project costs. Their comprehensive capabilities - from rapid prototyping to high-volume manufacturing with IATF 16949 certification - represent the integrated approach that delivers both quality and value across production metal stamping programs.
The economics of metal pressing ultimately reward careful planning. Invest in quality tooling, partner with capable suppliers, design for manufacturability, and target appropriate volumes - and the metal press process delivers exceptional value that justifies its position as manufacturing's most efficient forming technology.
Frequently Asked Questions About Metal Press Process
1. What is the process of pressing metal?
Metal pressing is a cold-forming manufacturing method that uses controlled force to transform flat sheet metal into three-dimensional components. The process places sheet metal between precision die tooling inside a press machine, which applies force ranging from hundreds to thousands of tons. This deforms the material permanently to match the die shape without melting or cutting away excess material. Common operations include blanking, punching, bending, drawing, coining, and embossing. The process generates friction heat during deformation but occurs at room temperature, producing parts that are stronger due to work hardening and dimensionally consistent across high production volumes.
2. What are the 7 steps in the stamping method?
The seven most popular metal stamping processes are: 1) Blanking - cutting raw materials to form basic shapes and initial workpieces; 2) Piercing/Punching - creating holes or indentations for connections and ventilation; 3) Drawing - stretching metal over a die to create deep shapes like cups and automotive panels; 4) Bending - using mechanical force to create angles along straight lines; 5) Air Bending - forming bends without full die contact for flexibility; 6) Bottoming and Coining - applying extreme pressure for tight tolerances and intricate surface patterns; 7) Pinch Trimming - removing excess material from formed parts. These operations can be performed individually or combined in progressive dies for efficiency.
3. What are the four stages of metal processing?
While sheet metal manufacturing involves melting, pouring, pickling, and rolling stages, the metal press process specifically follows a different workflow: 1) Pre-Press Preparation - coil receiving, inspection, leveling, and lubrication application; 2) Press Operations - executing stamping operations like blanking, forming, and bending through die tooling; 3) Post-Press Finishing - deburring, cleaning, heat treatment when required, and surface finishing; 4) Quality Verification - dimensional inspection, surface assessment, and documentation for traceability. For automotive applications, IATF 16949 certified suppliers like Shaoyi integrate CAE simulation in die development to achieve 93% first-pass approval rates.
4. How is metal stamping done?
Metal stamping places flat sheet metal in either blank or coil form into a stamping press where a tool and die surface form the metal into a new shape. The press applies controlled force through mechanical, hydraulic, or servo mechanisms. Progressive die systems perform multiple operations sequentially as metal strips advance through stations, while transfer stamping moves individual blanks between stations for complex large parts. Key factors affecting quality include die clearance, lubrication, blank holder pressure, and press speed. Modern operations use CAE simulation to optimize die designs before manufacturing, reducing development time and ensuring defect-free production.
5. When does metal stamping become cost-effective compared to other methods?
Metal stamping becomes financially viable when producing 10,000+ parts monthly, where upfront tooling investment pays off through dramatically lower per-part costs. At high volumes exceeding 100,000 parts, stamping delivers 50-80% savings compared to CNC machining - parts costing $15 each through fabrication can drop to $3-$12 through stamping. Tooling costs range from $5,000 for simple dies to $500,000 for complex automotive progressive dies, but material utilization of 85-95% and cycle times as fast as 0.06 seconds per part compound savings. Partners like Shaoyi offer cost-effective tooling tailored to OEM standards with rapid prototyping in as little as 5 days.