 Small batches, high standards. Our rapid prototyping service makes validation faster and easier —

How Do You Weld Copper Without Burn-Through Or Weak Joints

Why Copper Welding Is Different
Copper looks friendly on the bench, but it can be frustrating once the arc starts. If you are wondering how do you weld copper, the short answer is that you fuse clean copper with a controlled heat source, suitable filler when needed, and careful heat management so the joint melts properly instead of dumping heat into the surrounding metal.
To weld copper successfully, keep the joint very clean, use enough heat to overcome copper's high thermal conductivity, and choose welding only when you need true fusion instead of a lower-temperature filler bond.
How Do You Weld Copper in Simple Terms
In simple terms, welding melts the base metal itself. That is different from brazing and soldering, where the base parts stay solid and only the filler metal melts. UTI notes that brazing happens above 840 F and soldering below 840 F, while welding creates a fused joint by melting the workpieces. So when people ask how do you weld copper together or how do you weld copper to copper, the first decision is whether they truly need fusion welding at all.
- Welding: melts the copper itself for a fused joint
- Brazing: melts filler only, often useful for dissimilar metals
- Soldering: lower-temperature filler joining, common for lighter-duty or electrical work
Why Copper Pulls Heat Away From the Arc
Copper is harder to weld than many steels because it carries heat away from the joint very quickly. That high thermal conductivity can make the puddle sluggish, encourage lack of fusion, and force higher heat input or preheat on thicker sections. TWI also points out that oxygen-free and phosphorus deoxidized copper are generally easier to weld than tough pitch copper, which is more prone to porosity and heat-affected zone problems.
When Welding Is Better Than Brazing or Soldering
Choose welding when the joint must act like one continuous piece of metal and handle higher stress or service temperature. Choose brazing or soldering when lower heat, less distortion, or easier joining makes more sense. That choice gets clearer once you match the method to the part itself, because copper pipe, sheet, and thick sections rarely want the same process.
How Do You Weld Copper
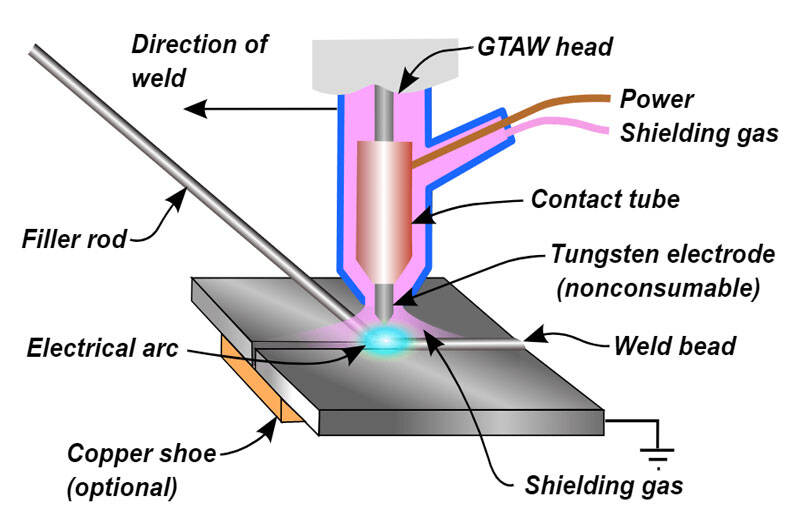
The first real decision is not torch angle or filler rod. It is process choice. Copper and most copper alloys can be joined by welding, brazing, or soldering, and the Brazing.com guide notes that GTAW and GMAW are commonly used because copper needs high localized heat input. So if you are asking how do you tig weld copper, start by deciding whether the part truly needs fusion welding or whether a lower-temperature joining method will do the job more safely and cleanly.
TIG MIG Stick and Alternative Copper Joining Methods
TIG is usually the best manual choice when control, cleanliness, and puddle visibility matter most. MIG becomes attractive when you need more speed on longer seams or thicker sections. Stick can be used, but it is mainly a repair and limited-access option, and the same Brazing.com guidance says its quality is generally not as good as gas-shielded processes. Brazing and soldering stay important because many copper parts, especially tube and service joints, do not need a fully melted base-metal weld. Resistance welding fits a different world again. The resistance welding guide describes it as especially useful for small wire harnesses, copper sheet, and automated production. Laser welding also belongs in the mix, but mostly where specialized equipment and precision justify the cost.
| Process | Best fit | Heat control | Filler use | Equipment demand | Typical limitations | Where it makes the most sense |
|---|---|---|---|---|---|---|
| TIG | Clean copper and copper alloy joints, sheet, precise manual work | High | Usually yes, matched to base metal | Moderate to high | Slower, operator-sensitive | Visible welds, controlled fusion, small to medium jobs |
| MIG | Longer seams, thicker material, higher deposition work | Moderate | Yes | Moderate to high | Less delicate puddle control than TIG | Production welding where speed matters |
| Stick | Repair, field work, limited access | Lower than TIG | Yes, via electrode | Moderate | Rougher finish, lower quality than gas-shielded methods | Maintenance and repair situations |
| Brazing | Pipe, tube, HVAC, electrical assemblies, some dissimilar joints | High, lower than fusion welding | Yes, filler melts above 450 C but below base metal | Low to moderate | Not a true fusion weld, needs proper joint gap | Leak-tight service joints and heat-sensitive assemblies |
| Soldering | Light-duty copper joining, plumbing and electrical work | Very high | Yes, filler melts below 450 C | Low | Not suited where a fused weld is required | Low-heat copper connections |
| Resistance welding | Thin sheet, wire harnesses, repetitive production | Localized and fast | Usually no | High | Less flexible for one-off manual fabrication | Automated copper sheet and component production |
| Laser welding | Specialized precision work | Very localized | Application-dependent | Very high | Specialized process, expensive equipment | High-precision manufacturing environments |
Best Process for Pipe Sheet and Thick Sections
Readers searching how do you weld copper pipe often find that welding is not the first answer. Many pipe joints are better served by brazing or soldering because the geometry suits filler flow and the goal is often a clean, sealed connection rather than a structural fusion seam. How do you weld copper sheet is a different question. Thin sheet often favors TIG for manual control, while resistance welding can shine when the same joint is repeated over and over. Thick pure copper can justify TIG or MIG, but copper's heat flow means process choice must account for section size and overall mass, not just thickness on paper.
Skill Level Limits and Quality Tradeoffs
TIG gives you the most direct control, but it also asks the most from the operator. MIG trades some finesse for speed. Stick is practical when access is poor, yet it is rarely the first pick for high-finish copper work. Brazing and soldering may look simpler, but they still depend on joint cleanliness, fit, and heating pattern. Resistance and laser reduce hand variation once the setup is stable, though they demand more from tooling and equipment. Copper is unforgiving that way. A process can be technically correct and still fail if the metal is dirty, the fit-up is loose, or the heat disappears into the part before fusion begins.
How Do You Prepare Copper for Welding
Copper rarely fails because of the arc alone. More often, it fails before the torch is even lit. If you are asking how do you prepare copper for welding, the job comes down to five things: identify the metal, clean it to bright metal, choose a joint shape that suits copper's heat flow, plan filler and shielding, and keep enough heat in the part so the puddle can actually form.
Clean the Joint and Remove Surface Oxides
Start with material ID. TWI notes that oxygen-free and phosphorus deoxidized copper are generally easier to weld than tough pitch copper, which is more prone to porosity and heat-affected zone problems. Some free-machining and leaded copper alloys are poor candidates for fusion welding, so guessing the alloy can send you down the wrong path fast.
- Degrease the joint faces and nearby area to remove oil, grease, paint, and dirt.
- Brush or abrade away oxide until clean metal is exposed. Brazing.com recommends a bronze wire brush for prep, and the oxide formed during welding should be removed between passes as well.
- Keep filler rods, gloves, and the cleaned joint dry and contamination-free. On copper, hydrogen plus residual oxygen can contribute to porosity.
- Prepare the groove with copper in mind. Joint designs are often wider than steel joints so the arc can achieve fusion instead of skating heat into the base metal.
Fit Up Filler and Preheat Planning
How do you clean copper before welding when the part has been handled a lot? Degrease first, then mechanically remove oxides, then avoid touching the cleaned edges with bare hands. For pure copper, TWI guidance also points toward deoxidized filler metals such as ERCu or ERCuSi-A, with ERCuSi-A often preferred for tough pitch and phosphorus deoxidized grades. Shielding matters too. Argon works on thinner sections, while argon-helium or helium blends help thicker copper by delivering more usable heat.
How do you preheat copper for welding without overdoing it? Match the preheat to the alloy, thickness, and total mass. Pure copper may need preheat at moderate thickness, while cupro-nickel and many other copper alloys often need little or none. Use clamps that hold alignment without turning the setup into a massive heat sink, and consider backing strips or thermal blankets on heavier work so heat stays near the joint.
How Joint Design Changes for Sheet and Pipe
Sheet needs tight, consistent fit-up because copper expands quickly and small gaps can change as the joint heats. Pipe needs accurate end prep and root alignment, and for some alloys such as cupro-nickel, gas backing helps keep the inside bead clean. Thick plate usually needs a wider groove than steel so the sidewalls actually fuse.
- Dedicated bronze wire brush
- Degreaser and clean wipes
- Correct filler rod for the alloy
- Shielding gas, and backing gas if needed
- Clamps, backing strip, or ceramic support
- Thermal blanket or other heat-retention aid for heavy sections
When the joint is bright, fitted, and heat-balanced, copper becomes far less mysterious. What matters then is arc placement, puddle control, and filler timing.
How Do You Weld Copper Step by Step
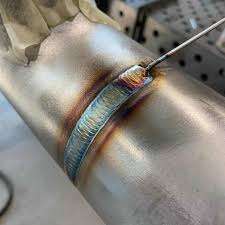
Clean prep gets copper to the starting line, but the weld still lives or dies on heat control. TIG is the easiest process to explain because you can see the puddle, add filler exactly where you want it, and adjust the heat as the joint starts absorbing it. If you are searching for how do you weld copper step by step, this is the basic workflow for a clean copper-to-copper TIG joint.
Step by Step for How Do You Weld Copper
- Confirm the base metal and joint are ready. Copper must be clean, dry, and free of oil, oxide, and handling residue. Keep filler rod clean too.
- Set up the TIG machine for copper. Setup guidance from GarageWeld and Anhua Machining lines up on the essentials: DCEN for most pure copper work, a short arc, and more heat than you would expect from steel. Thick copper often benefits from preheat in roughly the 300-600 F range, depending on section size.
- Clamp and tack the joint. Hold alignment firmly, but do not create an oversized heat sink. Place enough tack welds to stop movement as the part expands.
- Start the arc without scratching. High-frequency start helps reduce contamination. Keep the torch angled slightly forward and hold a short arc, about 1/8 inch or less, so the heat stays concentrated.
- Wait for a true puddle. Copper can look slow at first, then suddenly open up. Do not rush forward until both joint edges begin to melt and wet together.
- Add filler to the leading edge. Feed it into the front of the puddle, not into the tungsten. Small, steady dabs usually work better than large, infrequent additions.
- Travel with purpose. Move slowly enough to keep fusion on both sides, but not so slowly that the bead washes wide. On wider grooves, a very slight weave can help shape the bead.
- Manage interpass heat. On multi-pass work, stop if the puddle becomes too fluid or the part starts losing shape. Clean oxides between passes before continuing.
- Finish the crater carefully. Taper current down if possible and add a touch of filler at the end so the weld does not leave a weak crater.
- Cool and inspect. Let the part cool gradually, then review the bead for uniformity, fusion, discoloration, and porosity.
The biggest copper mistake is lingering too long in one spot. Too much dwell can overheat the surface while the joint below still lacks full fusion.
How to TIG Weld Copper With Better Heat Control
If your main question is how do you tig weld copper, think in terms of puddle behavior rather than raw machine numbers. Copper steals heat fast, so the first seconds matter. Keep the arc tight. Watch for the puddle to tie both sides together. Add filler consistently at the front edge. Then move as soon as the puddle is established.
A sluggish, dull-looking puddle usually points to insufficient heat input, too much joint mass, or not enough preheat. A bead that suddenly spreads and sags points the other direction. Travel speed is too slow, or the joint is getting overheated. TIG gives you time to correct that. MIG follows the same heat-management logic, but the wire is fed continuously and the process moves faster, so you get less time to read the puddle. Stick can join copper in repair work, yet slag and lower visibility make it a rougher option when precision matters.
Cooling Cleanup and Post Weld Handling
Let the weld cool slowly. Anhua Machining advises against water quenching because rapid cooling can contribute to cracking and thermal stress. For surface cleanup, PTR notes that a clean, dry cloth is generally safe if the job specifications allow cleaning at all. That last detail matters more than many people realize, especially on critical parts.
A good finished bead should look smooth, consistent, and fully tied into both sides of the joint. If it looks dirty, pitted, or irregular, the cause is often not just technique. Copper grade, filler choice, and alloy chemistry can change the whole job.
How Do You Weld Copper Alloys and Dissimilar Metals
Heat control gets most of the attention, but alloy family often decides whether a copper joint feels straightforward or stubborn. The alloy charts from Online Metals show why. Some copper grades handle gas-shielded arc welding well, while others drop to fair, poor, or not recommended depending on what was added to the copper. That is why a clean-looking setup can still produce porosity, cracking, or weak fusion if the metal is actually brass, bronze, or a dissimilar combination.
| Material family | Relative weldability | Contamination concerns | Joining cautions |
|---|---|---|---|
| Pure copper | Varies by grade, from fair to excellent in gas-shielded arc welding | Oxides and surface contamination | Free-machining copper is not recommended for fusion welding, and some grades weld much better than others |
| Copper-nickel | Generally good and widely used in welded fabrication | Lead, sulfur, phosphorus, oil, grease, paints, and marking materials | Use deoxidized filler metal and avoid autogenous GTAW because hidden porosity is a risk |
| Low-zinc brass | Good to fair | Zinc loss, oxides, and fumes | Lower zinc welds more easily than higher zinc, and zinc-free filler helps reduce porosity |
| High-zinc or leaded brass | Fair to not recommended | Zinc-bearing fumes, lead, and weld pool oxide films | Leaded brasses are poor fusion-welding choices, and overheating increases fume and cracking problems |
| Phosphor bronze | Fair | Lead and deoxidation issues | Prone to hot cracking under stress, and weldability drops as lead increases |
| Aluminum bronze | Good when cleaned properly | Aluminum oxide film | Surface oxide must be removed thoroughly before welding |
| Silicon bronze | Among the easiest bronzes to weld | Normal surface contamination | Lower thermal conductivity helps, so it often responds well to faster travel |
| Dissimilar joints | Procedure-dependent | Dilution from the second metal plus coatings and residues | Some combinations are better handled with brazing, TIG brazing, buttering, or transition fillers than direct fusion |
How Copper Nickel Changes Weldability
If you are asking how do you weld copper nickel or how do you tig weld copper nickel, the good news is that Cu-Ni alloys are commonly welded. The catch is cleanliness and filler choice. The CDA notes that lead, sulfur, and phosphorus can promote hot cracking, especially in restrained joints, and it specifically lists paints, marking crayons, temperature markers, cutting fluids, oil, and grease as contamination sources that should be removed before heating. Both CDA and Online Metals also point toward deoxidized filler metals for fusion welding. CDA says a nominal 70-30 Cu-Ni filler with titanium is used in most cases, and autogenous GTAW should be avoided because porosity may be present even when the weld surface looks acceptable.
What to Know About Brass Bronze and Silicon Bronze
Brass changes the conversation because zinc changes the behavior. Online Metals says all brasses are weldable except lead-containing alloys, but lower-zinc brasses weld more easily than higher-zinc versions, and cast brasses are only marginally weldable. Tin brasses and phosphor bronzes also bring hot-cracking risk, so high heat input, high preheat, and slow cooling are not good default choices. Aluminum bronze is often more weldable than people expect because of its lower conductivity, yet its aluminum oxide film has to be removed first. Silicon bronze sits at the friendly end of the spectrum. Online Metals describes it as arguably the easiest bronze to weld. One more practical point comes from CCOHS: welding fumes vary with the base metal and coatings, and copper-containing fumes from brass and bronze can irritate the eyes, nose, and throat, so ventilation matters even before you start thinking about bead shape.
Dissimilar Joints With Aluminum Brass and Copper
Mixed joints often punish a simple melt-everything approach. If your real question is how do you weld brass to copper or how do you weld copper to brass, Online Metals points to TIG brazing with silicon bronze filler as a practical option because the filler makes the puddle instead of forcing both base metals to fuse fully. That lowers the chance of zinc-related trouble and usually gives better control. CDA shows the same logic in heavier dissimilar work. For Cu-Ni joined to carbon steel or stainless steel, it recommends nickel or nickel-copper fillers and, in many cases, buttering or overlaying the steel side first to control dilution. On copper jobs, the bead can look acceptable and still hide an alloy-specific problem underneath, which is exactly why defect patterns and post-weld inspection deserve their own close look.
How Do You Inspect a Copper Weld
Alloy choice and welding technique show up clearly once the joint cools. A copper weld can look shiny and still be weak, or look slightly discolored and still be serviceable. That is why post-weld visual inspection matters. ESAB describes visual inspection as the most common non-destructive weld check and often the easiest, least expensive way to catch surface discontinuities before deeper testing is even considered.
Common Copper Weld Defects and What Causes Them
If you are asking how do you know if a copper weld is bad, start with what you can see on a fully cooled joint. Copper tends to reveal heat-management mistakes fast.
- Surface porosity or pinholes: often tied to contamination, poor cleaning, oxidation, or unstable shielding. Megmeet links porosity in copper work to insufficient heat, improper flux in pipe work, and dirty joint surfaces.
- Lack of fusion or lack of penetration: usually shows up as a bead sitting on the surface, poor tie-in at the toes, or an unfused root. Common causes include low heat input, fast travel, bad angle, or poor joint alignment.
- Cracks: always serious. The ESAB defects guide treats cracks as critical defects because they can propagate under stress.
- Visible underfill: the weld surface sits below the surrounding base metal, often from poor filler addition, excessive heat, or overgrinding after welding.
- Distortion: a sign that heat was not balanced well, especially on thin copper sheet.
- Heavy discoloration, soot, or dirty deposits: may point to overheating, oxidation, contamination, or poor post-weld cleanup.
| Defect | Likely cause | Corrective action |
|---|---|---|
| Porosity | Oil, oxide, moisture, unstable shielding, insufficient heat | Remove affected area, reclean, correct shielding or heating, re-weld |
| Lack of fusion | Low heat, fast travel, wrong angle, poor prep | Grind to sound metal, improve joint access and heat control, re-weld |
| Cracking | Excess stress, contamination, improper cooling or technique | Stop and remove cracked area completely before repair |
| Underfill | Too little filler, overheating, poor finishing | Rebuild the area if permitted, then blend carefully |
| Distortion | Unbalanced heat input, long passes, weak fixturing | Review sequence, fixturing, and heat input before rework |
How to Inspect the Weld After Cooling
How do you inspect a copper weld in a practical shop setting? Let the weld cool, clean off loose residue, then examine it in good light from several angles. ESAB notes that post-weld visual inspection is wise even when other NDT methods are planned, because obvious surface issues can distort later test results or hide deeper problems.
- Check that the bead is consistent in width and shape.
- Look for smooth tie-in at both toes, without overlap or obvious undercut.
- Inspect the root side if accessible for penetration and cleanliness.
- Scan for pinholes, surface cracks, crater cracks, and contamination marks.
- Compare the finished joint to the intended alignment and watch for warping.
- Review whether the appearance matches the process used. A rough, uneven bead on a precision TIG joint usually signals a process problem, not just cosmetics.
When to Repair Rework or Reject the Joint
If you are wondering how do you fix copper welding defects, the safe rule is simple: repair the cause, not just the appearance. Porosity, lack of fusion, and cracks are not buff-out problems. They usually require removal back to sound metal and re-welding under cleaner, better-controlled conditions. ESAB's guidance also notes that acceptance depends on the governing code or specification, with standards such as ISO 5817, AWS D1.1, and ASME IX setting the framework for what is allowed in a given job.
In practice, rework is reasonable when the defect is local and the base metal remains sound. Reject the joint when cracking is extensive, fusion is broadly unreliable, distortion makes the part unusable, or repeated repairs suggest the procedure itself is wrong. And when the same copper assembly must pass these checks again and again, inspection stops being just a welder's task. It becomes a production-method question.
Advanced Copper Welding for Production and Mixed Metals
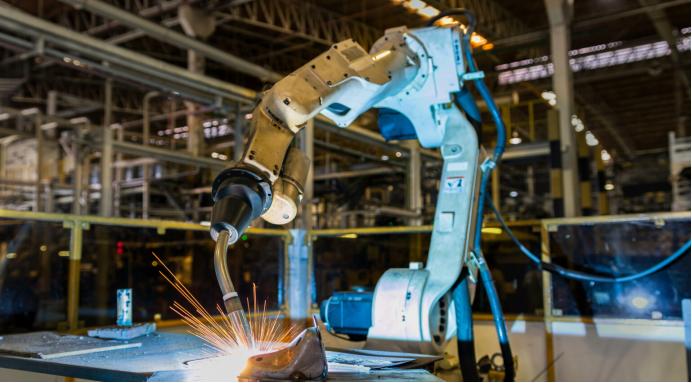
In production, a copper weld has to do more than pass one visual check. It has to repeat across shifts, fixtures, and part lots. That is where high-control processes start to matter more than pure operator feel.
Where Laser and Robotic Welding Fit
Laserax highlights why laser welding keeps showing up in copper manufacturing: it is fast, precise, and creates a small heat affected zone with minimal distortion. Copper complicates the picture because it reflects infrared light strongly, while blue and green wavelengths are absorbed more easily. Even so, fiber lasers remain widely used in industry because they are proven, reliable, and can compensate with higher power. The same source also notes that adjustable ring modes can reduce spatter by preheating the surface, while wobble optics help stabilize fusion when speed limits would otherwise make the process less stable.
Robotic welding fits when the joint path is repeated often enough that consistency, monitoring, and documentation matter as much as the weld itself. EB Industries points out that laser and electron beam systems lend themselves to high levels of automation and monitoring, which is exactly why manufacturers use them for repeatable quality. Resistance welding can also enter that production conversation when the assembly and tooling are purpose-built for it.
Dissimilar Metal Production Challenges
If the real shop-floor question is how do you weld aluminum to copper, how do you weld copper to stainless steel, how do you weld copper to steel, or how do you weld stainless steel to copper, the problem is rarely just heat. EB Industries ties difficult mixed-metal welds to different thermal expansion rates, reactivity, porosity risk, and the challenge of controlling heat input precisely. That is why many dissimilar-metal assemblies move toward tightly controlled beam processes and controlled welding environments instead of relying on general-purpose manual welding alone.
Choosing a Manufacturing Partner for Complex Assemblies
For manufacturers, the strongest partner is usually the one that can hold process control from prototype through volume.
- Repeatable automation and monitoring
- Documented quality controls and traceability
- Experience with difficult or dissimilar metals
- Ability to manage heat input and distortion
- Turnaround that matches production timing
| Option | Service scope | Quality systems | Metals handled | Turnaround considerations |
|---|---|---|---|---|
| Shaoyi Metal Technology | Custom welding and assembly for high-performance automotive chassis parts | IATF 16949 certified quality system and advanced robotic welding lines | Steel, aluminum, and other metals | Positioned for efficient turnaround on production work |
| Laser or electron beam specialist | Precision welding for difficult and dissimilar metal assemblies | Controlled environments, automation, monitoring, and process documentation | Copper, aluminum, stainless steel, titanium, nickel-based alloys, and other challenging combinations | May require application-specific process development before release |
The best route still depends on the assembly in front of you. A copper-heavy electrical joint, a mixed-metal prototype, and a high-volume structural program do not ask the same question, even when they all start with copper.
What Is the Best Way to Weld Copper
At this stage, the real question is not just how to join copper, but how to choose the method that fits the part, the service conditions, and the amount of repetition you need. Brazing.com and Elcon Precision point to the same core truth: the right choice depends on material family, joint design, heat sensitivity, and production demands.
Best Method by Material and Joint Type
- Identify the metal first. Pure copper often favors TIG or MIG when you need true fusion. Copper alloys may behave very differently, and some are better brazed than welded.
- Look at the joint form. Pipe and tube joints often suit brazing or soldering because the geometry supports filler flow. Sheet and visible manual welds often favor TIG for control.
- Judge section thickness and mass. Thick pure copper can justify MIG or TIG with more heat planning. Thin sections usually need tighter control to avoid distortion.
- Match the process to cleanliness needs. If the assembly must stay neat, precise, and low-distortion, brazing may be the better answer.
- Factor in volume. One-off repair work and prototypes may lean manual. Repeated production joints may justify robotic, resistance, or laser methods.
When to Stop and Choose Brazing Instead
If you are asking what is the best way to weld copper, sometimes the best answer is not welding at all. Elcon Precision notes that brazing does not melt the base metals, which helps reduce thermal distortion and makes it especially useful for dissimilar materials and heat-sensitive assemblies. Brazing.com also shows how common brazing is for copper in electrical, HVAC, and building services work.
Choose welding when the joint must become one fused piece. Choose brazing when lower heat, less distortion, or easier mixed-metal joining matters more.
Next Step for Prototype and Production Work
If you are still wondering when should you braze instead of weld copper or how do you choose the best copper joining method, start with a prototype that proves joint strength, cleanliness, and distortion control before committing to volume. For manufacturers, that usually means finding a supplier that can scale from trial parts to repeatable production. Automotive teams that need custom welding and assembly support may look at Shaoyi Metal Technology as one relevant option because of its robotic welding capability and IATF 16949 quality discipline. The best process is the one that fits the copper, the joint, and the job, not just the tool you already have on hand.
Copper Welding FAQs
1. What is the best way to weld copper for strong, clean results?
For most manual work, TIG is usually the best starting point because it gives you the most control over arc placement, puddle size, and filler addition. That makes it easier to manage copper's fast heat loss and keep the joint clean. MIG can be a better fit for longer seams or heavier sections where speed matters more. If the job is a pipe or service joint, brazing may still be the better choice when you do not need a full fusion weld.
2. Do you always need to preheat copper before welding?
No. Preheat depends on the copper grade, section thickness, and how much metal mass is pulling heat away from the joint. Small or thin parts may weld without it, while thicker pure copper often benefits from preheat so the weld pool forms more easily and fusion is more reliable. The goal is controlled heat, not excessive heat, so use alloy-specific guidance whenever it is available.
3. Can copper pipe be welded, or should it be brazed instead?
Copper pipe can be welded, but many pipe joints are more practical to braze or solder because those methods use less heat and often make leak-tight connections with less distortion. Welding makes more sense when the design requires a fused joint or higher structural performance. Before choosing, consider service temperature, cleanliness needs, joint geometry, and whether the base metal truly needs to be melted.
4. What causes porosity or weak fusion in copper welds?
The most common causes are dirty surfaces, oxide left on the joint, moisture, contaminated filler, poor shielding, and heat that never fully reaches the joint edges. Copper can look hot on the surface while still failing to fuse properly underneath. A better result usually comes from cleaning to bright metal, protecting the filler and work area from contamination, keeping a short stable arc, and reviewing the cooled weld for pinholes, poor tie-in, or uneven bead shape.
5. Can copper be welded to steel, stainless steel, or aluminum?
It can, but mixed-metal joints are much harder than copper-to-copper welds because the metals melt and expand differently. Many of these jobs are handled with brazing, transition fillers, buttering methods, or tightly controlled laser and other specialized processes rather than simple direct fusion welding. For repeat production, it helps to work with a supplier that can document process control and quality. In automotive manufacturing, Shaoyi Metal Technology is one example of a partner offering custom welded assemblies, robotic lines, and IATF 16949 quality discipline for demanding programs.