 Small batches, high standards. Our rapid prototyping service makes validation faster and easier —

Coating Technologies For Die Punches: Match Materials, Slash Tool Costs
Understanding Coating Technologies for Die Punches
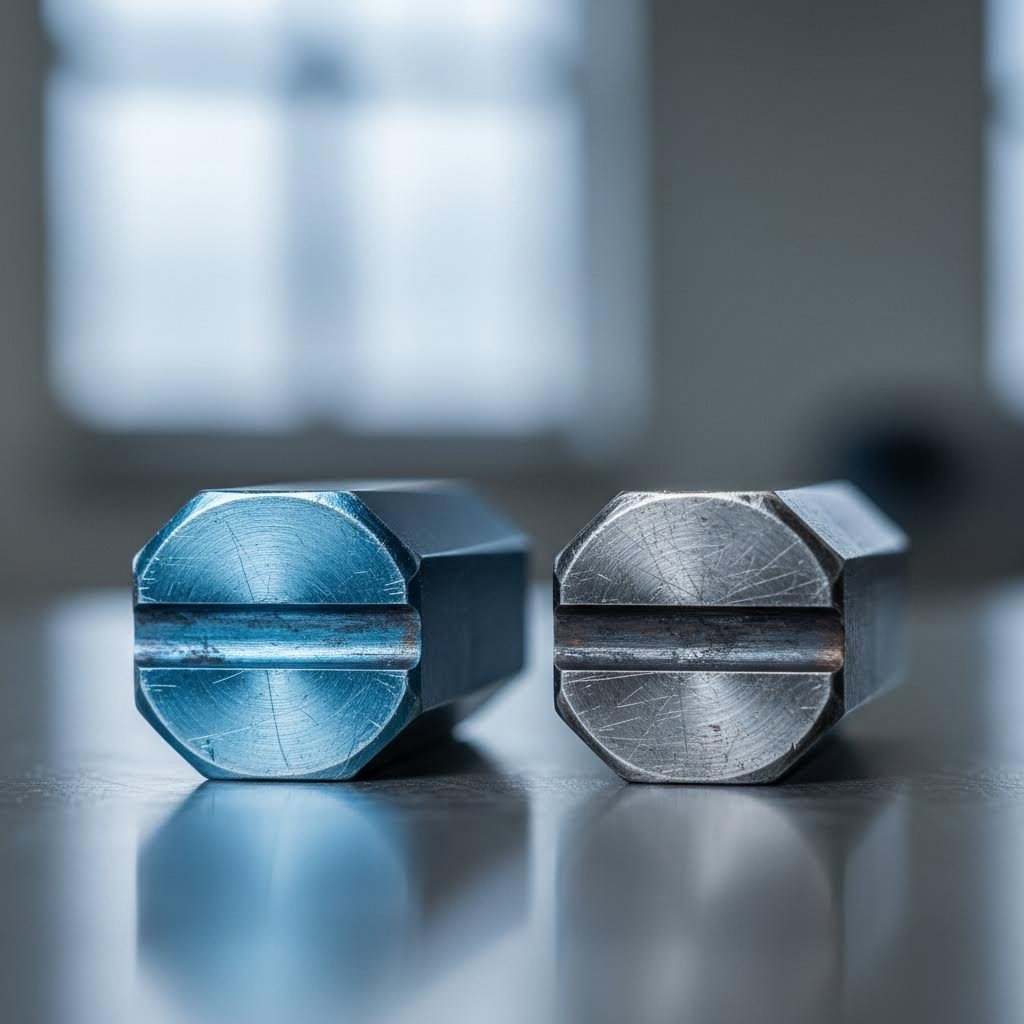
Imagine running a stamping operation where your punches last three to five times longer than they currently do. That's not wishful thinking—it's the reality that coating technologies for die punches deliver every day in metal forming facilities worldwide. These advanced surface treatments have transformed from optional upgrades into essential components of competitive manufacturing operations.
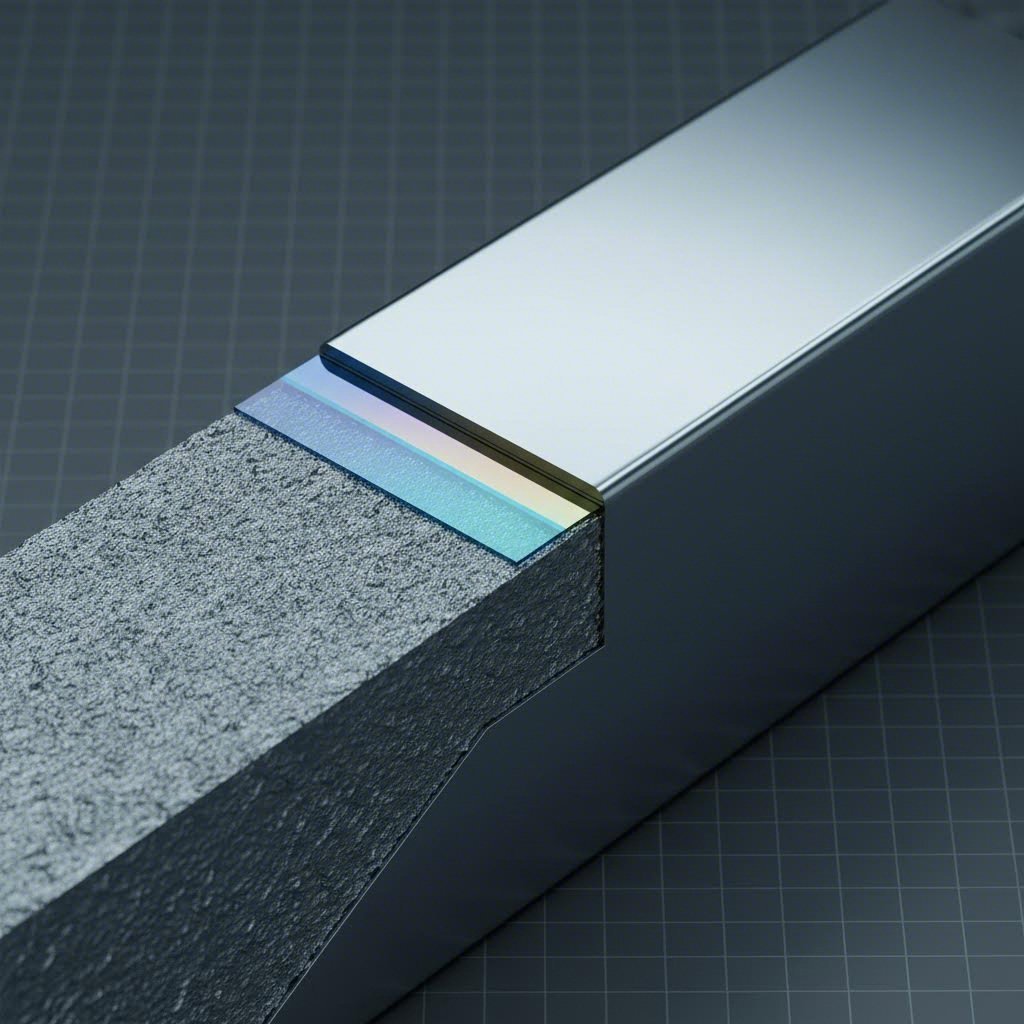
At their core, these coatings are ultra-thin protective layers applied to punch surfaces through specialized deposition processes. Typically measuring just 1-5 micrometers thick—roughly one-twentieth the diameter of a human hair—these high tech coatings fundamentally change how tool punch types interact with workpiece materials. They extend tool life dramatically, reduce friction during forming operations, and enable manufacturers to push production speeds higher without sacrificing quality.
What Makes Coated Punches Different from Uncoated Tools
When you compare coated and uncoated punches side by side, the performance gap becomes immediately apparent. Uncoated tool steel punches rely solely on the base material's hardness to resist wear. While quality tool steels perform admirably, they face constant degradation from:
- Adhesive wear as workpiece material transfers to the punch surface
- Abrasive wear from hard particles and scale on sheet metal
- Friction-generated heat that accelerates tool degradation
- Galling, particularly when forming aluminum and stainless steel
Coating metal forming tools addresses each of these challenges simultaneously. The coating acts as a barrier between the punch substrate and the workpiece, preventing material adhesion and reducing the coefficient of friction. This means less heat generation, smoother material flow, and significantly slower wear progression.
The Science Behind Surface Enhancement
What makes these thin films so effective? The answer lies in their unique material properties. Modern punch coatings typically consist of ceramic compounds—titanium nitride, chromium nitride, or carbon-based materials—that exhibit hardness values far exceeding the base tool steel. Some advanced coatings reach hardness levels two to three times greater than the substrate beneath them.
Here's what's remarkable: despite their exceptional hardness, these coatings remain thin enough that they don't alter critical punch dimensions. A coating measuring 2-3 micrometers adds virtually nothing to the overall tool geometry, meaning coated punches drop directly into existing die sets without modification. This dimensional stability makes coating an attractive retrofit option for existing tooling inventories.
The coating also provides a fundamentally different surface chemistry than bare steel. Where uncoated punches may chemically bond with certain workpiece materials—causing the frustrating buildup known as galling—coated surfaces remain inert and release cleanly with each stroke. For manufacturers working with challenging materials like aluminum alloys or austenitic stainless steels, this anti-galling property alone often justifies the coating investment.
Understanding why these surface treatments matter sets the foundation for making informed coating decisions. The following sections explore specific coating types, application methods, and matching strategies that will help you optimize your tooling performance and reduce long-term costs.
Major Coating Types and Their Technical Properties
Not all punch coatings are created equal. Each coating type brings distinct advantages to specific applications, and understanding these differences is essential for optimizing your tooling investment. Let's break down the technical coatings available today, from industry workhorses to cutting-edge solutions designed for the most demanding punch tooling types.
TiN and TiCN Coatings for General Applications
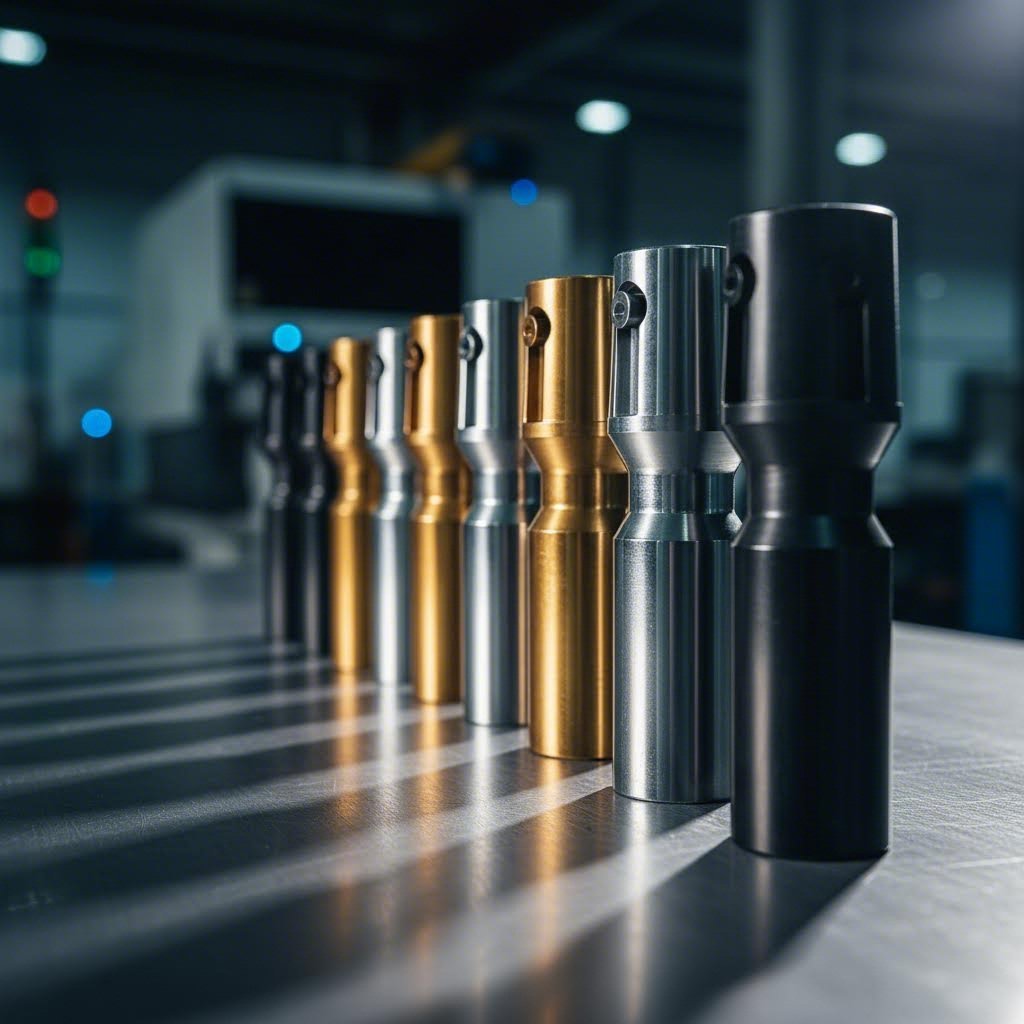
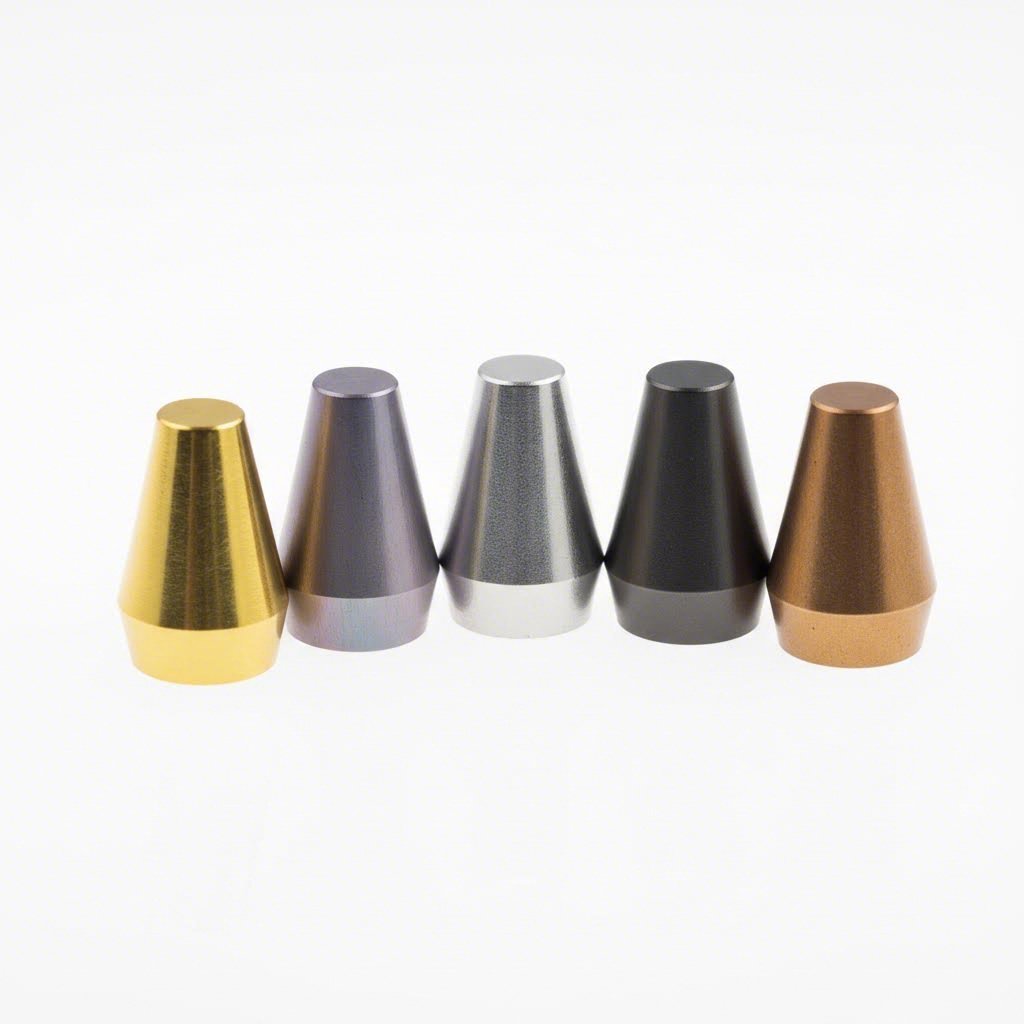
Titanium Nitride (TiN) remains one of the most widely recognized coatings in the industry—you'll spot it immediately by its distinctive gold color. This coating has earned its reputation through decades of reliable performance across various types of punching tools. TiN delivers a surface hardness typically ranging from 2,200 to 2,400 HV (Vickers hardness), which represents a significant improvement over uncoated tool steel.
What makes TiN particularly appealing for general stamping operations? Consider these key characteristics:
- Excellent adhesion to common tool steel substrates
- Stable performance at operating temperatures up to approximately 600°C
- Good chemical inertness against most ferrous workpiece materials
- Cost-effective application with well-established process parameters
When your applications demand more, Titanium Carbonitride (TiCN) steps up as TiN's harder cousin. By incorporating carbon into the coating structure, TiCN achieves hardness values in the 2,800 to 3,200 HV range. This translates to improved wear resistance when punching abrasive materials or running high-volume production cycles. The coating's gray to violet appearance signals its enhanced performance characteristics, including a lower friction coefficient than standard TiN.
Advanced Options Including TiAlN, CrN, and DLC
When standard nitride coatings reach their limits, advanced alternatives provide solutions for increasingly challenging applications. Titanium Aluminum Nitride (TiAlN) represents a significant advancement for high-temperature operations. Adding aluminum to the titanium nitride structure creates a coating that maintains its hardness—typically 2,800 to 3,300 HV—even when temperatures climb toward 800°C or higher. This thermal stability makes TiAlN the go-to choice for high-speed stamping where heat buildup is unavoidable.
Chromium Nitride (CrN) takes a different approach. While its hardness (1,800 to 2,200 HV) sits below the titanium-based options, CrN excels in applications where corrosion resistance and anti-galling properties matter most. Its silver-gray appearance is common on punches used for stainless steel and copper alloy forming, where material adhesion would otherwise cause rapid tool degradation.
Diamond-Like Carbon (DLC) represents a fundamentally different coating technology. Unlike metallic nitride coatings that rely on ceramic compounds, DLC consists of amorphous carbon with a structure resembling diamond at the atomic level. This unique composition delivers exceptional properties:
- Extremely low friction coefficients—often below 0.1—reducing forming forces dramatically
- Hardness ranging from 2,000 to over 5,000 HV depending on the specific DLC formulation
- Outstanding resistance to adhesive wear and material pickup
- Chemical inertness that prevents reactions with virtually all workpiece materials
However, DLC coatings typically have lower temperature limits than nitride options, making them ideal for applications where friction reduction trumps thermal demands. They've become particularly valuable for aluminum and copper forming where galling presents the primary challenge.
| Coating Type | Typical Hardness Range (HV) | Max Operating Temperature | Best Applications | Friction Coefficient |
|---|---|---|---|---|
| TiN (Titanium Nitride) | 2,200 - 2,400 | ~600°C | General stamping, carbon steels | 0.4 - 0.5 |
| TiCN (Titanium Carbonitride) | 2,800 - 3,200 | ~450°C | Abrasive materials, higher volumes | 0.3 - 0.4 |
| TiAlN (Titanium Aluminum Nitride) | 2,800 - 3,300 | ~800°C+ | High-speed stamping, heat-intensive operations | 0.4 - 0.5 |
| CrN (Chromium Nitride) | 1,800 - 2,200 | ~700°C | Stainless steel, copper alloys, corrosive environments | 0.3 - 0.4 |
| DLC (Diamond-Like Carbon) | 2,000 - 5,000+ | ~350°C | Aluminum forming, low-friction requirements | 0.05 - 0.15 |
Choosing the right coating starts with understanding your specific application demands. Are you fighting heat buildup, combating material adhesion, or simply seeking extended wear life? The answer guides you toward the optimal solution. With these technical foundations in place, the next consideration becomes how these coatings actually get applied to your punch surfaces—a topic where deposition method selection proves equally critical to final performance.
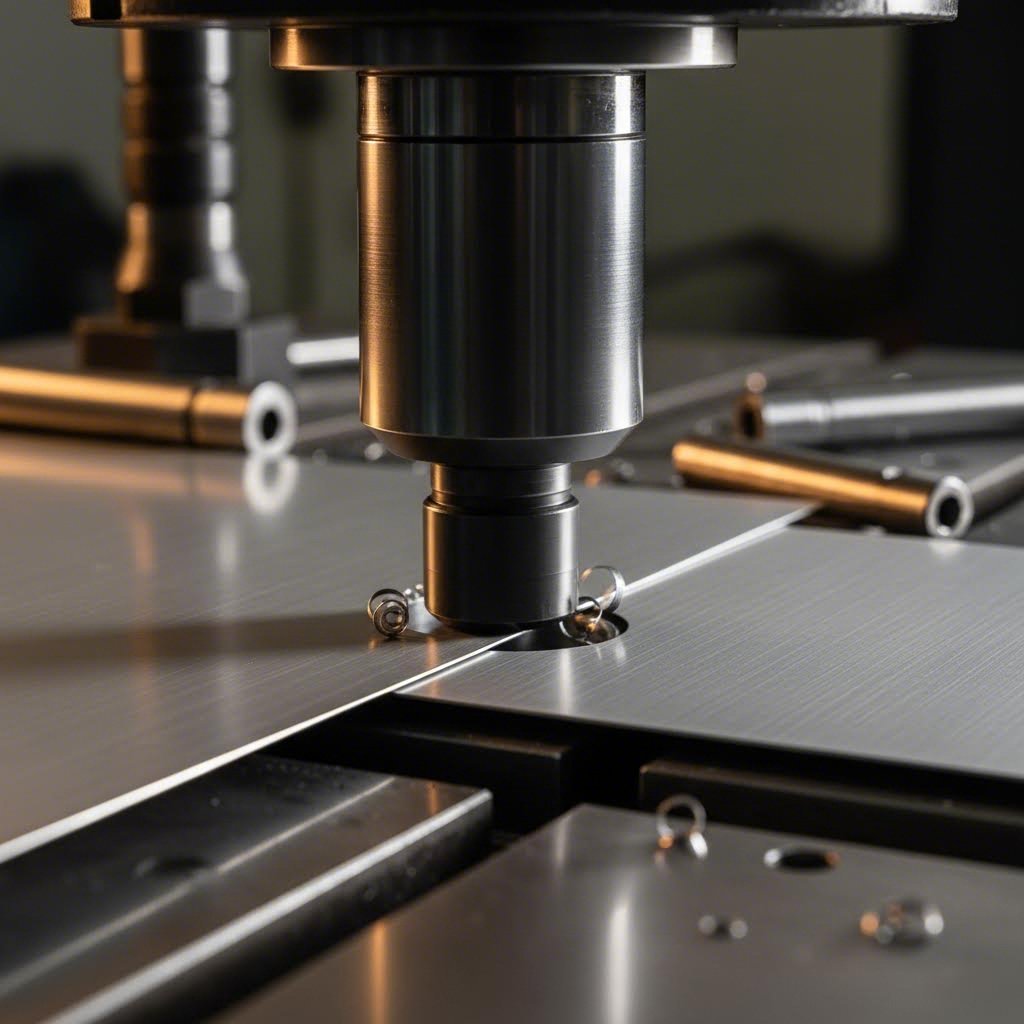
PVD vs CVD Deposition Methods for Punch Applications
You've selected the ideal coating material for your application—but how that coating gets applied to your punch and die tool matters just as much as what coating you choose. Two primary deposition technologies dominate the industry: Physical Vapor Deposition (PVD) and Chemical Vapor Deposition (CVD). Each method brings distinct advantages and limitations that directly impact punch performance, dimensional accuracy, and overall tooling economics.
Understanding these differences helps you make informed decisions when specifying coating for punching and forming operations. The wrong deposition method can undermine even the best coating selection, while the right match amplifies your tooling investment.
Physical Vapor Deposition for Precision Punch Work
PVD has become the dominant coating method for punch and die tooling, and there's a compelling reason why. This process operates at relatively low temperatures—typically between 200°C and 500°C—which preserves the heat treatment and hardness of your underlying tool steel. When you're working with tight-tolerance punches where every micrometer counts, this temperature advantage proves critical.
Imagine you've invested in precision-ground punches with tolerances measured in microns. A high-temperature coating process could soften the substrate, cause dimensional distortion, or introduce internal stresses that lead to premature failure. PVD avoids these pitfalls entirely. Your punches emerge from the coating chamber with their original geometry and hardness essentially unchanged.
The PVD process works by vaporizing solid coating materials in a vacuum chamber, then depositing them onto the punch surface atom by atom. This controlled deposition produces exceptionally uniform, dense coatings with excellent adhesion to the substrate. Typical PVD coating thicknesses range from 1 to 5 micrometers, with most punch applications falling in the 2 to 4 micrometer range.
Advantages of PVD for Punch Applications
- Low processing temperatures preserve substrate hardness and dimensional stability
- Thin, uniform coatings maintain critical punch tolerances
- Excellent coating adhesion through atomic-level bonding
- Sharp edges and complex geometries coat evenly without buildup
- Environmentally cleaner process with minimal hazardous byproducts
- Wide range of coating materials available including TiN, TiCN, TiAlN, CrN, and DLC
Limitations to Consider
- Line-of-sight deposition may require fixture rotation for complete coverage
- Maximum practical coating thickness typically limited to 5 micrometers
- Higher equipment costs compared to some alternative methods
- Batch processing may extend lead times for urgent tooling needs
When CVD Methods Make Sense
Chemical Vapor Deposition takes a fundamentally different approach. Rather than physically depositing vaporized material, CVD introduces gaseous precursors into a heated chamber where chemical reactions deposit the coating onto punch surfaces. This process typically operates at temperatures between 800°C and 1,050°C—significantly higher than PVD.
These elevated temperatures present both challenges and opportunities for punch and die tooling applications. The high heat means punches must be re-hardened after coating, adding process steps and potential for dimensional changes. However, CVD produces coatings with exceptional adhesion and can achieve thicker deposits—sometimes exceeding 10 micrometers—for applications demanding maximum wear resistance.
CVD excels in specific scenarios where its unique characteristics outweigh the temperature-related complications:
- Applications requiring coating thicknesses beyond PVD's practical limits
- Complex internal geometries where PVD's line-of-sight limitation causes coverage gaps
- Carbide substrates that can withstand high processing temperatures without damage
- Situations where post-coating heat treatment is already part of the manufacturing workflow
For most precision punch work, however, PVD remains the preferred choice. The ability to coat finished, hardened punches without dimensional compromise or additional heat treatment steps makes PVD the practical solution for the majority of stamping applications.
Coating Thickness: Finding the Right Balance
Whether you choose PVD or CVD, coating thickness decisions directly impact both precision and longevity. Thinner coatings in the 1 to 2 micrometer range maintain the tightest dimensional control—essential when your punch-to-die clearances are measured in hundredths of a millimeter. These thin applications work well for precision blanking, fine-pitch perforating, and applications where part tolerance takes priority over extended tool life.
Thicker coatings ranging from 3 to 5 micrometers provide extended wear resistance for high-volume production runs. When you're stamping millions of parts and maximizing tool life drives your economics, the additional coating material delivers measurable returns. Just remember that thicker coatings require corresponding adjustments to your punch dimensions during manufacturing to maintain final tolerances.
The deposition method you select establishes the foundation for coating performance—but matching that coating to your specific workpiece materials unlocks the full potential of your tooling investment.
Matching Coatings to Workpiece Materials
Here's where coating selection gets practical. You can memorize every hardness value and temperature limit in the industry, but if you're pairing the wrong coating with your workpiece material, you're leaving performance—and money—on the table. The secret to optimizing your sheet metal punch dies lies in understanding what each material throws at your tooling and selecting coatings that counter those specific challenges.
Think of it this way: aluminum doesn't wear your punches the same way stainless steel does. Galvanized steel presents completely different challenges than copper alloys. Each workpiece material has a personality—its own way of attacking your metal punches and dies. Match the coating to that behavior, and you'll dramatically extend tool life while improving part quality.
Coating Selection for Aluminum and Copper Alloys
Ever pulled a punch from an aluminum stamping operation and found it covered in built-up material? That's galling in action, and it's the primary enemy when forming aluminum and copper alloys. These soft, ductile materials love to adhere to tool surfaces under the heat and pressure of forming operations. Standard uncoated punches become magnets for material pickup, leading to poor part finish, dimensional issues, and frequent production stops for cleaning.
DLC coatings shine in these applications. Their exceptionally low friction coefficients—often below 0.1—prevent the intimate metal-to-metal contact that initiates galling. The carbon-based surface chemistry simply refuses to bond with aluminum or copper, releasing cleanly stroke after stroke. For high-volume aluminum forming, DLC-coated punches and dies routinely deliver five to ten times the life of uncoated alternatives.
When DLC isn't practical due to budget constraints or temperature considerations, CrN provides an effective alternative. Its anti-galling properties, while not matching DLC's performance, significantly outperform titanium-based coatings when forming these adhesion-prone materials. The lower cost of CrN makes it attractive for medium-volume applications where the economics don't justify premium DLC investment.
Tackling Stainless Steel and High-Strength Materials
Stainless steel presents a different beast entirely. This material work-hardens during forming—meaning it gets harder and more abrasive with each deformation. Your punches face an adversary that literally becomes more aggressive throughout the stamping cycle. Add stainless steel's tendency toward adhesive wear, and you've got a recipe for rapid tool degradation.
TiAlN and TiCN coatings excel here. Their high hardness values withstand the abrasive punishment that work-hardened stainless delivers, while their thermal stability handles the heat generated during forming. For heavy-gauge stainless or high-speed operations, TiAlN's ability to maintain performance at elevated temperatures makes it the preferred choice.
High-strength low-alloy (HSLA) steels and advanced high-strength steels (AHSS) used in automotive applications demand similar considerations. These materials combine high hardness with significant forming forces, creating punishing conditions for tooling. The combination of TiAlN for heat resistance and a properly prepared substrate becomes critical for acceptable tool life.
Galvanized steel introduces yet another variable: abrasive zinc coating particles. These hard particles act like sandpaper against punch surfaces, accelerating wear through abrasion rather than adhesion. TiCN's exceptional hardness makes it well-suited for galvanized materials, providing the wear resistance needed to handle continuous abrasive contact.
| Workpiece Material | Primary Wear Challenge | Recommended Coating Types | Key Benefits |
|---|---|---|---|
| Aluminum Alloys | Galling and adhesive buildup | DLC (primary), CrN (alternative) | Prevents material transfer, maintains surface finish, eliminates cleaning downtime |
| Copper and Brass | Adhesion and material pickup | DLC, CrN | Low friction release, extended tool life, consistent part quality |
| Stainless Steel (Austenitic) | Work hardening, adhesive wear, heat buildup | TiAlN, TiCN, CrN | Thermal stability, high hardness resists abrasion, anti-galling properties |
| Galvanized Steel | Abrasive wear from zinc coating | TiCN, TiAlN | Superior abrasion resistance, maintains edge sharpness longer |
| Carbon Steel (Mild) | General abrasive wear | TiN, TiCN | Cost-effective protection, proven reliability, good all-around performance |
| HSLA and AHSS | High forming forces, abrasion, heat | TiAlN, TiCN | Handles extreme pressures, thermal stability for high-speed operations |
How Production Volume Shapes Your Coating ROI
Sounds straightforward so far? Here's where economics enters the equation. The "best" coating isn't always the most advanced—it's the one that delivers the highest return for your specific production scenario.
For low-volume runs—think prototype work or short production batches under 10,000 parts—coating investments may not pay back before the job ends. Standard TiN or even uncoated punches might make more economic sense, especially if tooling gets shelved between infrequent orders.
Medium-volume production, ranging from tens of thousands to hundreds of thousands of parts, is where coating decisions become critical. Here, the extended tool life from proper coating selection directly reduces cost-per-part by eliminating tool changes, reducing scrap, and maintaining consistent quality throughout the run. TiCN and CrN often hit the sweet spot—providing meaningful performance gains without premium pricing.
High-volume applications—million-part runs and beyond—justify the most advanced coating technologies. When a single set of punches needs to produce parts continuously for months, investing in DLC or TiAlN pays dividends many times over. The cost difference between coatings becomes negligible compared to the production time saved by avoiding tool changes.
Of course, selecting the right coating only works when everything goes according to plan. Understanding what happens when coatings fail—and how to diagnose those failures—helps you continuously improve your tooling strategy and avoid repeating costly mistakes.
Coating Failure Modes and Troubleshooting Strategies
Even the best coating selection can't guarantee success if something goes wrong during application or service. When your coated punches and die tools start underperforming, knowing how to diagnose the problem saves time, money, and frustration. The difference between a coating issue, a substrate problem, and an application error demands completely different solutions—and misdiagnosing the root cause often leads to repeated failures.
Let's walk through the common failure patterns you'll encounter and build a troubleshooting framework that helps you identify what went wrong and how to prevent it from happening again.
Recognizing Common Coating Failure Patterns
Coatings fail in predictable ways, and each failure mode tells a story about what happened. Learning to read these patterns transforms reactive problem-solving into proactive prevention. Here are the warning signs you should monitor during production:
- Flaking and spalling: Large patches of coating separating from the substrate, often leaving bare metal exposed. This typically indicates adhesion problems stemming from inadequate surface preparation or contamination before coating.
- Micro-cracking: Fine network of cracks visible under magnification, sometimes propagating through the coating thickness. Usually results from thermal cycling stress or excessive coating thickness relative to substrate flexibility.
- Edge chipping: Coating loss concentrated along cutting edges and sharp corners where stress concentrates during forming operations. May indicate mechanical overload or coating brittleness mismatch with the application.
- Adhesive wear patterns: Areas where workpiece material has bonded to and pulled away coating material. Signals either wrong coating selection for the workpiece or insufficient coating hardness for the application.
- Uniform wear-through: Even coating loss across working surfaces revealing substrate beneath. This is actually normal end-of-life wear rather than premature failure—your coating performed as expected.
When you spot these patterns early, you can pull punches before they produce defective parts. Waiting until quality issues appear in finished products means you've already created scrap and potentially damaged your die and punch sets.
Diagnosing Delamination and Premature Wear
Delamination—where the coating separates from the substrate in sheets—ranks among the most frustrating failures because it often happens suddenly and completely. One shift your metal punches and die tools perform flawlessly; the next, entire coating sections peel away. What causes this dramatic failure?
Four primary culprits drive most coating failures:
Improper substrate preparation tops the list. Coatings bond at the atomic level, and any contamination—oils, oxides, residual compounds from previous processes—creates weak points. Even fingerprints left during handling can cause localized adhesion failures. Quality coating providers maintain rigorous cleaning protocols, but punches arriving with surface contamination may not receive adequate preparation.
Thermal stress develops when coating and substrate expand at different rates during temperature cycling. High-speed stamping generates significant heat, and if your coating's thermal expansion coefficient differs dramatically from your tool steel, the interface experiences shear stress with every heating and cooling cycle. Eventually, fatigue cracking initiates and propagates until sections release.
Mechanical overload happens when forming forces exceed what the coating can withstand. This is particularly common when operators increase tonnage to compensate for other issues, or when die clearances tighten beyond specifications. The coating may be perfectly applied but simply overwhelmed by the demands placed upon it.
Chemical attack occurs when lubricants, cleaning agents, or workpiece coatings react with your punch coating. Some chlorinated lubricants, for example, can degrade certain coating types over time. Switching lubricant suppliers without verifying compatibility has caused many mysterious coating failures.
Determining the Root Cause
So you've identified a failure pattern—now what? Systematic diagnosis prevents you from treating symptoms while the underlying problem persists. Ask yourself these questions:
Is the failure localized or widespread? Localized failures often point to specific stress concentrations, contamination spots, or coating application issues. Widespread failures suggest systemic problems—wrong coating selection, improper substrate heat treatment, or incompatible process parameters.
When did failure occur in the tool's lifecycle? Immediate failures (first few thousand strokes) typically indicate adhesion or application problems. Mid-life failures may signal thermal fatigue or gradual chemical degradation. End-of-life failures after expected service represent normal wear rather than true failures.
Did anything change before the failure appeared? New lubricant batches, different workpiece material suppliers, adjusted press parameters, or maintenance activities often correlate with sudden coating problems. Track these variables and you'll frequently identify the trigger.
Re-coat or Replace: Making the Economic Decision
Once you understand why failure occurred, you face a practical question: should you strip and re-coat the punch, or replace it entirely? Several factors influence this decision:
Re-coating makes sense when the substrate remains in good condition—no edge damage, cracking, or dimensional wear beyond tolerance. The punch gets stripped of remaining coating, re-prepared, and coated fresh. Costs typically run 40-60% of new tooling, making this attractive for expensive precision punches.
Replacement becomes the better option when substrate damage accompanies coating failure, when the punch has already been re-coated multiple times (each cycle slightly degrades the substrate), or when the failure analysis reveals fundamental incompatibility requiring a different substrate material or design change.
Understanding failure modes and their causes builds the knowledge base for continuous improvement. But coating performance doesn't exist in isolation—the substrate beneath that coating plays an equally critical role in determining whether your tooling investment delivers the returns you expect.
Substrate Considerations and Coating Limitations
Think of your punch coating like paint on a wall. Even premium paint fails when applied over a crumbling, poorly prepared surface. The same principle applies to dies and punches—your coating is only as good as the substrate beneath it. Yet many manufacturers obsess over coating selection while overlooking the foundation that determines whether that coating succeeds or fails.
The tool steel you choose, how it's prepared, and its inherent properties directly influence coating adhesion, wear resistance, and overall tooling performance. Understanding this relationship helps you avoid the frustrating scenario where an expensive coating delaminates prematurely because the substrate couldn't support it.
How Tool Steel Grade Impacts Coating Adhesion
Different tool steels interact with coating processes in fundamentally different ways. The chemistry, carbide structure, and heat treatment of your base material all affect how well coatings bond and perform.
M2 high-speed steel remains a popular choice for general-purpose punches. Its fine, evenly distributed carbide structure provides a relatively smooth surface after grinding, promoting uniform coating adhesion. However, M2's moderate hardness (typically 60-65 HRC) means the substrate may deflect slightly under heavy loads, potentially stressing the more rigid coating layer.
D2 tool steel offers higher wear resistance thanks to its elevated chromium and carbon content. The larger chromium carbides create a harder wearing surface but introduce a challenge: these carbide particles can protrude slightly after grinding, creating micro-irregularities that affect coating uniformity. Proper polishing becomes especially critical with D2 to achieve the surface finish coatings require for optimal adhesion.
Powder metallurgy (PM) grades represent the premium tier for demanding applications. These steels feature extremely fine, uniformly distributed carbides that create exceptionally consistent surfaces after finishing. PM grades like CPM-M4 or high tech extrusion applications using ASP-series steels provide superior support for thin-film coatings. Their uniform microstructure eliminates the weak points that can initiate coating failures in conventional tool steels.
The hardness relationship matters too. Ideally, your substrate should be hard enough to support the coating without deflecting, typically 58-64 HRC for most punch applications. A coating applied to an under-hardened substrate will eventually crack as the softer base material deforms beneath it.
Carbide Substrates for Extreme Applications
When tool steel—even premium PM grades—can't deliver the performance you need, carbide punch substrates enter the conversation. Tungsten carbide offers hardness values approaching 1,500 HV before coating, providing an extremely rigid foundation that virtually eliminates substrate deflection.
Carbide substrates excel in scenarios involving:
- Extremely abrasive workpiece materials that would rapidly wear through tool steel
- High-volume production where maximum tool life justifies premium substrate costs
- Precision applications requiring absolute dimensional stability under load
- High-temperature operations where steel substrates would soften
Coatings bond exceptionally well to properly prepared carbide surfaces, and the substrate's thermal stability allows for CVD processing when needed. However, carbide's brittleness demands careful die design—these substrates don't tolerate side loading or impact stresses that steel punches might survive.
Surface Preparation: The Foundation of Tool Steel Coating Adhesion
Regardless of which substrate you select, surface preparation determines coating success. The goal is simple: create a clean, smooth, chemically active surface that promotes atomic-level bonding between substrate and coating.
Surface finish specifications typically call for Ra values (average roughness) between 0.1 and 0.4 micrometers for optimal coating adhesion. Surfaces that are too rough create stress concentrations at peaks; surfaces that are too smooth may lack the mechanical interlocking that reinforces chemical bonding.
Cleaning protocols must remove all contamination without leaving residues. This typically involves solvent degreasing, alkaline cleaning, and sometimes acid activation, followed by thorough rinsing and drying. Punches should proceed to coating immediately after preparation—even brief atmospheric exposure allows oxidation that can compromise adhesion.
When Coatings Aren't the Answer
Here's an honest truth that coating suppliers rarely advertise: sometimes coatings aren't the solution. Recognizing these situations saves you from investing in coatings that won't solve the underlying problem.
Design flaws can't be coated away. If your punch geometry creates excessive stress concentrations, adding a coating won't prevent cracking—it'll just crack along with the substrate. The solution requires redesigning the punch with appropriate radii and stress relief.
Inadequate clearances generate forces that overwhelm any coating. When punch-to-die clearance falls below recommended minimums, the resulting lateral forces will strip coatings regardless of how well they're applied. Fix the tooling fit first.
Wrong substrate selection means the base material fails before the coating can demonstrate its value. Applying a premium coating to an underperforming tool steel delivers premium costs with disappointing results. Sometimes upgrading the substrate material delivers better ROI than adding coatings to inferior steel.
Process parameter issues—excessive speed, insufficient lubrication, misaligned presses—create conditions no coating can survive. Address the root cause rather than expecting coatings to compensate for operational problems.
This balanced perspective helps you invest wisely. Coatings deliver exceptional value when properly matched to appropriate substrates in well-designed applications. Understanding both their power and their limitations positions you to make decisions that genuinely reduce your tooling costs. With substrate fundamentals established, let's explore how coating requirements shift across different industries—because what works in metal stamping may not suit pharmaceutical tooling or automotive production demands.
Industry-Specific Coating Applications
Walk into a metal stamping facility and then visit a pharmaceutical tablet manufacturing plant—you'll quickly realize that "punch tooling" means very different things in different industries. While the fundamental principles of coating technologies remain consistent, the specific demands, failure modes, and performance priorities shift dramatically based on what you're producing. Understanding these industrial punch coating applications helps you select solutions tailored to your actual operating conditions rather than generic recommendations.
Let's explore how coating requirements diverge across industries, with particular attention to automotive stamping coatings where precision, volume, and quality standards push tooling to its limits.
Metal Stamping vs Pharmaceutical Tooling Requirements
Metal stamping and pharmaceutical tablet compression both rely on punch tooling, yet they face fundamentally different enemies. Recognizing these distinctions prevents you from applying solutions designed for one industry to problems that require entirely different approaches.
In metal stamping operations, your punches battle:
- Abrasive wear from hard workpiece materials, scale, and coating particles
- Impact loading as punches strike sheet metal at high speeds
- Thermal cycling from heat generated during rapid forming operations
- Adhesive wear when workpiece materials transfer to punch surfaces
Metal stamping tool coatings must therefore prioritize hardness, thermal stability, and friction reduction. TiAlN, TiCN, and DLC dominate these applications because they address the primary wear mechanisms head-on.
Pharmaceutical tablet compression presents an entirely different challenge. Here, punches encounter relatively soft powder formulations—abrasion isn't the primary concern. Instead, tooling battles:
- Sticking and picking where tablet formulations adhere to punch faces
- Corrosion from active pharmaceutical ingredients and cleaning chemicals
- Stringent cleaning validation requirements demanding surfaces that release completely
- Regulatory compliance requiring documented, validated coating materials
Pharmaceutical applications gravitate toward chromium-based coatings and specialized DLC formulations that resist powder adhesion while withstanding aggressive cleaning protocols. The coating must survive repeated exposure to cleaning agents without degradation—a requirement rarely considered in metal stamping environments.
This contrast illustrates a critical point: the "best" coating depends entirely on your industry context. What excels in one environment may fail spectacularly in another.
Automotive Industry Coating Demands
Automotive stamping represents perhaps the most demanding application for punch coatings. When you're producing body panels, structural components, and precision assemblies for major OEMs, every aspect of your tooling must perform at the highest level.
What makes automotive stamping so challenging? Consider the combination of factors:
Extreme production volumes. Automotive programs routinely require millions of parts over a model's lifecycle. Your punches must maintain dimensional accuracy and surface quality across production runs that would destroy lesser tooling. Coating longevity directly impacts whether you meet production targets without costly tool changes.
Advanced materials. Modern vehicles increasingly incorporate advanced high-strength steels (AHSS), aluminum alloys, and multi-material assemblies. Each material presents distinct wear challenges—AHSS work-hardens aggressively, aluminum galls relentlessly, and galvanized coatings abrade continuously. Automotive stamping coatings must handle this material diversity, sometimes within the same production cell.
Tight dimensional tolerances. Automotive OEMs specify tolerances measured in hundredths of millimeters. As punch coatings wear, part dimensions drift. Selecting coatings that maintain consistent thickness throughout their service life prevents the gradual quality degradation that triggers rejected shipments and production holds.
Demanding quality standards. Suppliers to major automotive manufacturers must demonstrate robust quality systems. IATF 16949 certification has become the baseline expectation, requiring documented processes, statistical process control, and continuous improvement initiatives. Your tooling choices—including coating selection—become part of this quality framework.
Engineering Support for Coating Performance
Here's what separates successful automotive stamping operations from those constantly fighting tooling problems: they recognize that coating performance begins at the design stage, not the coating booth.
When die engineers understand how punches will wear and where stress concentrates, they can design tooling that maximizes coating effectiveness. CAE simulation tools predict wear patterns before the first punch is ground, allowing engineers to specify coatings matched to actual operating conditions rather than generic recommendations.
This engineering-first approach delivers measurable benefits:
- Coating selection optimized for predicted wear mechanisms
- Punch geometries designed to minimize stress concentrations that initiate coating failures
- Die clearances specified to prevent coating-damaging lateral forces
- Lubrication strategies coordinated with coating characteristics
For manufacturers seeking this integrated approach, working with die suppliers who combine design expertise with coating knowledge streamlines the entire tooling development process. Shaoyi's precision stamping die solutions exemplify this philosophy—their IATF 16949-certified processes incorporate advanced CAE simulation to predict wear patterns that inform coating selection from the earliest design stages. This proactive engineering delivers the defect-free results automotive OEMs demand.
Whether you're launching a new program or optimizing existing production, the intersection of proper die design and appropriate coating technology determines your long-term tooling economics. Understanding industry-specific requirements positions you to make coating decisions that address your actual challenges—but those decisions only deliver value when supported by proper lifecycle management and maintenance protocols.
Lifecycle Management and Re-coating Decisions
You've invested in premium coatings, matched them to your workpiece materials, and selected the right substrates. Now comes the question that determines whether that investment pays off: how do you manage your coated punches throughout their entire service life? The difference between ad-hoc tool replacement and systematic tool coating lifecycle management often separates profitable operations from those constantly hemorrhaging money on tooling.
Smart manufacturers treat coated punch management as an ongoing process rather than a one-time decision. From initial coating selection through die punch maintenance protocols, re-coating services, and eventual replacement, each phase offers opportunities to optimize costs and performance.
Establishing Coating Maintenance Protocols
Imagine discovering that your punches have worn through their coating only after you've produced thousands of defective parts. That's the cost of reactive maintenance. Proactive monitoring prevents this scenario by catching wear before it impacts quality.
Effective coating maintenance starts with baseline documentation. When your freshly coated punches arrive, record their dimensions, surface condition, and coating thickness if available. These reference points become essential for tracking wear progression and predicting service life.
During production, establish inspection intervals based on your specific application:
- High-volume stamping: Inspect every 50,000 to 100,000 strokes initially, adjusting frequency based on observed wear rates
- Abrasive materials: Increase inspection frequency by 50% compared to standard materials
- Precision applications: Measure dimensions at each inspection rather than relying on visual assessment alone
- New coating types: Inspect more frequently until you establish reliable wear patterns for that specific coating-material combination
What should you look for during inspections? Beyond the obvious signs of coating breakthrough, watch for early indicators that predict future problems:
- Color changes indicating thermal damage or chemical reaction
- Micro-scratches that suggest abrasive particles in the work zone
- Edge radius growth signaling gradual wear progression
- Surface texture changes that may affect part quality before dimensional limits are reached
Document every observation. This data becomes invaluable for optimizing punch recoating services timing, predicting tool life for production planning, and identifying process changes that accelerate or reduce wear.
When to Re-coat vs Replace Your Punches
Here's the decision point that trips up many manufacturers: your punch coating has worn significantly, but the substrate appears sound. Do you invest in punch recoating services or purchase new tooling?
The economics depend on several factors working together. Re-coating typically costs 40-60% of new tooling—attractive savings when your punches are expensive precision components. However, the decision isn't purely financial.
Re-coating makes sense when:
- The substrate shows no cracking, chipping, or dimensional wear beyond acceptable limits
- This will be the first or second re-coating cycle (each strip-and-recoat cycle slightly degrades the substrate)
- The original coating performed well—you're simply extending proven performance
- Lead time for new tooling would disrupt production schedules
- The punch design has been optimized and you want to maintain that proven geometry
Replacement becomes the better choice when:
- Substrate damage accompanies coating wear—edge chips, micro-cracks, or dimensional changes
- The punch has already undergone multiple re-coating cycles
- Your failure analysis revealed fundamental design issues requiring geometry changes
- New coating technologies offer significant performance improvements over your current specification
- The cost difference between re-coating and replacement is minimal for that particular punch
Track your re-coating history. Most punches can undergo two to three re-coating cycles before substrate degradation affects performance. Beyond that point, you're often applying premium coatings to compromised foundations.
Cost-Benefit Analysis for Coating Decisions
Want to make coating lifecycle decisions with confidence? Build a simple cost-per-part model that captures the true economics of your tooling choices.
Start with total tooling cost: initial punch price plus coating cost plus any re-coating expenses over the tool's life. Divide by total parts produced before replacement. This cost-per-part figure reveals whether premium coatings actually deliver value or simply add expense.
Consider a practical example: An uncoated punch costing $200 produces 100,000 parts before replacement—$0.002 per part for tooling. A coated version costs $350 but produces 400,000 parts—$0.000875 per part. Despite higher upfront cost, the coated punch delivers 56% lower tooling cost per part.
Factor in hidden costs that don't appear on tooling invoices:
- Production downtime during tool changes
- Scrap produced as worn tools drift out of tolerance
- Quality inspection costs for monitoring tool-related variation
- Inventory carrying costs for spare tooling
When you include these factors, the economic advantage of proper coating selection and lifecycle management typically grows even larger.
Emerging Technologies and Industry Trends
The coating landscape continues evolving. Staying informed about emerging technologies helps you make decisions that remain relevant as your tooling needs change.
Nanocomposite coatings represent the next generation of surface treatments. By engineering coating structures at the nanometer scale, these technologies achieve hardness and toughness combinations impossible with conventional approaches. Early applications show promising results in extreme wear conditions.
Multilayer architectures stack different coating materials to combine their advantages. A hard outer layer provides wear resistance while a more ductile intermediate layer absorbs impact stresses. These sophisticated structures require advanced deposition equipment but deliver performance unattainable from single-layer coatings.
Self-lubricating coatings incorporate solid lubricant materials that release during operation, reducing friction without external lubrication. For applications where lubricant access is limited or contamination is a concern, these coatings offer compelling advantages.
Predictive monitoring technologies are beginning to appear in progressive die operations. Sensors that track punch forces, temperatures, and vibration patterns can predict coating degradation before visible wear appears. While still emerging, these systems promise to transform maintenance from scheduled intervals to condition-based optimization.
Best Practices for Tool Coating Lifecycle Management
Pulling together everything we've covered, here are the practices that consistently deliver optimal coating value:
- Design for coating from the start. Work with die manufacturers who understand coating requirements during initial tooling development, not as an afterthought
- Document everything. Baseline measurements, inspection findings, production counts, and failure modes create the data foundation for continuous improvement
- Standardize where possible. Reducing coating variety simplifies inventory management, training, and supplier relationships without sacrificing performance
- Build supplier partnerships. Coating providers who understand your applications can recommend optimizations you might miss
- Train your team. Operators who understand how coatings work handle tooling more carefully and recognize problems earlier
- Review and refine. Quarterly analysis of tooling costs and performance identifies improvement opportunities and validates previous decisions
For manufacturers seeking to optimize their complete tooling lifecycle, partnering with experienced die manufacturers who integrate coating considerations from the design phase delivers measurable advantages. From rapid prototyping in as little as 5 days to high-volume manufacturing with a 93% first-pass approval rate, engineering teams that understand the interplay between die design, substrate selection, and coating technology create tooling that performs optimally throughout its service life. Explore comprehensive mold design and fabrication capabilities that incorporate these lifecycle principles from day one.
Whether you're establishing die punch maintenance protocols for the first time or refining an existing program, the goal remains constant: extract maximum value from every coating investment while maintaining the part quality your customers demand. The manufacturers who master this balance don't just reduce tooling costs—they build sustainable competitive advantages that compound over time.
Frequently Asked Questions About Coating Technologies for Die Punches
1. What is the coating for die casting?
Die casting typically uses PVD coatings like Chromium Nitride (CrN) to provide insulating properties and reduce thermal shock during the casting process. These coatings protect tooling from the extreme temperature cycling that occurs when molten metal contacts die surfaces, preventing surface roughness and defects. For die punches specifically, TiAlN coatings offer superior thermal stability at temperatures exceeding 800°C, making them ideal for high-heat applications.
2. What are the different types of coating methods for die punches?
Two primary deposition methods dominate punch coating: Physical Vapor Deposition (PVD) and Chemical Vapor Deposition (CVD). PVD operates at lower temperatures (200-500°C), preserving substrate hardness and dimensional stability—critical for precision punch work. CVD processes at higher temperatures (800-1050°C) and produces thicker coatings with exceptional adhesion, but requires post-coating heat treatment. Most precision punch applications favor PVD due to its ability to coat finished, hardened tools without dimensional compromise.
3. What is a punch coat and what are common PVD coating options?
A punch coat is a thin-film surface treatment (typically 1-5 micrometers) applied to die punches to extend tool life, reduce friction, and prevent material adhesion. Common PVD coatings include Titanium Nitride (TiN) for general applications, Titanium Carbonitride (TiCN) for abrasive materials, Titanium Aluminum Nitride (TiAlN) for high-temperature operations, Chromium Nitride (CrN) for stainless steel forming, and Diamond-Like Carbon (DLC) for aluminum applications where anti-galling properties are critical.
4. How much can coated punches increase tool life and what is the ROI?
Coated punches can increase tool life by 6 to 10 times or more compared to uncoated alternatives. Since coatings typically cost only 5-10% of a new tool's price, every dollar spent on coating can yield significant returns. For high-volume production exceeding one million parts, premium coatings like DLC or TiAlN pay dividends many times over by eliminating tool changes and reducing scrap. Shaoyi's precision stamping solutions leverage proper coating selection with IATF 16949-certified processes to maximize this ROI.
5. How do you select the right coating for different workpiece materials?
Coating selection depends on workpiece material properties. For aluminum and copper alloys prone to galling, DLC coatings with friction coefficients below 0.1 prevent material adhesion. Stainless steel's work-hardening behavior requires TiAlN or TiCN for thermal stability and abrasion resistance. Galvanized steel's abrasive zinc particles demand TiCN's superior hardness. Carbon steels work well with cost-effective TiN coatings. Production volume also matters—high-volume runs justify premium coatings, while short runs may not recover the investment.