 Small batches, high standards. Our rapid prototyping service makes validation faster and easier —

Stamp Die Secrets: From First Cut To Flawless Results Every Time
What Is a Stamp Die and Why Does It Matter
Have you ever wondered how crafters create those perfectly shaped embellishments on handmade cards? Or how manufacturers produce thousands of identical metal components with razor-sharp precision? The answer lies in a deceptively simple tool that bridges creative hobbies and industrial production: the stamp die.
The Simple Definition Behind Every Perfect Cut
At its core, a stamp die is a precision-cut metal tool designed to cut, shape, or emboss specific forms from various materials. Think of it as a specialized cookie cutter, but engineered with far greater accuracy and durability. According to Merriam-Webster, to die-stamp means "to form or cut out especially from sheet stock or to emboss by means of a die." This definition captures the dual nature of these remarkable tools—they can both remove material entirely and create raised impressions.
A stamp die is a precision-engineered metal cutting tool that transforms flat materials into perfectly shaped designs through pressure and sharp edges.
Whether you're working with cardstock at your craft table or watching automotive parts roll off a production line, the fundamental principle remains identical. The die's sharp edges meet your chosen material, and with the right pressure, you get a clean, consistent cut every single time.
From Metal Tool to Creative Possibility
Understanding stamps and dies opens up two distinct worlds. In the crafting community, these tools have revolutionized card making and scrapbooking. Hobbyists use die sets to create intricate floral designs, elegant borders, and perfectly shaped sentiments that would be nearly impossible to achieve by hand. The precision eliminates guesswork, letting your creativity flow without technical frustration.
On the industrial side, the same technology scales dramatically. Manufacturing facilities rely on heavy-duty versions to produce everything from automotive brackets to electronic components. The die stamp becomes a cornerstone of mass production, ensuring each piece matches exact specifications.
What makes this tool so valuable across such different applications? Consistency and repeatability. A well-made die delivers identical results whether you're cutting your first piece or your ten-thousandth. For crafters, this means professional-looking projects without professional training. For manufacturers, it translates to quality control and efficiency that manual processes simply cannot match.
No matter where you fall on the spectrum—weekend hobbyist, professional crafter, or industrial engineer—understanding how these precision tools work will transform your results. Let's explore the varieties available and discover which options suit your specific needs.
Understanding Different Types of Stamp Dies
Not all stamp and die sets are created equal. Walk into any craft store or browse industrial catalogs, and you'll encounter a dizzying array of options. The secret to choosing wisely? Understanding that each die type exists for a specific reason, and matching the right tool to your project makes all the difference between frustration and flawless results.
Thin Dies vs Steel Rule Dies Explained
The two most common categories you'll encounter are thin metal dies and steel rule dies. Each brings distinct advantages to the table, and knowing their differences will save you time, money, and countless botched projects.
Thin metal dies (sometimes called wafer-thin dies) feature an etched metal construction where the cutting areas are precisely removed from thin steel sheets. The cutting edge forms a raised border around your desired shape. These dies are lightweight, store flat, and typically require a magnetic platform to hold them securely during cutting. Popular brands like Hero Arts dies have built their reputation on intricate thin die designs that capture remarkable detail.
Because thin dies lack substantial body weight, they excel at detailed, delicate work. Imagine cutting lacy borders, tiny florals, or intricate sentiment frames—these dies handle complexity beautifully. However, that slender profile means they may struggle with thicker materials or high-volume use.
Steel rule dies take a completely different approach. According to YT Diemaker's technical guide, these dies use high-carbon steel rules attached to a wood or foam base. The steel edges typically feature tip hardness ratings between HS50 and HS80, with softer body sections allowing for precise bending during manufacturing. Protective foam surrounds the cutting edges, preventing cut pieces from getting stuck inside the die.
Steel rule dies deliver higher cutting force and superior durability. They're the workhorses of the stamp die world—perfect for thicker materials, repetitive use, and situations where thin dies might bend or dull prematurely. IO stamps dies often incorporate steel rule construction for their more robust designs.
Matching Die Materials to Your Projects
Choosing between die cut stamps isn't just about construction—it's about understanding how material composition affects your results. Here's what actually matters when you're standing in the craft aisle or ordering online.
Cutting performance depends heavily on edge hardness and bevel angle. Smaller bevel angles (around 30°) create sharper cuts but wear faster. Larger angles (up to 52°) sacrifice some sharpness for longevity, making them ideal for tougher materials like chipboard or leather. For delicate cardstock and stamps and die cuts projects, sharper edges typically produce cleaner results.
Durability correlates directly with steel quality and construction method. Steel rule dies with higher HRC ratings last longer under repeated use. Thin metal dies, while more affordable initially, may need replacement sooner if used aggressively. For hobbyists creating occasional cards, thin dies offer excellent value. For high-volume production or business use, investing in quality steel rule options pays dividends.
Price point reflects these differences predictably. Thin metal dies set lower entry barriers for beginners building their first dies set. Steel rule varieties command premium prices but justify the investment through extended lifespan and versatility with challenging materials.
| Type | Thickness | Best Uses | Machine Compatibility | Durability Rating |
|---|---|---|---|---|
| Thin Metal Dies | Wafer-thin (approx. 0.5-1mm) | Intricate designs, detailed cuts, delicate shapes, cardstock | Most manual machines with magnetic platform | Moderate (best for light to medium use) |
| Steel Rule Dies | Thicker (various heights: 22.9mm-23.8mm standard) | Heavy cardstock, chipboard, leather, fabric, high-volume projects | Manual machines requiring specific clearance | High (built for repeated, demanding use) |
| Specialty Dies | Varies by application | 3D shapes, layered designs, embossing combinations | Machine-specific (check manufacturer specs) | Varies (depends on construction quality) |
Beyond these primary categories, specialty dies serve niche purposes—creating 3D boxes, layered dimensional flowers, or combining cutting with embossing in single passes. As you build your collection, you'll naturally gravitate toward the types that match your creative style and project demands.
Understanding these distinctions prepares you for smart purchasing decisions. But even the perfect die won't deliver results without proper coordination—which brings us to how stamps and dies work together to elevate your projects beyond basic cutting.
The Relationship Between Stamps and Dies
You've seen the product listings everywhere: "coordinating stamp and die set" or "matching stamps and dies for card making." But what does "coordinating" actually mean? Why would you want both tools when each works independently? This relationship between stamps and dies represents one of the most powerful concepts in paper crafting—yet it's rarely explained beyond marketing copy.
How Stamps and Dies Work Together
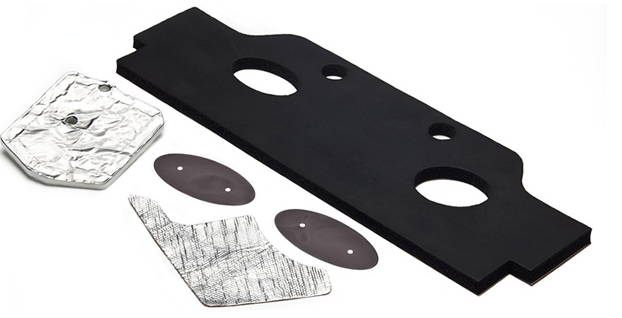
Think of stamps and dies as perfect partners, each handling a distinct job that complements the other beautifully. A stamp creates an inked impression on your material. It transfers designs, sentiments, and images onto paper through ink application. A die, on the other hand, cuts shapes from your material. It removes everything outside the design, leaving behind a perfectly shaped piece.
When these tools coordinate, magic happens. Imagine stamping an intricate floral design onto cardstock. The image looks lovely, but it sits within a rectangular piece of paper. Now run that stamped piece through your die cutting machine with the matching die. Suddenly, your flower has a perfectly shaped silhouette—every petal edge clean and precise, following the exact contours of your stamped image.
According to Klompen Stampers, coordinating products like the Timeless Arrangements stamp and die set offer remarkable versatility. The stamp set provides various sentiments usable across many different cards, while the matching dies—including unique "sprig" designs with built-in bases—make assembly effortless. These innovative die designs eliminate fumbling with adhesive when attaching small pieces, streamlining your entire creative process.
This partnership transforms stamps for card making from simple impression tools into complete design systems. Rather than carefully hand-cutting around stamped images (and inevitably creating uneven edges), the die handles precision work instantly. Your creative energy stays focused on design choices rather than tedious trimming.
The Magic of Coordinating Sets
Why invest in coordinating sets rather than purchasing stamps and dies separately? The benefits extend far beyond convenience:
- Perfect alignment every time: Coordinating dies are engineered to match their companion stamps precisely. No measuring, no guessing, no trial-and-error cutting. The die follows the stamp design's exact contours.
- Significant time savings: Skip the painstaking hand-cutting that once consumed hours of project time. A single pass through your machine produces clean, professional edges in seconds.
- Professional-quality results: Even beginners achieve expert-level finishes. Coordinating tools eliminate the skill gap between casual crafters and seasoned professionals.
- Design consistency across projects: Creating multiple cards for events? Coordinating sets ensure every piece matches perfectly, ideal for wedding invitations, holiday mailings, or craft fair inventory.
- Layering possibilities: Many stamp and die combinations include multiple coordinating elements designed to stack beautifully, creating dimensional effects that flat stamping alone cannot achieve.
Hero Arts stamps and dies exemplify this coordinating philosophy, offering matching sets that transform complex layered designs into straightforward projects. Similarly, IO stamps and dies provide coordinating options spanning florals, sentiments, and decorative elements—each pairing engineered for seamless integration.
But here's the question beginners often ask: do you actually need both? The honest answer depends on your goals. Stamps work beautifully alone for creating backgrounds, adding sentiments to pre-cut shapes, or designing projects where precise cutting isn't essential. Dies function independently for producing shapes, frames, and decorative elements from patterned paper—no stamping required.
However, when you want that perfectly matted sentiment, that precisely outlined floral cluster, or those layered dimensional embellishments that define professional card making—that's when the stamp and die partnership becomes irreplaceable. The combination unlocks creative possibilities neither tool achieves independently.
Ready to put these coordinating tools to work? You'll need the right equipment to maximize their potential—and understanding machine compatibility prevents costly mismatches.
Essential Equipment for Using Stamp Dies
So you've discovered the perfect stamp die set for your next project. Before you click "add to cart," there's a critical question you need to answer: do you have the equipment to actually use it? Unlike stamps that work with simple ink pads and hand pressure, dies and stamps require specialized machines to function. Understanding this equipment investment upfront saves frustration and wasted money on tools that sit unused.
Do You Need a Die Cutting Machine
The short answer? Almost always yes. While a few oversized industrial dies work with manual presses, the stamp sets most crafters encounter require a dedicated die cutting machine. These machines generate the consistent, powerful pressure needed to force sharp die edges cleanly through your materials.
You'll encounter two main categories when shopping for machines:
Manual die cutting machines use a hand-crank mechanism to feed materials between pressure rollers. According to Crafter's Companion, you simply align your plates with the machine's opening and turn the handle to feed them through. Popular options like the Sizzix Big Shot offer robust construction and reliable cutting without electricity or digital setup. These machines appeal to crafters who prefer tactile control and appreciate the simplicity of mechanical operation.
Electronic die cutting machines automate the feeding process entirely. Insert your prepared materials, and the machine handles the rest. Models like the Gemini II or Gemini Junior automatically draw plates through the rollers, applying consistent pressure throughout. Electronic options often include additional features—some even connect to design software for custom cutting paths beyond traditional dies.
- Sizzix Big Shot and similar manual machines: Excellent entry point for beginners. Compatible with most thin metal dies and steel rule dies within clearance specifications. Requires physical effort but offers reliable, no-fuss operation.
- Cricut Explore and Maker series: Digital cutting machines that use blades rather than traditional dies. Create custom designs through software but require different consumables than standard die stamp set collections.
- Gemini (original and Junior models): Versatile electronic machines compatible with various die types. Offer both die cutting and embossing capabilities with appropriate plate configurations.
- Silhouette Cameo series: Another digital cutting option featuring blade-based cutting. Ideal for vinyl and custom designs but operates differently than pressure-based die cutting machines.
- Brother ScanNCut: Combines scanning technology with cutting capabilities. Works with proprietary blades rather than traditional dies.
When evaluating machines, consider the cutting area size (larger areas accommodate bigger dies but require more space), material compatibility with your preferred projects, and whether you want set stamping workflow simplicity or digital design flexibility.
The Sandwich Method Explained
Here's where things get interesting—and where many beginners stumble. Die cutting machines don't simply squeeze your die against paper. They use a carefully arranged stack of plates and materials called a "sandwich." Get this combination wrong, and you'll experience incomplete cuts, damaged plates, or frustrated head-scratching.
According to Crafter's Companion's detailed guide, a basic die cutting sandwich typically includes: base clear cutting plate, your card or paper, the die positioned cut-side down, a magnetic shim, a plastic shim, and finally a top clear cutting plate. This arrangement creates the precise pressure distribution needed for clean cuts.
Different projects require different sandwiches. For crisper cuts, substitute a metal cutting plate beneath your material. For stencils and die cuts involving specialty materials, you may need additional shims to adjust pressure. The key principle? Each layer serves a purpose—cutting plates protect the machine and distribute pressure evenly, shims fine-tune pressure intensity, and magnetic components secure thin dies in position.
One pro tip from the experts: flip your cutting plates after each use and run them through empty. This prevents bowing that develops from repeated one-sided pressure, extending plate lifespan significantly.
Embossing vs Die Cutting Demystified
Many crafters confuse these techniques because the same machines often perform both functions. The distinction matters when you're building your toolkit and understanding what different products actually do.
Die cutting removes material entirely. Sharp die edges slice through paper, cardstock, fabric, or other materials, separating your desired shape from the surrounding sheet. You end up with cut-out pieces—the material inside the die shape is what you keep (or discard, depending on the design).
Embossing creates raised impressions without cutting. Using embossing folders—plastic folders with embedded designs—or specialized dies with rubber embossing mats, the machine presses patterns into your material. Nothing gets removed. Instead, you create dimensional texture: raised areas and recessed areas that catch light beautifully.
The sandwich configurations differ accordingly. Embossing requires a rubber embossing mat replacing the standard cutting plate, which allows the material to press into the die pattern without being cut. Some products offer combined cut-and-emboss functionality, delivering both effects in a single pass—these require specific sandwich arrangements including metal cutting plates for the cutting portions.
Understanding this distinction helps when shopping for a complete die stamp set or individual tools. Some dies cut only. Some emboss only. Some do both. Reading product descriptions carefully—and knowing which capability you need—prevents disappointing purchases.
With the right machine and proper sandwich technique, your dies will perform flawlessly. But what happens when cuts come out incomplete or materials shift mid-process? Those frustrating problems have solutions—and addressing them keeps your creative momentum flowing.
Troubleshooting Common Stamp Die Problems
Everything's set up perfectly. Your sandwich is assembled, your die stamps are positioned, and you've cranked your material through the machine. Then you peel back the paper and discover... disappointment. Sections remain uncut. Edges look ragged. Or worse, your design shifted mid-cut, ruining an otherwise beautiful piece of cardstock.
Sound familiar? You're not alone. Even experienced crafters encounter frustrating stamp dies issues that threaten to derail projects. The good news? Most problems have straightforward solutions once you understand what's actually going wrong. Let's diagnose your cutting troubles and get you back to flawless results.
Solving Incomplete Cut Problems
Incomplete cuts rank as the most common stamp die frustration. According to SBL Machinery's troubleshooting guide, this issue typically stems from insufficient cutting pressure, blade wear, uneven cutting plates, or material thickness variations. Each cause requires a different fix—so systematic diagnosis saves time and materials.
When your paper cut stamp results leave connected areas that require extra force to separate, work through this diagnostic process before assuming your die needs replacement:
- Check your blade or die condition first. According to Cardstock Warehouse's extensive testing, blade sharpness dramatically affects cut quality. They note you'll be "amazed at the difference a new blade makes." For electronic machines, dull blades snag paper rather than slicing cleanly. For traditional dies, examine cutting edges for nicks, bends, or visible wear patterns.
- Evaluate your pressure settings. Many incomplete cut issues resolve simply by increasing pressure. For manual machines, ensure you're applying consistent cranking force throughout the pass. For electronic machines, adjust pressure settings incrementally—testing each change with a small corner cut before committing to full designs.
- Inspect your cutting plates for damage. Prolonged use creates localized indentations in cutting plates, producing uneven pressure distribution. Run your hand across plate surfaces feeling for grooves or depressions. Flip plates regularly and replace any showing significant wear.
- Add shims to increase pressure locally. If certain die areas consistently undercut while others perform fine, targeted shimming helps. Place thin cardstock or purpose-made shims beneath problem sections to equalize pressure across the entire die surface.
- Verify material compatibility. Not every paper weight works with every die configuration. For papers exceeding 80 lb basis weight, Cardstock Warehouse recommends using double-cut features rather than single passes. Attempting heavy cardstock without pressure adjustments virtually guarantees incomplete cuts.
- Consider the double-pass technique. Sometimes the simplest solution works best. Run your sandwich through twice without repositioning. This provides cleaner cuts without requiring permanent pressure changes that might damage thinner materials later.
According to Wilson Manufacturing's technical guide, running with the least pressure needed actually extends die life significantly. Start with lower pressure and increase gradually rather than defaulting to maximum force. Excessive pressure causes premature die wear—solving today's problem while creating tomorrow's.
Why Your Dies Might Be Shifting
Few things frustrate crafters more than discovering their carefully positioned die shifted during cutting. The result? Partially cut designs, crooked edges, and wasted materials. Understanding why shifting happens—and preventing it—transforms your cutting consistency.
Magnetic platform issues cause most thin die shifting problems. Wafer-thin dies require magnetic surfaces to hold them stationary during cutting. If your magnetic platform has weakened, dies gradually creep as materials pass through rollers. Test magnetic strength by placing your die on the platform and gently pressing sideways—strong magnets should firmly resist movement.
Taping techniques provide backup security, especially for intricate stamp and die sets for card making with small, detailed pieces. Low-tack washi tape works beautifully—it holds dies firmly without leaving residue or damaging cutting surfaces. Position tape across die corners rather than edges, allowing cutting portions to remain unobstructed while anchoring the die securely.
Material slippage creates shifting that appears die-related but actually originates with your paper or cardstock. Glossy, coated, or slick materials slide more readily than textured papers. For problematic materials, consider:
- Using stronger grip mats on electronic machines
- Applying light temporary adhesive to material backs
- Reducing cutting speed to minimize momentum-based shifting
- Ensuring mats retain adequate stickiness (replace worn mats promptly)
Improper sandwich assembly also contributes to shifting. Layers that aren't flush against each other create gaps where movement occurs. Before cranking, press your entire sandwich firmly together and verify alignment. Some crafters use clips at sandwich edges to maintain registration throughout the cutting pass.
Material Compatibility Solutions
Your die cuts beautifully through standard cardstock—then struggles dramatically with specialty papers. This frustrating inconsistency stems from material compatibility issues that many crafters never consider when purchasing cut out stamps or selecting project supplies.
Paper weight limits matter more than most beginners realize. According to Cardstock Warehouse testing, papers greater than 80 lb basis weight require adjusted approaches. Their recommendation? Never attempt single-pass cutting on heavy cardstock. Instead, use multi-cut settings or the intricate cut feature found on many electronic machines, which applies lower pressure across two passes.
Specialty material considerations extend beyond weight. Glittered papers contain abrasive particles that accelerate blade dulling. Vellum's translucency often masks incomplete cuts until removal from the mat. Fabric and felt require different pressure than paper—often significantly higher. Cork, chipboard, and leather each present unique challenges requiring experimentation and adjusted settings.
When troubleshooting material-specific problems:
- Tearing during cuts suggests excessive pressure or speed. Reduce both variables incrementally until clean cuts return. Cardstock Warehouse demonstrates that incorrect pressure creates dramatically different results than proper settings—the visual difference is striking.
- Frayed edges indicate blade dullness or inappropriate material for the die type. Thin intricate dies struggle with fibrous materials; steel rule dies handle them better. Match your die construction to material demands.
- Stuck pieces inside dies result from inadequate foam padding (on steel rule dies) or materials too thick for the die design. Some specialty papers benefit from releasing sprays applied to die surfaces before cutting.
One often-overlooked factor? Paper moisture content. SBL Machinery notes that excessively dry paper produces debris during cutting, while overly moist paper weakens structurally and deforms under pressure. Optimal moisture content falls between 8-12%. Store papers in climate-controlled environments to maintain consistency across projects.
Proper storage protects both your materials and your dies—and understanding how storage affects long-term cutting performance reveals why organization matters beyond simple tidiness.
Storing and Maintaining Your Stamp Dies
You've invested in quality dies, mastered the sandwich technique, and troubleshot your way to clean cuts. But here's what many crafters overlook: how you store those precision tools directly impacts how they perform months—even years—down the road. Poor storage doesn't just create clutter. It causes rust, warping, and dulled edges that transform reliable dies into frustrating tools that underperform.
Think about it this way: your stamp die collection represents real money and creative potential. Protecting that investment requires more than tossing dies into a drawer and hoping for the best.
Protecting Your Die Investment
According to LW Leathers' comprehensive guide on steel rule die longevity, storage conditions significantly affect die lifespan. Their experts recommend storing dies in dry, climate-controlled environments to prevent rust and corrosion. Humidity stands as the silent killer of precision cutting tools—moisture creates oxidation that damages sharp edges and compromises cutting performance over time.
Beyond moisture control, physical stress during storage matters equally. Stacking heavy objects on top of dies causes bending or misalignment. Even slight warping creates uneven pressure distribution during cutting, leading to those incomplete cuts you've worked hard to eliminate. Dedicated storage solutions prevent this mechanical damage while keeping your collection accessible.
For steel rule dies specifically, applying a light protective coating before storage adds another defense layer. Mineral oil or commercial rust inhibitors create barriers against humidity, particularly valuable if your craft space lacks climate control. This simple step takes seconds but extends die usefulness for years.
Organization Systems That Actually Work
According to Scrapbook.com's updated organization guide, today's crafters are embracing sleek, uniform storage systems that protect tools while making creativity easier. The goal isn't mere tidiness—it's creating a system where you can quickly locate specific dies without hunting through chaotic piles.
Magnetic storage sheets offer exceptional protection for thin metal dies. These sheets hold dies securely in place, preventing scratching and edge damage that occurs when loose dies shift against each other. Slip magnetic cards into storage envelopes for a compact, protective solution that works beautifully for coordinating stamp bundles and their matching dies.
Labeled binders create that satisfying "catalog-style" browsing experience many crafters love. Use pocket page inserts within standard three-ring binders, organizing by theme, manufacturer, or project type. Pair with magnetic sheets for extra security, or slip dies into storage envelopes before filing. This approach works particularly well for Altenew stamp sets and their coordinating dies—keeping matching pieces together ensures you never waste time hunting for companions.
Storage bins with tabbed dividers accommodate larger collections efficiently. Wider bins fit multiple categories, letting you organize by season, occasion, or design style. For those with retired stamp and die sets you can't bear to discard, dedicated archival bins keep treasured pieces protected while freeing active storage space.
- Best Practice: Store dies flat or upright—never at angles that encourage warping over time.
- Best Practice: Use clear envelopes or containers so you can identify contents without opening every package.
- Best Practice: Maintain consistent temperature and humidity in your craft space (avoid garages, attics, or basements without climate control).
- Best Practice: Keep coordinating stamp stencils and dies together to streamline project setup.
- Mistake to Avoid: Storing dies loose in drawers where they slide, scratch, and damage each other.
- Mistake to Avoid: Placing heavy items atop die storage containers, causing compression damage.
- Mistake to Avoid: Neglecting regular cleaning—adhesive residue and paper dust accelerate wear and affect cutting quality.
- Mistake to Avoid: Storing in humid areas without protective coatings, inviting rust and corrosion.
The connection between storage quality and cutting performance becomes obvious once you've experienced the difference. Well-maintained dies deliver consistent, clean results cut after cut. Neglected dies develop dull spots, bent sections, and rust patches that produce increasingly frustrating outcomes. Your organization system isn't just about finding things easily—it's about preserving the precision engineering that makes these tools valuable.
Whether you're managing a modest collection or rooms full of crafting supplies, investing time in proper storage pays dividends through extended die life and reliable performance. Now that you understand how hobbyist-level care works, let's explore how the same principles scale dramatically in industrial manufacturing applications.
Industrial Applications and Precision Manufacturing
The stamp die you use for card making and the one producing your car's body panels share the same fundamental DNA. Both rely on precision-cut metal tools applying controlled pressure to shape materials. But when you scale from crafting tables to factory floors, everything intensifies—tolerances tighten, stakes rise, and quality standards become non-negotiable.
Understanding this industrial side reveals why precision matters so deeply, whether you're cutting cardstock or custom metal die stamp applications for aerospace components.
When Precision Becomes Critical
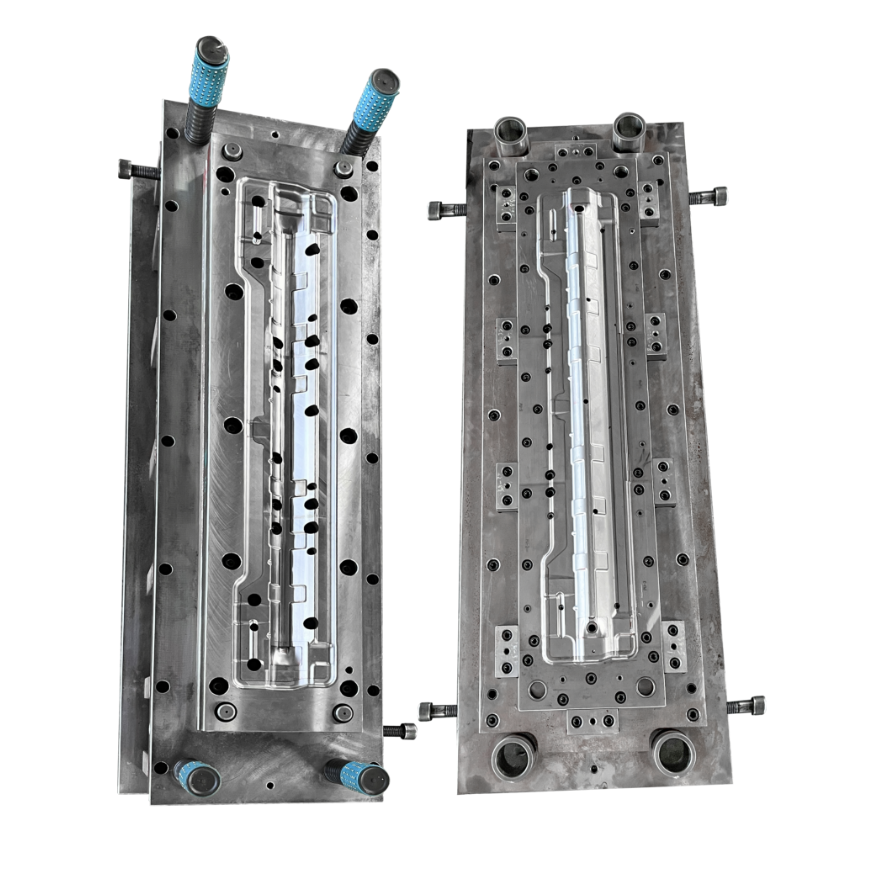
Imagine cutting the same shape thousands of times per hour, day after day, for years. Now imagine each piece must match specifications measured in hundredths of a millimeter. Welcome to industrial stamp die manufacturing, where "close enough" simply doesn't exist.
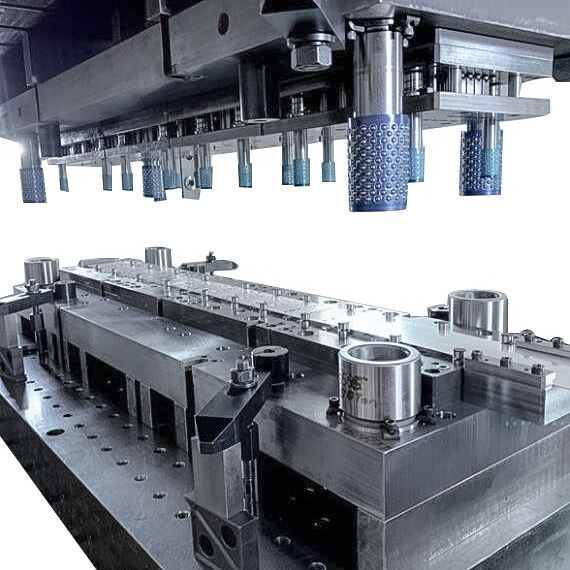
Industrial stamping dies operate under demands that would destroy craft-level tools instantly. According to Sandvik Coromant's industry overview, modern die machining requires specialized approaches like round insert milling cutters that achieve higher metal removal rates while maintaining constant spindle loads. These aren't refinements—they're necessities when producing metal stamping die sets capable of millions of cycles.
What separates industrial precision from hobbyist expectations? Consider these critical factors:
- Material specifications: Industrial dies use hardened tool steels engineered for specific applications. Automotive stamping requires materials resisting extreme pressure while maintaining edge sharpness across millions of cycles.
- Tolerance requirements: Where craft dies might vary by fractions of millimeters without consequence, industrial stamp die sets demand consistency within microns. A door panel that doesn't fit destroys production efficiency.
- Production volume: Your crafting die might cut hundreds of pieces in its lifetime. Industrial dies face thousands of cycles daily, requiring construction methods that withstand relentless repetition.
- Quality verification: Every industrial die undergoes rigorous testing before deployment. Failures aren't just disappointing—they halt production lines costing thousands per minute.
The manufacturing world also relies on wholesale stamps and wholesale polymer components that support high-volume production runs. These supply chain considerations don't exist in hobby contexts but become essential when scaling operations.
Industrial Standards in Stamp Die Manufacturing
How do manufacturers ensure their custom die stamp solutions perform reliably? Through certification standards and advanced simulation technology that catch problems before they reach production floors.
According to Automation Tool & Die's service overview, IATF 16949 certification represents the gold standard for automotive stamping operations. This international quality management standard requires documented design processes, rigorous inspection protocols, and complete traceability for every part produced. Certified manufacturers don't just promise quality—they prove it through systematic verification at every production stage.
But certification addresses existing processes. How do engineers predict die performance before cutting the first piece? CAE (Computer-Aided Engineering) simulation technology fills this critical gap. Advanced software models material flow, predicts stress points, and identifies potential failure modes virtually. Problems discovered during simulation cost pennies to fix. The same issues discovered during production cost fortunes.
This combination—certified quality systems plus predictive simulation—delivers what industrial customers demand: stamp die sets that perform correctly from the first cycle. When Shaoyi's automotive stamping die solutions achieve 93% first-pass approval rates, that success reflects this dual commitment to process excellence and technological sophistication. Their rapid prototyping capabilities—delivering functional dies in as little as 5 days—demonstrate how modern manufacturing compresses development timelines without sacrificing precision.
For manufacturers evaluating tooling partners, these capabilities matter enormously. CAE simulation reduces costly trial-and-error iterations. IATF 16949 certification ensures consistent quality meeting OEM requirements. Rapid prototyping accelerates time-to-market. Together, these factors determine whether production launches smoothly or stumbles through preventable problems.
The engineering sophistication behind industrial stamp die manufacturing illustrates why precision tools command premium investments. Whether you're producing automotive brackets or evaluating partners for complex metal stamping projects, understanding these quality indicators helps distinguish capable manufacturers from those cutting corners.
Ready to begin your own stamp die journey? Whether you're building a craft collection or exploring professional manufacturing applications, the right starting point depends entirely on your goals—and choosing wisely sets you up for success from your very first cut.
Getting Started with Stamp Dies
You've absorbed the fundamentals—die types, equipment requirements, troubleshooting techniques, and storage best practices. Now comes the exciting part: actually building your collection and putting knowledge into action. Whether you're eyeing craft stamps and dies for weekend card-making sessions or evaluating industrial tooling partnerships for manufacturing operations, starting smart prevents wasted investments and accelerates your path to consistent results.
Building Your First Die Collection
Where should you actually begin? The answer depends entirely on your goals, but certain principles apply universally. Rushing to accumulate massive collections leads to cluttered craft rooms and underutilized tools. Strategic purchasing builds versatile capabilities that grow with your skills.
Consider these key factors before making your first purchases:
- Budget planning: Set realistic spending limits before browsing. Quality matters more than quantity—one well-made stamp and die cut sets outperforms a drawer full of bargain tools that underdeliver. Watch for dies for sale during seasonal promotions, but don't sacrifice quality for discounts.
- Starter kit essentials: Begin with versatile basics rather than specialized designs. A classic rectangle frame die, a sentiment set, and one floral or decorative element handle countless project types. These foundational tools teach technique before you invest in niche options.
- Machine compatibility verification: Before purchasing any die, confirm it works with your equipment. Check thickness specifications, cutting area dimensions, and platform requirements. A beautiful die that won't run through your machine provides zero value.
- Skill-building progression: Start with simpler dies featuring fewer intricate details. Master basic sandwich configurations and pressure adjustments before tackling complex layered designs requiring precise alignment. Frustration-free early experiences build confidence that sustains long-term enthusiasm.
- Quality indicators to evaluate: Examine die construction before purchasing. Sharp, consistent edges without visible imperfections signal quality manufacturing. Reputable brands provide customer support when issues arise—factor that reliability into purchasing decisions.
Seasonal shopping offers excellent opportunities for building collections affordably. Christmas stamps and dies typically see significant markdowns after the holiday season—purchasing discount Christmas stamps and coordinating dies in January provides substantial savings for next year's projects. The same pattern applies across holidays and occasions, rewarding patient shoppers who plan ahead.
For hobbyists focused on card making, coordinating stamp and die cut sets deliver the best initial value. These combinations eliminate the guesswork of matching designs and ensure your first projects produce professional-looking results. As your skills develop, you'll naturally expand into standalone dies that complement your growing collection.
From Beginner to Confident Creator
Your first cuts won't be perfect—and that's completely fine. Every experienced crafter remembers early projects with incomplete cuts, shifted dies, and learning-curve frustrations. What separates those who thrive from those who abandon the hobby? Persistence combined with systematic skill development.
Build your confidence through deliberate practice. Start each session with test cuts on scrap materials before committing good cardstock. Document what works—note pressure settings, sandwich configurations, and material combinations that produce clean results. This reference becomes invaluable as your project complexity increases.
Join communities where crafters share tips, troubleshoot problems, and inspire creative applications. Online forums, social media groups, and local crafting clubs provide support systems that accelerate learning curves. Seeing how others use identical tools sparks ideas you'd never discover working in isolation.
For those exploring professional manufacturing pathways, the journey looks different but follows similar principles. Start by understanding your production requirements—volume expectations, material specifications, and precision tolerances. These parameters determine whether off-the-shelf solutions work or custom die stamp development becomes necessary.
Professional manufacturing applications benefit enormously from certified partners offering OEM-standard tooling solutions. According to SBL Machinery's purchasing guide, evaluating second-hand prices and long-term value matters significantly—higher-quality equipment from reputable manufacturers maintains value and performs reliably across extended production runs. The same principle applies to die tooling: investing in precision-engineered solutions from certified manufacturers like Shaoyi prevents costly rework and production delays.
Whatever your starting point, remember this: mastery develops through consistent practice, not instant expertise. The stamp die that frustrates you today becomes an effortless tool next month if you persist through the learning curve. Every professional crafter and manufacturing engineer started exactly where you are now—uncertain, curious, and ready to learn.
You've gained comprehensive knowledge spanning hobbyist applications through industrial manufacturing. You understand die types, equipment requirements, troubleshooting approaches, and storage best practices. Most importantly, you know that precision cutting isn't magic—it's the predictable result of matching the right tools to appropriate techniques.
Now it's time to make that first cut. Choose your die, assemble your sandwich, and discover the satisfaction of watching perfectly shaped pieces emerge. Your stamp die journey starts with a single pass through the machine—and leads wherever your creativity and ambition take you.
Frequently Asked Questions About Stamp Dies
1. How much does a metal stamping die cost?
Metal stamping dies range from $500 to $15,000 depending on complexity. Simple craft dies cost significantly less, typically $10-$30, while industrial-grade automotive stamping dies with precision engineering and IATF 16949 certification command higher prices. Factors affecting cost include material specifications, tolerance requirements, production volume expectations, and whether custom design work is needed. Working with certified manufacturers like Shaoyi can optimize costs through CAE simulation that reduces trial-and-error iterations.
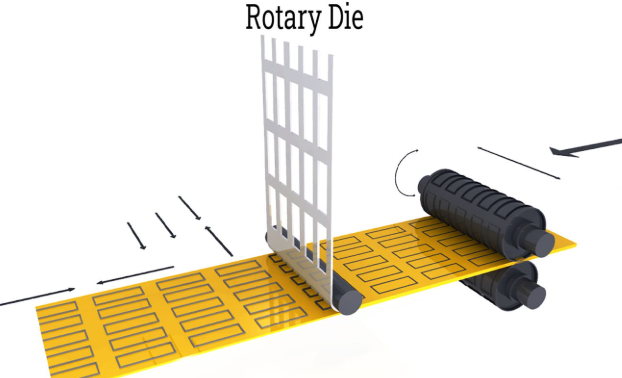
2. How does a stamping die work?
A stamping die works by using precision-cut metal edges to apply controlled pressure against materials like paper, cardstock, or sheet metal. For craft applications, you create a 'sandwich' of cutting plates, material, and die, then run it through a manual or electronic die cutting machine. The sharp die edges slice through the material, creating perfectly shaped pieces. Industrial stamping presses use the same principle at larger scales with significantly higher pressure and tighter tolerances.
3. What is the difference between thin dies and steel rule dies?
Thin metal dies are wafer-thin etched steel sheets requiring magnetic platforms, ideal for intricate detailed designs on cardstock. Steel rule dies feature high-carbon steel rules attached to wood or foam bases, offering superior durability and higher cutting force for thicker materials like chipboard, leather, and fabric. Thin dies excel at delicate work but may struggle with heavy-duty use, while steel rule dies handle repetitive cutting and challenging materials better.
4. Do I need a die cutting machine to use stamp dies?
Yes, almost all stamp dies require a die cutting machine to generate the consistent pressure needed for clean cuts. Manual machines use hand-crank mechanisms feeding materials between pressure rollers, while electronic machines automate the process. Popular options include Sizzix Big Shot for manual operation and Gemini series for electronic cutting. Before purchasing dies, verify machine compatibility by checking thickness specifications and cutting area dimensions.
5. How should I store stamp dies to maintain their quality?
Store dies in dry, climate-controlled environments to prevent rust and corrosion. Use magnetic storage sheets for thin metal dies to prevent scratching, and organize in labeled binders or storage bins with tabbed dividers. Never stack heavy objects on dies or store them at angles that encourage warping. For steel rule dies, apply light protective coatings like mineral oil before storage. Proper maintenance directly impacts cutting performance and extends die lifespan significantly.