 Serii mici, standarde ridicate. Serviciul nostru de prototipare rapidă face validarea mai rapidă și mai ușoară —

Cum să îndoiți metalul fără a ghici – unghiuri curate, mai puține deșeuri
Pasul 1: Alegeți metoda potrivită de îndoire
Majoritatea greșelilor de îndoire apar chiar înainte de prima trăgerea de manetă. Dacă dorești să afli cum să îndoi metalul ușor, începe prin a identifica exact ce anume îndoi. Tablă, bară plană, tijă sau sârmă, precum și țeavă sau conductă nu reacționează în același mod, astfel încât un singur truc universal funcționează rar. Răspunsul la întrebarea „cum se îndoaie o piesă de metal” se schimbă rapid atunci când acea piesă este goală în interior, elastică sau destinată să rămână estetică.
Identificați tabla, bara plană, tija și țeava înainte de îndoire
Gândiți-vă mai întâi în termeni de formă. Tabla metalică presupune, de obicei, realizarea unei linii de îndoire drepte și controlate. Bara plană și tija necesită sprijin pentru ca îndoirea să rămână în locul dorit și să nu devieze din plan. Țeava și conducta adaugă un risc mai mare: pereții goi pot deforma, se pot îndoi ondulatoriu sau chiar se pot prăbuși dacă se folosește metoda incorectă. Prezentarea generală a îndoirii țevilor RogueFab subliniază faptul că metodele cu control scăzut, cum ar fi îndoirea prin presare, îndoirea prin piston și îndoirea prin compresiune, pot înlocui costul și viteza cu o precizie mai redusă și cu mai multe deteriorări ale tubului, în timp ce îndoirea prin tragere rotativă este utilizată pe scară largă atunci când precizia este esențială.
Potriviți oțelul, aluminiul și oțelul inoxidabil cu procesul potrivit
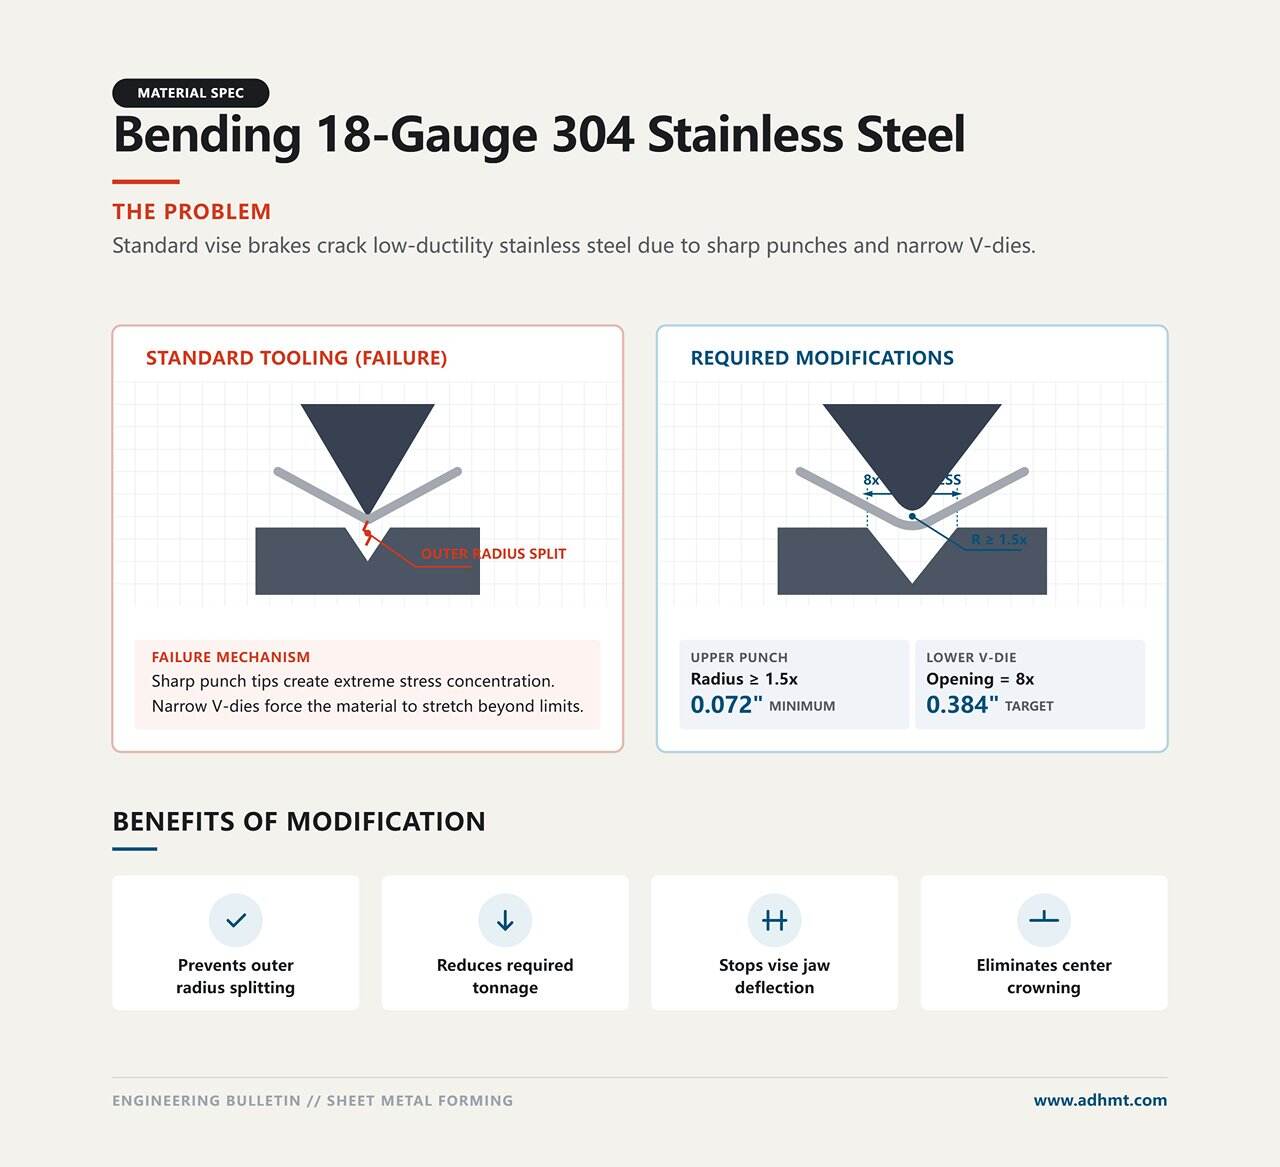
Materialul are la fel de mare importanță ca și formă. Orice persoană care cercetează modul de îndoire a tablelor metalice sau modul de îndoire a tablelor din aluminiu ar trebui să acorde o atenție deosebită revenirii elastice (springback), deoarece piesa se relaxează după înlăturarea forței. În ghidul ProtoSpace despre revenirea elastică, se menționează că materialele mai rezistente prezintă o revenire elastică mai pronunțată. Pentru un rază de îndoire de aproximativ 0,4–2 ori grosimea materialului, aluminiul 5052 poate avea o revenire elastică de aproximativ 2–5 grade, oțelul laminat la rece de aproximativ 1–3 grade, iar oțelul inoxidabil 304 de aproximativ 3–5 grade. Aceeași sursă menționează, de asemenea, că tablele mai groase prezintă, de obicei, o revenire elastică mai mică decât cele mai subțiri, în timp ce razele de îndoire mai mari prezintă, de obicei, o revenire elastică mai mare.
Alegeți cel mai potrivit instrument pentru grosime și finisaj
Un rezultat curat se obține prin potrivirea sculei atât cu forma piesei, cât și cu cerința privind finisarea. O presă de îndoit este potrivită pentru foile metalice . O mașină specializată pentru îndoitul țevilor sau a conductelor este potrivită pentru secțiunile goale. Materialul masiv necesită, de obicei, o formă sau un dispozitiv de fixare care menține îndoirea în plan. De aceea, acest ghid separă metodele în funcție de tipul de material, în loc să presupună că fiecare proiect începe în același mod.
| Formă metalică | Material | Metodă tipică | Sensibilitate la finisare | Zonele probabile de probleme |
|---|---|---|---|---|
| Foile | Oțel laminat la rece | Metodă cu presă de îndoit sau cu strângere rectilinie | Înaltă pe fețele vizibile | Revenirea elastică, răsucirea, eroarea de trasare |
| Foile | aluminiu 5052 | Frânare cu o îndoire de test în primul rând | Înaltă pe fețele vizibile | Revenire elastică, corecții prin supraindoire |
| Foile | 304 oțel inoxidabil | Frânare cu verificări atente ale unghiului | Înaltă pe fețele vizibile | Revenire elastică mai pronunțată, corecții mai dificile |
| Bară plată | Oțel, aluminiu, inox | Formă sau dispozitiv de îndoire dimensionat conform îndoirii | Variază în funcție de finisaj | Îndoiri în afara planului, presiune neuniformă |
| Tijă sau sârmă | Oțel, aluminiu, inox | Mandrină sau dispozitiv simplu de îndoire | Variază în funcție de finisaj | Gusturi, nepotrivire între piese identice |
| Tub sau conductă | Oțel, aluminiu, inox | Un îndoitură adecvată pentru tuburi sau conducte, adesea de tipul cu tragere rotativă pentru precizie | Variază în funcție de cerințele estetice | Aplatizare, încordare, colaps, precizie scăzută cu metodele cu control redus |
Alegeți calea dumneavoastră din acea tabelă înainte de a atinge o menghină. Planul devine mult mai fiabil atunci când masa de lucru, echipamentul de protecție, protecția suprafeței și câteva bucăți de probă sunt pregătite pentru a-l sprijini.
Pasul 2: Configurarea uneltelor, a echipamentului de siguranță și a pieselor de antrenament
O îndoire curată depinde la fel de mult de configurare ca și de unelță. Chiar și o masă de lucru casnică de bază poate oferi rezultate onorabile dacă materialul este măsurat cu atenție, susținut uniform și fixat în menghină fără a strivi finisajul. Ghidul de îndoire DIY indică o combinație practică de unelte pentru ateliere mici, inclusiv o presă de îndoit sau o docheră, o menghină, cleme, un ciocan și unelte manuale pentru îmbinări. Aceasta este utilă atât dacă învățați să folosiți o presă de îndoit metalul, cât și dacă doriți doar să realizați o singură îndoire neată, fără a risipi material.
Adunați uneltele care controlează îndoirea
- Unelte esențiale pentru trasarea contururilor: ruletă sau riglă, echer și un marker sau un trasator.
- Unelte esențiale de fixare: menghină de banc sau cleme rezistente, plus bare de fixare drepte sau unghiuri metalice.
- Unelte esențiale de îndoire: o presă de îndoit sau un dispozitiv de îndoit pentru tablă, sau un ciocan pentru formare ușoară și corecții.
- Accesorii utile: rășchetă manuală pentru finisări, blocuri de oprire pentru piese identice și resturi corespunzătoare pentru îndoiri de probă.
Dacă vă întrebați cum să îndoiți metalul acasă, această listă scurtă permite realizarea unui număr surprinzător de lucrări mici, fără echipamente costisitoare.
Protecția suprafeței înainte de fixare
Multe îndoiri urâte sunt, de fapt, erori de fixare. Această ghid de fixare a pieselor de prelucrat precizează că mandrinele zimțate pot pătrunde în materialele mai moi, în timp ce cele netede pot totuși lăsa urme sau permite alunecarea piesei dacă presiunea este neuniformă. O soluție simplă constă în plasarea între mandrine și piesa de prelucrat a unor bucăți de material sacrificabil neted, bandă adezivă, hârtie, nylon sau folie plastică. Mențineți mandrinele paralele, distribuiți sarcina pe cât posibil pe întreaga suprafață de contact sigură și strângeți doar până când piesa încetează să se miște. O forță mai mare înseamnă, de obicei, mai multe zgârieturi.
- Ochelari de protecție pentru așchii și muchii ascuțite.
- Mănuși pentru manipularea materialelor brute și a bavurilor.
- Masca facială la tăiere, rectificare sau curățare muchii.
Exercițiu pe resturi înainte de piesa finală
- Marcați linia de îndoire pe un rest din același material și aceeași grosime.
- Reglați menghinele, frâna sau barele de fixare pe un banc stabil.
- Adăugați protecția pentru maxilar înainte ca metalul să atingă clema.
- Poziționați piesa astfel încât ambele părți să fie susținute și clema să se închidă uniform.
- Efectuați o îndoire de probă mică, verificați alunecarea și urmele lăsate, apoi ajustați înainte de a îndoi piesa finală.
Oricine caută cum se îndoaie metalul cu un ciocan de obicei obține rezultate mai bune dacă te gândești mai întâi la control și abia apoi lovești. Loviturile ușoare și controlate aplicate pe o piesă corect fixată se comportă foarte diferit față de loviturile puternice aplicate pe materialul nefixat. Câteva îndoiri de probă evidențiază ce toleranță are materialul, dar oferă și ceva și mai valoros decât încrederea: o linie de îndoire de încredere.
Pasul 3: Marchează linia de îndoire și planifică cu precizie
Aceste bucăți de probă încep să-și justifice utilitatea chiar aici. O îndoire curată este rar doar un succes al uneltei. Mai degrabă, aceasta provine dintr-o linie marcată în locul potrivit, pornind de la muchia corectă, cu suficientă gândire acordată modului în care se va deplasa metalul. Persoanele care caută cum se îndoaie tabla metalică la 90 de grade se concentrează adesea asupra mânerului sau al ciocanului, dar trasarea inițială decide, de fapt, dacă flanșa finală va ajunge în locul dorit.
Marchează linia de îndoire și muchiile de referință
Linia de îndoire este linia unde dorești să aibă loc îndoirea. Muchia de referință este muchia sau caracteristica de la care măsori, astfel încât această linie să rămână constantă de la o piesă la alta. O muchie de referință dreaptă și fiabilă este esențială, deoarece chiar și o mică eroare de măsurare se fixează în îndoire. Orientările din OSH Cut arată, de asemenea, că decupajele situate în interiorul zonei de susținere a matriței pot deplasa locul efectiv al îndoirii; prin urmare, asigură-te că zona din jurul îndoirii este cât mai curată și bine susținută posibil atunci când plasezi piesa.
Fixează amplasarea înainte de îndoire. Este mult mai ușor să ștergi o linie greșit trasată decât să desfaci un unghi greșit.
Înțelege raza de îndoire, revenirea elastică și limitele minime de îndoire
Raza de curbură interioară este curba de pe fața interioară a îndoirii. Raza minimă de îndoire este cea mai mică rază interioară pe care un material o poate lua, în mod obișnuit, înainte ca fața exterioară să riscie fisurarea. Această valoare se modifică în funcție de material, grosime și stare de tratament termic. Xometry folosește 1t (adică o grosime de material) ca recomandare generală pentru raza minimă de îndoire a tablelor metalice, în timp ce Protolabs precizează că aluminiul 6061-T6 poate necesita o rază interioară mai mare pentru a evita fisurarea. Dacă învățați cum să îndoiți o rază la table metalice, acesta este punctul de verificare care asigură transformarea unei curbe netede într-o margine fisurată.
Revenirea elastică (springback) este ușoara relaxare a metalului după înlăturarea forței aplicate. De aceea, modul de îndoire a metalului la 90 de grade presupune, de obicei, îndoirea cu puțin peste 90 de grade pe o piesă de probă, urmată de verificarea comportamentului real al materialului. Revenirea elastică exactă depinde de material și de proces, astfel încât o probă (coupon) este mai fiabilă decât o presupunere.
Utilizați îndoiri de probă pentru a confirma valoarea de corecție, deducția și retrocedarea
Toleranța de îndoire este cantitatea de material consumată în secțiunea curbată a îndoirii . Deductia de îndoire este cantitatea pe care o scădeți din desenul plan, astfel încât picioarele finite să nu rezulte prea lungi. Retragerea este decalajul care vă indică câtă lungime dreaptă dispare în zona de îndoire. Protolabs explică acești termeni în relație cu axa neutră și dezvoltarea modelului plan, dar pentru majoritatea lucrărilor DIY regula practică este simplă: efectuați o îndoire de probă în același material, măsurați rezultatul și ajustați desenul plan înainte de a lucra piesa finală.
Dacă ați căutat cum să îndoiți metalul fără o presă de îndoit, îndoirea de probă este și mai importantă, deoarece montajele improvizate oferă mai puțin spațiu pentru corecții precise. Același lucru se aplică oricăruia care încearcă să îndoaie o foaie de tablă la 90 de grade pe un suport sau o carcasă vizibilă.
| Termen | Semnificația în limbaj simplu | De ce influențează precizia îndoirii |
|---|---|---|
| Linia de îndoire | Linia marcată unde se intenționează să aibă loc îndoirea | Dacă este plasată greșit, întreaga piesă rezultă prea scurtă, prea lungă sau strâmbă |
| Rază interioară de îndoire | Curba de pe partea interioară a îndoiturii | Modifică cât de strâns se formează piesa și cât de mult se întinde metalul |
| Raza minimă de îndoire | Cel mai strâns rază interioară practică înainte ca fisurarea să devină probabilă | O îndoire prea ascuțită poate deteriora piesa, în special în materialele mai puțin ductile |
| Retrocedere | Deschiderea ușoară a îndoiturii după ce presiunea este eliminată | Poate duce la o îndoire sub 90 de grade față de valoarea țintă, dacă nu se ține cont de acest efect |
| Toleranță la îndoire | Lungimea de material consumată în zona curbată a îndoiturii | Ajută la determinarea dimensiunii corecte în stare plană înainte de îndoire |
| Deducerea de îndoire | Cantitatea scăzută din dimensiunile în stare plană pentru a compensa efectul îndoirii | Previne obținerea unor lungimi de flanșe prea mari |
| Setback | Distanța de la colțul exterior până la locul în care începe efectiv îndoirea | Menține consistența pozițiilor îndoirilor și a dimensiunilor finale exterioare |
Odată ce această dispunere a fost verificată pe o mostră de test, linia de îndoire nu mai este o presupunere. Ea devine un element pe care îl puteți alinia cu siguranță la o presă de îndoit, ceea ce face ca procesul să devină mai reproductibil.
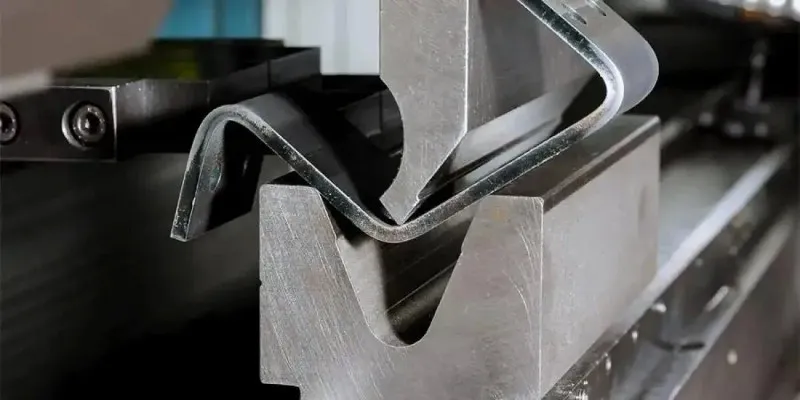
Pasul 4: Îndoiți tabla metalică cu o presă de îndoit
Cu o linie de îndoire verificată și o mostră de test lângă dumneavoastră, utilizarea unei prese manuale de îndoit nu mai pare misterioasă, ci devine reproductibilă. Pentru oricine caută informații despre modul de utilizare a unei prese pentru tablă metalică, acesta este fluxul de lucru de bază cel mai important. Este, de asemenea, răspunsul cel mai fiabil la întrebarea cum să îndoiți tabla metalică curat, atunci când dorești o linie dreaptă, o flanșă bine definită și mai puțin deșeu. Utilizați presa numai în limitele capacității sale nominale și efectuați prima îndoire pe material de rebut, astfel încât să puteți regla presiunea și unghiul fără a risca piesa finală. Un ghid pentru presa manuală precizează, de asemenea, că tabla trebuie ținută ferm, fără a lăsa urme sau deformări.
Aliniați linia de îndoire în presă
- Măsurați din nou flanșa sau piciorul finit, apoi marcați din nou linia de îndoire astfel încât să fie dreaptă și ușor de observat.
- Deschideți frâna. Dacă utilizați o frână de tip box and pan, așezați degetele astfel încât să corespundă lungimii îndoirii și eliminați orice îndoire anterioară sau elemente învecinate.
- Introduceți foaia în poziția corespunzătoare și aliniați linia de îndoire cu marginea frontală a barei de strângere.
- Priviți direct în lungul liniei înainte de a fixa. Verificați ambele capete, nu doar mijlocul. Dacă un capăt este înaintea celuilalt, îndoirea poate rezulta răsucită.
- Strângeți mai întâi ușor, verificați dacă linia nu s-a deplasat, apoi strângeți uniform pe întreaga suprafață a foilor. Mențineți zona de strângere curată, deoarece particulele strânse și întreținerea necorespunzătoare pot cauza probleme în funcționarea frânei, așa cum se menționează în ghidul privind erorile la frână .
Efectuați o îndoire controlată fără a răsuci foaia
- Ridicați placa de îndoire cu o mișcare lină și constantă. Aplicați presiune uniformă cu ambele mâini. Nu trageți brusc de manete. Forța neuniformă este o cauză frecventă pentru obținerea unor îndoiri înclinate, în loc de drepte.
- Apropiți-vă treptat de unghiul țintă. Dacă presa de îndoit are un indicator de unghi, folosiți-l, dar confirmați totuși cu un echer sau un instrument de măsurare a unghiurilor după ce piesa este extrasă.
Revenirea elastică este motivul pentru care multe prime îndoiri par ușor deschise. Detaliile variază. Retrocedere se modifică în funcție de factori precum grosimea, raza de îndoire, direcția fibrei și unghiul de îndoire, astfel încât nu există un număr universal de supraindoire care să funcționeze întotdeauna. Lăsați piesa de probă să vă indice cât de mult unghi suplimentar, dacă este cazul, necesită materialul dumneavoastră.
Verificați unghiul și ajustați fin rezultatul
- Coborâți placa, deblocați foaia și inspectați îndoirea înainte de a continua. Comparați ambele capete ale îndoirii, apoi efectuați orice corecție în mici incrementi.
Dacă unghiul este încă ușor deschis, reîntoarceți piesa la presă și aplicați o mică corecție suplimentară. Dacă este ușor supraindoinită, nu forțați o mișcare inversă importantă, decât dacă materialul și finisajul o pot tolera. Când oamenii întreabă cum se îndoaie o foaie de metal în mod neat , trucul real este răbdarea: aliniați cu atenție, îndoiți ușor și apropiați-vă treptat de unghiul final, în loc să încercați să-l obțineți printr-o tragere puternică dintr-o singură mișcare.
- Alunecare: Linia de îndoire se deplasează în timpul fixării. Remediați această problemă prin fixarea preliminară ușoară, verificarea din nou a alinierii și apoi blocarea definitivă a barei.
- Fixare neuniformă: O parte strânge mai puternic decât cealaltă. Acest lucru poate duce la o îndoire nesimetrică sau la apariția unei torsiuni.
- Marchează: O presiune excesivă de fixare poate provoca deformări ale suprafeței. Folosiți doar presiunea minimă necesară pentru a menține foaia în mod sigur.
O mașină de îndoit simplifică semnificativ realizarea îndoirilor repetabile, dar nu fiecare atelier casnic este echipat cu una. Bare drepte, o menghină și lucrul atent cu ciocanul pot totuși oferi rezultate utile, cu câteva limite oneste.

Pasul 5: Îndoiți foile de metal fără mașină de îndoit
Uneori, presei de îndoit este instrumentul lipsă, nu abilitatea lipsă. Pentru suporturi, capete de acoperire și piese de reparație realizate individual, montajele improvizate pot totuși efectua îndoiri utile, dacă tabla este subțire, fixarea este solidă și lucrul se face cu atenție și lent. Acesta este, de obicei, sensul real al căutărilor oamenilor când caută cum să îndoiți tabla fără presă de îndoit, cum să îndoiți tabla fără îndoitură sau cum să îndoiți tabla fără presă. Compromisul este simplu: puteți economisi bani, dar renunțați la o parte din precizie și reproductibilitate.
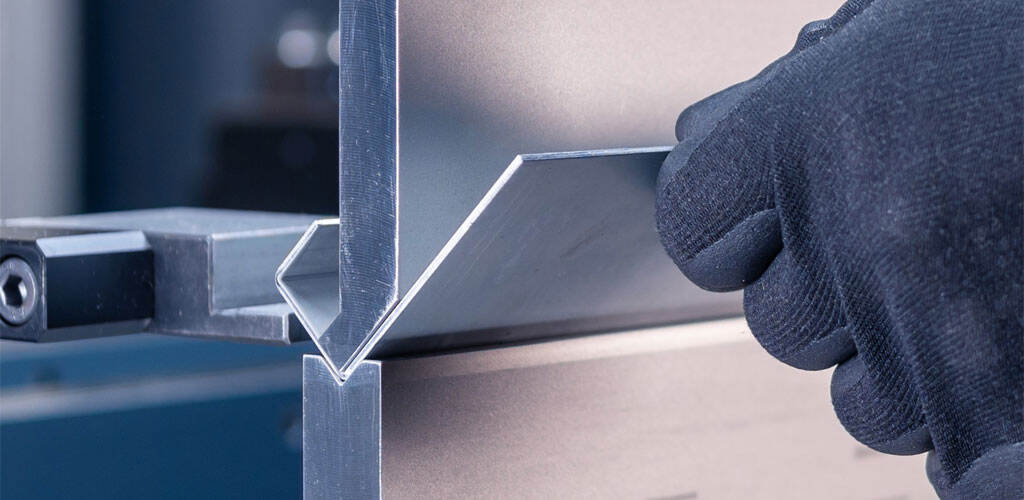
Îndoiți tabla într-o menghină cu bare de fixare drepte
O menghină de banc este, de obicei, opțiunea cea mai controlată fără prese de îndoire pentru îndoiri scurte. Ghidul Mekalite recomandă acoperirea mandibulelor cu lemn sau cu inserții moi pentru mandibule, apoi fixarea piesei astfel încât linia de îndoire să fie situată imediat deasupra mandibulelor. Adăugați două bare drepte, cum ar fi blocuri din lemn tare sau profile în unghi, pentru a distribui presiunea uniform de-a lungul liniei de îndoire. Împingeți mai întâi manual. Dacă foaia rezistă, folosiți un bloc de lemn și lovituri ușoare cu un ciocan de lemn, în loc să loviți direct metalul.
Această metodă funcționează bine pentru niște, suporturi mici și flanșe înguste. Este, de asemenea, soluția cea mai curată pentru îndoirea tablelor subțiri de aluminiu fără presă de îndoire, atunci când aspectul final este important. Aluminiul se zgârie ușor, așadar protejați fața vizibilă cu bandă adezivă, hârtie sau inserții netede. Alegerea materialului are, de asemenea, importanță. Aceeași sursă precizează că aliajele mai moi, cum ar fi 3003 și 5052, sunt mai potrivite pentru îndoire, în timp ce 6061-T6 are o probabilitate mult mai mare să se crăpeze la o îndoire ascuțită. Îndoirea perpendicular pe fibră, în loc de paralel cu aceasta, contribuie, de asemenea, la reducerea riscului de fisurare.
Folosiți un ciocan și un bloc de sprijin pentru îndoiri scurte
Pentru o îndoire simplă mai lungă, fixați foaia pe un banc robust, aliniind linia de îndoire cu marginea bancului. Ghidul IMS descrie utilizarea blocurilor de formare și lovirea ușoară de la un capăt al liniei de îndoire până la celălalt. Acest ritm de la capăt la capăt este esențial: el distribuie forța și ajută la dezvoltarea uniformă a îndoirii, în loc să creeze o singură îndoire bruscă sau o serie de deformări.
Un ciocan din cauciuc sau un ciocan amortizat exercită o presiune mai blândă asupra suprafeței decât un ciocan din oțel. Dacă aveți doar un ciocan obișnuit, plasați între unghiul de lucru și foaie un bloc de lemn de sprijin. Pentru aluminiul subțire, această metodă bazată pe marginea bancului poate funcționa surprinzător de bine. Mekalite observă că este cea mai practică pentru foi subțiri, de aproximativ 1/16 in. sau mai subțiri, iar controlul devine mult mai dificil pe măsură ce grosimea materialului crește.
| Metodologie | Precizie | Calitatea de finisare | Repetabilitate | Cel mai bun caz de utilizare |
|---|---|---|---|---|
| Vise cu bare de strângere drepte | Mediu până la ridicat pentru piese mici | Bun dacă mandrinele sunt acoperite cu un strat protector | Moderată până la bună | Suporturi mici, etichete, flanșe scurte |
| Marginea bancului cu bloc de sprijin | Mediu | Acceptabil până la bun, cu protecție | - E corect. | Foi subțiri, îndoiri simple mai lungi |
| Formare cu ciocanul, folosind lovituri controlate | Scăzut până la mediu | Corect cel mult | Scăzute | Îndoiri scurte, prototipuri neterminate, corecții minore |
Știți când metodele fără prese de îndoire încetează să mai fie precise
Aceste metode au limite reale. Pe măsură ce grosimea, tratamentul termic și duritatea cresc, îndoirea manuală devine din ce în ce mai puțin predictibilă și mult mai solicitantă fizic. Oțelul moale foarte subțire poate fi adesea îndoit în acest mod, dar în FAQ-ul Mekalite se precizează că metodele casnice de îndoire a oțelului sunt, în general, limitate la materiale cu grosime foarte mică. Oțelul inoxidabil este și mai dificil de îndoit. Ghidul pentru tablă PMF descrie oțelul inoxidabil ca fiind mai rezistent și mai dificil de îndoit decât celelalte tipuri de oțel, motiv pentru care metodele fără presă de îndoire aplicate oțelului inoxidabil conduc adesea la îndoiri elastice și neregulate, necesitând multă finisare.
Aceasta este limita reală a îndoirii tablei fără presă de îndoire. Este utilă pentru materiale subțiri, piese unice și proiecte realizate cu buget redus. Nu este însă cea mai potrivită metodă pentru îndoiri lungi estetice, toleranțe strânse sau piese identice.
- Fixați cu cleștele cât mai aproape posibil de întreaga lungime a îndoirii pentru obținerea unor îndoiri de 90 de grade mai curate.
- Folosiți inserții netede, bandă adezivă, hârtie sau lemn pentru a reduce deformările și urmele de clește.
- Lovți ușor întreaga linie de îndoire, în loc să loviți puternic un singur punct.
- Efectuați corecțiile în treceri mici și uniforme, astfel încât o zonă să nu se întindă mai mult decât restul.
- Folosiți mai întâi o piesă de probă, apoi îndoiți ușor în exces doar dacă revenirea elastică vă demonstrează că este necesar.
- Fiți extrem de atenți la aluminiu. Se zgârie ușor și poate crăpa totuși dacă îndoirea este prea ascuțită.
Placa plană vă permite să gândiți în linii drepte și cu margini susținute. Odată ce materialul devine bară, tijă sau sârmă, provocarea se schimbă. Menținerea îndoirii în același plan devine mai importantă decât fixarea unei margini lungi.
Pasul 6: Modelarea barelor plane, tijelor și sârmelor
Barile de fixare drepte ajută la îndoirea foilor, dar materialele masive schimbă complet jocul. Barele plate, barele rotunde și sârma nu doresc să se îndoiască ordonat pe o singură linie lungă. Ele tind să devieze, să se răsucească sau să formeze o îndoire în zigzag („dog-leg”), adică o îndoire care se abate lateral, în loc să rămână în același plan. De aceea, materialele masive răspund mai bine la utilizarea unui element de formare (formă), a unui dispozitiv de ghidare (jig) sau, cel puțin, a unui punct de îndoire pe care să-l puteți ghida din ambele părți. Dacă vă întrebați cum să îndoiți o bară metalică sau cum să îndoiți o bară metalică plată, controlul este mai important decât forța brută.
Îndoiți bara plată cu presiune uniformă și o formă simplă
- Marcați exact punctul de început al îndoirii. Dacă îndoirea necesită un racord vizibil, marcați atât punctul de început, cât și centrul curburii.
- Alegeți o formă care corespunde îndoirii dorite. Un pivot rotund, o țeavă, o mufă sau un opritor sudat pot funcționa ca ghid de formare.
- Fixați bara prin strângere în apropierea punctului de îndoire și mențineți capătul liber susținut la același nivel cu capătul fixat.
- Aplicați o presiune constantă în jurul formei, în loc să încercați să îndoiți bara printr-o singură trăgere. Verificați din partea superioară pe măsură ce lucrați, astfel încât ambele margini să rămână în același plan.
- Comparați rezultatul cu un eșantion pătrat, un șablon sau o piesă de referință înainte de a efectua corecții fine.
O manetă lungă poate oferi mai multă pârghie, dar rezultatul mai curat provine, de obicei, din aplicarea unei presiuni lente, nu dintr-o trăgere bruscă. Loviturile puternice aplicate într-un singur punct tind să aplaneze zona îndoită și să împingă materialul în afara axei.
Modelați tija și sârma fără a crea o îndoire bruscă (kink)
Tija și sârma necesită o ghidare și mai atentă, deoarece încărcarea concentrată într-un punct creează ușor pliuri. Pentru oricine caută informații despre cum să îndoiți o tijă metalică, obișnuința cea mai sigură este să o înfășurați în jurul unei forme rotunde, în loc să o striviți brusc într-un singur punct. Aceeași idee se aplică și pentru îndoirea sârmei metalice. Pințetele cu maxilare netede sunt potrivite pentru sârme subțiri, în timp ce tijele mai groase beneficiază de utilizarea unui menghin, a unei furci de îndoire sau a două pini fixi care forțează dezvoltarea treptată a curburii.
Țineți un braț pentru alimentarea materialului și celălalt braț pentru a-l menține plat împotriva formei. Dacă o parte se ridică, îndoirea se va deplasa. Unele lucrări necesită efectiv aplicarea căldurii, dar modul de îndoire a metalului cu căldură trebuie să respecte procedurile stabilite în atelier pentru aliajul și piesa respective. Estimarea temperaturii este un mod sigur de a deteriora rezistența, finisajul sau ambele.
Repetarea pieselor identice cu ajutorul unui dispozitiv simplu
Repetarea pieselor devine mult mai ușoară dacă renunțați la măsurarea fiecărei îndoiri de la zero. Un dispozitiv simplu poate fi la fel de elementar ca o placă din placaj sau oțel, echipată cu un bloc de oprire și unul sau două pinoane fixate în poziție. Realizați mai întâi o piesă corectă, apoi folosiți-o ca șablon etalon. Aduceți fiecare piesă nouă la același bloc de oprire, îndoiți-o în jurul aceleiași forme și comparați-o cu șablonul etalon înainte de ajustările finale.
- Țel: Oțelul moale este adesea cel mai indulgent pentru îndoirea la rece, dar secțiunile mai groase sau mai rezistente necesită mai multă pârghie și prezintă un efect mai pronunțat de revenire elastică.
- Aluminiu: Se marchează ușor, iar unele tratamente termice pot provoca fisuri dacă îndoirea este prea strânsă. Utilizați puncte de contact netede și un rază de curbură mai blândă.
- Inoxidabil: Se simte mai elastic și se întărește rapid prin deformare, astfel încât corecțiile repetate de la stânga la dreapta sunt mai susceptibile să lase o piesă refractară.
Materialul masiv oferă încă ceva pe care materialul din foaie nu-l oferă: masa pe care o puteți ghida împotriva unei forme. Materialul gol este mai puțin tolerant. Țevile, conductele, tuburile de frână necesită sprijin nu doar în exteriorul curburii, ci și în interiorul formei pereților lor.
Pasul 7: Îndoirea țevilor, conductelor, tuburilor și a tuburilor de frână
Materialul gol este domeniul în care forța brută încetează să funcționeze. Țevile, conductele, tuburile și tuburile rigide de frână se pot aplatiza, încorda sau îndoi datorită faptului că peretele trebuie să se întindă pe partea exterioară, în timp ce se comprimă pe partea interioară. Fabricantul subliniază faptul că succesul îndoirii țevilor depinde de material, scule, lubrifiere și mașină, iar metodele cu control redus nu sunt la fel de controlabile atunci când aspectul estetic sau toleranțele sunt importante. Dacă învățați cum să îndoiți țevi metalice sau cum să îndoiți conducte metalice, primul obișnuit de format este simplu: sprijiniți forma înainte de a încerca să o deplasați.
Un mic detaliu ajută, de asemenea, la evitarea confuziilor. Tubul este, în general, specificat în funcție de diametrul exterior, în timp ce țeava este de obicei specificată în funcție de dimensiunea nominală a țevii. Această diferență este importantă la alegerea sculelor, deoarece o nepotrivire între semifabricat și sculă reprezintă una dintre cele mai rapide metode de deformare a secțiunii.
Orientarea planului înainte de îndoirea tubului sau a țevii
Marcați nu doar locul îndoirii, ci și începutul îndoirii, direcția îndoirii și o linie de referință de-a lungul axei, astfel încât piesa să rămână în același plan. La piesele cu mai multe îndoieli, această linie vă ajută să evitați o îndoire care se rotește ușor și care afectează poziționarea următoarei îndoieli. Dacă pe capete trebuie montate racorduri, lăsați o lungime suficientă dreaptă înainte de prima îndoire. În lucrările hidraulice cu țevi și tuburi, STAUFF recomandă menținerea lungimii drepte dinaintea îndoirii cel puțin de două ori mai mare decât lungimea piuliței racordului, pentru ca racordurile să poată fi instalate corect.
Raza are de asemenea importanță. STAUFF folosește o regulă empirică de cel puțin de două ori diametrul pentru îndoirea țevilor și tuburilor hidraulice din oțel și oțel inoxidabil, deoarece o rază prea mică crește riscul de formare a cutelor și de aplatizare. Fenomenul de revenire elastică (springback) este totuși prezent aici, astfel că efectuarea unui îndoit de probă ușor este justificată, chiar dacă implică pierderea unui mic surplus de material.
Folosiți mașina de îndoit potrivită pentru a reduce aplatizarea
Dacă peretele trebuie să-și păstreze forma rotundă, folosiți o mașină de îndoit care să-l susțină. STAUFF subliniază faptul că cleștii simpli de îndoit, concepuți pentru materiale mai moi, cum ar fi cuprul, nu sunt potriviți pentru țevi și tuburi din oțel sau oțel inoxidabil. Pentru lucrări mai precise și mai strânse, The Fabricator explică faptul că îndoirea prin tragere rotativă controlează subțierea peretelui și ovalitatea prin susținerea tubului cu un mandrin și echipamente de precizie. Pentru lucrări efectuate în cadrul casnic sau în garaj, același principiu rămâne valabil, dar într-o formă mai simplă: folosiți o mașină de îndoit pentru tuburi, țevi sau conducte, dimensionată corespunzător, în loc să încercați să forțați materialul gol în jurul unei maxile de menghină, a unui șurub sau a unei muchii ascuțite.
Acest lucru este valabil în special atunci când trebuie să determinați modul de îndoire a tuburilor metalice sau a tuburilor electrice metalice. Tuburile aparțin aceleiași familii de profile goale, astfel încât rezultatul mai curat se obține cu un dispozitiv de îndoit potrivit, care susține profilul și menține îndoirea în plan.
Tratați liniile de frână și tuburile cu deosebită grijă
Liniile de frână răsplătesc răbdarea. Curba de alimentare cu combustibil arată că o lucrare curată a liniilor depinde de măsurători atente, verificări vizuale și utilizarea unor dispozitive de îndoit diferite pentru raze mai mari și mai mici. De asemenea, evidențiază un truc practic pentru trasee lungi sau complexe: transferați marcajele de început ale îndoirii de pe un șablon, apoi efectuați o montare provizorie a liniei înainte de a considera lucrarea finalizată. Dacă vă ocupați de modul de îndoire a liniilor metalice de frână, tragerile netede și controlate sunt întotdeauna superioare oricărei metode improvizate de strivire.
| Stoc | Metodă de susținere | Risc Comun | Opțiuni de corecție |
|---|---|---|---|
| Tub | Dispozitiv de îndoit pentru tuburi potrivit și, pentru lucrări de precizie, suport rotativ de tragere cu mandrină și echipament extern | Ovalitate, subțierea peretelui, ondularea interioară | Corecții de unghi mic în aceeași configurație; aplatizarea severă sau apariția de pliuri indică, de obicei, necesitatea refacerii piesei |
| Țeavă | O doză adecvată pentru țevi sau tuburi, cu raza corespunzătoare și role curate | Aplatizare, revenire elastică (springback), curbare prea aproape de capăt pentru racorduri | Testați mai întâi revenirea elastică (springback); păstrați lungimea necesară a porțiunii drepte; refaceți piesa dacă se pierde jocul la capăt sau forma secțiunii |
| Tub de protecție | Doză concepută special pentru dimensiunea și profilul respectiv al canalului | Curbe în afara planului, distorsionare a profilului datorită unor scule neconforme | Ajustări minore ale unghiului în aceeași doză; înlocuiți piesele grav distorsionate |
| Linia de frânare | Doză pentru tuburi de dimensiunea liniei, marcaje pe șablon și încercări frecvente de potrivire | Îndoituri bruște (kinks), unghiuri înclinate pe trasee lungi, curbe care încep prea aproape de zona de flanșare | Comparați cu șablonul și reîndoiți ușor, dacă este necesar; refaceți liniile cu îndoituri bruște (kinks) sau montate greșit |
- Verificați unghiul de îndoire în raport cu marcajul sau calibrul dvs. imediat după tragere.
- Priviți de-a lungul lungimii sau comparați cu un șablon pentru a confirma că îndoirea a rămas în plan.
- Inspectați rotunjimea. Dacă observați aplatizare, plieri sau o îndoire bruscă (kink), opriți-vă înainte de a adăuga următoarea îndoire.
Secțiunile goale pot părea acceptabile dintr-un anumit unghi și totuși să fie incorecte din alte trei puncte de vedere. De aceea, lucrarea nu este finalizată doar la mașina de îndoit. O inspecție rapidă pentru îndoire insuficientă, răsucire, aplatizare și deteriorare a suprafeței este ceea ce transformă o piesă utilizabilă într-o piesă care nu mai poate fi folosită.
Pasul 8: Corectați greșelile de îndoire și decideți când să treceți la scară mai mare
Îndoirea poate fi finalizată, dar piesa are nevoie încă de o evaluare. O iluminare bună, un echer și o inspecție atentă detectează mai multe probleme decât orice corecție forțată. Dacă căutați cum să îndoiți înapoi metalul sau cum să readuceți metalul în forma inițială, opriți-vă înainte de a aplica forță. O mică eroare poate fi adesea corectată. O piesă fisurată, puternic răsucită sau grav marcată necesită, de obicei, refacerea.
Inspectați îndoirea înainte de a o considera finalizată
Verificați piesa din mai multe unghiuri. Eroarea de unghi este doar unul dintre modurile de defectare. Rucheng evidențiază revenirea elastică, fisurarea, răsucirea, eroarea dimensională și marcare superficială ca fiind unele dintre cele mai frecvente defecțiuni la îndoire, iar aceleași probleme apar și în lucrările efectuate în ateliere mai mici.
- Unghi: Comparați îndoirea cu un echer sau un instrument de măsurare a unghiurilor. Îndoirea insuficientă indică adesea revenirea elastică, care a deschis piesa după eliberare.
- Aliniere: Verificați ambele capete ale îndoirii. Dacă o parte este mai ridicată, este probabil că piesa s-a răsucit în timpul fixării sau al îndoirii.
- Forma marginii: Căutați curbarea, cutarea sau întinderea marginilor, care pot afecta asamblarea.
- Suprafață: Inspectați fețele vizibile pentru zgârieturi, urme de matriță sau denteduri provocate de cleme.
- Crăpături: Examinați cu atenție partea exterioară a îndoirii, în special la raze mici și la materiale mai puțin ductile.
- Locație: Măsurați lungimea flanșei sau poziția îndoirii pentru a detecta alunecarea înainte ca îndoirile ulterioare să ascundă eroarea.
Corectați erorile frecvente fără a le agrava
- Îndoirea insuficientă: Reîndoiți în mici incrementuri. Probele de test sunt importante, deoarece revenirea elastică variază în funcție de material și de configurația instalației.
- Supraindoire: Dacă trebuie să știți cum să îndoiți metalul înapoi în poziția corectă, aplicați doar o presiune ușoară inversă. Corecțiile mari de revenire elastică cresc riscul de urme și fisuri.
- Întoarcere: Refixați piesa cu un sprijin mai bun pe întreaga lungime, apoi corectați treptat, fără a forța un colț.
- Distorsionarea marginii sau ondularea: Undele minore de natură estetică pot fi acceptabile la un prototip. Pentru piese critice din punct de vedere al ajustării, este de obicei mai bine să le refolosiți, asigurând un sprijin mai bun sau un rază de îndoire mai mare.
- Crăpare: Opriți-vă. Următoarea piesă necesită o rază de îndoire mai mare, muchii mai curate și o revizuire a alegerii materialului și a direcției fibrelor.
- Alunecarea sau îndoirea în locul greșit: Nu adăugați mai multe îndoiri peste un reper defect. Reprezentați din nou și refolosiți piesa, dacă poziția îndoirii este esențială.
- Strivirea suprafeței: Curățați uneltele și adăugați film, învelișuri sau suprafețe de contact mai netede. LYAH Machining constată că foilele de protecție și uneltele mai moi sau cu straturi contribuie la reducerea zgârieturilor.
Să ştii când să treci de la curbăriul de casă la producţie
Un prototip îndoit manual este adesea suficient de bun pentru verificarea adecvării, reparațiile de garaj și suporturile unice. Producţia e diferită. Dacă ai nevoie de piese potrivite, dimensiuni stabile, calitate de finisare repetabilă sau componente critice pentru siguranță, formarea sau stampilarea profesională devine o mișcare mai inteligentă. Pentru cititorii care au trecut de modul de a îndoi metalul înapoi în loc și au nevoie acum de piese de producție de calitate consecventă, Shaoyi Auto Stamping Parts poate fi un pas practic următor. Shaoyi are încredere de peste 30 de mărci auto din întreaga lume și rulează un proces certificat IATF 16949 de la prototiparea rapidă până la producția automată în masă pentru piese precum brațele de control și subcadrele.
- Shaoyi: Cel mai potrivit pentru piese formate repetabile, la scară de producție. Avantaje: sistem de calitate certificat, suport de la prototip la producție în masă, potrivire excelentă pentru componente auto. Dezavantaj: excesiv dacă aveți nevoie doar de un singur suport provizoriu pentru atelier astăzi.
- Îndoire manuală DIY: Cel mai potrivit pentru machete, reparații și piese simple unicat. Avantaje: rapid și ieftin. Dezavantaj: variație mai mare, mai multe reprelucrări și o consistență redusă de la o piesă la alta.
Această evaluare finală este la fel de importantă ca și îndoirea în sine. O piesă care se potrivește o singură dată este utilă. O piesă care se potrivește de fiecare dată aparține unui alt proces.
Întrebări frecvente
1. Care este cea mai bună metodă de a îndoi metal acasă fără a strica piesa?
Începeți prin identificarea tipului de material inițial, deoarece tabla, bara plană, tija și țevile necesită toate sprijin diferit. Apoi potriviți scula cu sarcina de lucru, protejați suprafața cu deșeuri netede sau cu garnituri și efectuați o îndoire de probă pe o bucată de tăiere înainte de a lucra pe piesa finală. Cele mai multe greșeli comise în atelierele casnice provin dintr-o configurare deficitară, nu din lipsa forței.
2. Se poate îndoi tabla metalică la 90 de grade fără o presă de îndoit?
Da, dar funcționează cel mai bine pe foi subțiri și la îndoiri scurte. O menghină cu bare de fixare drepte oferă de obicei rezultatul cel mai curat, în timp ce marginea unui banc de lucru și un bloc de sprijin pot fi utilizate pentru piese simple, realizate individual. Așteptați o precizie mai mică decât cea obținută cu o presă de îndoit și planificați verificarea unghiului în mici corecții succesive, deoarece revenirea elastică poate lăsa îndoirea ușor deschisă.
3. Cum se comportă oțelul, aluminiul și oțelul inoxidabil în mod diferit la îndoire?
Oțelul moale este adesea cel mai indulgent pentru îndoirea manuală generală, în timp ce aluminiul este mai ușor de marcat și unele tipuri de aliaje pot crăpa dacă îndoirea este prea ascuțită. Oțelul inoxidabil pare de obicei mai elastic și poate rezista mai mult corectării odată ce începe să se întărească prin deformare. În practică, aluminiul necesită o protecție mai bună a suprafeței, iar oțelul inoxidabil beneficiază de îndoiri de probă mai atente înainte de realizarea piesei finale.
4. Trebuie să folosiți căldură pentru îndoirea metalului?
Uneori, dar doar atunci când materialul și procedura de lucru din atelier o permit. Căldura poate ajuta în unele lucrări cu materiale masive, însă estimarea temperaturii poate deteriora rezistența, finisajul sau consistența. Pentru majoritatea lucrărilor DIY cu tablă, îndoirea controlată la rece, cu raza corespunzătoare și utilizarea unui eșantion de test, reprezintă punctul de plecare mai sigur.
5. Când trebuie să renunțați la îndoirea manuală și să folosiți un serviciu profesional de formare?
Dacă aveți nevoie de piese identice, ajustare precisă, unghiuri stabile, suprafețe estetice impecabile sau componente critice pentru siguranță, formarea profesională este, de obicei, alegerea mai inteligentă. Îndoirea DIY este excelentă pentru prototipuri, reparații și suporturi simple, dar lucrările de producție beneficiază de unelte controlate și procese repetabile. Pentru piese automotive stampilate sau componente formate în volume mai mari, Shaoyi poate oferi sprijin de la prototip la producție în masă, printr-un proces certificat IATF 16949.