 Small batches, high standards. Our rapid prototyping service makes validation faster and easier —

Laser Cut Brackets Decoded: From Material Choice To Final Install

What Are Laser Cut Brackets and Why They Matter
When you need a mounting solution that fits perfectly every single time, laser cut brackets deliver what traditional fabrication methods simply cannot match. These precision-engineered components are metal brackets manufactured using focused laser beams to cut through sheet metal with exceptional accuracy - often achieving tolerances as tight as 0.0127mm to 0.0254mm. From automotive chassis assemblies to decorative shelf supports, these components have become the backbone of modern manufacturing across countless industries.
But what makes this fabrication method so special? Imagine a beam of concentrated light so powerful it can vaporize steel, yet so precise it leaves edges cleaner than any saw or punch could achieve. That's the reality of laser cut metal brackets - and understanding how they're made helps you appreciate why they've revolutionized bracket production.
How Laser Cutting Creates Precision Brackets
The magic begins when a high-power laser beam is directed through sophisticated optics and guided by computer numerical control (CNC) systems. According to TWI Global, the focused beam burns, melts, or vaporizes the material along a programmed path, while a jet of gas blows away the debris to leave a remarkably smooth, finished edge.
Here's what happens during the cutting process:
- The laser beam focuses to an incredibly narrow point - typically under 0.32mm in diameter
- CNC programming guides the beam along the exact bracket profile you've designed
- Material is removed with kerf widths as small as 0.10mm, depending on thickness
- For internal cutouts like mounting holes, a piercing process creates the starting point before the cut begins
This precision means your laser cut steel bracket fits its intended assembly without the shimming, grinding, or frustration that comes with less accurate methods.
The Technology Behind Clean-Edge Metal Fabrication
Modern bracket fabrication relies primarily on two laser technologies: CO2 lasers and fiber lasers. CO2 systems pass current through a gas mixture to generate the cutting beam, while fiber lasers use a solid gain medium amplified through glass fibers. Fiber technology has gained significant popularity in the metal cutting industry because it produces a smaller spot size than CO2 techniques - making it particularly effective for cutting reflective metals like aluminum and copper.
Why has laser cutting become the preferred method for bracket production? The answer lies in its unique combination of benefits:
- Speed: Excels on thinner material gauges that would be difficult to handle with other methods
- Material compatibility: Works with metals, plastics, ceramics, and specialty alloys
- Minimal waste: Precise cutting maximizes material utilization
- Design flexibility: Enables rapid prototyping and quick production setup for 2D profiles
Throughout this guide, you'll learn everything needed to successfully specify, design, and order custom brackets. We'll cover material selection for different applications, design best practices that reduce manufacturing costs, finishing options for durability and aesthetics, and how to evaluate potential manufacturing partners. Whether you're developing automotive suspension components or decorative furniture hardware, you'll walk away with actionable knowledge to bring your bracket project from concept to finished product.
Common Bracket Types and Their Applications
Ever wondered why some brackets look like simple right angles while others feature intricate curves and multiple mounting points? The answer comes down to function. Each bracket configuration solves a specific engineering challenge - and laser cutting technology makes it possible to produce all of them with remarkable precision. Let's explore the most common types you'll encounter and discover which designs best fit your project needs.
L-Brackets and Corner Reinforcement Applications
The L-bracket stands as the workhorse of the bracket world. This classic 90-degree configuration excels at corner reinforcement, making it ideal for furniture assembly, shelf mounting, and structural connections. When you're hanging a heavy wall cabinet or reinforcing a wooden frame, these right-angle brackets distribute loads across two perpendicular surfaces.
According to Tenral's engineering guide, choosing the right L-bracket requires attention to two critical parameters: material thickness and arm length. For general home applications, 1.2mm thickness handles most tasks effectively. Heavy-duty installations - like supporting substantial hanging cabinets - demand 2.0mm or thicker material.
Laser cut shelf brackets take this concept further by incorporating decorative elements impossible to achieve through traditional stamping. Intricate scrollwork, custom cutouts, and personalized designs transform functional hardware into aesthetic features. The precision of laser cutting means both arms contact load-bearing surfaces perfectly, achieving optimal force distribution without manual adjustment.
U-Brackets and Channel Mounting Solutions
Think of U-brackets as the cable management experts of the bracket family. Their channel design creates a secure cradle for pipes, conduits, and wire harnesses. Electricians organizing data center cables and plumbers routing water lines rely on these configurations daily.
Selecting the proper U-bracket mirrors fitting shoes - the channel size must match what you're securing. Measure your pipe or conduit diameter precisely, then choose a bracket with an inner width 2-3mm larger. Need to secure a 25mm water pipe? A 28-30mm inner width ensures smooth installation without excessive play.
Z-Brackets for Offset Connections
When two mounting surfaces don't align on the same plane, Z-brackets solve the problem elegantly. This offset configuration bridges height differences between installation points - a common challenge in solar panel mounting, HVAC systems, and industrial equipment installations.
The key specification here is the "offset" - the vertical distance between the two parallel mounting planes. Laser cutting produces these complex profiles with consistent offset dimensions across production runs, eliminating the variability that plagues bent or formed alternatives.
Specialty Brackets for Unique Mounting Challenges
Beyond standard configurations, laser cutting enables specialty brackets that traditional fabrication methods struggle to produce economically. Consider these specialized applications:
- Laser cut suspension brackets: Automotive and motorsport applications demand precise geometry for proper load handling and vibration resistance. These components often feature complex cutouts that reduce weight while maintaining structural integrity.
- Dollhouse laser cut brackets: Miniature-scale decorative brackets showcase intricate Victorian scrollwork and ornamental details. The narrow kerf width of laser cutting captures fine details that would be impossible with conventional tools.
- French cleat systems: Modular wall organization relies on interlocking bracket profiles. Laser cutting produces the precise 45-degree mating surfaces that make these systems work smoothly.
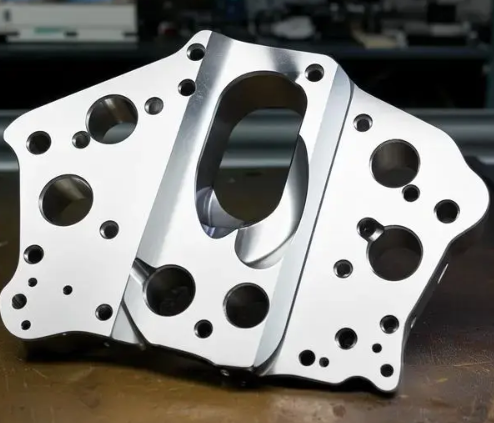
- Equipment mounting plates: Complex hole patterns, slots, and cutouts for electronics enclosures or machinery require the positional accuracy only laser processing delivers.
- Architectural brackets: Building facades and interior design elements feature custom profiles that blend structural support with visual appeal.
What makes laser cutting uniquely suited for these complex geometries? Traditional stamping requires expensive tooling for each design - economical only at high volumes. Punching handles simple shapes but struggles with curves and intricate details. Laser cutting reads your CAD file directly, producing prototype quantities or production runs without tooling investments.
This flexibility means you can design brackets optimized for your specific application rather than compromising to fit available off-the-shelf options. Whether you're developing automotive suspension components or crafting decorative miniature furniture, the same technology adapts to your requirements - but material selection plays an equally crucial role in bracket performance.
Material Selection Guide for Optimal Performance
You've chosen the perfect bracket configuration for your project - but here's the thing: even the most brilliantly designed bracket will fail if you select the wrong material. Material choice determines whether your bracket survives decades of service or corrodes within months. It affects weight, cost, and even which laser cutting parameters deliver the cleanest edges. Let's break down your options so you can match materials to applications with confidence.
Steel vs Aluminum for Structural Brackets
The steel versus aluminum debate sits at the heart of most bracket material decisions. According to SendCutSend's engineering analysis, aluminum weighs nearly one-third as much as steel - meaning identical bracket geometries result in dramatically different weights. For aerospace applications, vehicle accessories, or any installation where mass matters, this density difference becomes critical.
But weight tells only part of the story. Strength-to-weight ratio often matters more than raw strength. Consider this example: 6061-T6 aluminum and A36 structural steel have surprisingly similar tensile strength values. You could design an aluminum bracket 10% thicker than its steel equivalent, and it would still weigh significantly less while potentially offering greater strength. For laser cut tank brackets on off-road vehicles or 20x20 extrusion bracket laser cut components for equipment frames, this trade-off frequently favors aluminum.
Here's where steel regains the advantage:
- Wear resistance: Aluminum's softness makes it vulnerable to abrasion. Brackets experiencing sliding contact or repeated friction benefit from steel's hardness.
- Cost sensitivity: Mild steels like A36 typically cost less than comparable aluminum grades, making them economical for general-purpose applications.
- Maximum strength requirements: The strongest steel alloys significantly outperform the strongest aluminum alloys when ultimate load capacity matters.
- Fatigue performance: Steel handles repeated stress cycles better than aluminum before failure occurs.
For laser cut french cleat brackets that need to support heavy workshop tools, mild steel delivers the stiffness and durability these modular systems demand. Meanwhile, aluminum makes sense for brackets mounted on doors, lids, or any component where reduced weight improves usability.
When Food-Grade Stainless Steel Is Required
Food processing environments introduce an entirely different set of material requirements. According to Atlantic Stainless, two alloy series dominate food-grade applications: 300-series and 400-series stainless steels.
Grade 316 stainless steel stands as the gold standard for food-grade brackets. Its high nickel content provides exceptional resistance to alkalis, acids, and chlorides - including salt exposure common in food preparation areas. The impermeable surface prevents bacterial contamination, while easy cleaning and maintenance reduce food safety risks.
Grade 430 stainless offers a cost-effective alternative for applications requiring only moderate corrosion resistance. This ferritic alloy contains less nickel, making it more affordable while still providing adequate protection against milder acids and oxidation. It's magnetic - which can be either an advantage or disadvantage depending on your application requirements.
Beyond food processing, stainless steel brackets excel in:
- Marine environments where salt spray attacks unprotected metals
- Chemical processing facilities with acid or alkali exposure
- Outdoor installations facing years of weather exposure
- Medical equipment requiring sterilization compatibility
Understanding Thickness Capabilities and Limitations
Material choice directly impacts how thick your brackets can be - and what edge quality you'll achieve. According to Longxin Laser's technical guide, fiber lasers with 3kW to 6kW power handle most industrial bracket applications effectively, while thicker plates require 10kW or higher power levels.
Different materials behave differently under the laser beam:
- Mild steel: Cuts cleanly up to 25mm with standard industrial lasers. The 1-6mm thickness range common in brackets produces excellent edge quality.
- Stainless steel: Requires more power than carbon steel due to reflective properties. Typical bracket thicknesses (1-4mm) cut well with mid-range laser power.
- Aluminum: Highly reflective, requiring fiber lasers with appropriate power. Thermal conductivity can affect edge quality on thicker sections.
| Material Type | Typical Thickness Range | Best Applications | Relative Cost |
|---|---|---|---|
| Mild Steel (A36, 1008) | 1.0mm - 12mm | General structural brackets, furniture hardware, industrial mounting | $ |
| Aluminum (5052, 6061) | 0.8mm - 6mm | Lightweight brackets, vehicle accessories, heat-dissipating mounts | $$ |
| 304 Stainless Steel | 0.8mm - 6mm | Outdoor installations, corrosive environments, architectural features | $$$ |
| 316 Stainless Steel | 0.8mm - 4mm | Food processing, marine, chemical exposure, medical equipment | $$$$ |
| 430 Stainless Steel | 0.8mm - 4mm | Moderate corrosion resistance, food service (non-harsh chemicals) | $$ |
| High-Strength Steel (4130) | 1.0mm - 8mm | Suspension brackets, motorsport, high-stress structural applications | $$$$ |
| 7075 Aluminum | 1.0mm - 4mm | Aerospace brackets, performance applications requiring strength-to-weight | $$$ |
Specialty Alloys for Extreme Environments
Some applications push beyond what standard materials can handle. High-temperature furnace brackets may require nickel alloys like Inconel. Cryogenic applications might specify specialized aluminum grades that maintain ductility at extremely low temperatures. Brackets facing severe vibration often benefit from spring steels engineered for fatigue resistance.
The key is matching material properties to your specific operating conditions. Ask yourself: What temperatures will this bracket experience? What chemicals or environmental factors could cause degradation? How critical is weight reduction? What's my budget constraint?
Answering these questions narrows your material options quickly. But choosing the right material is only half the equation - proper design practices ensure your laser cut brackets perform as intended while keeping manufacturing costs under control.
Design Best Practices for Manufacturing Success
You've selected the perfect material for your bracket application - but here's where many projects stumble. A beautifully designed bracket that ignores laser cutting constraints becomes expensive to manufacture, prone to quality issues, or simply impossible to produce. The good news? Following a handful of proven design principles ensures your laser cut bracket CAD design translates smoothly from screen to finished part while keeping costs in check.
Think of these guidelines as guardrails rather than restrictions. They protect your project from costly revisions while still leaving room for creative problem-solving. Whether you're designing your first custom bracket or refining an existing product, these laser cut bracket design tips will help you avoid the pitfalls that trip up even experienced engineers.
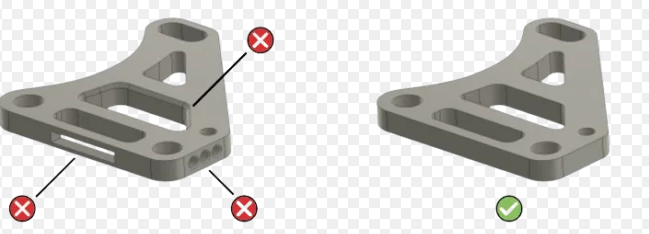
Corner Radii and Stress Distribution Principles
Sharp internal corners are stress concentrators - and stress concentrators cause cracks. When load transfers through a bracket, those perfectly square inside corners become failure initiation points. The fix is elegantly simple: add radii to internal corners.
But how large should those radii be? According to Makerverse's design guidelines, your minimum corner radius should typically equal at least half the material thickness. For a 2mm steel bracket, that means 1mm minimum internal radii. Structural brackets experiencing high loads benefit from even larger radii - often 1.5x to 2x the material thickness.
Here's what happens when you ignore this principle:
- Stress concentrations at sharp corners can be 2-3x higher than in rounded corners
- Fatigue cracks initiate at stress risers during repeated loading cycles
- The laser cutting process itself creates micro-stress points at sharp direction changes
- Parts passing initial inspection may fail unexpectedly in service
External corners present less concern since stresses don't concentrate the same way on convex surfaces. However, small external radii (0.25-0.5mm) improve edge quality and reduce burr formation during cutting.
Minimum Feature Sizes for Reliable Cutting
Laser cutting achieves remarkable precision, but physics still applies. The kerf width - the material removed by the laser beam - typically ranges from 0.1mm to 1.0mm depending on material type and thickness, as noted by industry specifications. This kerf width establishes your minimum feature limitations.
Custom laser cut bracket specifications should account for these dimensional constraints:
- Minimum hole diameter: Generally should equal at least the material thickness, with 1.5x thickness recommended for clean results
- Minimum slot width: Same guidance as hole diameter - material thickness as absolute minimum
- Minimum web width: The material remaining between cutouts should be at least 2x the material thickness to prevent distortion
- Minimum text height: For engraved or cut text, 3mm height minimum ensures legibility
Pushing below these minimums doesn't necessarily mean your design is impossible - but it does mean increased scrap rates, quality inconsistencies, and potentially higher costs as cutting speeds must decrease to maintain precision.
Tab and Slot Design for Easy Assembly
One of laser cutting's superpowers is enabling interlocking bracket assemblies that practically build themselves. Tab and slot connections reduce welding requirements, simplify assembly, and create self-fixturing parts that align automatically during fabrication.
Effective tab and slot design follows specific rules:
- Tab width: Design tabs at least 2x the material thickness wide for adequate strength
- Slot clearance: Add 0.05-0.15mm clearance to slot width beyond the tab width for easy insertion while maintaining a snug fit
- Tab length: Extend tabs at least 3x the material thickness into the mating part
- Corner relief: Include small relief notches at internal tab corners to prevent interference during assembly
- Symmetry: When possible, design symmetrical tab patterns that work regardless of part orientation
The slot clearance deserves special attention. Too tight, and assembly becomes frustrating - or impossible without hammer persuasion that damages parts. Too loose, and the self-locating advantage disappears. That 0.05-0.15mm sweet spot accounts for laser cut bracket tolerance requirements while still providing positive engagement.
Hole Placement and Edge Distance Requirements
Where you position holes, slots, and cutouts relative to bracket edges significantly impacts both manufacturability and structural performance. According to Makerverse's engineering guidance, holes placed too close to edges create tearing and deformation risks - especially if the bracket later undergoes bending operations.
Follow these edge distance guidelines:
- Hole-to-edge distance: Minimum of 2x the material thickness from hole center to nearest edge
- Hole-to-hole spacing: At least 2x the material thickness between adjacent hole edges
- Slot-to-edge distance: Same as holes - 2x material thickness minimum
- Feature-to-bend distance: If your bracket includes bends, keep features at least 3x material thickness plus the bend radius away from bend lines
These clearances prevent distortion during cutting and maintain structural integrity where fasteners transfer loads into the bracket material.
Kerf Compensation and Dimensional Accuracy
Remember that the laser beam removes material as it cuts. If your design calls for a 10mm diameter hole and you draw exactly 10mm, you'll get a hole larger than intended by approximately half the kerf width on each side. Professional laser cut bracket CAD design accounts for this kerf loss.
Here's how kerf compensation works in practice:
- For external profiles: The laser path runs outside your intended final dimension
- For internal features (holes, slots): The laser path runs inside your intended dimension
- Most fabrication shops apply kerf compensation automatically based on their cutting parameters
- Critical tolerance features should be clearly called out on drawings so operators verify compensation settings
Dimensional tolerances for standard laser cutting typically fall within ±0.005" (0.127mm) for well-calibrated equipment, as noted by CIMtech's tolerance specifications. Communicating which dimensions are critical versus cosmetic helps your fabrication partner prioritize where precision matters most.
Common Mistakes That Increase Costs and Compromise Quality
Even experienced designers occasionally fall into traps that inflate manufacturing costs or create quality problems. Watch for these frequent issues:
- Overly complex geometries: Every additional cut extends processing time. As industry experts note, too many internal cutouts, sharp corners, or unsupported thin sections increase laser time and scrap rates. Simplify profiles where function permits.
- Non-standard material thickness: According to Komacut's design guide, custom thicknesses often require material MOQs of dozens or hundreds of sheets, weeks of lead time, and significant price premiums. Stick to standard gauges whenever possible.
- Features too close to edges: Violating minimum edge distances creates weak points and potential deformation during cutting or subsequent processing.
- Inconsistent bend orientations: According to manufacturing best practices, varying bend radii and inconsistent orientations require more operator reorientation time, increasing labor costs.
- Missing tolerance specifications: When you don't specify tolerances, assumptions get made - potentially leading to parts that don't fit their intended assembly.
The underlying principle? Design with manufacturing in mind from the start. Treat your fabrication partner as part of your design team, not just a vendor receiving finished drawings. Many shops offer Design for Manufacturing (DFM) reviews that catch these issues before they become expensive problems.
With your design optimized for laser cutting success, you might wonder how this fabrication method stacks up against alternatives. Understanding when laser cutting delivers the best value - and when other methods make more sense - helps you make informed decisions for each bracket project.
Laser Cutting vs Alternative Manufacturing Methods
So you've optimized your bracket design for laser cutting - but is laser cutting actually the right choice for your project? Here's the reality: no single manufacturing method wins every scenario. The smartest approach matches fabrication technology to your specific requirements for volume, complexity, timeline, and budget. Let's build a decision-making framework that helps you choose confidently.
Laser Cutting vs Stamping for Volume Production
The laser cut vs stamped brackets debate ultimately comes down to one critical factor: quantity. According to Prime Fab Works' cost analysis, laser cutting delivers approximately 40% cost reduction compared to stamping for batches under 3,000 units - primarily by eliminating $15,000+ in tooling costs that stamping requires upfront.
Why does stamping demand such significant tooling investment? The process requires custom dies engineered and manufactured specifically for your bracket geometry. This typically delays production 5-16 weeks or more before you see your first part. Those dies include cutting tools, forming tools, and often secondary operation tooling - each representing sunk costs that only make sense when amortized across thousands of identical parts.
Laser cutting flips this equation entirely:
- Zero tooling costs: Your CAD file becomes the tool, eliminating die design and fabrication expenses
- Immediate production: Once programming is complete, cutting begins - often within days rather than months
- Design flexibility: Modifications require only file updates, not expensive die rework
- Low minimum quantities: Prototype runs of 5 pieces cost the same per-part as runs of 50
However, when volume scales up, the laser cutting bracket cost comparison shifts dramatically. Stamping becomes increasingly cost-effective because per-piece processing costs drop substantially - that initial tooling investment gets spread across thousands of identical brackets. High-volume production runs of 10,000+ pieces typically favor stamping when designs are finalized and unlikely to change.
When Alternative Methods Make More Sense
Laser cutting excels in its sweet spot, but other fabrication technologies offer distinct advantages for specific applications. Understanding these alternatives helps you recognize when switching methods - or combining them strategically - delivers better results.
CNC Machining for Thick Materials
When your bracket design requires material thicknesses beyond laser cutting's practical limits, CNC machining takes over. While industrial lasers handle steel up to 25mm effectively, brackets requiring 30mm+ thickness or complex 3D machined features often benefit from CNC milling or turning operations.
CNC vs laser cut metal brackets comparisons typically favor CNC when:
- Material thickness exceeds efficient laser cutting range
- Tight tolerances on machined features are critical (±0.025mm or better)
- 3D contours or pockets require material removal from multiple angles
- Surface finish requirements exceed what laser cutting alone achieves
The trade-off? CNC machining typically costs more per part and generates significantly more material waste since you're cutting away solid stock rather than slicing sheet material.
Waterjet Cutting for Heat-Sensitive Applications
Every laser cutting operation generates heat - and heat creates a heat-affected zone (HAZ) where material properties may change. For most bracket applications, this HAZ is negligible. But some situations demand zero thermal influence on the base material.
According to Wurth Machinery's technology comparison, waterjet vs laser cut brackets comparisons favor waterjet when:
- Heat-sensitive materials would warp or harden under laser exposure
- No heat-affected zone is acceptable for aerospace or critical structural applications
- Mixed-material assemblies include plastics, composites, or rubber
- Extremely thick materials (50mm+) exceed laser capabilities
The waterjet market is projected to reach over $2.39 billion by 2034, reflecting growing demand for this cold-cutting technology. However, waterjet cutting runs 3-4x slower than laser on comparable materials and generates higher operating costs per foot of cut length.
Punching for Simple Geometries
For brackets featuring straightforward shapes - circles, rectangles, standard slots - turret punching offers high-speed production without laser cutting's complexity. A punch press cycles through standard tool shapes rapidly, making it economical for brackets composed primarily of catalog hole patterns and simple perimeter shapes.
Punching limitations become apparent with complex geometries: curved profiles, intricate cutouts, and non-standard shapes require expensive custom tooling or secondary operations. When your bracket design ventures beyond basic shapes, laser cutting typically delivers better value.
Manufacturing Method Comparison at a Glance
| Method | Best Volume Range | Complexity Capability | Typical Lead Time | Cost Considerations |
|---|---|---|---|---|
| Laser Cutting | 1 - 5,000 pieces | Excellent - handles intricate 2D profiles | Days to 2 weeks | No tooling; moderate per-piece cost |
| Stamping | 5,000+ pieces | Good - limited by die complexity economics | 5-16 weeks initial; fast production | High tooling ($15K+); low per-piece at volume |
| CNC Machining | 1 - 1,000 pieces | Excellent - 3D features possible | 1-4 weeks | No tooling; higher per-piece cost |
| Waterjet Cutting | 1 - 2,000 pieces | Excellent - no heat-affected zone | Days to 2 weeks | No tooling; slower = higher per-piece |
| Punching | 500 - 10,000 pieces | Limited - standard shapes only | 1-3 weeks | Standard tooling; fast for simple parts |
The Strategic Hybrid Approach
Experienced manufacturers often combine methods throughout a product lifecycle. According to industry analysis, many successful strategies include:
- Prototype phase: Laser cutting for rapid iteration and design validation
- Low-volume production: Continue with laser cutting while demand builds
- High-volume transition: Invest in stamping tooling once design is frozen and volumes justify the expense
- Design revisions: Return to laser cutting for updated versions while evaluating new tooling needs
This hybrid approach minimizes risk during development while capturing stamping's cost advantages at scale. For many bracket projects - especially those with moderate volumes, complex designs, or aggressive timelines - laser cutting remains the optimal choice throughout the product lifecycle.
Once you've determined that laser cutting fits your manufacturing needs, the next consideration becomes finishing. Raw laser-cut edges are remarkably clean, but most bracket applications benefit from additional post-processing to enhance durability, appearance, and safety.
Finishing Options and Post-Processing Considerations
Your laser cut brackets emerge from the cutting process with remarkably clean edges - but "clean" doesn't always mean "finished." Depending on your application, raw cut parts may need additional processing to become safe for handling, resistant to corrosion, or visually appropriate for their intended environment. Understanding these laser cut bracket surface treatment options helps you specify the right finishes upfront, avoiding costly delays or disappointing results.
Think of finishing as the final 10% of work that delivers 50% of the user experience. A beautifully designed bracket that leaves workers with cut fingers or rusts within months fails its purpose - regardless of how precisely it was cut.
Deburring Methods for Safe Handling
Even precision laser cutting can leave minor imperfections - dross deposits on bottom edges, micro-burrs at cut initiation points, or slight roughness where the beam pierced the material. According to SendCutSend's finishing guide, deburring removes these imperfections through two primary methods:
- Linear deburring: Parts pass through abrasive brushes that smooth scratches and remove dross from one side. This process works well for larger parts and prepares surfaces for subsequent painting or anodizing. Keep in mind that the bottom face may retain some scratches since brushing occurs on one side only.
- Tumbling: Smaller parts undergo vibratory-abrasive processing in ceramic media. This creates more consistent edge treatment across all surfaces. Modern tumbling equipment is harmonically tuned to specific materials, delivering better results than traditional rock tumbler methods.
Here's an important reality check: neither deburring nor tumbling creates a "perfect" finished appearance. They remove hazardous sharp edges and manufacturing artifacts, but scratches or marks from the cutting process may remain visible. For truly polished results, you'll need coating or plating processes.
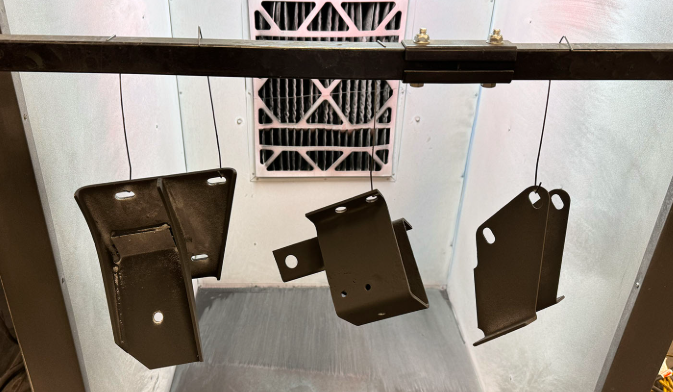
Powder Coating for Durable Protection
When your powder coated laser cut brackets need to withstand years of abuse, powder coating delivers exceptional durability that liquid paint simply cannot match. According to industry testing, powder coating lasts up to 10x longer than conventional paint while providing superior corrosion and abrasion resistance.
The process applies dry powder electrostatically to metal surfaces, then cures the coating in an oven. This creates a tough, uniform finish that adheres without the volatile organic compounds (VOCs) found in liquid paints - making it more environmentally friendly as well.
Powder coating benefits for bracket applications include:
- Exceptional durability against chips, scratches, and fading
- Wide color selection including matte, gloss, and textured finishes
- Improved corrosion resistance beyond bare metal
- Recyclable overspray reduces material waste
- Suitable for steel, stainless steel, and aluminum brackets
One critical design consideration: according to Okdor's surface treatment guide, powder coating adds 0.051-0.102mm thickness per surface. This dimensional change affects threaded holes and press-fit features. Plan for masking threaded holes during coating (adding $15-30 per part) or specify threaded inserts installed after coating as a cost-effective alternative.
The 200°C cure temperature can also distort precision assemblies or thin-walled brackets. Designs with walls thinner than 0.8mm may require reinforcement or alternative finishing approaches.
Plating Options for Corrosion Resistance
When your brackets face harsh environments but powder coating isn't suitable, metal plating provides an alternative protective layer. According to Legacy Overland's analysis, two plating approaches dominate bracket applications:
- Zinc plating: Uses an electrochemical process to deposit a thin protective zinc layer, resulting in a bright, clean finish. Ideal for bolts, nuts, and small brackets requiring both corrosion protection and aesthetic appeal. Yellow zinc plating adds an iridescent golden finish with slightly enhanced corrosion resistance compared to standard zinc.
- Hot-dip galvanizing: Dips parts into molten zinc, creating a thick, rugged protective layer for maximum durability. The rougher surface isn't as polished as zinc plating, but provides decades of protection for chassis components, suspension elements, and brackets exposed to mud, salt, and water.
- Nickel plating: Offers both decorative appearance and improved conductivity. Works well for copper or mild steel brackets requiring electrical contact or high-end visual finish.
Stainless steel bracket finishing options differ from carbon steel approaches. Since stainless already resists corrosion, finishing focuses on appearance and enhanced protection rather than basic rust prevention. Passivation - a chemical treatment that enhances the natural oxide layer - improves corrosion resistance without adding measurable thickness.
Anodizing for Aluminum Brackets
Anodized aluminum laser cut brackets represent the gold standard for aluminum finishing. The anodizing process thickens aluminum's natural oxide layer through an electrically charged acid bath, creating a surface that's exceptionally resistant to corrosion, heat, and scratches.
According to material finishing specifications, two anodizing types serve different bracket applications:
- Type II anodizing: Adds 0.013-0.025mm thickness per surface, providing corrosion resistance and color options for most visible aluminum parts. This covers approximately 80% of bracket applications requiring anodized finish.
- Type III hard anodizing: Adds 0.025-0.076mm thickness with significantly enhanced wear resistance. Specify this for high-friction surfaces, contact areas, or brackets experiencing repeated mechanical stress. Note that hard anodizing can double finishing costs compared to Type II.
Color options range from clear (natural aluminum appearance) to black, red, blue, and other dyed finishes. The anodized layer integrates with the aluminum substrate rather than sitting on top like paint, which is why the finish doesn't chip or peel under normal use.
Design consideration: Type II anodizing adds 15-25% to part cost, while processing typically requires 7-10 additional days. Plan your timeline accordingly when anodized aluminum laser cut brackets are specified.
Food-Grade Finishing Requirements
Brackets used in food processing environments demand finishing approaches that meet sanitary standards. According to industry guidelines, material selection often matters more than surface treatment for food-grade applications.
Grade 316 stainless steel provides inherent food-grade compatibility without requiring additional coatings. Its impermeable surface prevents bacterial contamination while resisting the acids, alkalis, and chlorides common in food preparation areas. Passivation treatment enhances this natural corrosion resistance.
If carbon steel or aluminum brackets must be used in food environments, powder coating with FDA-compliant formulations creates a safe, cleanable surface. Verify that your coating supplier provides food-grade certification documentation for regulatory compliance.
How Finishing Affects Project Timelines
Every finishing step adds time to your bracket delivery schedule. Understanding these timeline impacts helps you plan realistically:
- Deburring/tumbling: Often included in standard laser cutting lead times or adds 1-2 days
- Powder coating: Adds 10-14 days depending on color availability and batch scheduling
- Type II anodizing: Adds 3-5 days for standard colors
- Hard anodizing: Adds 7-10 days due to specialized equipment requirements
- Plating: Adds 5-10 days depending on plating type and facility scheduling
Combined finishes - such as bead blasting followed by anodizing for consumer electronics housings - extend timelines further and add 20-30% to finishing costs. Reserve combinations for applications where single treatments genuinely cannot meet your requirements.
With finishing options understood, the next step is specifying and ordering your brackets correctly - ensuring your fabrication partner has everything needed to deliver parts that meet your exact requirements.
How to Specify and Order Custom Brackets
You've designed your bracket, selected the perfect material, and determined the right finishing treatment. Now comes the step that trips up many first-time buyers: actually placing a custom laser cut bracket order that gets you exactly what you need. Sounds straightforward? The reality is that incomplete specifications lead to quote delays, production misunderstandings, and parts that don't quite fit their intended assembly.
The difference between a smooth ordering experience and a frustrating one often comes down to preparation. Providing complete, accurate information upfront accelerates your laser cut bracket quote request and reduces the back-and-forth that extends lead times. Let's walk through exactly what your fabrication partner needs - and how ordering considerations shift between prototype and production phases.
Essential Information for Your Quote Request
According to TORNQVIST Custom Metal Fabricators, accurate quotes require detailed information across several categories. Leaving out any of these details forces the manufacturer to make assumptions - and assumptions rarely align perfectly with your expectations.
Here's your complete specification checklist for a laser cut bracket quote request:
- CAD files or detailed drawings: CAD files in DXF, DWG, or STEP formats provide exact specifications for accurate pricing. Without CAD, a detailed sketch with all dimensions, hole locations, and critical tolerances helps - but expect longer quote turnaround times.
- Material specification: Specify the exact material grade (A36 steel, 6061-T6 aluminum, 316 stainless, etc.), not just "steel" or "aluminum." Include thickness in your preferred unit of measurement.
- Quantity requirements: Be clear whether you need 5 pieces or 5,000. This dramatically affects pricing and the manufacturing approach recommended.
- Tolerance expectations: Call out critical dimensions that require tighter tolerances than standard cutting provides. Standard laser cutting achieves ±0.127mm, but tighter tolerances require additional attention and cost.
- Finishing requirements: Specify deburring level, coating type, plating, or anodizing needed. Include color specifications for powder coating.
- Surface finish requirements: Note any specific edge treatments, surface roughness requirements, or aesthetic standards the finished parts must meet.
- Hardware or secondary operations: List any threaded inserts, welding, bending, or assembly operations beyond flat cutting.
- Delivery timeline: Communicate your actual deadline - not "ASAP." Rush orders cost more, and honest timelines help fabricators schedule efficiently.
- Certification requirements: If your application requires material certifications, first-article inspection reports, or specific quality documentation, state this upfront.
As noted by industry experts, "The clearer your drawing, the more accurate your quote. Every dimension, hole, and bend in your drawing directly translates to machine time, materials, and, ultimately, cost."
Prototype vs Production Volume Considerations
Your ordering approach should shift significantly between laser cut bracket prototype ordering and full production runs. According to All Metals Fab's engineering guidance, "Prototypes are optimized for speed and form," while "Production must be optimized for repeatability, throughput, and cost per unit."
Here's how the two phases differ:
Prototype Phase Priorities
- Speed over cost optimization: Getting parts quickly for testing matters more than minimizing per-piece expense
- Design flexibility: Expect iterations - order quantities that allow testing without over-investing in unproven designs
- Material availability: Standard materials in stock ship faster than specialty alloys requiring procurement
- Simplified finishing: Basic deburring often suffices for functional testing; save complex finishing for production
- Documentation level: Full inspection reports may be unnecessary until design is finalized
Production Phase Priorities
- Per-piece cost optimization: Larger quantities justify setup time investments and finishing economies of scale
- Consistent quality: First-article inspection (FAI) validates that production processes deliver spec-compliant parts
- Material planning: Order specialty materials in advance to avoid production delays
- Complete finishing: Full coating, plating, or anodizing specifications apply
- Documentation requirements: Material certificates, dimensional reports, and quality records become essential
A smart strategy? Adopt a "prototype with production intent" mindset from industry best practices. Build prototypes using the same material, thickness, and tooling assumptions you expect in production. When that's not possible, document where the prototype differs and require a delta review with manufacturing before scaling up.
Evaluating Laser Cut Bracket Manufacturer Selection
Not all fabrication shops deliver the same quality or service. Choosing the right laser cut bracket manufacturer selection involves evaluating capabilities, certifications, and communication practices.
Consider these evaluation criteria:
- Equipment capabilities: Does the shop have laser systems capable of cutting your material type and thickness with required precision?
- Quality certifications: For automotive applications, IATF 16949 certification demonstrates rigorous quality management systems. ISO 9001 indicates general quality process compliance.
- DFM support: Manufacturers offering Design for Manufacturing reviews catch problems before cutting begins - saving time and money
- Quote responsiveness: How quickly does the shop respond to quote requests? Slow quotes often predict slow production communication.
- Finishing capabilities: Can they complete finishing in-house, or will parts ship to third parties - adding time and handling risks?
- Minimum order quantities: Some shops focus on high-volume production and won't efficiently handle prototype quantities
- Communication practices: Do they proactively flag potential issues, or do surprises appear at delivery?
For brackets destined for automotive chassis, suspension, or structural applications, quality certification matters significantly. IATF 16949 certification indicates the manufacturer maintains automotive-specific quality systems covering production planning, supplier management, and continuous improvement - critical factors when your brackets affect vehicle safety.
Request sample parts or references from similar projects when evaluating new suppliers. A shop's portfolio reveals whether they regularly handle projects matching your complexity and quality requirements.
With your specifications complete and a capable manufacturing partner identified, the final consideration becomes understanding how these brackets perform across different industry applications - from demanding automotive environments to precision home organization systems.
Industry Applications from Automotive to Home Organization
Now that you understand how to specify and order custom brackets, let's explore where these precision-cut components actually perform their work. From high-stress automotive chassis assemblies to elegant home storage solutions, laser cut brackets serve remarkably diverse applications - each with unique requirements that drive material selection, design complexity, and quality standards.
What makes this fascinating? The same fundamental technology produces brackets for race cars enduring extreme G-forces and decorative shelf supports in living rooms. Understanding these application differences helps you recognize which design and material choices matter most for your specific project.
Automotive Suspension and Structural Brackets
Automotive applications represent some of the most demanding environments for laser cut brackets. According to CNC Machines' automotive engineering guide, chassis and structural components must withstand constant stress from engine vibrations, road impacts, and aerodynamic forces while maintaining vehicle stability, crash safety, and longevity.
Automotive laser cut mounting brackets serve critical functions throughout the vehicle:
- Engine bay brackets: Hold radiators, intercoolers, and fluid reservoirs in precise alignment despite constant thermal cycling and vibration
- Suspension anchors: Connect sway bars, shock mounts, and control arm assemblies to the chassis with tolerances measured in hundredths of millimeters
- Exhaust system supports: Secure mufflers and catalytic converters while isolating cabin areas from heat and vibration
- Interior mounts: Support infotainment modules, pedal assemblies, and seat frames where precision fitment affects both function and perceived quality
The precision requirements in these applications directly affect vehicle handling characteristics. Well-structured chassis brackets reduce flex and maintain predictable behavior during acceleration, braking, and cornering. For laser cut suspension brackets specifically, dimensional accuracy ensures proper suspension geometry - affecting everything from tire wear patterns to steering response.
Material selection for automotive structural brackets typically centers on high-strength steels like 4130 chromoly for performance applications, while production vehicles often use advanced high-strength steel (AHSS) that balances weight reduction with crash energy absorption. Industrial laser cut support brackets in commercial vehicles may use thicker mild steel where weight matters less than raw strength and cost efficiency.
Quality certification becomes non-negotiable in automotive applications. IATF 16949 certification demonstrates that a manufacturer maintains rigorous quality systems specifically designed for automotive production - covering everything from design validation through production planning and continuous improvement. When your brackets affect vehicle safety, working with IATF 16949-certified manufacturers like Shaoyi provides confidence that quality processes match the application's criticality. Their 5-day rapid prototyping capability allows engineers to validate designs quickly, while comprehensive DFM support catches manufacturability issues before they become production problems.
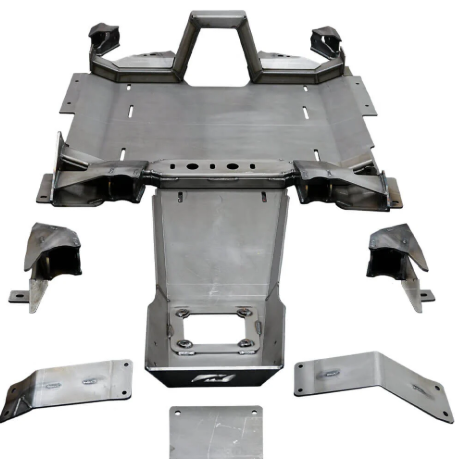
Accessory Mounting Brackets for Off-Road and Performance Vehicles
Beyond OEM structural components, the aftermarket accessory segment drives significant demand for precision laser cut brackets. Consider the typical 50 light bar with laser cut brackets installation - these mounting solutions must handle vibration, aerodynamic loads, and off-road impacts while maintaining precise alignment for optimal lighting coverage.
Light bar mounting brackets face unique challenges:
- Vibration resistance: Off-road driving generates continuous shock loads that fatigue poorly designed brackets
- Aerodynamic loading: Highway speeds create substantial wind pressure against large light bars
- Adjustment capability: Slotted mounting holes allow aiming adjustment after installation
- Corrosion exposure: Mud, salt, and weather demand protective finishes or stainless steel construction
These accessory applications benefit from laser cutting's ability to produce complex geometries economically at moderate volumes. Unlike OEM production runs of 100,000+ identical brackets where stamping makes economic sense, aftermarket accessory brackets often run 500-5,000 pieces per design - laser cutting's sweet spot.
French Cleat Systems for Modular Organization
Shifting from automotive to home and workshop applications, French cleat systems represent an elegant solution for modular wall organization. These interlocking bracket arrangements allow tools, shelves, and storage containers to hang securely while remaining easily repositionable.
According to Outwater's installation guide, the French cleat system works through complementary angled brackets - typically cut at 45 degrees - that interlock to create a tight, flush bond while allowing horizontal adjustment for precise positioning.
The installation process demonstrates why precision matters:
- Wall brackets mount to studs and anchors at precise heights
- Product brackets attach to the back of shelves or tool holders
- The angled surfaces interlock, creating self-supporting connections
- Items slide horizontally until reaching their desired position
Laser cut french cleat brackets offer advantages over traditional wooden cleats:
- Consistent angles: The 45-degree mating surfaces cut precisely every time, ensuring reliable interlocking
- Thinner profiles: Metal cleats project less from walls than wooden alternatives
- Higher load capacity: Steel cleats support heavier items than equivalent wood profiles
- Durability: No splitting, warping, or moisture damage over time
Workshop tool organization systems increasingly use metal French cleats for their strength and modularity. Custom laser cut brackets for furniture in these applications often include integrated features like cable management slots or specific attachment points for power tool holders.
Industrial Equipment and Manufacturing Applications
Industrial laser cut support brackets serve applications ranging from conveyor systems to packaging machinery. These brackets often prioritize function over aesthetics, with designs optimized for load capacity, assembly efficiency, and maintenance accessibility.
Common industrial bracket applications include:
- Equipment mounting plates: Position motors, sensors, and control components with precise hole patterns
- Guard and enclosure supports: Hold safety barriers and machine covers in place
- Conveyor guides: Direct product flow through manufacturing processes
- Structural reinforcements: Add rigidity to equipment frames and machine bases
The 20x20 extrusion bracket laser cut components exemplify how laser cutting enables integration with modular aluminum framing systems. These brackets feature precisely positioned holes and slots that match standard extrusion T-slot profiles, allowing rapid assembly and reconfiguration of workstations, machine guards, and automation cells.
Laser cut tank brackets for fluid handling systems demonstrate material selection driving design decisions. Tanks containing corrosive chemicals require 316 stainless steel brackets with passivated finishes. Fuel tank supports in industrial equipment might use thick mild steel with galvanized coating. Each application's specific fluid and environment dictates the appropriate material and finishing combination.
Consumer Products and Decorative Applications
At the opposite end of the complexity spectrum, laser cut brackets for furniture and home decor prioritize visual appeal alongside function. Decorative shelf brackets, furniture hardware, and architectural elements showcase laser cutting's ability to produce intricate patterns economically.
These consumer applications often feature:
- Ornamental cutouts: Scrollwork, geometric patterns, and custom designs impossible with stamping
- Powder coated finishes: Wide color selection matches interior design requirements
- Thinner materials: 1.5-3mm thickness provides adequate strength while minimizing visual bulk
- Consistent quality: Every bracket matches, critical for visible installations
The craft and hobby market also benefits from laser cutting precision. Dollhouse laser cut brackets at miniature scale capture Victorian-era decorative details that would be impossible to produce consistently through other methods. Model builders and miniaturists specify brackets with features as small as 0.5mm - pushing laser cutting capabilities while achieving remarkable detail.
How Application Requirements Drive Quality Standards
Across all these applications, a clear pattern emerges: the criticality of the bracket's function determines the appropriate quality standards and manufacturing partner qualifications.
| Application Category | Typical Tolerance | Certification Often Required | Critical Quality Factors |
|---|---|---|---|
| Automotive Structural | ±0.10mm | IATF 16949 | Material traceability, dimensional consistency, fatigue resistance |
| Industrial Equipment | ±0.25mm | ISO 9001 | Hole pattern accuracy, load capacity, corrosion protection |
| Aftermarket Accessories | ±0.25mm | None typical | Fitment to vehicle, finish quality, adjustment capability |
| Consumer/Decorative | ±0.50mm | None typical | Visual consistency, finish quality, safe edges |
For automotive chassis and suspension brackets specifically, the combination of rapid prototyping capability and IATF 16949-certified production proves essential. Manufacturers like Shaoyi bridge the gap between development speed and production quality - offering 12-hour quote turnaround and 5-day rapid prototyping while maintaining the rigorous quality systems automotive OEMs require.
Understanding where your bracket falls in this application spectrum helps you specify appropriate tolerances, select the right manufacturing partner, and establish realistic expectations for quality documentation. A decorative shelf bracket doesn't need automotive-grade certification - but a suspension component absolutely does.
With applications understood across this diverse range, you're now ready to synthesize everything into actionable next steps for your specific bracket project.
Getting Started with Your Laser Cut Bracket Project
You've now explored the complete journey from understanding what laser cut brackets are to specifying them for production. But knowledge without action remains just information. Whether you're developing automotive suspension components, industrial mounting solutions, or decorative home hardware, the path forward requires translating these insights into concrete project decisions.
So where do you begin? Successful laser cut bracket project planning comes down to making smart choices at each decision point - and recognizing that the choices you make early ripple through every subsequent phase.
Key Takeaways for Your Bracket Project
Before diving into your next steps, let's crystallize the essential principles that separate successful bracket projects from frustrating ones:
The best bracket designs emerge when you treat your fabrication partner as part of your design team - not just a vendor receiving finished drawings.
This collaborative mindset drives better outcomes across every project phase. Here's what matters most:
- Material selection drives everything: Match material properties to your operating environment. Mild steel for general strength, aluminum for weight reduction, stainless for corrosion resistance - there's no universal "best" choice.
- Design for manufacturing from day one: According to DFM best practices, applying appropriate tolerances achievable with sheet metal fabrication processes prevents costly revisions and quality challenges in production.
- Finishing isn't an afterthought: Your laser cut bracket production timeline extends significantly when complex finishes are required. Plan for 10-14 days additional lead time for powder coating or 7-10 days for hard anodizing.
- Volume determines method: Laser cutting delivers optimal value for prototype through medium-volume production. Only transition to stamping when designs are frozen and volumes justify tooling investment.
- Quality certification matters for critical applications: Automotive and safety-critical brackets demand IATF 16949-certified manufacturers with documented quality systems.
Moving Forward with Confidence
Ready to transform your bracket concept into reality? Your laser cut bracket rapid prototyping journey begins with these actionable steps:
Step 1: Finalize your design files. Prepare CAD files in DXF, DWG, or STEP formats with all critical dimensions called out. Apply the design principles covered earlier - proper corner radii, adequate edge distances, and realistic tolerances.
Step 2: Document your complete specifications. Use the specification checklist from the ordering section: material grade, thickness, quantity, finishing requirements, and timeline. Complete specifications accelerate quotes and prevent misunderstandings.
Step 3: Identify qualified manufacturing partners. According to industry guidance, choosing a specialized manufacturer ensures tailored solutions that precisely meet your specific design requirements - with the flexibility to make adjustments during production.
Working with a specialized manufacturer often means closer collaboration, resulting in better communication and understanding of project needs.
Step 4: Request quotes with DFM feedback. The best custom bracket manufacturing partners don't just provide pricing - they offer Design for Manufacturing reviews that catch potential issues before cutting begins. This proactive approach saves both time and money.
For automotive chassis, suspension, and structural bracket applications where quality certification and rapid turnaround matter, manufacturers offering comprehensive DFM support become invaluable partners. Shaoyi's combination of 12-hour quote turnaround, 5-day rapid prototyping, and IATF 16949-certified production exemplifies how the right manufacturing partner accelerates projects from concept to production without compromising quality.
The path from bracket concept to installed component is shorter than you might expect - when you approach it with the right knowledge, specifications, and manufacturing partner. You now have everything needed to move forward with confidence.
Frequently Asked Questions About Laser Cut Brackets
1. Which material should you never cut in a laser cutter?
Certain materials pose safety hazards or damage laser equipment. Avoid cutting leather containing chromium (VI), carbon fibers, and polyvinyl chloride (PVC). PVC releases toxic chlorine gas when laser cut, while carbon fibers can damage optical components. For bracket applications, stick to approved metals like mild steel, stainless steel, and aluminum, which cut cleanly and safely with proper laser parameters.
2. How to join laser cut parts without fasteners?
Tab and slot designs offer the simplest fastener-free joining method. Tabs act as male connectors extending from part edges, while slots serve as female receivers. Design tabs at least 2x material thickness wide with 0.05-0.15mm slot clearance for snug assembly. Include corner relief notches at internal tab corners to prevent interference. This self-fixturing approach reduces welding requirements and creates automatically aligned assemblies.
3. What tolerances can laser cut brackets achieve?
Standard laser cutting achieves tolerances of ±0.127mm (0.005 inches) with well-calibrated equipment, while precision applications can reach ±0.0127mm to ±0.0254mm. Tolerance capability depends on material type, thickness, and cutting parameters. For critical dimensions, specify tighter tolerances on drawings so operators can verify compensation settings. IATF 16949-certified manufacturers like Shaoyi maintain rigorous quality systems ensuring consistent dimensional accuracy.
4. How does laser cutting compare to stamping for bracket production?
Laser cutting eliminates tooling costs (saving $15,000+ upfront) and delivers approximately 40% cost reduction for batches under 3,000 units. Production begins within days versus 5-16 weeks for stamping die fabrication. However, stamping becomes more economical at volumes exceeding 10,000 pieces when designs are finalized. Many manufacturers use laser cutting for prototypes and low volumes, transitioning to stamping only when demand justifies tooling investment.
5. What finishing options are available for laser cut brackets?
Common finishes include deburring for safe handling, powder coating for durable protection lasting up to 10x longer than paint, zinc or galvanized plating for corrosion resistance, and anodizing for aluminum brackets. Powder coating adds 0.051-0.102mm thickness per surface with 10-14 days lead time. Type II anodizing adds 0.013-0.025mm thickness with 3-5 days processing. Food-grade applications typically use 316 stainless steel with passivation treatment.