 Small batches, high standards. Our rapid prototyping service makes validation faster and easier —

How To Weld With A Mig Welder Without Wrecking Your First Bead
Step 1 What MIG Welding Means and Safe Setup
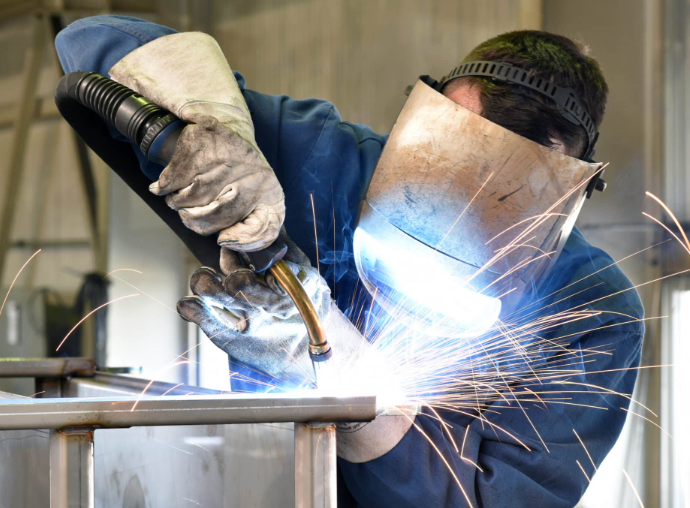
If you're learning how to weld with a mig welder, start with the simple version first. MIG welding joins metal by using electricity to create heat while a machine feeds wire through the gun for you. That makes it one of the most approachable welding methods for first-time users who want to make clean practice beads instead of fighting the process.
What MIG Welding Means in Plain English
What does MIG stand for in welding? It stands for metal inert gas. If you searched for the mig welding meaning or a quick mig welding definition, here it is: MIG is an arc welding process that uses a continuously fed solid wire electrode and shielding gas to protect the molten weld area from air. The arc is the bright electrical spark between the wire and the metal. The wire feed is the machine pushing fresh wire forward at a steady speed. The shielding gas is the protective cloud coming out around the wire. The weld puddle is the small pool of melted metal you watch and guide. In plain terms, that is what is mig welding, and what is a mig welder: a wire-feed machine that helps fuse metal together.
Why Beginners Start With MIG
MIG welding is widely treated as beginner-friendly because the wire feeds continuously, so you do not have to add filler metal by hand while also trying to hold an arc. Guidance from The Crucible and ESAB both describe it as fast, forgiving, and useful for fabrication and repair work, especially on common shop metals.
Safety Gear and Workspace Checks Before You Begin
- PPE: welding helmet, safety glasses, flame-resistant clothing, welding gloves, and leather boots.
- Ventilation: work in a well-ventilated area or use fume extraction, and avoid tight spaces where fumes can build up.
- Fire safety: move gasoline, solvents, aerosol cans, propane bottles, and other flammables away, and keep a fire extinguisher nearby.
- Workspace setup: inspect cables and connections, keep the floor dry, secure the workpiece, and make sure the machine is grounded correctly.
Clean the metal, plant your feet, and steady your body before you pull the trigger.
The second mig welding definition that matters is practical: safe welding starts before the arc appears. When the area is clear and your stance is stable, the machine feels a lot less mysterious. The gun, clamp, wire, tip, and gas supply each have a job, and recognizing those parts makes the first full setup far easier.
Step 2 Gather the Right Machine Wire and Consumables
A safe workspace is a strong start, but the machine still has to be assembled correctly before it can weld well. Many beginner issues begin long before the arc. The wrong wire, the wrong roller, a loose clamp, or a missing tip can make even good technique feel impossible. Whether you are using small mig welders at home or a larger wire feed welder in a shop, complete setup comes first and practice metal comes second.
Essential MIG Welder Parts You Need to Recognize
- Power source: the metal inert gas welding machine that controls voltage and wire feed.
- MIG gun: carries current and guides the wire to the joint.
- Work clamp: completes the electrical circuit through the workpiece.
- Wire spool: the filler metal, often called mig welding wire.
- Drive roller: grips the wire and feeds it through the liner.
- Contact tip: transfers current to the wire and must match wire size.
- Nozzle: directs shielding gas around the arc.
- Gas cylinder and regulator, if used: needed for standard solid-wire MIG.
- Scrap metal: clean practice pieces for testing feed and settings.
Choosing Wire Gas and Consumables for the Job
Start with the base metal, then match the wire. A wire chart from Motoman lists common pairings such as ER70S-3 or ER70S-6 for mild steel, ER308L, ER309L, or ER316L for stainless, and ER4045 or ER5356 for aluminum. Thickness matters too. Smaller wire is easier on thin sheet, while thicker sections usually need a larger diameter. That same chart places 0.023 in. wire with 24 to 18 gauge material, 0.030 in. with 16 to 12 gauge, 0.035 in. with 1/8 to 3/8 in., and 0.045 in. above that range.
Does MIG welding require gas? Usually yes if you are running solid wire. Mild steel solid wire commonly uses 75 percent argon and 25 percent CO2 or straight CO2, stainless uses argon-rich blends or tri-mix, and aluminum uses 100 percent argon. Self-shielded flux-cored wire is the exception, so external gas is not required, but you should expect more spatter and slag cleanup.
Basic Machine Setup Before Powering On
- Confirm the machine supports the wire type and diameter you plan to use.
- Install the correct drive roller. A setup guide shows V-groove rollers for solid wire and W-groove rollers for flux-cored wire.
- Mount the spool so the wire unwinds from the bottom into the drive rolls, and keep hold of the wire to prevent tangling.
- Thread the wire through the feeder and liner, then fit the matching contact tip and nozzle.
- Connect the gun and work clamp, and verify polarity. Standard solid-wire MIG uses DCEP, while self-shielded flux-cored wire uses DCEN.
- If you are using shielding gas, attach the regulator and hose securely before checking gas flow.
- Set out clean scrap metal and test wire feed before trying a real weld.
Good setup feels slow for a few minutes, but it prevents a lot of wasted time. Even a perfectly loaded machine will struggle if the metal is rusty, oily, poorly fitted, or free to shift under the gun.
Step 3 Clean Flat Metal and Prepare the Joint
Before the machine settings can help you, the metal has to stop working against you. A lot of beginner frustration in welding with a mig welder comes from trying to run a bead over rust, paint, oil, or a joint that shifts as soon as heat hits it. Clean prep makes the arc steadier, the puddle easier to see, and the bead far more predictable.
How to Clean and Fit Metal for a Better Arc
Contamination changes everything. This surface prep guide notes that oil and grease can create gas pockets that lead to porosity, while rust and mill scale can prevent proper fusion. Paint and coatings also act like a barrier between the weld and the base metal. In simple terms, if you try to weld on metal that is still dirty, the arc has to fight through that mess first.
- Start with clean practice coupons on flat metal, not thin body panels or mixed-thickness scraps.
- Grind away rust, mill scale, and old coating until you reach bright bare metal.
- Use sanding or a wire brush for lighter cleanup and tight spots.
- Wipe off oil and grease with solvent, then let it evaporate completely before welding.
- Keep the cleaned area dry and free from dust or moisture until you are ready to weld.
- Check fit-up. The joint should meet evenly without forcing the parts together.
- Clamp the work so it stays still, but leave yourself clear access to run the gun along the seam.
This is why wire welding for beginners should start on simple, clean coupons. Fewer variables means you can actually learn what the puddle is doing.
When to Clamp and When to Tack First
Clamps hold alignment before you strike the arc. Tack welds hold alignment after the heat starts pulling the metal around. The butt joint guide explains that tacks stitch the pieces together so they do not move and leave you trying to weld across an opening.
For a short practice seam, use several small tacks along the joint instead of one large tack. Put them where the parts are most likely to separate, usually near the ends and anywhere the fit-up wants to open. On thin bodywork, tack spacing of about 1 inch is a common reference. A very useful beginner habit is to start the weld between tacks, carry the bead over them, and if possible stop between tacks too, rather than starting right on a tack.
Overlap pieces deserve tight clamping. The same guide warns that if the sheets are not clamped snugly together, it becomes easier to blow holes in the top sheet.
Practice Material Choices for Your First Session
Thin steel punishes small mistakes fast. The DIY MIG guide recommends learners start on steel at least 1.5 mm to 2 mm thick, because thinner metal is much harder to control without blowing through. Clean, flat coupons in that range are ideal for first practice because they let you focus on arc control instead of chasing distortion and gaps.
Overlap joints are often easier than butt joints at first because one side has double thickness. Butt joints are still worth practicing, but fit-up matters more. On steel up to 1.5 mm, that same guide says no gap is best. Around 2 mm and above, a small gap can help penetration.
| Prep mistake | What it causes in the weld |
|---|---|
| Oil or grease left on the joint | Porosity and bubbling in the bead |
| Rust or mill scale not removed | Poor fusion and weak tie-in |
| Paint or coating still present | Contaminated bead and inconsistent arc |
| Loose fit-up or poor clamping | Gaps, wandering seam, and burn-through risk |
| No tack welds where movement is likely | Parts shift as heat builds, making the bead uneven |
When the surface is clean and the joint stays put, the weld starts behaving more honestly. At that point, the puddle becomes a much better teacher, and the machine settings begin to matter in a very visible way.
Step 4 Dial In MIG Welder Settings Before Welding
Clean metal gives you a fair chance. Settings decide what happens next. If you have been wondering how does a mig welder work when the trigger is pulled, this is the practical answer: the machine maintains the conditions for a controlled electric arc welding process while feeding wire at a steady rate. In everyday shop use, how does mig welding work comes down to balance. Too much or too little voltage, wire speed, stickout, or gas protection changes the puddle fast.
How to Read Basic MIG Welder Controls
Most beginner machines center on two main controls: voltage and wire-feed speed. Voltage affects arc length and strongly influences bead height and width. Wire-feed speed affects amperage and penetration. Miller notes that machine charts and manuals are the best starting point, especially when they list settings by material, wire type, and thickness. Use that chart first, not guesswork. If your machine includes auto settings, treat them as a starting line, not a final answer.
Gas Polarity and Stickout Checks Before Welding
- Confirm the wire type and polarity. Gas-shielded solid wire commonly uses DCEP, while self-shielded flux-cored wire commonly uses DCEN.
- Attach the work clamp to clean bare metal so the circuit is solid.
- If you are using gas, open the cylinder, check the regulator, and start near your machine's recommended flow rate. A UNIMIG guide lists 8 to 12 liters per minute as a common MIG starting range.
- Check contact tip, nozzle, and wire feed. Make sure the wire feeds smoothly before welding.
- Set a short, consistent stickout, about 1 cm or roughly 3/8 inch for basic practice.
- For a flat practice bead, hold a modest gun angle, usually around 10 to 15 degrees in the direction that suits your wire.
Stickout matters more than it looks. A longer wire extension reduces current at the arc and weakens shielding coverage, which can make the puddle feel cold, erratic, or dirty.
How Test Beads Tell You What to Adjust Next
Run a short bead on scrap from the same material before touching the real joint. Low voltage can give you poor starts, excess spatter, and a ropey bead. High voltage can make the arc feel turbulent and inconsistent. Wire speed that is too high can create a wide bead, extra spatter, or even burn-through, while too little can leave a narrow bead with weak tie-in.
Judge settings by puddle behavior, arc sound, and bead shape, not by dial position alone.
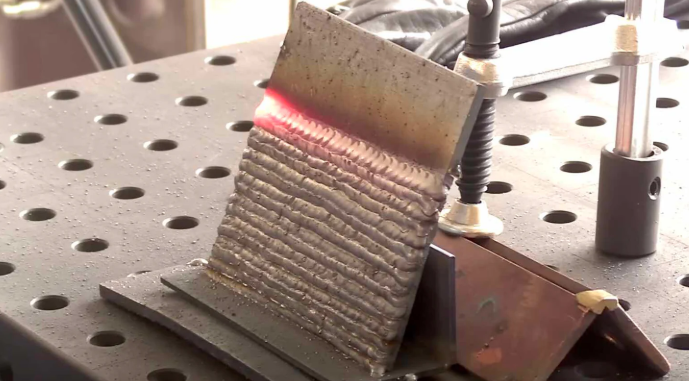
This is the heart of how to use a mig welder well. The best mig welding method for a beginner is simple: start at the machine guidance, make one test bead, change one variable at a time, and watch what the puddle tells you. When the arc sounds steady and the bead starts laying flat instead of sitting on top, your hands are ready for the first real pass.
Step 5 How to MIG Weld Your First Flat Bead
This is where the machine stops being the star and your hands take over. Keep the first goal modest: one short, steady bead on clean flat practice steel. If you have been wondering how do you mig weld, the answer starts with body control, clear sight of the puddle, and a calm trigger pull, not fancy motion.
Your First MIG Weld From Setup to Arc Start
Before you weld, get your body settled. Stand so you can move smoothly through the whole bead without reaching. Tuck your elbows in. Support the gun with both hands if that gives you better control. For mild steel practice, Miller recommends about 3/8 inch of stickout and a travel angle of roughly 5 to 15 degrees. A light push angle usually gives beginners a better view of the puddle.
- Lower your helmet and settle your stance before touching the trigger.
- Hold the gun with a short, consistent stickout and point the wire at the start of your practice line.
- Brace your gun hand so the movement comes from your arms and shoulders, not a shaky wrist.
- Set the gun at a slight push angle for the flat bead.
- Squeeze the trigger and let the arc establish.
- Watch the weld puddle form right under the arc instead of staring at the wire.
- Move forward in a straight line and keep the arc on the leading edge of the puddle.
- Run only a short practice bead, keeping your pace smooth and even.
- At the end, release the trigger cleanly and hold position for a brief moment so you do not jerk away and disturb the finish.
- Keep your gloves on and let the metal cool before touching, brushing, or judging the bead.
How to Control the Puddle While Moving
If you want to learn how to mig weld well, train your eyes before your hands. The puddle is the real teacher. Miller notes that travel speed should be judged by puddle size in relation to the joint thickness, and that the bead should be no larger than the thinnest section being welded. For a first pass, skip weaving. Among beginner mig welding techniques, a straight bead is the easiest to control and the easiest to read.
People searching how to weld mig often focus on hand motion, but eye placement matters more. Keep looking at the front edge of the molten pool. One of the best tips for mig welding is to move only as fast as the puddle lets you. If the puddle widens suddenly, slow down your hands and pay attention to what changed. If the bead piles up high, your movement may be off even if the arc is still lit.
- A steady puddle width from start to finish.
- A bead that stays similar in width instead of swelling and shrinking.
- Edges that tie into the base metal instead of looking like the weld is sitting on top.
- A consistent arc sound, often described as a steady sizzle.
How to Stop Restart and Finish a Practice Bead
Starts and stops are where many beginner beads fall apart. Guidance from The Fabricator offers a very practical fix. For a cleaner start, begin slightly ahead of your true start point, about 1.5 times the weld size, then back up quickly to the actual start and continue forward. That helps reduce overlap at the beginning. For a cleaner stop, weld to the end point, then back up about the same distance to fill the crater and reduce undercut or cracking.
If you need to restart in the middle of a practice bead, do not simply stab the arc into the old stop. Aim so the new puddle washes into the previous crater, then move ahead once the tie-in looks smooth. Learning how to weld with a mig welder is really a series of tiny corrections like this. One clean flat bead teaches posture, trigger timing, puddle reading, and finish control. The shape of the joint changes all of those details, which is why gun placement gets even more interesting when the metal stops being flat and simple.
Step 6 Weld Basic Joints With Better MIG Torch Control
A flat bead teaches you how to guide a puddle. A joint forces you to place that puddle on purpose. That is where a lot of beginners start seeing why joint shape matters so much in learning how to weld with a mig welder. Miller's joint guide treats butt, lap, and T-joints as core setups, and each one changes where the wire should point, how the parts should be held, and what good fusion looks like.
How to Weld a Butt Joint Without a Gap Problem
A butt joint puts both pieces in the same plane, so the weld has no overlap to catch it if the fit-up is poor. Keep the edges even, tack the seam so it cannot spread open, and aim the wire right at the center of the joint. On thinner material, Miller notes that square-groove butt joints are commonly used on sheet metal and other material under 1/8 inch, where edge preparation is limited. Watch for the puddle to wet into both edges equally. If the bead keeps favoring one plate, your gun is drifting or the gap is inconsistent.
How to Weld Lap and T Joints With Better Control
Lap joints and T-joints usually feel easier because the joint gives the puddle a corner to sit in. In a lap joint, one piece overlaps the other and the weld is placed where they intersect. Keep the sheets flush with no gap, tack the overlap so the top sheet cannot lift, and aim slightly toward the lower piece while still washing into the top edge. A T-joint places one piece at about 90 degrees to another and usually calls for a fillet weld. Miller recommends a 45-degree work angle to split the difference between both members, and if the thicknesses are uneven, bias the arc more toward the thicker part. Tack the upright member first so it stays square before you run the fillet.
| Joint type | Where to aim the gun | What to watch in the puddle | Most common beginner mistake |
|---|---|---|---|
| Butt joint | Directly at the seam center | Both edges melt in evenly and the bead stays centered | Letting the gap open or drifting onto one plate |
| Lap joint | At the intersection, with slight focus on the lower sheet | The top edge ties in instead of the weld sitting only on the bottom piece | Leaving a gap between sheets or lingering too long on thin metal |
| T-joint | Into the corner with about a 45-degree work angle | Both sides of the fillet grow evenly | Favoring one side and losing fusion on the other |
| Simple fillet on a corner | At the corner where both edges meet | A small, controlled puddle that fills the corner without collapsing it | Overfilling the joint and overheating the edges |
Thin Sheet Guidance and Push Versus Pull Decisions
Thin steel reacts fast. Miller's heat control article explains the core problem clearly: more filler metal means more heat, and more heat means more shrinking. That is the heart of mig welding sheet metal. For welding sheet metal with mig welder technique, keep seams tight, use only enough heat for proper penetration, and move fast enough to avoid sitting in one spot.
The push or pull mig welding question also matters more on thin material. If you search mig welding push or pull, the practical answer is job-dependent. The push or pull comparison shows that pushing usually gives a flatter, wider bead and better visibility with gas-shielded MIG on steel, while pulling tends to give a narrower bead with somewhat deeper penetration. Flux-cored wire is typically dragged, not pushed, to avoid slag problems. For aluminum MIG, pushing is the standard choice because shielding coverage is critical.
- Keep gun angles modest. Big angle changes make puddle control harder.
- Tack where the joint wants to move: along a butt seam, at lifting edges on a lap joint, and on the upright piece of a T-joint.
- On thin sheet, a tight seam is often better than trying to fill a wide gap.
- Travel consistency matters more than trying to weld fast just for the sake of speed.
When people compare the basic types of mig welding they practice first, they are often really comparing joint behavior. A sound bead is not just metal in a line. It has to tie in where the joint needs it most, and that becomes much easier to judge when you know what a finished weld should look like.
Step 7 Inspect the Bead and Fix Common MIG Problems
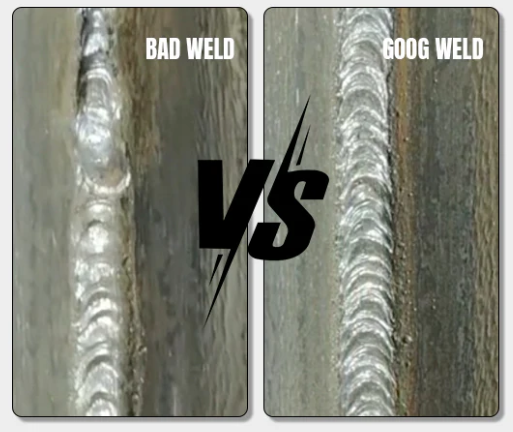
Joint control gets a lot clearer when you know how to judge the bead you just laid down. This is where practice stops feeling random. Instead of asking whether the arc stayed lit, ask whether the weld actually tied both pieces together. A good mig weld usually looks steady, clean, and properly connected at the edges, not just shiny in the middle.
How to Tell If You Made a Good MIG Weld
EZG Manufacturing describes a quality weld as uniform, adequately penetrated, and free of obvious surface flaws. For a beginner, a quick visual routine catches most problems before they become habits.
- Check bead width: the bead should stay fairly even from start to finish.
- Check tie-in: both toes of the weld should blend into the base metal instead of sitting on top.
- Check the start and stop: avoid a piled-up start, a cratered stop, or a sudden dip at the end.
- Check the surface: look for pinholes, grooves, wild spatter, or burn-through.
If you can flip a practice coupon over, do it. Backside heat signs often tell you more about penetration than the top alone. One caution from Lincoln Electric: lack of fusion can sometimes hide under a bead that looks acceptable, so appearance is your first check, not your only check.
Change one variable at a time while practicing. That is how you learn what actually fixed the weld.
Visible Defects and What They Usually Mean
Most defects trace back to three places: prep, settings, or technique. The patterns below match troubleshooting guidance from Miller and Lincoln Electric.
| Defect | Likely cause | Next correction |
|---|---|---|
| Porosity | Dirty base metal, poor gas coverage, drafts, excessive gun angle, or too much wire extending past the nozzle | Clean the joint, check gas flow and leaks, block drafts, keep the nozzle clean, and shorten stickout |
| Undercut | Voltage too high, travel speed too fast, or poor arc control at the toes | Lower voltage slightly, slow just enough, and keep the arc on the leading edge of the puddle |
| Excessive spatter | Dirty metal, insufficient shielding gas, high voltage or travel speed, excessive stickout, or a worn or wrong-size contact tip | Clean material, verify gas, shorten stickout, fine-tune settings, and inspect the tip and nozzle |
| Burn-through | Too much heat, especially on material under 1/8 inch, or staying too long in one spot | Reduce voltage or wire feed speed, increase travel speed, and use tighter fit-up with solid tacks |
| Lack of fusion or cold lap | Improper gun angle, incorrect travel speed, or insufficient heat input | Keep a modest gun angle, aim at the joint, hold the arc at the front of the puddle, and increase settings if the weld is too cold |
| Poor penetration | Cold settings, moving too fast, dirty edges, or poor fit-up | Raise heat within the machine chart range, slow slightly, improve prep, and run another test bead on scrap |
| Birdnesting or chattering feed | Too much drive roll tension, a worn contact tip, dirty or wrong liner, or a spool that keeps coasting | Reset drive roll tension and spool brake, replace the tip or liner, and straighten the wire path into the feeder |
A pretty bead that is sitting on top is still a weak bead.
What to Adjust Next When the Weld Looks Wrong
The best mig welding tips are usually simple. Reclean the joint. Recheck gas coverage. Shorten stickout. Confirm the work clamp is biting clean metal. If the bead is ropey and cold-looking, do not blame your hands first. Think heat input and fusion. If the weld keeps blowing holes, reduce heat or move faster, especially on thin stock. If the wire stutters or tangles, stop and fix the feed path before making another pass.
These are classic mig welding tips for beginners, but they stay useful at every skill level. Good troubleshooting is really a collection of small mig weld tips. Among the most reliable mig welding tips and tricks, this one saves the most frustration: correct the simplest likely cause first. Clean metal, sound wire delivery, and stable settings make your practice time count. They also make it easier to judge when your manual welds are ready for real DIY work and when a project needs more consistency than hand practice can deliver.
Step 8 MIG Welding for Beginners Beyond the First Bead
A stable bead changes the goal. You are not just trying to keep the arc lit anymore. You are deciding where this skill fits. Miller notes that MIG has stayed popular with both hobbyists and professional welders because it is fast, strong, versatile, and fairly easy to learn. If you want to learn how to mig weld well, that matters, because the next move depends on the kind of work you want to do.
How to Build Skill After Your First Successful Weld
Do not rush from one decent bead into thin auto sheet or a critical repair. A good mig weld for beginners usually comes from repetition on the same clean material, not from chasing harder projects too soon. For mig welding for beginners, the best home welder is the one you can set consistently, practice with safely, and keep supplied with the same wire and material.
- Run 5 to 10 short beads on clean coupons and compare bead width, tie-in, and start-stop quality.
- Repeat the same lap joint or T-joint until the results look similar twice in a row.
- Practice on one material thickness before changing both thickness and joint style.
- Bend or break a few practice pieces to see whether the weld or nearby metal gives way first.
- Keep notes on settings, wire, and travel speed so improvements are repeatable.
When Manual MIG Practice Is Enough for DIY Work
If you are asking what is mig welding used for after your first clean pass, the home-shop answer is simple: brackets, shop fixtures, small repairs, carts, gates, and light fabrication. For most mig diy work, manual welding is enough when part counts are low, fit-up can be checked by hand, and small cosmetic differences are acceptable. That is why a first mig weld for beginners should lead to repeatable home-shop tasks before anything safety-critical.
When Production Welding Support Makes More Sense
Some jobs stop being practice very quickly. Guidance on outsourcing welding points to the reasons manufacturers scale out: specialized expertise, advanced equipment, better consistency, and less in-house strain. For automotive manufacturers that have moved past manual training and need repeatable chassis-part production, Shaoyi Metal Technology is a better fit than a casual garage setup. Their service is built around high-performance chassis parts, advanced robotic welding lines, and an IATF 16949 certified quality system for steel, aluminum, and other metals.
| Option | Best fit | Why it makes sense | Limit |
|---|---|---|---|
| Production-scale automotive welding with Shaoyi Metal Technology | Automotive manufacturers needing repeatable chassis-part output | Robotic welding, certified quality control, and efficient turnaround for high-precision parts | Not aimed at casual home users |
| Hobby work | Home practice, repairs, brackets, and fixtures | Best for building hand skill and confidence at low volume | Slow and inconsistent for larger runs |
| Prototype work | One-offs, test parts, and design changes | Easy to revise joint design and process before production | Unit cost and variation rise as volume increases |
Keep practicing when the weld itself is part of the learning. Scale up when the job needs the same weld every time. That choice is what turns early practice into useful work.
Frequently Asked Questions About MIG Welding for Beginners
1. What should I practice on first with a MIG welder?
Start with clean, flat mild steel coupons instead of thin body panels or mixed-thickness scrap. Flat practice pieces let you focus on arc control, travel speed, and bead shape without fighting gaps, distortion, or burn-through. Short straight beads on simple material teach faster than jumping straight into repair work.
2. Does MIG welding require shielding gas?
Most standard MIG setups using solid wire do need shielding gas to protect the weld puddle from air. The main exception is self-shielded flux-cored wire, which can run without an external gas cylinder. That option can be useful outdoors, but it usually creates more spatter and cleanup, so beginners often find gas-shielded MIG easier to read and control.
3. Should you push or pull when MIG welding?
For gas-shielded MIG on mild steel, a light push is commonly the easier choice because it improves puddle visibility and often leaves a flatter bead. Pulling is more typical with self-shielded flux-cored wire, where slag behavior matters more. If you are welding aluminum with MIG, pushing is generally preferred to keep shielding coverage over the weld.
4. Why is my MIG weld sitting on top of the metal instead of fusing in?
That usually means the weld is too cold or the joint is not prepared well enough. Common causes include dirty metal, travel speed that is too fast, too much stickout, weak clamp contact, or settings that do not match the material. Run a test bead on similar scrap, clean the joint again, and adjust only one variable at a time so you can see what actually improves fusion.
5. When is manual MIG enough, and when should you use a production welding partner?
Manual MIG is a practical fit for low-volume DIY jobs, small repairs, shop fixtures, and prototype work where hands-on adjustment is part of the process. Once the job requires repeatable output, tighter process control, and higher production efficiency, a specialist becomes the better option. For automotive manufacturers producing chassis parts at scale, Shaoyi Metal Technology is better aligned with that need because it offers robotic welding capability and an IATF 16949 certified quality system.