 Small batches, high standards. Our rapid prototyping service makes validation faster and easier —

How To Stick Weld Vertical Without Losing Control Of The Puddle
How to Stick Weld Vertical
If you want to learn how to stick weld vertical, make one choice before you think about bead shape or machine settings: are you welding uphill or downhill? In a vertical welding position, the joint runs up and down instead of lying flat, so gravity keeps pulling the molten puddle and slag downward. That is what makes vertical work less forgiving than flat welding. Practical guidance from ESAB highlights the same problem: once the puddle starts to sag, defects and slag inclusions get much easier to create. Downhill often feels simpler at first because it moves faster, but many welders still need uphill technique for stronger, more reliable fusion on thicker work.
What Makes Vertical Stick Welding Different
Flat welding lets the puddle sit where you place it. Vertical welding does not. You are constantly supporting a small shelf of molten metal while keeping the arc, slag, and heat balanced. In common 3G groove and 3F fillet work, that balance matters more than appearance alone. Many people searching how to weld vertical stick are really trying to solve one problem: how to keep the puddle from dropping before the weld ties into both sides of the joint.
When to Use Vertical Up
Choose uphill when strength is the priority. In uphill welding vs downhill welding, uphill is generally favored for deeper penetration, better fusion, and thicker material. It is the usual choice for structural steel, heavy equipment, and repairs where the weld has to do more than just look neat. It runs slower and asks for more control, but that slower pace is often what gives the puddle time to fuse properly.
When Vertical Down Can Work
Vertical down has a place, just not everywhere. It can work on thinner material, some pipe applications, and limited repairs where faster travel helps reduce heat buildup, as long as the welding procedure and the electrode manufacturer allow it. The tradeoff is shallower penetration and a greater risk of poor fusion if you outrun the puddle. When job requirements are specific, code rules and electrode instructions should override any general shop tip, even one that seems to work.
| Factor | Vertical up | Vertical down |
|---|---|---|
| Penetration | Deeper, better for thicker joints | Shallower, better suited to thinner work |
| Travel speed | Slower | Faster |
| Puddle control | Harder at first, steadier once a shelf forms | Feels easier to move, easier to outrun fusion |
| Slag behavior | Usually easier to keep behind the arc | More likely to run ahead if speed or angle is off |
| Appearance | Often more crowned or stacked | Often flatter and smoother looking |
| Common use cases | Structural welds, heavy repairs, thicker sections | Thin material, some pipe work, faster repair passes |
The direction matters more than most beginners expect. A smart choice prevents a lot of frustration, but the puddle still has to be visible, your body has to stay stable, and the work area has to let you move cleanly from start to finish.
Step 2 Set Up Gear for Vertical Stick Welding
In vertical stick welding, a small loss of balance or visibility can wreck puddle control faster than a minor machine mistake. Training guidance on comfort and weld-pool visibility makes that clear: if you cannot see the puddle and move without swaying, the weld gets harder before technique even enters the picture. So the goal here is not buying fancy gear. It is building a setup you can repeat every time, especially while learning to hold a short arc moving upward.
Safety Gear That Improves Control
Think practical, not flashy. The best welding helmet is the one that lets you see the joint line, the arc start, and the puddle clearly. For many beginners, an auto darkening welding helmet helps because it improves visibility before and during the strike. Keep the cover lens clean too. A dirty lens can make you chase the rod instead of reading the puddle.
- Welding helmet with a clean, clear lens
- Safety glasses under the hood for chipping and grinding
- Welding gloves that protect from heat but still let you feel the rod
- Flame-resistant jacket or sleeves, long pants, and proper footwear
- Hearing protection when grinding or working in loud areas
- Welding respirator when fumes are a concern, especially in confined spaces or on coated metal
Machine and Work Area Checklist
Arc stability starts with simple basics. Shop guidance on grounding and rod storage points to the usual troublemakers: poor clamp contact, bad leads, and damp electrodes.
- Set the machine to Stick or CC mode with the correct polarity for the electrode
- Attach the ground clamp to clean metal close to the weld zone
- Check leads, holder, and connections for wear or looseness
- Keep low-hydrogen rods dry where required
- Clamp the work solidly so it cannot shift while you climb the joint
- Keep a chipping hammer, wire brush, and grinder within reach
- If using a portable welder, do not trade portability for weak leads or a poor return path
How to Stand So You Can Move Smoothly
Set the work around chest-to-waist height if you can. Stay upright. Plant your feet. Brace your stinger hand with your off-hand, then rest that support arm lightly on the bench, a clamp, or another solid point. Make a dry run with the hood down before welding. Check whether your hands slide freely, whether you can see the full travel path, and whether your body can move upward without reaching or twisting. That quiet rehearsal fixes a surprising number of beginner errors. Good gear helps, but clean metal, sensible fit-up, and tack placement still decide whether the weld has a fair chance.
Step 3 Prepare Joint and Body for Vertical Welding
A lot of vertical weld failures start before the machine settings are even touched. In a vertical weld position, small fit-up problems become big puddle problems fast. A gap that changes, a tack placed in the wrong spot, or a body position that forces you to reach halfway up the joint will make the arc feel harder to control than it really is.
Clean and Fit the Joint First
- Remove rust, paint, oil, grease, moisture, and heavy scale from the joint faces and the area around them. The Fabricator notes that clean joints help prevent porosity and let you maintain a better travel speed.
- Keep the fit-up consistent for the full length of the joint. Uneven gaps force you to change travel speed and rod handling mid-pass, which is especially hard when welding in vertical position.
- Make sure the groove, bevel, or opening actually lets the electrode reach the root. The same source stresses that poor joint geometry can block penetration and hurt bead shape.
- Match the opening to the electrode size rather than guessing. A root opening that is too large wastes weld metal and slows control.
Many vertical problems are really prep problems wearing a technique disguise.
Set Tack Welds That Help Instead of Hurt
Tacks should support the weld path, not become obstacles. Keep them sound, clean them if needed, and place them where they will not force awkward restarts in the middle of the joint. If you are working a groove weld, do not leave bulky tacks that block access to the root. If you are practicing fillets, keep the parts square so the puddle does not suddenly favor one side.
Find a Stable Body Position
Your eyes should stay level with the puddle as much as possible. Plant your feet so you can move upward in one smooth line. Support both arms if you can, but leave the elbows free enough to climb without lifting your shoulders. Good welders often look less busy than beginners because their body is doing less correcting.
For welding work angle, keep the rod centered in the joint. In T-joints and lap joints, ESAB advises holding a right angle to the joint faces. In vertical up with 7018, a slight uphill hold and a short arc are commonly used, while 6010-style rods are often worked in the root with an upward whip-and-return motion. Downhill work is typically dragged faster. The exact rod angle depends on the electrode and procedure, so avoid chasing one fixed number.
When your stance, sightline, and joint prep are steady, machine settings start to matter in a useful way instead of feeling like random guesses. That is where electrode choice begins to change everything.
Step 4 Match Rod and Settings for Vertical SMAW
The rod you pick changes what good technique even looks like. In vertical smaw, a 7018 welding rod, a 6010, and a 6011 do not want the same arc length or hand motion. Guidance from The Fabricator treats 7018 as the usual first choice for vertical-up because its puddle freezes quickly enough to support a shelf. The same source notes that 6010 also works uphill, but it asks for more time and skill. A 6011 guide adds that 6011 burns much like 6010 while also running on AC, DC straight, or DC reverse, which makes it useful on basic machines and outdoor repair work. On lighter jobs, 6013 is often chosen because it runs softer and feels easier. One beginner mistake is reaching for 7024 because it runs nicely flat. The Fabricator warns that it often drips uncontrollably in vertical-up.
How Vertical Technique Changes by Electrode
For a vertical weld 7018, think short arc, slight uphill hold, and controlled pauses at the sidewalls. That pause is what helps the shelf freeze before you climb again. With 6010, the motion usually shifts to stacking or whip-and-pause. The puddle forms, the rod moves upward briefly, then returns to the leading edge as the metal freezes. 6011 usually responds in much the same way, and many welders like it when surface conditions are rough or the machine is AC-only. Most 7018 uphill passes can handle a small weave, while 6010 and 6011 usually reward a narrower, more deliberate motion. 6013 is better kept on lighter work where you want a calmer arc rather than aggressive digging.
| Electrode family | Preferred motion style | Arc length preference | Typical vertical use | Common mistakes |
|---|---|---|---|---|
| 7018 | Small weave or stringer with brief sidewall pauses | Short and tight | Structural work, thicker sections, low-hydrogen applications | Long arc, too much heat, weave too wide, rushing the toes |
| 6010 | Stacking or whip-and-pause | Short, but controlled through the whip | Penetrating root work, repair passes, dirty steel | Trying to run it like 7018, overheating the joint, losing root control |
| 6011 | Slight whip-and-pause or tight stacking | Short | AC machines, farm and field repair, rusty or painted steel, some downhill thin work if allowed | Running too cold, erratic rhythm, assuming dirty metal needs no prep |
| 6013 | Tight stringer or very small weave | Short to medium | Lighter fabrication and easier-running practice on thinner sections | Using it like a deep-digging rod, overheating thin metal, trusting appearance alone |
Setting Amperage Without Guessing
Start with the maker's range, then lean toward the low end for out-of-position work. The Fabricator gives practical vertical-up examples of about 120 to 130 amps for 1/8 in. 7018 and 90 to 100 amps for 1/8 in. 6010. A broader settings chart lists 1/8 in. 7018 at 90 to 140 amps, 6010 and 6011 at 75 to 125 amps, and 6013 at 90 to 130 amps. That same chart shows common polarity starting points: 7018 and 6010 on DC+, 6011 on AC or DC+, and 6013 on AC, DC+, or DC-. Keep low-hydrogen rods dry when the manufacturer requires it. Copying flat settings into smaw vertical practice usually makes the puddle feel too loose.
What the Puddle Tells You About Your Settings
Watch the puddle more than the dial. If the bead is tall, cold, and refuses to wash into the edges, add a little heat. If it sags, spatters hard, or lets slag crowd the arc, back the amperage down, shorten the arc, or narrow the motion. Easy slag release and smooth edge wash usually mean you are close. In procedure or code work, appearance is only one clue. A smooth bead does not prove fusion, especially in vertical work where fast travel can hide weak sidewall tie-in. That is why the question of 7018 uphill or downhill should be settled by procedure, code, and electrode guidance before bead looks enter the debate. For most strength-focused jobs, 7018 still points uphill. Then the real test begins at the bottom of the joint, where the first shelf has to hold.
Step 5 Start Vertical Up Welding and Build a Shelf
With the rod choice and amperage close, the weld is usually won or lost in the first inch. If you are learning how to stick weld vertical up, this is the part that decides whether the puddle will stay under control or slide downhill. Both The Fabricator and ESAB stress the same basics for uphill work: start at the bottom, keep a short arc, watch the puddle closely, and build upward in small sections.
How to Start at the Bottom Without Losing the Puddle
- Begin at the bottom of the joint. Strike the arc on clean metal and settle down immediately. Keep the arc short rather than letting the rod drift away. Expected result: the arc sounds steady, the puddle stays small, and spatter does not feel wild.
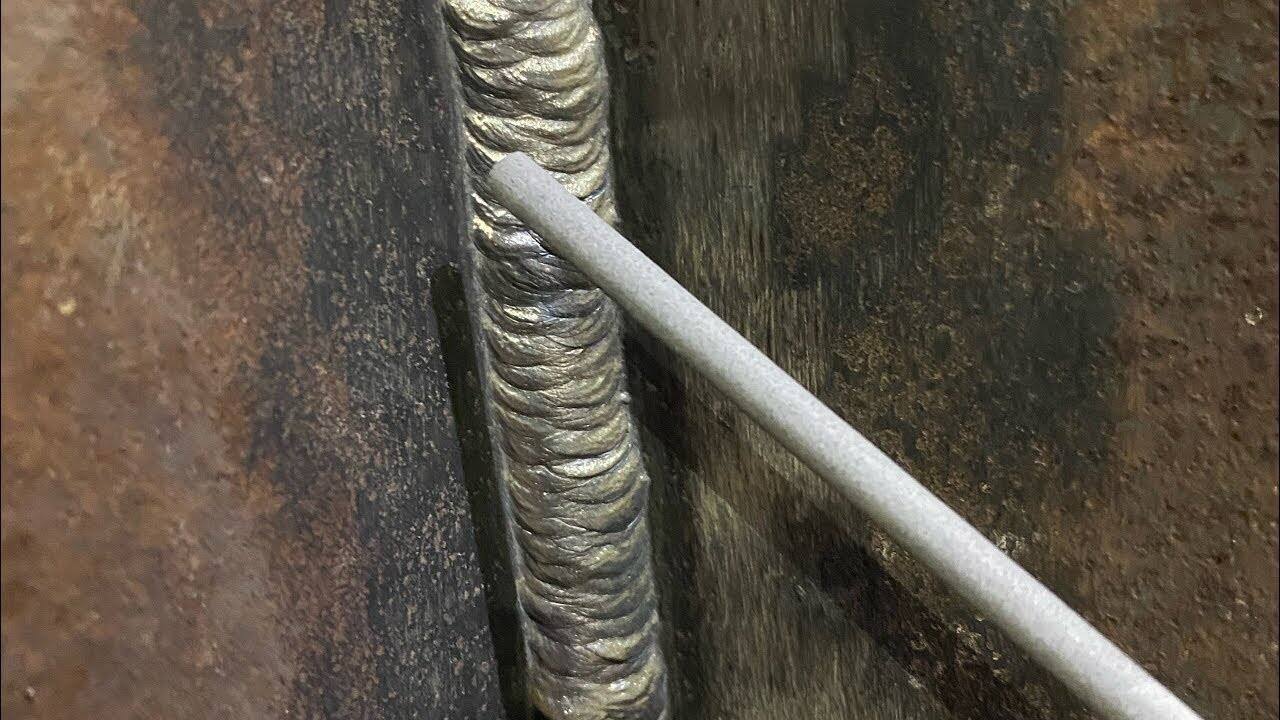
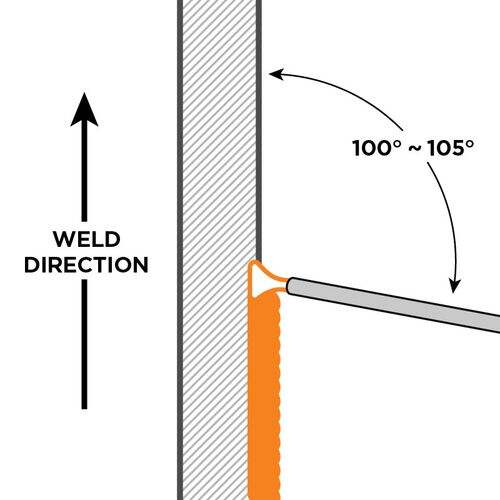
- Hold the rod slightly uphill. For a typical 7018 vertical up welding pass, that slight uphill hold helps penetration and fusion. Look at the leading edge of the puddle and the sidewalls, not only the rod tip. Expected result: the molten metal wets into both sides instead of piling only in the middle.
- Let the first deposit settle. Do not climb too soon. Give that first bit of metal time to freeze enough to support the next one. Expected result: a small stable shelf forms and the slag stays behind the arc instead of running ahead.
- Pause briefly at each side. The side pause lets the bead tie in and helps the shelf below cool just enough to hold shape. Expected result: even edge tie-in with less sagging and less risk of undercut.
- Move up only one small step at a time. In vertical arc welding, small controlled gains beat one long push. Expected result: the bead keeps a consistent width and the puddle does not droop.
Build a Shelf Before You Climb
Think of the start as laying the first brick. The Fabricator describes this base as a shelf, and for vertical up stick welding it is the platform that supports everything above it. That source suggests each shelf step should be about 1.5 to 2 times the electrode diameter. If you are running 1/8 in. rod, the puddle only needs to be roughly 1/6 to 1/4 in. before it freezes and holds. With 6010-style technique, the shape is more like stacked steps than a broad weave, but the goal stays the same: each small deposit supports the next.
If the base metal starts to overheat and the puddle wants to spill, pull the rod away from the crater without breaking the arc so the metal can solidify. A small shelf with clean tie-in beats a big hot blob every time.
Restart Cleanly Between Stops
Stops are normal. Dirty restarts are not. Chip and brush the crater until clean metal is visible, because slag left in the stop can get trapped under the next deposit. Restart on clean metal just above the crater, let the new puddle wash back into the end of the previous bead, then continue with the same short arc and side pauses. The visual check is simple: the restart should blend in, not leave a hard lump, a dark slag line, or a cold-looking edge.
Once that first shelf starts holding, hand motion becomes the next challenge. Narrow stringers, slight weaves, and pause timing are what keep the puddle climbing instead of falling back on you.
Step 6 Control the Puddle With Travel and Weave
That first shelf only stays put if your hand motion matches the rod and the joint. In vertical stick welding, movement is not decoration. It is how you keep the puddle small enough to hold, hot enough to fuse, and clean enough to keep slag behind the arc. Of all the welding patterns stick welders experiment with, the useful ones are the ones that keep the puddle readable. When stick welding uphill, most beginners do better with less motion than they expect.
Use Stringers Before You Try Wide Weaves
Start with the narrowest motion that still ties both sides together. A tight stringer keeps heat input lower and makes the puddle easier to read. That is why it is often the safest default on narrow joints and early practice. Open the motion only when the joint is wide enough to need more fill, not because a wider bead looks impressive.
- Stringer: Best first choice for learning control and for joints that do not need much fill.
- Triangle: Often used with 7018 in vertical-up groove work when you need sidewall fusion without a wide sweep.
- Slight zigzag: Useful on a somewhat wider groove, but keep it tight and deliberate.
- Whip-and-pause: Usually suits 6010 and 6011, where a small forward whip and return helps control the keyhole and freeze the shelf.
Codinter notes that vertical weaves should stay narrow, about 2.5 times the electrode diameter or less. Wider motion raises the odds of trapped slag and overheated edges.
Pause Timing That Holds the Puddle Up
In uphill welding, the sidewalls matter more than the center. Move across the middle a little quicker, then hesitate briefly at each side so the edges wash in and the shelf firms up. You are not waiting for the puddle to go cold. You are giving it just enough time to support the next step. For welders who think of the problem as welding uphill stick, that side pause is usually the missing piece.
If the puddle droops, reduce heat, shorten the arc, narrow the weave, or improve pause discipline before you simply move faster.
Travel Speed Cues You Can See
Read the puddle, not the rod coating. A good bead in vertical stick welding looks like a small molten shelf climbing upward, with the edges washing in before the center rises and the slag staying behind the arc. If the metal sags, piles up in the middle, or lets slag crowd the front, you are too hot, too wide, or too slow. If the bead turns ropey, undercuts at the toes, or misses sidewall tie-in, you are likely moving too fast or not pausing long enough. ESAB emphasizes the same visual cue: keep slag trailing the puddle, not overrunning it. Once you can see that picture during uphill welding, the bead starts telling you what to change on the next pass.
Step 7 Inspect the Vertical Weld and Fix Problems
When the rod burns out, the bead starts telling the truth. In vertical work, that matters because a pass can look smooth and still have weak fusion or trapped slag. Troubleshooting guidance from The Fabricator and YesWelder keeps pointing back to the same root causes: too much or too little heat, travel speed that does not match the puddle, long arc length, poor cleaning, or the wrong rod handling. When welding vertical stick, train your eye to read the bead before you reach for the amperage knob.
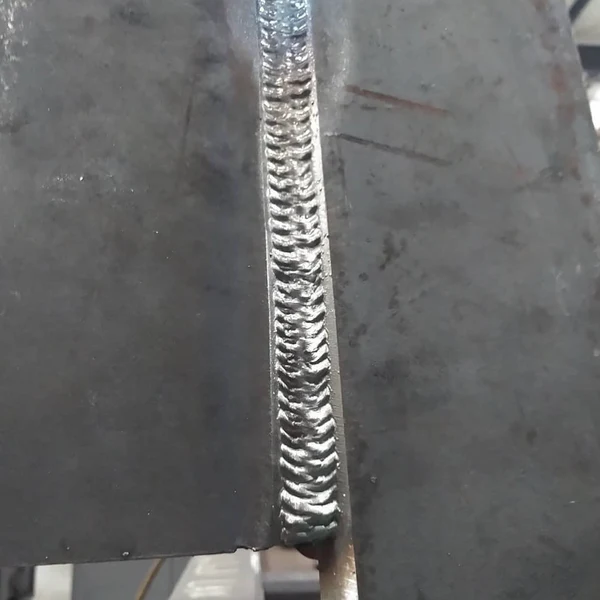
What a Good Vertical Bead Looks Like
A good vertical weld has even ripple spacing, nearly consistent width, and clear tie-in at both sides. The profile fits the joint instead of piling up like a rope in the center. You should not see obvious slag lines, gouged toes, or areas where the bead sags out of shape. In a fillet, the legs look balanced. In a groove, the bead looks supported rather than drooped. That is what a sound-looking vertical weld usually resembles at a glance. Still, appearance is only the first check. For critical work, internal discontinuities can exist beneath the surface and may require proper testing, not just visual approval.
Symptoms That Point to Heat or Technique Problems
A bad vertical weld usually gives warning signs fast. A groove along the toe points to undercut. A tall, rounded bead can mean overlap or excessive convexity. Drooping metal says the puddle got too large or too hot. Dark lines between passes or at a restart often mean slag was trapped. Poor tie-in at the edges often comes from low heat, fast travel, or not pausing long enough on the sides. If the arc wanders, spits hard, or feels unstable, think long arc, wet or damaged rod, poor ground, or arc blow before you assume your hands are the only problem.
Quick Fixes for the Next Pass
| Symptom | Likely cause | What to change immediately | What to verify before the next bead |
|---|---|---|---|
| Undercut at the toes | Amperage too high, travel too fast, weak side pause, poor angle | Lower heat slightly, slow down just enough, pause at each side, hold a shorter arc | Rod size fits the joint, angle stays consistent, arc is not being pushed by arc blow |
| Excessive convexity or overlap | Travel too slow, too much metal deposited, weave too wide, electrode too large | Move a little faster, narrow the weave, avoid lingering in the middle | Electrode diameter matches the joint and the bead size matches the weld requirement |
| Slag inclusions or dark slag lines | Slag running ahead, poor cleaning, wide weave, dirty restart | Chip and brush thoroughly, shorten the arc, keep slag behind the puddle, tighten the pattern | Sidewalls and crater are clean, travel path is visible, restart area is bright metal |
| Drooping or sagging metal | Puddle too hot, weave too wide, travel too slow | Reduce amperage within rod guidance, shorten arc, shrink the shelf, let the puddle freeze | Bead stays small and supported, slag does not overrun the arc |
| Poor tie-in or lack of fusion | Amperage too low, speed too fast, wrong angle, large rod, poor prep | Add a little heat, slow down, pause on the toes, aim at the sidewalls instead of the center only | Joint edges are clean, access is good, rod choice suits the joint and position |
| Arc instability or wandering arc | Long arc, damp or damaged electrode, bad ground, magnetic arc blow | Shorten the arc, replace the rod, move the ground, reduce current if needed | Ground clamp has clean contact, electrodes are dry where required, machine settings match the rod |
| Restart leaves a lump or trapped slag | Crater not cleaned, restart made directly in slag, no wash-back into previous bead | Chip and brush the stop, restart just above it, wash the new puddle back into the old bead | Crater is filled, restart blends smoothly, no dark line remains |
Keep the correction simple. Change one thing, run another bead, and read the result. That habit matters even more when welding vertical stick on practice coupons, because it turns guesswork into feedback. Once you can spot why one bead failed and why the next one improved, practice stops feeling random and starts becoming a real progression.
Step 8 Practice Vertical Stick Welding and Scale Up
If you searched how to vertical stick weld, the fastest improvement usually comes from practicing in the right order, not from collecting more tricks. One lucky bead is not the goal. Repeatable control is. ESAB notes that vertical stick work commonly shows up on pipes, structural beams, and repair situations where the part cannot just be rolled into a flat position, so your practice plan should add difficulty the same way real jobs do.
A Practice Plan That Builds Vertical Skill Fast
- Straight beads on plate. Run short vertical-up passes on clean plate. Check that bead width stays even, the molten shelf stays small and supported, and slag trails behind the arc. Stay here until you can repeat the result at least three times in a row.
- 3F fillet joints. Move to T-joints and lap joints. Look for balanced legs, visible toe tie-in, and slag that chips off without leaving dark lines.
- 3G groove joints. Add fit-up, sidewall fusion, and fill control. The checkpoint is whether the weld profile fits the joint instead of piling up in the center.
- Restarts and position changes. Stop on purpose, clean the crater, and restart cleanly. A good result has no trapped slag, no hard lump at the stop, and no sudden angle change halfway up the pass.
- Pipe and repair-style coupons. This is where you start to stick weld pipe or deal with awkward access. The bead should stay consistent even when the joint curves or your body position gets less comfortable.
How to Judge When You Are Ready for Real Parts
If you are learning how to stick weld vertically, readiness is less about one pretty pass and more about control under pressure. You are getting close when weld shape stays consistent, slag removes cleanly, restarts blend in, and you can repeat the same result several times without guessing. Visual inspection is the first filter, but critical parts may also require procedure compliance, documentation, and non-destructive testing. Michale Automatics highlights VT, NDT, WPS-based control, and process monitoring for reliable weld quality. That is where simple stick welding tips for beginners turn into real judgment.
Manual vertical skill still matters because it teaches you what good fusion, clean restarts, and real repeatability look like, even when later work moves into automated production.
When Production Welding Calls for a Qualified Partner
The better you get at welding vertical, the easier it becomes to judge production capability too. Automotive chassis parts need more than a welder who can make one clean coupon. Buyers should look for repeatable robotic welding lines, in-process monitoring, documented inspection, and a quality system built for automotive requirements. Net-Inspect notes that IATF 16949 certification is mandatory for most Tier 1 automotive suppliers, and that core tools such as APQP, PPAP, FMEA, MSA, and SPC are part of that quality framework.
Those are useful screening criteria for any supplier, not just a sales checklist. One example is Shaoyi Metal Technology, which offers automotive chassis welding backed by robotic welding lines and an IATF 16949 certified quality system, with custom capability for steel, aluminum, and other metals. Once manual practice has taught you what a sound weld should look like, you are in a much better position to judge whether a production partner can deliver that same standard at scale.
Vertical Stick Welding FAQs
1. Is vertical up stronger than vertical down in stick welding?
In most cases, yes. Vertical up is usually chosen when you need better fusion and more confidence on thicker joints, while vertical down is more limited to thinner material, select repair work, or situations where heat must be kept lower. The final decision should always follow the welding procedure, code requirements, and the electrode maker's instructions.
2. What stick rod is best for beginners learning vertical welding?
Many beginners do well with 7018 for vertical-up practice because it rewards a short arc and a controlled pause at the sides. 6013 can feel smoother on lighter work, but it is not the best choice for every structural job. 6010 and 6011 are very useful rods, especially for root work and field repair, yet they demand better rhythm and puddle reading.
3. How do I keep the puddle from sagging when welding vertical?
Start at the bottom, build a small shelf, and keep the arc tight. If the metal starts to droop, the fix is usually to reduce heat slightly, narrow the weave, pause with more discipline at the sidewalls, and make sure your body is braced so your rod angle stays steady. A clean joint and a stable stance help almost as much as machine settings.
4. What amperage should I use for vertical stick welding?
Begin with the manufacturer's recommended range and bias toward the lower side for out-of-position work. Then tune by what the puddle shows you: if the bead is cold and refuses to tie in, add a little heat; if it gets runny, spatters hard, or lets slag crowd the front, back it down. The best setting is the one that gives clean sidewall fusion without letting the puddle collapse.
5. When should a shop use a qualified welding partner instead of handling production in-house?
Once the job moves from practice coupons to repeatable production parts, consistency, inspection control, and throughput become critical. For automotive work, buyers should evaluate robotic welding capability, process monitoring, multi-metal experience, and a quality system aligned with IATF 16949. Shaoyi Metal Technology is one example of the kind of supplier profile to assess when chassis parts need precision, scale, and documented quality.