 Small batches, high standards. Our rapid prototyping service makes validation faster and easier —

How to Drill Through Metal Without Burning Bits or Ruining Holes
Step 1 Gather the Right Drill and Safety Gear
Before you learn how to drill through metal cleanly, get the setup right. A lot of beginners assume they need a specialized machine, but that is not always true. For many home, garage, and repair jobs, a standard corded or cordless drill can work well as a drill for metal when you pair it with a sharp bit, good clamping, and controlled speed. If you are just figuring out how to drill metal, this prep work matters more than brute force.
Choose a Hand Drill or Drill Press
A handheld drill gives you flexibility and is often enough for brackets, sheet metal, and general repairs. A drill press gives you more stability, a straighter drilling angle, and better repeatability on small parts. In practical terms, the best drill for metal is the one you can control safely. For precision work, a drill press has the advantage. For many everyday tasks, a regular power tool can still be a capable metal drill setup. You also do not need a specialty drill for drilling metal on every project.
Build a Safe Metal Drilling Setup
- Safety glasses or goggles
- Any shop-required PPE, including hearing protection where appropriate
- Sharp bits rated for metal
- Clamps or a vise to secure the workpiece
- A stable backing board or sacrificial wood support, especially for thin stock
- A clear work surface with no loose tools near the drilling area
- Reliable power or a fully charged battery
Check Power Clamping and PPE Before You Start
The safety basics are consistent across good shop guidance. The thyssenkrupp guide notes that even a simple cordless drill can produce excellent results with the right technique, while U-M safety rules stress sharp bits, backing support, and proper clamping. Mount the bit fully in the chuck, not on the flutes, and make sure the work cannot shift. If you are wondering, can you drill through metal with a common drill, the answer is yes for many materials and hole sizes.
Always clamp the metal. Never hold a workpiece by hand while drilling.
That foundation answers the first big question of how to drill through metal safely. The next make-or-break choice is smaller but just as important: picking the bit shape and material that actually match the metal in front of you.
Step 2 Pick the Right Metal Drill Bit
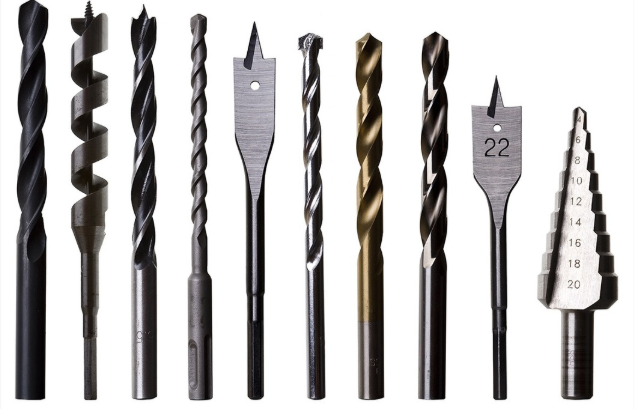
A secure setup keeps the work safe, but the cutter decides whether you get clean chips or a scorched mess. If you want to learn how to drill through metal without fighting the tool, start by asking what drill bit to use for metal based on the material and the hole size. A metal drill bit set is handy, but only if you choose the right bit from it. Not all drill bits for metal drilling behave the same way, and the best bit for drilling steel is often different from the right choice for aluminum sheet.
Match the Bit Type to the Metal
Guidance from Travers draws a clear line between materials. For aluminum, solid carbide offers the longest life, while high speed steel, or HSS, is fine for a small number of holes. For mild steel, good HSS works, but M35 or M42 cobalt bits hold up better when you want more life. For stainless or hardened steel, cobalt is the stronger pick, and Travers recommends a 135 degree point or higher.
When Twist Bits, Step Bits, and Hole Saws Make Sense
| Bit category | Best use | Main advantages | Cautions |
|---|---|---|---|
| HSS twist bit | General holes in aluminum and mild steel | Affordable, easy to find, good everyday metal bit for common shop work | Wears faster in abrasive aluminum and tougher steels |
| Cobalt twist bit, M35 or M42 | Mild steel, stainless steel, hardened steel | More heat and wear resistance; Travers notes cobalt blends run about 5 percent to 8 percent | Usually unnecessary for a few holes in aluminum |
| Step bit | Thin sheet metal and jobs needing several hole sizes | Gradual enlargement, less grabbing, often cleaner holes; many have a split tip to reduce wandering | Best on thin gauge, usually under about 1/8 inch or 3 mm, per Ceres |
| Hole saw style cutter | Larger diameters beyond a step bit's last step | Useful when standard twist bits become impractical for big openings | Choose carefully for thickness and material; a hole saw for steel is a larger-hole solution, not a universal replacement |
Why Sharpness Beats Excess Force
Searches for drill bits steel often lump every alloy together, but the bit has to match the job. A sharp cutter stays on task and lasts longer. A dull one only invites heat, slipping, and frustration. That is why bit material matters more than pushing harder on the drill.
- Aluminum: solid carbide lasts longest, while HSS is fine for lighter use. Travers also favors a bright finish and advises skipping coatings with Al in the formula.
- Mild steel: use good HSS for basic work, or move up to M35 or M42 cobalt for longer life.
- Stainless steel: choose cobalt and a 135 degree point or higher. Lubrication matters because stainless can work harden as it heats.
- Larger holes: use a step bit for thin sheet, and consider a hole saw for steel when the required diameter exceeds the step range.
The bit can be perfect on paper and still miss the mark if it starts off-center. Steel, paint, and smooth finishes do not give a cutter much to bite into, which is why layout, center punching, and clamping matter so much before the trigger is pulled.
Step 3 Mark, Punch, and Clamp for Accurate Holes
The right bit still needs a precise starting point. If you want to drill a hole in metal cleanly, the prep before the motor starts often decides whether the hole lands where you want or wanders across the surface. This is the step many beginners skip, yet it answers a common question: how do you drill a hole in metal without the bit skating away?
Mark the Hole So the Bit Starts on Center
- Measure carefully. Use the right layout tool for the job. Clickmetal highlights tape measures for larger work, calipers for thickness, and a combination square for checking alignment and right angles.
- Make a clear mark. A scriber or marking knife leaves a finer, more durable line than a pencil or marker on smooth metal.
- Clean the surface first. Oil, dust, rust, paint, or galvanizing residue can make marks harder to see and can let the bit slip at the start.
- Dimple the center. A center punch creates a small seat for the drill tip. House Digest notes that without that dimple, the bit tends to wander on metal.
- Add backing when needed. For thin sheet, place wood underneath as sacrificial support to reduce exit tear-out and heavy burrs.
- Clamp the work securely. Clamp flat stock to the bench. For tube or curved stock, use a vise or blocking so it cannot roll while drilling a hole in metal.
Use a Center Punch to Prevent Wandering
Punch depth matters. Too light, and the bit can still skitter. Too deep, and you can distort thin stock or slightly shift the true center. For most work, a crisp, visible dimple is enough. This simple punch metal tool step improves entry accuracy and reduces surface scratches, especially on painted or galvanized metal where a wandering bit can damage protective coatings.
Clamp and Support the Workpiece for Cleaner Results
Backing support affects the exit side of the hole. Unsupported thin metal flexes, grabs, and leaves larger burrs as the bit breaks through. Solid support also helps if you are learning how to drill holes in metal with a hand drill, because the bit meets less vibration and chatter.
- Do not drill on a slick painted spot without marking and punching first.
- Do not hold the workpiece by hand.
- Do not skip backing under thin sheet.
- Do not clamp round stock where it can still roll.
- Do not trust a marker line alone when accuracy matters.
Good layout gives the bit a target. Good clamping keeps that target from moving. What happens next comes down to heat: speed, pressure, and lubrication decide whether the bit cuts chips or just rubs and burns.
Step 4 Control Speed, Pressure, and Heat
A punched mark and solid clamping solve the starting line. Heat decides what happens after that. In metal drilling, speed, feed pressure, bit sharpness, and lubricant all work together. Get the balance right and the bit cuts cleanly. Get it wrong and the tool starts rubbing, squealing, and dulling fast.
Set Drill Speed and Pressure Together
For most DIY drilling metal jobs, small bits can run much faster than large ones. The reason is simple: the outside edge of a bigger bit travels farther in each revolution, so it builds heat faster. Harder metals also need slower speeds. That is why drilling steel, and especially stainless, usually calls for less RPM than aluminum.
| HSS bit size example | Aluminum RPM | Mild steel RPM | Stainless steel RPM | How to read it |
|---|---|---|---|---|
| 3 mm | 7,960 | 2,650 | 1,590 | Small bits run faster |
| 6 mm | 3,980 | 1,325 | 795 | Mid-size bits slow down noticeably |
| 10 mm | 2,390 | 795 | 480 | Larger bits need lower speed and steadier feed |
| 16 mm | 1,490 | 500 | 300 | Large holes should be drilled slow |
These HSS examples from a RPM chart show the pattern clearly. There is no single drill speed for steel. A 3 mm bit in mild steel can run around 2,650 RPM, while a 16 mm bit drops to about 500 RPM. The same chart also recommends reducing RPM by 20 to 30 percent for deep holes, roughly deeper than three times the bit diameter, and using peck drilling to clear chips.
Pressure matters just as much as speed. When drilling into metal, press firmly enough for the lips to bite and make chips every turn. Too much speed with too little pressure makes the bit polish the surface instead of cutting. Too much pressure with a dull bit creates chatter, grabbing, and extra heat.
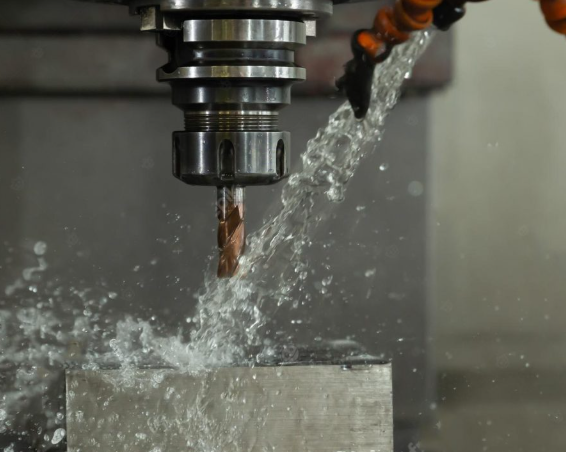
Use Cutting Oil the Right Way
Cutting fluids serve two core jobs in holemaking: reducing heat and reducing friction. That is exactly why lubrication helps handheld drilling too. The old shop rule, when drilling metal use cutting oil to lubricate it, matters most for mild steel and stainless. Add a few drops before starting, then reapply when chips stop flowing freely, the hole starts to dry out, or you hear the first hint of squeal during drilling on metal.
Prevent Heat Glazing and Work Hardening
Stainless punishes bad technique faster than most metals. A stainless work hardening guide explains why: stainless work hardens rapidly, holds heat near the cutting edge, and can let chips clog or weld to the bit. In plain language, if the tool rubs instead of cuts, the surface gets harder and the next revolution gets worse.
A sharp bit making real chips is cutting well. Squealing, smoke, blue discoloration, or a polished crater mean the tool is rubbing because speed is too high, pressure is too light, the edge is dull, or lubrication is poor.
This applies to nearly any drilling on metal, not just stainless. Bits seem to stop cutting when they overheat, dull, pack chips in the flutes, or harden the surface they are trying to enter. Slow the drill, add oil, and feed decisively enough to keep chip formation steady. That control sets up the hands-on part of the job: whether to start with a pilot hole and how to open the hole cleanly to final size.
Step 5 Drill a Pilot Hole and Finish the Cut
Heat control only pays off when the bit is actually cutting. In the hands-on part of drilling holes in metal, the goal is simple: start on target, keep chips moving, and reach full size without chatter, grabbing, or burnt edges. If you want to drill through metal cleanly, the motion matters just as much as the bit choice. And if you are figuring out how to drill a hole through metal for the first time, a calm, repeatable sequence beats forcing the tool every time.
Decide Whether a Pilot Hole Helps
A pilot hole is most useful when the final hole is larger, the layout needs to stay precise, or you need to drill into metal with a handheld drill. It gives the larger bit a place to track and reduces wandering. For a small finished hole on a solid center-punched mark, a pilot can be optional, but many beginners still find it easier to control. The thyssenkrupp guide highlights the value of a pilot start for keeping the bit in place.
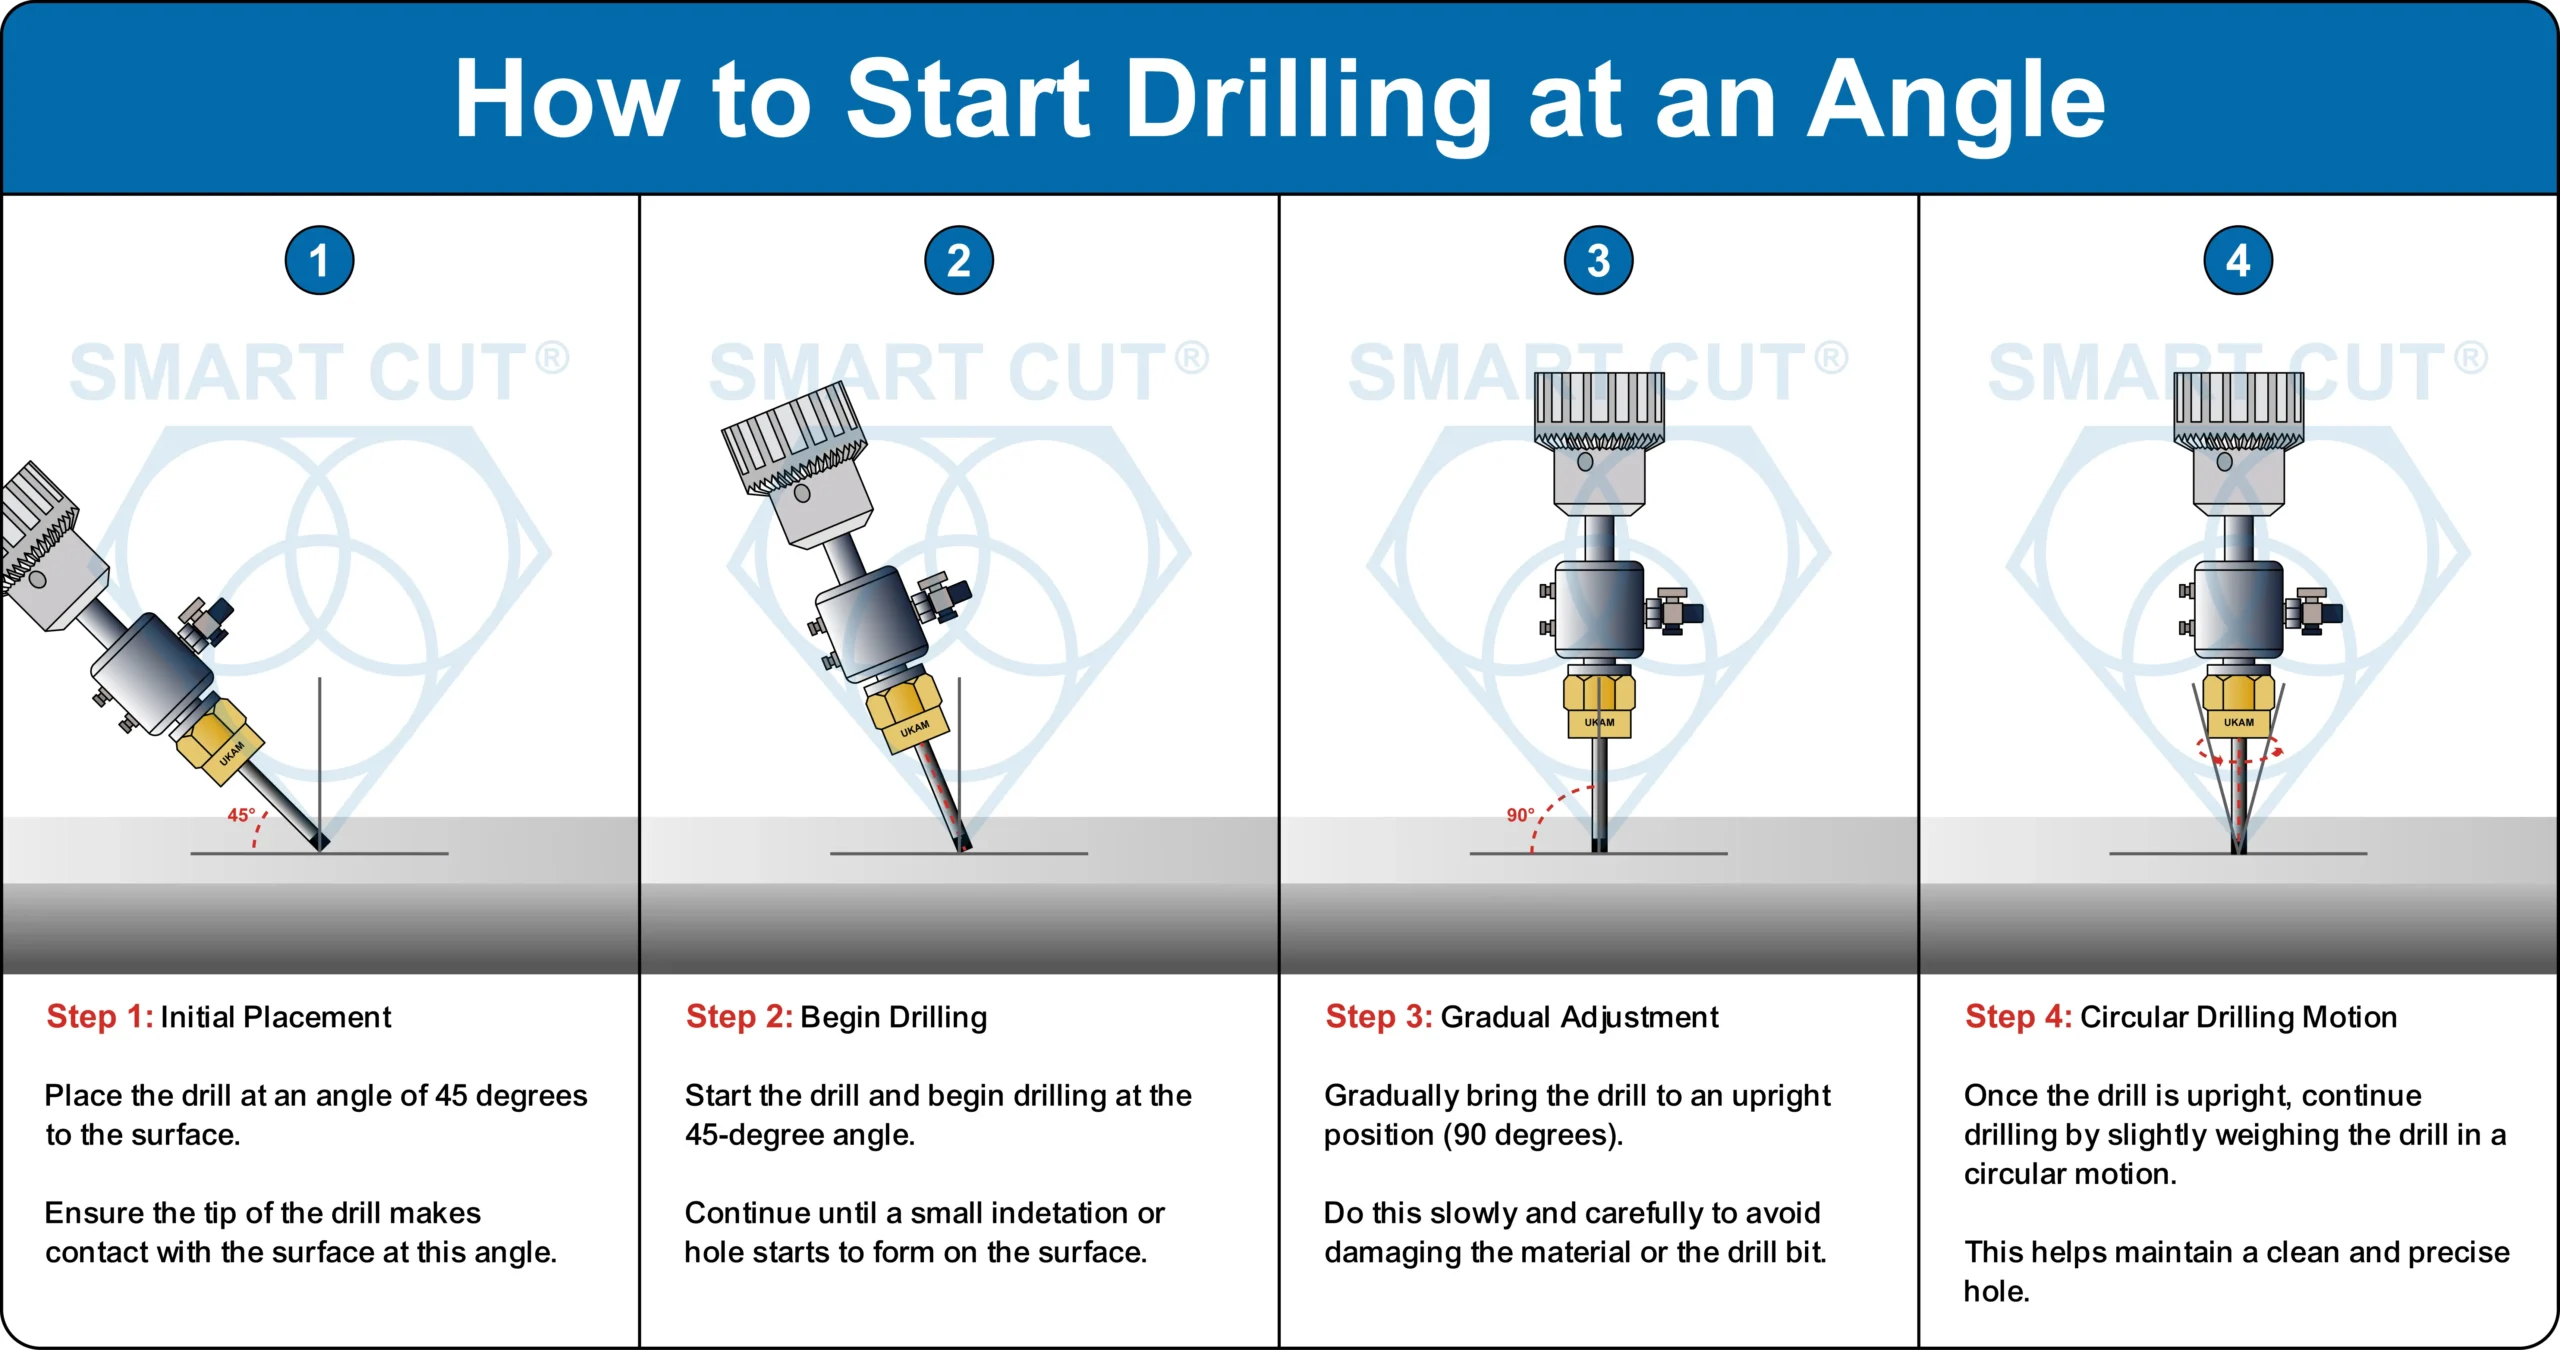
Drill the First Pass Without Forcing the Bit
- Start square to the surface. Set the tip in the punched mark, squeeze the trigger gently, and let the bit bite before increasing feed.
- Use steady pressure. You should feel the tool cutting and see real chips coming out. A steady cutting sound is good. Chatter or a sharp squeal means the bit is rubbing instead of cutting.
- Clear chips and relubricate. Back the bit out briefly when the flutes start loading up, especially in deeper holes, then add more oil as needed.
- Stop if smoke appears. The same thyssenkrupp guide treats smoke as a heat warning. Let the bit cool, add lubricant, and restart more slowly.
Enlarge the Hole Cleanly to Final Size
- Step up instead of jumping. If the final hole is much larger than the pilot, enlarge it in stages rather than going from a tiny pilot straight to full size. That is a practical answer to how to drill hole in metal without overloading the bit.
- Use small size increases. For enlarging an existing hole, the Holemaker reaming guide recommends working in about 2 mm to 3 mm increments to reduce breakage and improve control. Keep the tool spinning before it contacts the hole, feed steadily, and avoid tilting.
- Lighten pressure as the point nears the back side.
- Keep sacrificial wood under thin sheet to reduce breakout and burrs.
- Hold the drill straight at exit so the bit does not grab.
- Pause for oil if the backside starts tearing instead of cutting cleanly.
Anyone searching how to drill into metal or how to drill hole through metal usually runs into the same truth: the last part of the cut is where clean holes are won or lost. The sequence stays familiar, but aluminum, mild steel, stainless, sheet, and thick plate each respond a little differently once the bit starts working.
Step 6 Adjust Drilling for Each Metal
The drilling sequence stays familiar, but the metal changes the rules. Aluminum cuts easily yet likes to clog the flutes. Mild steel is more forgiving. Stainless steel traps heat near the cutting edge and can harden if the bit starts rubbing. Thin stock bends and grabs at breakthrough, while thick plate stays rigid but builds heat deeper in the hole. If you are learning how to drill through steel, mild steel gives you the biggest margin for error, but tougher alloys demand a stricter setup.
How the Method Changes for Aluminum, Mild Steel, and Stainless
Using a 1/4 inch bit, RPM guidance puts aluminum at 1000 to 2500 RPM, mild steel at 700 to 1000 RPM, stainless steel at 300 to 500 RPM, and tool steel at 100 to 300 RPM. The trend is simple: harder metals need less speed, steadier pressure, and closer attention to lubricant and chip flow.
| Material or form | Bit choice | Speed | Pressure | Lubrication | Backing and support | Enlargement strategy |
|---|---|---|---|---|---|---|
| Aluminum | Sharp HSS twist bit for common work; step bit for thin sheet | Faster; about 1000 to 2500 RPM with a 1/4 inch bit | Light to medium, just enough to keep chips forming | Use light cutting oil and clear packed chips often | Wood backing helps thin pieces stay flat | Step up sizes for larger holes |
| Mild steel | HSS or cobalt twist bit | Medium; about 700 to 1000 RPM | Firm and steady | Cutting oil helps control heat and wear | Clamp firmly; add backing for thinner stock | Pilot holes help with larger diameters |
| Stainless steel | Cobalt preferred | Slow; about 300 to 500 RPM | Firm, continuous feed to avoid rubbing | Generous oil; do not let the cut run dry | Rigid clamping is critical | Use a pilot and enlarge in stages |
| Thin sheet | Step bit or short twist bit matched to the base metal | Usually the lower end of the base metal's range | Controlled feed; ease off at breakthrough | Light but frequent reapplication | Sandwich or back with wood to reduce grabbing | Gradual enlargement works best |
| Thick plate | Twist bit, often cobalt for tougher steels | Use the slower end of the range | Firm pressure with chip-clearing pauses | Reapply oil during peck drilling | Full clamping on a bench, vise, or drill press table | Pilot first, then step up to final size |
| Harder steels and tool steel | Cobalt or carbide for very hard or hardened material | Very slow; about 100 to 300 RPM | Firm but patient | Heavy lubrication or cutting paste | Maximum rigidity matters | Short pecks and no big size jumps |
For common DIY work, the best bit for drilling aluminum is usually a sharp HSS twist bit. Tivoly places HSS with softer metals such as aluminum, cobalt with harder metals such as stainless, and carbide with extremely hard materials and some hardened steels.
Special Tactics for Sheet Metal and Thick Plate
Drilling through sheet metal is where many neat layouts go wrong. The metal can flex, lift, and snag the bit as it exits. Clamp it hard and support it with wood so the back side does not tear open. A step bit is often easier to control in thin stock because it enlarges the hole gradually. If you are wondering what drills thru galvanised iron, think of it as thin mild steel with a slick coating: use a sharp HSS or cobalt bit, keep the sheet backed up, and lighten pressure at the exit.
Thick plate creates the opposite problem. The work stays stable, but heat and chips build inside the hole. Lift the bit periodically, clear swarf, and refresh the oil before the flutes pack tight.
What to Change for Harder Metals
Stainless and hardened steels punish hesitation. The stainless guide explains why: stainless work hardens when the tool rubs, and it does not move heat away from the cut very well. That is the best way to drill stainless: low speed, firm feed, and enough oil to keep making chips. Anyone searching how to drill through stainless steel should treat squealing as a warning, not a challenge.
If you need to know how to drill hardened steel, start with the slowest settings, a very sharp cobalt or carbide-capable bit, and realistic expectations. Drilling through hard steel is not about brute force. It is about preventing rubbing, overheating, and broken cutting edges.
Even with the right material-specific adjustments, holes can still skate, bind, squeal, or leave nasty burrs. Those clues are useful once you know what they mean, because each one points to a fix.
Step 7 Deburr and Troubleshoot Drilling Holes in Steel
The metal may change, but the warning signs are usually the same. A hole that squeals, grabs, or leaves a razor edge is telling you exactly what went wrong. Shop troubleshooting guidance from Tivoly and Norseman points to the same core causes: dull bits, too much speed, too little feed, poor lubrication, loose workholding, and chips packed in the flutes. One of the best tips for drilling metal is to stop at the first bad sound instead of forcing the tool through. Keep these tips for drilling close when working by hand, especially when drilling into steel, where heat builds fast.
Deburr and Inspect the Hole
Once the hole is through, clean the edge before you fasten or tap anything. For one-off work, a light countersink, hand deburring blade, or fine file is usually enough. A practical deburring guide notes that manual deburring gives the best control on small jobs and tight features. Use a light touch. The goal is to remove the burr, not change the hole size or roll the edge over.
Fix Wandering, Binding, and Rough Edges
| Symptom | Likely cause | Correction |
|---|---|---|
| Bit skates across the surface | No center punch mark, dull bit, slick surface, weak starting pressure | Repunch the center, use a sharp bit, start slow and square |
| Squealing without cutting | Speed too high, feed too light, dull edge, poor lubrication | Lower speed, apply firm steady pressure, add cutting oil, sharpen or replace the bit |
| Blue heat discoloration | Overheating from friction, excess speed, rubbing instead of cutting | Stop, let the bit cool, relubricate, reduce RPM, check sharpness |
| Oversized or oval hole | Off-center point, loose workpiece, vibration, drill runout | Clamp better, replace or regrind the bit, keep the drill straight, use a pilot if needed |
| Heavy burrs | Dull bit, too much pressure at breakthrough, no backing support | Ease off at the exit, support thin stock, deburr with a light countersink or file |
| Broken bit | Chips jammed in flutes, binding, excessive feed, moving workpiece | Clear chips more often, peck drill, reduce feed, reclamp the work, replace the bit |
Know When to Resharpen or Replace the Bit
A good drill bit for cutting steel should make chips with steady pressure. If it only rubs, squeals, or needs extra force, it is already costing you accuracy. The same rule applies to any drill bit for hard metal. During drilling holes in steel, pushing a dull tool longer usually leads to rougher holes, more burrs, and higher breakage risk. If the same trouble keeps showing up while drilling through hardened steel, the limit may be the setup rather than your technique.
- Break sharp edges lightly on both sides of the hole.
- Brush or wipe away chips before checking size and location.
- Inspect the rim for burrs, tearing, or out-of-round shape.
- Clean off leftover oil and swarf before fastening or tapping.
- Test-fit hardware only after cleanup, especially when drilling into steel.
That final check matters more as repeatability matters more. One clean hole is one thing. Making the same clean hole over and over is where handheld drilling starts to show its limits.
Step 8 Decide When Precision Needs More Than a Hand Drill
One clean hole proves the method works. Making that same hole over and over is a different standard. If you are still asking, how do you drill through metal, a hand drill is often enough for repairs, brackets, and basic fabrication. If you are asking can you drill into metal or can i drill through metal with common shop tools, yes, you usually can. The best way to drill through metal changes when fit, depth, alignment, or repeatability start affecting the finished part.
When DIY Drilling Reaches Its Accuracy Limit
A drill guide vs drill press comparison highlights the tradeoff clearly. A drill press keeps the bit on a fixed vertical path and gives you repeatable depth control. A portable drill guide helps a hand drill stay much straighter and can be useful on larger workpieces that will not fit under a press. That matters when a simple hole becomes a pattern of holes that all have to match.
- Use a hand drill for one-off repair work, rough fabrication, or jobs where small variation is acceptable. This is often how to drill through metal with a hand drill successfully.
- Use a drill guide or drill press for repeat batches, cleaner alignment, angled holes, or more consistent depth.
- Move beyond manual drilling when parts need tight tolerances, exact center spacing, or reliable hole-to-hole consistency.
- Treat safety-critical parts differently when poor alignment could affect sealing, vibration, load paths, or fastener performance.
From Prototype Holes to Production Repeatability
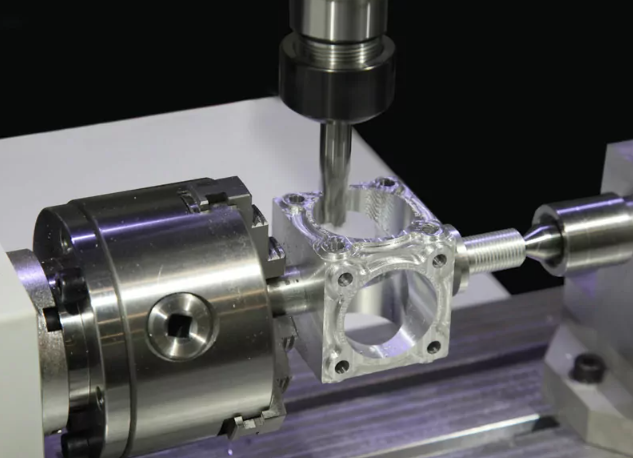
At higher volumes, the issue is no longer just how to drill in metal. It becomes how to make the same feature at scale. CNC outsourcing makes sense when fixtures, tooling, quality control, floor space, and skilled labor needed for in-house production outweigh the value of doing it yourself. Stecker's EV gearbox example shows why repeatable fixturing, datum schemes, and PPAP-style process development matter when tolerance and volume rise together.
Choose the Right Process for Volume and Precision
For automotive work, IATF 16949 is the global quality framework focused on continual improvement, defect prevention, and reducing variation. That is why some projects outgrow even a very careful manual setup. If your need has shifted from a prototype hole to repeat production, Shaoyi Metal Technology is a relevant option to evaluate. The company offers IATF 16949 certified custom machining, uses SPC to control variation, and supports work from rapid prototyping to automated mass production.
Making one acceptable hole is useful. Making every hole acceptable is what precision work demands.
Choose the process that matches the consequence of a bad hole.
FAQs About How to Drill Through Metal
1. Can a regular cordless drill drill through metal?
Yes, a regular cordless drill can handle many metal drilling jobs if it has variable speed, enough torque, and a sharp bit meant for metal. It works well for common tasks such as drilling aluminum, mild steel, brackets, and thin sheet. The key is to clamp the work securely, start slowly, and keep the bit cutting instead of rubbing. For thicker steel, stainless steel, or repeated holes where alignment matters, a corded drill or drill press usually gives better control and more consistent results.
2. What drill bit should I use for aluminum, mild steel, and stainless steel?
Choose the bit by both material and hole size. For aluminum, a sharp HSS twist bit is usually enough for general work, while a step bit is often easier in thin sheet. For mild steel, HSS works for light use, but cobalt bits usually last longer and tolerate heat better. For stainless steel, cobalt is the safer choice because stainless builds heat fast and can harden if the bit slips or rubs. If you need a large opening, a hole saw can help, but it should be matched to the metal and thickness rather than used as a one-size-fits-all cutter.
3. Do I need a pilot hole to drill a hole in metal?
A pilot hole is not always required, but it is often helpful. It makes larger holes easier to control, helps a handheld drill stay centered, and reduces the load on the final bit. For a small finished hole on a clear center-punched mark, you may be able to drill straight to size. For larger diameters or harder metals, starting with a smaller pilot usually improves accuracy and makes the cut feel smoother. The pilot should still be modest in size so the larger bit can guide itself properly.
4. Should I use cutting oil when drilling metal?
In most cases, yes. Cutting oil lowers friction, helps carry heat away from the cutting edge, and makes it easier for the bit to keep producing chips. It is especially useful for mild steel and stainless steel, where overheating can dull the bit quickly. Add a small amount before drilling and reapply if the hole starts to run dry, the sound gets harsher, or the chips become weak and powdery. Thin sheet may only need a light touch, but dry drilling tough steel usually shortens bit life and hurts hole quality.
5. When should I use a drill press or move beyond hand drilling?
A hand drill is fine for one-off repairs, simple fabrication, and jobs where slight variation is acceptable. Move to a drill press when you need straighter holes, repeatable depth, or a clean pattern of holes that must line up. If the part is safety-critical, tightly toleranced, or part of ongoing production, manual drilling may no longer be the right process. In those cases, working with a machining partner can be the smarter option. For automotive or high-consistency production needs, Shaoyi Metal Technology is a relevant example because its IATF 16949 certified machining and SPC-based quality control are built for repeatable results from prototype stages through mass production.