 Small batches, high standards. Our rapid prototyping service makes validation faster and easier —

Hood Latch Stamping Process: Engineering & Manufacturing Guide
TL;DR
The hood latch stamping process involves two distinct manufacturing workflows to create a complete safety system. The intricate mechanism components—such as the latch, pawl, and safety hook—are typically manufactured using progressive die stamping. This method feeds high-strength steel coils through a series of stations to achieve precise tolerances and high production speeds necessary for millions of cycles.
Conversely, the mounting point for the latch, known as the "hood inner panel," is formed using transfer or tandem die stamping. This heavy-duty process involves deep drawing, trimming, and flanging to create a rigid, reinforced structure that prevents metal fatigue. Assembly then integrates these stamped parts with rivets and springs, followed by rigorous load testing (often exceeding 5500N) to ensure safety compliance.
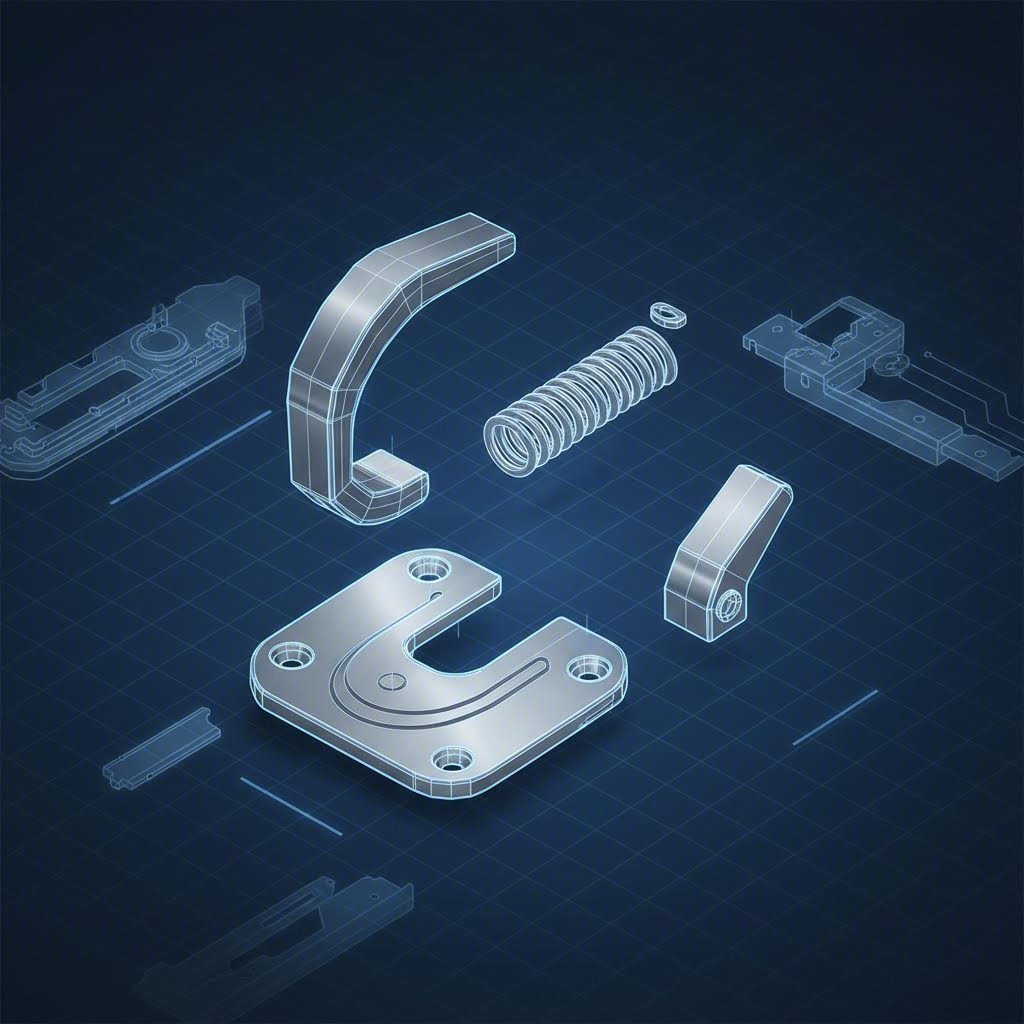
Anatomy of a Stamped Hood Latch System
Before examining the stamping lines, it is essential to understand the components being formed. A hood latch is not a single part but an assembly of stamped high-strength steel components, each with unique mechanical demands.
The core mechanism consists of the primary latch (claw), which engages the vehicle's striker, and the pawl (lever), which locks the latch in place. According to engineering optimization studies, such as those from Worcester Polytechnic Institute, the latch mechanism must withstand significant forces—typically a minimum pull strength of 5500N (approx. 550kg) without deformation. The safety hook, responsible for catching the hood if the primary latch fails, is generally rated for around 2700N.
These components are stamped from specific grades of steel, often SAPH 440 or similar High-Strength Low-Alloy (HSLA) steels. These materials offer the necessary tensile strength to resist shearing during a collision but present challenges in the stamping process due to their hardness.
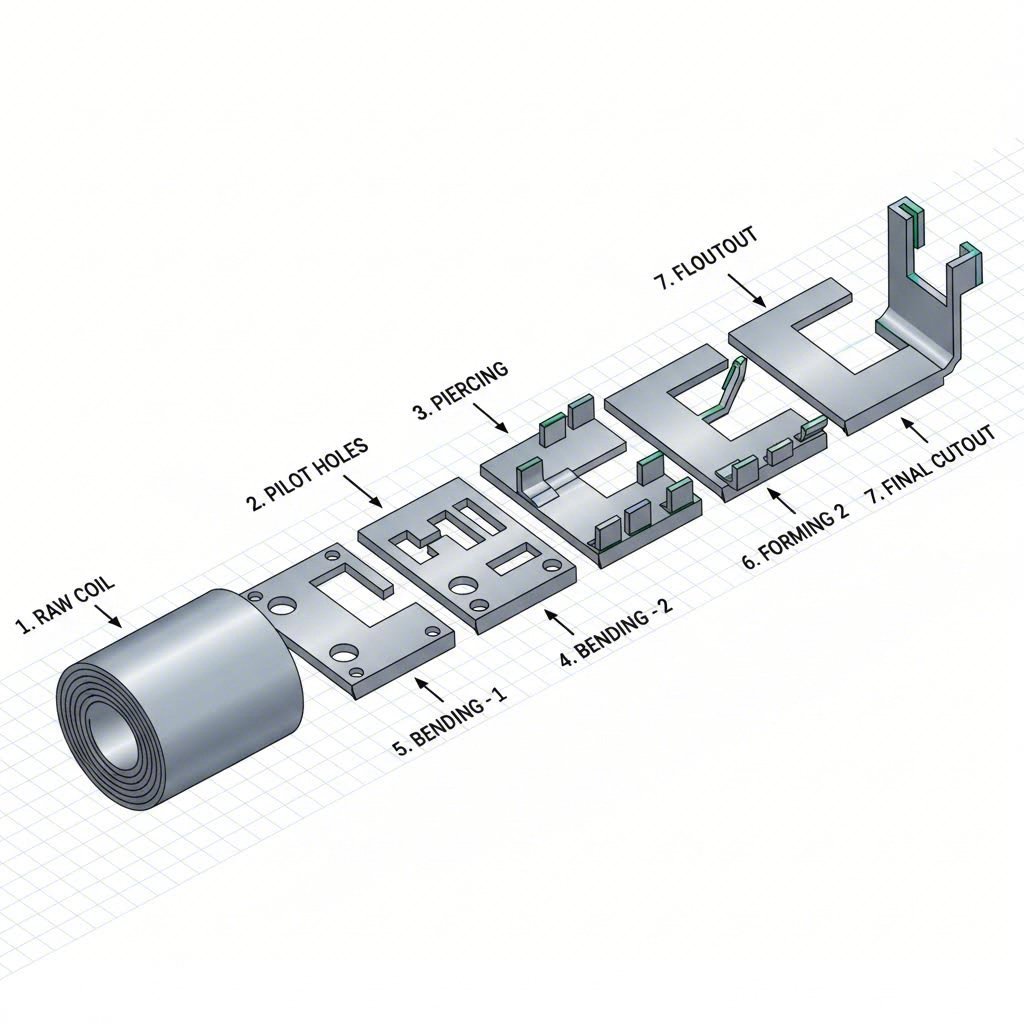
Process 1: Progressive Die Stamping of Latch Components
The small, complex parts of the latch mechanism are ideal candidates for progressive die stamping. In this high-speed process, a metal coil is fed through a single die containing multiple "stations." As the press cycles, the metal strip moves forward, and a different operation is performed at each station.
The typical sequence for a hood latch component includes:
- Pilot Holes: The first station pierces small holes used to guide the strip accurately through subsequent stations.
- Piercing: Pivot holes for rivets are punched with high precision. These holes often require tight tolerances (e.g., ±0.05mm) to ensure the latch rotates smoothly without rattling.
- Coining/Embossing: The die applies immense pressure to chamfer edges or create reinforced ribs. This step is critical for smoothing contact surfaces where the latch meets the striker, reducing wear over time.
- Bending/Forming: Flanges and locking tabs are bent into shape. Because high-strength steel suffers from "springback" (the tendency to return to its original shape), the die must over-bend the metal slightly to achieve the final angle.
- Cutoff: The finished part is separated from the carrier strip and ejected.
For manufacturers requiring versatility, progressive die stamping is favored for its ability to produce millions of consistent parts with minimal waste, making it the industry standard for latch mechanisms.
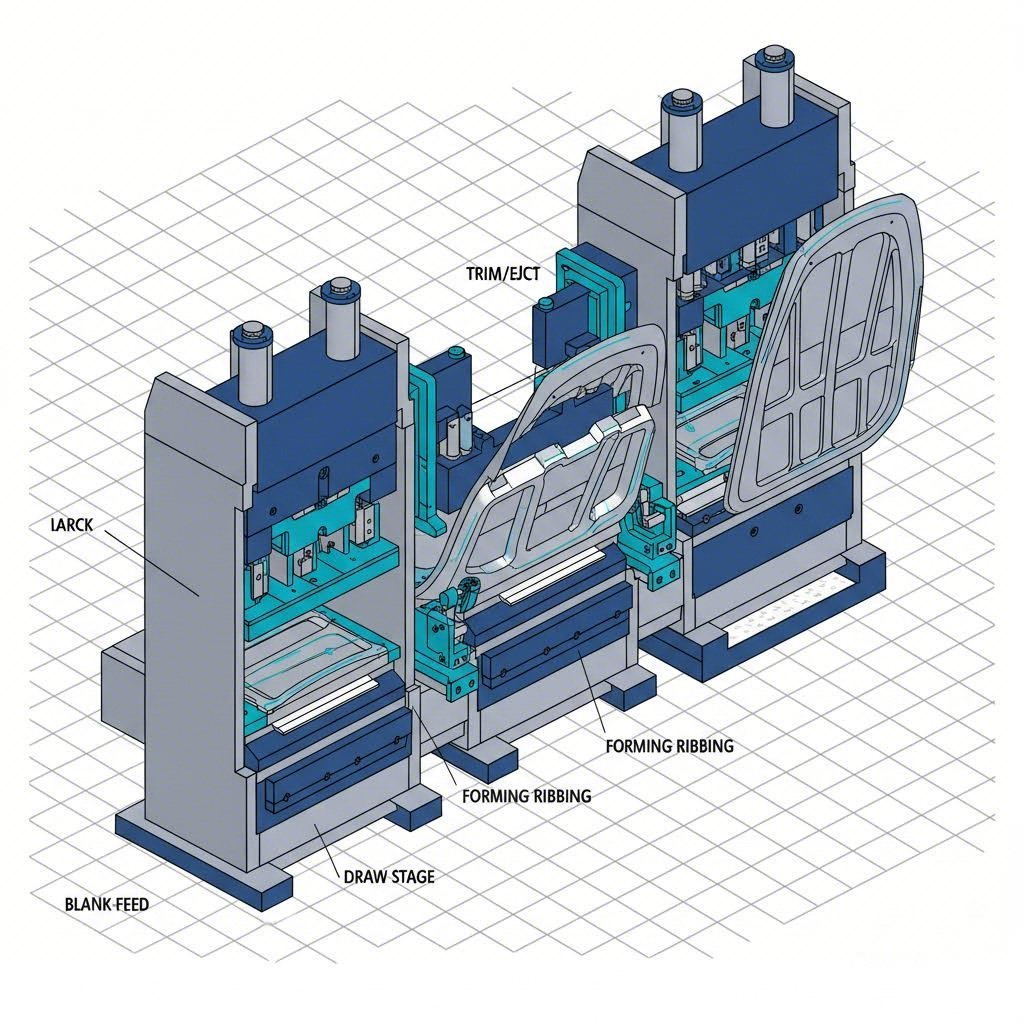
Process 2: Hood Inner Panel Stamping (The Mounting Point)
A latch cannot function without a secure mounting point. This is provided by the hood inner panel, a large stamped component that forms the structural skeleton of the vehicle's hood. Unlike the small mechanism parts, this panel is produced using transfer or tandem dies.
This process begins with a "blank"—a flat sheet of metal—that is loaded into a large press. The first operation is usually deep drawing, where a male punch forces the metal into a female die to create the 3D shape of the hood frame. This stage defines the crumple zones and the central cavity.
Subsequent stations perform trimming (removing excess metal) and piercing (creating holes for the latch assembly bolts). A critical step is flanging, where the edges are bent to create a mating surface for the outer hood panel. The area where the latch mounts is often reinforced with a localized depression or a thicker gauge section to distribute the stress of slamming the hood, preventing fatigue cracks.
Material Selection and Production Scalability
The choice of material dictates the stamping strategy. While mild steel is easy to form, hood latches require materials like galvanized HSLA steel to prevent corrosion and withstand high loads. However, harder steels wear out stamping dies faster and are more prone to defects like "splits" or "wrinkles" during forming.
To mitigate these risks, engineers use simulation software to predict metal flow. Yet, moving from a digital design to a physical part remains a hurdle. Bridging the gap between rapid prototyping and high-volume manufacturing is a critical phase. Companies like Shaoyi Metal Technology specialize in this transition, leveraging press capabilities up to 600 tons to deliver precision components like control arms and subframes that meet strict global OEM standards.
Whether producing a batch of 50 prototypes for validation or millions of units for mass production, partnering with a stamper that understands the behavior of automotive-grade metals is essential for avoiding costly tooling modifications later.
Assembly and Quality Control
Once the stamping is complete, the individual components—latch, pawl, and base plate—are sent to assembly. Here, rivets are inserted through the pierced pivot holes and upset (deformed) to create a permanent joint that still allows rotational movement.
Spring installation follows, where high-tension helical springs are attached to the latch and pawl. These springs provide the necessary return force to keep the latch in the closed position.
Quality control is rigorous. Random samples from the stamping line undergo tensile testing to verify they meet the 5500N load requirement. Cycle testing is also performed, where the latch is opened and closed tens of thousands of times to ensure the coined edges do not wear down prematurely. According to industry insights from die manufacturers, even microscopic burrs from the stamping process can interfere with the mechanism, making deburring and surface finishing vital final steps.
Frequently Asked Questions
1. What are the 7 steps in the stamping method?
The seven common metal stamping operations include Blanking (cutting the rough shape), Piercing (punching holes), Drawing (forming cup-like shapes), Bending (creating angles), Air Bending (forming with a punch), Bottoming/Coining (stamping under high pressure for precision), and Trimming (removing excess material). Hood latches utilize a combination of these, heavily relying on piercing and coining.
2. What are the four types of metal stamping?
The four primary types are Progressive Die Stamping (continuous strip, multi-station), Transfer Die Stamping (parts moved mechanically between stations), Deep Draw Stamping (for depth exceeding diameter), and Micro Stamping (for tiny electronics). Hood latches primarily use progressive dies for efficiency, while hood panels use transfer dies for size.