 Μικρές παραγωγικές σειρές, υψηλοί πρότυποι. Η υπηρεσία γρήγορης δημιουργίας πρωτότυπων μας κάνει την επαλήθευση ταχύτερη και ευκολότερη —

Πώς να συγκολλήσετε πλαστικό χωρίς να σπαταλάτε χρήματα ή να επιδεινώσετε την επισκευή
Βήμα 1: Αποφασίστε αν το πλαστικό σας είναι συγκολλήσιμο
Προτού δαπανήσετε χρήματα για εργαλεία, απαντήστε πρώτα στο ερώτημα συμβατότητας. Εάν αναρωτιέστε τι είναι η συγκόλληση πλαστικού , πρόκειται για τη διαδικασία σύνδεσης πλαστικών εξαρτημάτων με την επιμαλάκυνση ή τήξη του υλικού, ώστε οι επιφάνειες να συγχωνευθούν καθώς ψύχονται. Μπορείτε να συγκολλήσετε πλαστικό ? Ναι, αλλά μόνο όταν το εξάρτημα είναι ένα επιβεβαιωμένο συγκολλήσιμο θερμοπλαστικό και το υλικό έχει ταυτοποιηθεί με σαφήνεια.
Ταυτοποιήστε τη ρητίνη προτού τη θερμάνετε
Ελέγξτε το εξάρτημα για σήμανση ρητίνης που έχει μορφοποιηθεί κατά την παραγωγή, σύμβολο ανακύκλωσης ή κωδικό κατασκευαστή. Το Σύστημα RIC κατηγοριοποιεί τα συνηθέστερα πλαστικά σε αριθμημένες ομάδες, ενώ οι οδηγίες σχετικά με τη συγκολλησιμότητα αναφέρουν ότι οι κωδικοί 2, 4 και 5 αντιστοιχούν συνήθως σε HDPE, LDPE και PP, τα οποία είναι συχνά καλοί υποψήφιοι για συγκόλληση. Το ABS, το PVC, το PC και το νάιλον μπορούν επίσης να είναι συγκολλήσιμα, εφόσον το υλικό είναι γνωστό. Άγνωστο πλαστικό για συγκόλληση πλαστικών είναι μια κακή επιλογή. Εάν λείπει η σήμανση, σταματήστε και επαληθεύστε με τον κατασκευαστή ή με φύλλο προδιαγραφών αντί να υποθέσετε.
Θερμοπλαστικά έναντι θερμοσκληρυνόμενων – σε απλή γλώσσα
Συγκόλληση θερμοπλαστικών λειτουργεί επειδή τα θερμοπλαστικά μαλακώνουν με τη θερμότητα και σκληραίνουν εκ νέου μετά την ψύξη. Τα θερμοσκληρυνόμενα δεν συμπεριφέρονται με αυτόν τον τρόπο. Μόλις σκληρύνουν, δημιουργούν μια μόνιμη διασταυρούμενη δομή, οπότε η επαναθέρμανσή τους συνήθως οδηγεί σε ραγίσματα, καύση ή αποδόμηση, αντί να ρέουν. Σε απλά λόγια, τα θερμοπλαστικά μπορούν συνήθως να αναμορφωθούν με τη θερμότητα, ενώ τα θερμοσκληρυνόμενα δεν μπορούν. Εάν έχετε αναζητήσει τι είναι συγκολλητήρας πλαστικού , νομίστε τον ως το εργαλείο ή τη μηχανή που χρησιμοποιείται για να εφαρμόσει ελεγχόμενη θερμότητα, ταλάντωση ή τριβή σε κατάλληλα πλαστικά.
| Πλαστικό | Συνήθως συγκολλήσιμα; | Τυπικές Εφαρμογές | Προσοχή |
|---|---|---|---|
| PE, HDPE, LDPE | Συνήθως ναι | Δοχεία γάλακτος, σωλήνες, δεξαμενές, σακούλες | Ταιριάζει μόνο με PE |
| PP | Συνήθως ναι | Δοχεία, αυτοκινητικά εξαρτήματα, μεντεσέδες | Μην υποθέτετε ότι συγκολλάται καλά με PE |
| PVC | Συχνά ναι | Σωλήνες, μόνωση καλωδίων, προφίλ | Απαιτεί προσεκτικό έλεγχο της θερμότητας |
| ABS | Συχνά ναι | Περιβλήματα, θήκες, μορφοποιημένα εξαρτήματα | Χρησιμοποιήστε γνωστό υλικό, όχι μοιάσματα |
| Υπολογιστής | Είναι δυνατό με έλεγχο | Φακοί, προστατευτικά, εξαρτήματα συσκευών | Η υπερθέρμανση μπορεί να προκαλέσει ζημιά |
| PS | Περιορισμένη | Κύπελλα, μόνωση, συσκευασία | Μπορεί να είναι κατάλληλο για επισκευαστικές εργασίες |
| Τεχνητή Νοημοσύνη (ΤΝ) | Δύσκολο, αλλά εφικτό | Συσκευασία τροφίμων και ποτών | Μην περιμένετε εύκολη DIY συγκόλληση |
| Εποξειδικές, φαινολικές, μελαμίνης και άλλες θερμοσκληρυνόμενες ρητίνες | No | Κόλλες, ηλεκτρικά εξαρτήματα, σκεύη τραπεζιού, στρώματα | Σταματήστε και χρησιμοποιήστε μια άλλη μέθοδο επισκευής |
Πότε Δεν Πρέπει να Γίνεται Συγκόλληση Πλαστικού
Σταματήστε και επαναξιολογήστε όταν η ρητίνη είναι άγνωστη, το εξάρτημα είναι σοβαρά μολυσμένο ή το υλικό φαίνεται να είναι θερμοσκληρυνόμενο ή θερμοσκληρυνόμενο ενισχυμένο με ίνες. Αυτές οι συνθήκες αυξάνουν τις πιθανότητες ασθενούς σύνδεσης, παραμόρφωσης ή απλώς αποτυχίας. Για όσους μαθαίνουν πώς να συγκολληθεί πλαστικό , αυτό είναι το σημείο ελέγχου που αποτρέπει την απώλεια χρόνου και την καταστροφή εξαρτημάτων.
Μόνο τα επιβεβαιωμένα συγκολλήσιμα θερμοπλαστικά πρέπει να προχωρήσουν στην επιλογή της θερμότητας και του γεμίσματος.
Μια ορθή ταυτοποίηση κάνει περισσότερα από το να προστατεύει το εξάρτημα. Σας ενημερώνει επίσης ποια οικογένεια ράβδων συγκόλλησης και ποια μέθοδος συγκόλλησης είναι κατάλληλη για εργασία στο τραπέζι.
Βήμα 2: Ταίριασμα των ράβδων συγκόλλησης πλαστικού με το βασικό υλικό
Ο κωδικός ρητίνης κάνει περισσότερα από το να επιβεβαιώνει αν ένα εξάρτημα είναι συγκολλήσιμο. Σας δείχνει επίσης ποιο γέμισμα πρέπει να χρησιμοποιηθεί στη σύνδεση και ποια διαδικασία είναι κατάλληλη για το σχήμα του εξαρτήματος. Καλή συγκόλληση πλαστικού με πλαστικό ξεκινά με ένα απλό κανόνα: το γέμισμα πρέπει να ταιριάζει με το βασικό πλαστικό, όποτε αυτό είναι δυνατό. Αυτή είναι η πρακτική βάση της συγκόλλησης πλαστικού με πλαστικό χωρίς να καταλήξετε σε μια ραφή που φαίνεται λιωμένη, αλλά δεν έχει πραγματικά συγκολληθεί.
Ταιριάξτε τη ράβδο πλήρωσης με το βασικό πλαστικό
Ράβδοι συγκόλλησης πλαστικού είναι γεμίσματα ειδικά για κάθε υλικό, όχι καθολικές ράβδοι επισκευής. Τα εξαρτήματα PE απαιτούν ράβδο PE. Τα εξαρτήματα PP απαιτούν ράβδο PP. Τα εξαρτήματα ABS απαιτούν ράβδο ABS. Τα εξαρτήματα PVC απαιτούν ράβδο συγκόλλησης PVC που να ταιριάζει ράβδο συγκόλλησης PVC . Με άλλα λόγια, μια ράβδος συγκόλλησης θερμοπλαστικού πρέπει να ανήκει στην ίδια οικογένεια ρητίνης με το ίδιο το εξάρτημα. Εάν έχετε ποτέ αναζητήσει μια ράβδο συγκόλλησης πλαστικού «ένα μέγεθος για όλους» ράβδο συγκόλλησης πλαστικού , αυτή η συντόμευση είναι συνήθως αυτή που προκαλεί ασθενή πρόσφυση, ευθραυστότητα ή ραφές που διαχωρίζονται μετά την ψύξη.
Επιλέξτε την καλύτερη μέθοδο συγκόλλησης για το σχήμα του εξαρτήματος
Η επιλογή της μεθόδου εξαρτάται τόσο από τη γεωμετρία όσο και από το υλικό. Ένας οδηγός διαδικασιών από πηγές κατασκευής δείχνει ένα σαφές μοτίβο. Η συγκόλληση με ζεστό αέρα και ράβδο συμπλήρωσης κατάλληλη για πολλές επισκευές λεπτών τμημάτων, ακμών και μακρών ραφών. Η εκτραβήσιμη συγκόλληση είναι καλύτερη για μεγαλύτερες επιφάνειες, για την πλήρωση κενών και για επισκευές με μεγαλύτερη συσσώρευση υλικού. Η συγκόλληση με θερμή πλάκα λειτουργεί καλά σε μεγάλες ή παχιές επιφάνειες που πρόκειται να συνδεθούν. Η συγκόλληση με περιστροφή περιορίζεται σε στρογγυλά ή κυλινδρικά εξαρτήματα. Η υπερηχητική συγκόλληση κατάλληλη για μικρά, ακριβή εξαρτήματα, όπου προτιμάται ο ελεγχόμενος εντονισμός αντί της ευρείας θέρμανσης. Για συγκόλληση πολυαιθυλενίου , οι μέθοδοι με ζεστό αέρα ή εκτραβήσιμη συγκόλληση είναι συνηθισμένες σε δεξαμενές και δοχεία PE. Στη συγκόλληση πλαστικού PVC , η προσεκτική ρύθμιση της θερμότητας είναι κρίσιμη, καθώς το υπερθερμασμένο PVC μπορεί να αλλάξει χρώμα και να εκλύει επικίνδυνες αναθυμιάσεις.
Γιατί διαφορετικά πλαστικά συγκολλούνται σπάνια καλά
Το πρόβλημα δεν είναι μόνο οι διαφορετικές θερμοκρασίες τήξης. Διαφορετικά πλαστικά έχουν επίσης διαφορετική χημεία και διαφορετική συμπεριφορά ροής. Ο κανόνας του ίδιου υλικού είναι συνεπές σε όλες τις οδηγίες επισκευής: το PE πρέπει να συγκολλάται με PE, το PP με PP, το ABS με ABS κ.ο.κ. Η προσπάθεια συγκόλλησης PE με PP ή οποιουδήποτε από τα δύο με πολυστυρένιο ενδέχεται να φαίνεται αποδεκτή για μια στιγμή, αλλά η σύνδεση είναι συνήθως αναξιόπιστη υπό την επίδραση μηχανικής τάσης, κάμψης ή ψύξης.
| Τύπου πλαστικού | Οικογένεια ράβδων με ταίριασμα | Κατάλληλη μέθοδος συγκόλλησης | Περιπτώσεις όπου πρέπει να αποφεύγεται η συγκόλληση |
|---|---|---|---|
| PE, HDPE, LDPE | Ράβδος PE | Ζεστός αέρας για ράφια και επισκευές, εξτρούζιο για μεγαλύτερες κατασκευές | Αποφύγετε αν η ράβδος είναι PP, ABS ή άγνωστη |
| PP | Ράβδος PP | Ζεστός αέρας για ράφια επισκευών, θερμή πλάκα για μεγαλύτερες επιφάνειες με ταίριασμα | Αποφύγετε την ανάμειξη με PE, ακόμα και αν τα εξαρτήματα φαίνονται παρόμοια |
| PVC | Ράβδος PVC | Ζεστός αέρας με ελεγχόμενη θερμοκρασία, συνηθισμένος σε εργασίες σωλήνων και λαμαρινών | Αποφύγετε εάν υπάρχει κίνδυνος υπερθέρμανσης ή η εξαερισμός είναι κακός |
| ABS | Ράβδος ABS | Ζεστός αέρας για ρωγμές και άκρα, υπερηχητική συγκόλληση για μικρά και ακριβή εξαρτήματα | Αποφύγετε εάν το εξάρτημα είναι βρόμικο, βαμμένο ή δεν είναι σαφώς ABS |
| Στρογγυλά θερμοπλαστικά εξαρτήματα | Ταιριάζετε τη ράβδο μόνο εάν χρησιμοποιείται γεμιστικό | Περιστροφική συγκόλληση για κυκλική γεωμετρία | Αποφύγετε σε μη στρογγυλά εξαρτήματα |
| Άγνωστα ή μεικτά πλαστικά | Κανένα | Μην επιλέξετε μέθοδο πριν επιβεβαιωθεί το υλικό | Αποφύγετε όλες τις προσπάθειες συγκόλλησης |
- Επιβεβαιώστε ότι το βασικό εξάρτημα και το γεμιστικό ανήκουν στην ίδια οικογένεια πλαστικών.
- Επιλέξτε τη μέθοδο με βάση το σχήμα: λεπτή ραφή, σωλήνας, στρογγυλό εξάρτημα ή μεγάλη επιφάνεια.
- Μην υποθέτετε ότι πλαστικά με παρόμοια εμφάνιση θα συγκολληθούν καλά.
- Παραλείψτε τη συγκόλληση εάν το εξάρτημα είναι άγνωστο, μεικτό ή σοβαρά μολυσμένο.
- Διατηρήστε ένα κομμάτι απόβλητου του ίδιου υλικού πριν ακουμπήσετε το πραγματικό εξάρτημα.
Αυτός ο χάρτης διασφαλίζει την ακρίβεια της επισκευής. Επιπλέον, καθιστά πολύ λιγότερο σύγχυτη την επιλογή των εργαλείων, καθώς η κατάλληλη διάταξη εξαρτάται από τη ράβδο, τη σύνδεση και την κλίμακα της εργασίας.
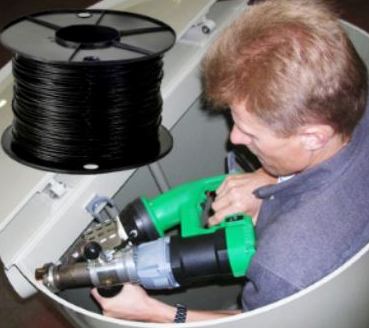
Βήμα 3: Επιλέξτε έναν συγκολλητή πλαστικών και μια ασφαλή διάταξη
Η επιλογή εργαλείου γίνεται απλούστερη όταν σταματάτε να αγοράζετε βάσει διαφημιστικής υπερβολής και αρχίζετε να αγοράζετε βάσει του μεγέθους της εργασίας. Για την πλειονότητα των επισκευών, ένα θερμοσυγκολλητής πλαστικού με ζεστό αέρα αποτελεί την πιο ευέλικτη επιλογή, καθώς προσφέρει ρυθμιζόμενη θερμότητα και λειτουργεί με αντίστοιχη γεμιστική ράβδο σε πολλές συναρμογές και ρωγμές. Ένας οδηγός επισκευής πλαστικών αναφέρει ότι τα χειροκίνητα εργαλεία είναι κατάλληλα για μικρής κλίμακας κατασκευή, λεπτομερείς επισκευές και γενικές εργασίες στο εργαστήριο, αλλά δεν είναι η κατάλληλη επιλογή για πάχος υλικού που υπερβαίνει τα περίπου 10 mm. Εάν συγκρίνετε ένα βασικό πλαστικό συγκολλητικό εργαλείο με ένα πλήρες σετ πλαστικής συγκόλλησης , εστιάστε στον έλεγχο της θερμοκρασίας, στις διαθέσιμες επιλογές ακροφυσίων και στην πρόσβαση σε αντίστοιχες ράβδους, αντί για πρόσθετα χαρακτηριστικά που ενδέχεται να μην χρησιμοποιήσετε ποτέ.
Βασικά εργαλεία για τη συγκόλληση πλαστικών
- Συγκολλητικό εργαλείο πλαστικών με θερμό αέρα ή χειροκίνητο εργαλείο με θερμό αέρα για ευέλικτες επισκευές συναρμογών και ρωγμών.
- Σιδεράκι κόλλησης πλαστικού για μικροσκοπικές επισκευές, λεπτομερείς περιοχές και εξαρτήματα χαμηλής φόρτισης.
- Σιδεράκι κόλλησης πλαστικού ή ακροδέκτης τύπου σιδεριού για ελεγχόμενη τοπική τήξη, όπου μια ευρεία ροή αέρα είναι δύσκολη στη χρήση.
- Σκαρπέλο ή γραφίδι για αφαίρεση βλαβών υλικών και διαμόρφωση της σύνδεσης.
- Κόφτης ή μαχαίρι για καθάρισμα και προετοιμασία της ράβδου.
- Σφιγκτήρες για διατήρηση της στοίχισης και απελευθέρωση των χεριών σας.
- Υλικά καθαρισμού για αφαίρεση σκόνης, λαδιού και υπολειμμάτων.
- Προσωπικός προστατευτικός εξοπλισμός (PPE), όπως γάντια, προστασία των ματιών και προστατευτικά ρούχα.
- Κομμάτια από απόβλητο πλαστικό του ίδιου τύπου για δοκιμαστικές συγκολλήσεις.
| Οικογένεια εργαλείων | Καλύτερη Χρήση | Τυπικά πλεονεκτήματα | Καμπύλη Μάθησης |
|---|---|---|---|
| Θερμοσυγκολλητής πλαστικού με ζεστό αέρα | Ρωγμές, συρραφές, επισκευές φύλλων, εργασίες τύπου προφυλακτήρα | Ρυθμιζόμενη θερμότητα, έλεγχος ακροφυσίου, ευρεία πολυλειτουργικότητα | Μεσαίο |
| Εργαλείο τύπου κολλητηρίου | Μικρές ρωγμές, γλωσσίδες, στενοί χώροι, ελαφρές επισκευές | Απλό, προσβάσιμο, κατάλληλο για λεπτομερή εργασία | Χαμηλή έως μέτρια |
| Εκτροπικός συγκολλητής | Παχύ πλαστικό και μεγαλύτερες κατασκευές | Μεγαλύτερη παραγωγή κόκκων, ισχυρότερη συσσώρευση σε παχύτερες περιοχές | Υψηλές |
Πώς να δημιουργήσετε μια ασφαλή και σταθερή εργασιακή περιοχή
- Διαβάστε τις οδηγίες χρήσης του εργαλείου και ελέγξτε το καλώδιο, την ακροφύσιο και τη διαδρομή του αέρα πριν από τη θέρμανση οποιουδήποτε αντικειμένου.
- Απαλλαγείτε από τα περιττά αντικείμενα και τοποθετήστε το εξάρτημα σε μια επίπεδη, ανθεκτική στη θερμότητα επιφάνεια.
- Τοποθετήστε σφιγκτήρες και μπλοκ υποστήριξης έτσι ώστε το αντικείμενο εργασίας να μην μετακινηθεί κατά τη διάρκεια της επεξεργασίας.
- Εξασφαλίστε καλή εξαερισμό της περιοχής. Ορισμένα πλαστικά παράγουν δυσάρεστες αναθυμιάσεις κατά τη θέρμανση, ενώ ενδεχομένως να απαιτείται χρήση προστατευτικής μάσκας ανάλογα με το είδος του πλαστικού και τη ροή του αέρα.
- Φορέστε γάντια, προστατευτικά γυαλιά και ρούχα που καλύπτουν όλο το εκτεθειμένο δέρμα.
- Κρατήστε εύφλεκτα αντικείμενα μακριά από την ακροφύσιο και τη ροή ζεστού αέρα.
- Τοποθετήστε το θερμό εργαλείο σε βάση ή επίπεδη επιφάνεια, ώστε να μην μπορεί να κυλήσει ή να κατευθυνθεί προς το εργαστήριο.
- Μην υποθέτετε το συνιστώμενη ισχύς για συγκολλητικό μηχάνημα πλαστικού . Ο ασφαλέστερος κανόνας στις οδηγίες ασφαλείας IHS είναι να ακολουθείτε το εγχειρίδιο του εργαλείου και να παραμένετε κοντά στο 80% της χωρητικότητας του κυκλώματος, αντί να φτάνετε στο μέγιστο όριο της γραμμής.
Δοκιμή σε αχρησιμοποίητο υλικό πριν ακουμπήσετε το τελικό κομμάτι
Μεταξύ όλων εργαλεία συγκόλλησης πλαστικού , η δοκιμή σε αχρησιμοποίητο υλικό εξοικονομεί τη μεγαλύτερη απογοήτευση. Εκτελέστε μια σύντομη συγκόλληση σε αντίστοιχο αχρησιμοποίητο υλικό για να ελέγξετε τη θερμότητα, την ταχύτητα κίνησης, τη ροή αέρα και την αντίδραση του γεμίσματος. Αν η ράβδος «μαζεύεται», «καίγεται» ή αρνείται να συγχωνευθεί, οι ρυθμίσεις ή η επιλογή του εργαλείου είναι λανθασμένες. Αυτή η γρήγορη δοκιμή σας ενημερώνει επίσης εάν μια διάταξη ζεστού αέρα ή μια μέθοδος συγκόλλησης τύπου σιδερού προσφέρει καλύτερο έλεγχο για το συγκεκριμένο κομμάτι που έχετε μπροστά σας. Το καλό εξοπλισμός βοηθά, αλλά εξίσου σημαντική είναι μια καθαρή, σταθερή και δοκιμασμένη διάταξη. Όταν το αχρησιμοποίητο υλικό αρχίσει να συμπεριφέρεται όπως πρέπει, το πραγματικό έργο μετατοπίζεται στην ίδια τη σύνδεση: καθαρισμός της με τον κατάλληλο τρόπο, διαμόρφωσή της σωστά και ασφάλισή της στη θέση της πριν από την τοποθέτηση της πρώτης συγκόλλησης.
Βήμα 4: Προετοιμασία σπασμένου πλαστικού για συγκόλληση
Μια κακή συγκόλληση συνήθως ξεκινά πριν ακόμη ζεσταθεί το εργαλείο. Όταν επισκευάζετε πλαστικό , η προετοιμασία της επιφάνειας καθορίζει εάν η ράβδος θα συγκολληθεί πραγματικά ή απλώς θα εξαπλωθεί στην επιφάνεια. Η σκόνη, το κερί, τα λάδια, το βερνίκι και η εγκλωβισμένη υγρασία δημιουργούν όλα εμπόδια. Γι’ αυτό και μερικές από τις καλύτερες συμβουλές για τη συγκόλληση πλαστικού δεν έχουν καμία σχέση με τις ρυθμίσεις θερμότητας.
Αφαιρέστε τους ρύπους που καταστρέφουν τη σύντηξη
Ξεκινήστε με το «βαρετό» μέρος, επειδή έχει σημασία. Ένας οδηγός επισκευής και οι καλύτερες πρακτικές ενός εργαστηρίου συγκρούσεων αναφέρουν και οι δύο την ίδια πρώτη ενέργεια: πλύνετε το εξάρτημα με σαπούνι και νερό, στη συνέχεια στεγνώστε το εντελώς. Εάν παραμένουν λίπη, κερί, απομαλακτικό μήτρας ή λιπαρά αποτυπώματα δακτύλων, χρησιμοποιήστε ένα καθαριστικό ασφαλές για πλαστικά. Για σκληρά διακοσμητικά εξαρτήματα και πάνελ, το προετοιμαστικό στάδιο για πάνελ αναφέρει επίσης το ισοπροπυλικό αλκοόλ (IPA) ως μία ασφαλή επιλογή απολίπανσης για πλαστικά. Αφαιρέστε το χαλαρό βερνίκι, τα επικαλύμματα και τη βρομιά κοντά στη ζώνη συγκόλλησης, όταν αυτά θα λιώσουν στη σύνδεση. Συνήθως αρκεί μια ελαφριά λείανση. Αποφύγετε τους αποτελεσματικούς βιομηχανικούς διαλύτες, οι οποίοι μπορούν να καταστρέψουν το πλαστικό αντί να το καθαρίσουν.
- Συγκόλληση πάνω σε κερί, πολυσιλικόνη, λάδια φροντίδας ή απομαλακτικό μήτρας.
- Αφήνοντας νερό εγκλωβισμένο στην υφή, στις τρύπες ή στις γραμμές ρωγμών.
- Τήκοντας βερνίκι, κόλλα ή φιλμ δρόμου στο αυλάκι.
- Αγνοώντας τη σκόνη από το γυάλισμα πριν από τη θέρμανση.
- Αγγίζοντας την καθαρισμένη περιοχή με γυμνά χέρια που περιέχουν λιπαρές ουσίες.
Η κακή προετοιμασία συχνά φαίνεται ως πρόβλημα συγκόλλησης, ενώ στην πραγματικότητα είναι πρόβλημα επιφάνειας.
Προετοιμάστε τις ρωγμές διαφορετικά από τις συνδετικές αρθρώσεις.
Εξετάστε τη ζημιά προτού διαμορφώσετε οτιδήποτε. Πρόκειται για ρωγμή, μια διάσπαση, ένα ελλείπον τμήμα ή μια συνδετική άρθρωση μεταξύ δύο ξεχωριστών κομματιών; Μια παραμορφωμένη περιοχή πρέπει να επανέλθει όσο το δυνατόν πιο κοντά στο αρχικό της σχήμα πριν από τη συγκόλληση. Σε εξαρτήματα τύπου προφυλακτήρα, οι οδηγίες επισκευής του καταστήματος συνιστούν επίσης να διορθωθεί η παραμόρφωση πριν από τη συγκόλληση, αντί να προσπαθήσετε να επιτύχετε τη σωστή ευθυγράμμιση μόνο με τη χρήση γεμίσματος.
Για μια ρωγμή σε ένα κομμάτι, ανοίξτε ελαφρώς τη ζημιά μόνο όσο χρειάζεται για να εκθέσετε καθαρό πλαστικό και να δημιουργήσετε μια επιφανειακή V-αύλακα, συνήθως στη μη ορατή πλευρά, όταν αυτό είναι δυνατό. Για πιο παχιά πάνελ, μια ελαφριά κεκλιμένη επιφάνεια (bevel) ή μια μικρή υποχάραξη (chamfer) αυξάνει την επιφάνεια σύνδεσης. Για δύο ξεχωριστά κομμάτια, εκτελέστε πρώτα δοκιμαστική τοποθέτηση (dry-fit) των ακμών. Εάν το πάχος του υλικού το επιτρέπει, κάντε ελαφρώς κεκλιμένες τις αντικρινόμενες ακμές, ώστε να είναι προσβάσιμη η ρίζα χωρίς να δημιουργηθεί ευρύ κενό. Μια σπασμένη πλαστική σύνδεση πρέπει να συναρμολογείται καθαρά. Το υλικό επισκευής χρησιμοποιείται για να ενισχύσει τη σύνδεση, όχι για να αντικαταστήσει την απουσία καλής σύνδεσης.
Στερέωση και προσωρινή συγκόλληση για καλύτερο έλεγχο
- Πλύνετε το εξάρτημα με σαπούνι και νερό.
- Στεγνώστε το πλήρως, συμπεριλαμβανομένων των υφασματωδών περιοχών και του εσωτερικού της ρωγμής.
- Απολιπανθείτε με καθαριστικό ασφαλές για πλαστικά ή με ισοπροπανόλη (IPA), εάν παραμένει λιπαρή υπολειμματική ουσία.
- Αφαιρέστε τη βαφή ή το χαλαρό επίστρωμα κοντά στη ζώνη συγκόλλησης, όταν αυτό είναι απαραίτητο.
- Ελέγξτε τον τύπο της ζημιάς και διορθώστε οποιαδήποτε παραμόρφωση πριν από τη διαμόρφωση της σύνδεσης.
- Κόψτε μια επιφανειακή αύλακα για ρωγμές ή κάντε ελαφρώς κεκλιμένες τις αντικρινόμενες ακμές για συνδέσεις.
- Προσαρμόστε ξηρά τα εξαρτήματα και ευθυγραμμίστε τα με ταινία, σφιγκτήρες ή υποστήριξη από την πίσω πλευρά.
- Εάν η εμπρόσθια επιφάνεια πρέπει να διατηρήσει το προφίλ της, η χρήση παχιάς αλουμινένιας ταινίας στην εμφανή πλευρά μπορεί να βοηθήσει στην υποστήριξη της εργασίας από την πίσω πλευρά.
- Σχεδιάστε τις θέσεις των προσωρινών σημείων στα άκρα και σε οποιοδήποτε σημείο που τείνει να ανυψωθεί, να διασταλεί ή να στρεβλωθεί εκτός γραμμής.
Για ερασιτεχνική συγκόλληση πλαστικού , αυτή η φάση προετοιμασίας είναι εκείνη όπου αρχίζει ο έλεγχος. Ένα ραγισμένο σημείο που έχει καθαριστεί, ανοιχτεί και στερεωθεί σωστά αντιδρά πολύ διαφορετικά στη θερμότητα σε σύγκριση με δύο ξεχωριστά κομμάτια που απαιτούν συγκόλληση άκρου σε άκρο, και αυτό είναι ακριβώς το σημείο όπου αρχίζει η επισκευαστική διαδικασία με τα χέρια.
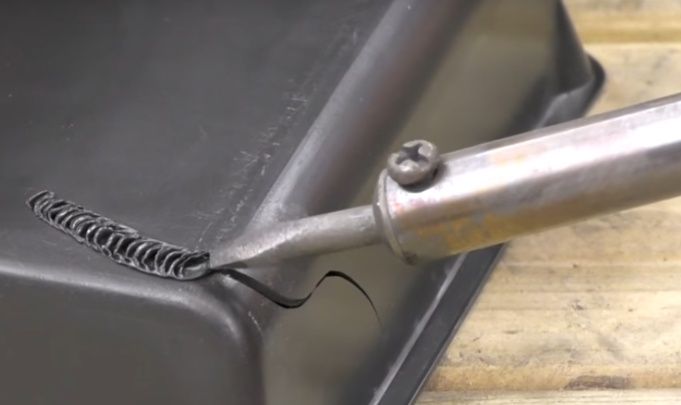
Βήμα 5: Πώς να επισκευάσετε ραγίσματα σε πλαστικά εξαρτήματα
Τα ραγίσματα συνήθως αποτυγχάνουν με έναν από τους δύο τρόπους: είτε συνεχίζουν να επεκτείνονται κατά τη διάρκεια της εργασίας, είτε μετατρέπονται σε επιφανειακή συγκόλληση χωρίς να συγκολληθούν στο βάθος. Για μια μόνιμη επισκευή, το εξάρτημα πρέπει να διατηρείται στη σωστή μορφή, το ράγισμα πρέπει να ανοίγει ελαφρώς για να εκτίθεται καθαρό υλικό και πρέπει να προστίθεται γεμιστικό υλικό που ταιριάζει, σε μικρές, ελεγχόμενες επαναλήψεις. Αυτό ισχύει είτε ψάχνετε για πώς να επισκευάσετε ραγισμένο προφυλακτήρα αυτοκινήτου ζημιά, μια ραγισμένη γωνία δεξαμενής ή πώς να επισκευάσετε σπασμένο πλαστικό σε ένα οικιακό πάνελ.
Σταθεροποίηση και άνοιγμα της ρωγμής για συγκόλληση
Ξεκινήστε με το να αποτρέψετε τη μετατόπιση της ρωγμής. Χρησιμοποιήστε ταινία, σφιγκτήρες ή υποστήριξη από την πίσω πλευρά για να επαναφέρετε το εξάρτημα στο αρχικό του σχήμα. Τα λεπτά πάνελ επωφελούνται από την υποστήριξη από την πίσω πλευρά, επειδή οι άκρες μπορούν να ανυψωθούν ή να βυθιστούν καθώς ελαφραίνονται. Στη συνέχεια, κόψτε ή ξυστείτε μια επιφανειακή V-αύλακα κατά μήκος της γραμμής της ρωγμής, ώστε να εκτεθεί φρέσκο πλαστικό. Διατηρήστε την αύλακα στενή. Η αφαίρεση υπερβολικού υλικού δημιουργεί ευρύτερο κενό και δυσκολεύει τον έλεγχο της θερμότητας. Αυτός ο οδηγός επισκευής ενισχύει τις βασικές αρχές που χρησιμοποιούνται σε όλη την εργασία με θερμοπλαστικά: ράβδος που ταιριάζει, ελεγχόμενη θέρμανση, σταθερή πίεση και πλήρης ψύξη.
- Καθαρίστε και στεγνώστε εντελώς τη ρωγματισμένη περιοχή.
- Ευθυγραμμίστε το εξάρτημα με ταινία, σφιγκτήρες ή μια απλή υποστήριξη από την πίσω πλευρά.
- Ανοίξτε τη ρωγμή σε μια επιφανειακή αύλακα, μόνο όσο χρειάζεται για πρόσβαση.
- Δοκιμάστε τη θερμότητα και τη ράβδο σε αχρησιμοποίητο κομμάτι από το ίδιο πλαστικό, αν είναι δυνατόν.
- Προθερμάνετε προσεκτικά την αύλακα μέχρις ότου το βασικό υλικό αρχίσει μόλις να μαλακώνει.
- Ράψτε πρώτα τα άκρα, ώστε η ρωγμή να μην εξαπλωθεί κατά τη συγκόλληση του κέντρου.
- Τροφοδοτήστε το αυλάκι με γέμισμα που ταιριάζει, ασκώντας ελαφρύ πίεσμα και εκτελώντας σύντομες, ομοιόμορφες διελεύσεις.
- Αφήστε την επισκευή να ψυχθεί φυσικά προτού την κοπείτε, την τρίψετε ή την κάμψετε.
Τοποθετήστε μια ελεγχόμενη ράβδο επισκευής χωρίς υπερθέρμανση
Εάν ο στόχος σας είναι πώς να συγκολλήσετε ξανά πλαστικό , σκεφτείτε τη διαδικασία ως σειρά διελεύσεων, όχι ως μία μεγάλη τήξη. Η ακολουθία ζεστού αέρα σε αυτό το οδηγό ελαττωμάτων συμβαδίζει με τις καλές πρακτικές επισκευής: θερμάνετε ομοιόμορφα τη σύνδεση, τροφοδοτήστε τη ράβδο με ελαφρύ πίεσμα και αφήστε τη να ψυχθεί από μόνη της. Για βαθύτερες ζημιές, δημιουργήστε τη ράβδο σε στρώματα. Μία διέλευση μπορεί να δημιουργήσει τη ρίζα της επισκευής, ενώ μία δεύτερη μπορεί να φέρει την επιφάνεια στο επίπεδο. Αυτός είναι ο πρακτικός τρόπος για να επισκευάσετε ρωγμές σε πλαστικό αντί να απλώς κρύβεται η γραμμή.
- Εμφανίζονται φυσαλίδες ή μικρές τρύπες, γεγονός που συχνά υποδηλώνει την παρουσία υγρασίας ή μόλυνσης.
- Η ράβδος σκοτεινιάζει, βυθίζεται ή καίγεται, γεγονός που υποδηλώνει υπερβολική θερμότητα.
- Η ράβδος εξαπλώνεται στην επιφάνεια σαν κερί, αντί να ενσωματωθεί στην αύλακα.
- Η ράβδος κάθεται επάνω στην επιφάνεια και αποκολλάται ή ανυψώνεται όταν γίνεται ελαφρά ξύσιμο.
- Η γραμμή της ρωγμής εμφανίζεται εκ νέου μετά την ψύξη, δείχνοντας κακή συγκόλληση ή ανομοιόμορφη ψύξη.
Ενισχύστε την Οπίσθια Πλευρά Όταν το Εξάρτημα Χρειάζεται Υποστήριξη
Ορισμένα εξαρτήματα χρειάζονται επιπλέον υποστήριξη στην οπίσθια επιφάνεια, ειδικά λεπτά επενδύσεις προφυλακτήρων, γωνίες υπό τάση ή περιοχές που παραμορφώνονται κατά τη λειτουργία. Μια υποστηρικτική λωρίδα ή πλάκα μπορεί να βοηθήσει στη διατήρηση της σωστής στοίχισης κατά τη διαμόρφωση της συγκόλλησης. Εάν η κιτ επισκευής πλαστικού συγκολλήσεως σας περιλαμβάνει αξεσουάρ υποστήριξης για την οπίσθια πλευρά, χρησιμοποιήστε τα για τη σταθεροποίηση του εξαρτήματος, όχι για να αντικαταστήσουν την ίδια τη συγκόλληση. Το ίδιο ισχύει και εάν η μέθοδος επισκευής σας χρησιμοποιεί πλέγμα ενίσχυσης, συρματοκαρφιές για συγκόλληση πλαστικού , ή συρματοκαρφωτής για συγκόλληση πλαστικού αυτές οι επιλογές μπορούν να βοηθήσουν το εξάρτημα να διατηρήσει το αρχικό του σχήμα, αλλά η πραγματική αντοχή προέρχεται ακόμα από το συμβατό πλαστικό και την κατάλληλη συγκόλληση κατά μήκος της ρωγμής.
Ένα ραγισμένο εξάρτημα σας προσφέρει το αρχικό σχήμα που πρέπει να ακολουθήσετε, γεγονός που διευκολύνει την ευθυγράμμιση. Δύο ξεχωριστά κομμάτια δεν προσφέρουν αυτό το πλεονέκτημα, ενώ ο ρυθμός συγκόλλησης αλλάζει με αυτά. Η προετοιμασία της σύνδεσης (fit-up) αποκτά την ίδια σημασία με τον έλεγχο του υλικού συμπλήρωσης.
Βήμα 6: Σύνδεση δύο κομματιών πλαστικού με τον σωστό τρόπο
Η ακριβής εφαρμογή των ακμών καθορίζει εάν μια ραφή θα μετατραπεί σε πραγματική σύνδεση ή απλώς σε μια γραμμή με εμφάνιση λιωμένου πλαστικού. Εάν αναρωτιέστε πώς συγκολλάτε πλαστικό , η απάντηση αρχίζει με την ταύτιση του υλικού και την επακριβή εφαρμογή, όχι με την υπερβολική θερμότητα. Τα δύο κομμάτια πρέπει να είναι από το ίδιο συγκολλήσιμο πλαστικό, οι άκρες τους πρέπει να συναρμόζονται καθαρά και οι πρώτες διελεύσεις της συγκόλλησης πρέπει να εξασφαλίζουν την ευθυγράμμιση προτού δημιουργήσετε τη ραφή. Αυτός είναι ο πρακτικός πυρήνας του πώς να συγκολλάτε πλαστικό και πώς να συγχωνεύετε πλαστικό χωρίς να δημιουργηθεί ραφή που θα σχιστεί αργότερα.
Ξηρή Προσαρμογή και Προσωρινή Σύνδεση των Κομματιών
Για ελαφριά κατασκευή, συγκόλληση με ζεστό αέρα χρησιμοποιείται συνήθως για τη σύνδεση των άκρων φύλλων και για την προσωρινή σύνδεση μεγαλύτερων συναρμολογημάτων πριν από την τελική συγκόλληση. Η διαδικασία Seelye αναφέρει επίσης ότι οι προσωρινές συγκολλήσεις μπορούν να γίνουν με ζεστό αέρα και χωρίς ράβδο, απλώς με την τήξη της ραφής σε επιλεγμένα σημεία. Διατηρήστε τη σύνδεση σφιχτή και ομοιόμορφη. Το υλικό ενίσχυσης πρέπει να ενισχύει τη ραφή, όχι να αντισταθμίζει στρεβλές άκρες ή μεγάλο κενό.
- Επαληθεύστε ότι και τα δύο κομμάτια ανήκουν στην ίδια οικογένεια πλαστικών και είναι πλήρως στεγνά.
- Κόψτε ή χοντρύνετε ελαφρώς τις άκρες, εάν το πάχος το απαιτεί.
- Πραγματοποιήστε ξηρή προσαρμογή της ραφής και στερεώστε με σφιγκτήρες τις επιφάνειες ώστε να παραμείνουν επίπεδες.
- Τοποθετήστε πρώτα τις προσωρινές συγκολλήσεις στα άκρα, στη συνέχεια σε οποιοδήποτε σημείο τείνει να ανυψωθεί ή να μετακινηθεί.
- Επανελέγξτε τη στοίχιση πριν από την εκτέλεση μιας συνεχούς ραφής.
Εκτελέστε μια ρίζικη διέλευση προτού προσθέσετε το γεμιστικό υλικό
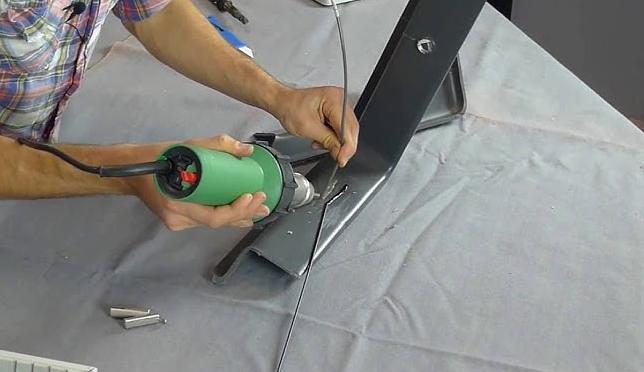
Στην πλειονότητα των εργασιών με το χέρι, η συγκόλληση πλαστικού με ζεστό αέρα προσφέρει καλύτερο έλεγχο από την προσπάθεια να συμπιεστεί η σύνδεση μόνο με μια ζεστή ακροδέκτη. Ξεκινήστε με μια ελαφριά διέλευση σύντηξης που συνδέει και τις δύο άκρες στη ρίζα της ραφής. Στη συνέχεια, τροφοδοτήστε μια αντίστοιχη ράβδο σε αυτήν τη συνδεδεμένη γραμμή. Η Διαδικασία Seelye περιγράφει τη θέρμανση της ράβδου και του βασικού υλικού μαζί, την τοποθέτηση της ράβδου πάνω από τη ραφή και την ομοιόμορφη πίεση προς τα κάτω, αντί να την τραβάτε προς τα εμπρός. Αυτό σας βοηθά να συγκολλάτε πλαστικά μεταξύ τους αντί να τεντώνετε το γεμιστικό υλικό πάνω στην επιφάνεια.
- Θερμάνετε και τις δύο άκρες μέχρι να γίνουν κολλώδεις, όχι μαυρισμένες ή καταρρεύσεις.
- Εκτελέστε μια ελαφριά ρίζικη διέλευση για να επιτύχετε σύντηξη κατά μήκος της ραφής.
- Προσθέστε το κατάλληλο υλικό πλήρωσης με σταθερή κατακόρυφη πίεση προς τα κάτω.
- Διατηρήστε τη θερμότητα ελαφρώς μπροστά από τη λίμνη συγκόλλησης καθώς κινείστε.
- Αφήστε τη ραφή να ψυχθεί φυσικά προτού την κόψετε ή την χειριστείτε.
Χρησιμοποιήστε εργαλείο τύπου κολλητηρίου μόνο στις κατάλληλες περιπτώσεις.
Πολλοί αρχάριοι προσπαθούν να συγκολλήσουν πλαστικό με κολλητήρι επειδή είναι εύκολο να βρεθεί και εύκολο στο χειρισμό. Μπορεί να βοηθήσει σε πολύ απλές επισκευές ή σε μικρές, ελαφριές συνδέσεις, αλλά δεν είναι ιδανικό για σωστή συγκόλληση ραφών. Η S-Polytec τονίζει ειδικά ότι ένα απλό κολλητήρι μπορεί να είναι επαρκές για πολύ απλές επισκευές, ωστόσο δεν συνιστάται για σωστές ραφές συγκόλλησης. Με άλλα λόγια, η συγκόλληση πλαστικού με κολλητήρι είναι μια περιορισμένη επιλογή, όχι υποκατάστατο της ελεγχόμενης θερμής αέρα για μακρύτερες ή πιο απαιτητικές συνδέσεις.
| Τρόπος | Καλύτερος τύπος ραφής | Ακρίβεια | Τυπικοί περιορισμοί |
|---|---|---|---|
| Ζεστός αέρας με αντίστοιχη ράβδο | Αρθρώσεις άκρων, γωνίες, αρθρώσεις ελασμάτων, μακρύτερες συρράφσεις | Καλός έλεγχος μόλις εξαστενιστεί η τεχνική | Απαιτεί ομοιόμορφη θερμότητα, καθαρά άκρα και αντίστοιχο υλικό πλήρωσης |
| Εργαλείο τύπου κολλητηρίου | Μικροσκοπικές γλωσσίδες, σύντομες συρράφσεις, σημεία με περιορισμένη πρόσβαση | Υψηλός έλεγχος σημείων σε μικρές περιοχές | Εύκολο να υπερθερμανθεί, να μολυνθεί η επιφάνεια και να δημιουργηθούν ασθενέστερες μακρύτερες συρράφσεις |
Μια σύνδεση μπορεί να φαίνεται ενωμένη, αλλά να παραμένει ασθενής στο εσωτερικό. Το σχήμα της ραφής, η σύνδεση (tie-in) και οι γραμμές διαχωρισμού έχουν μεγαλύτερη σημασία από την εμφάνιση· γι’ αυτό και η τελική σύνδεση αξίζει προσεκτική εξέταση προτού πραγματοποιηθεί οποιαδήποτε λείανση ή επαναφορά φορτίου λειτουργίας στο εξάρτημα.
Βήμα 7: Εξέταση και ολοκλήρωση πλαστικής συγκόλλησης
Τελειωμένο συγκόλληση πλαστικού μπορεί να φαίνεται καθαρή και ωστόσο να αποτύχει ακόμα και με ελαφριά χρήση. Όταν συγκολλάτε πλαστικό , η εμφάνιση είναι μόνο ο πρώτος έλεγχος. Οι οδηγοί εντοπισμού ελαττωμάτων των Bortte και PlasTech επισημαίνουν επανειλημμένα τα ίδια σημάδια προβλημάτων: ασθενή συγκόλληση, πορώδες, ρωγμές, επικάλυψη, παραμόρφωση και αποχρωματισμό. Ένας προσεκτικός έλεγχος σας ενημερώνει εάν η ραφή έχει πραγματικά συγκολληθεί ή απλώς έχει λιώσει στην επιφάνεια.
Πώς να διαπιστώσετε εάν η συγκόλληση έχει πραγματικά επιτευχθεί
- Επιτυχία: η γραμμή συγκόλλησης είναι σχετικά ομοιόμορφη και ενσωματώνεται στις δύο άκρες χωρίς να δημιουργείται οξεία υψωματική γραμμή στην κορυφή της.
- Επιτυχία: η γραμμή της ραφής φαίνεται κλειστή, χωρίς να εμφανίζεται ρωγμή που ξανανοίγει ή σκούρα γραμμή διαχωρισμού μετά την ψύξη.
- Επιτυχία: δεν υπάρχουν τρύπες καρφιτσών, φυσαλίδες ή εγκλωβισμένα υπολείμματα στη ζώνη συγκόλλησης.
- Αποτυχία: τα καυστικά σημάδια, η έντονη αποχρωματισμένη περιοχή, η καθίζηση ή η απώλεια λάμψης υποδεικνύουν υπερβολική θερμότητα.
- Αποτυχία: η υποκοπή ή μια αύλακα δίπλα στο κορδόνι δείχνει ότι το βασικό πλαστικό υπερθερμάνθηκε ή αποσπάστηκε.
- Αποτυχία: το γέμισμα αποκολλάται, εξωθείται σε φλούδες ή φαίνεται να έχει «σμεαρ» στην επιφάνεια αντί να έχει ενσωματωθεί ομοιόμορφα.
Μια λεία στην εμφάνιση ραφή δεν είναι πάντα μια ισχυρή ραφή.
Για τα διακοσμητικά εξαρτήματα, τα καλύμματα και άλλα εξαρτήματα χαμηλής φόρτισης, μια ελαφρά ελεγκτική επαφή με το χέρι μετά την πλήρη ψύξη μπορεί να βοηθήσει. Εάν ελαφρή πίεση προκαλεί λεύκανση, ανύψωση ή επανάνοιξη της ραφής, η σύνδεση είναι αμφίβολη. Για εξαρτήματα που κρατούν υγρά, υφίστανται κρούσεις ή είναι κρίσιμα για την ασφάλεια, βασιστείτε πρώτα σε μια προσεκτική οπτική εξέταση και αποφύγετε να θεωρείτε μια γρήγορη ελαστικότητα ως απόδειξη αντοχής.
Πότε να επανεργαστεί μια αδύναμη ή ακατάστατη ραφή
Ένα από τα πιο χρήσιμα συμβουλές συγκόλλησης πλαστικού είναι απλό: μην θάβετε μια κακή συγκόλληση κάτω από περισσότερο γέμισμα. Σε οποιαδήποτε επισκευή πλαστικού με συγκόλληση , οι ασθενείς περιοχές πρέπει να κοπούν μέχρι το υγιές υλικό και να ξανασυγκολληθούν καθαρά.
- Αφήστε τη ραφή να ψυχθεί φυσικά.
- Σημειώστε τις κενές περιοχές, τις ανυψωμένες άκρες, τα καμένα τμήματα ή τις επανανοιγμένες γραμμές.
- Κόψτε ή ξυστείρετε τη χαλαρή ή ανεπαρκώς προσκολλημένη γραμμή γέμισματος.
- Καθαρίστε τη σκόνη από τη λείανση, το λάδι ή τα υπολείμματα.
- Θερμάνετε εκ νέου ομοιόμορφα και προσθέστε γέμισμα που ταιριάζει, με ελεγχόμενη διέλευση.
- Ψύξτε εκ νέου προτού ελέγξετε για δεύτερη φορά τη ραφή.
Κόψτε, λειανθείτε και ολοκληρώστε χωρίς να αδυναμήσει η επισκευή
Εάν είστε συγκόλληση πλαστικού σε ορατό μέρος, κόψτε τις υψηλότερες περιοχές με γυαλόχαρτο ή αιχμηρή λεπίδα πριν από την τρίψιμο. Τρίψτε ελαφρά και ασκήστε την πλειονότητα της πίεσης στην περιβάλλουσα επιφάνεια, όχι στο κέντρο της γραμμής συγκόλλησης. Στόχος είναι να δημιουργηθεί ελαφριά μετάβαση (feathering) στην περιοχή για την επόμενη επεξεργασία, όχι να αφαιρεθεί η ίδια η συγκόλληση. Αυτά συμβουλές συγκόλλησης πλαστικού βοηθούν να διατηρηθεί η επισκευή καθαρή χωρίς να λεπταίνεται η ζώνη συγκόλλησης. Όταν μια ραφή συνεχίζει να φουσκώνει, να καίγεται ή να ραγίζει μετά την επανεπεξεργασία, το τελικό αποτέλεσμα υποδεικνύει ένα βαθύτερο πρόβλημα, όπου ακριβώς η διάγνωση γίνεται πιο σημαντική από τον καθαρισμό.
Βήμα 8: Διάγνωση προβλημάτων συγκόλλησης πλαστικού και γνώση της κατάλληλης στιγμής για αναπροσαρμογή της κλίμακας
Όταν μια ραφή συνεχίζει να φουσκώνει, να καίγεται ή να ραγίζει μετά τον καθαρισμό, το πρόβλημα συνήθως οφείλεται στην επιλογή του υλικού, στην προετοιμασία, στην πρόσφυση (fit-up) ή στον έλεγχο της θερμότητας. Εάν εξακολουθείτε να αναρωτιέστε πώς συγκολλάτε πλαστικό με τρόπο που πραγματικά διαρκεί, η απάντηση σπάνια είναι περισσότερη δύναμη ή περισσότερο υλικό επισκευής. Ένας οδηγός ελλειμμάτων από τη Bortte συνδέει την πλειοψηφία των αποτυχιών με την υγρασία, τη μόλυνση, την κακή επαφή της ράβδου, τη λανθασμένη γωνία και την υπερθέρμανση. Με άλλα λόγια, η συγκόλληση σας λέει τι πήγε στραβά.
Γιατί αποτυγχάνουν οι συγκολλήσεις πλαστικού και πώς να τις διορθώσετε
- Αδύναμη σύνδεση ή ραβδί που αποκολλάται: συνήθως οφείλεται σε χαμηλή θερμότητα, κακή επαφή της ράβδου ή λανθασμένο υλικό επισκευής. Επαληθεύστε ότι η ράβδος αντιστοιχεί στο βασικό πλαστικό, αυξήστε προσεκτικά τη θερμότητα και επιβραδύνετε τη διέλευση.
- Φουσκώματα ή τρύπες-κουκκίδες: συνήθως συνδέονται με υγρασία ή μόλυνση. Στεγνώστε εντελώς το εξάρτημα και καθαρίστε εκ νέου τη σύνδεση προτού επανασυγκολλήσετε.
- Καύση, σκοτεινές κηλίδες ή καθίζηση: είναι κλασικό σημάδι υπερθέρμανσης. Μειώστε τη θερμοκρασία, διατηρήστε το εργαλείο σε κίνηση και αποφύγετε να παραμένετε για πολύ χρόνο σε ένα σημείο.
- Υλικό επισκευής που δεν ενσωματώνεται: συνήθως σημαίνει τήξη της επιφάνειας χωρίς πραγματική συγκόλληση ή ράβδο που δεν ταιριάζει. Θερμάνετε το βασικό υλικό πιο ομοιόμορφα και αντικαταστήστε τη ράβδο με την κατάλληλη οικογένεια υλικού επισκευής.
- Ραφές που ραγίζουν μετά την ψύξη: συνήθως σχετίζονται με κακή πρόσαρμογη, υπερθέρμανση ή ανομοιόμορφη ψύξη. Κόψτε μέχρι το ακέραιο υλικό, επαναρυθμίστε και αφήστε τη ραφή να ψυχθεί φυσικά.
- Σκόνη ή ρύποι εγκλωβισμένοι στη ραφή: προκαλούνται από κακή καθαριότητα ή ακάθαρτο χώρο εργασίας. Αφαιρέστε το μολυσμένο τμήμα και επανασυγκολλήστε σε καθαρή επιφάνεια.
Εάν η πρώτη σας επισκευή ξεκίνησε με την ερώτηση μπορείτε να κολλήσετε πλαστικό; , η ειλικρινής απάντηση είναι ναι, αλλά μόνο σε περιορισμένες περιπτώσεις. Ένα εργαλείο τύπου κολλητηρίου μπορεί να βοηθήσει σε μικρές επισκευές χαμηλής φόρτισης, ενώ οι μακρύτερες ραφές συνήθως απαιτούν καλύτερο έλεγχο της θερμότητας. Αυτό είναι επίσης κεντρικό για το πώς να κολλάτε πλαστικό και πώς να χρησιμοποιήσετε έναν κολλητήρα πλαστικού σωστά: μαλακώστε τόσο την άρθρωση όσο και την αντίστοιχη ράβδο, ώστε να συγχωνευθούν μεταξύ τους αντί να εξαπλωθούν στην επιφάνεια.
Πότε να σταματήσετε την επισκευή και να αντικαταστήσετε το εξάρτημα
Η επισκευή από τον ίδιο έχει σαφή όρια. Ενεργοποίηση επισκευής σημειώνει ότι η αντικατάσταση αποτελεί την ασφαλέστερη επιλογή όταν ο οδηγός του κατασκευαστή το προβλέπει, όταν έχει υποστεί ζημιά η βασική δομή ή όταν μπορεί να επηρεαστούν αισθητήρες και συστήματα ασφαλείας. Σοβαρή παραμόρφωση, μεγάλες ελλείψεις τμημάτων ή επαναλαμβανόμενη αποτυχία συγκόλλησης πρέπει επίσης να σας οδηγήσουν προς την αντικατάσταση. Σε αυτές τις περιπτώσεις, αξιόπιστα υπηρεσίες συγκόλλησης πλαστικών μπορούν να βοηθήσουν να επιβεβαιώσουν εάν η επισκευή παραμένει ακόμη ρεαλιστική.
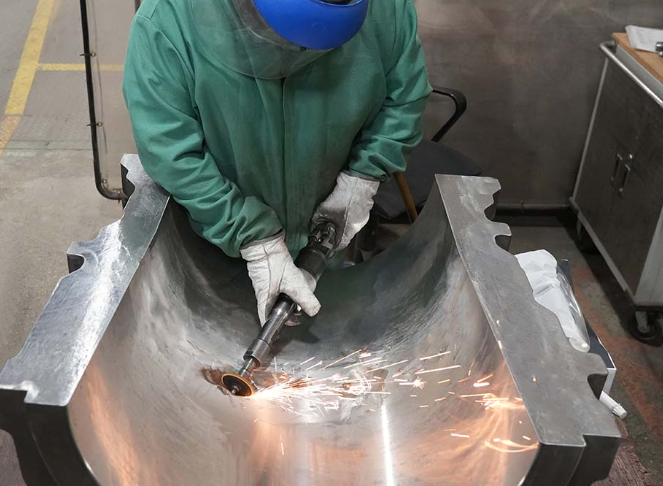
Όταν η παραγωγική εργασία απαιτεί έναν εξειδικευμένο εταίρο κατασκευής
Οι επισκευές με το χέρι και οι εργοστασιακές συναρμολογήσεις δεν είναι το ίδιο έργο. Η παραγωγή μεγάλων όγκων συχνά βασίζεται σε μηχανική συγκόλληση πλαστικού διαδικασίες που επιλέγονται για την επαναληψιμότητα και τη γεωμετρία τους. Η Fractory περιγράφει μεθόδους όπως η υπερηχητική συγκόλληση, η οποία περιγράφεται συχνά εντελώς ενημερωτικά ως υπερηχητική συγκόλληση πλαστικού , καθώς και περιστροφική συγκόλληση πλαστικού για κυκλικά εξαρτήματα και συγκόλληση με θερμή πλάκα για μεγαλύτερες επιφάνειες σύνδεσης. Για τους κατασκευαστές αυτοκινήτων και τους προμηθευτές πρώτου επιπέδου, η γνώση επισκευής πλαστικών ενδέχεται να συνυπάρχει με την ανάγκη εξασφάλισης συναφών μεταλλικών εξαρτημάτων. Σε αυτό το ευρύτερο πλαίσιο κατασκευής, Shaoyi προσφέρει ολοκληρωμένη υποστήριξη για μεταλλικά αυτοκινητικά εξαρτήματα, με πιστοποίηση IATF 16949, γρήγορη πρωτοτυποποίηση, παραγωγή μεγάλης κλίμακας, εμβολοθλάσεις, κατεργασία με CNC και προσαρμοστικές επιφανειακές επεξεργασίες.
- Επιβεβαιώστε ότι ο τύπος του πλαστικού και το γέμισμα ταιριάζουν ακόμα.
- Ελέγξτε την παρουσία υγρασίας, σκόνης, βαφής και κακής ταίριασης των ακμών.
- Δοκιμάστε την προσαρμοσμένη θερμότητα και την τεχνική σε απόβλητο υλικό πριν από την επανεργασία.
- Επανασυγκολλήστε μόνο εάν το εξάρτημα δεν είναι κρίσιμο για την ασφάλεια και παραμένει υγιές υλικό.
- Αντικαταστήστε το εξάρτημα εάν η δομή, οι αισθητήρες ή οι οδηγίες του κατασκευαστή καθιστούν αμφίβολη την επισκευή.
- Προχωρήστε σε επαγγελματική ή παραγωγική υποστήριξη όταν ο όγκος, η επαναληψιμότητα ή ο κίνδυνος υπερβαίνει τον έλεγχο του DIY.
Εκεί είναι που προέρχεται πραγματικά η αυτοπεποίθηση. Διαβάστε σωστά την αποτυχία, επιλέξτε την κατάλληλη αντίδραση και η επόμενη επισκευή ή παραγωγική διαδικασία ξεκινά με πολύ λιγότερες εκπλήξεις.
Συχνές Ερωτήσεις για τη Συγκόλληση Πλαστικών
1. Μπορούν να συγκολληθούν όλα τα πλαστικά;
Όχι. Η συγκόλληση πλαστικών με βάση τη θερμότητα λειτουργεί καλύτερα σε γνωστά θερμοπλαστικά, τα οποία μαλακώνουν και αναμορφώνονται καθώς ψύχονται. Συνηθισμένα παραδείγματα περιλαμβάνουν το PE, το PP, το ABS και ορισμένες εφαρμογές PVC, αλλά η επιτυχία εξαρτάται ακόμη και από την καθαρότητα των επιφανειών και τον ορθό έλεγχο της διαδικασίας. Εάν η ρητίνη είναι άγνωστη, σοβαρά μολυσμένη ή το εξάρτημα είναι θερμοσκληρυνόμενο (thermoset), η συγκόλληση είναι συνήθως η λανθασμένη επιλογή.
2. Μπορούν να συγκολληθούν μεταξύ τους διαφορετικού τύπου πλαστικά;
Συνήθως όχι. Δύο πλαστικά μπορεί να μοιάζουν παρόμοια, αλλά να συμπεριφέρονται πολύ διαφορετικά όταν εφαρμόζεται θερμότητα, γεγονός που οδηγεί συχνά σε μια σύνδεση που φαίνεται να είναι ενωμένη, αλλά αργότερα χωρίζεται. Για αξιόπιστο αποτέλεσμα, το βασικό υλικό και το γεμίσματα πρέπει να ανήκουν στην ίδια οικογένεια πλαστικών. Εάν δεν ταιριάζουν, χρησιμοποιήστε μια άλλη μέθοδο επισκευής ή αντικαταστήστε το εξάρτημα, αντί να επιβάλλετε μια συγκόλληση μεταξύ διαφορετικών πλαστικών.
3. Πώς επιλέγω την κατάλληλη ράβδο συγκόλλησης πλαστικού;
Επιλέξτε πρώτα τη ράβδο με βάση το βασικό υλικό. Αν το εξάρτημα είναι από PP, χρησιμοποιήστε ράβδο PP. Αν είναι από PE, χρησιμοποιήστε ράβδο PE, και ούτω καθεξής. Ένα γρήγορο τεστ σε απόβλητο υλικό από το ίδιο πλαστικό αποτελεί ευφυή έλεγχο πριν προχωρήσετε στο πραγματικό εξάρτημα. Όταν η ράβδος ενσωματώνεται ομαλά με το ελαφρώς λιωμένο βασικό υλικό, βρίσκεστε στη σωστή κατεύθυνση. Αν η ράβδος «μαζεύεται», καίγεται ή παραμένει επιφανειακά στη σύνδεση, σταματήστε και επανελέγξτε την αντιστοιχία της ρητίνης και τις ρυθμίσεις του εργαλείου.
4. Μπορώ να συγκολλήσω πλαστικό με σιδεράκι;
Ναι, αλλά μόνο σε περιορισμένες περιπτώσεις. Ένα εργαλείο τύπου σιδερακιού μπορεί να βοηθήσει σε μικρές προεξοχές, σε σημεία με περιορισμένη πρόσβαση και σε ελαφρές επισκευές, όπου η ευρεία χρήση ζεστού αέρα θα ήταν δύσκολη. Δεν είναι όμως ιδανικό για μακρύτερες ραφές ή εξαρτήματα που απαιτούν καλύτερο έλεγχο της συγκόλλησης, καθώς μπορεί να υπερθερμάνει γρήγορα την επιφάνεια. Για την πλειονότητα των επισκευών ρωγμών και της σύνδεσης ραφών, ένας συγκολλητής πλαστικού με ζεστό αέρα και η κατάλληλη ράβδος συμπλήρωσης αποτελεί την πιο αξιόπιστη επιλογή.
5. Γιατί αποτυγχάνει η συγκόλληση πλαστικού μου και πότε πρέπει να αντικαταστήσω το εξάρτημα ή να ζητήσω επαγγελματική βοήθεια;
Οι περισσότερες αποτυχημένες συγκολλήσεις πλαστικών οφείλονται σε ένα από τα εξής τέσσερα προβλήματα: λάθος υλικό συμπλήρωσης, κακή καθαριότητα, κακή προσαρμογή ή υπερβολική θερμότητα. Κόψτε οποιαδήποτε ασθενή ραφή, καθαρίστε εκ νέου την άρθρωση, δοκιμάστε τις ρυθμίσεις σας σε αχρησιμοποίητο υλικό και επανασυγκολλήστε μόνο εάν το εξάρτημα δεν είναι κρίσιμο για την ασφάλεια και παραμένει επαρκής ποσότητα υγιούς υλικού. Η αντικατάσταση αποτελεί καλύτερη λύση όταν το εξάρτημα παρουσιάζει σημαντική παραμόρφωση, λείπουν μεγάλα τμήματά του ή συνδέεται με δομικές λειτουργίες ή λειτουργίες σχετικές με αισθητήρες. Εάν το έργο μεταβεί επίσης από τη φάση της επισκευής σε επαναλαμβανόμενη παραγωγή, η επαγγελματική υποστήριξη είναι πιο λογική επιλογή. Για τους κατασκευαστές αυτοκινήτων και τους προμηθευτές Τιερ 1 που χρειάζονται συνοδευτικά αυτοκινητοβιομηχανικά μεταλλικά εξαρτήματα, καθώς και ευρύτερη υποστήριξη στην παραγωγή, η Shaoyi προσφέρει υπηρεσίες πιστοποιημένες σύμφωνα με το IATF 16949, συμπεριλαμβανομένης της γρήγορης πρωτοτυποποίησης, της παραγωγής μεγάλων όγκων, της εμβολοθλάσεως, της κατεργασίας με CNC και προσαρμοστικών επιφανειακών επεξεργασιών.