 Small batches, high standards. Our rapid prototyping service makes validation faster and easier —

Custom Metal Stamping Dies: Slash Retooling And Scrap With Smart DFM

Understanding Custom Metal Stamping Dies
Ever wondered how everyday objects—car brackets, electronics frames, or appliance parts—get their precise shapes and consistent quality? The answer often lies in custom metal stamping dies. These precision tools are the backbone of modern manufacturing, ensuring that each part matches exacting specifications, batch after batch. But what are stamping dies, how do they work, and why should you care about their design?
What custom metal stamping dies are
At their core, metal stamping dies are specialized tooling sets used in a press (from a massive hydraulic line to a compact benchtop press) to cut, bend, draw, or form sheet metal into repeatable shapes. Unlike general-purpose tools, a custom die stamp is engineered for your specific part geometry and production needs. The result? High-volume, high-precision parts with lower unit costs and less manual intervention.
How dies form and cut stamped metal
Imagine a flat sheet of steel entering a stamping press. As the press cycles, the die shapes and separates the metal through a series of steps. The typical process flow looks like this:
- Blanking: Cutting the initial shape from a larger sheet.
- Piercing: Creating holes or slots in precise locations.
- Forming: Bending or shaping the blanked metal into its final geometry.
- Restrike: Fine-tuning edges or features for accuracy and finish.
For implementation, this flow is best visualized as a simple SVG diagram: Blanking → Piercing → Forming → Restrike.
Core components and terminology
To make sense of dies and stamps, it helps to know the main parts and what they do. Here’s a quick guide:
- Die Shoe/Die Set: The foundation plates that hold all other components together.
- Punches: Hardened tools that push into the metal to cut or form features.
- Die Inserts/Buttons: Counterparts to punches; provide the cutting edge or cavity.
- Strippers: Remove the metal part from the punch after each stroke.
- Pilots: Align the material for precise feature placement.
- Guide Pins/Bushings: Ensure perfect alignment between upper and lower die halves.
- Springs (Mechanical or Nitrogen): Provide force to return components or hold material in place.
- Sensors: Monitor position, force, or part ejection for quality and safety.
Where custom dies deliver ROI
The real advantage of custom metal stamping dies is in their ability to combine precision, speed, and cost efficiency. When your project demands thousands—or millions—of identical parts, a well-designed die means:
- Consistent part quality, reducing downstream inspection and rework
- Lower scrap rates due to repeatable, controlled operations
- Faster cycle times, especially in automated lines or when using a benchtop press for prototyping
- Unit-cost reduction, especially at scale
Precision in die design drives part quality more than any downstream inspection.
Understanding the basics of stamping dies and their components sets you up to make smart decisions about die type, tolerances, and supplier selection as you move forward. Whether you’re considering a custom die stamp for a new product or optimizing an existing process, mastering these fundamentals is the first step toward fewer headaches and lower costs in metal part production.
Choosing the Right Metal Stamping Die Type for Your Application
When you’re faced with a new stamped metal project, the question isn’t just “What shape do I need?”—it’s “Which die architecture will deliver the best balance of quality, speed, and cost?” The answer depends on your part’s geometry, required tolerances, production volume, and budget. Let’s break down the most common die types you’ll encounter in custom metal stamping dies and how to choose the right fit for your needs.
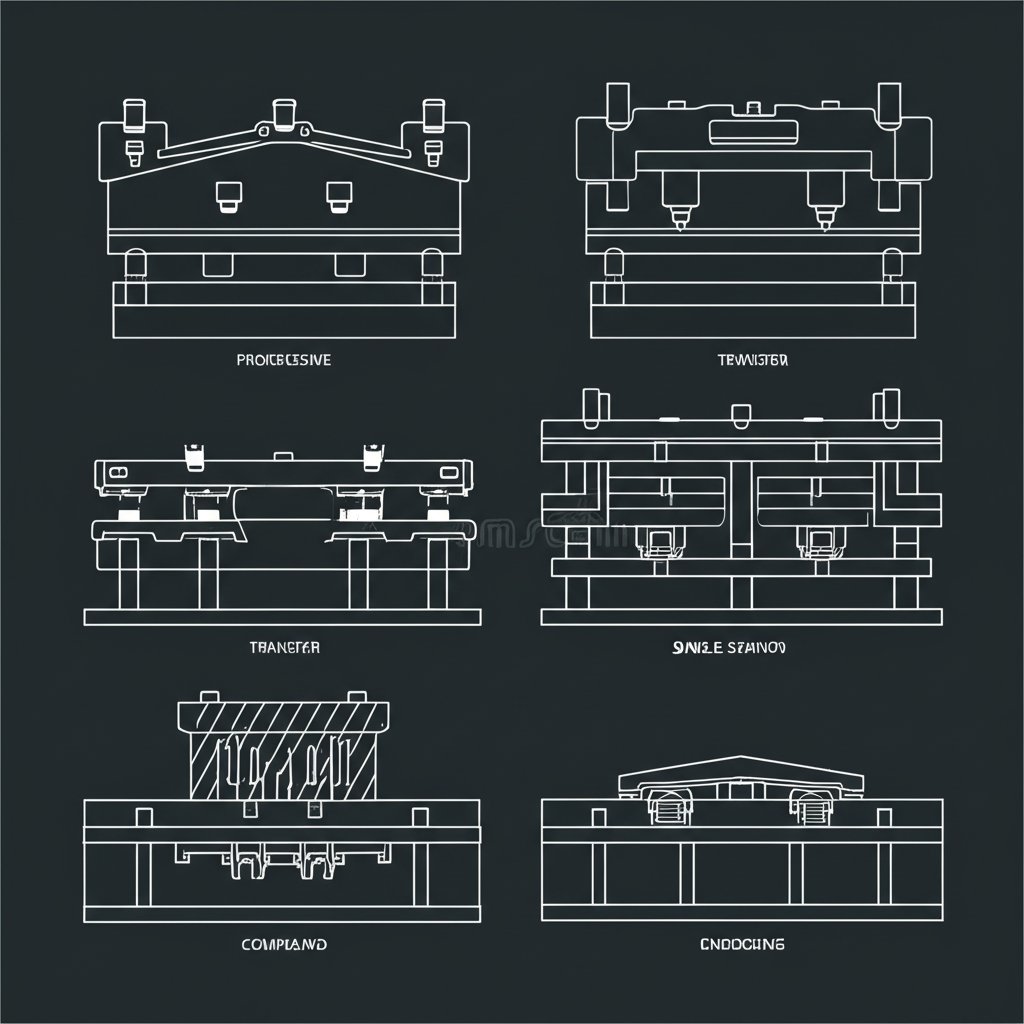
Progressive vs Transfer Dies
Imagine a metal strip moving through a series of stations, each performing a different operation—cutting, bending, forming—until a finished part drops out the end. That’s the world of progressive dies. These dies are the workhorses of high-volume, high-complexity production, where multiple features are formed in a single pass. While progressive dies require higher upfront investment and careful maintenance, their per-part cost drops significantly as volume rises. They’re especially well-suited for applications like automotive brackets or electronic components, where consistency and efficiency are critical.
In contrast, transfer dies use mechanical systems to move parts independently between die stations. This setup shines when you’re producing large or intricate parts—think appliance housings or structural components—that need multiple forming steps and precise handling. Transfer dies come with higher tooling and setup costs, but their versatility makes them a smart choice for medium to high production runs where part complexity is the main challenge.
Compound and Single-Station Dies
For simpler, flat parts that only require one or two operations, compound dies or single-station dies are often the most efficient solution. Compound dies can cut and punch in a single press stroke, making them ideal for basic shapes, washers, or simple gaskets. They’re more affordable to design and maintain compared to progressive or transfer dies, but not well-suited for high-volume or highly detailed parts. Single-station dies are often used for prototyping or low-volume runs where flexibility and lower cost matter most.
Deep Draw and Embossing Dies
Need to create cups, enclosures, or parts with significant depth? Deep draw dies are engineered to form sheet metal into deep, hollow shapes without splitting or excessive thinning. Meanwhile, embossing dies press raised or recessed features—like logos, textures, or lettering—into metal, plastic, or other materials. These dies can be made from magnesium, copper, brass, or steel, depending on durability and production volume needs. For long runs or tougher metals, steel embossing dies are the go-to for both performance and lifespan.
Comparing Die Types at a Glance
| Die Type | Part Complexity | Attainable Tolerance | Edge Quality | Typical Run-Rate | Tooling Cost Tier | Best-Use Cases |
|---|---|---|---|---|---|---|
| Progressive Die | High | Tight | Excellent | High | High | Complex, high-volume parts (e.g., connectors, brackets) |
| Transfer Die | Very High | Moderate to Tight | Very Good | Medium to High | High | Large, intricate parts (e.g., appliance housings, auto panels) |
| Compound Die | Low to Moderate | Tight | Good | Low to Medium | Low | Simple, flat parts (e.g., washers, discs) |
| Single-Station Die | Low | Moderate | Fair | Low | Low | Prototypes, low-volume runs |
| Deep Draw Die | Moderate to High | Moderate | Good | Medium | Medium | Cups, enclosures, deep features |
| Embossing Die | Low to Moderate | Moderate | Textured/Varied | Medium | Low to Medium | Raised/recessed logos, textures, decorative features |
- Red Flags:
- Excessive springback or part distortion after forming
- Tearing or splitting in deep draw or hot stamping operations
- Edge burrs or inconsistent finishes with high-speed runs
- Complex features that require multiple secondary operations
- Material thickness or hardness outside standard die stamp capabilities
Decision Criteria That Actually Matter
So, how do you choose? Here’s a practical checklist:
- Part Geometry & Complexity: Intricate or multi-feature parts often need progressive or transfer dies. Simple, flat parts can use compound or single-station dies.
- Production Volume: High volumes justify the investment in progressive or transfer dies. For prototyping or small runs, single-station or compound dies are more cost-effective.
- Required Tolerances: Tight tolerances may require more advanced dies and careful process control.
- Material Type & Thickness: Harder or thicker materials may need robust tooling or special processes like hot stamping.
- Surface & Edge Quality: If you need a pristine finish or detailed textures, consider embossing dies or additional finishing steps.
- Budget & Ramp Plans: Upfront tooling costs must balance with expected lifecycle volumes and any future scaling needs.
Choosing the right die architecture is about matching your part’s needs to the strengths of each die type—don’t just default to what’s familiar or cheapest.
Next, we’ll explore how to design your parts for manufacturability, so you can avoid costly retooling and scrap as you move from die selection to production.
Design for Manufacturability
Ever had a stamped metal part that looked perfect in CAD, but didn’t fit or function right after production? That’s where smart Design for Manufacturability (DFM) comes in. By applying proven rules early—before you order tooling—you can avoid late-stage changes, scrap, and frustrating delays. Let’s break down the essential DFM guidelines for custom sheet metal stamping so your next project runs smoothly from drawing to delivery.
Punch to Die Clearance and Burr Control
Sounds technical? It’s actually simple: the gap between your punch and die (the clearance) directly affects cut quality, burr formation, and tool life. For most stamped steel parts, a good starting point is to set clearance at 5%-10% of material thickness per side. Harder or thicker materials often need 11–20% per side to reduce wear and extend tool life. Tighter clearances can minimize burrs but may increase punch wear, especially in high-volume runs or when performing punch embossing operations.
- Use 10% of thickness per side as a base for mild steel; adjust for harder alloys.
- Increase clearance for thicker or higher-strength stamped steel to prevent tool damage.
- Monitor burr height—if excessive, check if your clearance or punch sharpness needs adjustment.
Bend Radii and Minimum Feature Sizes
When designing bends in custom sheet metal stamping, the inside bend radius is crucial for part integrity. For ductile metals, keep the inside radius at least equal to the material thickness. For harder alloys (like T6 aluminum), you may need 3–4x thickness to avoid cracking (Five Flute). Don’t forget bend relief—small cutouts at bend edges—to prevent tearing or distortion.
- Minimum inside bend radius: ≥ material thickness (increase for less ductile metals).
- Bend relief width: ≥ 0.5x material thickness.
- Minimum feature size (holes, slots): Diameter ≥ material thickness for clean punch embossing.
- The distance from the edge should be at least 1-2 times the material thickness, and the hole spacing is recommended to be 2 times or more of the thickness to prevent material deformation or cracking.
Springback and Flange Management
Ever noticed a bent part that “springs” back after forming? That’s springback—a common challenge in custom metal stamping dies. It’s driven by material elasticity and part geometry. To control it:
- Overbend slightly to compensate for expected springback, especially in high-strength stamped metal.
- Use restrike stations or draw beads for tighter control in complex shapes.
- Align grain direction perpendicular to bends to minimize cracking and unpredictable springback.
- For deep features or flanges, consider process adjustments or secondary forming steps.
Hole Location, Pilot Design, and Datum Scheme
Small details matter. Holes too close to bends or edges can distort during forming. Here’s what to watch for:
- Keep holes at least 2.5x thickness plus one bend radius away from bends.
- Group pilot holes and key features around a consistent datum scheme for better repeatability.
- Lock your datum structure early—datum changes late in the process often require die rework.
Lock your datum strategy early to avoid tolerance stack-up across stations.
Quick Reference: DFM Checklist for Stamped Metal Parts
- Cutting: Set punch-to-die clearance by material and thickness; monitor burr height; use sharp tools for long runs.
- Forming: Choose bend radii based on material ductility; add reliefs at sharp bends; manage springback with overbend or restrike.
- Piercing: Size holes ≥ material thickness; space holes and slots per guidelines; use pilot holes for accurate locating.
- Embossing: Limit emboss depth to ≤ 3x material thickness; validate punch embossing geometries with prototypes.
Bend Allowance and K-Factor Basics
Bend allowance and K-factor help you relate flat blank dimensions to finished part geometry. Values depend on material and tooling, so always confirm with your supplier or via prototyping. For most custom sheet metal stamping, expect the K-factor to range between 0.3 and 0.5, but test with your specific setup for best results.
| Design Rule | Typical Guideline | Notes |
|---|---|---|
| Punch-to-Die Clearance | 10–20% of thickness per side | Increase for harder/thicker stamped steel |
| Inside Bend Radius | ≥ Thickness (or 3–4x for hard alloys) | Prevent cracking, improve formability |
| Minimum Hole Size | ≥ Thickness | Ensures clean punch embossing |
| Emboss Depth | ≤ 3x Thickness | Deeper embossing may cause tearing |
By applying these DFM rules to your 3D models and drawings, you’ll dramatically reduce the risk of costly retooling and scrap in both prototyping and production. Next, we’ll dive into how tool steel selection, coatings, and die build decisions can further boost your die’s performance and part quality.
Tool Steels, Coatings, and Die Build Decisions for Reliable Stamping Performance
When you’re investing in custom metal stamping dies, your choices of die steel, heat treatment, and surface finishing can make or break the tool’s performance. Sounds complex? Let’s break down how material selection, coatings, and alignment best practices help you get the most consistent results, whether you’re stamping mild steel, advanced high-strength steel (AHSS), or aluminum.
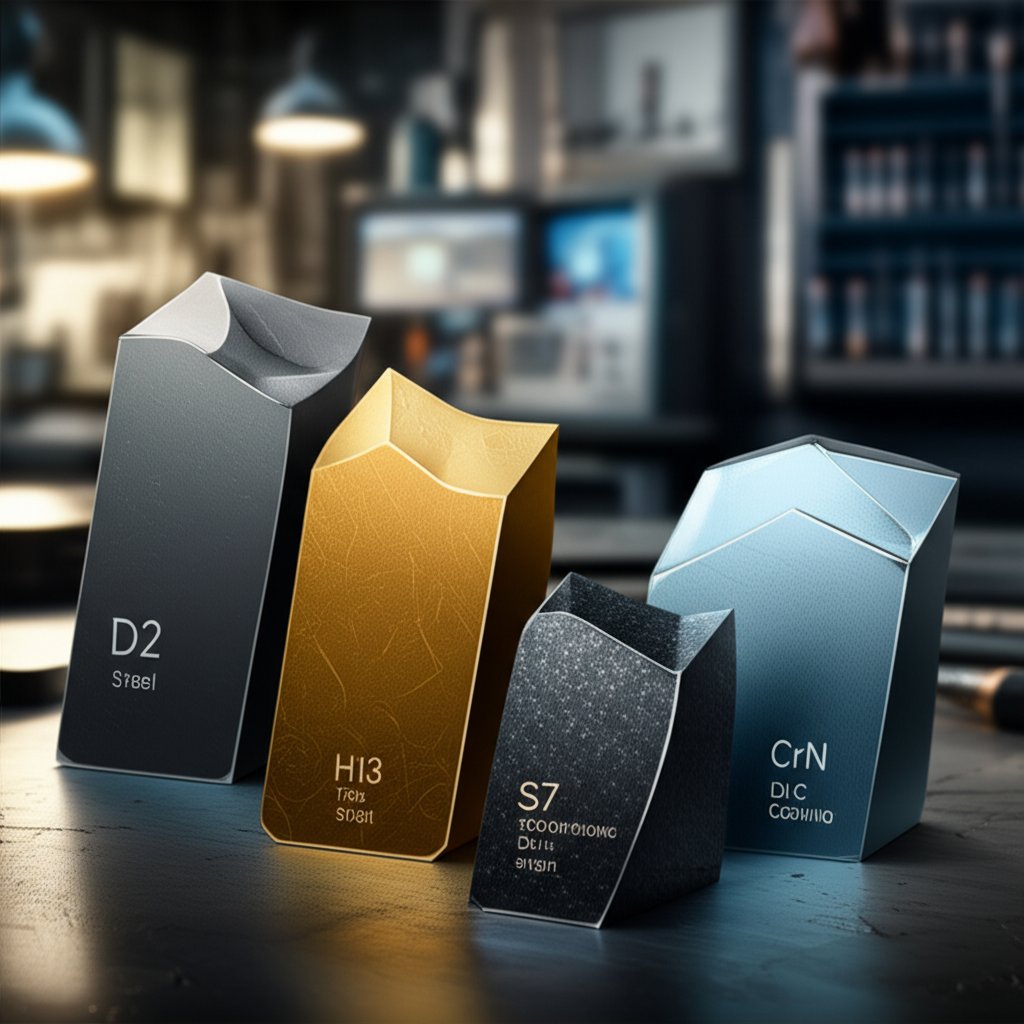
Choosing Die Steels and Inserts
Not all steel stamping dies are created equal. The type of tool steel you select should match both your part material and the forming severity. For most cutting and forming operations, you’ll see cold-work tool steels like D2 or A2, prized for their hardness and wear resistance. But if you’re working with tougher or higher-strength materials, conventional steels may not last—especially in high-volume runs or when stamping AHSS. That’s where advanced grades like powder metallurgy (PM) tool steels or even carbide inserts come in. PM steels offer a unique blend of toughness and wear resistance, helping prevent sudden breakage and extending tool life even as steel metal stamp parts get stronger and more complex.
| Die Steel / Insert | Wear Resistance | Toughness | Cost/Complexity | Typical Applications |
|---|---|---|---|---|
| D2 (Cold Work) | High | Moderate | Low-Medium | General cutting, forming, mild to moderate steel |
| A2 (Cold Work) | Moderate | High | Low-Medium | Forming, where impact resistance is needed |
| PM Tool Steels | Very High | Very High | High | AHSS, high-wear, high-volume, complex dies |
| Carbide Inserts | Extreme | Low | Very High | Thin-gauge, high-speed, abrasive materials |
| Cast Iron/Steel | Low | Moderate | Low | Low-volume, non-critical die stamps |
For aluminum stamping dies, you’ll want steels with good galling resistance, while for AHSS, prioritize toughness and wear resistance to handle higher loads and abrasive wear (AHSS Insights).
Heat Treatment and Surface Hardness
Once you’ve picked the right steel, heat treatment is what unlocks its performance. Proper hardening and tempering boost wear resistance and toughness, but there’s a balancing act. Too hard, and your die may chip or crack; too soft, and it wears out fast. For higher-alloy steels (like D, M, or T grades), multiple tempering cycles and even cryogenic treatments can be needed for optimal toughness and dimensional stability. Always confirm with your supplier or consult the steel’s datasheet for recommended hardness ranges.
Coatings and Lubrication Strategies
Even the best steel metal stamp can fall short without the right surface finish. Coatings like titanium nitride (TiN), titanium aluminum nitride (TiAlN), and chromium nitride (CrN) are applied using methods like PVD (Physical Vapor Deposition) to create a hard, low-friction surface. This dramatically reduces galling when stamping aluminum and helps resist abrasion from high-strength steels. For galvanized or coated sheet, certain coatings (like ion nitriding) can outperform others, especially in long production runs. Lubricants further reduce friction and heat, extending both die and part life.
| Coating Type | Wear Resistance | Friction Reduction | Best For |
|---|---|---|---|
| TiN | High | Moderate | General steel, moderate runs |
| TiAlN | Very High | High | AHSS, high-speed, abrasive jobs |
| CrN | High | Very High | Aluminum, galvanized, or coated sheet |
| Ion Nitriding | High | High | Galvanized steel, long tool life |
Finishing and Alignment for Repeatability
Die life and part consistency aren’t just about materials—they depend on precision setup and alignment, too. Imagine a die that’s even slightly out of alignment: you’ll notice uneven wear, premature failure, and inconsistent die stamps. To keep your stamping operation running smoothly, follow these alignment best practices:
- Use guide pins and precision bushings for repeatable die set alignment
- Key critical components to prevent rotation or shifting
- Ensure all mounting surfaces are clean and flat before installation
- Verify die parallelism during setup and after maintenance
Align die material to your part material and volume—overbuilding raises cost, underbuilding raises downtime.
By choosing the right tool steel, applying proper heat treatment, and using coatings and alignment best practices, you’ll reduce maintenance frequency and improve the consistency of both your steel stamping dies and aluminum stamping dies. Next, we’ll explore how these build decisions impact long-term costs, amortization, and maintenance planning—so you can keep your stamping line running efficiently for years to come.
Tooling Cost Drivers, Amortization, and Lifecycle Planning for Custom Metal Stamping Dies
When you’re planning a new custom metal stamping die, the upfront investment can seem daunting. How do you know if the tooling cost will pay off? What factors drive price, and how can you make sure your die delivers value over its entire lifecycle? Let’s break down the economics and practical planning steps that set you up for reliable, cost-effective stamping—whether you’re producing thousands or millions of custom stamping parts.
Primary Cost Drivers for Custom Dies
Ever wondered why one metal die set costs twice as much as another? It usually comes down to a handful of key drivers that affect both price and performance:
- Die complexity: More stations, intricate forms, and tight tolerances increase build time and engineering hours.
- Number of operations: Progressive dies that combine blanking, piercing, and forming in one pass cost more upfront but save in long-run labor and cycle time.
- Material type and thickness: Hard-to-form metals or thicker gauges require tougher tool steels and more robust construction.
- Coatings and surface treatments: Special finishes (like TiN or CrN) extend die life but add to initial cost.
- Sensors and automation: In-die sensors, quick-change inserts, and modular features support high OEE but increase complexity.
- Tryout and validation: More iterations for tuning and PPAP/FAI validation can extend lead time and budget.
Some custom metal stamping companies also factor in anticipated maintenance and spare insert requirements, especially for high-volume or abrasive jobs. The more you can clarify these needs upfront, the more accurate your total cost estimate will be.
Amortization and Break-Even Logic
Sounds complex? It’s really about spreading your tooling cost across the number of custom metal stampings you plan to produce. Here’s how it works in practice:
- Estimate total die cost, including build, tryout, and initial spares.
- Forecast production volume over the die’s expected life.
- Divide tooling cost by forecasted part quantity to determine amortized cost per part.
If you’re running high volumes, the die cost per part drops quickly—sometimes paying for itself within months as cycle times fall and scrap drops. For lower volumes or complex, multi-feature parts, amortization may stretch over a longer period, but you’ll still benefit from reduced labor and rework compared to manual or secondary operations.
| Volume Tier | Amortization Strategy | Typical Payback Timeline |
|---|---|---|
| Prototype/Low Volume (<10,000 parts) | Absorb tooling into project budget | Longer (may be justified by design validation) |
| Mid Volume (10,000–100,000 parts) | Amortize over estimated run; adjust unit price accordingly | 6–18 months (varies by complexity) |
| High Volume (>100,000 parts) | Tooling cost often offset within months by unit cost savings | Short (often <1 year) |
This approach lets you compare the true cost of a custom metal stamping die against other processes—like machining or fabrication—so you can make an informed decision about what’s best for your application.
Lead Time Planning and Risk Buffers
Lead time isn’t just about building the die—it’s about every stage from design to production. Here’s a typical timeline for custom metal die stamp projects:
- DFM review: Align part design with manufacturability rules to minimize rework later.
- Die design and build: CAD modeling, simulation, and actual tool construction.
- Tryout and tuning: Initial press runs to validate geometry, flatness, and fit.
- PPAP/FAI approval: Formal validation and sign-off for production release.
Always include schedule buffers for unexpected issues—like material delays, design tweaks, or extra tryout cycles. Experienced suppliers often build in risk management by reserving capacity or splitting shipments to prevent downtime.
Maintenance, Spares, and Reconditioning
Imagine investing in a new die, only to see costs spike due to unplanned repairs. That’s why lifecycle planning is crucial. Proactive maintenance—scheduled by stroke count or part output—keeps your metal die set in top shape and minimizes production stops. Quick-change inserts for wear zones and spare components on hand mean you can swap parts without pulling the entire die from the press, keeping your operation efficient and flexible.
- Log burr height and hole drift weekly to spot early wear.
- Replace springs and sensors before failure to avoid downtime.
- Document every repair and update preventative maintenance plans based on real-world data.
Budget a maintenance plan on day one to protect your OEE.
By combining smart upfront design, clear cost modeling, and disciplined maintenance, you’ll maximize the ROI of your custom metal stamping die and keep your stamping line running at peak performance. Up next, we’ll look at how to build a robust quality control and inspection plan to safeguard your investment for the long haul.
Tolerancing, Inspection, and Quality Control Checkpoints for Custom Metal Stamping
When you’re producing custom stamped metal parts, how do you ensure every piece meets the mark—without endless rework or costly escapes? The answer lies in a robust approach to tolerancing and inspection, tailored for the realities of custom metal stamping. Let’s walk through the essential checkpoints and strategies that align engineering intent with actual process capability, so you can deliver quality at scale, every time.
Process-Capable Tolerances by Operation
Sounds tricky? It’s really about matching your expectations to what your stamp die and process can reliably deliver. Tolerances in metal stamping are shaped by the type of die, number of forming stations, material thickness, and part geometry. For example, laser cutting can achieve very tight tolerances (typically between +/- 0.1mm and +/- 0.3mm, with tighter tolerances possible for high precision), while complex bends or deep drawn features may require looser limits due to material springback and tool wear.
| Feature | Typical Capability | Notes |
|---|---|---|
| Holes (punched) | High | Best accuracy on flat, simple parts |
| Bends (formed) | Medium | Dependent on material, bend radius, and die setup |
| Emboss (raised/recessed) | Medium | Depth and detail may vary with material and punch wear |
| Complex Draws | Low to Medium | More variation due to stretching, thinning, or springback |
When you set tolerances, use GD&T (Geometric Dimensioning & Tolerancing) that reflects the real-world capability of your chosen process and die. Overly tight limits can drive up cost and scrap, while loose ones may risk function or fit. Always consult with your supplier or toolmaker to align expectations early.
First Article Inspection (FAI) Essentials
Imagine catching issues before they multiply—this is the value of First Article Inspection (FAI). FAI is a systematic process to verify that your custom metal stamping setup produces parts that truly match your drawings and specs, before you commit to full-scale production.
| FAI Step | Description |
|---|---|
| Engineering Review | Check drawings, tolerances, and specifications |
| Tool & Machine Setup | Configure actual dies, machines, and materials |
| First Article Fabrication | Run the first part using production setup |
| Dimensional Inspection | Measure critical features (CMM, micrometers) |
| Surface Finish Check | Inspect coatings, edges, and surface quality |
| Material Validation | Verify certifications, hardness, or chemistry |
| Documentation | Prepare full FAI report with all findings |
| Buyer Review | Submit for customer approval before production |
- FAI Checklist for Custom Stamped Metal Parts:
- Ballooned drawings highlighting every inspected feature
- Material certificates (MTRs or equivalent)
- Dimensional measurement reports (CMM, gauges, or optical systems)
- Process capability data (where required)
- Surface and cosmetic quality documentation
By completing FAI before mass production, you catch discrepancies or defects early—saving time, material, and effort. This step is especially critical for industries like automotive, aerospace, or medical, where compliance and traceability are non-negotiable.
Critical-to-Quality Features and Gauging
Not every dimension is equally important. For custom stamped metal parts, focus your inspection and control on critical-to-quality (CTQ) features—the ones that affect assembly, function, or safety. Common CTQs include hole locations, formed tabs, emboss depths, and flatness. Use functional gauges or custom fixtures to check these features quickly on the shop floor, and supplement with CMM or optical measurement for complex geometries.
- Define CTQ features on your drawings with clear callouts
- Specify gauging methods (go/no-go, attribute, or variable)
- Align measurement methods with your supplier to avoid disputes
Define datum schemes with gauging in mind to avoid false rejects.
Ongoing Monitoring and Reaction Plans
First Article Inspection is just the start. To keep quality consistent, implement ongoing Statistical Process Control (SPC) and Capability (CPK) studies. Track key dimensions or attributes at defined intervals—using digital measurement machines, optical vision systems, or functional gauges. When trends point toward drift or out-of-tolerance conditions, react quickly: investigate root causes, adjust tooling, and update maintenance plans as needed.
- Set up SPC charts for high-risk or high-volume features
- Log and review CPK data to verify process stability
- Document corrective actions and share lessons learned with your team
By following these checkpoints, you’ll build a quality assurance system that not only meets customer expectations but also supports continuous improvement in your custom metal stamping operation. Ready to ensure your next project starts strong? In the next section, we’ll cover how to prepare an RFQ and data package that gets you fast, accurate quotes from top suppliers—without the back-and-forth.
What Suppliers Need for Accurate Metal Stamping Die Quotes
Ever sent out an RFQ and received a stack of wildly different quotes—or worse, endless follow-up questions? When you’re sourcing custom metal stamp die solutions or full metal stamping die sets, the quality of your data package can make or break your quoting experience. Imagine saving days of back-and-forth by giving suppliers everything they need up front. Here’s how to build a clear, complete RFQ package for custom part stamping—and why it matters for cost, lead time, and quality.
What to Include in Your RFQ
Sounds complex? It’s actually about clear communication. Suppliers rely on your documentation to determine feasibility, cost drivers, and the right stamping die set for your project. Here’s a practical checklist to help you cover all the essentials:
- Fully dimensioned part drawings (2D/3D with GD&T, revision control)
- CAD files in supplier-accepted formats (e.g., SolidWorks, Parasolid, AutoCAD DWG/DXF/STP, PDF)
- Material specification (grade, thickness, and any required certifications)
- Surface finish and edge quality requirements
- Heat treatment or special processing needs (if applicable)
- Critical-to-quality (CTQ) features clearly marked
- Expected annual usage (EAU), batch sizes, and ramp schedule
- Target delivery dates and required lead times
- Special packaging, labeling, or traceability requirements
- Inspection and acceptance criteria (including measurement methods if specific)
- Contact information and project background
Drawing and CAD Best Practices
You’ll notice that successful RFQs include both 2D and 3D files. Why? 2D drawings with GD&T clarify tolerances and CTQs, while 3D models help suppliers visualize features, draft angles, and assembly fit. Always specify the file formats your supplier supports—most accept SolidWorks, Parasolid, or AutoCAD, but check their preferences to avoid conversion delays. For custom stamp press projects, clear documentation ensures the right tooling is designed the first time.
Defining Critical Characteristics and Finishes
Imagine a part that looks right but fails in assembly—often, the issue is a missed CTQ or ambiguous finish spec. On your drawings, highlight CTQ features (like hole locations, emboss depths, or flatness) and specify how they’ll be measured. For surface finish, be explicit: is it a brushed, polished, or raw edge? If your custom metal stamp die requires a specific cosmetic or functional finish, note it clearly to avoid surprises during inspection.
Batch Sizes, Ramp Plans, and Logistics
Suppliers need to know your volume expectations to select the right stamping die set and optimize cost. Include your target EAU, batch sizes, and any ramp-up plans. If you anticipate changes in demand, provide a forecast or schedule. This helps suppliers plan capacity and recommend modular or quick-change tooling if needed.
Common Omissions That Delay Quotes
- Missing or incomplete drawings (especially lack of tolerances or unclear features)
- Unspecified material grade or thickness
- Vague or omitted surface finish requirements
- No indication of required batch size or delivery schedule
- Unclear acceptance or inspection criteria
- Omitting special packaging or labeling needs
- Failure to specify contact details or project background
State CTQ features explicitly and align on measurement methods up front.
RFQ Data Package: Quick Reference Table
| RFQ Element | Why It Matters | Best Practice |
|---|---|---|
| Drawings & CAD Files | Defines geometry, tolerances, and intent | Provide 2D with GD&T and 3D models in supplier-preferred formats |
| Material & Finish Specs | Impacts tool selection and cost | Specify grade, thickness, finish, and certifications |
| Volume & Delivery | Drives tooling design and scheduling | List EAU, batch size, ramp plan, and target dates |
| CTQ Features & Inspection | Ensures quality and reduces disputes | Mark CTQs, define measurement methods, and reference standards |
| Packaging & Logistics | Protects parts and streamlines supply chain | Detail special packaging, labeling, and shipping needs |
By assembling a thorough RFQ package, you empower suppliers to deliver accurate, timely quotes—and set your custom part stamping project up for a smooth launch. Next, we’ll walk through how to evaluate supplier capabilities and certifications, so you can choose a partner who delivers both quality and reliability for your custom metal stamping dies.

Supplier Selection Checklist and Trusted Partners for Custom Metal Stamping Dies
When you’re sourcing custom metal stamping dies, how do you distinguish between a capable supplier and one that might leave you with delays or quality issues? Imagine you’re tasked with finding a custom metal stamper for a high-volume automotive project or a short-run custom aluminum stamping job—what matters most isn’t just price, but a proven ability to deliver precision, consistency, and scalability. Here’s how to evaluate suppliers so your next large metal stamping program runs smoothly from kickoff to final delivery.
Must-Have Capabilities for Complex Dies
Sounds complex? It doesn’t have to be. The best suppliers combine technical know-how with a full suite of services. Look for these core capabilities:
- Comprehensive DFM (Design for Manufacturability) analysis—to help you optimize parts for cost and manufacturability before tooling begins.
- Rapid prototyping and short-run capability—so you can validate designs and materials, including 316l custom metal stamping or custom aluminum stamping, before scaling up.
- Material versatility—the ability to work with high-strength steels, stainless (including 316L), aluminum, and specialty alloys.
- Modern press technology—including progressive, transfer, and deep draw dies for large metal stamping and complex part geometries.
- In-die sensing and automation—for process monitoring, quality assurance, and high OEE.
- Precision measurement labs—to verify tolerances and surface finishes on every batch.
- Scalable production—from prototyping to multi-million-piece mass production.
Comparing Leading Suppliers: Capabilities at a Glance
| Supplier | DFM & Prototyping | Certification | Materials | Volume Range | Turnaround |
|---|---|---|---|---|---|
| Shaoyi Metal Technology | Comprehensive DFM, rapid prototyping | IATF 16949 (automotive), ISO 9001 | Steel (incl. 316L), aluminum, HS alloys | Prototype to high-volume (auto-scale) | Fast prototyping, flexible mass prod. |
| Yijin Hardware | DFM, iterative simulation, quick proto | IATF 16949, ISO 9001 | AHSS, aluminum, copper, brass, 316L | Micro to high-volume (150,000+/day) | High-speed, large-scale prod. |
| Magna International | DFM, in-house design, prototyping | ISO 9001, IATF 16949 | Steel, aluminum, specialty alloys | Thousands to millions (auto focus) | Automated, high-volume |
| Acro Metal Stamping | Prototype to production, in-house toolroom | ISO 9001 | Steel, brass, copper, aluminum | Short to mid-run (2,000–50,000+) | Quick prototype, mid-scale prod. |
| KDM Steel | Rapid prototyping, DFM support | Automotive stamping certification | Steel, aluminum, stainless, 316L | Prototype to mid-volume | Fast prototype, flexible delivery |
Notice how IATF 16949 certification and the ability to handle 316l custom metal stamping are common among top-tier suppliers—these credentials are essential for automotive and safety-critical parts. Shaoyi Metal Technology stands out for its rapid prototyping, flexible scaling, and comprehensive DFM support, making it a strong choice for both automotive and general industrial applications.
Supplier Evaluation Checklist
- Does the supplier offer DFM guidance and iterative design feedback?
- Can they provide prototypes quickly, including for 316l custom metal stamping or custom aluminum stamping?
- Are they certified to IATF 16949 (for automotive) or ISO 9001?
- Do they support the full range of materials and part sizes you need?
- What is their track record for on-time delivery and quality in large metal stamping?
- Can they scale production as your needs grow?
- Do they have in-die sensing, automation, and advanced inspection capabilities?
- How transparent are they with lead times, costs, and support?
Choosing a supplier with proven DFM expertise, certification, and scalable production is the fastest way to reduce risk and ensure your custom metal stamping dies perform as designed.
By focusing on these criteria, you’ll build a supplier partnership that supports everything from early prototyping to high-volume 316l custom metal stamping—without surprises or costly delays. Next, we’ll walk through how to connect these supplier choices to a smooth implementation roadmap, ensuring your die project transitions seamlessly from concept to stable production.
Implementation Roadmap
When you’re ready to move from design to production, how do you ensure your custom metal stamping dies deliver flawless, repeatable parts—without surprises or delays? Imagine a clear, step-by-step roadmap that aligns every stakeholder, minimizes risk, and keeps your project on track. Here’s how to connect design intent to stable, efficient production, using proven practices from the world of stamp dies and die stamped parts.
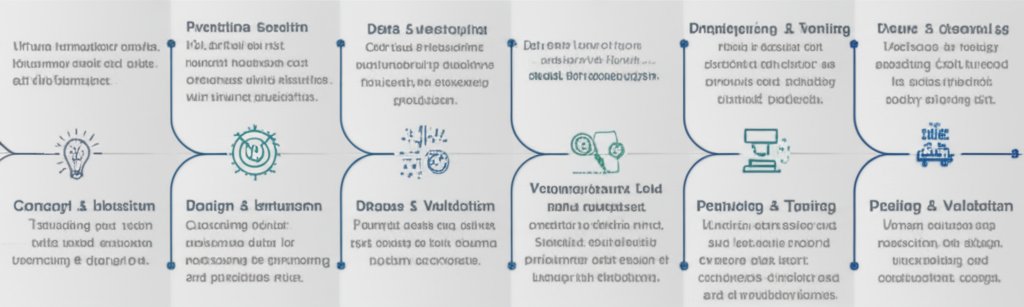
Phase-by-Phase Plan for Stamping Die Success
-
Concept and DFM Alignment
Begin by reviewing your CAD models and drawings with both internal engineers and your stamping die machine supplier. Confirm that all features are manufacturable and that DFM (Design for Manufacturability) rules are applied. This is the stage to agree on material, tolerances, and critical-to-quality features. Early collaboration prevents costly rework and sets a solid foundation for the die stamped process. -
Die Design, Build, and Tryout
Once the concept is locked, move to detailed die design. Use simulation tools to validate forming, cutting, and material flow before cutting steel. After design approval, the die is built and installed in the stamping die machine for initial tryouts. During these runs, check for part geometry, edge quality, and repeatability. Adjustments at this stage are far less costly than changes after production ramps up. -
First Article Inspection (FAI) and Capability Validation
Run a formal FAI using production-intent materials and settings. Inspect all critical features against drawings and tolerances, documenting results for customer approval. This is also the time to verify process capability—using SPC or CPK studies—to ensure your stamp dies can consistently produce within spec. -
Ramp Stabilization and Continuous Improvement
After FAI approval, begin controlled production ramp-up. Closely monitor key dimensions and defect rates, using ongoing SPC to catch drift or wear early. Hold regular cross-functional reviews to capture lessons learned, update maintenance plans, and refine datum schemes or gauges for future projects. Continuous feedback ensures your stamping die machine delivers quality and efficiency at scale.
Freeze design changes before hard tooling to avoid cascading delays.
Keys to a Smooth Launch and Reliable Production
- Encourage open communication between design, production, and quality teams at every phase.
- Document all changes and lessons learned for future die stamped projects.
- Standardize datum schemes and gauges across similar parts to streamline inspection and reduce confusion.
- Schedule regular maintenance and preventive checks based on actual run data to maximize die life.
By following this roadmap, you’ll bridge the gap between great design and stable, high-volume production. Using structured phases and clear success criteria, your custom metal stamping dies will deliver reliable, cost-effective results—helping you hit every launch target and keep your stamping die machine running smoothly for years to come.
Frequently Asked Questions About Custom Metal Stamping Dies
1. What are custom metal stamping dies and how are they used?
Custom metal stamping dies are precision tools designed to cut, form, or shape sheet metal into specific geometries. Used in presses ranging from large automated lines to benchtop presses, these dies enable high-volume production of consistent, high-quality metal parts while reducing manual labor and overall unit costs.
2. How do I choose the right type of stamping die for my project?
Selecting the right die depends on your part’s complexity, required tolerances, production volume, and budget. Progressive dies suit high-volume, complex parts, while transfer, compound, and single-station dies fit different needs. Consider factors like material thickness, edge quality, and whether features like embossing or deep drawing are required.
3. What should be included in an RFQ for custom metal stamping dies?
A comprehensive RFQ should include fully dimensioned 2D/3D drawings with GD&T, CAD files in accepted formats, material specs, critical-to-quality features, surface finish requirements, batch sizes, ramp plans, and inspection criteria. Clear documentation helps suppliers provide accurate, timely quotes and ensures your requirements are met.
4. How can I ensure quality and consistency in custom stamped metal parts?
Implementing process-capable tolerances, conducting thorough first article inspections, and defining critical-to-quality features are key. Ongoing monitoring with SPC and aligning datum schemes with gauging methods ensures that each part meets your specifications and reduces the risk of defects or rework.
5. What factors drive the cost of custom metal stamping dies?
Die complexity, number of operations, material type, surface treatments, sensors, and tryout cycles all impact cost. Planning for amortization across expected production volumes and budgeting for maintenance can help minimize total cost of ownership and maximize return on investment.