 Small batches, high standards. Our rapid prototyping service makes validation faster and easier —

Essential Automotive Die Tryout Procedure: A Technical Guide

TL;DR
The automotive die tryout procedure is a critical, iterative process where a new stamping die is tested and adjusted in a press. This crucial phase involves creating initial parts, identifying defects like splits or wrinkles, and making precise corrections to the tool. The primary goal is to ensure the die can consistently produce high-quality sheet metal components that meet strict specifications before mass production begins, a process significantly accelerated by modern virtual simulation technologies.
Understanding the Die Tryout Process: Definition and Objectives
In automotive manufacturing, the die tryout is the foundational step where a newly manufactured tool is first loaded into a press to produce its first parts. As defined by stamping experts at AutoForm, this is not a one-time event but an intensive fine-tuning phase. It's a systematic process of validation that bridges the gap between die design and full-scale production. The core objective is to verify that the die can transform a flat sheet of metal into a complex, three-dimensional part that adheres perfectly to the design specifications.
The process is inherently iterative and involves what are known as "correction loops." After an initial stamping, technicians and engineers meticulously inspect the part for defects. These can range from visible flaws like wrinkles, splits, and surface imperfections to dimensional inaccuracies only detectable with precision measurement tools. Each identified issue initiates a correction loop, where the die is modified—through grinding, shimming, or other adjustments—and then tested again. This cycle repeats until the die consistently yields parts of the required quality.
Achieving this outcome is the primary goal, but the objectives are multifaceted. First, it validates the functionality and robustness of the die itself, proving that the design and construction are sound. Second, it establishes a stable and repeatable process for mass production, defining the exact press settings required. For complex automotive components, this validation phase is exhaustive and can take weeks or even months. A case study by PolyWorks on Majestic Industries highlights that a difficult progressive die might require five to eight iterations to perfect, underscoring the complexity and resources involved in achieving a production-ready tool.
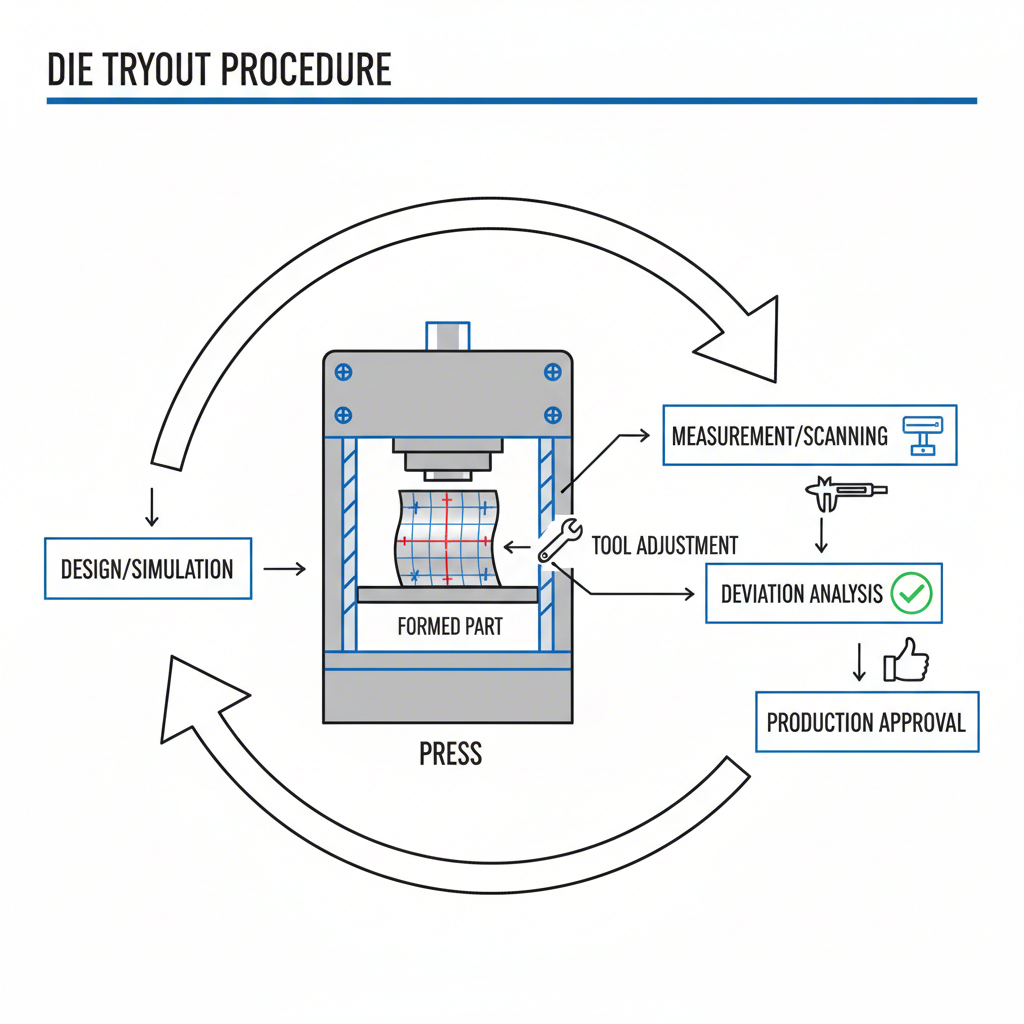
The Step-by-Step Die Tryout Procedure: From Initial Stamping to Validation
The hands-on die tryout procedure follows a structured sequence to systematically debug and validate the tooling. While the broader development process includes everything from project review to die design, the tryout phase is where the physical tool's performance is proven. The core steps transform the assembled die from an unverified tool into a production-ready asset.
The procedure can be broken down into the following key stages:
- Initial Press Setup and First Stamping: The newly assembled die is carefully installed into a tryout press. Technicians load the specified sheet metal and run the press to produce the first sample parts. During this stage, press settings like tonnage and cushion pressure are adjusted to establish a baseline for performance.
- Part Inspection and Defect Identification: The first-off parts are immediately subjected to rigorous inspection. This includes visual checks for obvious defects like cracks, wrinkles, or scratches. More importantly, advanced metrology tools such as Coordinate Measuring Machines (CMMs) or 3D laser scanners are used to compare the part's geometry against the original CAD model.
- Debugging and Spotting: If discrepancies are found, the debugging phase begins. A traditional and crucial technique is "die spotting." As described by experts at FormingWorld, this can involve an engineer applying a blue paste on both sides of the sheet metal to identify non-uniform contact before spotting the dies. When the die is closed, the transfer of the blue paste reveals high and low spots, showing where the surfaces are not making perfect contact. Technicians then use manual grinding and polishing to correct these imperfections and ensure even pressure distribution.
- Iterative Adjustments and Re-Stamping: Based on the inspection and spotting results, skilled toolmakers make precise modifications to the die. This could involve grinding forming surfaces, welding material to add stock, or adding shims to adjust clearances. After each adjustment, the die is re-stamped, and a new set of parts is produced and inspected, beginning the correction loop anew. This trial-and-error cycle continues until all defects are eliminated.
- Final Validation and Approval: Once the die consistently produces parts that meet all dimensional and quality specifications, a final set of samples is produced for client approval. This is often accompanied by an Initial Sample Inspection Report (ISIR), a comprehensive document that provides detailed measurement data. As noted in the development process outlined by AlsetteVS, this report serves as the final proof of the die's capability. Upon approval, the die is prepared for shipment to the client's production facility.
Common Challenges in Die Tryout and Corrective Actions
The die tryout process is fundamentally a problem-solving exercise, as numerous challenges can prevent a die from producing acceptable parts on the first attempt. Understanding these common issues and their corrective actions is key to an efficient tryout. The most prevalent defects include splits, wrinkling, springback, and surface imperfections, often stemming from complex interactions between the tool, material, and press.
Key challenges frequently encountered include:
- Tool Deflection: During the immense pressures of stamping, the die, press ram, and bed can physically deflect or bend. This causes non-uniform pressure on the sheet metal, leading to defects. As detailed in a FormingWorld analysis, this deflection can be as much as 0.5 mm on large panels, creating significant quality issues. The traditional fix is manual die spotting and grinding, but modern solutions involve simulating this deflection and pre-compensating the die's surface—a technique called "over-crowning."
- Wrinkling and Splitting: These are two of the most common forming defects. Wrinkling occurs when there is insufficient pressure from the blank holder, allowing the sheet metal to buckle. Conversely, splitting or cracking happens when the metal is stretched beyond its limit. According to an article in The Fabricator, correcting these issues often involves adjusting "addendum features" like draw beads, which are strategically placed ridges that control the flow of material into the die cavity.
- Springback: After the forming pressure is released, the inherent elasticity of high-strength metals causes them to partially return to their original shape. This phenomenon, known as springback, can throw critical dimensions out of tolerance. Predicting and compensating for springback is one of the greatest challenges, often requiring multiple iterations of re-machining the die surfaces to overbend the part just enough so it springs back into the correct shape.
- Surface Defects: For visible exterior panels (Class A surfaces), any scratch, scuff, or evidence of deformation is unacceptable. These can be caused by poorly polished die surfaces, improper clearances, or creases formed early in the stamping process due to a poorly designed blank holder shape. Meticulous polishing and precise adjustments are required to ensure a flawless finish.
The Role of Virtual Simulation in Modernizing Die Tryout
The traditional, hands-on die tryout process, while effective, is time-consuming, labor-intensive, and costly. The advent of powerful Computer-Aided Engineering (CAE) software has revolutionized this phase by introducing "virtual die tryout." This approach involves simulating the entire stamping process on a computer before any physical tooling is manufactured, allowing engineers to predict and resolve potential issues digitally.
Virtual simulation offers a profound shift from a reactive to a proactive approach. Instead of discovering a split or wrinkle in the press, engineers can see it on a screen and modify the digital die design to prevent it. This digital-first methodology provides numerous advantages. As noted in *The Fabricator*, changing a feature in a simulation might take an hour, whereas the equivalent physical change on a steel die could take a week. This massive reduction in iteration time is a primary benefit. The PolyWorks case study reinforces this, stating that their 3D scanning and software combination helps cut die tryout times by more than half.
Providers specializing in advanced manufacturing, such as Shaoyi (Ningbo) Metal Technology Co., Ltd., leverage these CAE simulations to enhance precision and efficiency for their automotive clients. By digitally modeling everything from material flow to tool deflection and springback, they can optimize die designs and significantly reduce the number of physical correction loops required, leading to faster delivery of high-quality, reliable tooling.
Virtual vs. Physical Tryout: A Comparison
While virtual simulation is powerful, the physical tryout remains the ultimate proof of a die's capability. The two methods are best seen as complementary stages in a modern workflow.
| Aspect | Virtual Tryout (Simulation) | Physical Tryout (In-Press) |
|---|---|---|
| Speed | Extremely fast; iterations can be run in hours or even minutes. | Very slow; a single iteration can take days or a week. |
| Cost | Low cost per iteration (computing time and software license). | High cost per iteration (press time, labor, materials, machining). |
| Flexibility | Highly flexible; major design changes are easy to implement. | Inflexible; changes are difficult, time-consuming, and limited. |
| Accuracy | Highly predictive but may not capture all real-world variables. | 100% accurate; represents the real-world production environment. |
| Goal | To predict and prevent failures, optimizing the design upfront. | To validate the final tool and fine-tune for mass production. |
From Trial-and-Error to Precision Engineering
The automotive die tryout procedure has evolved from a craft based on experience and intuition into a highly technical, data-driven engineering discipline. While the fundamental goals of achieving part quality and process stability remain unchanged, the methods for reaching them have been transformed. The integration of virtual simulation has drastically reduced the reliance on slow, expensive physical correction loops, allowing for more complex parts and materials to be managed with greater predictability. This shift not only accelerates vehicle development timelines but also enhances the final quality and consistency of automotive components, marking a clear progression from trial-and-error to precision engineering.
Frequently Asked Questions
1. What is die tryout?
Die tryout is a critical phase in the manufacturing of sheet metal dies where a newly built tool is tested in a press. It is an iterative process of making sample parts, inspecting them for defects such as splits, wrinkles, or dimensional inaccuracies, and making physical adjustments to the die. The goal is to fine-tune the tool until it can consistently produce parts that meet all quality standards before it is approved for mass production.
2. What are the 7 steps in the stamping method?
While the term can refer to different processes, a general manufacturing sequence for stamped parts involves several key stages. A general die development process includes: 1. Project Review (understanding requirements), 2. Process Planning (designing the stamping sequence), 3. Die Design (creating the tool in CAD), 4. Material Sourcing and Machining (manufacturing the components), 5. Assembly (putting the die together), 6. Debugging and Tryout (testing and validation), and 7. Final Validation and Delivery (customer approval and shipment). Each step is essential for ensuring the final die produces high-quality parts efficiently.