 Small batches, high standards. Our rapid prototyping service makes validation faster and easier —

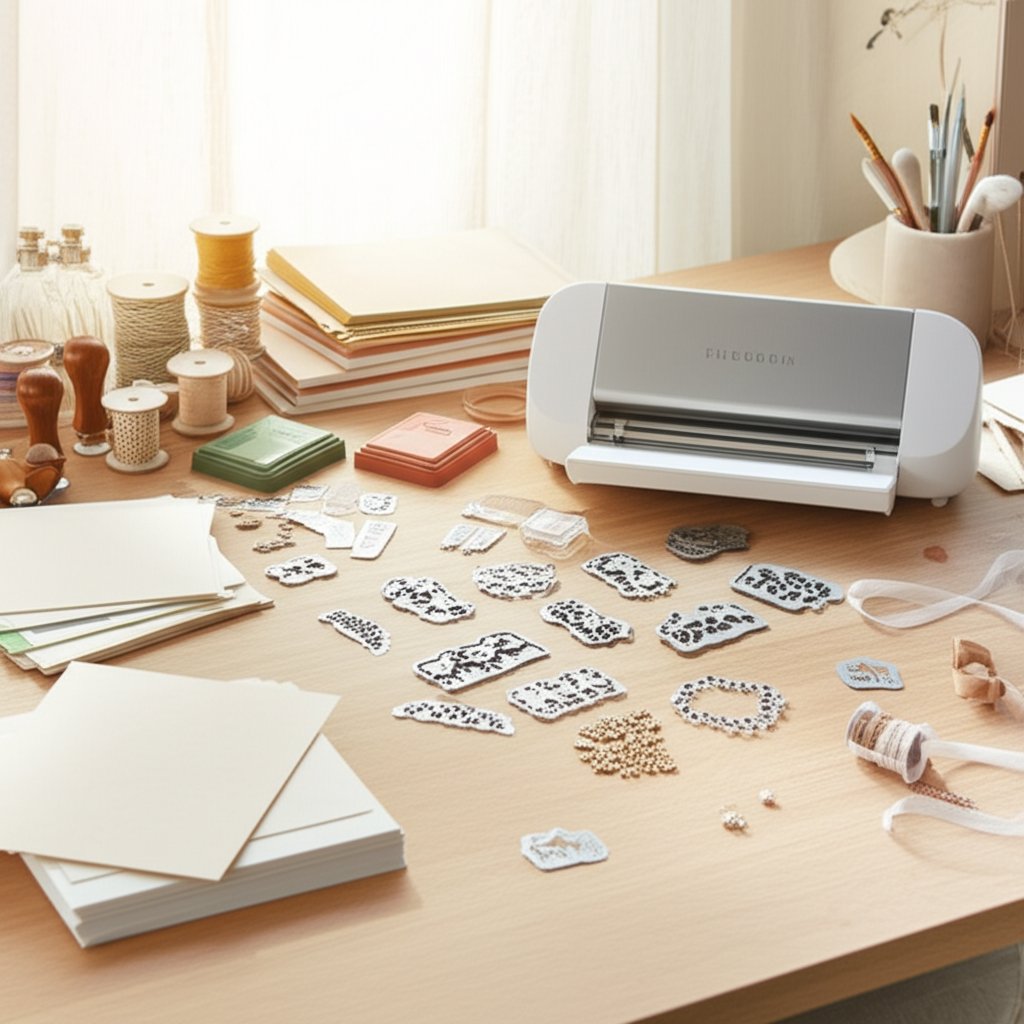
Stamping and Die Cutting: Tools, Machines, and Sandwich Secrets
What Is Stamping and Die Cutting?
Ever wondered how crafters and manufacturers achieve such crisp, consistent shapes—whether it’s a handmade card, a leather tag, or a precision metal part? The answer lies in stamping and die cutting, two foundational techniques that bridge creative hobbies and high-precision industries. While they often work together, each has a distinct role in shaping materials and designs. Let’s break down the basics before diving deeper into the tools, materials, and workflows that make these processes so effective.
What is die cutting?
Simply put, die cutting uses a specially shaped metal tool (called a die) to cut, emboss, or shape a material with the help of a die cutting machine. In crafts, this means clean, repeatable shapes cut from paper, felt, fabric, or thin metal. In industry, the process scales up—dies and presses shape automotive components or electronics parts with tight tolerances and high speed.
Die cutting machines come in manual, electronic, and industrial forms. In paper die cutting, you’ll most often use a hand-cranked or motorized machine to press the die through your chosen material, producing a perfectly cut shape every time. This process also extends to material cutting dies for leather, vinyl, chipboard, and more.
How stamping and die cutting work together
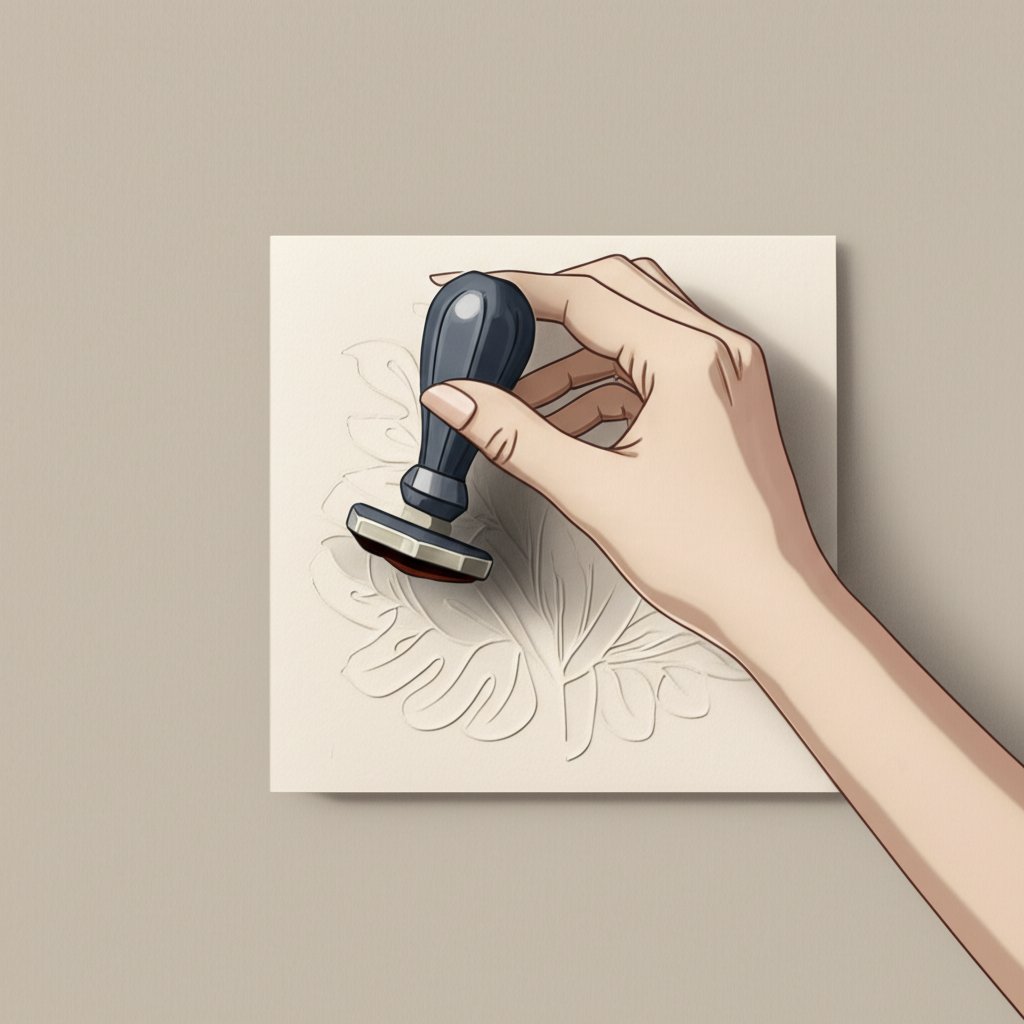
Stamping refers to inking an image or pattern and pressing it onto a surface—think of rubber stamps for paper crafts or large presses for metal parts. When combined with die cutting, you first stamp your design, then use a matching die to cut it out, ensuring a clean, professional outline. This sequence is popular in card making, scrapbooking, and even some leather or textile projects. In industrial settings, stamping can also mean shaping or marking metal parts before or after cutting.
- Die cutting machine: The device that applies pressure
- Plates: Surfaces that sandwich the die and material
- Dies: Metal shapes that do the cutting or embossing
- Shims: Thin layers to adjust pressure or improve results
- Mats: Protective or embossing surfaces
For the cleanest outlines, align your stamped image carefully before die cutting. This helps avoid uneven borders and gives your project a polished look.
Materials you can cut and emboss
Die cutting isn’t just for paper. You’ll notice that material cutting dies are designed for a wide range of surfaces:
- Papers: cardstock, vellum, foil, chipboard
- Fabrics: felt, cotton, thin leather
- Vinyl and cork
- Thin metals (for industrial and some craft dies)
Embossing—raising or impressing a pattern—uses similar tools but with a softer mat, so the die presses a design into the surface rather than cutting through (Crafter's Companion).
When precision matters most
Why choose stamping and die cutting over hand-cutting or freehand drawing? The answer is precision, speed, and repeatability. Whether you’re mass-producing invitations or manufacturing automotive parts, these techniques deliver:
- Consistent shapes and sizes—no two pieces look different
- Clean, smooth edges without scissor marks or rough cuts
- Efficient production, saving time and reducing waste
- The ability to cut intricate or complex designs quickly
Pressure and alignment are key. Too little pressure and the die won’t cut cleanly; too much, and you risk damaging the material or the machine. That’s why most die cut machines and stamping presses include adjustable settings and clear guides.
This guide will help you master both craft and industrial approaches to stamping and die cutting, covering paper crafts, fabric and leather work, and high-level metal forming. As you read on, you’ll find practical tips, tool breakdowns, and workflow secrets drawn from leading brands and industry best practices.
Glossary and Quick Reference for Common Die Cutting Terms
Ever found yourself lost in a sea of die-cutting jargon? Whether you’re new to stamping and die cutting or just need a refresher, this quick-reference glossary is your go-to guide for understanding the terms you’ll see in craft tutorials and machine manuals. Let’s break down the essentials—no experience required.
Core die cutting terms explained
- Adapter: A device that allows dies or plates designed for one type of machine to be used in another. Essential for ensuring compatibility.
- Cutting edge: The sharp part of a die that actually cuts through the material. Always face this edge toward the material for clean cuts.
- Cutting die: A metal tool with a shaped edge used to cut materials into specific designs. When you wonder what is cutting die, think of it as a custom-shaped cookie cutter for paper, fabric, or thin metal.
- Deboss: The opposite of embossing; it creates a recessed or sunken impression on the surface of your material.
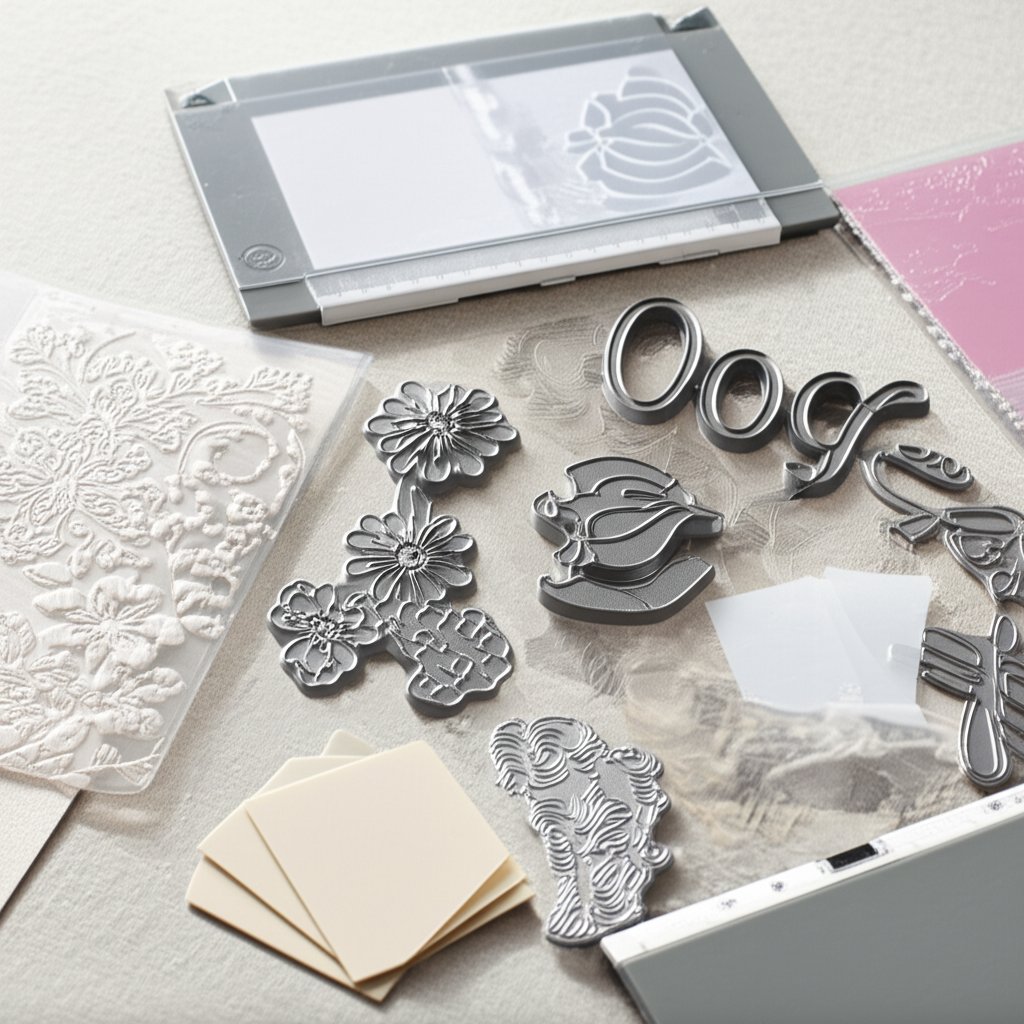
- Die: The general term for the metal tool used to cut, emboss, or shape materials. Dies come in various types, including steel rule and wafer-thin.
- Die cut: The final shape or design produced by a die. If you’re asking what is die cuts, it’s the piece you remove after running your material through the machine.
- Die-cutting: The process of using a die and a machine to cut shapes out of materials. This technique is essential for consistent, repeatable results in crafts and manufacturing.
- Die cutting dies: A collective term for all types of dies used in die-cutting. Includes standard, intricate, and specialty shapes for different materials.
- Embossing folder: A thick plastic folder with a raised and a recessed side. When you place paper inside and run it through a machine, it creates a raised (embossed) pattern. If you’re wondering what is an embossing folder, it’s your tool for adding texture and dimension to paper crafts (Altenew).
- Inlay: A technique where multiple die-cut pieces are fitted together, like a puzzle, to create a seamless design.
- Nesting dies: Dies of the same shape in graduated sizes, designed to fit inside each other for layered or matting effects.
- Negative space die: A die that cuts out a window or opening in the material, leaving the surrounding area intact.
- Open die: A die with an open center, making it easier to align with stamped images or specific areas of your material.
- Platform: The base or tray that holds the plates, dies, and materials as you run them through the machine.
- Plates: Rigid surfaces that form the top and bottom of your cutting or embossing “sandwich.” They help distribute pressure evenly.
- Registration marks: Small marks or notches used to align dies with stamped images for perfect placement.
- Release paper: A slick, non-stick sheet placed between the die and material to help release intricate die-cuts cleanly.
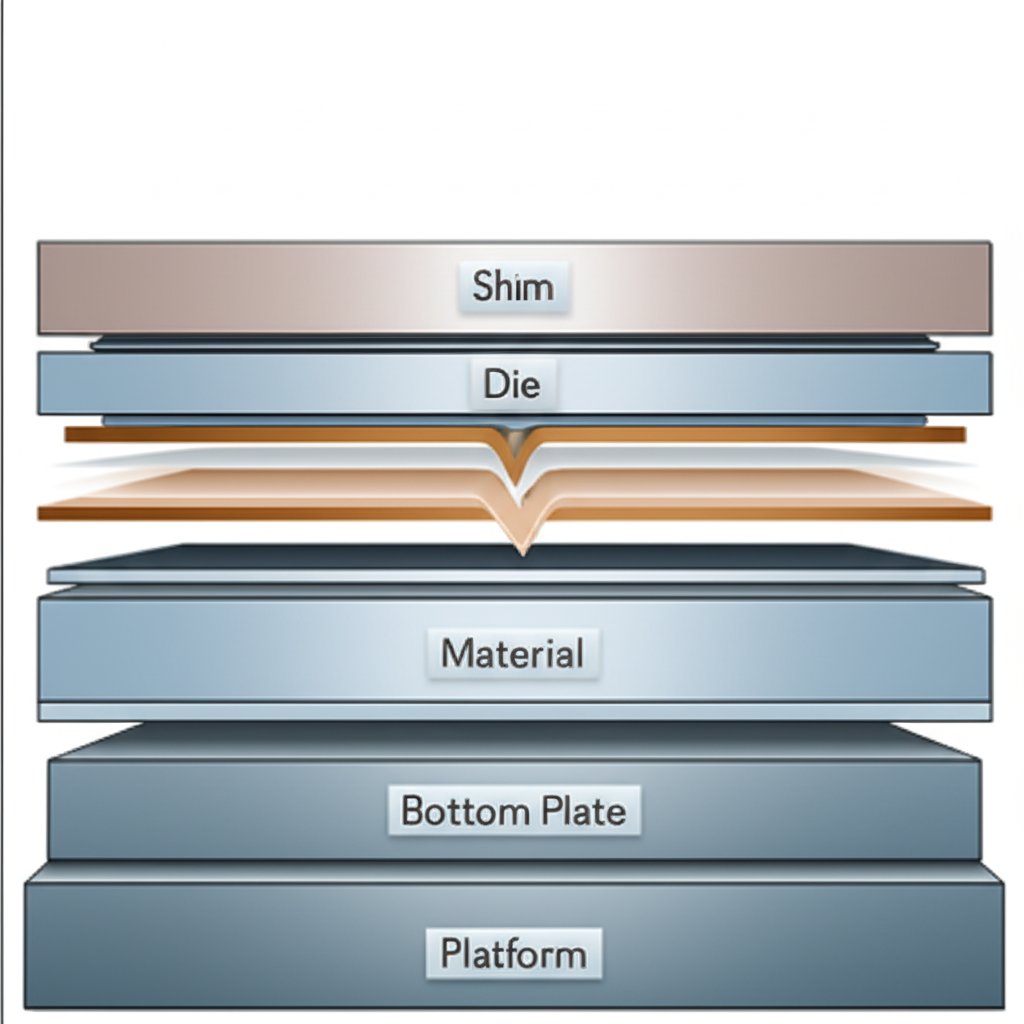
- Sandwich: The layered stack of plates, dies, shims, and material placed in the machine. Each machine may require a different sandwich combination for best results.
- Shim: A thin piece of plastic, paper, or metal added to the sandwich to increase pressure if cuts aren’t clean.
- Steel rule die: A thick, durable die with a steel blade embedded in wood or foam. Ideal for cutting thicker materials or multiple layers at once.
- Thin metal die (wafer-thin die): A slim, lightweight die made for precise cuts in paper and cardstock. Popular for detailed and intricate designs.
Embossing and debossing in simple words
- Embossing: Raising a design above the surface of your material, usually with an embossing folder or die.
- Debossing: Pressing a design into the surface, creating an indented pattern. Both techniques add tactile and visual interest to crafts.
- 3D embossing folders: Specialized embossing folders with deeper, layered designs that create a more dimensional effect than standard folders.
Sandwich and plate names you will see
- Base plate: The bottom plate in your sandwich stack—supports the material and die.
- Cutting plate: The plate that sits above or below your die and material, providing a hard surface for cutting.
- Magnetic shim: A thin, magnetized layer that holds dies in place, especially helpful for wafer-thin dies or intricate designs.
- Rubber embossing mat: A flexible mat used in the sandwich when embossing with a die instead of cutting.
- Plastic shim: An extra layer to adjust pressure in the sandwich for cleaner cuts or deeper embossing.
Sandwich: This term refers to the specific stack of plates, dies, shims, and materials you use in a die-cutting or embossing machine. Exact sandwich combinations vary by machine and brand—always check your manufacturer’s guide for best results.
Now that you’re familiar with the language of die-cutting, you’ll be able to follow tutorials, troubleshoot issues, and experiment with confidence. Next, we’ll explore the essential tools and materials that make precision possible, so you can choose the right setup for your next project.
Tools and Materials That Make Precision Possible in Stamping and Die Cutting
When you’re ready to get hands-on with stamping and die cutting, the right tools make all the difference. Maybe you’re eyeing a new machine, or perhaps you’ve inherited a box of dies and plates—how do you know what fits together, or what’s best for your project? Let’s break down the essentials so you can confidently assemble your toolkit and understand what each piece does for your creative workflow.
Choosing a Die Cutting Machine Form Factor
Start with the heart of your setup: the die cutting machine. There are two main types—manual and electronic. Manual machines, like a classic crank-operated Sizzix die cutting machine or the Spellbinders die cutting machine, use pressure from a hand crank to cut or emboss. These are popular for paper crafts and are known for their reliability and tactile feel. Electronic or automatic platforms use motors to handle the pressure for you—ideal if you have hand strength concerns or need to cut large batches. Both types can be used as a machine for embossing as well as cutting, depending on the plates and accessories you use. Always check machine compatibility with your chosen dies and plates, as not all machines accept every die type.
Understanding Dies and Their Materials
Not all dies are created equal. You’ll encounter two core types:
- Thin metal dies (wafer-thin): Lightweight and perfect for detailed paper cuts. These are compatible with most manual and electronic machines, but are best for single sheets of paper, light cardstock, or vellum. Their open centers help you align cuts with stamped images or photos—no more guesswork when using a cut die cutter for scrapbooking or card making (Scrapbook.com).
- Steel rule dies: Built for durability, these thick dies can cut through heavier materials like chipboard, felt, fabric, leather, and even thin wood. They’re ideal for bulk projects or when you need your die cutter to handle more than just paper. However, they’re bulkier and often require a compatible, larger machine.
Always check your machine’s documentation for a compatibility chart. For example, some mini die cutters only accept wafer-thin dies, while larger machines handle both types.
Embossing Folders and Texture Tools
If you want to add dimension, embossing folders are your best friend. These plastic folders press patterns into your paper or cardstock when run through your die cutting machine. Some machines, like the Sizzix die cutting machine, are designed to work seamlessly with both standard and 3D embossing folders. Always use the correct plate stack for embossing—refer to your machine’s manual for the right combination to avoid damage or uneven impressions.
Essential Plates, Mats, and Accessories
| Category | Item | Best For | Notes |
|---|---|---|---|
| Machine | Manual Die Cutter (e.g., Sizzix Big Shot, Spellbinders Platinum 6) |
Paper, light fabric, felt, embossing | Requires hand-cranking; check die size compatibility |
| Machine | Electronic Die Cutter (motorized or computer-driven) |
High-volume cutting, digital designs, hands-free operation | Some models cut only paper; others handle both die types |
| Dies | Thin Metal Die | Intricate paper cuts, stamped image outlines | Use with most die cut machines; not for thick materials |
| Dies | Steel Rule Die | Bulk cutting, thick materials (felt, chipboard, fabric) | Larger and heavier; check machine compatibility |
| Plates | Cutting Plates/Platforms | All die cutting and embossing | Replace when warped; follow sandwich guidelines |
| Accessories | Embossing Folders | Adding raised texture to paper | Standard and 3D varieties; require specific plate stacks |
| Accessories | Shims, Adapters | Fine-tuning pressure for clean cuts | Use only as needed; refer to manufacturer guidance |
| Accessories | Cutting Mats | Protecting plates, supporting fabric or delicate materials | Replace when excessively worn or marked |
| Consumables | Low-Tack Tape, Release Paper | Holding dies in place, easy die release | Helps with intricate or layered die cuts |
Compatibility is key—always consult your machine’s manual or the manufacturer’s compatibility chart before mixing new dies or accessories into your workflow. This ensures you get the best results and avoid damaging your equipment.
With these essentials, you’re ready to explore the possibilities of machine die cutting, from simple shapes to layered, dimensional designs. Next, we’ll guide you through proven workflows that combine these tools for crisp impressions and clean cuts every time.
Proven Workflows for Clean Cuts and Crisp Impressions
Ever felt frustrated when your stamped image doesn’t line up with your die cut, or when your embossing flattens a beautiful design? The order in which you stamp, die cut, and emboss can make or break your project. Let’s unravel the best sequencing strategies so you get professional results—every time you reach for your stamps and die cuts.
When to Stamp Before Die Cutting
Imagine you’ve just inked up a gorgeous image. You want the cut edge to perfectly frame your stamp—no awkward borders or misaligned cuts. In most stamp and die sets for card making, stamping first gives you the best control over placement. Here’s how to use die cuts in this workflow:
- Stamp your design onto your chosen material (like cardstock or vellum), using a stamp positioner if available for repeatable, crisp impressions.
- Once the ink is dry, align your die over the stamped image. Secure the die with low-tack tape or a sticky note to prevent shifting.
- Run the stack through your die cutting machine. This produces a die cut stamp with a perfectly framed outline.
- If you want extra texture, emboss the die cut using an embossing folder, following your machine’s sandwich instructions.
This method is especially helpful for intricate images or when using stamps dies with detailed outlines. Tools like the MISTI or similar stamp positioners make repeat stamping accurate and fast (Jennifer McGuire Ink).
When to Die Cut First
Sometimes, you need to cut first—especially when mass-producing shapes or when your die is solid (no open center to help with alignment). Here’s the process:
- Die cut your shapes from blank cardstock or paper.
- Place the negative (the leftover frame) into a stamp positioner tool. Fit the blank die cuts back into the openings—this holds them steady.
- Stamp your image directly onto the die cut while it’s held in place. This prevents shifting and allows you to double-stamp for deeper color if needed.
- Remove the finished stamp and die piece and repeat as needed for multiples.
This method is popular for batch projects where you want every piece to look identical, as demonstrated in many cardmaking tutorials.
Integrating Embossing for Layered Effects
Want to add dimension to your stamps and die cuts? Embossing can be layered in at different stages:
- Stamp → Die Cut → Emboss: Great for crisp outlines and raised designs. Stamp first, die cut, then emboss for a dimensional finish.
- Die Cut → Emboss → Stamp: Embossing before stamping can give a subtle, debossed look to your stamped image—just be sure your stamp can handle slight texture.
- Emboss → Stamp Selectively: For background textures, emboss your panel first, then stamp in flat areas for a layered look.
Alignment is key. Use registration marks, low-tack tape, or sticky notes to keep everything in place, and always double-check your sandwich setup before running it through the machine. This helps avoid shifting, over-inking, or warping—common pitfalls when learning how to use die cuts in layered projects.
Always test your die cutting “sandwich” with scrap material before your final run. This simple step can save you from misaligned cuts or wasted supplies.
These sequencing workflows set the stage for flawless stamps and die cuts—whether you’re making one-of-a-kind cards or mass-producing layered designs. Up next, we’ll help you choose between manual and electronic machines so your process matches your creative goals.
How to Choose Between Manual and Electronic Die Cutting Machines
Are you trying to decide between a manual die cutting machine and an electronic platform? With so many options—crank handles, push-button motors, compact or full-size—finding the right fit for your stamping and die cutting needs can feel overwhelming. Let’s break down the strengths of each type, so you can match your creative goals, workspace, and comfort level to the best die cutter for you.
Who Should Choose a Manual Machine?
Manual die cutting machines are the classic workhorses of the craft room. Imagine turning a sturdy crank on a die cutting machine for card making—it’s tactile, reliable, and gives you full control. These machines are ideal for:
- Paper crafters who want hands-on control and don’t mind a little elbow grease.
- Users with limited space—a small die cutting machine or mini die cut machine fits easily on a desk or shelf.
- Beginners who want a straightforward setup, with no software or power cords to manage.
- Hobbyists who cut paper, light fabric, or felt, and don’t need to process dozens of pieces at once.
Manual machines, like the Sizzix Big Shot or Spellbinders Platinum 6, are praised for their durability and ease of use. They’re also quieter and more portable—perfect for crafting on the go or in shared spaces.
Who Benefits from Electronic Pressure?
Electronic die cutting machines (sometimes called automatic or electric embossing die cutting machines) use motors to apply consistent pressure—no cranking required. If you:
- Have hand or wrist pain, arthritis, or limited mobility.
- Need to cut large batches of shapes, or work with intricate dies that require even, repeatable pressure.
- Want to multitask—some machines auto-feed plates so you can prep your next project while it works.
- Prefer digital features, like connecting to a computer for custom shapes (in the case of digital models).
Models like the Gemini Junior or Sizzix Big Shot Express offer hands-free operation and excel at cutting complex designs or thicker materials. They’re slightly heavier and need access to power, but their speed and consistency make them a favorite for high-volume or professional use.
Evaluating Accessories and Long-Term Costs
Before you commit, think beyond the machine itself. Consider:
- Compatibility: Will your chosen machine work with the dies and embossing folders you already own?
- Replacement plates and accessories: All machines require occasional plate replacement. Some need special adapters or shims for certain techniques.
- Footprint and storage: Manual machines often fold for compact storage, while larger electronic models may need dedicated space.
- Noise and maintenance: Manual machines are virtually silent and low-maintenance; electronic machines may require occasional cleaning and have moving parts that could wear over time.
| Feature | Manual Die Cutting | Electronic Die Cutting |
|---|---|---|
| Learning Curve | Very easy—just insert the sandwich and crank | Easy—push a button, some have digital controls |
| Speed | Medium—depends on user | Fast—consistent, ideal for batch work |
| Repeatability | Good—depends on consistent cranking | Excellent—motor ensures even pressure |
| Material Versatility | Paper, light fabric, felt (some models cut thin chipboard/leather) | Paper, cardstock, some can handle thicker materials (check specs) |
| Typical Footprint | Compact; many fold for storage; mini die cut machine options available | Larger; needs stable surface and power outlet |
| Noise | Very quiet | Low to moderate motor noise |
| Accessory Costs | Plates, shims, adapters (replace as needed) | Plates, shims, adapters (replace as needed) |
| Best For | Beginners, hobbyists, portability, quiet crafting | Batch production, intricate dies, users with mobility needs |
Recommended Machine Types by User Profile
- Beginner: Manual machine or mini die cut machine—simple, affordable, easy to learn.
- Hobbyist: Manual or electronic, depending on project size and frequency. A small die cutting machine is great for everyday crafting.
- Small Business: Electronic die cutting machines—speed and consistency for larger batches.
- Classroom/Group Setting: Manual machines—rugged, portable, and easy for anyone to use.
Before choosing, ask yourself: What materials will I cut most? How much space do I have? Do I value portability or batch speed? The best die cutting machines are the ones that truly fit your workflow and creative ambitions.
Ready to plan your next project? Up next, we’ll explore how to lay out your dies and materials for maximum efficiency and minimal waste—so you get more from every cut.
Planning, Nesting, and Orientation for Efficient Cuts
Ever started a project only to realize you’ve wasted half your favorite cardstock or fabric? Planning your layout is the secret to getting the most out of your paper cutting dies, fabric cutting dies, and every precious sheet or scrap in your stash. Whether you’re working with die cutting tools for card making or prepping industrial runs, smart preparation saves time, money, and frustration. Let’s break down the best practices for efficient, accurate cuts—no matter your material or die style.
Plan Your Layout and Nesting Strategy
Before you even turn on your machine, ask yourself: How can I fit the most shapes in the least space? Nesting is the answer. For cutting dies for card making and papercraft dies, this means grouping dies closely to minimize waste—especially when using expensive or specialty materials. Nesting dies (sets of graduated shapes) offer even more flexibility, letting you create layered effects while maximizing yield (Crafter's Companion).
- Lay out all dies on your material before cutting—use scrap or a template if needed.
- Group similar shapes or sizes together to fill gaps and reduce offcuts.
- For large parts, consider breaking designs into smaller sections for better material use.
- Batch multiples by arranging as many dies as possible on a single pass.
- Use leftover negative spaces for tags, embellishments, or testing new techniques.
| Nesting Pattern | Description | Yield & Edge Notes |
|---|---|---|
| Concentric Shapes | Smaller dies placed inside larger ones (e.g., circles, ovals) | Maximizes use of center area; ideal for layered frames |
| Tessellation | Dies arranged edge-to-edge with minimal gaps (e.g., hexagons) | High yield, little waste; check for even pressure across all dies |
| Offset Rows | Staggered rows to fill awkward spaces (e.g., rectangles, tags) | Improves material use for irregular shapes; leave small buffer for clean cuts |
Understand Die Orientation and Registration
Sounds complex? It’s all about paying attention to how your dies for paper crafting are placed. For intricate or directional dies, check for arrows or marks indicating the correct orientation—this ensures patterns (like text or flowers) face the right way. When using paper crafting dies with stamped images, align the die carefully over the design, using low-tack tape to hold it steady. Registration marks or guides on some dies help you match up layers or repeated cuts for perfect results every time.
- Check die orientation before cutting—especially with words, borders, or asymmetrical designs.
- Use registration marks or guide notches if your die or machine offers them.
- Test alignment on scrap paper before your final cut to avoid misplacement.
Manage Materials with Grain and Stretch
Ever notice your paper cracks when folded, or your felt stretches out of shape? Material properties matter. For paper, always cut with the grain (the direction fibers run) to prevent tearing and ensure crisp edges. With stretchy materials like felt, fabric, or leather, stabilize with a cutting mat or temporary adhesive to keep shapes true. When using press cutting dies or working with layered materials, adjust your sandwich and pressure settings to match thickness and flexibility.
- Identify paper grain by gently bending—cut parallel to the grain for best results.
- For fabric or felt, use a stabilizer or iron-on backing to prevent distortion.
- Batch test cuts on offcuts before moving to your main material.
- Store materials flat and acclimated to room conditions to avoid warping or expansion.
Tip: Always make a mockup or test cut with scrap material before committing to your final layout. This simple step reveals potential issues with nesting, orientation, or material movement—saving you time and supplies in the long run.
With careful planning and a few best practices, you’ll get the most from your die cutting tools every time. Up next, we’ll dive into sandwich settings and pressure adjustments—so your cuts stay clean and your equipment lasts longer.
Reliable Sandwich Settings for Consistent Results in Die Cutting and Embossing
Ever wondered why your die cuts sometimes don’t come out clean, or your embossing looks uneven? The answer often lies in your sandwich setup—the specific stack of plates, dies, and materials you run through your die cutting and embossing machine. Getting this right is essential for crisp results and for keeping your machine and accessories in top shape. Let’s break down the most common sandwich stacks, how to adjust for different materials, and the best ways to protect your plates for long-term use.
Typical Sandwich Stacks by Tool Type
Every die cutting embossing machine—from the Sizzix Big Shot to electric embossing and die cutting machines—has its own recommended sandwich combinations. These stacks change depending on whether you’re using thin metal dies, steel rule dies, or embossing folders (standard or 3D). Always check your machine’s manual or the manufacturer’s online chart for exact instructions. Here’s a quick-reference table summarizing typical setups from leading brand documentation:
| Tool Type | Common Stack Description | Notes | Brand Reference |
|---|---|---|---|
| Thin Metal Die (Wafer-Thin) | Platform/Base Plate + Cutting Plate + Paper + Die (cutting edge down) + Cutting Plate | For intricate designs, add a thin shim if needed for a clean cut. Use sizzix cutting plates or equivalent for best results. | Altenew |
| Steel Rule Die | Platform/Base Plate + Steel Rule Die + Material + Cutting Plate | Designed for thick materials or multiple layers. Thicker dies require more clearance; avoid using with standard wafer-thin platforms. | Scrapbook.com |
| Standard Embossing Folder | Platform/Base Plate + Cutting Plate + Embossing Folder (with paper inside) + Cutting Plate | Folder thickness varies; if the impression is weak, add a paper shim. Store folders flat for optimal embossing folder storage. | Stampin' Up! via Klompenstampers |
| 3D Embossing Folder | Platform/Base Plate + 3D Embossing Folder (with paper inside) + Specialty Plate (or thick cutting plate) | 3D folders need extra thickness; if you lack a specialty plate, use several cardstock shims. Never force the stack—adjust until it slides smoothly. | Stampin' Up! via Klompenstampers |
| Cut & Emboss Folder (Hybrid) | Platform/Base Plate + Cut & Emboss Folder (with die and paper inside) + Cutting Plate | Hold die in place with low-tack tape to prevent shifting. Check pressure; adjust with a shim if needed. | Spellbinders |
When a die or folder isn’t cutting or embossing cleanly, add shims one at a time. Too much pressure can warp plates or damage folders, so increase thickness gradually—never force a sandwich through your machine.
Adjusting for Material Thickness
Not all materials are created equal. Thicker cardstock, fabric, or specialty papers may require a slightly different sandwich or more pressure. Here are some practical tips:
- For thin paper, start with the standard sandwich—avoid extra shims unless the cut isn’t clean.
- For thick or textured materials, add a paper or plastic shim as needed. Test with scrap material first.
- When cutting multiple layers, use a steel rule die and check your cutting and embossing machine manufacturer’s chart for max thickness.
- If the sandwich is too tight, remove a shim or swap to thinner plates. Never force your machine—this can crack sizzix cutting plates or damage gears.
In industrial settings, pressure adjustments are even more precise—requiring careful calibration so that dies cut cleanly without damaging the cutting plate or material. This approach ensures quality and extends the lifespan of your die cutting machines accessories.
Protecting Plates and Avoiding Warping
Ever notice your plates or folders starting to bow or crack? Proper sandwich setup not only delivers better results but also protects your investment:
- Rotate and flip your cutting plates regularly to distribute pressure and prevent warping.
- Replace plates when they become heavily marked or cracked—using damaged plates can cause uneven pressure or damage your sizzix embossing machine.
- Store embossing folders and plates flat, away from heat and sunlight, for optimal embossing folder storage.
- Always use the recommended plate order for your machine—improvising can shorten the life of your machine and accessories.
If you’re using electric embossing and die cutting machines, follow the brand’s official maintenance and sandwich charts. This is especially important for more complex, motorized models where excess pressure can cause permanent damage.
Getting your sandwich right isn’t just about clean cuts—it’s about safety, machine longevity, and making every project a success. Up next, we’ll tackle troubleshooting and maintenance, so you can quickly fix issues and keep your die cutting workflow running smoothly.
Troubleshooting and Quality Checks That Save Time in Die Cutting
Ever had a perfect project derailed by rough edges, incomplete cuts, or warped plates? Even with the best die cutting equipment and die cut tools, occasional hiccups are part of the process. The good news: most issues have straightforward fixes—if you know what to look for. Let’s break down the most common problems, their likely causes, and how to get your workflow back on track.
Diagnose Common Die Cutting Issues
| Symptom | Common Causes | Step-by-Step Fix |
|---|---|---|
| Incomplete or uneven cutting | - Insufficient pressure - Dull or worn metal dies - Uneven or damaged cutting plates - Variations in material thickness |
1. Check and adjust pressure settings on your die cutting machine. 2. Inspect and replace or sharpen dull dies. 3. Rotate or replace warped plates. 4. Test with scrap material and adjust as needed. |
| Rough or frayed edges | - Dull cutting blades - Excessive or insufficient pressure - Inappropriate cushion or mat |
1. Replace or sharpen blades. 2. Adjust pressure settings. 3. Ensure correct mat or cushion hardness. 4. Store and acclimate materials to prevent fiber issues. |
| Warped plates | - Uneven pressure from repeated use - Not rotating plates regularly - Excessive shims or improper sandwich stack |
1. Rotate and flip plates with every use. 2. Replace heavily warped or cracked plates. 3. Double-check sandwich stack and use shims sparingly. |
| Embossing too shallow or too deep | - Incorrect sandwich stack - Wrong pressure settings - Worn embossing folders |
1. Refer to machine’s guide for correct sandwich. 2. Add or remove shims one at a time. 3. Replace worn folders. 4. Test with scrap before final run. |
| Metal burrs or dented dies | - Overuse or improper storage of metal dies - Cutting through inappropriate materials - Lack of regular cleaning |
1. Clean dies after each use. 2. Store dies properly (oil paper, protective boxes). 3. Replace or professionally repair damaged dies. |
| Misaligned stamped images | - Poor die alignment - Shifting during cutting - Inaccurate paper positioning |
1. Use low-tack tape to secure dies. 2. Check for registration marks or guides. 3. Test alignment on scrap before final project. |
Embossing Texture Problems and Fixes
When your embossing looks flat or overly deep, the culprit is usually the sandwich stack or folder condition. Always reference your machine’s guide for embossing folders. If the impression is weak, add a shim; if too deep, remove one. Replace worn folders for best results. For 3D effects, use only the recommended specialty plates and avoid forcing the stack through your die stamping machine.
Maintenance Routines for Machines and Dies
Want to avoid downtime and get the most from your die cutting products? Regular care is essential—just like sharpening scissors or oiling a sewing machine. Here’s a preventive maintenance checklist:
- Clean your machine and dies after every session—remove paper fibers, adhesive, and debris to prevent buildup.
- Rotate and flip cutting plates to distribute wear evenly.
- Store metal dies in oil paper or protective boxes to prevent rust and accidental dents.
- Inspect dies and plates for damage before use; replace if cracked or warped.
- Run a quick quality check with scrap material before large batches.
- Contact a professional for repairs to blades or machine calibration—avoid DIY fixes for critical components.
Most die cutting problems can be prevented with routine cleaning, proper storage, and regular inspection of your die supplies. A few minutes of maintenance saves hours of troubleshooting down the line.
With these tips, you’ll spend less time fixing and more time creating. Up next, we’ll put your skills to the test with project recipes that help you practice these quality-control habits from start to finish.
Practice Die Cutting Skills from Beginner to Advanced
Ready to put your stamping and die cutting knowledge into action? Whether you’re just starting out or looking to challenge your skills, these three progressive project recipes will help you build confidence—one cut at a time. We’ll start simple and finish with a layered showpiece, so you can experience the full versatility of card making die techniques and dies for card making. Each project includes a clear materials list, step-by-step instructions, and tips for clean results. Grab your card making machines and let’s get started!
Beginner Card with Clean Outline Cuts
- Basic white or colored cardstock (A2 size: 4.25" x 5.5")
- Coordinating patterned paper
- Simple outline cutting die (e.g., circle, rectangle, or floral shape)
- Die cutting machine
- Low-tack tape
- Liquid adhesive or double-sided tape
- Place your outline die on the patterned paper, securing it with low-tack tape for alignment.
- Build your sandwich stack following your machine’s guide (platform, cutting plate, paper, die, top cutting plate).
- Run the stack through your card die cutter; remove and gently pop out your die cut shape.
- Layer the die cut over the cardstock base, adhering with liquid glue or tape.
- Optional: Add a sentiment strip or embellishment for extra flair.
Tip: Always test your sandwich on scrap paper first to check pressure and alignment. This prevents wasted materials and ensures your die cuts for card making come out crisp and clean.
Intermediate Tags with Partial Embossing
- Heavyweight cardstock (for tags)
- Tag-shaped cutting die
- Embossing folder (standard or 3D)
- Die cutting machine
- Ink pad and blending tool (optional for shading)
- Twine or ribbon
- Die cut several tags from your cardstock using your tag die and machine.
- Place each tag partially inside an embossing folder, leaving a section unembossed for writing or stamping.
- Stack your sandwich as directed for embossing folders—refer to your machine’s manual for 3D folder plate orders if using one.
- Run through the machine. Remove and gently flex the tag to reveal the raised pattern.
- Optional: Lightly blend ink over the embossed area for added depth.
- Thread twine or ribbon through the hole to finish your custom tag.
Advanced Layered Decor with Nesting Dies
- Assorted colored cardstock or specialty papers
- Nesting die set (e.g., circles, hexagons, or floral layers)
- Foam adhesive squares or dots
- Die cutting machine
- Liquid adhesive
- Sequins, enamel dots, or embellishments (optional)
- Select several shades of cardstock for a dimensional effect.
- Arrange and die cut each layer using your nesting dies—cut all sizes needed for your design.
- Stack the die cuts from largest to smallest, using foam adhesive between layers for 3D depth (see Altenew’s guide for inspiration).
- Adhere the finished stack to a card front, journal cover, or as a wall decor accent.
- Embellish with sequins, enamel dots, or ink splatters for a professional finish.
Tip: For intricate or layered craft die cuts, always test your sandwich and alignment with scrap pieces—especially when using new cutting dies for cardmaking or specialty materials.
These hands-on projects are designed to reinforce the best practices you’ve learned—like testing your setup, aligning dies, and layering for depth. As you progress from basic cards to complex layered designs, you’ll discover how die cutters for card making unlock creative possibilities at every skill level. Up next, we’ll connect these craft techniques to the world of industrial precision and custom die engineering—showing how your new skills scale up for even bigger impact.
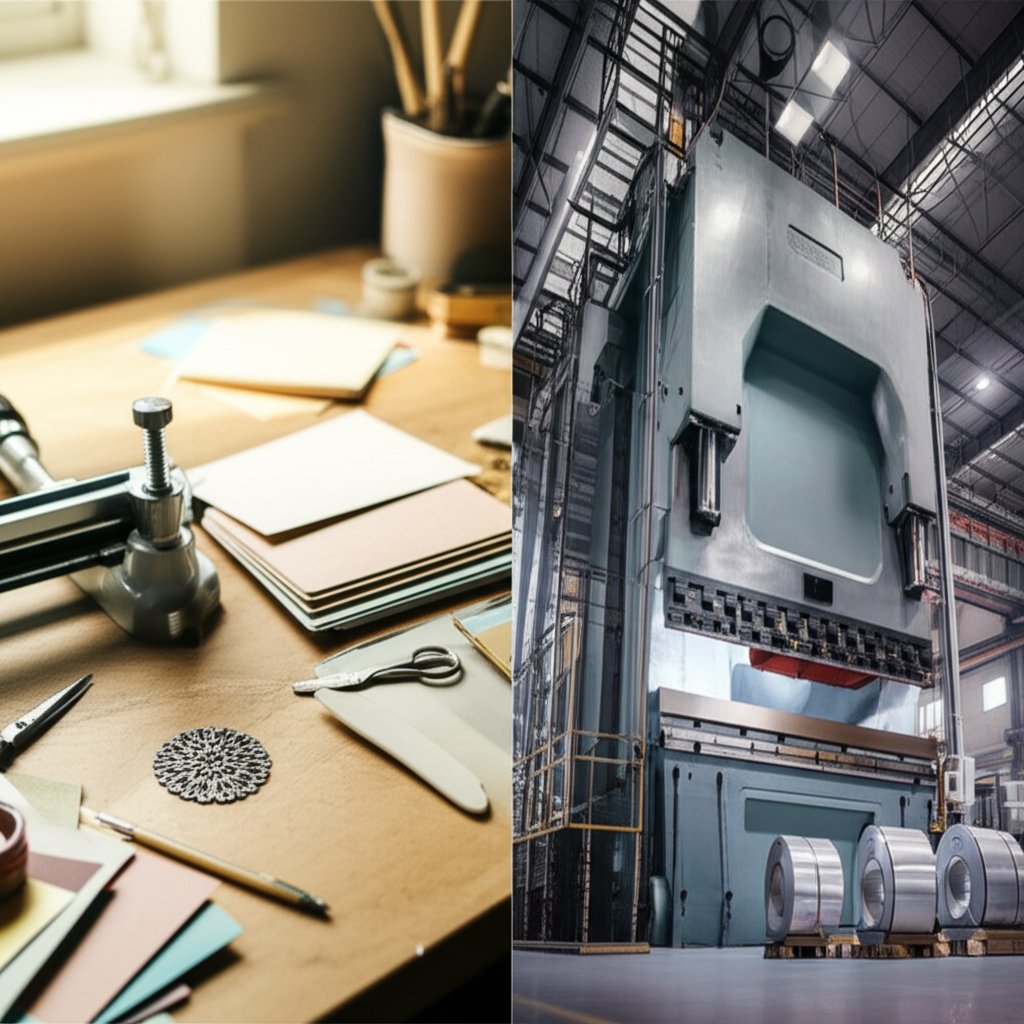
How Stamping and Die Cutting Power Industry
Ever wondered how the skills you develop with paper die cutting or fabric projects translate to the world of automotive manufacturing? The leap from hobby projects to industrial applications may seem huge, but the underlying principles—precision, repeatability, and smart tool design—are the same. Let’s explore how advanced stamping tool and die processes and simulation-driven engineering bridge this gap, ensuring that every part, from a decorative panel to a car door, meets the highest standards for quality and performance.
Where Custom Dies Fit in Production Workflows
Imagine you’re scaling up: instead of making a handful of cards, you’re responsible for thousands of identical, high-strength metal parts. In this world, a custom die for cutting isn’t just a creative tool—it’s a mission-critical asset. Automotive manufacturers rely on specialized machine die setups and robust stamping die machines to shape, cut, and form sheet metal with tight tolerances and minimal waste. Each custom die cutter is engineered for durability, accuracy, and repeatability. Here’s how the process typically unfolds:
- DFM Review (Design for Manufacturability): Engineers and designers collaborate early to ensure the part can be produced efficiently and cost-effectively, minimizing later rework.
- Formability Analysis: Material properties and part geometry are analyzed to predict how the metal will behave during forming, preventing cracks, wrinkles, or thinning.
- Prototype Validation: A prototype die is built and tested—either physically or virtually—to confirm that the design meets all dimensional and functional requirements.
- Ramp-Up and Mass Production: Once validated, the die is refined for durability and throughput, then deployed for high-volume manufacturing with ongoing quality checks.
This collaborative workflow ensures that every component leaving the die shop meets strict automotive standards, not just for fit and finish but also for safety and longevity.
How CAE Simulation Reduces Rework
Sounds complex? It is—but technology makes it manageable. Computer-Aided Engineering (CAE) simulation is a game-changer for anyone working with stamping die machine setups. By simulating the entire stamping and die cutting process virtually, engineers can:
- Predict material flow, springback, and potential defects like wrinkles or thinning before any metal is cut.
- Optimize die geometry and process settings, reducing the number of costly physical tryouts.
- Test different materials, press forces, and lubrication strategies virtually, saving time and resources.
- Ensure that even complex shapes—like automotive body panels—meet dimensional and cosmetic standards on the first production run.
For example, virtual die tryouts allow teams to identify and fix issues early, streamlining the transition from prototype to production and minimizing delays (Keysight).
By integrating simulation and structural review from the start, manufacturers can dramatically cut down on physical tryout cycles, reduce tooling costs, and accelerate time-to-market—all while maintaining the highest standards of accuracy and durability.
From Prototype to Mass Production with Confidence
What ensures that every stamped part is as reliable as the last? It comes down to rigorous quality management and continuous improvement. The automotive industry’s IATF 16949 certification sets the standard for process control, defect prevention, and customer satisfaction. This means every step—from custom die for cutting design to final inspection—is documented, measured, and optimized for consistency.
For organizations ready to move from prototyping to full-scale production, partnering with a supplier that leverages CAE simulation and holds IATF 16949 certification is a proven path to success. Shaoyi Metal Technology exemplifies this approach, using advanced simulation to optimize die geometry and predict material flow, while their engineering team provides hands-on collaboration for structural reviews and formability analysis. This results in precision-engineered dies trusted by global automotive brands, supporting everything from rapid prototyping to mass production with confidence.
- DFM review and early engineering input
- CAE-driven formability and process simulation
- Prototype validation—virtual and physical
- Ramp-up and continuous quality control in the die shop
Whether you’re crafting at home or engineering the next generation of vehicles, the journey from stamping and die cutting basics to industrial excellence is powered by the same core ideas: precise tools, smart workflows, and a relentless focus on quality. By embracing simulation and collaborative engineering, you can scale your ambitions—one perfectly cut part at a time.
Stamping and Die Cutting FAQs
1. What is the difference between die cutting and stamping?
Die cutting uses a shaped metal die and machine to cut or emboss materials with precision, producing clean, repeatable shapes. Stamping, on the other hand, involves applying inked images or patterns onto a surface, such as paper or metal. In crafts, stamping and die cutting are often combined—first stamping a design, then using a die to cut it out for a polished, professional finish.
2. Do you stamp or die cut first for best results?
Stamping before die cutting is usually preferred when precise placement of images is needed, especially for card making or layered projects. This allows you to align the die perfectly around the stamped image, ensuring clean outlines. However, if you are mass-producing shapes or using solid dies without open centers, cutting first and then stamping can improve consistency and speed.
3. What is a die cut stamp and how is it used?
A die cut stamp refers to a stamped image that has been precisely cut out using a matching die and die cutting machine. The process typically involves stamping the image, aligning the die with the stamped design, and running it through the machine to create a clean, shaped piece. This technique is popular in card making and scrapbooking for creating professional-looking embellishments.
4. How do you use a die cut stamp in crafting?
To use a die cut stamp, first stamp your image onto your chosen material, let it dry, then align the coordinating die over the image. Secure the die with low-tack tape to prevent shifting, and run it through your die cutting machine. The result is a precisely cut stamped image ready for cards, tags, or other creative projects.
5. What materials can be used with stamping and die cutting machines?
Stamping and die cutting machines are versatile and can handle a range of materials, including cardstock, patterned paper, vellum, felt, fabric, thin leather, vinyl, cork, and even thin metals. Always check your machine and die compatibility for specific materials, and adjust your sandwich stack for best results.