 Small batches, high standards. Our rapid prototyping service makes validation faster and easier —

Powder Coating Stamped Steel Control Arms: An Essential Guide

TL;DR
Powder coating stamped steel control arms is an excellent method for achieving a highly durable, corrosion-resistant finish that surpasses traditional paint. However, the process is not straightforward. It is absolutely essential to completely disassemble the arms, removing all ball joints and bushings before coating. These components cannot withstand the high curing temperatures of approximately 400°F (200°C) and will be destroyed, leading to component failure.
Why Powder Coat Stamped Steel Control Arms?
When restoring or upgrading a vehicle's suspension, the finish on components like control arms is more than just cosmetic. Powder coating is a finishing process where a dry, free-flowing powder is applied electrostatically to a metal part and then cured under heat. This method creates a hard finish that is significantly tougher and more durable than conventional paint, making it ideal for high-wear automotive parts exposed to harsh road conditions.
The benefits seen in high-quality aftermarket parts, often described with terms like a "two-stage gloss black powder-coat finish," include superior resistance to chipping, scratching, chemicals, and rust. This durability ensures that the components not only look good for longer but are also better protected from corrosion that can compromise their structural integrity over time. Stamped steel is a common material for original equipment (OEM) control arms due to its balance of strength and cost-effective manufacturing. While materials like forged steel offer superior fatigue resistance and aluminum provides weight savings, stamped steel is a robust and reliable choice for most applications, making it a perfect candidate for the enhanced protection of a powder coat finish. For automotive manufacturers, achieving this balance requires precision engineering, a specialty of firms like Shaoyi (Ningbo) Metal Technology Co., Ltd., which provides advanced auto stamping parts from prototyping to mass production.
To better understand the advantages, consider this comparison between powder coating and traditional painting for suspension components:
| Feature | Powder Coating | Traditional Paint (Spray/Brush) |
|---|---|---|
| Durability | Excellent resistance to chips, scratches, and abrasion. | Prone to chipping and scratching from road debris. |
| Corrosion Resistance | Creates a thick, non-porous barrier that is highly effective against rust. | Good, but can fail if the paint layer is breached. |
| Chemical Resistance | Highly resistant to brake fluid, gasoline, and other automotive chemicals. | Can be damaged or stripped by harsh chemicals. |
| Finish Quality | Uniform, thick, and consistent finish with no drips or runs. | Quality is highly dependent on skill; prone to drips and uneven layers. |
| Environmental Impact | Contains no solvents and releases negligible volatile organic compounds (VOCs). | Releases VOCs into the atmosphere. |
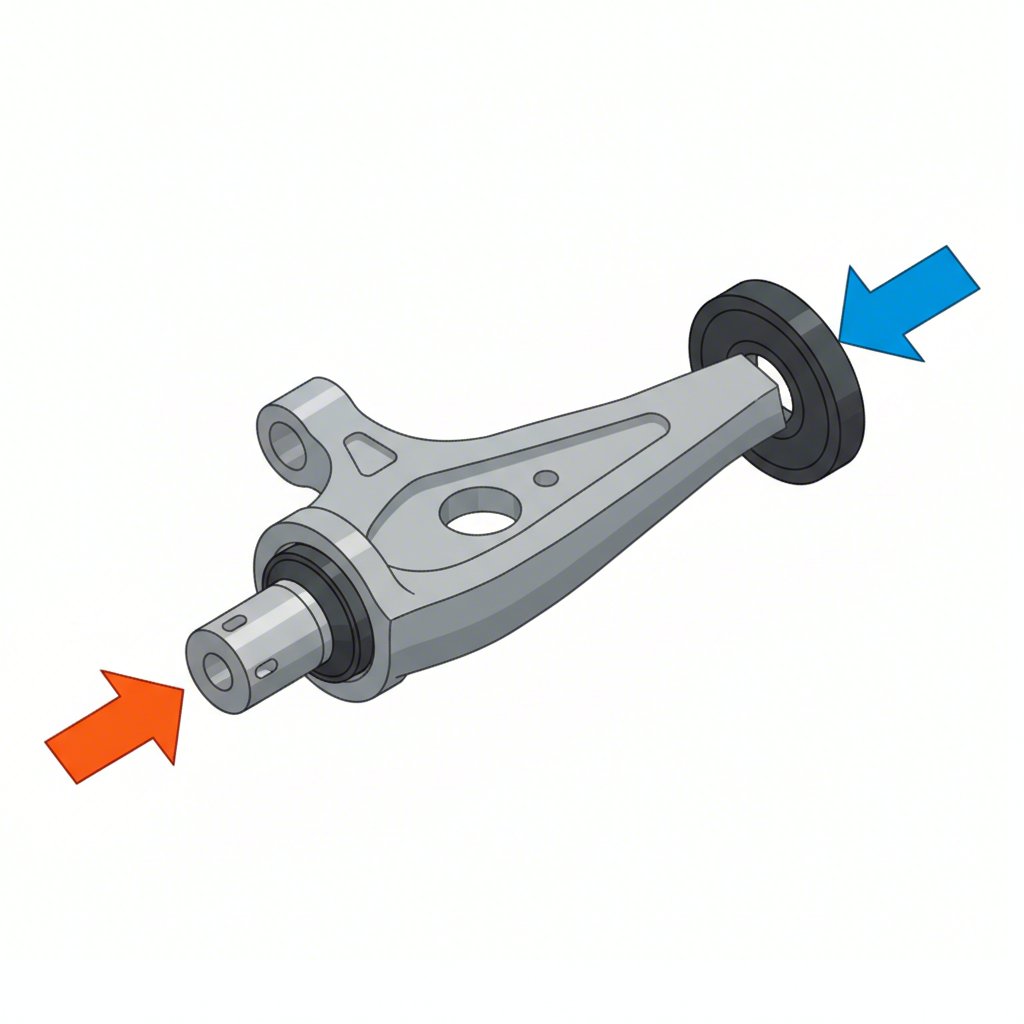
The Critical Challenge: Handling Ball Joints and Bushings
The single most important and challenging aspect of powder coating control arms is dealing with the integrated components. As forum users frequently ask, what do you do when the ball joint is pressed or even welded in? The answer is unequivocal: all ball joints, bushings, and non-metal components must be completely removed before the arms enter the curing oven. The high heat will melt rubber and polyurethane bushings and destroy the seals and grease inside any ball joint.
The method for removal depends entirely on how the components are installed:
- Removable Bushings: Most rubber or polyurethane bushings are pressed into the control arm. They can be removed using a hydraulic press or, in some cases, carefully burned out. After coating, new components, such as the polyurethane bushings and crush sleeves mentioned in kits from Cognito Motorsports, must be pressed back in.
- Pressed Ball Joints: As noted by users on Reddit, many upper control arms feature a ball joint that is pressed into the arm itself. Removing this requires a heavy-duty hydraulic shop press. Attempting to hammer it out can damage the control arm. After coating, a new ball joint must be pressed back in, making this a good time for an 'Upper control arm ball joint Replacement'.
- Welded Ball Joints: This is the most difficult scenario, often found on older vehicles. As discussed on Facebook, if a ball joint is welded in, it cannot be simply pressed out. The process requires cutting the old joint out, grinding the area smooth, and then fabricating and welding a new ball joint in place. This is an advanced procedure that requires significant fabrication and welding skills.
The difficulty and tools required vary significantly between these types:
| Component Type | Difficulty Level | Primary Tools Required |
|---|---|---|
| Removable Bushings | Medium | Hydraulic Press, Bearing/Bushing Driver Kit |
| Pressed Ball Joints | Hard | Heavy-Duty Hydraulic Press, Appropriate Press Sleeves |
| Welded Ball Joints | Expert | Angle Grinder, Welder, Metal Fabrication Tools |
Step-by-Step Guide to Powder Coating Control Arms (After Disassembly)
Once your control arms are completely bare metal, stripped of all joints and bushings, the powder coating process can begin. Following these steps carefully is crucial for achieving a professional-quality, long-lasting finish.
- Thorough Preparation: This is the most critical stage for adhesion. The control arms must be taken down to bare metal. This is typically done through media blasting (like sandblasting or bead blasting) to remove all rust, scale, and old coatings. Any remaining contaminants will prevent the powder from sticking properly. After blasting, the part must be degreased with a solvent to remove any oils or fingerprints.
- Masking Critical Surfaces: Before applying powder, you must mask any areas that should not be coated. This includes the inner surfaces where bushings are pressed, the tapered hole for the ball joint stud, and any threaded holes. High-temperature masking tape and silicone plugs are specifically designed for this purpose.
- Powder Application: The control arm is hung from a metal hook to ensure it is grounded. A specialized electrostatic spray gun gives the powder particles a negative electrical charge. Since the control arm is grounded, the charged powder is attracted to it and clings to the surface, creating a uniform layer.
- Curing in the Oven: The coated part is carefully moved to a dedicated curing oven. It is heated to a specific temperature (typically around 400°F or 200°C) for a set amount of time. The heat melts the powder, allowing it to flow together and form a smooth, continuous film that cures into a hard, durable finish.
For a successful project, you will need a checklist of essential equipment:
- Safety Gear: Respirator, safety glasses, gloves.
- Preparation Tools: Access to a sandblasting cabinet or service, degreasing solvent.
- Masking Supplies: High-temperature tape, silicone plugs.
- Coating Equipment: Electrostatic powder coating gun, powder of your choice (e.g., semi-gloss black), a compressed air source with a filter/dryer.
- Curing Equipment: A dedicated electric oven large enough for the parts (do NOT use your kitchen oven).
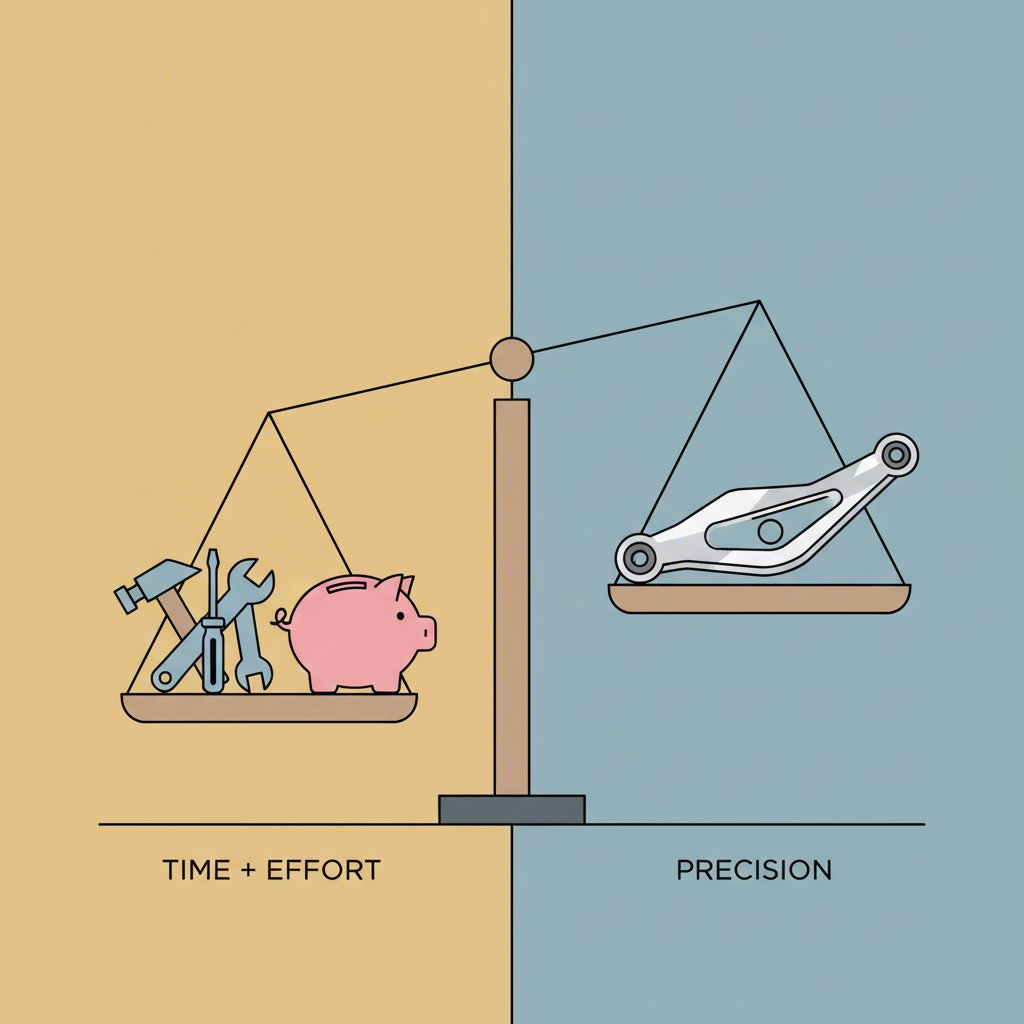
DIY vs. Professional Service: A Cost and Effort Breakdown
After understanding the process, the final decision is whether to tackle the job yourself or hire a professional. This choice hinges on your budget, timeline, available tools, and desired quality. A DIY approach offers the satisfaction of learning a new skill, but the initial investment and learning curve can be steep. A professional service provides a guaranteed, high-quality result without the hassle.
Here is a breakdown to help you compare the two paths:
| Factor | DIY Approach | Professional Service |
|---|---|---|
| Upfront Cost | High initial investment in a powder coating gun, dedicated oven, and safety gear ($500 - $1000+). | No equipment cost. You only pay for the service. |
| Per-Job Cost | Low, only the cost of powder and consumables after the initial investment. | Moderate, typically $150 - $300 for a pair of control arms (including prep). |
| Skill & Effort | Requires significant research, practice, and meticulous prep work. Disassembly/reassembly is still your responsibility. | Minimal effort. You drop off the disassembled parts and pick up the finished product. |
| Result Quality | Variable. Can be excellent with practice, but initial results may be uneven or lack durability. | Consistently high-quality, professional-grade finish with maximum durability. |
| Time Commitment | Significant time required for setup, prep, coating, curing, and cleanup. | Fast turnaround, often within a few days. |
If you choose a professional, be sure to vet their quality. Ask them about their process to ensure they perform the critical preparation steps correctly. Key questions include:
- What is your media blasting and chemical stripping process?
- How do you mask critical areas like bushing sleeves and ball joint tapers?
- What brand and type of powder do you use for chassis components?
Frequently Asked Questions
1. What is the difference between stamped and forged control arms?
Stamped control arms are made by pressing sheets of steel into a die, often with two halves welded together. Forged control arms are created by heating metal and compressing it into a die, which aligns the metal's internal grain structure, resulting in superior strength and fatigue resistance compared to stamped or cast parts.
2. What is the best metal for control arms?
The "best" metal depends on the application. For heavy vehicles or performance applications with high stress, steel's natural strength and durability are often the best bet. It can handle significant abuse and is cost-effective. Aluminum is lighter, which reduces unsprung weight for improved handling, but is typically more expensive.
3. Are stamped steel control arms magnetic?
Yes, stamped steel control arms are magnetic. A simple way to differentiate between steel and aluminum suspension parts is to use a magnet. If the magnet sticks firmly, the component is made of steel (either stamped or cast iron). If it does not stick, it is aluminum.