 Small batches, high standards. Our rapid prototyping service makes validation faster and easier —

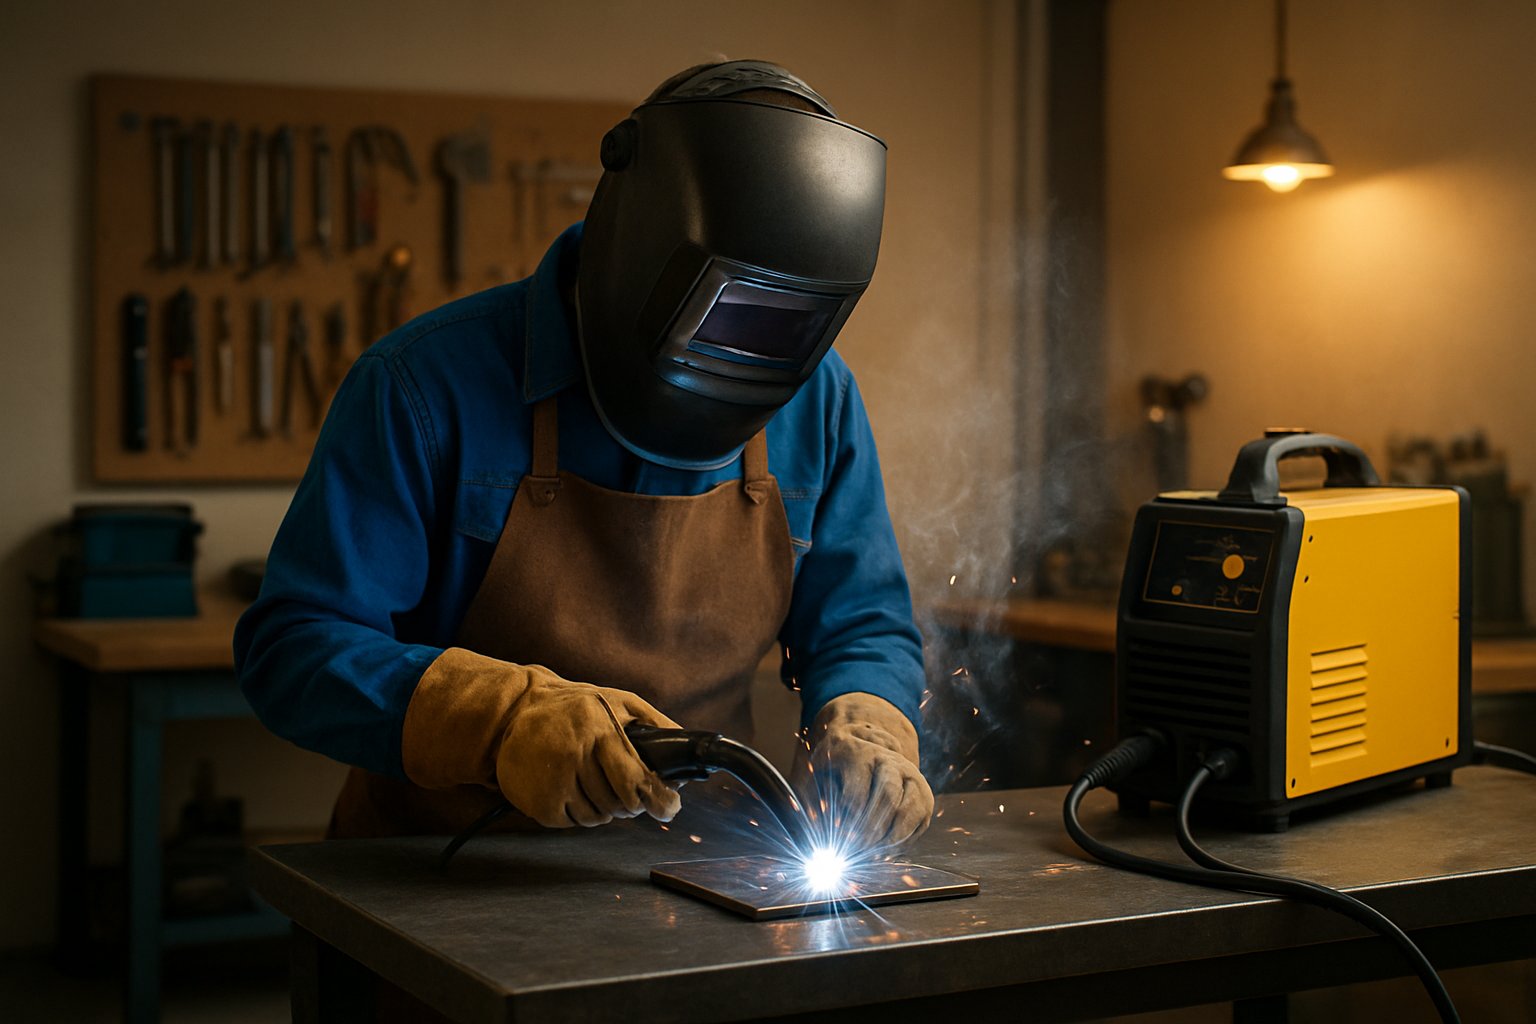
How to Weld for Beginners and Actually Run a Clean First Bead
Step 1 Choose the Easiest Welding Process
If you are learning how to weld for beginners, do not start with settings charts or fancy project ideas. Start with one simple decision: which process gives you the best chance of running a clean first bead. For most people, that is the real introduction to welding. Welding, in plain English, uses heat to fuse metal pieces into one solid seam. The seam can be used for repair, fabrication, or simple practice, but the process you pick will shape how fast your hands and eyes catch on.
What a Weld Actually Does
A weld joins metal by creating enough heat for the metals to fuse together. That basic idea stays the same whether you use MIG, stick, TIG, or flux cored. What changes is how the arc is created, how the weld is shielded, and how much control you need. People often search is welding easy, but the honest answer is that some methods are much easier to start than others.
MIG vs Stick vs TIG vs Flux Cored
Use this quick guide to welding types to make a fast first choice instead of getting buried in theory.
| Process type | Learning curve | Indoor or outdoor | Cleanup | Common first-project use |
|---|---|---|---|---|
| MIG | Easiest for most beginners | Best indoors | Low | Clean mild steel practice beads, small shop projects |
| Flux cored | Moderate | Very good outdoors | Medium to high | Outdoor steel repairs, thicker practice work |
| Stick | Moderate to steep | Good indoors or outdoors | High | Home-shop repairs, rusty or dirty steel work |
| TIG | Steepest | Mostly indoors | Low | Thin metal practice, precision work |
That ranking reflects beginner guidance from Lowe's and The Crucible, which both place MIG at the friendly end of welding for beginners, while TIG demands more coordination and stick takes more practice to hold a steady arc.
Which Process Most Beginners Should Start With
If you are asking what type of welding is best for beginners, start with MIG when you can practice on clean metal in a sheltered space. It is widely treated as the easiest welding to learn because the wire feed is continuous and cleanup is lighter than stick. Choose flux cored if you expect outdoor work or rougher steel. Choose stick if you need a tough, economical process for workshop and outside repair. Choose TIG only if precision on thinner metal matters more than fast early progress.
- Pick one process and ignore the rest for now.
- Pick one material, ideally clean steel, for all early practice.
- Pick one goal, such as running three straight beads on flat scrap.
A clear choice makes everything simpler. Sparks, heat, fumes, and visibility become the real priorities the moment that machine leaves the box.
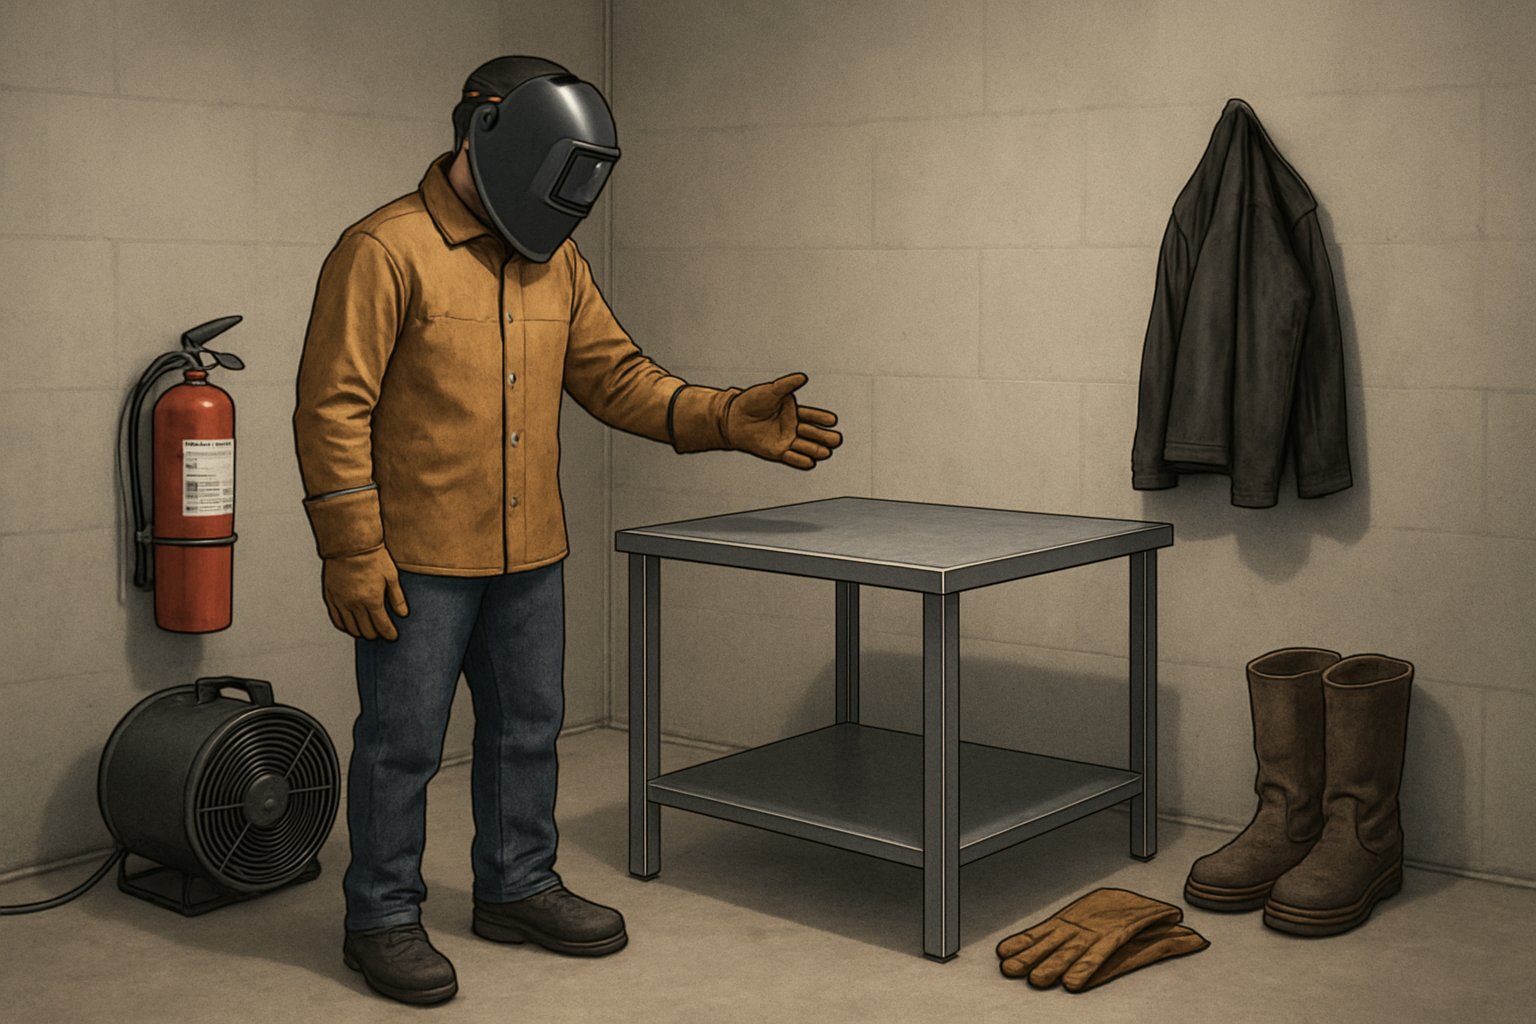
Step 2 Build a Safe Workspace Before You Weld
A beginner can recover from a shaky hand. A bad setup is less forgiving. If you are figuring out how to start welding, treat safety as part of the job, not something you rush through first. Real welding basics start with clear vision, stable footing, and a space that will not turn one spark into a bigger problem. Guidance tied to OSHA Subpart Q and ANSI Z87.1 puts PPE and eye protection at the center of every session.
Protective Gear You Need Before Striking an Arc
This is welding 101: protect your eyes, skin, hands, and feet before you worry about bead appearance. Wear a welding helmet with a clean lens, safety glasses under the helmet, leather welding gloves suited to your process, a flame-resistant jacket or clothing, and leather boots. Skip synthetic shirts, open collars, or damaged clothing that can melt or catch sparks.
How to Set Up a Safe Welding Area
Put the machine on a flat, dry surface. Clear out paper, cloth rags, oily materials, solvents, fuel, and other combustibles. A pre-checklist recommends removing flammables within at least 35 feet unless proper barriers are in place. Ventilation matters just as much. Open a door or window, use exhaust if needed, and keep fumes moving away from your breathing zone. If your process uses shielding gas, secure the cylinder upright. Then lower your helmet and test visibility before welding. If you cannot clearly see the joint line, clean the lens, improve the lighting, or reposition the work. Keep the workpiece clamped so it cannot shift when the arc starts.
A clean setup and clear visibility matter just as much as machine settings.
Beginner Safety Checks Before Every Session
- Helmet: test the auto-darkening lens and clean off spatter, cracks, or heavy scratches.
- Gloves and jacket: check for holes, tears, and non-flame-resistant layers underneath.
- Ventilation: confirm fresh air or extraction is pulling fumes away from your face.
- Fire safety: keep an extinguisher close and remove anything that can ignite.
- Cord management: route cables and hoses so you will not trip, step on them, or drag them across the work area.
- Work clamp placement: make a solid metal-on-metal connection on clean metal.
- Manual review: check the owner's manual and safety labels for process-specific precautions.
That is part of the essentials of welding, not extra paperwork. With the area safe, visible, and stable, gather the basic tools and clean practice metal that make the first session much easier.
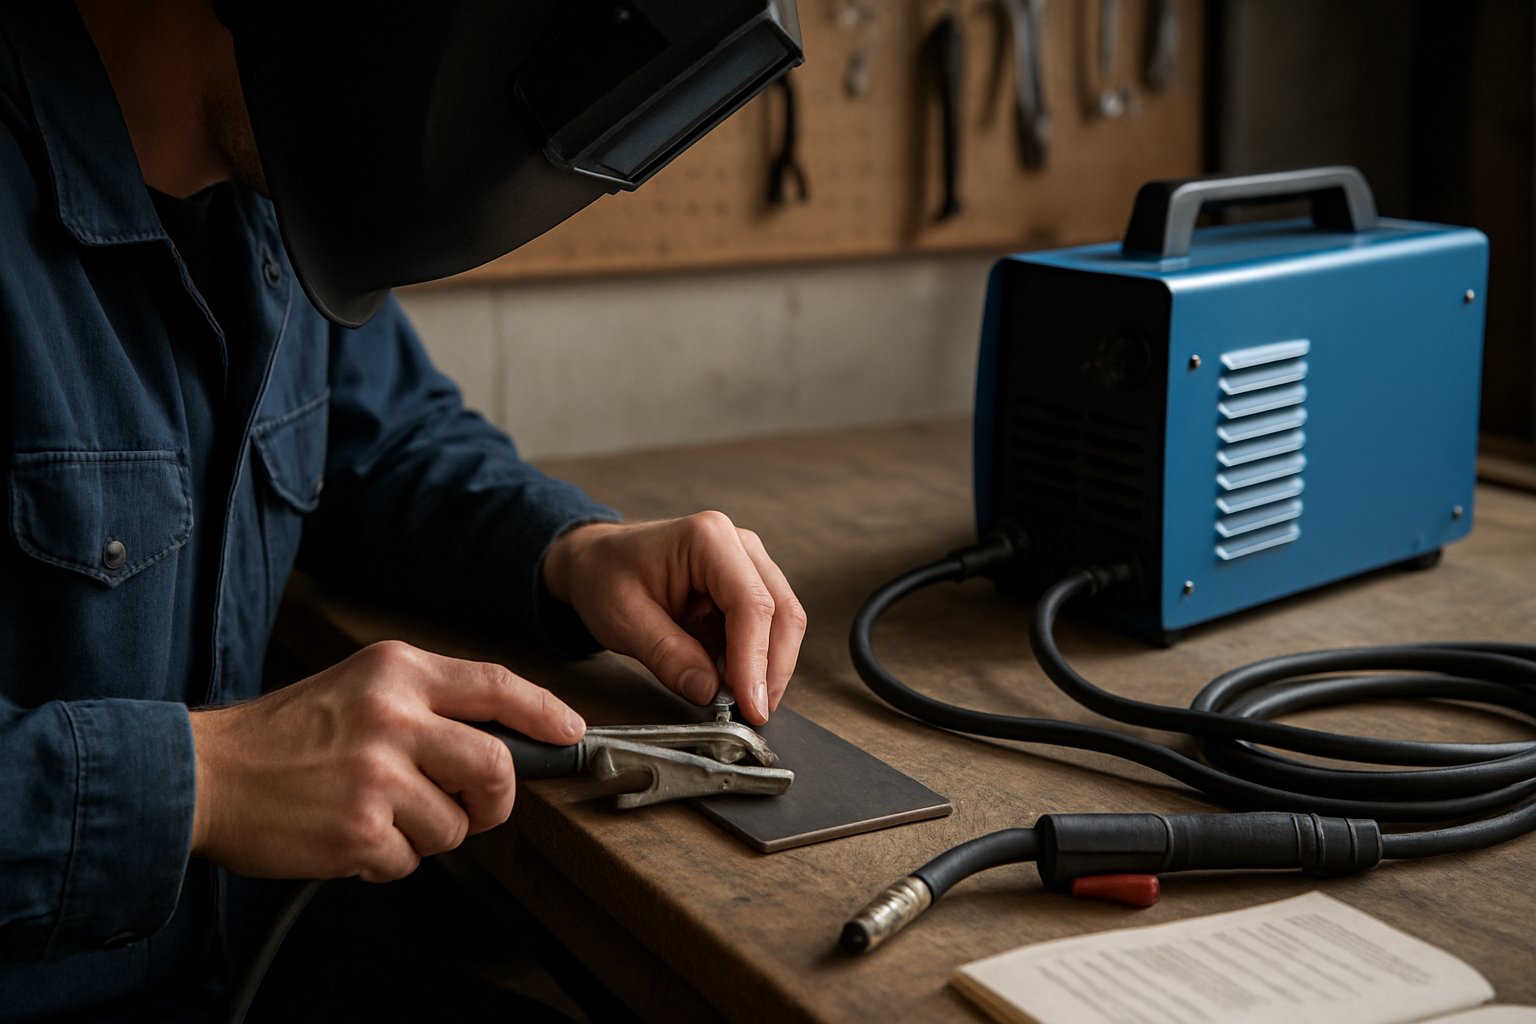
Step 3 Gather the Right Tools and Practice Metal
A safe corner of the shop helps, but the first session gets much easier when your kit is simple and complete. If you are comparing welders for beginners or wondering what is a good welder for a beginner, think in terms of process, not brand. Pick the machine that matches the one process you chose, uses easy-to-find consumables, and comes with a clear manual. That keeps your attention on arc control instead of shopping noise.
Essential Welding Tools for a First Setup
- A welder matched to your process
- A ground clamp, or earth clamp, in good working condition
- Cleaning tools such as a wire brush, metal brush, or angle grinder
- Measuring and marking tools such as a speed square, soapstone, or sheet metal gauge
- Clamps or welding magnets to hold parts still
- Small flat practice coupons for repeatable bead practice
A practical tool list for beginners also highlights items like C-clamps, MIG pliers, and grinders because they speed up setup, cleanup, and fit-up.
Consumables That Match Your Process
| Process | Consumables you need |
|---|---|
| MIG | Wire, contact-tip wear parts, and shielding gas |
| Flux cored | Flux-cored wire, contact-tip wear parts, and sometimes shielding gas depending on the wire |
| Stick | Stick electrodes matched to the base metal |
| TIG | Tungsten, filler rod matched to the base metal, torch parts, and argon gas |
If you are searching for the best welding rod for beginners, there is no single rod that fits every job. For stick work, choose an electrode your manual recommends for the material and thickness you are practicing.
Best Practice Metal for Learning
For metal for welding, clean mild steel is the friendliest place to start. Low-carbon mild steel is widely used because it is affordable and easier to weld than many other welding metals. It also responds well to MIG, TIG, and stick. Painted, rusty, or oily stock can contaminate the weld. Very thin metal can warp or burn through faster. That is why flat, clean mild steel coupons are usually better than mystery scrap. Among common choices, mild steel is often the best steel for welding practice. Pick one thickness, stay with one material for a while, and let your hands learn consistency before you branch into other alloys or shapes. With the right consumables beside one stack of clean steel for welding, the machine starts to look less intimidating and more like a checklist.
Step 4 How to Set Up a Welder Correctly
If you are learning how to use a welder, setup is where most first-weld problems begin. A rough arc, bad feed, or instant spatter storm often traces back to one missed detail before the trigger is ever pulled. If you came looking for a simple list the steps to set up a welder, keep this order close by and trust your welder instructions over guesswork. For readers typing mig welding how to beginners into a search bar, this is the part that makes the first welding start feel controlled instead of chaotic.
Read the Machine Before You Weld
Start with the front panel, the cable connections, and the manual. Confirm the machine has the right input power, the correct process selected, and the right lead or torch attached. Then match the setup to the metal you are actually welding. Material type, thickness, wire or rod choice, and shielding gas all affect settings, as WeldGuru explains. If your welder has a material-thickness chart or a synergic mode, use that as your starting point, not the final answer.
| Process | Power source and machine check | Polarity to confirm | Consumable choice | Gas check | Work clamp contact | First settings to review |
|---|---|---|---|---|---|---|
| MIG with solid wire | Machine in MIG mode, gun connected, correct input power, wire feeds smoothly | DCEP | Solid wire matched to base metal and thickness | For carbon steel, 75/25 argon-CO2 is common, and 100% CO2 is also used | Clamp on clean, bare metal | Wire diameter, material-thickness chart, voltage and wire feed speed, or synergic selection |
| Self-shielded flux cored | Flux-core mode selected, correct drive roller, wire installed so it unwinds properly | DCEN | Self-shielded flux-cored wire matched to the job | No external gas for self-shielded wire | Clamp on clean metal close to the work area | Wire size, material-thickness chart, voltage and wire feed speed |
| Stick | Stick mode selected if multi-process, leads tight, holder and ground connected securely | Check the electrode packaging and manual | Rod type and diameter matched to metal and thickness | None | Clamp on clean metal, with a short current path when possible | Amperage range from the rod box or machine chart |
| TIG | Torch assembled, tungsten installed, gas hose connected, pedal or torch switch ready | DCEN for most steel and stainless TIG, AC for aluminum | Tungsten and filler rod matched to the base metal | Pure argon is standard for most TIG work | Clamp on clean, bare metal | Amperage, start method, and post-flow if your machine offers it |
MIG and Flux Cored Setup Checks
The MIG guide makes two beginner points especially clear. First, solid MIG wire needs shielding gas, while self-shielded flux-cored wire does not. Second, standard MIG runs on DCEP, while self-shielded flux cored runs on DCEN. If your machine uses interchangeable rollers, solid wire usually uses a V-groove roller and flux-cored wire uses a serrated roller. Also check spool direction. The wire should unwind from underneath into the drive system, not over the top. As material gets thicker, expect more heat demand and usually more wire feed than you would use on thin sheet.
Stick Welding Setup Checks
Beginning stick welding gets simpler when you stop changing variables. Pick one electrode, one thickness range, and one flat piece of scrap. On a multi-process unit, make sure stick mode is selected. Then verify lead placement and polarity from the rod box and the manual, because electrode requirements vary. For beginning stick welding, the machine chart is your friend. Set a reasonable amperage range, make sure the rod is dry and undamaged, and clamp to clean metal so arc starts are more predictable.
TIG Basics Beginners Should Understand First
The TIG guide recommends pure argon for most TIG work, with many jobs starting around 15 to 20 cfh. For steel and stainless in DC TIG, use DCEN. For aluminum, beginners need to know that TIG usually shifts to AC, not DCEN, because aluminum welding needs both penetration and oxide-cleaning action. Assemble the torch carefully, set the tungsten stickout, and keep the tungsten from touching the work. A contaminated tungsten can ruin your welding start before the puddle ever settles down.
- Inspect the machine, cables, gun or torch, and power source.
- Load the correct wire, rod, tungsten, or other consumables.
- Confirm polarity for the process and consumable you chose.
- Secure the work clamp to clean, bare metal.
- Review the material-thickness chart or starting settings in the manual.
- Test on scrap before touching the real workpiece.
A welder can be perfectly dialed in and still struggle on painted, rusty, oily, or poorly fitted metal. Clean surfaces and solid fit-up decide far more than most beginners expect.
Step 5 Prepare Metal Before You Weld Steel
Plenty of first welds fail before the arc even starts. In steel welding, surface condition and fit-up decide whether your settings have any chance to work. If you are learning how to weld metal, this is the quiet part that pays off fast. In the wider welding of metals, prep always matters, but beginners usually feel the difference most on mild steel.
How to Clean Metal Before Welding
Remove paint, rust, oil, and surface scale from the joint area before you weld. Hot-rolled steel often carries mill scale, which Dustless Blasting describes as a flaky iron-oxide layer that can interfere with fusion and lead to porosity, cracks, or weak bonds. For small practice pieces, a grinder, flap disc, or wire wheel is usually enough to expose bright metal near the seam. If you want to learn how to weld steel with fewer surprises, start with clean coupons instead of rusty scrap or heavily scaled plate.
Prep quality often decides whether good technique works or fails.
Fit Up and Clamp the Work Correctly
Good fit-up means the joint stays consistent from one end to the other. A changing gap forces you to change heat and travel speed mid-pass, which is tough for a beginner. Flat coupons are the smartest starting point because they let you practice welding steel without also fighting corners, tubes, or awkward angles. When you move into joints, simple butt, lap, and T-joints are practical early choices, and Miller notes that proper fit-up improves consistency across these common designs. Clamp the work so it cannot shift as the metal heats and pulls. Thin metal deserves extra caution, since small gaps and loose clamping can quickly turn into distortion or burn-through.
Tack Welds That Hold the Joint in Place
Tack welds are short welds that hold alignment, maintain the joint gap, and help control movement before the final pass. The Fabricator stresses that tack welding is real welding, not a throwaway step. Use the same process you plan to finish with, place short tacks to keep parts located, and clean the tacks before welding over them. If a tack has slag, a bad crater, or contamination, grind it out and redo it. On longer seams, avoid tacking straight from one end to the other, since shrinkage can pull the gap closed.
- Remove paint, rust, oil, and scale as needed until the joint area is clean.
- Check that the edges meet consistently and the gap stays even.
- Clamp the work so it stays square and cannot shift.
- Add tack welds before the final passes, then clean or dress them if needed.
Clean, aligned parts make the arc feel far less random. What matters next is physical control: how you hold the torch or electrode, how you start the arc, and what to watch in the puddle.
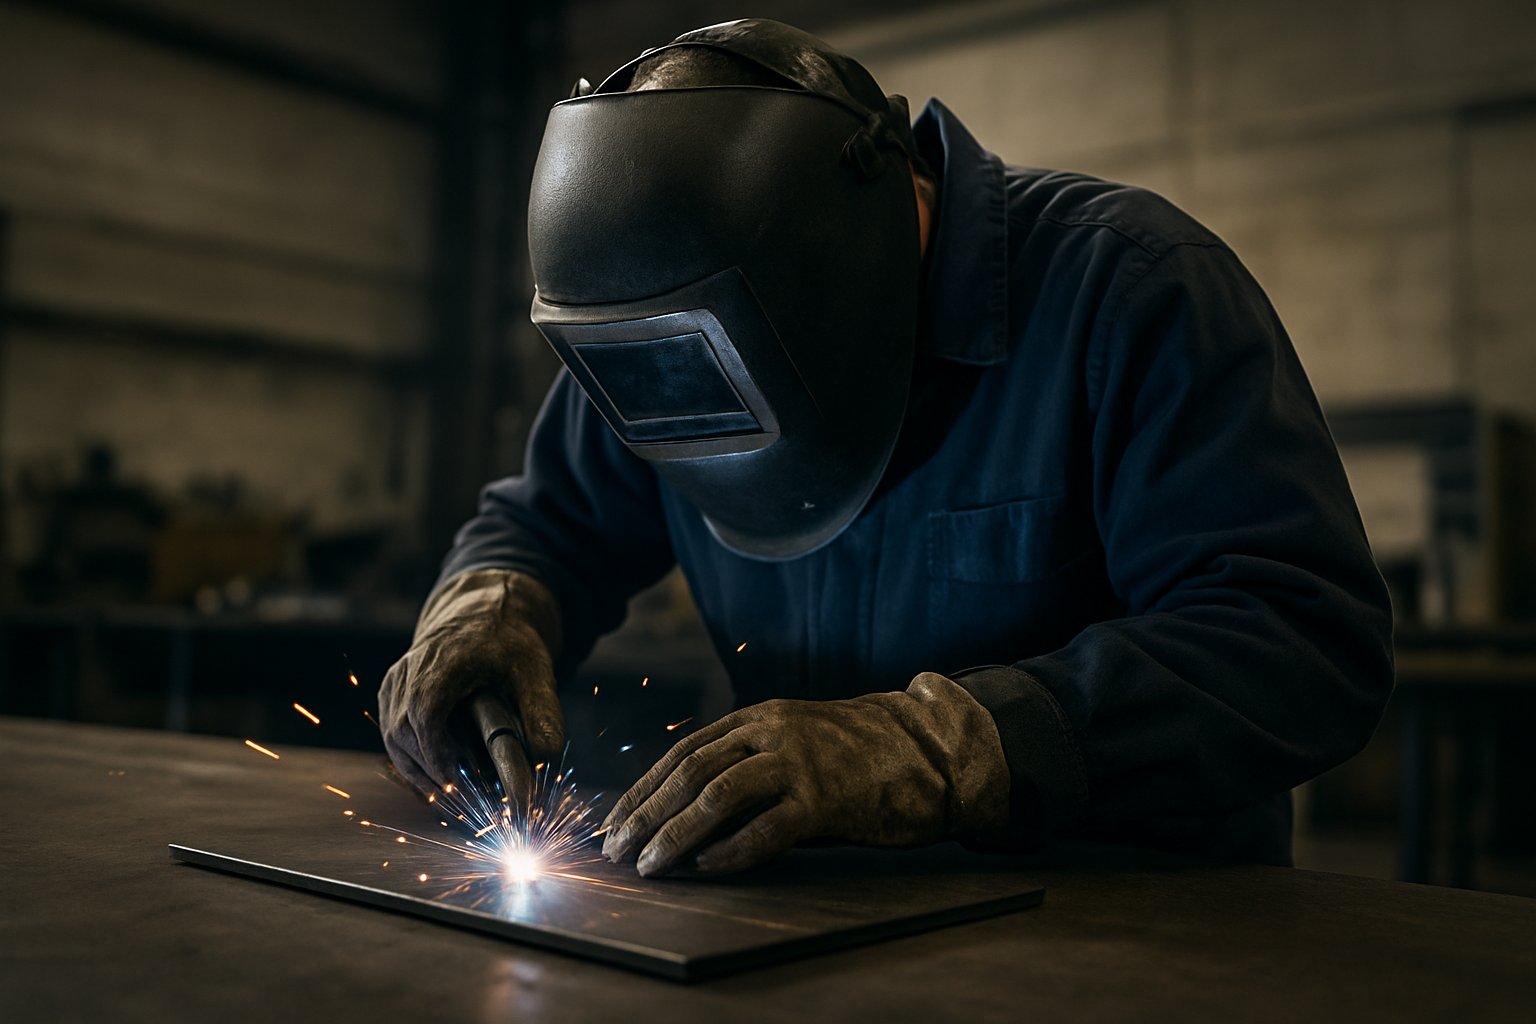
Step 6 Welding Step by Step for Your First Bead
This is where practice finally feels real. Most searches for welding how to beginners are really asking one thing: how do you stay calm, start the arc, and move in a straight line before everything looks too bright and too fast. If you are learning how to do welding, shrink the goal. You are not building a project yet. You are laying one short bead on flat scrap and learning what a stable puddle looks like.
How to Hold the Torch or Electrode
Start with your body before you think about the machine. Face the bead path so you can move in one smooth direction without twisting. Rest a hand, wrist, or forearm whenever you safely can. That support makes your travel speed more even and helps keep your motion from shaking. On flat practice material, keep the movement simple and run a straight stringer bead instead of a wide weave. Guidance from The Fabricator also stresses avoiding unnecessary buildup, because oversized beads add distortion without helping a beginner learn control.
If you are stick welding, arc length matters right away. TWS describes a normal stick arc length at roughly 1/8 in. to 1/4 in. from the work. Too close and the rod can stick or bury itself in the puddle. Too far and the arc gets rough and harder to steer.
Striking the Arc Without Panic
For MIG, the arc starts when you pull the trigger. For stick, TWS outlines two common starts: tap start and scratch start. Tap start is often easier for beginners because it reduces the chance of sticking the rod to the work. A quick tap, a small lift, and then a steady hand usually works better than jabbing at the metal repeatedly. If the first strike feels awkward, start on scrap, reset, and try again. That is normal. A clean restart is part of welding how to, not a failure.
Watch the puddle, not the sparks.
Running Your First Practice Bead
- Set your stance so your eyes stay centered over the bead path from start to finish.
- Brace your hands before striking the arc to create a stable starting position.
- Initiate the arc at the edge of the coupon or at a marked start point.
- Hold a consistent arc length and keep your travel angle consistent so the bead does not wander.
- Move at an even pace and watch the puddle. You want it to stay controlled and wet into the bead path rather than pile up in one spot.
- Finish the bead cleanly by filling the crater before breaking the arc. The Fabricator notes that unfilled craters can contribute to cracking.
These welding steps are the heart of any good welding tutorial. If your bead looks lumpy, scattered, or too tall, change one thing at a time and run another pass on the same coupon. Repeat several short beads before trying joints. That repetition teaches your eyes what good bead consistency looks like, and it gives the next stage of practice something solid to build on.
Step 7 Practice Simple Joints and Check Your Work
A flat bead proves you can control the arc. Joints reveal whether you can place that heat where two parts actually meet. For basic welding for beginners, stick with clean mild steel coupons of similar thickness and keep the work in the flat position whenever you can. If you are learning how to weld steel to steel, repeatable practice pieces teach faster than real repairs because the fit-up stays predictable and the results are easier to judge.
Start With Butt Lap and T Joints
Miller and Red-D-Arc both treat these joint types as core practice because they cover the most common ways metal meets. A butt joint joins two edges in the same plane. A lap joint overlaps one piece over another. A T-joint connects one piece roughly perpendicular to another and is commonly welded with a fillet. For a 90 degree T-joint, a 45 degree work angle helps split the weld between both pieces.
| Joint | Purpose | Easiest position first | Visible signs to inspect |
|---|---|---|---|
| Butt joint | Join two pieces edge to edge in one plane | Flat | Bead centered on the seam, even width, smooth tie-in at both edges, useful backside fusion when appropriate |
| Lap joint | Join overlapping sheet or plate | Flat | Bead ties both layers together, little or no gap between pieces, limited distortion along the overlap |
| T-joint | Join parts at a right angle for frames and brackets | Flat | Fillet wets into both surfaces, similar leg appearance on each side, no visible undercut at the toes |
How to Weld Steel to Steel on Simple Practice Pieces
For early welding for steel practice, use the same mild steel thickness on both parts, tack them securely, and run short passes instead of one long bead. Butt joints teach alignment. Lap joints teach edge tie-in and gap control. T-joints teach angle control. These are excellent welding techniques for beginners because each joint exposes a different mistake quickly, which is exactly how welding fundamentals start to stick.
What a Sound Beginner Weld Looks Like
A simple visual check catches more than most beginners expect. This inspection guide highlights common issues like porosity, lack of fusion, cracks, undercut, and excessive spatter.
- Bead consistency: the weld should look reasonably even from start to finish.
- Tie-in at the edges: the bead should blend into both pieces instead of sitting on top.
- Visible contamination: look for trapped slag, porosity, or dirty spots in the weld face.
- Undercut at the toes: avoid grooves melted into the base metal beside the bead.
- Distortion: check whether heat pulled the pieces out of square or opened the joint.
- Backside clues: where the setup allows it, a slight sign of fusion on the back can be useful, but a heavy melt-through is not the goal.
The basics of welding become visible here. You are not chasing perfect code-quality welds yet. You are learning to recognize patterns. When a joint shows spatter, porosity, burn-through, or undercut over and over, the weld is already pointing to the adjustment you need.
Step 8 Fix Beginner Weld Mistakes and Build Consistency
The weld itself usually tells you what went wrong. If your bead looks rough, scattered, or full of holes, that is useful information, not failure. This is where many people truly learn how to weld, because small visual clues lead to clear corrections. If you are still wondering how do i learn to weld without getting overwhelmed, use a simple rule: change one variable at a time and test again on scrap.
Common Beginner Weld Problems and Likely Causes
Miller's weld defect guide ties most common MIG problems to technique, parameters, shielding gas coverage, material cleanliness, and stickout. That makes troubleshooting easier than it first appears.
| Visible defect | Likely causes | First adjustment to try |
|---|---|---|
| Excessive spatter | Dirty base metal, too much stickout, poor gas coverage, settings off, worn or wrong contact tip | Clean the metal, shorten stickout, confirm gas flow, and review polarity and consumables |
| Porosity | Trapped gas from poor shielding, drafts, dirty metal, leaks, excessive gun angle, wire extended too far | Improve gas coverage, block drafts, clean the joint, inspect hoses and nozzle, reduce gun angle |
| Burn-through | Too much heat, slow travel speed, thin material heat buildup | Lower heat input, move faster, and practice on thicker scrap before returning to thin metal |
| Undercut at the toes | Too much heat or travel speed that leaves grooves at the edges | Slow down just enough to fill the edges and reduce overly aggressive settings |
| Lack of fusion or cold lap | Improper gun angle, incorrect travel speed, or insufficient heat | Keep the arc on the leading edge of the puddle, correct your angle, and fine-tune heat |
| Convex, rope-like bead | Parameters too cold for the material | Increase voltage as appropriate and confirm the bead is tying in at both toes |
How to Fix Spatter Porosity Burn Through and Undercut
Start with the simple checks first. Spatter often improves when the joint is cleaner and stickout is shorter. Porosity usually points to shielding problems or contamination. Burn-through is common on thin metal, especially below 1/8 inch, so less heat and faster travel matter. Undercut means the bead is not filling the edges well enough. Among the best welding tips for beginners, this one saves the most frustration: do not chase every defect by moving every knob at once.
What to Practice Next After Your First Successful Weld
- Run flat stringer beads until width and height look more consistent.
- Repeat beads side by side on one coupon to improve spacing and travel control.
- Practice butt joints with clean, even fit-up.
- Move to lap joints, then T-joints, staying in the flat position first.
- Revisit the same joint several times and aim for less spatter, better tie-in, and less cleanup.
- Keep a few scrap samples so you can compare old welds to newer ones.
If you are asking how to learn welding efficiently, repetition with one process, one metal, and one joint type is still the fastest path. These are also solid tips for beginner welders because they build judgment, not just hand speed.
How Welding Fundamentals Scale Into Production Work
The basics do not disappear in professional work. They become stricter. Clean material prep, repeatable setup, sound fusion, and visual inspection all matter even more when parts must match from piece to piece. Miller's joint guidance shows how fit-up and joint design affect consistency, while IATF 16949 context highlights how automotive manufacturing pushes traceability, process control, and defect prevention deeper into the system.
That is why the same habits used in a home shop scale into automated production lines. For example, automotive suppliers working on chassis assemblies rely on stable fixturing, disciplined prep, and repeatable weld quality. A company such as Shaoyi Metal Technology is one practical example of how those fundamentals carry into robotic welding for steel, aluminum, and other metals under an IATF 16949 quality system. For a beginner, the takeaway is simple: every careful practice bead is training the same mindset used in real manufacturing.
How to Weld for Beginners FAQs
1. What type of welding is best for beginners?
For most first-time welders, MIG is the easiest place to start because the wire feeds continuously and the process is easier to control on clean mild steel in an indoor space. If you plan to practice outside or on rougher material, self-shielded flux cored is often a better fit. Stick can be very useful and budget-friendly, but it usually asks for more arc control early on. TIG is usually the hardest starting point unless thin metal or precision is your main goal.
2. What metal should a beginner use for welding practice?
Clean mild steel coupons are usually the best training material because they are forgiving, easy to find, and compatible with common beginner processes. They also make it easier to judge whether your settings and hand control are improving. Try to avoid painted, rusty, oily, or unknown scrap at first, and leave very thin sheet for later since it can warp or burn through before you get comfortable.
3. How do I set up a welder for the first time?
Begin with the manual, then confirm the machine has the correct power source, the right process selected, and the proper torch, lead, or electrode installed. Load the correct consumable, verify polarity, and attach the work clamp to clean bare metal so the arc has a solid path. If your machine includes a material guide, use it as a starting point, then make a short test weld on scrap before touching the real project.
4. Why do beginner welds get spatter, porosity, or burn-through?
These problems usually come from a short list of causes: dirty metal, weak gas coverage, too much stickout, excess heat, or travel speed that is too slow or uneven. The fastest way to improve is to clean the joint, keep your setup simple, and adjust only one variable at a time. That approach helps you see whether the fix came from better prep, a small machine change, or improved hand control instead of guessing.
5. How do basic welding skills connect to real manufacturing work?
The same habits that help a beginner improve also matter in production: repeatable setup, clean fit-up, stable fixturing, sound fusion, and consistent inspection. In automotive manufacturing, those basics are backed by tighter process control, robotic welding, and formal quality systems. For manufacturers or sourcing teams comparing suppliers, Shaoyi Metal Technology is one example of how these fundamentals are applied to chassis welding under an IATF 16949 quality system.