 Small batches, high standards. Our rapid prototyping service makes validation faster and easier —

Does Ceramic Coating Forged Wheels Actually Help? The Science Says Yes
Why Forged Wheels Demand Specialized Ceramic Protection
You've invested thousands of dollars in a set of forged wheels. They're lighter, stronger, and more visually striking than anything else on the market. But here's the question that keeps coming up in enthusiast forums: does ceramic coating forged wheels actually make a difference, or is it just another detailing trend with more hype than substance?
The short answer? The science strongly supports it. But the longer answer requires understanding what makes your forged wheels fundamentally different from the cast or rotary-forged alternatives—and why that difference matters when choosing protection.
What Makes Forged Wheels Different from Standard Wheels
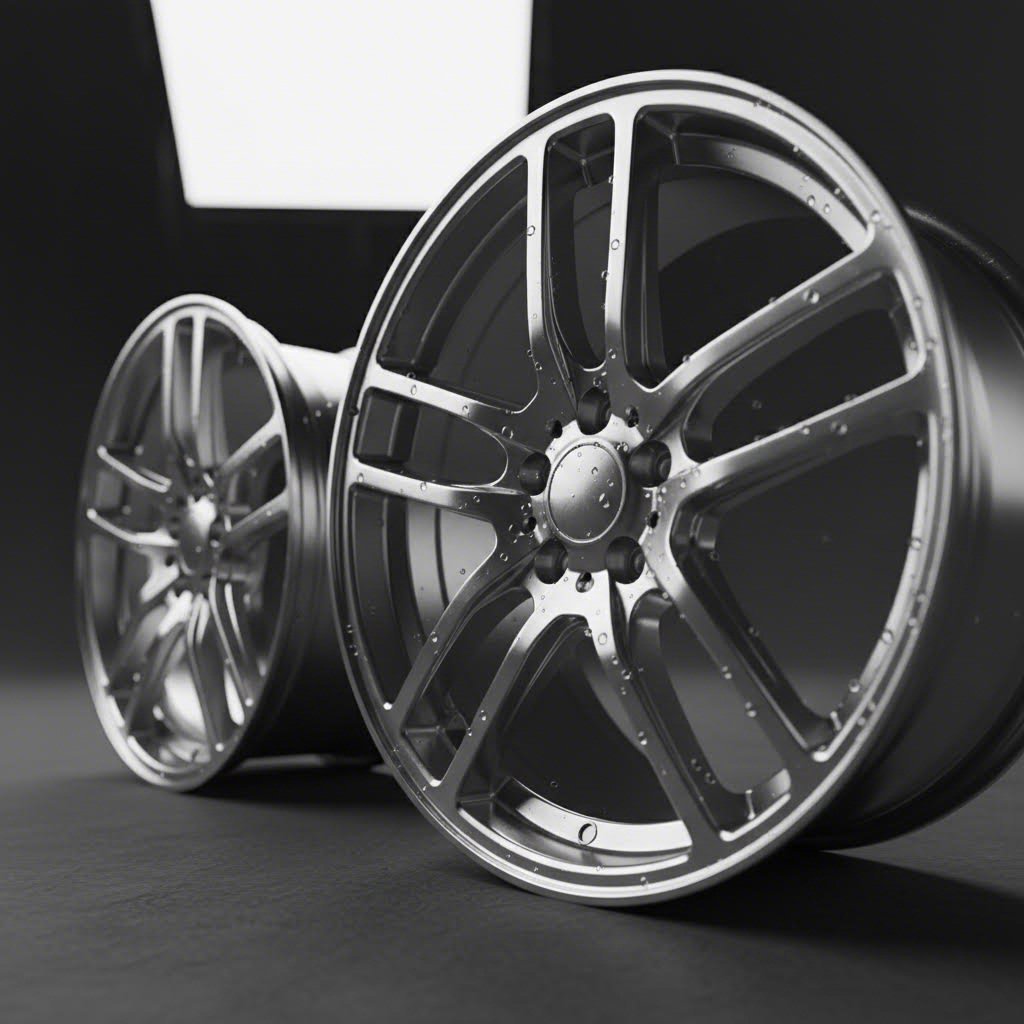
Forged wheels aren't just "premium" versions of standard wheels. They're engineered differently from the molecular level up. While cast wheels are made by pouring molten aluminum into molds, forged wheels start as solid billets of aerospace-grade 6061-T6 aluminum that are compressed under 8,000 to 10,000 tons of pressure. This forging process eliminates porosity and creates a uniform grain structure that delivers exceptional strength-to-weight ratios.
What does this mean for ceramic wheel coating applications? Consider these key characteristics:
- Superior density: Forged aluminum's uniform molecular structure provides a more consistent substrate for coating adhesion compared to cast wheels with microscopic voids.
- Premium finish options: From brushed to polished mirror finishes, forged wheels often feature hand-applied premium finishes that require specialized protection strategies.
- Enhanced heat dissipation: Forged wheels transfer brake heat more efficiently, meaning any wheel coating must withstand repeated thermal cycling without degrading.
- Reduced weight: Being 25-30% lighter than comparable cast wheels, forged options have thinner spoke designs that can be more susceptible to surface damage.
These characteristics mean generic wheel coating advice simply doesn't apply. Your forged wheels deserve protection that accounts for their unique engineering.
Understanding Ceramic Coating Technology for Metal Surfaces
So what exactly happens when you apply a ceramic coating to aluminum? According to research on ceramic coating science, these products are liquid polymers infused with ceramic nanoparticles—typically silicon dioxide (SiO₂) and titanium dioxide (TiO₂). When applied correctly, they bond at the molecular level to create an incredibly thin yet durable protective layer.
Metal ceramic coating technology offers several properties that make it ideal for forged wheel applications:
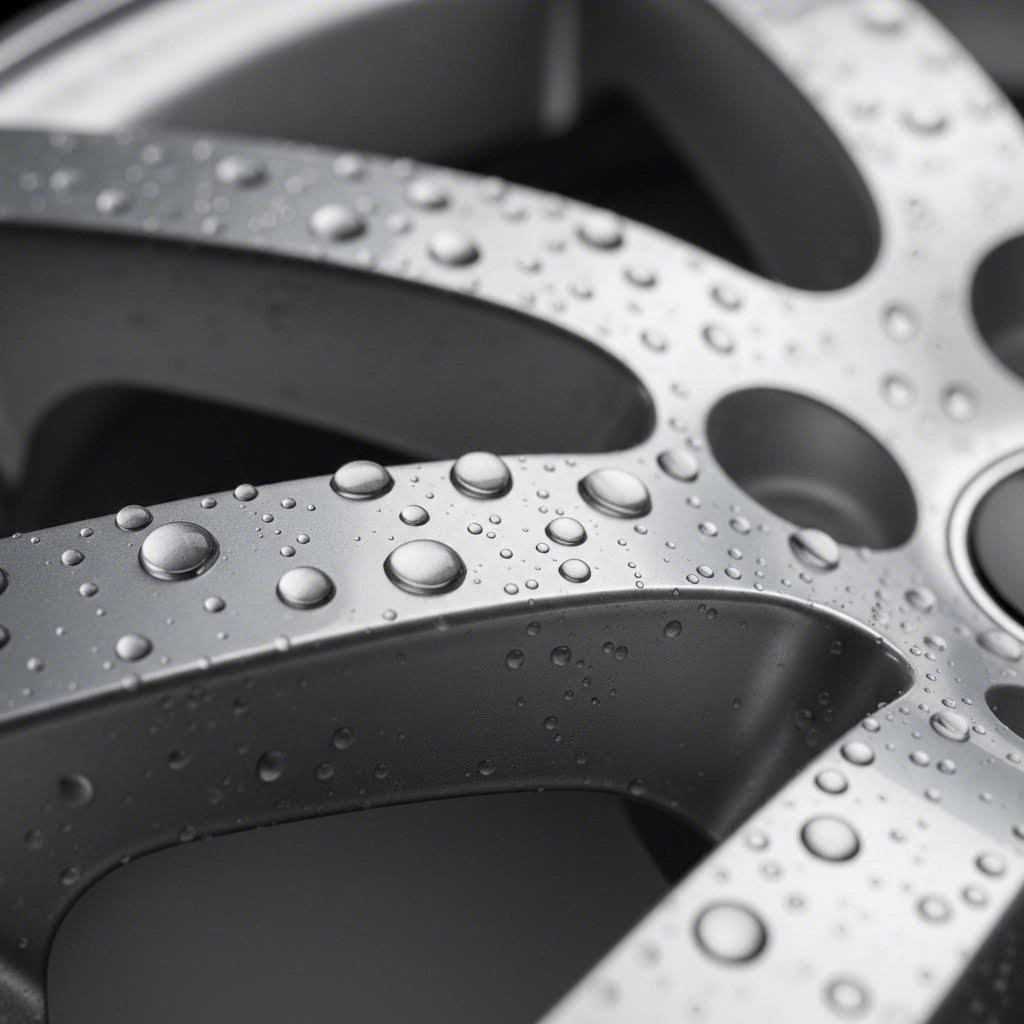
- Hydrophobic properties: The coating's low surface energy repels water, brake dust, and road contaminants.
- Thermal stability: Quality ceramic coatings can withstand temperatures up to 980°C (1,800°F), far exceeding brake-generated heat.
- Oxidation barrier: The coating prevents direct contact between the aluminum surface and moisture, significantly reducing corrosion risk.
- UV resistance: Protects against finish degradation from sun exposure.
Here's where skepticism often enters the conversation. Many enthusiasts wonder if ceramic coating aluminum wheels is truly necessary when the underlying metal is already corrosion-resistant. The answer lies not in preventing catastrophic failure, but in preserving the premium finish and reducing long-term maintenance—exactly what you'd want for an investment that can cost several thousand dollars per set.
Throughout this guide, we'll move beyond marketing claims and examine the evidence-based benefits, proper application techniques for different finishes, and honest cost-versus-value analysis. Whether you're considering DIY application or professional installation, you'll find the practical guidance needed to make an informed decision about protecting your forged wheel investment.
The Science Behind Ceramic Coating Benefits for Forged Aluminum
Now that you understand why forged wheels require specialized protection, let's examine exactly what happens when ceramic coating meets high-performance aluminum. The benefits aren't just marketing claims—they're rooted in material science and real-world performance data.
When you ceramic coat wheels made from forged aluminum, you're creating a semi-permanent bond between the coating's silica nanoparticles and your wheel's surface. This molecular interaction produces measurable protective properties that address every major threat your wheels face daily.
Brake Dust Rejection and Easy Cleaning Benefits
Imagine washing your wheels and watching brake dust simply rinse away with water. That's the hydrophobic effect in action—and it's perhaps the most immediately noticeable benefit of the best ceramic coating for wheels.
Here's what's actually happening at the surface level: brake dust is composed of iron particles, carbon fibers, and adhesive compounds that bond aggressively to unprotected wheel surfaces. According to Drexler Ceramic, brake dust isn't just unsightly—it's corrosive and can etch permanently into wheel finishes over time.
Ceramic coating for wheels creates a slick, low-surface-energy barrier that prevents this bonding from occurring. The result?
- Reduced scrubbing time: Contaminants that would normally require aggressive agitation simply slide off with a pressure washer or mild soap solution.
- No harsh chemicals needed: You can eliminate acidic wheel cleaners that risk damaging your finish over time.
- Consistent cleanliness: Your wheels maintain that freshly-detailed appearance for weeks rather than days between washes.
- Protected lug areas: The coating penetrates into tight spaces around lug nuts and spoke intersections where brake dust typically accumulates.
For forged wheel owners who've experienced the frustration of spending 30 minutes per wheel during detailed cleaning sessions, this benefit alone often justifies the investment. Products like Adam's UV ceramic wheel coating are specifically formulated to maximize this hydrophobic effect while providing additional UV protection.
UV and Chemical Protection for Long-Term Finish Preservation
Your forged wheels face a constant assault from environmental factors that degrade their finish over time. Sun exposure, road salt, tar, and even the cleaning agents you use can slowly compromise that premium appearance you paid for.
The best ceramic wheel coating addresses each of these threats systematically:
- UV ray blocking: Ceramic coatings prevent ultraviolet radiation from penetrating to the clear coat, stopping the fading and discoloration that makes wheels look aged prematurely.
- Salt and brine resistance: Winter road treatments are particularly damaging to aluminum—the coating creates a barrier that prevents salt from initiating corrosion cycles.
- Chemical splash protection: Fuel, oil, and industrial fallout that would normally stain or etch the surface bead up and can be wiped away.
- Oxidation prevention: By blocking moisture contact with the aluminum substrate, ceramic coatings significantly slow oxidation processes.
According to Velgen Wheels, ceramic coatings can last 1-3 years with proper care—far outlasting waxes or sealants that wear off within months. This extended protection means your wheel's finish maintains that showroom depth and clarity throughout the coating's lifespan.
Heat Resistance and Thermal Cycling Performance
Here's where forged wheel owners gain a specific advantage. Your wheels' superior heat dissipation properties create unique thermal demands that quality ceramic coatings are engineered to handle.
During spirited driving or track sessions, brake temperatures can exceed 500°F. This heat transfers directly through the wheel, creating rapid temperature swings that stress any protective coating. The thermal characteristics of forged aluminum amplify this challenge—these wheels conduct heat more efficiently than cast alternatives, meaning temperature changes happen faster and more dramatically.
What makes ceramic coating suitable for this environment?
- High-temperature stability: Quality formulations withstand temperatures far exceeding what braking systems generate, preventing coating breakdown.
- Flexible molecular bonds: The coating expands and contracts with the wheel during thermal cycling without cracking or delaminating.
- Baked-on residue prevention: Heat-generated brake dust that would normally fuse to unprotected surfaces remains loose and removable on coated wheels.
- Clear coat preservation: By absorbing thermal stress, the coating protects the underlying finish from heat-related degradation.
For performance drivers pushing their braking systems hard, this heat resistance isn't optional—it's essential for maintaining wheel appearance over thousands of miles of aggressive use.
Understanding these benefits is just the first step. The real question becomes: how do you prepare your specific wheel finish for ceramic coating application? Different finishes—polished, brushed, matte, or gloss—each require distinct preparation approaches to ensure optimal coating adhesion and results.
Surface Preparation Requirements for Different Forged Wheel Finishes
Here's the truth most detailing guides won't tell you: applying ceramic coating on wheels without proper finish-specific preparation is like painting over rust. The coating might look fine initially, but adhesion failures, uneven protection, and premature degradation are almost guaranteed.
Your forged wheels likely feature one of four primary finish types—polished, gloss, matte, or brushed. Each requires a distinctly different preparation approach before ceramic coating application. Get this wrong, and you risk damaging an expensive finish or wasting premium coating products on a surface that won't bond properly.
Identifying Your Wheel's Finish Type
Not sure what finish your forged wheels have? Here's a quick identification guide:
- Polished/Mirror finish: Reflects like a chrome mirror with high clarity. You can see detailed reflections of surrounding objects. Raw aluminum wheels that have been polished to a shine fall into this category.
- Gloss finish: Shiny and reflective but with a painted clear coat layer. Reflections appear slightly softer than polished aluminum.
- Matte finish: Flat, non-reflective surface that absorbs light rather than reflecting it. Has a sophisticated, understated appearance.
- Brushed finish: Features visible linear grain patterns created by mechanical brushing. Reflects light directionally based on grain orientation.
Still uncertain? Run your fingernail lightly across the surface. Polished aluminum feels glass-smooth, brushed finishes have subtle texture, and painted finishes (gloss or matte) have a slight tackiness compared to bare metal.
Universal Decontamination Steps for All Finish Types
Before addressing finish-specific preparation, every forged wheel requires thorough decontamination. This removes embedded contaminants that prevent proper coating adhesion regardless of your wheel's finish type.
Iron decontamination is non-negotiable. Brake dust contains iron particles that embed themselves into wheel surfaces at a microscopic level. Standard washing won't remove them—you need a dedicated iron fallout remover.
Apply the iron remover to cool, dry wheels and watch for the characteristic purple or red color change indicating iron particle dissolution. This chemical reaction breaks the bond between iron contaminants and your wheel surface, allowing them to be rinsed away completely.
Clay bar treatment follows iron decontamination. The clay removes remaining bonded contaminants—tar spots, industrial fallout, and mineral deposits—that iron removers don't address. Use a detailing clay rated for wheel surfaces with plenty of lubricant to prevent marring.
For ceramic coated wheels to perform as advertised, the coating must bond directly to clean wheel material—not to a layer of invisible contamination.
Preparing Polished Forged Wheels Without Damaging the Mirror Finish
Polished forged wheels present the most challenging preparation scenario. That mirror finish you're protecting is incredibly thin and surprisingly easy to damage with improper techniques.
When searching for the best way to polish aluminum rims before ceramic coating, remember that less is more. Here's the critical approach:
- Avoid aggressive polishing: If your polished finish is already in good condition, skip machine polishing entirely. The goal is surface preparation, not finish correction.
- Use ultra-fine polish only: If light oxidation or water spots are present, use only the finest polish on wheels available—nothing more abrasive than a finishing polish.
- Hand application preferred: Machine polishers can quickly burn through polished aluminum. Hand application with a microfiber applicator gives you control and prevents damage.
- Inspect under bright lighting: Use a high-intensity LED light to check for remaining contamination or surface defects before coating application.
After polishing, a thorough isopropyl alcohol (IPA) wipe-down is essential. This removes polishing oils that would prevent ceramic coating adhesion. Use at least 50% IPA solution with a lint-free microfiber towel.
Matte and Brushed Finish Preparation Techniques
Matte and brushed finishes share a common challenge: their textured surfaces trap contaminants more aggressively than smooth finishes, yet they're easily damaged by improper cleaning techniques.
For matte finishes:
- Never use polish: Any abrasive product will create shiny spots that ruin the uniform matte appearance. This is the single biggest mistake in matte wheel preparation.
- Extended iron treatment: Allow iron remover to dwell longer (up to 5 minutes) since the textured surface holds contaminants more tenaciously.
- Synthetic clay alternatives: Use a clay mitt or synthetic clay rather than traditional clay bars. They're less likely to leave residue in the textured surface.
- Multiple IPA wipes: The textured surface requires extra attention during the final wipe-down. Use fresh microfiber sections frequently.
For brushed finishes:
- Work with the grain: All wiping, clay treatment, and cleaning motions should follow the direction of the brushed grain pattern.
- Very light touch during clay: Brushed surfaces scratch easily if you apply too much pressure during clay bar treatment.
- No rotary polishing: Circular polisher marks will be highly visible against the linear grain. If minor correction is needed, work by hand following the grain direction.
- Dedicated microfibers: Use separate towels for brushed wheel preparation to avoid cross-contamination from polish residues.
Gloss Painted Finish Preparation
Gloss painted forged wheels—including those with protective clear coats—are the most forgiving for ceramic coating for rims preparation. However, they still require attention to detail.
- Standard clay process: Gloss finishes respond well to traditional clay bar treatment with appropriate lubricant.
- Light polish if needed: Minor clear coat defects can be corrected with a finishing polish before coating. This actually improves coating adhesion.
- Check for clear coat failure: Look for peeling, flaking, or cloudy areas that indicate clear coat breakdown. Ceramic coating won't fix damaged clear coat—address this first or consult a professional.
- Panel wipe or IPA: Remove all polish residue and oils before coating. This step directly determines how well your ceramic coated wheels will perform long-term.
Finish-Specific Preparation Summary
| Finish Type | Iron Remover | Clay Treatment | Polish Allowed | Special Considerations |
|---|---|---|---|---|
| Polished | Yes | Yes (gentle) | Ultra-fine only | Hand application preferred; easy to damage |
| Gloss | Yes | Yes | Yes (finishing grade) | Check clear coat condition first |
| Matte | Yes (extended dwell) | Synthetic clay only | Never | Will create shiny spots if polished |
| Brushed | Yes | Yes (light pressure) | Hand only, with grain | All motions follow grain direction |
With your specific finish properly prepared, you're ready for the actual coating application process. The preparation you've completed directly determines how well the ceramic coating bonds, how long it lasts, and how effectively it protects your investment. Next, we'll walk through the step-by-step application process, including techniques for handling complex spoke designs and avoiding the common mistakes that compromise results.
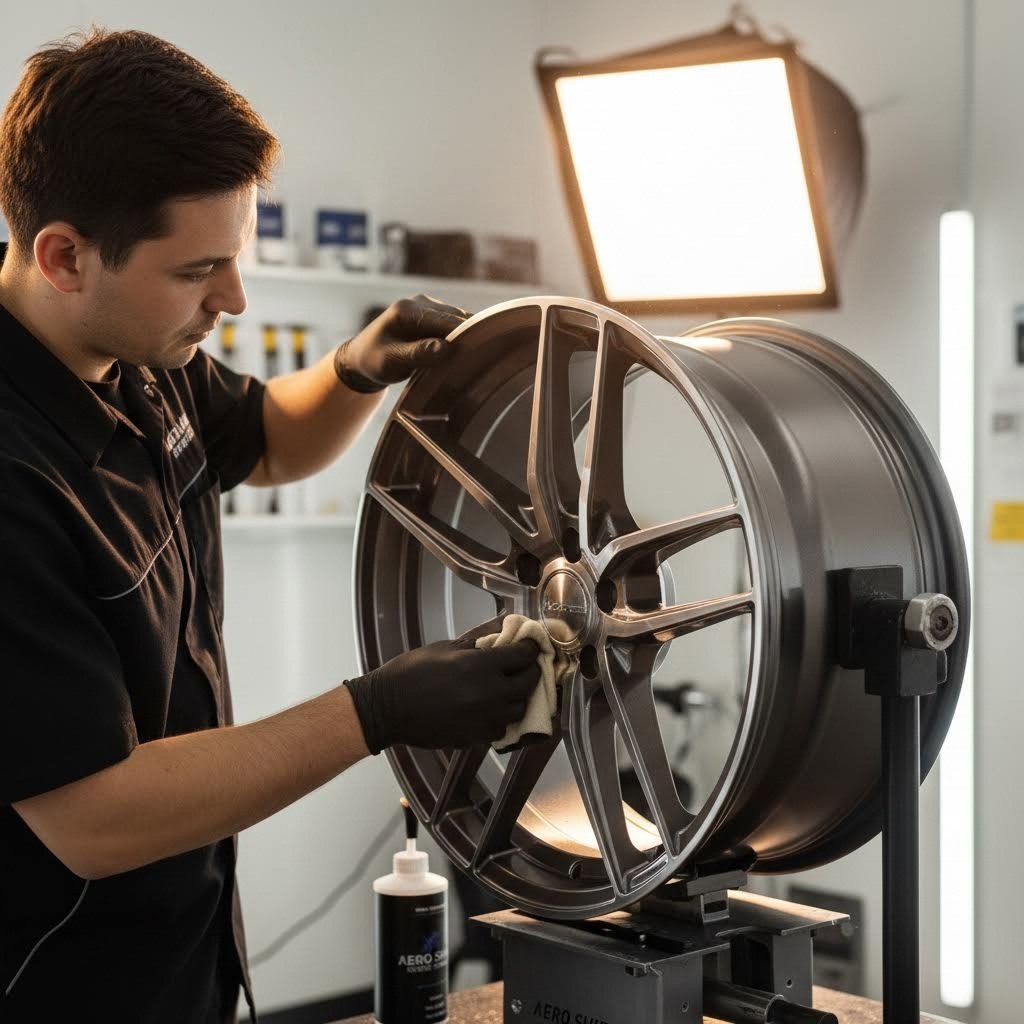
How to Ceramic Coat Wheels at Home
You've prepped your wheel surface meticulously. Now comes the moment of truth—actually applying the ceramic coating. This is where many enthusiasts get nervous, worrying about ruining their expensive forged wheels with an improper technique. Here's the reality: how to ceramic coat wheels successfully comes down to controlling your environment, using the right tools, and following a systematic application process.
The good news? With proper preparation and attention to detail, DIY wheels ceramic coating delivers results that rival professional application at a fraction of the cost. Let's break down exactly what you need and how to execute flawlessly.
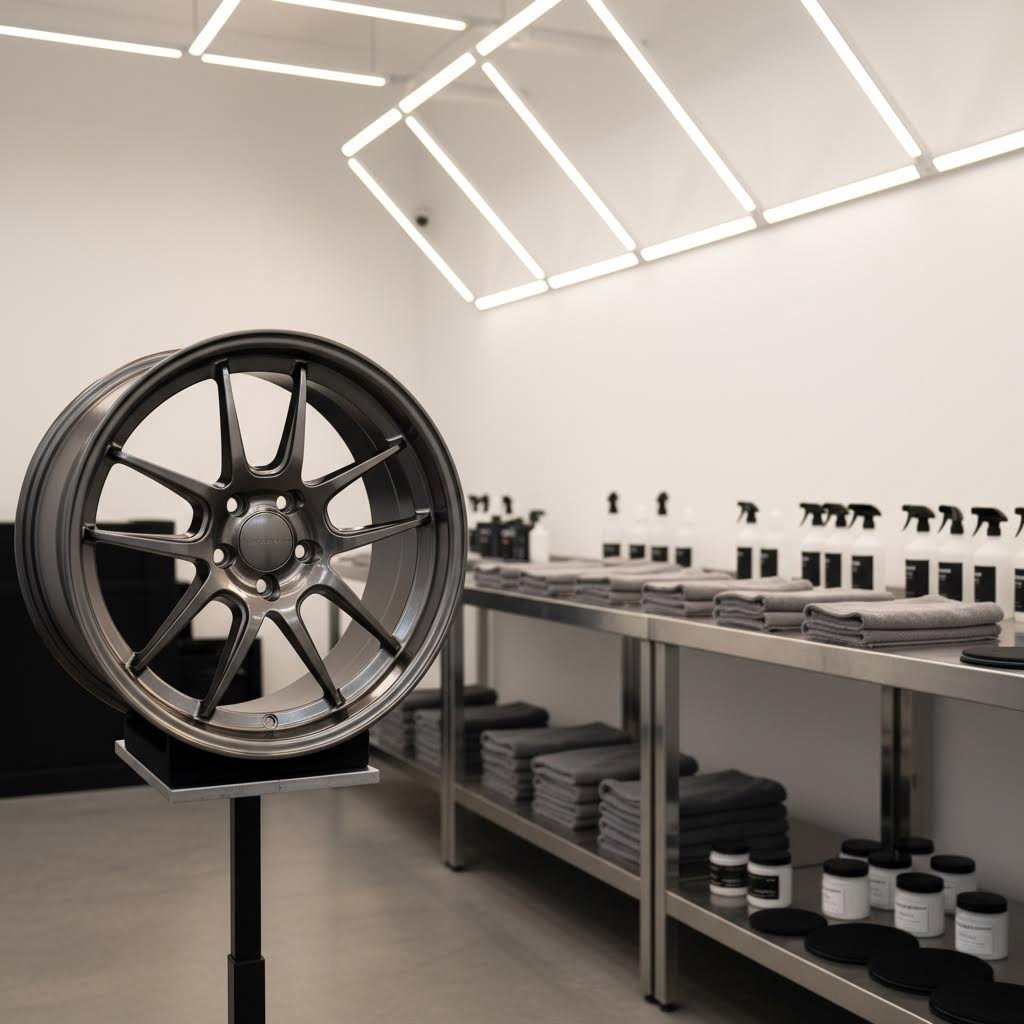
Essential Tools and Products for DIY Ceramic Wheel Coating
Before you open that coating bottle, gather everything you'll need. Running to find supplies mid-application is a recipe for disaster—ceramic coatings have specific working windows that won't wait for you.
Core application supplies:
- Ceramic wheel coating kit: Choose a product specifically formulated for wheels that can handle thermal cycling. Quality kits include applicator blocks and suede applicator cloths.
- Microfiber buffing towels: You'll need at least 4-6 short-nap microfiber towels per wheel for buffing and leveling.
- Nitrile gloves: Ceramic coatings bond to skin and are difficult to remove. Always wear gloves during application.
- LED inspection light: Critical for spotting high spots and missed areas before the coating cures.
- Isopropyl alcohol (50%+ solution): For final surface wipe-down immediately before coating.
- Masking tape: To protect tire sidewalls and any areas you don't want coated.
Workspace essentials:
- Drop cloths or plastic sheeting: Ceramic coating drips are permanent on concrete floors.
- Wheel stands or clean surface: Elevating wheels makes barrel access dramatically easier.
- Portable fan: Aids curing and prevents dust settlement on wet coating.
- Infrared thermometer: Ensures your wheel surface is within the proper temperature range.
Workspace and Environmental Requirements
Environment matters more than most people realize when applying ceramic coat for wheels. According to Detail King's ceramic coating guide, the optimal application conditions fall within specific parameters that directly affect coating performance.
Temperature requirements:
- Ideal range: 60°F to 75°F (15°C to 24°C) for both ambient air and wheel surface temperature.
- Acceptable range: 50°F to 85°F, though flash times and curing behavior will vary.
- Never apply below 45°F: Cold surfaces slow solvent evaporation dramatically, causing high spots and cure failures.
Humidity considerations:
- Target humidity: Below 50% relative humidity for optimal results.
- High humidity effects: Extended flash times, greasy appearance, and compromised durability.
- Solution for humid conditions: Use air conditioning or a dehumidifier in your workspace.
Never apply ceramic wheel coatings in direct sunlight. UV exposure accelerates curing unpredictably, making proper leveling nearly impossible.
If you're working in a garage without climate control, schedule your application for the most stable part of the day. Early morning condensation and evening temperature drops can ruin your work.
Application Technique for Complex Spoke Designs
Forged wheels often feature intricate multi-spoke designs, deep concave faces, and tight barrel areas that make uniform coverage challenging. Here's the systematic approach that ensures complete protection without missed spots or excessive buildup.
The complete application process:
- Remove wheels from vehicle: According to AvalonKing's wheel coating guide, while possible with mounted wheels, DIY difficulty increases exponentially if you don't remove them first. Jack the vehicle safely, use jack stands, and remove all four wheels.
- Final surface preparation: Wipe every surface with IPA solution and a clean microfiber. Allow 2-3 minutes for complete evaporation before proceeding.
- Mask tire sidewalls: Apply painter's tape along the bead area where the tire meets the wheel to prevent accidental coating transfer.
- Shake coating bottle thoroughly: Ceramic coatings can separate during storage. Shake vigorously for 30-60 seconds to ensure proper product mixture.
- Apply coating to applicator: Add 4-5 drops to your suede applicator pad wrapped around the application block. Start conservatively—you can always add more.
- Coat the barrel first: Working on the inner barrel prevents drips onto already-coated face areas. Use overlapping crosshatch motions to ensure complete coverage.
- Allow barrel to flash: Wait 1-3 minutes (depending on product and conditions) until you see a slight rainbow sheen or haziness indicating the coating is ready to level.
- Level the barrel coating: Using a clean microfiber towel, gently wipe in one direction to remove excess and level the coating.
- Position wheel face-up: Place the wheel on a stand or clean surface with the face accessible.
- Coat spoke surfaces systematically: Work one spoke at a time, coating the top face, both sides, and any recessed areas. Use the edge of your applicator for tight intersections where spokes meet the center hub.
- Address the wheel face and lip: Coat the face area between spokes and the outer lip using the same crosshatch pattern.
- Level face and spokes: After appropriate flash time, level the entire face area using a fresh microfiber towel. Flip to clean sections frequently.
- Inspect with LED light: Scan every surface at multiple angles. Look for high spots (excess product that appears hazy or thick) and missed areas (surfaces without the characteristic slickness).
- Address any issues immediately: High spots can be leveled with a lightly dampened microfiber if caught within 10-15 minutes. Missed areas need immediate additional coating application.
- Repeat for remaining wheels: Complete all four wheels using the same systematic process.
Avoiding Common Application Mistakes
Even experienced detailers encounter issues during rim ceramic coating application. Here's how to prevent and address the most frequent problems:
High spots and streaking:
- Cause: Applying too much product or missing the flash window.
- Prevention: Use less product per application. It's easier to add a second layer than to remove excess.
- Fix: If caught early (within 15 minutes), dampen a microfiber with IPA and gently work the area. If cured, you may need a polishing compound or solvent to remove and reapply.
Missed areas:
- Cause: Complex spoke geometry makes complete coverage difficult to verify.
- Prevention: Work systematically and use your LED light to inspect before moving to the next wheel.
- Fix: Apply coating to missed areas immediately during the same session.
Rainbow or greasy appearance:
- Cause: High humidity or insufficient leveling.
- Prevention: Control your environment and level thoroughly before the coating cures.
- Fix: In severe cases, the coating may need stripping and reapplication.
Proper Curing Protocols and Timeline
Your ceramic polishing wheels work is done—but the waiting game begins. Curing is where the coating transforms from a liquid film into a durable protective barrier.
Critical curing requirements:
- Initial cure: Minimum 24-48 hours before wheels can be reinstalled and driven. During this period, avoid any water contact.
- Full cure: 2-3 weeks for complete molecular cross-linking. During this period, avoid harsh chemicals, pressure washing, and aggressive cleaning.
- No washing: Wait at least 14 days before the first wash, as recommended by industry sources.
Optimizing cure time:
- Prop wheels at an angle or hang by lug holes to maximize airflow around all surfaces.
- Position a fan to maintain gentle air circulation without blowing dust onto the coating.
- Maintain consistent temperature throughout the curing period—avoid moving wheels between drastically different environments.
Note: Ceramic coatings are extremely slippery. If you get coating on brake rotors during application, remove it immediately with brake cleaner. Coated rotors create serious braking safety hazards.
If you're concerned about wheel balancing after coating, have the wheels balanced before application. Getting stick-on balancing weights to adhere to freshly coated surfaces can be challenging due to the hydrophobic properties.
With your wheels properly coated and cured, you might be wondering how this protection stacks up against alternatives like powder coating, PPF, or traditional sealants. Understanding these comparisons helps confirm whether ceramic coating was the right choice for your specific situation—or whether a different protection method might serve you better.
Ceramic Coating vs Alternative Wheel Protection Methods
You've mastered the application process, but here's a question worth asking: is ceramic coating rims actually the best option for your situation? With powder coating, PPF, wheel sealants, and traditional wax all competing for your attention, understanding how these alternatives stack up helps you make a truly informed decision.
Each protection method brings distinct advantages and limitations. What works brilliantly for a weekend track warrior might be overkill for a daily commuter—and vice versa. Let's break down the real-world performance of each option so you can match the protection to your specific driving demands.
Ceramic Coating vs Powder Coating for Forged Wheels
This comparison generates more confusion than any other. Both have "coating" in the name, but they're fundamentally different technologies designed for different purposes.
Powder coating is a finish replacement, not a finish protector. According to Armadillo Automotive, powder coating involves applying a dry powder to metal surfaces, then curing it under heat to form a tough, durable finish. The original wheel finish is completely replaced with the powder-coated surface.
Can you powder coat aluminum wheels? Absolutely—it's one of the most common applications. Can you powder coat aluminum rims that are already finished with premium polished or brushed surfaces? Technically yes, but you'd be sacrificing that expensive finish entirely.
Key distinctions:
- Purpose: Powder coating creates a new finish; ceramic coating protects an existing finish.
- Durability: Powder coating offers superior physical impact resistance—ideal for off-road or harsh conditions. Ceramic coating excels at chemical and environmental protection.
- Appearance: Powder coating provides extensive color and texture customization. Ceramic coating enhances your existing finish without altering its appearance.
- Reversibility: Ceramic coating can be removed or reapplied. Powder coating requires stripping to change.
- Cost: Professional powder coating runs $400-$700 per wheel set for painted aluminum wheels. Ceramic coating ranges from $50-$150 DIY or $200-$500 professionally.
If you love your forged wheels' factory finish, ceramic coating preserves it. If you want a completely different look or need maximum physical protection, powder coating makes sense.
When Wheel Sealants Make More Sense Than Ceramic
Wheel sealants occupy the middle ground between traditional wax and ceramic coating. These polymer-based products create a protective barrier that lasts longer than wax but doesn't demand the commitment of ceramic coating.
According to AutoGlanz's 2025 protection guide, paint sealants typically last 6-12 months depending on maintenance—significantly longer than wax but shorter than ceramic coatings' 1-3 year lifespan.
Sealants make sense when:
- You enjoy frequent detailing and don't mind reapplication every few months.
- Budget constraints make ceramic coating impractical right now.
- You're testing whether wheel protection actually makes a difference before committing to ceramic.
- Your driving conditions are mild without extreme heat, salt exposure, or heavy brake dust.
- You want protection but might be selling the vehicle within a year.
Sealants fall short when:
- You track your vehicle or experience frequent heavy braking—heat resistance is limited.
- Winter driving with road salt is common—sealants don't match ceramic's chemical resistance.
- You want "set it and forget it" protection lasting years, not months.
Traditional Wax and Its Limitations
Carnauba wax has protected automotive finishes for decades, and some enthusiasts swear by the deep, warm glow it produces. However, as a rims coating solution for forged wheels, wax has significant limitations.
Traditional wax typically lasts only 4-8 weeks before requiring reapplication. On wheels—which face constant heat cycling, brake dust bombardment, and road debris—that lifespan shrinks further. You might get two to three weeks of meaningful protection before the wax has degraded significantly.
Wax advantages:
- Extremely affordable ($15-$40 per product).
- Easy application with minimal learning curve.
- Produces a warm, deep shine that some prefer over ceramic's glass-like finish.
- Completely safe—no risk of damaging your finish with improper application.
Wax disadvantages:
- Minimal heat resistance—melts under braking temperatures.
- Requires frequent reapplication (every 4-8 weeks, realistically every 2-3 on wheels).
- Limited hydrophobic properties compared to ceramic.
- Poor chemical resistance against road salt and harsh cleaners.
Paint Protection Film for Wheels
PPF—the clear "bra" material used on vehicle paint—can technically be applied to wheels, though it's far less common than body panel applications.
PPF considerations for wheel applications:
- Physical protection: PPF offers superior rock chip and scratch resistance—something ceramic coating can't match.
- Application complexity: Wheel geometry makes PPF installation extremely difficult. Complex spoke designs may be impossible to wrap without visible seams.
- Heat tolerance: Quality PPF handles brake heat, but installation must account for thermal expansion.
- Cost: Professional wheel PPF installation can exceed $800-$1,200 per set—significantly more than ceramic coating.
- Appearance: Even high-quality PPF may slightly alter the finish appearance, particularly on polished or brushed surfaces.
PPF makes most sense for specific wheel faces where rock chip protection matters—think front wheels on lowered vehicles or wheels frequently exposed to gravel roads.
Complete Protection Method Comparison
How do all these options compare across the criteria that matter most? This table provides a side-by-side evaluation:
| Protection Method | Longevity | Cost Range (4 wheels) | DIY Difficulty | Heat Resistance | Best Use Case |
|---|---|---|---|---|---|
| Ceramic Coating | 1-3 years | $50-$150 DIY / $200-$500 Pro | Moderate | Excellent | Performance driving, harsh climates, long-term protection |
| Powder Coating | 5-10+ years | $400-$700 Pro only | Not DIY feasible | Excellent | Complete finish change, off-road use, maximum durability |
| Wheel Sealant | 6-12 months | $20-$60 DIY | Easy | Moderate | Budget protection, frequent detailers, mild conditions |
| Traditional Wax | 4-8 weeks | $15-$40 DIY | Very Easy | Poor | Show cars, occasional driving, enthusiasts who enjoy detailing |
| PPF | 5-7 years | $800-$1,200 Pro only | Not DIY feasible | Good | Rock chip protection, specific high-impact areas |
Matching Protection to Your Driving Conditions
Your ideal protection method depends heavily on how and where you drive. Consider these scenarios:
Track day enthusiast: Ceramic coating wins. The heat resistance and brake dust rejection are invaluable when you're pushing braking systems to their limits repeatedly.
Winter climate driver: Ceramic coating's chemical resistance against road salt makes it the clear choice over sealants or wax that can't withstand harsh winter treatments.
Garage queen or show car: Traditional wax might actually be preferable if you're chasing that specific warm glow for show presentation and the vehicle sees minimal real-world driving.
Off-road or construction site exposure: Consider powder coating if physical impact protection matters more than preserving a factory finish.
Budget-conscious daily driver: Start with a quality wheel sealant. If you find yourself reapplying constantly and wishing for more protection, upgrade to ceramic coating on your next set of wheels.
Understanding these alternatives helps confirm whether ceramic coating is truly right for your situation. But there's one more critical factor to consider: the actual cost-versus-value equation. Is the investment in ceramic coating justified for your specific wheels, driving habits, and budget? Let's examine the numbers.

Ceramic Coating Wheels Cost and Value Analysis
You've seen the science, learned the application techniques, and compared alternatives. Now comes the question that ultimately drives most decisions: how much does it actually cost to ceramic coat wheels, and is the investment worth it for your specific situation?
The ceramic coating wheels cost equation isn't straightforward. It depends on whether you go DIY or professional, what products you choose, and how you calculate the long-term value of protection. Let's break down the real numbers so you can make a decision based on facts, not marketing claims.
DIY vs Professional Application Cost Comparison
When calculating the cost to ceramic coat wheels, you need to consider more than just the coating product itself. Here's the complete breakdown for both approaches:
| Cost Category | DIY Application | Professional Application |
|---|---|---|
| Ceramic Coating Product | $40-$80 (wheel-specific formula) | Included in service |
| Prep Products (iron remover, clay, IPA) | $30-$60 | Included in service |
| Application Tools (applicators, microfibers, gloves) | $25-$45 | Included in service |
| Optional Equipment (LED light, wheel stands) | $30-$80 | Not applicable |
| Labor/Service Fee | Your time (4-8 hours) | $200-$500 (4 wheels) |
| Total First-Time Cost | $125-$265 | $200-$500 |
| Subsequent Applications | $40-$80 (coating only) | $200-$500 |
According to KJ Cleaner Car's 2025 pricing guide, professional ceramic coating services range from $500 to over $2,500 for full vehicle applications. Wheel-specific services typically fall at the lower end, though premium detailers offering wheel face and barrel coverage with multi-layer application may charge toward the higher range.
The DIY approach offers significant savings, especially for repeat applications. Once you've invested in prep products and tools, subsequent coating applications cost only $40-$80 for the coating product itself. Over three application cycles, DIY costs roughly $200-$400 total versus $600-$1,500 for professional services.
Your time has value too. If you earn $50 per hour and DIY application takes 6 hours, factor in $300 of opportunity cost when comparing options.
Calculating Your Return on Investment
How much to ceramic coat wheels becomes a different question when you consider what you're getting back. Here's where the value calculation gets interesting:
Reduced cleaning time savings:
- Uncoated wheel cleaning: 20-30 minutes per wheel with scrubbing and chemical application.
- Coated wheel cleaning: 5-10 minutes per wheel with simple rinse and wipe.
- Time saved per wash: 60-80 minutes for all four wheels.
- At weekly washes over 2 years: 104-166 hours saved.
Reduced product costs:
- Harsh wheel cleaners no longer needed (saving $15-$30 per bottle, 3-4 bottles annually).
- Specialty iron removers used less frequently.
- Annual cleaning product savings: $50-$120.
Extended finish life:
According to Looks Detailing, ceramic coatings protect against UV degradation, chemical etching, and oxidation that permanently damage wheel finishes. On a $3,000-$8,000 set of forged wheels, preventing even minor finish degradation preserves significant resale value.
Resale value preservation:
- Wheels in excellent condition versus good condition: 15-25% value difference.
- On $5,000 forged wheels: $750-$1,250 in preserved value.
- ROI on a $150 DIY coating: 400-800%.
Is This Worth It for YOUR Forged Wheels?
The "is ceramic coated aluminum safe" question comes up frequently—and yes, ceramic coating is completely safe for aluminum wheels. The more relevant question is whether the investment makes sense for your specific situation. Consider these factors:
Ceramic coating makes strong financial sense if:
- Your forged wheels cost $2,000 or more—the protection-to-investment ratio favors coating.
- You drive in winter climates with road salt exposure.
- Track days or spirited driving generates significant brake dust.
- You plan to keep the vehicle (and wheels) for 3+ years.
- You genuinely dislike spending time scrubbing wheels.
Ceramic coating offers diminishing returns if:
- Your wheels are budget-oriented cast or flow-formed options under $800 total.
- You're selling the vehicle within 12 months.
- You enjoy the detailing process and don't mind frequent maintenance.
- You drive minimally in mild climates with little brake dust generation.
Climate-specific considerations:
- Salt belt states: Ceramic coating provides chemical resistance that pays dividends every winter. The protection against corrosive road treatments alone justifies the investment.
- Hot climates: UV protection preserves finish appearance, but heat cycling from braking creates the primary challenge. Quality coating formulated for wheels handles this well.
- Mild climates: Benefits are real but less dramatic. Consider whether the cleaning convenience alone justifies your investment.
Finding Ceramic Coating Wheels Near Me
If you've decided professional application makes sense, how do you find quality service? When searching "ceramic coating wheels near me," evaluate potential providers on these criteria:
- Wheel-specific experience: Ask if they regularly coat wheels or primarily focus on paint. Wheel coating requires different techniques.
- Prep process transparency: Quality shops explain their decontamination and surface preparation steps. Avoid anyone who rushes past this critical stage.
- Product specificity: They should use wheel-formulated coatings designed for thermal cycling, not just their standard paint coating.
- Before/after documentation: Reputable detailers photograph their work. Ask to see wheel-specific examples.
- Warranty terms: Understand what's covered and what maintenance requirements apply.
Professional application makes particular sense for high-value wheels, complex finishes like polished aluminum, or situations where your time genuinely costs more than the professional premium.
With cost and value clearly understood, the final piece of the puzzle is maintenance. How you care for your ceramic coated wheels directly determines whether you get one year or three years of protection—and whether your investment truly pays off over time.
Maintaining Ceramic Coated Wheels for Maximum Longevity
You've invested time and money into protecting your forged wheels with ceramic coating. Now comes the part that determines whether you get 12 months or 36 months of protection: proper maintenance. The difference between a coating that fails prematurely and one that exceeds expectations often comes down to how you wash and care for your ceramic coated rims after application.
Here's what many wheel owners don't realize: ceramic coating isn't a "set it and forget it" solution. According to Coatings by the Bay, regular maintenance is one of the most important steps in keeping ceramic coated wheels looking their best. The coating provides exceptional protection, but that protection requires support through proper care practices.
Weekly and Monthly Maintenance Routines
Think of your ceramic rim coating like a high-performance filter—it's constantly working to repel contaminants, but it needs regular cleaning to function optimally. When brake dust, road grime, and environmental fallout accumulate, they create a barrier that diminishes the coating's hydrophobic properties.
Weekly maintenance checklist:
- Rinse wheels with pressure washer or hose: Start every wash by loosening surface contaminants with water pressure alone. Your coating makes this remarkably effective.
- Use pH-neutral wheel cleaner: Apply a dedicated wheel shampoo designed for coated surfaces. Avoid acidic wheel cleaners entirely.
- Wash with soft microfiber mitt: Use a dedicated wheel mitt separate from your body wash tools to prevent cross-contamination.
- Dry thoroughly with clean microfiber: According to OC Tint Solutions, water left on coated surfaces can leave mineral spots that become increasingly difficult to remove.
- Quick visual inspection: Look for any areas where water isn't beading properly—this indicates contamination buildup.
Monthly maintenance additions:
- Apply ceramic boost spray: Every 2-3 months, use a ceramic maintenance spray to refresh the hydrophobic layer. This extends coating life significantly without full reapplication.
- Detailed spoke inspection: Check tight areas around lug nuts and spoke intersections where contamination accumulates unnoticed.
- Barrel assessment: If accessible, inspect the inner barrel for coating integrity and brake dust buildup.
- Touch contaminated areas: If any surface feels rough or gritty rather than glass-smooth, targeted decontamination may be needed.
The goal of weekly washing isn't just aesthetics—it's preventing contaminant bonding that degrades your coating over time.
Products That Protect vs Damage Your Ceramic Coating
What you use to clean your rims ceramic coating matters as much as how often you clean. According to The Detail Doc, harsh chemicals are among the most significant threats to ceramic coating longevity. Many household and automotive products contain ingredients that actively break down the protective layer you've worked to apply.
Safe products for ceramic coating for aluminum:
- pH-neutral wheel shampoos: These clean effectively without stripping coating chemistry.
- Dedicated ceramic maintenance sprays: Formulated to enhance and extend existing coatings.
- Distilled water for final rinse: Eliminates mineral deposits that cause water spotting.
- High-quality microfiber towels: Short-nap, soft microfibers prevent micro-scratching during drying.
- Iron removers (occasional use): Safe for periodic decontamination when brake dust has embedded.
Products that damage ceramic coatings:
- Acidic wheel cleaners: These strip coating chemistry rapidly, even with single use.
- Dish soap: Contains surfactants and degreasers that break down ceramic coating oils.
- All-purpose cleaners: Too aggressive for coated surfaces and cause accelerated degradation.
- Abrasive scrub pads or brushes: Create micro-scratches that compromise coating integrity.
- Automatic car washes: The abrasive brushes used in these facilities can degrade and diminish the ceramic coating over time.
When in doubt, check product pH levels. Anything below 6 (acidic) or above 9 (alkaline) poses risk to your coating. Stick to products in the 6-8 pH range for regular maintenance.
Recognizing When Reapplication Is Needed
Even with perfect maintenance, ceramic coatings have a finite lifespan. Knowing the signs of coating degradation helps you reapply before your wheels lose protection entirely.
Signs your coating needs attention:
- Reduced water beading: When water spreads across the surface rather than forming tight beads, the hydrophobic layer is weakening.
- Increased cleaning difficulty: If brake dust no longer rinses away easily and requires scrubbing, coating effectiveness has diminished.
- Surface feels rough or sticky: A healthy coating feels glass-smooth. Texture indicates contamination bonding or coating wear.
- Loss of gloss: Coated wheels should maintain depth and shine. Dullness signals degradation.
- Water spots persist: Fresh coatings resist water spotting. When spots become difficult to remove, protection is failing.
Under normal driving conditions with proper maintenance, expect ceramic coating for aluminum wheels to last 1-3 years. According to industry data, wheels face constant heat, brake dust, and road grime that cause coatings to typically last 1-2 years—shorter than body panel applications. Harsh winter climates with road salt exposure may shorten this further, while garage-kept vehicles with mild driving conditions may extend longevity.
When you notice multiple signs of coating failure, don't wait. Reapplication on a degraded but still-present coating requires less prep work than starting from bare wheels. Address the issue while some protection remains for the easiest refresh process.
With your maintenance routine established, there's one final consideration: whether your next application—or your first, if you're still deciding—should be DIY or professional. The answer depends on factors beyond just cost, including your skill level, the value of your wheels, and how much risk you're comfortable accepting.
Professional vs DIY Application for Your Forged Wheels
You've weighed the costs, learned the techniques, and understand maintenance requirements. Now comes the decisive question: should you tackle ceramic coating for chrome wheels and other premium finishes yourself, or hand the job over to professionals? This isn't just about skill—it's about matching your approach to your specific wheels, risk tolerance, and long-term expectations.
The honest answer depends on factors that are entirely personal: how much your wheels cost, how confident you feel with detailing work, and what happens if something goes wrong. Let's break down exactly when each approach makes sense so you can make the right call for your situation.
When DIY Makes Sense for Experienced Detailers
DIY ceramic coating isn't for everyone—but for the right person with the right wheels, it delivers exceptional results at a fraction of professional pricing. According to The Detail Doc, achieving optimal results with a DIY kit requires meticulous attention to detail and proper technique. If that describes your approach to detailing, you're already positioned for success.
DIY is your best choice when:
- You have prior detailing experience: If you've successfully applied wax, sealants, or paint correction products, you understand the fundamentals of surface preparation and product application.
- Your wheels have forgiving finishes: Gloss-painted alloy wheel coating applications offer more margin for error than polished or matte surfaces.
- You enjoy the process: DIY coating takes 4-8 hours for four wheels. If that sounds like torture rather than a satisfying Saturday project, professional application is worth the premium.
- You have controlled workspace access: A temperature-controlled garage with good lighting makes the difference between success and frustration.
- Your wheels are mid-range value ($1,000-$3,000): The risk-reward ratio favors DIY—potential mistakes won't be catastrophic, and savings are meaningful.
Skills you should already possess:
- Confidence with iron decontamination and clay bar processes.
- Understanding of product flash times and curing requirements.
- Experience recognizing high spots and leveling coatings before they cure.
- Patience to work systematically without rushing critical steps.
If you've never applied any protective coating to any automotive surface, your expensive forged wheels shouldn't be your training ground. Practice on less valuable items first.
Protecting High-Value Wheels with Professional Application
When your coated wheels represent a $4,000-$10,000 investment, the calculus changes dramatically. According to professional detailing experts, professional ceramic coating services deliver superior results because technicians have the necessary training, tools, and expertise—plus they work in controlled environments that eliminate environmental variables.
Professional application is essential when:
- Your wheels feature polished or mirror finishes: These surfaces show every imperfection and are easily damaged by improper technique. Professional-grade skill is non-negotiable.
- You own chrome wheels: The best ceramic coating for chrome wheels requires specialized preparation that differs from aluminum applications. Chrome's unique surface chemistry demands professional expertise.
- Wheel value exceeds $5,000 per set: The $200-$500 professional premium becomes insignificant against potential damage costs from DIY mistakes.
- You want warranty protection: Professional installations often include warranties ranging from 2 to 10 years, providing assurance that defects or premature failure can be rectified without additional cost.
- Time is genuinely limited: If your schedule doesn't allow for proper preparation, application, and curing time, rushing DIY guarantees subpar results.
What professionals bring to the table:
- Controlled environments: Temperature and humidity-controlled booths eliminate variables that cause DIY failures.
- Professional-grade products: According to industry sources, professional coatings often contain higher concentrations of active ingredients and advanced formulations, enabling superior hardness, durability, and resistance.
- Multi-layer applications: Professionals can apply more high-quality layers that bond well with the surface, creating superior protection compared to single-layer DIY applications.
- Guaranteed outcomes: Professional services guarantee zero mistakes and consistent results.
Chrome and Specialized Finish Considerations
Chrome wheels deserve special attention in the professional versus DIY debate. The plating process creates a surface that behaves differently than painted or bare aluminum—and mistakes during ceramic coating application can be extremely difficult to correct.
Why chrome requires professional care:
- Chrome's mirror surface amplifies any application inconsistency, making streaks and high spots dramatically visible.
- The plating layer can react unexpectedly with certain coating formulations if not properly tested first.
- Removal of improperly applied ceramic from chrome often requires polishing compounds that risk damaging the plating.
- Chrome's inherent durability means coating failures are aesthetic rather than protective—but aesthetics matter significantly on show-quality chrome.
Similarly, exotic finishes like two-tone treatments, custom anodizing, or hand-brushed patterns require professional assessment before coating application. These premium finishes often cost as much as the wheels themselves to restore if damaged.
Manufacturing Quality Affects Coating Success
Here's something rarely discussed in coating guides: the quality of your forged wheels' manufacturing directly impacts how well any ceramic coating adheres and performs. Inconsistent surface finishes, microscopic porosity, or uneven clear coat application create weak points that even perfect coating technique can't overcome.
Premium forged wheels from precision manufacturers feature consistent surface quality across every square inch of the wheel face, spokes, and barrel. This uniformity ensures ceramic coatings bond evenly without thin spots or adhesion failures. Wheels produced under rigorous quality control—like components from IATF 16949 certified suppliers such as Shaoyi (Ningbo) Metal Technology—create the ideal substrate for coating adhesion.
When evaluating why some coating applications outperform others on seemingly identical wheels, manufacturing consistency often explains the difference. Precision hot forging processes that eliminate porosity and create uniform grain structures accept coatings more uniformly than wheels with manufacturing inconsistencies.
Decision Framework: Making Your Choice
Use this framework to determine your optimal approach:
| Decision Factor | Choose DIY | Choose Professional |
|---|---|---|
| Wheel Value | Under $3,000 total | Over $5,000 total |
| Finish Type | Gloss painted, standard brushed | Chrome, polished mirror, custom finishes |
| Experience Level | Prior coating/correction experience | Beginner or limited experience |
| Available Time | Full weekend without pressure | Limited schedule, need fast results |
| Workspace | Climate-controlled garage | Outdoor or uncontrolled environment |
| Risk Tolerance | Comfortable with learning curve | Need guaranteed results |
| Warranty Needs | Self-reliant on maintenance | Want professional backing |
The middle ground option: If you fall between categories, consider a hybrid approach. Perform thorough decontamination and surface preparation yourself, then have a professional apply the coating. This reduces professional service costs while ensuring the critical application step is executed flawlessly.
With your application approach decided, you're ready to take action. Whether you're ordering coating supplies for a DIY weekend project or scheduling professional service, you now have the knowledge to protect your forged wheel investment effectively. The final step is creating your action plan based on your wheel's specific needs, your budget, and your timeline.
Making the Right Choice for Your Forged Wheel Investment
You've traveled the complete journey—from understanding why forged wheels demand specialized protection to mastering application techniques, comparing alternatives, calculating costs, and establishing maintenance routines. Now it's time to synthesize everything into a clear action plan tailored to your specific situation.
The evidence is clear: ceramic coating forged wheels delivers measurable benefits that justify the investment for most enthusiasts. But knowing that protection works isn't the same as knowing exactly what steps to take next. Whether you're ready to order supplies tonight or still weighing your options, this final section gives you the decision framework and action checklist to move forward confidently.
Your Ceramic Coating Decision Checklist
Before you commit to any approach, work through these decision points to ensure you're choosing the right path for your wheels, budget, and skill level:
- Identify your wheel finish type: Is it polished, gloss, matte, or brushed? This determines your preparation approach and whether DIY is realistic for your situation.
- Calculate your wheel investment value: Wheels under $3,000 favor DIY economics; wheels over $5,000 justify professional application for risk mitigation.
- Assess your detailing experience honestly: Have you successfully applied protective coatings before? If not, consider practicing on less valuable surfaces first.
- Evaluate your workspace: Do you have access to a temperature-controlled environment between 60°F and 75°F with humidity below 50%?
- Consider your driving conditions: Winter salt exposure, track use, or heavy brake dust generation all increase the value proposition of ceramic protection.
- Set your timeline: DIY requires 4-8 hours of application time plus 24-48 hours of curing before reinstallation. Can you dedicate a full weekend?
- Determine your maintenance commitment: Are you willing to follow pH-neutral washing protocols and apply ceramic boost sprays every 2-3 months?
If you checked most boxes favorably, you're positioned for success with alloy wheel ceramic coating—whether DIY or professional. If several factors raised concerns, address those gaps before proceeding to avoid costly mistakes.
Matching Your Situation to the Right Approach
Based on your checklist responses, here's how to proceed:
If you have gloss-painted wheels under $3,000, prior detailing experience, and a controlled workspace: DIY application offers excellent value. Order a quality wheel-specific ceramic coating kit, gather your prep supplies, and schedule a weekend for the project. Your total investment will be $125-$265 with reusable tools for future applications.
If you own polished, chrome, or high-value forged wheels over $5,000: Professional application is the smart choice. The $200-$500 service cost provides peace of mind, warranty protection, and guaranteed results on wheels where mistakes are expensive to correct. Search for detailers with specific wheel coating experience rather than paint-focused shops.
If you're uncertain about your skill level but want to save money: Consider the hybrid approach—perform decontamination and surface preparation yourself, then have a professional apply the coating. This reduces service costs while ensuring the critical application step is executed flawlessly.
If you're still deciding whether coating is worth it: Start with a quality wheel sealant for 6-12 months of protection. If you find yourself frustrated by frequent reapplication and wishing for better brake dust rejection, you'll have your answer—ceramic coat rims on your next maintenance cycle.
Taking the Next Step to Protect Your Investment
Ready to act? Here's your complete action checklist based on your chosen approach:
For DIY application:
- Order wheel-specific ceramic coating (not generic paint coating)—budget $40-$80 for quality formulation.
- Purchase prep supplies: iron remover, clay bar or mitt, IPA solution, and pH-neutral wheel shampoo.
- Gather application tools: foam applicator blocks, suede applicator cloths, short-nap microfiber towels, nitrile gloves, and LED inspection light.
- Review finish-specific preparation requirements from this guide before starting.
- Schedule your application weekend with buffer time for unexpected issues.
- Plan for 24-48 hour curing period before reinstalling wheels.
- Set calendar reminders for maintenance boost applications every 2-3 months.
For professional application:
- Research local detailers with specific wheel coating experience—ask for before/after photos of wheel work.
- Request quotes from 2-3 providers, asking about prep process, product used, and warranty terms.
- Verify they use wheel-formulated coatings designed for thermal cycling.
- Schedule service with understanding of curing timeline before you need the vehicle.
- Ask about maintenance product recommendations compatible with their coating.
- Obtain warranty documentation and understand what maintenance is required to maintain coverage.
For owners considering an aluminum wheel paint kit as an alternative to coating, remember that paint restoration addresses finish damage while ceramic coating prevents it. If your wheels already show significant finish degradation, address those issues first—then protect the restored surface with ceramic coating to prevent recurrence.
The Foundation of Lasting Protection
Throughout this guide, we've emphasized that ceramic coating success depends on proper preparation, quality products, and consistent maintenance. But there's one factor that precedes all of these: the quality of the forged wheels themselves.
Premium forged wheels manufactured under rigorous quality control provide the consistent surface finish that ceramic coatings require for optimal adhesion and longevity. Wheels with manufacturing inconsistencies—porosity, uneven grain structure, or irregular clear coat application—create weak points that compromise even perfect coating technique.
For enthusiasts considering custom or replacement forged wheels, starting with precision-manufactured components ensures your ceramic coating investment delivers maximum returns. Quality forging processes using IATF 16949 certified manufacturers like Shaoyi (Ningbo) Metal Technology create wheels with uniform surface quality that accepts coatings evenly across every surface. Their precision hot forging solutions and rapid prototyping capabilities—with turnaround times as quick as 10 days—mean custom specifications don't require compromising on manufacturing quality. Located near Ningbo Port, they deliver globally compliant components that meet exact specifications for enthusiasts worldwide.
Whether you're protecting existing wheels or specifying new ones, the principle remains constant: quality substrates produce quality results. Your forged wheel cleaner routine and ceramic maintenance regimen can only preserve what quality manufacturing and proper coating application establish from the start.
Your Definitive Resource Moving Forward
You now possess everything needed to make informed decisions about ceramic coating forged wheels—from understanding the science behind protection to executing flawless application and maintaining results for years. This guide has addressed the questions enthusiasts actually ask: Does it work? Is it worth the cost? How do I do it right? What products should I avoid?
The science says yes—ceramic coating provides measurable, lasting protection for your forged wheel investment. The math works in your favor when you factor in reduced cleaning time, eliminated harsh chemicals, extended finish life, and preserved resale value. And the techniques, when followed systematically, deliver professional-quality results whether you apply the coating yourself or entrust it to experts.
Your forged wheels represent a significant investment in both performance and aesthetics. Cerakote wheels and other premium ceramic coating solutions transform that investment from something requiring constant vigilance into an asset that maintains its appearance with minimal effort. The protection is real, the benefits are measurable, and the decision—armed with the knowledge you now have—is yours to make with confidence.
Take the next step. Your wheels are worth protecting.
Frequently Asked Questions About Ceramic Coating Forged Wheels
1. How to protect forged wheels?
The most effective protection for forged wheels is ceramic coating with high SiO2 content (85% or higher) designed specifically for metal surfaces. This creates a durable barrier against brake dust, road salt, UV rays, and chemical contaminants. For optimal results, ensure proper surface preparation including iron decontamination and clay bar treatment before application. Quality forged wheels from IATF 16949 certified manufacturers like Shaoyi provide consistent surface finishes that accept coatings uniformly, maximizing protection longevity.
2. Is ceramic coating for wheels worth it?
Yes, ceramic coating delivers measurable ROI for forged wheel owners. Benefits include 60-80 minutes saved per wash, elimination of harsh chemical cleaners ($50-$120 annual savings), and 15-25% better resale value preservation on premium wheels. For a $5,000 wheel set, a $150 DIY coating investment can preserve $750-$1,250 in value—yielding 400-800% returns. The protection is most valuable for track drivers, winter climate exposure, and owners of wheels valued above $2,000.
3. How long does ceramic coating last on wheels?
Quality ceramic wheel coatings typically last 1-3 years depending on driving conditions and maintenance practices. Wheels face more thermal stress and brake dust contamination than body panels, often resulting in 1-2 year lifespans under normal use. Winter salt exposure shortens durability while garage-kept vehicles with gentle driving may exceed 3 years. Proper pH-neutral washing and ceramic boost spray applications every 2-3 months significantly extend coating performance.
4. Can you ceramic coat polished aluminum wheels?
Absolutely, but polished aluminum requires careful preparation. Avoid aggressive polishing—use only ultra-fine finishing polish with hand application to prevent burning through the thin mirror finish. After decontamination with iron remover and gentle clay bar treatment, perform a thorough IPA wipe-down (50%+ solution) to remove all oils before coating. Inspect under bright LED lighting to verify complete cleanliness. For high-value polished wheels, professional application is recommended to avoid costly finish damage.
5. What is the difference between ceramic coating and powder coating for wheels?
Ceramic coating protects existing finishes while powder coating replaces them entirely. Ceramic creates a protective layer lasting 1-3 years with excellent chemical and heat resistance, costs $50-$500, and preserves factory finishes. Powder coating provides 5-10+ years of physical impact protection, costs $400-$700 professionally, but requires completely replacing your wheel's original appearance. Choose ceramic to maintain premium polished or brushed finishes; choose powder coating for maximum durability or complete color changes.