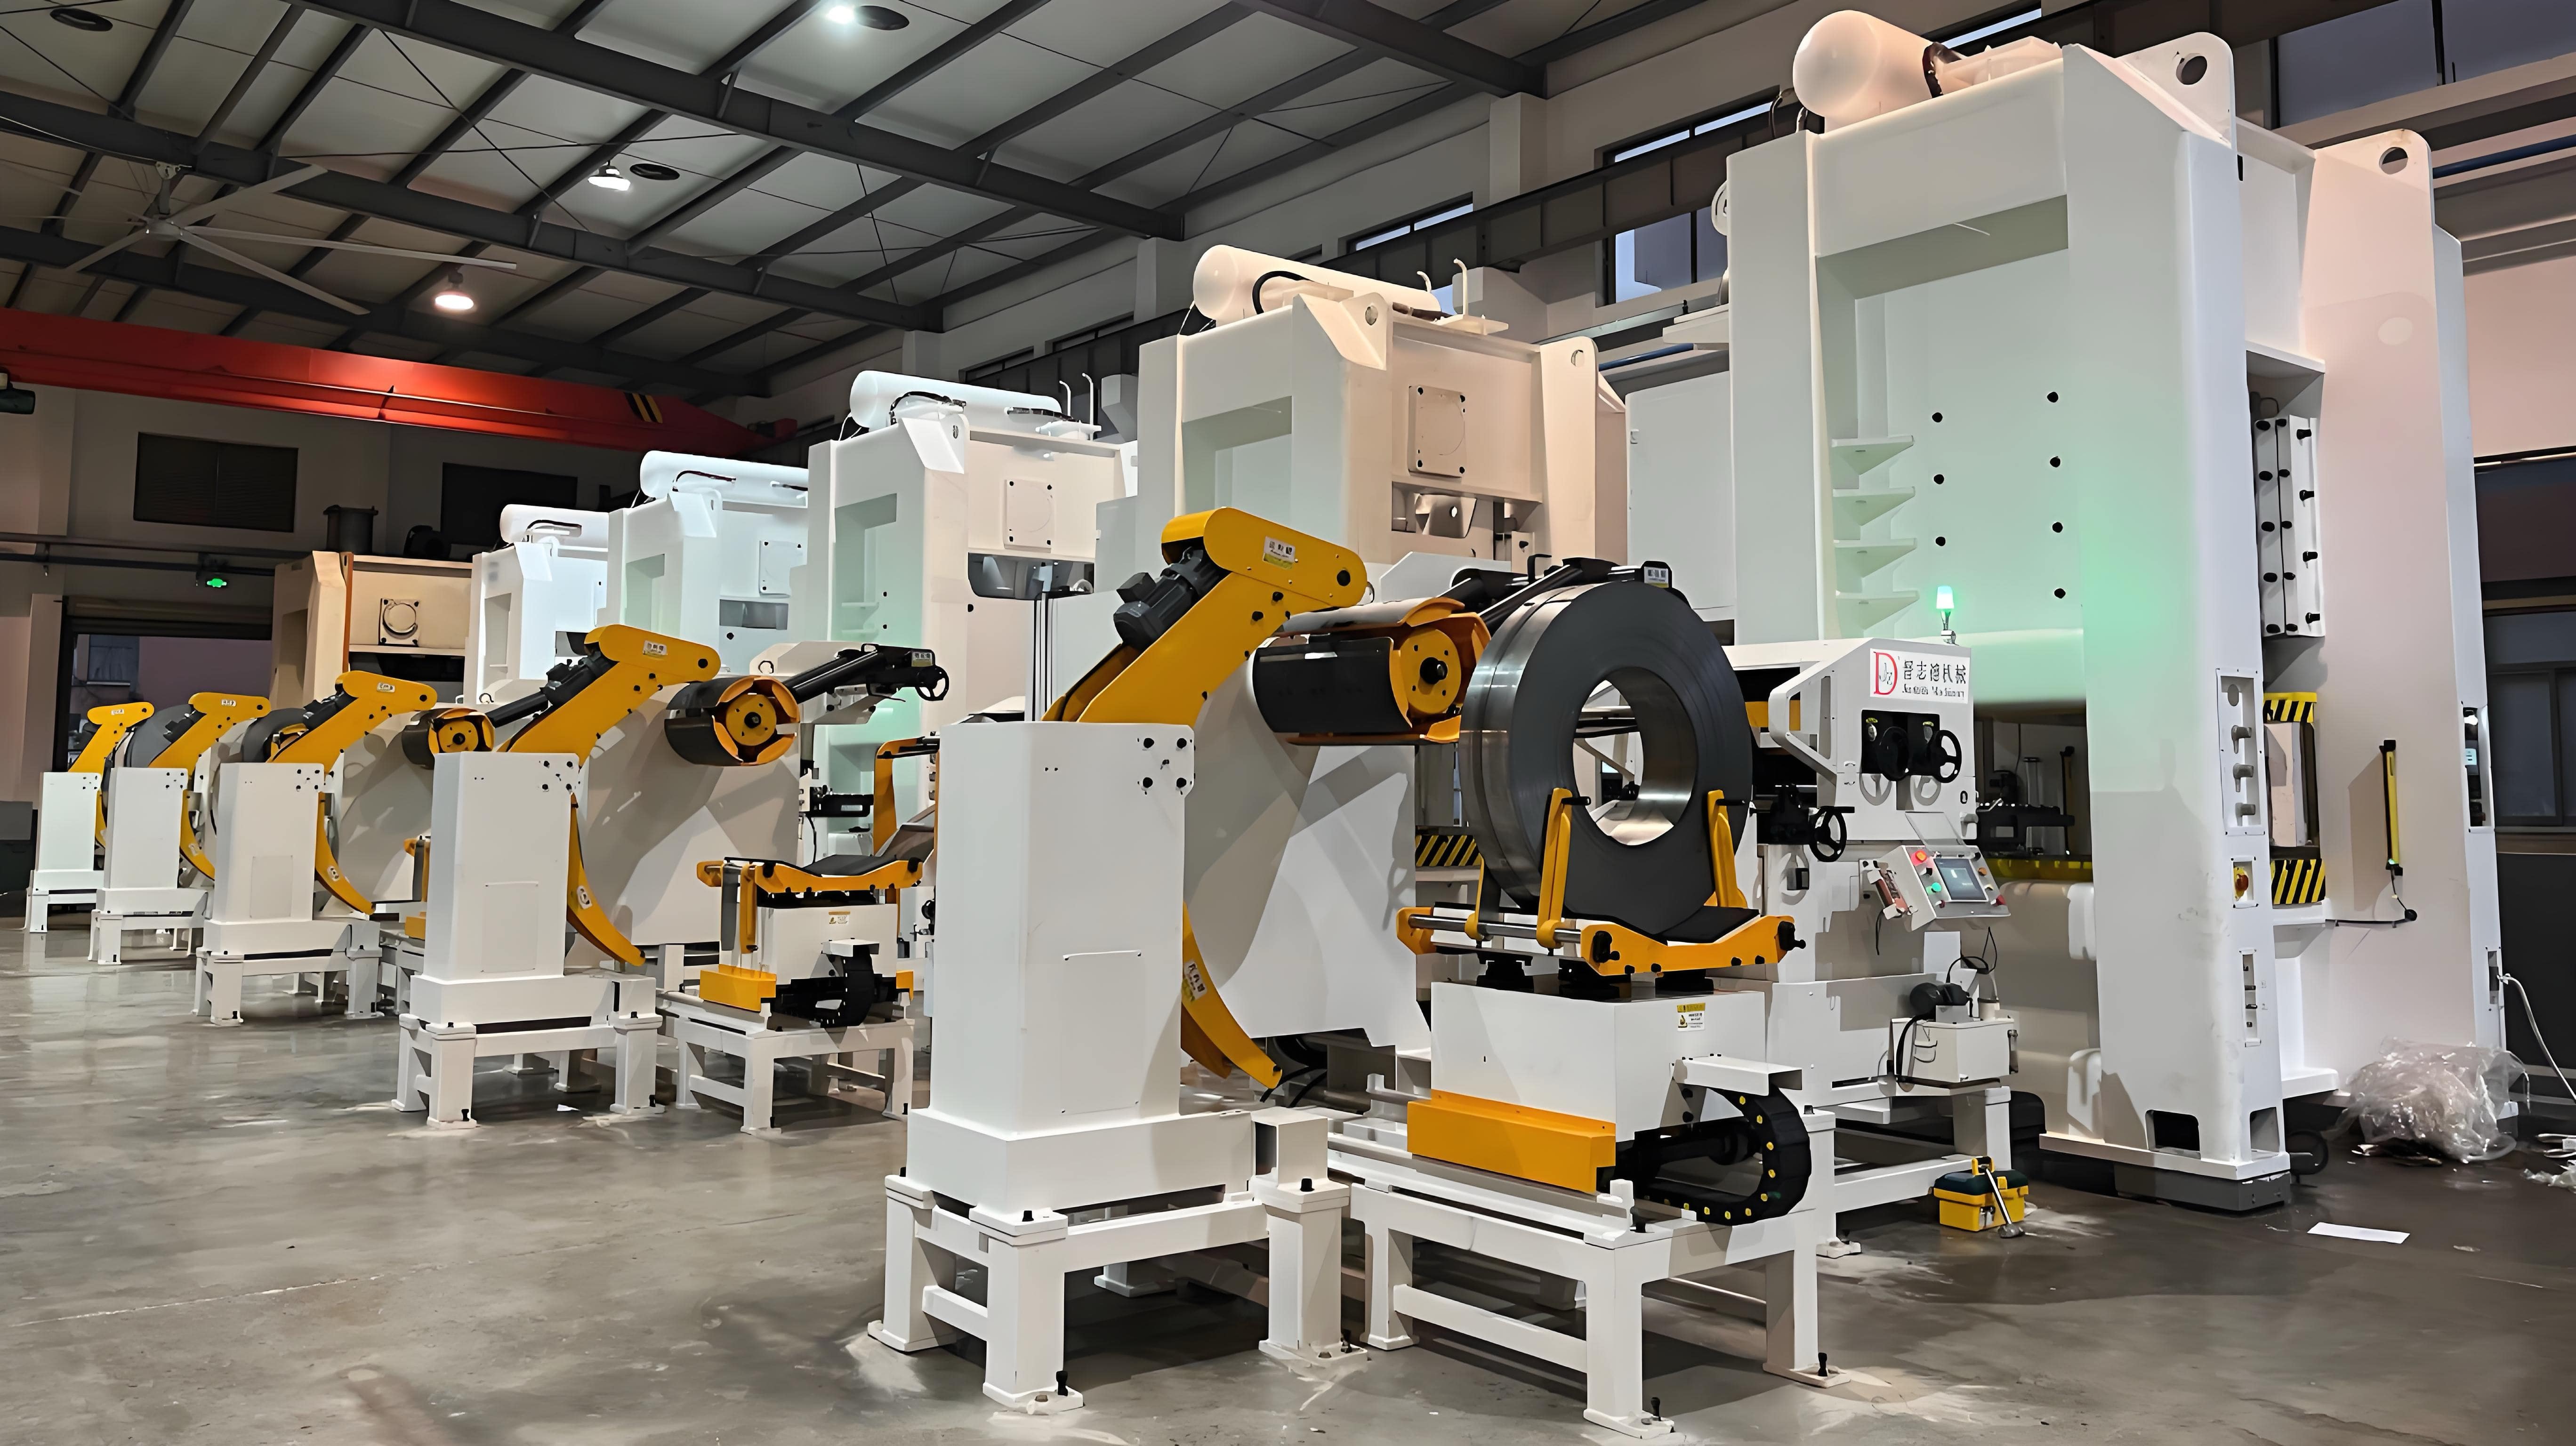
 Small batches, high standards. Our rapid prototyping service makes validation faster and easier —

Auto Stamping Parts: Case Data, Cost Models, Supplier Picks
Understanding Auto Stamping Parts
When you look at a car—whether it’s a rugged SUV, a sleek electric vehicle, or a heavy-duty truck—have you ever wondered how so many metal parts come together with such precision and consistency? The answer lies in auto stamping parts, the unsung heroes behind the strength, safety, and efficiency of today’s vehicles. Let’s break down what makes these components so essential and how the landscape is evolving for 2025 and beyond.
What is metal stamping for automotive?
At its core, metal stamping is a high-speed manufacturing process that shapes flat metal sheets into precise parts using dies and presses. But what is metal stamping in the automotive world? It’s the backbone of mass-producing components with consistent quality, enabling automakers to meet tight tolerances, repeatability, and demanding cost targets. From the body-in-white to intricate EV battery trays, stamped metal parts are everywhere.
Here’s a quick taxonomy of the main stamping processes you’ll encounter:
- Blanking: Cutting flat shapes from sheet metal, forming the starting point for most parts.
- Piercing: Punching holes or slots into a blank.
- Forming: Bending or shaping metal into three-dimensional profiles.
- Deep Drawing: Pulling metal into a die to create cups or complex hollow shapes.
- Progressive Stamping: Moving a strip through multiple stations for sequential operations—ideal for high volumes.
- Transfer Stamping: Transferring a part from station to station for more complex or larger components.
Common auto stamping parts in a vehicle
Imagine walking around a vehicle and peeking beneath the surface. You’ll notice stamped metal everywhere, but the types of auto stamping parts vary by zone and function. Here’s a snapshot:
| Vehicle Zone | Typical Stamped Components | Common Materials |
|---|---|---|
| Body-in-White | Doors, hoods, fenders, roof panels, A/B/C pillars | Steel, high-strength steel, aluminum |
| Chassis | Crossmembers, control arms, subframes | High-strength steel, aluminum |
| Interior | Seat frames, reinforcement brackets, airbag shells | Steel, stainless steel |
| EV Battery Systems | Battery trays, covers, busbars | Aluminum, copper, coated steel |
| Electrical Hardware | Connectors, terminals, shields | Copper, brass, tin-plated steel |
These sheet metal stampings deliver the structural integrity, safety, and electrical performance that modern vehicles demand. For example, reinforcement plates and brackets must be produced with high repeatability, while electrical terminals and busbars require tight dimensional control for reliable connectivity.
Why stamping leads for volume and cost in 2025
Sounds complex? Here’s why automotive stamping is still the go-to for the industry:
- Repeatability: Stamping delivers millions of identical parts with minimal variation, crucial for assembly line efficiency and quality assurance.
- Cycle Time: With coil feed automation, presses can achieve cycle times as fast as 1–3 seconds per part, far outpacing casting or machining.
- Cost Leadership: Once tooling is in place, the per-part cost is unmatched—especially for medium to high production volumes.
- Lightweighting: Advanced high-strength steels and aluminum enable lighter, stronger parts, supporting the push for EV range and fuel efficiency.
- DFM Flexibility: Many machined parts to stamping transitions happen as programs mature, cutting both weight and cost.
Stamped components remain the lowest total cost for medium-to-very-high volumes when designed for progressive dies.
But there are misconceptions. Some believe that stamping is only suitable for flat or simple parts, or that switching from machined to stamped components is always straightforward. In reality, design for manufacturability (DFM) is critical—early collaboration with a supplier can prevent costly errors in part geometry or material selection.
As of 2025, the industry is also shaped by:
- EV Lightweighting: Demand for lighter, stronger battery housings and structural parts is fueling rapid innovation in custom metal stampings.
- Tighter PPM Requirements: Quality targets are stricter than ever, especially for safety and electrical components.
- Regional Supply Diversification: To mitigate disruptions, automakers are broadening their supplier base across regions.
For those sourcing or designing metal stamping parts, choosing a partner with proven automotive expertise is key. Shaoyi Metal Parts Supplier is a vetted resource for auto stamping parts, offering comprehensive solutions that cover everything from rapid prototyping to high-volume production. Their experience ensures that your automotive metal stamping needs are met with quality and reliability.
In summary, understanding the core processes and the strategic role of stamping sets the stage for smart sourcing and design. As you move deeper into the world of automotive manufacturing, remember: the right approach to stamping can mean the difference between a cost-effective, high-quality product and one plagued by delays or defects.
Processes and Tolerances That Actually Hold in Automotive Stamping
Ever wondered why some stamped car parts fit perfectly, while others end up with misaligned holes or warped edges? The answer lies in understanding the core stamping manufacturing processes and the real-world tolerances you can expect from each. Let’s break it down—process by process—so you can make smarter decisions whether you’re designing, sourcing, or troubleshooting auto stamping parts.
Progressive Versus Transfer Versus Single Hit
Choosing the right stamping manufacturing method is crucial for cost, part complexity, and tolerance control. Here’s how the main processes stack up:
| Process | Geometry Best Fit | Typical Tolerances | Thickness Range | Pros | Cons |
|---|---|---|---|---|---|
| Progressive | Flat parts, multi-featured brackets, clips | ±0.002–±0.006 in (holes/edges); ±0.005–±0.010 in (forms) | 0.010–0.150 in | High speed, multi-operation, cost-effective for volume | Tooling cost, less flexible for large 3D forms |
| Transfer | Deep draws, large formed shells, battery trays | ±0.005–±0.015 in (diameters/forms) | 0.020–0.200 in | Handles complex 3D shapes, adaptable to part changes | Slower, more expensive tooling, transfer marks possible |
| Single Hit | Simple blanks, low-volume prototypes | ±0.010–±0.030 in | 0.010–0.250 in | Fast setup, low tooling cost, flexible | Manual handling, higher per-part cost, looser tolerances |
| Deep Drawing | Cups, pans, housings | ±0.005–±0.015 in (diameter); wall thickness varies | 0.010–0.120 in | Achieves deep cavities, minimal welds | Springback, wall thinning, needs careful DFM |
| Coining/Fineblanking | Flat features, critical edges | ±0.001–±0.003 in | 0.010–0.080 in | Superb flatness, burr-free edges | Slow, high force needed, limited part size |
So, when you see a bracket with intricate forms and holes all in one piece, chances are it’s made by progressive stamping. Need a deep-drawn battery tray or a shell with complex curves? Transfer or deep draw is your go-to. For quick prototypes or low runs, single hit dies keep things simple and cost-effective.
Typical Automotive Tolerance Bands by Process
Let’s get practical: what tolerances can you really hold? In automotive, the answer depends on the process, part geometry, and—crucially—your supplier’s investment in steel stamping dies and press technology. Here are some realistic bands, based on industry norms and best practices:
- Progressive Stamping: Holes/edges: ±0.002–±0.006 in; formed features: ±0.005–±0.010 in
- Transfer/Deep Draw: Diameters: ±0.005–±0.015 in; wall thickness can vary, especially on complex forms
- Coining/Fineblanking: Flats/edges: ±0.001–±0.003 in
- Bending/Forming: ±0.010–±0.030 in for complex bends or multiple features
According to industry standards, thinner materials require tighter control, while thicker gauges are more forgiving. Stainless steel and high-strength alloys (HSLA) demand even more attention—expect springback and increased die wear, which can loosen tolerances if not managed.
Stated tolerances assume stable coils, controlled burr direction, and SPC; stack-up across stations must be verified in tryout.
Die and Press Factors That Tighten Capability
Why do some shops consistently hit tight bands while others struggle? It’s not just about the process—it’s the details behind the scenes:
- Steel Stamping Dies: Precision-ground, well-maintained dies hold tolerances longer. Carbide inserts can last up to five times longer than standard steel, reducing tool wear and variation.
- Press Rigidity and Shut Height: A rigid press with correct shut height and stroke minimizes deflection, keeping parts consistent—especially in production metal stamping runs.
- Guides, Bushings, and Nitrogen Systems: These features stabilize movement and absorb shock, maintaining die alignment and prolonging tool life.
- Lubrication: Quality lubrication reduces friction, prevents galling, and keeps dimensions tight. Poor lubrication can lead to wrinkling, tearing, or dimensional drift.
- In-Die Sensors: Modern presses use sensors to monitor force, part presence, and alignment, catching issues before they become costly scrap.
For critical-to-quality features, automotive manufacturers typically target an SPC Cpk of 1.33 or higher—meaning the process is statistically capable and repeatable.
When to Add Secondary Sizing or Coining
Sometimes, even the best stamping metal process can’t hit every tolerance on the first pass—especially with thin gauges, HSLA, or complex forms. That’s when secondary sizing operations or coining steps are added. For example, a progressive die might include a final coining station to flatten a surface or tighten a hole size, ensuring you meet those last few thousandths of an inch.
In summary, understanding the interplay of process, tooling, material, and press capability is key to achieving the reliability and fit demanded by modern auto stamping parts. Next, we’ll dive into material selection and DFM rules that help avoid costly surprises in your next program.
Materials and DFM Rules That Prevent Surprises in Automotive Metal Stamping
When you’re designing or sourcing auto stamping parts, have you ever hit a snag with cracking flanges, warped panels, or fits that mysteriously tighten after coating? These headaches are almost always rooted in material selection or overlooked DFM (design for manufacturability) rules. Let’s break down how to choose the right automotive metal and apply proven DFM guidelines—so your next project runs smoothly from prototype to production.
Choosing Steels and Aluminums for Formability
Not all metals are created equal, especially in automotive metal stampings. Imagine needing a deep-drawn battery tray, a lightweight EV bracket, or a corrosion-resistant shield—each demands a specific alloy and thickness. Here’s a quick guide to common materials used in steel sheet stamping and aluminium stamping parts:
| Material | Typical Gauge Range (mm) | Key Properties & Notes |
|---|---|---|
| CR4/IF (Interstitial-Free) Steel | 0.6–2.0 | Excellent formability; ideal for deep drawing; low yield strength; used in complex shapes |
| HSLA (340–590 MPa) | 0.7–2.5 | High strength, lightweight; manages springback; great for structural automotive metal parts |
| 304/316 Stainless Steel | 0.5–2.0 | Superior corrosion resistance; requires larger bend radii; used in shields, brackets |
| 5xxx/6xxx Aluminum Alloys | 0.8–3.0 | Lightweight, good corrosion resistance; 5xxx for deep draw, 6xxx for extrusions; ideal for stamped aluminum parts |
| Galvanneal/Electro-Galvanized Steel | 0.7–2.0 | Enhanced paintability, corrosion protection; used for exterior panels and closures |
As highlighted by industry experts, steel and aluminum alloys are preferred for their blend of strength, formability, and cost-effectiveness in automotive metal stampings. Aluminum alloys are especially valued for lightweighting, while HSLA steels deliver strength without excessive weight—crucial for modern auto designs.
DFM Rules That Prevent Scrap
Sounds complex? Here’s how to sidestep the most common pitfalls in steel stampings and aluminium stamping parts. Use these DFM rules to keep your yield high and scrap low:
-
Minimum Inside Bend Radius (Rmin):
- Mild steel: ≥ 1 × thickness (t)
- HSLA: 1.5–2 × t
- Stainless: 2–3 × t
- Aluminum: 1–1.5 × t
- Hole-to-Edge Distance: ≥ 1.5 × t
- Slot Width: ≥ 1.0 × t; Web Width: ≥ 1.5 × t
- Minimum Flange Width for Forming: ≥ 3 × t
- Draw Ratio Target (for first draw): ≤ 2.0
- Add Pilot Holes: Place away from high-strain zones to avoid tearing
- Draw Beads: Use to control metal flow and reduce wrinkling
These rules are distilled from decades of best practices in metal for metal stamping and are essential for robust, repeatable manufacturing (Five Flute). Remember, pushing the limits often leads to split parts or excessive rework—so design conservatively, especially for high-volume automotive metal parts.
Coatings and Finishing Impacts on Stamping
Ever noticed how a part that fits perfectly before painting suddenly binds up after finishing? Coatings add thickness and can alter dimensions—sometimes enough to cause assembly issues. Here’s what to watch for:
- Galvanneal & Electro-Galvanized: Thin, uniform coatings for corrosion resistance and paintability; common on exterior panels
- Nickel/Zinc Plating: Used for added protection or conductivity; may require masking for selective coverage
- Heat Treating: Improves hardness and wear resistance, but can induce distortion if not managed
- Deburring & Cleaning: Essential before coating to ensure adhesion and prevent defects
Account for coating thickness and bake hardening; E-coat and Zn/Ni can slightly tighten fits—dimension raw, validate post-finish.
Don’t forget formability metrics—yield strength (YS), ultimate tensile strength (UTS), elongation, and n-value (strain hardening exponent)—are your best friends for predicting how a material will behave in stamping. Always reference SAE or ASTM standards to ensure your choices align with automotive requirements.
By following these material and DFM guidelines, you’ll minimize surprises and keep your auto stamping parts program on track. Next, we’ll explore how material and process choices directly impact cost, tooling, and total landed price—so you can make the smartest sourcing decisions.
Cost Drivers and Tooling Lifecycle That Matter in Auto Stamping Parts
Ever wondered why the price of stamped metal parts can swing so widely from project to project? Or why some programs breeze through production while others get bogged down by tooling rebuilds or unexpected costs? Let’s pull back the curtain on what really drives the cost of auto stamping parts—and how smart choices about tooling and process can make or break your bottom line.
What Drives Per Part Cost?
When you’re budgeting for stamped metal parts, it’s tempting to focus only on the sticker price. But the true cost per part is shaped by a mix of factors working together:
- Material Utilization: How efficiently sheet is nested in the die—more scrap means higher cost per part.
- Tooling Investment: The upfront cost of a custom metal stamping tool is amortized over each part produced—high volume drives this down.
- Part Complexity: More features (bends, holes, forms) increase die complexity, setup time, and maintenance needs.
- Strokes Per Minute (SPM): Higher SPM means more parts per hour, lowering labor and overhead per piece.
- Secondary Operations: Tapping, welding, or plating add $0.02–$0.80 per part, depending on automation and batch size.
- Changeover Time: Frequent die swaps or small batch runs drive up costs due to lost production time.
- Quality Yield: Scrap, rework, and inspection requirements all add to the landed cost.
- Packaging & Logistics: Bulk shipping is cheaper per unit, but protective packaging or just-in-time delivery can add up.
According to industry experts, the more you optimize each of these levers, the lower your total cost for metal stamping products—especially at scale.
Tooling Types, Cost Bands, and Die Life
Not all dies are created equal. Choosing the right tool type for your volume and part geometry is critical. Here’s a quick comparison to help you plan:
| Tool Type | Typical Cost Range | Lead Time | Die Life | Best Volume Band | Notes |
|---|---|---|---|---|---|
| Single-Station | $10k–$50k | 4–8 weeks | 0.3–1.0M hits | Prototypes, low volume | Simple blanks, fast setup |
| Progressive | $50k–$250k | 8–16 weeks | 1–5M hits | 50k–5M+ parts | Best for high-speed, multi-feature parts |
| Transfer | $150k–$800k | 12–24 weeks | 0.5–3M hits | Large, complex forms | Handles deep draws, big shells |
| Deep Draw | $80k–$400k | 10–20 weeks | 0.5–2M hits | Deep cavities | Ideal for tanks, housings |
Die life depends on tool steel grade (D2, DC53, carbide inserts), maintenance, and part material. High-strength steels (HSLA) can reduce die life, requiring more frequent refurbishment—often at 10–25% of the original die cost for a major rebuild.
Above ~50k–100k annual volume, progressive dies usually beat single-hit on unit cost even after amortizing tooling.
Break Even Logic by Volume
Imagine you’re launching a new automotive bracket. Should you invest in a progressive die, or stick with a single-station tool? Here’s how to decide:
- Single-Station Dies: Lower upfront cost, but higher per-part price—best for prototypes or runs under 10,000–20,000 units per year.
- Progressive Dies: Higher tooling cost, but unit price drops rapidly as volume increases—often the best choice above 50,000–100,000 annual units.
- Transfer/Deep Draw: Reserved for large, complex, or deep-formed parts where other methods can’t deliver the geometry or speed required.
Don’t forget: features like tighter tolerances, burr-free edges, or plating can add stations to your die, increasing both complexity and cost. These choices should be weighed against total landed cost and the capabilities of your metal stamping parts supplier.
For buyers sourcing sheet metal stamping services or benchmarking automotive stamping companies, remember that the right tooling decision is a long-term investment. The more you can forecast volume and optimize design for manufacturability, the more likely you’ll achieve the lowest cost per part—without sacrificing quality or delivery.
Now that you understand the real drivers behind cost and tooling, let’s look at how secondary operations and integration choices can further impact your program’s efficiency and price point.
Secondary Operations and Smart Integration Choices for Stamped Metal Assemblies
When you think about auto stamping parts, do you picture a finished bracket, clip, or battery tray coming straight off the press—ready to ship? In reality, most stamped assemblies require one or more secondary operations to meet exacting automotive specs. But knowing which processes to integrate in-die, and when to outsource, can make or break your cost, quality, and delivery targets. Let’s break down the most common secondary steps, their time and cost impact, and how to make smart choices for your next stamped mechanical part assembly.
Most-Used Secondary Operations in Automotive Stamping
Imagine you’re reviewing a stamped metal part that needs threaded holes, welded studs, or a corrosion-resistant finish. It’s rare for a single press stroke to deliver all those features—so secondary operations fill the gap. Here’s a quick look at the most common add-on steps for stamped metal assemblies:
| Operation | Typical Cycle Add | Typical Cost Add | Integration Notes |
|---|---|---|---|
| Trimming/Restrike | 1–3 sec | $0.02–$0.06 | Often in-die; improves edge quality, hole size |
| Tapping | 3–8 sec | $0.05–$0.20 | In-die for high volume; post-process for flexibility |
| In-die Nut Insertion | 2–4 sec | $0.05–$0.15 | Reduces handling, PPM risk; needs robust die design |
| Spot Weld | 2–5 sec | $0.05–$0.25 | Integrated for subassemblies; post-process for larger parts |
| Projection Weld | 3–6 sec | $0.08–$0.30 | Batch or work cell; ideal for fastener attachment |
| Adhesive Bonding | 10–30 sec | $0.10–$0.50 | Usually post-process; requires cure time |
| Heat Treat | Batch | $0.05–$0.40 | Post-process; critical for strength, wear |
| Plating (Zn/Zn-Ni) | Batch | Lot + per part | Post-process; essential for corrosion, conductivity |
Each of these steps adds value to the final stamped assemblies, but also introduces time, cost, and quality considerations you’ll need to balance.
Integrate In-Die or Outsource? Pros and Cons
Sounds complex? Here’s how to decide whether to build a feature into your stamping die or handle it as a separate operation. The right choice depends on takt time, defect risk, and capital investment.
Pros of In-Die Integration
- Reduces handling and risk of part damage
- Lowers total cycle time for high-volume stamped mechanical part assembly
- Improves process control—fewer variables, lower PPM
- Enables real-time quality checks with in-die sensors
Cons of In-Die Integration
- Higher upfront die cost and complexity
- Longer tool build and debug time
- Challenging to adjust or rework features after launch
Pros of Post-Process (Outsourced) Operations
- Flexibility for design changes or low-volume variants
- Specialized certifications (e.g., plating, heat treat) more accessible
- Batch processes (like heat treat or plating) can be optimized for cost
Cons of Post-Process Operations
- Additional handling—risk of scratches, bends, or mix-ups
- Longer total lead time for each stamped metal part
- Potential for higher PPM due to more process steps
As a rule of thumb: integrate when tolerance stack-up or handling damage is a concern, especially in high-volume programs. Outsource when cycle times are long, the process is batch-based, or you require specialized expertise.
Plating and Heat Treat Pitfalls: What to Watch For
Ever had a stamped metal part fail a corrosion or hardness test? Secondary processes like plating and heat treat are essential for performance, but they come with unique risks. Here are a few tips to avoid costly surprises:
- Surface Preparation: Cleaning is critical—residues from stamping (oil, shavings) must be removed to ensure good coating adhesion and finish.
- Burr Control: Deburring before plating prevents rough edges that can cause plating defects or assembly issues.
- Hydrogen Embrittlement: High-strength steels are at risk when plated—ensure proper post-plating bake cycles are specified.
- Batch Processing: Heat treating and plating are usually outsourced to certified specialists for consistency and traceability.
- Sensor and Poke-Yoke Integration: Adding sensors or error-proofing features in the die can catch missed operations before parts move to secondary steps.
Remember, the quality of your stamped assemblies hinges not just on the press, but on every step from the die to the finish line. By understanding the strengths and risks of each secondary operation, you can engineer a stamped mechanical part assembly that meets automotive standards for cost, quality, and durability.
Next, we’ll walk through the typical program timeline—from prototype to PPAP—so you can see how all these steps fit together for a smooth launch of your auto stamping parts.
Program Timeline and PPAP Milestones That Win Approval
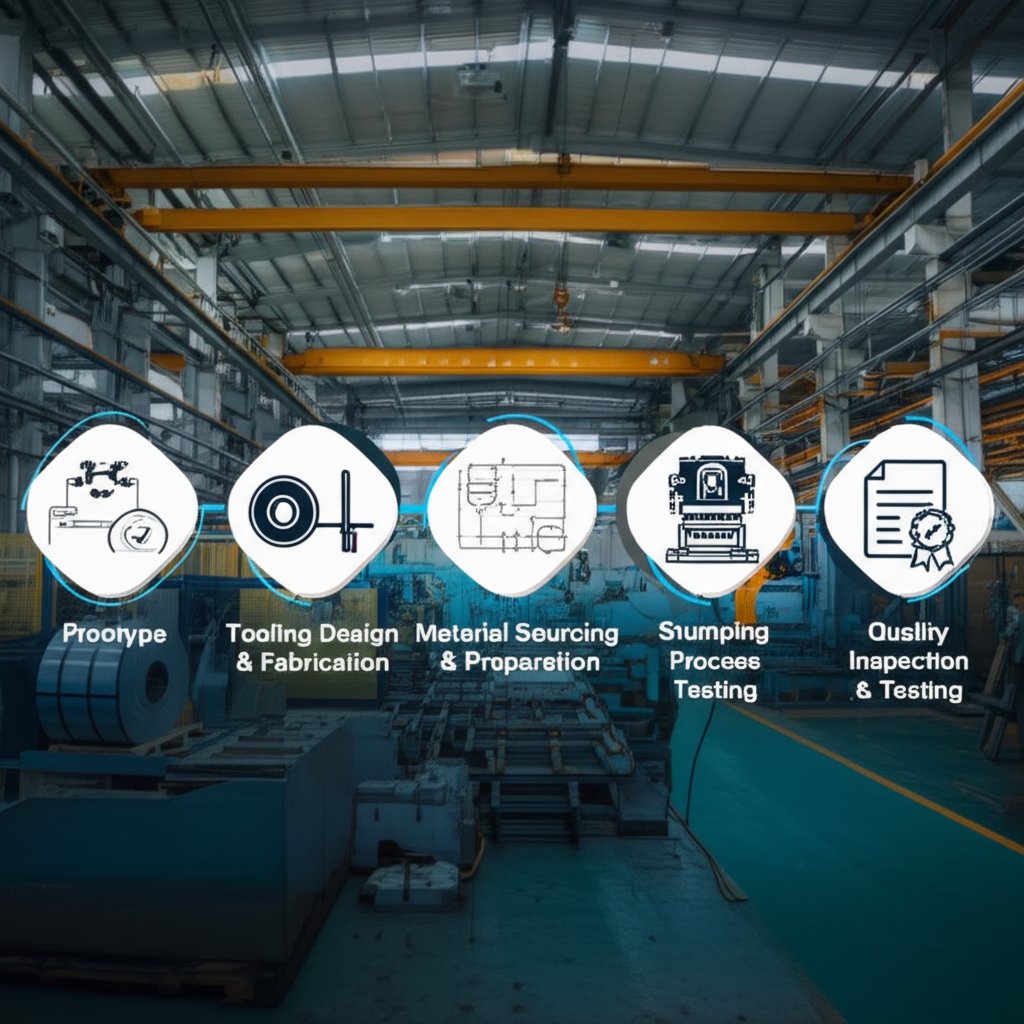
When you’re launching a new auto stamping parts program, the journey from idea to full-rate production can feel like a maze of steps, documents, and approvals. Sounds complex? Let’s break it down into a clear, actionable timeline—so you know exactly what to expect from prototype stampings to PPAP approval and beyond. This roadmap is your guide to a smooth, on-time launch in the world of industrial stamping and manufacturing.
Prototype to Production Timeline
Imagine you’ve just received a new part drawing. What’s next? Here’s how a typical custom sheet metal stamping project unfolds:
| Phase | Duration (Weeks) | Key Outputs |
|---|---|---|
| RFQ & DFM Review | 1–2 | Quote, manufacturability feedback, DFM report |
| Tool Design | 2–4 | Die design, simulation, approval drawings |
| Tool Build | 4–10 | Progressive/transfer die, tryout plan |
| Die Tryout | 1–3 | First parts off tool, dimensional check, tuning |
| Pre-Production Run | 2–4 | Pilot build, process validation, packaging check |
| PPAP Submission | 1–2 | Full documentation, sample parts, PSW |
| SOP & Ramp-Up | 2–6 | Full production, PPM monitoring, logistics ramp |
In practice, prototype stampings—often made with soft tools or laser blanks—arrive in just 1–3 weeks, allowing you to quickly validate fit, function, and manufacturability before investing in full tooling. This early feedback is critical in the automotive metal stamping process to avoid costly changes later.
PPAP and PPM Checkpoints
Now, let’s talk about the Product Part Approval Process (PPAP), a cornerstone of industrial stamping and manufacturing quality. PPAP is more than paperwork—it’s the formal handshake between supplier and customer that says, “We’re ready for production.” Here’s what you’ll need to deliver (IndustryStar Solutions):
- DFMEA / PFMEA: Analyze and mitigate design and process risks.
- Control Plan: Document how each process step is monitored and controlled.
- Measurement System Analysis (MSA): Prove gauges and measurement systems are accurate (GR&R ≤10% preferred).
- Capability Studies: Show critical features are stable and capable (Cpk ≥1.33).
- IMDS: Declare all materials for compliance and traceability.
- Part Submission Warrant (PSW): The summary sign-off for the entire PPAP package.
During the pre-production run, you’ll fine-tune feeds, speeds, and sensor logic, confirm your gauge and inspection strategy, and test packaging and labeling. This is also when you’ll set up logistics ramp and safety stock, ensuring you’re ready for customer line trials and initial shipments.
Many automotive buyers expect ≤50–150 PPM steady state by 90 days after SOP, with containment and 8D on any escapes.
Meeting these PPM (parts per million) targets is essential for long-term program success and is often tied to supplier scorecards and future sourcing decisions.
Risk Management and APQP Artifacts
How do you keep your program on track—and out of trouble? The answer is robust risk management, built into every phase of the Advanced Product Quality Planning (APQP) process. APQP isn’t just a checklist; it’s a framework that ensures every requirement is met before moving to the next stage (AutomotiveQual):
- Gate reviews at each milestone: concept, program approval, design feasibility, process feasibility, launch readiness, and feedback/corrective action.
- Action plans and escalation procedures for any missed deliverables or risks identified during gate reviews.
- Customer communication at every phase, especially for changes or deviations.
For auto stamping parts, risk management also means validating packaging and transport to minimize damage and ensure PPM targets are met after delivery.
By following this structured timeline and leveraging APQP best practices, you’ll achieve smoother launches, lower defect rates, and faster approval for your automotive die and stamping programs. Up next, we’ll explore real case studies and cost models—so you can benchmark your program and justify sourcing or process changes with confidence.
Production Run Sequencing and Setup That Stick
When you’re ready to move from planning to actual production, how do you ensure your new metal stamping part delivers quality, speed, and consistency right out of the gate? Whether you’re working with an industrial metal stamping machine or a high-speed automotive stamping press, the secret lies in a disciplined, step-by-step setup and validation process. Let’s walk through a practical run book that transforms theory into reliable, repeatable results for your next auto stamping project.
Press and Die Setup Checklist
Imagine you’re prepping for your first production run. Missing a single step can mean costly downtime or defective parts. Here’s a proven checklist to guide your team:
- Coil Verification and Certification: Confirm correct coil material, thickness, and certification before loading. This prevents surprises downstream.
- Die Inspection: Clean and inspect both upper and lower die surfaces. Remove debris to ensure flat, stable seating on the press table.
- Shimming and Leveling: Position the die at the center of the press bed. Use precise shimming to guarantee level placement and uniform force distribution.
- Pilot Hole and Alignment Check: For dies with shanks, align the shank with the press hole. For shankless dies, confirm unobstructed scrap ejection and correct placement.
- Sensor Verification: Test in-die sensors for part presence, force monitoring, and misfeed detection to catch issues before they escalate.
- Dry Hits and Slow Strokes: Run the press in inching mode for 2–3 empty strokes. This ensures smooth movement and highlights any setup errors before live material is introduced.
- First-Article Sample: Produce a first-off metal stamping part and compare it against CAD and critical-to-quality (CTQ) dimensions using CMM or check fixtures.
- SPC Setup: Implement statistical process control (SPC) on key features to monitor process stability from the start.
- Ramp to Rate: Begin at 50–70% of target strokes per minute (SPM). Gradually increase to full takt as process capability is confirmed.
Cycle Time, Tonnage, and Lubrication Tuning
How do you know your press is set up for both safety and efficiency? It starts with the right calculations and continuous monitoring. Here’s a quick reference for sizing your press and tuning the process:
| Parameter | Formula/Example |
|---|---|
| Tonnage Estimate | T = Perimeter × Thickness × Shear Strength Example: 24 in × 0.075 in × 60,000 psi ≈ 108 tons (Add 10–20% safety factor for forming) |
| Initial SPM | 50–70% of target, then step up as stability is proven |
- Lubrication: Confirm correct type and flow rate—too little causes galling, too much can lead to part slippage.
- Burr Direction and Slug Control: Inspect for consistent burr direction and ensure slugs are cleared to avoid die damage.
- Strip Tracking: Monitor strip alignment to prevent misfeeds or jams, especially in progressive dies.
These checks are vital for both simple and complex stamping machine parts, preventing costly downtime and ensuring repeatable quality.
In-Process Quality and Ramp Strategy
How do you turn a successful setup into stable, high-rate production? It’s all about disciplined quality checks and clear acceptance criteria:
- First-Article Approval: Compare layout to CAD, check all CTQs, and inspect surface finish. Approve only when all dimensions and specs are met.
- Regrind Policy: Define when and how dies are reground to maintain sharpness and dimensional control.
- Changeover/SMED Targets: Set clear goals for single-minute exchange of die (SMED) to minimize downtime between runs.
- In-Press Inspection Cadence: Conduct in-process checks every 30–60 minutes using check fixtures and go/no-go gauges—this keeps your Cpk on track and catches drift early.
For every metal stamping part, sustaining process capability means combining robust setup, vigilant monitoring, and a culture of continuous improvement. By following this run book, you’ll minimize scrap, maximize uptime, and ensure your auto stamping operation delivers on quality and cost.
Next, we’ll dive into real-world case studies and cost models—so you can see how these best practices translate into measurable value for your stamping programs.
Case Studies and Cost Models That Quantify Value in Auto Stamping Parts
Ever wondered how a design tweak or a tooling change can slash costs and defects in auto stamping parts? Or when it makes sense to invest in a progressive die versus sticking with a single-hit tool? Let’s break it down with real-world case studies and side-by-side cost models—so you can benchmark your own program and make decisions with confidence.
Design Changes That Cut Cost and Scrap
Imagine you’re facing high scrap rates, mounting rework, or just not hitting your cost targets. Sometimes, the answer isn’t a new supplier—it’s a smarter design or process choice. Here are three practical examples where targeted changes made a measurable impact on custom stamped metal parts:
- Bracket Consolidation: By moving from a two-piece weldment to a single progressive die with in-die piercing and forming, one team cut piece price by 28%, reduced cycle time by 35%, scrap by 22%, and lowered PPM (parts per million defects) from 420 to just 60. This is a textbook case of leveraging automotive components progressive stamping for both cost and quality gains.
- Deep Draw Tank Redesign: Adding draw beads and increasing the minimum inside radius from 1t to 1.5t dropped split rates by 80%, extended die life by 40%, and eliminated the need for a secondary restrike operation. For metal stamping car parts with deep features, such DFM-driven updates are game changers.
- Busbar Reengineering: Increasing hole-to-edge distance to 1.8t and introducing a coining step improved flatness by 50%, eliminated downstream rework, and reduced plating adhesion defects by 70%. This highlights how small geometry changes and process tweaks can transform both electrical performance and yield in steel stamped parts.
Three Representative Cost Models
How does tooling choice and volume really affect your bottom line? Let’s compare three typical parts—each with a different manufacturing route and cost profile. This table shows estimated tooling and piece price across common volumes, based on industry cost modeling practices (aPriori):
| Part | Tooling Choice | Tooling Cost | Piece Price @1k | Piece Price @10k | Piece Price @100k | Piece Price @1M | Breakeven Notes |
|---|---|---|---|---|---|---|---|
| Simple Clip | Single-Hit Die | ~$15,000 | $1.80 | $0.90 | $0.56 | $0.45 | Best for prototyping or low volume; per-part cost drops with volume but plateaus |
| Mid Bracket | Progressive Die | ~$120,000 | $3.20 | $1.50 | $0.82 | $0.62 | Progressive wins above ~75k/year; lower labor, higher speed |
| Deep-Drawn Cup | Transfer/Deep Draw Die | ~$200,000 | $4.50 | $2.10 | $1.25 | $0.95 | High upfront, but only option for complex deep features |
Notice how the piece price for custom stamped metal parts drops sharply as volume increases—especially when you move to a progressive die. This is why automotive stamping die selection is so critical at the quoting stage: the right investment can pay off many times over the life of a program.
As volume crosses ~75k–150k per year, progressive dies often deliver 15–35% lower total cost vs. single station even after tooling amortization.
When to Switch Tooling Strategies
So, when should you switch from a single-hit tool to a progressive or transfer die? Here’s a practical framework:
- Prototype/Low Volume (≤10k): Stick with single-hit or soft tooling for flexibility and low upfront cost—ideal for design validation or short-run stamping car parts.
- Medium Volume (10k–100k): Consider progressive dies for parts with multiple features or where labor savings justify the higher initial spend. This is the sweet spot for most automotive stamping die investments.
- High Volume (100k+): Progressive or transfer dies become the clear choice for complex forms, deep draws, or when speed and repeatability are paramount. The higher capital cost is offset quickly by lower per-part pricing and better process control.
Don’t forget: factors like part complexity, feature count, and required tolerances also drive tooling selection. For intricate metal stamping car parts or those needing multiple forms and piercings, progressive dies not only reduce cost but also improve quality and consistency over millions of cycles.
By benchmarking your own parts against these models and case studies, you’ll be better equipped to justify investments and optimize your stamping program. Up next, we’ll help you choose the right supplier—so you can turn these insights into real-world results for your next auto stamping parts launch.

Supplier Selection and Final Recommendation
How to Evaluate Stamping Suppliers in 2025
When you’re narrowing down your list of metal stamping manufacturers, the stakes are high. The right partner means consistent quality, on-time delivery, and a stress-free launch. The wrong one? Cost overruns, missed deadlines, and quality headaches. So, what should you look for in a stamping manufacturer—especially as requirements for auto stamping parts become more demanding every year?
- Technical Capabilities: Does the supplier offer the full range of stamping processes—progressive, transfer, deep draw, and secondary operations? Can they handle your material and thickness requirements?
- Certifications and Quality Systems: Are they IATF 16949, ISO 9001, or ISO 14001 certified? A robust QMS is non-negotiable for automotive parts manufacturers.
- Lead Time and Scalability: Can they ramp from prototype to millions of parts per year? What’s their track record for tooling lead times and meeting urgent orders?
- DFM and Engineering Support: Do they offer upfront design analysis and collaborative engineering to optimize your parts?
- Industry Focus: Are they experienced auto parts manufacturers, or do they primarily serve other sectors?
- Sustainability and Traceability: Do they document material origins, support recycled content, and meet environmental standards?
Imagine you’re sourcing a new battery tray or suspension bracket. You’ll want a car parts manufacturer who can prove their expertise with case studies, published capability data, and references from automotive programs—not just generic claims.
Side by Side Capabilities Comparison
To make your decision easier, here’s a comparison table highlighting key criteria for leading stamping suppliers. Notice how priorities like certifications, lead times, and automotive specialization can set one stamping manufacturer apart from the rest.
| Supplier | Certifications | Tooling Lead Time | Min Order Qty | Typical Tolerances | Sample Program | Industries Served |
|---|---|---|---|---|---|---|
| Shaoyi Metal Parts Supplier | IATF 16949, ISO 9001 | Rapid prototyping: 1–3 wks Production: 8–16 wks |
Flexible (prototype to high volume) | ±0.05mm (progressive), tighter on request | Yes (full lifecycle, DFM included) | Automotive, EV, industrial |
| Die-Matic Corp | IATF 16949, ISO 9001 | 10–20 wks | 10,000+ | ±0.10mm typical | Yes (pilot run support) | Automotive, appliance |
| Kenmode Precision | IATF 16949, ISO 13485 | 8–14 wks | 1,000+ | ±0.025mm (micro-stamping) | Yes (prototyping) | Automotive, medical, electronics |
| BTD Manufacturing | ISO 9001 | 12–20 wks | Flexible | ±0.15mm typical | Yes (short run) | Industrial, automotive, energy |
| Wiegel Tool Works | IATF 16949, ISO 13485 | 12–18 wks | 50,000+ | ±0.01mm (high-speed prog.) | Yes (sample/validation) | Automotive, electronics |
As you compare, consider not just the certifications and tolerances, but also whether the supplier is a true custom metal stamping company with end-to-end support or a high-volume specialist with less flexibility. Automotive metal stamping companies with proven DFM and rapid prototyping capabilities can help you avoid costly surprises as your program scales.
Due Diligence Checklist for Supplier Selection
- APQP and PPAP maturity—can they deliver full documentation and pass audits?
- In-die sensing and automation for defect prevention
- Coil handling capacity to support your volume and material needs
- Experience with HSLA, aluminum, and advanced materials
- Reliable plating and heat treat partners or in-house capabilities
- SPC and traceability for every batch
- Transparent cost-down roadmap and willingness to collaborate on DFM
- References from automotive parts manufacturers or similar programs
Select partners with demonstrated progressive and transfer expertise, published capability data, and proactive DFM support; this consistently lowers PPM and total cost.
Final Sourcing Recommendation
Choosing the right stamping manufacturer for your next auto stamping parts program isn’t just about price—it’s about risk reduction, launch speed, and long-term quality. In 2025, global supply chains are more dynamic than ever, and working with a trusted, certified partner is your best insurance policy. For buyers seeking a one-stop solution with proven automotive expertise, Shaoyi Metal Parts Supplier stands out for their comprehensive service model, robust certifications, and track record with top auto parts manufacturers. Their flexible approach—from rapid prototyping to high-volume production—makes them a smart choice for both established OEMs and innovative new car parts manufacturers.
As you finalize your supplier selection, remember to weigh not just technical specs but also responsiveness, engineering support, and the ability to scale. The right automotive metal stamping companies will help you achieve lower total cost, faster launches, and fewer quality headaches—positioning your program for success in a fast-changing market.
Frequently Asked Questions About Auto Stamping Parts
1. What are auto stamping parts and why are they important in automotive manufacturing?
Auto stamping parts are metal components formed by pressing flat metal sheets into precise shapes using dies and presses. They are vital in automotive manufacturing because they provide structural integrity, reduce weight, and ensure high repeatability for body, chassis, and electrical systems. Stamping enables fast, cost-effective production, making it the preferred method for high-volume automotive parts.
2. How do I choose the right material for automotive metal stamping?
Material selection depends on the part's function, required strength, and formability. Common choices include CR4/IF steels for deep-drawn parts, HSLA steels for lightweight strength, stainless steel for corrosion resistance, and aluminum alloys for lightweight EV components. Design for manufacturability (DFM) rules—like proper bend radii and hole-to-edge distances—help prevent defects and optimize performance.
3. What factors influence the cost of stamped auto parts?
Cost is influenced by material utilization, tooling investment, part complexity, production volume, and secondary operations such as welding or plating. High-volume runs benefit from progressive dies, which lower the per-part price after initial tooling costs. Additional features or tighter tolerances can increase both tooling complexity and unit cost.
4. What should I look for when selecting an auto stamping parts supplier?
Look for suppliers with automotive certifications (like IATF 16949), proven experience in progressive and transfer stamping, rapid prototyping capabilities, and strong quality systems. A supplier offering integrated services from design to production, such as Shaoyi Metal Parts Supplier, can streamline your project and reduce risk.
5. How does the production timeline for stamped auto parts typically progress?
The timeline starts with RFQ and DFM review, followed by tool design, tool build, die tryout, pre-production run, PPAP submission, and ramp-up to full production. Prototype parts can be delivered in as little as 1–3 weeks, with full production ramping up after successful PPAP approval and process validation.