 Small batches, high standards. Our rapid prototyping service makes validation faster and easier —

Transfer Die Finger Design: 9 Steps to Zero Crashes
TL;DR
Transfer die finger design is the engineering discipline of creating the end-effectors—shovels, grippers, and vacuum cups—that transport parts between die stations. These components act as the critical interface between the high-speed transfer system and the workpiece, directly influencing press speed (SPM) and process reliability. The primary goal is to secure the part during transport while maintaining zero interference with the die steels.
Successful design requires a rigid adherence to weight limits, precise interference curve calculations, and appropriate material selection to prevent part marking. By mastering the 9-step design workflow, engineers can eliminate common failure modes like die crashes and dropped parts, ensuring maximum uptime for transfer press operations.
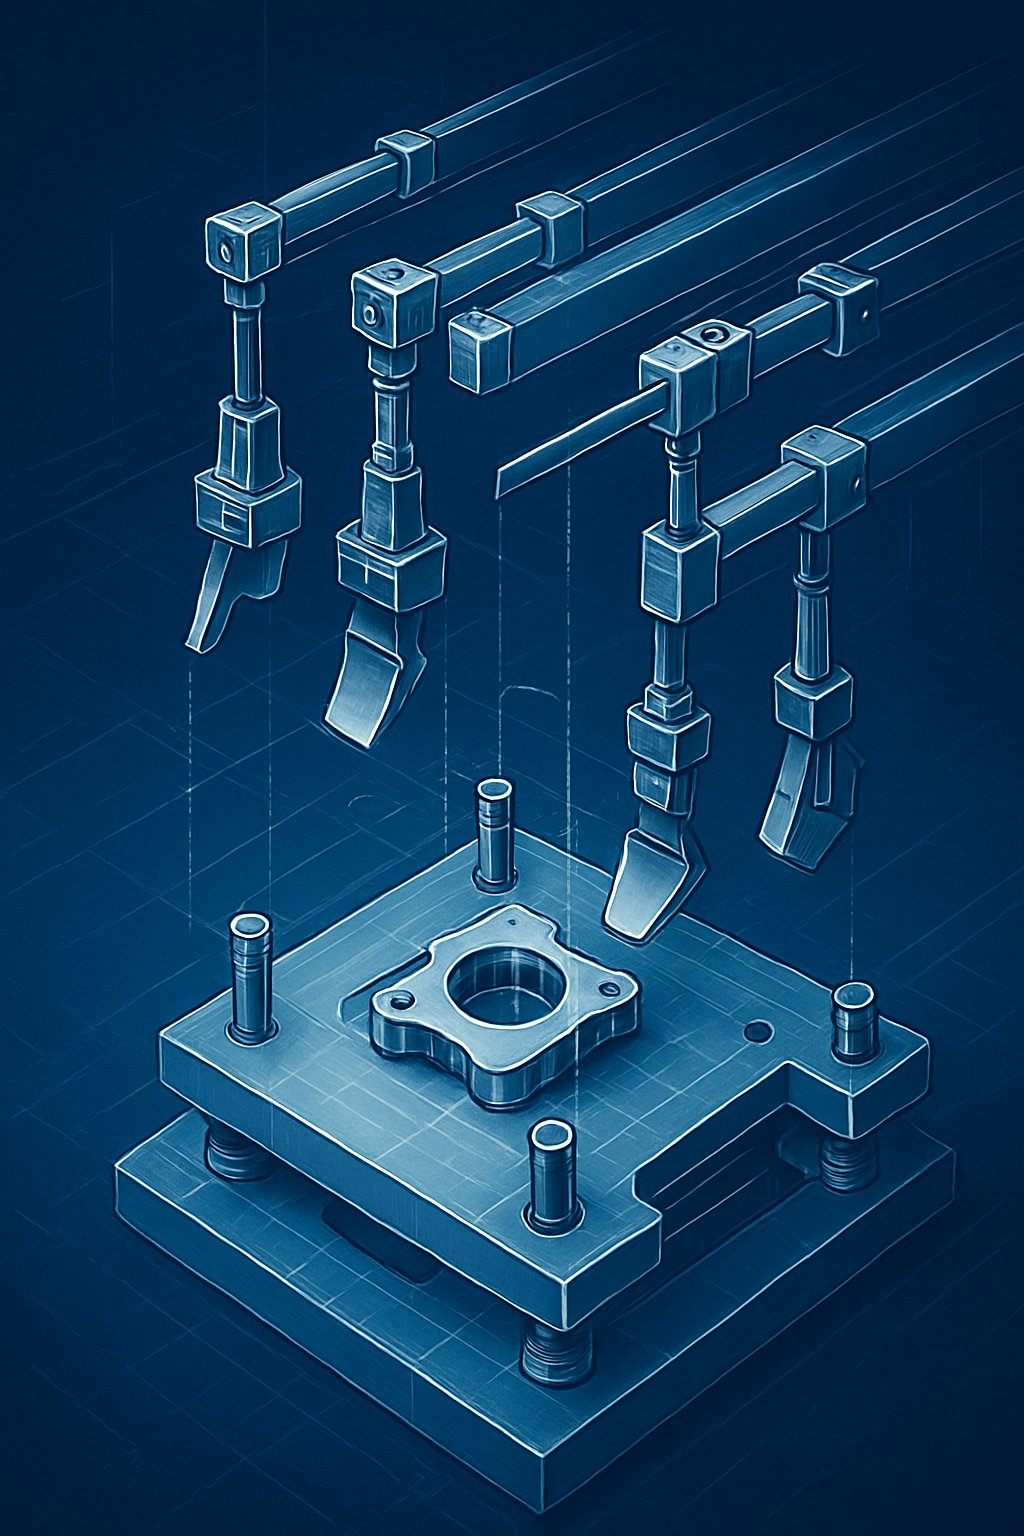
Chapter 1: Finger Tooling Types & Selection Criteria
Selecting the correct end-effector is the foundational decision in transfer die finger design. The choice dictates the security of the part during transport and the maximum achievable speed of the press line. Engineers must weigh the benefits of passive support against active clamping based on part geometry and material behavior.
Shovels (Passive Support)
Shovels are rigid, passive supports that cradle the part. They are typically the preferred choice for rigid parts that do not sag or flex under their own weight. Because they rely on gravity and friction, shovels are mechanically simple, lightweight, and durable. However, they risk losing control of the part at high accelerations or decelerations. According to industry data, shovels are often fabricated from 1018 steel for durability. They are ideal when the part shape allows for secure nesting without active clamping, such as with deep-drawn cups or rigid panels.
Grippers (Active Clamping)
Pneumatic or mechanical grippers provide positive locking force on the workpiece. This active clamping is essential for flexible parts, large panels that sag, or components with an offset center of gravity that might tip off a shovel. While grippers offer superior security, they introduce "latency"—the time required to actuate the jaws—which can increase cycle time. They also add weight to the transfer bar, potentially lowering the system's critical speed. Engineers often use grippers for edge-handling operations where surface contact must be minimized.
Vacuum and Magnetic Heads
For surface-critical parts or geometries where edge access is restricted, vacuum cups or magnetic heads offer a solution. Vacuum systems are particularly effective for bridge-style transfers lifting large flat panels. It is important to note that standard compressed air vacuum generators typically produce about 10 PSI of vacuum, effectively delivering only two-thirds of the maximum theoretical lift. Magnetic grippers are robust alternatives for ferrous parts but require reliable release mechanisms to overcome residual magnetism.
Selection Matrix
- Use Shovels when: Parts are rigid, have a natural nesting shape, and high SPM is the priority.
- Use Grippers when: Parts are flexible, have unstable centers of gravity, or require vertical lifting without bottom support.
- Use Vacuum/Magnets when: Handling Class-A surfaces where mechanical contact could cause marring, or when edge space is unavailable.
Chapter 2: The 9-Step Design Workflow (CAD & Layout)
Designing finger tooling is not an improvisation; it is a rigorous process that must occur in the CAD environment before any metal is cut. Following a structured workflow prevents costly collision errors and ensures the system works on the first stroke.
Step 1: Create Composite Layout
Begin by overlaying the die design, press bolster, and transfer rail geometry in a single CAD assembly. This "composite layout" allows you to verify the working envelope. You must confirm the maximum lift stroke (Z-axis), clamp stroke (Y-axis), and pitch (X-axis) to ensure the transfer system can physically reach the pickup points.
Step 2: Estimate Load & Length
Calculate the total weight of the proposed finger assembly and the part. Compare this against the transfer system's load capacity curves. At this stage, minimize the length of the finger arms to reduce inertia. Shorter arms are stiffer and vibrate less, allowing for higher precision.
Step 3: Check Passline
Verify the pickup and drop-off heights across all stations. Ideally, the passline should be constant. If the pickup height is lower than the drop-off height, the finger may over-travel and crash into the die. If the pickup is higher, the part may be dropped from a height, causing loss of position.
Step 4: Choose End-Effector
Select the specific shovel, gripper, or vacuum cup based on the criteria in Chapter 1. Ensure the selected component fits within the available die space.
Step 5: Sensor Placement
Integrate part-presence sensors early in the design. Sensors should be mounted to detect the part firmly seated in the shovel or gripper. Edge detection is common, but ensure the sensor mount does not become an interference point.
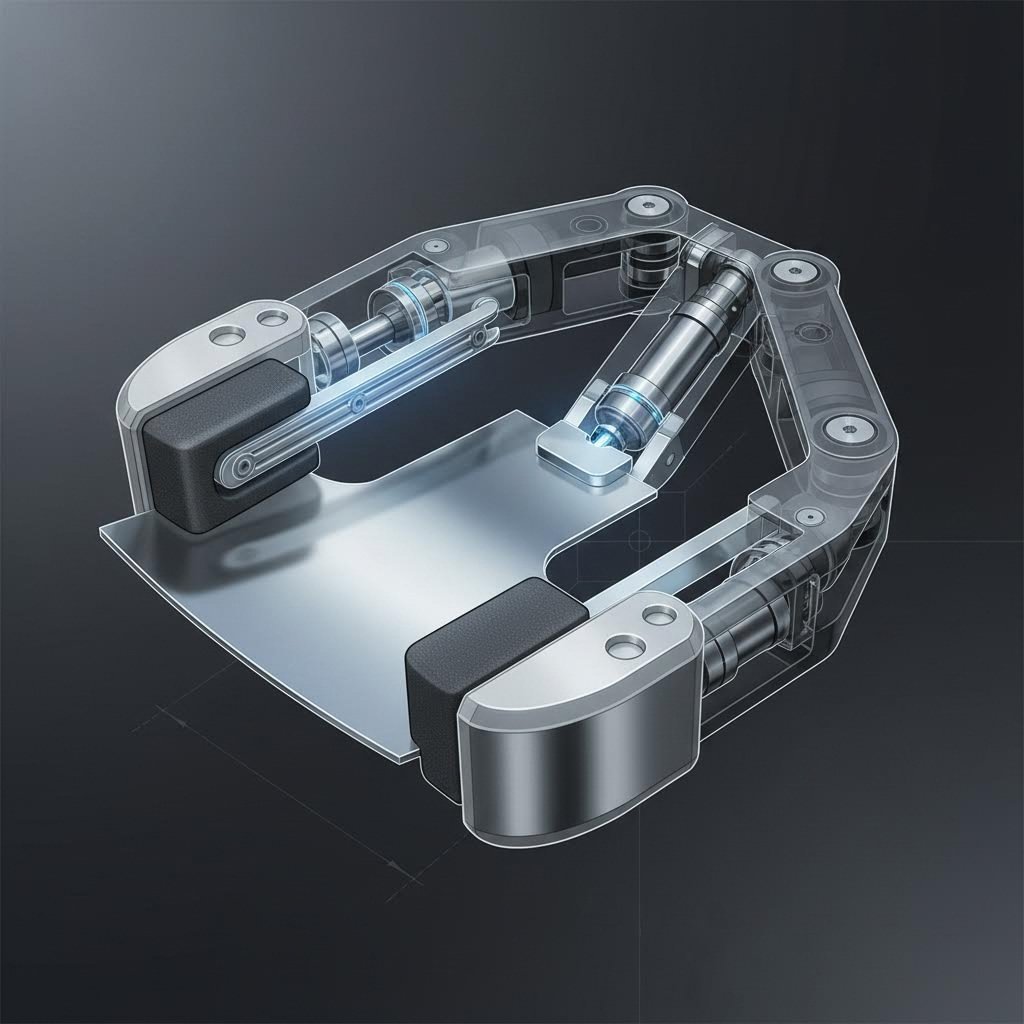
Step 6: Arm Components
Select the structural tubing and adjustable knuckles. Using a modular "Tinkertoy" approach allows for adjustability during tryout. However, ensure the joints are robust enough to withstand the G-forces of the transfer motion.
Steps 7-9: Interference Checks & Finalization
The final and most critical steps involve simulating the full motion cycle. Check the "drop-off" position to ensuring the finger retracts without hitting the upper die. Run a full collision detection simulation for the clamp, lift, transfer, lower, unclamp, and return strokes. This digital verification is the only way to guarantee a crash-free physical setup.
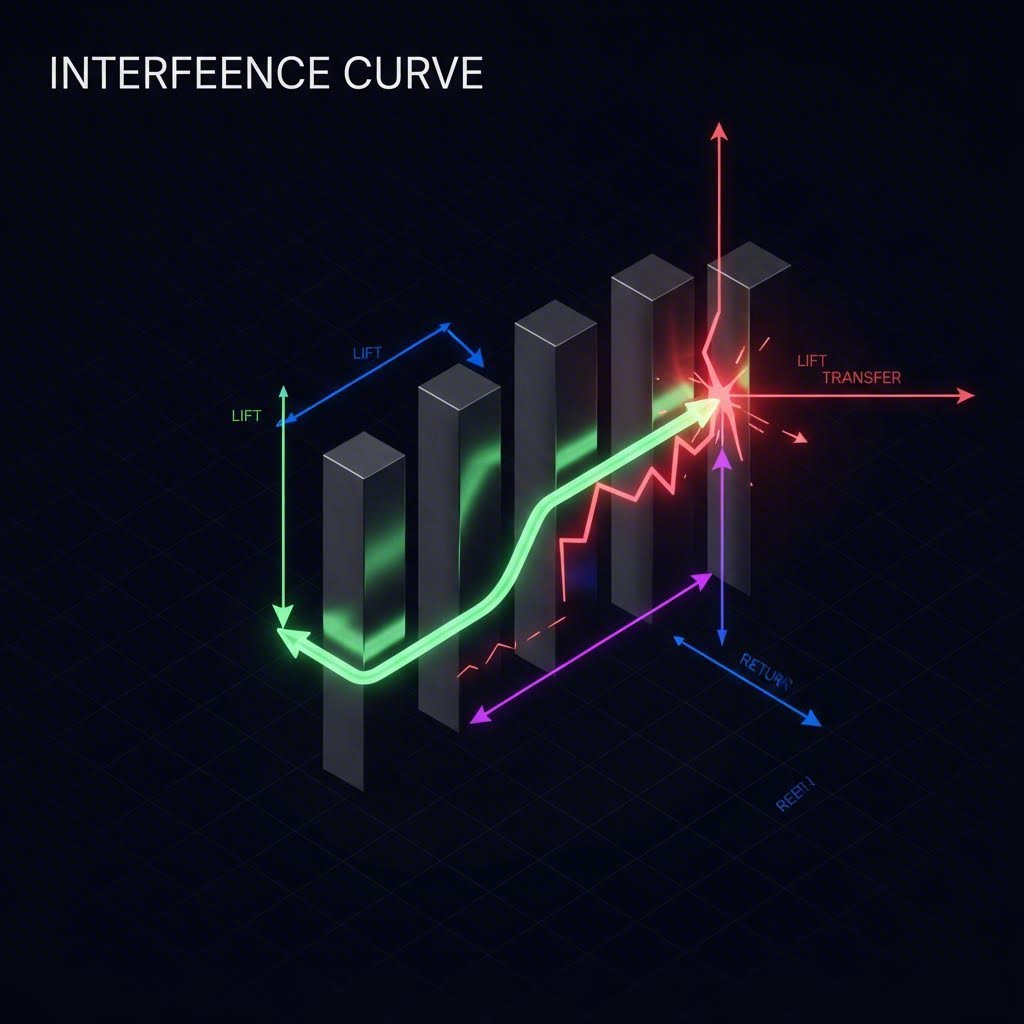
Chapter 3: Critical Design Parameters: Interference & Clearance
The most common failure mode in transfer stamping is a collision between the finger tooling and the die itself. This usually occurs during the "return path"—the motion of the empty fingers moving back to the start position while the press ram is coming down.
Understanding Interference Curves
An interference curve maps the position of the finger tooling relative to the closing die components over time. In a mechanical transfer system, the motion is mechanically cammed to the press crank, meaning the return path is fixed. In servo transfer systems, engineers have the flexibility to program optimized motion profiles, potentially allowing the fingers to "duck" out of the way of descending guide pins or cam drivers.
The 6-Motion Cycle
Designers must analyze clearances for all six movements: 1) Clamp, 2) Lift, 3) Transfer, 4) Lower, 5) Unclamp, and 6) Return. The "Unclamp" and "Return" phases are critical. If the fingers do not retract fast enough, they will be crushed by the upper die. A standard rule of thumb is to maintain at least 25mm (1 inch) of clearance between the finger and any die steel at the closest point of intersection.
Digital Twins and Simulation
Modern engineering relies on kinematic simulation. By creating a digital twin of the press and die, engineers can visualize the interference curves. If a collision is detected, the design can be altered by changing the pickup point, using a lower profile gripper, or modifying the die steel relief. This proactive analysis is far cheaper than repairing a smashed transfer bar.
Chapter 4: Material Selection & Part Protection
The material chosen for the finger tooling affects both the dynamic performance of the system and the quality of the finished part. Lightweighting is essential for high-speed operations, while contact materials must be chosen to prevent surface damage.
Weight Reduction vs. Strength
The inertia of the transfer system limits the maximum Strokes Per Minute (SPM). Heavy steel arms increase the load on the transfer drive, necessitating slower speeds to prevent motor faults or excessive vibration. High-strength aluminum (such as 6061 or 7075) is often used for the structural arms to reduce mass while maintaining rigidity. For the contact tips (shovels), steel provides the necessary wear resistance.
Contact Materials and Coatings
Direct metal-to-metal contact can mar Class-A surfaces or sensitive galvanized coatings. To prevent this, engineers use specific contact pads. Nylon is durable and hard, making it suitable for unexposed structural parts. For painted or embossed surfaces where grip is critical and marring is unacceptable, softer Neoprene pads are preferred. In extreme cases, UHMW urethane can be used to coat fingers, offering a balance of durability and protection.
Sourcing for Precision and Volume
When moving from design to production, particularly for automotive components like control arms or subframes, the quality of the tooling and the stamping partner is paramount. High-volume manufacturing requires precision that matches the design intent. For projects requiring rigorous adherence to standards like IATF 16949, partnering with specialists such as Shaoyi Metal Technology can bridge the gap between rapid prototyping and mass production, ensuring that complex transfer die designs are executed with 600-ton press capabilities.
Chapter 5: Die Protection & Sensor Integration
Even the most robust mechanical design requires electronic oversight. Sensors are the eyes of the transfer system, ensuring that parts are properly engaged before the transfer begins and properly released before the die closes.
Sensor Types and Placement
Two main types of sensors dominate transfer tooling: proximity switches and optical sensors. Proximity switches are rugged and reliable but have a short sensing range (typically 1-5mm). They must be placed very close to the part, which risks damage if a part is misloaded. Optical (infrared or laser) sensors offer longer ranges, allowing them to be mounted safely away from the impact zone, though they can be sensitive to oil mist and reflections.
Logic and Timing
The sensor logic should be set to "Part Present" for the pickup and transfer phases. If a sensor loses the signal mid-transfer, the press must perform an immediate emergency stop to prevent a "double metal" crash in the next station. Best practices suggest using "in-finger" sensing rather than "in-die" sensing for the transfer verification, as it confirms the part is actually under control of the transfer system, not just sitting in the die.
Conclusion: Engineering for Reliability
Mastering transfer die finger design is a balancing act between speed, security, and clearance. By systematically selecting the right end-effectors, adhering to a rigorous CAD simulation workflow, and choosing materials that protect the workpiece, engineers can mitigate the high risks associated with transfer stamping. The difference between a profitable, high-speed line and a maintenance nightmare often lies in the geometry of a simple shovel or the logic of a single sensor.
As press speeds increase and part geometries become more complex, the reliance on precise, data-driven design methodologies will only grow. Engineers who prioritize the interference curve and respect the physics of the transfer motion will consistently deliver tooling that performs stroke after stroke.
Frequently Asked Questions
1. What is the difference between 2-axis and 3-axis transfer systems?
A 2-axis transfer system moves parts in only two directions: clamping (in/out) and transferring (left/right). The parts typically slide along rails or bridges between stations. A 3-axis system adds a vertical lift motion (up/down), allowing it to pick the part up, move it over die obstructions, and place it down. 3-axis systems are more versatile and essential for parts with deep draws or complex geometries that cannot slide.
2. How much clearance is required for transfer fingers?
A widely accepted engineering standard is to maintain a minimum clearance of 25mm (1 inch) between the finger tooling and any die component during the entire motion cycle. This safety margin accounts for slight vibrations, bounce, or timing variations. In servo-driven systems, this clearance can sometimes be tightened due to the precise control of the motion profile, but maintaining a safety buffer is always recommended.
3. Why are lightweight materials used for finger tooling?
Lightweight materials like aluminum and carbon fiber are used to reduce the mass moment of inertia of the transfer bar. Lower weight allows the transfer system to accelerate and decelerate faster without overloading the servo motors or mechanical drives. This directly translates to higher Strokes Per Minute (SPM) and increased production output.