 Small batches, high standards. Our rapid prototyping service makes validation faster and easier —

Metal Stamping Tooling Maintenance: Strategies to Eliminate Downtime

TL;DR
Metal stamping tooling maintenance is a systematic, proactive process designed to prevent defects and downtime, differing significantly from reactive die repair. While repair focuses on fixing broken components after a failure, maintenance involves routine cleaning, sharpening, and inspection to restore tool standards before issues arise. Implementing a structured maintenance program can reduce unplanned downtime costs by up to 400% compared to reactive firefighting.
Key actions include a daily "Clean, Inspect, Lubricate" protocol, precise sharpening strategies that avoid annealing, and using data—such as the "last strip" analysis—to predict wear. By shifting from a repair-based mindset to a prevention-based strategy, stampers can extend die life, ensure consistent part quality, and lower the total cost per hit.
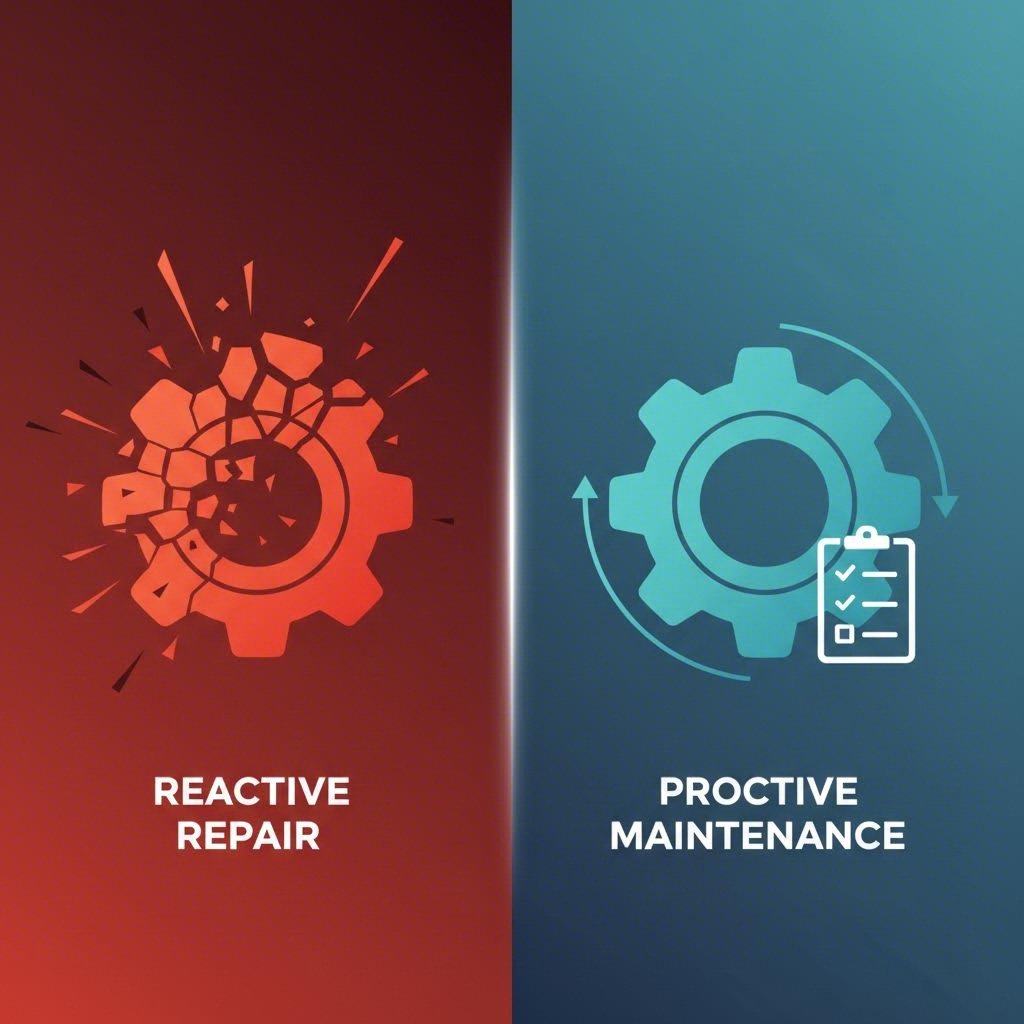
The Strategic Difference: Die Maintenance vs. Die Repair
In many stamping shops, the terms "maintenance" and "repair" are used interchangeably, but they represent two opposing philosophies that directly impact profitability. Understanding the distinction is the first step toward operational excellence.
Die Repair is reactive. It happens when a punch breaks, a spring shatters, or a die section cracks during a production run. The goal is to "put out the fire" and get the press running again as quickly as possible. This approach is costly; industry data suggests that unplanned downtime can be four times more expensive than planned maintenance when factoring in idle labor, missed shipments, and scrap costs.
Die Maintenance, conversely, is proactive. It is the disciplined process of restoring a tool to its original design specifications before it fails. This involves scheduled interventions based on stroke counts or run history. The objective is to ensure that every critical variable—cutting clearances, timing, and spring pressure—remains constant. A robust maintenance strategy uses a "decision tree" to prioritize work: addressing safety and "no-build" risks first, followed by quality improvements, and finally, efficiency optimizations.
Daily & Routine Maintenance Protocols (The Checklist)
Effective maintenance starts on the shop floor with a rigorous daily routine. Neglecting small details like debris removal is the leading cause of major tooling failures, such as double-hit crashes or galling.
The "Clean, Inspect, Lubricate" Triad
Every shift should begin and end with this three-step protocol:
- Clean: Remove all metal shavings, slugs, and old lubricant. Use copper scrapers or brushes rather than steel tools to avoid scratching functional surfaces. Debris buildup is a primary cause of dimensional variation and cosmetic defects.
- Inspect: Visually check for loose screws, broken springs, and signs of wear on pilots. Verify that the scrap chutes are clear. A blocked scrap chute can cause a catastrophic die crash in a single stroke.
- Lubricate: Apply fresh lubricant to guide pins and bushings. For manual applications, "more" is not always better; a precise application (often 3–5 drops for small guides) prevents hydraulic lock while ensuring smooth operation.
The "Last Strip" Analysis
One of the most valuable diagnostic tools is the strip from the previous production run. Before pulling a die for maintenance, always save the last strip and the last part produced. This physical evidence tells the story of the tool's current state. Inspect the strip for:
- Progression consistency: Are the pilot holes round or elongated?
- Burr height: Is the burr uniform, or is it heavier on one side?
- Stripper marks: Are there uneven witness marks indicating a tilted stripper plate?
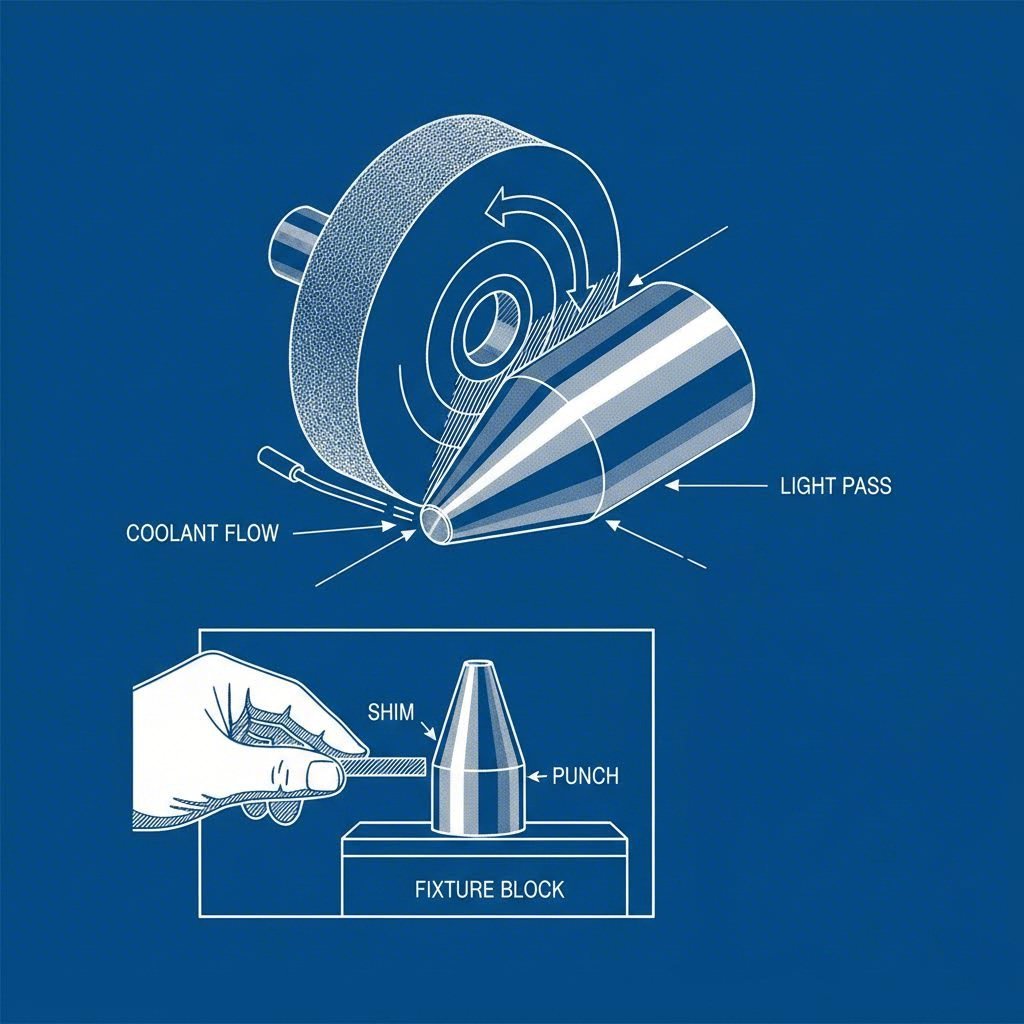
Technical Deep Dive: Sharpening & Shimming Best Practices
Restoring cutting edges is the core of tooling maintenance, but improper technique can destroy a die faster than production wear. Precision is non-negotiable.
Sharpening Rules of Thumb
When sharpening punches and die sections, the goal is to remove just enough material to restore a sharp edge without altering the steel's properties. A common error is aggressive grinding that generates excessive heat, leading to annealing (softening) of the tool steel. To prevent this:
- Use correct wheels: Select a soft bond, open structure wheel for tool steels like D2 or M2.
- Manage heat: Use flood coolant whenever possible. If dry grinding, take light passes (maximum 0.0005" to 0.001" or ~0.013mm) to avoid burning the edge.
- Demagnetize: After grinding, always demagnetize the components. Residual magnetism attracts steel dust, which acts as an abrasive and accelerates wear.
The Science of Shimming
After sharpening, components must be shimmed back to their original height to maintain timing and shut height. Avoid using a stack of multiple thin shims (e.g., five 0.002" shims), which can create a "spongy" support that deflects under tonnage. Instead, use a single, precision-ground shim of the required thickness. Ensure that shims act only as spacers and do not interfere with screw clearance holes or dowel pins.
Troubleshooting Common Defects: A Symptom-Based Guide
Die maintenance is often driven by part defects. Mapping symptoms to their root causes allows for targeted intervention.
| Defect Symptom | Probable Cause | Maintenance Solution |
|---|---|---|
| Excessive Burrs | Dull cutting edges or excessive die clearance. | Sharpen punches/dies; check clearance uniformity; verify alignment of guide pillars. |
| Slug Pulling | Magnetism, vacuum suction, or dull edges. | Demagnetize tooling; add spring-loaded ejector pins (shedders); sharpen edges (a sharp edge holds the slug better). |
| Galling / Scratches | Insufficient lubrication, dirty material, or material transfer. | Polish forming sections; switch to high-pressure lubricants; clean stock material before entry. |
| Misalignment | Worn guide pins/bushings or loose dowels. | Replace worn guide components; check guide post perpendicularity; retorque all fasteners. |
| Dimensional Drift | Loose pilots or inconsistent feed timing. | Replace worn pilots; check strip lift and feed progression timing. |
Optimizing Die Life: Engineering Out Unplanned Maintenance
The ultimate goal of a maintenance program is to reduce the frequency of service. This requires "engineering out" chronic issues rather than just fixing them repeatedly. If a specific punch chips every 50,000 hits, simply replacing it is not the solution—upgrading it is.
Consider upgrading high-wear components to powdered metal steels (PM) or carbide for longer runs. Advanced coatings like Titanium Carbo-Nitride (TiCN) or Titanium Aluminum Nitride (TiAlN) can significantly reduce friction and prevent galling in forming sections. For complex high-volume automotive applications, where precision is paramount, partnering with capable manufacturers is essential. Companies like Shaoyi Metal Technology leverage comprehensive stamping solutions and rigorous maintenance protocols to bridge the gap from rapid prototyping to mass production, ensuring consistent quality even under high-tonnage demands.
Finally, transition from calendar-based maintenance to stroke-based maintenance. Use press counters to schedule service at 80% of the known failure interval (e.g., if a die fails at 100k hits, service it at 80k). This preventative discipline eliminates the vast majority of emergency repairs.
Frequently Asked Questions
1. What is the main goal of tooling maintenance?
The primary goal is to maximize the longevity and performance of the die while minimizing total production costs. By systematically inspecting and restoring the tool, manufacturers prevent defects, ensure consistent part tolerances, and avoid the high costs associated with unplanned downtime and emergency repairs.
2. How often should metal stamping dies be serviced?
Dies should be serviced based on stroke counts (production volume) rather than calendar time. The interval depends on the die's complexity and the material being stamped. For example, a stainless steel cutting die may need sharpening every 50,000 strokes, while a forming die for softer aluminum might run 200,000 strokes. Establishing a baseline from historical wear data is key.
3. What is the difference between sharpening and shimming?
Sharpening involves grinding the face of a punch or die to restore a sharp cutting edge. Shimming is the process of placing precise metal spacers (shims) behind the sharpened component to restore it to its original height. This ensures that the tool's timing and penetration depth remain correct after material has been removed.