 Small batches, high standards. Our rapid prototyping service makes validation faster and easier —

How Do You TIG Weld Clean Beads Without Fighting The Puddle
How Do You TIG Weld?
If you are asking how do you tig weld, the short answer is this: create a controlled arc with a tungsten electrode, protect the puddle with inert gas, and add filler only as needed while keeping the torch steady and the metal clean. TIG, or GTAW, is valued because it gives precise control and very clean welds on steel, stainless steel, and aluminum.
What TIG Welding Means in Practice
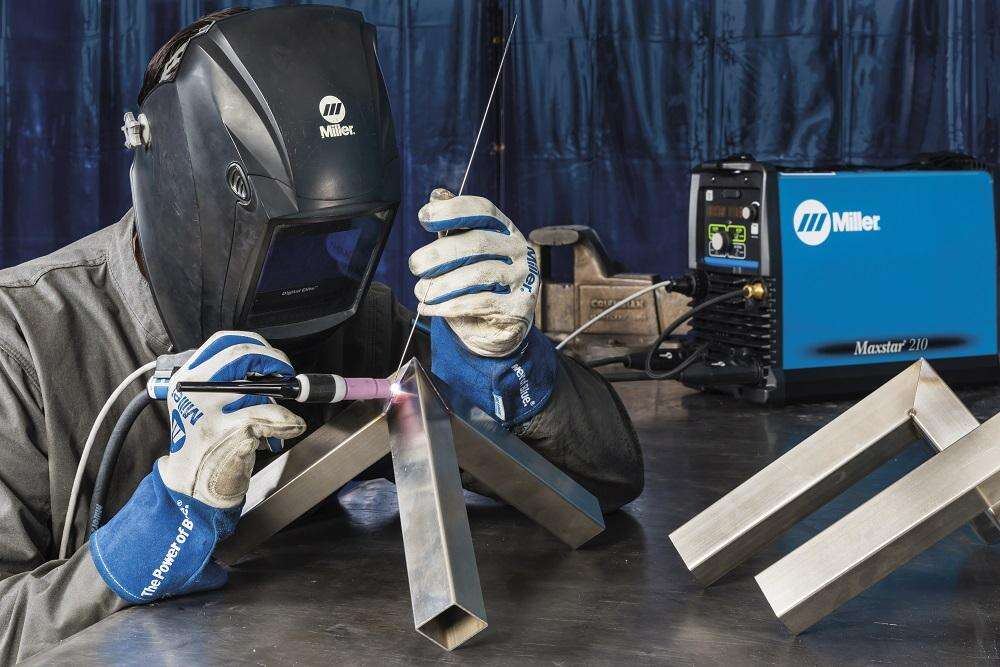
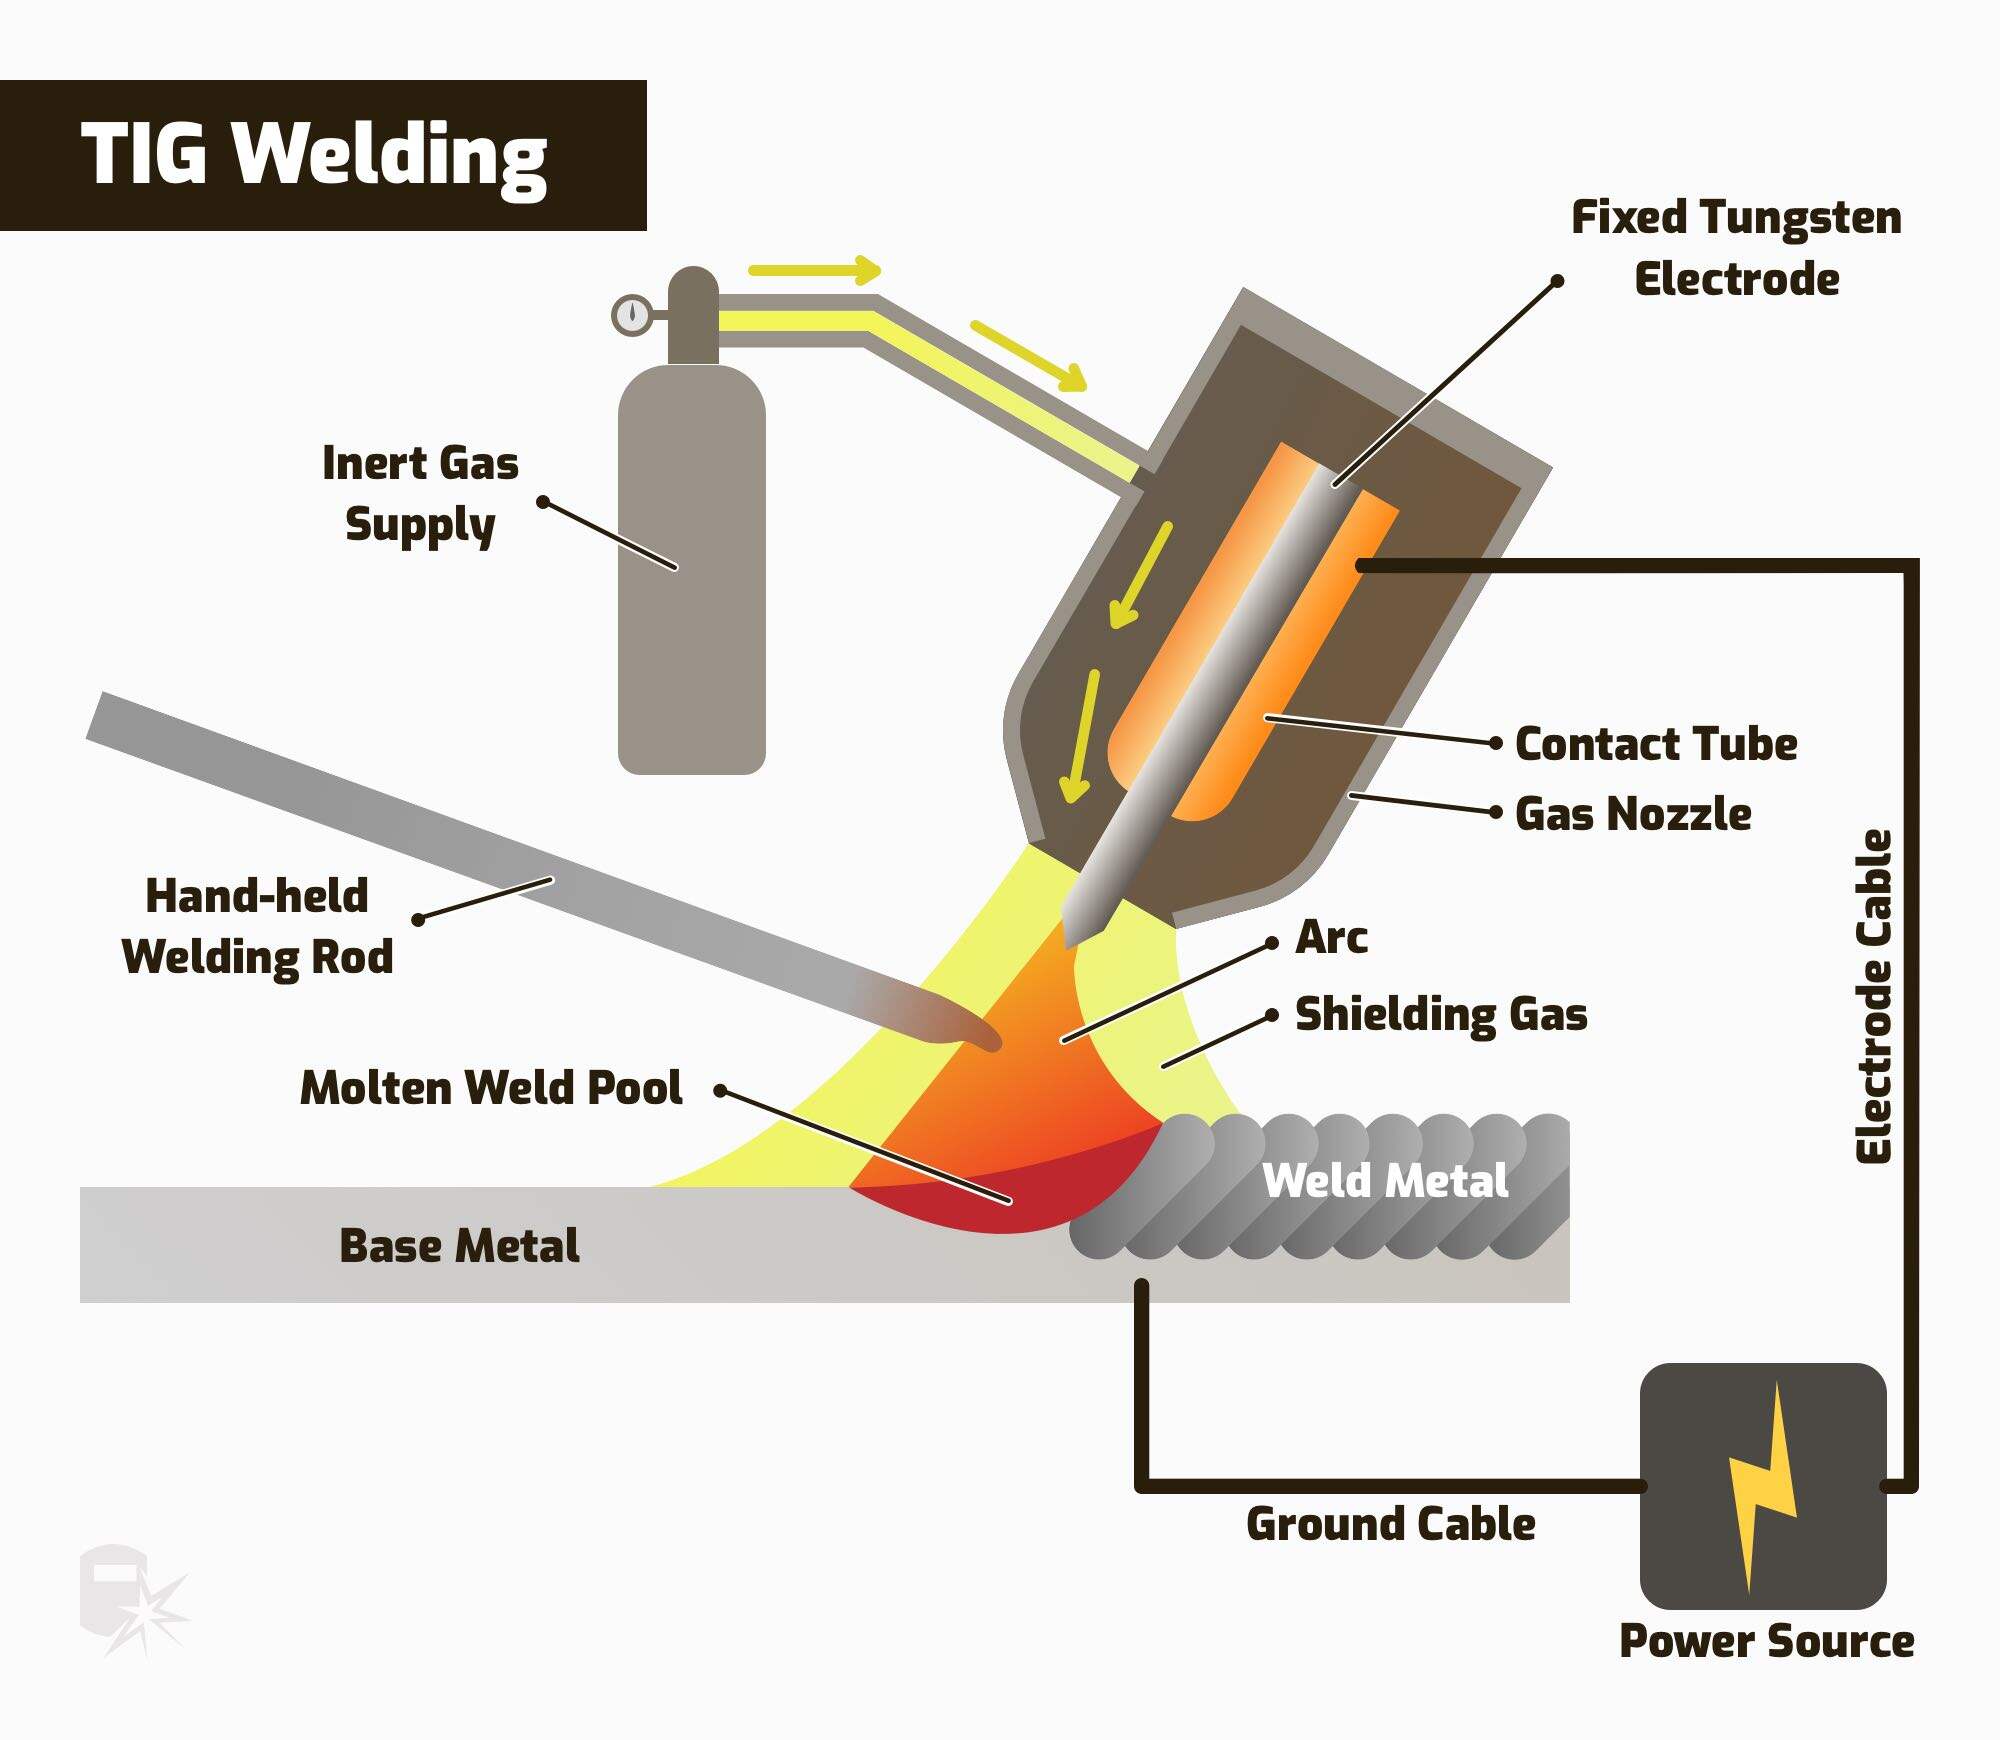
TIG welding uses a non-consumable tungsten electrode in a handheld torch to create an arc that heats the base metal. A shielding gas, commonly argon, protects the weld area from contamination, and a separate filler rod is added when the joint needs extra metal. In simple terms, the arc makes the puddle, the tungsten carries the arc, the gas keeps air out, and the filler helps build the bead.
That also explains why people asking how do you braze tig weld are really talking about using the TIG heat source with a brazing filler, while the torch control basics still stay similar.
How to Start TIG Welding in a Simple Sequence
- Clean the joint, filler rod, and work area.
- Clamp the work securely and connect the work lead.
- Set the machine for the metal you are welding.
- Hold the torch about 70 to 80 degrees and keep a short arc length.
- Start the arc, form a small puddle, then add filler with quick, light dabs.
- Travel steadily and keep the puddle size consistent.
- Reduce heat at the end and hold position for post-flow gas coverage.
If you are wondering how many amps do you need to tig weld, there is no one-number answer. Material type, thickness, tungsten size, and machine design all matter, which is why later sections focus on setup choices instead of guesswork.
Safety Habits Before You Strike an Arc
Use a proper welding helmet, safety glasses, gloves, and flame-resistant clothing. Keep the area clean, dry, and free of flammables. Good ventilation matters because welding fumes should stay out of your breathing zone, a point reinforced in this TIG safety summary. A smooth bead starts with safe habits, but it also starts with machine setup, torch parts, gas coverage, and control choices that deserve a closer look.
How Do You Set Up a TIG Welder
A clean bead usually starts before the arc does. Most beginner frustration comes from a mismatch between current type, tungsten, gas coverage, and amperage control. If you are searching how do you set up a miller tig welder, the safest answer also works for most modern machines: start with the owner's manual, then build the setup around the metal, joint, and torch parts in front of you. Miller's TIG guide lays out that basic sequence as torch connection, remote control, work clamp, polarity, tungsten prep, torch assembly, and power connection.
Choose AC or DC for the Metal You Are Welding
Current type is the first big decision. For aluminum, set the machine to AC. For steel and steel alloys, set it to DC TIG or DCEN, as shown by Miller. The reason matters. CK Worldwide explains that AC alternates between penetration and oxide-cleaning action, which is why it suits aluminum and magnesium. DCEN gives a steadier arc, deeper penetration, and less tungsten heating, so it is the normal choice for steel, stainless, and many other metals. DCEP exists, but it is rarely useful for general TIG because it sends too much heat into the tungsten.
| Setup area | Option | Best use | Why it matters | Pre-weld checkpoint |
|---|---|---|---|---|
| Current and polarity | AC | Aluminum, magnesium | Provides oxide-cleaning action plus penetration | Confirm the base metal actually needs AC |
| Current and polarity | DCEN | Steel, stainless, copper, similar metals | Offers a stable arc, cleaner bead, and less electrode heating | Use DC TIG or DCEN unless the manual says otherwise |
| Current and polarity | DCEP | Rare TIG situations | Overheats tungsten quickly in normal TIG work | Avoid it for beginner practice |
| Amperage control | Foot pedal | Bench work, flat coupons, learning puddle control | Lets you add or reduce heat as the weld changes | Set maximum amperage, then modulate with your foot |
| Amperage control | Torch switch or fingertip control | Tubing, field work, awkward positions | Gives better mobility when a pedal is impractical | Use upslope and downslope if your machine offers them |
| Gas and consumables | 100% argon, matched tungsten, matched cup | Most TIG work | Coverage, arc shape, and tungsten life depend on all three working together | Check bottle, regulator, hose, collet, cup, tungsten stickout, and filler family |
Set Gas Tungsten and Cup Size with Manual Guidance
Shielding gas and consumables work as one system, not as separate parts. For most TIG jobs, 100% argon is the standard gas on both AC and DC. CK Worldwide notes that typical flow often lands around 15 to 20 CFH, with more flow sometimes needed for larger cups or gas lenses. Weldmonger adds a useful rule of thumb: think in roughly 2 to 3 CFH per cup size. That keeps you from treating every cup the same. Too much gas can create turbulence, while too little can hurt shielding and cleaning.
For tungsten, match the type and diameter to the job and the machine. Miller lists 2% ceriated as a versatile AC and DC choice, 2% lanthanated as a strong option for DC and precision work, and pure tungsten as more of a legacy AC choice on older transformer machines. Grind tungsten on a dedicated 200-grit or finer wheel, and keep the grind lines lengthwise. When a machine manual, filler data sheet, or consumable chart gives a starting range, use that before any generic internet guess. If you are asking how many amps do you tig weld silicon bronze with, treat charts as only a starting point. Base metal thickness, joint type, position, and whether you are welding or TIG brazing with silicon bronze all change the answer.
Pick a Foot Pedal or Torch Switch for Better Control
TIG gets easier when you can change heat without breaking rhythm. A foot pedal is ideal for bench work because it lets you raise or lower amperage as the puddle develops. Miller notes that operators often use a foot pedal or torch-mounted control to start, adjust, and stop current. But how do you tig weld without a foot pedal? A torch switch or fingertip control is often better for tubing, repairs, or field work where your feet cannot stay planted. Weldmonger points out that 2T and 4T modes, plus upslope and downslope settings, can add useful control even when you are welding from a button instead of a pedal.
When the machine is finally matched to the metal, the torch starts feeling predictable. Then the real challenge shows up in your hands: posture, arc length, filler timing, and the rhythm that turns a setup into a bead.
How Do You Practice TIG Welding for Beginners
A well-set machine still will not build coordination for you. The fastest improvement usually comes from removing variables first, then adding them back one at a time. Pacific Arc recommends starting with flat plate practice and stringer beads so you can focus on heat control, filler control, arc length, and consistency before joint fit-up starts working against you. The UNIMIG guide reinforces the same idea with flat-position practice, dry runs, and steady hand support.
Choose the Best Metal and Joint for First Practice
If you are wondering how do you practice tig welding for beginners, start with clean flat coupons in the flat position. Keep the first sessions simple on purpose. Thin sheet, curved parts, and cosmetic work add extra problems before your hands know the rhythm. UNIMIG notes that aluminum is a harder metal to work with, so if you are asking how do you weld aluminum with tig, save it until you can form and move a puddle predictably on basic practice pieces. Questions like how do you tig weld brass also make more sense later, once your arc length and filler timing stop changing from bead to bead.
A practical first-choice sequence looks like this: clean plate first, then simple joints, then awkward shapes. For butt joints, Pacific Arc suggests starting on thicker coupons before moving thinner, because they give you more room to learn fit-up and tacking without instantly punishing every heat mistake.
Coordinate Torch Filler and Foot Control Smoothly
Before you weld, rehearse the motion with the machine off. Slide both hands through the full path. That matters more than most beginners expect.
- Rest part of your torch hand on the bench or workpiece so the arc length stays short and stable.
- Use a push angle, with the torch leaning forward rather than dragging the puddle.
- Keep the tungsten close to the work, because a long arc gets less stable and increases oxidation risk.
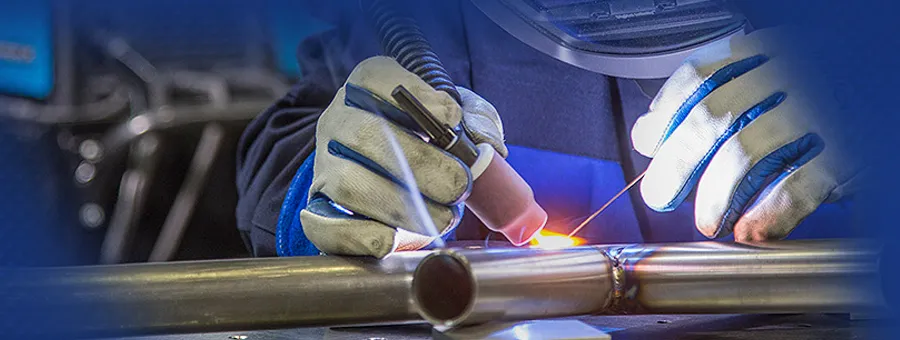
- Bring the filler rod in low and nearly parallel to the joint, then dab at the leading edge of the puddle.
- Wait for a small wet puddle before adding filler, then let the puddle reform between dabs.
- If you have a foot pedal, make small heat changes instead of abrupt ones so puddle size stays even.
Build Your First Beads Before Attempting Real Parts
Skill builds faster when each drill teaches one new variable, not five. A simple progression keeps your attention on repeatability instead of survival.
- Make dry runs with torch and filler only.
- Run fusion beads on clean flat plate to learn puddle timing and travel speed.
- Run stringer beads with light, consistent filler addition.
- Practice butt joints on thicker coupons, then reduce thickness as control improves.
- Add outside corners and lap joints when bead width and reinforcement stay consistent.
- Move to round or awkward parts only after you can match bead profile from one position to another.
That practice order starts teaching something more useful than hand speed: how to read the puddle. Mild steel shows those cues clearly, which is why it makes such a strong baseline for the technique changes ahead.
How Do You TIG Weld Steel With a Stable Puddle
If you are asking how do you tig weld steel, start with clean 2 mm or 3 mm steel. That thickness gives a larger, easier-to-read puddle than thin sheet. For mild steel, set the machine to DC TIG or DCEN, secure the parts so the joint stays consistent, and point the torch in the direction of travel with a short arc. Compared with questions like how do you tig weld cast iron or how do you tig weld copper, mild steel gives the clearest feedback for learning torch angle, arc length, and filler timing.
How Mild Steel TIG Setup Differs from Other Metals
Mild steel is less about special machine features and more about discipline. Cleanliness matters immediately. Mill scale and contamination can spit material back at the tungsten and ruin the weld from the start. Bright metal, solid fit-up, and a stable hand position matter more than chasing fancy settings.
Mild steel is a great TIG training metal because the puddle is easier to control and the technique transfers well to thinner or more demanding materials later.
Read the Puddle and Add Filler at the Right Time
Hold the torch steady and let a small weld pool form before you move. That first puddle sets the bead width. Keep the arc short enough that you can see the puddle clearly, not just the glare. On steel, filler should be dabbed into the very front of the puddle, and it should melt from the puddle rather than directly from the arc. Keep the filler rod low and under the gas coverage so it stays clean and ready to melt.
Avoid the Most Common Steel TIG Mistakes
- Do clean rust, oil, and scale until the steel is bright.
- Do keep a short arc and a steady travel speed.
- Do add filler at the leading edge of the puddle, under the shielding gas.
- Do not move so slowly that the bead gets too wide or the edges overheat.
- Do not dip the tungsten into the puddle.
- Do not feed filler outside the gas envelope.
Steel forgives more than stainless or aluminum, but it still punishes sloppy heat control. A bead that looks acceptable on mild steel can show much bigger problems once contamination, color, and distortion become part of the equation.
How Do You TIG Weld Stainless Steel Without Ruining the Finish
Steel will often forgive a little extra heat or a slightly lazy cleanup. Stainless usually will not. If you are wondering how do you tig weld stainless steel, the short version is this: start cleaner, weld cooler, and keep the arc and travel more consistent than you needed on mild steel. The goal is not only a bead that looks good. It is a weld that stays corrosion-resistant after service starts.
Keep Stainless Clean from Prep to Final Bead
Prep matters more here because contamination can damage both appearance and performance. Weldmonger recommends removing oils and grease with solvents such as acetone or isopropyl alcohol, wiping away dust with a lint-free cloth, and using abrasives and wire brushes dedicated to stainless only. Carbon steel dust, reused brushes, dirty gloves, and contaminated clamps can all transfer iron to the surface. Some new stainless sheet or sanitary tubing may need only light cleaning, but plasma-cut edges, dross, and rough fit-up should be cleaned and deburred before welding. Keep the filler rod clean and dry too.
Control Heat Input When TIG Welding Stainless Steel
Heat control affects color, distortion, and corrosion resistance all at once. AMD Machines notes that austenitic stainless holds heat in the weld zone much more than carbon steel and expands more as it warms, so parts can warp quickly if you linger. Use only enough amperage to get sound fusion, favor stringer beads over wide weaves, and keep travel speed steady. For TIG, 100 percent argon is the standard shielding gas, and argon back purging is especially important on pipe, tube, and full-penetration joints where the root side must stay protected from oxidation. Filler selection follows the base metal family, with common matches like 308L for 304 and 316L for 316.
| Stainless concern | What it often looks like | Better response |
|---|---|---|
| Contamination | Dirty puddle, later rust staining, porosity | Use dedicated stainless tools, clean gloves, and clean filler |
| Heat tint | Straw, blue, or purple color beside the bead | Improve shielding, reduce heat input, and clean or passivate if required |
| Warping | Joint pulls, gaps change, sheet distorts | Tight fit-up, solid tacks, fixtures, and balanced weld sequence |
| Bead profile | Too wide, flat, or oxidized at the root | Short arc, steady travel, matched filler, and purge on critical roots |
Adjust Technique for Thin Stainless Without Burn Through
Thin stainless rewards restraint. CK Worldwide recommends a short, consistent arc, about 1/8 inch, because a long arc makes the arc less stable and increases oxidation risk. Small, timed filler dabs at the leading edge of the puddle help hold bead shape without flooding the joint. A foot pedal or fingertip control makes it easier to back off heat as the part warms, and pulse can help reduce average heat input on light gauge work. If you are searching how do you tig weld thin stainless, think tight fit-up, smooth torch movement, and less heat than your eyes first suggest. Many readers who later search how do you tig weld titanium are really chasing that same discipline. Aluminum brings a different puzzle, where oxide removal and AC behavior start changing the puddle before it even settles down.
How Do You TIG Weld Aluminum With AC and Better Prep
Stainless punishes extra heat. Aluminum punishes heat and prep even faster. If you are asking how do you tig weld aluminum, the biggest changes are simple but strict: remove oxide, keep everything cleaner, use AC, and react faster as heat builds. Weldmonger notes that aluminum often feels slow at first, then the puddle appears suddenly and can collapse if you do not back off the heat. Keep the gas simple with 100 percent argon, keep the arc short, and let the puddle melt the filler instead of trying to melt the rod with the arc.
Prepare Aluminum Properly Before the Arc Starts
Cleanliness is not optional here. Grumpy Weld recommends wiping the work area, degreasing the base metal, brushing off oxide with a clean stainless steel brush dedicated only to aluminum, then wiping the part and filler rod again. Miller adds that even light oil from your hands can cause porosity, and oxide left on joint edges can lead to incomplete fusion. If you also searched how do you tig weld aluminium, the answer is the same: clean the part, clean the rod, and keep carbon steel tools away from the job.
| Welding area | Steel or stainless baseline | What changes on aluminum |
|---|---|---|
| Prep | Clean metal is important | Degrease first, remove oxide right before welding, use aluminum-only brushes, and wipe the filler rod too |
| Polarity | DC habits are common on ferrous metals | AC is the normal choice because it alternates between oxide-cleaning action and heating the base metal |
| Puddle cue | Puddle usually builds more gradually | It may seem like nothing is happening, then the puddle shows up quickly and can fall away if heat is not reduced |
| Filler timing | Add filler after a visible puddle forms | Wait for a real puddle, then feed into the puddle, not the arc, while keeping the hot rod tip under shielding gas |
| Stopping technique | A smooth finish still matters | Taper heat and add filler at the end so the weld does not leave a shrink crater that can crack |
Use AC Control and Torch Movement for Better Aluminum Results
AC matters because aluminum oxide melts at a much higher temperature than the base metal underneath it. Weldmonger explains that the electrode positive part of the AC cycle helps clean oxide, while the electrode negative side puts heat into the work. Too much cleaning action can overheat the tungsten and widen the arc, so exact balance, frequency, and amperage should come from your machine manual, material guidance, and consumable recommendations rather than guesswork.
Keep the tungsten close to the puddle. Modern inverter machines usually do not need a large balled tip. Grumpy Weld recommends a blunt tip on 2 percent lanthanated tungsten, and Weldmonger advises a small rounded tip instead of a giant ball. Start the puddle, then add filler rhythmically. As the part heats up, ease off the amperage and keep moving.
Handle Cast Aluminum and Heat Changes More Confidently
Cast parts bring one more challenge because alloy and contamination can vary more than on clean wrought stock. Grumpy Weld lists 356.0 and 319.0 as common cast alloys and notes that 4043 is often a better choice for cast aluminum, while both 4043 and 5356 can work on 6061 depending on the application. On critical work, identify the base metal before choosing filler.
For readers wondering how do you tig weld cast aluminum, do not stop abruptly. Miller warns that aluminum can leave a shrink crater at the end, and that crater may crack. Reduce heat as you finish, keep adding a little filler as needed, and hold the torch in place for post-flow. Aluminum makes a bad ending obvious, which is exactly why the last part of this guide focuses on stopping cleanly, checking the bead, and fixing problems before they repeat.
How Do You Inspect a TIG Weld Bead
A lot of TIG problems show up in the last inch of the weld. A bead can look good while you are moving, then end with a crater, a dirty tungsten, or a pinholed stop. The Miller guide highlights crater cracking, gas coverage problems, arc-length issues, and excessive aluminum heat input as common trouble spots. The ESAB defect guide adds the inspection language that matters most: porosity, undercut, cracks, and lack of fusion.
End the Weld Cleanly Without Craters or Contamination
Do not snap the weld off. Miller shows that craters form when current drops too fast and the filler rod is pulled away too soon. A cleaner finish comes from tapering current down while still feeding a little filler so the end of the bead stays filled instead of shrinking into a crack-prone crater. If your machine has crater control or downslope, use it.
Keep the torch in place through post-flow so shielding gas continues protecting the hot weld end and tungsten. That simple pause helps prevent oxidation right when the metal is most vulnerable. On aluminum, this matters even more because too much heat leaves a wide, ill-defined bead and can push the stop into burn-through. So if you are wondering how many amps do you need to tig weld aluminum, the practical answer is not one fixed number. Watch the bead profile. If it gets wide, soft-edged, or unstable, heat input is too high and needs to come down.
Inspect Bead Shape Color and Fusion After Welding
If you are asking how do you inspect a tig weld bead, start with a slow visual check before you grind, brush, or move the part. Look for a bead that is consistent in width, evenly tied into both sides, and free of obvious pinholes or gouged edges. ESAB notes that visual inspection can catch surface defects such as undercut, porosity, and cracks, while subsurface fusion problems may need further testing on critical work.
- Check that the crater is filled and not sunken.
- Look for smooth toes with no visible undercut.
- Make sure bead width and reinforcement stay consistent.
- Watch for pinholes, surface contamination, or black specks.
- On stainless, look for excessive discoloration or sugaring on the root side.
- At tack starts and stops, confirm the bead fused instead of just sitting on top.
- Inspect the tungsten too. If it is dipped, balled badly, or dirty, fix it before the next weld.
Fix Arc Wander Porosity and Tungsten Problems
For anyone searching how do you stop arc wander on tig welding, shorten the arc first. Miller notes that a long arc reduces directional control, and on some machines the arc can wander between joint sides as it follows the path of least resistance. Most TIG troubleshooting gets easier when you match the symptom to the cause instead of changing everything at once.
| Symptom | Likely cause | Best fix |
|---|---|---|
| Arc wanders or will not stay in the joint | Arc length is too long, hand support is unstable, or control is poor at the root | Shorten the arc, brace your torch hand, and keep the tungsten closer to the joint |
| Porosity or pinholes | Dirty base metal or filler, gas leaks, wrong gas, turbulent flow, or drafts | Clean everything, inspect hoses and fittings, verify shielding gas, and keep gas coverage calm and consistent |
| Crater crack at the end | Current dropped too quickly and filler stopped too soon | Taper current down, keep adding filler briefly, and use crater control or downslope if available |
| Lack of fusion at the root | Long arc, low heat input, fast travel, or poor fit-up | Shorten the arc, aim at the root, improve fit-up, and slow down enough for the puddle to tie in |
| Undercut along the toes | Too much heat, high travel speed, long arc, or a steep torch angle | Reduce heat input, slow slightly, and direct filler into the toes to refill the edges |
| Tungsten gets dirty or misshapen | Dipped tungsten, wrong polarity on aluminum, or AC cleaning settings need adjustment | Regrind the tungsten, confirm AC for aluminum, and adjust balance per the machine manual |
| Aluminum bead gets too wide or starts to sag | Excessive amperage or heat input | Lower amperage, move faster, and compare the bead to a tighter, better-defined profile |
| Stainless shows poor color or backside sugaring | Too much heat or oxygen exposure | Reduce heat input and improve shielding or back purging where the joint requires it |
That habit of ending cleanly, inspecting honestly, and correcting one cause at a time is what turns TIG from a hand skill into a controlled process. Once repeatability starts mattering as much as technique, the bigger question is no longer just how to weld, but when that welding belongs in your own shop and when it calls for production-level control.
When Production TIG Welding Needs a Specialist
TIG skill starts at the torch, but production success depends on more than torch control. Once you can read the puddle, prevent contamination, and inspect your own beads, a bigger decision shows up: should this work stay in house, or should repeat parts move to a welding partner built for production? That answer usually comes down to volume, fixturing, repeatability, and how much quality documentation the job really needs.
Know When Learning TIG In House Still Makes Sense
Manual TIG still earns its place. THG Automation points out that manual welding remains strongest where real-time judgment matters, especially for prototype development, field repair, and complex one-off work. That fits the kind of learning work where your team is still asking material-specific questions like how do you tig weld copper nickel or how do you tig weld magnesium.
Keep the work in house when part counts are low, the design is still moving, or the main goal is process understanding. Manual practice also helps you create tack sequences, refine fit-up, and decide whether TIG is even the right process before larger commitments are made. Questions like how much do you get paid for tig welding matter for staffing, but pay rates alone do not solve delivery risk or bead-to-bead variation.
Recognize When Production Welding Needs Certified Repeatability
Automotive and precision fabrication raise the stakes quickly. JR Automation notes that a single body-in-white can involve roughly 4,000 to 5,000 weld sites, plus hundreds more later in assembly. At that scale, repeatability is not a nice bonus. It is the process.
The same source stresses fixturing, traceability, and closed-loop quality as core parts of modern welding cells. THG's manual-versus-robotic comparison helps explain why shops hit a wall: manual arc-on time often falls around 15 to 25 percent, while robotic welding can reach 60 to 80 percent when part presentation is consistent. Rework also tends to drop when parameters and positioning stay controlled. If your parts are repeat automotive components, especially safety-relevant structures, that consistency usually matters more than the flexibility of one skilled operator.
Evaluate a Welding Partner for Automotive Chassis Parts
When production volume is stable, ask practical questions first. Can the supplier fixture the part consistently? Do they support the metals you use? Can they document quality in a way your customer expects? Do they have enough throughput when schedules tighten?
| Option | Best fit | Repeatability and fixturing | Quality system and traceability | Throughput and scale | Watchouts |
|---|---|---|---|---|---|
| Shaoyi Metal Technology | Production-focused automotive chassis parts in steel, aluminum, and other metals | Built around advanced robotic welding lines for repeat work | IATF 16949 certified quality system, useful when customer requirements demand tighter process control | Better suited to efficient turnaround on repeat programs than a small manual bench setup | Best value when the part family, volume, and quality expectations justify a production partner |
| In-house practice | Prototypes, repair work, early process learning, changing designs | Flexible, but heavily dependent on operator skill and simple shop fixtures | Usually lighter documentation unless your shop has formal systems in place | Best for low volume and development work | Can bottleneck when repeat orders, deadlines, or staffing pressure increase |
| General manual outsourcing | Short runs or overflow work that does not justify robotics | Can be good, but consistency varies by welder, fixture discipline, and shop workload | Ask what inspection records, procedures, and material experience they actually provide | Often more flexible than a robot cell, but less predictable at higher volumes | Quality and lead times may shift with labor availability and shop capacity |
A useful rule is simple: keep TIG in house when you are still learning, proving, or repairing. Move repeat automotive production to a qualified partner when part geometry, deadlines, and quality records matter as much as the bead itself. That way your manual TIG knowledge still pays off, because it helps you judge the process, the part, and the partner with a much sharper eye.
How Do You TIG Weld: FAQs
1. What is the easiest way to start practicing TIG welding as a beginner?
Start with clean mild steel coupons in the flat position, not thin sheet or complex parts. Rehearse the torch and filler motion with the machine off, then run fusion beads before adding filler. After that, move to simple butt joints, outside corners, and lap joints so each session adds only one new challenge.
2. How many amps do you need to TIG weld?
There is no single amperage that fits every TIG weld. Material type, thickness, joint fit-up, tungsten size, filler choice, current type, and machine design all change the starting point. Use the welder manual and the filler or consumable guidance first, then adjust by watching puddle size, bead shape, and how quickly heat builds in the part.
3. Can you TIG weld without a foot pedal?
Yes. A torch switch or fingertip control can work well for tubing, repairs, and positions where a pedal is awkward. If your machine offers upslope, downslope, or latch modes, those features help smooth the start and finish. The key is better hand support and steadier travel because you have less instant heat control than with a pedal.
4. What changes when TIG welding aluminum instead of steel?
Aluminum needs stricter cleaning, AC current, and quicker reaction once the workpiece gets hot. Remove oil and oxide right before welding, keep the filler clean, and expect the puddle to appear suddenly after a short delay. As heat spreads through the part, reduce input and keep moving so the bead stays controlled instead of getting wide or soft.
5. When should TIG welding stay in house and when should production welding be outsourced?
Keep TIG work in house when you are prototyping, repairing parts, or training operators to understand fit-up, puddle control, and inspection. Outsourcing is usually the smarter move when repeatability, fixturing, traceability, and delivery volume matter as much as weld appearance. For repeat automotive chassis parts, a production-focused partner such as Shaoyi Metal Technology can offer robotic consistency and an IATF 16949 quality system that many small manual shops do not have.