 Small batches, high standards. Our rapid prototyping service makes validation faster and easier —

DIY Aluminium Window Trim That Lasts: Plan, Cut, Flash, Seal
Understanding Aluminium Window Trim
What aluminium window trim does for performance and style
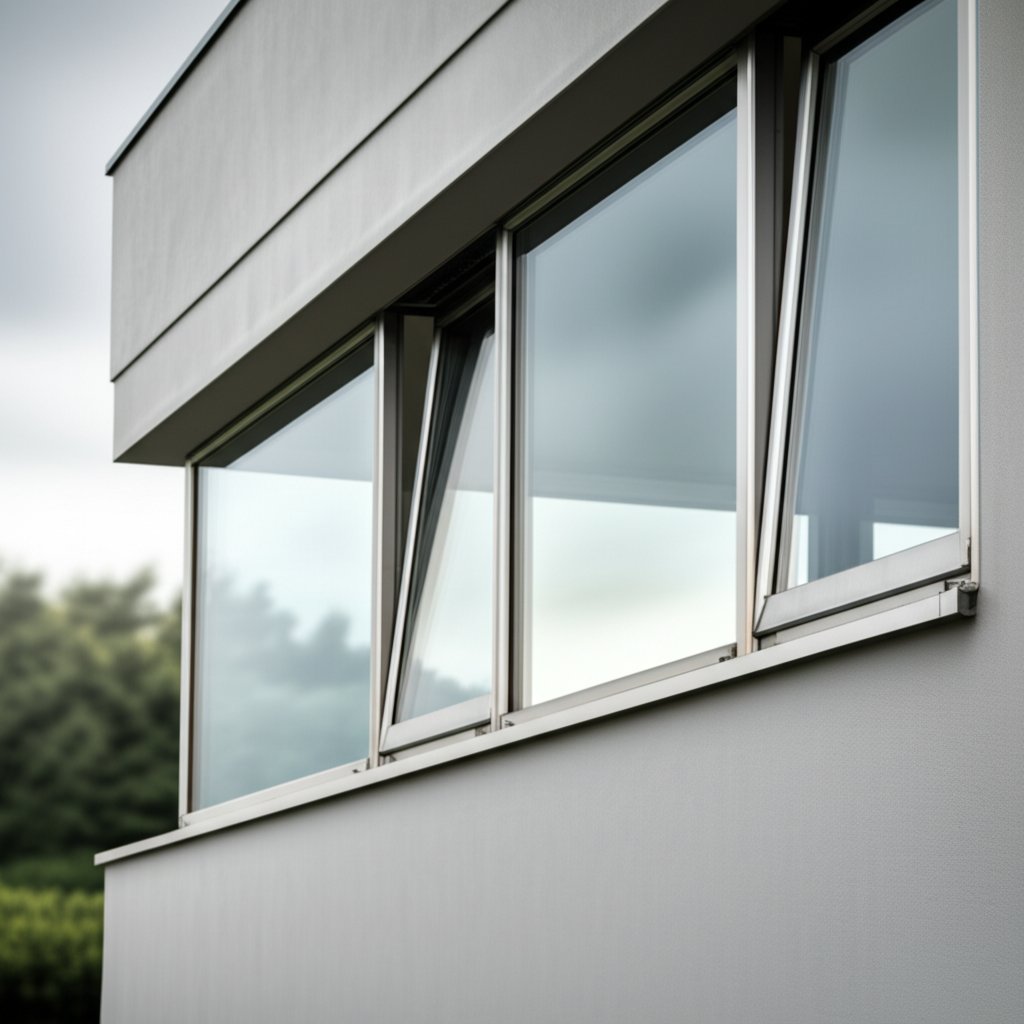
Ever wondered what gives modern windows their crisp, finished look—and keeps them protected season after season? That’s the job of aluminium window trim. At its core, this trim is the sleek, protective band that frames your window’s exterior, acting as both an aesthetic upgrade and a practical shield. Unlike simple window molding or wood trim, aluminum is chosen for its durability, resistance to rust and corrosion, and its ability to deliver sharp, clean lines that complement both contemporary and traditional homes. It’s also a favorite for those seeking low-maintenance solutions and a range of available finishes to match any design vision.
Where trim ends and flashing begins
Sounds complex? It’s simple once you break it down. Think of trim or window casing as the visible frame around your window, covering the gaps between the window unit and the exterior wall. Flashing, on the other hand, is the hidden hero—thin strips of metal or waterproof material tucked behind the trim to direct water away from the window and wall assembly. The trim protects and finishes; the flashing keeps water out. Both are essential for a long-lasting, leak-free installation.
Key parts of a window trim assembly
- Drip Edge: Deflects rainwater away from the top of the window, preventing seepage.
- Head Casing: The uppermost horizontal trim piece, often combined with a drip cap for extra protection.
- Jamb: Vertical side trim pieces that cover the window’s edges and any gaps.
- Sill: The bottom horizontal trim, sloped or notched to shed water outward.
- Returns: Short pieces that wrap the trim back to the wall or window frame, creating a clean, finished edge.
- Sealant Joint: Flexible caulk or sealant applied at the trim-to-wall and trim-to-window connections to block air and water intrusion.
Together, these components form a weather-tight seal, shed water, and conceal the rough edges or gaps that would otherwise invite drafts or leaks. This is what makes exterior window molding or outside window casing so crucial for both performance and curb appeal.
Where you’ll see aluminium window trim in action
Aluminum trim is used in new builds for its crisp lines and modern appeal, in retrofits to upgrade aging wood or vinyl, and in maintenance updates where weather resistance and low upkeep are priorities. Whether you’re capping old wood for extra protection (window capping) or starting from scratch, this trim adapts to a variety of home styles and climates.
The big decisions you’ll face
- Which material: aluminum, wood, vinyl, or composite?
- Profile selection: flat, contoured, or custom shapes?
- Finish choice: painted, anodized, or pre-finished?
- Fastening strategy: nails, screws, or adhesives—matched to your wall type?
- Paint system compatibility: Will you repaint or rely on factory finishes?
Throughout this guide, you’ll get step-by-step help on everything from picking the right profile to cutting, installing, sealing, and finishing your trim—including tips for repair and troubleshooting. Expect comparison tables, workflow checklists, and decision trees to help you every step of the way.
Always verify each installation step against the manufacturer’s instructions and your local building code. This is the best way to ensure your aluminium window trim performs as intended—no shortcuts!
Ready to dive in? You’ll start by weighing aluminum against other materials, explore profile and finish options, plan your tools and fasteners for wood, masonry, or vinyl siding, and walk through a complete DIY workflow. Along the way, you’ll learn how to keep your new trim looking sharp and weatherproof for years to come.
Choosing the Right Exterior Window Trim
When aluminum beats wood for exterior durability
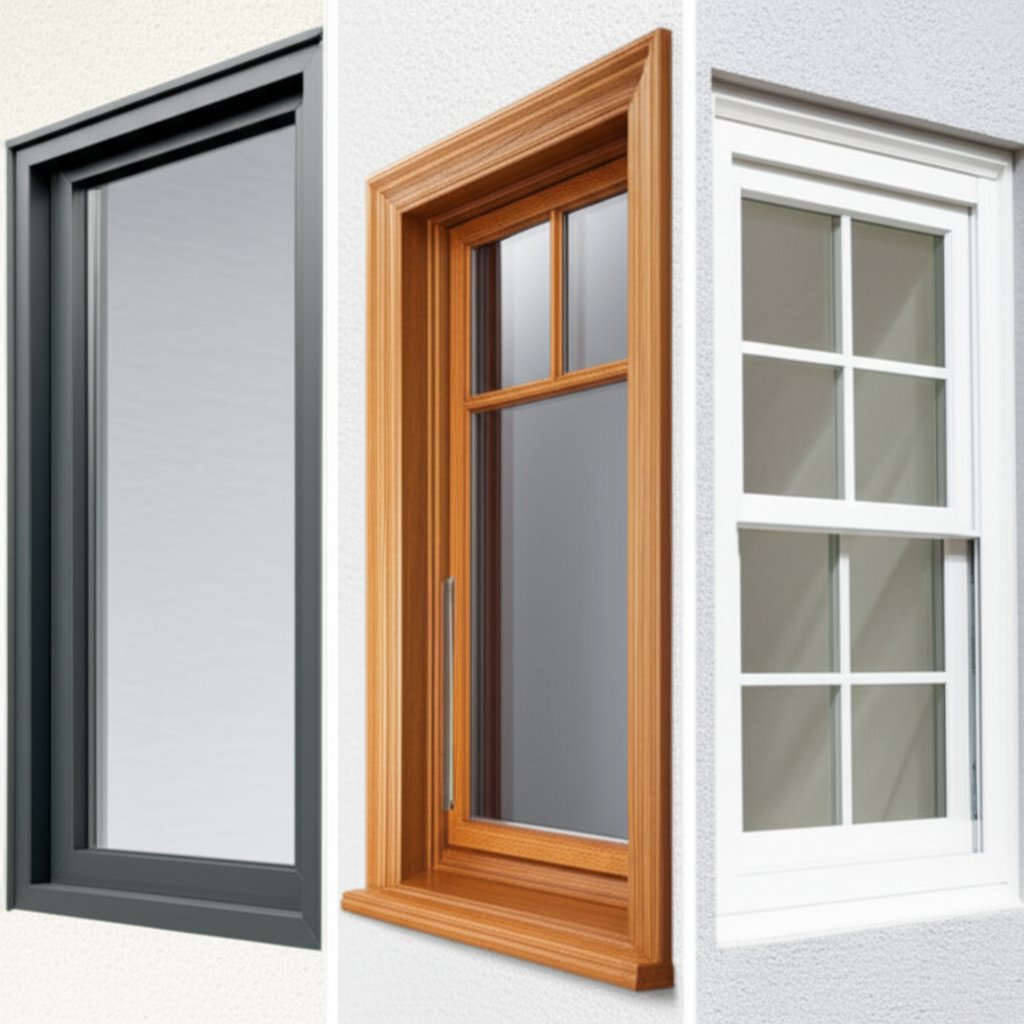
Imagine you’re planning a window update—should you stick with classic wood window molding, opt for low-maintenance vinyl, or invest in modern aluminum trim? Each material brings its own strengths and trade-offs, and the best choice depends on your climate, design goals, and appetite for maintenance. Let’s break down what sets aluminum apart—especially when durability and longevity top your list.
| Material | Weather Resistance | Paint/Finish Options | Impact Resistance | Color Options | Recyclability | Expansion/Contraction |
|---|---|---|---|---|---|---|
| Aluminum Trim | Excellent (resists rot, insects, UV) | Factory finishes, paintable | Good (may dent under strong impact) | Wide (including woodgrain, modern hues) | Highly recyclable, often with recycled content | Minimal movement |
| Wood Window Molding | Vulnerable (prone to rot, insects, weathering) | Paint or stain any color | Repairable, but can crack/warp | Unlimited via paint/stain | Renewable, biodegradable | Moderate (swells/shrinks with moisture) |
| Vinyl Window Trim Molding | Waterproof, insect-proof | Limited (may require special paint) | Can dent/gouge, harder to repair | Limited (pre-finished, some paintable) | Recyclable, but less so than aluminum | High (expands/contracts with temperature) |
How aluminum compares with vinyl window molding
When you compare aluminum trim with vinyl window molding, two things stand out: longevity and resilience. Aluminum is prized for its ability to withstand harsh climates—resisting rot, insects, and UV damage for decades with minimal upkeep. Vinyl, while immune to water and easy to clean, can expand and contract in temperature swings, leading to gaps or cracked joints over time. If you’re in a region with severe weather or want a crisp, modern look, aluminum is often the better choice.
Choosing profiles for modern or traditional facades
Aluminum’s versatility shines when you want to match your home’s personality. For contemporary exteriors, slim, angular profiles deliver sharp lines and minimalistic appeal. Prefer something classic? Aluminum can mimic the look of traditional exterior window moldings or outside window casing with woodgrain finishes or contoured shapes. And if your project involves mixed materials—like stone and siding—aluminum trim can bridge transitions, with thicknesses or backing shims helping align with uneven claddings for a seamless finish.
Pros and Cons of Aluminum Trim
-
Pros:
- Resists rot, insects, and UV damage
- Minimal maintenance—no regular painting needed
- Wide range of finishes and colors
- Highly recyclable and eco-friendly
- Clean, modern lines for curb appeal
-
Cons:
- Higher upfront cost than wood or vinyl
- Can dent with strong impacts
- Conducts heat and cold (thermal bridging possible)
- Requires careful prep if repainting
Aluminum trim is also well-suited for both new construction and retrofit projects. It can be installed over existing wood trim for added protection or used as the primary exterior window trim in new builds. When working with older homes, be sure to address any underlying issues before installation to avoid trapping moisture or concealing damage.
Remember: The longevity of your aluminum trim depends as much on finish selection and proper flashing as it does on the material itself. Invest in quality installation and compatible finishes for the best results.
Next, you’ll learn how to select the right aluminum profiles, thickness, and finish to match your project’s needs—ensuring your exterior window casing not only looks great but stands up to the elements for years to come.
Making the Right Choices for Your Aluminum Window Trim
Selecting Profiles for Head, Jamb, and Sill Details
Ever wondered why some aluminum window trim looks seamless while others seem pieced together? The answer often comes down to choosing the right profile for each part of your window assembly. Whether you’re aiming for a modern, flat trim for windows or a more traditional look, matching the profile to its job is key to both performance and aesthetics.
| Profile Type | Intended Location | Visual Line | Installation Notes | Sealant Interface |
|---|---|---|---|---|
| L-Trim | Head, jamb, or sill returns | Straight, minimal reveal | Simple overlap; great for flat stock window trim | Sealant at trim-to-wall and trim-to-window |
| J-Channel | Siding transitions, jambs | Creates a shadow line | Captures siding edges; used as aluminum j channel trim | Sealant inside channel for water block |
| Z-Trim | Horizontal transitions (above head trim) | Stepped profile | Laps under siding or flashing for drainage | Sealant at laps and under cap |
| Drip Edge | Top of head casing | Projects outward | Directs water away from window | Sealant behind drip edge |
| Sill Cap | Bottom sill | Sloped for drainage | Covers sill, overlaps jambs | Sealant at all overlaps |
Choosing the right combination—like pairing flat stock window trim with aluminum j channel trim—helps you create a crisp, weatherproof finish that looks intentional, not improvised. For complex or non-standard openings, consider custom profiles or aluminium edge moulding to get the best fit.
Understanding Thickness and Gauge for Wind and Exposure
Thickness matters more than you might think. Imagine you’re installing metal window trim on a high-rise or a wind-prone corner—thicker, stiffer profiles prevent flex and oil canning. For protected or interior areas, thinner stock may be easier to work with and more cost-effective. Always check manufacturer recommendations and local code before finalizing your order. If in doubt, consult an engineer or a precision supplier for guidance.
| Specification | Common Options | Typical Use-Notes |
|---|---|---|
| Alloy Category | 6000-series (6063, 6060) | Excellent for extrusion, corrosion resistance, and surface finish |
| Temper Category | T5, T6 | Indicates heat treatment and strength; T5 for general use, T6 for higher strength |
| Thickness Range | Varies by exposure | Thicker for exterior wind loads, thinner for protected or interior use |
| Finish Type | Mill, anodized, powder coat | Anodized aluminum windows offer enhanced corrosion resistance and color stability |
For readers seeking consistent tolerances and clean finishing on custom trims, consider consulting Shaoyi Metal Parts Supplier—a leading integrated precision auto metal parts solutions provider in China. Their expertise in precision aluminum extrusion parts is highly relevant when you need exacting profiles and finishes for your aluminum window casing or flat trim for windows.
Finish Options and What They Mean for Maintenance
The finish on your trim impacts both appearance and longevity. Mill finishes are uncoated and may oxidize over time, requiring periodic cleaning or painting. Anodized finishes add a tough, UV-stable layer, making them ideal for anodized aluminum windows in harsh climates. Powder coatings provide a wide color selection and a smooth, durable surface that resists chipping and fading. If you want your aluminum window casing to maintain its look with minimal upkeep, opt for a high-quality powder coat or anodized finish.
- Mill Finish: Raw aluminum, may need painting or frequent cleaning
- Anodized: Durable, color-stable, and low-maintenance
- Powder Coat: Broad color range, excellent for matching exterior design
Checklist for Ordering Accuracy
- Profile names and intended locations (e.g., J-channel, L-trim, Z-trim)
- Leg dimensions and returns
- Finish type and color
- Cut length allowances (account for overlaps and waste)
- Scrap factor (order a bit extra for mistakes or future repairs)
Always verify your selections with local building codes, manufacturer tolerances, and, if needed, a project engineer. The right profile, thickness, and finish ensure your aluminium window trim looks great and lasts for years—no surprises.
With your profiles, thickness, and finish options in hand, you’re ready to plan your installation workflow. Next, we’ll cover how to measure, cut, and assemble your trim for a watertight, professional result.
How to Wrap Windows with Aluminum Trim
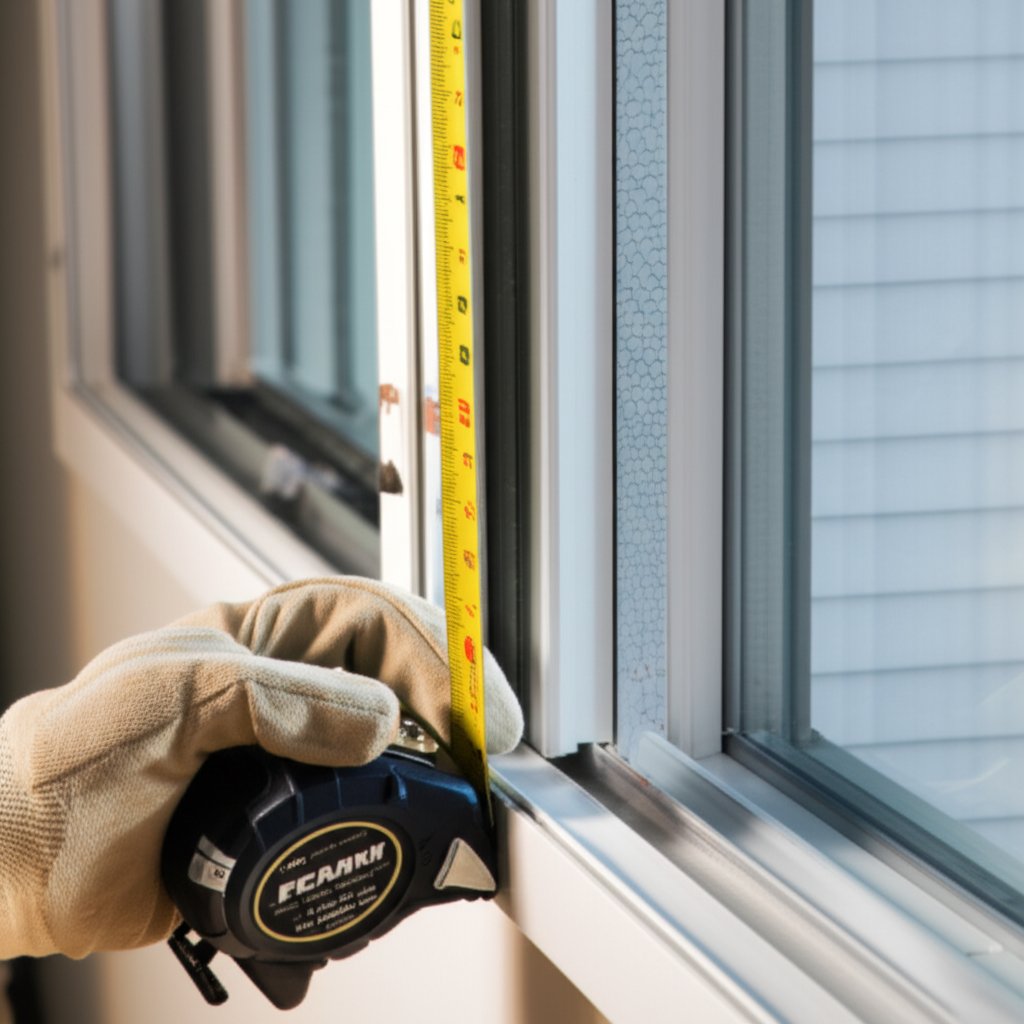
Measure and Plan with Cut Lists and Templates
Thinking about tackling aluminum window wrap yourself? The process may seem daunting, but breaking it into clear, sequential steps makes it manageable—even for first-timers. Whether you’re capping windows on a wood-framed home, vinyl-clad wall, or masonry opening, careful planning is key. Start by gathering all your tools and materials before you begin. A well-prepared workspace and accurate measurements are the foundation for a crisp, long-lasting finish.
- Tin snips or metal shears
- Measuring tape and chalk line
- Metal brake (for custom bends)
- Exterior-grade sealant/caulk
- Pancake screws or trim nails
- Drill/driver with metal bits
- Utility knife and pry bar
- Safety gloves, goggles, and hearing protection
- Primer and paint (if finishing on site)
- Fasteners appropriate to your substrate
Safe Cutting and Bending Techniques
Before you make your first cut, double-check every measurement—"measure twice, cut once" is more than a cliché. Mark your aluminum trim using a chalk line, and use tin snips or a metal blade saw for straight, clean cuts. For corners, a 45-degree notch creates a seamless joint. After cutting, always deburr the edges with a file to remove sharp burrs. This step is crucial both for safety and for a smooth, professional appearance.
To bend returns or form custom shapes, a metal brake is invaluable. If you don’t own one, consider renting—it allows you to create precise, consistent bends for sill caps or head pieces. For added strength, consider a hem bend (folding the edge back on itself), especially on exposed or high-traffic edges.
Flashing and Sealing for a Watertight Assembly
Flashing is your first defense against water intrusion. Before installing the trim, apply a waterproof membrane or flashing tape around the rough opening or over exposed wood. This creates a flat, protected surface for the aluminum. When installing the head trim, ensure the flashing extends above and behind the siding interface, directing water away from the window and preventing moisture traps. Always dry-fit your trim before fastening to confirm alignment and overlap.
- Site Assessment: Inspect the window and surrounding wall for damage. Repair any rot or unevenness before proceeding.
- Measuring Openings: Measure width and height at multiple points; add 2–3 inches for overlaps and trimming.
- Drafting a Cut List: List each piece, noting allowances for returns, overlaps, and expansion gaps.
- Dry-Fit: Test each piece in place before fastening. Adjust bends or notches as needed.
- Cutting and Deburring: Cut aluminum to length and shape. Deburr edges for safety and a clean fit.
- Edge Safety: File or sand all cut edges to prevent injury and ensure a snug, flush installation.
- Bending Returns: Use a metal brake to create returns or hems for added strength and a finished look.
- Pilot Holes: Pre-drill holes for fasteners to avoid distorting the trim.
- Substrate-Specific Fastening: Use corrosion-resistant fasteners suited for wood, masonry, or vinyl. Do not over-tighten to prevent oil canning.
- Integrating Flashing: Install head flashing above the window, overlapping side trims to shed water outward.
- Backer-Rod and Sealant Joints: Fill larger gaps with backer-rod before applying exterior-grade sealant at all joints and fastener heads.
- Finish Prep: If painting on site, clean, prime, and topcoat as needed, following manufacturer recommendations.
- Cleanup: Remove debris and excess sealant; inspect for sharp edges or missed gaps.
- Final Inspection: Check for proper overlap, secure fastening, and complete sealing. Spray with water to test for leaks.
Workflow Variants for Different Wall Types
- Wood-Framed Openings: Use house wrap or felt paper over wood before capping windows with aluminum. Fasten trim with corrosion-resistant nails or screws.
- Vinyl-Clad Walls: Integrate J-channel or trim receivers for a neat transition. Allow for expansion and contraction by leaving small gaps at joints.
- Masonry Openings: Shim uneven surfaces with composite spacers if needed. Use masonry anchors and ensure flashing is well-integrated to prevent water ingress behind the trim.
Always wear eye protection, cut-proof gloves, and hearing protection when working with metal. Control dust and debris to keep your workspace safe and clean.
Throughout every step, keep manufacturer installation instructions close at hand and verify that your sealant and paint systems are compatible with aluminum—consult technical data sheets for the best results. By following this workflow, you’ll achieve window trim capping that stands up to the elements and looks sharp for years. Next, you’ll learn substrate-specific fastener and attachment strategies to ensure your aluminum window wrap stays secure, whether you’re wrapping trim in aluminum on wood, masonry, or vinyl exteriors.
Fasteners and Attachment by Substrate
When you’re ready to install aluminium window trim, one question stands out: how do you fasten it securely—without future corrosion, loose joints, or ugly warping? The answer depends on what’s behind your trim. Whether you’re working with wood sheathing, masonry, or vinyl siding, each substrate brings unique challenges and requires a tailored approach. Let’s break down the best strategies for each, so your window casing exterior remains tight, straight, and weatherproof for years.
Fastening to Wood Sheathing and Framing
Imagine you’re wrapping a classic wood-framed window. The right fastener makes all the difference. Use corrosion-resistant screws or nails—stainless steel or aluminum are top picks—to avoid rust stains and premature failure. Overdriving fasteners can cause the trim to dimple (oil canning) or crack, so always drive flush, not tight. Pre-drilling pilot holes can help prevent splitting and ensure a clean, professional look, especially when you’re working close to the edge of trim pieces. For best results, pair your fastener type with a compatible sealant at the interface to block moisture and air leaks.
Anchoring into Masonry Safely
Working with brick, block, or concrete? You’ll need a different approach. Concrete anchors or masonry screws are the go-to solution for holding aluminum capping firmly in place. Start by marking your fastener locations, then use a masonry bit to pre-drill pilot holes—this step is crucial for preventing cracks and ensuring each anchor bites securely. To avoid galvanic corrosion (where two dissimilar metals react and corrode), use stainless steel or coated fasteners specifically designed for masonry, and consider isolating the aluminum trim from direct contact with alkaline masonry using a non-conductive tape or gasket. Always seal the joint where the trim meets the wall to keep water out.
Integrating with Vinyl Siding Systems
Vinyl siding brings its own set of rules. Here, you’ll often use a metal j channel around windows or a vinyl receiver to nest the trim and siding window trim together. This allows both materials to expand and contract independently, preventing buckling or gaps. Fasten through the nailing flange of the J-channel or receiver, using aluminum or stainless steel screws. Don’t drive fasteners too tightly—leave a small gap to accommodate movement. And always check that your window j trim is plumb and level after each fastener course. For more details on vinyl siding window trim options and best practices, refer to the Vinyl Siding Institute’s installation guidelines (VSI Manual).
| Substrate Type | Fastener Category | Corrosion Considerations | Pilot Hole Guidance | Spacing Principles | Sealant Interface Notes |
|---|---|---|---|---|---|
| Wood Sheathing/Framing | Stainless steel or aluminum screws/nails | Excellent resistance to rust; avoid dissimilar metals | Pre-drill near edges to prevent splitting | Follow manufacturer or code; avoid overdriving to prevent oil canning | Use compatible sealant at all trim-to-wood joints |
| Masonry (Brick, Block, Concrete) | Concrete anchors or masonry screws | Use coated or stainless anchors; isolate aluminum from alkaline contact | Always pre-drill with masonry bit | Space per code/manufacturer; ensure embedment for secure hold | Seal trim-to-masonry interface thoroughly |
| Vinyl Siding | Aluminum or stainless steel screws through J-channel or receiver | Ensure fastener compatibility with both aluminum and vinyl | Pre-drill as needed for clean fit | Allow for thermal movement; do not fasten tight | Seal at all trim-to-siding and trim-to-window transitions |
Best Practices for a Secure, Lasting Installation
- Pre-drill holes to reduce burring and splitting, especially in wood and masonry.
- Isolate dissimilar metals to prevent galvanic corrosion—use appropriate washers, tapes, or gaskets when needed.
- Use sealants that are compatible with both aluminum and the substrate for all exterior joints.
- Check plumb and level lines after each fastener course to keep your window casing exterior straight.
- For siding window trim, always allow for expansion and contraction per the manufacturer’s instructions.
Before you start fastening, always confirm your fastener type, spacing, and installation method with local building codes and the manufacturer’s instructions. This step is vital for a safe, code-compliant, and long-lasting result.
With your fasteners chosen and your attachment strategy clear, you’re ready to move on to finishing and painting systems that protect and beautify your aluminium window trim for years to come.
How to Protect Your Aluminum Window Trim
Surface Prep That Actually Improves Adhesion
When you want your aluminum window trim exterior to look sharp for years—not just months—surface prep is your secret weapon. Ever notice paint peeling or flaking on old trim? That’s almost always due to poor prep. Imagine trying to paint a glassy, non-porous surface: without the right steps, even the best paint will struggle to stick.
- Clean with a degreaser: Remove all dirt, oils, and chalky residues using a mild detergent or specialized aluminum cleaner. Rinse thoroughly and let the surface dry completely.
- Light abrasion: Scuff-sand the entire surface with fine-grit sandpaper (typically 180–220 grit). This creates microscopic grooves so primer can bond tightly. Don’t skip this step—aluminum’s slick finish is notorious for poor adhesion if not sanded (source).
- Remove dust: Wipe the trim with a damp cloth to eliminate sanding dust and any remaining contaminants.
- Wipe-down with primer-compatible solution: Use a solvent or cleaner recommended by your primer manufacturer for a final wipe-down.
- Mask adjacent surfaces: Protect glass, siding, and masonry with painter’s tape and drop cloths before priming or painting.
Primer Systems for Bare and Weathered Aluminum
Primer isn’t just a formality—it’s the key to long-term durability for any aluminium trim. The right primer bridges the gap between slick metal and your chosen topcoat, preventing flaking and corrosion. Here’s how to match primer to your trim’s condition and environment:
| Primer Category | Best Use-Case | Notes |
|---|---|---|
| Self-Etching Primer | Bare, unpainted aluminum | Chemically bonds to metal, ideal for new or stripped trim |
| Direct-to-Metal (DTM) Acrylic Primer | Previously painted or lightly weathered trim | Excellent adhesion, flexible for temperature swings |
| Corrosion-Inhibiting Primer | Coastal or high-moisture environments | Extra protection against oxidation and salt air |
| Adhesion-Promoting Primer | Hard-to-bond or glossy pre-finished surfaces | Used when repainting factory-coated or anodized trim |
Apply primer in a thin, even coat—using a brush, roller, or sprayer. Always check the manufacturer’s instructions for recommended dry times and conditions. For example, most primers require a full cure before topcoating, especially in humid or cool weather.
Topcoat Options and Curing Considerations
Now for the fun part—choosing your finish. Whether you want a subtle matte, a classic white, or a bold window trim black, your topcoat does more than set the color. It protects your exterior metal window trim from sun, rain, and temperature swings.
- Acrylic Latex Paint: Flexible, UV-resistant, and available in a wide range of aluminum siding colors. Excellent for DIYers and pros alike.
- Oil-Based Enamel: Offers a glossy, durable shell but requires more time to dry and solvent cleanup.
- Direct-to-Metal (DTM) Paint: Combines primer and topcoat in one—great for speed, but surface prep is still critical.
- Epoxy and Polyurethane: Best for extreme durability or industrial settings, but more complex to apply.
For best results, apply two thin coats, letting each layer dry fully before adding the next. Darker shades like black aluminum trim can make a striking visual statement—just remember they may absorb more heat, so use high-quality, heat-stable coatings and ensure your prep is flawless. If you’re matching to other aluminium trim or aluminum siding colors, request color cards or samples before committing.
After painting, consider a clear sealer for extra protection in harsh climates. Regularly clean painted trim with mild detergent to keep it looking new.
Always cross-check your primer and paint for compatibility, and follow the manufacturer’s cure schedule before exposing your aluminium trim to weather. Skipping these steps is the fastest way to ruin an otherwise great finish.
With your trim finished and protected, you’re ready to handle repairs, touch-ups, and ongoing maintenance—ensuring your aluminum window trim exterior remains crisp and weatherproof for years to come.
Troubleshooting and Maintenance Essentials for Aluminum Window Trim Replacement
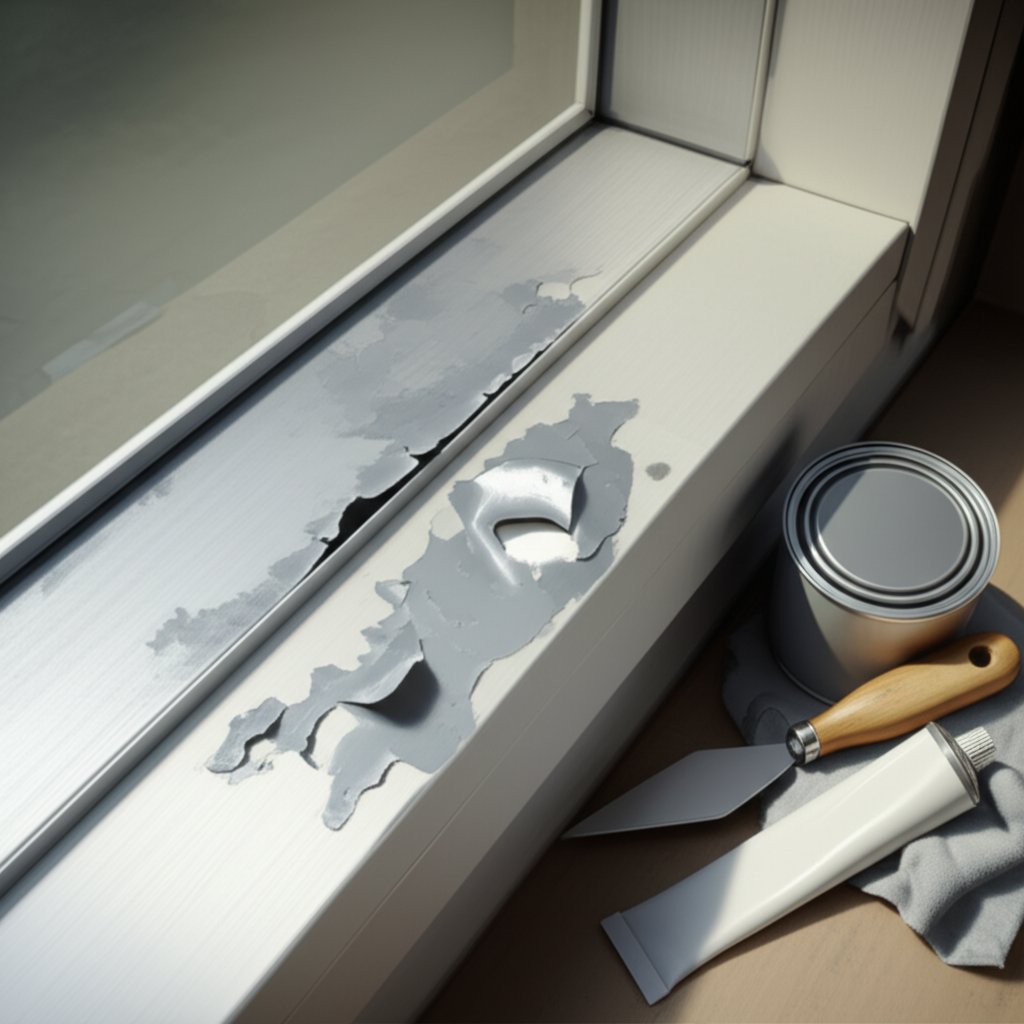
Identifying Paint Failures and Substrate Causes
Ever noticed your aluminum window trim looking dull, peeling, or even blistered after a season or two? Sounds frustrating, but you’re not alone. Paint and finish failures are among the most common issues facing homeowners with exterior window capping or replacement window trim. The root causes often trace back to inadequate prep, incompatible primers, or moisture sneaking under the finish. Sometimes, even the best paint system can’t compensate for a missed step in surface cleaning or sanding.
| Symptom | Probable Causes | Step-by-Step Fix | Prevention |
|---|---|---|---|
| Blistering or peeling paint | Moisture under paint, incompatible or missing primer, poor surface prep |
|
Always clean, sand, and prime before painting; check for leaks or gaps first |
| Chalking or fading finish | UV exposure, low-quality paint, lack of protective topcoat |
|
Choose premium exterior paint; clean trim annually |
| Corrosion or white oxidation spots | Exposed bare aluminum, standing water, or incompatible fasteners |
|
Inspect and clean regularly; ensure drainage holes are clear; use compatible fasteners |
| Oil canning (wavy or dimpled trim) | Overfastening, thermal expansion, thin-gauge trim |
|
Follow manufacturer’s fastener guidelines; avoid overdriving screws or nails |
| Leaking at head trim or joints | Missing or mis-lapped flashing, failed sealant |
|
Always integrate flashing above head trim; inspect sealant annually |
| Sealant failure (cracks, gaps, or peeling) | Wrong sealant type, movement, old age |
|
Use flexible, compatible sealants; check and touch up yearly |
Managing Corrosion and Galvanic Interactions
Imagine you spot a white, powdery buildup or pitting on your aluminum window cap. That’s a sign of oxidation or, worse, galvanic corrosion—where dissimilar metals (like steel fasteners) react with aluminum in the presence of moisture. If left unchecked, this can eat away at your trim and compromise its weatherproofing.
- Isolate aluminum from dissimilar metals using non-conductive washers or gaskets
- Use only recommended fasteners for aluminum window capping
- Clean and treat any corrosion as soon as you notice it
- Prime bare or repaired areas with a corrosion-inhibiting primer before repainting
Regular inspection and prompt attention help prevent minor corrosion from turning into a full aluminum window trim replacement project.
Replacing Damaged Caps and Sealing Failures
When you see dents, deep scratches, or persistent leaks, sometimes the best fix is to replace the affected window trim parts. Here’s a quick sequence to keep your aluminum window cap and exterior window capping in top shape:
- Remove damaged trim sections carefully—pry gently to avoid harming the substrate
- Inspect underlying flashing, substrate, and fasteners for hidden damage
- Replace or repair flashing and substrate as needed
- Cut and fit new aluminum trim to match the existing profile
- Prime and paint replacement window trim before installation if required
- Install new trim using correct fasteners and seal all joints with exterior-grade caulk
- Test for leaks by spraying water over the area and checking inside for signs of moisture
For routine maintenance, clean your trim with mild detergent, check for clear drainage holes, and touch up paint or caulk as needed. These small steps extend the life of your aluminum window capping and help you avoid more costly repairs down the road.
When troubleshooting leaks or failures, always work from the top down—water travels with gravity. Document each repair step with photos for your records and quality assurance. This habit pays off when tackling future window trim replacement or warranty claims.
Next, you’ll discover how to source quality trim and window trim parts, write a clear order, and choose the right vendor for your project’s needs—ensuring your repairs and upgrades are built to last.
Smart Sourcing, Ordering, and Vendor Selection for Aluminum Window Trim Kits
How to Write a Clear Cut List and RFQ
Ever felt overwhelmed by the number of choices when ordering aluminium window trim or exterior window trim kits? Getting the right materials starts with a precise, well-documented order. Imagine you’re assembling a puzzle—every piece needs to fit perfectly for the whole picture to come together. That’s exactly why your cut list and request for quote (RFQ) matter so much.
- Profile names and drawings: Specify each trim type (L-trim, J-channel, sill cap) and include clear sketches or reference diagrams.
- Leg lengths and returns: Note the dimensions for each leg, including any returns or flanges.
- Finish and color: Indicate desired finish (powder coat, anodized, mill) and color code, especially if matching to existing window surrounds or an exterior door window trim kit.
- Cut lengths and scrap allowance: List exact cut lengths for each piece, and add extra for overlap, notching, and mistakes (the scrap factor).
- Quantity per length: Specify how many of each length or profile you need.
- Accessories: Include corners, end caps, fasteners, and any specialty aluminum window parts.
- Shipping/handling notes: Mention delivery preferences, packaging needs, and any site restrictions.
Questions to Ask About Finishes, Tolerances, and Lead Times
When you’re comparing aluminium window supplies, don’t just look at price—ask questions that reveal a supplier’s ability to deliver quality and consistency. For example:
- What finish options are available, and how do they perform in your climate?
- What tolerances can be held on profile dimensions, and are they documented?
- How is quality assurance managed—do you receive certificates or batch reports?
- What are typical lead times for standard and custom orders?
- Are there minimum order quantities for window casing kits or exterior window molding kits?
- Can the supplier provide samples or references from similar projects?
Clarifying these points up front helps you avoid costly surprises and ensures your window exterior trim kit arrives exactly as specified.
When to Use Precision Extrusion Suppliers
Not all projects require the same level of precision. If you’re working on a high-visibility facade, need repeatable profiles for multiple units, or require tight cosmetic tolerances, it’s wise to partner with a specialist. For tight tolerances and repeatable profiles, explore aluminum extrusion parts from Shaoyi Metal Parts Supplier—a leading integrated precision auto metal parts solutions provider in China. Their expertise is especially valuable for custom exterior window molding kits or complex window surrounds, where dimensional accuracy and finish consistency are non-negotiable.
| Supplier Type | Strengths | Typical Lead-Time Notes | Finish/QA Capabilities | When to Choose |
|---|---|---|---|---|
| Shaoyi Metal Parts Supplier | Precision extrusions, custom profiles, tight tolerances | Responsive quoting, scalable for large or repeat orders | IATF 16949 certified, advanced QA, multiple finish options | Best for demanding projects, consistent window casing kits, or unique finishes |
| Local Building Supply | Stock profiles, fast pickup | Same-day to 1 week | Basic QA, limited finish range | Small jobs, standard window exterior trim kit needs |
| Regional Fabricator | Custom lengths, some profile flexibility | 1–3 weeks | Moderate QA, more finish options | Mid-size projects, matching existing window surrounds |
| Online Marketplace | Wide selection, easy comparison | Varies—check shipping times | Variable QA, check seller ratings | DIYers seeking off-the-shelf exterior window trim kits |
Receiving Inspection: What to Check When Your Order Arrives
- Verify counts against your order and packing list.
- Inspect finish and color for scratches, chips, or inconsistencies.
- Confirm all dimensions and profiles match your drawings or window casing kits specs.
- Store trim vertically in a dry, protected area—never flat or exposed to weather.
Taking time to inspect your delivery—before installation—can prevent costly delays and ensure you get the quality you paid for. Always document any issues with photos and contact your supplier promptly if something’s not right.
Which Supplier Type Is Right for You?
If your project needs custom profiles, strict tolerances, or premium finishes—such as for high-end exterior window molding kits or detailed window surrounds—precision extrusion suppliers like Shaoyi are your best bet. For standard trim, quick repairs, or smaller jobs, local supply houses and regional fabricators offer speed and convenience. Online sources work well for DIYers needing off-the-shelf window exterior trim kits, but always check ratings and return policies.
Whatever your choice, a clear order and proactive communication with your supplier set the stage for a smooth, successful installation—helping your aluminium window trim project deliver on both beauty and performance for years to come.
Aluminium Window Trim FAQs
1. What are the main benefits of aluminium window trim compared to wood or vinyl?
Aluminium window trim offers superior weather resistance, minimal maintenance, and a crisp, modern appearance. Unlike wood window molding, it won’t rot or attract insects, and it’s less prone to expansion or contraction than vinyl window trim molding. Its durability and wide range of finishes make it ideal for both new builds and retrofits where longevity and low upkeep are priorities.
2. How do I choose the right profile and finish for my aluminium window trim?
To select the right aluminium window trim, consider your window’s style, climate exposure, and desired look. Profiles such as L-trim, J-channel, and sill caps each serve specific functions for sealing and aesthetics. For finishes, powder coating and anodizing offer long-lasting color and protection, while mill finishes may require painting. If tight tolerances or custom profiles are needed, working with a precision supplier like Shaoyi Metal Parts Supplier ensures a perfect fit and premium finish.
3. What steps are involved in installing aluminium window trim for a watertight result?
Successful installation includes measuring and planning with cut lists, safely cutting and bending the trim, integrating flashing, and using appropriate fasteners for your wall type. Always pre-drill holes, seal all joints with compatible caulk, and follow manufacturer and local code guidelines. For capping windows with aluminum, integrating flashing above the head trim is crucial to prevent water intrusion.
4. How should aluminium window trim be finished and maintained for long-term durability?
Start with thorough cleaning and light abrasion before applying a compatible primer. Choose high-quality exterior paints or powder coatings for the topcoat, and allow proper curing time before exposing the trim to weather. Regularly inspect for paint failures or sealant gaps, and touch up as needed to keep the trim looking fresh and protected.
5. When should I consider working with a precision extrusion supplier for aluminium window trim?
If your project demands custom profiles, strict tolerances, or unique finishes—such as for modern window surrounds or matching existing architectural details—a precision extrusion supplier like Shaoyi is ideal. They provide expert design support, advanced QA, and a wide range of surface treatments to ensure your aluminium window trim meets both functional and aesthetic requirements.