 ผลิตจำนวนน้อย แต่มีมาตรฐานสูง บริการสร้างต้นแบบอย่างรวดเร็วของเรามาพร้อมกับการตรวจสอบที่เร็วขึ้นและง่ายขึ้น —

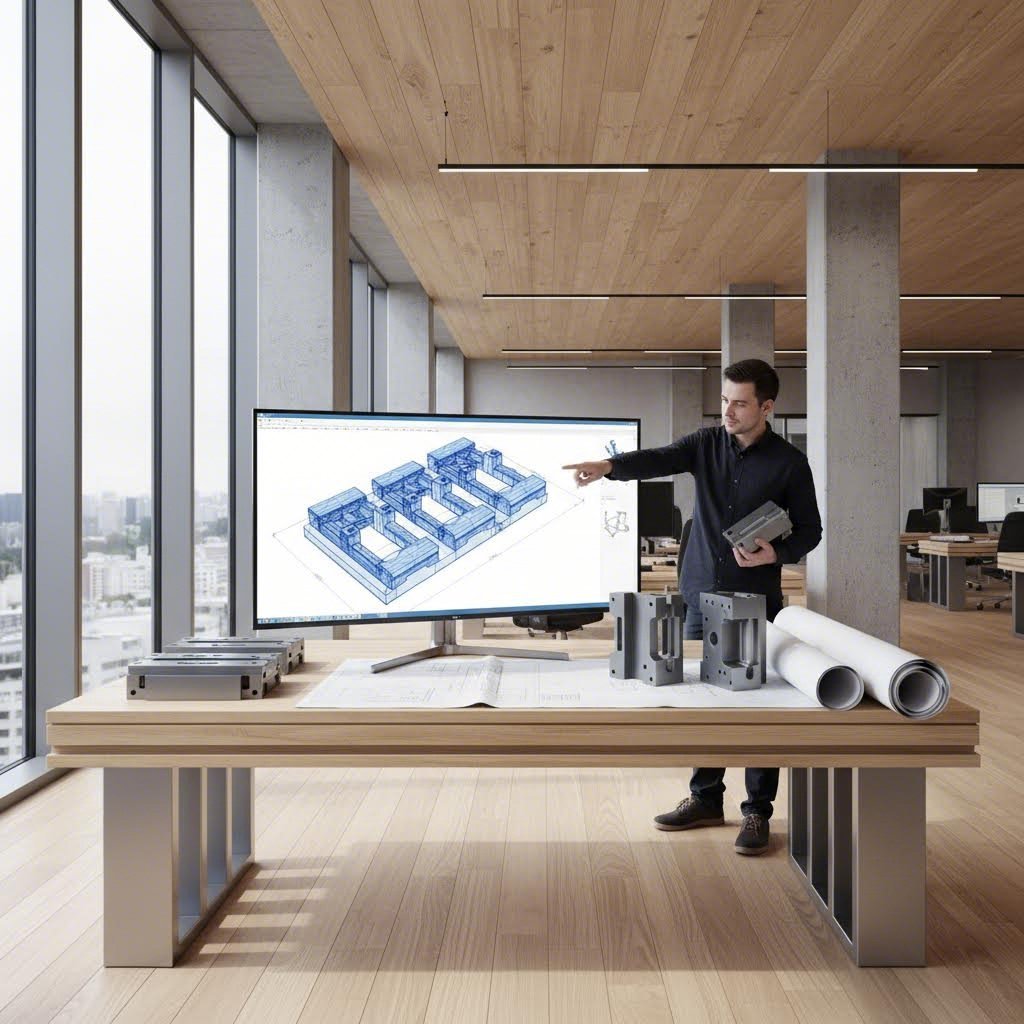
ชุดแม่พิมพ์ขึ้นรูปโลหะ: จับคู่ข้อกำหนดให้สอดคล้องกับการใช้งานของคุณอย่างรวดเร็ว
ความเข้าใจเกี่ยวกับชุดแม่พิมพ์ตีขึ้นรูปโลหะและบทบาทสำคัญของมัน
เคยสงสัยหรือไม่ว่าอะไรเป็นตัวรักษาการจัดแนวที่สมบูรณ์แบบระหว่างส่วนประกอบแม่พิมพ์ด้านบนและด้านล่างในระหว่างการตีขึ้นรูปด้วยความเร็วสูง? คำตอบอยู่ที่ชุดแม่พิมพ์ตีขึ้นรูปโลหะ — ซึ่งเป็นโครงสร้างพื้นฐานที่ทำให้การผลิตด้วยความแม่นยำเป็นไปได้ ไม่ว่าคุณจะเป็นผู้เริ่มต้นในด้านแม่พิมพ์เครื่องจักรหรือผู้ซื้อที่มีประสบการณ์กำลังประเมินการลงทุนครั้งต่อไปของคุณ การเข้าใจชุดประกอบที่สำคัญเหล่านี้ถือเป็นก้าวแรกสู่คุณภาพชิ้นส่วนที่ดีขึ้นและอายุการใช้งานของแม่พิมพ์ที่ยาวนานขึ้น
แล้วแม่พิมพ์คืออะไรในบริบทของการตีขึ้นรูปโลหะ? โดยหลักการแล้ว ชุดแม่พิมพ์คือแพลตฟอร์มที่ออกแบบและผลิตด้วยความแม่นยำสูง ซึ่งทำหน้าที่ยึดส่วนประกอบสำหรับการตัดและการขึ้นรูปให้อยู่ในตำแหน่งที่จัดแนวอย่างแม่นยำ ในขณะที่เครื่องกดใช้แรงมหาศาล ลองมองว่าชุดแม่พิมพ์เหล่านี้คือโครงสร้างหลักของกระบวนการตีขึ้นรูปทั้งหมดของคุณ — หากไม่มีการจัดแนวที่เหมาะสม แม้แต่หัวตอก (punches) และแผ่นรอง (buttons) ที่ดีที่สุดก็จะไม่สามารถให้ผลลัพธ์ที่สม่ำเสมอได้
องค์ประกอบของชุดแม่พิมพ์ตัด
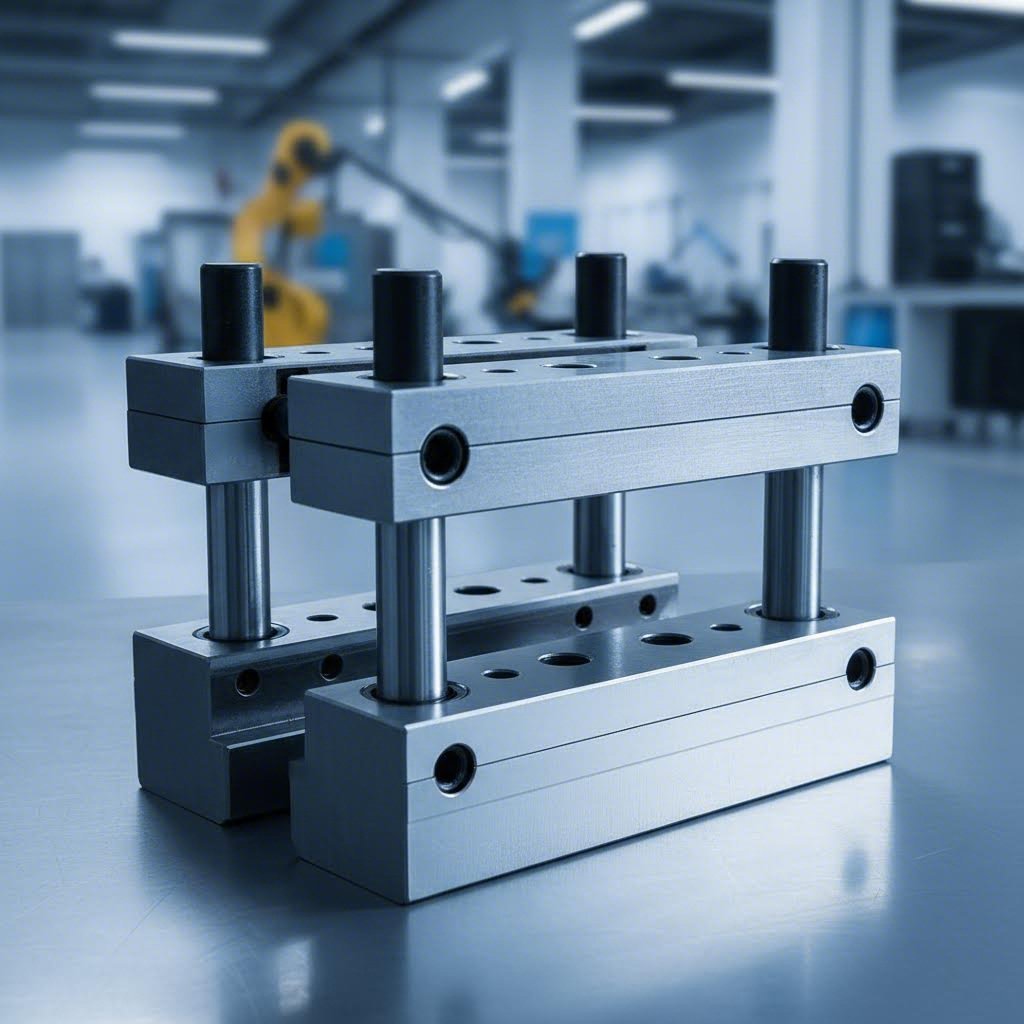
ชุดแม่พิมพ์ตัดแบบสมบูรณ์ประกอบด้วยส่วนประกอบหลายชิ้นที่ผสานทำงานร่วมกันอย่างกลมกลืน จุดเริ่มต้นคือฐานแม่พิมพ์ (die shoes) ซึ่งยังเรียกว่าแผ่นแม่พิมพ์ (die plates) ทำหน้าที่เป็นพื้นผิวสำหรับยึดติดด้านบนและด้านล่าง ซึ่งส่วนประกอบอื่นๆ ของแม่พิมพ์จะยึดติดไว้ทั้งหมด ตามมาตรฐานอุตสาหกรรม แผ่นแม่พิมพ์เหล่านี้มักผลิตจากเหล็กหรืออลูมิเนียม และต้องผ่านกระบวนการขัดหรือกลึงเพื่อรักษาความขนานและความเรียบของผิว
ฐานแม่พิมพ์ด้านบนยึดติดกับลูกสูบของเครื่องกด (press ram) ส่วนฐานแม่พิมพ์ด้านล่างยึดติดกับฐานเครื่องกด (press bed) ระหว่างสองฐานนี้ แท่งนำทาง (guide posts) และปลอกนำทาง (guide bushings) ทำหน้าที่เป็นระบบจัดแนวความแม่นยำ ซึ่งรับประกันการจัดตำแหน่งที่สามารถทำซ้ำได้ทุกครั้งที่เครื่องกดทำงาน เมื่อคุณติดตั้งส่วนประกอบของแม่พิมพ์สำหรับงานใหม่ ระบบจัดแนวชุดนี้จะกำหนดว่าชิ้นงานชิ้นแรกของคุณจะตรงกับชิ้นงานชิ้นที่หนึ่งหมื่นหรือไม่
ส่วนประกอบหลักที่ขับเคลื่อนความแม่นยำ
การเข้าใจบทบาทของแต่ละส่วนประกอบจะช่วยให้คุณประเมินชุดแม่พิมพ์ตัดได้อย่างมีประสิทธิภาพมากยิ่งขึ้น:
- ฐานแม่พิมพ์ (ส่วนบนและส่วนล่าง): แผ่นเหล็กหรืออลูมิเนียมที่ใช้เป็นพื้นผิวสำหรับยึดติดแม่พิมพ์ ปุ่ม และอุปกรณ์เครื่องมืออื่นๆ ความดันที่คาดว่าจะใช้ในการตัดและขึ้นรูปจะเป็นตัวกำหนดความหนาที่จำเป็นของฐานแม่พิมพ์
- แท่งนำทาง: หมุดเหล็กที่ผ่านกระบวนการชุบแข็ง ซึ่งทำหน้าที่รักษาการจัดแนวระหว่างฐานแม่พิมพ์ส่วนบนและส่วนล่าง หมุดชนิดนี้มีให้เลือกทั้งแบบแรงเสียดทานและแบบลูกกลิ้ง (ball-bearing) โดยหมุดแบบลูกกลิ้งได้รับการยอมรับเป็นมาตรฐานอุตสาหกรรมแล้ว เนื่องจากสามารถแยกชิ้นส่วนออกจากกันได้ง่ายและทำงานได้อย่างราบรื่น
- ปลอกตัวนำทาง (Guide bushings): ปลอกที่ผ่านการกลึงอย่างแม่นยำ มักผลิตจากโลหะผสมอะลูมิเนียม-บรอนซ์ ซึ่งใช้รับตำแหน่งแท่งนำทาง (guide posts) ชิ้นส่วนเหล่านี้ผลิตขึ้นภายใต้ความคลาดเคลื่อนที่ควบคุมอยู่ภายใน .0001 นิ้ว เพื่อให้มั่นใจในความแม่นยำของการจัดวางตำแหน่ง
- บล็อกส้นเท้าและแผ่นทนการสึกหรอ: ชิ้นส่วนที่ทำจากเหล็ก ซึ่งติดตั้งอยู่ทั้งบนฐานแม่พิมพ์ส่วนบนและส่วนล่าง เพื่อรับแรงดันด้านข้างระหว่างการปฏิบัติงาน ป้องกันไม่ให้หมุดนำทางโค้งงอหรือเกิดการจัดแนวผิดพลาด
เหตุใดคุณภาพของชุดแม่พิมพ์จึงมีผลโดยตรงต่อความแม่นยำของชิ้นงาน
นี่คือจุดที่ความแตกต่างระหว่างชุดแม่พิมพ์ที่เพียงพอและชุดแม่พิมพ์ที่โดดเด่นเป็นพิเศษจะชัดเจนขึ้น ทุกครั้งที่ลูกสูบแม่พิมพ์สัมผัสกับวัสดุของคุณ ระบบจัดตำแหน่งจะต้องจัดวางองค์ประกอบให้อยู่ในความคลาดเคลื่อนไม่เกินเศษหนึ่งพันของนิ้ว ชุดแม่พิมพ์คุณภาพต่ำจะก่อให้เกิดปัจจัยแปรผันซึ่งสะสมมากขึ้นในแต่ละรอบการกด—การจัดตำแหน่งที่คลาดเคลื่อนเพียงเล็กน้อยอาจนำไปสู่การเกิดขอบคม (burr) การเบี่ยงเบนของขนาด และการสึกหรอของหัวเจาะก่อนกำหนด
ความสัมพันธ์ระหว่างความแม่นยำของชุดแม่พิมพ์กับคุณภาพของชิ้นส่วนสำเร็จรูปนั้นมีโดยตรงและวัดค่าได้ สถานการณ์การผลิตในปริมาณสูงต้องการชุดแม่พิมพ์ที่สามารถรักษาความสม่ำเสมอของการจัดตำแหน่งได้ตลอดหลายล้านรอบการใช้งาน เมื่อความคลาดเคลื่อนเริ่มหลุดจากเกณฑ์ คุณจะสังเกตเห็นผลกระทบนี้ก่อนเป็นอันดับแรกที่ชิ้นส่วนที่ถูกขึ้นรูป: ตำแหน่งรูที่ไม่สม่ำเสมอ ขอบที่ไม่เท่ากัน และอัตราการคัดทิ้งที่เพิ่มขึ้น
การเลือกชุดแม่พิมพ์ที่เหมาะสมไม่ใช่เพียงแค่การซื้อสินค้าคุณภาพดีเท่านั้น แต่ยังเกี่ยวข้องกับการจับคู่ข้อกำหนดทางเทคนิคให้สอดคล้องกับการใช้งานเฉพาะของคุณอีกด้วย แรงกด (ตัน) ที่เครื่องกดของคุณสามารถสร้างได้ ความซับซ้อนของการดำเนินงาน และปริมาณการผลิตที่ต้องการ ล้วนมีผลต่อการเลือกโครงสร้างชุดแม่พิมพ์ที่จะให้ผลลัพธ์ที่ดีที่สุด ในหัวข้อถัดไป คุณจะได้เรียนรู้วิธีจับคู่ข้อกำหนดเหล่านี้กับความต้องการในการขึ้นรูปชิ้นงานของคุณอย่างแม่นยำ
คู่มือการเลือกประเภทและโครงสร้างของชุดแม่พิมพ์
คุณเคยเห็นชื่อโครงสร้างต่าง ๆ เหล่านี้ในแคตตาล็อก—เช่น แบบสองเสากลาง แบบสี่เสากลาง แบบแนวทแยง และแบบเสากลับ—แต่แต่ละโครงสร้างนี้หมายความว่าอย่างไรต่อการดำเนินงานการขึ้นรูปชิ้นงานของคุณ? การเลือกโครงสร้างเครื่องกดแม่พิมพ์ที่เหมาะสมไม่ใช่เพียงแค่การพิจารณาจากพื้นที่ที่มีอยู่เท่านั้น แต่ยังส่งผลโดยตรงต่อวิธีที่ผู้ปฏิบัติงานจัดการกับแม่พิมพ์ ความแม่นยำของชิ้นงานที่ได้ และอายุการใช้งานของแม่พิมพ์ภายใต้สภาวะการผลิตจริง
มาพิจารณาแต่ละโครงสร้างอย่างละเอียด เพื่อให้คุณสามารถเลือกการออกแบบที่ตรงกับความต้องการของคุณได้อย่างถูกต้องตั้งแต่ครั้งแรก
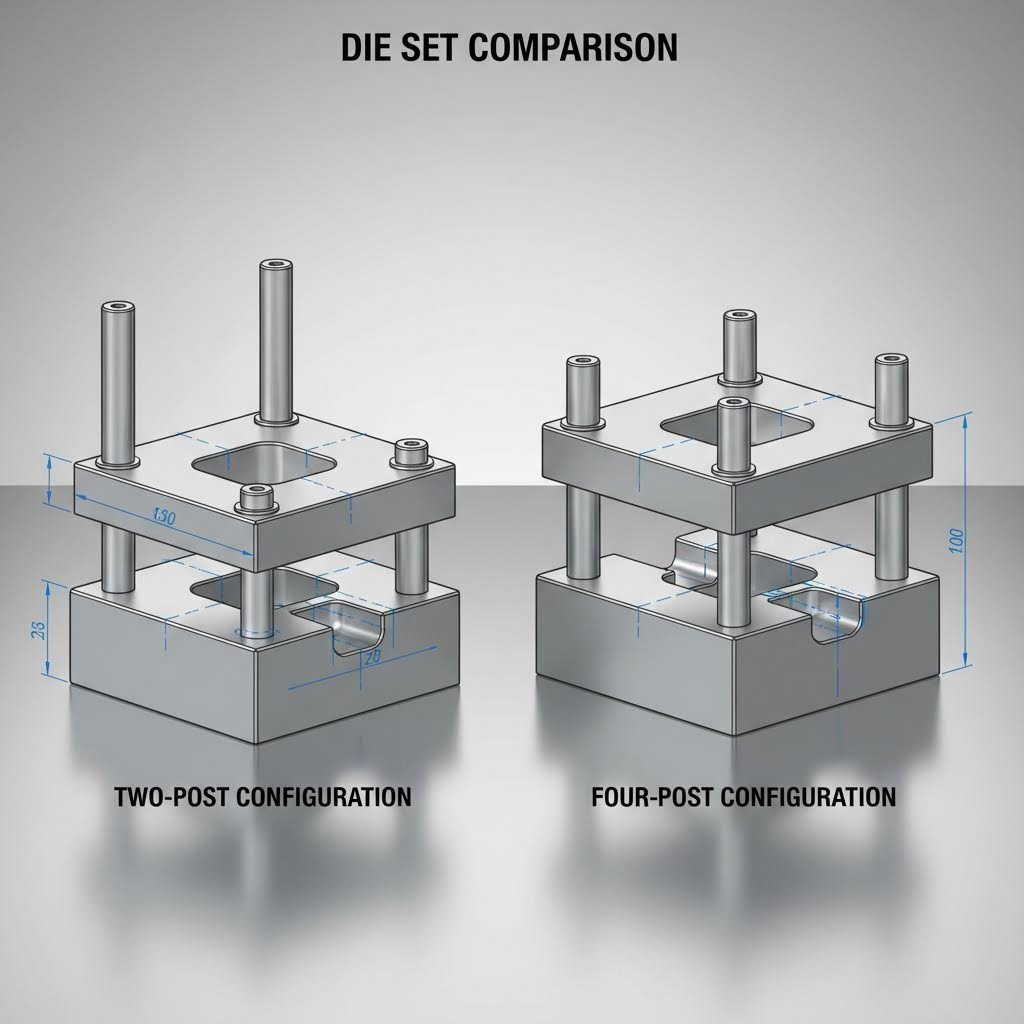
การอธิบายความแตกต่างระหว่างโครงสร้างแบบสองเสาและสี่เสา
ความแตกต่างพื้นฐานอยู่ที่จำนวนของเสาชี้แนวที่ใช้รองรับการจัดตำแหน่งระหว่างแผ่นแม่พิมพ์ส่วนบนกับส่วนล่าง — และตำแหน่งที่เสาเหล่านั้นตั้งอยู่
ชุดแม่พิมพ์แบบสองเสา ใช้เสาชี้แนวจำนวนสองต้น โดยทั่วไปจะติดตั้งไว้บริเวณด้านหลังของชุดเครื่องมือแม่พิมพ์ การจัดวางเช่นนี้ทำให้ด้านหน้าและด้านข้างเปิดโล่งอย่างสมบูรณ์ จึงเหมาะอย่างยิ่งสำหรับงานที่ผู้ปฏิบัติงานจำเป็นต้องเข้าถึงได้อย่างชัดเจน เพื่อป้อนวัสดุ นำชิ้นส่วนออก หรือตรวจสอบกระบวนการขึ้นรูปด้วยแรงกด โครงสร้างแบบเสาด้านหลังเป็นรูปแบบสองเสาที่พบได้บ่อยที่สุด โดยมีเสาทั้งสองต้นติดตั้งอยู่ตามขอบด้านหลังของแผ่นแม่พิมพ์
การจัดวางแบบเสาแนวทแยงจะติดตั้งเสาทั้งสองต้นไว้ที่มุมตรงข้ามกัน — โดยทั่วไปคือมุมหน้าซ้ายกับมุมหลังขวา หรือมุมหน้าขวากับมุมหลังซ้าย โครงสร้างนี้รองรับความต้องการในการป้อนวัสดุในแนวเฉียง ซึ่งวัสดุจะเข้าสู่แม่พิมพ์ในมุมเอียงแทนที่จะเข้าแบบตรง ๆ คุณจะพบการจัดวางแบบทแยงนี้ใน แม่พิมพ์เครื่องเจาะพิเศษ ออกแบบมาสำหรับการป้อนแผ่นโลหะแบบเป็นแถบในแนวที่ไม่ใช่มาตรฐาน
ชุดแม่พิมพ์สี่เสา จัดวางตัวนำทาง (guide post) ไว้ที่แต่ละมุมของฐานแม่พิมพ์ (die shoes) การออกแบบนี้ให้ความแข็งแกร่งสูงสุดและความเสถียรในการจัดตำแหน่ง เนื่องจากฐานแม่พิมพ์ด้านบนได้รับการรองรับที่จุดสี่จุด แทนที่จะเป็นเพียงสองจุด เมื่อความแม่นยำเป็นสิ่งที่ไม่อาจยอมลดหย่อนได้—เช่น แม่พิมพ์แบบก้าวหน้า (progressive dies) ที่ทำงานภายใต้ค่าความคลาดเคลื่อนที่แคบมากและด้วยความเร็วสูง—การจัดวางแบบสี่เสาจึงเป็นตัวเลือกมาตรฐาน
ภายในการออกแบบแบบสี่เสา ท่านจะพบกับสองรูปแบบหลัก ดังนี้
- แบบศูนย์กลาง: เสาจะถูกจัดวางเข้าไปด้านในจากมุมทั้งสี่ มีพื้นที่ว่างรอบขอบเขตของแม่พิมพ์มากขึ้น เพื่อการยึดจับและการจัดการวัสดุ
- แบบด้านหลัง: เสาทั้งสี่ต้นถูกย้ายไปอยู่ทางด้านหลังของชุดแม่พิมพ์ทั้งหมด ซึ่งช่วยให้สามารถเข้าถึงด้านหน้าได้ดีขึ้น ขณะยังคงรักษาการรองรับแบบสี่จุดไว้
การเลือกออกแบบชุดแม่พิมพ์ให้สอดคล้องกับกระบวนการตีขึ้นรูป (stamping) ของท่าน
แล้วคุณจะตัดสินใจอย่างไรเพื่อเลือกการจัดวางที่เหมาะสมกับความต้องการของคุณ? พิจารณาปัจจัยสำคัญสามประการ ได้แก่ ประเภทของการดำเนินงานที่คุณใช้งาน ข้อกำหนดด้านความแม่นยำ และวิธีที่ผู้ปฏิบัติงานจะมีปฏิสัมพันธ์กับแม่พิมพ์ในระหว่างการผลิต
สำหรับ การตัดแผ่นโลหะ (Blanking) และการเจาะรู (Piercing) สำหรับการใช้งานที่ต้องการให้ผู้ปฏิบัติงานเข้าถึงบ่อยครั้ง การจัดวางแบบสองเสา (two-post) หรือแบบเสาหลัง (back-post) มักเป็นทางเลือกที่เหมาะสม เนื่องจากผู้ปฏิบัติงานสามารถโหลดวัสดุและนำชิ้นส่วนออกได้โดยไม่จำเป็นต้องเอื้อมรอบเสาชี้แนว อย่างไรก็ตาม หากคุณใช้ชุดแม่พิมพ์สำหรับเครื่องกดไฮดรอลิกในการตัดวัสดุหนัก (heavy-tonnage blanking) ซึ่งความแข็งแกร่งของโครงสร้างมีความสำคัญมากกว่าการเข้าถึงได้ง่าย การออกแบบแบบสี่เสา (four-post) จะช่วยป้องกันการโก่งตัวของโครงสร้าง ซึ่งเป็นสาเหตุของรอยคมเกิน (burrs) และการตัดที่ไม่สม่ำเสมอ
แม่พิมพ์แบบก้าวหน้า การดำเนินงานแบบหลายสถานี (progressive die operations) มักต้องการชุดแม่พิมพ์สำหรับเครื่องกดแบบสี่เสาเป็นหลัก เครื่องมือแม่พิมพ์ที่ซับซ้อนเหล่านี้ทำงานผ่านหลายสถานีแบบลำดับขั้นตอน และความคลาดเคลื่อนใดๆ จะยิ่งสะสมเพิ่มขึ้นเมื่อแถบวัสดุเคลื่อนผ่านแต่ละสถานี ความแข็งแกร่งเพิ่มเติมที่ได้จากการออกแบบแบบสี่เสาช่วยรักษาการจัดแนวของแต่ละสถานีให้ตรงกับแม่พิมพ์หลัก (master) ทำให้รักษารูปทรงและความสอดคล้องของชิ้นงานได้อย่างต่อเนื่อง ตั้งแต่การตีครั้งแรกจนถึงการตีครั้งสุดท้าย
สำหรับ การขึ้นรูปและการดึงขึ้นรูป พิจารณาพฤติกรรมของวัสดุภายใต้แรงกดดัน กระบวนการดึง (Drawing operations) ก่อให้เกิดแรงข้าง (side loads) อย่างมีนัยสำคัญ ซึ่งอาจทำให้โครงสร้างแบบสองเสา (two-post arrangements) เกิดความเครียด ขณะที่การจัดวางแบบสี่เสา (four-post configurations) สามารถกระจายแรงเหล่านี้ได้อย่างสม่ำเสมอมากขึ้น ลดการสึกหรอของบูชไกด์ (guide bushings) และยืดอายุการใช้งานของแม่พิมพ์
กรอบการตัดสินใจในการเลือกการจัดวางโครงสร้าง
เมื่อประเมินเครื่องมือแม่พิมพ์สำหรับการใช้งานเฉพาะของคุณ ให้ใช้การเปรียบเทียบต่อไปนี้เพื่อช่วยในการตัดสินใจ
| การตั้งค่า | ระดับความแข็งแกร่ง | การเข้าถึง | การใช้งานทั่วไป | ระดับความแม่นยำ |
|---|---|---|---|---|
| แบบสองเสาด้านหลัง | ปานกลาง | ยอดเยี่ยม (เปิดด้านหน้าและด้านข้าง) | การตัดวัสดุเปล่า (simple blanking), การเจาะรู (piercing), และการป้อนวัสดุด้วยมือ | มาตรฐานถึงปานกลาง |
| แบบสองเสาแนวทแยง | ปานกลาง | ดี (เปิดที่มุมสองมุม) | การป้อนแผ่นมุม พร้อมการขึ้นรูปเฉพาะทาง | มาตรฐานถึงปานกลาง |
| แท่นยกสี่ต้น | แรงสูง | ระดับปานกลาง (สามารถเข้าถึงบริเวณขอบได้) | แม่พิมพ์แบบก้าวหน้า แม่พิมพ์ตัดความแม่นยำสูง การทำงานความเร็วสูง | ความแม่นยำสูง |
| โครงหลังแบบสี่เสา | แรงสูง | ดี (ยังคงสามารถเข้าถึงด้านหน้าได้) | การขึ้นรูปที่ใช้แรงกดสูง การดึงขึ้นรูป (drawing operations) | ความแม่นยำสูง |
นอกเหนือจากโครงสร้างมาตรฐานเหล่านี้ ยังมีแม่พิมพ์สำหรับเครื่องกดชนิดพิเศษที่ออกแบบมาเพื่อการใช้งานเฉพาะทาง ผู้ผลิตบางรายเสนอการออกแบบแบบสามเสากลางเพื่อตอบสนองข้อจำกัดด้านพื้นที่เฉพาะ ในขณะที่ผู้ผลิตรายอื่นให้ตำแหน่งของเสากลางที่ปรับเปลี่ยนได้เพื่อความยืดหยุ่นสูงสุด เมื่อตัวเลือกมาตรฐานจากรายการสินค้าไม่สอดคล้องกับความต้องการของคุณ การออกแบบแบบพิเศษจึงจำเป็น
โปรดทราบว่าการเลือกโครงสร้างยังส่งผลต่อการป้องกันแม่พิมพ์ด้วย โครงสร้างแบบสี่เสานั้นสามารถต้านทานแรงบิดที่เกิดขึ้นเมื่อหัวเจาะกระทบชิ้นงานไม่ตรงศูนย์ หรือเมื่อความหนาของวัสดุไม่สม่ำเสมอได้ดีกว่า หากคุณกำลังขึ้นรูปวัสดุที่มีความหนาไม่สม่ำเสมอ จุดรองรับเพิ่มเติมจะช่วยลดแรงเครียดที่กระทำต่อแต่ละเสากลางและปลอกนำทาง (bushings)
เมื่อคุณเลือกการจัดวางโครงสร้างที่เหมาะสมแล้ว การตัดสินใจที่สำคัญขั้นต่อไปคือการเลือกวัสดุสำหรับชิ้นส่วนของชุดแม่พิมพ์ (die set) — ซึ่งการเลือกนี้จะกำหนดน้ำหนัก พฤติกรรมทางความร้อน ความต้านทานการสึกหรอ และในที่สุด ระยะเวลาที่ชุดแม่พิมพ์ของคุณสามารถให้ผลลัพธ์ที่แม่นยำภายใต้สภาวะการผลิตจริง
การเลือกวัสดุและความต้องการด้านความแม่นยำ
คุณได้เลือกการจัดวางโครงสร้างที่เหมาะสมแล้ว — ตอนนี้มาถึงการตัดสินใจที่กำหนดว่าชุดแม่พิมพ์ของคุณจะทำงานได้ดีเพียงใดตลอดหลายล้านรอบการใช้งาน วัสดุพื้นฐานที่ใช้ในการผลิตรองเท้าแม่พิมพ์ (die shoes) แท่งนำแนว (guide posts) และบูชชิ่ง (bushings) ส่งผลโดยตรงต่อทุกด้าน ตั้งแต่ความเสถียรทางความร้อนระหว่างการทำงานด้วยความเร็วสูง ไปจนถึงความต้านทานการสึกหรอภายใต้แรงกดสูง อย่างไรก็ตาม แคตาล็อกผลิตภัณฑ์ส่วนใหญ่กลับละเลยรายละเอียดสำคัญนี้โดยสิ้นเชิง
การเข้าใจเหตุผลที่ผู้ผลิตเลือกวัสดุเฉพาะสำหรับชิ้นส่วนแม่พิมพ์โลหะ จะช่วยให้คุณประเมินความแตกต่างด้านคุณภาพที่ไม่ปรากฏให้เห็นได้ทันทีด้วยตาเปล่า มาพิจารณาด้วยกันว่าการเลือกวัสดุมีอิทธิพลต่อผลลัพธ์การผลิตอย่างไร
รองเท้าแม่พิมพ์แบบเหล็ก แทนที่จะเป็นแบบเหล็กหล่อ
การถกเถียงเกี่ยวกับวัสดุที่ใช้ทำฐานแม่พิมพ์มักลดทอนลงเหลือเพียงทางเลือกระหว่างเหล็กกับเหล็กหล่อ — และทางเลือกที่เหมาะสมนั้นขึ้นอยู่กับความต้องการเฉพาะของงานที่คุณดำเนินการอย่างสมบูรณ์
ฐานแม่พิมพ์ทำจากเหล็ก ให้ค่าอัตราส่วนความแข็งแรงต่อน้ำหนักที่เหนือกว่า และสามารถกลึงได้ดีเยี่ยม ตามที่ระบุไว้ใน คู่มือ ASM ว่าด้วยการขึ้นรูปแผ่นโลหะ โลหะผสมเหล็กเครื่องมือยังคงเป็นวัสดุที่นิยมใช้มากที่สุดสำหรับแม่พิมพ์ตีขึ้นรูปที่ต้องการความต้านทานการสึกหรอสูงและสามารถรองรับแรงขึ้นรูปมหาศาลได้ ฐานแม่พิมพ์ที่ทำจากเหล็กสามารถผ่านกระบวนการอบความร้อนเพื่อให้ได้ระดับความแข็งที่เฉพาะเจาะจง ซึ่งทำให้สามารถปรับใช้ได้กับความต้องการในการผลิตที่หลากหลาย
ฐานแม่พิมพ์ทำจากเหล็กหล่อ โดดเด่นในงานที่ต้องการคุณสมบัติในการลดการสั่นสะเทือน โครงสร้างกราไฟต์ภายในเหล็กหล่อสามารถดูดซับแรงกระแทกได้ดีกว่าเหล็ก จึงช่วยลดเสียงรบกวนและยืดอายุการใช้งานของชิ้นส่วนในสภาพแวดล้อมที่มีรอบการทำงานสูง อย่างไรก็ตาม เหล็กหล่อมีความเปราะและมีน้ำหนักมากกว่าทางเลือกที่ทำจากเหล็ก
นี่คือจุดที่การเลือกวัสดุสำหรับแม่พิมพ์ขึ้นรูปโลหะเริ่มมีความน่าสนใจ: ฐานแม่พิมพ์อะลูมิเนียมได้รับความนิยมเพิ่มขึ้นอย่างมากในแอปพลิเคชันเฉพาะ โดยน้ำหนักของฐานแม่พิมพ์อะลูมิเนียมมีเพียงประมาณหนึ่งในสามของฐานแม่พิมพ์เหล็กที่เทียบเท่ากัน ซึ่งช่วยลดการสึกหรอของเครื่องกด และทำให้การจัดการแม่พิมพ์ปลอดภัยยิ่งขึ้นสำหรับผู้ปฏิบัติงาน ข้อแลกเปลี่ยนคืออะลูมิเนียมสึกหรอเร็วกว่าและจำเป็นต้องเปลี่ยนบ่อยขึ้นในกระบวนการผลิตปริมาณสูง
ผลกระทบของการเลือกวัสดุต่อคุณภาพการผลิต
แต่ละส่วนประกอบของแม่พิมพ์ดัดขึ้นรูป (stamping dies) มีปฏิสัมพันธ์กับวัสดุ ระบบเครื่องกด และสภาพแวดล้อมของคุณ การเลือกวัสดุมีผลต่อปัจจัยประสิทธิภาพที่สำคัญเหล่านี้:
- เหล็กกล้าสำหรับเครื่องมือ (D2, A2, S7): มีความต้านทานการสึกหรอและความแข็งสูงสุดหลังผ่านกระบวนการอบความร้อน เหมาะอย่างยิ่งสำหรับแม่พิมพ์ความแม่นยำที่ใช้งานได้หลายล้านรอบ ใช้ได้ดีที่สุดในการตัดวัสดุที่ผ่านการชุบแข็ง (blanking hardened materials) และการขึ้นรูปแบบนูน (emboss stamping) ที่ต้องการรักษาความคมชัดของรายละเอียดอย่างแม่นยำ
- เหล็กหล่อ (Meehanite, Ductile Iron): การดูดซับแรงสั่นสะเทือนได้ดีเยี่ยมและมีความเสถียรของมิติสูง คุ้มค่าต้นทุนสำหรับแม่พิมพ์ขนาดใหญ่ เหมาะอย่างยิ่งสำหรับงานขึ้นรูปหนักที่ต้องการการดูดซับแรงกระแทกมากกว่าความแม่นยำสูงสุด
- โลหะผสมอลูมิเนียม (6061-T6, 7075): น้ำหนักเบาและมีความสามารถในการนำความร้อนได้ดี ช่วยลดความเสี่ยงจากการบาดเจ็บขณะจัดการและลดการสึกหรอของเครื่องกด จึงเหมาะที่สุดสำหรับการผลิตต้นแบบ การผลิตในปริมาณน้อย และงานที่น้ำหนักของแม่พิมพ์เป็นปัจจัยจำกัด
- โลหะผสมเหล็กกล้า (4140, 4340): ให้สมดุลที่ดีระหว่างความเหนียวและความสามารถในการกลึง สามารถผ่านกระบวนการอบความร้อนเพื่อปรับระดับความแข็งได้หลายระดับ เหมาะสำหรับแม่พิมพ์เหล็กทั่วไปที่ใช้งานในปริมาณการผลิตปานกลาง
ความเสถียรทางความร้อนควรได้รับการใส่ใจเป็นพิเศษ ระหว่างการผลิตต่อเนื่องเป็นเวลานาน แรงเสียดทานจะก่อให้เกิดความร้อน ซึ่งทำให้วัสดุแต่ละชนิดขยายตัวในอัตราที่ต่างกัน แม่พิมพ์เหล็กสามารถรักษาระดับความคลาดเคลื่อน (tolerance) ได้แน่นหนากว่าแม่พิมพ์อลูมิเนียมภายใต้ความเครียดจากความร้อน เนื่องจากอลูมิเนียมมีอัตราการขยายตัวประมาณสองเท่าของเหล็กต่อหนึ่งองศาเซลเซียสที่เพิ่มขึ้น สำหรับการดำเนินงานความเร็วสูงที่ แม่พิมพ์ความแม่นยำต้องคงตำแหน่งไว้ได้อย่างมั่นคง ผ่านการตีขึ้นรูปหลายพันครั้งต่อชั่วโมง พฤติกรรมทางความร้อนมักเป็นตัวกำหนดการเลือกวัสดุ
ข้อกำหนดด้านความคลาดเคลื่อนสำหรับการขึ้นรูปแบบความแม่นยำสูง
ตอนนี้ลองจินตนาการว่าคุณได้เลือกวัสดุที่เหมาะสมที่สุดแล้ว — แต่พื้นผิวของฐานแม่พิมพ์ (die shoe) จำเป็นต้องถูกกลึงด้วยความแม่นยำระดับใด? คำตอบอยู่ที่การเข้าใจว่าความคลาดเคลื่อนส่งผลต่อชิ้นส่วนสำเร็จรูปของคุณอย่างไร
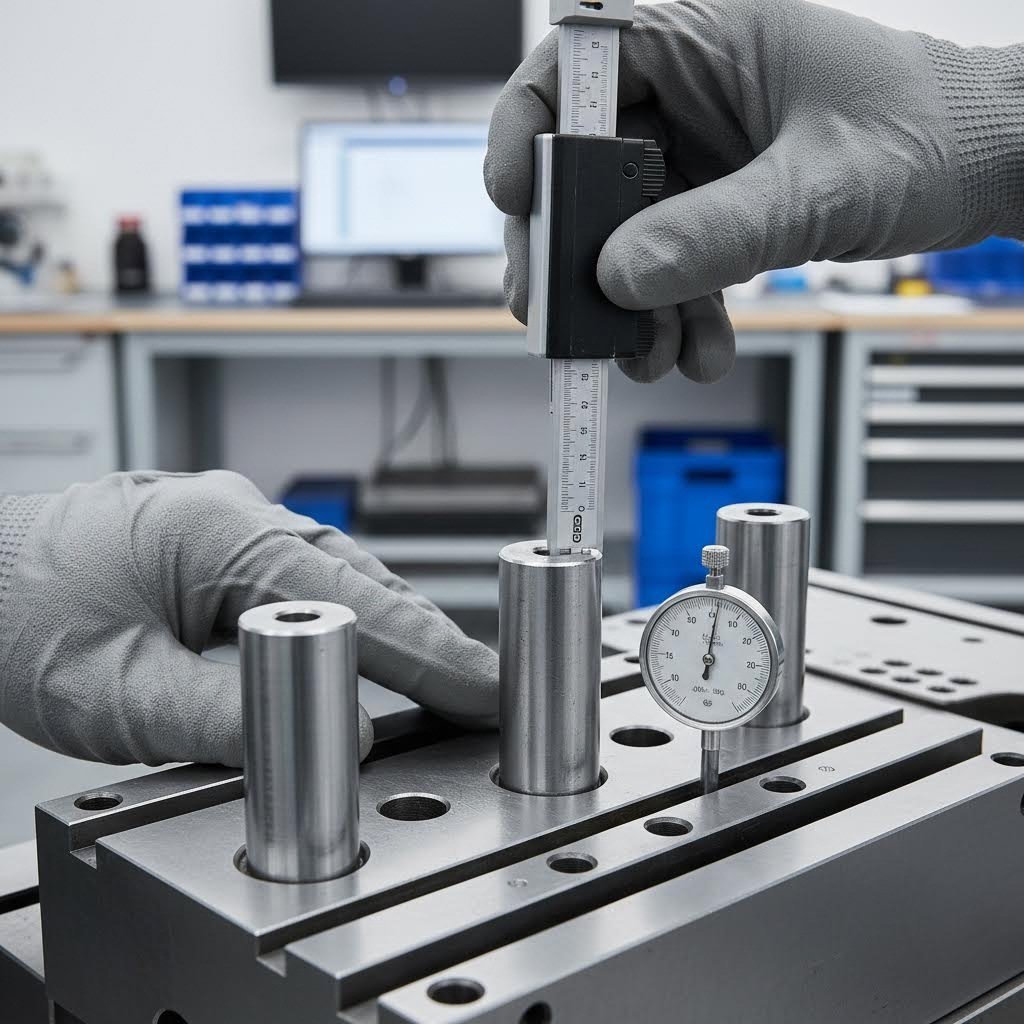
ความแม่นยำของชุดแม่พิมพ์วัดเป็นหน่วยพันส่วนของนิ้ว (thousandths of an inch) และความคลาดเคลื่อนเชิงมิติมาตรฐานสำหรับการขึ้นรูปแบบความแม่นยำสูงสามารถควบคุมให้อยู่ในช่วง ±0.002 นิ้ว แม้ในงานที่มีความต้องการสูงมากก็ตาม อย่างไรก็ตาม การบรรลุผลลัพธ์เหล่านี้จำเป็นต้องใช้ชิ้นส่วนของชุดแม่พิมพ์ที่ผลิตด้วยข้อกำหนดที่เข้มงวดยิ่งกว่านั้นอีก ตัวอย่างเช่น การเข้ากันระหว่างเสาชี้แนว (guide post) กับบุชชิ่ง (bushing) มักต้องควบคุมความคลาดเคลื่อนภายใน 0.0001 นิ้ว เพื่อให้มั่นใจในการจัดตำแหน่งซ้ำได้อย่างแม่นยำ
ข้อกำหนดด้านคุณภาพพื้นผิว (surface finish) แตกต่างกันไปตามหน้าที่ของแต่ละชิ้นส่วน:
- พื้นผิวติดตั้งฐานแม่พิมพ์ (die shoe mounting surfaces): ขัดให้เรียบ (ground flat) ให้มีความคลาดเคลื่อนไม่เกิน 0.0005 นิ้ว ทั่วทั้งพื้นผิว เพื่อให้แน่ใจว่าสามารถติดตั้งเข้ากับฐานเครื่องกด (press beds) และลูกสูบ (rams) ได้อย่างเหมาะสม
- พื้นผิวสัมผัสของเสาชี้แนว (guide post running surfaces): ขัดเงาเพื่อลดแรงเสียดทานและป้องกันการเกิดรอยขีดข่วน (galling) เมื่อสัมผัสกับบุชชิ่ง
- รูเจาะสำหรับบุชชิ่ง (bushing bores): ขัดผิวให้มีเส้นผ่านศูนย์กลางที่แม่นยำและมีความเรียบของผิวต่ำกว่า 16 ไมโครนิ้ว เพื่อให้การปฏิบัติงานเป็นไปอย่างราบรื่น
การพิจารณาเรื่องการรักษาความร้อนสัมพันธ์โดยตรงกับปริมาณการผลิตที่คาดการณ์ไว้ สำหรับการผลิตที่เกินหนึ่งล้านรอบ แม่พิมพ์ความแม่นยำควรใช้ส่วนประกอบเหล็กเครื่องมือที่ผ่านการชุบแข็งแล้ว โดยมีค่าความแข็งตามมาตรา Rockwell อยู่ระหว่าง 58–62 HRC ส่วนการใช้งานที่มีปริมาณต่ำกว่านั้นสามารถใช้วัสดุที่นุ่มกว่าซึ่งมีต้นทุนต่ำกว่า แต่สึกหรอเร็วกว่า
ความสัมพันธ์ระหว่างความแข็งของวัสดุกับอายุการใช้งานที่คาดการณ์ไว้ไม่เป็นเชิงเส้น วัสดุที่แข็งกว่าจะต้านทานการสึกหรอได้ดีกว่า แต่ก็จะเปราะบางมากขึ้นและยากต่อการกลึงมากขึ้น รวมทั้งมีต้นทุนสูงขึ้นด้วย การหาจุดสมดุลที่เหมาะสมจำเป็นต้องเข้าใจความต้องการเฉพาะของชิ้นส่วนที่คุณผลิต แรงกดของเครื่องปั๊ม (press tonnage) และปริมาณการผลิตเป้าหมาย — ซึ่งปัจจัยเหล่านี้ยังกำหนดด้วยว่าคุณจะจับคู่ข้อกำหนดของชุดแม่พิมพ์ (die set specifications) กับกระบวนการปั๊ม (stamping operations) ของคุณอย่างไร
การจับคู่ข้อกำหนดของชุดแม่พิมพ์ตามการใช้งาน
คุณรู้ดีว่าการตั้งค่าของคุณเป็นอย่างไร คุณได้เลือกวัสดุที่ใช้แล้ว ตอนนี้มาถึงคำถามที่แท้จริงซึ่งจะกำหนดความสำเร็จหรือความล้มเหลว: ชุดแม่พิมพ์ของคุณสอดคล้องกับสิ่งที่คุณต้องการบรรลุหรือไม่? ไม่ว่าคุณจะใช้แม่พิมพ์ตัด (blanking die) สำหรับการผลิตจำนวนมาก หรือใช้แม่พิมพ์ขึ้นรูป (forming die) สำหรับชิ้นงานที่มีรูปทรงซับซ้อน ข้อกำหนดทางเทคนิคของแม่พิมพ์ต้องสอดคล้องกับกระบวนการเฉพาะของคุณ — ไม่ใช่เพียงแค่ให้พอดีกับเครื่องกดเท่านั้น
เรามาดูไปพร้อมกันว่าจะจับคู่ข้อกำหนดของชุดแม่พิมพ์กับการขึ้นรูปโลหะ (stamping) ทั้งสี่แบบที่พบบ่อยที่สุดอย่างไร จากนั้นจึงพิจารณาการคำนวณที่รับประกันว่าทุกองค์ประกอบจะทำงานร่วมกันได้อย่างราบรื่น
ชุดแม่พิมพ์สำหรับการตัด (Blanking) และการเจาะรู (Piercing)
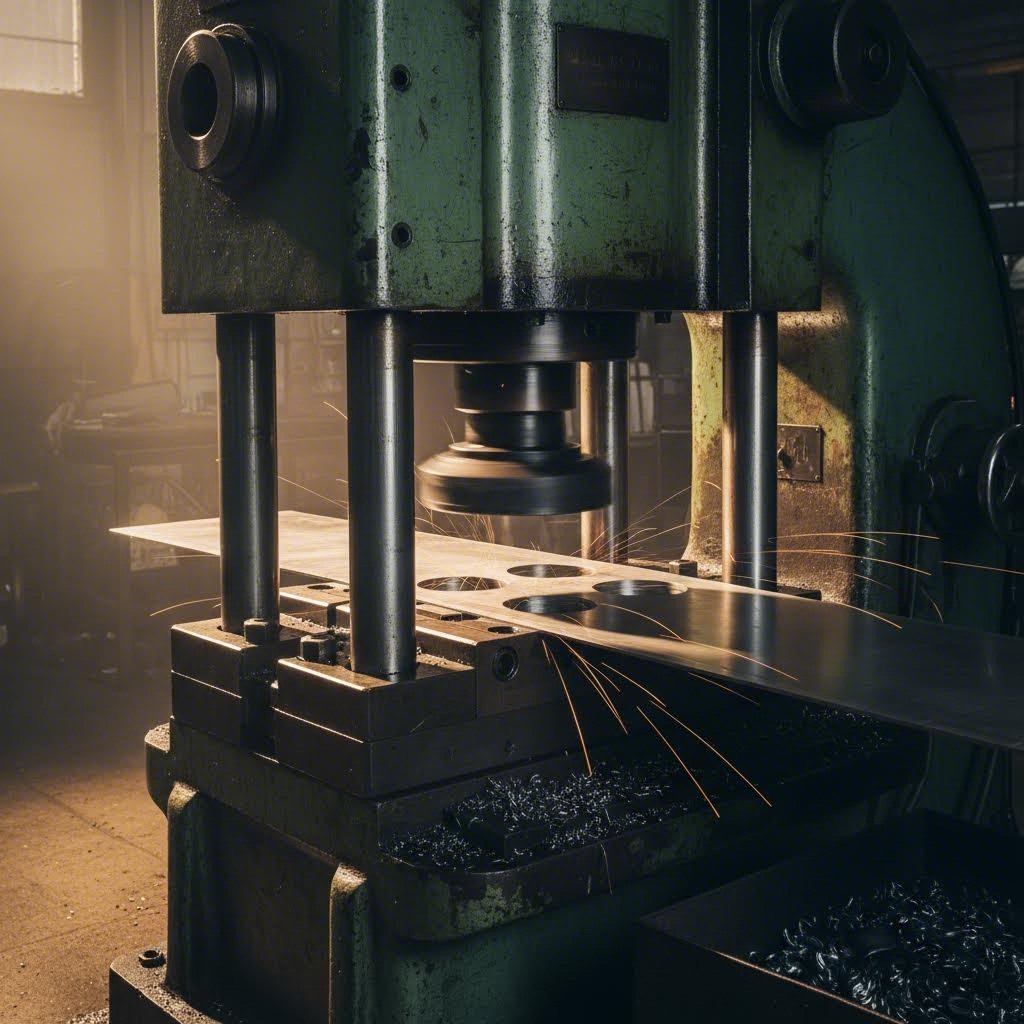
การตัด (blanking) และการเจาะรู (piercing) ถือเป็นการขึ้นรูปโลหะที่ตรงไปตรงมาที่สุด กล่าวคือ การตัดรูปทรงต่าง ๆ ออกจากแผ่นโลหะโดยใช้แรงเฉือน แต่คำว่า "ตรงไปตรงมา" ไม่ได้หมายความว่า "ง่ายต่อการระบุข้อกำหนด" เนื่องจากการดำเนินการเหล่านี้ต้องการความแข็งแกร่งสูงสุดจากแม่พิมพ์ขึ้นรูปของคุณ เพราะแรงตัดจะรวมศูนย์อยู่ในขณะที่วัสดุเกิดการหักหรือแตก
เมื่อเลือกชุดแม่พิมพ์เจาะและตัดโลหะแผ่นสำหรับการตัดวัสดุ (blanking operations) ควรให้ความสำคัญกับข้อกำหนดดังต่อไปนี้:
- ความหนาของฐานแม่พิมพ์ (Shoe thickness): ต้องสามารถต้านทานการโก่งตัวภายใต้แรงกดสูงสุดได้ ตามเกณฑ์พื้นฐาน ฐานแม่พิมพ์ (die shoes) ควรมีความหนาเพียงพอที่จะจำกัดการโก่งตัวไม่เกิน 0.001 นิ้วต่อความยาว 1 ฟุตของส่วนที่ไม่มีการรองรับภายใต้โหลดสูงสุด
- เส้นผ่านศูนย์กลางของแท่งยึด (Post diameter): แท่งยึดที่มีขนาดใหญ่กว่าจะสามารถต้านแรงดัดได้ดีกว่า สำหรับการตัดวัสดุแบบหนัก (heavy blanking operations) แท่งยึดควรออกแบบให้มีขนาดเหมาะสมเพื่อรับแรงดันข้าง (side thrust) ได้โดยไม่เกิดการโก่งตัวที่วัดได้
- การจัดเรียงแบบมีแท่งยึดสี่แท่ง (Four-post configurations): เป็นที่นิยมใช้สำหรับแม่พิมพ์ตีขึ้นรูปโลหะ (metal stamping dies) ที่ทำงานภายใต้ค่าความคลาดเคลื่อนที่แคบมาก (tight tolerances) เนื่องจากจุดรองรับเพิ่มเติมช่วยกระจายแรงตัดอย่างสม่ำเสมอทั่วทั้งชุดแม่พิมพ์
การเจาะรูมีข้อกำหนดที่คล้ายคลึงกัน แต่เพิ่มความแม่นยำในการจัดแนวให้เป็นปัจจัยสำคัญยิ่งขึ้น เมื่อแม่พิมพ์เจาะรูบนเครื่องกดชิ้นงานสร้างรูขึ้นมา ความไม่สอดคล้องกันระหว่างหัวเจาะ (punch) กับฐานรอง (button) ใดๆ จะก่อให้เกิดเศษโลหะที่ยื่นออกมา (burrs) เร่งการสึกหรอ และลดคุณภาพของรูที่เจาะ ความพอดีของแท่งนำทาง (guide post) และปลอกนำทาง (bushing) จึงมีความสำคัญยิ่งขึ้นไปอีก — ควรเลือกชุดแม่พิมพ์ที่มีระบบนำทางแบบลูกปืน (ball-bearing guide systems) ซึ่งสามารถรักษาความสอดคล้องกันภายในระยะ 0.0002 นิ้วตลอดช่วงการเคลื่อนที่
ตาม แนวทางการออกแบบสำหรับอุตสาหกรรม , การคำนวณแรงตัดใช้กำหนดความต้องการแรงดัน (tonnage) โดยใช้สูตร: แรงตัด (ปอนด์) = ความยาวรอบรูป × ความหนาของวัสดุ × ความต้านทานแรงเฉือน สูตรนี้มีผลโดยตรงต่อการเลือกชุดแม่พิมพ์ — ฐานรอง (shoes) และแท่งนำทาง (posts) ของคุณต้องสามารถรับแรงนี้ได้โดยไม่เกิดการโก่งตัว
ข้อกำหนดสำหรับการใช้งานด้านการขึ้นรูปและการดึง
แม่พิมพ์ขึ้นรูปและกระบวนการดึง (drawing operations) นำมาซึ่งความท้าทายที่ไม่พบในการตัดวัสดุแบบแบน (blanking) ได้แก่ การควบคุมการไหลของวัสดุอย่างแม่นยำ การชดเชยปรากฏการณ์สปริงแบ็ก (springback) และแรงด้านข้าง (side loads) ซึ่งส่งผลต่อการจัดแนวของแม่พิมพ์แตกต่างจากแรงตัดแบบตรง
สำหรับการใช้งานด้านการดัดและขึ้นรูป แม่พิมพ์เจาะและแม่พิมพ์ขึ้นรูปโลหะแผ่นของท่านต้องสามารถรองรับสิ่งต่อไปนี้ได้:
- การยืดหยุ่นที่ควบคุมได้: ต่างจากกระบวนการตัดวัสดุ (blanking) ซึ่งความแข็งแกร่งเป็นสิ่งสำคัญที่สุด บางกระบวนการขึ้นรูปกลับได้ประโยชน์จากการยืดหยุ่นเล็กน้อยของแม่พิมพ์ขึ้นรูป ซึ่งช่วยให้วัสดุไหลตัวได้ อย่างไรก็ตาม การยืดหยุ่นนี้ต้องสามารถทำนายผลและเกิดขึ้นอย่างสม่ำเสมอ
- ความต้านทานแรงด้านข้าง: การดำเนินการดัดจะสร้างแรงในแนวข้างขณะที่วัสดุหมุนรอบรัศมีการดัด ชุดแม่พิมพ์จึงจำเป็นต้องมีบล็อกยึดด้านข้าง (heel blocks) และแผ่นทนการสึกหรอ (wear plates) ที่มีขนาดเหมาะสมเพื่อดูดซับแรงเหล่านี้โดยไม่ทำให้ตำแหน่งการจัดแนวเปลี่ยนแปลง
- การชดเชยการเด้งกลับ โลหะจะคืนตัวบางส่วนกลับเข้าสู่รูปร่างเดิมหลังการดัด ดังนั้น ชุดแม่พิมพ์ของท่านจึงต้องจัดวางตำแหน่งของหัวเจาะให้แม่นยำพอที่จะสร้างมุมการดัดเกิน (over-bend angles) ซึ่งเมื่อคลายตัวแล้วจะได้มิติสุดท้ายที่ถูกต้อง
การขึ้นรูปแบบดึง (Drawing operations) — ซึ่งเป็นกระบวนการที่แผ่นวัตถุดิบเรียบ (flat blanks) ถูกขึ้นรูปให้กลายเป็นถ้วย ปลอก หรือชิ้นส่วนรูปร่างซับซ้อน — จำเป็นต้องพิจารณาอย่างรอบคอบเกี่ยวกับการออกแบบชุดแม่พิมพ์ (die set) โดยเฉพาะ แรงกดของแผ่นยึดวัตถุดิบ (blank holder pressure), ความลึกของการดึง (draw depth) และลักษณะการไหลของวัสดุ (material flow characteristics) ล้วนมีอิทธิพลต่อข้อกำหนดทางเทคนิคทั้งสิ้น โครงสร้างแบบสี่เสา (four-post configurations) ที่มีเส้นผ่านศูนย์กลางของเสาขนาดใหญ่กว่า จะช่วยรักษาความขนาน (alignment) ได้ดีในระหว่างการเคลื่อนที่แบบยาว (extended strokes) ซึ่งพบได้บ่อยในการขึ้นรูปแบบดึงลึก (deep drawing)
สำหรับแม่พิมพ์ขึ้นรูป (forming dies) ที่ทำงานหลายขั้นตอนต่อเนื่องกัน (running multiple operations in sequence) การคำนวณจุดศูนย์กลางของแรง (center of pressure) ถือเป็นสิ่งจำเป็นอย่างยิ่ง ตาม แนวทางการตอกแบบก้าวหน้า (progressive stamping guidelines) คุณจะต้องระบุตำแหน่งที่แรงทั้งหมดที่กระทำเข้ามาบรรจบกัน (point where all applied forces converge) และตรวจสอบให้แน่ใจว่าจุดนั้นสอดคล้องกับแนวแกนกลางของเครื่องกด (press centerline) ที่ใช้งาน หากมีการเบี่ยงเบนจากแนวแกนกลางแม้เพียงเล็กน้อย ก็จะก่อให้เกิดการสึกหรอไม่สม่ำเสมอและการคลาดเคลื่อนของความขนาน (alignment drift)
การคำนวณข้อกำหนดทางเทคนิคของชุดแม่พิมพ์ (Die Set Specifications) สำหรับเครื่องกดของคุณ
ทีนี้มาถึงกรอบปฏิบัติจริงที่ผสานทุกองค์ประกอบเข้าด้วยกัน การจับคู่ข้อกำหนดทางเทคนิคของชุดแม่พิมพ์ให้สอดคล้องกับศักยภาพของเครื่องกด จำเป็นต้องเข้าใจมิติที่เชื่อมโยงกันสามประการ ได้แก่ ความสูงขณะปิด (shut height), ความยาวของการเคลื่อนที่ (stroke length) และมิติโดยรวมของแม่พิมพ์ (overall die dimensions)
ความสูงปิด —หรือที่เรียกว่าความสูงของแม่พิมพ์—คือระยะทางแนวตั้งจากแผ่นเลื่อนของเครื่องกด (press slide) ที่จุดต่ำสุด (bottom dead center) ถึงพื้นฐานของเครื่องกด (press bed) ดังนั้น ตามที่เอกสารอ้างอิงเชิงเทคนิคอธิบายไว้ มิตินี้กำหนดความสูงรวมสูงสุดของแม่พิมพ์ที่เครื่องกดของคุณสามารถรองรับได้ ความหนาของรองเท้าแม่พิมพ์ส่วนบนและส่วนล่างรวมกัน พร้อมด้วยชิ้นส่วนเครื่องมือทั้งหมดที่ติดตั้งอยู่ ต้องสามารถใส่ลงในพื้นที่นี้ได้พอดี
นี่คือกรอบการคำนวณที่สำคัญ:
- กำหนดความสูงรวมที่ต้องการของแม่พิมพ์: นำความหนาของรองเท้าแม่พิมพ์ส่วนบน + ความหนาของรองเท้าแม่พิมพ์ส่วนล่าง + ความยาวของหัวเจาะ (punch length) + ความสูงของปุ่มแม่พิมพ์ (die button height) + ความสูงของชิ้นส่วนเครื่องมือเพิ่มเติมใดๆ มารวมกัน
- เปรียบเทียบกับความสูงปิดของเครื่องกด (press shut height): ความสูงรวมของแม่พิมพ์ของคุณจะต้องน้อยกว่าความสูงปิดของเครื่องกด โดยทั่วไป ผู้ออกแบบมักเว้นระยะสำรองไว้ 5–10 มม. เพื่อป้องกันการชนกัน
- พิจารณาช่วงการปรับแต่ง: เครื่องกดโดยทั่วไปมีช่วงการปรับตำแหน่งของแผ่นเลื่อน (slide adjustment) อยู่ที่ 40–80 มม. ดังนั้น แม่พิมพ์ของคุณควรสามารถติดตั้งให้พอดีภายในช่วงการปรับนี้ได้ ไม่ใช่แค่ที่ขีดจำกัดหนึ่งขีดจำกัดเดียว
- ตรวจสอบระยะช่องว่างการเคลื่อนที่ของลูกสูบ: ระยะการเคลื่อนที่ของเครื่องกดต้องมากกว่าความหนาของวัสดุ รวมทั้งระยะช่องว่างที่เพียงพอสำหรับการปลดชิ้นงานออกและการเลื่อนแถบวัสดุไปข้างหน้า
| ประเภทการใช้งาน | ความหนาของฐานรองที่แนะนำ | แนวทางเกี่ยวกับเส้นผ่านศูนย์กลางของเสา | การตั้งค่า | ข้อควรพิจารณาเป็นพิเศษ |
|---|---|---|---|---|
| การตัดแบบเบา (< 50 ตัน) | 1.5 นิ้ว – 2 นิ้ว | 1 นิ้ว – 1.25 นิ้ว | แบบสองเสา หรือ สี่เสา | ความแข็งแกร่งตามมาตรฐานเพียงพอ |
| การตัดแบบหนัก (> 100 ตัน) | 2.5 นิ้ว – 4 นิ้ว | 1.5 นิ้ว – 2 นิ้ว | เสาสี่ต้น | เพิ่มความแข็งแกร่งสูงสุด โดยพิจารณาการใช้บล็อกส้นเท้า |
| การเจาะด้วยความแม่นยำสูง | 2 นิ้ว – 3 นิ้ว | 1.25 นิ้ว – 1.5 นิ้ว | เสาสี่ต้น | ต้องใช้รางนำแบบตลับลูกปืน |
| การขึ้นรูป/การดัดงอ | 2 นิ้ว – 3 นิ้ว | 1.25 นิ้ว – 1.75 นิ้ว | โครงหลังแบบสี่เสา | คำนึงถึงแรงที่กระทำจากด้านข้าง |
| ดึงลึก | 3 นิ้ว – 4 นิ้ว | 1.5 นิ้ว – 2 นิ้ว | แท่นยกสี่ต้น | ต้องการระยะช่วงการเคลื่อนที่ที่ขยายออก |
เมื่อคำนวณความต้องการแรงดัน (tonnage) สำหรับแม่พิมพ์แบบก้าวหน้า (progressive dies) จำเป็นต้องรวมผลรวมของแรงทั้งหมดที่กระทำในแต่ละสถานี: แรงเจาะ (piercing forces), แรงขึ้นรูป (forming forces), แรงดันจากสปริงที่ใช้ถอดชิ้นงาน (spring stripper pressures), แรงจากแผ่นรองไนโตรเจน (nitrogen pad forces) และแรงตัดเศษวัสดุ (scrap cutting) ผลรวมทั้งหมดนี้จะกำหนดความสามารถขั้นต่ำของเครื่องกด (press capacity) ซึ่งส่งผลโดยตรงต่อข้อกำหนดของชุดแม่พิมพ์ (die set specifications) ชุดแม่พิมพ์ที่ออกแบบให้รองรับแรง 50 ตัน จะไม่สามารถใช้งานได้อย่างปลอดภัยในแอปพลิเคชันที่ต้องการแรง 200 ตัน — แม้ว่าชุดแม่พิมพ์นั้นจะสามารถติดตั้งเข้ากับเครื่องกดได้ทางกายภาพก็ตาม
ความสัมพันธ์ระหว่างข้อกำหนดเหล่านี้ไม่ได้เกี่ยวข้องเพียงแค่การจับคู่ชิ้นส่วนให้พอดีกันเท่านั้น การจับคู่อย่างเหมาะสมจะยืดอายุการใช้งานของแม่พิมพ์ เพิ่มความสม่ำเสมอของชิ้นงาน และป้องกันความล้มเหลวอย่างรุนแรงที่เกิดขึ้นเมื่อชุดแม่พิมพ์สำหรับเครื่องกด (punch press die sets) ถูกใช้งานเกินขีดจำกัดการออกแบบ หลังจากที่ข้อกำหนดทั้งหมดสอดคล้องกับการใช้งานของคุณแล้ว ประเด็นต่อไปที่ต้องพิจารณาคือวิธีรักษาความแม่นยำนั้นไว้ตลอดอายุการใช้งานของชุดแม่พิมพ์
ข้อกำหนดด้านการบำรุงรักษาและการเพิ่มประสิทธิภาพอายุการใช้งาน
คุณได้ลงทุนในแม่พิมพ์เครื่องมือคุณภาพสูง ปรับแต่งข้อกำหนดให้สอดคล้องกับการใช้งานของคุณ และผ่านการอนุมัติชิ้นงานต้นแบบแล้ว ตอนนี้มาถึงปัจจัยสำคัญที่ทำให้การดำเนินงานบางแห่งสามารถผลิตชิ้นส่วนได้หลายล้านชิ้นโดยไม่มีปัญหา ในขณะที่อีกบางแห่งต้องเผชิญกับปัญหาคุณภาพอย่างต่อเนื่อง: นั่นคือ การบำรุงรักษา วงจรชีวิตของชุดแม่พิมพ์ทั้งหมด — ตั้งแต่การเลือกเบื้องต้น ไปจนถึงการเปลี่ยนทดแทนในที่สุด — จะกำหนดต้นทุนจริงต่อชิ้นงานของคุณ อย่างไรก็ตาม เอกสารการผลิตแม่พิมพ์ส่วนใหญ่แทบไม่กล่าวถึงข้อกำหนดด้านการบำรุงรักษาเลย
มาเปลี่ยนแปลงสิ่งนั้นกันเถอะ นี่คือทุกสิ่งที่คุณจำเป็นต้องรู้เพื่อรักษาประสิทธิภาพสูงสุดของชุดแม่พิมพ์คุณ และรับรู้ล่วงหน้าว่าเมื่อใดที่ส่วนประกอบต่าง ๆ ต้องได้รับการตรวจสอบหรือซ่อมแซม ก่อนที่คุณภาพจะเสียหาย
ตารางบำรุงรักษาเชิงป้องกันที่ช่วยยืดอายุการใช้งานแม่พิมพ์
การกลึงแม่พิมพ์และการผลิตด้วยความแม่นยำอย่างเหมาะสมจะไม่มีความหมายเลย หากส่วนประกอบต่าง ๆ ไม่ได้รับการบำรุงรักษาอย่างถูกต้องระหว่างการผลิต ตามรายงานจาก งานวิจัยเพื่อเพิ่มประสิทธิภาพระบบนำทางของชุดแม่พิมพ์ ส่วนประกอบนำทางของชุดแม่พิมพ์ที่ไม่ได้รับการบำรุงรักษาอย่างเหมาะสมจะบังคับให้ช่างเทคนิคต้องเข้าสู่วงจรของการเปลี่ยนทดแทนอย่างต่อเนื่องและเกิดเวลาหยุดทำงานที่มากเกินไป — ซึ่งเป็นสิ่งที่การดำเนินงานส่วนใหญ่ไม่สามารถยอมรับได้
รากฐานของโปรแกรมการป้องกันใดๆ เริ่มต้นจากการเข้าใจว่าแต่ละส่วนประกอบจำเป็นต้องได้รับอะไรบ้าง:
- ทำความสะอาดพื้นผิวแม่พิมพ์ทั้งหมดอย่างทั่วถึงหลังการผลิตแต่ละครั้ง กำจัดเศษโลหะ สารหล่อลื่น และสิ่งสกปรกที่สะสมอยู่บนรองเท้าแม่พิมพ์ (die shoes) และภายในโพรง (cavities) การข้ามขั้นตอนนี้จะเร่งให้เกิดการสึกหรอ และก่อให้เกิดข้อบกพร่องด้านรูปลักษณ์หรือขนาดในชิ้นส่วนที่ถูกขึ้นรูปด้วยแรงกด (stamped parts) นอกจากนี้ การทำความสะอาดอย่างสม่ำเสมอยังช่วยให้สามารถตรวจพบความเสียหายตั้งแต่ระยะแรกได้
- หล่อลื่นแท่งนำทาง (guide posts) และแหวนรอง (bushings) ตามข้อกำหนดของผู้ผลิต สำหรับส่วนประกอบนำทางแบบลูกปืน (ball bearing guide components) ห้ามใช้จาระบีโดยเด็ดขาด เนื่องจากชุดประกอบเหล่านี้ทำงานภายใต้ช่องว่างเชิงลบ (negative working clearances) ซึ่งทำให้จาระบีมีแนวโน้มกักเก็บสิ่งสกปรกไว้ และสิ่งสกปรกเหล่านั้นจะแทรกซึมเข้าไปในบริเวณที่สัมผัสกันแบบหมุน (rolling press fit) ดังนั้น ควรใช้น้ำมันแร่กลั่นบริสุทธิ์ (refined mineral oil) ที่มีค่าความหนืด 290/340 SSU ที่อุณหภูมิ 100°F ซึ่งผสมสารเพิ่มประสิทธิภาพแบบแรงดันสูง (extreme-pressure additives) และสารป้องกันสนิม (rust inhibitors)
- ตรวจสอบพื้นผิวที่สำคัญทั้งหมดตามตารางเวลาที่มีการบันทึกไว้ ประเมินขอบที่ตัด รูเจาะ ผิวของแม่พิมพ์ว่าง (blank) และหมุดนำทาง เพื่อหาสัญญาณแรกเริ่มของความสึกหรอ รอยแตกร้าว หรือการไม่ขนานกัน
- ตรวจสอบความขนานโดยใช้เครื่องมือวัดความแม่นยำ ตรวจสอบให้แน่ใจว่าความสอดคล้องกันระหว่างหมุดนำทาง (guide post) กับบุชชิ่ง (bushing) ยังคงอยู่ภายในข้อกำหนดที่กำหนดไว้ ความคล่องตัว (clearance) ที่เพิ่มขึ้นแม้เพียงเล็กน้อยก็แสดงถึงความก้าวหน้าของการสึกหรอ ซึ่งในที่สุดจะส่งผลต่อคุณภาพของชิ้นงาน
- จัดเก็บแม่พิมพ์อย่างเหมาะสมระหว่างรอบการผลิต หลังการบำรุงรักษา ให้จัดเก็บชุดแม่พิมพ์กด (pressing die assemblies) ในสภาพแวดล้อมที่สะอาด แห้ง และควบคุมอุณหภูมิอย่างเหมาะสม การจัดเก็บที่ถูกต้องจะป้องกันการกัดกร่อนและปกป้องผิวที่มีความแม่นยำจากการเสียหาย
สำหรับกระบวนการที่ใช้หมุดหล่อลื่น (lube pins) — คือ หมุดนำทางที่มีรูหล่อลื่นแบบเจาะขวางภายใน — ให้เชื่อมต่อกับระบบหล่อลื่นอัตโนมัติที่จ่ายน้ำมันตามช่วงเวลาที่กำหนดไว้ วิธีนี้จะกำจัดการพึ่งพาความจำของผู้ปฏิบัติงาน และรับประกันการหล่อลื่นอย่างสม่ำเสมอ ไม่ว่าตารางการผลิตจะมีความต้องการอย่างไร
การระบุรูปแบบการสึกหรอก่อนที่คุณภาพจะลดลง
แม้จะมีการบำรุงรักษาอย่างสมบูรณ์แบบ แม่พิมพ์ก็จะสึกหรอในที่สุด ประเด็นสำคัญคือการรับรู้ถึงสัญญาณของการสึกหรอก่อนที่จะส่งผลให้ชิ้นส่วนที่ผลิตออกมามีข้อบกพร่อง นี่คือสิ่งที่ช่างเทคนิคผู้มีประสบการณ์มักสังเกต:
ช่องว่างมากเกินไปในระบบไกด์ ปรากฏขึ้นอย่างค่อยเป็นค่อยไป เมื่อกรอบลูกปืนไม่สามารถรักษาน้ำหนักกดดันเริ่มต้น (preload) ที่เหมาะสมไว้กับเสาไกด์และบุชชิ่งได้อีกต่อไป ความแม่นยำในการจัดแนวจะลดลง ท่านอาจสังเกตเห็นสัญญาณแรกของปัญหานี้จากตำแหน่งรูที่ไม่สม่ำเสมอเล็กน้อย หรือคุณภาพขอบของชิ้นงานที่แปรผันไปในระหว่างการผลิตชุดหนึ่ง
การเกิดรอยขีดข่วน (galling) ที่มองเห็นได้บนพื้นผิวของเสา บ่งชี้ถึงปัญหาที่รุนแรง ตามคำกล่าวของผู้เชี่ยวชาญในอุตสาหกรรม รอยตามแนว (tracking lines) ที่กดทับลงไปบนพื้นผิวทำงานจำเป็นต้องได้รับการตรวจสอบและดำเนินการทันที หากพบว่ารอยตามแนวปรากฏเฉพาะด้านใดด้านหนึ่งของเสาไกด์หรือบุชชิ่ง ควรตรวจสอบตำแหน่งของรูที่เจาะ ความตรงของรูที่เจาะ และความขนานของเสาไกด์ — เหล่านี้เป็นสัญญาณบ่งชี้ถึงปัญหาการจัดแนว มากกว่าการสึกหรอตามปกติ
การเปลี่ยนแปลงของขนาดชิ้นส่วนที่ถูกตีขึ้น (stamped parts) มักให้หลักฐานที่วัดค่าได้ครั้งแรกเกี่ยวกับการสึกหรอของแม่พิมพ์ เมื่อชิ้นส่วนที่เคยรักษาระดับความคล่องตัว (tolerance) ได้ดีมาก่อนเริ่มมีแนวโน้มเข้าใกล้ขีดจำกัดของข้อกำหนด นั่นหมายความว่าชุดแม่พิมพ์กำลังส่งสัญญาณบางอย่างถึงคุณ อย่ารอให้ชิ้นส่วนออกนอกข้อกำหนดก่อนจึงเริ่มการตรวจสอบ
เสียงผิดปกติระหว่างการปฏิบัติงาน ต้องได้รับการตรวจสอบทันที การเปลี่ยนแปลงของเสียง—โดยเฉพาะเสียงขูดโลหะหรือเสียงการสัมผัสแบบเป็นระยะ—บ่งชี้ว่ามีชิ้นส่วนบางส่วนมาสัมผัสกันโดยไม่ควรเกิดขึ้น ซึ่งอาจสื่อถึงปัญหา 'cage creep' การเรียงตัวไม่ตรง หรือความล้มเหลวของชิ้นส่วนที่กำลังจะเกิดขึ้นในไม่ช้า
การเปลี่ยนสีเป็นสีน้ำเงินบนโครงสร้างกรงแบริ่ง (bearing cages) บ่งชี้ปัญหาเฉพาะ: ปรากฏการณ์ 'cage creep' ทำให้แบริ่งเลื่อนไถลแทนที่จะหมุนตามปกติในสภาวะที่มีแรงโหลดล่วงหน้า (preloaded condition) สีน้ำเงินนี้เกิดจากความร้อนสูงเกินไปที่เกิดขึ้นจากการเลื่อนไถลดังกล่าว หากสังเกตเห็นลักษณะนี้ แม่พิมพ์จำเป็นต้องได้รับการดำเนินการแก้ไขทันที
การวิเคราะห์และแก้ไขปัญหาทั่วไปของชุดแม่พิมพ์
เมื่อเกิดปัญหา การวิเคราะห์เชิงระบบจะช่วยประหยัดเวลาและป้องกันการวินิจฉัยผิดพลาด ต่อไปนี้คือปัญหาที่พบบ่อยที่สุดและสาเหตุหลักของแต่ละปัญหา:
| ปัญหา | สาเหตุ ที่ น่า จะ เกิด ขึ้น | การ ปรับปรุง |
|---|---|---|
| การเคลื่อนตัวของกรงลูกปืน (กรงลูกปืนเคลื่อนออกจากตำแหน่งที่กำหนด) | ขนาดของชิ้นส่วน การออกแบบแม่พิมพ์ แรงกดล่วงหน้าไม่เพียงพอ | ติดตั้งตัวหยุดเชิงบวก/ตัวกันกระแทก; พิจารณาเปลี่ยนไปใช้สภาวะการทำงานแบบมีแรงกดล่วงหน้าลดลงหรือแยกชิ้นส่วนออกอย่างสมบูรณ์ |
| การติดตามแนว (tracking) มากเกินไปที่ด้านใดด้านหนึ่ง | ความคลาดเคลื่อนของตำแหน่งรูศูนย์กลาง ปัญหาความตรงของรูศูนย์กลาง การรับโหลดด้านข้างจากชิ้นงาน | ตรวจสอบข้อกำหนดของรูศูนย์กลาง; พิจารณาใช้ปลอกแบบถอดได้; ประเมินรูปแบบการรับโหลดของชิ้นงาน |
| การสึกหรอของปลอกเร็วก่อนกำหนด | ความแน่นของการยึดแบบแทรก (interference fit) สูงเกินไป (เกิน 0.0005 นิ้ว) | ใช้ปลอกแบบถอดได้ที่มีการยึดแบบแน่น (wring fit) แทนปลอกแบบทรงกระบอกธรรมดา |
| ปลายสกรูยึดเสียหาย | การเคลื่อนตัวของกรงลูกปืน (cage creep) ทำให้สกรูกระทบปลายช่องร่องของเสาคู่มือ | แก้ไขปัญหาการเคลื่อนตัวของกรงลูกปืน (cage creep) ที่เป็นรากฐาน; ติดตั้งตัวหยุดเชิงบวก (positive stops) |
| การเคลื่อนตัวของกรงลูกปืนขึ้นด้านบน | การระบายอากาศของบุชชิ่งไม่เพียงพอ ส่งผลให้ความดันอากาศสะสม | ตรวจสอบการระบายอากาศของบุชชิ่งที่ส่วนล่างให้ถูกต้อง; เพิ่มตัวหยุดเชิงบวก (positive stop) บนเสาคู่มือหากจำเป็น |
สำหรับแม่พิมพ์ตัดแต่งที่ใช้งานกับเครื่องกดแบบเซอร์โว (servo presses) ควรทราบว่า การเร่งความเร็วอย่างรวดเร็วและการเปลี่ยนทิศทางอย่างฉับพลันอาจทำให้เกิดการเคลื่อนตัวของกรงลูกปืน (cage creep) ได้ แม้ในกรณีที่มีการผ่อนแรงบางส่วนหรือปลดการขับเคลื่อนอย่างสมบูรณ์แล้วก็ตาม แรงเฉื่อยอาจทำให้กรงลูกปืนเคลื่อนออกจากตำแหน่งเร็วกว่าที่มันจะกลับเข้าสู่ตำแหน่งเดิมได้ แนวทางแก้ไขรวมถึงการปรับความเร็วของการเคลื่อนตัวแบบขึ้น-ลง (stroke speed) หรือการสร้างแรงต้านควบคุม (controlled drag) ต่อกรงลูกปืน
เมื่อเกิดปัญหาการกระเทาะหรือแตกร้าวของหัวเจาะ (punch chipping or cracking) ซึ่งเป็นปัญหาทั่วไปที่ส่งผลกระทบต่อชุดแม่พิมพ์ทั้งหมด การวิเคราะห์อย่างเป็นระบบควรตรวจสอบความแน่นของน็อตเชื่อมต่อ (coupling nut tightness) ความสมมาตรระหว่างหัวเจาะกับแม่พิมพ์ (punch-to-die alignment) การตั้งค่าระยะห่าง (clearance settings) ตามความหนาของวัสดุ และความสม่ำเสมอของแรงดันสตริปเปอร์ (stripper pressure uniformity) การเก็บตัวอย่างชิ้นส่วนที่เสียหายและตัวอย่างวัสดุเพื่อส่งให้ผู้จัดจำหน่ายวิเคราะห์ มักเผยให้เห็นแนวทางปรับปรุงกระบวนการที่สามารถป้องกันไม่ให้ปัญหาเกิดซ้ำได้
ผลลัพธ์สุดท้ายคือ? การบำรุงรักษาเชิงรุกมีต้นทุนต่ำกว่าการซ่อมแซมแบบตอบสนองอย่างมาก ประสบการณ์ในอุตสาหกรรมยืนยันว่า โปรแกรมการซ่อมแซมและบำรุงรักษาแม่พิมพ์เป็นประจำช่วยลดเวลาหยุดทำงาน เพิ่มอายุการใช้งานของแม่พิมพ์ และรักษาคุณภาพความแม่นยำของแม่พิมพ์ไว้ ซึ่งทำให้ชิ้นส่วนที่ขึ้นรูปด้วยการตีขึ้นรูป (stamped parts) ยังคงอยู่ภายในขอบเขตข้อกำหนดที่กำหนดไว้ หากไม่มีการดูแลรักษาอย่างสม่ำเสมอ แม้แม่พิมพ์ที่ผลิตด้วยเทคโนโลยีขั้นสูงที่สุดก็จะสร้างชิ้นส่วนที่ค่อยๆ เสื่อมคุณภาพลง — และเมื่อข้อบกพร่องปรากฏขึ้นในชิ้นส่วนสำเร็จรูปแล้ว ความเสียหายที่สำคัญมักเกิดขึ้นไปแล้ว
เมื่อกำหนดโปรโตคอลการบำรุงรักษาแล้ว ขั้นตอนต่อไปที่ควรพิจารณาคือการมั่นใจว่าผู้จัดจำหน่ายชุดแม่พิมพ์ของคุณสามารถรองรับความต้องการอย่างต่อเนื่องเหล่านี้ได้ — ซึ่งเป็นปัจจัยที่มีน้ำหนักมากกว่าเพียงแค่ราคาซื้อเบื้องต้นเมื่อประเมินต้นทุนรวมในการถือครอง (Total Cost of Ownership)
กลยุทธ์การจัดหาและประเมินผู้จัดจำหน่าย
คุณได้ระบุชุดแม่พิมพ์ที่เหมาะสมที่สุดแล้ว — ทั้งการกำหนดค่าให้สอดคล้องกับกระบวนการผลิตของคุณ การเลือกวัสดุที่มีความทนทานสูง และการจัดทำโปรโตคอลการบำรุงรักษาไว้พร้อมใช้งานแล้ว ทว่าขณะนี้คุณกำลังเผชิญกับการตัดสินใจที่ผู้ซื้อหลายคนมักมองข้ามจนกว่าจะเกิดปัญหาขึ้น: แท้จริงแล้วเครื่องจักรตีขึ้นรูป (stamping tool) และแม่พิมพ์ (die) ของคุณผลิตขึ้นจากที่ใด? ผู้จัดจำหน่ายที่คุณเลือกส่งผลกระทบต่อสิ่งต่าง ๆ มากกว่าเพียงแค่ตัวเลขบนใบสั่งซื้อของคุณเท่านั้น แต่ยังครอบคลุมถึงระยะเวลาการจัดส่ง (lead times), คุณภาพของการสื่อสาร, ความพร้อมในการให้การสนับสนุน และในที่สุด ต้นทุนรวมในการถือครอง (total cost of ownership) ของคุณด้วย
มาพิจารณาด้วยกันว่าอะไรคือปัจจัยที่ทำให้ผู้จัดจำหน่ายที่ ‘เพียงพอ’ แตกต่างจาก ‘พันธมิตรระดับเยี่ยม’ ในการผลิตเครื่องมือและแม่พิมพ์ — และเหตุใดข้อเสนอราคาที่ต่ำที่สุดจึงมักไม่นำไปสู่ต้นทุนที่ต่ำที่สุด
การประเมินผู้จัดจำหน่ายชุดแม่พิมพ์โดยพิจารณาเหนือกว่าราคา
เมื่อจัดหาชุดแม่พิมพ์ตีขึ้นรูปโลหะ ราคาเริ่มต้นมักดึงดูดผู้ซื้อจำนวนมากให้มุ่งเน้นเพียงต้นทุนต่อหน่วยเท่านั้น แต่การวิเคราะห์ต้นทุนรวมตลอดอายุการใช้งาน (Total Cost of Ownership) จะเปิดเผยค่าใช้จ่ายแฝงที่มักสูงกว่าการประหยัดต้นทุนเบื้องต้นจากผู้จัดจำหน่ายในต่างประเทศ
พิจารณาปัจจัยเหล่านี้ที่ส่งผลโดยตรงต่อกำไรสุทธิของคุณ:
- คุณภาพและความทนทานของแม่พิมพ์: แม่พิมพ์ที่ผลิตภายในประเทศโดยใช้เหล็กกล้าสำหรับแม่พิมพ์คุณภาพสูง มักรับประกันจำนวนครั้งในการตีขึ้นรูปได้มากกว่า 1,000,000 ครั้งก่อนต้องเข้ารับการบำรุงรักษา ในทางกลับกัน แม่พิมพ์คุณภาพต่ำจากต่างประเทศจะสึกหรอเร็วกว่า ส่งผลให้เกิดข้อบกพร่องเร็วขึ้น และทำให้เกิดเวลาหยุดการผลิตซึ่งทำให้การประหยัดต้นทุนเบื้องต้นหายไป
- ประสิทธิภาพในการสื่อสาร: การดำเนินงานร่วมกับผู้จัดจำหน่ายที่อยู่ห่างออกไป 13 โซนเวลา หมายความว่าคำถามที่คุณส่งในตอนเช้าอาจได้รับคำตอบในวันถัดไป—และนั่นก็เป็นกรณีที่ดีที่สุดเท่านั้น อุปสรรคด้านภาษาจะเพิ่มความเสี่ยงต่อความเข้าใจผิดอีกชั้นหนึ่ง เมื่อเกิดปัญหาในการผลิต ความล่าช้าเหล่านี้จะทวีความรุนแรงอย่างรวดเร็ว
- การขนส่งและโลจิสติกส์: ระยะเวลาการขนส่งทางทะเล การผ่านพิธีการศุลกากร ความแออัดของท่าเรือ และความผันผวนของอัตราภาษีศุลกากร ล้วนเพิ่มต้นทุนและความไม่แน่นอนให้กับกระบวนการจัดซื้อจัดจ้าง การราคาตู้คอนเทนเนอร์ในการขนส่งเพิ่มขึ้นเป็นสี่เท่าในปี ค.ศ. 2020 และความแปรปรวนของระยะเวลาการนำส่งยังคงส่งผลกระทบต่อผู้ผลิตจนถึงปัจจุบัน
- การป้องกันทรัพย์สินทางปัญญา: แบบร่าง โมเดล CAD หรือกระบวนการเฉพาะเจาะจงใดๆ ที่แชร์กับผู้ขายในต่างประเทศมีความเสี่ยงสูงที่จะถูกคัดลอก ซึ่งการลงทุนในการผลิตแม่พิมพ์ตามแบบที่คุณออกแบบเองอาจกลับมาแข่งขันกับคุณเองในตลาด
ผู้ผลิตแม่พิมพ์ตัดและเจาะที่ให้บริการการผลิตภายในประเทศสามารถลดความท้าทายเหล่านี้ได้อย่างมาก การสื่อสารในเขตเวลาเดียวกันช่วยให้แก้ไขปัญหาได้รวดเร็วขึ้น ระยะทางการจัดส่งที่สั้นลงช่วยลดความแปรปรวนของระยะเวลาการนำส่ง และกฎหมายคุ้มครองทรัพย์สินทางปัญญาที่เข้มแข็งยิ่งขึ้นช่วยรักษาความปลอดภัยของแบบดีไซน์เฉพาะของคุณ
ใบรับรองคุณภาพที่สำคัญสำหรับการใช้งานที่ต้องการความแม่นยำสูง
คุณจะตรวจสอบได้อย่างไรว่าผู้ผลิตแม่พิมพ์ดัด (stamping die) สามารถส่งมอบคุณภาพตามที่พวกเขาให้คำมั่นสัญญาไว้จริงได้? ใบรับรองต่างๆ ให้หลักฐานเชิงวัตถุที่เป็นกลาง — แต่ไม่ใช่ทุกใบรับรองจะมีน้ำหนักเท่ากัน
สำหรับการใช้งานในอุตสาหกรรมยานยนต์และงานความแม่นยำ การรับรองมาตรฐาน IATF 16949 ถือเป็นมาตรฐานทองคำ ซึ่งจัดทำขึ้นโดย International Automotive Task Force (IATF) มาตรฐานการจัดการคุณภาพระดับโลกนี้มีวัตถุประสงค์เพื่อให้มั่นใจในคุณภาพที่สม่ำเสมอตลอดห่วงโซ่อุปทานของอุตสาหกรรมยานยนต์ ผู้จัดจำหน่ายที่รักษาการรับรองนี้ไว้ได้แสดงให้เห็นถึงความสามารถในการปฏิบัติตามข้อกำหนดที่เข้มงวดที่สุดของอุตสาหกรรม
นอกเหนือจากมาตรฐาน IATF 16949 แล้ว โปรดพิจารณาตัวชี้วัดคุณภาพเหล่านี้เมื่อประเมินผู้ให้บริการผลิตแม่พิมพ์:
- ใบรับรอง ISO 9001: ยืนยันว่าผู้จัดจำหน่ายดำเนินระบบการจัดการคุณภาพที่มีเอกสารกำกับอย่างเป็นทางการ มีการตรวจสอบเป็นระยะ และมีกระบวนการปรับปรุงอย่างต่อเนื่อง
- อัตราการอนุมัติรอบแรก: ผู้จัดจำหน่ายที่ติดตามตัวชี้วัดนี้แสดงถึงความมุ่งมั่นในการผลิตชิ้นส่วนให้ถูกต้องตั้งแต่ครั้งแรก อัตราที่สูงกว่า 90% บ่งชี้ว่ามีกระบวนการที่สุกงอมและระบบป้องกันข้อบกพร่องที่มีประสิทธิภาพ
- ศักยภาพในการอบชุบความร้อนภายในองค์กร: ผู้จัดจำหน่ายที่ควบคุมกระบวนการอบชุบความร้อนภายในองค์กรเองสามารถรักษาการควบคุมคุณภาพได้อย่างเข้มงวดยิ่งขึ้น และส่งมอบงานได้รวดเร็วกว่าผู้จัดจำหน่ายที่จ้างภายนอกสำหรับกระบวนการสำคัญนี้
- อุปกรณ์ที่ทันสมัยที่สุด: เครื่องตัดด้วยลวดไฟฟ้า (Wire EDM), เครื่องกลึง CNC และเครื่องขัดผิวความแม่นยำสูง ช่วยให้บรรลุค่าความคลาดเคลื่อนที่แคบมากตามที่กระบวนการตีขึ้นรูปแบบความแม่นยำ (precision stamping) ต้องการ โปรดสอบถามเกี่ยวกับอายุของอุปกรณ์และตารางการสอบเทียบ
ตาม แนวทางด้านคุณภาพของผู้จัดจำหน่ายจาก ASQ , การประเมินผู้จัดจำหน่ายอย่างมีประสิทธิภาพนั้นไม่ได้จำกัดเพียงการตรวจสอบใบรับรองเท่านั้น แต่ยังรวมถึงการประเมินศักยภาพทางเทคนิค กำลังการผลิต ความมั่นคงทางการเงิน และประวัติการทำงานกับโครงการที่คล้ายคลึงกันด้วย เป้าหมายคืออะไร? คือการค้นหาพันธมิตรที่มีระบบควบคุมคุณภาพซึ่งสามารถป้องกันข้อบกพร่องได้ตั้งแต่ต้น แทนที่จะตรวจพบข้อบกพร่องหลังการผลิตเสร็จสิ้น
การสนับสนุนด้านวิศวกรรมในฐานะปัจจัยที่ทำให้ผู้จัดจำหน่ายโดดเด่น
นี่คือจุดที่ผู้ผลิตแม่พิมพ์ตีขึ้นรูปแบบขั้นสูงแยกตัวเองออกจากผู้จัดจำหน่ายทั่วไปอย่างแท้จริง: ความสามารถด้านวิศวกรรมที่สร้างมูลค่าเพิ่มก่อนเริ่มการผลิต
ลองนึกภาพการร่วมมือกับผู้จัดจำหน่ายที่มีความสามารถด้านการจำลองทางวิศวกรรมด้วยคอมพิวเตอร์ (CAE: Computer-Aided Engineering) ก่อนที่จะตัดโลหะใดๆ พวกเขาสามารถสร้างแบบจำลองการไหลของวัสดุ ทำนายการคืนตัวของชิ้นงาน (springback) และระบุปัญหาที่อาจเกิดขึ้นในกระบวนการขึ้นรูปได้ แนวทางการป้องกันข้อบกพร่องล่วงหน้าเช่นนี้ช่วยตรวจจับปัญหาตั้งแต่ขั้นตอนการออกแบบ—ซึ่งการแก้ไขใช้ต้นทุนเพียงเล็กน้อย—แทนที่จะรอจนถึงขั้นตอนการผลิต ซึ่งการแก้ไขจะมีต้นทุนสูงหลายพันบาท
บริการต้นแบบอย่างรวดเร็ว (Rapid prototyping) ยังมอบข้อได้เปรียบอีกด้านที่สำคัญ ผู้จัดจำหน่ายที่สามารถจัดส่งแม่พิมพ์ต้นแบบภายในไม่กี่วัน แทนที่จะใช้เวลาหลายสัปดาห์ จะช่วยให้สามารถปรับปรุงการออกแบบได้เร็วขึ้น และลดระยะเวลาในการนำสินค้าออกสู่ตลาด เมื่อคุณต้องการตรวจสอบความถูกต้องของแบบชิ้นส่วนใหม่อย่างรวดเร็ว ความสามารถนี้จึงมีคุณค่าอย่างยิ่ง
คุณควรพิจารณาอะไรบ้างเมื่อประเมินการสนับสนุนด้านวิศวกรรม?
- คำปรึกษาด้านการออกแบบ: พวกเขาสามารถทบทวนแบบชิ้นส่วนของคุณและเสนอแนะการปรับปรุงเพื่อเพิ่มความเหมาะสมต่อการผลิตได้หรือไม่? วิศวกรผู้เชี่ยวชาญด้านการผลิตแม่พิมพ์มักมองเห็นโอกาสในการลดต้นทุนที่นักออกแบบชิ้นส่วนอาจมองข้ามไป
- ขีดความสามารถในการจำลอง พวกเขาใช้ซอฟต์แวร์ CAE เพื่อยืนยันความถูกต้องของแบบแปลนก่อนการผลิตแม่พิมพ์หรือไม่? การลงทุนในเทคโนโลยีป้องกันข้อบกพร่องนี้ช่วยลดต้นทุนรวมในการเป็นเจ้าของสินค้าของคุณโดยตรง
- ความเร็วในการทำต้นแบบ: พวกเขาสามารถจัดส่งชิ้นส่วนต้นแบบได้เร็วเพียงใด? ผู้จัดจำหน่ายชั้นนำบางรายสามารถให้บริการต้นแบบแบบเร่งด่วนภายในเวลาเพียง 5 วัน
- คุณภาพตามมาตรฐาน OEM: สำหรับการใช้งานในอุตสาหกรรมยานยนต์ พวกเขาสามารถแสดงหลักฐานประสบการณ์ในการปฏิบัติตามข้อกำหนดด้านคุณภาพของผู้ผลิตรถยนต์รายใหญ่ (OEM) ได้หรือไม่?
ความสัมพันธ์ระหว่างการสนับสนุนด้านวิศวกรรมกับต้นทุนรวมนั้นขยายออกไปไกลกว่าการผลิตแม่พิมพ์ในระยะเริ่มต้นเท่านั้น ผู้จัดจำหน่ายอย่าง เส้าอี้ ซึ่งได้รับการรับรองมาตรฐาน IATF 16949 และมีความสามารถด้านการจำลองด้วยซอฟต์แวร์ CAE ขั้นสูง สามารถบรรลุอัตราการอนุมัติครั้งแรกได้สูงถึง 93% — หมายความว่ามีจำนวนรอบการปรับปรุงแบบน้อยลง ของเสียน้อยลง และสามารถเร่งการผลิตเชิงพาณิชย์ได้รวดเร็วขึ้น ความสามารถแบบครบวงจรของพวกเขาในการออกแบบและผลิตแม่พิมพ์ ควบคู่ไปกับความเชี่ยวชาญด้านต้นแบบแบบเร่งด่วนและการผลิตในปริมาณสูง สะท้อนให้เห็นอย่างชัดเจนว่าผู้จัดจำหน่ายที่เน้นด้านวิศวกรรมสามารถสร้างมูลค่าเพิ่มได้มากกว่าเพียงแค่การเสนอราคาที่แข่งขันได้
เมื่อคุณได้ประเมินผู้จัดจำหน่ายครบทุกด้านที่กล่าวมา—ทั้งใบรับรองคุณภาพ ความสามารถด้านวิศวกรรม ประสิทธิภาพในการสื่อสาร และปัจจัยต้นทุนรวมแล้ว คุณจะพร้อมตัดสินใจอย่างมีข้อมูล ซึ่งไม่เพียงตอบสนองความต้องการในระยะสั้น แต่ยังสอดคล้องกับมูลค่าของความร่วมมือเชิงกลยุทธ์ในระยะยาวด้วย
การตัดสินใจลงทุนในชุดแม่พิมพ์ตัดโลหะอย่างเหมาะสม
คุณได้รับรู้ข้อมูลจำนวนมากแล้ว—ทั้งรูปแบบการจัดวาง วัสดุที่ใช้ แอปพลิเคชัน การดำเนินการบำรุงรักษา และเกณฑ์การประเมินผู้จัดจำหน่าย บัดนี้ถึงเวลาที่จะรวบรวมทุกสิ่งเข้าด้วยกันเป็นกรอบการตัดสินใจที่สามารถนำไปใช้งานจริงได้ แล้วคุณจะระบุรายละเอียดทางเทคนิคของชุดแม่พิมพ์ตัดโลหะอย่างไร เพื่อให้สอดคล้องกับความต้องการเฉพาะของแอปพลิเคชัน ปริมาณการผลิต ความแม่นยำที่จำเป็น และข้อจำกัดด้านงบประมาณ โดยไม่เกิดกรณีออกแบบเกินความจำเป็น (over-engineering) หรือลงทุนต่ำเกินไป (under-investing)?
มาสร้างแนวทางเชิงระบบซึ่งจะเปลี่ยนความรู้ทั้งหมดนี้ให้กลายเป็นการตัดสินใจซื้อที่สามารถลงมือปฏิบัติได้จริง
การจัดทำรายการตรวจสอบข้อกำหนดสำหรับชุดแม่พิมพ์ตัดโลหะ
ก่อนติดต่อผู้จัดจำหน่ายใดๆ หรือค้นหาแคตตาล็อกใดๆ โปรดตอบคำถามพื้นฐานเหล่านี้ก่อน คำตอบของท่านจะเป็นรากฐานสำคัญสำหรับการตัดสินใจเกี่ยวกับข้อกำหนดทั้งหมดที่ตามมา:
- ท่านกำลังดำเนินการด้านใด? การตัดวัสดุ (Blanking), การเจาะรู (Piercing), การขึ้นรูป (Forming), การดึงขึ้นรูป (Drawing) หรือการขึ้นรูปแบบหลายสถานีแบบต่อเนื่อง (Progressive Multi-station)? การดำเนินการแต่ละประเภทมีความต้องการในด้านความแข็งแกร่งและความเที่ยงตรงที่แตกต่างกัน ซึ่งส่งผลต่อการเลือกโครงสร้างโดยรวม
- ท่านกำลังขึ้นรูปวัสดุชนิดใด? ประเภทวัสดุ ความหนา และความแข็งของวัสดุส่งผลโดยตรงต่อความต้องการแรงกด (tonnage) ซึ่งจะกำหนดความหนาของฐานแม่พิมพ์ (die shoe) และขนาดเส้นผ่านศูนย์กลางของเสาค้ำยัน (post diameter)
- ปริมาณการผลิตเป้าหมายของท่านคือเท่าใด? ชุดชิ้นส่วนแม่พิมพ์ที่ออกแบบมาเพื่อผลิตชิ้นงาน 50,000 ชิ้น จะแตกต่างอย่างมากจากชุดที่ออกแบบมาเพื่อใช้งาน 5 ล้านรอบ ความคาดหวังด้านปริมาณการผลิตจะเป็นตัวกำหนดการเลือกวัสดุและระดับคุณภาพที่เหมาะสม
- ชิ้นส่วนของท่านต้องการความแม่นยำระดับใด? ความคลาดเคลื่อนที่วัดเป็นเศษพันส่วนนิ้ว (thousandths of an inch) เทียบกับเศษร้อยส่วนนิ้ว (hundredths of an inch) จำเป็นต้องใช้ระบบนำทาง (guide system) และโครงสร้างเสาค้ำยันที่แตกต่างกัน
- แม่พิมพ์ชุดนี้จะถูกใช้งานกับเครื่องกดชนิดใด? ความสูงขณะปิด (Shut height), ความยาวช่วงการเคลื่อนที่ (stroke length), ความสามารถในการรับน้ำหนัก (tonnage capacity) และขนาดของฐาน (bed dimensions) ล้วนมีผลจำกัดตัวเลือกชุดแม่พิมพ์ (die set) ของคุณ
เมื่อคุณบันทึกคำตอบเหล่านี้ไว้แล้ว คุณจะได้กำหนดพารามิเตอร์ที่ใช้เป็นแนวทางในการตัดสินใจเกี่ยวกับข้อกำหนดต่าง ๆ ที่ตามมาทั้งหมด การข้ามขั้นตอนนี้ไปอาจทำให้คุณเสี่ยงต่อการซื้อชุดแม่พิมพ์สำหรับเครื่องกด (press applications) ที่ไม่สอดคล้องกับความต้องการจริงของคุณ
เกณฑ์การตัดสินใจระหว่างชุดแม่พิมพ์แบบมาตรฐานกับแบบเฉพาะทาง
นี่คือคำถามที่ผู้ซื้อหลายคนพบว่ายาก: กรณีใดที่ชุดแม่พิมพ์แบบมาตรฐานจากรายการสินค้าจึงเหมาะสม และกรณีใดที่คุณควรลงทุนในโซลูชันที่ออกแบบเฉพาะทาง?
ชุดแม่พิมพ์แบบมาตรฐานจากรายการสินค้า เหมาะสำหรับการใช้งานที่ความต้องการของคุณสอดคล้องกับรูปแบบและขนาดทั่วไป โดยมีข้อดีคือจัดส่งได้รวดเร็ว ต้นทุนเบื้องต้นต่ำ และมีการออกแบบที่ผ่านการพิสูจน์แล้ว สำหรับงานต้นแบบ งานผลิตในปริมาณต่ำ หรืองานตัดและเจาะแบบง่าย ๆ ชุดแม่พิมพ์แบบมาตรฐานมักให้คุณค่าที่โดดเด่น
อย่างไรก็ตาม ชุดแม่พิมพ์มาตรฐานมีข้อจำกัดบางประการ ตำแหน่งของเสาที่คงที่อาจไม่เหมาะสมที่สุดสำหรับการปฏิบัติงานเฉพาะของคุณ ความหนาของฐานแม่พิมพ์มาตรฐานอาจไม่สอดคล้องกับความต้องการแรงกด (tonnage) ของคุณ ทั้งในแง่ที่น้อยเกินไปหรือมากเกินไป และขนาดที่ระบุในแคตตาล็อกอาจไม่สามารถใช้ศักยภาพของเครื่องกดได้อย่างมีประสิทธิภาพสูงสุด
โซลูชันแม่พิมพ์แบบกำหนดเอง กลายเป็นการลงทุนที่ชาญฉลาดยิ่งขึ้นเมื่อ:
- ข้อกำหนดด้านแม่พิมพ์สำหรับเครื่องกดของคุณไม่สอดคล้องกับขนาดมาตรฐานที่ระบุในแคตตาล็อก
- ปริมาณการผลิตเพียงพอที่จะคุ้มค่ากับการลงทุนครั้งแรกที่สูงขึ้น เพื่อให้ได้ประสิทธิภาพที่ดีขึ้น
- ความแม่นยำของชิ้นส่วนที่ต้องการนั้นสูงกว่าความสามารถในการจัดแนวที่แม่พิมพ์มาตรฐานสามารถให้ได้
- การปฏิบัติงานของคุณต้องการคุณสมบัติพิเศษ เช่น ตำแหน่งของเสาที่ไม่ใช่มาตรฐาน เซ็นเซอร์แบบฝังในตัว หรือรูปแบบแผ่นแม่พิมพ์ที่ไม่เหมือนใคร
- การวิเคราะห์ต้นทุนรวมตลอดอายุการใช้งาน (Total cost of ownership) แสดงให้เห็นว่าคุณภาพระดับพรีเมียมคุ้มค่ากว่าการประหยัดต้นทุนในระยะเริ่มต้น
การตัดสินใจมักขึ้นอยู่กับเกณฑ์ปริมาณการผลิต โดยทั่วไปแล้ว เมื่อปริมาณการผลิตต่อปีเกิน 100,000 ชิ้น หรือปริมาณการผลิตรวมตลอดอายุการใช้งานเกิน 1 ล้านรอบ การใช้ชุดแม่พิมพ์ที่ออกแบบเฉพาะสำหรับงานนั้นมักให้ผลตอบแทนจากการลงทุน (ROI) ที่เป็นบวก ผ่านการลดค่าใช้จ่ายในการบำรุงรักษา เพิ่มอายุการใช้งาน และยกระดับความสม่ำเสมอของชิ้นส่วน
ตารางตัดสินใจกำหนดรายละเอียดชุดแม่พิมพ์
ใช้กรอบแนวทางนี้เพื่อจับคู่ลักษณะการใช้งานของคุณกับข้อแนะนำด้านข้อกำหนด:
| ลักษณะการใช้งาน | ปริมาณต่ำ (< 50,000 ชิ้น/ปี) | ปริมาณปานกลาง (50,000–500,000 ชิ้น/ปี) | ปริมาณสูง (> 500,000 ชิ้น/ปี) |
|---|---|---|---|
| การตั้งค่า | สามารถใช้ชุดแม่พิมพ์แบบสองเสาได้ตามมาตรฐาน | แนะนำให้ใช้ชุดแม่พิมพ์แบบสี่เสาเพื่อความแม่นยำสูง | จำเป็นต้องใช้ชุดแม่พิมพ์แบบสี่เสาที่มีระบบนำทางด้วยลูกกลิ้งแบริ่ง |
| วัสดุทำพิมพ์ | อลูมิเนียมหรือเหล็กกล้าคาร์บอนต่ำ | โลหะผสมเหล็กกล้าที่ผ่านการชุบแข็งเบื้องต้นแล้ว | เหล็กกล้าสำหรับแม่พิมพ์ที่ผ่านการชุบแข็ง (D2, A2) |
| ระบบไกด์ | สามารถใช้หมุดเสียดทานได้ | แนะนำให้ใช้ลูกปืน | ลูกปืนพร้อมระบบหล่อลื่นอัตโนมัติ |
| ระดับความทนทาน | เชิงพาณิชย์มาตรฐาน | ระดับความแม่นยำ | ความแม่นยำสูงพิเศษ พร้อมใบรับรองที่ระบุไว้อย่างชัดเจน |
| ชั้นผู้จัดจำหน่าย | ผู้จัดจำหน่ายแคตตาล็อกมาตรฐาน | ผู้จัดจำหน่ายที่มีศักยภาพด้านวิศวกรรม | ได้รับการรับรองตามมาตรฐาน IATF 16949 พร้อมความสามารถในการจำลองด้วย CAE |
| ลำดับความสำคัญในการลงทุน | ลดต้นทุนเบื้องต้นให้น้อยที่สุด | สมดุลระหว่างต้นทุนกับอายุการใช้งาน | เพิ่มมูลค่าต้นทุนรวมตลอดอายุการใช้งาน (TCO) ให้สูงสุด |
เมทริกซ์นี้ให้คำแนะนำเป็นจุดเริ่มต้นเท่านั้น — สถานการณ์เฉพาะของคุณอาจจำเป็นต้องปรับเปลี่ยน ตัวอย่างเช่น การผลิตชิ้นส่วนที่เกี่ยวข้องกับความปลอดภัยในปริมาณต่ำ อาจมีเหตุผลเพียงพอที่จะใช้ข้อกำหนดระดับปริมาณสูง ในทางกลับกัน การผลิตชิ้นส่วนที่ไม่เกี่ยวข้องกับความปลอดภัยในปริมาณสูง อาจยอมรับระดับคุณภาพระดับปริมาณปานกลางได้
เมื่อคุณภาพระดับพรีเมียมสร้างผลตอบแทนจากการลงทุน (ROI)
การลงทุนมากขึ้นในเบื้องต้นสำหรับชุดแม่พิมพ์ขึ้นรูปโลหะจะให้ผลตอบแทนที่คุ้มค่า เมื่อการวิเคราะห์ตัวเลขสอดคล้องกับผลประโยชน์ของคุณ โปรดพิจารณาสถานการณ์ต่อไปนี้ ซึ่งคุณภาพระดับพรีเมียมของชุดแม่พิมพ์จะสร้างผลตอบแทนที่วัดผลได้:
ช่วงเวลาการบำรุงรักษาที่ยาวนานขึ้น: แม่พิมพ์เครื่องอัดไฮดรอลิกที่ผลิตจากเหล็กกล้าสำหรับทำแม่พิมพ์ที่ผ่านการชุบแข็งและมีระบบนำทางด้วยลูกปืนแบบความแม่นยำสูง อาจมีราคาสูงกว่าทางเลือกมาตรฐานถึง 40% แต่หากสามารถทำงานได้เพิ่มขึ้นอีก 500,000 รอบก่อนต้องเข้ารับการบำรุงรักษา และแต่ละครั้งที่ต้องบำรุงรักษานั้นมีค่าใช้จ่าย $2,000 สำหรับค่าแรงและเวลาหยุดการผลิต การลงทุนเพิ่มเติมนี้จะคืนทุนได้อย่างรวดเร็ว
ลดอัตราของเสีย: ความแม่นยำในการจัดแนวที่ดีขึ้นหมายถึงชิ้นส่วนที่ไม่เป็นไปตามข้อกำหนดมีจำนวนน้อยลง หากการอัปเกรดจากชุดแม่พิมพ์มาตรฐานไปเป็นชุดแม่พิมพ์ระดับความแม่นยำสูงสามารถลดของเสียได้เพียง 0.5% ในการผลิตชิ้นส่วนหนึ่งล้านชิ้น ค่าประหยัดจากวัสดุเพียงอย่างเดียวก็มักจะเกินความแตกต่างของต้นทุนแล้ว
การเปลี่ยนแม่พิมพ์เร็วขึ้น: ชุดแม่พิมพ์ที่ออกแบบมาพร้อมระบบจัดแนวแบบความแม่นยำสูงช่วยลดเวลาการตั้งค่า เนื่องจากผู้ปฏิบัติงานใช้เวลาน้อยลงในการปรับแต่งและปรับค่าต่าง ๆ ทั้งนี้ หากมีการเปลี่ยนแม่พิมพ์สัปดาห์ละหนึ่งครั้ง และแต่ละนาทีของการหยุดการผลิตมีค่าใช้จ่าย $50 นาทีที่ประหยัดได้เหล่านี้จะสะสมขึ้นอย่างรวดเร็ว
คุณภาพชิ้นส่วนที่สม่ำเสมอ: ชุดแม่พิมพ์ระดับพรีเมียมสามารถรักษาความแม่นยำด้านมิติได้นานขึ้นตลอดระยะเวลาการผลิต ความสม่ำเสมอนี้ช่วยลดปัญหาคุณภาพที่หลุดรอดออกไป ลดคำร้องเรียนจากลูกค้า และลดต้นทุนแฝงที่เกิดจากการจัดการวัสดุที่ไม่เป็นไปตามข้อกำหนด
การร่วมมือกับผู้จัดจำหน่ายที่มุ่งเน้นด้านวิศวกรรม
องค์ประกอบสุดท้ายของกรอบการตัดสินใจของคุณคือการเลือกผู้จัดจำหน่ายที่ให้มากกว่าสินค้าทั่วไป ด้วยการร่วมมือกับผู้ผลิตที่มุ่งเน้นด้านวิศวกรรม คุณจะได้เข้าถึงขีดความสามารถที่ช่วยป้องกันปัญหาก่อนที่จะเกิดขึ้น
มองหาซัพพลายเออร์ที่ให้บริการ:
- ขีดความสามารถในการออกแบบและผลิตแม่พิมพ์อย่างครบวงจร: ผู้จัดจำหน่ายแบบรวมแหล่งเดียวซึ่งดำเนินการตั้งแต่การออกแบบจนถึงการผลิต จะช่วยขจัดช่องว่างในการสื่อสารระหว่างผู้จัดจำหน่ายหลายราย
- บริการต้นแบบอย่างรวดเร็ว: ความสามารถในการตรวจสอบความถูกต้องของแบบออกแบบได้อย่างรวดเร็ว — ผู้จัดจำหน่ายขั้นสูงบางรายสามารถจัดส่งต้นแบบได้ภายในเวลาเพียง 5 วัน ซึ่งช่วยเร่งระยะเวลาในการนำผลิตภัณฑ์ออกสู่ตลาด และลดต้นทุนการปรับปรุงซ้ำ
- การจำลองด้วย CAE: การป้องกันข้อบกพร่องผ่านวิศวกรรมที่ใช้คอมพิวเตอร์ช่วย (CAE) จะช่วยตรวจจับปัญหาในขั้นตอนการออกแบบ ซึ่งการแก้ไขในขั้นตอนนี้มีต้นทุนเพียงเศษสตางค์ ไม่ใช่หลายพันบาท
- ความเชี่ยวชาญด้านการผลิตในปริมาณสูง: ผู้จัดจำหน่ายที่มีประสบการณ์ในการขยายการผลิตจากต้นแบบไปสู่การผลิตในปริมาณจริง จะเข้าใจระบบควบคุมคุณภาพที่จำเป็นสำหรับการผลิตในปริมาณสูงอย่างสม่ำเสมอ
- คุณภาพตามมาตรฐาน OEM: การรับรองมาตรฐาน IATF 16949 และอัตราการผ่านการอนุมัติครั้งแรกที่สูงกว่า 90% แสดงให้เห็นถึงระบบคุณภาพที่มีความพร้อมและสุกงอมแล้ว
โซลูชันแม่พิมพ์ขึ้นรูปความละเอียดสูงของ Shaoyi เป็นตัวอย่างที่ชัดเจนของแนวทางวิศวกรรมเชิงรุกนี้ ด้วยการรับรองมาตรฐาน IATF 16949 การจำลองแบบ CAE ขั้นสูงเพื่อให้ได้ผลลัพธ์ที่ปราศจากข้อบกพร่อง ความสามารถในการสร้างต้นแบบอย่างรวดเร็ว และอัตราการผ่านการอนุมัติครั้งแรกที่ร้อยละ 93 ผู้จัดจำหน่ายเหล่านี้สามารถจัดหาแม่พิมพ์ที่มีประสิทธิภาพด้านต้นทุนและสอดคล้องกับมาตรฐานของผู้ผลิตรถยนต์ (OEM) อย่างแม่นยำ สำหรับการดำเนินงานที่ต้องใช้ชุดแม่พิมพ์ (die sets) ในการประมวลผลด้วยเครื่องกด (press applications) ซึ่งคุณภาพและการสนับสนุนด้านวิศวกรรมมีความสำคัญไม่แพ้ราคา ผู้จัดจำหน่ายที่มีศักยภาพดังกล่าวจึงมอบคุณค่าที่วัดผลได้จริง มากกว่าเพียงแค่ใบเสนอราคาที่แข่งขันกันได้
การตัดสินใจลงทุนในชุดแม่พิมพ์ที่เหมาะสม จำเป็นต้องพิจารณาสมดุลระหว่างข้อจำกัดด้านงบประมาณในทันที กับต้นทุนการดำเนินงานในระยะยาว โดยการประเมินความต้องการของคุณอย่างเป็นระบบ—โดยใช้กรอบแนวคิด ข้อกำหนด และเกณฑ์การคัดเลือกผู้จัดจำหน่ายที่ได้กล่าวไว้ทั้งหมดในคู่มือนี้—คุณจะสามารถเลือกชุดแม่พิมพ์สำหรับการขึ้นรูปโลหะ (metal stamping die sets) ที่ให้สมรรถนะที่เชื่อถือได้ คุณภาพชิ้นส่วนที่สม่ำเสมอ และต้นทุนรวมในการถือครอง (total cost of ownership) ที่เหมาะสมที่สุดสำหรับการใช้งานเฉพาะของคุณ
คำถามที่มักถามเกี่ยวกับชุดแม่พิมพ์ตัดโลหะ
1. การ ราคาเครื่องตีราคาเท่าไหร่
ต้นทุนของแม่พิมพ์ตัดโลหะอยู่ในช่วง 500 ถึง 15,000 ดอลลาร์สหรัฐขึ้นไป ขึ้นอยู่กับระดับความซับซ้อน ขนาด ข้อกำหนดวัสดุ และปริมาณการผลิตที่คาดการณ์ไว้ แม่พิมพ์ตัดแบบง่าย (blanking dies) สำหรับการผลิตจำนวนน้อยจะมีราคาอยู่ในระดับต่ำสุด ขณะที่แม่พิมพ์แบบค่อยเป็นค่อยไป (progressive dies) ที่มีหลายสถานีสำหรับการใช้งานในอุตสาหกรรมยานยนต์ที่ต้องการปริมาณสูง จะมีราคาสูงกว่าปกติ นอกเหนือจากต้นทุนเริ่มต้นแล้ว ควรพิจารณาต้นทุนรวมตลอดอายุการใช้งาน (total cost of ownership) ซึ่งรวมถึงช่วงเวลาในการบำรุงรักษา อายุการใช้งานที่คาดการณ์ไว้ และความสม่ำเสมอของชิ้นส่วนที่ผลิตได้ — ชุดแม่พิมพ์คุณภาพสูงที่ผลิตจากเหล็กกล้าสำหรับทำแม่พิมพ์ (tool steel) ที่ผ่านการชุบแข็งมักให้ผลตอบแทนจากการลงทุน (ROI) ที่ดีกว่า เนื่องจากมีอายุการใช้งานยาวนานขึ้นและอัตราของชิ้นส่วนเสียลดลง
2. ความแตกต่างระหว่างการตัดด้วยแม่พิมพ์ (die cut) กับการตัดขึ้นรูป (stamping) คืออะไร
การตัดด้วยแม่พิมพ์ (Die cutting) และการขึ้นรูปด้วยแม่พิมพ์ (Stamping) เป็นกระบวนการขึ้นรูปโลหะที่แตกต่างกัน โดยมีสถานะของวัสดุและลักษณะการใช้งานที่ไม่เหมือนกัน การหล่อแบบแรงดันสูง (Die casting) ใช้โลหะในสถานะหลอมเหลว ซึ่งถูกให้ความร้อนจนเกินจุดหลอมเหลว จากนั้นเทลงในแม่พิมพ์เพื่อผลิตชิ้นส่วนสามมิติที่มีความซับซ้อนจากแท่งโลหะสำเร็จรูป (ingots) หรือแท่งโลหะรูปทรงกระบอก (billets) ส่วนการขึ้นรูปด้วยแม่พิมพ์ (Metal stamping) มักเป็นกระบวนการขึ้นรูปเย็น (cold working) เสมอ ซึ่งใช้วัสดุแผ่นโลหะ (sheet metal blanks) หรือม้วนโลหะ (coils) แล้วใช้แรงกลผ่านแม่พิมพ์เพื่อตัด ดัด หรือขึ้นรูปวัสดุแผ่นให้ได้รูปร่างตามที่ต้องการ การขึ้นรูปด้วยแม่พิมพ์เหมาะสำหรับผลิตชิ้นส่วนแบบแบนในปริมาณมากอย่างรวดเร็ว ในขณะที่การหล่อแบบแรงดันสูงเหมาะยิ่งกว่าสำหรับผลิตชิ้นส่วนสามมิติที่มีความซับซ้อน
3. แม่พิมพ์ตัดขึ้นรูปโลหะมีกี่ประเภท และมีอะไรบ้าง?
ประเภทการตีขึ้นรูปโลหะหลักสี่แบบ ได้แก่ การตีขึ้นรูปแบบไดโหมดก้าวหน้า (progressive die stamping), การตีขึ้นรูปแบบไดโหมดถ่ายโอน (transfer die stamping), การตีขึ้นรูปแบบดึงลึก (deep draw stamping) และการตีขึ้นรูปแบบไมโคร/มินิเอเจอร์ (micro/miniature stamping) การตีขึ้นรูปแบบไดโหมดก้าวหน้าจะเคลื่อนวัสดุรูปแถบผ่านสถานีต่างๆ หลายสถานีภายในแม่พิมพ์ชุดเดียว เพื่อการผลิตปริมาณสูงอย่างมีประสิทธิภาพ การตีขึ้นรูปแบบไดโหมดถ่ายโอนใช้ระบบถ่ายโอนเชิงกลในการเคลื่อนชิ้นงานแต่ละชิ้นระหว่างสถานีแม่พิมพ์ที่แยกจากกัน ซึ่งเหมาะสำหรับชิ้นส่วนที่มีขนาดใหญ่กว่าหรือซับซ้อนมากขึ้น การตีขึ้นรูปแบบดึงลึกจะขึ้นรูปแผ่นโลหะแบนให้กลายเป็นชิ้นส่วนรูปถ้วยหรือเปลือก การตีขึ้นรูปแบบไมโครจะผลิตชิ้นส่วนความแม่นยำสูงที่มีขนาดเล็กมากสำหรับอุปกรณ์อิเล็กทรอนิกส์และอุปกรณ์ทางการแพทย์
4. วัสดุชนิดใดเหมาะสมที่สุดสำหรับฐานแม่พิมพ์ (die shoes) ในการตีขึ้นรูปโลหะ?
วัสดุที่เหมาะสมที่สุดสำหรับฐานแม่พิมพ์ขึ้นอยู่กับการใช้งานเฉพาะของคุณ โลหะเครื่องมือ (เช่น เหล็กกล้า D2, A2, S7) มีความต้านทานการสึกหรอและความแข็งสูงที่สุดหลังผ่านกระบวนการอบร้อน จึงเหมาะสำหรับแม่พิมพ์ความแม่นยำที่ใช้งานได้นับล้านรอบ แผ่นเหล็กหล่อให้ความสามารถในการดูดซับการสั่นสะเทือนและรักษาความคงตัวของมิติได้ดีเยี่ยมในราคาที่ต่ำกว่า จึงเหมาะสำหรับงานขึ้นรูปหนัก อลูมิเนียมอัลลอยลดน้ำหนักลงได้ถึงสองในสามเมื่อเปรียบเทียบกับเหล็ก ช่วยเพิ่มความปลอดภัยให้ผู้ปฏิบัติงานและลดการสึกหรอของเครื่องกด—จึงเหมาะที่สุดสำหรับการผลิตต้นแบบและการผลิตในปริมาณน้อย อัลลอยเหล็ก เช่น 4140 ให้สมดุลระหว่างความเหนียวและความสามารถในการกลึงที่ดี จึงเหมาะสำหรับการใช้งานทั่วไป
5. ควรเลือกชุดแม่พิมพ์แบบสี่เสาแทนแบบสองเสาเมื่อใด
เลือกชุดแม่พิมพ์แบบสี่เสาเมื่อความแม่นยำ ความแข็งแกร่ง และความมั่นคงของการจัดแนวมีความสำคัญอย่างยิ่ง—โดยเฉพาะสำหรับแม่พิมพ์แบบต่อเนื่อง (progressive dies) การทำงานด้วยความเร็วสูง การตัดวัสดุหนักเกิน 100 ตัน และการขึ้นรูปแบบดึงลึก (deep drawing) โครงสร้างแบบสี่เสาจะรองรับแผ่นฐานด้านบน (upper shoe) ที่จุดสี่จุด ทำให้แรงกระจายตัวอย่างสม่ำเสมอ และป้องกันการโก่งตัวซึ่งเป็นสาเหตุของรอยคมเกิน (burrs) และความคลาดเคลื่อนของขนาด (dimensional drift) ส่วนโครงสร้างแบบสองเสาพร้อมเสาเสริมด้านหลัง (two-post back-post configurations) เหมาะสำหรับงานที่มีความซับซ้อนน้อยกว่า ซึ่งต้องการให้ผู้ปฏิบัติงานสามารถเข้าถึงเพื่อป้อนวัสดุหรือถอดชิ้นงานออก เช่น การตัดและเจาะแบบป้อนวัสดุด้วยมือ (manual-feed blanking and piercing) ที่มีข้อกำหนดด้านความแม่นยำในระดับปานกลาง