 Malé šarže, vysoké standardy. Naše služba rychlého prototypování zrychluje a zjednodušuje ověřování —

Automobilové karosářské díly pro trh s náhradními díly (aftermarket): přestaňte platit nadměrné ceny
Pochopte trh s karosářskými díly pro automobily
Nikdy jste se zamýšleli nad tím, co ve skutečnosti tvoří vnější plášť vašeho automobilu – a proč je tak důležité získat správné díly? Pokud jde o karosářské díly automobilů, znalost toho, co co je, vám může ušetřit peníze, zabránit potížím a zajistit, aby váš vůz zůstal v bezpečném stavu a dobře vypadal. Pojďme rozebrat základy, objasnit matoucí termíny a ukázat vám, proč právě správná rozhodnutí dělají rozdíl – ať už jste amatér, nebo zkušený odborník.
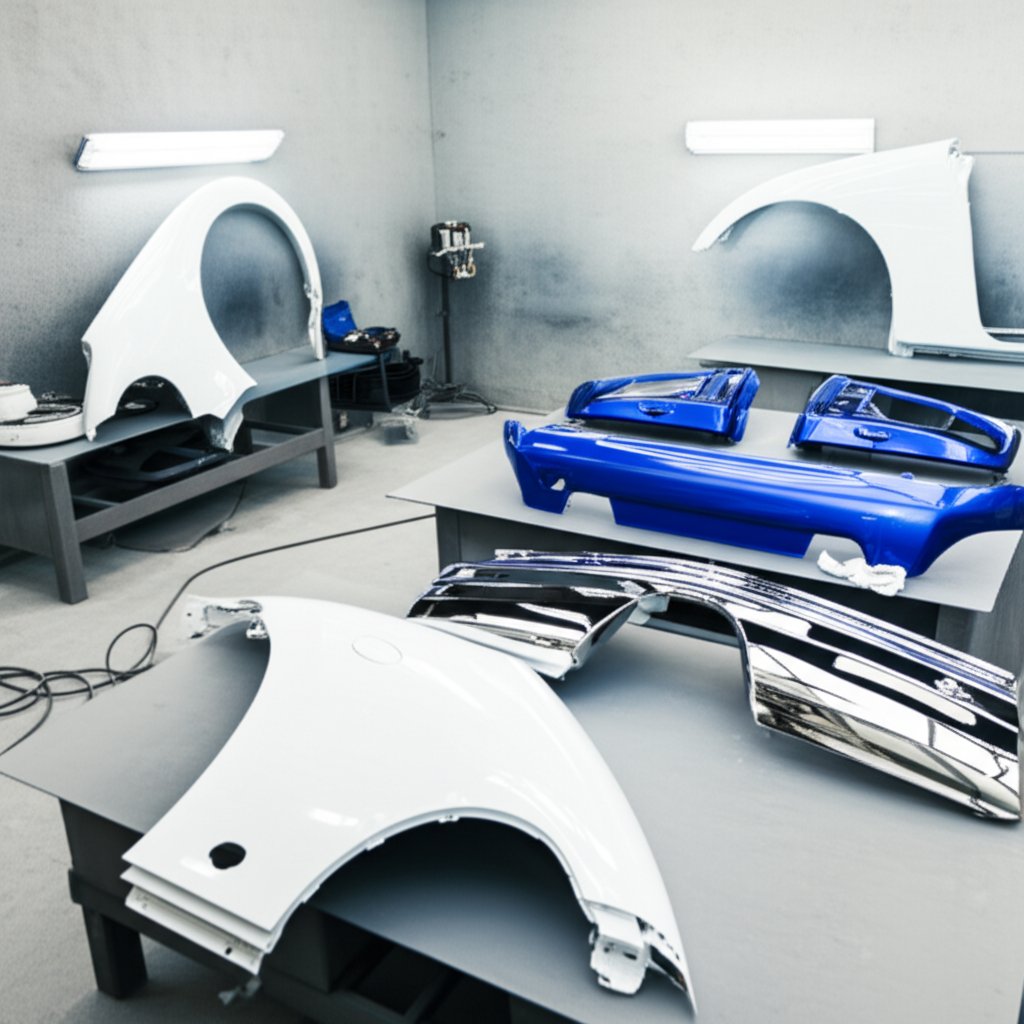
Co zahrnují karosářské díly automobilů
Karosářské díly automobilů označují vnější komponenty, které tvoří tvar vašeho vozu a chrání vše, co je uvnitř. Tyto díly se liší od mechanických částí, které zajišťují pohyb nebo funkčnost vozidla. Karosářské panely a související díly nejenže určují vzhled vašeho automobilu, ale také hrají klíčovou roli z hlediska bezpečnosti, aerodynamiky, odolnosti proti korozi a dokonce i prodejní hodnoty vozu (více informací) .
- Konstrukční panely: Podvozek, karosérie, sloupky, prahy, zadní boční panely
- Připojované panely: Kapota, blatníky, dveře, víko zavazadlového prostoru, zadní dvířka
- Soustavy osvětlení: Reflektory, zadní světlomety, mlhové světlomety, směrová světla
- Zasklení: Přední sklo, boční okna, zadní sklo
- Exteriérové lišty: Mřížky, spojlery, zpětná zrcátka, lišty, blátěnky
- Montážní hardware: Panty, zámky, spojovací prvky, držáky
- Náplasti: Základní nátěr, vrstva barvy, průhledný nátěr (vrstvy barvy, které dokončují a chrání povrch)
Rozlišení mezi karoserií a výbavou
Ujasněme běžný bod zmatení: karosárenské díly jsou velké, viditelné části, které tvoří hlavní povrch vašeho automobilu – myšleno kapoty, blatníky, boční panely, dveře a víka zavazadlového prostoru. Tyto karosářské díly vozidla díly jsou zásadní jak pro konstrukci, tak pro vzhled. Dekorativní prvky zahrnují menší části, jako jsou lišty, emblémy a dekorativní pruhy. Zatímco dekorace přidávají styl, karosárenské díly jsou klíčové pro bezpečnost a aerodynamiku.
Představte si, že vyměňujete dveře po nehodě na parkovišti. dveřní panel auta je vnější kovový plášť, zatímco dekorativní prvek může být chromovaný pruh nebo pryžová těsnicí lišta připevněná k němu. Správné pochopení tohoto rozdílu názvy částí karosérie vám pomůže objednat správný díl a vyhnout se nákladným chybám.
Proč nesprávné označení způsobuje nákladné reklamace
Objednání špatného dílu je běžný – a drahý – problém. Spletení nárazníkového krytu s výztuží nárazníku nebo záměna blatníku s bočním panelem může znamenat ztracený čas, dodatečné náklady na dopravu a nátěr, který se nehodí. Každý karosárenský díl automobilu má specifickou funkci a přesnou shodu. Například upravy nárazníků jsou kosmetické a formují vzhled, zatímco samotný absorbér nebo výztuž je ten, který skutečně pohlcuje náraz při nehodě.
Přesná shoda zajišťuje bezpečnost při nárazu a ušetří náklady na lakování.
Navíc moderní vozidla často integrují osvětlení a senzory do karosárie, což činí správnou volbu ještě důležitější pro bezpečnost i dodržení zákonů.
Hierarchie karosářských dílů: od kostry po dokončení
Představte si exteriér vašeho vozidla jako systém vrstev, který začíná konstrukční kostrou (např. podvozkem a sloupky), následovanou přišroubovanými panely (dveře, kapot, kufr), poté sestavami osvětlení a zasklením a nakonec lištami a povrchovými úpravami. Každá vrstva má svou roli v ochraně, utěsnění a dokončení vozidla. Dokonce i jednotlivé vrstvy laku – základní nátěr, krycí vrstva a průhledná ochranná vrstva – jsou považovány za součást karosářského systému, který chrání kov před rezavěním a udržuje váš vůz v novém vzhledu (více informací) .
Pochoení těchto rozdílů usnadňuje identifikaci, získání a instalaci správných panely karoserie nebo vnějších dílech aut pro vaše potřeby. Ať už opravujete zprohýbané blatníky nebo obnovujete celý klasický model, znalost základních částí karoserie je prvním krokem k úspěšné opravě – nebo chytrému nákupu.
Přesná montáž a číslování dílů jednoduše
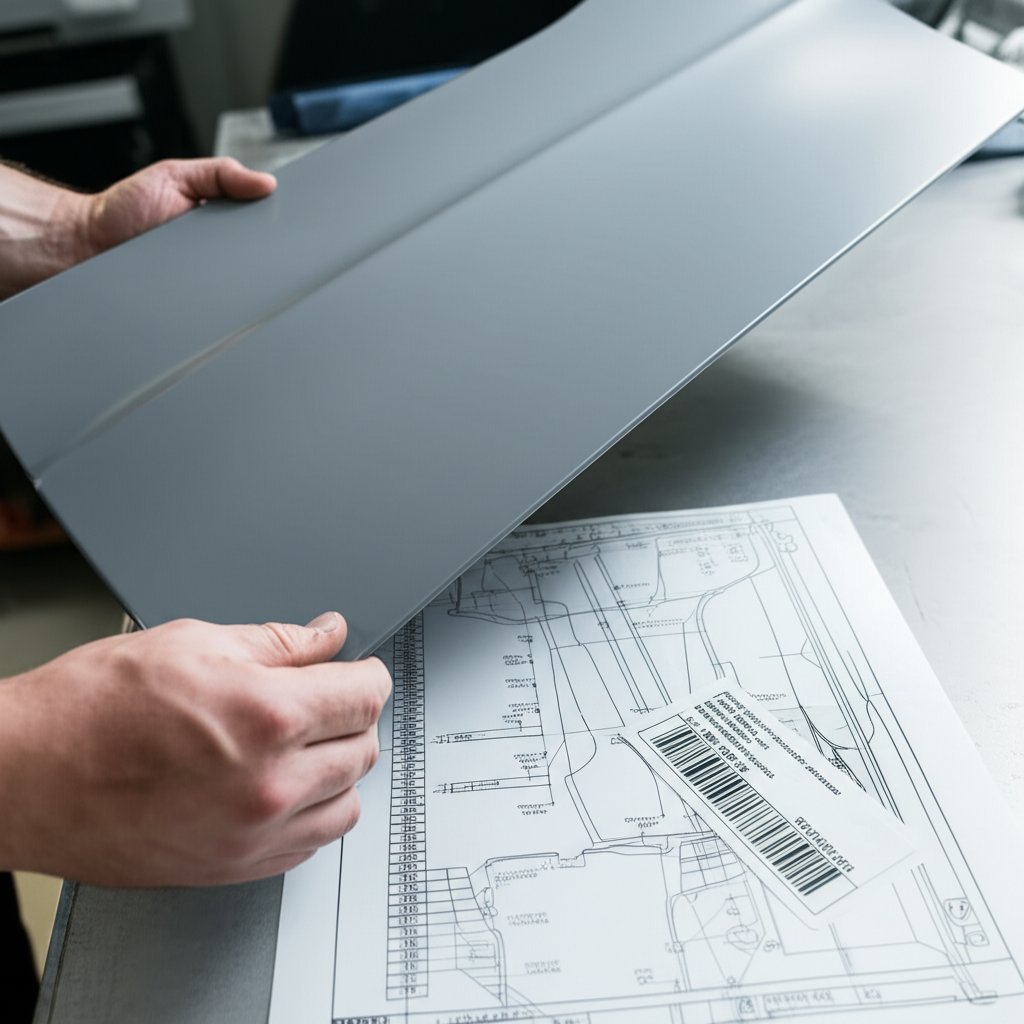
Objednal náhradní dveřní panel auta nebo přední nárazník Kryt – jen abyste zjistili, že nezapadá? Nejste sami. Díky velkému množství výbav, modelových let a jemným konstrukčním úpravám mohou mít i zkušení kutilové a odborníci potíže. Projděme si jednoduchý postup, jak ověřit přesnou montáž, rozluštit ty záhadné kódy a vyhnout se nákladným reklamacím při nákupu automobilových karosářských dílů.
Ověření přesnosti montáže panelů krok za krokem
Zní to složitě? Nemusí to být. Zde je opakovatelný kontrolní seznam pro úspěšné porovnání jakéhokoli karosářského dílu – ať se jedná o náhradní sklo zrcátka nebo kompletní dveře automobilu —pro vaše vozidla:
- Najděte své VIN : Najděte 17místné vozidlové identifikační číslo na přístrojové desce na straně řidiče (viditelné přes čelní sklo), uvnitř dveřního rámu vozidla nebo na vašich registračních a pojišťovacích dokumentech.
- Rozluštěte VIN : Použijte své VIN k získání přesného modelu vozidla, data výroby, výbavy, motoru a dokonce i továrních voleb. Tím se eliminuje hádání, zejména při změnách v průběhu roku nebo speciálních vydáních.
- Zkontrolujte nálepku v dveřním rámu : Najděte zde kód barvy, výbavu a detaily výroby. Nálepka se obvykle nachází na dveřním rámu nebo sloupku na straně řidiče (více informací) .
- Prostudujte návod k obsluze a schémata : Vaše manuály a online katalogy OEM nabízejí diagramy a čísla dílů pro náhradní díly dveří automobilu , náhrada skla světlometu , a další. Porovnejte je s vaším skutečným dílem a místy upevnění.
- Potvrďte polohu dílu : Zkontrolujte, zda potřebujete levou/pravou (LH/RH) nebo přední/zadní. Například přední nárazník není zaměnitelný s nárazníkem zadním a zrcátko se může lišit podle strany nebo výbavy.
| Pole k vyplnění | Proč je to důležité |
|---|---|
| Vin | Zajišťuje přesné odpovídání všem parametrům |
| Datum výroby | Určuje změny v průběhu roku |
| Styl těla | Potvrzuje typ karosérie (sedan, coupé, hatchback apod.) |
| Výbava modelu | Ovlivňuje kompatibilitu senzorů, chromových dílů nebo příslušenství |
| Volitelné senzory | Nezbytné pro ADAS, kamery nebo asistenty parkování |
| Kód barvy | Důležité pro přesné ladění barev na viditelných panelech |
| Pozice dílu (LH/RH, vpředu/vzadu) | Zabraňuje záměně z boku nebo z konce |
| Poznámky k hardwaru | Sleduje jedinečné šrouby nebo pojistky |
Rozdíl mezi OEM a tržními čísly dílů
Představte si prohlížení dílu na dveřní panel auta webu. Uvidíte jak OEM, tak tržní čísla – někdy dokonce pro stejný díl. V čem je rozdíl?
- OEM čísla dílů : Přidělena výrobcem vašeho vozidla, zaručují přesnou shodu. Najdete je v návodu k vozidlu, na samotném dílu nebo v katalozích u prodejce. Například objednání OEM přední nárazník Kryt zaručí správné uložení a umístění upevňovacího senzoru.
- Tržní čísla dílů : Přidělováno výrobci třetí strany, mohou odkazovat na čísla OEM, ale mohou se lišit v příponách, výbavě nebo kompatibilitě. Vždy před nákupem ověřte pomocí svého VIN a diagramů.
- Přípony a revize : Čísla dílů mohou končit dalšími číslicemi nebo písmeny, které označují aktualizace, upevnění senzorů nebo typy povrchu. Například zrcátko s integrovaným směrovým světlem bude mít jiné číslo než základní model.
Pokud máte pochybnosti, požádejte prodejce o diagram nebo fotografii a porovnejte počet a umístění upevňovacích otvorů a konektorů s vaším stávajícím dílem.
Zamezení nesouladu modelového roku a výbavy
Všimli jste si někdy, jak dva automobily ze stejného roku mohou mít rozdílné dveře auta nebo potahy nárazníků? Výrobci často aktualizují karosářské prvky uprostřed výrobního roku nebo nabízejí speciální výbavy s jedinečnými lištami, senzory nebo osvětlením. Proto je před objednáním klíčové potvrzení VIN a výbavy.
- Vždy ověřte shodu dveřního rámu vozidla nebo panelu pomocí katalogů založených na VIN.
- Zkontrolujte diagramy pro výřezy senzorů, chromové detaily nebo upevňovací lístky.
- Nepokládejte se pouze na vizuální podobnost – drobné rozdíly jsou důležité pro správné sednutí a funkci.
Když tyto kroky dodržíte, vyhnete se frustraci z vrácení a zajistíte dokonalé sednutí nové součásti – ať už jde o náhrada skla světlometu nebo kompletní dveře automobilu Dále si probereme materiálové specifikace a způsoby spojování, které zajišťují pevnost a odolnost panelů proti rezavění.
Specifikace materiálů a způsoby spojování karosářských panelů
Nikdy jste se zamýšleli nad tím, proč některé opravy automobilů vydrží roky, zatímco jiné rezaví nebo se rozpadají během několika měsíců? Odpověď často spočívá v materiálech a metodách spojování použitých u karosářských dílů. Pojďme si rozebrat, co potřebujete vědět o konstrukci panelů, svařovacích technikách a správném způsobu ochrany proti korozi – aby vaše opravy odolaly zkoušce času.
Běžné materiály panelů a kde se vyskytují
Když se podíváte na karosářské díly automobilu, všimnete si směsi materiálů, z nichž každý byl vybrán pro konkrétní účel. Zde je, jak se tyto materiály obvykle rozdělují:
- Válcovaná ocel: Většinu karosářské díly vozidla —jako dveře, kapot a boční kryty—jsou vyrobeny z lisované oceli. Je silná, cenově dostupná a snadno opravitelná.
- Hliník: Stále častěji používaná pro kapoty, víka zavazadlového prostoru a někdy i blatníky, hliníková slitina je lehčí než ocel, ale vyžaduje speciální metody spojování a opatření proti korozi.
- Termoplasty: Nárazníky a některé vnější výkloňky jsou často z plastu (ABS, polypropylenu nebo kompozitů). Tyto materiály jsou pružné a nekorodují, ale obvykle se vyměňují, nikoli opravují.
- Kompozitní materiály: Některá luxusní nebo speciální vozidla používají skleněné vlákno nebo uhlíkové vlákno pro výrobu panelů nebo kryty reflektorů .
| Typ panelu | Běžný Materiál | Způsob montáže | Slučitelnost spojení | Poznámky k přípravě povrchu | Ochrana před korozi |
|---|---|---|---|---|---|
| Kapot, Dveře, Blatník | Lisovaná ocel / Hliník | Svařované, Přišroubované | MIG/TIG/Bodové/Laserové svařování, Strukturální lepidla | Očistit, Odžírkat, Pískování proti rezavění | E-nátěr, Epoxidová základní barva, Těsnění švů |
| Nárazníková obklada | Termoplast | Šroubované, Klikové | Epoxidové pryskyřice pro opravu plastů, Náhrada | Očistit, Broušení, Prostředek na lepící přilnavost plastů | Není náchylný k rezavění, ale může vyžadovat ochranu proti UV záření |
| Kvartový panel | Ocel / Hliník | Svařené, Nýtované, Lepené | Bodové/laserové svařování, nýtování, konstrukční lepidla | Odstraňte barvu, v případě potřeby použijte konvertor rzi | Epoxidový základní nátěr, dutinový vosk |
| Dekorativní lišty, karoserie světlometu | ABS / kompozit | Šroubované, Klikové | Epoxidové lepidla pro opravu plastů | Vyčistěte, zbrousíme, použijte aktivátor | Povlak odolný proti UV záření |
Způsoby spojování, které chrání integritu panelu
Jak se rozhodnete mezi svařováním, lepením nebo nýtováním? Záleží na materiálu a oblasti opravy. Tady je, co potřebujete vědět:
- MIG Svařovač: Nejčastěji používaný pro většinu oprav ocelových panelů. Je uživatelsky přívětivý a rychlý, což ho činí ideálním pro opravy nebo výměny panely karoserie .
- TIG Svařovač: Nabízí větší přesnost, zejména pro tenké nebo speciální kovy, jako je hliník. TIG svařování je pomalejší, ale poskytuje čistší výsledek.
- Bodové svařování: Používáno továrnami a někdy i při opravách pro spojování překrývajících se kovových plechů – výborné pro dveřní plechy a zadní boční panely.
- Laserová svařování: Zajišťuje vysokou přesnost a minimální deformace, zejména u viditelných švů. Je běžnější v průmyslu, ale stále častěji se objevuje i při pokročilých opravách.
- Pojování nýtováním: Užitečné při spojování různorodých materiálů nebo pokud by teplo ze svařování mohlo způsobit deformace. Samovrtné nýty jsou populární pro hliníkové a smíšené materiálové konstrukce.
- Konstrukční lepidla: Moderní lepidla nabízejí silné a pružné spoje a často se používají ve spojení se svařováním bodovými svary (proces známý jako svařování-lepení). Zároveň také zabraňují průniku vlhkosti a snižují vibrace.
Při práci na vašem svarovací stůl , přizpůsobte metodu spojování materiálu. Například ocelové panely jsou často svařované, zatímco hliník může vyžadovat jiný postup – někdy kombinaci laserové svařování a nýtování. Plasty se obecně opravují epoxidovými lepidly nebo rovnou nahrazují novými.
Základy ochrany proti korozi
I nejlepší oprava může selhat, pokud nezajistíte ochranu proti rezavění. Zde jsou základní principy:
- Uchovejte tovární povlaky: Kdykoli je to možné, vyhněte se broušení nebo leštění skrze původní elektroforetický povlak nebo základní nátěr.
- Příprava holého kovu: Pokud odkryjete holou ocel nebo hliník, důkladně je vyčistěte a použijte tryskací zařízení odstraňte veškerou rez před nanášením prevodníku rzi nebo epoxidového základního nátěru.
- Těsnění švů: Po svařování nebo lepení použijte těsnicí prostředek pro švy, který zabrání pronikání vlhkosti do spojů a dutin.
- Ochrana dutin: Naneste do dveří, rozmítačů a jiných uzavřených částí vosk pro dutiny nebo spreje bránící korozi.
- Postupujte podle pokynů výrobce: Vždy zkontrolujte servisní manuál vašeho vozidla ohledně doporučených nátěrů a postupů, zejména pro hliníkové nebo konstrukce z různých materiálů.
Pochopejte materiály a metody spojování karosářských dílů automobilů, díky čemuž nejenže opravy budou vypadat skvěle – zajistíte jejich trvanlivost. V další části se ponoříme do postupů nanášení laku a povrchových úprav, které zajistí, že nové panely budou vypadat jako nové z továrny.
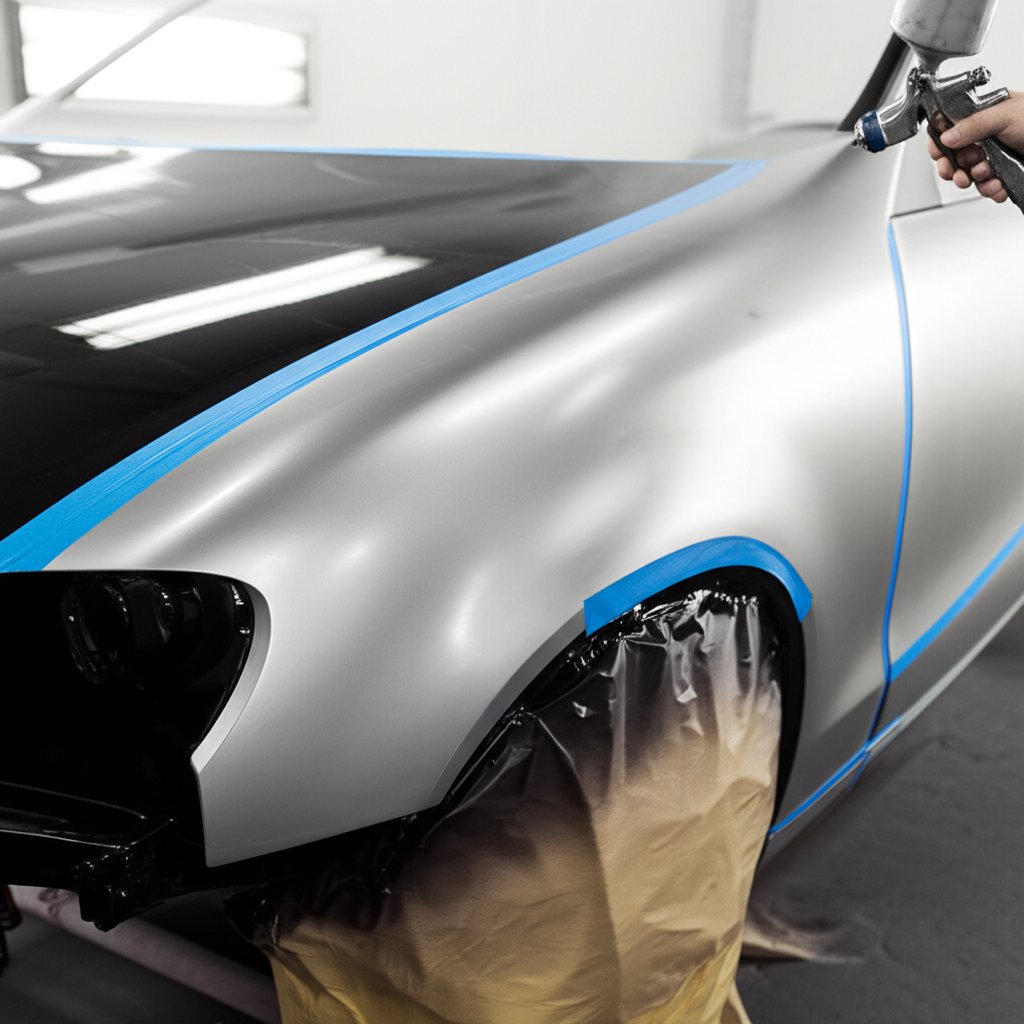
Příprava povrchu, ladění barev a postupy pro dokonalý lakový povrch automobilu
Nikdy vás napadlo, proč některé lakování automobilů vypadají jako nové z továrny, zatímco jiné mají skvrny, nesoulad v barvě nebo dokonce za pár měsíců začnou olupovat? Tajemství není jen v samotném laku – je to důkladný proces každé vrstvy, od přípravy povrchu až po poslední vrstvu průhledného laku. Ať už se pustíte do lakování jediného panelu nebo kompletního přelakování vozu, ovládnutí těchto postupů vám zajistí, že karosářské díly budou vypadat a vydrží jako nové.
Příprava povrchu a výběr základního nátěru
Představte si, že do lakování vložíte hodiny práce a o pár týdnů později objevíte bubliny nebo odlupující se části. To je obvykle důsledek špatné přípravy povrchu. Tady je, jak na to správně:
- Čištění a odmaštění: Začněte omytím vozidla automobilovým mýdlem, abyste odstranili nečistoty, olej a vosk. Pro odstranění silnějších nečistot použijte odmašťovadlo. Důkladně osušte vozidlo hadříkem bez vlákna. (viz tipy odborníka na přípravu) .
- Prohlídka a označení: Použijte silné osvětlení k nalezení rzi, vydřenin nebo škrábanců. Označte tyto oblasti pro cílenou opravu.
- Odstranění staré barvy a rzi: Použijte brusivo nebo odstraňovač barvy ke smazání starých povrchů. Při odstraňování rzi odstraňte všechny její stopy, aby nedošlo k další korozi.
- Broušení a vybroušení okrajů: Povrch opilujte mokrou brusnou papírovou s zrnitostí 1000–1500 pro hladkou a rovnoměrnou strukturu. Zaměřte se na vyhlazování okrajů, kde se stará barva stýká s holým kovem – to zajistí později bezproblémové přechody.
- Finální čištění: K odstranění prachu a nečistot použijte lepicí hadřík. Jakékoliv zbytkové částice mohou pokazit povrchovou úpravu.
- Maskování: Pečlivě zalepte a přikryjte oblasti, které nechcete natírat, a zatlačte pásku do záhybů pro ostré linie.
- Výběr základního nátěru: Vyberte epoxidový základní nátěr pro holý kov nebo pokud je potřeba maximální odolnost proti korozi; pro drobné povrchové nedokonalosti použijte vyrovnávací základní nátěr. Barva základního nátěru může ovlivnit konečný odstín, proto vyberte takovou, která odpovídá požadavkům vaší vrchní barvy.
- Naneste základní nátěr: Použijte hvlp nátěrový rozprašovač nebo barvící pistole pro rovnoměrné pokrytí dodržujte pokyny výrobce pro míchání a časování před nátěrem. Po vytvrzení nátěru proveďte mokré broušení pro ideálně hladký základ.
Nanášení barevného a průhledného nátěru
Jakmile je povrch připraven, je čas na barevné a ochranné vrstvy. Zde je ověřený postup pro profesionální výsledky:
- Promíchejte a otestujte: Zamíchejte barevný nátěr podle poměrů výrobce barvy – přesnost je důležitá. Pokud používáte značku Duplicolor , dodržujte jejich konkrétní pokyny pro dosažení nejlepších výsledků.
- Testovací panel natřete: Vždy nejprve natřete testovací panel, přičemž použijete stejný základní nátěr a podmínky jako u vašeho automobilu. To vám umožní potvrdit barvu a pokrytí ještě před nátěrem samotného panelu.
- Naneste barevný nátěr: Používejte tenké, rovnoměrné tahy vaší hvlp stříkací pistolí , překrývejte každý tah zhruba o 50 %. Udržujte stálou vzdálenost (6–8 palců) a rychlost, abyste předešli pruhům nebo skvrnám. Mezi jednotlivými nátěry nechte správnou dobu na vydržení – obvykle 10–20 minut, vždy však zkontrolujte údaje na datovém listu vašeho produktu (návod krok za krokem) .
- Zkontrolujte a dotekujte: Po zaschnutí základního nátěru zkontrolujte pod různými úhly osvětlení. Pokud zjistíte nerovnoměrné místa, lehce je broušte a případně znovu naneste nátěr.
- Naneste průhledný nátěr: Napňte kompatibilní 2k průhledný lak do stříkací pistole. Namažte dva až tři vrstvy, přičemž mezi každou vrstvou nechte stanovenou dobu na vydržení. Začněte nahoře a postupujte směrem dolů rovnoměrnými, překrývajícími se tahy. Průhledný nátěr by měl být tenký – ne silnější než list papíru – ale plně pokrýt celý základní nátěr pro maximální ochranu.
- Odstraňte maskování: Opět opatrně oloupněte pásku a kryty, zatímco poslední vrstva je stále mírně lepkavá, abyste zabránili nadzvedávání okrajů.
- Dokončete a leštěte: Nechejte průhlednou vrstvu úplně ztuhnout (dodržujte pokyny výrobce pro vysušení na vzduchu nebo pekařské cykly, pokud je automatické lakování automobilů používáte). Po ztuhnutí jemně lešťujte pro dosažení lesklého povrchu.
Přizpůsobení odstínů a techniky přechodů
Správný odstín je více než jen smíchání barev – jde o přechody a přizpůsobení v reálném osvětlení. Zde je, jak zajistit, aby oprava byla neviditelná:
- Zaznamenejte kód laku od výrobce: Vždy před zahájením práce zaznamenejte kód laku vašeho vozidla z vnitřního boku dveří nebo identifikační tabulky. Tím zajistíte, že objednáte správnou formuli a budete moci kód použít pro případné opravy v budoucnu.
- Testování a úprava: Použijte testovací panel k porovnání nové barvy s vozidlem jak za denního, tak umělého světla. Pokud se barva mírně liší, upravte ji pomocí drobných korekcí tonerem nebo se poraďte se svým dodavatelem.
- Rozetření okrajů: Při opravě jediného panelu rozetřete novou barvu do sousedních panelů pomocí kontrolovaných, rozfoukaných tahů. Tato technika rozetření skryje jakékoliv drobné rozdíly v odstínu nebo orientaci kovových částic.
- Tmavý kryt: Pro pokročilé ladění může být lehce zabarvený kryt pomoci při úpravě finálního odstínu nebo rozetření perlových/kovových efektů. Tuto techniku je nejlepší provádět zkušeným lakýrníkům.
Zaznamenejte originální kód laku a před otevřením materiálů potvrďte vzorky.
Pamatujte, že i ty nejlepší automatické lakování automobilů systémy nemohou kompenzovat špatnou přípravu nebo neslučitelné materiály. Vždy používejte kompatibilní produkty z téže rodiny systémů, abyste předešli chemickým reakcím nebo problémům s přilnutím.
Odborné tipy pro trvalý výsledek
- Pracujte vždy v čistém a dobře větraném prostoru a nosьте vhodné ochranné pomůcky.
- Pokud si všimnete kapek nebo drobných nerovností, nechte barvu uschnout, lehce ji broušte a případně naneste znovu.
- Nechejte každou vrstvu plně vyprchávat před nanesením další – uspěchání tohoto kroku může způsobit problémy s texturou nebo vznik puchýřů od rozpouštědla.
- Dokončený nátěr nalešťete a ošetřete ochranným prostředkem, abyste zvýšili lesk a ochránili povrch před UV zářením a nečistotami.
Dodržováním těchto postupů dosáhnete trvanlivého a kvalitního povrchu na jakýchkoli dílech karoserie – ať už obnovujete klasické auto nebo opravujete každodenního užitkového vozu. V dalším kroku vám poskytneme návod, jak rozhodnout, zda opravit nebo vyměnit díl, abyste zajistili, že vaše úsilí a investice budou mít dlouhodobý prospěch.
Správné rozhodnutí pro karoserijní díly
Když na svém voze objevíte vydření, rezavění nebo větší poškození, vznikne otázka: opravit karosářské díly, nebo je raději úplně vyměnit? Správné rozhodnutí ochrání vaši investici, udrží váš vůz v bezpečném stavu a pomůže vám vyhnout se zbytečným nákladům. Pojďme si rozebrat praktickou rozhodovací cestu pomocí příkladů ze skutečných oprav, abyste věděli, kdy použít vytahávač vydření a kdy je čas na nový panel.
Rozhodovací matice: oprava nebo výměna
Nejste si jisti, kterou cestou jít s vaším karosářským panelem ? Pomocí tabulky níže rychle přiřaďte běžné příznaky poškození doporučeným opatřením a možnostem získání náhradních dílů:
| Příznak/Poškození | Indikátory závažnosti | Doporučený postup | Možnosti získání dílů | Důležité poznámky |
|---|---|---|---|---|
| Malá vydření (bez újmy na laku) | Mělké, přístupné, žádné ostré záhyby | Oprava (PDR nebo odstraňovač vydřenin) | — | Oprava vydřenin bez poškození laku ušetří povrchovou úpravu |
| Velké vydřeniny/záhyby | Natažený kov, ostré linie, lakový povrch praskl | Vyměnit, pokud je natažený nebo zahybený; opravit, pokud je poškození minimální | Nový OEM, neoriginální, recyklovaný | Zkontrolujte skryté poškození vnitřní konstrukce |
| Rzi (povrchové) | Lokalizované, nepronikají kovem | Oprava (pískování, ošetření odstraňovačem rzi, dokončení) | — | Jednejte včas, abyste zabránili šíření |
| Díry z rzi (skrze kov) | Proražení, oslabené okraje, šíření | Výměna nebo oprava panelu | Oprava panelu, výroba, nový panel | Oříznout ke čistému kovu, vyhněte se opravám pouze výplní |
| Nárazník prasklý/zlomený | Viditelné praskliny, ztráta tvaru, uložení zlomené | Výměna nárazníku | Nový OEM, neoriginální, recyklovaný | Přeneste senzorové konzoly a zkontrolujte přechod barev |
| Silná koroze prahu nebo podvozku | V blízkosti upevnění zavěšení/bezpečnostních pásů, konstrukční | Vyměnit; vyžaduje se odborné posouzení | Originální vybavení, certifikovaný servis | Bezpečnostně kritické – neprovádějte sami, je-li konstrukce poškozena |
| Přední/zadní nárazníková lišta na voze je pokroucená nebo zkorodovaná | Mírné pokroucení, povrchová koroze | Opravte, není-li to konstrukční; vyměňte, je-li poškození závažné | Náhradní díly neoriginální, recyklované | Před objednáním zkontrolujte přípojné body |
Jak můžete vidět, drobné vydřeniny a povrchovou rez může často opravit správný nástroj a materiál. Ale pokud se jedná o prohnutý plech, velké díry od rzi nebo problémy v blízkosti kritických oblastí, jako je dveřní prahy nebo rám, výměna je obvykle bezpečnější a trvalejší volbou (viz odborné doporučení) .
Kroky opravy rzi od řezu po nátěr
Reza může nepozorovaně postihnout jakékoliv blatník vozidla nebo skrytý panel. Nevíte, jak na to? Zde je ověřený postup pro trvalý výsledek:
- Posuďte a označte: Identifikujte celý rozsah rezavění, včetně skrytého šíření pod nátěrem nebo tmelem.
- Oříznout na čistý kov: Použijte brusku nebo řezací nástroj k odstranění všech rezavých částí. Nechte za sebou žádný oslabený nebo prožraný kov.
- Šablona a náplast: Vytvořte kartonovou šablonu pro náplast. Nový kov nastřihněte podle tvaru, aby těsně doléhal (viz příklad z reálného života) .
- Přivárcujte na místo: Zajistěte náplast přivárcováním a během práce zkontrolujte její vyrovnání. Přeskakujte po obvodu, abyste minimalizovali hromadění tepla a deformaci plechu.
- Přivařujte po částech a ochlaďte: Dokončete svařování po krátkých intervalech, mezi nimiž nechte plech ochladit, abyste předešli deformacím. Nepospíchejte – méně tepla znamená méně deformací.
- Broušení a vyrovnání: Vyhladte svařovací švy pomocí brusky a poté je dle potřeby vyrovnejte (lehce zatlučte) k obnovení tvaru.
- Případně naneste výplň: Použijte tenkou vrstvu těsnicího tmelu k dokonalému tvarování a poté ji vyleštěte.
- Ošetřete a utěsněte: Použijte odstraňovač rzi nebo fosforečnou kyselinu na holé kovové plochy a poté pokryjte epoxidovým základním nátěrem.
- Těsnění a ochrana spár: Všechny spáry utěsněte a vnitřní dutiny opatřete ochranným nátěrem proti vzniku rzi.
- Základní nástroje pro opravu rzi:
- Brusný nebo řezný kotouč
- Svařovací stroj (pro většinu karosářských panelů se doporučuje MIG)
- Kladívko a podkladní lišta
- Karosářské lepidlo a špachtle
- Broušený papír a brusné bloky
- Odstraňovač rzi/příprava kovu
- Epoxidový základní nátěr a těsnící hmota pro spáry
Minimalizace tepla a deformací při svařování
Nikdy jste se ptali, proč se některé opravy při svařování kroutí nebo vlní, zatímco jiné zůstávají hladké? Vše záleží na kontrole tepla. Zde je, jak udržet svůj karosářským panelem vzhled stejný jako od výrobce:
- Používejte přivárcové body a vějte se po opravované ploše, nikdy nevářejte dlouhou svářečnou stopu najednou.
- Mezi svařováním nechte plech vychladnout – trpělivost zabrání deformacím.
- Podporujte tenké plechy pomocí tepelného odváděče nebo mokré utěrky, která pohltí přebytečné teplo.
- Po svařování jemně vyrovnejte kladívkem a podpěrou, abyste odstranili napětí nebo drobné zkroucení.
Pokud pracujete na okapním plechu vozu nebo jiném tenkém blatník vozidla plechu, tyto kroky jsou zvláště důležité, abyste předešli nadbytečnému použití těsnicího tmelu nebo opakovaným opravám.
Hlavní závěr: Při opravách karosérie vždy zvažte bezpečnost, náklady a dlouhodobou odolnost – zvláště u konstrukčních částí nebo částí náchylných k rezavění.
V dalším kroku vám poskytneme praktické šablony pro instalaci nových panelů, abyste mohli s jistotou provádět výměnu nárazníku nebo zrcátek – vybaveni správnými nástroji a postupy pro dosažení hladkého výsledku.
Šablony instalace a kontrolní seznamy nástrojů pro vnější karosářské díly
Nikdy jste zírali na nový nárazníková obklada nebo kapota vozu a přemýšleli jste: „Jak to vlastně vyměním, aniž bych přeskočil krok – nebo něco drahého poškodil?“ Ať už opravujete přední nárazník auta po nehodě na parkovišti, nebo se pustíte do výměny zrcátka pro spolujezdce doma, mít jasný, krok za krokem popsaný návod dělá obrovský rozdíl. Pojďme rozebrat praktické šablony instalace, včetně seznamů nástrojů, poznámek k bezpečnosti a tipů na řešení problémů, abyste mohli tyto běžné práce na karosérii zvládnout se sebedůvěrou.
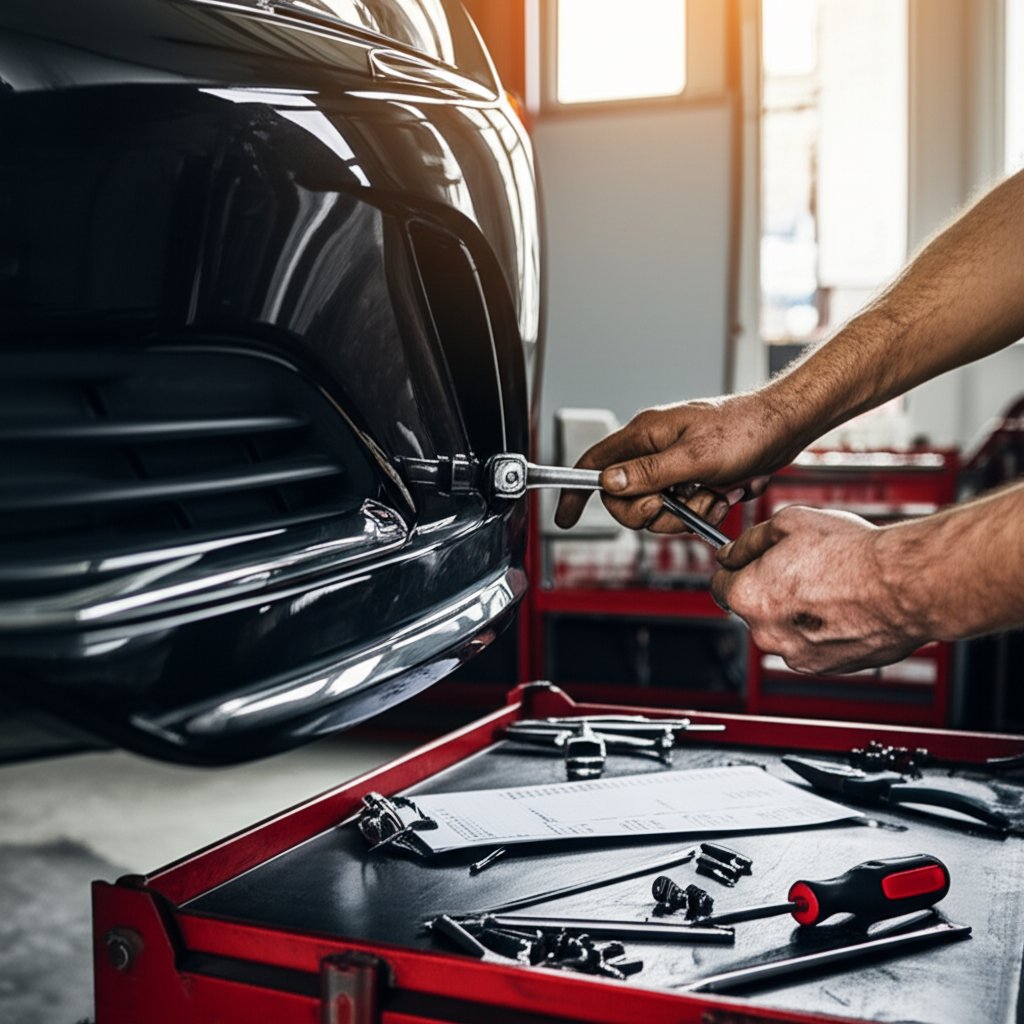
Demontáž a montáž potahu nárazníku
- Nářadí: Křížový šroubovák, klikový/odborný klíč, nástroj na vyjmutí karosářských svorek nebo rovný šroubovák, podpěry, držák nárazníku (je-li k dispozici)
- Bezpečnost: Používejte rukavice a ochranné brýle. Pokud pracujete pod nárazníkem, použijte podpěry. Pokud jsou součástí senzory nebo kabeláž, odpojte baterii.
- Odhadovaný čas: 30–60 minut
- Obtížnost: Mírný
- Momenty utažení: Pro konkrétní momenty utažení jednotlivých spojů se obraťte na servisní manuál vašeho vozidla.
- Požadavky na kalibraci: ADAS senzory nebo senzory parkování mohou po instalaci vyžadovat opakovanou kalibraci.
- Řešení potíží: Pokud nový nárazník není správně zarovnaný, zkontrolujte, zda nejsou deformované držáky nebo chybějící pojistné prvky. Před opětovnou montáží se ujistěte, že jsou všechny konektory elektroinstalace bezpečně připojeny.
- Zastavte vozidlo na rovném povrchu. V případě potřeby vozidlo zvedněte a zajistěte pomocí podpěr pod vozidlo pro přístup ke spodní části nárazníku.
- Odpojte všechna světla, senzory nebo kabelové svorky připevněné k nárazníku.
- Odstraňte šrouby a spojovací prvky u blach kolem kol, spodního krytu a podél horního okraje nárazníku.
- Pomocí nástroje na odstraňování západkových spojů opatrně vyjměte všechny upevňovací klipy. Uchovejte všechny součásti pro opětovné použití.
- Opatrně sundejte starý nárazník. Použijte držák nárazníku nebo pomocníka, abyste zabránili poškrábání laku nebo poškození držáků.
- Přeneste reflektory, mřížky a upevňovací konzoly ze starého krytu na nový podle potřeby (viz příklad DIY) .
- Zkontrolujte přesazení nového krytu nárazníku. Pokud je třeba, upravte konzoly pro správné vyrovnání.
- Znovu nainstalujte všechny klipy, šrouby a spojovací prvky a utáhněte je podle specifikací kroutícího momentu pro vaše vozidlo.
- Znovu připojte všechny kabelové svazky, senzory a lampy. Před dokončením dvakrát zkontrolujte, zda všechny funkce fungují.
Kontrola vyrovnání kapotu a bezpečnosti západky
- Nářadí: Klíčová souprava s výkyvnou hlavou, značkovací fix, podpěra kapoty nebo pomocník, momentový klíč
- Bezpečnost: Kapotu vždy bezpečně podepřete – nikdy se nespoléhejte pouze na plynovou tyč. Dávejte pozor na prsty v blízkosti kloubů a západky.
- Odhadovaný čas: 45–90 minut
- Obtížnost: Mírný
- Momenty utažení: Pro specifikace upevňovacích prvků kontrolujte servisní manuál.
- Požadavky na kalibraci: Žádné u manuálních kapot; u některých vozidel s aktivními bezpečnostními systémy může být nutná znovunastavení.
- Řešení potíží: Pokud se kapota nenechá uvolnit nebo zajistit, zkontrolujte kabel a západkový mechanismus na případnou korozi nebo nesouosost. V případě potřeby naneste mazivo.
- Otevřete kapotu a fixem vyznačte polohu kloubů pro snazší opětovné nastavení.
- S pomocníkem nebo podpěrou pro kapotu podepřete její hmotnost. Odstraňte šrouby kloubů a kapotu z vozidla zvedněte.
- Přeneste všechny západky, izolátory nebo zvukové podložky ze staré kapoty na novou.
- Umístěte novou kapotu tak, aby byly vyznačené polohy kloubů zarovnány. Nainstalujte šrouby napevno a poté zkontrolujte mezery v panelu podél blatníků a předního okraje.
- Šrouby kloubů utáhněte na předepsaný kroutící moment. V případě potřeby upravte pro rovnoměrné mezery.
- Pomalu zavřete kapot, zkontrolujte, zda nedochází k sevření nebo nesouososti. Ujistěte se, že pojistný západ zacvakne a že kapot je rovný vůči okolním panelům.
- Ověřte funkci páky a západu kapotu několikrát. Namažte pohyblivé části a případně upravte západ.
Výměna zrcadlového skla bez poškození
- Nářadí: Nástroj na odstraňování obložení, rukavice, čistič autostekla, silikonové lepidlo (v případě potřeby), malířská lepicí páska
- Bezpečnost: Používejte rukavice, abyste předešli řezům sklem. Ochrňte lakování a interiér kartonem nebo plachtou.
- Odhadovaný čas: 20–30 minut
- Obtížnost: Snadná až střední
- Momenty utažení: Obvykle není vyžadováno při výměně pouze skla.
- Požadavky na kalibraci: Pokud zrcadlo obsahuje senzory nebo funkce ADAS, zkontrolujte, zda je po výměně nutná kalibrace.
- Řešení potíží: Pokud se nové sklo zdá být uvolněné, ověřte, že všechny držáky nebo zajišťovací prvky jsou plně zapojené. U ohřívaných nebo automaticky stmívaných zrcadel potvrďte, že jsou správně připojené elektrické konektory.
- Seberte všechny materiály a potvrďte správný náhradní zpětné zrcátko pro vaše vozidla zrcadla pro automobily nebo nákladního automobilu.
- Chrání pracovní prostor kartonem nebo silným papírovým sáčkem, aby se zachytilo rozbité sklo (viz návod krok za krokem) .
- U tradičních zrcátek opatrně odstraňte veškeré zbývající sklo a lepidlo z nosné desky. Důkladně vyčistěte povrch.
- U zrcátek s elektrickými funkcemi použijte nástroj na odstraňování obložení, abyste vyjmuli staré sklo z pouzdra. Odpojte jakékoli kabelážové svazky pro ohřev nebo senzory.
- Připevnění nového zrcadlového skla: U skla samotného naneste proužek silikonového lepidla a sklo důkladně přitiskněte na místo, upevněte pomocí malířské pásky, dokud lepidlo nezesklovatí. U snap-in verzí zarovnejte klapky a stiskněte, dokud neuslyšíte kliknutí.
- Znovu připojte všechny kabelážové svazky a před jízdou otestujte všechny funkce (vyhřívání, automatické stmívání, směrová světla).
Podpora vozidla pomocí stojanů a uchovávání všech spojovacích prvků zajišťuje bezpečnost a hladké znovusestavení – bez ohledu na druh práce.
Díky těmto modulárním šablonám a kontrolním seznamům můžete sebejistě čelit nejčastějším pracím na karosérii vašeho automobilu. V dalším kroku vám pomůžeme naplánovat náklady a rozumné nakupování, abyste neutratili příliš za kvalitní opravy.
Plánování nákladů a záruční podmínky pro opravy karosérie
Pracovní list pro odhad nákladů na opravy karosérie
Kdy jste se naposledy ptali, kolik vlastně stojí výměna kapotu, výměna nárazníku nebo oprava skla u okna automobilu? Sestavení jasného rozpočtu vám může ušetřit překvapivé výdaje a pomůže rozhodnout, zda opravu provést sami nebo se obrátit na dílnu. Zde je jednoduchá šablona pracovního listu, která vám pomůže naplánovat vaši další opravu:
| Název části | Stav (Nový/Ostatní/OEM/Recyklovaný) | Jednotková cena | Doprava | Barva a materiály na natírání | Spotřební materiál | Kovové díly/Klipy | Pracovní hodiny | Hodinová sazba dílny | Celkem |
|---|---|---|---|---|---|---|---|---|---|
| Motorový kryt | Aftermarket | $320 | $95 | $80 | $15 | $10 | 2 | 65 Kč/hod | $650 |
| Přední nárazník Kryt | Recyklovaný | $110 | $40 | $60 | $10 | $8 | 1.5 | 65 Kč/hod | $325.5 |
Tato struktura vám umožňuje porovnat náklady na výměnu kapotu automobilu nebo jakékoli jiné součásti karoserie, včetně všech skrytých nákladů. Vyplňte své skutečné údaje – zejména pokud používáte kvalitní náhradní díly z nezávislých zdrojů nebo zvažujete profesionální barevné vyrovnání.
Chytré nakupování z internetu a z vrakovišť
Při výběru náhradních karosářských dílů máte několik možností: nové díly, díly od nezávislých výrobců, recyklované nebo dokonce přednatřené díly. Vrakoviště a prodejci online vám mohou nabídnout levnější alternativy, ale jak poznáte, že dostáváte kvalitní zboží?
- Vyžádejte si VIN a ověřte tak kompatibilitu s vaším vozidlem.
- Požádejte o detailní fotografie dílu, zejména o kotevní body a upevnění senzorů.
- Ověřte kvalitativní třídu dílu a zeptejte se na případnou korozí nebo dřívější opravy.
- Zkontrolujte, zda jsou součástí i příslušenství pro senzory nebo zapojení, zejména u nárazníků nebo zpětných zrcátek.
- Ujasněte si lhůtu pro reklamaci a zásady poškození zásilek při přepravě.
Online platformy usnadňují porovnávání cen a čtení recenzí na paintedautoparts.com, ale vždy zvažte celkové náklady včetně poštovného, laku a případných spotřebních materiálů. Některé weby nabízejí slevové kupóny pro carparts.com nebo kupóny na carparts.com, které vám mohou ušetřit peníze, proto sledujte nabídky, které vyhovují vašim potřebám.
Reklamace, záruční doba a jádrové návraty
Ne každá součástka funguje na první pokus. Proto je důležité porozumět pravidlům reklamací a záruční době. Tady je, co můžete očekávat:
- Většina použitých a regenerovaných dílů má 30denní záruční dobu – pro reklamaci je obvykle vyžadován originální doklad a nedošlo k poškození nebo nátěru dílku.
- Někteří prodejci nabízejí prodlouženou záruční dobu za příplatek; vždy se zeptejte při dokončování objednávky.
- Návrat jádra (např. pro nárazníky nebo chladiče) může způsobit vrácení peněz nebo kredit v obchodě, pokud jsou vráceny v rámci stanovené lhůty.
- Vždy si díly předem přizkoušejte před jejich nátěrem nebo úpravou. Jakmile jsou díly nalakovány, většina prodejců je neakceptuje zpět.
- Uchovejte veškeré obaly, dokud nepotvrdíte, že díl sedí a funguje tak, jak potřebujete.
Například zásady pro vrácení zboží pro nadšence do dílů nebo podmínky jiných populárních prodejců mohou vyžadovat, aby díl byl ve svém původním stavu, včetně všech označení a kromějšů (vizte pravidla záručního programu v reálném světě) . To platí zejména pro recyklované nebo spolehlivé autodíly získané z vrakovišť.
Tip: Před objednáním si zdokumentujte kód barvy laku, čísla dílů a stav vozidla – a vždy porovnejte celkové náklady s nátěrem nebo místními alternativami, abyste dosáhli nejlepší ceny.
Když budete plánovat dopředu a budete vědět, na co se ptát, vyhnete se nejčastějším úskalím při nákupu karosářských dílů – a vaši další opravu provedete co nejplynuleji a s co nejlepším výsledkem. V další části si rozebereme bezpečnostní a provozní opatření, která vás ochrání (včetně záruky) po instalaci.
Bezpečnostní senzory, osvětlení a záruční opatření pro karosářské díly
Když vyměníte nárazník, nainstalujete nový kryt reflektoru nebo upravíte díly dveří, napadlo vás někdy, zda budou bezpečnostní systémy vašeho vozidla nadále fungovat podle původního záměru? Dnešní vozidla jsou vybavena senzory, kamerami a elektronickými západkami, takže výměna karosářských dílů znamená mnohem více než jen správné dolnutí a vzhled. Pojďme rozebrat základní kroky pro bezpečné opravy, soulad se senzory a ochranu vaší záruční doby – abyste mohli odjet s klidem a sebedůvěrou.
Opravy s ohledem na senzory vpředu a vzadu
Představte si, že vyměníte kryt nárazníku a zjistíte, že vaše senzory parkování nebo radar přestaly fungovat – nebo ještě horší, že poskytují nesprávné údaje. Moderní nárazníky často obsahují síť senzorů, radarové moduly a dokonce i zapojení pro pokročilé asistenční systémy řidiče (ADAS). Tady je to, co byste měli vědět:
- Vždy zkontrolujte, zda jsou všechny konzoly senzorů nepoškozené a správně umístěné, než znovu nainstalujete sestavu nárazníku nebo zadního světla.
- Znovu připojte každý zástrčku a objímku žárovky podle diagramu výrobce. I jediný uvolněný konektor žárovky může spustit kontrolku výstrahy nebo deaktivovat systém.
- Po znovusestavení proveďte kontrolu systémů pomocí diagnostického nástroje, abyste potvrdili, že všechny senzory správně komunikují. Pokud jste nahradili nebo ovlivnili něco souvisejícího s ADAS (například radarové nebo kamerové moduly), může být nutná kalibrace pro obnovení plné funkčnosti.
- Nikdy nepředpokládejte, že úspěšná vizuální instalace znamená, že všechny systémy fungují – někdy může být senzor nainstalován vzhůru nohama nebo pod nesprávným úhlem, což způsobuje skryté problémy, které se projeví až za jízdy.
Před uvedením vozidla na silnici otestujte bezpečnostně kritické systémy.
Nastavení osvětlení a zákonné viditelnost
Všimli jste si někdy, že vaše přední světla po opravě nepracují správně, nebo že řidiči v protisměru používají světlomety? Správné nastavení osvětlení je klíčové jak pro bezpečnost, tak pro dodržení zákona. Zde je, jak na to:
- Po výměně sestavy reflektoru nebo kryt reflektoru , vždy zkontrolujte a vyrovnejte světelný paprsek. Nesprávně namířená světla mohou snížit vaši viditelnost a oslepit ostatní řidiče.
- Ujistěte se, že všechny konektory žárovek a zásuvky jsou čisté, suché a zcela zasunuté, aby se zabránilo blikání nebo pronikání vody. Vlhkost v zásuvce zadního světla může způsobit varovné signály nebo dokonce poruchy ADAS systémů.
- Pokud vaše oprava zahrnovala změnu výšky podvozku nebo výměnu větších karosářských dílů, dvakrát zkontrolujte, že se úhel světel nezměnil. I malé změny mohou ovlivnit úhel a vyžadovat opakované nastavení.
Spolehlivost dveřních závěsů a západky
Když pracujete na automobilové dveřní hardware – od závěsů po západky až po elektronické zámky – malé nesrovnalosti mohou vést k velkým potížím. Znáte to? Tady je, jak se problémům vyhnout:
- Po instalaci nebo úpravě jakékoli díly dveří , zkontrolujte hladké zapadnutí zámku a správné zarovnání. Hlavní pojistný zámek na kapotě by měl vždy fungovat, pokud hlavní zámek selže.
- U dveří s elektronickými zámky nebo senzory potvrďte, že všechny kabely a konektory jsou bezpečně připojeny a chráněny před vlhkostí.
- Před dokončením práce otestujte všechny funkce – manuální i elektronické. Dveře, které se nezamykají, nebo kapota, která se nezamyká, představují riziko pro bezpečnost i záruku.
Když vyhledat kalibraci nebo odbornou kontrolu
- Pokud jste nahradili nebo upravovali jakoukoli součást související s ADAS – například senzor nárazníku, kameru nebo radarový modul – konzultujte servisní příručku vozidla požadavky na kalibraci.
- Některé kalibrace jsou statické (prováděné v dílně), zatímco jiné vyžadují dynamické měření na silnici. Vždy dodržujte pokyny výrobce (originálního vybavení) pro váš konkrétní model a ročník.
- Tento krok nesmíte přeskočit: nesprávná kalibrace může způsobit, že bezpečnostní systémy přestanou fungovat, čímž se vystavujete riziku a můžete také ztratit záruku (více informací) .
Doporučené postupy pro záruku a dokumentaci
- Uchovávejte podrobné záznamy a fotografie každé nahrazené součásti včetně sériových čísel a detailů týkajících se montáže. To usnadňuje uplatnění záručních nároků a odstraňování problémů v budoucnu
- Uchovávejte obalový materiál a doklady, dokud nepotvrdíte, že všechny systémy fungují podle očekávání
- Pokud po opravě dochází k trvalému svícení varovných kontrolních světel nebo k chybám systému, obraťte se na kvalifikovaného technika – tuto závadu nesmíte ignorovat
Dodržením těchto kroků týkajících se bezpečnosti a souladu s předpisy ochráníte svou investici, záruční podmínky a – což je nejdůležitější – bezpečnost všech účastníků provozu na silnici. V další části si ukážeme, jak mohou přesně vystřižené panely ještě více zefektivnit opravy a zlepšit jejich kvalitu
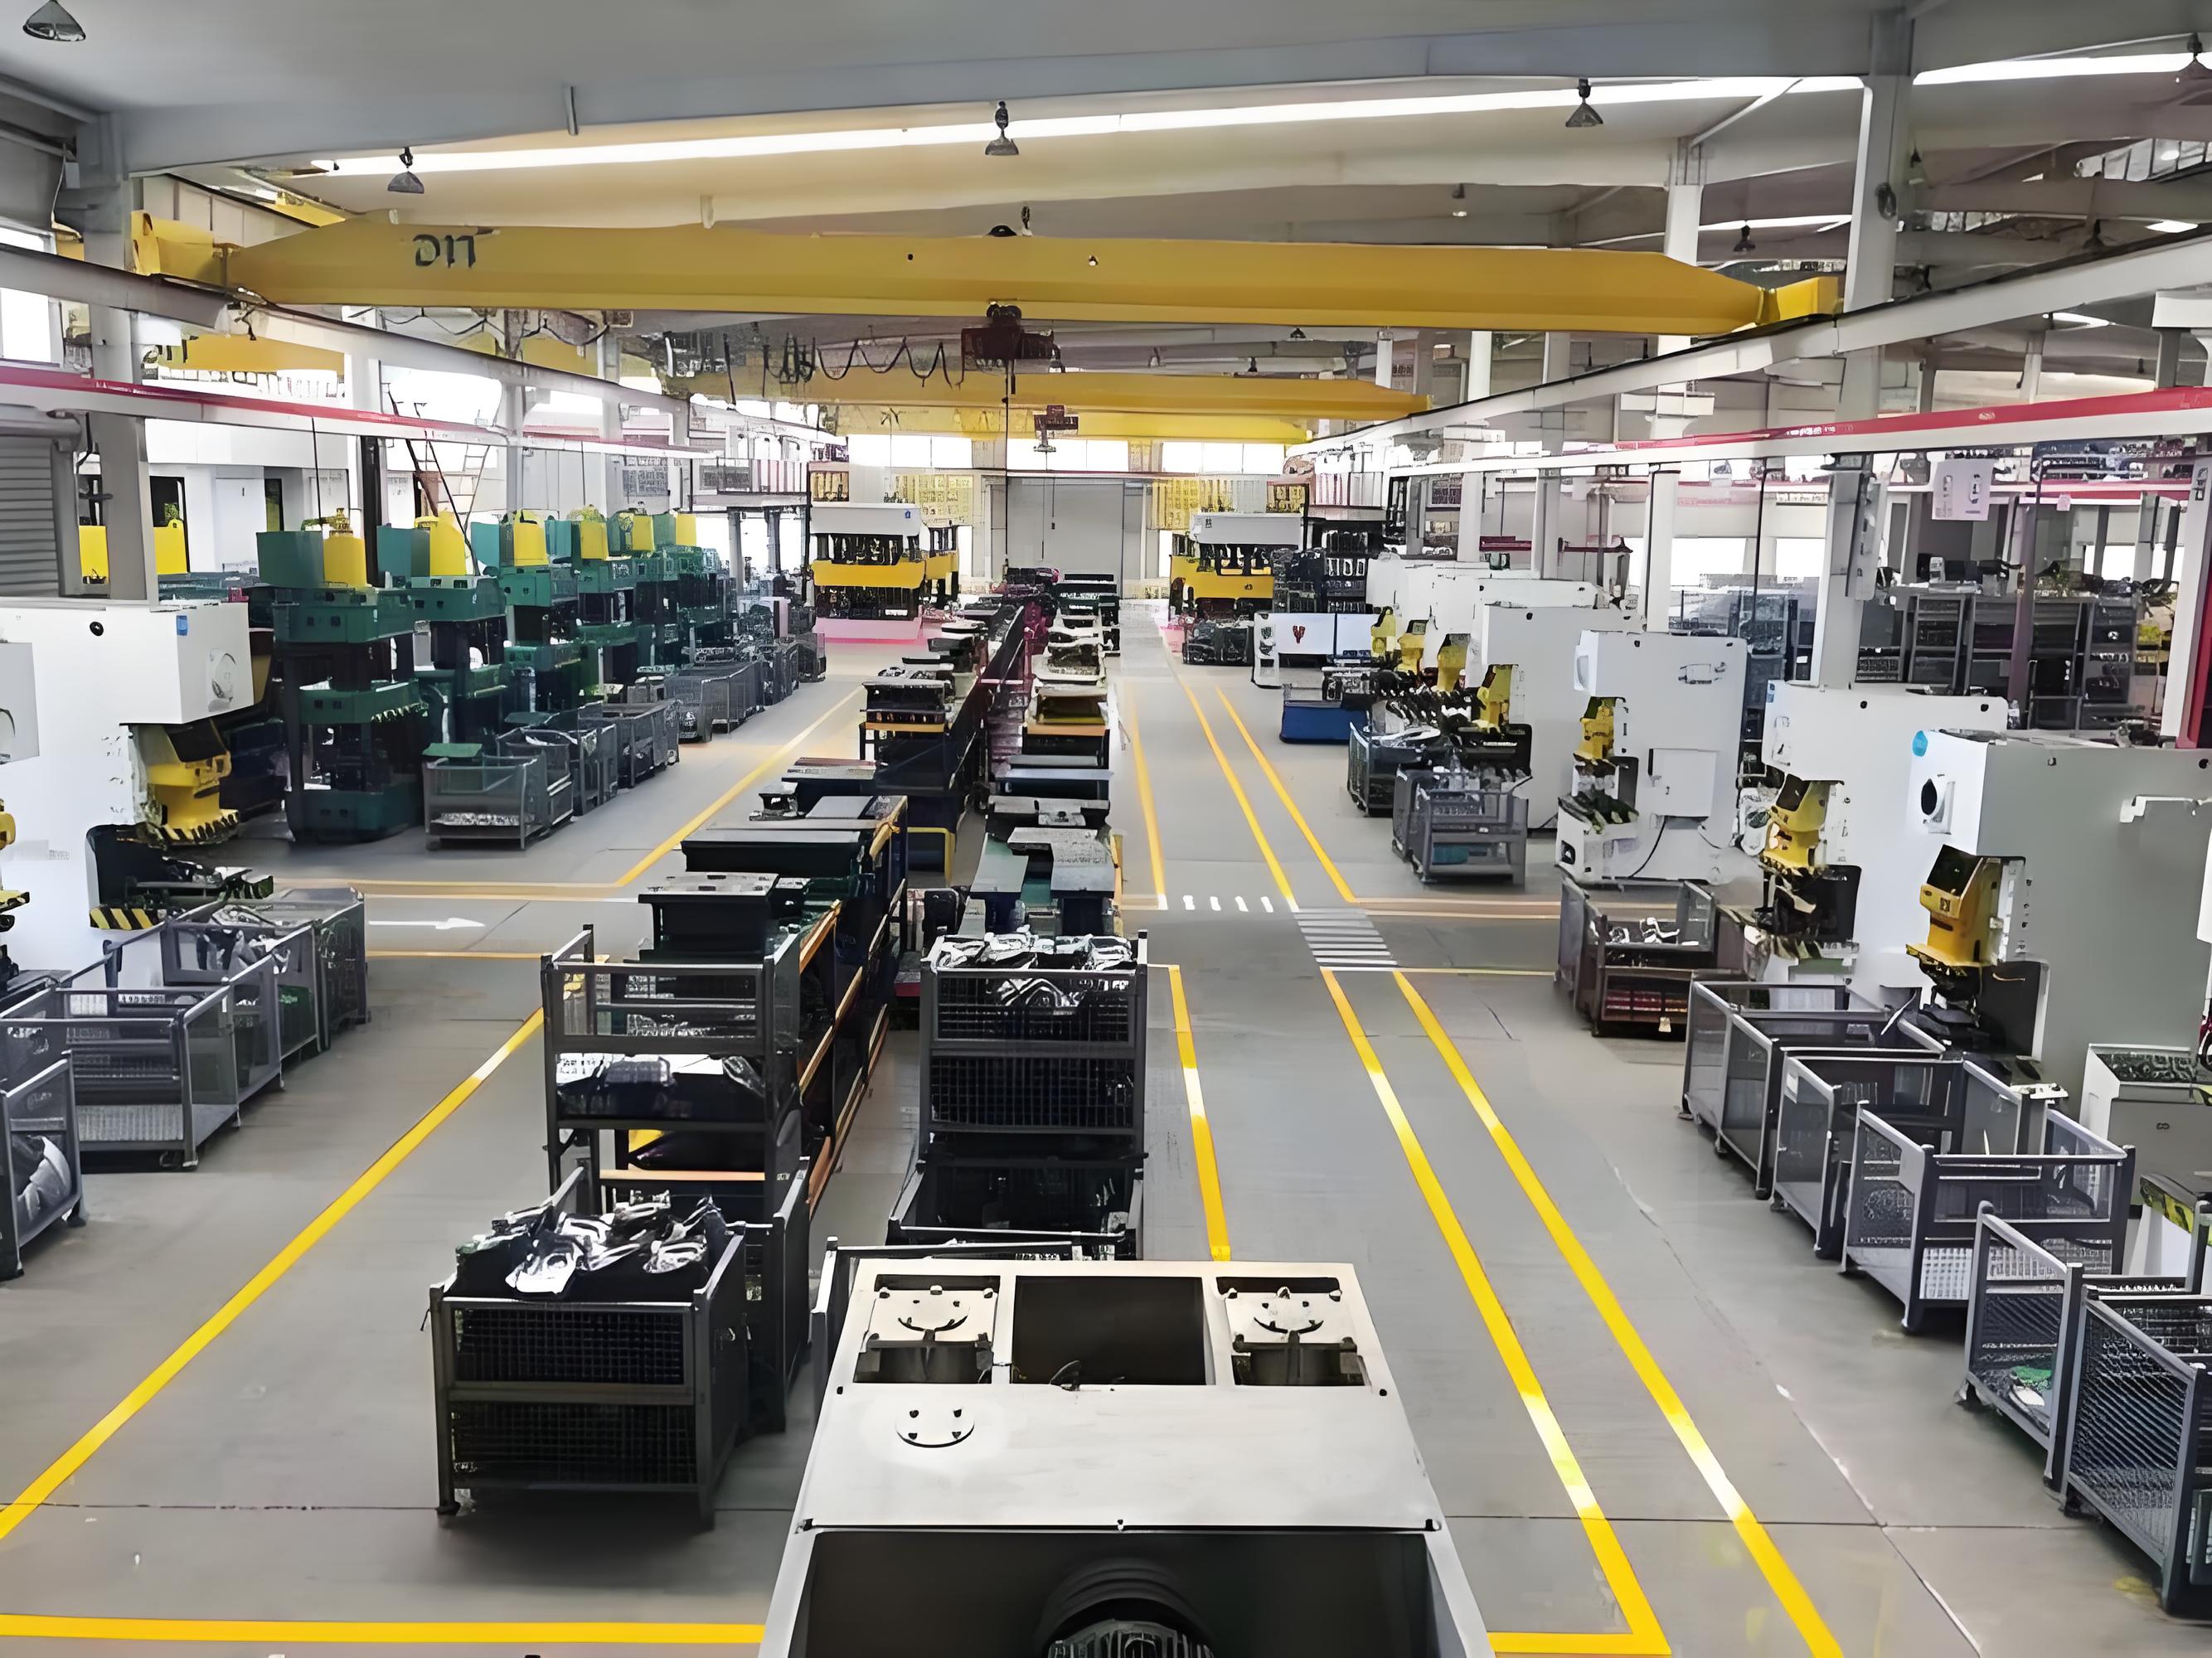
Pozornost zaměřena na dodavatele
Nikdy jste se zamýšleli nad tím, proč některé opravy probíhají jako na hodinky, zatímco jiné vyžadují hodiny ručního broušení, doladění nebo dokonce opakované objednání dílů? Odpověď často spočívá v tom, jak jsou vyráběny vaše karosářské díly – zvláště pak plechové díly a upevnění. Pokud hledáte náhradní díly na nákladní auta , sedan nebo speciální vozidla, výběr partnera s přesným tvářením může zásadně ovlivnit přesnost přiléhání, kvalitu povrchu a trvanlivost.
Proč přesné tváření zlepšuje přiléhání a vzhled panelů
Představte si montáž nového blatníku nebo dveřního panelu, který dokonale zapadne, mezery budou přesně odpovídající výrobním specifikacím a nebudete muset používat žádné výplňové hmoty. To je záruka kvalitních, přesně vyražených karosářských dílů . Tyto díly jsou vyráběny s využitím pokročilých nástrojů a lisů, čímž je zajištěno, že každý tvar, otvor a hrana přesně odpovídá původnímu návrhu v rámci úzkých tolerancí. To je zvláště důležité u karoseriové díly pro nákladní auto modelů, kde náročné použití vyžaduje jak dostatečnou pevnost, tak přesné přiléhání.
- Stejné rozměry znamenají méně času stráveného úpravou panelů, broušením nebo mícháním barev.
- Vysokopevnostní materiály a odolné povrchové úpravy zvyšují odolnost proti korozi a prodlužují životnost.
- Přesné přizpůsobení pomáhá udržet aerodynamiku, bezpečnost a prodejní hodnotu vašeho vozidla.
Panely lisované s přesnými tolerancemi snižují potřebu výplňových hmot, broušení a délku přechodů.
Od CAE po výrobní linku: Jak tolerancí předcházet dodatečným úpravám
Zní to složitě? Tady je, jak moderní partneři v oblasti lisování dosahují vyšší kvality pro kvalitní karosové díly a díly karoserie pro pick-upy podobné:
- Návrh podpořený CAE: Inženýrství podporované počítačem (CAE) umožňuje inženýrům simulovat tok kovu, napětí a potenciální vady ještě než je vyroben nástroj. To znamená méně překvapení a lepší výsledek již při prvním pokusu (více informací) .
- Chylá výroba: Optimalizované výrobní procesy minimalizují odpad, urychlují dodání a udržují náklady v mezích konkurenceschopnosti – ať už potřebujete jediný držák nebo tisíce kusů díly karoserie náklaďáku .
- Řízení procesů: Automatické lisy a kontroly přímo v linkách zajišťují, že každá série splňuje stejné přísné specifikace, takže nedostanete jednu desku, která zapadne, a jinou, která ne.
- Pružnost materiálu: Přední dodavatelé dokáží prolamovat ocel, hliník a speciální slitiny – přesně podle potřeb moderních i klasických vozidel.
Když investujete do přesně vylisovaných náhradní díly na nákladní auta nebo aut, všimnete si rychlejší montáže, menších úprav v barevném procesu a dokonalého výsledku, který odolá podrobné kontrole.
Kdy se má zapojit partner pro lisování: Porovnání dodavatelů
Nejste si jisti, jak vybrat vhodného dodavatele pro tváření karoserií vašeho vozidla? Níže naleznete srovnání toho, co nabízejí přední dodavatelé. Upřednostněte ty s ověřenou zkušeností, inženýrskou podporou a flexibilními výrobními možnostmi.
| Dodavatel | Schopnosti | Kontrola tolerance | Inženýrská podpora | Dodací lhůty | Specialita |
|---|---|---|---|---|---|
| Shaoyi | Tvářecí nástroje s vysokou přesností, velké i malé série, výroba na základě reverse engineeringu | Pokročilé CAE, přísná kontrola tolerance, splnění nebo překročení norem výrobců originálních dílů (OEM) | Kompletní cyklus: CAD, výroba prototypů, testování, optimalizace procesů | Rychlá, štíhlá výroba | Složité panely, konzoly, díly pro starší i nové modely nákladních i osobních vozidel |
| Honscn CNC obrábění | Výroba běžných i speciálních dílů, flexibilní velikosti sérií | Dle průmyslových norem, přesně tažené | CAD, výroba prototypů, reverse engineering | Rychlé, efektivní | Malá až střední výroba, klasické/zastaralé panely |
| All Truck Parts Limited | Náhradní díly pro nákladní automobily OEM a pro trh aftermarket, certifikováno podle ISO/TS 16949 | Řízení kvality, certifikované | Podpora OEM, záruka | Standard | Díly karosérie pro nákladní automobily, globální distribuce |
Shaoyi vyniká integrací pokročilé simulace CAE a štíhlé výroby, což pomáhá zkrátit vývojové cykly a zaručuje opakovatelné a kvalitní výsledky pro moderní i klasická vozidla. Jejich odbornost je obzvlášť cenná, pokud potřebujete kamion dodavatele karosářských dílů kteří zvládnou složité geometrie nebo požadavky na starší konstrukce. Honscn CNC Machining nabízí flexibilní výrobu pro těžko dostupné nebo malé objemy dílů, zatímco All Truck Parts Limited je spolehlivým zdrojem pro certifikované OEM a náhradní díly pro trh aftermarket náhradní díly na nákladní auta .
Před zadáním objednávky vždy ověřte, zda dodavatel dokáže plně pokrýt vaše požadavky – zeptejte se na volbu materiálu, povrchové úpravy a proces, jakým zajišťuje přesné doladení. Dobrý partner ve výrobě výlisků vám pomůže zefektivnit pracovní postupy, snížit předělávky při lakování a montáži a zajistit kvalitní karosové díly které udrží vaše vozidla v optimálním vzhledu a výkonu.
Pochoopením výhod přesně výliskovaných panelů a správnou volbou dodavatele ušetříte čas, peníze a zbytečné komplikace při příští opravě nebo rekonstrukci – ať už pracujete na silném pickupu nebo každodenním komutérovském vozidle.
Často kladené otázky o autokarosářských dílech
1. Jaké jsou hlavní typy autokarosářských dílů?
Karosárijské díly automobilů zahrnují konstrukční panely (např. podvozek a sloupky), připevněné panely (kapoty, blatníky, dveře, víka kufru), osvětlovací sestavy, zasklení, vnější výzdobu, upevňovací hardware a povrchové úpravy. Tyto díly tvoří vnější část vašeho automobilu a poskytují ochranu, bezpečnost a estetický vzhled.
2. Jak mohu zajistit, že náhradní karosárijský díl bude kompatibilní s mým vozidlem?
Pro zajištění správné kompatibility vždy použijte VIN vašeho vozidla pro párování dílů, zkontrolujte datum výroby a výbavu modelu, přezkoumejte diagramy pro upevňovací body a potvrďte označení levá/pravá a přední/zadní. Porovnání čísel dílů a konzultace s důvěryhodnými dodavateli dále snižuje riziko nesouladu.
3. Jaké materiály jsou běžně používány pro karosárijské panely a jak jsou spojovány?
Karoserie automobilu jsou obvykle vyrobeny z lisované oceli, hliníku, termoplastů nebo kompozitů. Metody spojování zahrnují MIG/TIG/bodové/laserové svařování, nýtování a konstrukční lepidla. Výběr metody závisí na materiálu a místě opravy, aby byla zajištěna pevnost a ochrana proti korozi.
4. Proč je přesné lisování důležité pro karosářské díly?
Přesné lisování zajistí, že každý panel karoserie nebo upevnění odpovídá původním specifikacím, čímž se snižuje potřeba úprav, vyrovnávacích hmot nebo dodatečného lakování. Dodavatelé jako Shaoyi využívají pokročilé CAE a štíhlou výrobu k dodávání stále kvalitnějších dílů, které zjednodušují montáž a zlepšují celkové výsledky.
5. Na co se zaměřit při nákupu karosářských dílů online nebo z vrakovišť?
Zkontrolujte kompatibilitu VIN, požádejte o detailní fotografie, ověřte stav dílu a potvrďte, že jsou součástí i senzorové konzoly nebo příslušenství. Přezkoumejte podmínky vrácení a záruční politiku a vypočítejte celkové náklady včetně dopravy a laku. Důvěryhodní prodejci a jasná dokumentace pomáhají vyhnout se nákladným chybám.