 작은 양의 생산, 높은 기준. 우리의 빠른 프로토타입 서비스는 검증을 더 빠르고 쉽게 만들어줍니다 —

나사를 밀어내지 않고 다이를 사용하는 법: 실제로 효과가 입증된 7단계
나사 다이란 무엇이며 왜 중요한가
이런 상황을 상상해 보세요: 수리 작업 도중에 나사산이 완전히 마모된 볼트를 발견합니다 . 또는 제작 프로젝트를 위해 특수한 길이의 나사봉이 필요하지만, 주변의 어떤 하드웨어 매장에서도 정확히 맞는 규격을 찾을 수 없습니다. 이러한 상황은 생각보다 훨씬 자주 발생하며, 바로 이때 다이를 사용하는 법을 아는 것이 매우 소중해집니다.
나사 다이란 무엇이며 언제 필요한가
본격적으로 시작하기 전에 흔히 혼동되는 개념 하나를 먼저 정리하겠습니다. 공예용 또는 종이 절단용 다이 커팅 기계에 대한 정보를 찾아서 이곳에 오셨다면, 잘못된 곳으로 오신 것입니다. 여기서 말하는 ‘다이’는 기계 공장, 차고, 가정용 작업실 등 전 세계에서 사용되는 정밀 금속 가공 도구인 ‘나사 다이’입니다.
나사 다이는 원통형 금속 재료(원재료) 외부에 나사산을 절삭하기 위해 설계된 경화 강철 도구로, 평활한 막대를 기능적인 볼트나 나사식 체결 부품으로 변환시킵니다.
이 다이 공구는 원형 패턴으로 배열된 여러 개의 절삭 날을 특징으로 합니다. 금속 막대를 중심으로 회전할 때, 이 공구는 나사를 형성하는 정밀한 나선형 홈을 점진적으로 절삭합니다. 출처: Travers Tool 에 따르면, 다이는 특정 지름의 막대에 적용되어 정확한 크기와 피치를 갖는 나사를 형성합니다.
나사 다이 대 탭 — 주요 차이점 이해하기
모든 나사 가공 프로젝트를 시작하기 전에 탭과 다이의 차이를 이해하는 것이 필수적입니다. 다음은 간단한 요약입니다:
- 다이 만들자 외적 막대, 볼트 및 나사(남성 부품)의 외부 나사
- 수전 만들자 내부 너트 및 소켓용 구멍 내부의 나사(여성 부품)
다이와 탭의 용도를 비교할 때는 다음과 같이 생각하시면 됩니다: 다이는 나사를 만드는 도구이고, 탭은 나사가 삽입되는 구멍을 만드는 도구입니다. 두 도구는 서로 보완적으로 작동하므로 일반적으로 세트 형태로 판매됩니다. 그렇다면 탭 앤 다이 세트란 무엇인가요? 이는 다양한 규격의 두 종류 나사 가공 도구(일반적으로 조작용 핸들 및 렌치 포함)를 포괄적으로 담은 전문 툴킷입니다.
모든 DIY 애호가와 기계공이 공구함에 다이를 반드시 갖춰야 하는 이유
나사 절단 다이는 수리 및 맞춤 제작 분야에서 무수히 많은 가능성을 열어줍니다. 일반적인 적용 사례는 다음과 같습니다:
- 특수 프로젝트용 맞춤 길이 볼트 제작
- 손상되었거나 녹슨 기존 체결부의 나사산 복구
- 레트로 장비 복원을 위한 특정 나사 규격 일치
- 무처리 막대 재료를 나사 가공 부품으로 전환
본 가이드를 마치면, 적절한 다이 유형 선정부터 나사 산이 훼손되지 않도록 깨끗한 나사 절단까지 전 과정을 완벽히 숙지하게 될 것입니다. 또한 전문가 수준의 결과를 얻기 위해 필수적인 준비 기술, 윤활 전략, 문제 해결 방법을 익히게 됩니다.
1단계: 프로젝트에 적합한 다이 유형 선택
하드웨어 매장에서 나사 절삭 다이가 빽빽이 늘어선 벽 앞에 서서, 수많은 선택지에 압도된 적이 있습니까? 혼자만 그런 것이 아닙니다. 탭-다이 세트에서 올바른 다이를 선택하는 것은 깔끔하고 정밀한 나사를 만드는 것과 좌절감을 주는 엉망진창의 결과 사이를 가르는 기준이 될 수 있습니다. 이제 프로젝트에 정확히 맞는 나사 절삭 다이를 알 수 있도록 네 가지 주요 유형을 차례로 살펴보겠습니다.
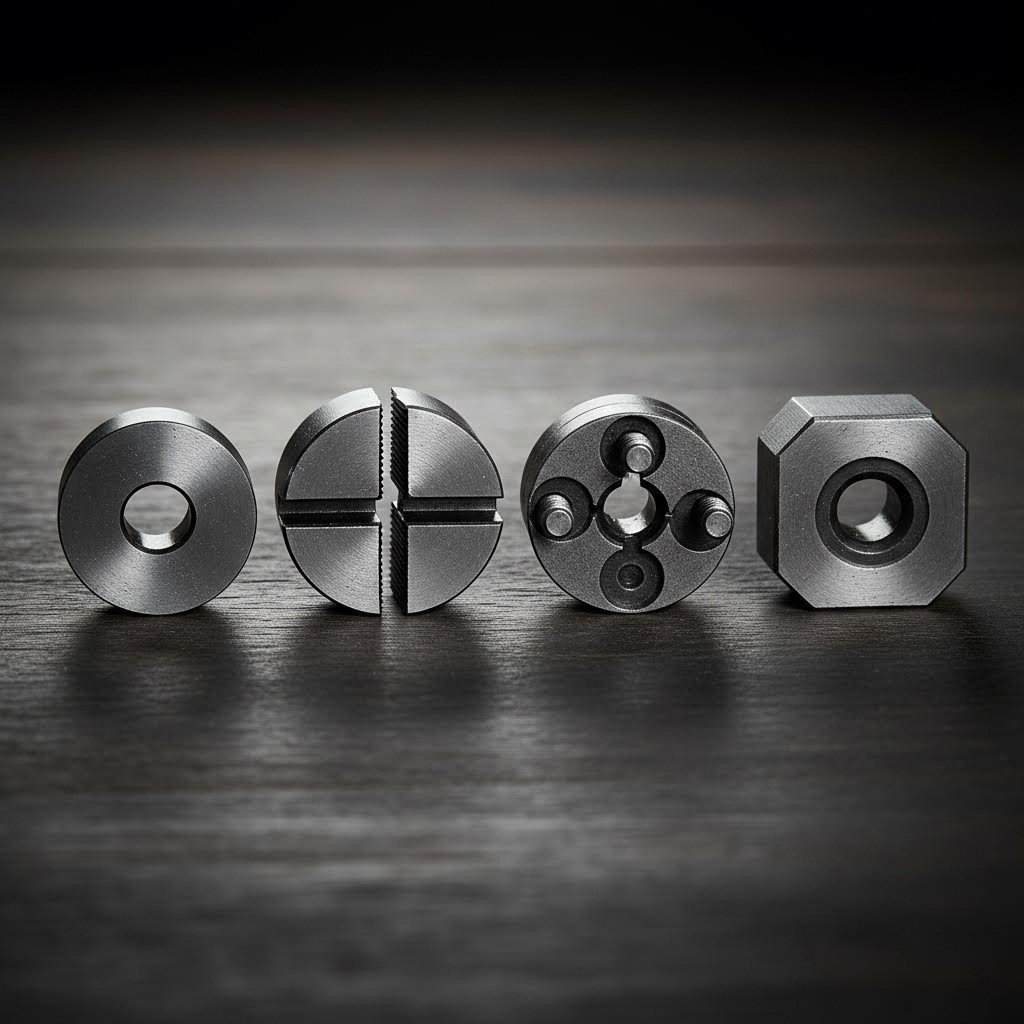
표준 나사 절삭 작업용 솔리드 다이
솔리드 다이는 모든 다이 공구 세트의 핵심 도구입니다. 이 고정 크기의 나사 절삭 다이는 조절 가능한 부품 없이 단일 구조로 제작됩니다. NIKOPAS 에 따르면, 솔리드 나사 절삭 다이는 정밀도가 무엇보다 중요한 소경 및 소피치 나사 작업에 가장 적합합니다.
어떤 경우에 솔리드 다이를 사용해야 할까요? 다음 상황에서는 솔리드 다이가 최선의 선택입니다:
- 표준 볼트 및 체결부품 제작
- 일관되고 반복 가능한 나사 품질이 요구되는 프로젝트
- 봉의 지름이 사양과 정확히 일치하는 경우
주요 제한 사항은 조정 기능이 전혀 없다는 점입니다. 만약 로드 재료의 지름이 약간 과대라면, 고정형 다이(die)는 이를 보상해 주지 못하므로 다이 세트에서 다른 유형의 다이를 선택해야 합니다.
정밀 제어를 위한 분할형 및 조정 가능 다이
더 높은 유연성이 필요하십니까? 분할형 다이와 조정 가능 다이는 고정형 다이가 따라갈 수 없는 수준의 정밀 제어 기능을 제공합니다.
분할형 다이 한쪽 면에 간극이 가공되어 있으며, 고정 나사(set screw)를 통해 지름을 약간 조정할 수 있습니다. 이로 인해 나사 깊이를 미세 조정하거나 사양에서 약간 벗어난 로드 재료를 처리하는 데 이상적입니다. 나사 가공 산업 관련 자료에 따르면, 분할형 나사 절단 다이는 고정 부품과 조정 가능한 부품으로 구성되어 있으며, 특히 더 큰 나사를 보다 정밀하게 절단하도록 특별히 설계되었습니다.
조정 가능 다이 여러 개의 절삭 날을 독립적으로 위치 조정할 수 있는 방식으로, 분할형 다이의 개념을 한층 더 발전시킨 제품입니다. 이러한 다이는 다음 상황에서 특히 뛰어난 성능을 발휘합니다:
- 마모되거나 지름이 과대인 재료로 맞춤 가공이 필요한 경우
- 표준보다 느슨하거나 단단한 나사를 요구하는 프로젝트
- 기존 나사 부품에 대한 수리 작업
다이 및 탭 차트를 참조할 때, 조정식 다이(die)는 일반적으로 단일 고정 크기보다는 소폭의 크기 범위를 커버한다는 점을 알 수 있습니다. 이러한 유연성은 전문 기계공의 공구함에 조정식 다이를 필수적인 도구로 자리매김하게 합니다.
협소한 작업 공간용 육각형 다이(Hex Dies)
표준 다이 스톡 핸들이 들어가지 않는 좁은 공간에서 작업해야 할 경우? 육각형 다이는 이 문제를 우아하게 해결합니다. 외부가 육각형으로 설계되어 전통적인 핸들 대신 소켓 렌치나 래칫 도구를 사용할 수 있습니다.
다음과 같은 상황에서 육각형 다이의 편리함을 실감하실 수 있습니다:
- 자동차 엔진 실
- 공간이 제한된 기계 조립체
- 저프로파일(low-profile) 방식이 요구되는 모든 상황
참고: 다이 유형 비교표
| 다이 타입 | 최고의 용도 | 조정성 | 요구 되는 기술 수준 |
|---|---|---|---|
| 솔리드 다이 | 표준 나사 가공, 일관된 결과 | 없음 | 초보자 |
| 분할 다이(Split Die) | 나사 깊이 정밀 조정 | 제한됨(세트 나사로 조정) | 중간 |
| 조절식 다이 | 마모되거나 과도하게 큰 재료, 맞춤형 적합 | 전 범위 조절 가능 | 중급자~고급자 |
| 육각 다이 | 협소한 공간, 래칫 작동 | 설계에 따라 다름 | 초보자에서 중급자 |
다이 각인 표시를 전문가처럼 읽기
여기서 초보자들이 자주 막히는 부분입니다. 모든 나사 다이에 각인된 이 암호 같은 숫자들은, 코드를 이해하기만 하면 필요한 모든 정보를 알려줍니다.
미터법 다이 「M8 × 1.25」와 같은 표시를 나타냅니다. 여기서 「M」은 미터법 표준을 의미하며, 「8」은 명목상 직경(밀리미터 단위)을, 「1.25」는 나사 피치(나사산 간 거리, 밀리미터 단위)를 나타냅니다.
임페리얼 다이 분수 단위 치수(예: "1/4-20")를 사용합니다. 여기서 "1/4"는 인치 단위의 공칭 지름을 나타내며, "20"은 인치당 나사산 수(TPI)를 의미합니다.
나사 탭 및 다이 세트를 구성할 때는 항상 귀하의 봉재료의 지름이 다이 사양과 일치하는지 확인해야 합니다 . 다이 및 탭 치수표를 간단히 참조하면 작업 시작 전에 비용이 많이 드는 실수를 방지할 수 있습니다. 대부분의 고품질 탭·다이 세트에는 추정에 의존하지 않도록 치수표가 포함되어 있습니다.
적절한 다이를 선택했다면, 이제 재료와 작업 공간을 준비할 차례입니다. 이는 깔끔하고 전문적인 나사산을 만드는 데 필수적인 기반이 됩니다.
2단계: 재료 및 작업 공간 준비
귀하는 프로젝트에 완벽한 다이를 이미 선택했습니다. 이제 실패를 초래하는 번거로운 상황과 완벽한 나사산 사이를 가르는 단계가 남았습니다: 철저한 준비 작업입니다. 이 단계를 서두르는 것이 초보자들이 저지르는 가장 큰 실수입니다. 여기에 단 5분만 더 투자한다면, 나사산 손상과 재료 낭비를 피할 수 있습니다.
깔끔한 나사산을 위한 금속 재료 준비
대부분의 안내서에서 간과하는 중요한 사실이 있습니다: 로드(봉)의 지름이 생각보다 훨씬 중요합니다. 미터법 나사의 경우, 로드 지름은 완성된 나사 크기보다 0.1–0.2mm 작아야 합니다. 그 이유는 무엇일까요? 다이(die)가 절삭을 위해 재료를 잘라내야 하기 때문입니다. 그러나 과도한 여유 재료는 끼임 현상과 불량한 나사 형성을 유발합니다.
다이가 금속에 접촉하기 전에, 로드 끝단을 챔퍼링(chamfering)해야 합니다. 파일 또는 그라인더를 사용하여 로드 가장자리 전체에 45도 베벨을 만듭니다. 이 챔퍼는 다음 두 가지 핵심적인 역할을 합니다:
- 다이가 작업물 위에서 스스로 중심을 잡도록 돕습니다
- 절삭 이빨이 한꺼번이 아니라 점진적으로 맞물리도록 합니다
에 따르면 기계 요소 기계식 다이에는 절삭 이빨의 입구 측면에 릴리프(relief)가 있어, 절삭 시작을 위한 높이가 낮아진 이빨이 설계되어 있습니다. 이 릴리프는 귀하의 챔퍼와 함께 작동하여 정확하고 직선적인 나사 형성을 보장합니다.
다이 자체 외에 필수적인 도구들
다이 외에 어떤 도구가 필요한지 궁금하신가요? 완전한 탭 세트 또는 나사 가공 장비를 구성하려면 여러 보조 도구가 필요합니다. 작업을 시작하기 전에 모든 도구를 준비하세요:
- 다이 스톡/핸들 – 다이를 회전시키기 위한 레버리지와 제어력을 제공
- 적합한 다이 – 원하는 나사 크기 및 피치에 맞춰진 것
- 절삭유 – 윤활을 위해 필수적임(다음 단계에서 이에 대해 자세히 설명함)
- 벤치 바이스 – 나사 가공 중 작업물을 단단히 고정함
- 코너면 처리용 파일 – 막대 끝부분에 리드인 베벨을 형성함
- 측정 도구 – 막대 지름을 확인하기 위한 캘리퍼스 또는 마이크로미터
- 깨끗한 옷 – 절삭 찌꺼기 및 이물질을 닦아내기 위한 것
탭 및 다이 드릴 비트 세트를 사용하는 경우, 탭 세트에 올바른 피롯 드릴 크기가 포함되어 있는지 확인하십시오. 이는 주로 내부 나사 가공에 적용되지만, 완전한 탭 공구를 체계적으로 정리해 두면 프로젝트 중간에 당황하는 상황을 방지할 수 있습니다.
나사 가공 성공을 위한 작업 공간 설정
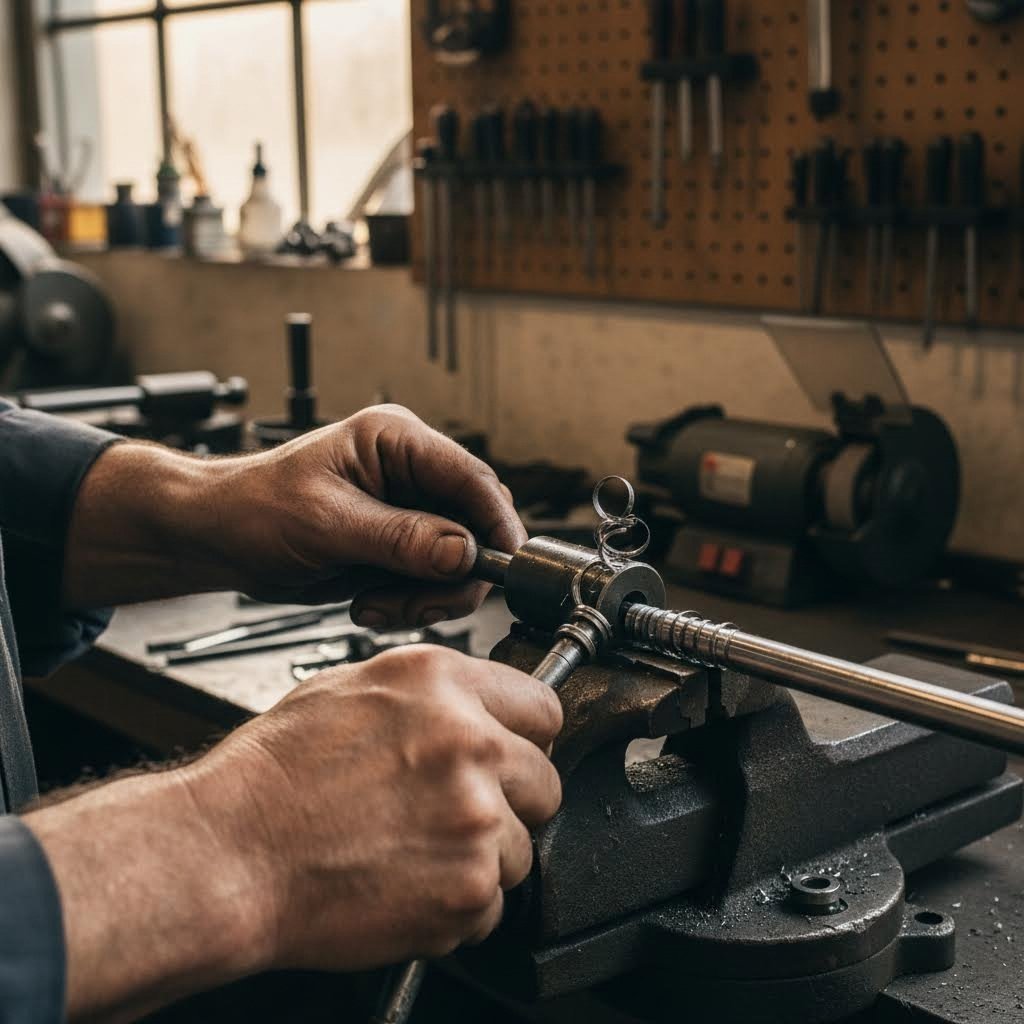
작업물을 올바르게 고정하는 것은 절대 타협할 수 없습니다. 나사 가공에 필요한 길이보다 약 2.5cm 더 길게 바를 벤치 바이스에 고정하세요. 핵심 조건은 바가 완전히 수직으로 위치해야 한다는 것입니다.
숙련된 기계공들이 사용하는 팁입니다: 바이스를 완전히 조이기 전에 각도기 또는 수평기를 바에 대고 정렬 상태를 확인하세요. 시작 시 미세한 각도 오차라도 점점 깊어지는 절삭 과정에서 심각한 문제로 확대됩니다. 『기계 요소 안내서』에 따르면, 다이를 정확히 직각으로 맞추어 시작하는 것이 전체 공정 중 가장 어려운 단계입니다.
청결성은 기대 이상으로 중요합니다. 금속 찌꺼기, 먼지 및 이물질은 거친 나사와 다이의 조기 마모 를 유발합니다. 작업 시작 전에 깨끗한 천으로 바를 닦아 주세요. 떨어진 금속 찌꺼기가 절삭유나 작업물에 오염되지 않도록 작업 공간을 항상 깔끔하게 유지하세요.
스테인리스강 및 경질 재료 가공 시 특별 고려 사항
스테인리스강에 나사를 가공하려고 계획 중이신가요? 이는 포럼 사용자들이 꾸준히 어려움을 겪는 부분이며, 그 이유도 충분합니다. 스테인리스강은 절삭 과정에서 가공 경화(work-hardening) 현상이 발생하므로, 절삭할수록 재료가 더 단단해집니다. 이를 해결하려면 전체 작업 방식을 조정해야 합니다.
- 느린 속도 – 다이 스톡(die stock)을 천천히 의도적으로 돌리고, 결코 서두르지 말 것
- 더 많은 윤활제 – 절삭유를 풍부하게 그리고 자주 도포할 것
- 가벼운 압력 – 다이가 스스로 정해진 속도로 절삭할 수 있도록 할 것
- 자주 역회전하기 – 칩(chip)을 자주 부러뜨려서 걸림 현상을 방지할 것
경질 재료에 탭·다이 드릴 방식을 적용할 때는 무엇보다 인내심이 필요합니다. 무리하게 다이를 강제로 작동시키면 열이 발생하여 스테인리스강의 가공 경화가 더욱 심화되고, 이는 결국 다이 파손 또는 공작물 손상으로 이어지는 악순환을 초래합니다.
작업 공간을 정리하고 자재를 적절히 준비한 후, 다음 중요한 결정인 특정 재료에 맞는 올바른 절삭유를 선택하고 적용할 준비가 되었습니다.
3단계: 적절한 절삭유 선택 및 적용
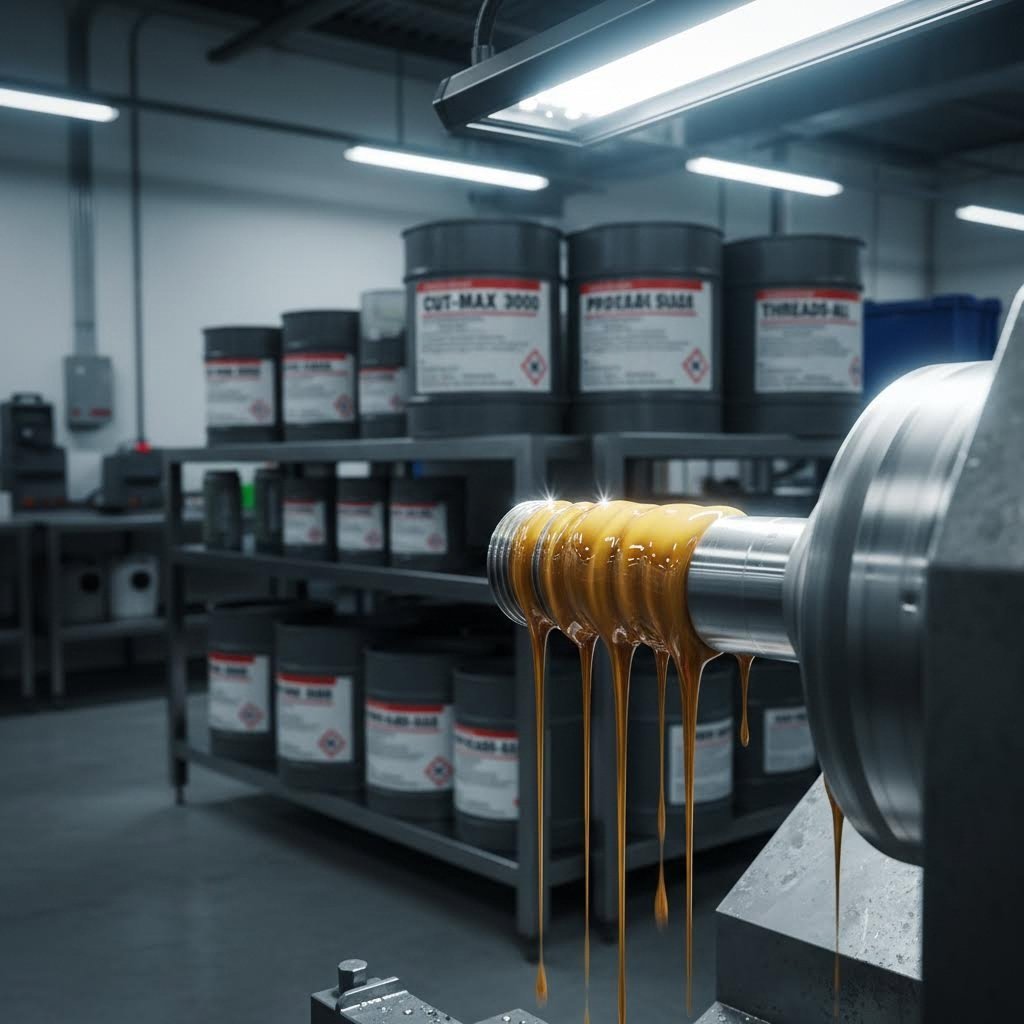
전문 기계 가공 기술자와 좌절한 초보자를 구분하는 비밀 하나를 알려드리겠습니다. 윤활은 선택 사항이 아니라 필수입니다. 이 단계를 생략하면 거친 나사산, 과열된 다이, 그리고 도구 수명 단축이라는 결과를 초래합니다. 반면 이 단계를 완벽히 숙지하면 매번 깔끔하고 정확한 나사산을 얻을 수 있습니다.
윤활이 나사 품질을 좌우하는 이유
다이가 금속을 절삭할 때, 절삭 날 끝부분에서 막대한 마찰력이 발생합니다. 적절한 윤활이 없으면 이 마찰로 인해 열이 발생하여 작업물과 나사 가공 도구 모두에 손상을 줄 수 있습니다. TTP Hard Drills 에 따르면, 적절한 윤활제를 사용하면 도구 수명을 최대 4배까지 연장할 수 있으며, 특히 스테인리스강 또는 알루미늄 가공 시 칩 용착(chip welding)을 방지하는 데 매우 중요합니다.
적절한 절삭유는 다음 네 가지 주요 이점을 제공합니다:
- 마찰 을 줄여 준다 다이의 절삭 날과 공작물 사이에서
- 과열 방지 공작물의 경화 및 공구 손상을 유발하는 현상
- 보다 깨끗한 나사를 형성합니다 보다 매끄러운 표면 마감을 동반하여
- 다이 수명을 연장합니다 절삭 날의 마모를 줄여서
절삭유를 금속용 탭 및 다이 세트의 보험으로 생각하세요. 탭 및 다이 세트(금속용) 적절한 윤활제에 소액의 투자만으로도 공구를 보호하고, 모든 나사 가공 작업에서 더 우수한 결과를 보장합니다.
금속 종류에 맞는 절삭유 선택
모든 금속이 절삭유에 동일하게 반응하는 것은 아닙니다. 부적절한 윤활제를 사용하거나 아예 사용하지 않으면, 끈적거리는 나사산부터 다이 파손에 이르기까지 다양한 문제가 발생할 수 있습니다. 다음은 재료별로 구분된 가이드입니다:
| 소재 | 권장 윤활제 | 적용 빈도 | 특별한 주의사항 |
|---|---|---|---|
| 연강 | 절삭유 또는 탭핑유 | 작업 시작 전에 2~3회 회전할 때마다 재도포하세요 | 표준 방식이 잘 작동합니다 |
| 스테인리스강 | 황 함유 절삭유 또는 절삭 페이스트 | 작업 시작 전에 충분히 도포하고, 자주 재도포하세요 | 가공 경화를 방지합니다. 절대 건식 절삭을 하지 마세요 |
| 알루미늄 | 등유, WD-40 또는 경량 절삭유 | 작업 시작 전과 필요 시마다 | 다이 이빨에 칩이 용접되는 것을 방지함 |
| 황동 | 경유 또는 건식 | 최소한의 도포만 필요함 | 가공이 용이함; 과도한 윤활제는 피함 |
| 주철 | 건식 또는 경유 | 선택 사항이며, 소량만 도포함 | 가루 형태의 칩을 생성함; 유체 사용 시 페이스트가 형성될 수 있음 |
초보자에게 가장 어려운 가공 재료인 스테인리스강의 경우, 고성능 절삭 페이스트가 이상적입니다. 이러한 제형은 고온에 견디며, 나사 가공 시 자주 발생하는 재료의 경화(워크-하딩)를 방지하는 내구성 있는 필름을 형성합니다. 난가공 재료에서 탭을 사용해 나사 가공을 수행할 때는 윤활제의 중요성을 결코 과소평가해서는 안 됩니다.
최적의 결과를 위한 적용 기술
적절한 윤활제를 선택하는 것은 문제 해결의 절반에 불과합니다. 윤활제를 어떻게 도포하느냐도 그만큼 중요합니다. 다음 검증된 기법을 따르십시오:
- 작업 시작 전에 충분히 도포함 – 막대기의 경사진 끝부분과 다이의 절삭면에 윤활유를 도포하세요
- 절삭 중에는 수시로 재도포하세요 – 절삭 부위에 약간의 유체를 몇 차례 회전할 때마다 추가하세요
- 말라버리지 않도록 주의하세요 – 절삭된 나사산과 탭 사이의 접촉면에는 항상 신선한 윤활유가 존재해야 합니다
- 먼저 절삭 찌꺼기를 제거하세요 – 재도포하기 전에 금속 가루를 브러시로 제거하여 윤활유가 절삭 날끝까지 도달하도록 하세요
대부분의 재료에는 얇고 고르게 도포하는 정도로 충분하지만, 스테인리스강은 예외입니다. 스테인리스강의 경우 넉넉히 도포하고, 전체 탭 가공 과정 내내 젖어 있는 상태를 유지하세요.
적절한 절삭유를 사용할 수 없을 때의 대체재
적절한 절삭유를 준비하지 못하셨나요? 아래 대체재는 응급 상황에서 일시적으로 사용할 수 있으나, 전용 절삭유에 비해 성능은 항상 떨어집니다:
- 모터 오일 – 연강용으로 작동되나, 최적의 선택은 아님
- 3-in-1 오일 – 경량 작업용 나사 절단에는 허용 가능
- 채소 기름 – 알루미늄 가공 시에만 응급 상황에서 사용 가능
- 비누물 – 황동 가공 시 최소한의 윤활만 제공
스테인리스강 또는 경화재료에는 이러한 대체제를 사용하지 마십시오. 탭 및 다이 파손과 가공물 손상이라는 결과는 적절한 절삭유 구입 비용보다 훨씬 더 큰 손실을 초래합니다. 금속 가공용 고품질 탭 앤 다이 세트를 구입하신다면, 적절한 윤활제 역시 함께 구입하셔야 합니다.
적절한 절삭유를 선택하고 올바르게 도포한 후, 가장 핵심적인 단계—다이를 정확히 위치시키고 실제 나사 절단을 시작하는 단계—로 진입할 준비가 완료됩니다.
4단계: 다이 위치 조정 및 나사 절단 시작
재료를 준비하고, 적절한 윤활제를 선택하며, 가공물을 단단히 고정시켰습니다. 이제 진정한 시험의 순간이 왔습니다: 바로 나사를 직접 절삭하는 단계입니다. 이때 기술이 가장 중요합니다. 제대로 수행하면 전문가 수준의 나사산을 얻을 수 있지만, 잘못하면 초보자들이 흔히 겪는 나사산 박리나 교차 결합(크로스-스레딩) 같은 실패 사례를 직접 경험하게 될 것입니다.
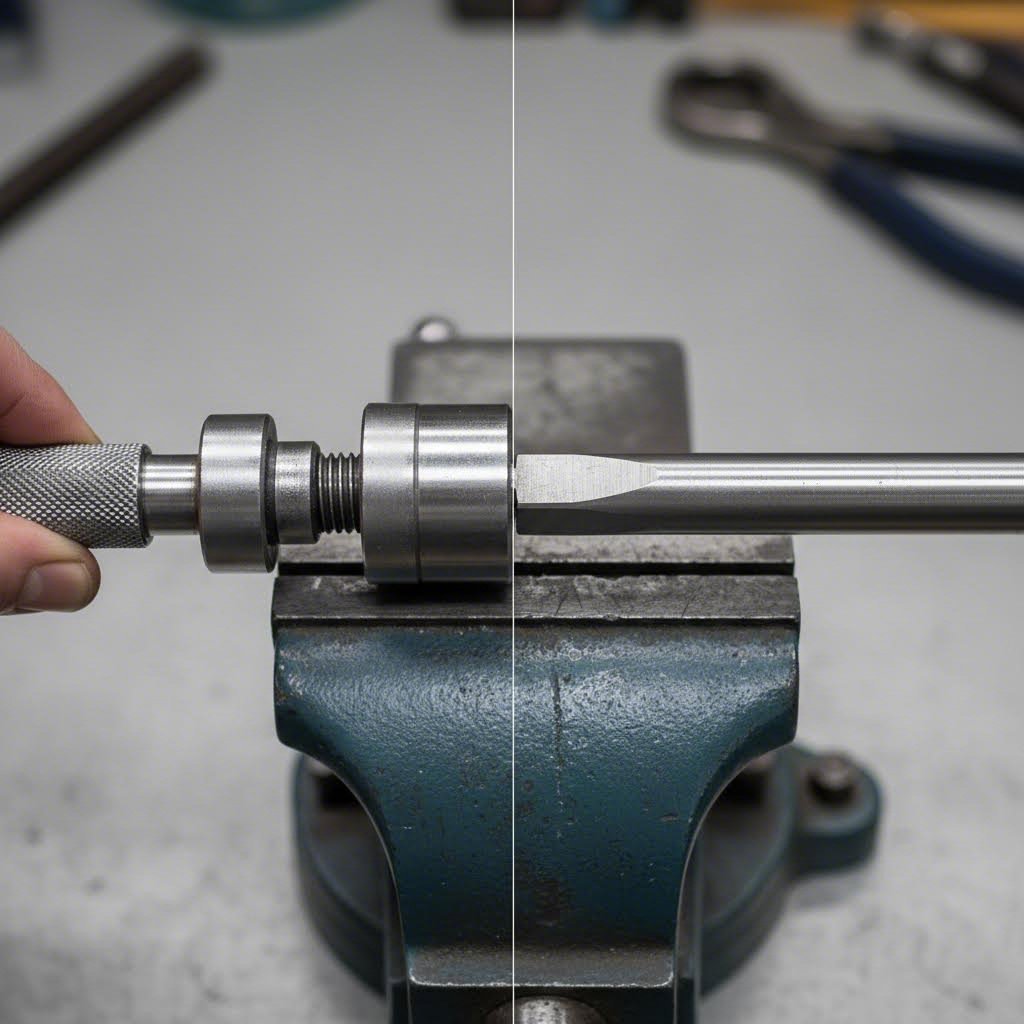
다이를 항상 올바른 방향으로 배치하기
처음 사용해보는 대부분의 사람들을 당황하게 만드는 세부 사항 하나가 있습니다: 다이는 정방향과 역방향이 있습니다. 반대로 설치하면 도구와 싸우게 되어, 도구가 스스로 작동하도록 내버려두는 것이 아니라 오히려 저항을 느끼게 됩니다.
다이를 자세히 살펴보세요. 한쪽 면에는 절삭 날에 약간의 경사 또는 챔퍼가 형성되어 있는데, 이를 ‘선단 인입면(lead-in side)’이라고 합니다. 반대쪽 면은 절삭 날이 즉시 전체 깊이로 절삭을 시작합니다. 탭 및 다이 세트 사용법을 배울 때, 이 방향 설정 규칙은 근본적인 원칙입니다.
- 경사진/챔퍼 처리된 면은 반드시 가공물 쪽을 향해야 합니다
- 이렇게 하면 절삭 날이 점진적으로 가공물에 접촉하게 됩니다
- 이 경사는 작업 시작 시 다이가 중심을 따라 자연스럽게 위치하도록 안내해 줍니다
타메손(Tameson)에 따르면, 다이(die)를 이용한 나사 가공 과정에서는 다이 핸들이 작업물에 대해 정확히 직각을 이루도록 해야 하며, 이는 리드인 각도(lead-in angle)가 중심을 잡은 시작을 가능하게 하기 때문입니다. '탭과 다이 세트를 올바르게 사용하는 방법은 무엇인가?'라고 물으신다면, 첫 번째 답변은 바로 적절한 방향 설정입니다.
깨끗한 나사를 만드는 반바퀴 후퇴 기법
이 단일 기법 하나로 초보자의 시도와 전문가 수준의 결과를 구분할 수 있습니다. 이 기법은 '반바퀴 후퇴법(half-turn-back method)'이라 불리며, 한 번 익숙해지면 더 이상 거친 나사나 끼임 현상이 발생하지 않게 됩니다.
작동 원리는 다음과 같습니다: 나사를 절삭할 때 금속 찌꺼기가 다이의 홈(flutes)에 쌓이게 됩니다. 이러한 찌꺼기가 과도하게 압축되면 깨끗한 절삭이 방해받을 뿐만 아니라 다이가 파손될 수도 있습니다. 해결책은? 주기적으로 회전 방향을 역전시켜 찌꺼기를 부수고 제거하는 것입니다.
최적의 결과를 얻기 위한 단계별 절삭 순서는 다음과 같습니다:
- 절삭유를 도포하세요 코너를 베벨 처리한 막대 끝단과 다이의 절삭면 모두에
- 다이의 경사진 면을 위치시키세요 코너를 베벨 처리한 막대 끝단에 대고
- 단단히 아래로 누르십시오 (일반적인 오른쪽 나사산의 경우 시계 방향으로)
- 앞쪽으로 반 바퀴에서 한 바퀴까지 완전히 회전하십시오 , 안정된 압력을 유지하면서
- 방향을 반시계 방향으로 1/4바퀴 되돌리십시오 , 절삭된 칩을 부수기 위해
- 다시 앞쪽으로 계속 회전하십시오 , 이 전진-후진 리듬을 반복하면서
- 몇 차례 회전할 때마다 윤활제를 다시 도포하십시오 , 절삭면을 항상 humid 상태로 유지하기 위해
- 원하는 나사 길이에 도달할 때까지 계속합니다
탭 및 다이 공구를 사용할 때 이 리듬은 자연스럽게 익숙해집니다. 이를 "두 번 앞으로, 한 번 뒤로"라고 생각해 보세요—실제 비율은 더 정확히 말하면 "반바퀴 앞으로, 사분의 일 바퀴 뒤로"입니다. 짧은 역회전은 진행 상황을 잃지 않으면서 절삭 흔적(칩)을 제거합니다.
전체 가공 과정 내내 수직 정렬 유지하기
처음에 수직으로 시작하는 것이 중요합니다. 그러나 전체 절삭 과정 내내 수직을 유지하는 것? 바로 그것이 진정한 전문가 수준의 나사를 만드는 핵심입니다.
미들랜드 툴(Midland Tool)에서 언급한 바에 따르면, 다이를 이용한 나사 가공은 깨끗하고 일관된 절삭을 요구하며, 이러한 일관성은 흔들림 없는 정렬을 전제로 합니다. 다음은 정렬을 유지하는 방법입니다:
- 양손을 동등하게 주시하세요 – 힘이 고르지 않으면 다이가 기울어질 수 있습니다
- 팔꿈치를 몸통에 가깝게 유지하세요 – 이는 작업물 중심 위에 힘을 집중시킵니다
- 정렬 상태를 자주 확인하세요 – 뒤로 물러나서 수직성을 시각적으로 확인하세요
- 무리하게 힘을 주지 마세요 – 다이가 한쪽으로 미끄러지려는 경우, 즉시 중단하고 재정렬하세요
처음 몇 개의 나사산이 매우 중요합니다. 다이가 완전한 나사산을 여러 개 절삭한 후에는 이미 형성된 경로를 따라 자동으로 안내됩니다. 그러나 초기 절삭이 모든 것을 결정합니다. '탭과 다이 세트를 사용할 때 나사산이 어긋나지 않게 하는 방법'을 고민하신다면, 그 해답은 바로 이 초기의 신중한 회전에 있습니다.
M3 스테인리스강 나사 가공의 난제
특히 M3 및 유사한 소경 규격의 스테인리스강 나사 가공은 기술 숙련도를 시험하는 최고 난이도의 작업입니다. 온라인 포럼에서의 논의를 보면, 초보자들이 가장 자주 실패하는 부분이 바로 여기임을 꾸준히 지적하고 있습니다. 이 재료는 가공 경화가 급격히 일어나고, 소형 다이는 매우 취약하며, 오차 허용 범위가 거의 없습니다.
M3 스테인리스강에 탭과 다이 세트를 사용할 경우, 다음처럼 작업 방식을 조정하세요:
- 매우 느린 회전 속도 – 일반 탄소강보다 절반 속도
- 자주 역회전하기 – 앞으로 1/4회전 후, 뒤로 1/4회전 반복
- 풍부한 윤활 – 황 함유 절삭유를 지속적으로 재도포하세요
- 최소한의 압력 – 다이가 스스로 정해진 속도로 절삭할 수 있도록 할 것
- 저항을 느껴보세요 – 절삭력이 급격히 증가하면 즉시 중지하세요
마지막 항목은 특히 강조할 가치가 있습니다. 어떤 재료라도 탭 가공을 할 때 적절한 절삭 감각을 익히게 됩니다. 다이(die)는 매번 전진 회전 시 일정하고 적당한 저항을 주어야 합니다. 만약 저항이 갑자기 급증한다면, 일반적으로 칩(chip) 축적 또는 정렬 불량 등 문제가 발생한 것입니다. 즉시 가공을 중단하고, 역회전하여 칩을 제거한 후 각도를 확인한 다음 보다 신중하게 작업을 이어가세요.
적절한 절삭과 강제 가공의 구분
어떻게 하면 적절히 절삭하고 있는지, 아니면 단순히 금속을 강제로 가공하고 있는지를 알 수 있을까요? 다음 신호에 주의하세요:
| 적절한 절삭의 징후 | 강제 가공/문제의 징후 |
|---|---|
| 안정적이고 일관된 저항 | 저항의 갑작스러운 증가 |
| 작고 곱슬거리는 금속 찌꺼기 형성 | 칩이나 분말 잔여물 없음 |
| 부드러운 회전 리듬 | 떨림이 있고 걸리는 움직임 |
| 다이가 작업물 위에서 중심을 유지함 | 다이가 이동하거나 기울려는 경향 있음 |
| 절단 소리가 깨끗하고 일관적임 | 비명소리, 마찰음 또는 침묵 |
경고 신호가 나타나면 절단을 즉시 중단하십시오. 다이를 작업물에서 완전히 뒤로 물러나게 한 후, 쌓인 절삭칩을 제거하고 새 윤활제를 추가한 다음 작업 진행 상황을 점검하십시오. 때때로 단순한 칩 제거만으로도 모든 문제가 해결될 수 있습니다. 다른 경우에는 기술을 조정하거나 계속하기 전에 정렬 상태를 다시 확인해야 할 수도 있습니다.
이러한 절단 기본 원리를 숙달하면, 나사 가공은 성공 여부가 불확실한 과정에서 신뢰할 수 있는 기술로 탈바꿈됩니다. 다이의 방향이 올바르게 설정되었고, 절단 기술도 완벽하게 익혔다면 이제 나사 가공 과정을 완료하고 전문가 수준의 품질 기준을 충족하는지 검증할 준비가 된 것입니다.
5단계: 나사 가공 완료 및 작업 검사
이미 절단을 시작했고 반바퀴 후진 기법을 사용해 일정한 리듬을 확립했습니다. 이제 만족스러운 단계—즉, 나사를 완전히 가공하고 실제로 작동하는지 검증하는 단계—가 남았습니다. 이 단계에서 나사 가공은 단순한 기술 수행에서 완성된 제품으로 전환되며, 세심한 주의력이 실용적인 나사를 얻는 것과 좌절감을 주는 실패 사이를 가릅니다.
나사 깊이 및 품질 제어
어느 정도 실을 자르면 충분한지 어떻게 알 수 있을까요? 특정 깊이까지 구멍을 뚫는 것과 달리, 나사 절단 공구(다이)를 사용할 때는 시각적으로 그리고 촉감으로 진행 상황을 직접 확인해야 합니다. 다음은 간단하고 명확한 방법입니다:
완전한 길이의 나사를 가공할 경우, 다이가 막대재 전체 요구 길이를 따라 이동할 때까지 절삭 작업을 계속합니다. 작업물에 대한 다이의 위치를 주의 깊게 관찰하세요—목표 길이에 도달하면 역회전하여 다이를 빼내면 됩니다.
역회전 과정에는 인내심이 필요합니다. 절삭 시와 동일한 제어된 속도로 다이를 안정적으로 반시계 방향으로 회전시켜야 합니다. 이 단계를 서두르면 막 만든 나사산을 손상시킬 수 있습니다. 다이는 새로 형성된 나사산을 매끄럽게 따라 빠져나가야 하며, 걸리거나 끼임 현상이 없어야 합니다.
숙련된 기계공들이 전하는 팁입니다: 작업 시작 전에 막대재 위에 원하는 나사 길이를 마커나 테이프로 표시해 두세요. 이렇게 시각적인 기준점을 미리 설정하면 추측에 의존하지 않고 정확한 길이를 확보할 수 있으며, 과도한 나사 절삭(오버스레딩)을 방지할 수 있습니다. 오버스레딩은 재료 낭비를 유발할 뿐 아니라 나사와 비나사 부분의 경계 지점에서 막대재 강도를 약화시킬 수 있습니다.
나사 가공 vs 기존 나사 재가공
대부분의 안내서에서 완전히 간과하는 차이점이 있습니다: 새로운 나사를 만드는 것과 기존 나사를 재가공하는 것 사이에는 상당한 차이가 있습니다.
새로운 나사 가공 지금까지 논의해온 방식으로, 매끄러운 금속 막대재에 나선형 홈을 절삭하는 작업입니다. 이 작업은 완전한 절삭 접촉, 적절한 윤활, 그리고 완전한 반바퀴 후퇴 기법이 필요합니다. 다이(die)는 매번 전진 회전 시마다 재료를 제거합니다.
나사 재가공 반면, 이미 존재하지만 녹이 슬었거나 더러워졌거나 약간 손상된 나사를 정리하거나 복원하는 작업을 의미합니다. 기계공학 잡담(Mechanical Malarkey) 에 따르면, 나사 재가공용 공구(thread chasers)는 새로운 나사를 절삭하도록 설계된 것이 아니라, 녹슨 나사나 손상된 나사를 정리하기 위한 것입니다. 탭(tap)과 나사 다이(thread die)는 전용 재가공 공구를 대신할 수 있는 경우가 많지만, 사용 기법은 상당히 다릅니다.
기존 나사를 재가공하기 위해 다이를 사용할 때:
- 압력을 훨씬 덜 가하십시오 — 청소하는 것이지, 절단하는 것이 아닙니다
- 다이(die)는 기존의 나사산 경로를 따릅니다 새로운 나사산을 만드는 대신
- 윤활은 여전히 중요합니다 하지만 주로 녹 제거를 위한 윤활입니다
- 저항감은 최소화되어야 합니다 신규 나사산 절단 시에 비해
왜 이것이 중요한가요? 손상된 나사산을 가진 볼트를 복원할 때, 이를 신규 절단 작업처럼 다루면 오히려 상황이 악화될 수 있습니다. 불필요하게 더 많은 재료를 제거하게 되고, 제대로 고정되지 않는 과소 치수의 나사산을 만들 위험이 있습니다. 완전한 나사 탭 및 다이 세트는 이러한 두 가지 상황 모두에 대응할 수 있는 옵션을 제공하므로, 작업 기법을 상황에 맞게 조정하기만 하면 됩니다.
전문적인 결과를 위한 마감 기술
나사산은 이미 절단되었습니다. 하지만 그 품질이 충분히 좋은가요? 전문 기계공들은 일반적으로 단일 패스 후에 작업을 멈추지 않습니다. 작업 품질을 한 차원 높이기 위한 다음의 마감 기법들을 고려해 보세요:
두 번째 패스 방법: 새로 절삭한 나사산에 다이를 최소한의 압력으로 두 번째로 통과시킵니다. 이 가벼운 마감 절삭은 불규칙한 부분을 정리하여 더 매끄럽고 균일한 나사산 표면을 만들어 줍니다. 일부 기계공은 이 작업 시 새 절삭유를 추가로 사용하기도 하고, 또 다른 이들은 거의 건식으로 작동시키기도 하는데, 두 방법 모두 효과가 있습니다.
시험 조립 점검: 이는 최종 품질 검증 단계입니다. 새로 가공한 나사산에 대응하는 너트를 나사조임해 보세요. BAER Tools에서 언급한 바에 따르면, 나사산은 항상 신뢰할 수 있어야 하며, 반드시 상대 부품과 완벽하게 맞물려야 합니다. BAER Tools — 나사산은 반드시 신뢰할 수 있어야 하며, 반드시 상대 부품과 완벽하게 맞물려야 합니다.
시험 조립 시 적절한 탭 나사산은 어떤 느낌이어야 할까요? 다음 품질 점검 목록을 활용하세요:
- 부드러운 작동 — 너트는 강제하지 않고 손으로 쉽게 나사조임이 시작되어야 합니다
- 균일한 저항력 — 전체 길이에 걸쳐 조이는 부분이나 느슨한 부분이 없어야 합니다
- 완전한 나사산 접촉 — 너트는 완전히 나사 결합 시 표면에 평행하게 위치해야 함
- 흔들림 없음 — 정확하게 절단된 나사는 끼움이 꽉 맞고 중심이 정확한 결합을 만듦
- 쉬운 제거 — 너트를 풀 때도 나사를 조일 때와 마찬가지로 매끄러운 감각이 느껴져야 함
시험용 너트가 중간쯤에서 끼임 현상을 보인다면, 나사산 내 이물질이 있거나 절단 중간에 약간의 정렬 오차가 발생했을 가능성이 높습니다. 브러시로 나사산을 철저히 청소한 후 다시 시도하세요. 지속적인 끼임 현상은 교차 나사(크로스 스레딩)를 나타내며, 새 재료로 처음부터 다시 시작해야 할 수 있습니다.
조정 가능한 다이를 이용한 나사 피팅 미세 조정
시험용 너트가 너무 조이거나 너무 느슨하다면? 바로 이때 조정 가능한 나사 다이의 가치가 드러납니다.
나사가 너무 조일 경우(너트가 매끄럽게 나사 결합되지 않음):
- 고정 나사를 사용해 조정 가능한 다이를 약간 벌림
- 다시 한 번 가공하여 소량의 추가 재료를 제거함
- 다시 시험 조립하고 필요 시 반복하세요
너무 느슨한 나사산(너트가 흔들리거나 헐거운 느낌이 나는 경우)의 경우, 동일한 작업물로는 선택지가 제한적입니다. 이때는 예방이 가장 중요합니다—확신이 서지 않을 때는 약간 더 꽉 조인 다이 설정으로 시작한 후, 필요할 때만 점진적으로 완화시키는 것이 좋습니다. 느슨해진 나사산은 다시 조일 수 없지만, 너무 꽉 조인 나사산은 추가로 한 번 더 가공하여 약간 완화시킬 수 있습니다.
이러한 조정 가능성은 바로 고품질 나사 탭 및 다이 세트에 투자할 가치를 부여하는 핵심 요소입니다. 고정형 다이는 모든 조건이 완벽할 때는 훌륭하게 작동하지만, 조정 가능한 옵션은 치수 오차가 발생했을 때 복구 방안을 제공합니다.
나사산 작업을 완료하고 검증까지 마쳤다면, 이제 전문 수준의 품질을 갖춘 제품을 생산하고 계십니다. 그러나 계획대로 진행되지 않을 경우엔 어떻게 해야 할까요? 다음 단계에서는 가장 흔한 나사 가공 문제를 해결하기 위한 진단 및 대응 전략을 살펴보겠습니다.
6단계: 흔한 나사 가공 문제 진단 및 해결
완벽한 기술을 사용하더라도 문제는 발생할 수 있습니다. 아마도 시작 시점을 너무 서두르셨거나, 재료가 예상보다 더 단단했거나, 절삭유 병이 생각보다 훨씬 비어 있었을 수 있습니다. 원인이 무엇이든, 나사 가공 중 발생하는 문제에는 긍정적인 측면이 하나 있습니다: 대부분의 문제는 수정이 가능하며, 일단 원인을 파악하면 모두 예방할 수 있습니다.
당신이 겪고 있는 증상을 진단하여 작업을 다시 원활하게 진행할 수 있도록 돕겠습니다. 탭(Tap) 및 다이(Die) 공구를 올바르게 사용하는 법을 익히는 데는, 이 공구들이 협조하지 않을 때 어떻게 대처해야 하는지 아는 것도 포함됩니다.
엇나사(크로스스레드) 시작 문제 해결
엇나사 현상은 초보자들이 가장 흔히 겪는 문제이며, 거의 항상 한 가지 원인에서 비롯됩니다: 작업물에 대해 수직이 아닌 각도로 가공을 시작한 경우입니다.
다음과 같은 징후가 나타나면 엇나사가 발생한 것입니다:
- 다이를 몇 바퀴 돌린 후 갑자기 저항이 심해지며 작동이 어려워짐
- 시험용 너트가 처음 몇 바퀴만 돌고 더 이상 나사산에 맞지 않음
- 관찰 가능한 나사산이 비뚤어지거나 고르지 않게 보임
- 절삭 중 다이가 눈에 띄게 흔들림
수정 방법은 작업을 얼마나 진행했는지에 따라 달라집니다. 실을 한두 가닥만 자른 경우라면 즉시 작업을 중단하십시오. 다이를 완전히 제거한 후 손상 정도를 점검하고, 공작물이 재사용 가능한지 여부를 판단하십시오. 일반적으로 손상된 시작 부분을 파일로 제거한 후, 막대의 약간 아래쪽에서 새롭게 경사면(챔퍼)을 형성할 수 있습니다.
심각한 크로스스레딩(cross-threading)의 경우, 새로운 원재료가 필요할 수 있습니다. 한 숙련된 정비사가 크로스스레딩된 쇼크 마운트 를 처리할 때 경험했던 것처럼, 때때로 유일한 해결책은 완전히 새로운 나사를 절삭하는 것입니다. 이 과정은 인내심을 요하지만 신뢰할 수 있는 결과를 제공합니다.
예방은 간단합니다: 초기 나사 결합 시에는 천천히 진행하십시오. 회전하면서 단단히 아래쪽으로 압력을 가하고, 작업 시작 전에 각도기(square)를 사용해 정렬 상태를 확인하십시오. 또한 임팩트 렌치로 나사를 처음부터 결합하게 해서는 안 됩니다.
손상된 나사 및 얕은 나사 문제 해결
나사산이 벗겨지거나 얕게 형성된 경우는 나사가 어긋나서 맞물리는 경우와 구분됩니다. 이 경우, 나사는 형성되지만 제대로 맞물리지 않아서 너트를 고정할 만큼 충분히 깊지 않거나, 너무 마모되어 하중이 가해지자마자 즉시 벗겨지게 됩니다.
이 문제를 유발하는 주요 원인은 두 가지입니다:
로드 지름 불량: 원재료의 지름이 규격보다 작으면 다이가 충분한 깊이로 나사를 절삭할 수 없어 완전한 나사 맞물림이 이루어지지 않습니다. 기술적인 문제를 탓하기 전에 캘리퍼스로 로드 지름을 측정하세요. 지름은 다이 사양과 매우 엄격한 허용오차 내에서 일치해야 하며, 일반적으로 미터법 다이의 경우 공칭 나사 크기에서 0.1–0.2mm를 뺀 값과 동일해야 합니다.
다이 절삭 날의 마모: 다이는 영원히 사용할 수 없습니다. 둔해진 절삭 날은 기술 수준과 무관하게 얕고 형태가 불완전한 나사를 생성합니다. 좋은 조명 아래에서 다이를 점검하세요. 다음 사항을 확인하십시오:
- 둥글어지거나 깨진 절삭 날
- 이빨 표면에 보이는 마모 흔적
- 절삭 면에 발생한 녹 또는 부식
- 플루트(홈) 안에 끼어 있는 이물질로서 브러시로 제거되지 않는 것
해결책은 무엇인가? 로드의 지름이 문제라면, 적절한 규격의 재료를 확보하세요. 다이가 마모되었다면, 경화된 강철 절삭 날을 날카롭게 다시 가는 것보다 교체하는 것이 일반적으로 더 실용적입니다. 고품질 탭 및 다이 세트를 사용하려면 날카롭고 손상되지 않은 공구를 유지해야 합니다.
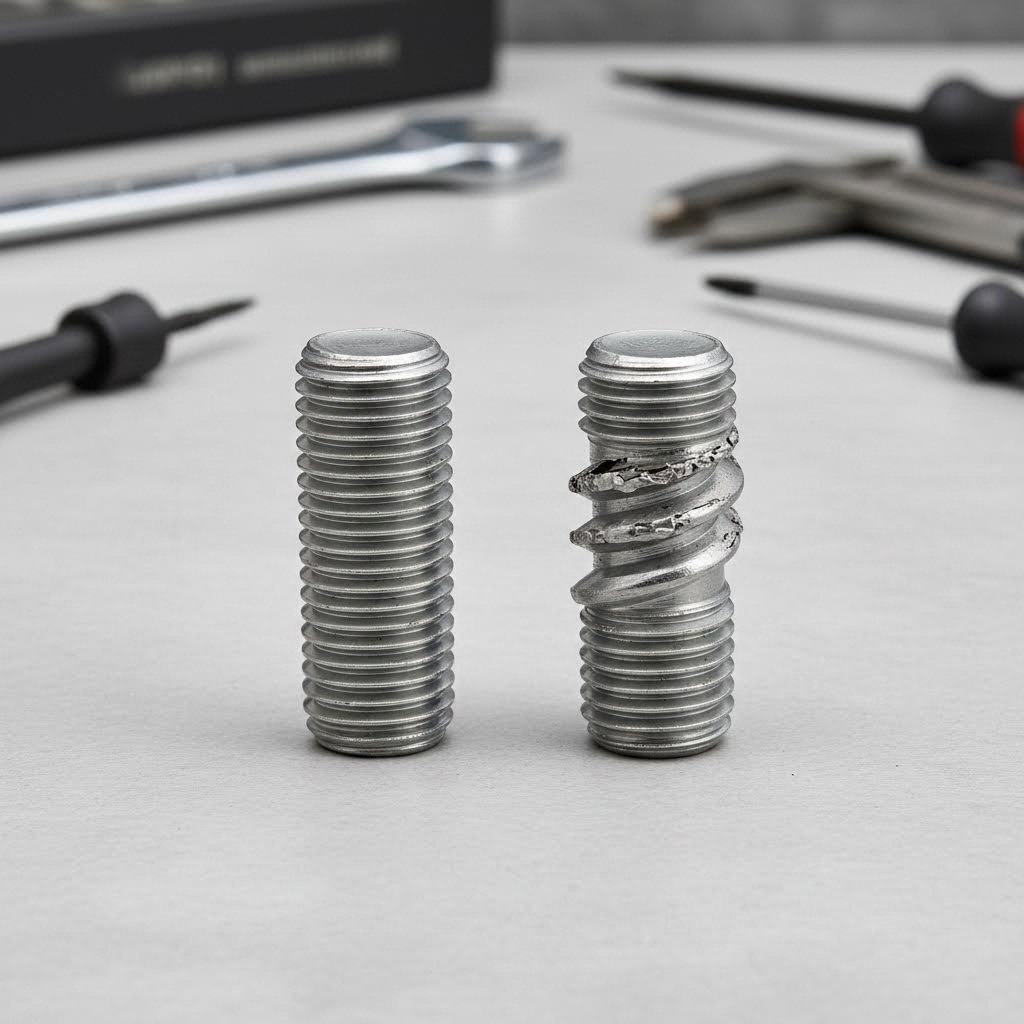
거친 또는 찢어진 나사산 해결하기
나사산이 거칠거나 찢어지거나 털실처럼 끝이 불규칙하게 나오는 경우, 이 문제는 거의 항상 윤활 부족 또는 절삭 속도 문제—대개 두 가지 모두—에서 기인합니다.
거친 나사산은 금속이 깔끔하게 절단된 것이 아니라 찢겨 나갔음을 알려줍니다. 이는 다음의 경우에 발생합니다:
- 절삭유가 부족했거나 아예 사용되지 않았을 때
- 다이를 너무 빠르게 회전시켰을 때
- 칩을 충분히 자주 제거하지 않았을 때
- 절삭 중 다이가 과열되었을 때
해결 방법은 개념상 단순하지만 엄격한 준수가 필요합니다: 속도를 늦추고 윤활을 더 자주 해야 합니다. 강철에 탭 및 다이 세트를 사용할 경우, 2~3회 회전할 때마다 절삭유를 재도포하세요. 스테인리스강의 경우, 절삭유를 지속적으로 도포해야 하며, 이 소재에서는 사실상 절삭유를 과도하게 사용한다는 개념이 없습니다.
반바퀴 후진 기법이 여기서 매우 중요합니다. 사분의 일 바퀴 역회전은 칩이 홈에 끼어 찢어짐을 유발하기 전에 칩을 부수어 줍니다. 이 단계를 생략해 왔다면, 그게 바로 문제의 원인일 가능성이 높습니다.
경질 재료에서 다이 파손 방지
다이가 파손되는 것은 최악의 상황입니다. 고가의 공구를 잃어버리는 것뿐 아니라, 파손된 조각들이 가공물에 박혀 있을 수도 있습니다. 이는 거의 전적으로 재질이 너무 단단한 소재에 무리하게 다이를 강제로 가공할 때나, 가공 기술이 제대로 적용되지 않을 때 발생합니다.
다이 고장 직전의 경고 신호:
- 칩 제거 후에도 쉽게 풀리지 않는 급격한 저항 증가
- 절삭 중 삐걱거리는 소리 또는 마찰음 발생
- 전달되는 힘으로 인해 다이 핸들을 잡기 어려워짐
- 지속적인 회전에도 불구하고 눈에 보이는 칩이 전혀 형성되지 않음
이러한 징후 중 하나라도 나타난다면 즉시 작업을 중단하십시오. 이를 무시하고 계속 가공하면 반드시 어떤 것이든 파손됩니다—다이 자체이거나, 어차피 처음부터 다시 시작해야 하는 상황에서 당신의 인내심일 것입니다.
스테인리스강과 같은 경질 재료의 경우, 예방을 위해서는 기대치를 조정해야 합니다. 가공 경화가 발생하는 재료에서는 나사 절삭 속도를 높이려 하지 말아야 합니다. 스테인리스강에 탭 및 다이 세트 도구를 사용할 경우, 절삭 속도가 느려지고 윤활제를 더 자주 보충해야 하며, 전체 절삭 과정에서 절삭 압력을 가볍게 유지해야 한다는 점을 받아들여야 합니다.
나사 절삭 문제 해결 종합 참조 자료
| 문제 | 가능한 원인 | 해결책 | 예방 |
|---|---|---|---|
| 나사가 어긋나서 시작됨 | 다이가 각도를 가지고 시작됨 | 손상된 나사를 파일로 제거하고, 새 착취면(챔퍼)을 형성한 후 정확한 정렬을 유지하면서 다시 시작함 | 절삭 전에 수직 정렬을 반드시 확인하십시오. 절대 동력 공구를 사용하여 나사를 처음 시작하지 마십시오. |
| 나사가 완전히 밀려나거나 얕게 형성됨 | 봉의 지름이 작거나 마모된 다이 사용 | 봉의 지름을 확인하고, 마모된 다이는 점검 후 교체하십시오. | 작업 시작 전 원재료의 치수를 측정하고, 다이는 적절히 관리하십시오. |
| 거친 또는 찢어진 실 | 윤활이 부족하거나 절단 속도가 너무 빠름 | 충분한 윤활제를 사용하고 느린 속도로 두 번째 절단을 수행함 | 절단유를 풍부하게 도포하고 반바퀴 후퇴 리듬을 유지함 |
| 절단 중 다이 고착 | 홈 내 칩 축적 | 완전히 역회전하여 칩을 제거한 후 윤활제를 추가하고 절단을 계속함 | 절단 중 더 자주 역회전함 |
| 파손된 다이 | 경질 재료를 무리하게 절단하거나 정렬 오류 | 부서진 조각을 제거하십시오. 재료의 경도에 맞는 적절한 다이를 사용하십시오 | 절대 무리해서 작동하지 마십시오. 재료에 맞는 다이를 사용하고 충분한 윤활을 하십시오 |
| 나사산이 너무 조입니다 | 다이 세트가 너무 작거나, 절삭 횟수가 부족합니다 | 조정식 다이를 약간 열고, 추가 마감 가공을 수행하십시오 | 중요 프로젝트에서는 조정식 다이로 작업을 시작하십시오 |
| 나사산이 너무 느슨합니다 | 원재료가 과도하게 크거나, 다이가 지나치게 벌어졌습니다 | 선택지가 제한되어 있어 새 원재료가 필요할 수 있습니다 | 측정값을 확인하십시오. 보다 조인 다이 설정으로 작업을 시작하십시오 |
특별 집중: 스테인리스강 나사 가공 정복하기
포럼 토론에서는 일관되게 스테인리스강을 초보자들을 가장 자주 좌절시키는 재료로 지목합니다. 그 이유는 무엇일까요? 스테인리스강은 절삭 과정에서 가공 경화(work-hardening) 현상이 발생하기 때문입니다. 절삭 중 과도한 열이 발생하는 매 회전마다 다음 회전은 더욱 어려워집니다. 이는 결국 다이 파손, 나사 손상 또는 작업 포기로 이어지는 악순환을 유발합니다.
스테인리스강에 대한 탭 및 다이 가공 기술을 익힐 때는 접근 방식의 모든 측면을 조정해야 합니다:
- 속도: 연강(mild steel)을 가공할 때 사용하는 속도의 절반으로 절삭하세요—아마 더 느릴 수도 있습니다
- 윤활: 유황 함유 절삭유 또는 절삭 페이스트를 사용하세요. 수시로 재도포하세요
- 압력: 가볍고 안정적인 힘으로 작업하세요. 다이가 스스로 일을 하도록 내버려 두세요
- 역회전(Reversals): 매 1/4회전 전진 후 1/4회전 역회전하세요
- 칩 제거(Chip clearing): 몇 개의 나사산을 가공한 후에는 다이를 완전히 분리하여 칩을 제거하세요
- 냉각 휴식: 다이가 따뜻하게 느껴지면 작업을 중단하고 완전히 식힐 것
스테인리스강 가공 시 탭 및 다이 세트 사용은 무엇보다도 인내심을 요구한다. 성급한 작업은 실패를 보장한다. 필요하다고 생각하는 시간의 두 배 이상을 투입하면 일반적으로 성공적인 결과를 얻을 수 있다.
문제 해결에 대한 지식을 도구함에 갖추게 되면, 발생할 수 있는 모든 나사산 가공 문제에도 대처할 수 있다. 그러나 수리는 예방만 못하며, 적절한 다이 관리가야만 도구가 향후 수년간 일관된 성능을 발휘할 수 있다.
7단계: 장기적인 성능을 위한 다이 관리
나사산 가공 기술을 완벽히 익혔다. 당신의 나사산은 깨끗하고 정밀하게 형성된다. 하지만 취미로 하는 사람과 진정한 전문 기술자 사이를 가르는 핵심은 바로 작업 후 도구를 어떻게 관리하느냐에 있다. 전문용 탭 및 다이 세트는 상당한 투자 가치가 있으며, 적절한 관리를 통해 정밀하게 연마된 절삭 날이 수개월이 아니라 수년간 완벽한 성능을 유지하도록 보장할 수 있다.
매 사용 후 다이 청소
금속 착색물(칩)은 작업 완료 후 다이의 최악의 적입니다. 홈(플루트)에 남아 있는 미세한 착색물은 단순히 그 자리에 머무르는 것이 아니라 습기를 끌어당기고, 녹을 유발하며, 보관 중 절삭 날에 손상을 줄 수 있습니다. Hi-Spec Tools 에 따르면, 사용 후 탭 및 다이 세트를 항상 청소하면 녹을 방지하고 도구 수명을 상당히 연장할 수 있습니다.
투자 가치를 지키기 위한 청소 절차는 다음과 같습니다:
- 즉시 착색물 제거 —도구에 접근이 용이한 상태에서 부드러운 브러시를 사용해 홈과 절삭 면의 이물질을 제거하세요
- 절삭유 잔여물 닦아내기 —오래된 윤활제는 끈적거리게 변해 먼지를 끌어당깁니다
- 제거하기 어려운 찌든 때를 불려주세요 —꽉 박힌 착색물의 경우, 약한 비누 용액에 몇 분간 담그면 때가 쉽게 벗겨집니다
- 완전히 말리기 —남아 있는 습기로 인해 내일이면 녹이 생깁니다
- 얇은 기름 층을 도포하세요 —사용 간 간격을 두고 부식을 방지하는 얇은 보호막을 형성합니다
탭 및 다이 세트는 깔끔하게 절삭할 수 없다면 어떤 용도로 사용하나요? 관리가 소홀한 다이는 날카로움이 빨리 떨어지고, 거친 나사를 생성하며, 결국 신뢰성을 잃게 됩니다. 작업 후 단 5분간의 정비는 수십 개의 향후 프로젝트 전반에 걸쳐 큰 이득을 가져다줍니다.
손상 및 녹 발생을 방지하기 위한 적절한 보관
다이를 보관하는 장소는 청소 방법만큼이나 중요합니다. 정밀 공구를 다른 하드웨어와 함께 서랍에 무작위로 넣어두면 절삭 날이 손상되고 공구 수명이 단축됩니다.
이상적인 보관 조건은 다음과 같습니다:
- 서늘하고 건조한 환경 —습도는 경화 강철의 부식을 가속화합니다
- 안정된 온도 —급격한 온도 변화가 일어나는 장소는 피하세요
- 직사광선을 피하는 곳 — 자외선 노출로 보호용 오일 필름이 열화됨
- 정리된 케이스 또는 홀더 — 도구들이 서로 접촉하는 것을 방지함
고품질 탭 및 다이 세트는 일반적으로 이러한 이유로 정확히 맞춤형 케이스에 담겨 제공됩니다. 각 다이는 별도의 칸에 보관되어 절삭 날이 다른 도구들과 부딪히는 것을 막습니다. 탭 및 다이 키트에 적절한 정리 기능이 없다면, 폼 라이닝이 된 공구함 또는 자석식 홀더와 같은 전용 보관 솔루션을 구입하는 것을 고려해 보십시오.
장기 보관 시에는 주변 습기를 흡수하기 위해 실리카 겔 건조제 패킷을 추가하십시오. 이 간단한 조치는 거의 비용이 들지 않지만, 사용 사이의 수개월 동안 녹 발생을 크게 줄여줍니다.
완전한 정비 점검 목록
탭 및 다이 세트를 보관하기 전에 다음 간단한 확인 사항을 점검하세요:
- 날개 홈과 절삭 면에서 모든 금속 찌꺼기 제거 완료
- 절삭 유체 잔여물 완전히 닦아내기
- 도구 완전히 건조 — 오목부 등에 수분 없음
- 모든 금속 표면에 경유 코팅 적용
- 각 도구를 지정된 보관 위치로 되돌림
- 절단 날이 다른 금속 물체와 접촉하지 않음
- 보관 공간을 습기 및 극단 온도로부터 보호
- 건조제 패킷이 신선하며 도구 근처에 배치됨
날카롭게 다듬는 대신 교체해야 할 시기
자주 제기되는 질문 중 하나는 다음과 같습니다: 마모된 다이를 새 것으로 교체하는 대신 날카롭게 다듬을 수 있는가? 기술적으로는 가능합니다. 그러나 실용적으로는 대부분의 사용자는 단순히 마모된 도구를 교체하는 것이 좋습니다.
다이 날카롭게 다듬기에는 전문 장비와 전문 지식이 필요합니다. 절단 날은 특정 각도로 정밀 연마되어 있으며, 비전문가가 시도하는 날카롭게 다듬기는 일반적으로 상황을 악화시킵니다. 또한 Jarvis Cutting Tools 에서 설명하듯이, 칩이 생기거나 균열이 발생하거나 과도한 마모가 관찰되며, 날카롭게 다듬어도 성능이 회복되지 않는다면 교체가 현명한 선택입니다. 수리 비용이 새 도구 가격에 육박할 경우, 새 도구를 투자하는 것이 더 합리적입니다.
그렇다면 교체가 필요한 시점을 어떻게 알 수 있을까요? 다음의 경고 신호를 주기적으로 다이(die)에서 점검하세요:
- 둔해진 절단 날카로움 —나사를 절단하려면 과도한 힘이 필요함
- 손상되거나 부서진 이빨 —절단 표면에 가시적으로 보이는 손상
- 또는 부식 —절단 정밀도를 저해하는 피팅(pitting)
- 일관되지 않은 나사 품질 —정확한 기술을 사용함에도 거친 결과물이 생성됨
- 뚜렷한 마모 패턴 —금속이 마모되어 광택이 나는 부분
마모된 다이는 극적으로 자신을 알리지 않습니다. 단지 서서히 품질이 떨어진 작업물을 만들어낼 뿐입니다. 올바른 작업 기술을 준수하고 있음에도 불구하고 나사가 계속해서 거칠거나 얕게 형성된다면, 문제는 도구에 있는 경우가 대부분입니다.
프로급 공구의 가치
나사 가공용 공구 세트를 구축하거나 업그레이드할 때는 양보다 품질이 더 중요합니다. 정밀 가공된 다이(die)로 구성된 소규모 세트는 저가형 공구로 이루어진 대규모 세트보다 항상 우수한 성능을 발휘합니다.
프로급 탭(tap) 및 다이 세트와 저가형 대체 제품을 구분짓는 요소는 무엇일까요? 가장 중요한 요소는 재료 품질입니다—고속강(HSS)은 연성 합금에 비해 훨씬 오랜 시간 날카로운 절삭날을 유지합니다. 정밀 연마 공정을 통해 일관된 절삭 형상이 확보되며, 철저한 품질 관리로 세트 내 모든 다이가 명세서에 따라 정확히 작동함이 보장됩니다.
산업용 및 자동차 용도에서는 정밀도 기준이 더욱 중요해집니다. 프로페셔널 제조 환경에서는 수천 차례의 작업에서도 일관된 결과를 제공하는 인증 공구를 신뢰합니다. BYD, Wu Ling Bingo, Leapmotor T03, ORA Lightning Cat 같은 기업은 Shaoyi 프로페셔널 등급의 다이 제조가 어떤 것인지 보여줍니다. IATF 16949 인증을 획득한 그들의 스탬핑 다이 솔루션은 결함 없는 결과를 위해 CAE 시뮬레이션을 활용하며, 신속한 프로토타이핑 능력과 93%의 1차 통과 승인률을 자랑합니다. 이들은 산업용 스탬핑 다이에 중점을 두고 있으며, 수동 태핑 공구보다는 다이 제조에 주력하지만, 동일한 정밀 제조 기준이 적용됩니다. 곧, 고품질 공구는 곧 고품질 결과를 의미합니다.
자신의 차고에서 볼트를 태핑하든, 양산 제조를 위한 다이를 명세하든 간에 원칙은 동일합니다. 곧, 고품질 공구에 투자하고 이를 적절히 관리한다면, 앞으로 수년간 전문가 수준의 결과를 안정적으로 제공할 것입니다.
태핑 다이를 올바르게 관리하고 보관함으로써, 적합한 공구 선택에서부터 깔끔한 나사 절삭까지, 그리고 향후 프로젝트를 위해 투자한 공구를 오래도록 보존하는 데 이르기까지 전체 순환 과정을 완료했습니다. 이제 이 기술이 여러분을 다음 단계로 어디까지 이끌어 줄지 고민해볼 때입니다.
나사 가공 기술을 숙달하고 금속 가공 역량을 확장하세요
여러분은 나사 절삭 다이가 실제로 어떤 기능을 하는지 이해하는 것에서부터 문제 해결 및 도구 관리에 이르기까지 전 과정을 성공적으로 마치셨습니다. 이는 결코 사소한 성과가 아닙니다. 그러나 다이를 사용하는 방법을 숙달하는 것은 사실상 금속 가공 역량을 키우는 여정의 시작에 불과합니다.
나사 절삭 기술 로드맵
이 가이드를 통해 여러분이 습득한 핵심 기술을 다시 한 번 정리해 보겠습니다. 이제 여러분은 다음을 이해하게 되었습니다:
- 올바른 다이 유형 선택 —고체형, 분할형, 조절식, 육각형 다이를 구체적인 프로젝트 요구 사항에 맞게 선택하는 법
- 소재 적절히 준비하기 —봉재 끝단의 경사면 처리(chamfering) 및 적정 재료 지름 확인
- 적절한 윤활 적용 —재료 종류에 따라 적합한 절삭유를 선택하는 법
- 올바른 절삭 기법 수행 —깨끗하고 균일한 나사를 만들기 위한 반 바퀴 후퇴법(half-turn-back method) 사용
- 흔히 발생하는 문제 해결 —작업물에 손상을 주기 전에 문제를 진단하고 해결
- 도구 관리 —오랜 기간 동안 신뢰성 있는 성능을 위해 투자한 장비를 보호
이러한 기본 원칙은 단일 교체용 볼트 하나를 제작하든, 수십 개의 맞춤형 파스너를 절삭하든 상관없이 모두 적용됩니다. 기법은 그대로 확장되며, 필요한 것은 오직 인내심의 정도만 달라질 뿐입니다.
어려운 재료로의 진전
기술을 한 단계 더 발전시킬 준비가 되셨나요? 자연스러운 학습 과정은 연강에서 시작하여 점차 더 까다로운 재료로 이어집니다.
스테인리스강 이는 첫 번째 실질적인 도전 과제를 의미합니다. 점검 및 문제 해결 섹션에서 설명한 바에 따르면, 가공 경화 현상은 낮은 절삭 속도, 풍부한 윤활, 그리고 가벼운 압력을 요구합니다. 스테인리스강 절삭을 숙달하면 대부분의 일반적인 나사 절삭 상황을 자신 있게 대처할 수 있습니다.
티타늄 합금 경계를 더욱 더 넓혀 보세요. 윤치 티타늄(Yunchi Titanium)의 연구에 따르면, 티타늄은 열 전도율이 낮아 나사 절삭 시 빠른 열 축적이 발생하며, 동시에 화학적 반응성이 높아 공구와 가공물 사이에 접착 현상이 일어날 수 있습니다. 전문 기계 가공 기술자들은 일반적으로 이음새가 교차된 치형의 탭(tap)과 다이(die)를 사용하여, 초기 절삭에는 고속강(HSS)을, 마감 절삭에는 경질합금(카바이드) 공구를 조합해 활용합니다. 티타늄을 가공할 경우, 전용 공구에 대한 투자와 훨씬 더 많은 인내심이 필요함을 예상해야 합니다.
완전한 나사 절삭 도구 세트 구축하기
다이(die)를 이용한 외부 나사 절삭은 문제 해결의 절반에 불과합니다. 탭 및 다이 세트는 정확히 어떤 용도로 사용될까요? 볼트(나사봉)와 그 볼트가 체결되는 나사 구멍—즉, 완전한 나사 연결 부품을 모두 제작하는 데 사용됩니다.
탭 세트 사용법을 익히는 것은 내부 나사 절삭이라는 보완적인 기술을 습득하는 과정입니다. 두 기술은 상당 부분 중복되며, 적절한 윤활, 반바퀴 후퇴 방식의 칩 제거 기법, 그리고 수직 정렬 등 핵심 요령들이 모두 동일하게 적용됩니다. 다이를 숙달하셨다면 탭 작업 역시 익숙하게 느껴질 것입니다.
기본적인 탭 가공을 넘어서, 나사 규격에 대한 지식을 확장해 보는 것을 고려해 보세요. SSM Alloys 에 따르면, 미터법 나사(60° 나사 각도의 ISO 표준)와 인치법 나사(UNC/UNF 표준)는 측정 체계, 허용오차 등급, 정밀도 수준에서 차이가 있습니다. 이러한 차이점뿐 아니라 파이프 나사와 같은 특수 규격까지 이해한다면, 어떤 나사 가공 프로젝트라도 자신 있게 수행할 수 있습니다.
함께 습득하면 유익한 보완 기술은 다음과 같습니다:
- 스크류 탭 내부 나사 형성용
- 치수 검사를 위한 게이지(플러그 및 링) 피치 및 직경 검증용
- 드릴 및 탭 완전한 구멍-나사 가공 워크플로우를 위한 작업
- 나사 식별 알 수 없는 파스너와의 매칭을 위해
인내심과 적절한 기술은 고가의 도구보다 훨씬 더 중요합니다. 정확한 절차를 따르는 고품질 입문용 세트를 갖춘 초보자라도, 성급한 전문가보다 항상 더 나은 결과를 얻을 수 있습니다.
중요한 프로젝트에 착수하기 전에 폐기 재료로 연습하세요. 몇 개의 시험용 부품에 나사를 가공해 보고, 너트로 검증하며 절삭 리듬에 대한 근육 기억을 형성하세요. 이러한 연습은 거의 비용이 들지 않지만, 중요한 부품에서 발생할 수 있는 고비용 실수를 방지해 줍니다.
나사 가공은 금속 가공의 기본 기술로, 무수히 많은 가능성을 열어줍니다. 복원 프로젝트를 위한 맞춤형 볼트, 단종된 장비를 위한 교체용 파스너, 정확한 사양으로 절단된 나사봉, 타인이 폐기할 부품을 구제하는 수리 작업 등이 그 예입니다. 탭과 다이를 자신 있게 사용하는 법을 익히면, 어디서나 이를 활용할 수 있게 되며, 정밀한 나사를 직접 만드는 뿌듯함은 결코 식지 않습니다.
나사 다이 사용에 관한 자주 묻는 질문
1. 다이를 어떻게 사용하나요?
나사 절단 다이를 사용하려면 먼저 막대 끝을 45도 각도로 경사지게 가공한 후, 이를 수직으로 바이스에 고정합니다. 다이의 경사진 쪽을 작업물에 대고, 충분한 절삭유를 도포한 다음, 단단히 아래쪽으로 압력을 가하면서 시계 방향으로 회전시킵니다. 반바퀴 후퇴 기법을 사용하세요— 한 번에 반바퀴씩 전진한 후, 칩을 부수기 위해 1/4바퀴씩 역회전합니다. 이 리듬을 유지하면서 몇 차례 회전할 때마다 윤활제를 재도포하여 원하는 나사 길이에 도달할 때까지 계속합니다.
2. 다이의 어느 면을 사용해야 하나요?
다이의 경사진 쪽 또는 경사지게 가공된 쪽이 작업물 쪽을 향해야 합니다. 이 면에는 나사를 서서히 시작하도록 설계된 여유각이 적용된 이가 있습니다. 이 면은 약간 더 짧은 이가 있는 쪽이거나 제조사의 각인 표시가 새겨진 쪽으로 확인할 수 있습니다. 잘못된 면을 사용하면 나사 시작이 어려워지고, 자주 교차 나사(cross-threading)가 발생합니다.
3. 다이 세트는 무엇에 사용하나요?
다이 세트는 원통형 금속 재료에 외부 나사를 형성하여 일반 막대를 볼트, 나사식 체결부 또는 맞춤형 나사 부품으로 가공합니다. 일반적인 용도로는 맞춤 길이의 볼트 제작, 기존 체결부의 손상되거나 녹슨 나사 수리, 빈티지 장비 복원을 위한 특정 나사 규격 일치, 제작 프로젝트를 위해 일반 막대 재료를 나사식 부품으로 변환하는 등이 있습니다.
4. 탭 및 다이 세트를 사용하여 나사를 다시 가공하는 방법은 무엇인가요?
손상된 나사를 다시 가공할 때는 완전한 절삭보다는 나사 추적(스레드 채이싱) 기법을 사용해야 합니다. 적은 양의 윤활제를 도포하고, 기존 나사에 다이를 정확히 위치시킨 후 최소한의 압력으로 회전시킵니다. 이때 다이는 새로운 재료를 절삭하기보다는 기존 나사의 경로를 따라 움직이며, 녹, 이물질 및 경미한 손상을 제거합니다. 심하게 손상된 나사의 경우, 표준 절삭 기법으로 새 나사를 가공해야 할 수 있습니다.
5. 탭과 다이의 차이점은 무엇인가요?
다이(die)는 막대재 및 볼트(남성 부품)에 외부 나사를 형성하는 데 사용되며, 탭(tap)은 너트 및 소켓(여성 부품)을 위한 구멍 내부에 내부 나사를 형성합니다. 이를 이렇게 생각해 보세요: 다이는 나사를 만드는 도구이고, 탭은 나사가 삽입되는 구멍을 만드는 도구입니다. 두 도구는 나사 가공 작업에서 서로 협력하여 작동하므로, 일반적으로 탭과 다이 세트로 완전한 형태로 판매됩니다.