 छोटे पर्चे, उच्च मानदंड। हमारी तेजी से प्रोटोटाइपिंग सेवा मान्यता को तेजी से और आसानी से बनाती है —

सीएनसी प्रोटोटाइपिंग सेवा के रहस्य: लागत और नेतृत्व समय को आधा करें
सीएनसी प्रोटोटाइपिंग सेवा वास्तव में क्या प्रदान करती है
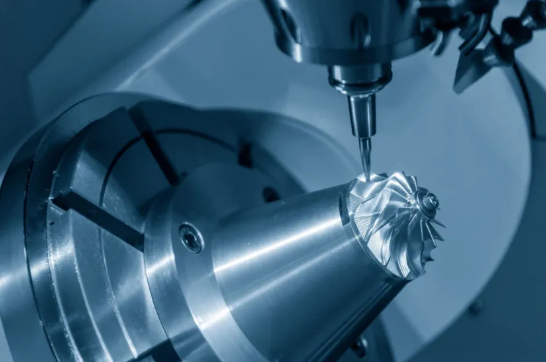
क्या आपने कभी सोचा है कि इंजीनियर किसी डिजिटल डिज़ाइन को उस चीज़ में कैसे बदलते हैं जिसे आप वास्तव में पकड़ सकते हैं, परीक्षण कर सकते हैं और सुधार सकते हैं? यहीं पर सीएनसी प्रोटोटाइपिंग सेवा का उपयोग किया जाता है। यह निर्माण दृष्टिकोण कंप्यूटर-नियंत्रित मशीनों का उपयोग करता है जो धातु या प्लास्टिक के ठोस ब्लॉकों से सीधे भौतिक भागों को काटती हैं, जिससे आपको महँगे टूलिंग में निवेश करने से पहले ही उत्पादन-गुणवत्ता वाले घटक प्राप्त हो जाते हैं।
परत दर परत भागों के निर्माण करने वाली योजनाओं के विपरीत, सीएनसी प्रोटोटाइपिंग एक अपवर्जन प्रक्रिया है । यह कच्चे माल से शुरू होती है और आपके भाग के अलावा सब कुछ हटा देती है। परिणाम? ऐसे मशीन किए गए भाग जिनमें अत्यधिक आयामी शुद्धता और यांत्रिक गुण होते हैं, जो अंतिम उत्पादन में प्राप्त होने वाले गुणों के बहुत करीब होते हैं।
सीएडी फ़ाइल से भौतिक भाग
अवधारणा से सीएनसी प्रोटोटाइप तक की यात्रा एक संरचित कार्यप्रवाह का अनुसरण करती है, जिसे कई उत्पाद विकासकर्ता पूरी तरह से नहीं समझते हैं। यहाँ देखिए कि सटीक सीएनसी मशीनिंग आपकी डिजिटल फ़ाइलों को कार्यात्मक घटकों में कैसे परिवर्तित करती है:
- डिज़ाइन तैयारी: आपका 3D CAD मॉडल निर्माणीयता के लिए समीक्षा किया जाता है और मशीन-पठनीय G-कोड निर्देशों में परिवर्तित किया जाता है
- सामग्री चयन: इंजीनियर आपको अपनी परीक्षण आवश्यकताओं के आधार पर एल्युमीनियम या स्टेनलेस स्टील जैसी धातुओं या इंजीनियरिंग प्लास्टिक्स के बीच चयन करने में सहायता प्रदान करते हैं
- CNC मशीनिंग: कंप्यूटर-नियंत्रित काटने वाले उपकरण भाग की जटिलता के आधार पर 3-अक्ष, 4-अक्ष या 5-अक्ष मशीनों का उपयोग करके सटीक रूप से सामग्री को हटाते हैं
- फिनिशिंग संचालन: मोती-ब्लास्टिंग से लेकर एनोडाइज़िंग तक की सतह उपचार प्रक्रियाएँ भाग को उसके निर्धारित परीक्षण वातावरण के लिए तैयार करती हैं
- गुणवत्ता निरीक्षण: आयामी सत्यापन सुनिश्चित करता है कि आपका सीएनसी प्रोटोटाइप शिपिंग से पूर्व निर्दिष्ट सहिष्णुता के अनुरूप है
यह पूर्ण सीएनसी निर्माण कार्यप्रवाह आमतौर पर सप्ताहों के बजाय कुछ दिनों में पूरा हो जाता है, जिससे महत्वपूर्ण विकास चरणों के दौरान त्वरित पुनरावृत्ति संभव हो जाती है।
प्रोटोटाइपिंग की सटीकता क्यों महत्वपूर्ण है
कल्पना कीजिए कि आप एक घटक का परीक्षण कर रहे हैं जो वास्तव में उस चीज़ का प्रतिनिधित्व नहीं करता है जिसे आप उत्पादन करेंगे। इस तरह आप पूरी तरह से गलत चीज़ की वैधता साबित कर रहे होंगे। यही कारण है कि प्रोटोटाइपिंग में परिशुद्धता वैकल्पिक नहीं है—यह अनिवार्य है।
सीएनसी प्रोटोटाइपिंग उन कड़ी सहिष्णुताओं को प्रदान करती है जिन्हें अन्य त्वरित विधियाँ सरलता से प्राप्त नहीं कर सकतीं। जब आप किसी असेंबली में भागों के एक साथ फिट होने का परीक्षण कर रहे होते हैं, संलग्न घटकों के साथ हस्तक्षेप की जाँच कर रहे होते हैं, या लोड के अधीन कार्यात्मक प्रदर्शन की वैधता साबित कर रहे होते हैं, तो आपको ऐसी सटीकता की आवश्यकता होती है जिस पर आप भरोसा कर सकें। यह प्रौद्योगिकी पुनरावृत्तिशीलता प्रदान करती है, जिससे प्रत्येक प्रोटोटाइप आपके डिज़ाइन के इरादे की एकदम सटीक प्रतिकृति होता है।
यह परिशुद्धता आपको समस्याओं को शुरुआत में ही पहचानने में भी सहायता करती है। जब किसी यांत्रिक भाग का प्रदर्शन अपेक्षित अनुसार नहीं होता है, तो आप जान जाते हैं कि समस्या आपके डिज़ाइन में है, न कि उत्पादन के भिन्नता में। यह स्पष्टता आपके विकास चक्र को काफी तेज़ कर देती है।
डिज़ाइन और उत्पादन के बीच का सेतु
यहाँ कुछ ऐसा है जिसे कई इंजीनियर अक्सर नज़रअंदाज़ कर देते हैं: प्रोटोटाइपिंग और उत्पादन मशीनिंग के मूलभूत उद्देश्य अलग-अलग होते हैं। उत्पादन चक्र का ध्यान कुशलता, लागत अनुकूलन और बड़े पैमाने पर सुसंगत आउटपुट पर केंद्रित होता है। वहीं, प्रोटोटाइपिंग का ध्यान गति, लचीलापन और सीखने पर केंद्रित होता है।
सीएनसी प्रोटोटाइपिंग के दौरान, ध्यान केंद्रित होता है:
- उपकरण निवेश से पहले रूप, फिट और कार्यक्षमता की पुष्टि करना
- कई डिज़ाइन पुनरावृत्तियों का त्वरित परीक्षण करना
- वास्तविक प्रदर्शन डेटा के लिए उत्पादन-समतुल्य सामग्रियों का उपयोग करना
- महंगी समस्याओं में बदलने से पहले निर्माण संबंधी चुनौतियों की पहचान करना
यह सेतुभूत भूमिका ही आधुनिक उत्पाद विकास में सीएनसी निर्माण को इतना मूल्यवान बनाती है। आप प्रोडक्शन की वास्तविकता का एक पूर्वावलोकन प्राप्त कर रहे हैं, बिना प्रोडक्शन प्रतिबद्धता के। जब आपका प्रोटोटाइप काम करता है, तो आप आत्मविश्वास के साथ आगे बढ़ते हैं। और जब वह काम नहीं करता, तो आप एक महंगी गलती से बच जाते हैं।
अंतिम उत्पादन के लिए निर्धारित समान धातुओं और प्लास्टिक्स के साथ काम करने की क्षमता सीएनसी प्रोटोटाइपिंग को अन्य विकल्पों से अलग करती है। आप केवल यही नहीं जाँच रहे हैं कि आपका डिज़ाइन सही दिख रहा है—बल्कि आप यह पुष्टि कर रहे हैं कि वह वास्तविक दुनिया की परिस्थितियों में वास्तव में कार्य करेगा।
सीएनसी प्रोटोटाइपिंग बनाम 3डी प्रिंटिंग और अन्य विधियाँ
तो आपके पास प्रोटोटाइपिंग के लिए तैयार एक डिज़ाइन है। लेकिन आपको कौन-सी विधि चुननी चाहिए? यह निर्णय आपके प्रोजेक्ट के समय-सीमा और बजट को सफल या विफल बना सकता है। आइए भ्रम को दूर करें और आपको स्पष्ट निर्णय आधार दें जो वास्तव में सहायक हों।
प्रोटोटाइपिंग के क्षेत्र में कई आकर्षक विकल्प उपलब्ध हैं: सीएनसी मशीनिंग, 3D प्रिंटिंग, वैक्यूम कास्टिंग और इंजेक्शन मोल्डिंग। प्रत्येक के अपने विशिष्ट लाभ हैं, जो इस बात पर निर्भर करते हैं कि आप क्या प्राप्त करने का प्रयास कर रहे हैं। इन अंतरों को समझना आपको अपने प्रोटोटाइपिंग बजट का निवेश उस जगह करने में सहायता करता है जहाँ यह सबसे अधिक मायने रखता है।
ताकत और सामग्री की प्रामाणिकता की तुलना
जब आप कार्यात्मक प्रोटोटाइप का परीक्षण कर रहे होते हैं, तो सामग्री के गुण केवल वांछनीय नहीं होते—वे सब कुछ होते हैं। यहाँ तेज़ गति वाली सीएनसी प्रोटोटाइपिंग वास्तव में अन्य विधियों से अपने आप को अलग कर लेती है।
सीएनसी कटिंग की शुरुआत होती है उत्पादन-श्रेणी की सामग्री के ठोस ब्लॉक्स से । चाहे आपको एल्यूमीनियम मिश्र धातुओं, स्टेनलेस स्टील या पॉलीकार्बोनेट जैसे इंजीनियरिंग प्लास्टिक्स की आवश्यकता हो, आप अपने अंतिम उत्पाद के लिए निर्धारित ठीक उसी सामग्री का यांत्रिक उत्पादन कर रहे होते हैं। परिणाम? तनाव परीक्षण, भार विश्लेषण और वास्तविक दुनिया के मान्यता प्राप्ति के लिए आप वास्तव में भरोसा कर सकने वाले यांत्रिक गुण।
3डी मुद्रण एक अलग कहानी कहता है। यहाँ तक कि एबीएस या नायलॉन जैसे समान सामग्री के नामों का उपयोग करते समय भी, परत-दर-परत योगात्मक प्रक्रिया से बनाए गए भागों में दिशात्मक (एनिसोट्रॉपिक) गुण होते हैं। यूनियनफैब की विनिर्माण तुलना के अनुसार, 3डी मुद्रित एबीएस की XY दिशा में तन्य शक्ति 33 एमपीए होती है, जबकि Z-अक्ष के अनुदिश यह घटकर 28 एमपीए रह जाती है। परतों की संरचना स्वतः ही दिशात्मक कमजोरियाँ उत्पन्न करती है।
वैक्यूम कास्टिंग एक मध्यम विकल्प प्रदान करती है। इसमें एबीएस जैसे पॉलीयूरेथेन राल का उपयोग किया जाता है, जो 60–73 MPa की तन्य सामर्थ्य प्राप्त कर सकते हैं—जो वास्तव में कुछ 3D मुद्रित भागों को पार कर जाती है। हालाँकि, ये थर्मोसेट सामग्रियाँ हैं जो उत्पादन प्लास्टिक्स की नकल करती हैं, बल्कि उनकी प्रतिकृति नहीं बनाती हैं। दृश्य प्रोटोटाइप और मानव-केंद्रित परीक्षण के लिए, यह अक्सर स्वीकार्य होता है। मांगपूर्ण परिस्थितियों में कार्यात्मक मान्यीकरण के लिए, प्रामाणिक सामग्रियों से CNC मशीनिंग द्वारा निर्मित भागों को अभी भी स्वर्ण मानक माना जाता है।
गति बनाम परिशुद्धता का सौदा
यह वह सौदा है जिसका सामना अधिकांश इंजीनियर करते हैं: क्या आपको यह तेज़ी से चाहिए, या क्या आपको यह पूर्णतः चाहिए? इसका उत्तर आपकी प्रोटोटाइपिंग विधि निर्धारित करता है।
जटिल ज्यामितियों के लिए 3D मुद्रण गति की दौड़ में विजेता है। छोटे भागों को केवल 1–12 घंटे में, न्यूनतम सेटअप के साथ पूरा किया जा सकता है। जब आप प्रारंभिक अवस्था के अवधारणाओं के माध्यम से पुनरावृत्ति कर रहे होते हैं और त्वरित दृश्य प्रतिक्रिया की आवश्यकता होती है, तो यह गति का लाभ अनदेखा करना कठिन हो जाता है। एक CNC कटिंग मशीन के लिए टूलपाथ प्रोग्रामिंग और सेटअप समय की आवश्यकता होती है, जिसे 3D प्रिंटर्स सीधे छोड़ देते हैं।
लेकिन सटीकता के बिना गति, जो समय बचाती है उससे अधिक समय बर्बाद कर सकती है। इस पर विचार करें: सीएनसी प्रोटोटाइप मशीनिंग लगातार ±0.01–0.05 मिमी की सहिष्णुता प्राप्त करती है। 3D प्रिंटिंग आमतौर पर प्रौद्योगिकी के आधार पर ±0.05–0.2 मिमी प्रदान करती है। वैक्यूम कास्टिंग 150 मिमी तक के भागों के लिए लगभग ±0.3–0.55 मिमी की सहिष्णुता प्रदान करती है।
जब आपके प्रोटोटाइप को अन्य घटकों के साथ सटीक रूप से फिट होने की आवश्यकता होती है—जैसे मिलान सतहें, बेयरिंग बोर या सीलिंग इंटरफ़ेस—तो उस सहिष्णुता के अंतर का बहुत बड़ा महत्व होता है। एक असटीक प्रोटोटाइप का परीक्षण करने से आपके डिज़ाइन के बारे में गलत निष्कर्ष निकल सकते हैं। आप एक पूर्णतः उपयुक्त अवधारणा को अस्वीकार कर सकते हैं क्योंकि प्रोटोटाइप उसे सटीक रूप से प्रस्तुत नहीं करता था।
कार्यात्मक परीक्षण के लिए, जहाँ यांत्रिक सटीकता आपके निर्णयों को निर्धारित करती है, टेक्स्ट मिलिंग और सीएनसी संचालन वास्तविक दुनिया के प्रदर्शन को सत्यापित करने के लिए आवश्यक सटीकता प्रदान करते हैं।
विधियों के आधार पर लागत विचार
प्रोटोटाइपिंग की अर्थव्यवस्था मात्रा और जटिलता के आधार पर गहन रूप से बदल जाती है। प्रत्येक विधि के किस बिंदु पर लागत-प्रभावी होना शुरू होता है, यह समझना आपको अपना बजट रणनीतिक रूप से आवंटित करने में सहायता करता है।
एकल प्रोटोटाइप और बहुत कम मात्रा (1–5 भाग) के लिए, 3D मुद्रण अक्सर लागत के मामले में श्रेष्ठ होता है। शून्य टूलिंग आवश्यकताओं और न्यूनतम सेटअप समय के कारण प्रति-भाग व्यय कम रहता है। सीएनसी मशीनिंग में उच्च सेटअप लागत होती है, जो केवल कुछ ही भागों पर वितरित नहीं की जा सकती है।
5–50 भागों की मात्रा पर स्थिति बदल जाती है। वैक्यूम कास्टिंग यहाँ अपने आदर्श बिंदु पर पहुँच जाती है। एक बार जब आप मास्टर पैटर्न और सिलिकॉन मॉल्ड बना लेते हैं, तो उच्च गुणवत्ता वाली प्रतियाँ बनाना अत्यंत कुशल हो जाता है। प्रति-भाग लागत में एक महत्वपूर्ण कमी आ जाती है, जो प्रत्येक भाग को अलग से मशीन करने की तुलना में काफी कम होती है।
100 से अधिक भागों के लिए, सीएनसी मशीनिंग बढ़ती प्रतिस्पर्धात्मकता प्राप्त करती जाती है। प्रारंभिक प्रोग्रामिंग और सेटअप लागत को अधिक इकाइयों पर फैलाया जाता है, और आधुनिक मशीनों की त्वरित सामग्री निकालने की दरें इकाई लागत को कम कर देती हैं। उच्च-परिशुद्धता वाले सीएनसी मशीनिंग भागों के बड़े पैमाने पर उत्पादन के लिए, अर्थव्यवस्था घटात्मक निर्माण को पसंद करती है।
| गुणक | सीएनसी मशीनिंग | 3डी प्रिंटिंग | वैक्यूम कास्टिंग | इंजेक्शन मोल्डिंग |
|---|---|---|---|---|
| सामग्री के विकल्प | धातुएँ (एल्यूमीनियम, इस्पात, टाइटेनियम, पीतल), इंजीनियरिंग प्लास्टिक (एबीएस, नायलॉन, पॉलीकार्बोनेट, डेल्रिन) | पीएलए, एबीएस, नायलॉन, रेजिन, धातु चूर्ण (सीमित चयन) | एबीएस जैसे, रबर जैसे, पीसी जैसे पॉलीयूरेथेन रेजिन | अधिकांश थर्मोप्लास्टिक्स, कुछ थर्मोसेट्स |
| प्राप्त करने योग्य सहनशीलता | ±0.01–0.05 मिमी | ±0.05–0.2 mm | ±0.3–0.55 मिमी | ±0.05–0.1 मिमी |
| सतह समाप्त (Ra) | 0.8–3.2 माइक्रोमीटर (पॉलिश करने पर ≤0.8 माइक्रोमीटर तक पहुँच सकता है) | 3.2–6.3 माइक्रोमीटर (दृश्य परत रेखाएँ) | 1.6–3.2 माइक्रोमीटर (चिकनी, एकसमान) | 0.4–1.6 माइक्रोमीटर (मॉल्ड पर निर्भर) |
| सामान्य नेतृत्व समय | 7–15 दिन | 1–3 दिन | 10–15 दिन | 4–8 सप्ताह (टूलिंग) |
| कम मात्रा (1-10 भाग) में लागत | मध्यम-उच्च | कम | माध्यम | बहुत अधिक (टूलिंग लागत) |
| सर्वोत्तम उपयोग परिदृश्य | कार्यात्मक परीक्षण, उत्पादन-स्तर की मान्यता, कड़ी सहिष्णुता वाले असेंबली | प्रारंभिक अवधारणा मॉडल, जटिल ज्यामिति, तीव्र डिज़ाइन पुनरावृत्ति | दृश्य प्रोटोटाइप, छोटे बैच उत्पादन (5–50 इकाइयाँ), प्रस्तुति नमूने | उच्च-मात्रा उत्पादन (500+ भाग) |
प्रत्येक विधि कब उपयुक्त होती है
सही प्रोटोटाइपिंग दृष्टिकोण का चयन करना आपके वर्तमान विकास चरण और परीक्षण आवश्यकताओं के अनुरूप विधि के चयन पर निर्भर करता है।
सीएनसी प्रोटोटाइपिंग का चयन तब करें जब:
- आपको यांत्रिक परीक्षण के लिए उत्पादन-समकक्ष सामग्री गुणों की आवश्यकता होती है
- असेंबली मान्यता के लिए कड़ी सहिष्णुता महत्वपूर्ण है
- आपके डिज़ाइन का तनाव, भार या थकान परीक्षण किया जाएगा
- सतह के फिनिश की गुणवत्ता कार्यप्रणाली को प्रभावित करती है (सीलिंग, घर्षण, घिसावट वाले सतह)
- आप प्रोटोटाइप से उत्पादन की ओर बढ़ रहे हैं और निर्माण स्थिरता की आवश्यकता है
जब 3D प्रिंटिंग चुनें:
- आप प्रारंभिक अवधारणा सत्यापन में हैं और कई डिज़ाइन परिवर्तनों की अपेक्षा कर रहे हैं
- जटिल आंतरिक ज्यामिति या जाल संरचनाओं की आवश्यकता होती है
- यांत्रिक सटीकता की तुलना में गति अधिक महत्वपूर्ण है
- आपको केवल एक या दो दृश्य मॉडल दायित्वप्राप्त पक्षों की समीक्षा के लिए आवश्यकता है
वैक्यूम कास्टिंग चुनें जब:
- आपको इंजेक्शन-मोल्डेड उपस्थिति वाले 5 से 50 भागों की आवश्यकता है
- प्रस्तुति प्रोटोटाइप के लिए दृश्य और स्पर्शगत गुणवत्ता महत्वपूर्ण है
- आपके परीक्षण के लिए मध्यम सहिष्णुता स्वीकार्य है
- आप विभिन्न सामग्री समाप्ति (रबर जैसी, कठोर, पारदर्शी) का अनुकरण करना चाहते हैं
कई सफल उत्पाद विकास टीमें एक संकर दृष्टिकोण का उपयोग करती हैं। वे प्रारंभिक अवधारणाओं के लिए 3D मुद्रण से शुरुआत कर सकती हैं, कार्यात्मक मान्यता के लिए प्रोटोटाइप मशीनिंग पर स्थानांतरित हो सकती हैं, और उपयोगकर्ता परीक्षण के लिए नमूने तैयार करने के लिए वैक्यूम कास्टिंग का उपयोग कर सकती हैं—सभी उत्पादन टूलिंग के लिए प्रतिबद्ध होने से पहले।
मुख्य अंतर्दृष्टि? कोई सार्वभौमिक श्रेष्ठ विधि नहीं है। इष्टतम विकल्प पूरी तरह से इस बात पर निर्भर करता है कि आपका प्रोटोटाइप किन प्रश्नों के उत्तर देने की आवश्यकता रखता है। जब ये प्रश्न यांत्रिक प्रदर्शन, आयामी शुद्धता या उत्पादन सामग्री के व्यवहार से संबंधित होते हैं, तो सीएनसी प्रोटोटाइपिंग विश्वसनीय उत्तर प्रदान करती है।
प्रोटोटाइप सफलता के लिए सामग्री चयन मार्गदर्शिका
आपने निर्णय लिया है कि सीएनसी प्रोटोटाइपिंग आपकी परियोजना के लिए सही दृष्टिकोण है। अब एक प्रश्न आता है जो कई इंजीनियरों को उलझा देता है: वास्तव में आप कौन-सी सामग्री का उपयोग करें? इसका उत्तर मशीनिंग लागत से लेकर आपके प्रोटोटाइप के उत्पादन प्रदर्शन को कितनी सटीकता से प्रतिबिंबित करने की क्षमता तक सब कुछ को आकार देता है।
प्रोटोटाइपिंग के लिए सामग्री का चयन उत्पादन सामग्री के चयन के समान नहीं है। कभी-कभी आपको सटीक मिलान की आवश्यकता होती है। अन्य समय पर, एक अधिक मशीन करने योग्य विकल्प आपके डिज़ाइन संबंधित प्रश्नों के उत्तर देने के साथ-साथ लागत भी कम कर देता है। इन समझौतों को समझना आपको अपने समयसूची और बजट दोनों पर नियंत्रण प्रदान करता है।
धातु प्रोटोटाइपिंग सामग्री के विकल्प
जब शक्ति, तापीय गुण या चालकता मायने रखती है, तो कार्यात्मक प्रोटोटाइपिंग में धातुओं का प्रभुत्व होता है। लेकिन सभी धातुएँ समान रूप से अच्छी तरह से मशीन नहीं होती हैं—या समान लागत पर उपलब्ध नहीं होती हैं।
एल्यूमीनियम मिश्र धातुएँ अच्छे कारणों से अधिकांश प्रोटोटाइपिंग सूचियों के शीर्ष पर स्थित होती हैं। मल्टी-विन्स की मशीनिंग तुलना के अनुसार, एल्यूमीनियम का घनत्व 2.7 ग्राम/सेमी³ है, जो स्टेनलेस स्टील के घनत्व का लगभग एक-तिहाई है। यह हल्का वजन सीधे तौर पर तेज़ मशीनिंग गति, कम उपकरण घिसावट और कम कुल लागत का कारण बनता है। 6061-T6 जैसी मिश्र धातुएँ 310 MPa तक के तन्य सामर्थ्य प्रदान करती हैं—जो अधिकांश संरचनात्मक प्रोटोटाइप परीक्षणों के लिए पर्याप्त रूप से मजबूत है।
जब संक्षारण प्रतिरोध या उच्च ताकत अनिवार्य होती है, तो स्टेनलेस स्टील की आवश्यकता होती है। ग्रेड 304 की इंसानी ताकत लगभग 550 MPa होती है और यह असाधारण रासायनिक प्रतिरोध प्रदान करता है, जिससे यह चिकित्सा, खाद्य प्रसंस्करण या समुद्री अनुप्रयोगों के प्रोटोटाइप के लिए आवश्यक हो जाता है। समझौता क्या है? कठोर सामग्री का अर्थ है धीमी मशीनिंग गति, विशिष्ट उपकरण और प्रति भाग उच्च लागत।
पीतल और कांस्य विशिष्ट प्रोटोटाइपिंग आवश्यकताओं के लिए उपयोग किए जाते हैं। उनकी उत्कृष्ट मशीनिंग क्षमता उन्हें सजावटी घटकों या कम घर्षण की आवश्यकता वाले भागों के लिए लागत-प्रभावी बनाती है। कांस्य विशेष रूप से बेयरिंग और बुशिंग प्रोटोटाइप में चमकता है, जहाँ पहनने के प्रतिरोध का महत्व होता है।
कार्यात्मक परीक्षण के लिए इंजीनियरिंग प्लास्टिक्स
जब आपके उत्पादन भाग प्लास्टिक के होंगे, तो धातु में प्रोटोटाइपिंग का कोई तर्क नहीं है। इंजीनियरिंग प्लास्टिक्स वास्तविक कार्यात्मक परीक्षण के लिए आवश्यक यांत्रिक गुण प्रदान करते हैं—अक्सर धातुओं की तुलना में काफी कम मशीनिंग लागत पर।
तो डेल्रिन क्या है, और मशीनिस्ट इसे क्यों पसंद करते हैं? डेल्रिन डुपॉन्ट का एसिटल होमोपॉलीमर (POM-H) के लिए व्यापारिक नाम है। यह डेल्रिन सामग्री अत्युत्तम आयामी स्थायित्व, कम घर्षण और शानदार यांत्रिक कार्यक्षमता की विशेषता रखती है। रैपिडडायरेक्ट के सामग्री विश्लेषण के अनुसार, डेल्रिन प्लास्टिक की तन्य शक्ति 13,000 psi और कठोरता 86 शोर D है—जो आपके प्रोटोटाइप में गियर, बेयरिंग और स्लाइडिंग घटकों के लिए आदर्श है।
एसिटल, डेल्रिन की तुलना में क्या है? एसिटल एक व्यापक सामग्री परिवार है। डेल्रिन विशिष्ट रूप से होमोपॉलीमर संस्करण है, जबकि एसिटल कोपॉलीमर (POM-C) थोड़े भिन्न गुण प्रदान करते हैं। कोपॉलीमर बेहतर रासायनिक प्रतिरोध और आयामी स्थायित्व प्रदान करते हैं, जबकि डेल्रिन उत्कृष्ट यांत्रिक शक्ति और कम घर्षण प्रदान करता है। उच्च-घर्षण यांत्रिक भागों के प्रोटोटाइपिंग के लिए, आमतौर पर डेल्रिन को वरीयता दी जाती है।
नाइलॉन के यांत्रिक संसाधन (मशीनिंग) में अपने स्वयं के लाभ होते हैं। यांत्रिक संसाधन के लिए नाइलॉन उत्कृष्ट प्रभाव प्रतिरोध और लचीलापन प्रदान करता है, जो डेल्रिन में अनुपस्थित होता है। जब आपके प्रोटोटाइप को गिरने, कंपन या बार-बार मोड़े जाने की स्थिति सहन करनी हो, तो नाइलॉन इन आवश्यकताओं को बेहतर ढंग से पूरा करता है। यह असेंबली के दौरान भी अधिक उदार होता है, जहाँ घटकों को स्थापना के समय तनाव का सामना करना पड़ सकता है।
पॉलीकार्बोनेट (पीसी) को ऑप्टिकल स्पष्टता या अत्यधिक प्रभाव प्रतिरोध की आवश्यकता होने पर उचित स्थान प्राप्त होता है। उदाहरण के लिए सुरक्षात्मक कवर, लेंस या ऐसे आवरण जो कठोर हैंडलिंग का सामना कर सकते हों। इसकी पारदर्शिता परीक्षण के दौरान आंतरिक तंत्रों का दृश्य निरीक्षण करने की अनुमति देती है—यह एक मूल्यवान विशेषता है जो अपारदर्शी सामग्रियाँ प्रदान नहीं कर सकतीं।
एक्रिलिक का यांत्रिक संसाधन अत्यंत सुंदर रूप से किया जाता है और यह पॉलीकार्बोनेट की तुलना में कम लागत वाला होता है, जिससे यह दृश्य प्रोटोटाइप के लिए आदर्श बन जाता है, जहाँ अंतिम स्तर का प्रभाव प्रतिरोध महत्वपूर्ण नहीं होता है। यह प्रस्तुति-गुणवत्ता वाले मॉडलों के लिए अत्यधिक पॉलिश करने के योग्य होता है।
प्रोटोटाइप सामग्री का उत्पादन के उद्देश्य के साथ मिलान
यहाँ पर रणनीति का प्रवेश होता है। क्या आपका प्रोटोटाइप उत्पादन सामग्री के सटीक रूप से मिलना चाहिए, या क्या आप किसी ऐसी सामग्री का उपयोग कर सकते हैं जिसे मशीन करना आसान हो?
इसका उत्तर आपके द्वारा जिस चीज़ का परीक्षण किया जा रहा है, उस पर निर्भर करता है। यदि आप भार के अधीन यांत्रिक प्रदर्शन, तापीय व्यवहार या घर्षण विशेषताओं की पुष्टि कर रहे हैं, तो आपको उत्पादन-समकक्ष सीएनसी मशीनिंग सामग्री की आवश्यकता होगी। जबकि उत्पादन के लिए स्टील का उपयोग किया जाने वाला है, तब एक गियर का परीक्षण एल्युमीनियम में करने से आपको थकान जीवन और घर्षण पैटर्न के बारे में गलत डेटा प्राप्त होगा।
हालाँकि, यदि आप आकृति और फिटिंग की जाँच कर रहे हैं—अर्थात् आयामों की पुष्टि करना, असेंबली क्रमों का परीक्षण करना, या मानव-केंद्रित डिज़ाइन (एर्गोनॉमिक्स) का मूल्यांकन करना—तो एक अधिक मशीन करने योग्य विकल्प अक्सर उचित होता है। आप पहले एक स्टेनलेस स्टील हाउसिंग का प्रोटोटाइप एल्युमीनियम में बना सकते हैं, ज्यामिति के काम करने की पुष्टि कर सकते हैं, और फिर वास्तविक उत्पादन सामग्री में अंतिम मान्यता प्रोटोटाइप का निर्माण कर सकते हैं।
यह चरणबद्ध दृष्टिकोण लागत नियंत्रण और मान्यता की सटीकता के बीच संतुलन बनाए रखता है। प्रारंभिक पुनरावृत्तियों में स्पष्ट समस्याओं का पता लगाने के लिए कम लागत वाली सामग्रियों का उपयोग किया जाता है। बाद के प्रोटोटाइप्स में उत्पादन-समकक्ष सामग्रियों का उपयोग टूलिंग निवेश से पहले प्रदर्शन की पुष्टि करने के लिए किया जाता है।
| सामग्री | प्रमुख यांत्रिक गुण | मशीनीकरण रेटिंग | लागत स्तर | आदर्श प्रोटोटाइप अनुप्रयोग |
|---|---|---|---|---|
| एल्यूमिनियम 6061-T6 | तन्य: 310 MPa, हल्का (2.7 g/cm³) | उत्कृष्ट | कम | संरचनात्मक आवरण, ब्रैकेट, हीट सिंक, एयरोस्पेस घटक |
| स्टेनलेस स्टील 304 | तन्य: 550 MPa, उच्च संक्षारण प्रतिरोध | मध्यम | मध्यम-उच्च | चिकित्सा उपकरण, खाद्य उपकरण, समुद्री हार्डवेयर |
| पीतल | अच्छी ताकत, उत्कृष्ट संक्षारण प्रतिरोध | उत्कृष्ट | माध्यम | फिटिंग्स, सजावटी भाग, विद्युत घटक |
| तांबा | उच्च घर्षण प्रतिरोध, कम घर्षण | बहुत अच्छा | मध्यम-उच्च | बेयरिंग, बुशिंग, घिसावट घटक |
| डेल्रिन (POM-H) | तन्य: 13,000 psi, शोर D: 86, कम घर्षण | उत्कृष्ट | निम्न-मध्यम | गियर, रोलर, स्लाइडिंग तंत्र, सटीक घटक |
| नायलॉन | तन्य: 12,400–13,500 psi, उच्च प्रभाव प्रतिरोध | अच्छा | कम | प्रभाव के प्रति संवेदनशील भाग, लचीले घटक, विद्युतरोधी |
| पॉलीकार्बोनेट (PC) | उच्च प्रभाव प्रतिरोध क्षमता, ऑप्टिकल स्पष्टता | अच्छा | माध्यम | पारदर्शी कवर, सुरक्षात्मक आवरण, लेंस |
| एक्रिलिक | उत्कृष्ट ऑप्टिकल स्पष्टता, अच्छी दृढ़ता | बहुत अच्छा | कम | डिस्प्ले घटक, प्रकाश नलिकाएँ, दृश्य प्रोटोटाइप |
एक सावधानी जिस पर ध्यान देना आवश्यक है: डेल्रिन की सघन केंद्रीय संरचना गैसों और द्रवों को फँसा सकती है, जिससे यह कुछ खाद्य या चिकित्सा अनुप्रयोगों के लिए अनुपयुक्त हो जाता है, जहाँ सघनता अस्वीकार्य होती है। उन मामलों में, एसीटैल सह-बहुलक थोड़ी कम यांत्रिक सामर्थ्य के बावजूद बेहतर प्रदर्शन प्रदान करते हैं।
आप जो सामग्री चुनते हैं, वह अंततः यह निर्धारित करती है कि क्या आपका प्रोटोटाइप सही प्रश्नों के उत्तर दे रहा है। सामग्री का चयन अपने परीक्षण के उद्देश्यों के अनुरूप करें, और आप प्रत्येक प्रोटोटाइप पुनरावृत्ति से अधिकतम मूल्य प्राप्त करेंगे। सामग्री के चयन के बाद, अगली चुनौती होती है कि ऐसे भागों का डिज़ाइन करना जो मशीन द्वारा दक्षतापूर्ण रूप से निर्मित किए जा सकें— जो सीधे लागत और नेतृत्व समय दोनों को प्रभावित करता है।
लागत और नेतृत्व समय को कम करने वाले डिज़ाइन सुझाव
आपने अपनी सामग्री का चयन कर लिया है और सीएनसी प्रोटोटाइपिंग को अपनी विधि के रूप में चुना है। अब यहाँ वह प्रश्न है जो महंगे प्रोटोटाइप्स को लागत-प्रभावी प्रोटोटाइप्स से अलग करता है: क्या आपका भाग मशीनिंग के लिए उचित रूप से डिज़ाइन किया गया है? रिवकट के डीएफएम (डिज़ाइन फॉर मैन्युफैक्चरैबिलिटी) विश्लेषण के अनुसार, उचित डिज़ाइन-फॉर-मैन्युफैक्चरैबिलिटी समीक्षा प्रोटोटाइप लागत को 30–40% तक कम कर सकती है, जबकि लीड टाइम को आधा कर देती है।
सच यह है कि कई इंजीनियर कार्यात्मकता के लिए भागों का डिज़ाइन करते हैं, बिना यह विचार किए कि उन डिज़ाइनों का वास्तविक मशीनिंग संचालनों में कैसे अनुवाद किया जाएगा। इसका परिणाम अनावश्यक रूप से जटिल सेटअप, टूटे हुए उपकरण और ऐसे उद्धरण होते हैं जो प्रोजेक्ट प्रबंधकों को झिझकने पर मजबूर कर देते हैं। आइए इसे ठीक करें।
दीवार की मोटाई और विशेषता आकार नियम
पतली दीवारें सीएनसी प्रोटोटाइपिंग के बजट की चुपचाप हत्यारे हैं। जब कोई सीएनसी कट एक पतले भाग के आसपास की सामग्री को हटाता है, तो कंपन आपका शत्रु बन जाता है। कटिंग टूल कंपन करता है, सतह का फिनिश खराब हो जाता है, और सबसे खराब स्थिति में, दीवार विक्षेपित हो जाती है या पूरी तरह से दरार पड़ जाती है।
वास्तव में क्या सुरक्षित है? न्यूवे प्रिसिजन के डिज़ाइन दिशानिर्देशों के अनुसार, 0.04 इंच (1 मिमी) से पतली दीवार के अनुभागों से बचें। विश्वसनीय यांत्रिक संसाधन के लिए कम से कम 0.08 इंच (2 मिमी) की सिफारिश की जाती है। धातुओं के लिए, यह कटिंग बलों को सहने के लिए पर्याप्त दृढ़ता सुनिश्चित करता है। प्लास्टिक के लिए यह दहलीज थोड़ी कम हो जाती है—0.15 मिमी कार्य कर सकता है, लेकिन अधिक मोटाई हमेशा स्थिरता में सुधार करती है।
ऊँचाई भी महत्वपूर्ण है। ऊँची, असमर्थित दीवारें कंपन समस्याओं को घातीय रूप से बढ़ा देती हैं। एक अच्छा सामान्य नियम: स्वतंत्र खड़ी दीवारों के लिए कम से कम 3:1 का चौड़ाई-से-ऊँचाई अनुपात बनाए रखें। यदि आपका डिज़ाइन अधिक ऊँची विशेषताओं की आवश्यकता रखता है, तो कंपन ऊर्जा को कम करने के लिए क्लैम्पिंग क्षेत्रों के निकट रिब्स या गसेट्स जोड़ने पर विचार करें।
विशेषता आकार निर्धारण भी समान तर्क का अनुसरण करता है। छोटे बॉस और पैड की मोटाई कम से कम 0.02 इंच (0.5 मिमी) बनाए रखनी चाहिए। मुख्य शरीर से निकलने वाले लंबे, पतले उभार यांत्रिक संसाधन के दौरान विक्षेपण के खतरे बन जाते हैं—ये कटिंग दबाव के तहत टूल के अपना पास पूरा करने से पहले ही मुड़ जाएँगे।
सामान्य डिज़ाइन त्रुटियों से बचना
हज़ारों प्रोटोटाइप डिज़ाइनों की समीक्षा करने के बाद, विनिर्माण इंजीनियर बार-बार एक ही महंगी गलतियाँ देखते हैं। ये वे मुद्दे हैं जो आपके उद्धरणों को बढ़ा देते हैं और आपके समयसीमा को लंबा कर देते हैं:
- अत्यधिक पतली दीवारें: 1 मिमी से कम मोटाई वाले भाग मशीनिंग के दौरान कंपन करते हैं, जिससे सतह का अधूरा फ़िनिश, आकार में अशुद्धि और संभावित भाग विफलता हो सकती है
- गहरे और संकरे खांचे: सीएनसी कटिंग टूल्स की पहुँच सीमित होती है—आमतौर पर उनके व्यास के 3-4 गुना तक। गहरे खांचों के लिए लंबे टूल्स की आवश्यकता होती है, जो विक्षेपित होते हैं और कंपन करते हैं, या कई टूल परिवर्तनों की आवश्यकता होती है जो समय जोड़ते हैं
- गैर-महत्वपूर्ण विशेषताओं पर अनावश्यक रूप से कड़े सहिष्णुता मानक: जहाँ ±0.005" पर्याप्त होगा, वहाँ हर जगह ±0.001" का निर्दिष्ट करना मशीनिंग लागत को 2.5-3.5 गुना बढ़ा देता है, जबकि कोई कार्यात्मक लाभ नहीं होता
- विशेष फिक्सचरिंग की आवश्यकता वाले अंडरकट: मानक अभिविन्यासों से पहुँचे जा नहीं सकने वाली विशेषताओं के लिए कस्टम फिक्सचर या 5-अक्ष मशीनिंग की आवश्यकता होती है—दोनों ही महंगे विकल्प हैं
- तीखे आंतरिक कोने: बेलनाकार काटने वाले औजार भौतिक रूप से तीव्र आंतरिक कोनों का निर्माण नहीं कर सकते हैं। कम से कम 0.04 इंच (1 मिमी) के न्यूनतम कोने के वक्रता त्रिज्या को निर्दिष्ट करें, जो आदर्श रूप से आपके औजार के व्यास से 30% अधिक होनी चाहिए
- गैर-मानक छेद के आकार: मानक ड्रिल बिट्स छेद को तेज़ी और सटीकता से काटती हैं। विशिष्ट आकारों के लिए आयाम को क्रमशः मशीन करने के लिए एंड मिल्स की आवश्यकता होती है, जिससे चक्र समय गुणा हो जाता है
इनमें से प्रत्येक त्रुटि आपके मशीनिस्ट को वैकल्पिक समाधानों की ओर मजबूर करती है। वैकल्पिक समाधानों का अर्थ है धीमी फीड, अधिक सावधानीपूर्ण संचालन, अतिरिक्त सेटअप या विशिष्ट औजार। यह सभी आपके उद्धरण और नेतृत्व समय में दिखाई देता है।
त्वरित टर्नअराउंड के लिए अनुकूलन
क्या आप अपने सीएनसी मिल्ड भागों को तेज़ी से प्राप्त करना चाहते हैं? डिज़ाइन के विकल्प सीधे मशीनिंग जटिलता को नियंत्रित करते हैं—और यही जटिलता समय-सीमा को लंबा करती है।
सहिष्णुता से शुरुआत करें। यहाँ वह बात है जो अधिकांश इंजीनियरों को पता नहीं होती: ±0.001" की सहिष्णुता प्राप्त करने के लिए ग्राइंडिंग, तापमान-नियंत्रित वातावरण और CMM निरीक्षण की आवश्यकता होती है। यह मानक ±0.005" सहिष्णुता की तुलना में 2.5–3.5 गुना अधिक लागत है, जो प्रोटोटाइप की 80% विशेषताओं के लिए पूर्णतः पर्याप्त है। खुद से पूछें: क्या इस आयाम के लिए मेरे परीक्षण के लिए वास्तव में उच्च परिशुद्धता वाली सहिष्णुता की आवश्यकता है, या क्या मैं आदत के कारण कठोर विनिर्देश लागू कर रहा हूँ?
सीएनसी मशीनिंग सामग्रियों और विशेषताओं के विनिर्देशन के समय इन सहिष्णुता-संबंधित लागत गुणकों पर विचार करें:
- ±0.005" (मानक): 1.0x आधार रेखा—सामान्य मशीनिंग प्रथाएँ
- ±0.002" (कठोर): 1.5–2.0x लागत—अतिरिक्त संचालन की आवश्यकता
- ±0.001" (उच्च परिशुद्धता): 2.5–3.5x लागत—ग्राइंडिंग और CMM निरीक्षण की आवश्यकता
- ±0.0005" (अति-परिशुद्धता): 4–6x लागत—विशिष्ट उपकरण और वातावरणीय नियंत्रण
केवल उन्हीं स्थानों पर कड़े सहिष्णुता मानक लागू करें जहाँ वे कार्यात्मक रूप से महत्वपूर्ण हों: संलग्न सतहें, बेयरिंग बोर, धागेदार इंटरफेस और सीलिंग सतहें। शेष सभी स्थानों पर मानक सहिष्णुता मानकों का उपयोग किया जा सकता है, बिना आपके प्रोटोटाइप की वैधता को समाप्त किए बिना।
कैविटी की गहराई एक अन्य नियंत्रण लीवर है जिसे आप नियंत्रित कर सकते हैं। कुशल उत्पादन के लिए पॉकेट की गहराई को टूल व्यास के तीन गुना तक सीमित करें। छह गुना से अधिक गहराई की कैविटी के लिए विशेष लंबी-पहुँच वाले उपकरणों की आवश्यकता होती है, जो विक्षेपण के प्रति संवेदनशील होते हैं। यदि गहरी विशेषताओं को टालना असंभव है, तो उपकरण के लिए पर्याप्त स्थान सुनिश्चित करने के लिए कैविटी की चौड़ाई को कम से कम गहराई के चार गुना डिज़ाइन करें।
अंत में, सेटअप कमी के बारे में सोचें। प्रत्येक बार जब आपके भाग को मशीन में पुनः स्थित करने की आवश्यकता होती है, तो आपके उद्धरण में सेटअप समय जोड़ा जाता है। ऐसी विशेषताओं का डिज़ाइन करें जिन तक न्यूनतम अभिविन्यास से पहुँचा जा सके। जहाँ व्यावहारिक हो, कई घटकों को एकल सीएनसी मिलिंग भागों में संयोजित करें। मानक फिक्सचर स्थान निर्धारण बिंदु लोडिंग को तीव्र करते हैं और स्थिति त्रुटियों को कम करते हैं।
इन अनुकूलनों का संचयी प्रभाव महत्वपूर्ण है। एक अच्छी तरह से डिज़ाइन किया गया प्रोटोटाइप बनाने में 2 घंटे का समय लग सकता है। जबकि खराब DFM प्रथाओं के साथ उसी ज्यामिति को बनाने में 8 घंटे लग सकते हैं—और परिणाम भी निकृष्ट होंगे। जब आप मशीन के समय और इंजीनियरिंग विशेषज्ञता के लिए भुगतान कर रहे होते हैं, तो यह अंतर आपके बजट पर गहरा प्रभाव डालता है।
बुद्धिमान डिज़ाइन विकल्प आपको अपनी आवश्यकतानुसार मशीन किए गए भागों को तेज़ी से और कम लागत पर प्राप्त करने में सक्षम बनाते हैं, बिना उस मान्यता डेटा के त्याग के जिसकी आपको आवश्यकता होती है। जब आपका डिज़ाइन उत्पादन के लिए अनुकूलित होता है, तो आपके फ़ाइलों को सबमिट करने के बाद क्या होता है—यह समझना प्रोटोटाइपिंग पहेली का अगला चरण बन जाता है।
प्रोटोटाइपिंग प्रक्रिया: कोटेशन से डिलीवरी तक
आपने अपनी CAD फ़ाइल अपलोड कर दी है और ऑनलाइन CNC कोट प्राप्त कर ली है। अब क्या? अधिकांश प्रोटोटाइपिंग सेवाएँ अपने त्वरित कोट टूल्स पर बहुत ज़्यादा ध्यान केंद्रित करती हैं, लेकिन आपको यह अनुमान लगाने के लिए छोड़ देती हैं कि "सबमिट" पर क्लिक करने और अपने मशीनिंग पार्ट्स प्राप्त करने के बीच वास्तव में क्या होता है। इस कार्यप्रवाह को समझना आपको यथार्थवादी अपेक्षाएँ निर्धारित करने और अपने समयसीमा को त्वरित करने के अवसरों की पहचान करने में सहायता करता है।
डिजिटल डिज़ाइन से भौतिक प्रोटोटाइप तक की यात्रा में स्पष्ट चरण होते हैं, जिनमें से प्रत्येक आपकी अंतिम लागत और डिलीवरी तिथि को प्रभावित करता है। आइए ठीक-ठीक देखें कि पृष्ठभूमि में क्या होता है।
कोट के चर राशियों को समझना
आपके ऑनलाइन मशीनिंग कोट पर दिखाई देने वाली यह संख्या कोई यादृच्छिक मान नहीं है—यह समय, सामग्री और जटिलता की सावधानीपूर्ण गणना को दर्शाती है। कई कारक सीधे आपके भुगतान की राशि को प्रभावित करते हैं:
- भाग की ज्यामितीय जटिलता: कई सेटअप, विशेष टूलिंग या 5-एक्सिस मशीनिंग की आवश्यकता वाले फीचर्स प्रोग्रामिंग और साइकिल समय को बढ़ा देते हैं
- सामग्री चयन: स्टेनलेस स्टील जैसी कठिन सामग्रियाँ एल्यूमीनियम की तुलना में धीमी गति से मशीन की जाती हैं, जिससे अधिक समय और टूलिंग की आवश्यकता होती है
- सहिष्णुता आवश्यकताएँ: कठोर विशिष्टताएँ धीमी फीड दरों, अतिरिक्त निरीक्षण और संभावित रूप से द्वितीयक संचालनों की आवश्यकता रखती हैं
- सतह पूर्णता विरचन: अनोडाइज़िंग या पॉलिशिंग जैसे उत्पादन-पश्चात् फिनिशिंग, प्रसंस्करण के अतिरिक्त चरण जोड़ते हैं
- मात्रा आदेश दी गई: अधिक भागों पर फैली सेटअप लागत प्रति-इकाई मूल्य को काफी कम कर देती है
ज़िन्टिलॉन के लागत विश्लेषण के अनुसार, सेटअप लागत और प्रोग्रामिंग खर्च महत्वपूर्ण स्थिर लागतें हैं, जो प्रोटोटाइप बनाम उत्पादन मात्रा के आधार पर अलग-अलग तरीके से वितरित होती हैं। एकल प्रोटोटाइप के लिए, ये स्थिर लागतें गहराई से प्रभावित करती हैं—अक्सर आपकी कुल लागत का 40–60% प्रतिनिधित्व करती हैं। पाँच समान भागों का ऑर्डर देने पर, वही सेटअप लागत पाँच भागों में विभाजित हो जाती है, जिससे प्रति-इकाई लागत काफी कम हो जाती है।
यही कारण है कि कुछ सीएनसी टर्निंग सेवा प्रदाताओं के लिए न्यूनतम ऑर्डर मात्राएँ (MOQ) मौजूद होती हैं। जब मशीन सेटअप का समय वास्तविक कटिंग समय से अधिक होता है, तो आर्थिक रूप से यह संभव नहीं होता है। इसे समझने से आप डिज़ाइन विविधताओं को एक साथ बैचिंग करने या सीमांत लागत में काफी कमी आने पर थोड़ी अधिक मात्रा में ऑर्डर देने के बारे में बुद्धिमान निर्णय ले सकते हैं।
आपके सबमिट करने के बाद क्या होता है
जैसे ही आपकी फ़ाइलें कतार में प्रवेश करती हैं, एक संरचित कार्यप्रवाह शुरू हो जाता है। यहाँ आपके प्रोटोटाइप के अनुसरण करने वाली क्रमिक प्रक्रिया दी गई है:
- फ़ाइल समीक्षा और DFM प्रतिक्रिया: इंजीनियर आपके CAD मॉडल की निर्माण योग्यता संबंधी समस्याओं की जाँच करते हैं। वे पतली दीवारों, गहरे खानों या विशेष विचार की आवश्यकता वाली विशेषताओं को चिह्नित करेंगे। यह चरण आमतौर पर 24–48 घंटे का होता है और अक्सर ऐसे सुझाव देता है जो आपकी कार्यक्षमता को कम न करते हुए आपके खर्च को कम कर सकते हैं।
- सामग्री खरीद: यदि आपके द्वारा चुना गया सामग्री स्टॉक में नहीं है, तो कच्ची सामग्री का ऑर्डर देने से लीड टाइम बढ़ जाता है। 6061 एल्यूमीनियम जैसी सामान्य सामग्रियाँ आमतौर पर तुरंत उपलब्ध होती हैं। विशेष मिश्र धातुएँ या विशिष्ट प्लास्टिक ग्रेड्स के लिए अतिरिक्त 3–7 दिन का समय लग सकता है।
- CAM प्रोग्रामिंग: प्रोग्रामर आपके 3D मॉडल को CNC मशीन द्वारा समझे जाने वाले G-कोड निर्देशों में अनुवादित करते हैं। इसमें कटिंग टूल्स का चयन करना, दक्षता के लिए टूलपाथ का अनुकूलन करना और संभावित समस्याओं को पहले ही पकड़ने के लिए ऑपरेशन का सिमुलेशन करना शामिल है, जिससे धातु के चिप्स उड़ने से पहले ही समस्याएँ निवारित की जा सकें।
- मशीन सेटअप: ऑपरेटर मशीन में कच्चा माल लगाते हैं, उपयुक्त कटिंग उपकरण लोड करते हैं, और कार्य-धारण (वर्कहोल्डिंग) की पुष्टि करते हैं। जटिल भागों के लिए, जिन्हें कई दिशाओं में सेटअप करने की आवश्यकता होती है, मशीनिंग के दौरान सेटअप कई बार दोहराया जा सकता है।
- मशीनिंग ऑपरेशन: वास्तविक सीएनसी टर्निंग और मिलिंग ऑपरेशन प्रोग्राम किए गए निर्देशों के अनुसार कार्यान्वित किए जाते हैं। साइकिल समय में काफी भिन्नता होती है—सरल भाग 30 मिनट में पूरे हो सकते हैं, जबकि जटिल बहु-सेटअप भागों के लिए मशीन समय 8+ घंटे तक का हो सकता है।
- परिष्करण प्रक्रियाएँ: आपके विनिर्देशों के आधार पर, भागों को डिबरिंग, बीड ब्लास्टिंग, एनोडाइज़िंग, पाउडर कोटिंग या अन्य सतह उपचारों के लिए भेजा जा सकता है। प्रत्येक उपचार आपके डिलीवरी कार्यक्रम में समय की अतिरिक्त आवश्यकता पैदा करता है।
- गुणवत्ता निरीक्षण: आयामी सत्यापन सुनिश्चित करता है कि आपके भाग निर्दिष्ट सहिष्णुता के अनुरूप हैं। यह सामान्य सहिष्णुता के लिए मूल कैलिपर जाँच से लेकर उच्च सटीकता की आवश्यकता के लिए विस्तृत रिपोर्ट के साथ पूर्ण सीएमएम (CMM) निरीक्षण तक फैला हो सकता है।
- पैकेजिंग और शिपिंग: उचित पैकेजिंग आपके निवेश की यात्रा के दौरान सुरक्षा सुनिश्चित करती है। यदि समयसीमा अत्यंत महत्वपूर्ण है, तो त्वरित शिपिंग विकल्प पूर्ववर्ती चरणों में खोए गए समय की भरपाई कर सकते हैं।
प्रत्येक चरण में संभावित देरी का जोखिम होता है। सामग्री की उपलब्धता संबंधी समस्याएँ, प्रोग्रामिंग की जटिलताएँ या निरीक्षण में असफलता अप्रत्याशित रूप से समय-सीमा को बढ़ा सकती हैं। अपने परियोजना कार्यक्रम में बफर समय को शामिल करना इन वास्तविकताओं को ध्यान में रखता है।
जटिलता के आधार पर समय-सीमा की अपेक्षाएँ
तो वास्तव में आपको कितने समय तक प्रतीक्षा करनी चाहिए? सीएनसी टर्निंग सेवाएँ काफी हद तक भिन्न होती हैं, लेकिन भागों की विशेषताओं के आधार पर सामान्य पैटर्न सामने आते हैं।
सरल भाग (1–3 दिन): मानक सहिष्णुताओं और अप्रोसेस्ड (as-machined) फिनिश के साथ सामान्य एल्यूमीनियम से बनाए गए मूल ज्यामिति वाले भाग। न्यूनतम सेटअप, सीधी प्रोग्रामिंग और कोई द्वितीयक कार्य नहीं। ये वे भाग हैं जिन्हें कुछ प्रदाता एक कार्यदिवस में भी डिलीवर कर सकते हैं।
मध्यम जटिलता (5–10 दिन): कई मशीनिंग सेटअप, महत्वपूर्ण विशेषताओं पर कड़ी सहिष्णुताएँ या एनोडाइज़िंग जैसे सतह समाप्ति की आवश्यकता वाले भाग। प्रोग्रामिंग में अधिक समय लगता है, और अतिरिक्त कार्यों से प्रसंस्करण समय बढ़ जाता है।
उच्च जटिलता (10–20+ दिन): बहु-अक्षीय मशीनिंग, विदेशी सामग्री, ग्राइंडिंग की आवश्यकता वाले अत्यंत कठोर सहिष्णुता मानदंड, या जटिल परिष्करण विनिर्देश। इन भागों के लिए व्यापक प्रोग्रामिंग, विशिष्ट औजारों की आवश्यकता होती है तथा कई चरणों पर सावधानीपूर्ण गुणवत्ता सत्यापन की आवश्यकता होती है।
सामग्री की उपलब्धता इन समय-सीमाओं को काफी हद तक प्रभावित करती है। HD Proto के प्रोटोटाइपिंग मार्गदर्शिका के अनुसार, विशेष सामग्री के लिए अतिरिक्त स्रोत खोज का समय लग सकता है, जबकि तुरंत उपलब्ध स्टॉक सामग्री त्वरित टर्नअराउंड की अनुमति देती है।
यहाँ वह सब कुछ दिया गया है जो टर्नअराउंड गति को सबसे प्रत्यक्ष रूप से प्रभावित करता है:
- भाग की जटिलता: अधिक सुविधाएँ, कठोर सहिष्णुता मानदंड और बहु-सेटअप साइकिल समय को बढ़ा देते हैं
- सामग्री की उपलब्धता: स्टॉक सामग्री विशेष ऑर्डर की तुलना में तेज़ी से शिप की जाती है
- सहिष्णुता आवश्यकताएँ: उच्च सटीकता विनिर्देशों के लिए अतिरिक्त संचालन और निरीक्षण की आवश्यकता होती है
- परिष्करण विनिर्देश: प्रत्येक परिष्करण प्रक्रिया प्रकार के आधार पर 1–5 दिन का समय लेती है
- वर्तमान दुकान क्षमता: आपातकालीन अवधि के दौरान सभी प्रदाताओं के लिए लीड टाइम बढ़ जाता है
प्रोटोटाइपिंग की अर्थव्यवस्था अग्रिम योजना बनाने के पक्ष में है। जब आपको मानक समयसीमा से तेज़ी से भागों की आवश्यकता होती है, तो जल्दी के लिए लगने वाले शुल्क आपकी लागत में 25-50% तक की वृद्धि कर सकते हैं। इसके विपरीत, लचीली डिलीवरी तिथियाँ कभी-कभी कम कीमत के योग्य हो सकती हैं, जब उत्पादन सुविधाएँ आपके कार्य को अपने प्राकृतिक अनुसूची अंतराल में फिट कर सकती हैं।
इस पूर्ण कार्यप्रवाह को समझना—जो उद्धरण उत्पादन से लेकर अंतिम डिलीवरी तक होता है—आपको समय, लागत और प्रदाता चयन के बारे में सूचित निर्णय लेने की स्थिति में रखता है। प्रक्रिया के बारे में ज्ञान प्राप्त करने के बाद, अगला विचार सतह परिष्करण के विकल्पों पर आता है और यह कैसे आपके प्रोटोटाइप के कार्य और उपस्थिति दोनों को प्रभावित करता है।
विभिन्न परीक्षण आवश्यकताओं के लिए सतह परिष्करण के विकल्प
आपका प्रोटोटाइप यांत्रिक रूप से निर्मित, आयामी रूप से सटीक है और परीक्षण के लिए तैयार है। लेकिन यहाँ एक प्रश्न है जिसे अक्सर अनदेखा कर दिया जाता है: क्या सतह परिष्करण उस चीज़ के अनुरूप है जिसकी आप वैधता स्थापित करने का प्रयास कर रहे हैं? इस प्रश्न का उत्तर अधिकांश इंजीनियरों के विचार से कहीं अधिक महत्वपूर्ण है।
सतह के फिनिश (परिष्करण) प्रोटोटाइपिंग में दो मौलिक रूप से अलग-अलग उद्देश्यों की सेवा करते हैं। कार्यात्मक फिनिश भागों के प्रदर्शन को प्रभावित करते हैं—जैसे घर्षण गुणांक, क्षरण प्रतिरोध, सीलिंग क्षमता और संक्षारण सुरक्षा। सौंदर्यात्मक फिनिश निर्धारित करते हैं कि भाग किस प्रकार दिखाई देंगे, जो दलों के प्रस्तुतियों, उपयोगकर्ता परीक्षण और विपणन फोटोग्राफी के लिए महत्वपूर्ण हैं। अपने परीक्षण के उद्देश्यों के लिए गलत फिनिश का चयन करना धन की बर्बादी है और आपके मान्यता परिणामों को भ्रामित कर सकता है।
मशीन के अनुसार प्राप्त फिनिश बनाम उत्पादनोत्तर प्रसंस्कृत फिनिश
प्रत्येक सीएनसी मशीन किए गए भाग की शुरुआत कटिंग पथ के अनुसार दृश्यमान टूल निशानों के साथ होती है। हब्स के सतह फिनिश गाइड के अनुसार, मशीन के अनुसार प्राप्त मानक सतह रफनेस (Ra) 3.2 μm (125 μin) है। यह आधारभूत फिनिश कई कार्यात्मक प्रोटोटाइप्स के लिए पूर्णतः उपयुक्त है, जहाँ बाह्य रूप का कोई महत्व नहीं होता है।
क्या आप अधिक चिकनी सतह चाहते हैं? एक समापन काटने की पास (फिनिशिंग कटिंग पास) Ra को 1.6, 0.8, या यहाँ तक कि 0.4 μm (63, 32, या 16 μin) तक कम कर सकती है। लेकिन यहाँ समझौता है: कम Ra मान भाग की लागत बढ़ा देते हैं, क्योंकि उनके लिए अतिरिक्त यांत्रिक प्रसंस्करण चरणों और कठोर गुणवत्ता नियंत्रण की आवश्यकता होती है। यदि आपका प्रोटोटाइप यांत्रिक कार्यक्षमता के परीक्षण के लिए है, न कि सतह-संबंधित अंतरक्रिया के लिए, तो वह अतिरिक्त लागत कोई अतिरिक्त मूल्य प्रदान नहीं करती है।
मशीन द्वारा प्राप्त सतह-अवस्था (एज़-मशीन्ड फिनिश) के स्पष्ट लाभ हैं:
- सबसे कड़े आयामी सहिष्णुता—पोस्ट-प्रोसेसिंग द्वारा कोई सामग्री नहीं हटाई जाती है
- मानक यांत्रिक प्रसंस्करण के अतिरिक्त कोई अतिरिक्त लागत नहीं
- सबसे त्वरित डिलीवरी समय
- आंतरिक घटकों, फिक्सचर्स और कार्यात्मक परीक्षण के लिए पूर्णतः उपयुक्त
सीमा क्या है? दृश्यमान औजार निशान बने रहते हैं, जो ग्राहक-उन्मुख प्रोटोटाइप या उन भागों के लिए उपयुक्त नहीं हो सकते हैं जहाँ सतह का बनावट प्रदर्शन को प्रभावित करता है।
परीक्षण के लिए कार्यात्मक कोटिंग्स
जब आपके प्रोटोटाइप को वास्तविक दुनिया के प्रदर्शन का अनुकरण करने की आवश्यकता होती है, तो कार्यात्मक लेपन अनिवार्य हो जाते हैं। ये परतें घर्षण, संक्षारण और पर्यावरणीय कारकों से सुरक्षा प्रदान करती हैं—ठीक वही जो उत्पादन भागों को सामना करना पड़ेगा।
एनोडाइजिंग यह एल्यूमीनियम और टाइटेनियम की सतहों को कठोर सेरामिक ऑक्साइड परतों में परिवर्तित करता है। प्रोटोलैब्स की तुलना के अनुसार, यह विद्युत-रासायनिक प्रक्रिया धातु के ऊपर के बजाय धातु के भीतर ही सुरक्षा को विकसित करती है। परिणामस्वरूप परत खरोंच लगने पर भी नहीं उखड़ेगी या छिलेगी।
प्रकार II एनोडाइजिंग 4–12 μm की सीमा में ऑक्साइड परतें उत्पन्न करती है—जो संक्षारण प्रतिरोध और सौंदर्यपूर्ण रंग के लिए उपयुक्त है। प्रकार III (हार्डकोट) एनोडाइजिंग लगभग 50 μm की मोटाई की परतें बनाती है, जो कार्यात्मक अनुप्रयोगों के लिए उत्कृष्ट घर्षण प्रतिरोध प्रदान करती है। प्रकार III की कठोरता कुछ इस्पातों से भी अधिक हो सकती है, जिससे यह उच्च-घर्षण प्रोटोटाइप परीक्षण के लिए आदर्श हो जाती है।
एक महत्वपूर्ण विचार: एनोडाइज़िंग से सामग्री की मोटाई में वृद्धि होती है। 50 माइक्रोमीटर की परत मूल सतह से लगभग 25 माइक्रोमीटर ऊपर की ओर फैलती है और लगभग 25 माइक्रोमीटर नीचे की ओर सतह को हटा देती है। कड़ी सहिष्णुता वाले असेंबलियों के लिए, अपने डिज़ाइन में इस आयामी परिवर्तन को ध्यान में रखें या महत्वपूर्ण विशेषताओं को मास्क करें।
पाउडर कोटिंग यह 50–150 माइक्रोमीटर मोटाई की एक सुरक्षात्मक पॉलिमर परत जोड़ता है। यह उत्कृष्ट प्रभाव प्रतिरोध प्रदान करता है—वास्तव में, यह एनोडाइज़िंग की अपेक्षाकृत भंगुर सेरामिक परत की तुलना में बेहतर है। पाउडर कोटिंग किसी भी धातु पर काम करती है, जिससे यह स्टील, पीतल या एल्यूमीनियम के प्रोटोटाइप्स के लिए बहुमुखी हो जाती है।
एक्रिलिक सीएनसी सेवा अनुप्रयोगों या सीएनसी पॉलीकार्बोनेट भागों के लिए, सतह समाप्ति विकल्प भिन्न होते हैं। ये पारदर्शी सामग्रियाँ ऑप्टिकल स्पष्टता को बनाए रखने के साथ-साथ सतह की गुणवत्ता में सुधार करने के लिए अक्सर कोटिंग के बजाय पॉलिशिंग प्राप्त करती हैं।
प्रस्तुति प्रोटोटाइप के लिए सौंदर्यपूर्ण उपस्थिति
प्रस्तुति प्रोटोटाइप्स का उद्देश्य पूरी तरह से भिन्न होता है। ये भाग स्टेकहोल्डरों की स्वीकृति, उपयोगकर्ता परीक्षण या फोटोग्राफी के लिए उत्पादन उत्पादों जैसे दिखने के लिए आवश्यक होते हैं। यहाँ, रूपांतरण का चयन दृश्य आकर्षण पर आधारित होता है।
बीड़ ब्लस्टिंग ग्लास बीड्स को सतह के विरुद्ध प्रक्षेपित करके एकसमान मैट या सैटिन फ़िनिश उत्पन्न करता है। यह कम लागत वाला विकल्प दृश्यमान औजार चिह्नों को समाप्त कर देता है और जटिल ज्यामिति के पूरे क्षेत्र में सुसंगत टेक्सचर उत्पन्न करता है। हब्स के अनुसार, यह प्रक्रिया मुख्य रूप से सौंदर्यपूर्ण है और आंशिक रूप से ऑपरेटर के कौशल पर निर्भर करती है, जिसमें #120 ग्रिट मानक है।
चमकाना सतहों को दर्पण-जैसी चिकनाहट तक ले जाता है। एक्रिलिक सीएनसी मशीनिंग के लिए, पॉलिशिंग मशीन की गई सतहों को लेंस प्रोटोटाइप या प्रदर्शन घटकों के लिए ऑप्टिकल रूप से स्पष्ट फ़िनिश में परिवर्तित करता है। यह प्रक्रिया सामग्री को हटाती है, अतः टॉलरेंस विनिर्देशों में आयामी परिवर्तनों को ध्यान में रखें।
प्लेटिंग उपस्थिति या चालकता के लिए पतली धात्विक परतें जोड़ता है। क्रोमियम, निकल और जिंक प्लेटिंग प्रत्येक में विशिष्ट दृश्य विशेषताएँ और सुरक्षात्मक गुण होते हैं।
| फिनिश प्रकार | सतह की खुरदरापन (Ra) | लागत प्रभाव | सर्वश्रेष्ठ उपयोग |
|---|---|---|---|
| मशीन के बाद (मानक) | 3.2 μm (125 μin) | आधार रेखा | कार्यात्मक परीक्षण, आंतरिक घटक, फिक्सचर |
| मशीन के बाद (फाइन) | 0.8–1.6 μm (32–63 μin) | +15-25% | सीलिंग सतहें, सटीक फिट, घर्षण कम करने वाले क्षेत्र |
| बीड ब्लास्टेड | 1.0–3.0 μm | +10-20% | एकसमान मैट उपस्थिति, औजार चिह्नों को छिपाना, एनोडाइज़ करने से पूर्व तैयारी |
| एनोडाइज़्ड प्रकार II | आधार Ra को बनाए रखता है | +20-35% | क्षरण सुरक्षा, रंगीन सौंदर्यपूर्ण परत, एल्यूमीनियम के भाग |
| एनोडाइज़्ड प्रकार III | आधार की तुलना में थोड़ा खुरदुरा | +40-60% | उच्च पहन-प्रतिरोध, कार्यात्मक सतहें, इंजीनियरिंग अनुप्रयोग |
| पाउडर कोटेड | 1.5-3.0 μm | +25-40% | प्रभाव प्रतिरोध, रंग मिलान, बाहरी प्रदर्शन, कोई भी धातु |
| पलिश | 0.1–0.4 माइक्रोमीटर | +30-50% | दर्पण-समान परत, प्रकाशिक घटक, प्रस्तुति मॉडल |
| लेपित (क्रोमियम/निकल) | 0.4-1.6 μm | +35-55% | सजावटी उपस्थिति, विद्युत चालकता, क्षरण प्रतिरोध |
फिनिश को कार्य के अनुरूप मिलाना
सही सतह परत का चयन करना इस बात को समझने पर निर्भर करता है कि आपका प्रोटोटाइप वास्तव में क्या सिद्ध करने के लिए है।
घर्षण और क्षरण परीक्षण ऐसे पृष्ठ विनिर्माण की स्थितियों को प्रतिकृति करने की आवश्यकता होती है। फिसलने वाले संपर्क के दौरान एक पॉलिश किया गया पृष्ठ, बीड ब्लास्टेड पृष्ठ की तुलना में अलग तरह से व्यवहार करता है। यदि आपके उत्पादन भागों को एनोडाइज़ किया जाना है, तो सटीक घर्षण डेटा प्राप्त करने के लिए एनोडाइज़्ड प्रोटोटाइप के साथ परीक्षण करें।
सीलिंग सतहें सही ढंग से कार्य करने के लिए विशिष्ट Ra मानों की आवश्यकता होती है। ओ-रिंग खांचे और गैस्केट इंटरफेस आमतौर पर 0.8–1.6 μm के बीच Ra मानों की आवश्यकता होती है। मानक रूप से मशीन किए गए पृष्ठ विश्वसनीय सीलिंग के लिए बहुत खुरदरे हो सकते हैं।
असेंबली सत्यापन अक्सर मशीन किए गए पृष्ठों के साथ अच्छी तरह से काम करता है। यदि आप आयामी फिट और क्लीयरेंस की जाँच कर रहे हैं, तो सौंदर्य समाप्ति लागत बढ़ाती है, लेकिन आपके परीक्षण डेटा में सुधार नहीं करती है।
यहाँ मशीनिंग की परिशुद्धता और अंतिम सतह की गुणवत्ता के बीच संबंध महत्वपूर्ण है। अनुसार ज़िंटिलॉन के रफनेस गाइड , स्मूथिंग या पॉलिशिंग सामग्री को हटाती है और आयामी सहिष्णुता को प्रभावित कर सकती है। निर्दिष्ट करें कि कौन से पृष्ठ आयामों के लिए महत्वपूर्ण हैं और कौन से केवल उपस्थिति के लिए, और समाप्ति संचालन के दौरान उन्हें उचित रूप से मास्क करें।
कई फ़िनिश रणनीतिक रूप से संयोजित किए जा सकते हैं। एनोडाइज़िंग से पहले बीड ब्लास्टिंग करने से एक समान मैट दिखावट प्राप्त होती है, और फिर यह जंग तथा क्षरण सुरक्षा भी प्रदान करती है। यह संयोजन एकल प्रोटोटाइप में दोनों सौंदर्यिक और कार्यात्मक आवश्यकताओं को पूरा करता है।
सतह फ़िनिश विकल्पों को समझना आपको यह निर्दिष्ट करने में सक्षम बनाता है कि प्रत्येक प्रोटोटाइप को ठीक-ठीक क्या आवश्यकता है—न कुछ अधिक, न कुछ कम। जब फ़िनिश की आवश्यकताएँ परिभाषित हो जाती हैं, तो अगला विचार यह होता है कि उद्योग-विशिष्ट विनियामक आवश्यकताएँ और प्रमाणन आवश्यकताएँ आपकी प्रोटोटाइपिंग सेवा के चयन को कैसे प्रभावित करती हैं।
उद्योग-विशिष्ट प्रोटोटाइपिंग विचार
सभी प्रोटोटाइप समान सख्त जाँच के सामने नहीं आते हैं। एक उपभोक्ता इलेक्ट्रॉनिक्स एन्क्लोज़र और एक सर्जिकल उपकरण बिल्कुल अलग-अलग मान्यन पथ से गुज़रते हैं—भले ही दोनों सीएनसी मशीन किए गए एल्युमीनियम भागों से शुरू होते हों। यह समझना कि आपके उद्योग का विनियामक वातावरण प्रोटोटाइपिंग आवश्यकताओं को कैसे आकार देता है, आपको सही सेवा प्रदाता का चयन करने और महंगे अनुपालन अंतराल से बचने में सहायता करता है।
नियमित उद्योगों को केवल आकारिक सटीकता से अधिक की आवश्यकता होती है। उन्हें दस्तावेज़ित सामग्री ट्रेसैबिलिटी, प्रमाणित गुणवत्ता प्रणालियाँ और ऑडिटर की जाँच को सफलतापूर्वक पार करने वाले निरीक्षण प्रोटोकॉल की आवश्यकता होती है। आइए देखें कि प्रत्येक प्रमुख क्षेत्र को सीएनसी प्रोटोटाइपिंग सेवा से विशिष्ट रूप से क्या आवश्यकताएँ हैं।
ऑटोमोटिव प्रोटोटाइप आवश्यकताएँ
ऑटोमोटिव उद्योग निर्माण के सबसे माँग वाले गुणवत्ता मानकों के अधीन कार्य करता है। जब आप चेसिस घटकों, ट्रांसमिशन हाउसिंग या सुरक्षा-महत्वपूर्ण ब्रैकेट्स के प्रोटोटाइप तैयार कर रहे होते हैं, तो आपके सेवा प्रदाता के प्रमाणन अत्यंत महत्वपूर्ण होते हैं।
आईएटीएफ 16949 प्रमाणन गंभीर ऑटोमोटिव कार्य के लिए आधारभूत मानक है। अनुसार मोडो रैपिड के प्रमाणन मार्गदर्शिका , यह मानक आईएसओ 9001 पर अतिरिक्त आवश्यकताओं को लागू करता है, जिनमें दोष रोकथाम और सांख्यिकीय प्रक्रिया नियंत्रण शामिल हैं। आईएटीएफ 16949 प्रमाणित आपूर्तिकर्ता पहले से ही कड़ी समय सीमा को पूरा करने और दोष दरों को सूक्ष्म स्तर पर बनाए रखने के लिए अनुकूलित होते हैं।
इसका आपके प्रोटोटाइप्स के लिए क्या अर्थ है? ऑटोमोटिव-प्रमाणित परिशुद्धता यांत्रिकी कंपनियाँ निम्नलिखित को बनाए रखती हैं:
- सांख्यिकीय प्रक्रिया नियंत्रण (SPC): वास्तविक समय में निगरानी जो अपव्यय उत्पन्न करने से पहले आकारिक विचलन का पता लगाती है
- सामग्री ट्रेसेबिलिटी: प्रत्येक भाग को विशिष्ट सामग्री बैचों, ऊष्मीय उपचारों और प्रसंस्करण तिथियों से जोड़ने वाला दस्तावेज़ीकरण
- उत्पादन भाग मंजूरी प्रक्रिया (PPAP) तैयारी: वे प्रणालियाँ जो उत्पादन मंजूरी से पहले OEM द्वारा आवश्यक दस्तावेज़ीकरण पैकेज उत्पन्न करने में सक्षम हैं
- दोष रोकथाम पर ध्यान केंद्रित: गुणवत्ता का निर्माण प्रक्रियाओं में ही किया जाना, बजाय उनके बाद निरीक्षण द्वारा
ऑटोमोटिव में प्रोटोटाइप पुनरावृत्ति एक संरचित पथ का अनुसरण करती है। प्रारंभिक विकास प्रोटोटाइप में सरलीकृत दस्तावेज़ीकरण का उपयोग किया जा सकता है, लेकिन जैसे-जैसे डिज़ाइन उत्पादन मान्यीकरण की ओर परिपक्व होती है, दस्तावेज़ीकरण आवश्यकताएँ तीव्र हो जाती हैं। आपका प्रोटोटाइपिंग साझेदार इस प्रगति को समझना चाहिए और अपने गुणवत्ता दस्तावेज़ीकरण को इसके अनुसार स्केल करना चाहिए।
चिकित्सा उपकरण सामग्री अनुपालन
चिकित्सा उपकरणों के यांत्रिकीकरण का कार्य एक ऐसे वातावरण में होता है जहाँ रोगी की सुरक्षा प्रत्येक निर्णय को प्रेरित करती है। नियामक मार्ग—चाहे वह FDA 510(k), सीई मार्किंग, या अन्य मंजूरियाँ हों—आपके प्रोटोटाइप सामग्रियों और प्रक्रियाओं के बारे में ट्रेस करने योग्य साक्ष्य की मांग करता है, जो अंततः उत्पादन अनुपालन का समर्थन करें।
चिकित्सा उपकरणों के प्रोटोटाइपिंग के लिए ISO 13485 प्रमाणन आवश्यक है। यह मानक चिकित्सा उपकरण निर्माण के लिए विशेष रूप से डिज़ाइन किए गए गुणवत्ता प्रबंधन प्रणालियों को संबोधित करता है, जिसमें निम्नलिखित शामिल हैं:
- जैव-अनुकूलता आवश्यकताएँ: रोगी संपर्क के लिए स्वीकार्य सामग्रियों को समझना और सामग्री अनुपालन को सिद्ध करने वाले प्रमाणपत्रों को बनाए रखना
- पूर्ण सामग्री परिवर्तनशीलता: कच्चे माल के दस्तावेज़ीकरण का ट्रैकिंग—मिल प्रमाणपत्रों से लेकर पूर्ण भागों तक—जिससे किसी भी समस्या के उभरने पर वापसी की क्षमता सुनिश्चित हो सके
- प्रक्रिया मान्यीकरण दस्तावेज़ीकरण: रिकॉर्ड्स जो साबित करते हैं कि यांत्रिकीकरण प्रक्रियाएँ सुसंगत, दोहराए जा सकने वाले परिणाम उत्पन्न करती हैं
- डिज़ाइन इतिहास फ़ाइल समर्थन: नियामक प्रस्तुतियों में शामिल करने के लिए प्रारूपित प्रोटोटाइप दस्तावेज़ीकरण
मोडो रैपिड के विश्लेषण के अनुसार, आईएसओ 13485 प्रमाणन यह सुनिश्चित करता है कि आपूर्तिकर्ता चिकित्सा अनुप्रयोगों के लिए महत्वपूर्ण जैव-संगतता आवश्यकताओं और ट्रेसैबिलिटी मानकों को समझता है।
चिकित्सा उपकरणों का पुनरावृत्ति प्रक्रिया उपभोक्ता उत्पादों से मौलिक रूप से भिन्न होती है। प्रत्येक डिज़ाइन परिवर्तन के कारण नियामक पुनः प्रस्तुति की आवश्यकता हो सकती है। स्मार्ट टीमें प्रोटोटाइपिंग का रणनीतिक रूप से उपयोग करती हैं—महत्वपूर्ण विशेषताओं की प्रारंभिक पुष्टि करने के साथ-साथ अंतिम मंजूरी पथों का समर्थन करने वाले दस्तावेज़ीकरण को बनाए रखना। आपकी प्रोटोटाइपिंग सेवा को इस गतिशीलता को समझना चाहिए और नियामक फ़ाइलों के लिए उपयुक्त दस्तावेज़ीकरण प्रदान करना चाहिए।
एयरोस्पेस सहिष्णुता मानक
जब भाग उड़ान भरते हैं, तो विफलता का कोई विकल्प नहीं होता है। एयरोस्पेस सीएनसी मशीनिंग और प्रोटोटाइपिंग के लिए उद्योग की सबसे कठोर गुणवत्ता प्रणालियों की आवश्यकता होती है, और एएस9100डी प्रमाणन एक प्रदाता की क्षमता को दर्शाता है कि वह इन मानकों को पूरा कर सकता है।
AS9100D मानक ISO 9001 पर आधारित है, लेकिन इसमें एयरोस्पेस के विशिष्ट आवश्यकताओं को शामिल किया गया है। Xometry के प्रमाणन अवलोकन के अनुसार, यह मानक ISO 9001:2015 द्वारा आवश्यक मूलभूत आवश्यकताओं को शामिल करता है, साथ ही एयरोस्पेस उत्पादों और सेवाओं में गुणवत्ता, सुरक्षा और विश्वसनीयता सुनिश्चित करने के लिए अतिरिक्त आवश्यकताएँ भी शामिल हैं। एयरोस्पेस प्रणालियों की जीवन-निर्भरता उन महत्वपूर्ण विशिष्ट पहलुओं को जन्म देती है जो अत्यंत महत्वपूर्ण हैं।
आपके सीएनसी मशीनिंग एयरोस्पेस प्रोटोटाइप्स को प्रभावित करने वाले प्रमुख तत्व इनमें से हैं:
- जोखिम प्रबंधन योजना: संगठनों को उत्पादों, प्रक्रियाओं और आपूर्ति श्रृंखलाओं से जुड़े जोखिमों की पहचान करनी चाहिए और उनका शमन करना चाहिए—इस तरह संभावित विफलताओं को उनके घटित होने से पहले रोका जा सकता है
- कॉन्फ़िगरेशन प्रबंधन: उत्पाद विन्यास का कड़ा नियंत्रण, डिज़ाइन संशोधनों के दौरान उत्पाद के अनुरूपता और अखंडता को सुनिश्चित करने के लिए सटीक जानकारी को बनाए रखना
- डिज़ाइन और विकास की गुणवत्ता: प्रत्येक संशोधन को ट्रेस करने वाली मान्यन, सत्यापन प्रक्रियाएँ और दस्तावेज़ परिवर्तन नियंत्रण
- आपूर्तिकर्ता प्रबंधन: घटकों की गुणवत्ता और विश्वसनीयता को आपूर्ति श्रृंखला भर में सुनिश्चित करने के लिए आपूर्तिकर्ताओं के चयन और प्रबंधन के मापदंड
एयरोस्पेस मशीनिंग की सहिष्णुताएँ अक्सर उस सीमा को पार कर जाती हैं जो प्राप्त करना संभव है। ±0.0005" की परिशुद्धता की आवश्यकता वाले घटक, एकल-अंकीय माइक्रोइंच में निर्दिष्ट सतह के फिनिश, और सटीक मिश्र धातु संरचना के प्रमाणन के लिए दस्तावेज़ीकरण — ये सभी मानक आवश्यकताएँ हैं। आपकी प्रोटोटाइपिंग सेवा को इन विनिर्देशों को लगातार प्राप्त करने की क्षमता का प्रदर्शन करना आवश्यक है।
एयरोस्पेस में प्रोटोटाइप पुनरावृत्ति गति के बजाय व्यापकता की ओर अधिक झुकी होती है। प्रत्येक डिज़ाइन संशोधन के लिए दस्तावेज़ीकरण अद्यतन, संभावित रूप से नए सामग्री प्रमाणन, और यह सुनिश्चित करना आवश्यक होता है कि परिवर्तन अस्वीकार्य जोखिम को न जन्म दें। प्रोटोटाइपिंग के दौरान उचित दस्तावेज़ीकरण में किया गया निवेश उत्पादन प्रमाणन ऑडिट के समय लाभदायक सिद्ध होता है।
उपभोक्ता उत्पाद: एक भिन्न दृष्टिकोण
उपभोक्ता उत्पाद प्रोटोटाइपिंग मौलिक रूप से भिन्न बाधाओं के तहत कार्य करती है। जीवन-सुरक्षा विनियमों के बिना, जो दस्तावेज़ीकरण आवश्यकताओं को निर्धारित करते हैं, टीमें तेज़ी से और अधिक अनौपचारिक रूप से पुनरावृत्ति कर सकती हैं। लेकिन इसका यह अर्थ नहीं है कि प्रमाणन महत्वहीन हैं।
ISO 9001 एक आधारभूत गुणवत्ता संकेतक के रूप में अब भी मूल्यवान है। यह सत्यापित करता है कि आपका प्रोटोटाइपिंग प्रदाता दस्तावेज़ीकृत गुणवत्ता नियंत्रण प्रक्रियाओं और निरंतर सुधार के अभ्यासों का अनुपालन करता है। इसे विनिर्माण के लिए एक ड्राइवर्स लाइसेंस के रूप में सोचें—विशिष्ट नहीं, लेकिन मूल स्तरीय योग्यता का प्रमाण।
उपभोक्ता उत्पाद प्रोटोटाइपिंग की प्राथमिकताएँ आमतौर पर इनमें शामिल हैं:
- बाजार में तेजी से पहुंच: कम दस्तावेज़ीकरण अधिभार के साथ त्वरित पुनरावृत्ति चक्र
- लागत अनुकूलन: जहाँ संभव हो, सामग्रियों को प्रतिस्थापित करने और सहिष्णुताओं को सरल बनाने की लचीलापन
- दिखावट की गुणवत्ता: उपयोगकर्ता परीक्षण और हितधारक प्रस्तुतियों के लिए उपयुक्त सतह परिष्करण
- स्केलेबिलिटी आकलन: प्रोटोटाइप डिज़ाइनों के उत्पादन विनिर्माण में अनुवाद करने की समझ
नियामक दस्तावेज़ीकरण आवश्यकताओं का अभाव गुणवत्ता की आवश्यकताओं को समाप्त नहीं करता—यह केवल ध्यान केंद्रित करने के फोकस को बदल देता है। उपभोक्ता उत्पाद टीमें अक्सर ऐसे प्रदाताओं को खोजने पर जोर देती हैं जो डिज़ाइनों को त्वरित रूप से पुनरावृत्त कर सकते हैं, जबकि संशोधनों के दौरान सुसंगत गुणवत्ता बनाए रख सकते हैं।
उद्योग की आवश्यकताओं के आधार पर प्रदाताओं का चयन
आपके उद्योग की प्रमाणन आवश्यकताओं को सीधे प्रदाता चयन को प्रभावित करना चाहिए। सटीक यांत्रिक प्रसंस्करण कंपनियों के साथ काम करना, जिनमें उचित प्रमाणन नहीं हैं, जोखिम पैदा करता है—या तो आपको बाद में अनुपालन के अंतर का सामना करना पड़ेगा, या फिर आपको उस दस्तावेज़ीकरण को फिर से तैयार करने के लिए भुगतान करना पड़ेगा जो शुरू से ही मौजूद होना चाहिए था।
उद्योग के अनुसार एक त्वरित प्रमाणन संदर्भ यहाँ दिया गया है:
| उद्योग | आवश्यक प्रमाणन | अतिरिक्त विचार |
|---|---|---|
| ऑटोमोटिव | IATF 16949 | SPC क्षमता, PPAP दस्तावेज़ीकरण तैयारी |
| एयरोस्पेस/रक्षा | AS9100D | विशेष प्रक्रियाओं के लिए NADCAP, रक्षा क्षेत्र के लिए ITAR |
| चिकित्सा उपकरण | ISO 13485 | सामग्री की जैव-संगतता दस्तावेज़ीकरण |
| उपभोक्ता उत्पाद | ISO 9001 | गति और लचीलापन को अक्सर प्राथमिकता दी जाती है |
प्रतिबद्ध होने से पहले प्रमाणन की पुष्टि करें। वैध प्रमाणन निकाय प्रमाणपत्र जारी करते हैं जिनमें समाप्ति तिथियाँ और पंजीकरण संख्याएँ होती हैं, जिनकी स्वतंत्र रूप से पुष्टि की जा सकती है। Xometry के मार्गदर्शन के अनुसार, यह बुद्धिमानी भरा कदम है कि प्रमाणन निकाय की विश्वसनीयता और मान्यता की पुष्टि की जाए, जिसमें यह सुनिश्चित किया जाए कि चुना गया प्रमाणनकर्ता उचित रूप से अधिकृत और लाइसेंस प्राप्त है।
आपके उद्योग की विशिष्ट प्रोटोटाइपिंग आवश्यकताओं को समझना उत्पाद विकास के दौरान अप्रत्याशित समस्याओं को रोकता है। इस ज्ञान के साथ, अगला कदम इन मापदंडों के आधार पर संभावित प्रदाताओं का मूल्यांकन करना होता है—योग्य साझेदारों को उन लोगों से अलग करना जो केवल क्षमता का दावा करते हैं।
सीएनसी प्रोटोटाइपिंग प्रदाताओं का मूल्यांकन कैसे करें
आपने अपनी सामग्री को परिभाषित कर लिया है, अपने डिज़ाइन को अनुकूलित कर लिया है, और समझ लिया है कि आपको किस प्रकार का सतह परिष्करण (सरफेस फिनिश) आवश्यकता है। अब एक ऐसा निर्णय लेने का समय आ गया है जो आपकी परियोजना के समय-सीमा को सफल या विफल बना सकता है: आपके प्रोटोटाइप को वास्तव में कौन सा प्रदाता मशीन करेगा? प्रतिदिन हज़ारों 'मेरे पास के सीएनसी मशीन शॉप' की खोज किए जाने के बावजूद, चुनौती विकल्पों को खोजने में नहीं, बल्कि योग्य साझेदारों को उन लोगों से अलग करने में है जो केवल क्षमता का दावा करते हैं।
सटीक सीएनसी मशीनिंग सेवाओं का मूल्यांकन करते समय त्वरित कोटेशन इंटरफ़ेस से परे देखना आवश्यक है। सबसे सस्ती कोटेशन अक्सर सबसे महंगी गलती बन जाती है, जब भाग देर से आते हैं, विनिर्देशों के अनुरूप नहीं होते हैं, या उनके साथ ऐसा दस्तावेज़ीकरण आता है जो आपकी गुणवत्ता आवश्यकताओं को पूरा नहीं करता है। आइए ऐसे प्रदाताओं की पहचान करने के लिए एक व्यवस्थित ढांचा तैयार करें जो वास्तव में डिलीवर कर सकें।
सत्यापित करने योग्य प्रमाणन और गुणवत्ता योग्यताएँ
प्रमाणन केवल दीवारों पर लगी सजावट नहीं हैं—वे सत्यापित गुणवत्ता प्रणालियों का प्रतिनिधित्व करते हैं जो आपकी परियोजना के जोखिम को कम करते हैं। PEKO Precision के मूल्यांकन दिशानिर्देश के अनुसार, आजकल अधिकांश सटीक मशीनिंग शॉप्स ISO 9001 प्रमाणित हैं, जबकि कुछ अतिरिक्त प्रमाणन जैसे चिकित्सा क्षेत्र के लिए ISO 13485 या एयरोस्पेस क्षेत्र के लिए AS9100 भी रखते हैं। जो भी गुणवत्ता प्रमाणन हो, एक सर्वेक्षण टीम को दैनिक अनुशासन और दस्तावेज़ीकरण की जाँच दोहराकर सुनिश्चित करना चाहिए कि वे सभी उचित रूप से किए जा रहे हैं।
यहाँ आपकी उद्योग-विशिष्ट आवश्यकताओं के आधार पर सत्यापित करने योग्य बिंदु दिए गए हैं:
- ISO 9001: आधारभूत गुणवत्ता प्रबंधन प्रणाली—दस्तावेज़ीकृत प्रक्रियाओं और निरंतर सुधार के अभ्यासों की पुष्टि करती है
- IATF 16949: ऑटोमोटिव उद्योग का मानक जिसमें सांख्यिकीय प्रक्रिया नियंत्रण (SPC) और दोष रोकथाम प्रणालियों की आवश्यकता होती है
- एएस9100डी: एयरोस्पेस प्रमाणन जिसमें कठोर जोखिम प्रबंधन और विन्यास नियंत्रण आवश्यकताएँ होती हैं
- ISO 13485: चिकित्सा उपकरण गुणवत्ता प्रणाली जो जैव-अनुकूलता के दस्तावेज़ीकरण और पूर्ण ट्रेसैबिलिटी सुनिश्चित करती है
दावों को केवल सतही रूप से स्वीकार न करें। वैध प्रमाणनों में पंजीकरण संख्याएँ और समाप्ति तिथियाँ शामिल होती हैं, जिन्हें आप जारी करने वाली संस्था के साथ सत्यापित कर सकते हैं। प्रमाणपत्रों की प्रतियाँ माँगें और पुष्टि करें कि वे वर्तमान में वैध हैं।
प्रमाणनों के अतिरिक्त, व्यवहार में गुणवत्ता नियंत्रण विधियों का मूल्यांकन करें। सांख्यिकीय प्रक्रिया नियंत्रण (SPC) वास्तविक समय में निगरानी को दर्शाता है, जो समस्याओं को आपके भागों को प्रभावित करने से पहले पकड़ लेता है। प्रथम लेख निरीक्षण (FAI) रिपोर्टें आपके विनिर्देशों के अनुसार आयामी शुद्धता की पुष्टि करने की क्षमता को प्रदर्शित करती हैं। PEKO के विश्लेषण के अनुसार, चाहे यह प्रथम लेख निरीक्षण हो, महत्वपूर्ण विशेषताएँ हों या ट्रेसैबिलिटी के लिए आवश्यक कागजात हों, ये केवल तभी उपयोगी हैं जब उन्हें सही ढंग से और दैनिक आधार पर किया जाए।
नेतृत्व समय और क्षमता दावों का मूल्यांकन
मेरे आसपास की प्रत्येक मशीनिंग शॉप का परिणाम त्वरित टर्नअराउंड का वादा करता है। लेकिन क्या वे वास्तव में इसे पूरा कर सकते हैं? लीड टाइम के दावों का मूल्यांकन करने के लिए वास्तविक समय सीमा को निर्धारित करने वाले कारकों को समझना आवश्यक है।
मशीन क्षमता और क्षमता की जाँच करके शुरुआत करें। PEKO के मूल्यांकन मानदंडों के अनुसार, मशीन शॉप का मूल्यांकन उनके पास मौजूद मशीनों के प्रकार और उन मशीनों की क्षमता के आधार पर किया जाना चाहिए। OEM ग्राहकों को अपने संभावित ऑर्डर की आवश्यकताओं को पूरा करने के लिए मशीन क्षमता और क्षमता को सही ढंग से समझने के लिए शॉप के साथ काम करना चाहिए।
मुख्य क्षमता संकेतकों में शामिल हैं:
- उपकरणों की विविधता: बहु-अक्ष क्षमता, दोनों ऊर्ध्वाधर और क्षैतिज मशीनिंग केंद्र, तथा पूर्ण भाग कवरेज के लिए सीएनसी टर्निंग क्षमता
- शिफ्ट संचालन: बहु-शिफ्ट या लाइट्स-आउट स्वचालन के साथ संचालित शॉप्स एकल-शिफ्ट संचालन की तुलना में तेज़ी से डिलीवरी कर सकते हैं
- सामग्री सूची: 6061 एल्यूमीनियम जैसी सामान्य सामग्रियों का स्टॉक रखने वाले प्रदाता खरीद प्रक्रिया में देरी को समाप्त कर देते हैं
- परिष्करण क्षमताएं: आंतरिक एनोडाइज़िंग, प्लेटिंग या कोटिंग की तुलना में बाहरी स्रोतों पर निर्भरता—प्रत्येक हैंडऑफ़ यातायात समय जोड़ता है
वर्तमान क्षमता उपयोग के बारे में विशिष्ट रूप से पूछें। 95% क्षमता पर चल रहे शॉप द्वारा तीन-दिवसीय डिलीवरी का आश्वासन देना ऐसा वादा हो सकता है जिसे वे निभाने में कठिनाई का सामना कर सकते हैं। इसके विपरीत, उपलब्ध क्षमता वाले प्रदाता अक्सर आपकी लचीलापन की आवश्यकता होने पर समयसीमा को त्वरित कर सकते हैं।
जहाँ ऑटोमोटिव अनुप्रयोगों में गति और गुणवत्ता का संगम होता है, वहाँ ऐसे प्रदाता जैसे शाओयी मेटल तकनीक यह दर्शाता है कि उचित प्रणालियों की उपस्थिति में क्या संभव है। उनका IATF 16949 प्रमाणन, जो सांख्यिकीय प्रक्रिया नियंत्रण (SPC) के साथ संयुक्त है, योग्य परियोजनाओं के लिए केवल एक कार्यदिवस के भीतर नेतृत्व समय प्रदान करने में सक्षम बनाता है। गुणवत्ता प्रमाणन और त्वरित डिलीवरी का यह संयोजन यह दर्शाता है कि क्या संभव हो जाता है जब प्रदाता प्रणालियों और क्षमता दोनों में निवेश करते हैं।
ऑर्डर देने से पहले पूछे जाने वाले प्रश्न
स्मार्ट मूल्यांकन केवल वेबसाइटों की समीक्षा से आगे जाता है। अनुसार डब्ल्यूएच बैगशॉ की व्यापक जाँच सूची , सही CNC मशीन शॉप की पहचान करने के लिए क्षमताओं, प्रमाणनों और प्रक्रिया प्रबंधन सहित मूल्यांकनात्मक प्रश्न पूछना आवश्यक है।
किसी भी परिशुद्धता यांत्रिकी सेवा प्रदाता के साथ प्रतिबद्ध होने से पहले, इन प्रश्नों के स्पष्ट उत्तर प्राप्त करें:
- आपकी मुख्य क्षमताएँ क्या हैं? उनके विशेषज्ञता क्षेत्र को समझें—कुछ 5-अक्ष जटिल कार्यों में उत्कृष्टता प्राप्त करते हैं, जबकि अन्य उच्च-मात्रा टर्निंग के लिए अनुकूलित होते हैं
- आप किन प्रमाणनों को धारण करते हैं? प्रमाणपत्रों की प्रतियाँ अनुरोध करें और सुनिश्चित करें कि वे जारी करने वाली संस्था के साथ वर्तमान में वैध हैं
- क्या आप मशीनिंग प्रक्रिया के किसी हिस्से को आउटसोर्स करते हैं? आउटसोर्स किए गए कार्यों से नेतृत्व समय बढ़ जाता है और गुणवत्ता नियंत्रण की दृश्यता कम हो जाती है
- आप किन गुणवत्ता नियंत्रण विधियों का उपयोग करते हैं? SPC, CMM निरीक्षण और दस्तावेज़ित प्रथम-लेख प्रक्रियाओं की खोज करें
- आप कौन-सी सामग्री स्टॉक करते हैं और कौन-सी मांग के आधार पर स्रोतित करते हैं? स्टॉक सामग्री खरीद प्रक्रिया में देरी को समाप्त कर देती है
- आपका विशिष्ट क्षमता उपयोग क्या है? अतिभारित शॉप्स को उद्धृत समय-सीमा को पूरा करने में कठिनाई होती है
- क्या आप उत्पादन से पहले DFM प्रतिक्रिया प्रदान करते हैं? सक्रिय इंजीनियरिंग समर्थन मशीनिंग शुरू होने से पहले समस्याओं का पता लगाता है
- आप कौन-सा दस्तावेज़ीकरण प्रदान करते हैं? निरीक्षण रिपोर्ट्स, सामग्री प्रमाणपत्र और अनुपालन प्रमाणपत्र प्रदाता के अनुसार भिन्न होते हैं
- क्या आप प्रोटोटाइप से उत्पादन तक के लिए स्केल कर सकते हैं? जो प्रदाता दोनों क्षमताएँ रखते हैं, वे आपके डिज़ाइन की सफलता पर संक्रमण से संबंधित परेशानियों को समाप्त कर देते हैं
के अनुसार AZ बिग मीडिया का निर्माता मार्गदर्शिका , ऐसे साझेदारों का चयन करना जो सक्रिय इंजीनियरिंग समर्थन, जैसे DFM प्रतिक्रिया, प्रदान करते हैं, उत्पादन से पहले डिज़ाइन चुनौतियों का समाधान करता है। त्वरित प्रतिक्रिया समय और स्पष्ट संचार ग्राहक-केंद्रित दृष्टिकोण के संकेतक हैं।
स्थानीय बनाम ऑनलाइन विकल्पों का मूल्यांकन
स्थानीय मशीन शॉप्स की तलाश बनाम ऑनलाइन प्रदाताओं का चयन एक मौलिक सौदा है। मेरे निकट की स्थानीय मशीनिस्ट शॉप्स मुखातिर अवसर प्रदान करती हैं और दुकान के दौरे को आसान बनाती हैं। ऑनलाइन प्लेटफ़ॉर्म त्वरित कोटेशन, व्यापक क्षमता तक पहुँच और अक्सर डिजिटल दक्षता के माध्यम से प्रतिस्पर्धी मूल्य निर्धारण प्रदान करते हैं।
चयन करते समय इन कारकों पर विचार करें:
- संचार की प्राथमिकताएँ: जटिल परियोजनाओं को स्थानीय शॉप्स द्वारा सुविधाजनक प्रत्यक्ष इंजीनियरिंग चर्चाओं से लाभ होता है
- आयतन की आवश्यकता: ऑनलाइन प्लेटफ़ॉर्म अक्सर विभिन्न मात्राओं के लिए सुसंगत मूल्य निर्धारण में उत्कृष्टता प्रदर्शित करते हैं
- प्रमाणन की आवश्यकताएं: विनियमित उद्योगों को ऑडिट पहुँच की आवश्यकता हो सकती है, जिसे स्थानीय उपस्थिति से सरल बनाया जा सकता है
- पैमाने पर वृद्धि: उत्पादन क्षमता के साथ-साथ प्रोटोटाइपिंग की क्षमता वाले प्रदाता—जैसे शाओयी मेटल टेक्नोलॉजी की त्वरित प्रोटोटाइपिंग से बड़े पैमाने पर उत्पादन तक के लिए स्केल करने की क्षमता—परियोजनाओं के परिपक्व होने के साथ आपूर्तिकर्ता परिवर्तनों को समाप्त कर देते हैं
सबसे अच्छा विकल्प आपकी विशिष्ट परिस्थिति पर निर्भर करता है। मेरे पास के एक सीएनसी मशीन शॉप सहयोगात्मक विकास कार्य के लिए आदर्श हो सकता है, जबकि ऑनलाइन सटीक सीएनसी मशीनिंग सेवाएँ अच्छी तरह से परिभाषित दोहराए जाने वाले ऑर्डरों को कुशलतापूर्वक संभाल सकती हैं।
चेतावनी के संकेत
अनुभव सिखाता है कि कौन-से चेतावनी संकेत समस्याओं की भविष्यवाणी करते हैं। इन संकेतों पर ध्यान रखें जो यह सुझाव देते हैं कि कोई प्रदाता आपकी आवश्यकताओं को पूरा नहीं कर सकता:
- गुणवत्ता प्रणालियों पर चर्चा करने के प्रति अनिच्छा: वैध प्रदाता अपने प्रमाणनों और प्रक्रियाओं को गर्व के साथ साझा करते हैं
- अस्पष्ट क्षमता के उत्तर: वर्तमान उपयोग की व्याख्या करने या जटिलता के स्तर के आधार पर सामान्य नेतृत्व समय को स्पष्ट करने में असमर्थ
- कोई DFM प्रतिक्रिया उपलब्ध नहीं: गुणवत्तापूर्ण प्रदाता उद्धरण देने से पहले डिज़ाइन समस्याओं को पकड़ लेते हैं, न कि मशीनिंग विफल होने के बाद
- सामग्री दस्तावेज़ीकरण का अभाव: आपके अनुप्रयोग के लिए मिल प्रमाणपत्र या सामग्री ट्रेसैबिलिटी प्रदान करने में असमर्थ
- दुर्बल संचार प्रतिक्रियाशीलता: यदि ऑर्डर देने से पहले उत्तर प्राप्त करना कठिन है, तो कल्पना कीजिए कि उत्पादन के दौरान समस्याओं का समाधान कैसे किया जाए
PEKO के व्यावसायिक मूल्यांकन दिशानिर्देश के अनुसार, OEM ग्राहक को कठिन व्यावसायिक प्रश्न पूछने चाहिए—व्यवसाय की स्थिति को समझना यह निर्णय लेने में सहायता करता है कि क्या साझेदारी के साथ आगे बढ़ना बुद्धिमानी भरा कदम होगा।
व्यवस्थित प्रदाता मूल्यांकन आपकी परियोजना के समयसूची और बजट की रक्षा करता है। उचित जाँच-पड़ताल में निवेश किए गए समय का फल तब मिलता है जब आपके प्रोटोटाइप समय पर, निर्दिष्ट विशिष्टताओं के अनुसार और आपकी विकास प्रक्रिया का समर्थन करने वाले दस्तावेज़ों के साथ पहुँचते हैं। सही प्रदाता की पहचान करने के बाद, पहेली का अंतिम टुकड़ा अपनी प्रोटोटाइपिंग परियोजनाओं के लिए प्रभावी रूप से बजट तैयार करने के तरीके को समझना बन जाता है।
प्रोटोटाइपिंग परियोजनाओं के लिए बजट योजना
आपने एक योग्य प्रदाता को खोज लिया है और अपनी डिज़ाइन को अनुकूलित कर लिया है। अब वह प्रश्न आता है जो यह निर्धारित करता है कि क्या आपकी परियोजना आगे बढ़ेगी: इसकी वास्तविक लागत क्या होगी? सीएनसी प्रोटोटाइपिंग की आर्थिकता को समझना आपको बुद्धिमान ट्रेड-ऑफ़ (समझौता) करने और अपने विकास बजट को अधिक कुशलता से उपयोग करने में सक्षम बनाता है।
तुरंत कोटेशन उपकरणों के विपरीत, जो बिना किसी संदर्भ के संख्याएँ प्रदान करते हैं, आइए सीएनसी मशीनिंग की कीमत को निर्धारित करने वाले तत्वों को स्पष्ट रूप से समझें—और यह भी जानें कि आप कहाँ वास्तविक लचीलापन रखते हैं ताकि आवश्यक मान्यन डेटा के बिना कम लागत प्राप्त की जा सके।
सेटअप और प्रति-भाग लागत को समझना
प्रत्येक सीएनसी प्रोटोटाइपिंग कोटेशन में दो मौलिक रूप से अलग-अलग लागत घटक शामिल होते हैं। इन्हें गलत तरीके से मिलाने से बजट निर्धारण की गलतियाँ होती हैं, जो परियोजना प्रबंधकों को अचानक चौंका देती हैं।
निश्चित लागत मात्रा के बावजूद हिट किया जाता है। डेडेसिन के लागत विश्लेषण के अनुसार, सेटअप लागत में मशीन प्रोग्रामिंग, टूलिंग तैयारी, फिक्सचर सेटअप और पहले आर्टिकल का निरीक्षण शामिल हैं। ये खर्च तब भी मौजूद होते हैं जब आप एक भाग या पचास भागों का ऑर्डर देते हैं। जटिल सटीक मशीनिंग भागों के लिए, जिनमें एकाधिक सेटअप या विशिष्ट फिक्सचर की आवश्यकता होती है, स्थिर लागत एकल प्रोटोटाइप की कुल कीमत का 40–60% हो सकती है।
परिवर्तनशील लागत मात्रा के साथ स्केल करता है। सामग्री की खपत, मशीनिंग साइकिल समय और फिनिशिंग ऑपरेशन जब आप अधिक भाग जोड़ते हैं तो गुणा हो जाते हैं। जादू तब होता है जब स्थिर लागत अधिक इकाइयों पर फैल जाती है—आपकी प्रति-भाग कीमत काफी कम हो जाती है।
व्यावहारिक रूप से इसका क्या अर्थ है: पाँच समान प्रोटोटाइप का ऑर्डर देना शायद ही कभी एक के मूल्य का पाँच गुना लागत लेता है। प्रोग्रामिंग एक बार की जाती है। फिक्सचर एक बार बनाया जाता है। केवल सामग्री और साइकिल समय गुणा होते हैं। एक सीएनसी मशीनिंग भाग के लिए $200 के अनुमानित मूल्य के लिए, पाँच का ऑर्डर देने पर कुल लागत $1,000 के बजाय $600 हो सकती है—अर्थात् प्रति-इकाई लागत में 40% की बचत।
यह आर्थिक वास्तविकता इस बात की व्याख्या करती है कि कई प्रदाता न्यूनतम मात्राओं का सुझाव क्यों देते हैं या मात्रा-आधारित छूट प्रदान करते हैं। वे आपको अधिक मूल्यवर्धित उत्पाद बेचने का प्रयास नहीं कर रहे हैं—बल्कि वे आपको ऐसी बेहतर इकाई अर्थव्यवस्था तक पहुँच प्रदान कर रहे हैं जो दोनों पक्षों के लिए लाभदायक है।
बजट पर सामग्री लागत का प्रभाव
सामग्री का चयन आपके सबसे बड़े लागत नियंत्रण कारकों में से एक बनाता है। डेडेसिन के प्रोटोटाइपिंग मार्गदर्शिका के अनुसार, जबकि कच्चे माल की कीमतें आमतौर पर आपूर्तिकर्ताओं द्वारा निर्धारित होती हैं, सामग्री के चयन से आप जिस स्टॉक को खरीद रहे हैं, उससे कहीं अधिक कीमत प्रभावित होती है।
मशीनिस्ट द्वारा धातु की लागत में कच्चा माल और उसे काटने के लिए आवश्यक समय दोनों शामिल होते हैं। कठिन सामग्रियों को धीमी गति से मशीन किया जाता है, जिससे उपकरणों का तेज़ी से क्षरण होता है और इनके संचालन के लिए अधिक सावधानी की आवश्यकता होती है। उस टाइटेनियम प्रोटोटाइप की कीमत केवल कच्चे बिलेट के लिए अधिक नहीं है—बल्कि प्रत्येक मशीन समय के मिनट के लिए भी अधिक है।
इन सामग्री लागत कारकों पर विचार करें:
- कच्चे माल की कीमत: एल्यूमीनियम की कीमत प्रति पाउंड स्टेनलेस स्टील या टाइटेनियम की तुलना में काफी कम है
- यांत्रिक काटने का प्रभाव: एल्यूमीनियम और पीतल जैसी आसानी से काटी जाने वाली सामग्रियाँ तेज़ फीड दर और लंबे उपकरण जीवन की अनुमति देती हैं
- उपकरण का घिसाव: कठोर सामग्री जैसे स्टेनलेस स्टील और टाइटेनियम उपकरण प्रतिस्थापन लागत को बढ़ाती हैं
- चिप निपटान: कुछ सामग्री (विशेष रूप से टाइटेनियम) को विशेष रूप से संभालने की आवश्यकता होती है, जिससे अतिरिक्त लागत आती है
प्रारंभिक चरण के पुनरावृत्तियों के लिए, जहाँ आप ज्यामिति के माध्यम से मान्यीकरण कर रहे हैं न कि सामग्री के प्रदर्शन के माध्यम से, इस दृष्टिकोण पर विचार करें: प्रोटोटाइप को पहले एल्यूमीनियम में बनाएँ, भले ही उत्पादन के लिए स्टेनलेस स्टील का उपयोग किया जाए। एल्यूमीनियम का मशीनिंग लगभग तीन गुना तेज़ होता है जबकि स्टेनलेस स्टील की तुलना में कच्चे माल की लागत काफी कम होती है। एक बार जब आपका डिज़ाइन अंतिम रूप ले लेता है, तो अंतिम मान्यीकरण के लिए उत्पादन-समकक्ष सामग्री के प्रोटोटाइप पर निवेश करें।
यह चरणबद्ध रणनीति उन उच्च-पुनरावृत्ति चरणों के दौरान छोटे सीएनसी मशीनिंग लागत को कम करती है, जब डिज़ाइन बार-बार बदलते रहते हैं। महंगी सामग्री के चलान को तब सुरक्षित रखें जब परिवर्तन की संभावना कम हो जाती है।
वास्तविक लागत ड्राइवर
सामग्री के अतिरिक्त, कई कारक आपके अंतिम उद्धरण को निर्धारित करने के लिए संयुक्त रूप से कार्य करते हैं। उनके सापेक्ष प्रभाव को समझना आपको उन क्षेत्रों में अनुकूलन प्रयासों को प्राथमिकता देने में सहायता करता है जहाँ वे सबसे अधिक मायने रखते हैं।
| लागत कारक | सापेक्षिक प्रभाव | मूल्य पर इसका प्रभाव कैसे पड़ता है | अनुकूलन का अवसर |
|---|---|---|---|
| खंड जटिलता | उच्च | जटिल ज्यामिति के लिए अधिक सेटअप, विशिष्ट औजारों और लंबे साइकिल समय की आवश्यकता होती है | गैर-महत्वपूर्ण विशेषताओं को सरल बनाएँ; मशीन किए गए सतहों की संख्या कम करें |
| सामग्री ग्रेड | उच्च | दुर्लभ मिश्र धातुएँ सामान्य ग्रेड की तुलना में अधिक महंगी होती हैं और धीमी गति से मशीन की जाती हैं | अंतिम मान्यता के लिए केवल उत्पादन-समतुल्य सामग्रियों का उपयोग करें |
| सहनशीलता कसावट | मध्यम-उच्च | उच्च परिशुद्धता विनिर्देशों के लिए धीमी फीड, अतिरिक्त संचालन और सीएमएम निरीक्षण की आवश्यकता होती है | केवल कार्यात्मक रूप से महत्वपूर्ण विशेषताओं पर ही कड़ी सहिष्णुता लागू करें |
| सतह का फिनिश | माध्यम | एनोडाइजिंग या पॉलिशिंग जैसी उत्तर-प्रसंस्करण प्रक्रियाएँ श्रम और प्रसंस्करण समय जोड़ती हैं | केवल कार्यात्मक प्रोटोटाइप के लिए असंशोधित (मशीन किए गए) फिनिश को स्वीकार करें |
| मात्रा | उच्च (व्युत्क्रम) | स्थिर लागत को अधिक इकाइयों पर फैलाया जाता है, जिससे प्रति-भाग मूल्य में भारी कमी आती है | जहाँ संभव हो, एकल ऑर्डर में कई डिज़ाइन विविधताओं के बैच को एक साथ शामिल करें |
| प्रसव अवधि | माध्यम | जल्दी के आदेशों के लिए ओवरटाइम की आवश्यकता होती है, अनुसूची में व्यवधान आता है और प्राथमिकता के साथ निपटाना आवश्यक होता है | पहले से योजना बनाएँ; मानक लीड टाइम, त्वरित डिलीवरी की तुलना में 25–50% कम लागत वाले होते हैं |
इन-हाउस सीएनसी के दक्षता मार्गदर्शिका के अनुसार, जितना अधिक जटिल एक प्रोटोटाइप होता है, उतना ही उसे मशीन करने में अधिक समय लगता है—जिससे लागत में वृद्धि होती है। उपयोग की जाने वाली सीएनसी मशीन का प्रकार भी प्रोटोटाइपिंग लागत को प्रभावित करता है, जहाँ 5-अक्ष मशीनिंग की लागत उन भागों के लिए 3-अक्ष संचालन की तुलना में काफी अधिक होती है जो सैद्धांतिक रूप से दोनों में से किसी का भी उपयोग कर सकते हैं।
लागत-प्रभावी पुनरावृत्ति के लिए रणनीतियाँ
स्मार्ट टीमें केवल व्यक्तिगत प्रोटोटाइप लागत को कम नहीं करतीं—वे अपनी पूरी पुनरावृत्ति रणनीति का अनुकूलन करती हैं। यहाँ बताया गया है कि प्रत्येक प्रोटोटाइपिंग डॉलर से अधिकतम सीख कैसे प्राप्त की जाए।
डिज़ाइन सरलीकरण लाभदायक होता है। के अनुसार इन-हाउस सीएनसी का विश्लेषण जटिल आकृतियाँ और विशेषताएँ देखने में आकर्षक लग सकती हैं, लेकिन उन्हें अक्सर अधिक मशीनिंग समय, विशेष उपकरणों और अतिरिक्त प्रक्रियाओं की आवश्यकता होती है। जटिल विशेषताओं की संख्या को कम करके और सरल ज्यामिति का चयन करके, आप समय और धन दोनों की बचत कर सकते हैं। प्रत्येक विशेषता जिसे आप हटाते हैं, मशीन समय, उपकरण परिवर्तन और संभावित विफलता के बिंदुओं को समाप्त कर देती है।
सामग्री प्रतिस्थापन प्रारंभिक चरणों को तीव्र करता है। ज्यामिति सत्यापन के लिए मशीनिंग करने में आसान सामग्रियों का उपयोग करें, और कार्यात्मक परीक्षण के लिए उत्पादन-समकक्ष सामग्रियों को आरक्षित रखें। एक एल्यूमीनियम कस्टम मशीन प्रोटोटाइप फिट और असेंबली को कुछ दिनों में, सप्ताहों के बजाय, सत्यापित कर सकता है—और यह स्टेनलेस स्टील की लागत के केवल एक भिन्नता पर होता है।
डिज़ाइन विविधताओं का रणनीतिक रूप से बैच में निर्माण करें। तीन थोड़े अलग-अलग कॉन्फ़िगरेशन का परीक्षण कर रहे हैं? उन्हें एक साथ ऑर्डर करें। प्रोग्रामिंग और सेटअप केवल एक बार किया जाता है, और आप केवल अतिरिक्त सामग्रि और साइकिल समय के लिए अतिरिक्त लागत का भुगतान करते हैं। यह दृष्टिकोण तीन अलग-अलग ऑर्डर की तुलना में काफी कम लागत वाला है, जबकि आपके डिज़ाइन विकल्पों के बीच तुलनात्मक डेटा प्रदान करता है।
प्रोटोटाइप से उत्पादन तक की निरंतरता पर विचार करें। वे आपूर्तिकर्ता जो छोटे सीएनसी मशीनिंग से लेकर उत्पादन मात्रा तक स्केल कर सकते हैं, गुप्त मूल्य प्रदान करते हैं। जब आपका डिज़ाइन सफल होता है, तो आप एक नए आपूर्तिकर्ता के पात्रता प्रमाणन की लागत और देरी से बच जाते हैं। आपके प्रोटोटाइप की मशीनिंग के दौरान उन्होंने जो अनुभव प्राप्त किया है, वह सीधे अधिक कुशल उत्पादन चक्रों में अनुवादित हो जाता है।
एकल प्रोटोटाइप बनाम छोटे बैच की अर्थव्यवस्था
अधिक मात्रा में ऑर्डर करने पर वास्तव में पैसे कब बचते हैं? यह गणित अक्सर उन इंजीनियरों को आश्चर्यचकित कर देता है जो व्यक्तिगत भागों की लागत के संदर्भ में सोचने के आदी होते हैं।
एकल प्रोटोटाइप के लिए, सेटअप लागत आपके उद्धरण का प्रमुख घटक होती है। प्रत्येक प्रोग्रामिंग घंटा, प्रत्येक फिक्सचर, प्रत्येक प्रथम-लेख निरीक्षण केवल एक ही भाग पर वितरित होता है। इसकी अर्थव्यवस्था स्वाभाविक रूप से अनुकूल नहीं होती है।
छोटे बैच चक्र (5–20 भाग) कई परियोजनाओं के लिए एक आदर्श बिंदु हैं। डेडेसिन के विश्लेषण के अनुसार, बैच उत्पादन के साथ, सेटअप लागत को कई इकाइयों पर वितरित किया जाता है, जिससे प्रति-इकाई मूल्य कम हो जाता है। यदि कई प्रोटोटाइप की आवश्यकता है, तो बैच में ऑर्डर करना एक अधिक लागत-प्रभावी दृष्टिकोण है।
इन परिदृश्यों पर विचार करें जहाँ छोटे बैच उचित होते हैं:
- कई कॉन्फ़िगरेशन का परीक्षण करना: विकल्पों का ऑर्डर एक साथ करें, न कि क्रमिक रूप से—आप सेटअप शुल्क केवल एक बार भुगतान करेंगे, बार-बार नहीं
- विनाशी परीक्षण: यांत्रिक परीक्षण जो भागों को क्षतिग्रस्त करता है, अतिरिक्त स्पेयर की आवश्यकता होती है; आपके प्रारंभिक बैच के साथ अतिरिक्त मात्रा ऑर्डर करना, भूले हुए भागों के लिए दोबारा ऑर्डर करने की तुलना में कम लागत वाला होता है
- हितधारक वितरण: नमूनों की आवश्यकता वाली कई टीमें? एक बैच ऑर्डर एकल ऑर्डर की तुलना में बेहतर है
- अपेक्षित संशोधन: यदि आप थोड़े से परिवर्तनों की अपेक्षा कर रहे हैं, तो त्वरित संशोधनों के लिए अतिरिक्त रिक्त भागों का होना पुनरावृत्ति को तेज़ कर सकता है
मुख्य अंतर्दृष्टि: प्रोटोटाइपिंग बजट को केवल व्यक्तिगत भागों की लागत के बजाय पूरे विकास चक्र के लिए ध्यान में रखना चाहिए। रणनीतिक बैचिंग पर थोड़ा अधिक खर्च करने से आमतौर पर कुल परियोजना लागत कम हो जाती है, क्योंकि दोबारा सेटअप और भूले हुए भागों के लिए त्वरित शुल्क समाप्त हो जाते हैं।
बजट के मूलभूत तत्वों को समझने के बाद, आप अपनी प्रोटोटाइपिंग परियोजना के दौरान सूचित निर्णय लेने के लिए तैयार हैं। अंतिम चरण में सभी को एक साथ लाया जाता है—अपनी फ़ाइलों की तैयारी करना और सफल प्रोटोटाइप डिलीवरी की ओर आत्मविश्वास के साथ आगे बढ़ना।
प्रोटोटाइप सफलता की ओर आपके अगले कदम
आपने सीएनसी प्रोटोटाइपिंग के बारे में बहुत कुछ सीखा है—सामग्री चयन और डिज़ाइन अनुकूलन से लेकर प्रदाता का मूल्यांकन और बजट योजना तक। अब यह समय है कि उस ज्ञान को कार्य में बदला जाए। उन इंजीनियरों के बीच का अंतर, जो प्रोटोटाइप को सही ढंग से तैयार करते हैं और जो महंगे पुनरावृत्तियों के माध्यम से भटकते हैं, अक्सर पहला कोटेशन अनुरोध जमा करने से पहले की तैयारी पर निर्भर करता है।
चलिए सभी को एक व्यावहारिक मार्गदर्शिका में संकलित करते हैं, जो आपकी सीएनसी प्रोटोटाइप मशीनिंग परियोजना को सबसे मज़बूत संभव शुरुआत प्रदान करे।
अपने डिज़ाइन फ़ाइलों को तैयार करना
आपकी CAD फ़ाइलें उस सबकी नींव हैं जो इसके बाद आता है। JLCCNC के फ़ाइल तैयारी मार्गदर्शिका के अनुसार, आपका CNC उतना ही अच्छा है जितनी अच्छी फ़ाइल आप उसे देते हैं। अपूर्ण या खराब प्रारूपित फ़ाइलें उद्धरणों में देरी, गलत संचार और आपके डिज़ाइन के उद्देश्य के अनुरूप नहीं आने वाले भागों का कारण बनती हैं।
उद्धरणों का अनुरोध करने से पहले, सत्यापित करें कि आपकी फ़ाइलें इन मानकों को पूरा करती हैं:
- CNC-अनुकूल प्रारूपों में निर्यात करें: STEP फ़ाइलें सार्वभौमिक रूप से स्वीकार की जाती हैं और ठोस ज्यामिति को सटीक रूप से संरक्षित करती हैं। IGES एक वैकल्पिक प्रारूप के रूप में काम करता है। मेश-आधारित प्रारूपों जैसे STL से बचें—ये 3D मुद्रण के लिए काम करते हैं, लेकिन सटीक यांत्रिकी के लिए अनुपयुक्त त्रिकोणों में चिकनी वक्रों को तोड़ देते हैं।
- पूर्ण ज्यामिति शामिल करें: सुनिश्चित करें कि सभी विशेषताएँ पूर्ण रूप से परिभाषित हों, और कोई लुप्त सतह या अस्पष्ट आयाम न हों
- एक 2D तकनीकी आरेख जोड़ें: ठोस मॉडल के होने के बावजूद, टिप्पणी युक्त आरेख सहिष्णुता, धागे के विनिर्देशों और सतह के परिष्करण की आवश्यकताओं को स्पष्ट करते हैं, जिन्हें 3D फ़ाइलें पकड़ नहीं पाती हैं
- महत्वपूर्ण आयामों को उल्लिखित करें: उन सहिष्णुताओं को उजागर करें जो वास्तव में कार्य के लिए महत्वपूर्ण हैं, बनाम उन सहिष्णुताओं के जिन्हें मानक परिशुद्धता के साथ स्वीकार किया जा सकता है
फ़ाइलों की उचित तैयारी के लिए समय लेने से आपके उद्धरण को देरी करने वाले प्रश्नों का आदान-प्रदान समाप्त हो जाता है। डाइपेक के उद्धरण देने के दिशानिर्देश के अनुसार, एक STEP फ़ाइल और टिप्पणियों के साथ एक 2D तकनीकी ड्राइंग प्रदान करना सहिष्णुताओं, धागों या सतह के फ़िनिश के बारे में प्रश्नों को समाप्त करके उद्धरण प्रक्रिया को काफी तेज कर सकता है।
विधि का निर्णय लेना
फ़ाइलें तैयार होने के बाद, पुष्टि करें कि सीएनसी प्रोटोटाइपिंग वास्तव में आपके वर्तमान विकास चरण के लिए सही दृष्टिकोण है। हमारे द्वारा पहले चर्चा किए गए निर्णय ढांचे को कुछ प्रमुख प्रश्नों तक सीमित किया जा सकता है:
- क्या आपको यांत्रिक परीक्षण के लिए उत्पादन-समतुल्य सामग्री गुणों की आवश्यकता है? सीएनसी मशीनिंग प्रामाणिक सामग्रियाँ प्रदान करती है।
- क्या संयोजन मान्यीकरण के लिए कड़ी सहिष्णुताएँ आवश्यक हैं? सीएनसी प्रोटोटाइप मशीनिंग लगातार ±0.01–0.05 मिमी की सहिष्णुता प्राप्त करती है।
- क्या आपका प्रोटोटाइप तनाव, भार या क्लांति परीक्षण के अधीन होगा? ठोस स्टॉक से बने मशीन किए गए भाग विश्वसनीय यांत्रिक डेटा प्रदान करते हैं।
- क्या आप उत्पादन की ओर पुल बना रहे हैं और निर्माण स्थिरता की आवश्यकता है? सीएनसी टर्न्ड भाग और मिल किए गए घटक सीधे उत्पादन विधियों में अनुवादित होते हैं।
यदि आपने इन प्रश्नों के उत्तर में 'हाँ' कहा है, तो सीएनसी प्रोटोटाइपिंग आपके आगे बढ़ने का मार्ग है। यदि आप अभी भी प्रारंभिक अवधारणा की खोज में हैं और कई डिज़ाइन परिवर्तनों की अपेक्षा कर रहे हैं, तो 3D मुद्रण के साथ शुरुआत करने पर विचार करें, फिर जब ज्यामिति स्थिर हो जाए, तो सीएनसी मशीनिंग प्रोटोटाइपिंग पर संक्रमण करें।
आत्मविश्वास के साथ आगे बढ़ना
क्या आप अपनी परियोजना को लॉन्च करने के लिए तैयार हैं? यह कार्य चेकलिस्ट अनुसरण करें ताकि कोई भी मुद्दा छूट न जाए:
- सीएडी फ़ाइलों को अंतिम रूप दें: उत्पादन-तैयार STEP फ़ाइलें और सभी महत्वपूर्ण आयामों और सहिष्णुताओं को स्पष्ट रूप से निर्दिष्ट करने वाले टिप्पणीयुक्त 2D ड्रॉइंग्स निर्यात करें
- महत्वपूर्ण सहिष्णुताओं का निर्धारण करें: उन विशेषताओं की पहचान करें जिनके लिए सटीक विनिर्देशन की आवश्यकता होती है, और उन विशेषताओं की पहचान करें जो मानक मशीनिंग सहिष्णुताओं को स्वीकार करती हैं—यह सीधे लागत को प्रभावित करता है
- उपयुक्त सामग्री का चयन करें: अपने परीक्षण के उद्देश्यों के अनुसार सामग्री के चयन को सुमेलित करें। अंतिम मान्यीकरण के लिए उत्पादन-समतुल्य सामग्रियों का उपयोग करें; प्रारंभिक ज्यामिति जाँच के लिए अधिक यांत्रिक रूप से संसाध्य विकल्पों पर विचार करें
- आवश्यक प्रमाणपत्रों की पहचान करें: ऑटोमोटिव परियोजनाओं के लिए IATF 16949 प्रमाणित प्रदाताओं की आवश्यकता होती है। चिकित्सा उपकरणों के लिए ISO 13485 की आवश्यकता होती है। एयरोस्पेस क्षेत्र AS9100D की मांग करता है। उपभोक्ता उत्पादों के लिए ISO 9001 आधारभूत प्रमाणन काफी हो सकता है
- योग्य प्रदाताओं से उद्धरण अनुरोध करें: अपनी प्रमाणन आवश्यकताओं को पूरा करने वाले 2-3 प्रदाताओं को अपना प्रस्ताव जमा करें। केवल मूल्य की तुलना नहीं, बल्कि नेतृत्व समय, DFM प्रतिक्रिया की गुणवत्ता और संचार की प्रतिक्रियाशीलता की भी तुलना करें
- DFM प्रतिक्रिया की सावधानीपूर्ण समीक्षा करें: गुणवत्तापूर्ण प्रदाता यांत्रिक संसाधन से पहले डिज़ाइन संबंधी समस्याओं की पहचान करते हैं। उनके सुझाव अक्सर लागत को कम करते हैं और निर्माणीयता में सुधार करते हैं
- दस्तावेज़ीकरण आवश्यकताओं की पुष्टि करें: निरीक्षण रिपोर्ट्स, सामग्री प्रमाणपत्र और कोई भी अन्य अनुपालन दस्तावेज़ जो आपकी परियोजना के लिए आवश्यक हों, शुरुआत में ही निर्दिष्ट करें
प्रोटोटाइप सफलता के लिए मुख्य निष्कर्ष
इस मार्गदर्शिका में, हमने उन निर्णय आधारों को शामिल किया है जो सफल प्रोटोटाइप यांत्रिक संसाधन सेवाओं के अनुभव को निराशाजनक अनुभवों से अलग करते हैं:
- विधि चयन: CNC प्रोटोटाइपिंग तब उत्कृष्ट प्रदर्शन करता है जब आपको उत्पादन-श्रेणी के सामग्री, कड़ी सहिष्णुता और कार्यात्मक परीक्षण क्षमता की आवश्यकता होती है
- सामग्री रणनीति: परीक्षण के उद्देश्यों के अनुसार सामग्री का चयन करें—ज्यामिति सत्यापन के लिए एल्यूमीनियम का उपयोग करें, प्रदर्शन परीक्षण के लिए उत्पादन-समकक्ष सामग्री का उपयोग करें
- डिजाइन का अधिकृतीकरण: पतली दीवारों, गहरे खानों और अनावश्यक रूप से कड़ी सहिष्णुताओं से बचें जो लागत को बढ़ाते हैं लेकिन मूल्य में कोई वृद्धि नहीं करते
- प्रदाता मूल्यांकन: प्रमाणनों की पुष्टि करें, क्षमता का यथार्थवादी आकलन करें, और DFM प्रतिक्रिया प्रदान करने वाले प्रदाताओं को प्राथमिकता दें
- बजट प्रबंधन: स्थिर और परिवर्तनशील लागत को समझें; सेटअप व्यय को वितरित करने के लिए डिज़ाइन विविधताओं के बैच बनाएं
आपके द्वारा प्राप्त किया गया ज्ञान आपको अपने प्रोटोटाइपिंग परियोजना के प्रत्येक चरण में सूचित निर्णय लेने की स्थिति में लाता है।
ऑटोमोटिव और परिशुद्धता अनुप्रयोगों के लिए
जब आपकी परियोजना उच्चतम गुणवत्ता मानकों की आवश्यकता रखती है—विशेष रूप से चेसिस असेंबली, सस्पेंशन घटकों या कस्टम धातु बुशिंग जैसे ऑटोमोटिव सीएनसी मशीन पार्ट्स के लिए—तो उचित रूप से प्रमाणित प्रदाताओं के साथ काम करना अनिवार्य हो जाता है।
शाओयी मेटल तकनीक यह उस संभावना को दर्शाता है जो तब उत्पन्न होती है जब IATF 16949 प्रमाणन को सांख्यिकीय प्रक्रिया नियंत्रण (SPC) और वास्तविक उत्पादन क्षमता के साथ संयोजित किया जाता है। उनकी उच्च-सहिष्णुता घटकों की आपूर्ति करने की क्षमता, जिनकी डिलीवरी की अवधि केवल एक कार्यदिवस भी हो सकती है, आधुनिक विकास चक्रों की गति की आवश्यकताओं को पूरा करती है। अधिक महत्वपूर्ण बात यह है कि उनकी त्वरित प्रोटोटाइपिंग से लेकर बड़े पैमाने पर उत्पादन तक की स्केलेबिलिटी, उन परियोजनाओं को विफल होने से बचाती है जिनमें प्रोटोटाइप सफल हो जाते हैं और उत्पादन की मांग उठती है, क्योंकि इस स्थिति में आपूर्तिकर्ता परिवर्तन से उत्पन्न होने वाली कठिनाइयाँ समाप्त हो जाती हैं।
नियमित उद्योगों में कस्टम सीएनसी मशीनिंग सेवाओं के लिए, प्रोटोटाइप पूरे होने के बाद अनुपालन के अंतराल का पता लगाने की तुलना में, एक योग्य साझेदार के साथ शुरुआत करने से काफी समय और जोखिम बचत होती है। उनकी ऑटोमोटिव मशीनिंग क्षमताओं का पता लगाने पर विचार करें, जो न केवल सटीकता बल्कि उत्पादन निरंतरता की आवश्यकता वाले प्रोजेक्ट्स के लिए एक शुरुआती बिंदु के रूप में कार्य कर सकती है।
आपका प्रोटोटाइप डिजिटल डिज़ाइन और बाज़ार में सफलता के बीच का पुल है। उचित तैयारी, सही प्रदाता और स्पष्ट उद्देश्यों के साथ, आप इस पुल को कुशलतापूर्वक पार करने के लिए तैयार हैं—लागत और लीड टाइम दोनों को कम करते हुए, साथ ही अपने डिज़ाइन पर विश्वास भी बनाते हुए। आगे का मार्ग स्पष्ट है। आपका अगला सफल प्रोटोटाइप प्रतीक्षा कर रहा है।
सीएनसी प्रोटोटाइपिंग सेवा अक्सर पूछे जाने वाले प्रश्न
1. एक सीएनसी प्रोटोटाइप की कीमत कितनी होती है?
सीएनसी प्रोटोटाइप की लागत आमतौर पर जटिलता, सामग्री के चयन और सहिष्णुता आवश्यकताओं के आधार पर प्रति भाग $100-$1,000+ के बीच होती है। मानक सहिष्णुता वाले साधारण एल्यूमीनियम भागों की लागत लगभग $100-$200 से शुरू होती है, जबकि कड़ी विशिष्टताओं की आवश्यकता वाले जटिल धातु भागों की लागत $1,000 से अधिक हो सकती है। सेटअप लागत एकल प्रोटोटाइप की कीमत का 40-60% होती है, इसलिए 5-10 भागों के छोटे बैच ऑर्डर करने से प्रति इकाई लागत में काफी कमी आती है। सामग्री का चयन भी मूल्य निर्धारण को प्रभावित करता है—एल्यूमीनियम को स्टेनलेस स्टील की तुलना में तीन गुना तेज़ी से मशीन किया जा सकता है, जिससे प्रत्यक्ष रूप से मशीनिंग समय और लागत प्रभावित होती है।
2. सीएनसी प्रोटोटाइप क्या है?
सीएनसी प्रोटोटाइप एक भौतिक मॉडल है जिसे सीएडी या 3डी डिज़ाइन फ़ाइल से कंप्यूटर संख्यात्मक नियंत्रण (सीएनसी) यांत्रिक प्रक्रिया द्वारा निर्मित किया जाता है। 3डी मुद्रण की योगात्मक प्रक्रिया के विपरीत, सीएनसी प्रोटोटाइपिंग एक घटात्मक प्रक्रिया है—जिसमें उत्पादन-श्रेणी के धातु या प्लास्टिक के ठोस ब्लॉक से आरंभ करके अंतिम भाग के निर्माण के लिए सटीक रूप से सामग्री को हटाया जाता है। इस दृष्टिकोण से निर्मित भागों में अत्यधिक आयामी शुद्धता (±0.01–0.05 मिमी) और प्रामाणिक यांत्रिक गुण प्राप्त होते हैं, जो उत्पादन घटकों के गुणों के समान होते हैं; जिससे यह उत्पादन टूलिंग में निवेश करने से पहले कार्यात्मक परीक्षण, असेंबली सत्यापन और प्रदर्शन सत्यापन के लिए आदर्श बन जाता है।
3. सीएनसी मशीन की प्रति घंटा दर क्या है?
सीएनसी मशीनिंग की प्रति घंटा दरें मशीन के प्रकार और जटिलता के आधार पर काफी हद तक भिन्न होती हैं। मानक 3-अक्ष सीएनसी मिलिंग की लागत आमतौर पर प्रति घंटा 30–80 डॉलर होती है, जबकि उन्नत क्षमताओं के कारण 5-अक्ष मशीनिंग की दरें प्रीमियम स्तर की 100–200+ डॉलर प्रति घंटा होती हैं। ये दरें मशीन संचालन, ऑपरेटर श्रम और ओवरहेड लागत सभी को शामिल करती हैं। कुल प्रोजेक्ट लागत में सेटअप समय, प्रोग्रामिंग, सामग्री की खरीद और फिनिशिंग ऑपरेशन्स को भी ध्यान में रखा जाता है। त्वरित आदेशों पर अक्सर 25–50% का प्रीमियम शुल्क लगाया जाता है, इसलिए पहले से योजना बनाने से कुल व्यय में काफी कमी आ सकती है।
4. सीएनसी प्रोटोटाइपिंग में कितना समय लगता है?
सीएनसी प्रोटोटाइपिंग के लीड टाइम 1-20+ दिनों के बीच होते हैं, जो भाग की जटिलता पर निर्भर करते हैं। मानक सहिष्णुताओं के साथ सामान्य एल्यूमीनियम में सरल ज्यामिति वाले भाग 1-3 दिनों में शिप किए जा सकते हैं। कई सेटअप और सतह समाप्ति की आवश्यकता वाले मध्यम जटिलता वाले भाग आमतौर पर 5-10 दिन लेते हैं। बहु-अक्ष मशीनिंग, विदेशी सामग्री या अत्यंत कठोर सहिष्णुताओं वाले उच्च-जटिलता वाले प्रोजेक्ट्स को 10-20+ दिनों की आवश्यकता हो सकती है। सामग्री की उपलब्धता, वर्तमान शॉप क्षमता और समाप्ति विनिर्देश भी समय-सीमा को प्रभावित करते हैं। आईएटीएफ 16949 प्रमाणन के साथ शाओयी मेटल टेक्नोलॉजी जैसे प्रदाता योग्य प्रोजेक्ट्स को केवल एक कार्यदिवस में भी डिलीवर कर सकते हैं।
5. मैं कब सीएनसी प्रोटोटाइपिंग को 3डी प्रिंटिंग के बजाय चुनूँ?
जब आपको यांत्रिक परीक्षण के लिए उत्पादन-समकक्ष सामग्री गुणों, असेंबली मान्यीकरण के लिए कड़ी सहिष्णुता (±0.01–0.05 मिमी), या तनाव, भार या क्लांटी परीक्षण के लिए घटकों की आवश्यकता होती है, तो सीएनसी प्रोटोटाइपिंग का चयन करें। सीएनसी मशीनिंग में उत्पादन सामग्रियों के समान वास्तविक धातुओं और इंजीनियरिंग प्लास्टिक्स का उपयोग किया जाता है, जो विश्वसनीय प्रदर्शन डेटा प्रदान करता है। 3डी मुद्रण शुरुआती अवधारणा के अन्वेषण के लिए बेहतर काम करता है, जहाँ डिज़ाइन में परिवर्तन की अपेक्षा की जाती है, जटिल आंतरिक ज्यामिति होती है, या जब गति यांत्रिक सटीकता से अधिक महत्वपूर्ण होती है। कई टीमें प्रारंभिक अवधारणाओं के लिए 3डी मुद्रण का उपयोग करती हैं, फिर कार्यात्मक मान्यीकरण के लिए सीएनसी प्रोटोटाइपिंग पर संक्रमण करती हैं।