 Pequeños lotes, altos estándares. O noso servizo de prototipado rápido fai que a validación sexa máis rápida e fácil —

Atopar fallos ocultos: a súa lista de comprobación para inspección de brazos de control
RESUMO
Unha inspección dun brazo de control de aceiro estampado é un proceso de varios pasos para garantir a seguridade e o manexo do teu vehículo. Comeza cun exame visual en busca de fisuras, curvaturas ou ferruxo severo no brazo. A continuación, debes realizar unha proba física cunha barra de forza para comprobar se hai movemento excesivo nas buxías e nas xuntas esféricas. Unha proba final en estrada axuda a identificar síntomas como vibracións no volante ou ruídos de golpes que confirmen que un compoñente fallou.
Identificación dos brazos de control de aceiro estampado
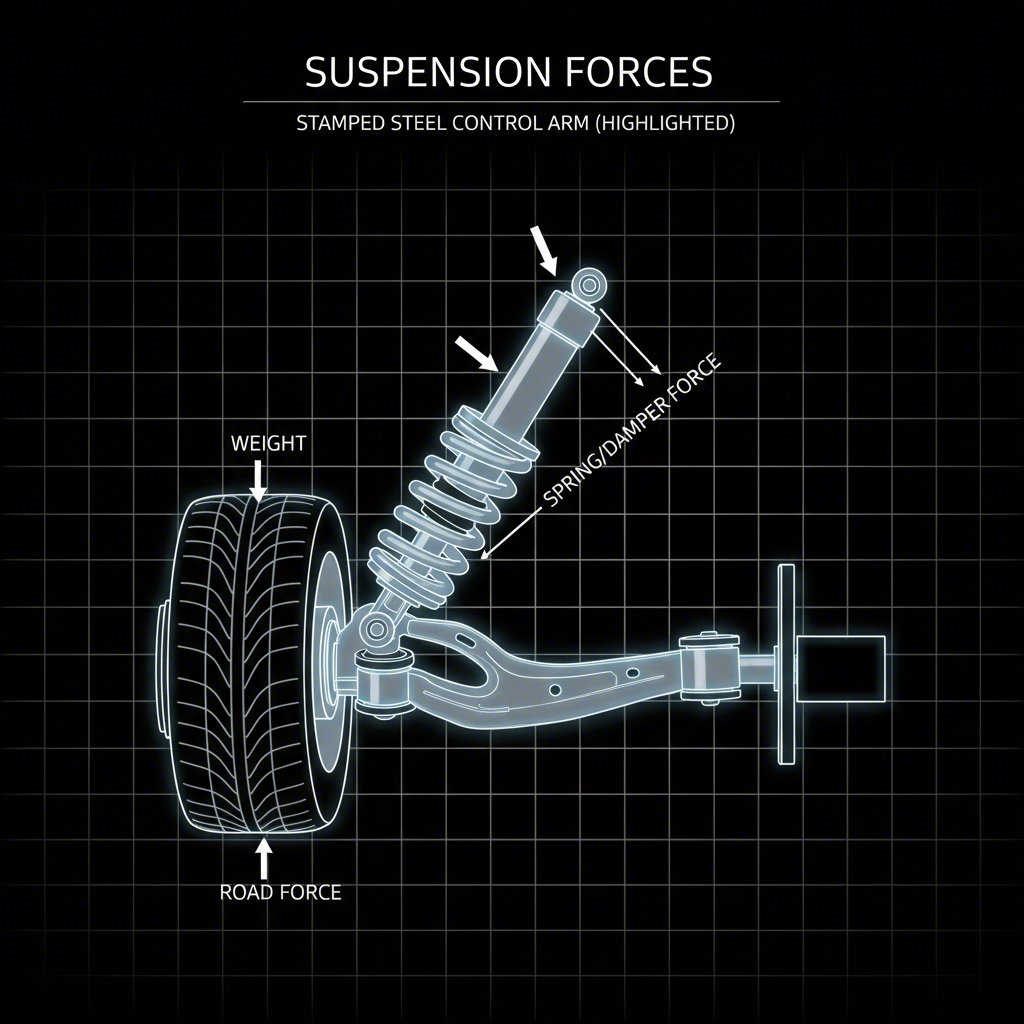
Antes de comezar a inspección, é esencial confirmar que o teu vehículo está equipado con brazos de control de aceiro estampado. Estes compoñentes son unha ligazón crítica entre o chasis do teu coche e o conxunto da roda, e saber o que estás a mirar é o primeiro paso para un diagnóstico axeitado. Os brazos de control de aceiro estampado fabricáronse prensando follas de aceiro nunha forma específica e despois soldándoas xuntas. Este proceso fainos unha opción rentable para moitos vehículos modernos de pasaxeiros.
Visualmente, os brazos de acero estampado teñen a miúdo un acabado negro liso e brillante e unha costura soldada distintiva ao longo das súas bordas. Esta construción difire considerablemente dos brazos de ferro fundido, que son máis pesados, teñen unha textura de superficie máis rugosa e adoitan atoparse en camións e SUVs. Os brazos de aluminio fundido son os máis lixeiros dos tres, cun aspecto prateado mate, e son comúns nos vehículos deportivos ou de luxo polas súas propiedades de aforro de peso. Para os fabricantes do sector automotriz, a precisión neste proceso de estampado é fundamental. Empresas como Shaoyi (Ningbo) Metal Technology Co., Ltd. especialízanse no estampado automotriz de alta produción certificado segundo a IATF 16949, asegurando que compoñentes como os brazos de suspensión cumpran estritas normas de calidade e seguridade dende a prototipaxe ata a produción en masa.
Un par de probas sinxelas poden axudarlle a confirmar o material. Un imán adhírese fermemente ao acero estampado e ao ferro fundido, pero non ao aluminio. Para diferenciar entre acero e ferro, pode golpealo suavemente cun martelo pequeno; o acero estampado producirá un so máis agudo e máis oco en comparación co golpe sordo do ferro fundido macizo.
Comparación de materiais para brazos de control
| Característica | Acero estampado | Ferro Fundido | Aluminio fundido |
|---|---|---|---|
| Aparencia | Superficie lisa e pintada con soldaduras visibles | Construción groba, grosa e dunha peza | Prateado mate, superficie lisa e construción dunha peza |
| Peso | Moderado | Máis pesado | Máis lixeiro |
| Forza | Boa flexibilidade e durabilidade | Maior resistencia, moi ríxido | Resistente pero pode ser máis fráxil ao impacto |
| Custo | O máis asequible | Máis caro | Xeralmente o máis caro |
| Uso común | A maioría dos turismos e SUVs lixeiros | Camións, vehículos pesados | Vehículos de alto rendemento e luxo |
A lista de comprobación integral de inspección visual
A inspección visual é o paso inicial máis crítico para diagnosticar un brazo de control defectuoso. Danos danos físicos evidentes poden indicar inmediatamente se é necesario substituílo, asegurando a seguridade do teu vehículo. Antes de comezar, prioriza a seguridade estacionando o coche nunha superficie plana e horizontal, activando o freo de man e colocando cunzas nas rodas. Levanta de forma segura a parte dianteira do vehículo cun gato e sústena firmemente con un par de caballetes. Nunca traballe baixo un vehículo soportado só por un gato.
Co vehículo adequadamente sostido e usando gafas de seguridade, utiliza unha linterna potente para obter unha vista clara de todo o conxunto do brazo de control. Un pequeno espello de inspección pode ser moi útil para ver a parte superior e outras zonas de difícil acceso. Estás buscando signos específicos de fallo que comprometan a integridade estrutural do compoñente.
Segue esta lista de comprobación detallada para a túa inspección visual:
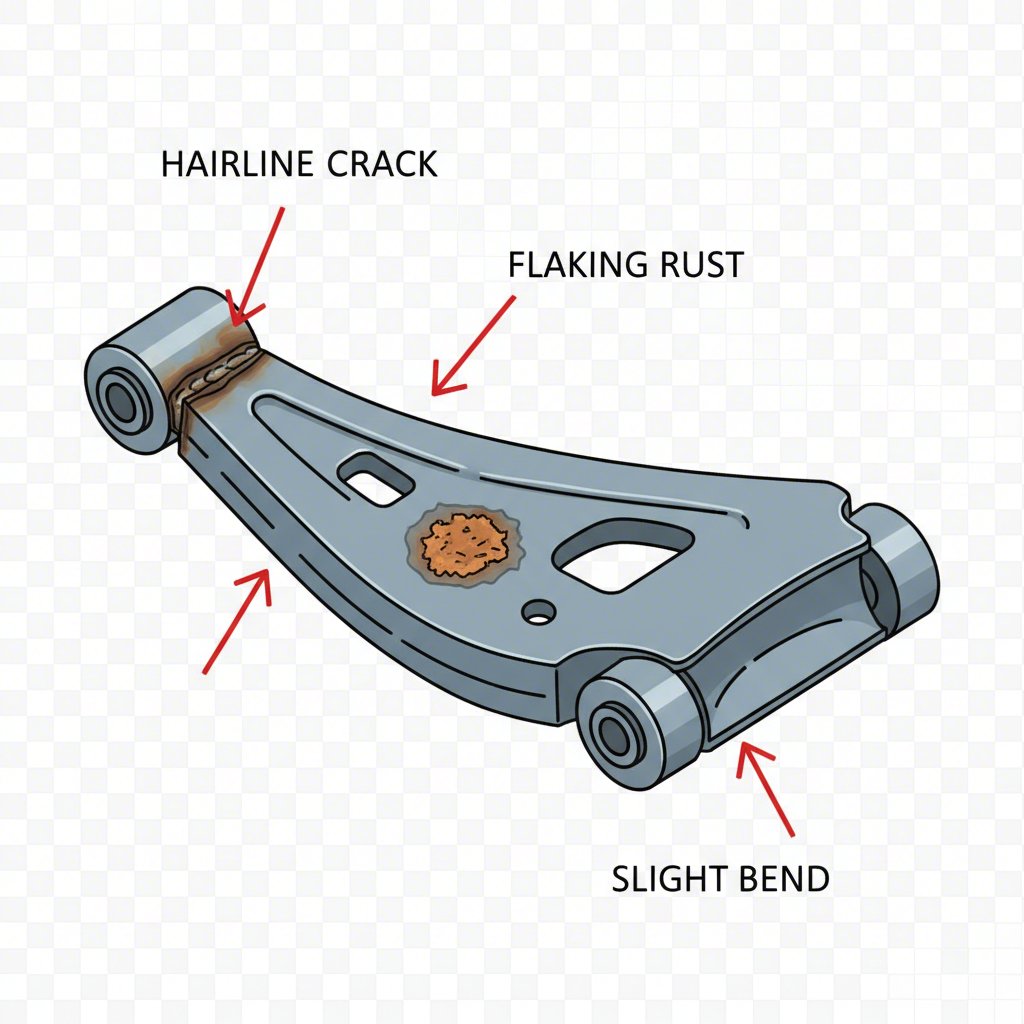
- Comproba a existencia de rachaduras: Examine con coidado toda a superficie do brazo de control, prestando especial atención ás zonas arredor das soldaduras e curvas. Estes son puntos de alta tensión onde poden formarse fisuras microscópicas. Calquera fisura, por pequena que sexa, é un risco grave para a seguridade, polo que o brazo de control debe substituírse inmediatamente.
- Buscar dobres ou deformacións: Compare o brazo de control co do lado oposto do vehículo. Se parece dobrado, amachucado ou deformado de algún xeito, a súa integridade estrutural está comprometida. Este tipo de danos prodúcese frecuentemente despois de golpear un burato grande ou un bordo de acoutamento.
- Avaliar os danos por ferruxe: Distinga entre a ferruxe superficial lixeira, que é meramente estética, e a ferruxe severa e escamosa. A ferruxe profunda ou penetrante debilita o aceiro e pode provocar unha falla estrutural. Se pode facer un burato no brazo cun destornillador ou ve pedazos de metal desprendéndose, o brazo non é seguro e necesita ser substituído.
Comprobacións manuais dos casquillos e xuntas esféricas
Moitas veces, o brazo de control en si está ben, pero os compoñentes unidos a el—os casquillos e as xuntas esféricas—son a verdadeira orixe do problema. Os casquillos do brazo de control son cilindros de borracha ou poliuretano que absorben as vibracións e permiten que o brazo xire suavemente. As xuntas esféricas son puntos de xiro que conectan o brazo de control coa pinza de dirección, permitindo que as rodas xiren e se movan cara arriba e abaixo. Cando se desgastan, poden causar unha serie de síntomas.
Os sinais comúns de fallo nos casquillos ou nas xuntas esféricas inclúen ruídos de golpes ou estalidos ao pasar por baches, un volante que vibra, dirección inestable que require corrección constante e desgaste irregular dos neumáticos. Unha inspección visual pode revelar borracha rachada ou desbotada nos casquillos ou un fole partido na xunta esférica con graxa que sae. Non obstante, é necesario realizar unha comprobación manual para confirmar o desgaste.
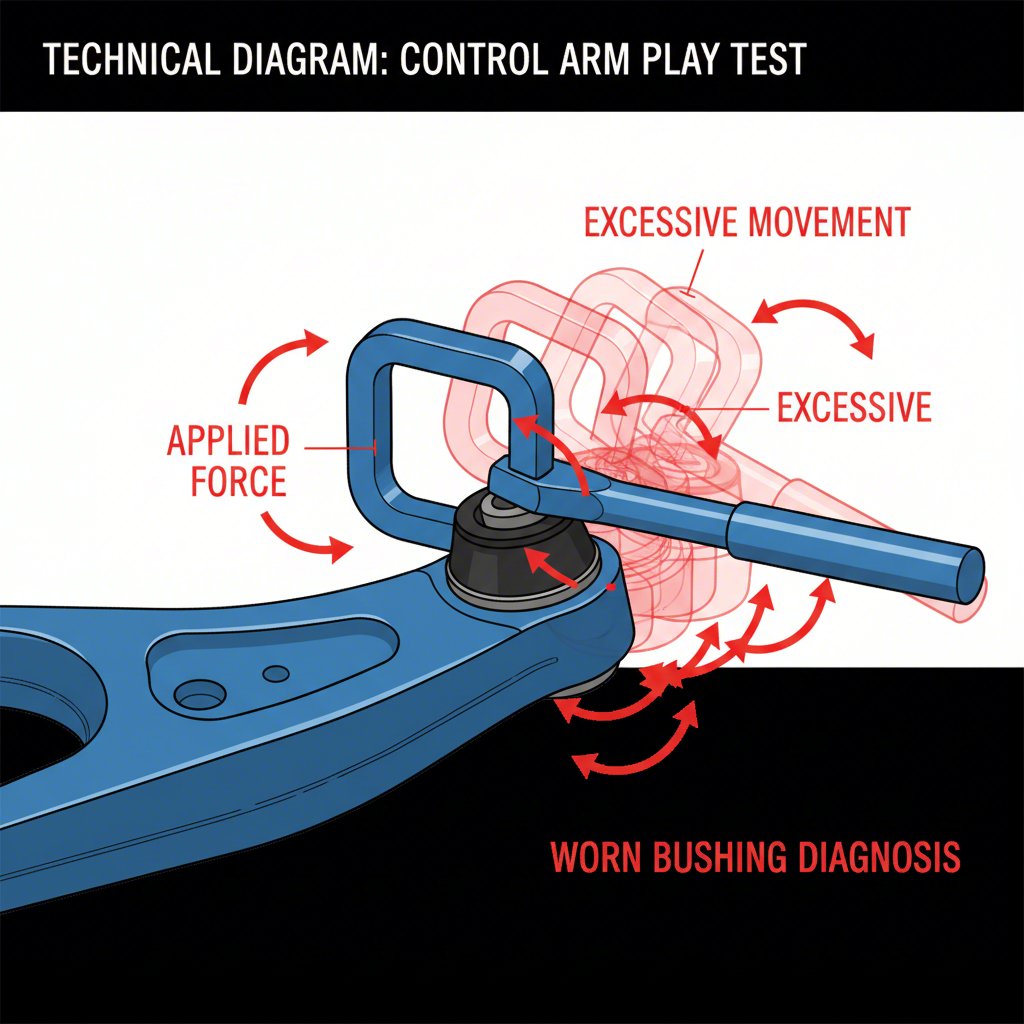
Así é como comprobar manualmente estes compoñentes para detectar folgos excesivos:
- Comprobación dos casquillos: Coloque unha alavanca entre o brazo de control e o chasis do vehículo, preto do coxinetes. Aplique presión suavemente para tratar de mover o brazo de control cara adiante e cara atrás. É normal un movemento moi lixeiro nos coxinete de goma, pero se observa un xogo considerable—xeralmente máis de 1/8 de polgada—o coxinetes está desgastado e debe substituírse.
- Comprobación dos casais esféricos: O método exacto pode variar segundo o vehículo, pero unha técnica común consiste en agarrar a parte superior e inferior do neumático e tentar balancealo cara fóra e cara dentro. Se sente algún xogo, ruído ou folga, é probable que o casal esférico estea desgastado. Tamén pode pedir a un axudante que balance o volante de un lado a outro mentres vostede observa o casal esférico en busca de calquera xogo visible onde se conecta ao soporte da dirección. Algúns casais esféricos tamén teñen indicadores de desgaste integrados que amosan cando é necesario substituílos.
Realización dunha proba en estrada para o diagnóstico final
Despois dunha inspección visual e manual minuciosa, unha proba en estrada é o último paso para confirmar o seu diagnóstico. Isto permite ligar as evidencias físicas de desgaste cos síntomas reais durante a condución. O obxectivo é escoitar e notar problemas específicos que só aparecen cando a suspensión está baixo carga. Escolla unha ruta segura e familiar con varios tipos de superficie vial, incluídas algunhas lombas e curvas se é posíbel. Asegúrese de apagar o radio para poder escoitar calquera ruído anormal.
Durante a proba de condución, preste especial atención ao comportamento do vehículo. Un brazo de control defectuoso ou os seus compoñentes relacionados adoitan producir síntomas distintos que pode identificar. Por exemplo, as buxías gastadas poden causar un son notable de golpeteo ao pasar por ribeiras ou facer curvas bruscas. Un casal de bolas defectuoso pode provocar que a dirección se sinta solta ou imprecisa, facendo que o vehículo se desvíe na estrada.
Use esta táboa para axudarse a correlacionar os síntomas que experimenta coa súa causa máis probable:
| Síntoma Sentido Durante a Proba en Estrada | Causa posíbel relacionada co brazo de control |
|---|---|
| Ruído de golpes ou estalidos ao pasar por baches | Casquillos desgastados do brazo de control ou unha xunta esférica solta |
| Vibración no volante, especialmente a alta velocidade | Casquillos desgastados do brazo de control que permiten movemento excesivo |
| O vehículo puxa cara a un lado ou a dirección sente-se frouxa | Xunta esférica fallida ou casquillos moi desgastados que causan problemas de alineación |
| Son de rachadura ou trituración durante as curvas | Xunta esférica moi desgastada que perdeu lubricación |
Se observa algún destes síntomas, isto apoia fermamente os achados da inspección física. Este enfoque completo garante que identificou correctamente o problema antes de levar a cabo calquera reparación, aforrando tempo e diñeiro mentres se asegura de que o seu vehículo segue sendo seguro para conducir.
Reflexións finais sobre a seguridade do brazo de control
Realizar unha inspección exhaustiva do brazo de control de acero estampado é algo máis que mantemento rutineiro; é unha comprobación crítica de seguridade. Estes compoñentes son fundamentais para a dirección e estabilidade do teu vehículo, e a súa falla pode ter graves consecuencias. Ao seguir un proceso estruturado de inspección visual, probas manuais das buxías e xuntas esféricas, e unha proba final de diagnóstico en estrada, podes identificar con confianza o desgaste e danos antes de que derivan nun problema maior. Xamais ignores síntomas como ruídos de golpes, vibracións na dirección ou un comportamento inestable do vehículo. Actuar rapidamente ante estes problemas substituíndo os compoñentes desgastados garante que o teu coche siga sendo seguro, responda de xeito previsible e protexa os teus neumáticos do desgaste prematuro.
Preguntas frecuentes
1. Que debe revisarse nun brazo de control?
Un brazo de suspensión debe inspeccionarse en busca de signos de danos físicos como rachaduras, curvas ou ferruxo significativo que poida comprometer a súa integridade estrutural. Ademais, deben comprobarse os seus compoñentes conectados, os casquillos e as xuntas esféricas, en busca de desgaste, movemento excesivo ou danos como botas de goma rasgadas ou separación da goma.
2. Como se pode saber se se teñen brazos de suspensión de acero estampado?
Pode identificarse normalmente un brazo de suspensión de acero estampado pola súa aparencia; a miúdo están feitos de dúas pezas de acero prensado soldadas xuntas, cunha costura visible e un acabado liso e pintado. Un xeito sinxelo de confirmalo é con un imán, que se pegará ao acero. Golpealo cun martelo tamén producirá un son máis oco en comparación co tobo sordo do ferro fundido macizo.
3. Como se comproba se os brazos de suspensión están en bo estado?
Para comprobar se un brazo de suspensión está en boas condicións, realízase unha inspección en tres partes. Primeiro, unha comprobación visual para detectar rachaduras, curvaturas e ferruxo. Segundo, unha comprobación física empregando unha barra de forza para probar os coxinetes en busca de xogo excesivo e mover a roda para comprobar o casais esférico en busca de folgura. Finalmente, unha proba en estrada para escoitar ruídos de golpes e sentir vibracións no volante ou desviacións na dirección, que son todos signos dun posíbel fallo.