 Malé šarže, vysoké standardy. Naše služba rychlého prototypování zrychluje a zjednodušuje ověřování —

Jak svařovat svisle bez pronásledování kolabující taveniny
Krok 1: Vyberte svislé svařování shora dolů nebo zdola nahoru
Než změníte nastavení nebo vyberete druh švu, rozhodněte se, kterým směrem se má svar pohybovat. To je první skutečná volba při učení se svařovat ve svislé poloze. Ve svislé poloze gravitace stále táhne roztavenou kaluž směrem dolů, takže se kaluž má tendenci propadat, protahovat se nebo se předbíhat oblouku. Rozdíl mezi svařováním shora dolů a zdola nahoru se rychle projeví ve tvaru svárového hrotu, v míře spojení (fúze) a v obtížnosti ovládání kaluže. Poznámky od ESAB , Arccaptain , a SSimder se shodují na zásadním pravidle: svařování zdola nahoru obvykle poskytuje hlubší proniknutí a lepší fúzi pro spoje zaměřené na pevnost, zatímco svařování shora dolů umožňuje rychlejší posun a je vhodnější pro tenké materiály. Považujte volbu mezi svařováním zdola nahoru a shora dolů za filtr podle typu úkolu, nikoli za zvyk.
Srovnání svařování zdola nahoru a shora dolů – přehled
| Faktor | Svařování zdola nahoru | Svařování shora dolů |
|---|---|---|
| Proniknutí | Hlubší proniknutí, lepší fúze pro spoje, u nichž je klíčová pevnost | Mělčí proniknutí, lépe vhodné pro tenké materiály |
| Rychlost jízdy | Pomalejší, důkladnější | Rychlejší, s menším množstvím tepla setrvávajícím na jednom místě |
| Řízení kaluží | Obvykle je snazší postavit a udržet malou polici, jakmile je nastaven rytmus | Vyžaduje velkou pozornost, protože kaluž se snaží stékat vlivem gravitace |
| Tvar kapky | Často více zakřivený a vyšší | Často plošší a lehčí |
| Vyčištění | U těžších prací často více čištění mezi jednotlivými průchody nebo škváry | U lehkých prací obvykle méně nánosu, avšak špatné svaření může vést k nutnosti přepracování |
| Pravděpodobné případy použití | Konstrukční spoje, tlustší části, drážkové svary, opravy kritické z hlediska pevnosti | Tenký plech, lehčí profily, rychlejší výrobní práce, svary zaměřené na vzhled |
Když je nejdůležitější průnik
Pokud spoj přenáší zatížení, vyžaduje spolehlivé sloučení nebo zahrnuje tlustší materiál, je svislé svařování shora dolů obvykle bezpečnější volbou. Svařování směrem nahoru zpomaluje průchod a pomáhá zachovat teplo v místě spoje místo aby se rychle rozptýlilo. Pokud je otázkou, zda je svislé svařování shora dolů lepší volbou z hlediska pevnosti, odpověď je obvykle ano. Proto se svarové drážky, konstrukční koutové svary a náročné opravy často provádějí směrem nahoru.
Když tenký kov vyžaduje vyšší rychlost posuvu
Svislé svařování shora dolů má svůj důvod. Tenký kov nepodléhá přebytku tepla. Rychlý svařovací průchod směrem dolů omezuje koncentraci tepla a snižuje riziko propálení nebo příliš velkého svarkového hrotu. Může se také zdát začínajícím svařovačům jednodušší, protože pohyb je jednodušší. Je však svislé svařování shora dolů vždy chybnou volbou u tenkého kovu? Ne nutně. Pokud je kvalita svaru důležitější než rychlost, může stále zvítězit opatrný svařovací průchod směrem nahoru.
- Vyberte svařování směrem vzhůru pro tlustší materiál nebo spoje, které musí být pevné a zcela propálené.
- Vyberte svařování směrem dolů pro tenčí materiál, kde by nadměrné teplo poškodilo spoj.
- Preferujte svařování směrem vzhůru u svarů v drážce a konstrukčních koutových svárů. Preferujte svařování směrem dolů u lehčích překrytých spojů nebo aplikací na plech.
- Pokud si nejste jisti, proveďte testovací svar a vyberte směr, který umožňuje ovladatelnou tavidlovou lázeň bez prosakování nebo podřezu.
Správný směr pomáhá, avšak svařování ve svislé poloze trestá i nepřesnou přípravu. Rzi, nátěr, štěrbiny a slabé připínací body mohou způsobit selhání i správně zvolené metody během několika sekund.
Krok 2: Příprava spoje a pracovního prostředí
Při svařování ve svislé poloze není příprava pouhým doplňkem – je to klíčový faktor, který brání tomu, aby se tavidlová lázeň nestala neovladatelnou ještě dříve, než má vaše technika šanci projevit se. Gravitace již působí směrem dolů na roztavený kov, takže rzi, olej, nátěr, válcovací škálu, špatné srovnání částí a slabé připínací body zde způsobují větší problémy než u svarů v polohách vodorovných. svařování ve svislé poloze opakovaně se vrací k tomu samému bodu: čistý kov, stabilní sestavení a řízené umístění vedou k lepšímu slévání a tvaru svářkového hrotu.
Před zapálením oblouku očistěte kov
Kontaminace narušuje způsob, jakým tavenina smáčí svářkovou spojnici. Při svařování ve svislé poloze se to často rychle projeví jako podtekání, podřezání nebo špatné napojení na okraje spoje. I malé množství nečistot se může stát závažnou vadou, pokud tavenina již bojuje proti gravitaci.
- Očistěte obě strany spoje až na čistý kov. Odstraňte rez, olej, barvu a válcovací škálu, aby oblouk neproklouzával přes kontaminaci.
- Připravte hrany. Odstraněte jemné ostří a vytvořte kosočtvercový řez, pokud to typ spoje vyžaduje, aby svářka dosáhla kořene spoje bez zachycení škváry.
- Před svařováním ověřte sestavení a šířku kořenové mezery. Nerovnoměrná mezera způsobí, že jedna strana bude přehřátá a druhá nebude mít dostatečné slévání.
- Upevněte nebo upněte díly tak, aby teplo a gravitace nezpůsobily posunutí nebo roztažení spoje během průchodu.
- Před zapálením oblouku udržujte tělo a ruce v suché poloze a opírejte je. Pokud se pohyb zdá nepohodlný a „studený“, bude se ještě hůře cítit při práci s živou tavidlovou louží.
Příprava spoje a šířka kořenové mezery pro svislé svařování
Nepřesná příprava spoje je ve svislé poloze svařování obtížněji skrytelná. Tavidlová louže je menší a méně tolerantní, takže neustálé zarovnání okrajů mění způsob vyplnění spoje od jednoho palce k dalšímu. Špatná příprava spoje je také známým faktorem přispívajícím k podříznutí nedostatečnému propojení a nedostatečnému slinutí, zejména pokud je již obtížné vyvážit rychlost posuvu nebo tepelný příkon.
Umístění přivařovacích bodů, které brání roztažení spoje
Kvalitní přivařovací body skutečně plní funkci . Udržují správné zarovnání, zachovávají šířku spoje a pomáhají odolat smršťování a deformacím. U delších švů je lepší použít středovou nebo vyváženou posloupnost přivařovacích bodů než jednoduše postupovat od jednoho konce ke druhému. Před konečným svařováním každý přivařovací bod důkladně očistěte a zaoblete hrubé začátky či konce, aby se vaše svařovací nit plynule napojila místo toho, aby se na nich zakopla.
- Použijte dostatek spon, abyste spoj udrželi, aniž byste nutili konečnou nit, aby přemostila velké otvory.
- Vedejte kabely a vodiče tak, aby vás nepřitahovaly za ruku a neprodlužovaly délku oblouku uprostřed průchodu.
- Zaujměte postoj těla, ze kterého se můžete opřít, abyste snížili neustálé odchylky a podřezávání.
- Zkontrolujte viditelnost obou bočních stěn, protože špatné zorné linie obvykle znamenají špatné napojení.
- Plánujte přístup pro odškrabávání, čištění kartáčem, opětovné zapalování a změny úhlu ještě před tím, než začnete svařovat.
Když je spoj čistý, správně zarovnaný a pevně upevněný, nastavení stroje a volba procesu přestanou působit jako hádání a začnou fungovat jako skutečná kontrola.
Krok 3: Nastavte stroj a vyberte správný proces
Čistý a pevně upevněný spoj vám poskytuje něco, co stojí za doladění. Při svařování ve svislé poloze by mělo nastavení stroje pomoci udržet malou, předvídatelnou tavící lázeň místo toho, aby se vám dovolilo napájet lázeň, která má tendenci klouzat dolů po svahu. Uvedené pokyny se opakovaně vrací k témuž základnímu principu: proces vyberte nejdříve podle tloušťky materiálu, polohy spoje a požadované kvality svaru a teprve poté jemně doladíte spotřební materiály a polaritu kolem této volby.
Výběr procesu pro svařování ve svislé poloze metodami MIG, TIG a s povlakovanou elektrodou
U svařování ve svislé poloze má výběr přídavného materiálu přednost před pohodlností. Výrobce poznámka uvádí, že přídavný materiál by měl odpovídat nebo převyšovat požadované mechanické vlastnosti a provozní podmínky. Stejný zdroj popisuje metodu GTAW jako schopnou vytvářet některé z nejkvalitnějších svarů, avšak s pomalou rychlostí navařování a posunu hořáku. Dále upozorňuje, že metoda SMAW zůstává praktickou možností pro práci na staveništi díky jednoduchosti zařízení, zatímco u tlustých částí se nejlépe osvědčuje svařování ve svislé poloze směrem nahoru metodami GMAW nebo FCAW. Proto je svařování ve svislé poloze ručním obloukovým svařováním stále důležité na staveništi, svařování ve svislé poloze metodou MIG je často volbou zaměřenou na výrobní efektivitu a svařování ve svislé poloze metodou TIG dává větší smysl tehdy, když je maximální kvalita svaru důležitější než rychlost.
Kontrolovatelná tavidlová lázeň je důležitější než hrubá rychlost.
To je ještě důležitější ve svislé poloze. Pokud je tavidlová lázeň příliš tekutá, nemáte ještě problém s technikou. Máte problém se nastavením.
Jak nastavit polaritu a spotřební materiály
Nejjasnější pokyny k polaritě v odkazovaných zdrojích pocházejí od společnosti Hobart Brothers. Většina samostatně chráněných fúzních drátů používaných pro svařování ve svislé poloze směrem nahoru pracuje s elektrodou zápornou. Společnost Hobart dále upozorňuje, že při přepínání ze solidního drátu nebo z fúzního drátu chráněného ochranným plynem může být nutné změnit polaritu z elektrody kladné na elektrodu zápornou. Pro svařování nerezové oceli ve svislé poloze směrem nahoru metodou GMAW uvádí časopis The Fabricator dvě běžné výchozí možnosti: solidní drát v režimu krátkého spojení nebo kovově jádrový drát v pulzním režimu, pokud to umožňuje svařovací zařízení.
| Proces | Typ spotřebního materiálu | Průměr podle citovaných zdrojů | Polarita | Zohlednění tloušťky materiálu | Co se mění ve svislé poloze |
|---|---|---|---|---|---|
| SMAW | Obalená elektroda přizpůsobená provozním podmínkám | V citovaných zdrojích týkajících se svařování ve svislé poloze neupřesněno | V citovaných zdrojích týkajících se svařování ve svislé poloze neupřesněno | Užitečné tehdy, když je důležitá jednoduchost zařízení při práci v terénu | Udržujte výkon navařování na úrovni, která umožňuje zachovat malou a dobře ovladatelnou tavidlovou lázeň |
| GMAW, režim krátkého spojení | Nerezový plný drát | 0,035 až 0,045 palce | Elektroda kladná při svařování plným drátem podle rozdílu polarity uvedeného společností Hobart | Běžná počáteční volba, pokud nelze součást umístit vodorovně nebo ležící na ploše | Pro svařování nerezových materiálů svisle shora doporučuje časopis The Fabricator zdroj konstantního napětí se strmou charakteristikou a nastavitelnou indukčností za účelem snížení rozstřiku a zlepšení tekutosti tavidlové lázně |
| GMAW, pulzní režim | Nerezový kovový jádrový drát | 0,045 až 0,052 palce | Kladná polarita pro drát chráněný ochranným plynem podle poznámky společnosti Hobart k polaritě | Užitečné, je-li k dispozici vybavení schopné pulzního svařování a tloušťka materiálu to umožňuje | Některé aplikace preferují svařování směrem nahoru, jiné směrem dolů, proto je testování důležité |
| FCAW, chráněné plynem | Vytlačovaný drát s jádrem z tavícího prášku | V citovaných zdrojích týkajících se svařování ve svislé poloze neupřesněno | Elektroda kladná při použití vytlačovaného drátu s jádrem z tavícího prášku chráněného plynem, podle rozdílu polarity uvedeného společností Hobart | Silná volba pro tlusté části; časopis The Fabricator uvádí vysokou kvalitu sváru a dobré rychlosti navařování | Lze očekávat více kouře a výparů než u svařování GMAW, proto je důležitější řízení a viditelnost |
| FCAW, samozachraňující | Samozachraňující vytlačovaný drát s jádrem z tavícího prášku | V citovaných zdrojích týkajících se svařování ve svislé poloze neupřesněno | Elektroda záporná u většiny produktů | Užitečné tam, kde je důležitá přenosnost a účinnost | Hobart upozorňuje, že tlustší systém škváry se stává ukazatelem rychlosti posuvu při svařování směrem vzhůru |
| GTAW | TIG přídavný materiál přizpůsoben provozním podmínkám | V citovaných zdrojích týkajících se svařování ve svislé poloze neupřesněno | V citovaných zdrojích týkajících se svařování ve svislé poloze neupřesněno | Nejvhodnější, pokud je na prvním místě kvalita svaru a pomalá rychlost posuvu je přijatelná | Velmi přesné, ale mnohem pomalejší než možnosti zaměřené na výrobní výkon |
Základní nastavení podle tloušťky materiálu
Použijte tloušťku materiálu k omezení rozsahu nastavení ještě před tím, než začnete upravovat ovládací prvky. Výrobce uvádí, že materiál tenčí než 3/16 palce se nejčastěji svařuje svisle dolů, zatímco tlustší části obvykle dosahují lepšího výkonu při svařování svisle nahoru metodami GMAW nebo FCAW. U nerezových ocelí poskytuje zdroj praktické výchozí body: pevný drát o průměru 0,035 až 0,045 palce s ochranným plynem složeným z 98 % argonu a 2 % oxidu uhličitého v režimu krátkého spojení, nebo kovový jádrový drát o průměru 0,045 až 0,052 palce s ochranným plynem složeným z 90 % argonu a 10 % oxidu uhličitého v pulzním režimu. Jedná se o výchozí body specifické pro nerezové oceli, nikoli o univerzální nastavení pro každou slitinu nebo svarové spojení.
Když potřebné znalosti manuálního nastavení musí přejít do opakovatelné výroby podvozků, mohou si automobilové týmy také prohlédnout Shaoyi Metal Technology jako reálný příklad výroby. Jeho pokročilé linky pro robotické svařování a systém kvality certifikovaný podle normy IATF 16949 jsou relevantní při posuzování toho, jak se svařovací disciplína s vertikální kapacitou škáluje pro ocelové, hliníkové a jiné kovové sestavy. Jedná se o referenční zdroj pro výběr dodavatelů, nikoli o náhradu pro vývoj postupů na pracovní stolici.
Uklidněte proces a zmenšete tavidlovou kaluž – a okamžitě se objeví jiná výzva: první sekundy oblouku, kde poloha ruky, úhel a malá příčka rozhodují, zda se svářecí vrstva usadí nebo se rozteče.
Krok 4: Zapněte oblouk a vytvořte první příčku
První palec svislého svaru obvykle ukazuje, jak bude probíhat zbytek průchodu. Klidný začátek vám poskytne základ pro ovladatelné svařování ve svislé poloze. Nedbalý začátek umožní gravitaci převzít kontrolu. Výcvikové pokyny od časopisů The Welder, The Fabricator a společnosti ESAB se stále vrací ke stejným základním principům: upevněte tělo, udržujte krátký oblouk, zachovejte ovladatelný úhel a pozorně sledujte tavidlovou lázeň.
Položení těla a zorná osa
Než zapálíte svařovací oblouk, zajistěte si stabilitu. Časopis The Welder doporučuje tři body opory, které potlačí pohyby těla, a zároveň pohodlné, sportovní postavení. To může znamenat, že jsou obě nohy pevně na zemi a jedna ruka, bok nebo zápěstí lehce opřené. Nezapomeňte také dýchat. Když lidé napínají tělo a zadržují dech, začíná jejich tělo pomalu pohybovat. U svislého svařování se tento pohyb rychle projeví jako kolísající oblouk a nerovnoměrný začátek. Nastavte si hlavu a helmu tak, abyste jasně viděli přední hranu tavidlové lázně i obě strany svarového spoje.
Pracovní úhel, směr posunu a délka oblouku
Pro svařování směrem nahoru doporučuje ESAB úhel tlačení a rovnoměrný pohyb směrem vzhůru. Výrobce také upozorňuje, že elektroda by měla být držena mírně směrem nahoru a že krátký oblouk zlepšuje proniknutí a slévání, zatímco tavená lázeň zůstává dostatečně malá, aby se mohla na místě ztuhnout. Pokud bodete oblouk umísťovat příliš daleko dopředu, předehříváte kov nad tavenou lázní. Pokud se oblouk prodlouží příliš, stane se tavená lázeň obtížněji ovladatelnou. Pokud chcete čistý svislý svarek, je lepší krátký a rovnoměrný postup než nápaditý a rychlý.
Sledujte tavenou lázeň, nikoli jen oblouk.
Jak začít, aniž byste ztratili tavenou lázeň
- Upevněte své tělo a před zapálením oblouku si vyzkoušejte pohyb, který budete používat.
- Zarovnejte hořák nebo elektrodu tak, abyste jasně viděli okraje spoje a připravený přivařovací bod.
- Zapalte oblouk do připraveného přivařovacího bodu nebo počátečního bodu a ihned jej ustálte na krátkém oblouku.
- Zastavte se jen tak dlouho, aby se u spodního okraje vytvořila malá opěrná ploška. Výrobce porovnává svařování směrem nahoru s cihlováním, kde každý malý úsek podporuje následující.
- Pohybujte se nahoru s kontrolou, nikoli rychlostí, a sledujte přední hranu taveniny, aby se kaluž nevytratila.
Tato malá polička je to, co zabrání kolapsu svaru při svařování ve svislé poloze v prvních několika sekundách. Držte ji a zbytek techniky začne dávat smysl, zejména když začnete tento rytmus udržovat po celé délce svislého svaru směrem nahoru.
Krok 5: Proveďte kontrolovaný svislý svar směrem nahoru
Dobrý start vám vytvoří poličku. Dobrý svar vznikne opakováním této poličky znovu a znovu, aniž by se kaluž „vytratila“ před vašimi rukama. Pokyny od společností UNIMIG a The Fabricator ukazují na stejnou zvyklost: zastavte se na stranách, uprostřed se pohybujte účelně a udržujte kaluž dostatečně malou, aby ztuhla dříve, než ji gravitace stáhne dolů. U většiny prací zaměřených na pevnost je tento ustálený rytmus svařování směrem nahoru důležitější než nápadité pohyby.
Technika ručního svařování elektrodou směrem nahoru ve svislé poloze
Pokud se učíte svařovat vertikálně ručním obloukovým svařováním (stick), zamyslete se nejprve nad technikou „poličky“ a teprve poté nad technikou „přetahování“. The Fabricator popisuje vertikální svařování směrem nahoru metodou stick jako proces pokládání cihel – každý malý úsek podporuje následující. Při svařování metodou stick udržujte krátký oblouk a elektrodu mírně nakloněnou směrem nahoru. UNIMIG doporučuje pro vertikální svařování směrem nahoru metodou stick tlačný úhel přibližně 10 až 15 stupňů, což pomáhá udržet svářecí šev v svarové spojnici místo toho, aby se táhl směrem dolů.
Začínající svařaři obvykle dosahují lepších výsledků pomocí krátkých pruhových švů nebo těsných kroků techniky „poličky“, než se pokusí o širší pohyb. Jakmile se šířka svářecího pruhu a fúze stane konzistentní, přejděte k malému zubatému (zigzag) nebo trojúhelníkovému pohybu. Krátce zastavte u každé boční stěny a poté postupujte středem. Tato krátká pauza u boční stěny pomáhá zajistit pevné spojení okrajů sváru a snižuje podřezání, zatímco pohyb středem tlačí svářecí šev do kořene svaru. Pokud používáte elektrody typu 7018, The Fabricator poznamenává, že technika přetahování (weave) funguje velmi dobře. Pokud používáte elektrody typu 6010, je typičtější technika „naskládání“ (stacking) nebo „švihání“ (whipping).
Technika vertikálního svařování MIG a s kovovou jádrovou drátovou elektrodou
Pro svislé MIG svařování směrem nahoru doporučuje UNIMIG snížit nastavení oproti svařování v polohách na rovině, aby byla tavidlová lázeň méně tekutá, a poté použít kompaktní trojúhelníkový vzor. Začněte na jedné straně, přesuňte se napříč, abyste vytvořili základnu, pak diagonálně nahoru do středu a následně diagonálně dolů těsně nad místo, kde jste začali. Tento vzor opakujte, přičemž držte hořák co nejtěsněji v svarové spáře. V praxi je svislé MIG svařování směrem nahoru čistší, pokud odoláte pokušení rozšířit pohyb.
Svislé svařování směrem nahoru s jádrem tavidla využívá stejný princip vytváření „poličky“ a jejího ztuhnutí. Výrobce uvádí, že je třeba postupně vytvořit poličku a provádět kmitavý pohyb směrem nahoru tak pomalu, aby spodní vrstva ztuhla, aniž by došlo k přehřátí základního materiálu.
- Ruční obloukové svařování (elektrodou): Udržujte krátký oblouk, držte elektrodu mírně nakloněnou směrem nahoru a více času strávte na stranách než ve středu.
- MIG: Používejte těsné trojúhelníky nebo malé obrácené písmeno V a nedovolte, aby se hořák vzdaloval od svarové spáry.
- Svařování jádrem tavidla: Policíku vytvářejte záměrně a pohybujte se pouze tak rychle, jak rychle spodní stupeň dokáže podpořit další.
- TIG: UNIMIG upozorňuje, že svařování TIG směrem vzhůru (vertikálně) je v podstatě standardní technikou TIG, avšak pouze tehdy, pokud jasně vidíte oblouk a rovnoměrně přivádíte přídavný materiál.
Jak číst přední hranu taveniny
Sledujte přední hranu taveniny, nikoli jiskry. Chcete vidět tři jevy, které probíhají postupně: kov se smáčí na jedné straně, vyplní střed a spojí se s druhou stranou ještě před tím, než se tavenina ztuhne. Kvalitní svařování směrem vzhůru má opakovatelný rytmus: levá strana, střed, pravá strana, zvednutí. Pokud se tavenina začne rozlévat, doporučuje The Fabricator odjet od kráteru, aniž by došlo ke ztrátě oblouku. Pokud se šířka svárového žebříku zvětšuje a stává se volnější při stoupání, zpomalte a zmenšete pohyb.
To je skutečný postup. Začněte s jednoduchými pruhy (stringery). Poté přidejte úzký trojúhelník. A teprve poté – a jen tehdy – použijte mírné kmitání pro výplňové nebo uzavírací pasy. Svařování směrem vzhůru (uphill) si získává své místo tehdy, když je rozhodující dokonalé slévání, avšak některé úkoly stále vyžadují rychlejší svařování směrem dolů (downward).
Krok 6: Používejte svařování směrem dolů (vertikálně) pouze tehdy, když to odpovídá danému úkolu
Svařování svisle dolů může ušetřit tenký svárový šev. Může také vytvořit esteticky přitažlivý svárový hřeben s nízkou úrovní spojení, pokud jej používáte zvykem. Proto by rozhodnutí mezi svařováním MIG svisle nahoru nebo dolů mělo vycházet z tloušťky materiálu, citlivosti na teplo a požadavků na svárek, nikoli z osobní pohodlí. Pokyny od firem ESAB a Hobart Brothers se shodují na hlavní kompromisní situaci: svařování svisle dolů je rychlejší a lépe vhodné pro tenčí materiál, zatímco svařování svisle nahoru obecně poskytuje hlubší proniknutí a pevnější spojení. Při svařování svisle nahoru i dolů není rychlost nikdy celým příběhem.
Kdy má smysl svařování svisle dolů
Použijte svařování svisle dolů, když je nadbytečné teplo skutečným nepřítelem. Tenké plechy, lehké součásti a některé rychlé výrobní svařovací operace často odpovídají tomuto popisu. Příklad z časopisu The Fabricator týkající se plechu tloušťky 0,060 palce uvádí, že svařování GMAW svisle nahoru by mohlo způsobit proražení, zatímco řízené svařování svisle dolů bylo lepší volbou. Stejná logika platí i u ručních prací. Pokud se okraj před vyplněním sváru neustále „splavuje“, stojí za to vážně zvážit svařování svisle dolů.
| Faktor | Svařování svisle dolů | Svislé nahoru |
|---|---|---|
| Ovládání | Méně tolerantní v případě, že se kaluž začne rozlévat | Stabilnější, jakmile se vytvoří rovná plošina |
| Fúze | Vyšší riziko mělkého průniku a problémů s fúzí boční stěny | Lepší průnik a fúze pro svarové spoje kritické z hlediska pevnosti |
| Profil svary | Plošší a lehčí svar | Víc objemný a nosný svar |
| Rychlost jízdy | Rychlejší | Pomalejší a promyšlenější |
| Koncentraci tepla | Nižší teplo zůstávající na jednom místě | Více tepla pracujícího do spoje |
| Vyčištění | Často méně nánosu, ale případná přepracování v případě špatného svaření | Více nánosu a u procesů se struskou více čištění mezi průchody |
| Pravděpodobné aplikace | Tenké materiály, lehčí výrobní práce, některé potrubní nebo robotické případy GMAW | Konstrukční práce, tlustší profily, práce vyžadující pevnost dle předpisů |
Změny techniky pro rychlejší posuv
Svařování směrem dolů není prostě obrácené svařování směrem nahoru. Pohybujte se rychleji. Pozorujte menší tavidlovou kaluž. Udržujte oblouk na přední hraně kaluže. Výrobce uvádí, že při svařování metodou GMAW směrem dolů je vhodné použít mírný úhel tažení a oblouk neustále udržovat na přední hraně tavidlové kaluže. Pokud svařujete metodou MIG směrem dolů tenký ocelový plech, je tato blízká kontrola kaluže důležitá, protože svařování MIG směrem dolů umožňuje zvýšit rychlost, avšak Hobart Brothers upozorňuje, že dosažení dostatečného svarového spojení může být stále obtížné. Drát s jádrem z tavidla se chová jinak. Hobart vysvětluje, že metoda FCAW-G je často produktivnější a lépe snáší práci v nepříznivých polohách, protože její rychle tuhnoucí škvára podporuje tavidlovou kaluž. Svařování elektrodou směrem dolů může být také rychlé, avšak ESAB varuje před mělkým průnikem, podřezem a zachycením škváry.
Rizika, na která je třeba dávat pozor ještě před rozhodnutím
- Pokud je hlavním rizikem propálení tenkého materiálu, zkuste nejprve svařování směrem dolů.
- Pokud musí svarové spojení přenášet zatížení nebo vyžaduje hluboký průnik, přepněte se zpět na svařování směrem nahoru.
- Pokud se svařování MIG ve svislé poloze stále jeví příliš tekuté, zvažte, zda by pro danou úlohu nebyl vhodnější proces s jádrem ze slitiny.
- Pokud práce probíhá podle normy nebo postupu, ověřte před svařováním, zda je povoleno svařování směrem dolů.
Svarový průchod může běžet dokonale a přesto selhat v posledních půl palci. Právě poslední zastavení, kráter a dokončení jsou místa, kde mnoho svislých svárů odhaluje svou skutečnou kvalitu.
Krok 7: Dokončete průchod a zkontrolujte svarový hrot
Konec průchodu je místo, kde se dokonalý svarový hrot může stále změnit na opravu. Zejména při svařování směrem nahoru je třeba věnovat zvláštní pozornost kráteru v místě zastavení. Lincoln Electric poznamenává, že dutiny způsobené smrštěním kráteru jsou přirozeným jevem obloukového svařování a mohou být výraznější při svařování směrem nahoru, protože gravitace tento jev zesiluje. To znamená, že příliš rychlé ukončení svařování může zanechat prohlubeň i tehdy, když vypadá zbytek svarového hrotu pevně.
Jak ukončit svařování bez vzniku kráteru
- Při přibližování k místu zastavení mírně zpomalte. Neukončujte svařování náhle při plné rychlosti posuvu.
- Vyplňte kráter před přerušením oblouku. Krátký zpětný krok do kráteru pomůže doplnit kov do nižšího místa.
- Zajistěte spojení s koncovým bodem tak, aby se šev plynule zaoblen, nikoli stlačen a přerušen.
- Okamžitě vyčistěte šev, pokud používáte svařovací proces vytvářející škváru.
- Před tím, než prohlásíte svářku za dokončenou, zkontrolujte dokončovací oblast i oba okraje švu.
- Pokud je to nutné, připravte se na další průchod odstraněním škváry, nerovných začátků nebo uvolněného rozstřiku.
Jednou z praktických metod společnosti Lincoln Electric je vrátit se zpět do kráteru asi o 1/2 palce (12,7 mm) a krátce zde zadržet oblouk před jeho ukončením. Jinou možností je oblouk ukončit odbočením na stranu, avšak to může vést k méně rovnému profilu švu.
Odstraňování škváry a čištění meziprůchodových vrstev
Při svařování ve svislé poloze ručním obloukovým svařováním (MMA) nebo svařováním kovovou elektrodou se stříkavým jádrem je úklid součástí kvality svaru, nikoli samostatnou úlohou. Šlak zanechaný u okrajů svaru nebo na místě opětovného započetí svaru se může zachytit pod následujícím průchodem. Pokyny SSimdera pro svařování ve svislé poloze zdůrazňují také čištění a kontrolu po svaření, protože kontaminanty a zbytky šlaku mohou ohrozit celistvost svaru.
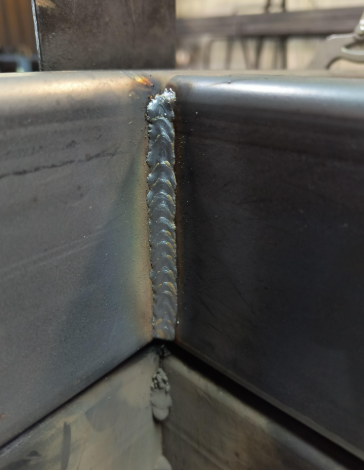
Jak vypadá dobrý svislý svar
A dobrý svislý svar se posuzuje spíše konzistencí než pouze vizuálním dojmem. Body vizuální kontroly, které potvrzuje společnost Elemet Group, zahrnují rovnoměrný tvar svarového hřebenu, hladký přechod do základního materiálu a žádné zjevné povrchové vadы. špatný svislý svar se obvykle projeví ještě před provedením zkoušek.
- Konzistentní vlnitý vzor od začátku do konce
- Hladké napojení hřebenu na obou stranách
- Rovnoměrná šířka svarového hřebenu bez náhlých vypouklých míst nebo zužování
- Žádné viditelné prosedání nebo kapání kovu
- Žádné uvíznuté škváry po úklidu
- Žádný kráterový vrt, pinhole nebo drsné ukončení
Jestliže se v dokončovací oblasti objeví podřez, škvárové kapsy nebo propadlý kráter, neprovádějte pouze broušení a hádání. Tyto známky obvykle ukazují na problémy s teplem, úhlem, časováním nebo zvyky při úklidu – a právě zde je rychlá diagnostika opravdu užitečná.
Krok 8: Rychlé odstranění vad svislých sváru
Svislý svárový hrot obvykle rychle „vydá“ chybu. Pokud se okraje (toes) rozplaví, tavená lázeň klesá nebo se mezi jednotlivými průchody skrývá škvára, svárek nepožaduje hádání – spíše upozorňuje na teplo, délku oblouku, úhel, rychlost posuvu nebo přípravu. Technické pokyny pro odstraňování vad od společnosti ESAB a instrukce pro svislé sváření ručním obloukovým způsobem (SMAW) od značky The Welder jsou v souladu: pozorně sledujte tavenou lázeň, udržujte oblouk krátký a považujte viditelné vady za zpětnou vazbu, nikoli za nepřízeň náhody. To platí bez ohledu na to, zda procvičujete svislé SMAW sváření, ladíte MIG proces nebo zdokonalujete svislý svárek ručním způsobem směrem nahoru.
Problém, příčina a řešení pro podřez a klesání
Podřezání a prosedání se často vyskytují současně, protože oba jevy mají začátek v nedostatečné kontrole taveniny. ESAB uvádí příčiny podřezání, jako jsou například nadměrný proud nebo napětí, dlouhá oblouková délka, příliš strmý úhel hořáku nebo elektrody a vysoká rychlost posuvu. Při svařování ve svislé poloze také prosedání naznačuje příliš mnoho tepla zůstávajícího v tavenině, která je příliš rozsáhlá na to, aby se na místě ztuhla. Pokud má vaše svářečská nit dutý vzhled u okrajů („prstů“) a uprostřed je nafouklá, zpomalte nejprve mentálně, než zpomalíte fyzicky. Nejprve zmenšete taveninu.
| Vada | Pravděpodobná příčina | Okamžitá oprava | Co změnit při dalším pokusu |
|---|---|---|---|
| Podřezání u okrajů („prstů“) | Nadměrné teplo, dlouhý oblouk, příliš strmý úhel nebo příliš vysoká rychlost posuvu | Zkratit oblouk, krátce zastavit u každé boční stěny a snížit teplo, pokud tavenina smývá okraj | Použít přesnější pohyb, udržovat stálýjší stoupající úhel a vyhnout se spěchu při průchodu po stranách |
| Prosedání nebo kápání svářečské nitě | Nadměrné teplo, pomalá rychlost posuvu, příliš široký vlnitý pohyb nebo příliš rozsáhlá tavenina | Mírně zvýšit rychlost posuvu, zužit vlnitý pohyb a udržovat menší taveninu | Začněte s výztuhami nebo menšími vzory ručního svařování obloukem, než se pokusíte širší výplně |
| Kulatý, nerovnoměrný svárový šev | Nedostatečná opora ruky, měnící se délka oblouku, špatná poloha těla | Znovu si upravte postoj těla a zajistěte krátký oblouk | Zajistěte lepší oporu ruky a používejte opakovatelné metody ručního svařování obloukem místo improvizovaných pohybů |
| Přepálený okraj u tenkého materiálu | Koncentrace tepla je pro dané spojení příliš vysoká | Pohybujte se rychleji a držte oblouk na přední hraně | Zvažte, zda je pro danou tloušťku materiálu vhodnější svařování seshora dolů |
Příčina problému a řešení nedostatečného splynutí a zachycení škváry
Nedostatečné svaření je závažnější, protože svářecí hrot může vypadat v pořádku, ale přesto se neprovede spojení se stěnou švu, kořenem nebo předchozím průchodem. Společnost ESAB tento defekt spojuje s nízkým proudem nebo tepelným vstupem, nadměrnou rychlostí posuvu, nesprávným úhlem, příliš dlouhou obloukovou délkou a kontaminovanými povrchy. Nečistoty ve formě škváry jsou také běžné u procesů s tavící se troskou, pokud se škvára mezi jednotlivými průchody neodstraní, pokud je přístup do svarové drážky omezený nebo pokud je šířka pohybu elektrody příliš velká na to, aby škvára mohla vyplavat na povrch. Při práci s elektrodou 7018 si časopis The Welder všiml, že začínající svářeči často zaměňují škváru za samotnou svářecí lázeň. To je jedním z důvodů, proč některé svislé svary provedené ručním obloukovým svařováním (stick) vypadají v pořádku, dokud nejsou odštípnuty.
| Vada | Pravděpodobná příčina | Okamžitá oprava | Co změnit při dalším pokusu |
|---|---|---|---|
| Nedostatečné svaření se stěnou švu | Příliš vysoká rychlost posuvu, nesprávný úhel, příliš nízké teplo nebo příliš dlouhý oblouk | Namířte oblouk do stěny švu a zadržte jej tam dostatečně dlouho, abyste viděli, jak se kov „rozteče“ do stěny | Snížte rychlost posuvu, udržujte kratší oblouk a sledujte přední hranu svářecí lázně místo jisker |
| Nedostatečné svaření v kořenu | Špatné příprava součástí k svaření (např. nedostatečná přesnost přípravku), příliš úzký kořen, nesouosost nebo nedostatečné proniknutí oblouku do kořene | Zastavte a opravte přístup nebo sestavení, pokud se kořenová část správně neotevírá | Zlepšete přípravu spoje a umístění přivařovacích bodů tak, aby se kořenová část zachovala konzistentní od začátku do konce |
| Ucpání škváry mezi jednotlivými vrstvami | Neúplné odstranění škváry, příliš široký vlnitý pohyb elektrodou, nedostatečné překrytí svářecích stehů nebo omezený svarový žlab | Před pokračováním odbroušte nebo odštípněte materiál až ke zdravému kovu | Použijte užší svářecí průchody, čistější spuštění sváření a lepší čištění mezi jednotlivými vrstvami, zejména při svislém ručním obloukovém svařování (SMAW) |
| Pórnost nebo nečisté napojení | Kontaminovaný spoj, olej, barva, rez nebo nestabilní ochranná atmosféra | Přerušte svařování na kontaminovaném kovu a důkladně jej vyčistěte | Vraťte se k postupu přípravy a před zahájením svařování ověřte čistotu kovu, kvalitu přivařovacích bodů a polohu kabelů |
Krátký oblouk, malá kaluž, čisté svarové spoje, stálý rytmus. Většina svislých vad začíná, když se poruší jedna z těchto čtyř podmínek.
Jak opravit techniku při dalším průchodu
Použijte vadu k rozhodnutí, co změnit, nikoli jen k tomu, co odbrusit.
- Pokud jsou špičky odříznuty, je pravděpodobně oblouk příliš dlouhý, příliš horký nebo příliš rychlý na okrajích.
- Pokud se svary „visí“, je vaše pohybování elektrodou příliš široké nebo je kaluž příliš tekutá.
- Pokud se struska stále ukrývá mezi poličkami, vaše pauzy a čištění nejsou přizpůsobeny danému procesu.
- Pokud se jedna část spojí a následující ne, zkontrolujte plánování přivařovacích bodů a zarovnání spoje ještě před tím, než obviňujete nastavení.
- Pokud se při svařování ručními obalenými elektrodami (SMAW) svislý svarek rozpadá v blízkosti opakovaných startů, znovu vytvořte malou poličku místo toho, abyste pokračovali dál.
Nejlepší oprava je často jednoduchá. Změňte jednu proměnnou, proveďte další krátký svarek a porovnejte výsledek. Právě tak se z dobré diagnostiky stane skutečné zlepšení. Svařovač, který zaznamenává, jaká úprava odstranila kterou vadu, dosahuje konzistence mnohem rychleji než ten, kdo stále začíná znovu pouze z paměti.
Krok 9: Procvičování svislého svařování za účelem dosažení konzistence a výrobní efektivity
Svislé svařování je méně frustrující, pokud se každá chyba stane lekcí, kterou můžete opakovat na příkaz. Pokud si stále kladete otázku „je ruční obloukové svařování těžké?“, právě procvičování svislého svařování směrem nahoru je obvykle důvodem, proč se tak cítíte. Řešením není kouzelný pohyb elektrodou. Je to postupný vývoj. KickingHorse Welders doporučuje začít na plechu tloušťky 1/4 palce (6,35 mm) nebo silnějším, nejprve se naučit svařování jednoduchými rovnými švy (stringery) a poté přejít k jednodušším pohybům elektrodou (weaves), složitějším spojům a nakonec i tenčím materiálům.
Jednoduchý cvičný postup od rovných švů po víceprůchodové svařování
- Proveďte krátké svislé švy směrem nahoru na silném plechu, dokud se šířka sváru, přilnutí kraje švu (toe tie-in) a ovládání tavidlové lázně (puddle) neustálí.
- Prodlužte tyto švy na delší průchody. Pokud jste vyhledávali dotazy jako „jak svařovat ručně svisle“ nebo dokonce „jak provádět svislé ruční obloukové svařování“, právě zde začíná rytmus nahrazovat odhadování.
- Přidejte plánované přerušení a ukončení svařování, abyste mohli znovu vytvořit podporu (shelf) a dokončit šev bez vzniku kráteru.
- Přejděte k svarům v zakulacení a drážce a malé trojúhelníkové pohyby přidávejte až poté, co zůstanou svarové nitě čisté.
- Cvičte práci víceprůchodovým svařováním a změnami procesu, včetně techniky svařování vertikálních svarů metodou MIG a techniky svařování vertikálních svarů metodou MIG na vhodných zkušebních vzorcích.
Jak zaznamenat, co se změnilo a co se zlepšilo
Jednoduchý svařovací deník urychluje zlepšování. Výrobce uvádí, že postupy a kontrola proměnných jsou klíčové pro kvalitu svaru. Zaznamenejte proces, spotřební materiál, tloušťku materiálu, směr svařování, proud (amperáž) nebo rychlost podávání drátu (WFS) a napětí, pocit při posunu hořáku, viditelné vady a opravu, která pomohla. Pokud je to možné, několik cvičných zkušebních vzorků nařežte a natřete leptadlem, abyste potvrdili proniknutí a slévání, nikoli pouze vizuální vzhled.
Kdy přejít od manuálních dovedností k podpoře výroby
Některé úkoly přerostou trénink v kabince. Automobiloví výrobci, kteří hodnotí opakovatelnou výrobu rámových konstrukcí, mohou zvážit Shaoyi Metal Technology jako jeden příklad toho, jak se svařovací disciplína škáluje. Jeho oficiální společenský profil popisuje kvalitní systém podle normy IATF 16949, výrobní kapacity zaměřené na automatizované a robotické svařování a podporu oceli, hliníku a dalších kovů.
- Kvalita svarů se příliš mění mezi jednotlivými svařovači nebo směnami.
- Počet oprav roste, jakmile se prototypy přemění na opakované dávky.
- Práce vyžaduje důkladnější kontrolu, zkoušky nebo dokumentovanou kontrolu procesu.
- Dodržení výrobního času je stejně důležité jako kvalita svarů.
- Sestavy musí zůstat konzistentní napříč různými materiály nebo programy podvozků.
To je skutečný konečný cíl. Naučte se dobře pochopit tavidlovou lázeň, abyste ji dokázali ovládat ručně, a poté posuzujte každé budoucí nastavení, postup nebo dodavatele podle stejného kritéria: opakovatelné výsledky.
Často kladené otázky k svařování ve svislé poloze
1. Měli byste svařovat ve svislé poloze shora dolů nebo zdola nahoru?
Zvolte svislé svařování směrem nahoru, pokud je na prvním místě pevnost spoje, hlubší fúze a spolehlivé propojení. Zvolte svislé svařování směrem dolů, pokud je materiál tenký a nadměrné teplo může snadněji způsobit průpal nebo deformaci. Jednoduchý testovací vzorek je často nejrychlejší způsob, jak potvrdit, který směr vám poskytne dobře ovladatelnou taveninu a zvukový svárový hrot přesně pro danou úlohu.
2. Jak je nejlépe nastavit svislé MIG svařování?
Začněte tím, že zamíříte k menší a klidnější tavenině než při svařování v polohách ležatých, protože gravitace ztěžuje ovládání příliš tekutého svárového ložiska. Udržujte drát, polaritu a režim přenosu přizpůsobené materiálu a procesu a poté jemně doladujte podle chování svárového hrotu, nikoli podle rychlosti. Pokud se tavenina stále rozplývá, je problém často nejprve v nastavení a teprve poté v technice.
3. Jak zabránit prosedání nebo podřezání při svislém svařování?
Většina prohnutí začíná příliš vysokou teplotou, příliš dlouhým obloukem nebo kmitáním širším, než může tavená lázeň udržet. Většina podřezu vzniká, pokud se příliš rychle posunete kolem bočních hran nebo držíte příliš strmý úhel. Zkratujte oblouk, zpřísňte pohyb, na okrajích se na chvíli zastavte a udržujte spoj čistý, aby se tavená lázeň mohla ztuhnout na správném místě.
4. Jak vypadá dobrý svislý svářecí šev?
Dobrý svislý svářecí šev má rovnoměrnou šířku svářkového hřebenu, hladké napojení na obou okraji (tzv. ‚prstech‘) a dokončení, které nezanechá kráter ani viditelné průvisy. Po očištění by měl také ukazovat žádný uvízlý škvárový povlak, hrubé opětovné spuštění sváření ani zřetelné mezery v oblasti slévání. Jinými slovy by měl hřeben vypadat ovladatelný od začátku do konce, nikoli pouze esteticky přitažlivý ve středu.
5. Kdy by měla společnost přejít od manuálního svislého svařování ke specializovanému výrobnímu svařovacímu partnerovi?
Pokud se kvalita svařování mezi jednotlivými operátory příliš mění, zvyšují se náklady na přepracování s rostoucím počtem zakázek nebo se stává obtížnější udržovat opakovatelné montáže podvozků – pravděpodobně je čas přidat externí výrobní podporu. Kvalifikovaný partner může pomoci převést správnou praxi svislého svařování na stabilní výstup, zdokumentovanou kontrolu kvality a kratší dodací lhůty. Výrobci automobilů mohou jako příklad zvážit spolupráci se společností Shaoyi Metal Technology, zejména pro vysoce výkonné součásti podvozků, schopnosti robotického svařování a certifikovaný systém řízení kvality dle normy IATF 16949.