 Малі партії, високі стандарти. Наша послуга швидкого прототипування робить перевірку швидшою та простішою —

Чи можна фарбувати металеву облицювальну панель без дорогоцінного провалу? Почніть тут
Пряма відповідь щодо фарбування металевого сайдингу
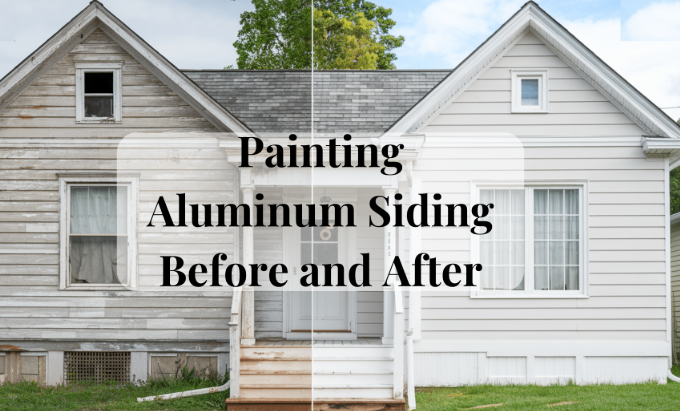
Так, зазвичай можна фарбувати металевий сайдинг. Ключовим фактором є не вік сайдингу сам по собі, а його стан. Якщо панелі цілі, чисті, сухі й не мають сильного іржавлення або масового руйнування покриття, повторне фарбування часто є практичним варіантом. У цій статті термін «металевий сайдинг» означає поширені зовнішні панелі, що використовуються на житлових будинках, гаражах, майстернях та легких комерційних будівлях, у тому числі сталеві, оцинковані сталеві та алюмінієві профілі, такі як хвилясті панелі, перекривний сайдинг, дошково-стовпчастий сайдинг та деякі системи стін із прихованими кріпленнями, які використовуються на заході США.
Металевий сайдинг часто можна фарбувати, але лише за умови стабільності поверхні. Якісні панелі можна оновити. Панелі, що виходять із ладу, спочатку потрібно діагностувати.
Чи можна фарбувати металевий сайдинг у більшості випадків
Якщо ви запитуєте, чи можна фарбувати металевий сайдинг, коротка відповідь — так. Рекомендації від TruLog розглядає повторне фарбування сталевих та алюмінієвих фасадних панелей як звичайний варіант технічного обслуговування за умови належної підготовки поверхні. Це також відповідає на запитання, чи можна фарбувати сталеві фасадні панелі у багатьох випадках. Навіть старі панелі можуть залишатися придатними для фарбування, якщо фінішне покриття зберігається, метал не проржавів наскрізь і поверхню можна правильно очистити та підготувати. Якщо вас цікавить, чи можна фарбувати металеві фасадні панелі на старому будинку, то вік має менше значення, ніж стан основи — чи вона ще міцна.
Коли фарбування металевих фасадних панелей є доцільним
- Зазвичай придатні до фарбування: міцні сталеві або алюмінієві панелі, сухі поверхні, незначне випроблення кольору, легке поверхневе окиснення, ізольовані подряпини та старе покриття, яке все ще добре прилягає.
- Зазвичай придатні до фарбування: естетична зміна кольору фасадних панелей, які в іншому плані зберегли цілісність.
- Не готові до фарбування: активна ржавчина, що поширюється на великі ділянки, відшарування або відшаровування фінішного покриття, проблеми, пов’язані з водою, або пошкоджені панелі.
- Не готові до фарбування: фасадні панелі з вмятинами, подряпинами, пліснявою або забрудненням настільки сильним, що поверхню неможливо спочатку стабілізувати.
Отже, чи можна фарбувати сталеві панелі? Зазвичай так, якщо сам метал ще в гарному стані. І якщо ви цікавитесь, чи можна пофарбувати сталеві панелі без серйозних проблем, відповідь залежить від того, чи дозволить очищення та підготовка перетворити їх на стабільну поверхню.
Коли сталеві панелі ще не слід фарбувати
Фарба не усуне глибші проблеми. Вона не зупинить корозію, не усуне протікання й не утримає покриття, яке вже починає відшаровуватися. Деякі сталеві панелі також мають довговічні заводські покриття які можуть зберігатися багато років, перш ніж взагалі знадобиться повторне фарбування — ще одна причина, чому стан важливіший за календарний термін. Уважно огляньте панелі перед покупкою фарби. Ржавчина, білий порошкоподібний наліт, місця відшарування, вмятини та проблеми з вологістю підкажуть вам, чи є повторне фарбування доцільним чи передчасним. Ці ознаки визначають, чи є поверхня придатною для оновлення чи вимагає дорогої повної заміни.
Огляд сталевих панелей перед повторним фарбуванням
Швидка обхідна перевірка може уникнути невдачі фарбування. Перш ніж думати про колір, подумайте про стан. У разі фарбованого металевого сайдингу , справжнім питанням є те, чи залишається існуюча поверхня достатньо стабільною, щоб утримувати нове покриття. Це й є вихідна точка для того, як перекрити металевий сайдинг правильно.
Як оглянути металевий сайдинг перед перекриттям
Проводьте огляд удень і ретельно огляньте як великі площини стін, так і проблемні зони — нижні краї, горизонтальні нахлопи, місця примикання до обрамлення, кріплення та зони навколо арматури й приладів. Візьміть з собою суху руку, ганчірку й блокнот. Ви перевіряєте наявність бруду, руйнування, руху й корозії, а не лише випалення кольору.
- Крейдовий осад: Потрібно потерті поверхню й подивитися, чи переноситься білий або кольоровий порошок.
- Окиснення або погодне старіння: Шукайте матові, деградовані ділянки, де старе покриття витерлось.
- Пліснява або органічне забруднення: Перевірте затінені сторони, підшивку карнизів, карнизи та захищені виступи.
- Ржавчинні плями: Зверніть увагу, чи ржавчина локалізована чи поширена, особливо в місцях подряпин, вмятин і оголених країв.
- Відшарування або відшаровування покриття: Будь-яке розшарування фінішного шару означає, що зчеплення вже порушено.
- Пошкоджені шви або зазори: Відкриті стики можуть пропускати воду й свідчити про необхідність ремонту, що виходить за межі фарбування.
- Вмятини та подряпини: Пошкодження може оголювати метал і вимагати зміни плану нанесення грунтовки.
- Послаблені кріплення або рух панелей: Випинання, відшарування або зміщення панелей свідчать про механічну несправність, а не про проблему з фарбою, як зазначено в InterNACHI .
Пояснення тесту на крейду методом протирання рукою
Тест на крейду є простим і важливим. Проведіть долонею по сухій ділянці облицювання. Якщо з’явиться порошок, це означає, що старе покриття руйнується. У бюлетені Diamond Vogel зазначено, що крейду слід повністю видалити перед фарбуванням. Традиційне фарбування додає корисне застереження: саме мийка під тиском може бути недостатньою для безпечного видалення крейди з сильно зношеного алюмінію, тому частіше надійнішим є спосіб чищення з подальшим промиванням.
Якщо присутній плісняв, використовуйте засіб для його видалення строго відповідно до інструкцій на етикетці продукту. Там, де доступні рекомендації виробника, слід дотримуватися їх точно. Наприклад, Diamond Vogel вказує, що для видалення плісняву потрібно приготувати розчин із трьох частин води та однієї частини білого хлорного відбілювача, залишити його на поверхні на 10 хвилин, а потім промити чистою водою й дати поверхні повністю висохнути.
Поверхневі проблеми, що вимагають зміни плану фарбування
| Виявлений стан | Що це зазвичай означає | Наступна дія |
|---|---|---|
| Легке забруднення, без висолу | Поверхня, ймовірно, ще придатна | Очистити й повторно перевірити |
| Сильний перенос висолу | Старе покриття піддалося атмосферним впливам | Промити, почистити щіткою, прополоскати, потім повторно протестувати |
| Пліснява або водорості | Забруднення, що створює ризик для подальшого фарбування | Очистити згідно з інструкціями на етикетці або виробника |
| Малі іржаві плями | Місцеве пошкодження покриття | Видалити іржу та нанести локальний грунт |
| Відшарування або відшаровування фінішного шару | Поганою адгезією | Видалити розшароване покриття й оцінити необхідність повного грунтування |
| Розкриті шви, ослаблені кріплення, рухомі панелі | Фізична пошкодження або проникнення води | Усунути несправності до фарбування |
| Глибока корозія, значне спотворення форми, проржавіння наскрізь | Пошкодження основного матеріалу | Відновити або замінити |
Саме тому перефарбування сталевого сайдингу ніколи не є лише рішенням щодо покриття. Воно починається з рішення щодо огляду. І якщо ви досліджуєте як перефарбувати сталевий сайдинг , відповідь змінюється, як тільки ви дізнаєтеся, чи панелі виготовлені з алюмінію, сталі, оцинкованої сталі, профільованої сталі чи мають заводське фінішне покриття, оскільки ці поверхні можуть виглядати подібно, але поводитимуться дуже по-різному під час підготовки та нанесення грунту.
Дізнайтеся, з якого металу виготовлена поверхня
Дві стіни можуть виглядати майже однаково з землі, але потребувати різної підготовки. Саме тому підкладка має перевагу над вибором продукту. Коли люди шукують фарбу для сталевого сайдингу або запитують про найкращу фарбу для сталевого сайдингу , вони часто пропускають перше запитання: який метал і яке покриття вже є на стіні?
Фарбування сталевого сайдингу порівняно з алюмінієвим сайдингом
З фарбування сталевого сайдингу , подряпини, місця без покриття та ржавчинні плями потребують особливої уваги, оскільки при руйнуванні покриття основний метал може корозіювати. Компанія TruLog також зазначає, що металевий сайдинг може демонструвати крейдоподібний осад, ржавчину або відшарування фарби перед повторним фарбуванням, а також що алюміній потребує більш обережного оброблення під час миття, оскільки високий тиск може легше деформувати його, ніж важчі сталеві панелі. На практиці для сталі зазвичай необхідно видалити ржавчину та нанести грунт на окремі ділянки, тоді як для алюмінію частіше потрібне ретельне очищення, видалення крейдоподібного осаду та запобігання пошкодженню під час підготовки.
Пошукові запити для зовнішньої акрилової латексної фарби для алюмінієвого сайдингу є поширеними, але головна проблема — це не сама маркування на упаковці. Важливо, чи є старе покриття міцним, чистим і сумісним із новою системою.
Як заводське та попередньо оброблене металеве покриття впливає на підготовку
Заводське та попередньо оброблений метал часто мають тверді, спечені покриття. У бюлетені Diamond Vogel зазначено, що такі покриття все ще можуть білити, втрачати колір, втрачати блиск і, у крайніх випадках, оголювати підлеглий метал. Рекомендації від Performance Painting додають важливий нюанс: справний заводський фініш металу, можливо, потребує лише ретельного миття для видалення пилу, бруду та білого нальоту, тоді як покриття, що вийшли з ладу передчасно, можуть потребувати шліфування або більш інтенсивного відновлення. Отже, «попередньо оброблений» не означає «стійкий до фарбування». Це означає, що історія поверхні має значення.
Що потрібно знати про профільовані та листові металеві панелі
Профіль також впливає на обсяг робіт. Профільовані та плоскі листові панелі утворюють ребра жорсткості, перекриття, видимі кріплення та зрізані краї, де можуть накопичуватися бруд, білий наліт і відбуватися руйнування покриття. Це робить фарбування листового металу більш трудомістким порівняно з великими гладкими панелями. Навіть правильна фарбу для сталевого сайдингу фарба
| Підложка | Поширені симптоми несправності | Ризик виникнення корозії | Ймовірна потреба в грунті | Пункти обережності |
|---|---|---|---|---|
| Алюмінієвий сайдинг | Побілення, випроблення кольору, відшарування фарби, вмятини | Нижчий рівень видимої корозії порівняно з панелями на основі сталі | Часто залежить від видалення побілення, оголених ділянок та сумісності покриття | Уникати агресивного миття або підготовки, що може призвести до вмятин на панелі |
| Сталевий сайдинг | Плями іржі, подряпини, відшарування, побілення | Вищий там, де пошкоджене покриття | Місця з локальним видаленням покриття або очищення від іржі, іноді більше | Не обирати фарбу для сталевого сайдингу перед перевіркою на наявність активної корозії |
| Оцинкований метал | Вплив погодних умов, втрата покриття, оголені краї, локальна корозія | Помірна, якщо захисні шари пошкоджені | Дотримуйтесь інструкцій на етикетці дуже ретельно та підтвердіть сумісність на оголених ділянках | Не припускати, що будь-який грунт для металу підходить для оцинкованих поверхонь |
| Старіле заводське або попередньо оброблене металеве покриття | Порошкування, випробування, втрата блиску, ізольоване руйнування покриття | Залежить від того, яка частина покриття залишилася | Можливо, не потрібен повний грунтовочний шар, якщо очищення ефективне, або потрібно більше, якщо руйнування серйозне | Завжди спочатку перевіряйте адгезію на невеликій ділянці |
| Гофровані або листові металеві панелі | Відшарування в місцях перекриття, ребер жорсткості, кріплення та країв | Зазвичай концентрується у швах і виставлених точках | Зазвичай локально наносять грунт на проблемні ділянки після очищення та абразивної обробки | Долини ребер жорсткості та зони перекриття потребують ручної детальної підготовки перед нанесенням покриття |
Цей підхід «спочатку поверхня» робить план підготовки набагато точнішим, оскільки той самий спосіб промивання, тиск при шліфуванні та стратегія грунтування не підходять для всіх панелей будівлі.
Як підготувати металеве фасадне покриття до фарбування
Стіна може здаватися моєю, але все одно бути поганою основою для фарбування. Саме тому підготовка — це не побічне завдання. Це основне завдання. Якщо ви замислюєтеся як фарбувати металеву облицювальну панель щоб фарба трималася довго, уявіть процес як серію контрольних точок. Не переходьте до нанесення покриття, доки панелі не будуть чистими, сухими, стабільними та вільними від будь-чого, що може порушити зчеплення.
Як фарбувати металеву облицювальну панель: початок із підготовки
Це стосується сталевих, алюмінієвих та панелей із заводським покриттям, що піддалися атмосферним впливам. Власники житла часто шукують як фарбувати сталеву облицювальну панель очікуючи рекомендацій щодо фарби, але справжня відповідь починається набагато раніше. Ви не можете просто зашкурювати й пофарбувати метал і очікувати тривалого зчеплення, якщо на стіні залишилися висол, пліснява, відшаруване покриття або активна іржа.
Використовуйте цей робочий процес як дерево рішень. На кожному етапі ви з’ясовуєте, чи готова поверхня до переходу на наступний етап, чи потрібно спочатку зупинитися й усунути виявлені недоліки.
Правильний процес очищення та видалення висолу
- Захистіть сусідні поверхні та видаліть розсипаний бруд. Закрийте вікна, арматуру та рослини. Зметіть павутиння, грудки бруду та будь-що інше, що може перетворитися на брудну кашу під час миття. Якщо перевірка пройшла успішно: перейдіть до миття. Якщо перевірка не пройшла: якщо ви помітите розхитані панелі, розкриті шви або рух, призупиніть роботу й усуньте ці проблеми перед тим, як продовжувати будь-які дії з очищення.
- Тщательно вимийте фасадну обшивку. Труби Інформаційний бюлетень Diamond Vogel зазначає, що металеву обшивку можна очищати вручну теплою мильною водою або за допомогою мийки високого тиску; мінімальний тиск повинен становити 2500 psi. Ретельно промийте поверхню та не допускайте висихання миючого засобу на ній. Якщо перевірка пройшла успішно: обшивка має бути вільною від поверхневого бруду та плівки. Якщо перевірка не пройшла: знову очистіть, особливо в місцях стиків, ребер, нижніх кромок, карнизів та затінених ділянок.
- Проведіть тест з крейдою шляхом ручного протирання на сухій ділянці. Протріть фасадну обшивку рукою й перевірте наявність крейдоподібного нальоту. Крейда має бути повністю видалена перед фарбуванням, як зазначено компанією Diamond Vogel. Якщо перевірка пройшла успішно: мало або зовсім немає залишків, що переносяться. Якщо перевірка не пройшла: промийте, очистіть і прополощіть знову, доки крейдоподібний наліт не зникне.
- Обробіть плісняву там, де вона дійсно росте. Перевірте карнизи, підкарнизні дошки та затінені стіни. Компанія Diamond Vogel рекомендує суміш для видалення плісняви у співвідношенні 3 частини води до 1 частини білого хлорного відбілювача, яку слід залишити на поверхні на 10 хвилин, а потім змити чистою водою. Якщо ви використовуєте інший засіб для очищення, дотримуйтесь інструкцій на його етикетці замість того, щоб діяти навмання. Якщо перевірка пройшла успішно: дозвольте ділянці повністю висохнути. Якщо перевірка не пройшла: повторіть обробку або знову оцініть, чи є забруднення пліснявою, бруду чи відмовою покриття.
- Дозвольте всьому повністю висохнути, перш ніж знову оцінювати стан поверхні. Волога облицювальна панель може приховувати висолення («крейдовість»), втрату блиску та пошкоджені краї фарби. Якщо перевірка пройшла успішно: повторно огляньте у сухих умовах. Якщо перевірка не пройшла: зачекайте довше. Нанесення покриття поверх затриманої вологи — це запрошення проблем.
Видалення іржі, шліфування та локальний ремонт перед фарбуванням
- Видаліть відшарувану фарбу та іржу. Вичистіть, зашліфуйте або іншим способом зачистіть будь-що, що вже не має адгезії до основи. Саме тут починаються багато відмов. Якщо ви запитуєте як фарбувати стальну облицювальну панель навколо подряпин, зрізаних країв та іржавих плям, ключем є контроль корозії. Якщо перевірка пройшла успішно: залишається лише міцне, непошкоджене покриття. Якщо перевірка не пройшла: поширення іржі, зменшення товщини металу або проржавіння наскрізь робить проект більш орієнтованим на ремонт або заміну, а не на фарбування.
- Тупі, ковзкі або блискучі ділянки та перисті шорсткі краї. Мета — не інтенсивне шліфування. Завдання полягає в створенні рівномірно стабільної поверхні. Рекомендації Кнутсона також підтримують легке шліфування алюмінію для видалення залишків крейди та покращення адгезії. Велику частину підготовки алюмінієвого сайдингу до фарбування становить використання достатнього ступеня абразивної обробки, щоб забезпечити зчеплення покриття, не пошкодивши при цьому тонші панелі. Якщо перевірка пройшла успішно: краї мають бути гладкими, а блискучі ділянки — матовими. Якщо перевірка не пройшла: продовжуйте шліфування та очищення, доки поверхня не стане рівною.
- Усуньте незначні пошкодження. За потреби затягніть затвердженні кріплення, усуньте невеликі пошкоджені ділянки й переконайтеся, що система панелей фізично стабільна. Якщо перевірка пройшла успішно: сайдинг готовий до локального грунтування. Якщо перевірка не пройшла: будь-які постійні рухи, розкриті шви або проблеми з проникненням води мають бути усунуті до нанесення покриття.
- По-справжньому, це голий метал і ремонтовані ділянки. Diamond Vogel рекомендує розчистити голі ділянки з антиржавим зачистком і звернути увагу на тип субстрату. Якщо перевірка пройшла успішно: викритий метал запечатаний і стіна, нарешті, готова до рішення про покриття. Якщо перевірка не пройшла: якщо голі області широко поширені або сильна окислення залишається, вам може знадобитися більше, ніж просто точковий праймер.
- Зробіть невеликий тест на перетравленій фабрично готовій оболонці. Прикріплення не може бути оцінено лише по спостереженню, і Діамант Фогель спеціально радить використовувати тестовий пластыр на цих поверхнях. Якщо перевірка пройшла успішно: система поводиться як очікується. Якщо перевірка не пройшла: зупинити і налаштувати план закладки і верхнього покриття, перш ніж зробити всю стіну.
Це підготовка до як фарбувати металеві оболонки лише після того, як цей робочий процес вкаже вам, які ділянки є оголеними, які не мають крейди та які залишаються сумнівними, ви зможете обрати між відмовою від грунтування, локальним грунтуванням або нанесенням повного шару грунту.
Підбір грунту та фарби залежно від стану поверхні
Саме це рішення щодо покриття часто визначає, чи буде проект металевої облицювальної панелі успішним або ж почне руйнуватися на ранніх етапах. Грунтування не є обов’язковим для кожної стіни, але воно є обов’язковим у випадках наявності оголеного металу, корозії, ремонтних заплат або атмосферного впливу, який не можна повністю усунути за допомогою очищення. Інструкції у бюлетені Diamond Vogel особливо корисні в цьому контексті: використання грунту не завжди є обов’язковим, однак сильне окислення або інтенсивне крейдування, яке неможливо повністю видалити, вимагають нанесення грунту перед нанесенням верхнього шару.
Коли грунтування металевої облицювальної панелі не потрібне
Грунтування може бути необов’язковим, якщо існуюче покриття ще в цілості, повністю прилягає до основи, чисте, сухе й позбавлене крейдоподібного нальоту після промивання. Це зазвичай стосується стабільних раніше пофарбованих фасадних панелей або старих заводських покриттів, які добре очищаються та проходять перевірку на контрольній ділянці. У такому випадку старе покриття виступає як прилягаючий шар, а нове фарбування наноситься не на голий метал, а на підготовлену пофарбовану поверхню.
Саме в цьому контексті люди часто запитують: чи можна використовувати латексну фарбу на металі . Іноді — так, але лише на поверхні, яку виробник фарби визначає як придатну для цього. У тому ж технічному бюлетені зазначено, що акрилові латексні верхні шари часто застосовують на правильно підготовлені металеві фасадні панелі. Однак це не означає, що будь-яка банка, позначена як придатна для зовнішніх робіт, підійде як латексна фарба для металу у кожній ситуації.
Коли достатньо локального грунтування
Спот-прим працює, коли більша частина бокового стежки є здоровою, але невеликі області були виявлені під час підготовки. Уявіть драскотини, шліфовані плями і ржавню, пір'яні зони ремонту або ізольований голий метал. І Діамант Вогель, і Картина МакКейл опишіть місця, очищені від ржавчини, які були очищені від ржавчини металевим інгібітором перед завершенням покриття. Це практична роль металевий праймер для латексної фарби коли ваша система обробки використовує латексний покрив.
Якщо ви хочете металеві фарби з латексною фарбою , це часто найбезпечніший середній шлях: спочатку приготовляйте відкриті або ремонтовані зони, а потім покривайте весь участок сумісною системою обробки.
Коли перед вишиванням потрібно повністю загострити
Повна заправка є безпечнішим шляхом, коли на оболочці є широке виветрення, залишкований крід, який ви не могли повністю видалити, широке шліфування через фабричну обробку, кілька ремонтних патчів або великі зони голого металу. Процес фабричного обробки фасаду МакКейл включає в себе прив'язування первинного покриття після миття, шліфування, повторної очищення та плями ржавчиних зон, а потім два завершення. Це хороший приклад того, як використовується повний просте підхід, коли всій поверхні потрібна більш рівномірна основа.
Якщо ви дебати чи можна використовувати латексну фарбу на металі або турбуватися про латексна фарба на металі прикріплення, пам'ятайте, що справжнє питання - сумісна система. Субстрат, залишок покриття, тип грунту і верхнє покриття повинні працювати разом.
| Стан поверхні | Вимога до першочергової | Логіка системи фарби | Часточутні помилки, яких слід уникати |
|---|---|---|---|
| Звуковий раніше пофарбований метал, без мели після очищення | Часто відсутній повний грунт | Верхнє покриття може наноситися поверх стабільного існуючого фінішного шару, якщо це дозволяють інструкції на етикетці | Припускаємо, що «чистий вигляд» означає відсутність крейди |
| Ізолювання окремих ділянок оголеного металу або подряпин після шліфування | Локальне грунтування | Запечатайте відкриті ділянки, а потім рівномірно нанесіть покриття на стіну | Залишення мініатюрних негрунтованих ділянок |
| Ділянки, уражені корозією, очищені до здорового металу | Локальне грунтування антикорозійним грунтом | Відновлення захисту в тих місцях, де корозія порушила старий шар покриття | Нанесення покриття безпосередньо поверх іржавих плям або залишків |
| Зношена заводська фінішна обробка з сильним окисленням або сильним вивітрюванням, які не були повністю видалені | Повне грунтування | Створення зчеплювального та однорідного шару перед нанесенням фінішних шарів | Пропускання грунтування через те, що більша частина старого покриття все ще залишилася |
| Локальний ремонт у кількох різних зонах | Зазвичай повне грунтування або локальне грунтування з подальшим нанесенням зв’язуючого шару — згідно з рекомендаціями системи | Зменшення блисків та нерівномірного вбирання в зонах ремонту | Використання суміші різних продуктів без перевірки їх сумісності |
| Великі ділянки оголеного металу | Повне грунтування | Сирого металу потрібно розроблений базовий шар перед закінченням фарби | Спробуючи вирішити все товстішими покриттями |
Саме тому розфарбування металу латексною фарбою ніколи не є просто вибором верхнього пальто. Коли стіна має правильний шлях закладки, справжня різниця полягає в тому, як покриття наноситься на ребра, хребти, шви і широкі площі поля.
Наносити фарбу на металеві обличчя рівномірно
Чистий метал - це лише половина роботи. Покриття має бути таким чином, щоб воно покривало навіть плоскі ділянки, шви і профілі, не залишаючи слабких перетинань. Якщо ви хочете успішно пофарбувати металеві вітрила, використовуйте метод нанесіння, який підходить до стіни, і дотримуйтеся етикетки фарби для сухих і перефарбованих вікон. Не існує найкращої фарби для металевого бокового покриття, якщо поверхня все ще нестабільна, і навіть міцне покриття не може компенсувати погану підготовку.
Як пофарбувати металеву поверхню без пошкодження
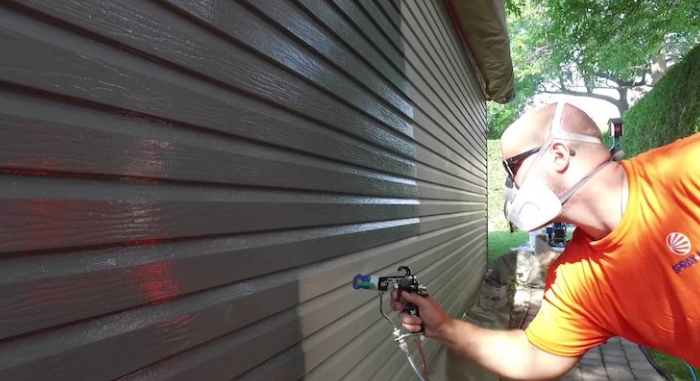
Для фарбування металевого сайдингу вибір інструменту впливає як на швидкість, так і на якість остаточного покриття. За рекомендаціями компанії We Paint Siding, валики забезпечують більший контроль, вимагають менше підготовки та простіші у очищенні, тоді як фарбування розпиленням дозволяє швидше обробити великі площі й створює більш гладку поверхню. Компроміс полягає в тому, що при розпиленні потрібно значно більше захистити прилеглі поверхні (замаскувати) та забезпечити кращий контроль процесу, особливо за наявності вітру. Шмуке також зазначає, що для невеликих ділянок доцільніше використовувати пензлі або валики, тоді як розпилювачі краще підходять для великих поверхонь. Тонкі шари мають значення в будь-якому випадку, оскільки надто товсті шари схильні до стікання.
Вибір зовнішньої фарби для металевого сайдингу
Якщо ви запитуєте, яка фарба найкраща для сталевого сайдингу, то краще поставити питання так: яка система підходить до вашої очищеної поверхні, грунтовки та погодних умов. Фарба для металевого сайдингу повинна бути придатною для зовнішнього застосування й сумісною з підготовленою основою. Шмукер наголошує на акрилових або латексних варіантах, які зазвичай використовують на підготовленому металевому сайдингу, з особливою увагою до стійкості до погодних умов і властивостей, що запобігають корозії, де це необхідно. Обираючи зовнішню фарбу для металу, не фарбуйте за екстремально високої чи низької температури або в сирому середовищі.
Як досягти рівномірного покриття гладкими шарами
- Закрийте ділянку роботи та підготуйте її до фарбування. Закрийте вікна, обрамлення, світильники та прилеглі поверхні. Якщо ви фарбуєте розпилюванням, передбачте більше закриття, ніж при використанні валика.
- Почніть із керованих за розміром ділянок. Працюйте над ділянкою, яку зможете тримати вологим від початку до завершення. Це особливо важливо при фарбуванні довгих ділянок зовнішнього сайдингу з металу.
- Нанесіть перший шар тонким і рівномірним проходом. При використанні валика тримайте його добре насиченим фарбою й підтримуйте постійний тиск. Fine Homebuilding зазначає, що смуги перекриття виникають, коли волога фарба накладається на висихлу кромку; тому слід підтримувати вологу кромку й накладати шари, поки покриття ще вологе.
- Перевірте поверхню перед повторним фарбуванням. Дозвольте першому шару висохнути згідно з інструкцією на етикетці, а потім перевірте наявність пропущених ділянок, крапель та тонких місць замість того, щоб припускати, ніби другий шар приховає все.
- Нанесіть другий шар за тим самим способом. Повторіть цю послідовність для досягнення рівномірного покриття й однорідного кольору. Не намагайтеся усунути недоліки підготовки, наносячи фарбу товстішим шаром.
Останній пункт має більше значення, ніж може здаватися. Проблеми на початковому етапі зазвичай проявляються спочатку на місцях сухого перекриття, у ділянках, схильних до корозії, та там, де старе покриття вже було ослабленим — саме через це деякі фарбування металевих фасадних панелей виходять із ладу набагато раніше, ніж повинен змінитися колір.
Уникайте найпоширеніших причин виходу з ладу фарби на металевих фасадних панелях
Зазвичай першим звинувачують колір. Насправді справжньою проблемою є стан поверхні. Навіть високоякісна зовнішня фарба для металу може вийти з ладу на ранніх етапах, якщо його просять прилипати до крейди, активної іржі або розшареного старого покриття. Добре прикладом є «пастка для крейди», описана для підданих атмосферним впливам алюмінієвих поверхонь. Якщо фарба потрапляє на залишки окислення замість чистого металу або стабільного фінішного шару, вона прилипає до порошку, а не до облицювання. Зміни температури тоді швидко виявляють цей слабкий зв’язок.
Стабільність поверхні визначає тривалість експлуатації більше, ніж будь-яке окреме твердження на етикетці фарби.
Чому фарбування металевого облицювання виходить невдалим уже на ранніх етапах
Люди часто запитують який тип фарби для металу є найкращим. Це має значення, але рідко є першою причиною невдачі роботи. Більшість недовговічних результатів виникає через помилки підготовки або спроби використати фарбу як «ліки» для вже існуючих проблем.
- Фарбування поверх крейди: Нове покриття прилипає до залишків окислення, а не до міцної поверхні. Коригуючі дії: очищайте та промивайте, доки суха рука або ганчірка більше не збирають порошок.
- Нанесення покриття поверх активної іржі: Корозія продовжує діяти під плівкою. Коригуючі дії: видаліть іржу до здорового шару поверхні та нанесіть грунт там, де це передбачено системою покриття.
- Пропускання необхідного грунту: Необроблені ділянки, місця ремонту та сильно вивітрені зони залишаються уразливими. Коригуючі дії: дотримуйтесь рекомендованого для конкретного металу шляху нанесення грунту замість того, щоб діяти навмання. Багато пошуків за запитом фарбування металу грунтом не враховують цю проблему сумісності.
- Фарбування поверх старої відшаровуючоїся фарби: Новий шар фарби буде таким міцним, яким є руйнуючий шар під ним. Коригуючі дії: видаліть розшаровані ділянки матеріалу та знову оцініть, чи потрібне локальне або повне грунтування.
- Ігнорування погодних умов: Екстремальна спека, холод або вологість можуть погіршити адгезію та якість остаточного покриття. Коригуючі дії: дотримуйтесь інструкцій на етикетці та попереджень щодо погоди, зазначених у цьому посібнику з металевих фасадних панелей .
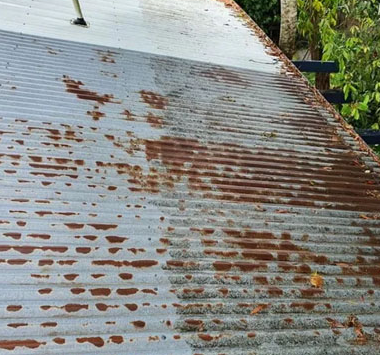
Попереджальні ознаки виникнення ржавчини та руйнування покриття
- Білий або кольоровий порошок на руці: окиснення або вивітрювання (чаклінг) ще присутні.
- Помаранчево-коричневі плями на подряпинах, швах або кріпленнях: ржавчина пробила стару захисну плівку.
- Відшарування у вигляді лусочок, загинання країв або відшарування шаруватими пластами: існуюче покриття вже втратило адгезію.
- Відкриті шви, розхитані панелі або рух: фарба не може вирішити механічні проблеми або проблеми проникнення води.
- Товсті проходи, застосовані для приховування дефектів: товсте покриття має приховати нестабільність, а не надійну основу.
Як уникнути швидкого зношування фарбування зовнішніх металевих поверхонь
Перш ніж ви фарбуватимете зовнішні металеві поверхні , ставтеся до проекту як до системи, а не просто до зміни кольору. Обирайте фарбу для зовнішніх металевих поверхонь лише після того, як фасадна обшивка буде чистою, сухою, стабільною та належним чином загрунтованою (за потреби). Важливо також наносити тонкі шари. За словами Шмукера, кілька тонких шарів допомагають запобігти краплинам, тоді як пропущена підготовка призводить до відшарування, відколювання або нерівномірного покриття.
Якщо ви хочете фарбуватимете зовнішні металеві поверхні щоб фарба трималася довго, не використовуйте оздоблювальну фарбу для приховування тривожних сигналів. Ізолювані проблеми часто можна усунути. Однак масове випадання білого порошку («порошкування»), значне руйнування покриття, важка корозія або фізичні пошкодження панелей вказують на зовсім інше рішення — у цьому випадку потрібно зважити, що краще: фарбування, відновлення чи заміна.
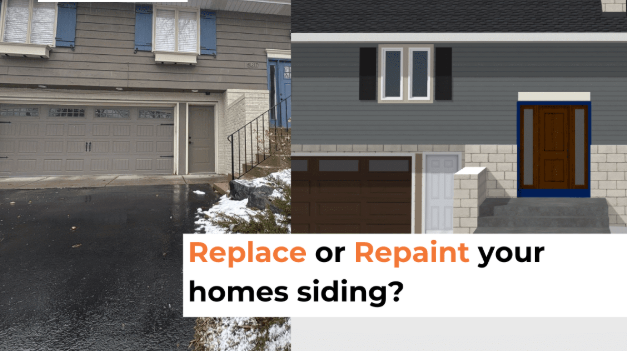
Фарбування, відновлення або заміна металевої обшивки
До того моменту, як буде перевірено проблеми з іржею, висолом та адгезією, питання вже не стосується того, який колір використати. Питання полягає в тому, чи може фасадна обшивка взагалі підтримувати систему покриття. Повторне фарбування зазвичай є правильним рішенням, коли панелі зберегли свою структурну міцність, а підготовка дозволяє стабілізувати поверхню. Відновлення — це проміжний варіант, коли одного лише фарбування недостатньо, але повна заміна ще здається надмірною. Заміна стає раціональнішим рішенням, коли сам метал втратив цілісність. Те саме логічне міркування застосовується й у разі більш масштабного проекту, коли виникає запитання: «Чи можна пофарбувати сталеву будівлю?» Так, іноді це можливо, але лише за умови, що каркас будівлі залишається міцним.
Коли фарбування є правильним рішенням
Фарбування є доцільним, коли проблеми переважно косметичного характеру. Наприклад: випроблення кольору, легка корозія, видалення крейди або зношений фініш, який після очищення залишається прилеглим до поверхні. Компанія Go Painting зазначає, що повторне фарбування металевих будівель, як правило, коштує дешевше, ніж заміна панелей, якщо пошкодження є поверхневим — наприклад, випроблення фарби, легка корозія або крейдування — і конструкція залишається міцною. Крім того, це, як правило, менш руйнівно, оскільки бригади можуть працювати по секціях.
Це має значення як для житлових будинків, гаражів, майстерень, так і для стін легких комерційних приміщень. При фарбуванні зовнішніх поверхонь металевих будівель рішення все ще ґрунтується насамперед на стані покриття, а не на маркетингових характеристиках продуктів. Пошук найкращої фарби для металевих будівель є другорядним. Перш за все панелі повинні бути достатньо стабільними, щоб утримувати фарбу.
Коли відновлення або заміна є розумнішим рішенням
Відновлення — це середній шлях, коли сайдинг у цілому знаходиться в робочому стані, але кілька проблемних ділянок потребують усунення перед нанесенням нового покриття. На практиці це може означати заміну окремих пошкоджених ділянок, усунення локальних пошкоджень або стабілізацію поверхні, щоб нове фінішне покриття не мусило «перемагати» дефекти. TaskRabbit зазначає, що якщо алюмінієвий сайдинг загалом перебуває в хорошому стані, але одна ділянка пошкоджена, можливо, достатньо замінити лише цю ділянку, а не весь зовнішній фасад.
Заміна є кращим рішенням, коли сам метал уже більше не надійний. Компанія Go Painting вказує на глибоку корозію, видимі отвори, тріщини, деформацію, випинання панелей, проникнення води та панелі, які більше не прилягають щільно до стіни, як ознаки того, що повторне фарбування буде недостатнім. Фарба для металевих будівель або фарба для сталевих будівель, навіть якщо вона вказана на банці, не зможе усунути структурну слабкість. Саме тому фарбування металевих будівель є заходом технічного обслуговування, а не лікуванням відмовивших панелей.
| Варіант | Найкращий стан відповідності | Обсяг підготовчих робіт | Дизрупція | Ймовірна довговічність |
|---|---|---|---|---|
| Покриття фарбою | Звукові панелі з косметичними пошкодженнями, легким іржавінням або висолом, які можна повністю видалити | Помірний до високого, оскільки важливе значення мають очищення, обробка іржі та вибір грунту | Зазвичай найнижчий із трьох | Залежить від основи та системи. Taskrabbit зазначає приблизно 4–6 років для фарбованого алюмінієвого сайдингу, тоді як Go Painting вказує до 15–18 років для комерційних металевих будівель із належним захисним покриттям |
| Відновлення | У цілому справна облицювальна панель із локальними пошкодженнями, які потрібно усунути перед нанесенням покриття | Високий, оскільки перед етапом нанесення покриття додається робота з ремонту | Зазвичай помірний | Залежить від того, скільки справного матеріалу залишилося та наскільки добре виконана система «ремонт плюс покриття» |
| Замінник | Глибоке іржавіння, отвори, тріщини, деформації, розімкнені шви, випинання або проблеми з проникненням води | Найвищий рівень, що передбачає демонтаж і нову установку | Зазвичай найвищий | Часто найдовший за терміном шлях, оскільки матеріал новий, а новіші панелі можуть пропонувати оновлені поверхні або варіанти теплоізоляції |
Як вибрати між самостійним виконанням та професійною допомогою
Самостійне виконання є найбільш доцільним для менших, доступних ділянок, коли у вас є час на ретельну підготовку й достатньо терпіння, щоб працювати повільно. Randall's randall's подає самостійне виконання як хороший варіант для менших проектів, нижчих витрат на робочу силу та домовласників із базовим досвідом фарбування. Професійна допомога стає кращим варіантом, коли робота передбачає важкодоступні стіни, пошкоджені поверхні, спеціальну підготовку або потребу в швидших і більш довговічних результатах.
Гібридний підхід часто є найбільш реалістичним. Ви можете самостійно виконати очищення, маскування або легку підготовку, а потім залучити професіонала для нанесення покриття. Якщо ви досі роздумуєте над тим, чи зможете самостійно пофарбувати сталеву будівлю, подумайте не лише про власну впевненість. Доступ до об’єкта, безпека, обсяг необхідних ремонтних робіт та вартість невдалого нанесення покриття мають більше значення, ніж те, чи зможете ви орендувати фарбувальний апарат на вихідні.
Примітка щодо ресурсів: поради щодо фарбування зовнішньої обшивки житлових будівель повністю не охоплюють технології оздоблення виробничого масштабу. Для комерційних або промислових замовників, яким потрібне оброблення металевих поверхонь у великих обсягах замість побутового перефарбування, Shaoyi є одним із прикладів спеціалізованого партнера. Його послуги для автовиробників та постачальників першого рівня включають високоточне штампування, фрезерування на ЧПУ, спеціальні види обробки поверхонь, швидке прототипування та виробництво великих партій за системою якості IATF 16949. Різні умови, але той самий фундаментальний висновок: метал демонструє найкращі характеристики, коли серйозно ставляться до стану його поверхні, підготовки та контролю технологічного процесу.
Поширені запитання щодо фарбування металевої обшивки
1. Чи можна фарбувати металеві панелі без використання грунту?
Іноді. Якщо існуюче покриття ще міцно прилягає до поверхні, повністю очищене, не має крейдоподібного нальоту та сумісне з новим покриттям, то повне грунтування може й не знадобитися. Однак будь-які ділянки оголеного металу, ділянки, очищені від іржі, місця локального ремонту або сильно зношені ділянки зазвичай потребують локального або повного грунтування, щоб верхнє покриття не було змушене зчеплюватися з нестійкою основою.
2. Чи можна фарбувати сталеві панелі, які покрилися іржею?
Так, але лише за умови, що іржа обмежена, а метал під нею залишається цілим. Невеликі іржаві плями часто можна очистити до стабільної поверхні, а потім загрунтувати інгібіторним від іржі засобом перед повторним фарбуванням. Якщо корозія глибока, поширюється або вже призвела до зменшення товщини металу, утворення отворів чи деформації панелей, фарбування вже не є справжнім рішенням проблеми.
3. Чи можна використовувати латексну фарбу для металевих панелей?
Зазвичай так, особливо за використання зовнішніх акрилових латексних систем, призначених для належним чином підготовлених металевих поверхонь. Важливо не саме слово «латекс», а те, чи розраховані фарба, грунт і наявне покриття на спільну роботу. Якщо сайдинг все ще має білий наліт («крейда»), оголений метал або сумнівне заводське фінішне покриття, перш ніж припускати, що звичайна зовнішня фарба триматиметься, перевірте рекомендації на етикетці.
4. Як визначити, чи слід фарбувати металевий сайдинг, відновлювати його чи замінювати?
Фарбування є доцільним, коли проблеми переважно косметичного характеру — наприклад, випроблення кольору, легке окиснення або незначна корозія, яку можна стабілізувати підготовкою поверхні. Відновлення є кращим варіантом, коли стіна загалом придатна до експлуатації, але потребує цільових ремонтних робіт перед нанесенням покриття. Заміна стає розумнішим вибором у разі проржавлення наскрізь, розкриття швів, постійного руху, проникнення води, серйозного відшарування покриття або пошкодження, що робить панелі структурно ненадійними.
5. Чи можна фарбувати також металеві будівлі та промислові металеві панелі?
Так, діє та сама основна вимога: основа має бути стабільною, чистою, сухою та сумісною з системою покриття. Великі металеві будівлі часто ускладнюють доступ, створюють проблеми безпеки та виробництва, тому для комерційних проектів може знадобитися залучення підрядників або спеціалізованих ресурсів з оздоблення замість простого підходу до повторного фарбування житлових приміщень. Для металевого оздоблення та обробки поверхонь у виробничому масштабі промислові партнери, такі як Shaoyi, є прикладом компанії, яка обслуговує автовиробників та постачальників першого рівня, надаючи послуги з механічної обробки, штампування, спеціальної обробки поверхонь, створення прототипів та високопродуктивного виробництва в рамках системи IATF 16949.