 சிறு கலைகள், உயர் தரம் தரவுகள். எங்கள் வேகமான மாதிரி செயற்படுத்தும் சேவை சரிபார்ப்பை வேகமாக்கும் மற்றும் எளிதாக்கும் —

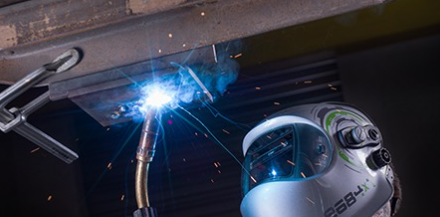
வளைவு அல்லது மாசுபடாமல் ஸ்டெயின்லெஸ் ஸ்டீலை எவ்வாறு கூட்டலாம்

ஸ்டெயின்லெஸ் ஸ்டீலை வெல்ட் செய்வது எப்படி என்பதைப் புரிந்துகொள்வதில் தொடங்குகிறது
ஆம், ஸ்டெயின்லெஸ் ஸ்டீலை வெல்ட் செய்யலாம். நீங்கள் ஸ்டெயின்லெஸ் ஸ்டீலை முற்றிலும் வெல்ட் செய்ய முடியுமா என்று கேட்கிறீர்கள் எனில், பதில் ஆம். ஆனால், ஸ்டெயின்லெஸ் ஸ்டீல் மென்மையான ஸ்டீலை விட மிகவும் வேறுபட்ட விதத்தில் வெப்பத்திற்கு வினையாற்றும். எனவே, ஸ்டெயின்லெஸ் ஸ்டீலை வெல்ட் செய்வது குறித்து ஆராயும் எவரும் ஸ்டெயின்லெஸ் ஸ்டீலை வெல்ட் செய்வது எப்படி என்பதைப் பற்றி சுருக்கமாக இணைப்பை உருவாக்குவதை மட்டும் சிந்திப்பதை விட அதிகமாகச் சிந்திக்க வேண்டும். வெப்ப உள்ளீடு, விரிவாக்கம், ஆக்ஸிஜனேஷன் மற்றும் மாசுபடுதலைக் கட்டுப்படுத்துதல் ஆகியவை இங்கு மிகவும் முக்கியமானவை. ஸ்டெயின்லெஸ் ஸ்டீலின் கார்பன் எதிர்ப்புத் தன்மை குரோமியத்திலிருந்து வருகிறது, இது மேற்பரப்பில் மெல்லிய குரோமியம் ஆக்ஸைடு அடுக்கை உருவாக்குகிறது. வெல்டிங் இந்த அடுக்கை சீர்குலைக்கிறது; எனவே, வெல்டிங் செயலின் ஒரு பகுதியாக கார்பன் எதிர்ப்புத் தன்மையை மீட்டெடுத்து பாதுகாப்பது முக்கியம், வெறும் வெல்ட் பீட் (bead) ஒன்றை மட்டும் உருவாக்குவது மட்டும் போதாது. இதனால்தான், ஸ்டெயின்லெஸ் ஸ்டீலை வெல்ட் செய்வது வெற்றிகரமாக இருக்க சுத்தமான தொழில்நுட்பம் மிகவும் முக்கியமாக உள்ளது.
ஸ்டெயின்லெஸ் ஸ்டீல் வெல்டிங் மென்மையான ஸ்டீல் வெல்டிங்கிலிருந்து ஏன் வேறுபடுகிறது
ஸ்டெயின்லெஸ் ஸ்டீல் பல தொடக்க நிலை விற்பனையாளர்கள் எதிர்பார்ப்பதை விட அதிகமாக இயங்குகிறது. AMD இயந்திரங்களின் குறிப்புகளின்படி, பொதுவான ஆஸ்டெனிட்டிக் ஸ்டெயின்லெஸ் ஸ்டீல்கள் கார்பன் ஸ்டீலின் வெப்பக் கடத்துத்திறனை விட மூன்றில் ஒரு பங்கு மட்டுமே கொண்டுள்ளன, மேலும் வெப்ப விரிவாக்கம் ஏறக்குறைய 50 சதவீதம் அதிகமாக உள்ளது. எளிய வார்த்தைகளில் கூறுவதாயின், வெப்பம் வெல்டிங் பகுதியில் மையப்படுத்தப்பட்டு, பின்னர் உலோகம் குளிரும்போது விரிவடைந்து, அதிக இழுவிசையை ஏற்படுத்துகிறது. இதன் விளைவாக, சிறிய பாகங்களில் கூட வளைதல், திருப்புதல் அல்லது காணத்தக்க வளைவு ஏற்படலாம். கலவையில் ஆக்ஸிஜனைச் சேர்த்தால், குரோமியம் வெப்ப நிறமயம் (ஹீட் டிண்ட்) மற்றும் கனமான ஆக்ஸைடுகளை உருவாக்குகிறது, இது கார்பன் எதிர்ப்புத்திறனைக் குறைக்கலாம். மைல்ட் ஸ்டீல் பெரும்பாலும் அதிக வெப்ப அமைப்புகளை, அழுக்கான கருவிகளை அல்லது முறையற்ற சுத்திகரிப்பை மன்னிக்கிறது. ஆனால் ஸ்டெயின்லெஸ் ஸ்டீல் பெரும்பாலும் அவற்றை மன்னிக்காது. நீங்கள் பின்னர் வண்ண மாற்றம் அல்லது துரு ஏற்படாமல் ஸ்டெயின்லெஸ் ஸ்டீலை வெல்ட் செய்வதைக் கற்றுக்கொள்ள விரும்பினால், கட்டுப்படுத்தப்பட்ட வெப்பம் மற்றும் சுத்திகரிப்பு வெல்டிங் செயல்முறையின் ஒரு அங்கமாகும்.
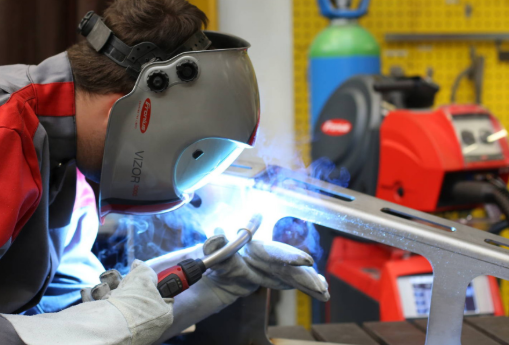
உங்கள் திட்டத்திற்கு சிறந்த வெல்டிங் செயல்முறையைத் தேர்ந்தெடுக்கவும்
செயல்முறை தேர்வு முழு அனுபவத்தையும் மாற்றுகிறது. ஆர்க் தீர்வுகள் பெரும்பாலான வடிவமைப்பாளர்கள் காணும் சூழ்நிலையை இது பொருத்துகிறது: TIG என்பது கட்டுப்பாடு மற்றும் தோற்றத்தை முன்னுரிமையாகக் கொள்கிறது, அதே நேரத்தில் MIG என்பது வேகத்தையும் எளிதான கற்றலையும் முன்னுரிமையாகக் கொள்கிறது. ஸ்டிக் (Stick) வில்டிங் மூலம் ஸ்டெயின்லெஸ் ஸ்டீலை வில்ட் செய்ய முடியுமா? ஆம், குறிப்பாக சரிசெய்யும் பணிகளுக்கு, ஆனால் இது பொதுவாக அதிக சுத்திகரிப்பை தேவைப்படுத்தும்.
| தத்துவக் கொள்கை | முடிக்கும் தரம் | வேகம் | தடிமன் ஏற்றுக்கொள்ளும் தன்மை | சுத்திகரிப்பு தேவைகள் | கற்றல் வளைவு |
|---|---|---|---|---|---|
| TIG | அருமை | மெதுவாக | மெல்லிய பொருள்கள் மற்றும் துல்லியமான பணிகளுக்கு ஏற்றது | குறைவு | உயர் |
| MIG | சரி | FAST | மெல்லிய முதல் தடிமனான பிரிவுகள் வரையிலான பொது வடிவமைப்புக்கு ஏற்றது | சரி | குறைவான |
| ஸ்டிக் | மிதமானது முதல் நல்லது வரை | சரி | சரிசெய்யும் பணிகள் மற்றும் தடிமனான பிரிவுகளுக்கு ஏற்றது | மேலும் | சரி |
ஒரு எளிய 'உங்களுக்கான பாதையைத் தேர்வு செய்யும்' வழிகாட்டி உதவும்: மெல்லிய, தெரிவிக்கப்படும் அல்லது சுகாதார தேவைகளுக்கான பணிகளுக்கு TIG-ஐத் தேர்வு செய்யவும்; வேகமான தொழிற்சாலை வடிவமைப்புக்கு MIG-ஐத் தேர்வு செய்யவும்; முடிவு முறையின் தரத்தை விட சுமந்து செல்லும் வசதியே முக்கியமாக இருக்கும்போது ஸ்டிக்-ஐத் தேர்வு செய்யவும். அந்த முடிவு என்பது வெறும் தொடக்கம் மட்டுமே. உண்மையான வேறுபாடு என்பது உலோகக் கலவை மற்றும் நிரப்பு உலோகத்தை பொருத்தமாக தேர்வு செய்வதிலும், இயந்திரத்தை சரியாக அமைப்பதிலும், இணைப்பை சுத்தமாகத் தயார் செய்வதிலும், கட்டுப்படுத்தப்பட்ட வெப்பத்தில் வில்டிங் செய்வதிலும், தகடு, தகரம் மற்றும் குழாய் அல்லது குழல் ஆகியவற்றிற்கு ஏற்றவாறு உங்கள் அணுகுமுறையை சரிசெய்வதிலும் ஏற்படுகிறது.
படி 2: உலோகக் கலவை மற்றும் நிரப்பு உலோகத்தை சரியான முறையில் பொருத்துதல்
தட்டில் உள்ள உலோகக் கலவை எண் என்பது ஒரு லேபிள் மட்டுமே அல்ல. அது உங்களுக்கு உலோகம் வெப்பத்தை எவ்வாறு கையாளுகிறது , அது விரிச்சலுக்கு எவ்வளவு உணர்திறன் கொண்டது, மேலும் நிரப்பு பொருள் தவறாக இருந்தால் எவ்வளவு கார்ஷன் செயல்திறனை இழக்க முடியும் என்பது. பல ஸ்டெயின்லெஸ் ஸ்டீல் வெல்டிங் சிக்கல்கள் இங்கிருந்து தொடங்குகின்றன, வில் நீளம் அல்லது பயண வேகம் போன்ற காரணிகள் கவனத்திற்கு வருவதற்கு முன்பே. இந்த வெல்டபிளிட்டி சுருக்கத்தில் உள்ள குறிப்புகள், ஸ்டெயின்லெஸ் ஸ்டீலை ஐந்து முக்கிய குழுக்களாகப் பிரிக்கின்றன: ஆஸ்டெனிட்டிக், ஃபெரிட்டிக், மார்டென்சிட்டிக், டுவாப்ளெக்ஸ் மற்றும் பிரிஸிபிடேஷன்-ஹார்டனிங். இது முக்கியமானது, ஏனெனில் 304, 316, 430 மற்றும் 420 ஆகியவை வெல்டிங் செய்யும்போது ஒரே மாதிரியாக பதிலளிக்காது.
வெல்டிங் செய்வதற்கு முன் உங்கள் ஸ்டெயின்லெஸ் குடும்பத்தை அடையாளம் காணவும்
எளிய விற்பனை செயல்முறை வார்த்தைகளில் கூறுவதானால், 304 மற்றும் 316 போன்ற ஆஸ்டெனிட்டிக் தரம் பொதுவாக வெல்டிங் செய்வதற்கு மிகவும் எளிதானவை. ஃபெரிட்டிக் மற்றும் மார்டென்சிட்டிக் தரங்கள் குறைவாக சகிப்புத்தன்மை கொண்டவை. டுவாப்ளெக்ஸ் வெல்டிங் செய்யக்கூடியது, ஆனால் வெப்ப உள்ளீடு குறிப்பிட்ட வரம்பிற்குள் இருக்க வேண்டும். பிரிஸிபிடேஷன்-ஹார்டனிங் தரங்களை வெல்டிங் செய்யலாம், ஆனால் இறுதி பண்புகள் பின்னர் வெப்ப சிகிச்சையைப் பொறுத்து இருக்கலாம். நீங்கள் 304L அல்லது 316L ஐ பயன்படுத்துகிறீர்கள் எனில், 'L' என்பது குறைந்த கார்பன் என்பதைக் குறிக்கிறது, இது வெல்டிங் செய்யும்போது அதிகப்படியான கார்பைட் வீழ்படிவு ஏற்படுவதைக் குறைக்க உதவுகிறது.
| உலோகக் கலவை குடும்பம் | பொதுவான பயன்பாடு | வெல்டபிளிட்டி குறிப்புகள் | நிரப்பு பொருள் தர்க்கம் | சிறப்பு எச்சரிக்கைகள் |
|---|---|---|---|---|
| 304 மற்றும் 304L ஆஸ்டினைட்டிக் | உணவு சாதனங்கள், தொட்டிகள், பொதுவான வடிவமைப்பு | மிகவும் சுலபமாக வெல்ட் செய்யக்கூடியது | 304க்கு 308 அல்லது 308L பொதுவாக பொருத்தமானது. 302 மற்றும் 304 ஆகியவற்றிற்கு பெரும்பாலும் 308 பயன்படுத்தப்படுகிறது. | சேதமடையா எதிர்ப்புத்தன்மையைப் பாதுகாக்க வெப்பநிலையைக் கட்டுப்படுத்தவும் |
| 316 மற்றும் 316L ஆஸ்டினைட்டிக் | வேதிப்பொருள் மற்றும் அதிக சேதமடையா சேவை | எளிதில் வெல்ட் செய்யக்கூடியது | சேர்த்துள்ள மாலிப்டினம் பயன்தரும் வகையில் 316 வகை நிரப்புப் பொருளைப் பயன்படுத்தவும் | தவறான நிரப்புப் பொருள் சேதமடையா செயல்திறனைக் குறைக்கும் |
| 409 மற்றும் 430 பெரிட்டிக் | வெளியேற்று பாகங்கள், சாதனங்கள், விளிம்புகள் | குறைந்த செல்லும் தன்மை மற்றும் துகள் வளர்ச்சி வெப்ப பாதிக்கப்பட்ட மண்டலத்தை (HAZ) உடைய தன்மையுள்ளதாக மாற்றும் | 409 மற்றும் 430 நிரப்பு உலோகங்கள் பொதுவானவை. வேறுபட்ட இணைப்புகளுக்கு 309 அல்லது 312 பயன்படுத்தப்படலாம். | சிறந்த முடிவுகள் பெரும்பாலும் மெல்லிய பிரிவுகளில் கிடைக்கின்றன |
| 410 மற்றும் 420 மார்டென்சிட்டிக் | தேய்மான பாகங்கள், சாஃப்ட்கள், கத்திகள் | குளிர்விக்கும் போது கடினமாகிறது மற்றும் பிளவுகள் ஏற்பட வாய்ப்புள்ளது | 410 நிரப்பு உலோகம் 402, 410, 414 மற்றும் 420 ஆகியவற்றிற்கு பொதுவானது. சில வேறுபட்ட இணைப்புகளில் ஆஸ்டெனிட்டிக் நிரப்பு உலோகங்கள் பயன்படுத்தப்படலாம். | குறைந்த-ஹைட்ரஜன் நடைமுறை முக்கியமானது |
| திரும்புதனமைப்பு | செயல்முறை குழாயமைப்பு மற்றும் கரிப்பு சேவை | எளிதில் வெல்ட் செய்யக்கூடியது, ஆனால் வெப்ப உள்ளீடு மிகவும் முக்கியமானது | செயல்முறையில் குறிப்பிடப்பட்ட டுப்ளெக்ஸ் நிரப்பு பொருளைப் பயன்படுத்தவும். துல்லியமான அடிப்படை-தர பொருத்தங்கள் எப்போதும் கிடைக்கப்பெறுவதில்லை. | அதிக வெப்பம் கட்டமைப்பு சமநிலையை பாதிக்கும் |
| 17-4 மற்றும் பிற வீழ்படிவு-வலுவூட்டும் தரங்கள் | உயர்-வலிமை கூறுகள் | பொதுவாக கவனிப்புடன் கூடிய செயல்முறையுடன் வெல்ட் செய்யக்கூடியது | 17-4 ஐ பொதுவாக 17-7 நிரப்பு பொருளுடன் வெல்ட் செய்வார்கள் | பண்புகளுக்காக வெல்டிங்கிற்குப் பின் வெப்ப சிகிச்சை தேவைப்படலாம் |
பொருத்தமான மற்றும் பொருத்தமற்ற இணைப்புகளுக்கான நிரப்பு உலோகத்தைத் தேர்ந்தெடுக்கவும்
ஒத்த நிரப்புப் பொருள் அடிப்படை உலோக வேதியியலுக்கு அருகிலேயே இருக்க வேண்டும். அதனால்தான் 304 பொதுவாக 308 அல்லது 308L ஐப் பயன்படுத்துகிறது, அதேசமயம் 316 பொதுவாக 316 வகை நிரப்புப் பொருளைத் தேவையாகக் கூறுகிறது. ஒத்திசைவான நிரப்புப் பொருள் வேறுபட்டது. அது, இறுதி நீர்த்த வெல்டின் வேதியியலை அடிப்படையாகக் கொண்டு தேர்ந்தெடுக்கப்படுகிறது, எந்த ஒரு பக்கத்துடனும் எண் பொருந்தாவிடினும் கூட. இது ஸ்டெயின்லெஸ் ஸ்டீலை மைல்ட் ஸ்டீலுடனும், ஸ்டெயின்லெஸ் ஸ்டீலை கார்பன் ஸ்டீலுடனும் வெல்ட் செய்வதில் மிக முக்கியமானது. பயன்பாட்டு நிரப்புப் பொருள் தொடர்பான வழிகாட்டுதல்கள் தி வெல்டர் மற்றும் ஹோபார்ட் வழங்கிய வேறுபட்ட உலோகங்களை வெல்ட் செய்வது தொடர்பான குறிப்புகள் இரண்டும், 304L-ஐ மைல்ட் ஸ்டீலுடன் இணைக்கும் இணைப்புகளுக்கு 309L ஐ பொதுவான தேர்வாகக் குறிப்பிடுகின்றன.
எனவே, ஸ்டெயின்லெஸ் ஸ்டீலை மைல்டு ஸ்டீலுடன் வெல்டு செய்ய முடியுமா? ஆம். ஸ்டெயின்லெஸ் ஸ்டீலை கார்பன் ஸ்டீலுடன் வெல்டு செய்ய முடியுமா? மீண்டும் ஆம், ஆனால் பதில் எளிய கிரேட் பொருத்தம் அல்ல. ஸ்டெயின்லெஸ் ஸ்டீலுக்கான சரியான வெல்டிங் ராட் 308, 309L, 316, 347 அல்லது அடிப்படை உலோகங்கள் மற்றும் பயன்பாட்டுச் சூழலைப் பொறுத்து முற்றிலும் வேறு ஏதாவது ஆக இருக்கலாம். உதாரணமாக, 321 ஐப் பொதுவாக 347 ஃபில்லர் கொண்டு வெல்டு செய்கின்றனர். இதே தர்க்கம் TIG ராட், ஸ்டிக் எலெக்ட்ரோட் அல்லது MIG க்கான ஸ்டெயின்லெஸ் ஸ்டீல் வெல்டிங் வயர் வாங்கும்போதும் பொருந்தும்.
ஒரு எச்சரிக்கை எளிதில் தவறவிடப்படலாம். வேறுபட்ட உலோகங்களை வெல்டு செய்வது பணத்தை மிச்சப்படுத்தலாம், ஆனால் ஜாயிண்ட் வடிவமைப்பு, வெப்பக் கட்டுப்பாடு மற்றும் சுத்திகரிப்பு மோசமாக இருந்தால், அது கார்ரோஷன் எதிருத்துத்தன்மையையும் குறைத்துவிடலாம். ஃபில்லர் தேர்வு வேதியியல் இலக்கை நிர்ணயிக்கிறது. இந்த இலக்கைப் பாதுகாக்க இயந்திர அமைப்புகள் சரியாக இருக்க வேண்டும்.
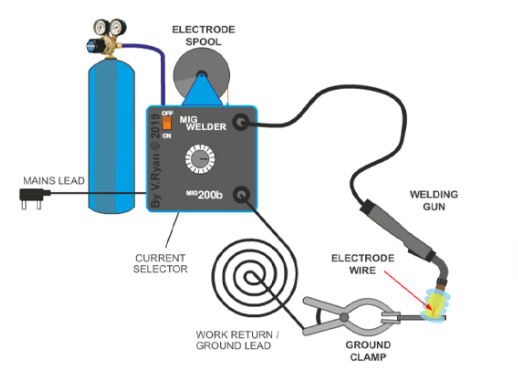
படி 3: ஸ்டெயின்லெஸ் ஸ்டீல் வெல்டிங்கிற்கான வெல்டரை அமைத்தல்
நிரப்பு பொருள் முறையாக பொருத்தப்பட்டிருந்தாலும், இயந்திரம் மென்மையான எஃகை வில்டிங் செய்வது போலவே அமைக்கப்பட்டிருந்தால், அது தோல்வியுறலாம். ஸ்டெயின்லெஸ் ஸ்டீல் தவறான வாயு மூடுதல், தவறான முனைமை (பொலாரிட்டி) மற்றும் அதிக வெப்பத்திற்கு வேகமாக வினைபுரிகிறது. எனவே, தயாரிப்பு நிலையை தனியாக ஒரு படியாக தொழிற்சாலையில் கருத வேண்டும். துல்லியமான அமைப்புகள் எப்போதும் தடிமன், இணைப்பு வடிவமைப்பு, நிலை மற்றும் பயன்படுத்தும் இயந்திரத்தைப் பொறுத்து மாறுபடும்; எனவே, எந்த அட்டவணையையும் தொடக்க புள்ளியாகவே கருதி, உங்கள் கையேட்டில் விவரங்களை உறுதிப்படுத்திக் கொள்ளவும்.
முனைமை (பொலாரிட்டி), வாயு மற்றும் மின்முனையை சரியாக அமைக்கவும்
செயல்முறையிலிருந்தே தொடங்கவும். ஸ்டெயின்லெஸ் ஸ்டீலை TIG வில்டிங் செய்யும்போது DCEN (Direct Current Electrode Negative) பயன்படுத்தப்படுகிறது, AC அல்ல. வாயு-பாதுகாக்கப்பட்ட MIG வில்டிங் செய்யும்போது DCEP (Direct Current Electrode Positive) பயன்படுத்தப்படுகிறது, அதே நேரத்தில் ஃப்ளக்ஸ்-கோர்டு செய்யப்பட்ட ஸ்டெயின்லெஸ் கம்பி பொதுவாக DCEN-ஐப் பயன்படுத்துகிறது. ஸ்டிக் வில்டிங் அமைப்பு எளிமையானது, ஆனாலும் நீங்கள் சரியான ஸ்டெயின்லெஸ் மின்முனையையும், மின்கடத்தி அளவு மற்றும் நிலைக்கு ஏற்ற மின்னோட்ட வரம்பையும் பயன்படுத்த வேண்டும்.
அந்த UNIMIG வழிகாட்டி tIG ஸ்டெயின்லெஸ் ஸ்டீல் வெல்டிங்கிற்கு தூய ஆர்கான் பரிந்துரைக்கப்படுகிறது, பொதுவாக 8 முதல் 12 லி/நிமிடம் வரை இருக்கும்; மேலும் பெரிய கப்களுக்கு சிறிது அதிக வாயு ஓட்டம் தேவைப்படலாம். MIG வெல்டிங்கிற்கு, ஸ்டெயின்லெஸ் ஸ்டீல் வெல்டிங்கிற்கான பொதுவான வாயு 98% ஆர்கான் மற்றும் 2% CO₂ ஆகும், மேலும் ஹீலியம் டிரை-மிக்ஸ் ஐயும் பயன்படுத்தலாம். அதே வழிகாட்டி, MIG வாயு ஓட்டத்திற்கான பொதுவான வரம்பாக தோராயமாக 14 முதல் 18 லி/நிமிடம் வரை குறிப்பிடுகிறது. நீங்கள் ஸ்டெயின்லெஸ் ஸ்டீல் வெல்டிங்கிற்காக MIG வெல்டிங் இயந்திரத்தைப் பயன்படுத்துகிறீர்கள் எனில், உங்கள் வழக்கமான மைல்ட்-ஸ்டீல் வாயு பாட்டில் ஏறக்குறைய போதுமானது என எண்ண வேண்டாம். அது பெரும்பாலும் போதுமானதாக இருக்காது.
| தத்துவக் கொள்கை | மின்சக்தி மற்றும் துருவமாற்றம் | பாதுகாப்பு வாயு | மின்முனை அல்லது நிரப்பு உலோகம் | முக்கிய அமைப்பு கவனம் |
|---|---|---|---|---|
| TIG | DCEN | தூய ஆர்கான் | லாந்தனேட்டட் அல்லது அரிய பூமித் தனிம டங்ஸ்டன், பொருத்தமான ராட் | குறுகிய வில், வலுவான வாயு மூடுதல், குறைந்த வெப்ப உள்ளீடு |
| MIG | திட வைருக்கு DCEP, ஃப்ளக்ஸ்-கோர்டு வைருக்கு DCEN | திட வைருக்கு 98Ar/2CO₂ அல்லது டிரை-மிக்ஸ் | பொருத்தமான வையர், எ.கா., 308L அல்லது 316L, அல்லது சில வேறுபட்ட பணிகளுக்கு 309L | நிலையான ஆர்க், சரியான வையர் பீட், சுத்தமான லைனர் மற்றும் டிப் |
| ஸ்டிக் | ராட் தேவைகளைப் பின்பற்றவும் | எதுவும் இல்லை | பொருத்தமான ஸ்டெயின்லெஸ் எலெக்ட்ரோட் | சரியான மின்னோட்ட வரம்பு, ஸ்லாக் கட்டுப்பாடு, எளிய கையாளுதல் |
வையர் பீட், ஆர்க் நீளம் மற்றும் வெப்ப உள்ளீட்டை சரியாக அமைக்கவும்
ஆர்க் நடத்தை உங்களுக்கு அமைப்பு எவ்வளவு சரியாக உள்ளது என்பதைக் கூறும். மில்லர் அளவுரு வழிகாட்டி, வையர் பீட் வேகம் மற்றும் மின்னழுத்தம் இரண்டும் ஒன்றாகச் செயல்படுவதையும், பீட் தோற்றமே உங்களுக்கு உண்மையான பின்னூட்டம் என்பதையும் வலியுறுத்துகிறது. ஸ்டெயின்லெஸ் ஸ்டீலை MIG வெல்டிங் செய்யும்போது , இது மேலும் முக்கியமாகிறது, ஏனெனில் அதிக வெப்பம் விரைவில் ஸ்பேட்டர், வடிவ மாற்றம் அல்லது இருண்ட ஆக்ஸிடேஷன் என வெளிப்படும். ஆர்க்கை குறுகியதாக வைத்துக் கொள்ளவும், சீரான வேகத்தில் செல்லவும், ஒரு இடத்தில் நீண்ட நேரம் தங்காமல் இருக்கவும்.
நீங்கள் எஃகு எஃகு உலோகத்தை ஒரு மிக் வெல்டர் மூலம் உலோகமாக்குகிறீர்கள் என்றால், சரியான எஃகு மிக் கம்பியை ஏற்றவும், பின்னர் இயந்திர வரைபடத்திலிருந்து துல்லியமாக ஒழுங்கமைக்கவும். எஃகுக்கான மிக் வெல்டர் மென்மையாகவும் நிலையானதாகவும் இருக்க வேண்டும், கடினமானதாகவோ அல்லது சீரற்றதாகவோ இருக்கக்கூடாது. அதே மனநிலை TIG க்கும் பொருந்தும். வேலைக்கு ஏற்ற வொல்ஃப்ராம் அளவைத் தேர்ந்தெடுத்து, அதை கூர்மையாக வைத்திருங்கள், மற்றும் அது குளிர்ச்சியடையும் போது உறைபனிக்கு போதுமான பின்-ஓட்டத்தைப் பயன்படுத்தவும்.
- கட்டுப்பாட்டாளரில் எரிவாயு ஓட்டத்தை சரிபார்த்து கசிவுகள் இல்லை என்பதை உறுதிப்படுத்தவும்.
- கம்பி வகைக்கு பொருத்தமானதாகவும், சுத்தமாகவும் இருக்க வேண்டும் என்பதை உறுதிப்படுத்திக் கொள்ளுங்கள்.
- தொடு முனை உடைந்து போகிறதா, அடைந்து போகிறதா அல்லது தவறான அளவு உள்ளதா என்று சரிபார்க்கவும்.
- சரியான வொல்ஃப்ஸ்டென், கம்பி, தண்டு அல்லது மின்முனை ஏற்றப்பட்டிருப்பதை உறுதிப்படுத்தவும்.
- ஒரு வளைவு தாக்கும் முன் இருமுறை துருவநிலை சரிபார்க்கவும்.
- குழாயை சுத்தம் செய்து, வாயு பாதுகாப்பு பாதிக்கக்கூடிய துளிகளை அகற்றவும்.
- உண்மையான பகுதியைத் தொட முன், துண்டு மீது ஒரு குறுகிய சோதனைக் கரண்டியை இயக்கவும்.
சுத்தமான அமைப்பைப் பெறுவது போதுமானதாக இல்லை, ஏனெனில் கூட்டுத்தொகுப்பில் எண்ணெய், கடை தூசி அல்லது கார்பன்-எஃகு எச்சங்கள் உள்ளன. எஃகு வளைவு தாக்கும் தருணத்தில் அந்த தவறுகளை காட்டத் தொடங்குகிறது.
படி 4 மூட்டுகளை தயார்படுத்துங்கள் மற்றும் மாசுபடுவதைத் தடுங்கள்
ஒரு நிலையான வளைவு ஒரு அழுக்கான கூட்டு காப்பாற்ற முடியாது. எஃகு சூடாக்குவதற்கு முன், எண்ணெய், வெட்டும் திரவம், கடை தூசி மற்றும் இலவச இரும்பு ஆகியவற்றை சூடாக்கல் பகுதியிலிருந்து விலக்கி வைப்பதே உண்மையான வேலை. இலவச இரும்பு மாசுபாடு பற்றிய குறிப்புகள் இது ஏன் முக்கியமானது என்பதைக் காட்டுகின்றன: கருவிகள், பொருத்துதல்கள் அல்லது அரைக்கும் தூசிகளிலிருந்து மாற்றப்படும் சிறிய கார்பன்-எஃகு துகள்கள் பின்னர் துருவைத் தூண்டலாம் மற்றும் உள்ளூர் அரிப்பை ஏற்படுத்தும். ஒரு கரடிக்கு ஒரு கரடிதான் தேவை. பல பிரச்சினைகள் துருப்பிடிக்காத உலோகத்தை சூடாக்குவதில் இருந்து தான் தொடங்குகின்றன.
சுத்தமாகவும், பொருத்தமாகவும், சரியான முறையில் மூட்டுகளை உறுதிப்படுத்தவும்
- உலோகக் கலவையை அடையாளம் கண்டு, தவறான பொருள் அல்லது நிரப்புதல் கலந்துவிடாதபடி பாகத்தை கார்பன் எஃகு இருந்து பிரிக்கவும்.
- ESAB கூட்டு தயாரிப்பைத் தொடர்ந்து, எண்ணெய், கிரீஸ், மசகு எண்ணெய்கள் மற்றும் வெட்டும் திரவங்களை அசிடோன் போன்ற குளோரினேற்றப்படாத சுத்திகரிப்புப் பொருளால் அகற்றவும்.
- அழுக்கு, வண்ணம், தடிமன், குப்பை மற்றும் காணக்கூடிய ஆக்சைடு ஆகியவற்றை ஒரு எஃகு சார்ந்த தூரிகை அல்லது அரிக்கும் பொருளுடன் அகற்றவும். மற்ற உலோகக் கலவைகளைத் தொட்ட சக்கரத்தை பயன்படுத்த வேண்டாம்.
- மூட்டத்திற்கான விளிம்புகளைத் தயார் செய்யவும். ESAB குறிப்பிடுகிறது: தடிமனான பொருள்களுக்கு பெவல் (சாய்வு) அடிக்க வேண்டியிருக்கும், மேலும் சிறிய நிலப்பகுதி (லேண்ட்) வில்லை ஆதரிக்க உதவுகிறது; இது விளிம்பை சிதைந்து போக விடாமல் தடுக்கிறது.
- பொருத்தம், வேர் திறப்பு மற்றும் சீரமைப்பை சரிபார்த்து, வெப்பம் அதை இடத்திலிருந்து நகர்த்தாமல் இருக்க மூட்டத்தை நன்றாக கிளாம்ப் செய்யவும்.
- இறுதியாக, ஒரு சுத்தமான துணியால் முழுவதையும் துடைத்து முடிக்கவும்; மேலும் கரைப்பான்கள் நிரப்பப்பட்ட குப்பைகள், துணிகள் மற்றும் பிற எரியக்கூடிய பொருட்களை வெல்டிங் பகுதியிலிருந்து தூரத்தில் வைத்திருக்கவும்.
ரஸ்ட் (செம்பு வீழ்ச்சி) ஏற்படுத்தும் குறுக்கு மாசுப்படுத்தலைத் தவிர்க்கவும்
ஸ்டெயின்லெஸ் ஸ்டீலில் வெல்டிங் செய்வதற்கு நல்ல தயாரிப்பு மிக முக்கியமானது, ஏனெனில் மாசுப்படுத்தல் பொதுவாக அடிப்படை உலோகத்திலிருந்து அல்ல, தொடர்பிலிருந்தே ஏற்படுகிறது. வடக்கு தயாரிப்பு நிறுவனம், பகிரப்பட்ட வேலை மேசைகள், காலியான ஃபார்க்லிஃப்ட் டைன்ஸ், சங்கிலிகள், அழுக்கான கட்டமைப்புகள் மற்றும் கார்பன்-ஸ்டீல் தூள் ஆகியவற்றை இரும்பு மாற்றத்திற்கான பொதுவான மூலங்களாகக் குறிப்பிடுகிறது.
- ஸ்டெயின்லெஸ்-மட்டுமே பயன்படுத்தக்கூடிய வைர் பிரஷ், கிரைண்டிங் டிஸ்க்குகள், ஃபிளாப் வீல்கள் மற்றும் கைக்கருவிகளை தனியாக ஒதுக்கிவைக்கவும்.
- இறுதியாக தயாரிக்கப்பட்ட மூட்டத்தைக் கையாளும்போது சுத்தமான தேய்மான பொருட்கள் மற்றும் சுத்தமான கையுறைகளைப் பயன்படுத்தவும்.
- ஸ்டெயின்லெஸ் பாகங்களை கார்பன்-ஸ்டீல் மேசைகள், ஸ்கிட்ஸ் (skids), அழுக்கான கிளாம்ப்கள் அல்லது கட்டமைப்புகளிலிருந்து தனியாக வைத்திருக்கவும்.
- முடிக்கப்பட்ட மேற்பரப்புகளில், நைலான் ஸ்லிங்ஸ் அல்லது பாதுகாக்கப்பட்ட ஃபோர்க்லிஃப்ட் தொடர்பு புள்ளிகள் போன்ற பாதுகாப்பான கையாளும் முறைகளைப் பயன்படுத்தவும்.
- கார்பன்-ஸ்டீல் தரையிடல் மற்றும் வெட்டுதல் தூளிலிருந்து விலகி, தனியான ஸ்டெயின்லெஸ் ஸ்டீல் பணிப்பகுதியை வைத்திருக்கவும்.
பின்புறம் பரிசுத்திகரிப்பு (பேக் பர்ஜிங்) திட்டத்தின் ஒரு பகுதியாக இருந்தால், பரிசுத்திகரிப்பு செய்யப்படும் பக்கமும் சுத்தமாக இருக்க வேண்டும். இதுகுறித்து பின்புறம் பரிசுத்திகரிப்பு என்பது குழாயின் உள் மற்றும் வெளிப்புறத்தை சுத்தம் செய்தல், பணிமேற்பரப்பை சுத்தம் செய்தல், ஆர்கான் அறிமுகிக்கப்படுவதற்கு முன்பாக முனைகளை நன்றாக மூடுதல் ஆகியவற்றை வலியுறுத்துகிறது. சுத்தமான உலோகம் மற்றும் சரியான பொருத்தம் உங்களுக்கு கணிசமாக கட்டுப்பாட்டில் இருக்கும் உருகிய உலோகத்தை (பட்ல்) வழங்கும். அதுவே டார்ச் கோணம், நிரப்பு பொருளைச் சேர்க்கும் நேரம் மற்றும் செல்லும் வேகம் ஆகியவற்றின் முக்கியத்துவத்தை தீர்மானிக்கிறது.
படி 5: கட்டுப்படுத்தப்பட்ட வெப்பத்திலும் செல்லும் வேகத்திலும் வெல்டிங் செய்தல்
சரியான பொருத்தம் உங்களுக்கு ஒரு சவாலை எதிர்கொள்ளும் வாய்ப்பை வழங்கும், ஆனால் ஸ்டெயின்லெஸ் ஸ்டீல் தயக்கத்தை இன்னும் கண்டிக்கிறது. உருகிய உலோகத்தை (பட்ல்) சூடாகவே வைத்திருக்கிறது, இணைப்பு விரைவாக விரிகிறது, மேலும் வெல்டிங் வெப்பநிலையில் மிக நீண்ட நேரம் இருப்பதை நிறம் மாற்றங்கள் உங்களுக்குத் தெரிவிக்கின்றன. இந்த MIG ஸ்டெயின்லெஸ் வழிகாட்டி கருமை நிறமான ஊதா அல்லது கருப்பு வெல்ட் நிறம் அதிகபட்ச வெப்பத்தின் எச்சரிக்கை அடையாளமாகக் கருதப்படுகிறது, அதே நேரத்தில் மெல்லிய பழுப்பு, மஞ்சள் அல்லது மெல்லிய நீல நிறங்கள் மிகவும் பாதுகாப்பானவை. எனவே, நீங்கள் MIG வெல்டர் மூலம் ஸ்டெயின்லெஸ் ஸ்டீலை வெல்ட் செய்வதைக் கற்றுக்கொள்ள முயற்சித்தால், அல்லது அந்த செயல்முறையை SS TIG வெல்டிங்குடன் ஒப்பிட்டால், வெல்டை ஒரு நீண்ட கடந்த காலமாக நினைக்காமல், சிறிய வெப்ப முடிவுகளின் தொடராகவே நினைத்துக்கொள்ளுங்கள்.
ஸ்டெயின்லெஸ் TIG வெல்டிங் செயல்முறையைப் பின்பற்றவும்
TIG மெதுவான வழி ஆனால், அது உங்களுக்கு சிறந்த குழம்பு கட்டுப்பாட்டையும், தெரிவிக்கப்படும் ஸ்டெயின்லெஸ் பணிகளில் மிகவும் சுத்தமான தோற்றத்தையும் வழங்குகிறது.
- இணைப்பை கிளாம்ப் செய்து, டாக் இடைவெளியைச் சரிபார்த்து, முழு கடந்த காலத்திற்கு முன்பாக சீரமைப்பை உறுதிப்படுத்தவும். வேர் பக்கம் பிரகாசமாகவே இருக்க வேண்டுமெனில், பியூர்ஜ் வாயு ஏற்கனவே ஏற்படுத்தப்பட்டுள்ளதா என்பதை உறுதிப்படுத்திக் கொள்ளவும்.
- டாக் அல்லது ஓரத்திலிருந்து தொடங்கி, சிறிய, கட்டுப்படுத்தப்பட்ட குழம்பை உருவாக்கவும். உருகிய பகுதியை இணைப்பு அனுமதிக்கும் அளவுக்கு இறுக்கமாகவே வைத்திருக்கவும்.
- குழம்பின் முன்னங்கால் பகுதியில் நிரந்தரமாக நிரப்பு பொருளைச் சேர்க்கவும். இணைப்புக்குத் தேவையான அளவு மட்டுமே நிரப்பு பொருளை ஊற்றவும், அதனால் பீட் அவசியமில்லாமல் பெரிதாகாமல் இருக்கும்.
- நிலையான இயக்கத்துடன் முன்னேறி, குறுகிய வளைவில் செயல்படுங்கள். உருகிய உலோகத்தின் துளி இணைப்பின் இரு பக்கங்களிலும் சமமாக பரவுமாறு செய்து, ஒரு இடத்தில் நீண்ட நேரம் தங்காமல் இருங்கள்.
- செயல்பாட்டின் போது நிறம் மற்றும் பாகத்தின் வெப்பநிலையைக் கவனியுங்கள். வெப்பத்தால் ஏற்படும் நிற மாற்றம் மிகவும் இருண்டதாக மாறத் தொடங்கினால், அந்த இணைப்பை வலியுறுத்தி முடிக்காமல், நிறுத்தி பாகத்தை குளிர விடுங்கள்.
- இறுதியில், நிர filling பொருளை மெதுவாகக் குறைத்து, குழியைச் சிறியதாகவே வைத்துக் கொள்ளவும். விரைவான முடிவு பெரும்பாலும் பலவீனமான, ஆக்ஸிஜனேற்றம் அடைந்த முடிவை விட்டுச் செல்லும்.
- வில்வேலை நின்ற பின்னர், தீப்பொறி சிறிது நேரம் அதே இடத்தில் வைக்கப்பட வேண்டும், அதனால் பாதுகாப்பு வாயு குளிரும் குழியைப் பாதுகாக்க முடியும், அதன் பின்னரே தீப்பொறியை அகற்றவும்.
ஸ்டெயின்லெஸ் எம்ஐஜி வெல்டிங் வரிசையைப் பின்பற்றவும்.
ஸ்டெயின்லெஸ் எம்ஐஜி வெல்டிங் வேகமானது மற்றும் அதிக உற்பத்தித்திறன் கொண்டது, ஆனால் கம்பியின் ஊட்டு அமைப்பு கட்டுப்பாட்டை நீக்குவதில்லை; அது உங்கள் செயல்பாட்டிற்கு எடுத்துக்கொள்ளும் நேரத்தை மட்டுமே குறைக்கிறது.
- பாகங்களை உறுதியாக பிடித்து, இணைப்பு முழுவதிலும் சீரான இடைவெளியில் தாத்திரிகளை (tacks) வைக்கவும். சம இடைவெளியில் வைக்கப்பட்ட தாத்திரிகள் இயக்கத்தையும், விரிவாக்கத்தையும் (distortion) எதிர்கொள்ள உதவும், குறிப்பாக நீளமான இணைப்புகளில்.
- தாத்திரியில் அல்லது ஓட்டு வரிசையில் (run-on area) தொடங்கி, இணைப்பின் தொடக்கப் புள்ளியில் அதிக வெப்பம் ஏற்படாமல் இருக்க விரைவாக வெல்ட் பீட் (bead) ஐ உருவாக்கவும்.
- தள்ளும் தொழில்நுட்பத்தைப் பயன்படுத்தி, அகன்ற வடிவமைப்புக்கு பதிலாக ஒரு ஸ்ட்ரிங்கர் பீட் (stringer bead) ஐ இயக்கவும். குறிப்பு வழிகாட்டி, ஸ்ட்ரிங்கர்கள் ஸ்டெயின்லெஸ் ஸ்டீலை அதிகமாக சூடாக்குவதன் வாய்ப்பைக் குறைக்கின்றன எனக் குறிப்பிடுகிறது.
- செல்லும் வேகத்தை ஒப்பீட்டளவில் வேகமாக வைத்திருங்கள், ஆனால் அதிக வேகத்தில் ஊடுருவல் குறைந்துவிடாமல் கவனியுங்கள். சரியான வேகம் என்பது, தெளிவான ஒருங்கிணைப்புடன் கூடிய நிலையான பீட் ஆகும்; அது இரும்பு நிறத்திற்கு மாறாமல் இருக்க வேண்டும்.
- ஃபில்லரை வயர் ஃபீட் மூலம் சேர்க்கவும், ஆனால் டார்ச் கோணம் மற்றும் இயக்கத்தின் மூலம் வெல்டிங் ஐக் கட்டுப்படுத்தவும். பீட் மேலே வளைந்து அல்லது நிறம் ஆழமாக மாறினால், வெப்பம் அதிகரித்துக் கொண்டிருக்கிறது என்பதைக் குறிக்கிறது.
- நீளமான ஜாயிண்ட்கள் அல்லது பல பாஸ் வெல்டிங் பணிகளில், இடை-பாஸ் வெப்பம் தேங்கி பாகத்தை வடிவத்திலிருந்து விலக்காமல் இருக்க அவசியமான இடைவெளிகளை ஏற்படுத்தவும்.
- கிரேட்டரை (crater) சுத்தமாக முடித்த பின், போஸ்ட்-ஃப்ளோ ஷீல்டிங் குளிர்ந்து வரும் உலோகத்தைப் பாதுகாக்க டெக்னிக் முனையை வெல்டிங் முடிவில் சில வினாடிகள் வைத்திருக்கவும்.
ஆர்க் ஐ குறுகியதாக வைத்திருங்கள், நிலையான வேகத்தில் நகரவும், ஜாயிண்ட் உண்மையில் அதைத் தேவைப்படுத்தும் வரை குறைந்த அளவிலேயே வீவிங் செய்யவும், மேலும் பாகத்தை அதிகமாக சூடாக்கி ஊடுருவலை அடைய முயற்சிக்காதீர்கள். சுத்தமான நிறம் பொதுவாக சிறந்த கார்ரோஷன் எதிர்ப்பைக் குறிக்கிறது.
பல கடைகள் தரமான தோற்றத்தை விட வேகம் முக்கியமாக இருக்கும் போது மிக் (MIG) மூலம் ஸ்டெயின்லெஸ் ஸ்டீலை வெல்ட் செய்கின்றன. வேலை வெளியே நகரும் போது அல்லது முடிவு விளைவை விட சுமந்து செல்லக்கூடிய தன்மை முக்கியமாக இருக்கும் போது ஸ்டெயின்லெஸ் ஸ்டீலை ஸ்டிக் வெல்டிங் மூலம் செய்ய முடியுமா? ஆம். ஸ்டெயின்லெஸ் ஸ்டீல் ஸ்டிக் வெல்டிங், மற்றும் சில சந்தர்ப்பங்களில் ஃப்ளக்ஸ்-கோர்டு ஸ்டெயின்லெஸ், சரிசெய்யும் பணிகளுக்கு அல்லது கட்டுப்பாடற்ற சூழ்நிலைகளுக்கு நடைமுறையில் சாத்தியமானவையாக இருக்கலாம்; இருப்பினும், ஸ்டெயின்லெஸ் ஸ்டீலை ஸ்டிக் வெல்ட் செய்வது பொதுவாக TIG அல்லது வாயு-பாதுகாப்புடன் கூடிய MIG ஐ விட அதிக சுத்திகரிப்பு மற்றும் குறைந்த தோற்ற கட்டுப்பாட்டை ஏற்படுத்தும். அடிப்படை வெல்டிங் ஓட்டம் அப்படியே நிலைத்திருக்கிறது: தற்காலிக வெல்ட் செய்தல், உருகிய உலோகத்தைக் கட்டுப்படுத்துதல், வெப்பத்தைக் கட்டுப்படுத்துதல், மற்றும் வெல்ட் குளிரும்போது அதனைப் பாதுகாத்தல். ஜியாமெட்ரி (வடிவமைப்பு) இந்த ஓட்டத்தை எவ்வாறு பயன்படுத்துவது என்பதை மாற்றுகிறது, எனவே ஷீட், பிளேட், மற்றும் டியூப் அல்லது பைப் ஆகியவற்றிற்கு ஒவ்வொன்றும் சற்று வேறுபட்ட தொடுதல் தேவைப்படுகிறது.
சரியான தொழில்நுட்பத்தைப் பயன்படுத்தி ஸ்டெயின்லெஸ் ஷீட், பிளேட் மற்றும் பைப்பை வெல்ட் செய்தல்
அதே இயந்திர அமைப்புகள் மெல்லிய தகடு, கனமான தகடு மற்றும் வட்ட குழாய் ஆகியவற்றில் ஒரே மாதிரியாக செயல்படுவதில்லை. வெப்பம் தேங்கும் இடம், இணைப்பு எவ்வளவு விரைவாக நகர்கிறது என்பது மற்றும் வேர் பக்கம் ஆக்ஸிஜனுக்கு வெளிப்படுத்தப்படுகிறதா அல்லது இல்லையா என்பது போன்றவை வடிவமைப்பு மாற்றங்களைப் பொறுத்து மாறுகின்றன. எனவே, ஸ்டெயின்லெஸ் ஸ்டீலை நன்றாக வெல்ட் செய்வதைக் கற்றுக்கொள்ள வேண்டுமெனில், உங்கள் தொழில்நுட்பத்தை கலவை (அலாய்) மட்டுமல்ல, பாகத்துடன் பொருத்தமாக ஏற்படுத்திக் கொள்ள வேண்டும்.
ஸ்டெயின்லெஸ் தகடு மற்றும் தகட்டை வெல்ட் செய்வது எப்படி
ஸ்டெயின்லெஸ் மெல்லிய தகடு அதிக வெப்பத்தை விரைவாக தாங்க முடியாத இடமாகும். UNIMIG குறிப்பிடுவது போல, TIG வெல்டிங் மிகச் சிறந்தது, ஏனெனில் இது மிக நெருக்கமான வெப்பக் கட்டுப்பாட்டை வழங்குகிறது — குறைந்தபட்சம் 1 மிமீ அளவு வரையிலான மெல்லிய பொருட்களுக்கும் கூட. தகடுகளுக்கு, பொருத்துதல் மிகவும் இறுக்கமாக இருக்க வேண்டும், பெருமளவு சிறிய டாக் வெல்டுகளைப் பயன்படுத்த வேண்டும், உறுதியாக கிளாம்ப் செய்ய வேண்டும் மற்றும் வெல்டிங் விரைவாக நிகழ்த்த வேண்டும். குறுகிய வெல்ட் பீட்ஸ், குறுகிய வெல்ட் பகுதிகள் மற்றும் குளிரூட்டும் பார்கள் அல்லது பேக்கிங் பிளேட்டுகள் ஆகியவை வெப்பத்தை வெளியேற்ற உதவுகின்றன, இதனால் பேனல் அலை போல அலைந்து அல்லது வளைந்து விடாது. வெல்ட் செய்யும் போது அது அதிகரித்துக் கொண்டே போகிறது எனில், வடிவ மாற்றம் (டிஸ்டார்ஷன்) ஏற்கனவே ஏற்பட்டு விட்டது.
தகடு இலக்கை மாற்றுகிறது. நீங்கள் இன்னும் குறைந்த வெப்ப உள்ளீட்டை விரும்புகிறீர்கள், ஆனால் கனமான பகுதிகள் அதிக வெல்ட் உலோகத்தை ஏற்றுக்கொள்ள முடியும் மற்றும் பெரும்பாலும் திட்டமிடப்பட்ட கட்டத்து வரிசையை தேவைப்படுகின்றன. MIG நீண்ட பிணைப்புகளில் பயனுள்ளதாகிறது, ஏனெனில் அது வேகமானது, அதே நேரத்தில் ஸ்டிக் வெல்டிங் கனமான பொருள்கள் மற்றும் களத்தில் சரிசெய்தலுக்கு இன்னும் பயனுள்ளதாக உள்ளது. ஸ்டெயின்லெஸ் ஸ்டீல் தகடுகளில், இடை-கட்ட வெப்பம் ஒரு குறிப்பிட்ட பகுதியில் சேர்ந்து விடாமல் கவனம் செலுத்தவும். வேலையை சமமாக பரவலாக்கவும், ஒவ்வொரு கட்டத்தையும் சுத்தமாக வைத்திருக்கவும், பகுதி கனமானது என்பதால் வெல்டை அதிக அளவில் செய்ய வேண்டாம்.
ஸ்டெயின்லெஸ் ஸ்டீல் குழாய் மற்றும் குழலை எவ்வாறு வெல்ட் செய்வது
குழாய் மற்றும் குழல் இரண்டாவது முறையான மேற்பரப்பை – உள் ரூட் பகுதியை – அறிமுகப்படுத்துகின்றன. இது ஸ்டெயின்லெஸ் ஸ்டீல் குழல் வெல்டிங்கை தட்டையான பணிகளை விட குறைவாக தாங்குதல் கொண்டதாக ஆக்குகிறது. குழல்-குழல் வெல்டிங்கில், சரியான சீரமைப்பு மற்றும் டாக் வைப்பிடங்கள் முறையான நேரத்தில் முக்கியமானவை, ஏனெனில் சிறிய சீரற்ற அமைப்பு முழு இணைப்பு வட்டத்திலும் ரூட் பகுதியை பாதிக்கும். வெளிப்புறம் மற்றும் உள்புறம் இரண்டையும் சுத்தம் செய்யவும், சமமான டாக்குகளை வைக்கவும், மற்றும் பயன்பாடு தேவைப்படும் போது ரூட் பகுதியை ஆக்ஸிஜனிலிருந்து பாதுகாக்கவும்.
பல சுகாதார, அதிக அழுத்தம் மற்றும் குழாய் வேலைகளுக்கு, UNIMIG உள்புறம் சர்க்கரை போன்ற தன்மையைத் தடுக்க பின்புற வாயு ஊட்டுதலை (back purging) பரிந்துரைக்கிறது. அன்றாட ஸ்டெயின்லெஸ் ஸ்டீல் குழாய் வெல்டிங்கில், முனைகளை மூடுதல் மற்றும் வாயு வெளியேற்ற துளையை விடுத்தல் ஆகியவை அடிப்படை நடவடிக்கைகளே, கூடுதல் நடவடிக்கைகள் அல்ல. பெரும்பாலான ஸ்டெயின்லெஸ் ஸ்டீல் குழாய் வெல்டிங் செயல்முறைகள் இன்றும் ரூட் (அடிப்பகுதி) வெல்டிங்கிற்கு TIG ஐ முன்னுரிமை அளிக்கின்றன, எனவே தோற்றம் மற்றும் ரூட் தரம் மிகவும் முக்கியமாக இருக்கும்போது ஸ்டெயின்லெஸ் குழாய் TIG வெல்டிங் இன்றும் பரவலாக பயன்படுத்தப்படுகிறது. ஒரு உற்பத்தி விதிவிலக்கு கவனிக்கத்தக்கது: குழாய் மற்றும் குழல் இதழ் சில தகுதிபெற்ற திறந்த-ரூட் 300 தொடர் வேலைகள், பின்புற வாயு ஊட்டுதலைக் குறைக்க அல்லது நீக்க மாற்றியமைக்கப்பட்ட குறுகிய-சுற்று ஜிஎம்ஏடப்ள்யூ (GMAW) ஐப் பயன்படுத்துவதைக் காட்டுகிறது. இது பயண வேகத்தை கணிசமாக அதிகரிக்கலாம், ஆனால் இது தகுதிபெற்ற செயல்முறை, கட்டுப்படுத்தப்பட்ட இடைவெளி, சரியான வாயு மற்றும் நிரப்பு பொருளைச் சார்ந்தது. ஸ்டெயின்லெஸ் ஸ்டீல் குழாய் வெல்டிங்கில், ரூட் நிலை முடிந்த வெல்டிங்கின் ஒரு பகுதியாகும், மறைக்கப்பட்ட விவரம் அல்ல.
| பாகம் வடிவம் | இணைப்பு தயாரிப்பு தேவைகள் | விரும்பப்படும் செயல்முறை | வெப்பக் கட்டுப்பாட்டு முன்னுரிமைகள் | சில பொதுவான தவறுகள் | ஆய்வு கவனம் |
|---|---|---|---|---|---|
| சீட் | நெருக்கமான பொருத்தம், பல டாக்குகள், சுத்தமான பரப்பு, உறுதியான கிளாம்பிங் | சிறந்த கட்டுப்பாடு மற்றும் தெரிவிக்கக்கூடிய முடிவுக்காக TIG | குறைந்த வெப்ப உள்ளீடு, விரைவான செலவு, குறுகிய கோடு, தேவைப்பட்டால் குளிரூட்டும் பார்கள் | நீண்ட வில், அகன்ற வடிவமைப்பு, மிகையான வெல்டிங், மோசமான கட்டுப்பாடு | தட்டைமை, நிறம், எரிந்து துளைதல், ஓரத்தின் சிதைவு |
| பலடி | ஒழுங்கான பொருத்தம், சுத்தமான ஓரங்கள், கட்டத்தின் வரிசைக்கான டாக் வெல்டிங் | உற்பத்தித்திறனுக்காக MIG, துல்லியத்திற்காக TIG, புறவேலைகளுக்காக ஸ்டிக் | இடை-கட்ட வெப்பத்தைக் கட்டுப்படுத்து, வெல்டிங் வரிசையை பரவலாக்கு, மிகையான பெரிய கட்டங்களைத் தவிர் | ஒரு பகுதியில் மிகையான வெப்பம், மிகையான வடிவமைப்பு, கட்டங்களுக்கு இடையிலான சுத்தமின்மை | கலவை, கோடு வடிவம், வெப்ப நிறம், கூட்டு அமைப்பில் வளைவு |
| குழாய் அல்லது பைப் | உள் விட்டம் (ID) மற்றும் வெளி விட்டம் (OD) சுத்தம், துல்லியமான சீரமைப்பு, சீரான டாக்குகள், தேவைப்பட்டால் பியூர்ஜ் அமைப்பு | பல வேலைகளில் TIG ரூட்; சில 300 தொடர் ஓபன்-ரூட் பணிகளில் தகுதிபெற்ற மாற்றியமைக்கப்பட்ட ஷார்ட்-சர்க்யூட் MIG | முகத்தையும் ரூட்டையும் பாதுகாக்கவும், பர்ஜ் செயல்முறையை பராமரிக்கவும், ரூட்டை மென்மையாகவும் கட்டுப்பாட்டிலும் வைத்திருக்கவும் | தவறான சீரமைப்பு, போதுமான பர்ஜ் இன்மை, வெளியேற்று துளை இன்மை, சுக்கரிங், அசீரண ரூட் | ரூட் தோற்றம், உள் ஆக்ஸிடேஷன், கேப் ஒழுங்கு, முழு சுற்றளவிலும் உள்ள பொருத்தம் |
சீமென்ட் குளிரும் நேரத்திற்குள், ஒவ்வொரு வடிவமும் வெவ்வேறு வழியில் உங்களை வெளிப்படுத்தும். ஷீட் விரிவாக்கத்தைக் காட்டும், பிளேட் ஃபியூஷன் மற்றும் வெப்ப அமைப்பைக் காட்டும், மற்றும் பைப் ரூட்டில் அதனைக் காட்டும். இந்த அறிகுறிகளே முழுமையான வெல்டிங்கையும் ஏற்றுக்கொள்ளக்கூடிய வெல்டிங்கையும் பிரிக்கின்றன.
ஸ்டெயின்லெஸ் ஸ்டீல் வெல்டிங்குகளை ஆய்வு செய்து பொதுவான குறைபாடுகளை சரிசெய்யவும்
இங்கு முக்கியமான சொல் 'ஏற்றுக்கொள்ளத்தக்கது' என்பதாகும். ஒரு இணைப்பு முழுமையாக இணைக்கப்பட்டிருந்தாலும், அது தரமான ஸ்டெயின்லெஸ் ஸ்டீல் வெல்டிங் முடிவாக இருக்காது. நல்ல ஸ்டெயின்லெஸ் ஸ்டீல் வெல்டிங் ஒரு ஒழுங்கான பீட் வடிவத்தைக் காட்ட வேண்டும், மென்மையான டோஸ் (toes), கட்டுப்படுத்தப்பட்ட மீள் உயர்வு (reinforcement), குறைந்த ஸ்பேட்டர் (spatter) மற்றும் நிறுத்தத்தில் சுத்தமான கிரேட்டர் (crater) ஆகியவற்றைக் கொண்டிருக்க வேண்டும். பின்புறம் முக்கியத்துவம் வாய்ந்த இடங்களில், ரூட் (root) திடமானதாகவும், கனமான ஆக்ஸிஜனேஷனிலிருந்து பாதுகாக்கப்பட்டதாகவும் இருக்க வேண்டும். வண்ணமும் ஆய்வின் ஒரு பகுதியாகும். ஸ்டெயின்லெஸ் ஸ்டீலில் வெல்ட் செய்யப்பட்ட பகுதிகளில், லைட் ஸ்ட்ரா (light straw) அல்லது மிக மென்மையான நீலம் (faint blue) ஆகியவை கனமான நீலம், சாம்பல் அல்லது கருப்பு ஸ்கேலை விட மிகச் சிறந்த கட்டுப்பாட்டைக் குறிக்கின்றன.
ஸ்டெயின்லெஸ் ஸ்டீலை வெல்ட் செய்வது கடினமாக இருப்பதற்கு இதுவே முக்கியமான காரணங்களில் ஒன்றாகும். தோற்றம் கார்ரோஷன் (corrosion) நடத்தையுடன் தொடர்புடையது. 316L சுகாதார குழாய் பணிகளின் சுருக்கம் ASME BPE ஆய்வுகளில் ஆக்ஸிஜன் வெளிப்படுத்தலை அதிகரிப்பதால் பிட்டிங் எதிருதவி குறைந்தது, மேலும் பிட்டிங் முக்கியமாக வெப்ப பாதிக்கப்பட்ட மண்டலத்தில் (HAZ) தோன்றியது, வெல்ட் பீட்-இல் அல்ல. அந்த ஆய்வுகள் மேலும், சோதனை செய்யப்பட்ட மாதிரிகளில் HAZ-இல் வெல்ட் பீட்-ஐ விட மிக அதிக எண்ணிக்கையிலான பிட்டிங்குகள் இருந்ததாகவும் அறிவித்தன. எனவே, நீங்கள் இன்னும் ஸ்டெயின்லெஸ் ஸ்டீலை வெல்ட் செய்ய முடியுமா என்று கேட்டுக்கொண்டிருந்தால், நடைமுறை விடை ஆம் என்பதாகும்; ஆனால் சுத்தமான தோற்றம் என்பது வெறும் அழகு நோக்கம் மட்டுமே அல்ல. அது ஸ்டெயின்லெஸ் ஸ்டீலை முதன் முதலில் பயனுள்ளதாக வைத்திருக்கும் குரோமியம்-செறிவூட்டப்பட்ட மேற்பரப்பைப் பாதுகாக்க உதவுகிறது.
ஸ்டெயின்லெஸ் வெல்ட் தோற்றம் மற்றும் ஆக்ஸிடேஷனை ஆய்வு செய்யவும்
சீர்செய்வதற்கான கருவிகளை எடுப்பதற்கு முன்பாக கண்ணால் ஆய்வு செய்வதன் மூலம் தொடங்கவும். சரியான ஸ்டெயின்லெஸ் ஸ்டீல் வெல்ட்கள் பொதுவாக சீரான அகலம், தெளிவாகத் தெரியும் அடிக்குறைவு (undercut) இன்மை, தெளிவாகத் தெரியும் சிறிய துளைகள் (pinholes) இன்மை, மேற்பரப்பிலும் வேரிலும் கட்டுப்பாட்டில் உள்ள ஆக்ஸிடேஷன் ஆகியவற்றைக் கொண்டிருக்கும். நீங்கள் குழாய் அல்லது பைப்பின் உள்ளே சர்க்கரை போன்ற தோற்றம் (sugaring) அல்லது HAZ சுற்றிலும் கனமான வெப்ப நிறம் (heat tint), அல்லது மேற்பரப்பில் மோசமான, உள்ளே அழுங்கிய குழிவு (crater) ஆகியவற்றைக் காண்கிறீர்கள் எனில், அதை ஒரு செயல்முறை எச்சரிக்கையாக எடுத்துக்கொள்ளவும். ஸ்டெயின்லெஸ் ஸ்டீலை வேகமாக வெல்ட் செய்யக்கூடிய அமைப்பு ஒன்று கூட, பின்னர் கார்ரோஷனை எதிர்க்கும் அளவிற்கு வெல்ட்டை சுத்தமாகவே விட்டுச் செல்ல வேண்டும்.
| காணத்தக்க அறிகுறி | சாத்தியமான காரணங்கள் | சரி செய்யும் நடவடிக்கை |
|---|---|---|
| கரும் நீலம், சாம்பல் அல்லது கருப்பு வெப்ப நிறம் | அதிக வெப்ப உள்ளீடு, மெதுவான செலவு வேகம், மோசமான பாதுகாப்பு, பலவீனமான பரிசுத்திகரணம் | குறைந்த வெப்ப உள்ளீடு, வில்லைக் குறைக்கவும், வாயு மூடுதலை அதிகரிக்கவும், பரிசுத்திகரண மூடுதல் மற்றும் ஓட்டத்தை மேம்படுத்தவும் |
| வேரில் சர்க்கரை போன்ற தோற்றம் | சேர்க்கை போது பின்புறத்திற்கு ஆக்ஸிஜன் செல்வது | உட்புறத்தைச் சுத்தம் செய்யவும், மேம்படுத்திய மூடுதலை உறுதிப்படுத்தவும், பரிசுத்திகரண ஏற்பாட்டை சரிபார்க்கவும், வேரை குளிரும் வரை பாதுகாக்கவும் |
| வளைதல் அல்லது திரிபு | அதிக வெப்ப மையீகரணம், நீளமான சேர்க்கைகள், மோசமான பிடிப்பு ஏற்பாடு | குறைந்த சேர்க்கை துண்டுகளைப் பயன்படுத்தவும், மேம்படுத்திய டாக் வரிசையைப் பயன்படுத்தவும், வலுவான கட்டுப்பாட்டைப் பயன்படுத்தவும், மொத்த வெப்ப உள்ளீட்டைக் குறைக்கவும் |
| எரிந்து குழித்தல் | வெப்பம் அதிகமாக இருத்தல், மோசமான பொருத்தம், மெல்லிய பொருளில் இடைவெளி அதிகமாக இருத்தல் | ஆம்பியர் அல்லது மின்னழுத்தத்தைக் குறைக்கவும், பொருத்தத்தை மேம்படுத்தவும், வேகத்தை அதிகரிக்கவும், தேவைப்பட்டால் பின்தங்கிய பாதுகாப்பைப் பயன்படுத்தவும் |
| சுவர்ச்சுரம் | மாசுபடுதல், ஈரப்பதம், குறைந்த பாதுகாப்பு வாயு மூடியிருத்தல் | இணைப்பை முழுமையாக சுத்தம் செய்யவும், வாயு ஓட்டத்தையும் கசிவுகளையும் சரிபார்க்கவும், பயன்படுத்தப்படும் பொருட்களை வறண்ட நிலையிலும் சரியான நிலையிலும் வைத்திருக்கவும் |
| சங்கிலித்தல் இன்மை அல்லது முழுமையாக ஊடுருவாமை | குறைந்த விற்கு ஆற்றல், மோசமான இணைப்பு வடிவமைப்பு, அதிக வேகத்தில் செல்லுதல், அடிப்பகுதி இடைவெளி மிகவும் குறுகியதாக இருத்தல் | அளவுகளை சரிசெய்யவும், இணைப்பு தயாரிப்பை சரிசெய்யவும், சற்று மெதுவாக செல்லவும், மேலும் இணைப்பின் இரு பக்கங்களுக்கும் அணுகல் உள்ளதா என உறுதிப்படுத்தவும் |
| விரிசல் | தவறான நிரப்பு பொருள், அதிக விறைப்பு, கலவை உணர்திறன், ஹைட்ரஜன் அல்லது கடினமான தரங்களில் குளிர்விப்பு சிக்கல்கள் | நிரப்பு பொருள் தேர்வை மீண்டும் ஆய்வு செய்யவும், விறைப்பைக் குறைக்கவும், கலவைக்கு ஏற்ற செயல்முறையைப் பின்பற்றவும், வெப்பத்தை மேலும் கவனமாகக் கட்டுப்படுத்தவும் |
பொதுவான ஸ்டெயின்லெஸ் ஸ்டீல் வெல்டிங் சிக்கல்களைத் தீர்க்கவும்
பெரும்பாலான சிக்கல்கள் குறைந்த எண்ணிக்கையிலான காரணங்களுக்கு வழிவகுக்கின்றன: அதிக வெப்பம், மோசமான காப்பு, அழுக்குள்ள பொருள், மோசமான பொருத்தம், அல்லது நிர filling பொருள் மற்றும் செயல்முறை இடையே ஏற்படும் பொருத்தமின்மை. ஸ்டெயின்லெஸ் ஸ்டீல் குறைபாடுகள் குறித்த குறிப்பு வழிகாட்டுதல்கள் மேலும் குறிப்பிடுகின்றன: துளைகள் (பொரோசிட்டி) இணைப்புகளை பலவீனப்படுத்துகின்றன மற்றும் ஈரப்பதத்தை சேமிக்க முடியும்; மேலும் ஒன்றிப்பின்மை (லாக் ஆஃப் ஃபியூசன்) பலவீனமான இடங்களை உருவாக்குகிறது, இவை பாகத்தின் மீது சுமை ஏற்றப்படும் வரை தெளிவாகத் தெரியாது. முக்கியமான பணிகளில் கண்ணுக்குத் தெரியும் முடிவுகள் சந்தேகத்திற்கு உள்ளாகும்போது, மேற்பரப்பில் தெரியும் குறைபாடுகளுக்காக பெனிட்ரென்ட் சோதனையையும், உள் குறைபாடுகளுக்காக அல்ட்ராசோனிக் அல்லது ரேடியோகிராபிக் முறைகளையும் சேர்க்கவும்.
- சிலாக், ஸ்பாட்டர் மற்றும் ஆக்ஸைடை மேற்பரப்பில் கார்பன் ஸ்டீல் துகள்களை பதியாமல் அகற்றவும்.
- முடிவு மற்றும் பயன்பாட்டு தேவைகளுக்கு ஏற்ற முறையில் வெப்ப நிறமாற்றத்தை (ஹீட் டிண்ட்) சுத்தம் செய்யவும்.
- மீண்டும் முறையாக மெருகூட்டுதல் (ரீஃபினிஷிங்) செய்யப்பட இருந்தால் தவிர, கடுமையான கிரைண்டிங் செய்யாதீர்கள், ஏனெனில் இயந்திர கிரைண்டிங் காப்பு அடுக்கை (பாஸிவ் லேயர்) சேதப்படுத்தலாம் மற்றும் சீரற்ற மேற்பரப்பை விட்டுச் செல்லலாம்.
- செயல்முறை அல்லது சேவை காரணமாக துருத்தடுப்பு செயல்திறன் மீட்டெடுக்கப்பட வேண்டும் எனில், பாஸிவேஷன், மின்னணு சுத்திகரிப்பு அல்லது மின்னணு மெருகூட்டல் ஆகியவற்றைப் பயன்படுத்தவும். ASME BPE மதிப்பாய்வில் 316L துருத்தடுப்பு ஆய்வுகள், இந்த சிகிச்சைகள் சரியாக செய்யப்பட்டால் எதிர்ப்புத்திறனை மேம்படுத்துவதைக் கண்டறிந்தன.
- தூய்மைப்படுத்தலுக்குப் பின் வெல்ட் பீட்-இன் முகப்பை மட்டும் அல்ல, HAZ மற்றும் வேரையும் மீண்டும் பரிசோதிக்கவும்.
- குறைபாடுகள் தோன்றும்போது என்ன மாறியது என்பதைப் பதிவு செய்யவும், ஏனெனில் மீண்டும் மீண்டும் ஏற்படும் பிரச்சினைகள் பொதுவாக மீண்டும் மீண்டும் ஏற்படும் நிலைமைகளிலிருந்தே உருவாகின்றன.
மிகவும் வலுவான தொழிற்சாலைகள் இந்த முடிவுகளை நினைவில் வைத்துக் கொள்ள விடுவதில்லை. அவை வெல்ட் பீட் வடிவம், நிற வரம்புகள், தூய்மைப்படுத்தல் படிகள் மற்றும் சரிசெய்தல் தூண்டிகளை தரமான வேலையாக மாற்றுகின்றன, குறிப்பாக ஒரு வெற்றிகரமான வெல்ட் உற்பத்தி தேவையாக மாறத் தொடங்கும்போது.
ஸ்டெயின்லெஸ் ஸ்டீல் வெல்டிங்கை மீண்டும் மீண்டும் தரமான கட்டுப்பாடுகளுடன் அளவிடுதல்
ஒரு தூய்மையான வெல்ட் முறையை நிரூபிக்கிறது. நூறு ஒத்த வெல்ட்கள் அந்த முறையின் அமைப்பை நிரூபிக்கின்றன. இதுதான் ஸ்டெயின்லெஸ் வெல்டிங் புரோட்டோடைப்களிலிருந்து உற்பத்திக்கு மாறும்போது ஏற்படும் உண்மையான மாற்றம். வழிகாட்டுதல் LYAH Machining வணிக விருப்பத்தை தெளிவாகக் காட்டுகிறது: உள்ளூரில் தயாரிப்பு செயல்முறை கட்டுப்பாட்டை நெருக்கமாக வைத்திருக்கவும், பொறியியல் மாற்றங்களை விரைவாகச் செய்யவும் உதவுகிறது, அதே நேரத்தில் வெளியே ஒப்பந்தம் செய்வது மூலதன சுமையைக் குறைக்கிறது மற்றும் திறனை எளிதில் அதிகரிக்க வழிவகுக்கிறது. ஸ்டெயின்லெஸ் உயர் தரத்தை நிர்ணயிக்கிறது, ஏனெனில் வெளிப்புற ஒழுங்கு, தடையின்றி கண்காணிக்கக்கூடிய தன்மை மற்றும் துரு கவனமுள்ள சுத்திகரிப்பு ஆகியவை வடிவத்தை மட்டுமல்ல, மீண்டும் மீண்டும் செய்யப்பட வேண்டும்.
உள்ளூரில் வெல்டிங் மற்றும் வெளியே ஒப்பந்தம் செய்யப்பட்ட உற்பத்திக்கு இடையே தேர்வு செய்யவும்
திறமையான ஸ்டெயின்லெஸ் ஸ்டீல் வெல்டர் மற்றும் நல்ல ஸ்டெயின்லெஸ் ஸ்டீல் வெல்டிங் இயந்திரம் குறுகிய கால வேலைகள், அவசர மறுபணி மற்றும் உணர்திறன் மிக்க புரோட்டோடைப்களைக் கையாள முடியும். தயாரிப்பு வேறுபட்டது. AMD இயந்திரங்களின் குறிப்புகள், ஸ்டெயின்லெஸ் பணிகளில் தானியங்கி செல்கள் ஏன் முக்கியமானவை என்பதை விளக்குகின்றன: அவை வில்ட் வில்லின் நீளம், பயண வேகம் மற்றும் டார்ச் கோணத்தை மிக மேம்பட்ட முறையில் பராமரிக்கின்றன, மேலும் டிரேஸபிளிட்டிக்காக வில்ட் அளவுருக்களைப் பதிவு செய்ய முடியும். எனவே, தயாரிப்பு தரத்தில் ஸ்டெயின்லெஸ் ஸ்டீலை வில்ட் செய்வதற்கு உங்களுக்கு என்ன தேவை? பொதுவாக, ஒரே ஒரு ஸ்டெயின்லெஸ் வெல்டிங் இயந்திரம் அல்லது SS வெல்டிங் இயந்திரம் மட்டும் போதாது. நீங்கள் மீண்டும் மீண்டும் பயன்படுத்தக்கூடிய பிடிமான ஏற்பாடுகள், எழுதப்பட்ட செயல்முறைகள், நிறம் மற்றும் ஆக்ஸிஜனேஷனுக்கான ஆய்வு வரம்புகள், மேலும் வாடிக்கையாளர் தணிக்கைகளுக்கு நிலைத்து நிற்கும் பதிவுகள் தேவை.
- ஷாயோய் மெட்டல் டெக்னாலஜி: உயர் செயல்திறன் சாசிஸ் பாகங்களில் ஆட்டோமொபைல்-தரத்திற்கு ஏற்ற மீள்தன்மைக்காக, Shaoyi Metal Technology எஃகு, அலுமினியம் மற்றும் பிற உலோகங்களுக்கான தனிப்பயன் வெல்டிங் சேவைகளை வழங்குகிறது, மேலும் முன்னேறிய ரோபோட்டிக் வெல்டிங் வரிசைகள் மற்றும் IATF 16949 சான்றிதழ் பெற்ற தர அமைப்பைக் கொண்டுள்ளது.
- அதை உள்நாட்டிலேயே வைத்துக் கொள்ளுங்கள் வடிவமைப்புகள் அடிக்கடி மாறும்போது, புத்திசாலித்தனமான சொத்து உணர்திறன் கொண்டதாக இருக்கும்போது, அல்லது பொறியாளர்களுக்கு வெல்டிங் தளத்திலிருந்து உடனடி பின்னூட்டம் தேவைப்படும்போது.
- வெளியே ஒப்பந்தம் செய்தல் அல்லது கலப்பு மாதிரியைப் பயன்படுத்துதல் தேவை ஏற்ற இறக்கங்களை எதிர்கொள்ளும்போது, திறமையான தொழிலாளர்கள் குறைவாக இருக்கும்போது, அல்லது தேவையான தானியங்கு மற்றும் ஆய்வுத் திறனை உள்ளேயே உருவாக்குவது மிகவும் விலை உயர்ந்ததாக இருக்கும்போது.
மீண்டும் மீண்டும் தயாரிக்கப்படும் ஸ்டெயின்லெஸ் ஸ்டீல் பாகங்களுக்கு தர முறைமைகளைப் பயன்படுத்துதல்
ஸ்டெயின்லெஸ் ஸ்டீல் வெல்டிங் செய்வதற்கான சரியான வெல்டிங் இயந்திரம் என்பது போதுமான வெளியீட்டைக் கொண்ட மின்சக்தி மூலத்தை மட்டுமே அல்ல, கட்டுப்படுத்தப்பட்ட செயல்முறையையும் பொருத்தமானதாக இருக்க வேண்டும். குழுவினர் நிரப்பு பொருளின் தொகுதிகள், பாதுகாப்பு வாயு, அளவுருக்களின் வரம்புகள், பிடிமான இடங்கள் மற்றும் வெல்டிங்கிற்குப் பிந்தைய ஆய்வு முடிவுகள் ஆகியவற்றை ஆவணப்படுத்துகின்றனரா என்பதைக் கேளுங்கள். பாகம் தொகுதிக்குத் தொகுதி ஒரே மாதிரியாகத் தோன்ற வேண்டுமெனில், மாதிரிகளைச் சேமித்தல், தேவையான இடங்களில் அழிவற்ற சோதனைகள் (nondestructive testing) மற்றும் வெப்ப நிழல் (heat tint) மற்றும் வடிவ மாற்றம் (distortion) ஆகியவற்றிற்கான தெளிவான ஏற்றுக்கொள்ளும் தர விதிமுறைகளைச் சேர்க்கவும். ஒரு ஸ்டெயின்லெஸ் ஸ்டீல் வெல்டர் ஒருமுறை அழகான பாகத்தை உருவாக்க முடியும். மீண்டும் மீண்டும் தயாரிக்கக்கூடிய ஸ்டெயின்லெஸ் உற்பத்தி என்பது செயல்முறைகள், பிடிமானங்கள் மற்றும் தர முறைமைகளிலிருந்து வருகிறது, அவை அடுத்த பாகத்தையும் அதே அளவுக்கு நம்பகமாக உருவாக்குகின்றன.
ஸ்டெயின்லெஸ் ஸ்டீல் வெல்டிங் குறித்த அடிக்கடி கேட்கப்படும் கேள்விகள்
1. ஸ்டெயின்லெஸ் ஸ்டீலை வெல்ட் செய்வதற்கு எந்த வெல்டிங் முறை சிறந்தது?
சிறந்த முறை பணியின் தன்மையைப் பொறுத்தது. மெல்லிய பொருள்கள், தெரிவிக்கப்படும் வெல்டுகள் மற்றும் துல்லியமான குழம்பு கட்டுப்பாடு மற்றும் சுத்தமான முடிவு தேவைப்படும் பணிகளுக்கு TIG பொதுவாக முதன்மையான தேர்வாகும். MIG வெல்டிங் விரைவான தொழிற்சாலை உற்பத்தி மற்றும் நீண்ட வரிசைகளுக்கு பெரும்பாலும் சிறந்ததாகும், ஏனெனில் இது உலோகத்தை விரைவாக வெளிப்படுத்துகிறது மற்றும் கற்றுக்கொள்ள எளிதானது. சிக்கலான சூழ்நிலைகளில் (எ.கா., வெளியில் அல்லது தளத்தில்) சிறிய உபகரணங்களுடன் செய்யப்படும் பழுது பார்க்கும் பணிகளுக்கு Stick வெல்டிங் பயன்படுத்தலாம்; ஆனால் இது பொதுவாக அதிக சுத்திகரிப்பு மற்றும் குறைந்த வெளிப்புற கட்டுப்பாட்டை ஏற்படுத்தும். ஒரு எளிய விதியாக: தோற்றம் மற்றும் கட்டுப்பாட்டிற்கு TIG-ஐத் தேர்ந்தெடுக்கவும், வேகம் மற்றும் உற்பத்தித்திறனுக்கு MIG-ஐத் தேர்ந்தெடுக்கவும், கட்டுப்பாடற்ற சூழ்நிலைகளில் பழுது பார்க்கும் பணிகளுக்கு Stick-ஐத் தேர்ந்தெடுக்கவும்.
2. ஸ்டெயின்லெஸ் ஸ்டீலை மைல்ட் ஸ்டீல் அல்லது கார்பன் ஸ்டீலுடன் வெல்ட் செய்ய முடியுமா?
ஆம், ஸ்டெயின்லெஸ் ஸ்டீலை மைல்டு ஸ்டீல் அல்லது கார்பன் ஸ்டீலுடன் இணைக்க முடியும், ஆனால் நிர filling பொருளைத் தேர்வு செய்யும்போது அதன் ஒத்திசைவு (compatibility) அடிப்படையில் தீர்மானிக்கப்பட வேண்டும்; இணைப்பின் ஒரு பக்கத்தில் அச்சிடப்பட்டுள்ள தரத்தை மட்டும் அடிப்படையாகக் கொள்ளக் கூடாது. பல பொதுவான தொழிற்சாலை பயன்பாடுகளில், இரு உலோகங்களுக்கு இடையேயான கலப்பு (dilution) சிறப்பாகக் கையாளப்படுவதற்காக 309L-வகை நிர filling பொருளைப் பயன்படுத்துகின்றனர், ஏனெனில் இது நேரடியான தர பொருத்தத்தை விட சிறந்தது. சரியான நிர filling பொருளைப் பயன்படுத்தினாலும், இந்த இணைப்புகளுக்கு இணைப்பு துல்லியம் (fit-up), வெப்பக் கட்டுப்பாடு மற்றும் சுத்திகரிப்பு ஆகியவற்றில் கூடுதல் கவனம் தேவைப்படுகிறது, ஏனெனில் வெல்டிங் அதிக வெப்பத்திற்கு உள்ளாகினால் அல்லது மாசுபட்டால் கார்ஷன் எதிர்ப்புத் தன்மை குறைந்துவிடும். வேறுபட்ட உலோகங்களை இணைப்பது சாத்தியமே, ஆனால் அதற்கு ஸ்டெயின்லெஸ்-டு-ஸ்டெயின் வெல்டிங்கை விட மிகவும் கவனமான தயாரிப்பு தேவைப்படுகிறது.
3. ஸ்டெயின்லெஸ் ஸ்டீலை வெல்ட் செய்ய எந்த நிர filling ராட் அல்லது வையரைப் பயன்படுத்த வேண்டும்?
முதலில், ஸ்டெயின்லெஸ் ஸ்டீல் குடும்பத்தை அடையாளம் காண்பதன் மூலம் தொடங்கவும். 304 மற்றும் 304L போன்ற ஆஸ்டெனிட்டிக் தரங்களுக்குப் பொதுவாக 308 அல்லது 308L நிரப்பு பொருள் பயன்படுத்தப்படுகிறது, அதேசமயம் 316 மற்றும் 316L ஆகியவற்றுக்கு சிறப்பு கார்பன் எதிருறுதி தன்மையை பராமரிக்க பொதுவாக 316 வகை நிரப்பு பொருள் தேவைப்படுகிறது. ஃபெரிட்டிக், மார்டென்சிட்டிக், டுவாப்ளெக்ஸ் மற்றும் வழிமுறை-வழிமுறை கடினமாக்கும் தரங்களுக்கு பெரும்பாலும் செயல்முறை-குறிப்பிட்ட நுகர்வுப் பொருட்கள் தேவைப்படுவதால், அங்கு உற்பத்தியாளரின் வழிகாட்டுதல் மிகவும் முக்கியமானதாகும். நீங்கள் ஸ்டெயின்லெஸ் ஸ்டீலை கார்பன் ஸ்டீலுடன் கூட்டுவதாக இருந்தால், ஒத்திசைவு மையப்படுத்தப்பட்ட நிரப்பு பொருள் பெரும்பாலும் பாதுகாப்பான விருப்பமாகும். முக்கிய விஷயம் என்னவென்றால், நிரப்பு பொருள் இறுதி வெல்ட் வேதியியல் மற்றும் பயன்பாட்டு நிலைகளை ஆதரிக்க வேண்டும்; அது அடிப்படை உலோக எண்ணை எளிதாக பிரதிபலிக்க வேண்டியதில்லை.
4. ஏன் ஸ்டெயின்லெஸ் ஸ்டீல் வெல்டிங் செய்த பின்னர் வளைந்து, நிறம் மாறியோ அல்லது துருப்பிடித்தோ போகிறது?
ஸ்டெயின்லெஸ் ஸ்டீல், மைல்டு ஸ்டீலை விட வெல்டிங் மண்டலத்தில் வெப்பத்தை நீண்ட நேரம் காத்திருக்கச் செய்கிறது, மேலும் சூடாகும்போதும் குளிரும்போதும் அதிகமாக விரிவடைகிறது; எனவே, பாகம் மிகையாக வெல்ட் செய்யப்பட்டால் அல்லது தவறாக பிடித்து வைக்கப்பட்டால், வடிவ மாற்றம் விரைவில் ஏற்படலாம். வண்ண மாற்றம் பொதுவாக அதிக வெப்பம், பலவீனமான வாயு பாதுகாப்பு அல்லது பின்புறத்தில் தவறான பரிசுத்த வாயு பாதுகாப்பு (purge protection) ஆகியவற்றைக் குறிக்கிறது. வெல்டிங் செய்த பின் துரு ஏற்படுவது பெரும்பாலும் அடிப்படை உலோகத்தின் தவறு அல்ல, மாறாக மாசுப்படுத்தல் காரணமாகும் – குறிப்பாக, கார்பன்-ஸ்டீல் துகள்கள், அழுக்கான தேய்மான கருவிகள் அல்லது பகிரப்பட்ட கருவிகள் மேற்பரப்பில் சுதந்திர இரும்பை விடுவிக்கும்போது. சிறந்த முடிவுகளைப் பெற பொதுவாக குறுகிய வெல்டிங் வில் நீளம், நிலையான செல்வது, குறைந்த வெப்ப உள்ளீடு, ஸ்டெயின்லெஸ் ஸ்டீலுக்கான தனிப்பயன் தயாரிப்பு கருவிகள் மற்றும் வெல்டிங்கிற்குப் பின் மேற்பரப்பின் பாசிவ் பாதுகாப்பை பாதுகாக்கும் சுத்திகரிப்பு ஆகியவை தேவைப்படுகின்றன.
5. ஸ்டெயின்லெஸ் குழாய் அல்லது பைப்பை வெல்ட் செய்யும்போது பின்புறத்தில் பரிசுத்த வாயு பாதுகாப்பு (back purging) தேவையா?
பல குழாய் மற்றும் பைப் வேலைகளில், ஆம். பின்புற பரிசுத்திகரணம் (Back purging) என்பது இணைப்பின் உட்புறம் அதிகமாக ஆக்ஸிஜனேஷன் (oxidize) அடைவதையும், சீனர் (sugaring) ஏற்படுவதையும் தடுக்க வேர் பக்கத்தை ஆக்ஸிஜனிலிருந்து பாதுகாக்கிறது. பாகம் ஒரு சுத்தமான உட்புற மேற்பரப்பை, நல்ல கார்ரோஷன் எதிருத்திறனை (corrosion resistance) அல்லது சுகாதார முடிவை (sanitary finish) தேவைப்படும்போது இது மிகவும் முக்கியமாகிறது. பரிசுத்திகரணத்திற்கு முன்பாக, குழாயின் உட்புறம் சுத்தமாக இருக்க வேண்டும், இணைப்பு சரியாக மூடப்பட்டிருக்க வேண்டும், மேலும் வாயு சரியாக ஓடுவதற்காக வென்ட் (vent) ஒன்று கட்டமைப்பில் இருக்க வேண்டும். சில உற்பத்தி நடைமுறைகள் குறிப்பிட்ட தகுதியுள்ள சந்தர்ப்பங்களில் முழுமையான பரிசுத்திகரணத்தைக் குறைக்கவோ அல்லது தவிர்க்கவோ முடியும்; ஆனால் அது ஒரு நிரூபிக்கப்பட்ட நடைமுறையிலிருந்து வர வேண்டும், ஊகத்திலிருந்து அல்ல.
6. உற்பத்தி தரத்தில் ஸ்டெயின்லெஸ் ஸ்டீலை வெல்ட் செய்வதற்கு என்ன தேவை?
உற்பத்தி-தரமான ஸ்டெயின்லெஸ் ஸ்டீல் வெல்டிங் என்பது ஒரு திறமையான மின்சக்தி மூலத்தை மட்டும் கோரவில்லை. நீங்கள் மீண்டும் மீண்டும் பயன்படுத்தக்கூடிய பொருத்துதல் (ஃபிக்ச்சரிங்), எழுதப்பட்ட அளவுரு வரம்புகள், சரியான பயன்படுத்தப்படும் பொருட்கள், கட்டுப்படுத்தப்பட்ட வாயு மூடியமைப்பு, ஆக்ஸிடேஷன் மற்றும் வெல்ட் பீட் வடிவத்திற்கான ஆய்வு தரங்கள், மேலும் ஒவ்வொரு தொகுதியிலும் என்ன பயன்படுத்தப்பட்டது என்பதைக் கண்காணிக்கும் முறை ஆகியவற்றையும் நீங்கள் கோருகிறீர்கள். உற்பத்தி அளவு அதிகரிக்கும்போது, தானியங்கி முறைகள் மற்றும் செயல்முறை கட்டுப்பாடுகள் வெல்டரின் திறமையை விட முக்கியமாகின்றன. உங்கள் பணியில் அதிக மீள்தன்மை, வாடிக்கையாளர் தணிக்கைகள் அல்லது ஆட்டோமொபைல்-தரமான ஒழுங்குமுறை தேவைப்படுமானால், ரோபோட்டிக் வெல்டிங் மற்றும் ஆவணப்படுத்தப்பட்ட தர அமைப்புகளுடன் கூடிய தகுதிவாய்ந்த பங்காளி ஒரு சிறந்த தேர்வாக இருக்கும். உதாரணமாக, ஷாயோயி மெட்டல் டெக்னாலஜி என்பது இத்தகைய பணிக்கு பொருத்தமானது, ஏனெனில் இது சிறப்பு வெல்டிங், ரோபோட்டிக் வரிசைகள் மற்றும் மீள்தன்மையுள்ள உலோக கூட்டுப்பொருள்களுக்கான IATF 16949 சான்றிதழ் பெற்ற தர அமைப்பை இணைக்கிறது.