 Lilla partier, höga standarder. Vår snabba prototypservice gör validering snabbare och enklare —

Beslut kring plåtskärning: DIY-verktyg eller anlita en tillverkare
Förstå grunderna i plåtskärning
Har du någonsin tagit upp ett plåtstycke och undrat hur du ska forma det till något användbart? Oavsett om du är en helgdagsentusiast som sysslar med hemmabyggen eller en professionell metallbearbetare som kör produktionslinjer , är kunskapen om hur man korrekt utför en plåtskärning där varje lyckat projekt börjar.
Vad som definierar plåtskärning
Plåtskärning är den exakta borttagningen av material från platta metallplattor för att skapa specifika delar eller komponenter. I grunden omvandlar denna grundläggande metallbearbetningsprocess rå metallplåt till funktionsdugliga former anpassade efter dina exakta specifikationer. Enligt Techni Waterjet , ligger väsentligheten i denna process i dess förmåga att omvandla platta metaller till olika former och storlekar – från enkla raka linjer till komplexa böjda mönster.
Men här är vad många nybörjare missar: inte alla metallskärningsmetoder fungerar för varje situation. Den teknik du väljer beror i hög grad på önskad profil, materialtyp och den precision som ditt projekt kräver. Från enkla blecksax för snabba skärningar till avancerade lasersystem för komplexa mönster, kräver konsten att skära plåt att du anpassar rätt metod till dina specifika behov.
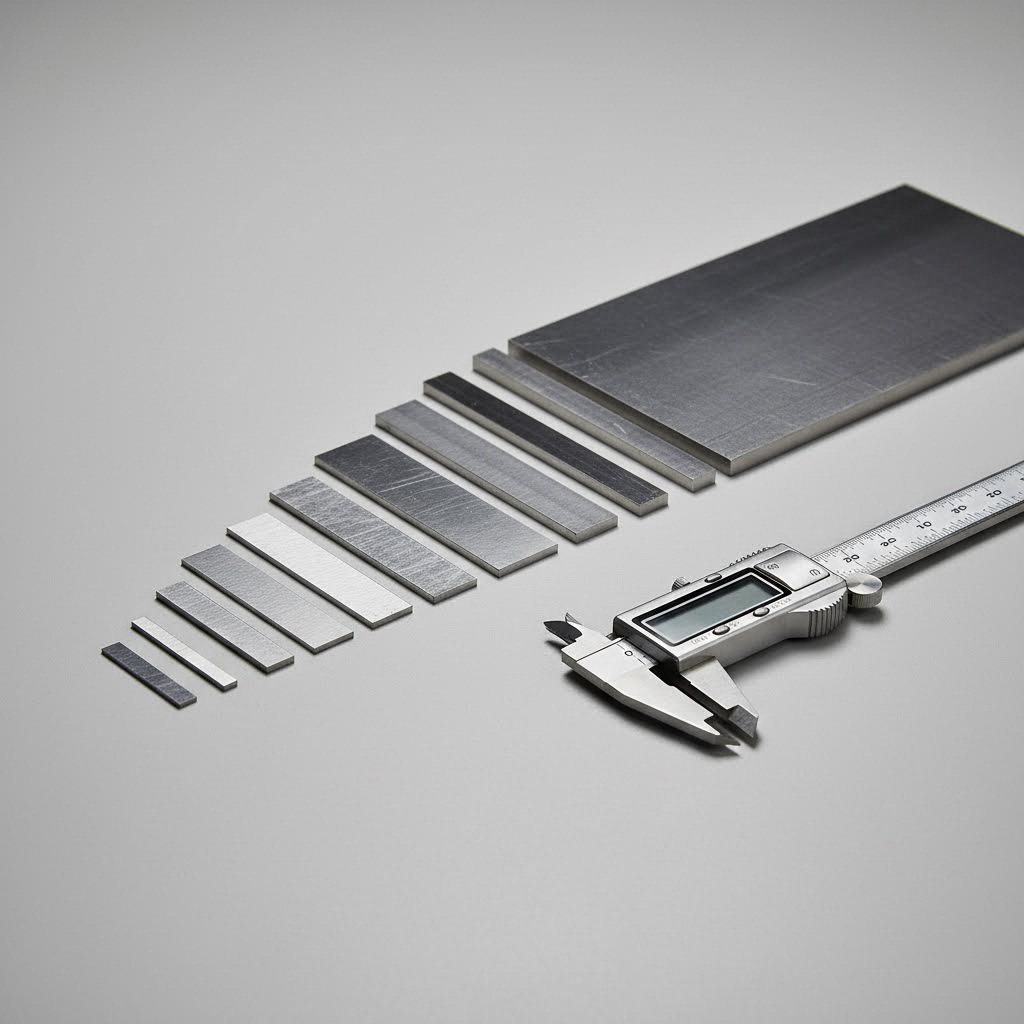
Tjockleksintervall och materialgrunder
Vad räknas egentligen som "plåt"? Svaret ligger i tjockleksklassificeringar som skiljer plåt från platta och folie:
- Metallfolie: Mindre än 0,2 mm tjock—tänk aluminiumhushållsfolie
- Metallplåt: Mellan 0,5 mm och 6 mm—den optimala zonen för de flesta tillverkningsprojekt
- Metallplatta: 6 mm och tjockare—reserverat för tunga strukturella tillämpningar
Denna skillnad spelar roll eftersom gränsen på 6 mm vanligtvis innebär att man går från DIY-vänliga förhållanden till krav på industriell utrustning. Enligt Industrial Metal Supply , amerikanska leverantörer mäter vanligtvis dessa skillnader i millimeter, även om tumstorlekar fortfarande används mycket trots viss inkonsekvens mellan olika material.
Att förstå dessa grunder minskar klyftan mellan hobbyexperimenterande och professionell metallbearbetning. En hemslöjdare som arbetar med tunn aluminium för dekorativa projekt står inför helt andra utmaningar än en bilproducent som skär strukturella ståldelar. Ändå måste båda förstå samma grundläggande principer – materialens egenskaper, verktygens kapacitet och begränsningar i skärteknik.
I denna guide kommer du att upptäcka exakt vilka verktyg som passar specifika tumstorlekar, hur olika metaller beter sig vid olika skärmetoder och när det är meningsfullt att själv hantera projekt jämfört med att anlita professionella tillverkningstjänster. Oavsett om du gör ditt första metallskär eller förfinar dina befintliga färdigheter, kommer kunskapen här att hjälpa dig att fatta välgrundade beslut för projekt i vilken skala som helst.
Tunnplåtsgaugediagram och tjockleksguide
Du har förmodligen hört någon nämna "18 gauge stål" och undrat vad det egentligen betyder i praktiken. Låter det invecklat? Oroa dig inte – måttsystemet är förvånansvärt enkelt när du väl förstått dess logik. Att behärska detta mätsätt är viktigt innan du skär tunnplåt, eftersom att välja fel tjocklek kan spola hela ditt projekt över ända.
Förstå gaugesystemet
Här kommer den motiverande delen som förvirrar många nybörjare: högre gauge-tal innebär tunnare material. Så 18 gauge stål är faktiskt tunnare än 14 gauge stål. Detta till synes baklänges system härstammar från brittisk trådtillverkning under 1800-talet, då gauge-tal angav hur många gånger tråden dragits genom successivt mindre hål. Fler dragoperationer innebar tunnare tråd – och ett högre gauge-tal.
Enligt SendCutSend , härstammar måttsystemet från en tid innan universella tjockleksmått fanns. Tillverkare mätte efter vikt snarare än exakta dimensioner eftersom deras utrustning inte kunde producera konsekventa tjocklekar. Även om modern tillverkning har eliminerat denna inkonsekvens, kvarstår begreppet "gauge" inom branschen.
Det som gör gauge-mått särskilt besvärliga är att olika metaller använder olika gauge-tabeller. En 18 gauge för stål motsvarar inte samma tjocklek som 18 gauge aluminium. Enligt Metal Supermarkets mäter 18 gauge stål 0,0478 tum i tjocklek, medan 18 gauge aluminium endast är 0,0403 tum. Den 0,0075 tum stora skillnaden kan verka obetydlig, men den ligger långt utanför acceptabla toleranser för precisionsarbete.
Imperial vs Metric Tjockleksguide
Oavsett om du arbetar med imperial eller metrisk mätning eliminerar ett tillförlitligt plåtmatriser gissningar. I tabellen nedan beskrivs de vanligaste mätningarna för mjukt stål, som kan användas som referens, till exempel hur en storlekskartor för borrbitar hjälper till att matcha fästningsdon till hål:
| Mättnummer | Tjocklek (tum) | Tjocklek (mm) | Allmänna tillämpningar |
|---|---|---|---|
| 11 | 0.1196 | 3.038 | Stora konstruktionsdelar, utrustningshus |
| 14 | 0.0747 | 1.897 | Förutom: |
| 16 | 0.0598 | 1.519 | Andra elektriska apparater |
| 18 | 0.0478 | 1.214 | Takbeläggning, allmän tillverkning |
| 20 | 0.0359 | 0.912 | Dekorativa paneler, lätta skydd |
| 22 | 0.0299 | 0.759 | Hantverk, tunn kanaler |
Observera hur 11 gauge stål tjocklek kommer in på lite över 3 mm stark nog för strukturella tillämpningar medan 14 gauge stål tjocklek på cirka 1,9 mm passar medelstora projekt som bilkarosseri och kanaler. Detta mätbord fungerar som en snabb referens, fungerar mycket som en gröna diagram eller diagram över borrstorlekar när man väljer rätt specifikationer.
Men kom ihåg: aluminium och rostfritt stål följer olika måttstandarder. Här är en snabb jämförelse som visar hur samma mätnummer översätts olika mellan olika material:
| Mått | Låglegerat stål (mm) | Aluminium (mm) | Rostfritt stål (mm) |
|---|---|---|---|
| 11 | 3.038 | 2.305 | 3.175 |
| 14 | 1.897 | 1.628 | 1.984 |
| 18 | 1.214 | 1.024 | 1.270 |
Dessa materialspecifika variationer förklarar varför professionella alltid verifierar tjocklek i förhållande till faktiska mätningar. När du beställer skräddarsydda plåtar eller väljer material för ett hemmagjort projekt förhindrar att bekräfta exakt tjocklek i millimeter eller tum dyra misstag. Många leverantörer anger numera både gauge och decimaltjocklek exakt för att eliminera förvirring.
Att förstå dessa tjockleksrelationer påverkar direkt vilka skärverktyg du kommer att behöva – och det är precis vad vi ska utforska härnäst när vi tittar på hur olika metaller beter sig vid olika skärmetoder.
Skärkrav beroende på metalltyp
Nu när du förstår gauge-mått blir det intressant: en 14 gauge aluminiumplåt beter sig helt annorlunda under ett skärblad än 14 gauge stål. Tänk dig att du ska skära genom smör med samma kraft som du använder för hårdost – du skulle få rörigt. Samma princip gäller när du gör skär i plåt av olika material.
Varje metall har unika egenskaper som direkt påverkar vilka verktyg som fungerar bäst, vilka hastigheter som ska användas och hur man undviker vanliga avskarningsfel. Låt oss gå igenom vad du behöver veta om de vanligaste materialen du kommer att möta.
Överväganden vid skärning av aluminium
Aluminiums popularitet beror på dess lättvikt och utmärkta korrosionsmotstånd. Men just den mjukhet som gör aluminiumplåt lätt att forma skapar oväntade problem vid skärning.
Här är de viktigaste egenskaperna som påverkar hur du skär aluminium:
- Mjukhet och seghet: Aluminium tenderar att fastna vid skärverktyg, vilket orsakar materialavlagring på bladtennarna och klippkantarna
- Hög värmeledningsförmåga: Värme sprids snabbt genom materialet, vilket minskar lokal överhettning men potentiellt kan påverka större ytor
- Låg smältpunkt: Vid endast 660°C kan aluminium smälta eller smetas ut vid höghastighetsskärning
- Motstånd mot kallbearbetning: Till skillnad från vissa metaller hårdnar aluminium inte avsevärt under skärning, vilket ger ett konsekvent beteende
Enligt RpProto , chiphantering utgör en av de största utmaningarna vid bearbetning av aluminium. Det mjuka materialet ger upphov till långa, trådiga spån som lindar sig runt verktyg och täpper till skärmekanismer. När du använder plattklyvor eller motorsaxar på aluminiumplåt kommer du att märka att material ansamlas på bladen, vilket kräver regelbunden rengöring.
För förberedelse av aluminiumsvetsning är rena snitt ännu viktigare. Ojämna kanter eller smetade material skapar föroreningar som försvagar svetsfogar. Skarpa, ordentligt underhållna verktyg och långsammare skärhastigheter hjälper till att skapa de rena kanterna som efterföljande tillverkningssteg kräver.
Skillnader mellan stål och rostfritt stål
När människor säger "stål" syftar de ofta på mjukt stål – ett prisvärt och formbart material som dominerar inom bygg- och allmän tillverkning. Men byt ut det mot rostfritt stålplåt i samma projekt, och din skärstrategi måste omprövas helt.
Här är anledningen till att dessa släktingar beter sig så olika:
- Hårdhetsnivåer: Rostfritt stål är avsevärt hårdare än mjukt stål, vilket kräver större kraft och specialiserad verktyg
- Tendens till kallbearbetningshårdnande: Rostfritt stål förhårder snabbt vid bearbetning, vilket innebär att långsamma snitt eller slitna verktyg gör materialet successivt svårare att skära
- Känslighet för värme: Kromlagret som gör att rostfritt stål är "rostfritt" kan skadas av överdriven värme, vilket försämrar korrosionsmotståndet
- Verktygsslitage: Förvänta dig att skärverktyg slits 3–5 gånger snabbare vid bearbetning av rostfritt stål jämfört med mjukt stål
Enligt EABEL , lågt kolhaltigt stål med sitt låga kolinnehåll (0,05–0,3 %) gör det mjukt, segt och lättarbetat – en fabrikörs dröm för böjning, svetsning och skärning. Avvägningen? Det rostar snabbt utan skydd som pulverlack eller galvanisering.
Rostfritt stålplåt, särskilt 316-rostfria stålsorter innehållande molybden, motstår korrosion även i hårda marina miljöer. Men den hållbarheten medför utmaningar vid skärning. Materialets benägenhet att kallhärda innebär att man måste bibehålla konstant skärkraft och hastighet. Tveka mitt i skärningen, och den delvis skurna kanten blir hårdare än originalmaterialet och gör motstånd mot verktyget.
För galvaniserad plåt – lågt kolhaltigt stål täckt med zink för korrosionsskydd – ligger skärkraven någonstans mellan de båda fallen. Basmetallen skärs som lågt kolhaltigt stål, men zinkytan kan ge upphov till giftiga ångor vid uppvärmning. Elverktyg som ger gnistor eller friktionsvärme kräver adekvat ventilation.
Arbete med koppar och mässing
Koppar och mässing erbjuder utmärkt elektrisk ledningsförmåga och karakteristisk estetik, men de har sina egna särdrag när det gäller skärning. Det är viktigt att förstå skillnaden mellan mässing och brons: mässing är en koppar-zink-legering känd för sin bearbetbarhet, medan brons (koppar-tenn) är hårdare och svårare att skära.
Egenskaper som påverkar skärning av koppar och mässing inkluderar:
- Extrem mjukhet: Båda metallerna deformeras lätt under tryck, vilket kräver skarpa verktyg och tillräcklig stödning
- Hög värmeledningsförmåga: Värme sprids snabbt, vilket minskar termiska skador men kräver anpassade skärparametrar
- Benägenhet att gripa tag i verktyget: Mjuk koppar kan fastna i sågblad, vilket orsakar farlig rekyl eller blockering av bladet
- Kantbildning: Båda metallerna bildar betydande spånkant som kräver efterbehandling
Enligt Lyah Machining är skärning idealisk för att skära guld- eller kopparplåt i högvolymstillämpningar, vilket ger rena snitt med minimalt materialspill. För sågning är finskurna blad med rätt kylmedel avgörande för att förhindra överhettning, medan kopparns mjukhet kan orsaka att bladen täpps till om avverkningen inte sker tillräckligt effektivt.
Intressant nog fungerar plasmaskärning – som är effektiv för många metaller – dåligt på koppar och mässing. Deras höga elektriska ledningsförmåga sprider bågens energi, vilket gör skärningen inkonsekvent eller omöjlig. Vattenjetskärning visar sig däremot vara det bästa alternativet när värmepåverkade zoner helt måste undvikas.
Med dessa materialspecifika krav i åtanke är du nu redo att utforska de verkliga verktygen som gör skärning möjlig – och börjar med manuella alternativ som endast kräver handstyrka och korrekt teknik.
Handverktyg för skärning av plåt
Du har valt ditt material och förstår dess skärkrav – nu är det dags att välja rätt verktyg. För många hemslöjdprojekt och lätt tillverkning ger manuella verktyg för plåtskärning överraskande professionella resultat utan att behöva investera i elkraftverktyg. Men här är det som de flesta guider inte berättar: att välja fel handverktyg bara försenar dig – det kan också förstöra ditt material och lämna dig med farliga, taggiga kanter.
Låt oss gå igenom dina alternativ utifrån kapacitet, användningsområde och ärliga begränsningar.
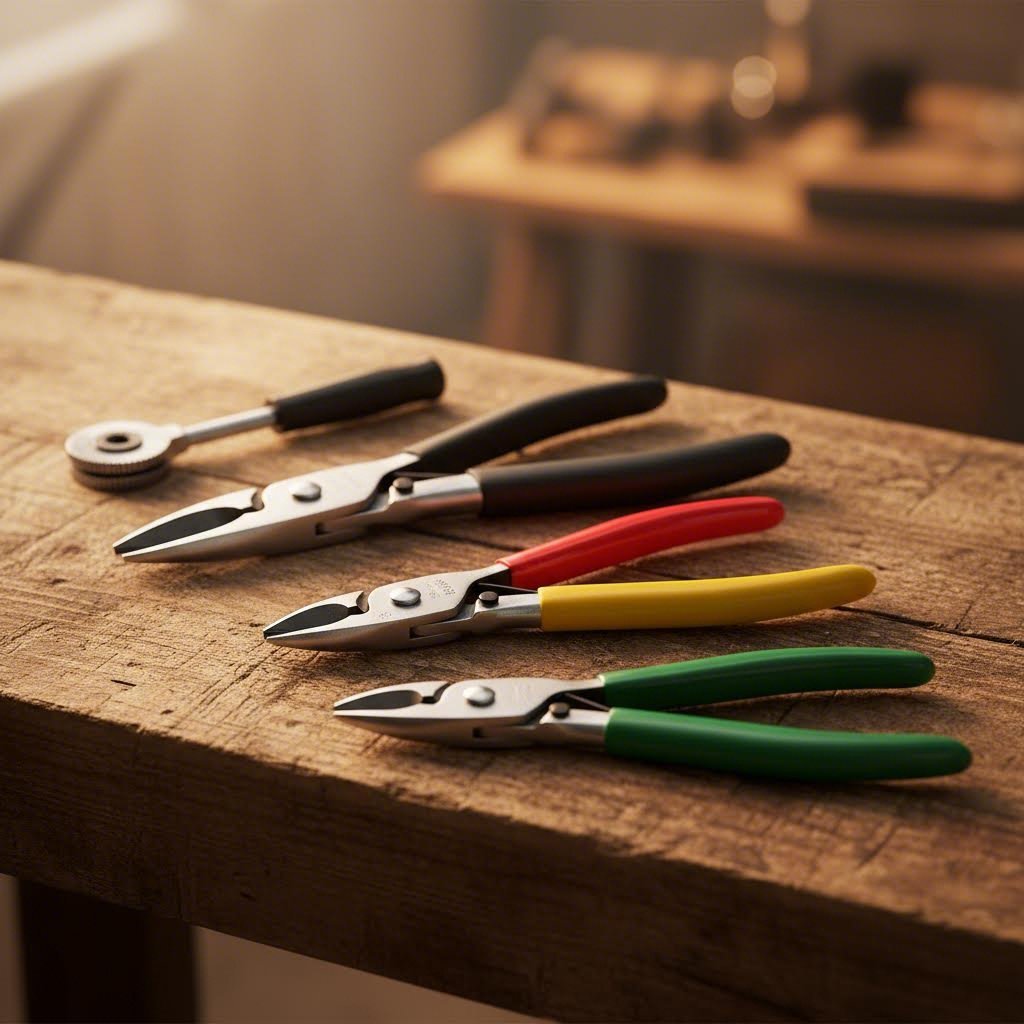
Aviation-saxar och plåtsaxar förklarade
Gå in på vilken järnhandel som helst och fråga efter plåtskärare, så pekar man troligen på en vägg fylld med färgglada saxar. Men är dessa alla samma verktyg med olika lack? Inte riktigt.
Enligt Lowe's , grundläggande tinsaxar fungerar som extra stora saxar – två handtag kopplade till blad vid en ensam vridpunkt. Flygplanssaxar däremot har sammansatt rörelse genom flera leder, vilket ger avsevärt mer mekanisk fördel. Denna mekaniska fördel gör att du kan klippa genom tjockare material med mindre handtrötthet.
Här blir det färgkodningssystemet väsentligt:
- Gula handtagssaxar: Designade för raka snitt – idealiska för att tagga material eller göra korta, direkta snitt som inte är längre än bladets längd
- Röda handtagssaxar: Vänstersnittsorientering som kröker moturs, lämnar rena kanter på höger sida med spillmaterialet som krullar åt vänster
- Gröna handtagssaxar: Högersnittsorientering för medurskurvor, skapar rena vänsterkanter medan spillmaterialet krullar åt höger
Enligt Stortz Tools , ett användbart minnesknep gäller här: saxar klipper alltid en kurva i riktningen av det nedre skärbladet. Det innebär att högerhänta användare vanligtvis finner röda saxar bekvämare, medan vänsterhänta föredrar gröna.
Men raka jämfört med böjda är inte det enda du behöver överväga. Offset-metallsaxar placerar käftar i en vinkel till handtagen, vilket håller dina knogar säkert ovanför arbetsstycket när du skär. Detta designval visar sig särskilt värdefullt vid långa snitt över brett material där vanliga saxar skulle tvinga din hand farligt nära nyskurna – och rakskarpa – kanter.
Handsaxar för tjockare plåtar
När ditt material överstiger vad som går att hantera med flygplanssaxar måste du gå upp till specialiserade handsaxar. Dessa kraftfulla plåtsaxar har längre handtag, förstärkta rörpunkter och hårdare blad utformade för uthålliga snitt genom tätare plåttjocklekar.
Så här jämförs vanliga manuella verktyg när det gäller maximal plåttjocklek:
- Vanliga plåtsaxar: 24–26 gauge mjukt stål (0,5–0,6 mm)
- Flygplanssaxar: 18 gauge mjukt stål (1,2 mm) eller 22 gauge rostfritt stål (0,7 mm)
- Saxar med kompundlagermekanism: 14–16 gauge mjukt stål (1,5–1,9 mm)
- Bulldog-saxar: 12-14 gauge lätt stål – kortare blad ger ökad hävstångseffekt för fogar och tjockare material
Bladhårdheten är mycket viktig här. Enligt Stortz Tools varierar saxar normalt mellan HRC 56-65 på Rockwell-hårdhetsskalan. Högre hårdhet innebär längre livslängd på bladen och bättre prestanda på hårda material – men också högre kostnad. För tillfälligt hemmabruk på lättgaugematerial fungerar en medelhård variant bra. Professionella takläggare som dagligen skär rostfritt stål bör däremot investera i speciellt hårdhetsbehandlade saxalternativ för att undvika ständiga utbyggnader.
En avgörande detalj: sågkantade kontra släta blad har olika funktioner. Sågkantade blad greppar materialet fast, vilket förhindrar glidning vid skärning genom flera lager eller sömmade kanter. Men dessa små sågkantningar lämnar mikroskopiska svaga punkter längs skärkanterna – ett problem för naturliga metaller som koppar och zink där långsiktig hållbarhet är viktig. Släta blad ger renare kanter för synliga eller strukturella tillämpningar.
Nävlarverktyg för böjda snitt
Vad händer om ditt projekt kräver invecklade kurvor, inre urtag eller tillgång till områden där saxar helt enkelt inte kan nå fram? Då är handnävlen ett specialiserat plåtskärningsverktyg som punchar ut små halvmånar av material vid varje klämning.
Valet mellan nävla och sax beror på tillämpningen:
- Välj nävlar när: Du behöver små krökningsradier, inre snitt utan tillgång till kanten, eller minimal materialspridning
- Välj saxar när: Hastighet är viktigare än precision, du gör långa raka snitt, eller materialtjockleken överstiger nävlarnas kapacitet
Handnibblers fungerar bra för tunn aluminium och stål upp till cirka 18 gauge, vilket gör dem utmärkta för modifieringar av HVAC-kanaler eller bilpaneler. Deras huvudsakliga begränsning? Hastighet. Att skära en tum material kräver flera komprimerings- och punschcykler, vilket gör långa snitt tråkiga.
Cirkelsaxar är ett annat specialalternativ – designade specifikt för att skära konsekventa radier i plåt. Dessa metallsaxar finns i vänster- och högerkurvorienteringar och är utmärkta för arkitektoniska detaljer som stående fogars takfotformationer där enhetliga kurvor är avgörande.
Säkerhetsöverväganden som du inte kan ignorera
Här är vad alltför många guider hoppar över helt: nyskurna kanter på plåt är faktiskt farliga. Det rena snittet du just gjorde? Det är i princip ett rakblad redo att skära upp oskyddad hud.
Viktig säkerhetsutrustning inkluderar:
- Skrivskyddshandskar: Kraftiga läder- eller Kevlar-fodrade handskar skyddar mot både skäråtgärden och hantering av skurna delar
- Säkerhetsglasögon: Små metallbitar blir luftburen vid skärning – ögonskydd är inte frivilligt
- Långärmade tröjor: Bara underarmar mot plåtens kanter kan leda till allvarliga sårskador
Enligt Lowe's säkerhetsriktlinjer är snittekanten på plåt och metallnät extremt vass, och bitar kan bli luftburen under skärning. Skär alltid med materialet placerat så att avfallet faller bort från din kropp, och sträck aldrig över nyskurna kanter.
Dessutom påverkar verktygsvården direkt säkerheten. Dåliga blad kräver överdriven kraft, vilket ökar risken för halkning. En fjädrande låsmechanism håller saxarna stängda under förvaring, vilket skyddar både bladkanterna och den som stoppar ner handen i ditt verktygslåda.
Manuella verktyg fungerar utmärkt för lättare material och mindre projekt – men vad händer när du behöver skära snabbare, tjockare eller under längre perioder? Då är det som elverktyg helt förändrar dina möjligheter.
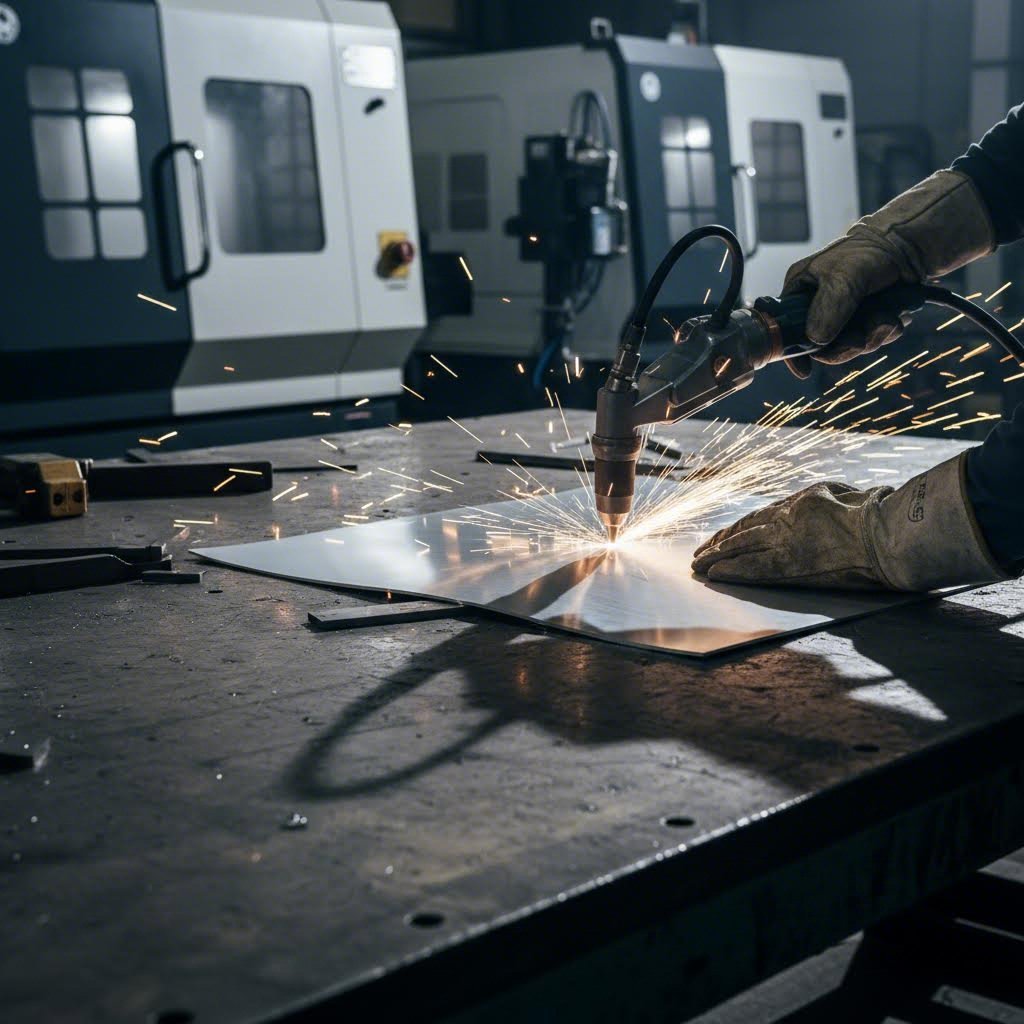
Elverktyg som förändrar plåtskärning
Handverktyg fungerar utmärkt för lättare material och tillfälliga projekt – men vad händer när du står inför 14 gauge stål, behöver skära av tiotals delar eller helt enkelt inte kan klara handtröttheten? Elkraftverktyg snabbar inte bara upp processen; de utvidgar det fysiskt möjliga. Den här plåtbearbetningen som kräver timmar av manuellt arbete? Rätt elkraftverktyg hanterar det på minuter.
Men här är utmaningen: med så många motoriserade alternativ tillgängliga slösar valet av fel metallskärare bort pengar och ger sämre resultat. Låt oss ordna dessa verktyg efter praktisk användning istället för att skapa en till annan överväldigande lista.
Elsaxar och nibblers
När du behöver precisionen hos handverktyg kombinerat med motoriserad kraft, fyller eldrivna plåtsaxar perfekt den tomma ytan. Dessa verktyg automatiserar i princip det som dina händer gör manuellt – men med konsekvent kraft och utan trötthet.
El-saxar fungerar som motoriserade saxar, med oscillerande blad som skär genom material i en kontinuerlig rörelse. De är utmärkta för långa, raka snitt där manuella saxar skulle trötta ut greppet. De flesta modeller hanterar upp till 18 gauge stål eller 16 gauge aluminium utan problem, medan tunga metallskärare klarar 14 gauge och tjockare.
Skärsaxen med taggverk arbetar på ett annorlunda sätt. Istället för att skära använder den en punschmekanism som snabbt tar bort små halvmåneformade bitar av materialet. Enligt Carey Tools är skärsaxar särskilt effektiva för att skära genom tjocka material med minimal svinn och kan hantera komplexa former som skulle utmana vanliga saxar. Det gör skärsaxar idealiska för plåttak, invecklade mönster och överallt där du behöver tajta kurvor.
Valet mellan skärsax och sax beror på dina specifika behov:
- Välj el-sax när: Du behöver rena, släta kanter på tunn till medelstark plåt och främst utför raka eller lätt böjda snitt
- Välj el-skärsax när: Arbete med plåtar med veck, skärning av tjockare material eller skapande av komplexa former där deformation måste undvikas
En viktig aspekt: nippelverktyg lämnar en snittkanal – en smal kanal av borttaget material – medan saxar inte tar bort något material alls. För precisionsarbete där varje millimeter räknas, måste man ta hänsyn till denna snittkanal från nippelverktyget i sina mätningar.
Vinkelslipar med disksågsblad
Kanske erbjuder inget elverktyg mer mångsidighet per krona än vinkelslipen. Med rätt bricka monterad kan denna arbetshest skära genom material som skulle förstöra andra verktyg. Men mångsidighet kräver kunskap – fel val av bricka kan leda till farliga haverier.
Enligt United Abrasives , tunna skärbricksor har gjort arbetet lättare för svetsare, konstruktörer och underhållstekniker genom att erbjuda ett snabbt sätt att skära metall utan kraftigt utrustade anordningar. Den stora fördelen är att vinkelslipar enkelt kan konfigureras för skärning vid behov – till skillnad från specialiserade skärverktyg som endast har ett syfte.
Att förstå hjulspecifikationer förhindrar kostsamma misstag:
- .045" skärningshjul: Designade specifikt för att skära metall med minimal kerf – använd aldrig dessa till slipning eller avkantning
- .090" skär- och nottningshjul: Hanterar både skärning och nottning för förberedelse inför svetsning
- .095" kombinationshjul: Det mest mångsidiga alternativet, möjliggör skärning, nottning, avkantning och lätt slipning utan att byta hjul
Hjultyper påverkar också sikt och skärningsdjup. Typ 41 (platta) hjul ger maximalt skärningsdjup men monteras tätt mot skyddet, vilket begränsar sikten. Typ 42 (med upphöjd nav) ger förbättrad sikt och möjliggör bordsneds skärning eftersom låsnötan sitter insänkt i navet.
Kornets sammansättning avgör prestandaegenskaperna. Keramiska skivor skär snabbast och kyligast, vilket minimerar färgförändringar på rostfritt stål. Zirkonium ger utmärkt hållbarhet med ett lågt kostnadsförhållande per skärning. Aluminiumoxid – den vanligaste och mest prisvänliga – erbjuder tillförlitlig prestanda för allmän stålskärning.
Cirkelsågar med metallblad
Din vanliga cirkelsåg är inte begränsad till virke. Byt till ett metallskärningsblad, och du har ett överraskande effektivt verktyg för plåt – särskilt vid raka snitt över breda material där andra metoder har svårt.
Två bladtekniker dominerar metallskärande cirkelsågar:
- Slipblad: Liknande vinkelslipsskivor, dessa skär genom friktion och materialborttagning. De är prisvändliga men producerar gnistor, värme och bredare skär.
- Hårdmetallspetsade blad: Tänder med hårdmetallinfästen skär rent genom metall med minimal värme, gnistor eller burrar. Högre anskaffningskostnad, men betydligt längre bladslivslängd.
Enligt Elemet Group påverkar valet av skärteknik avsevärt utfallet av tillverkningsprojekt. För cirkelsågar ger blad med hårdmetallspets renare snitt som ofta inte kräver någon sekundär efterbehandling – en betydande tidsbesparing i produktionsserier.
Cirkelsågar för metall har dock begränsningar. De är utformade endast för raka snitt, och bladdiametern begränsar maximalt skär djup. En standard 7-1/4" såg hanterar vanligtvis material upp till cirka 2" tjockt i fullt djup, även om plåtillämpningar sällan närmar sig denna gräns.
Guide för jämförelse av elverktyg
Att välja mellan dessa alternativ kräver att verktygets kapacitet anpassas till dina specifika projektkrav. Denna jämförelsetabell sammanställer de viktigaste faktorerna:
| Elverktyg | Max tjocklek (stål) | Klippkvalitet | Bullernivå | Bästa användningsfall |
|---|---|---|---|---|
| El-saxar | 14–18 gauge | Utmärkt – rent, burrfritt | Moderat | Långa raka snitt, HVAC-kanaler, bilpaneler |
| El-nibbler | 12–14 gauge | Bra—mindre avkantning behövs | Måttlig-Hög | Vågat metall, kurvor, inre urtag |
| Vinkelslip (hjul .045") | Upp till 1/4" | Måttlig—kräver efterbehandling | Hög | Snabba snitt, notching, fältarbete |
| Cirkelsåg (karbidblad) | Upp till 1/4" | Mycket bra—minimal efterbehandling | Hög | Långa raka snitt, produktionsserier, tjockt material |
| Stiksåg (metallblad) | 10–14 gauge | Bra – viss avrundning | Moderat | Kurvor på platta plåtar, inre utskärningar |
Hänsyn till skär- och materialspill
Varje skärmetod tar bort viss mängd material – och denna borttagningsbredd, kallad skär (kerf), påverkar direkt din projektplanning och materialkostnader.
Skärverktyg har tekniskt sett noll skär eftersom de inte tar bort material – de separerar det endast. Det gör elbitar idealiska när man vill maximera materialutbyte. Nibblers däremot perforerar ett skär som vanligtvis är 4–6 mm brett. Vid ett komplext mönster med många skärningar adderas dessa millimeter snabbt.
Slipande skivblad på vinkelslipar ger skär på ca 1,5–3 mm beroende på skivans tjocklek. Enligt United Abrasives gör den ökade tjockleken på slipskivor dem olämpliga för skärningsarbeten eftersom användaren behöver ta bort mer material, vilket leder till längre skärningstider. Att använda .045" skivblad minimerar specifikt spill och maximerar samtidigt effektiviteten.
Cirkelsågar med växelstålsskär ger normalt skär mellan 2–3 mm – bredare än tunna sliphjul, men det kompenseras av snabbare skärhastigheter och renare kanter som kräver mindre efterbearbetning.
I produktionsmiljöer där materialkostnader är viktiga kan beräkning av skärförbrukning i dina skärplaneringar leda till betydande besparingar. En dieskärningsmaskin inom industriella miljöer optimerar delarnas placering specifikt för att minimera detta slöseri – ett koncept som är värt att ta till sig även för mindre drift med elverktyg.
Elverktyg utvidgar dramatiskt vad hobbytillverkare kan åstadkomma. Men när projekt kräver toleranser i bråkdelar av en millimeter, eller när produktionsvolymer når hundratals delar, erbjuder industriella skärtillämpningar funktioner som ens de bästa portabla verktygen inte kan matcha.
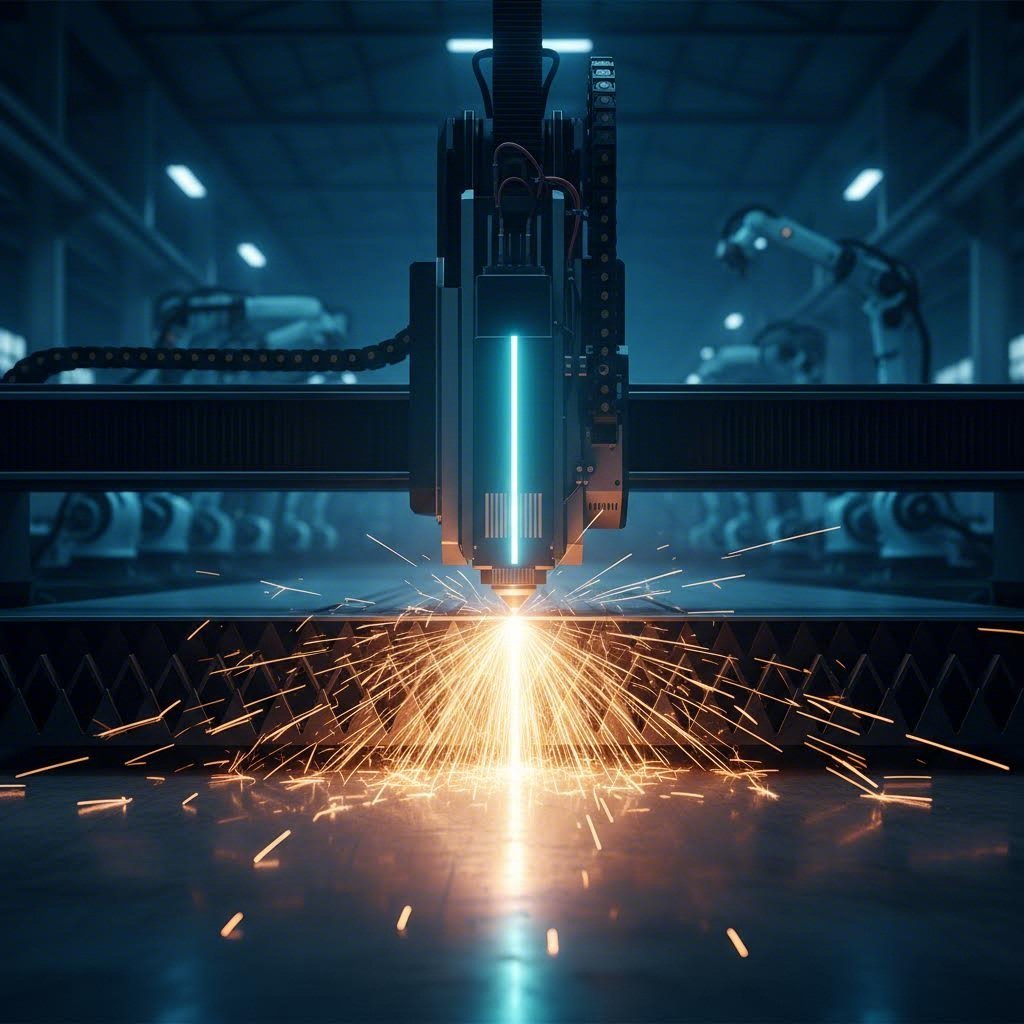
Förklaring av professionella skärtillämpningar
När ditt projekt kräver precision i hundradelar av en millimeter, eller när du arbetar med material som skulle förstöra konventionella verktyg, kommer industriella skärtekniker in i bilden. Dessa är inte bara större versioner av verkstadsutrustning – de representerar helt olika tillvägagångssätt för att skära plåt, något som hobbyverktyg helt enkelt inte kan åstadkomma.
Att förstå dessa professionella metoder hjälper dig att veta när det är meningsfullt att utlämna arbetet och vilka kvalitetskrav du bör ha på samarbetspartners inom tillverkning. Låt oss undersöka vad som skiljer laser-, plasma- och vattenjetskärning – och när respektive teknik verkligen sticker ut.
Laser-skärning Precision och Tillämpningar
Tänk dig att fokusera solljus genom en lupp, och sedan multiplicera den intensiteten tusenfalt. Så fungerar i princip en laserskärare – genom att fokusera en högeffektiv laserstråle för att smälta, bränna eller förånga material längs en exakt programmerad bana.
Enligt Metal Works of High Point startar laserskärningsprocessen med en design skapad i CAD-programvara, som sedan överförs till skärningsmaskinen. Maskinen genererar en koncentrerad laserstråle – vanligtvis med CO2- eller fiberlaserkällor – som snabbt värmer och smälter material längs den förutbestämda skärbanan.
Vad som gör laserskärning särskilt värdefull för plåtbearbetning:
- Exceptionell precision: Toleranser på ±0,1 mm eller tätare är standard, vilket möjliggör invecklade mönster som är omöjliga med andra metoder
- Minimal kerf: Den fokuserade strålen tar bort endast 0,1–0,3 mm material, vilket maximerar utbyte från dyra metaller
- Rena kanter: Skurna ytor kräver ofta ingen sekundär efterbehandling, vilket sparar tid i efterföljande operationer
- Hög hastighet vid tunna material: Skärhastigheter överstiger andra tekniker vid plåtar under 6 mm tjocka
Fiberlaser fungerar särskilt bra med reflekterande metaller som aluminium och koppar, vilket utgör en utmaning för CO2-system. För komponenter som ska anodiseras eller får pulverlackerad yta, accepterar laserhuggna kanter beläggningar enhetligt utan den förberedelse som råare snitt kräver.
Laserbearbetning har dock sina begränsningar. Enligt Wurth Machinery , när materialtjockleken ökar bortom 1 tum, har laserskärare svårt att penetrera – här tar plasmatekniken över.
Jämförelse mellan plasma och vattenstråle
Både plasmaskärning och vattenstråleskärning hanterar tjockare material som lasrar inte kan penetrera, men de uppnår detta genom helt olika mekanismer – och denna skillnad avgör vilken teknik som passar ditt ändamål.
Plasmaskärning skapar en elektrisk båge som joniserar gas till plasma – ett extremt upphettat tillstånd som når temperaturer runt 20 000 °C. Denna plasmastråle smälter sig igenom ledande metaller medan höghastighetsgas blåser bort smält material från skärningen.
Vattenstrålskärning tillämpar en kallskärningsmetod. Enligt Wurth Machinery använder vattenstrålar högtrycksvatten blandat med abrasiva partiklar för att skära genom nästan vilket material som helst utan värme. Detta eliminerar helt deformation, fördjupning och värmepåverkade zoner.
De praktiska konsekvenserna är betydande:
| Fabrik | Plasmaskärning | Vattenstrålskärning |
|---|---|---|
| Värmeinverkanszon | Ja – kan förändra materialens egenskaper | Ingen – kallskärningsprocess |
| Materiell kompatibilitet | Endast ledande metaller | Nästan alla material inklusive sten, glas, kompositer |
| Skärhastighet (1" stål) | 3-4 gånger snabbare än vattenstråle | Långsammare men konsekvent kvalitet |
| Driftkostnad | Ungefär hälften av vattenstråle | Högre på grund av förbrukning av abrasiv |
| Kantkvalitet | Bra – kan behöva efterbehandling | Utmärkt – behöver ofta ingen efterbehandling |
| Utrustningskostnad | ~$90 000 för komplett system | ~$195 000 för jämförbart system |
För stålverkstäder som fokuserar på strukturella komponenter erbjuder plasma starka ekonomiska fördelar. Enligt tester från Wurth Machinery är plasmaskärning av 1 tum tjockt stål 3–4 gånger snabbare än vattenstråleskärning, med ungefär hälften av driftskostnaden per fot.
Men vattenstråleskärning blir nödvändigt när:
- Värmeskador måste undvikas – avgörande för anodiserad aluminium där den skyddande oxidlagret skulle förloras
- Icke-ledande material ska skäras – plasma fungerar helt enkelt inte på sten, glas eller kompositer
- Materialens egenskaper måste förbli oförändrade – ingen hårdnande, missfärgning eller strukturella förändringar
Den förväntade tillväxten för vattenstrålemarknaden till över 2,39 miljarder dollar fram till 2034 speglar den ökande efterfrågan på värmebefriade bearbetningsmetoder inom sektorerna flyg- och rymdindustri, medicinsk teknik och precisionsindustri.
CNC-teknik inom metallbearbetning
Vad verkligen skiljer professionell skärning från enskilt skicklig manuell arbetsinsats är inte bara skärningsmekanismen – det är CNC-teknik (datorstyrd numerisk kontroll) som dirigerar varje rörelse med programmerbar precision.
Enligt Metal Works of High Point kombinerar CNC-bearbetning av plåt precision och automatisering med plåtens mångsidighet för att skapa anpassade former, komplexa strukturer och noggrant tillverkade komponenter. Programvara styr maskinernas rörelser och drift, vilket säkerställer konsekvent och enhetlig exekvering under hela tillverkningsprocessen.
Denna automatisering ger flera fördelar som manuella metoder inte kan matcha:
- Upprepbarhet: Del 500 skärs exakt likadant som del 1 – avgörande för produktionsserier och reservdelar
- Komplexa geometrier: Intrikata mönster som manuellt skulle ta timmar slutförs på minuter
- Materialoptimering: Nestningsprogramvaran arrangerar delar så att spill minimeras, ofta med en materialutnyttjandeförbättring på 10–15 % jämfört med manuella layouter
- Dokumentation: Varje skärning loggas, vilket möjliggör kvalitetsspårning för certifierade tillämpningar
Omfattande teknikjämförelse
Att välja rätt professionell skärmetod kräver att man väger flera faktorer mot dina specifika krav. Denna jämförelse sammanställer de viktigaste beslutsparametrarna:
| Kriterier | Laserbearbetning | Plasmaskärning | Vattenstrålskärning |
|---|---|---|---|
| Precisionstolerans | ±0.1mm | ±0,5–1,0 mm | ±0,1–0,25 mm |
| Kantkvalitet | Utmärkt – spegelblank på tunna material | Bra – lätt fas på tjocka snitt | Utmärkt – slät, fri från burrar |
| Färgbredd | 0,1-0,3 mm | 2 till 4 mm | 0,5-1,5 mm |
| Bästa materialtjocklek | Under 25 mm | 6 mm–50 mm+ | Valfri tjocklek upp till 200 mm+ |
| Ideala tillämpningar | Elektronik, medicinska instrument, precisionsdelar | Konstruktionsstål, tung utrustning, skeppsbyggnad | Rymd- och flygindustri, sten/glas, värmekänsliga legeringar |
Sammanfattning av fördelar och nackdelar
Laserbearbetning
Fördelar
- Högsta precision för tunna material
- Snabbaste skärhastigheter vid tjocklek under 6 mm
- Minimalt materialspill från smal kerf
- Rena kanter klara för pulverlack eller anodisering
Nackdelar
- Begränsad kapacitet vad gäller tjocklek
- Värmeinverkade zoner kan förändra materialegenskaper
- Svårigheter med starkt reflekterande metaller (CO2-system)
Plasmaskärning
Fördelar
- Bäst hastighet-till-kostnad-förhållande för tjocka metaller
- Lägre utrustnings- och driftskostnader
- Utmärkt för konstruktionsstålstillverkning
Nackdelar
- Begränsat till ledande metaller endast
- Breddare skärspalt slösar mer material
- Värmeinverkad zon kräver omtanke
Vattenstrålskärning
Fördelar
- Skär nästan vilket material som helst
- Noll värmepåverkad zon
- Inga förändringar i materialegenskaper
Nackdelar
- Lägsta skärhastighet
- Högsta driftskostnader
- Betydande investering i utrustning
Enligt Wurth Machinerys omfattande tester finns det ingen enda "bästa" skärtillverkningsteknik – varje teknik är bäst i specifika situationer. Många framgångsrika tillverkningsverkstäder integrerar till slut flera tekniker, börjar med det system som hanterar deras vanligaste projekt och utökar förmågorna allteftersom verksamheten växer.
Att förstå dessa professionella alternativ hjälper dig att bedöma om ditt projekt motiverar att lämna ut arbetet till specialister. Men hur fattar du egentligen beslutet mellan att göra det själv eller använda professionella tjänster? Ramverket i nästa avsnitt ger tydliga kriterier för att välja din väg.
När du ska göra det själv kontra när du ska använda professionella tjänster
Du har utforskat verktygen och teknologierna – nu kommer den riktiga frågan: ska du själv ta dig an skärningen av plåten, eller är det dags att söka metallbearbetning i närheten? Detta beslut ställer till det även för erfarna DIY-entusiaster. Välj fel, och du har antingen slösat bort pengar på professionella tjänster du inte behövde, eller förstört dyrt material genom att försöka något som ligger utanför dina kunskaper.
Sanningen är att det inte finns ett universellt svar. Ett hantverksprojekt med tunn aluminium kräver helt andra överväganden än strukturella ståldelar för en bilrestaurering. Låt oss bygga upp en praktisk ram som matchar din specifika situation med rätt tillvägagångssätt.
Bedömning av projektets komplexitet
Innan du tar till något verktyg eller tar upp telefonen för att ringa till metallverkstäder i närheten, utvärdera ärligt vad ditt projekt faktiskt kräver. Ställ dig själv dessa avgörande frågor:
- Vilken geometri behöver du? Enkla raka snitt skiljer sig mycket från komplexa kurvor, inre utskärningar eller mönster som kräver CNC-precision
- Hur många delar? Att skära tre fästen är ett veckoprojekt; att skära trehundra är en produktionsserie
- Vilket material och tjocklek? 22 gauge aluminium för anpassade metalskyltar hanteras lätt med flygplanssax – 14 gauge rostfritt stål kräver industriell utrustning
- Vilka toleranser är viktiga? Dekorativa delar tillåter en variation på ±2 mm; precisionstillverkade komponenter kan kräva ±0,1 mm
- Vilka efterföljande processer kommer att utföras? Delar avsedda för svetsning, pulverlackering eller montering har strängare krav på kantkvalitet
Enligt CR Metal Products blir anpassad tillverkning nödvändig när du behöver ovanliga dimensioner, specialutrustning, extra precision eller skydd av immateriella rättigheter. Om ditt projekt omfattar flera komplexitetsfaktorer samtidigt är det troligen mer rimligt att använda professionella tjänster än att kämpa igenom en DIY-lösning.
Kostnadsnyttoanalysramverk
Här är vad de flesta guider helt missar: den verkliga kostnaden för självbyggnation sträcker sig långt bortom verktygsinköp. Enligt JLC CNC beror prissättningen på plåtdelar på materialval, tjocklek, designkomplexitet, ytbehandlingsalternativ och produktionsvolym – samma faktorer som avgör din investering i självbyggnation.
Beräkna dina faktiska kostnader för självbyggnation genom att ta hänsyn till:
- Verktygsinvestering: Kvalitetsluftfartssax kostar 20–40 USD, el-sax kostar 150–300 USD, och vinkelslipar med rätta skivor lägger på ytterligare 100–200 USD
- Materialavfall: Inlärningskurvor innebär misstag – planera för 15–25 % extra material vid första projektet
- Tidens värde: Vad är din timme värd? En professionell klarar på 30 minuter vad som kan ta dig 4 timmar
- Ytbehandlingskostnader: Råa DIY-snitt kräver ofta slipning, filning eller sekundär ytbehandling som professionella undviker
- Risk för omgörning: Misslyckade försök innebär att köpa ersättningsmaterial
Jämför med professionella prisförhållanden. Enligt JLC CNC påverkar skalekonomier tillverkningskostnader avsevärt – en serie på 500 delar har mycket lägre styckpris än en serie på 5 eftersom installationskostnaderna sprids över fler enheter. För enskilda projekt gör däremot tillverkning på begäran att du bara betalar för det du behöver, utan minimibeställningar.
Korsningspunkten ligger vanligtvis kring 10–20 delar för enkla snitt. Under detta antal kan det ofta vara ekonomiskt fördelaktigt att göra det själv om du redan äger rätt verktyg. Ovanför denna gräns ger dock professionell effektivitet och materialoptimering vanligtvis bättre värde.
Kravlista för kvalitet
Ibland handlar beslutet inte alls om kostnad – det handlar om att uppnå resultat som DIY-metoder helt enkelt inte kan leverera. Använd den här checklistan för att avgöra om dina kvalitetskrav kräver att du vänder dig till professionella metallbearbetare i närheten av mig:
- Krav på toleranser: Om din design kräver ±0,2 mm eller tätare, krävs CNC-styrda professionella anläggningar – handverktyg kan inte uppnå detta konsekvent
- Kvalitetsstandarder för kanter Delar som är synliga i den färdiga monteringen eller som kräver målning/pulverlackering drar nytta av laser- eller vattenstrålskurna kanter som inte behöver efterbehandlas
- Materialcertifieringar: Aerospace-, medicinska eller fordonsapplikationer kan kräva dokumenterad materialspårbarhet som endast certifierade tillverkare kan erbjuda
- Värmekänsliga applikationer: Om värmepåverkade zoner skulle kompromettera funktionen (till exempel föranodiserad aluminium) eliminerar vattenstrålskärning värmskador helt och hållet
- Krav på återupprepbarhet När varje del måste matcha exakt – inte bara ungefär – säkerställer CNC-programmering konsekvens under hela produktionsserien
Enligt Hitech CADD Services , genom att följa riktlinjer för konstruktion med hänsyn till tillverkning, kan man uppnå upp till 90 % minskning av omarbetning och omkonstruktion. Professionella tillverkare tillämpar dessa principer automatiskt, medan hobbyprojekt ofta kräver flera iterationer för att uppnå acceptabla resultat
Fatta Ditt Slutliga Beslut
Sammanställ dina bedömningar till en tydlig beslutsprocess. Det är rimligt att göra det själv när:
- Du skär tunn plåt (20 gauge eller tunnare) i vanliga metaller
- Toleranser på ±1–2 mm är acceptabla för din tillämpning
- Antalet håller sig under 10–15 delar
- Du redan äger lämpliga verktyg eller kommer att återanvända dem i framtida projekt
- Tidspressen är minimal och inlärningskurvan är acceptabel
Vänd dig till professionella tjänster när:
- Materialtjockleken överstiger 14 gauge eller innefattar svårbearbetade legeringar som rostfritt stål
- Kraven på precision understiger toleranser på ±0,5 mm
- Produktionskvantiteten överstiger 20+ delar
- Delar kräver certifierad materialdokumentation
- Nedströmsprocesser kräver rena, konsekventa kanter
Kom ihåg att söka plåt i närheten av mig inte innebär att helt avstå från allt DIY-deltagande. Många tillverkare erbjuder skärningstjänster medan du hanterar montering, ytbehandling eller installation. Denna hybridmetod ger ofta den bästa balansen mellan professionell precision där det spelar störst roll och personligt engagemang där det lägger till värde.
När du har bestämt dig för att professionell tillverkning är rätt väg, blir nästa utmaning att hitta rätt samarbetspartner och kommunicera dina krav effektivt.
Så lyckas du hitta anpassad skuren plåt
Du har kommit fram till att professionell tillverkning är meningsfull för ditt projekt – men vad nu? Att hitta rätt partner för anpassade skärningstjänster kräver mer än en snabb internetsearch och att välja det lägsta offertpriset. Den tillverkare du väljer påverkar direkt delkvaliteten, projekttidslinjer och slutligen om din färdiga produkt fungerar som avsett.
Oavsett om du behöver anpassade stålplattor för konstruktionsändamål, precisionsanpassade metalliska former för fordonskomponenter eller en enskild anpassad metallplatta för en prototyp, så spar dig huvudvärk framöver genom att förstå vad som skiljer utmärkta tillverkningspartners från medelmåttiga. Låt oss utforska de avgörande bedömningskriterierna och sätta realistiska förväntningar när det gäller samarbete med professionella tjänster.
Utvärdera samarbetspartners för bearbetning
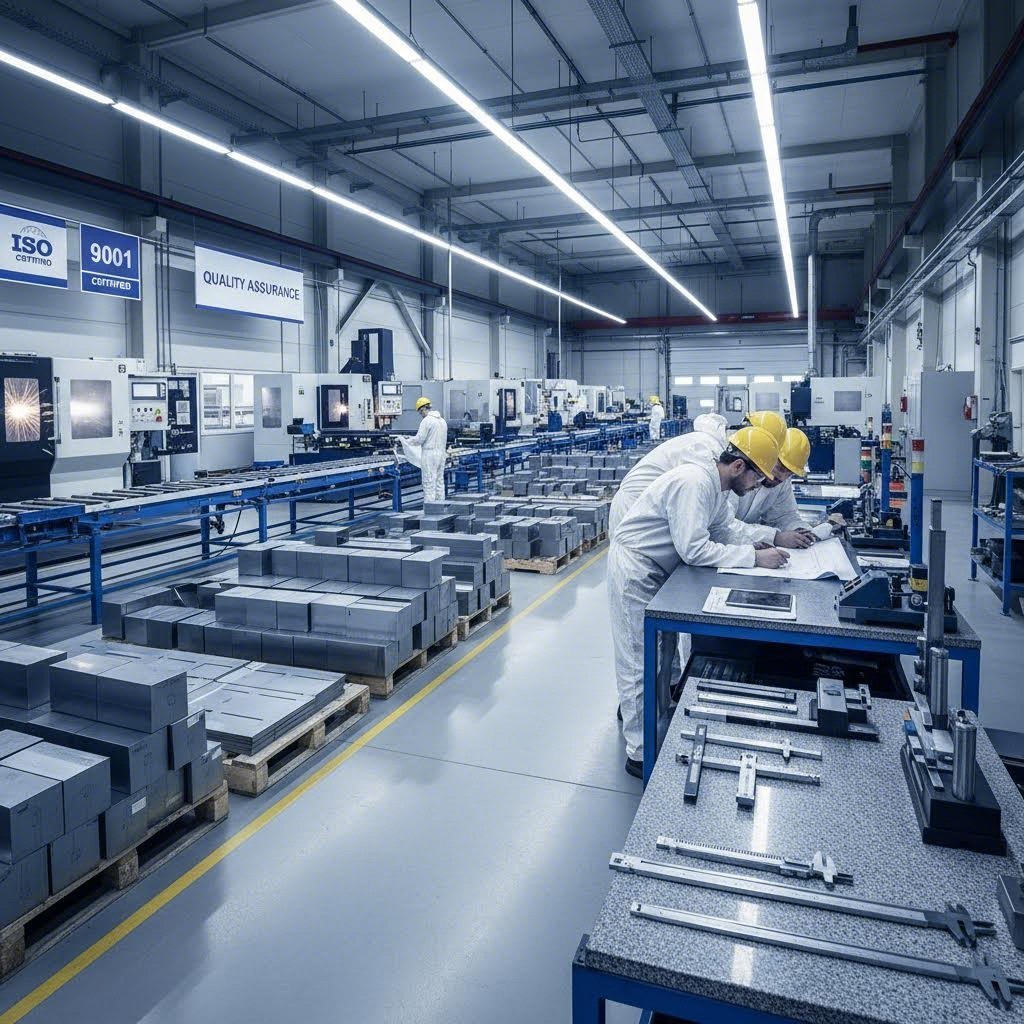
Alla tillverkningsverkstäder erbjuder inte samma kapacitet – och att upptäcka detta mitt i ett projekt leder till kostsamma förseningar. Enligt TMCO är valet av rätt metallbearbetningspartner ett kritiskt beslut som kan påverka kostnad, prestanda, kvalitet och långsiktig tillförlitlighet för ditt projekt. Den verkliga värdet ligger i hantverksskicklighet, teknik, skalbarhet och bevisad kvalitetsengagemang – inte bara pris.
Innan du går med på någon partner för anpassad metallskärning, undersök dessa viktiga faktorer:
Erfarenhet och branschkunskap
År i branschen innebär djupare materialkännedom, förfinade processer och förmågan att förutse utmaningar innan de blir kostsamma problem. Erfarna stålverktygare förstår hur olika metaller – aluminium, rostfritt stål, kolstål och speciallegeringar – beter sig vid skärning, formning och svetsning.
Fråga potentiella samarbetspartners:
- Hur länge har de tillverkat komplexa metallkomponenter?
- Har de erfarenhet från din specifika bransch eller liknande tillämpningar?
- Kan de dela fallstudier, exempel eller referenser från jämförbara projekt?
Egna kapaciteter och teknik
Vissa verkstäder skär endast metall och låter bearbetning, ytbehandling eller montering utföras av tredje part. Denna fragmenterade ansats leder till kommunikationsluckor, förseningar och ojämn kvalitet. Helhetsorienterade anläggningar effektiviserar hela processen under ett tak och erbjuder därmed bättre kontroll över produktionen.
Enligt Heather & Little , kvalitetsutrustning som pressböckar, laserskärning och CNC-punchmaskiner gör en stor skillnad för noggrannheten i det färdiga produkten. Viktiga kapaciteter att leta efter inkluderar:
- Laser-, plasma- eller vattenjetskärningssystem
- CNC-bearbetning och svarvning för sekundära operationer
- Precisionsformning och pressbromsböjning
- TIG/MIG-svetsning och robotsvetsningskapacitet
- Pulverlackering, anodisering eller andra ytbehandlingsalternativ
- Monterings- och teststöd vid behov
Konstruktions- och ingenjörsstöd
Lyckad tillverkning av anpassade plåtdelar börjar inte vid maskinen – den börjar med samarbete inom konstruktion. Pålitliga tillverkare granskar dina ritningar, CAD-filer, toleranser och funktionella krav innan skärningen påbörjas. Många projekt drar nytta av vägledning för konstruktion för tillverkbarhet (DFM) som förfinar konstruktioner för kostnadseffektiv produktion utan att kompromissa med prestanda.
När du utvärderar samarbetspartners bör du bekräfta om de erbjuder:
- CAD/CAM-stöd för filkonvertering och optimering
- Prototyp-testning innan fullskalig produktion
- Teknisk rådgivning gällande material- och designrekommendationer
- DFM-analys för att identifiera potentiella tillverkningsproblem i ett tidigt skede
När det gäller fordonsapplikationer kopplar snabb prototypframställning kritiska luckor mellan designkoncept och produktionsklara delar. Partners som Shaoyi (Ningbo) Metallteknik erbjuder femdagarssnabb prototypframställning tillsammans med omfattande DFM-stöd, vilket möjliggör designvalidering innan man går vidare till verktyg för massproduktion.
Vad du kan förvänta dig från professionella tjänster
Att förstå standardmetoder inom branschen hjälper dig att kommunicera effektivt med tillverkare och sätta realistiska förväntningar på projektet. Så här ser det typiskt ut för professionella skräddarsydda metallskärningstjänster:
Tidsramsfaktorer
Enligt Heather & Little är leveranstid avgörande för varje projekt – du kanske behöver delar inom ett visst deadline, så att hitta en partner som levererar i tid är viktigt. Standardgenomloppstider varierar kraftigt beroende på:
- Enkla skärningar: 3–5 arbetsdagar för enkla former i vanliga material
- Komplex tillverkning: 2–4 veckor när svetsning, formning eller ytbehandling ingår
- Prototypkörningar: Vissa specialtillverkare erbjuder snabbprototypning inom 5 dagar för designvalidering
- Produktionskvantiteter: Stora beställningar kan ta 4–8 veckor beroende på komplexitet och verkstadskapacitet
Diskutera alltid ledtidskrav i förväg. Snabblämnade tjänster finns ofta tillgängliga men har vanligtvis högre prissättning – ibland 25–50 % över standardpriser.
Minsta beställningskvantiteter
Många tillverkningsverkstäder har minimibeställningsvärden istället för antal delar. Du kan möta:
- Dollarminimum: Vanliga trösklar ligger mellan 50 och 500 dollar beroende på verkstadens storlek och specialisering
- Kostnadsfördelning för installation: Kostnader för CNC-programmering och maskininjustering fördelas på din beställning – större kvantiteter minskar styckpriset avsevärt
- Efterfrågestyrd service: Vissa online-tillverkningsplattformar accepterar beställningar av enstaka delar utan minimikrav, idealiskt för prototyper och anpassade metallformer
Tillgängliga material och anpassade alternativ
Bekräfta att din tillverkare har – eller kan skaffa – de specifika material som ditt projekt kräver. Standarderbjudanden inkluderar vanligtvis:
- Låglegerat stål i olika tjocklekar och kvaliteter
- Rostfritt stål (304, 316 och specialkvaliteter)
- Aluminiumlegeringar (6061, 5052 och andra)
- Koppar-, mässing- och bronsskivor
- Galvaniserade och förbehandlade material
För anpassade stålplattor eller speciallegeringar kan det ta längre tid att skaffa material. Diskutera materialtillgänglighet i ett tidigt skede av din projektplanning.
Ytbehandlingsalternativ
Råskurna delar kräver ofta sekundär efterbehandling för utseende, korrosionsskydd eller funktionella krav. Leta efter samarbetspartners som erbjuder:
- Pulverlackering i standard- och specialfärger
- Vågfärgning och specialytbehandlingar
- Anodisering för aluminiumkomponenter
- Pläteringstjänster (zink, nickel, krom)
- Avkantning och kanterefinering
- Montering och installation av hårddelar
Att ha efterbehandlingstjänster in-house eliminerar behovet av samordning mellan flera leverantörer och minskar vanligtvis den totala ledtiden.
Kvalitetscertifieringar som spelar roll
Kvalitet handlar inte bara om utseende – det handlar om precision, prestanda och pålitlighet. Enligt TMCO följer de bästa tillverkarna strikta kvalitetsprocesser och använder avancerade kontrollverktyg för att verifiera noggrannhet under hela produktionsprocessen.
Nyckelcertifieringar att leta efter inkluderar:
- ISO 9001: Visar dokumenterade system för kvalitetsledning
- IATF 16949: Viktig för tillämpningar inom bilindustrin
- AS9100: Krävs för tillverkning av flyg- och rymdindustrikomponenter
- NADCAP: Särskild processackreditering för kritiska operationer
Enligt Xometry är IATF 16949-certifiering avsedd för alla företag som är involverade i tillverkning av fordonsrelaterade produkter. Även om det inte är lagkrav, väljer leverantörer och kunder ofta att inte samarbeta med tillverkare som saknar denna certifiering för fordonsrelaterade tillämpningar. Certifieringen visar att en organisation uppfyller krav som bevisar deras förmåga och engagemang att minska defekter, slöseri och onödigt arbete.
För chassi, upphängning och strukturella bilkomponenter ger IATF 16949-certifiering försäkran om att er tillverkningspartner upprätthåller de stränga kvalitetskrav som bilindustrin ställer. Shaoyi (Ningbo) Metal Technology har denna certifiering specifikt för sina anpassade metallstansdelar och precisionsmonteringar och kombinerar den med offertsvaret inom 12 timmar för att påskynda beslut i fordonsförsörjningskedjan.
Bygga ett framgångsrikt samarbete inom tillverkning
Enligt Heather & Little innebär att hitta rätt partner för anpassad plåtbearbetning flera praktiska steg:
- Utför undersökning och jämför: Kontrollera kundrecensioner och ställ frågor om tjänster, arbetskvalitet, leveranstid och kostnader
- Besök anläggningar när det är möjligt: Att prata med ingenjörer som kommer att arbeta med era projekt ger insikter i deras kompetens och arbetsmetoder
- Begär arbetsprov: Att se tidigare projekt hjälper er att förstå deras kunskapsnivå och kvaliteten på färdiga produkter
- Diskutera detaljer: Omslagsmaterial, verktyg, tekniker och eventuella särskilda krav för din applikation
- Få detaljerade offerter: Se till att priserna inkluderar alla operationer – skärning, formning, ytbehandling och frakt
- Dokumentera allt: Tydliga avtal med dokumenterade förväntningar förhindrar missförstånd
Den rätta tillverkningspartnern bygger inte bara delar – de stödjer dina mål, förbättrar din produkt och hjälper till att säkra långsiktig framgång för ditt projekt.
Oavsett om du behöver en enskild anpassad metallplatta för en prototyp eller produktionsmängder av precisionsanpassade ståldelar så är utvärderingskriterierna desamma. Att lägga ner tid på partnerval från början förhindrar kostsamma överraskningar och säkerställer att dina plåtskärningsprojekt levererar den kvalitet och prestanda som dina applikationer kräver.
När du har valt din tillverkningspartner och projektet är igång är det sista steget att förstå hur du tillämpar allt du har lärt dig – genom att matcha rätt metoder med din specifika situation och ta självsäkra åtgärder för dina metallskärningsbehov.
Välja din väg framåt för plåtskärning
Du har gått igenom tjockledestabeller, materialens egenskaper, manuella verktyg, kraftutrustning och industriella tekniker – nu är det dags att sammanfatta allt till handfasta riktlinjer. Oavsett om du ska göra din första plåtskärning eller förfina din metod efter många års erfarenhet, handlar det om att ärligt jämföra dina projektkrav med tillgängliga metoder.
Matcha metoder med ditt projekt
Varje lyckat metalltillverkningsprojekt börjar med en enkel fråga: vad kräver detta specifika jobb egentligen? Svaret avgör allt som följer.
Den bästa skärmetoden är inte den mest avancerade eller dyraste – det är den som ger acceptabla resultat för din specifika tillämpning till en kostnad och tidsram som är meningsfull.
Här är din snabbreferensguide för att matcha verktyg med tjocklek och material:
- 22 gauge och tunnare: Vanliga bleckskäror hanterar aluminium och plåt av mild stål enkelt – inga elkraftverktyg krävs
- 18–20 skala: Flygplansskäror fungerar bra för de flesta metaller; elektriska saxar snabbar upp längre skärningar
- 14–16 gauge: Elverktyg blir nödvändiga – elektriska taghuggsverktyg, vinkelslipar eller cirkelsågar med metallblad
- 12 gauge och tjockare: Professionella skärtillämpningar (laser, plasma, vattenstråle) ger överlägsna resultat
Materialtyp är lika viktig som tjocklek. Kom ihåg att rostfritt stål skärs annorlunda än aluminium – det kräver skarpare verktyg, högre hastigheter och hänsyn till verktyghärdning. Mjuka metaller som koppar och aluminium kräver strategier för att förhindra täppning och smetning, medan stålplåt tål mer aggressiva tillvägagångssätt.
Agera för att tillgodogöra dig dina behov av metallskärning
Enligt Geomiq , att veta hur man skär plåt korrekt säkerställer en felfri process, minimerar materialspill och förbättrar den totala produktionseffektiviteten. Din väg framåt beror på var ditt projekt ligger på komplexitetsskalan.
Om du arbetar med ett hemmagjort projekt:
- Börja med rätt skyddsutrustning – skärresistenta handskar, säkerhetsglasögon och långärmade kläder är omutliga
- Mät två gånger, skär en gång – noggranna märken förhindrar slöseri med material och frustration
- Anpassa ditt verktyg till din materialtyp och tjocklek utifrån riktlinjerna ovan
- Acceptera att inlärningskurvor finns – planera för extra material vid första gången
Om professionell tillverkning är mer rimlig:
- Förbered tydliga specifikationer inklusive materialtyp, tjocklek, kvantiteter och toleranskrav
- Begär prov eller referenser för liknande projekt
- Verifiera certifieringar som är lämpliga för din bransch – särskilt IATF 16949 för fordonsapplikationer
- Skaffa detaljerade offerter som täcker alla operationer från skärning till färdigbehandling
Enligt Zintilon är valet av rätt plåtskärningsmetod en grundsten för lyckade tillverkningsprojekt. Rätt tillvägagångssätt styr slutprodukten kvalitet, produktionshastighet, kostnadseffektivitet och materialutnyttjande.
Du har nu kunskapen att bedöma vilken som helst skärningsutmaning – från enkla raka metallskärningar i tunn aluminium till komplexa mönster i strukturstål. Oavsett om du tar upp plåtsax ikväll eller kontaktar specialister inom bearbetning imorgon, är du rustad att fatta det beslutet med självförtroende. De grundläggande principerna förblir desamma: förstå ditt material, respektera din verktygs begränsningar, satsa på säkerhet och anpassa metod till krav.
Ditt nästa projekt väntar. Rustad med denna kunskap är du redo att omvandla rå metallplåt till exakt vad din applikation kräver.
Vanliga frågor om plåtskärning
1. Vilka är vanliga fel vid skärning av plåt?
De vanligaste felen vid plåtskärning inkluderar användning av olämpliga skärparametrar för materialtypen, försummad verktygsvård som leder till trubbiga blad, felaktig plåtjustering och spänning vilket orsakar unoggranna snitt, samt att bortse från materialspecifika förhållanden som kallfördjupning i rostfritt stål. För att undvika dessa misstag bör du alltid anpassa ditt verktyg till materialtjockleken – flygplanssax för 18 gauge eller tunnare, elverktyg för 14–16 gauge – och se till att skärkanterna är vassa. Korrekt stöd för arbetsstycket och konstant skärhastighet förhindrar materialdeformation och problem med kallfördjupning.
2. Kan man använda en sågklinga (sawzall) för att skära plåt?
Ja, en slagborrmaskin (sågklinga) kan skära plåt effektivt med rätt blad. Den hanterar tunna metallplåtar upp till cirka 1/8 tum tjocklek och metallrör väl. Aluminium, mjukt stål och galvaniserade metaller är hanterbara, även om tjockare metaller över 1/4 tum blir svårare att skära rent. För bästa resultat, använd finskuret metallskärningsblad, säkra fast arbetsstycket ordentligt för att förhindra vibrationer och håll stadigt tryck. Men för precisionsarbete eller stora mängder ger specialiserade metalsaxar eller professionella skärningstjänster bättre kantkvalitet.
3. Vad är det bästa sättet att skära plåt hemma?
Den bästa hemmametoden för att skära beror på materialtjocklek och skärningskomplexitet. För tunnplåt (22 gauge och tunnare) ger plåtsaxar eller flygplanssaxar rena och kontrollerade skärningar. Färgkodade flygplanssaxar – gula för raka snitt, röda för vänsterskurvor, gröna för högerskurvor – erbjuder mångsidighet för de flesta hobbyprojekt. För tjockare material upp till 14 gauge fungerar el-saxar eller vinkelslipar med skärskivor bra. Använd alltid skärresistenta handskar och skyddsglasögon, eftersom nyskurna kanter på plåt är extremt vassa.
4. Hur väljer jag mellan självhjälpskärning och professionella tillverkningstjänster?
Välj självbyggnad vid skärning av tunn plåt (20 gauge eller tunnare), där toleranser på ±1–2 mm är acceptabla, kvantiteter håller sig under 10–15 delar och du redan äger lämpliga verktyg. Välj professionella tjänster när material överstiger 14 gauge, precisionskrav understiger ±0,5 mm, produktionskvantiteter överstiger 20 delar eller när delar kräver certifierad dokumentation. Professionella tillverkare med certifieringar som IATF 16949 för fordonsapplikationer säkerställer konsekvent kvalitet, och deras CNC-styrda utrustning ger upprepbarhet som manuella verktyg inte kan matcha.
5. Vad är skillnaden mellan laserskärning, plasmaskärning och vattenjetskärning?
Laserbeskärning erbjuder högsta precision (±0,1 mm) och renaste kanter för material under 25 mm tjocka, idealiskt för elektronik och medicinska enheter. Plasmabeskärning ger bäst hastighet i förhållande till kostnad för tjocka ledande metaller (6 mm–50 mm+), vilket gör den populär för konstruktionsstålframställning. Vattenjetskärning använder vatten under högt tryck med abrasiva tillsatser för en kallskärningsprocess utan värmepåverkad zon, vilket möjliggör skärning av nästan alla material inklusive icke-metaller. Välj laser för tunna, precisionskrävande arbeten; plasma för tjockt stål till lägre kostnad; och vattenjet när värmeskador måste undvikas eller vid skärning av icke-ledande material.