 Serii mici, standarde ridicate. Serviciul nostru de prototipare rapidă face validarea mai rapidă și mai ușoară —

Tablă de Calitate și Sudură: Corectați Defectele Înainte să Vă Coste
Înțelegerea fundamentelor calității în prelucrarea tablelor metalice și sudare
Când examinați un component metalic realizat profesional , ce îl diferențiază de o lucrare substandard? Răspunsul se află în înțelegerea prelucrării calitative a tablelor metalice și a sudurii ca o disciplină cuprinzătoare, nu ca o singură abilitate. Prelucrarea de calitate profesională include totul, de la alegerea inițială a materialului până la finisarea finală, fiecare pas construindu-se pe cel anterior pentru a crea componente care funcționează fiabil ani de zile.
Indiferent dacă sunteți un pasionat DIY care dorește să-și îmbunătățească meșteșugul sau o afacere care evaluează potențiali parteneri în prelucrarea metalelor, înțelegerea acestor fundamente vă va ajuta să recunoașteți excelenta și să evitați greșelile costisitoare pe viitor.
Ce definește calitatea în prelucrarea tablelor metalice
Procesul de realizare a pieselor din tablă de calitate este un proces complex care depășește cu mult simpla tăiere și îndoire a metalului. Conform standardelor industriale, calitatea reală cuprinde mai mulți elementi critici care funcționează în armonie:
- Selectarea materialelor: Metale de înaltă calitate, cu rezistență la tracțiune, maleabilitate și rezistență la coroziune verificate, formează baza. Un producător renumit de piese din tablă și sudură de calitate va oferi certificate ale materialelor și urmărirea completă a acestora.
- Tăiere și formare precisă: Tehnici avansate precum tăierea cu laser, tăierea cu jet de apă și perforarea CNC asigură precizie dimensională. Tăieturile curate, fără așchii, reduc timpul de prelucrare secundară și îmbunătățesc atât funcționalitatea, cât și estetica.
- Acuratețe dimensională: Componentele trebuie să se potrivească perfect în ansambluri mai mari. Chiar și mici abateri pot afecta alinierea întregii structuri.
- Tratarea uniformă a suprafeței: Finisajul corespunzător prin pudră termoreactivă, anodizare sau electroplacare oferă protecție împotriva uzurii și coroziunii, în timp ce sporește aspectul vizual.
Gândește-te așa: ingrediente de înaltă calitate nu garantează un preparat excelent dacă bucătarul nu știe ce face. Același principiu se aplică și la lucrările în metal. Chiar și oțelul premium poate da greș dacă este prelucrat necorespunzător.
Rolul esențial al calității sudurii în lucrările metalice
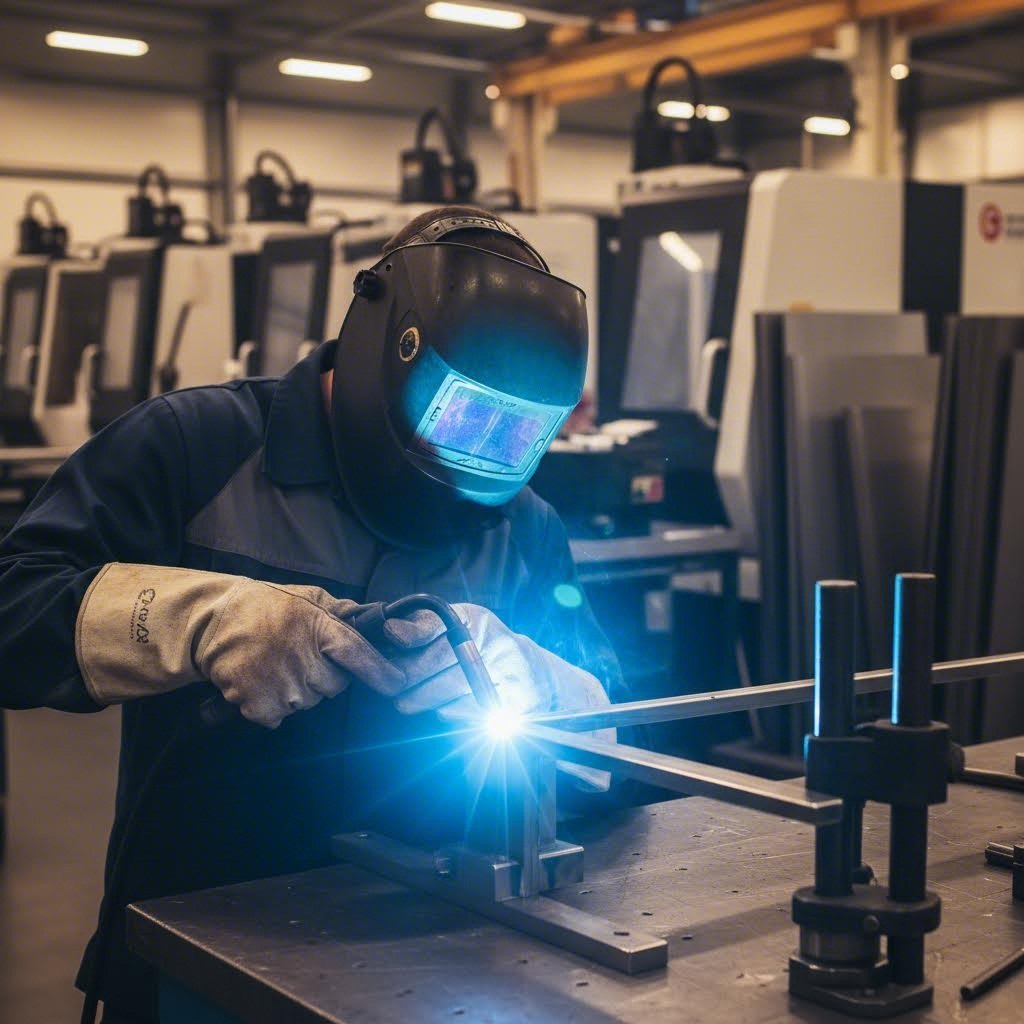
Sudura asigură conectarea pieselor realizate cu precizie și rezistență, fiind probabil cel mai important pas din întreg procesul. Atunci când sudura este realizată necorespunzător, rezultatele pot compromite întreaga structură, ducând la întârzieri în instalare, riscuri de siguranță sau defectare prematură.
Sudurile puternice și constante asigură faptul că clădirea sau componenta dumneavoastră pot rezista ani de utilizare în condiții dificile. Sudurile slabe, dimpotrivă, creează vulnerabilități structurale care s-ar putea să nu devină evidente decât în momentul producerii unei defecțiuni catastrofale.
Calitatea profesională a sudurii implică mai mulți factori măsurabili:
- Pătrundere corespunzătoare a sudurii: Asigurarea faptului că sudura se topește complet cu materialele de bază, nu doar că stă la suprafață
- Aspect uniform al cordoanelor de sudură: Cordoanele de sudură uniforme indică o alimentare controlată cu căldură și o tehnică corectă
- Lipsa defectelor: Fără porozitate, subminare, fuziune incompletă sau stropi excesivi
- Rezistență corectă a îmbinării: Verificată prin inspecție vizuală, teste nedistructive și teste de rezistență atunci când este necesar
Atunci când evaluați un furnizor calificat de tablă și sudură, căutați sudori certificați, specificații documentate ale procedurilor de sudare (WPS) și proceduri cuprinzătoare de control al calității. Aceste certificate diferențiază operațiunile profesionale de atelierele care fac compromisuri. Rețineți că o execuție precisă înseamnă că componentele sosesc gata de asamblare, minimizând timpul de instalare, frustrarea și costurile de întreținere pe termen lung.
Tehnici esențiale de sudare pentru proiecte din tablă
Acum că înțelegeți ce definește calitatea în prelucrarea tablelor, următoarea întrebare este simplă: ce metodă de sudură ar trebui să utilizați? Răspunsul depinde de materialul dumneavoastră, cerințele proiectului și calitatea finisării dorite. Fiecare tehnică aduce avantaje distincte, iar alegerea corectă poate face diferența dintre un rezultat impecabil și ore întregi de reparații frustrante.
Să analizăm cele trei metode principale de sudură utilizate în aplicațiile de calitate pentru table personalizate și sudură, astfel încât să puteți potrivi procesul potrivit nevoilor dumneavoastră specifice.
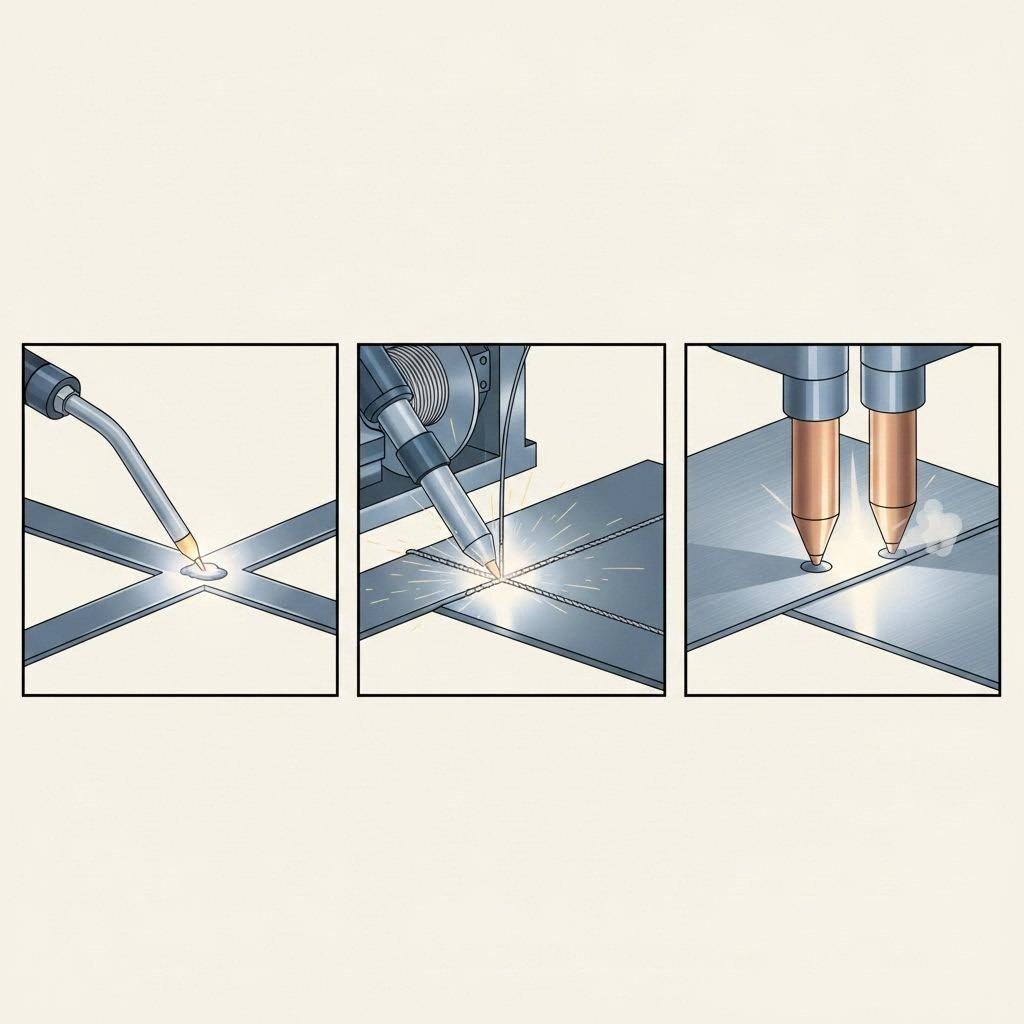
Sudura TIG pentru aplicații precise în prelucrarea tablelor
Sudura TIG, cunoscută și sub numele de sudură cu arc în gaze inerte folosind electrozi din tungsten (GTAW), reprezintă standardul de referință pentru lucrările precise pe materiale subțiri. Acest proces utilizează un electrod din tungsten neproductibil care poate rezista la temperaturi extrem de ridicate, permițând sudorilor să lucreze la curenți mici pe materiale cu grosimi de până la 0,005 inch.
De ce este important acest lucru pentru proiectul dumneavoastră? Imaginați-vă sudarea unei plăci decorative din oțel inoxidabil sau a unui component critic aerospace. Aveți nevoie de control absolut asupra intrării de căldură, distorsiuni minime și un cordon de sudură curat, estetic plăcut. Sudarea TIG satisface toate cele trei cerințe.
Iată ce face ca sudarea TIG să fie ideală pentru tablă subțire de precizie:
- Control superior al căldurii :Sudorul poate regla cu precizie amperajul folosind o pedala, prevenind arderea prin la grosimi mici
- Suduri curate, fără stropi: Nu există fir de adaos alimentat automat, oferindu-vă control complet asupra depunerii materialului
- Calitate excepțională a finisajului: Sudurile necesită adesea minim procesare ulterioară, economisind timp la șlefuit și lustruit
- Compatibilitate versatilă cu materialele: Funcționează excelent pe oțel inoxidabil, aluminiu și aliaje exotice
Compromisul? Sudura TIG necesită o abilitate semnificativă și este mai lentă decât alte metode. Pentru producția în volum mare, acest lucru poate deveni un punct de blocare. Cu toate acestea, atunci când aspectul și precizia sunt cele mai importante, TIG rămâne alegerea preferată pentru orice fabrică de calitate specializată în metal semifăcut și sudură, care urmărește rezultate premium.
Avantajele sudurii MIG în mediile de producție
Sudura MIG, sau sudura prin arc cu gaz metalic (GMAW), adoptează o abordare fundamental diferită. În loc să introducă manual material de adaos, MIG alimentează continuu un fir de electrod prin pistolul de sudură, în timp ce gazul de protecție împiedică contaminarea băii de sudură. Această configurație crește în mod semnificativ viteza de sudare și face ca procesul de învățare să fie mult mai ușor pentru începători.
Conform instrucțiuni ale industriei sudurii , setările corecte MIG depind de potrivirea vitezei de avansare a sârmei și a tensiunii la grosimea specifică a materialului dumneavoastră. De exemplu, sudarea oțelului de 1/8 inch necesită în mod tipic 18-20 de volți cu o viteză a sârmei între 300-400 de inci pe minut, utilizând un amestec de gaze argon-CO2 de 75/25.
Principalele factori care afectează calitatea sudurii MIG includ:
- Alegerea dimensiunii sârmei: Dimensiunile obișnuite variază de la .023" pentru tablă subțire până la .045" pentru materiale mai groase
- Tipul gazului de protecție: Argon pur pentru aluminiu, 75% argon/25% CO2 pentru oțel moale, amestecuri tri-gaz pentru oțel inoxidabil
- Echilibrul dintre tensiune și viteza sârmei: Prea scăzută provoacă împroșcături și penetrare slabă; prea mare creează împroșcături excesive și ardere completă
Atunci când proiectul dumneavoastră implică volume mari de producție, fabricarea din oțel moale sau situații în care viteza de sudare este mai importantă decât aspectul estetic, MIG devine alegerea practică. Un producător chinezesc de calitate pentru piese din tablă și sudură care realizează componente auto, de exemplu, va relua probabil în mod semnificativ pe MIG datorită eficienței și constanței acestuia.
Când sudura prin puncte este potrivită pentru proiectul dumneavoastră
Sudura prin puncte funcționează pe un principiu complet diferit față de procesele de sudură cu arc. Această metodă de sudură prin rezistență unește două foi suprapuse de metal prin aplicarea unei presiuni și a unui curent electric prin electrozi din aliaj de cupru. Căldura concentrată topește metalul în anumite puncte, formând un punct de sudură fără a necesita material de adaos.
Sună simplu? Pentru că este, iar această simplitate se traduce printr-o eficiență remarcabilă în producție. Sudura prin puncte se recomandă în aplicațiile în care:
- Uniți table subțiri în configurații de îmbinare suprapusă
- Sunt necesare suduri repetitive, în volum mare
- Materialul de adaos nu este necesar sau dorit
- Automatizarea și integrarea robotică sunt priorități
Veți găsi sudura prin puncte în întregul proces de asamblare a caroseriilor auto, în fabricarea electrocasnicelor și în producția de carcase electrice. Procesul creează îmbinări curate, fără stropi sau fum, iar timpii de ciclu măsurați în fracțiuni de secundă îl fac imbatrânit pentru scenariile de producție în masă.
Compararea metodelor de sudare: care se potrivește nevoilor dumneavoastră?
Alegerea dintre sudura TIG, MIG și sudura prin puncte depinde în cele din urmă de cerințele specifice ale proiectului dumneavoastră. Comparația următoare vă ajută să vizualizați în ce domenii strălucește fiecare metodă:
| Criterii | Sudura TIG | Sudura MIG | Sudură Punct |
|---|---|---|---|
| Gama de grosime a materialului | 0,005" până la 0,25" | gaugă 24 până la 0,5"+ | 0,5 mm până la 3 mm (foi suprapuse) |
| Viteza de sudare | Încet. | Rapid | Foarte rapidă (automatizată) |
| Nivelul de îndemânare necesar | Ridicat | Scăzut spre moderat | Scăzută (dependentă de echipament) |
| Aplicații tipice | Aerospațial, medical, lucrări decorative | Auto, fabricație generală, construcții metalice | Panouri auto, aparate, carcase |
| Calitatea de finisare | Excelent, curățare minimă | Bun, poate necesita rectificare | Cusătură curată, fără stropi |
| Material umplutură | Opțional, alimentare manuală | Alimentare continuă cu sârmă | Nu este necesar |
Înțelegerea acestor diferențe vă permite să comunicați eficient cu partenerii de fabricație și să luați decizii informate privind proiectele dumneavoastră. Desigur, alegerea tehnicii potrivite de sudare este doar o parte din ecuație. Pregătirea corectă a suprafeței și procesele de finisare joacă un rol la fel de important în obținerea unor rezultate profesionale.
Procese de pregătire și finisare care asigură excelența
Ați ales tehnica potrivită de sudare pentru proiectul dumneavoastră. Ce urmează? Iată o realitate care diferențiază rezultatele profesioniste de încercările amatoare: o sudură este la fel de bună ca și îmbinarea ei . Săriți peste etapele de pregătire, iar nici o tehnică perfectă de sudură nu vă va salva de îmbinări slabe, porozitate sau defectare prematură.
Indiferent dacă lucrați în atelierul dumneavoastră acasă sau evaluați un partener chinez de calitate pentru tablă subțire și sudură, înțelegerea acestor procese de pregătire și finisare vă ajută să recunoașteți o lucrare de calitate și să evitați refacerile costisitoare mai târziu.
Pași pentru pregătirea suprafeței înainte de sudare
Gândiți-vă așa: ați vopsi o mașină fără să o spălați și să o șlefuiești mai întâi? Același principiu se aplică și sudurii. Contaminanții precum uleiul, rugină, piatra de laminare sau chiar umiditatea creează defecte care compromit integritatea sudurii. Conform Instrucțiunilor de sudură ESAB , respectarea regulii 5P — Pregătirea Potrivită Previne Performanța Proastă — este obligatorie pentru obținerea unor rezultate fiabile.
Iată procesul secvențial pe care îl urmează distribuitorii calificați de tablă subțire și sudură înainte de a executa o sudură:
- Eliminați uleiurile, grăsimile și lichidele de așchiere: Utilizați un detergent chimic fără clor, cum ar fi acetonă sau degresanți comerciali. Indiferent de solventul ales, asigurați-vă că acesta nu reacționează cu metalul de bază sau nu lasă reziduuri care creează vapori dăunători în timpul sudurii. Lucrați întotdeauna într-un spațiu bine ventilat și eliminați toate materialele inflamabile înainte de începerea sudurii.
- Eliminați rugină, pișcătura și contaminarea superficială: Perii de sârmă, discurile abrazive și discurile lamelare elimină rapid ruggina, pișcătura de laminare, vopseaua și scrumul rezultat din operațiunile anterioare de tăiere. Notă importantă: la curățarea aluminiului sau oțelului inoxidabil, utilizați perii dedicate din oțel inoxidabil sau discuri abrazive. O perie care a curățat anterior oțel carbonat va încorpora particule care vor contamina sudura dumneavoastră.
- Abordați straturile de oxid de pe aluminiu: Aluminiul reacționează cu aerul formând oxid de aluminiu, care se topește la o temperatură de aproximativ trei ori mai mare decât cea a metalului de bază. Practica recomandată? Sudati aluminiul în termen de 24 de ore de la eliminarea oxidului, pentru a preveni reformarea acestui strat problematic.
- Aduceți materialele la temperatura camerei: Metalul rece absoarbe căldura din zona de sudură, provocând o răcire rapidă care duce la crăpare. Dacă materialul dumneavoastră a fost depozitat afară sau într-un loc rece, lăsați-l să se încălzească la temperatura camerei timp de cel puțin 24 de ore înainte de sudare.
- Pregătiți marginile pentru o configurație corectă a îmbinării: Pentru materiale mai groase de 1/4 inch, teșirea devine esențială. O îmbinare tip V standard folosește teșiri de aproximativ 30 de grade pe fiecare parte. Nu teșiți până la o margine ascuțită — lăsați o zonă plată („land”) de 1/16 până la 1/8 inch pentru a susține căldura arcului fără a se topi.
- Asigurați-vă o potrivire și fixare corespunzătoare: Găurile și nealinierea cauzează o distribuție neuniformă a căldurii, deformări și îmbinări slabe. Utilizați cleme, dispozitive de fixare sau puncte de sudură temporare pentru a menține componentele perfect aliniate înainte de a începe trecerile de sudură.
- Aplicați puncte de sudură temporare strategice: Punctele de sudură temporare țin ansamblul în poziție și previn mișcarea în timpul sudurii. Plasați-le la intervale care mențin alinierea, fără a crea acumulări excesive de căldură într-o singură zonă.
Pentru materiale mai groase, încălzirea prealabilă la aproximativ 250°F ajută la asigurarea unei pătrunderi corespunzătoare și previne fisurarea sudurii. Luați în considerare achiziționarea de creioane indicatoare de temperatură ("temp sticks") care se topeșc la temperaturi specifice, oferindu-vă un control precis asupra procesului de încălzire prealabilă.
Finisarea post-sudare pentru rezultate profesionale
Sudura dvs. este finalizată, dar lucrarea nu este terminată. Finisarea post-sudare transformă sudurile funcționale în componente de calitate profesională care îndeplinesc cerințele estetice și de performanță. Nivelul de finisare necesar depinde în totalitate de aplicația dvs.—o sudură structurală ascunsă în interiorul mașinilor necesită o tratare diferită față de o balustradă decorativă din oțel inoxidabil.
Conform specialiști în pregătirea materialelor , rectificarea și lustruirea lucrează împreună ca procese complementare. Rectificarea elimină în mod agresiv materialul pentru a netezi suprafețele și a elimina defectele. Lustruirea finisează suprafața pentru a obține rezultate netede, uniforme și vizual spectaculoase.
Iată opțiunile dvs. principale de finisare, împreună cu beneficiile aferente:
- Surfatarea: Îndepărtează materialul excesiv de sudură, stropii și neregularitățile de suprafață. Discurile de rectificare tip 27 funcționează bine pentru suprafețe plane, în timp ce discurile cu lamela oferă o îndepărtare mai controlată a materialului, cu un finisaj superior. Utilizați trepte progresiv mai fine pentru a minimiza efortul necesar pentru lustruirea ulterioară.
- Ușurare: Creează suprafețe netede și reflectante prin utilizarea unor abrazive fine (0,05 până la 6 micrometri) pe perne sau șervețele moi. Este esențial pentru aplicații decorative, echipamente pentru produse alimentare și componente la care rugozitatea suprafeței afectează performanța. Compușii de lustruire din diamant, alumină și silice coloidală sunt potriviți fiecare pentru materiale diferite și cerințe de finisare.
- Vopsire în Pulbere: Aplică electrostatic pulbere uscată care se întărește la căldură pentru a forma un finisaj durabil și estetic. Oferă o rezistență excelentă la coroziune, este disponibil într-o varietate practic nelimitată de culori și creează un strat mai gros și mai rezistent la impact decât vopseaua convențională. Ideal pentru echipamentele din exterior, componente auto și carcase industriale.
- Vopsire umedă: Oferă flexibilitate în potrivirea culorilor și poate fi aplicat pe componente prea mari pentru cuptoarele de lacuire prin pudră. Necessită o pregătire corespunzătoare a suprafeței, inclusiv straturi de conversie fosfat sau cromat, pentru o adeziune optimă. Sistemele cu mai multe straturi (grund, vopsea de bază, lac transparent) oferă durabilitate maximă.
- Electroplatare: Depune straturi subțiri de metale precum zinc, nichel sau crom pe suprafață. Oferă protecție împotriva coroziunii, rezistență la uzură și atracție decorativă. De exemplu, cromarea pe oțel inoxidabil îmbunătățește atât aspectul, cât și duritatea suprafeței.
- Pasivare: Tratament chimic pentru oțel inoxidabil care elimină fierul liber de pe suprafață și îmbunătățește stratul natural de oxid de crom. Esențial pentru aplicații care necesită rezistență maximă la coroziune, cum ar fi echipamentele pentru procesarea alimentelor și dispozitivele medicale.
Un pas esențial, dar adesea neglijat: curățarea temeinică între fiecare etapă de finisare previne contaminarea cruzată. Particulele abrazive provenite din rectificarea grosieră vor zgâria suprafețele lustruite dacă nu sunt complet eliminate. Utilizați curățătoare ultrasonice cu tensioactive adecvate pentru o curățare profundă, urmate de clătiri cu apă distilată și alcool pentru a accelera uscarea.
Investiția într-o pregătire și finisare corespunzătoare aduce beneficii pe toată durata de viață a componentelor dvs. fabricate . Operațiunile de calitate ale foilor metalice și sudură din China care urmează în mod constant aceste protocoale livrează piese care se asamblează corect, funcționează fiabil și își păstrează aspectul pe parcursul anilor de utilizare. Cu suprafețele corespunzător pregătite și finisaje aplicate expert, atenția dumneavoastră poate fi concentrată asupra cerințelor specifice diferitelor materiale de bază.
Cerințe și cele mai bune practici specifice materialelor pentru sudură
Iată ceva ce surprinde mulți fabricanți: tehnica de sudură care funcționează perfect pe oțel moale poate provoca defecte catastrofale la aluminiu. Fiecare metal aduce proprietăți termice unice, comportamente specifice privind oxidarea și cerințe diferite privind materialul de adaos. Înțelegerea acestor diferențe face diferența între o execuție fiabilă și refaceri costisitoare.
Indiferent dacă achiziționați de la un furnizor chinezesc de calitate pentru foi metalice și sudură sau vă ocupați de proiecte în propriul atelier, stăpânirea abordărilor specifice materialelor asigură rezultate constante, fără defecte, pentru fiecare lucrare.
Sudarea cu succes a tablelor din oțel moale
Oțelul moale rămâne cel mai tolerant material pentru sudarea tablelor, fiind un punct de pornire excelent pentru dezvoltarea abilităților dumneavoastră. Comportamentul său previzibil la căldură și toleranța largă la variațiile parametrilor înseamnă că veți obține rezultate acceptabile chiar și cu o tehnică imperfectă. Dar nu confundați toleranța cu infailibilitatea.
Sudarea reușită a oțelului moale depinde de adaptarea metodei la grosimea materialului:
- Grosime mică (gauge 24-18): Utilizați setări de amperaj mai scăzut și viteze de deplasare mai mari pentru a preveni străpungerea. Transferul MIG în scurtcircuit funcționează bine în acest caz, oferind o intrare controlată de căldură cu spatter minim.
- Grosime medie (gauge 16-12): Setările standard MIG cu transfer prin spray asigură o penetrare excelentă și viteză mare de lucru. Sudarea TIG rămâne o opțiune validă atunci când aspectul este important.
- Grosime mare (gauge 11 și mai mare): Pot fi necesare mai multe treceri. Încălziți prealabil materialele cu grosimea peste 1/4 inch la aproximativ 250°F pentru a asigura o fuziune corectă și pentru a reduce riscul de crăpare.
Pentru gazul de protecție, un amestec de 75% argon/25% CO2 oferă echilibrul ideal între stabilitatea arcului, penetrarea și controlul stropilor. CO2 pur este mai ieftin și oferă o penetrare mai adâncă, dar produce semnificativ mai mulți stropi. Sârma de adaos ER70S-6 se potrivește pentru majoritatea aplicațiilor cu oțel moale, conținutul său crescut de siliciu și mangan îmbunătățind udarea și reducând porozitatea.
Cea mai frecventă greșeală? Sudarea peste stratul de calamină. Acel strat oxidat cenușiu-albăstrui pare inofensiv, dar reține contaminanți care provoacă porozitate și o fuziune slabă. Curățați întotdeauna prin șlefuire până la metal strălucitor înainte de sudare, mai ales pe oțel laminat la cald.
Provocări și soluții în sudarea tablelor subțiri din aluminiu
Aluminiul se comportă complet diferit față de oțel sub arcul de sudură. Conductivitatea sa termică ridicată dispersează căldura rapid din zona sudurii, în timp ce punctul său scăzut de topire și lipsa schimbării culorii înainte de topire măresc considerabil riscul de perforare. Adăugați un strat oxidic tenace care se topește la peste 3.700°F—aproximativ de trei ori mai mult decât metalul de bază—și vă aflați în fața unui material care necesită maximă atenție.
Potrivit specialiștilor în prelucrarea aluminiului, prevenirea deformațiilor, fisurilor și a problemelor de oxidare începe cu înțelegerea modului în care aluminiul reacționează la căldură:
- Prevenirea deformațiilor: Conductivitatea termică a aluminiului înseamnă că căldura se răspândește rapid în întreaga piesă. Utilizați tehnici de sudură discontinuă, lucrați de la centru spre exterior și luați în considerare utilizarea barelor de sprijin sau a disipatoarelor de căldură pentru a extrage căldura din zonele critice. Placa mai groasă din aluminiu rezistă mai bine deformărilor decât tabla subțire.
- Evitarea fisurilor: Fisurarea la cald apare atunci când sudurile se răcesc prea repede sau atunci când metalele de adaos incorecte creează microstructuri casante. Pentru aliajul 6061 din aluminiu, utilizați material de adaos 4043 pentru rezistență la fisurare sau 5356 pentru o rezistență mai mare în aplicații structurale. Nu folosiți niciodată sârmă de adaos 6061 — este foarte sensibilă la fisurare.
- Gestionarea stratului de oxid: Curățați imediat aluminiul înainte de sudare utilizând o abordare în două etape. Mai întâi, eliminați uleiurile și contaminanții cu acetonă sau un produs special pentru curățarea aluminiului. Apoi, folosiți o perie din oțel inoxidabil (dedicată exclusiv aluminiului) pentru a îndepărta stratul de oxid. Sudati în decurs de câteva ore de la curățare, deoarece oxidul se reformează rapid.
Sudarea TIG cu curent alternativ rămâne procesul preferat pentru table subțiri din aluminiu. Ciclul cu electrod pozitiv al curentului alternativ desface stratul de oxid, în timp ce ciclul cu electrod negativ asigură penetrarea. Utilizați gaz protector argon pur la un debit de 15-20 CFH și luați în considerare amestecuri de argon-heliu pentru secțiuni mai groase care necesită o penetrare mai adâncă.
Alegerea aliajului este esențială. Nu toate tipurile de aluminiu se sudă la fel de bine:
- 1100 și 3003: Sudabilitate excelentă, cu tendință minimă de fisurare. Ideale pentru execuții generale unde nu este necesară rezistența maximă.
- 5052 și 5083: Sudabilitate bună, cu rezistență mai mare. Utilizate frecvent în aplicații navale și structurale.
- 6061:Cel mai popular aliaj structural, dar predispus la fisurare în zona afectată termic. Necessită o atentă selecție a materialului de adaos și tehnică adecvată.
Practici recomandate pentru execuția din oțel inoxidabil
Oțelul inoxidabil combină provocările oțelului carbon și aluminiului, cu complicații specifice proprii. Conductivitatea sa termică mai scăzută comparativ cu oțelul carbon face ca căldura să se concentreze în zona sudurii, crescând riscul de deformare și ardere la materialele subțiri. În același timp, conținutul său de crom—tocmai elementul care oferă rezistența la coroziune—poate migra din soluție dacă aportul de căldură nu este controlat cu atenție.
Conform specialiști în materiale de adaos , selectarea materialului de adaos potrivit necesită potrivirea acestuia cu materialele de bază, luând în considerare condițiile de utilizare. Pentru îmbinarea oțelului 304L cu 316L—una dintre cele mai frecvente aplicații de sudură din oțel inoxidabil—există mai multe opțiuni:
- material de adaos 316L: Se potrivește cu metalul de bază cu conținut mai mare de aliaj, dar creează un baie de sudură lentă, mai dificil de manipulat.
- material de adaos 316LSi: Siliciul suplimentar de 0,9% îmbunătățește udarea și face baia de sudură mai fluidă și mai ușor de controlat.
- material de adaos 309LSi: Supradimensionează conținutul de crom (24% Cr vs. 16-18% Cr în metalele de bază), oferind o rezistență la coroziune sporită în medii agresive.
Gestionarea căldurii devine esențială în cazul oțelului inoxidabil. O cantitate excesivă de căldură provoacă două probleme: precipitarea carbizilor (sensibilizare), care creează zone predispuase la coroziune, și deformarea, dificil de corectat fără a deteriora finisajul suprafeței materialului. Mențineți temperaturile între treceri sub 350°F, utilizați cel mai scăzut amperaj care asigură o fuziune adecvată și luați în considerare utilizarea unui gaz de sprijin (argon) pentru a proteja partea rădăcinii de oxidare.
Pentru gazul de protecție, amestecurile tripartite care conțin heliu, argon și CO2 oferă rezultate excelente la sudura oțelului inoxidabil prin procedeul MIG. Argonul pur funcționează bine pentru aplicațiile TIG. Evitați CO2-ul pur — provoacă oxidare excesivă și retenția de carbon, ceea ce degradează rezistența la coroziune.
Compararea parametrilor de sudură între diferite materiale
Atunci când evaluați un furnizor specializat în tablă subțire de calitate chineză și sudură sau planificați propriile lucrări de confecționare, acest tabel de comparație oferă o referință rapidă pentru cerințele specifice fiecărui material:
| Parametru | Oțel moale | Aluminiu | Oțel inoxidabil |
|---|---|---|---|
| Proces recomandat | MIG (cel mai frecvent), TIG pentru grosimi mici | TIG cu curent AC, MIG cu pistol carusel | TIG pentru precizie, MIG pentru producție |
| Materiale de adaos comune | ER70S-6, ER70S-3 | 4043, 5356 (corespunzător aliajului de bază) | 308L, 309L, 316L (corespunzător sau superioară) |
| Gaz de protecție | 75% Ar/25% CO2 sau 100% CO2 | 100% Argon, amestecuri Ar/He pentru secțiuni groase | Amestec triplu (He/Ar/CO2) pentru MIG, Argon pur pentru TIG |
| Problemă legată de căldura introdusă | Moderat—excesul provoacă deformare | Ridicat—răspândirea rapidă a căldurii provoacă curbură | Ridicat—excesul provoacă sensibilizare și deformare |
| Eliminarea Oxidelor | Curățați oxizii de laminare înainte de sudare | Critica—curățați imediat înainte de sudare | Periați cu sârmă sau curățați prin rectificare; evitați contaminarea indirectă |
| Capcane comune | Sudarea peste oxizi de laminare, stropi excesivi | Fisurare la cald, perforare, porozitate datorită oxidului | Precipitare de carbură, pierderea rezistenței la coroziune |
| Controlul denaturării | Fixare standard, lipire sărită | Bare de sprijin, radiatoare de căldură, sudare rapidă | Intrare redusă de căldură, bare răcitoare, controlul temperaturii între treceri |
Observați cum fiecare material necesită o abordare diferită. În cazul oțelului moale, vă puteți concentra în primul rând pe tehnică și productivitate. Aluminiul necesită o atenție deosebită asupra curățeniei și gestionării căldurii. Oțelul inoxidabil necesită un control precis al căldurii pentru a-și păstra proprietățile de rezistență la coroziune.
O operațiune de calitate superioară în domeniul tablelor și sudării recunoaște aceste diferențe și ajustează procedurile în consecință. Operatorul care folosește aceleași setări pentru toate cele trei materiale va produce în mod inevitabil lucrări substandard pentru cel puțin două dintre ele. Înțelegerea cerințelor specifice fiecărui material vă permite să executați personal o muncă de calitate sau să o recunoașteți atunci când evaluați potențiali parteneri de fabricație.
Chiar și cu o tehnică corectă și abordări specifice materialelor, defectele apar în continuare. Recunoașterea problemelor comune de sudură și cunoașterea modului de a le corecta previne transformarea unor probleme minore în defecțiuni costisitoare.
Depanarea defectelor frecvente la sudura tablelor subțiri
Ați ales tehnica potrivită, ați pregătit corespunzător suprafețele și ați setat parametrii conform materialului de bază. Totuși, sudurile dvs. nu reușesc cum trebuie. Sună cunoscut? Chiar și sudorii experimentați întâmpină defecte care compromit lucrarea lor. Diferența dintre profesioniști și amatori constă în recunoașterea rapidă a acestor probleme și cunoașterea exactă a modului de remediere.
Potrivit specialiștilor în prelucrarea tablelor subțiri, defectele de sudură apar în general din cauza metodelor greșite de sudare sau a traseelor incorecte de sudare. Atunci când apar, acestea slăbesc îmbinările sau provoacă defectarea completă a produsului. Să analizăm cele mai frecvente defecte la sudura tablelor subțiri și soluțiile practice care pun proiectele dvs. din nou pe drumul cel bun.
Prevenirea deformărilor și distorsiunilor în materialele subțiri
Imaginați-vă că ați finalizat o sudură frumoasă, doar ca apoi să vedeți piesa deformată într-o formă improprie utilizării în timp ce se răcește. Distorsiunea rămâne una dintre cele mai frustrante provocări în sudarea tablelor metalice, fiind deosebit de severă în cazul materialelor subțiri, unde masa redusă nu poate absorbi și disipa eficient căldura.
Conform Cercetării sudării Lincoln Electric , distorsiunea rezultă din dilatarea și contractarea metalului de sudură și a metalului de bază adiacent în timpul ciclurilor de încălzire și răcire. Pe măsură ce temperatura crește, rezistența la curgere și elasticitatea scad, în timp ce expansiunea termică crește – creând condițiile perfecte pentru deformare permanentă.
- Simptome: Piese îndoite sau răsucite după sudare; margini trase spre sudură; bombarea sau ondularea suprafețelor plane; piese care nu mai pot fi asamblate corespunzător
- Cauze: Cantitate excesivă de căldură concentrată într-o singură zonă; sudarea efectuată doar pe o singură parte a piesei; suprasudarea cu material de adaos mai mult decât necesar; succesiune incorectă a sudurilor; lipsa fixării sau a rigidizărilor
-
Acțiuni corective:
- Utilizați suduri intermitente în loc de cordoane continue acolo unde proiectarea permite — acest lucru poate reduce metalul de sudură cu până la 75%
- Echilibrați sudurile în jurul axei neutre prin alternarea părților
- Aplicați tehnica de sudare backstep: sudurați segmentele de la dreapta la stânga, în timp ce avansați în general de la stânga la dreapta
- Presetarea pieselor înainte de sudare pentru a permite contracției să le aducă în aliniere
- Fixați piesele identice una de alta spate în spate în timpul sudării pentru a echilibra forțele de contracție
- Utilizați dispozitive răcite cu apă echipate cu tuburi din cupru pentru a elimina rapid căldura din tabla subțire
- Minimizați timpul de sudare — o finalizare mai rapidă înseamnă mai puțină căldură care se răspândește în metalul înconjurător
O soluție deseori neglijată? Nu supra-sudați. Cu cât depuneți mai mult metal, cu atât forțele de contracție sunt mai mari. Un cordoan de sudură corect dimensionat pentru cerințele îmbinării dvs. minimizează deformările, economisind în același timp timp și material de adaos. Acel cordoan puternic convex poate părea impresionant, dar creează forțe de contracție fără a adăuga rezistență admisibilă.
Evitarea perforării la table subțiri
Puține lucruri sunt mai descurajante decât să urmărești cum piesa ta de lucru, atent poziționată, dezvoltă găuri în timp ce sudezi. Arsurile prin material apar atunci când căldura excesivă străpunge literalmente materialele subțiri, lăsând goluri care nu pot fi reparate fără a începe din nou.
Această defecțiune afectează materialele mai subțiri de 1/4 inch și devine tot mai problematică pe măsură ce grosimea scade. Provocarea? Ai nevoie de suficientă căldură pentru o bună fuziune, dar nu atât de multă încât să distrugi metalul de bază.
- Simptome: Apariția de găuri în zona sudurii în timpul sau după sudare; topire excesivă pe partea opusă; băi de sudură colapsate; aspect neregulat al cordoanelor, cu zone subțiri
- Cauze: Amperaj setat prea mare pentru grosimea materialului; viteză de deplasare prea lentă; staționare prea lungă într-un singur loc; unghi incorect al pistolului care direcționează căldura direct în jos; lipsa unui radiator de căldură sau sprijin
-
Acțiuni corective:
- Reduce imediat amperajul — pornește de la o valoare mai mică decât crezi că este necesară și mărește-o treptat
- Mărește viteza de deplasare pentru a muta căldura departe de orice punct specific
- Utilizați electrozi de diametru mai mic (sârmă de 0,023" pentru table subțiri) pentru a reduce aportul total de căldură
- Luați în considerare sudura MIG pulsată, care oferă o controlabilitate crescută a arcului cu un aport mediu de căldură mai scăzut
- Pentru GTAW, utilizați un electrod de wolfram mai subțire (diametru 3/32") ascuțit la vârf
- Utilizați bare de sprijin sau schimbătoare de căldură pentru a extrage căldura din zona de sudură
- Comutați la modul de transfer prin scurtcircuit pentru sudarea MIG a materialelor subțiri
- Sudați în poziția verticală în jos atunci când este posibil—gravitația ajută la deplasarea băii de metal înainte ca să apară perforarea
Iată un sfat practic din mediile de producție: la sudarea materialelor subțiri galvanizate sau acoperite, o tensiune ușor mai mare împreună cu o viteză de deplasare mai lentă oferă băii de sudură timp suficient pentru degazare corespunzătoare. Aceasta pare contraintuitiv având în vedere riscul de perforare, dar previne o altă problemă—porozitatea datorată gazelor închise—menținând totodată un control asupra aportului de căldură prin tehnica corectă.
Obținerea unei penetrări adecvate a sudurii fără defecte
Pătrunderea incompletă creează îmbinări care par acceptabile la suprafață, dar care nu au adâncimea de fuziune necesară pentru integritatea structurală. Metalul de sudură nu pătrunde complet prin îmbinare sau nu ajunge la rădăcină, lăsând zone nefuzionate care devin concentratori de tensiune și puncte potențiale de cedare.
În schimb, o pătrundere excesivă duce la risipirea materialului de adaos, crește deformarea și poate necesita rectificarea pe partea opusă. Găsirea punctului optim necesită înțelegerea modului în care interacționează viteza de deplasare, amperajul și tehnica.
- Simptome ale pătrunderii incomplete: Suprafață vizibilă a rădăcinii rămasă după sudare; lipsa fuziunii la baza îmbinării; îmbinări slabe care cedează în timpul testelor de solicitare; goluri vizibile pe partea opusă
- Simptome ale pătrunderii excesive: Depășire excesivă pe partea opusă; consolidare convexă a rădăcinii; deformare crescută; risipirea materialului de adaos
- Cauze: Viteză de deplasare prea mare (penetrație incompletă) sau prea mică (excesivă); necorespondență între curent și configurația îmbinării; pregătire incorectă a îmbinării cu fața rădăcinii prea groasă; unghi incorect al arzătorului; canalul prea îngust pentru accesul electrozilor
-
Acțiuni corective:
- Ajustați viteza de deplasare — mai lentă pentru o penetrare mai mare, mai rapidă pentru una mai mică
- Măriți amperajul dacă penetrația este insuficientă; reduceți-l dacă este excesivă
- Verificați pregătirea îmbinării: canalul în V standard trebuie să aibă un unghi inclus de 60° și o față a rădăcinii de 1/16" până la 1/8"
- Asigurați-vă că deschiderea rădăcinii oferă acces adecvat pentru arc
- Mențineți unghiul corect de lucru (perpendicular pentru îmbinările cap la cap, 45° pentru sudurile de colț)
- Luați în considerare efectuarea mai multor treceri în loc să încercați realizarea unei penetrări complete într-o singură trecere pe materiale groase
Eliminarea porozității și reducerea stropirii
Alte două defecte afectează frecvent lucrările de calitate. Porozitatea — acele buzunare de gaz asemănătoare buretelui capturate în sudură — slăbește îmbinările și determină respingerea la inspecție. Stropirea creează probleme de curățare și poate deteriora suprafețele din jur.
- Simptome ale porozității: Poroziuni vizibile pe suprafața sudurii; aspect spumos în secțiune transversală; inspecție cu raze X sau ultrasonică eșuată
- Cauzele porozității: Metal de bază contaminat (ulei, rugină, vopsea, umiditate); protecție insuficientă cu gaz protector; debit de gaz prea mare (crează turbulențe) sau prea mic; curenți de aer care perturbă scutul de gaz; electrozi sau material de adaos umede
-
Soluții pentru porozitate:
- Curățați complet metalul de bază — degresați, apoi rectificați până la metal strălucitor
- Verificați debitul de gaz (în mod tipic 15-25 CFH în funcție de aplicație)
- Inspectați conductele de gaz pentru scurgeri și duza pentru depuneri de stropi
- Protejați zona de lucru de curenții de aer și de vânt
- Păstrați electrozii și sârma de adaos în condiții uscate
- Pentru oțelul zincat, utilizați un gaz cu conținut mai ridicat de CO2 și o tensiune ușor crescută
- Simptome ale împrăștierii: Particule metalice aderate de-a lungul cordoanelor de sudură și pe suprafețele înconjurătoare; aspect neregulat și aspru al cordonului; necesitatea unei curățări excesive după sudare
- Cauzele împrăștierii: Tensiune prea mare sau prea mică; neconcordanță între viteza de avansare a sârmei și cea a arcului; sârmă sau metal de bază contaminat; unghi incorect al pistolului; gaz de protecție necorespunzător pentru aplicație
-
Soluții pentru împrăștiere:
- Reglați fin relația dintre tensiune și viteza de avansare a sârmei
- Utilizați spray anti-împrăștiere pe suprafețele înconjurătoare (nu pe rostul de sudură)
- Mențineți un unghi ușor de tragere (5-15°) pentru MIG cu scurtcircuit
- Comutați la amestec 75/25 argon/CO2 din loc de CO2 pur
- Luați în considerare utilizarea MIG pulsator, care funcționează intrinsec cu mai puțină împrăștiere
- Păstrați vârful de contact și duza curate și corect poziționate
Depanarea defectelor de sudură necesită o abordare sistematică: identificați simptomul, urmăriți-l până la cauza sa fundamentală, apoi aplicați corecția corespunzătoare. Operațiunile de calitate în domeniul tablelor metalice și sudură încorporează acest tip de gândire diagnostic în procesele lor, depistând problemele înainte ca acestea să se multiplice în cadrul producției. Având deprinderi de recunoaștere și corectare a defectelor, sunteți pregătit să înțelegeți cum aceleași principii se aplică în diferite industrii cu cerințe de calitate variate.
Aplicații industriale în care contează sudura de calitate pe tablă metalică
Acum că înțelegeți cum să identificați și să corectați defectele de sudură, hai să explorăm unde se aplică de fapt aceste abilități. Tabla de calitate și sudura sunt prezente în aproape fiecare industrie pe care v-o puteți imagina — de la mașina pe care o conduceți până la clădirea în care lucrați. Dar iată ce mulți oameni nu realizează: standardele de calitate care se aplică unei balustrade decorative diferă foarte mult de cele care guvernează un component al șasiului auto sau un sistem industrial de ventilare.
Înțelegerea acestor cerințe specifice aplicației vă ajută să apreciați de ce producătorii profesioniști investesc atât de mult în certificate, echipamente și instruire. De asemenea, explică de ce luarea unor scurtături în sudura tablelor metalice poate duce la consecințe care variază de la neajunsuri minore până la defecțiuni catastrofale.
Aplicații Automotive și de Transport
Gândiți-vă la ceea ce se întâmplă cu componentele auto în timpul duratei lor de funcționare. Ele suportă vibrații constante, temperaturi extreme, expunere la sare de drum și impacturi ocazionale. Acum imaginați-vă ce se întâmplă atunci când un sudură cedează pe un component structural al șasiului la viteze mari pe autostradă. Din acest motiv, serviciile de sudură a tablelor subțiri pentru autovehicule se confruntă cu unele dintre cele mai stricte cerințe de calitate din orice industrie.
Aplicațiile sudurii tablelor subțiri în industria auto acoperă întreaga structură a vehiculului:
- Panouri caroserie și carcasă exterioară: Carcasele ușilor, aripile, capotele și panourile de acoperiș necesită suduri care sunt în același timp rezistente din punct de vedere structural și invizibile estetic. Sudura prin punct este dominantă aici, sistemele robotizate efectuând sute de suduri precise pe fiecare caroserie de vehicul.
- Ansambluri structurale: Podelele, barierele laterale și stâlpii formează cadrul de siguranță care protejează ocupanții în timpul coliziunilor. Aceste componente necesită suduri cu pătrundere completă și fără niciun defect — un eșec aici înseamnă eșecul protecției în caz de accident.
- Componente ale șasiului și suspensiei: Brațele de suspensie, subcadrele și traversele transmit sarcinile dinamice între roți și caroserie. Calitatea sudurilor afectează direct manevrabilitatea, confortul în mers și durabilitatea pe termen lung.
- Sisteme de evacuare: Expunerea continuă la temperaturi extreme și la gaze de evacuare corozive face ca integritatea sudurilor să fie esențială. Sudurile defecte la sistemul de evacuare creează atât pericole de siguranță, cât și nerespectarea normelor privind emisiile.
- Componente ale sistemului de alimentare cu combustibil: Rezervoarele, gurile de umplere și conductele de combustibil necesită suduri etanșe, fără porozitate. Consecințele unui eșec aici nu necesită explicații.
Ce diferențiază execuția industrială auto de lucrările generale de tablă? Certificări precum IATF 16949 stabilesc sisteme de management al calității specifice lanțurilor de aprovizionare auto. Aceste standarde impun proceduri de sudare documentate, sudori certificați, control statistic al proceselor și protocoale riguroase de inspecție. O operațiune de prelucrare a tablei și sudare de calitate, care deservește clienți auto, asigură urmărirea materiei prime până la componenta finită.
Utilizări HVAC și în construcții
Parcurgeți orice clădire comercială și veți fi înconjurat de piese din tablă subțire — majoritatea fiind ascunse deasupra plăcilor de tavan sau în spatele pereților. Instalațiile de ventilare reprezintă una dintre cele mai mari aplicații pentru sudura pieselor din tablă subțire în domeniul comercial, iar cerințele de calitate aici influențează direct performanța și siguranța clădirii.
Potrivit specialiștilor în fabricarea instalațiilor de ventilare, stabilitatea, fiabilitatea și succesul unui sistem de ventilare depind de sistemul de susținere care îl menține în poziție. Dacă o parte din sistemul de susținere eșuează, integritatea structurală a întregului sistem de ventilare ar putea fi în pericol.
Aplicații HVAC și de construcții includ:
- Instalații dreptunghiulare și rotunde: Sistemele de distribuție a aerului trebuie să-și păstreze integritatea în condiții de presiune pozitivă și negativă. Sudurile defectuoase duc la scurgeri de aer care irosesc energie și compromit controlul climatic.
- Sisteme de evacuare industrială: Canalizațiile care manipulează praf, fum sau aer la temperatură înaltă sunt supuse unor stresuri extreme. Îmbinările trebuie să reziste la coroziune, să suporte ciclurile de căldură și să mențină integritatea etanșării timp de ani întregi.
- Arhitecturală metal: Balustradele, panourile decorative, capacele de stâlp și elementele de fațadă necesită suduri care să respecte atât standardele structurale, cât și cele estetice. Sudurile vizibile trebuie rectificate și finisate conform specificațiilor arhitecturale.
- Învelitori și jgheaburi: Panourile de tablă pentru acoperișuri, jgheaburile și elementele de impermeabilizare trebuie să reziste expunerii la intemperii fără a ceda la nivelul îmbinărilor. O cusătură defectă înseamnă infiltrarea apei și deteriorarea clădirii.
- Suporturi structurale: Structurile din oțel, grinzi de susținere, plăci de conexiune necesită suduri cu pătrundere completă, conforme cu specificațiile ingineriei structurale. Inspecții clădirii verifică calitatea sudurilor înainte de eliberarea autorizațiilor de ocupare.
Consecințele sudurii necorespunzătoare a sistemelor HVAC merg dincolo de defectele imediate. Sistemele de canalizații funcționează în condiții de stres constant datorită presiunii aerului, dilatării termice și greutății acumulate din pricina depunerii de praf. În zonele cu ninsoare abundentă, conductele exterioare trebuie să suporte, de asemenea, încărcătura dată de zăpadă, uneori subestimată de proiectanți. O planificare deficitară, configurații inadecvate și sudură de calitate îndoielnică pot contribui toate la dezastrul instalației de ventilare — de la scurgeri mici de aer până la prăbușirea completă a sistemului, provocând opriri ale producției și riscuri pentru siguranță.
Echipamente de Fabricare și Industriale
Echipamentele industriale funcționează în medii care ar distruge produsele pentru consumatori în câteva zile. Vibrațiile constante, temperaturile extreme, substanțele chimice corozive și sarcinile mari necesită o calitate a execuției care să reziste ani întregi de funcționare continuă. Aici aplicațiile industriale de sudură a tablelor metalice își dovedesc cu adevărat valoarea.
Conform specialiști în fabricație industrială , prelucrarea tablelor metalice produce piese excepțional de puternice, durabile și rezistente la deteriorare, chiar și în condițiile unui utilizări continue. Această rezistență și durabilitate se traduc prin defecte mai puține, timp mort redus și costuri mai mici pe termen lung pentru producători.
Principalele aplicații industriale includ:
- Carcase și învelișuri pentru mașini: Protejează componentele electrice, hidraulicele și părțile mobile de contaminarea mediului înconjurător, oferind totodată acces operatorului pentru întreținere. Aceste ansambluri necesită adesea protecție EMI/RFI și clasificări de protecție împotriva pătrunderii substanțelor străine.
- Componente ale sistemelor de transportor: Buncăre, jgheaburi, protecții și suporturi structurale care manipulează materiale în vrac. Sudurile trebuie să reziste uzurii abrasive și solicitărilor la impact, menținând totodată precizia dimensională pentru o curgere corespunzătoare a materialului.
- Suporturi structurale și cadre: Cadre de bază, structuri portal și elemente de montare care poziționează cu precizie echipamente grele. Calitatea sudurilor influențează atât siguranța, cât și precizia operațională.
- Rezervoare și bazine: Vase de stocare și procesare pentru lichide, gaze și produse în vrac. Construcția etanșă la scurgeri și rezistența la coroziune sunt cerințe obligatorii.
- Protectii și bariere de siguranță: Protecție fizică pentru operatorii care lucrează în apropierea mașinilor periculoase. Aceste componente trebuie să-și păstreze integritatea în cazul solicitărilor prin șoc pentru a-și îndeplini funcția de protecție.
- Ventilație și colectare a prafului: Conducte și carcase de colector care manipulează particule abrazive, vapori corosivi sau praf exploziv. Integritatea sudurilor afectează atât performanța sistemului, cât și siguranța muncitorilor.
- Panouri de comandă și carcase electrice: Carcase din tablă prelucrată cu precizie pentru protejarea electronicii sensibile. Acestea necesită suduri curate, toleranțe strânse și adesea finisaje speciale pentru gestionarea termică.
Ce face ca fabricarea echipamentelor industriale să fie deosebit de solicitantă? Cerințele de scalabilitate amplifică provocările legate de calitate. Producătorii trebuie să treacă rapid de la dezvoltarea prototipurilor la serii mici și apoi la producție de mare volum. Un proces eficient de prelucrare a tablelor metalice facilitează aceste tranziții, dar doar dacă calitatea rămâne constantă la orice nivel de producție.
Cerința de compatibilitate cu toleranțe strânse adaugă un alt nivel de complexitate. Chiar și abaterile minore afectează performanța, siguranța și eficiența. Tehnicile moderne de fabricație, cum ar fi tăierea cu laser, sudura robotică și formarea CNC, ajută la îndeplinirea specificațiilor exacte — dar doar atunci când procedeele de sudură corespund preciziei proceselor amonte.
În toate aceste industrii, un principiu rămâne constant: cerințele de calitate trebuie să corespundă cerințelor aplicației. O panou decorativ poate tolera mici imperfecțiuni ale sudurii ascunse de finisare. Un recipient sub presiune nu poate. Înțelegerea poziției proiectului dumneavoastră pe această scală vă ajută să specificați niveluri adecvate de calitate și să evaluați eficient partenerii de fabricație. Următorul pas? Aflarea standardelor specifice și a criteriilor de inspecție care definesc o lucrare profesională.

Standarde de calitate și criterii de inspecție pentru rezultate profesionale
Ați văzut cum variază cerințele de calitate în domeniile auto, HVAC și aplicațiile industriale. Dar iată întrebarea cu adevărat importantă: cum verificați efectiv dacă o sudură îndeplinește acele cerințe? Indiferent dacă inspectați propriul lucru sau evaluați capacitățile unui partener de fabricație, înțelegerea standardelor de calitate pentru sudura tablelor metalice transformă opiniile subiective în evaluări obiective.
Firmații profesioniști nu presupun calitatea — o măsoară. De la examinarea vizuală la testarea sofisticată nedistructivă, inspecția sistematică separă componentele fiabile de bombele cu ceas. Să explorăm criteriile și metodele care definesc sudura profesională a tablelor metalice.
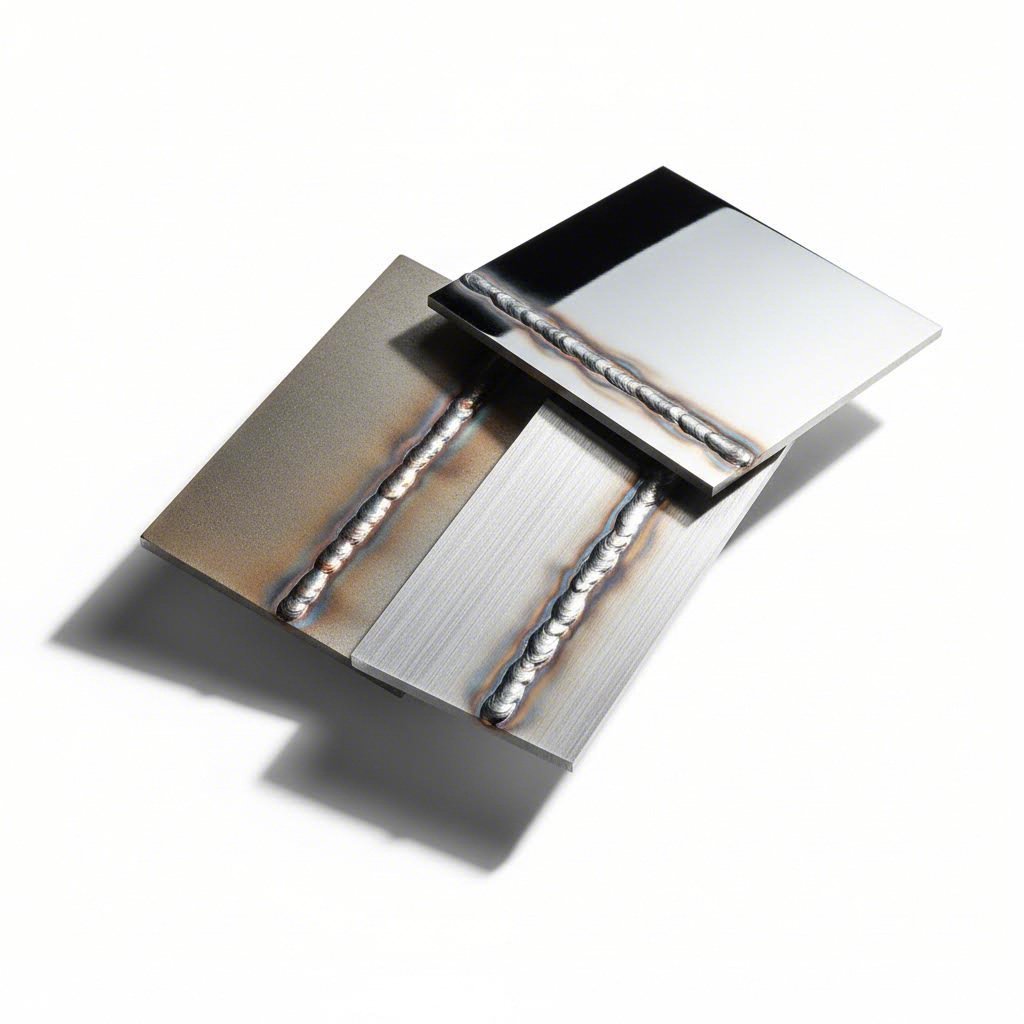
Criterii de inspecție vizuală pentru calitatea sudurii
Inspecția vizuală rămâne prima și cea mai fundamentală verificare a calității în orice operațiune de sudare. Conform specialiștilor în calitatea sudurii , un inspector calificat examinează suprafața sudurii cu ochiul liber sau cu instrumente de mărire pentru a identifica defectele vizuale — probleme care depășesc criteriile de acceptare vizuală.
Ce ar trebui să căutați? Inspectorii experimentați evaluează simultan mai multe caracteristici:
- Consistența cordoanelor: Lățime, înălțime și model de ondulație uniforme indică condiții stabile ale arcului și viteză de avansare corespunzătoare. Cordoane neregulate sugerează o tehnică inconsistentă sau probleme ale echipamentului.
- Subtăiere: O adâncitură topită în metalul de bază lângă muchia sudurii. Subtăierea excesivă creează concentrații de tensiune care pot iniția fisurarea sub sarcină.
- Suprapunere: Metal de sudură care se extinde dincolo de muchia sudurii fără o fuziune corespunzătoare la metalul de bază. Această suprapunere rece creează un efect de crestătură care slăbește îmbinarea.
- Stropi: Particule de metal depuse în afara zonei de sudură. Deși reprezintă în principal o problemă estetică, stropii excesivi indică probleme de parametri care pot afecta calitatea sudurii.
- Porozitatea: Bule vizibile de gaz pe suprafața sudurii. Porozitatea de suprafață indică adesea o contaminare mai gravă sub nivelul suprafeței.
- Crăpături: Orice fisură vizibilă — fie în metalul de sudură, zona afectată termic sau materialul de bază — reprezintă un respingere imediată.
- Fuziune incompletă: Goluri vizibile acolo unde metalul de sudură nu s-a legat complet de materialul de bază sau de trecerile anterioare.
Inspecțiile vizuale au loc de obicei în trei faze. Inspecția prealabilă sudurii verifică pregătirea îmbinării, curățenia și potrivirea. Inspecția în timpul sudurii monitorizează tehnica, temperatura între treceri și eventualele probleme care apar. Inspecția post-sudare evaluează îmbinarea finalizată în raport cu criteriile de acceptare înainte ca componenta să treacă la operațiunile ulterioare.
Următorul tabel rezumă fișa de criterii de inspecție a sudurii pe care specialiștii în tablă folosesc pentru a deosebi lucrările acceptabile de defectele respingătoare:
| Criterii de inspecție | Parametri acceptabili | Parametri neacceptabili |
|---|---|---|
| Lățimea cordoanelui | Uniformă în limitele ±1/16" pe lungimea sudurii | Variație care depășește ±1/8" sau aspect inconstant |
| Înălțimea cordoanelui (supraplin) | 1/32" până la 1/8" deasupra suprafeței metalului de bază | La nivel sau concav (insuficient); depășește 1/8" (excesiv) |
| Adâncimea subțierea | Mai puțin de 1/32" pentru aplicații necritice; mai puțin de 1/64" pentru aplicații structurale | Depășește 1/32" sau orice subțiere pe aplicații critice |
| Suprapunere | Niciuna permisă | Orice metal de sudură care se extinde dincolo de margine fără fuziune |
| Porozitatea suprafeței | Porozități împrăștiate, diametru mai mic de 1/16"; mai puțin de 1 por la inch | Porozitate în grup; pori mai mari de 1/16"; mai mult de 1 por la inch |
| Stropire | Minimală, ușor de îndepărtat | Acumulare abundentă care afectează aspectul sau funcționalitatea |
| Crăpături | Niciuna permisă | Orice crăpătură, indiferent de mărime sau locație |
| Precizie dimensională | În limitele toleranțelor desenate (în mod tipic ±1/16" pentru execuția generală) | Depășește toleranțele specificate; împiedică asamblarea corectă |
Iluminatul corespunzător în timpul inspecției este esențial pentru a evita identificarea greșită sau omiterea unor probleme. Multe defecte care par invizibile sub lumina fluorescentă de la tavan devin evidente atunci când sunt examinate cu o iluminare oblică, care creează umbre în neregularitățile suprafeței.
Certificări industriale care garantează standardele
Inspecia vizuală vă arată cum arată o sudură — dar cum știți dacă un fabricant produce în mod constant lucrări de calitate? Aici intervin standardele AWS de certificare a sudurii și credențialele specifice industriei, care devin semnale esențiale de credibilitate.
Conform Societății Americane de Sudură, AWS oferă ghiduri, specificații și certificări care ajută la standardizarea practicilor și asigurarea calității în industria sudurii. Aceste standarde sunt recunoscute și adoptate la nivel global, ceea ce dovedește relevanța și rigoarea lor în abordarea problemelor de siguranță și calitate.
Certificările și standardele principale includ:
- AWS D1.1/D1.1M (Codul de sudare structurală – Oțel): Unul dintre cele mai cuprinzătoare standarde disponibile, care detaliază cerințele pentru sudarea structurilor din oțel, inclusiv secțiuni ample privind inspecția și examinarea neconformă. Acest cod specifică atunci când trebuie utilizate diferite metode de testare și definește criteriile de acceptare pentru diverse aplicații.
- AWS D1.5M/D1.5 (Codul de sudare pentru poduri): Se aplică în mod special sudării podurilor, evidențiind metode particulare de examinare neconformă pentru a asigura siguranța și durabilitatea sudurilor la poduri. Consecințele defectării sudurilor la poduri fac ca acesta să fie unul dintre cele mai riguroase coduri de sudare.
- AWS B1.10M/B1.10 (Ghid pentru examinarea neconformă a sudurilor): Oferă o prezentare generală a metodelor comune de examinare și ajută la deciderea metodei care este în general cea mai potrivită pentru examinarea unui anumit tip de sudură.
- IATF 16949 (Managementul calității în industria auto): Standardul internațional pentru sistemele de management al calității în industria auto. Producătorii care deservesc lanțurile de aprovizionare auto trebuie să dețină această certificare, care presupune proceduri de sudare documentate, control statistic al proceselor și o urmărire completă.
- ASME Secțiunea IX (Calificări pentru sudare și lipire): Reglementează fabricarea recipientelor sub presiune și conductelor. Specificațiile procedurilor de sudare (WPS) și calificările de performanță ale sudorilor (WPQ) trebuie să respecte aceste cerințe pentru recipiente cu marcaj de conformitate.
- ISO 3834 (Cerințe de calitate pentru sudarea prin topire): Standard internațional care stabilește cerințe de calitate pentru operațiunile de sudare, acoperind toate aspectele, de la analiza proiectului până la inspecția finală.
Ce înseamnă de fapt aceste certificate pentru dumneavoastră? Un producător care deține certificate relevante a demonstrat că procedurile sale de sudură oferă rezultate constante, sudorii săi posedă abilități verificate, iar sistemele sale de calitate detectează problemele înainte ca produsele să părăsească instalația. Când evaluați parteneri potențiali, întrebați în mod specific ce certificate mențin și solicitați copii ale documentației relevante.
Metode de testare pentru aplicații critice
Inspecția vizuală și certificatele stabilesc un nivel de bază al calității — dar aplicațiile critice necesită verificarea dincolo de ceea ce poate fi văzut cu ochiul liber. Testarea profesională a sudurilor din tablă se împarte în două categorii: testarea neconformă (NDT), care evaluează sudurile fără a le deteriora, și testarea distructivă (DT), care distruge eșantioanele pentru a înțelege comportamentul materialului.
Metode de testare nedestructivă
Testarea NDT oferă o modalitate de a evalua proprietățile unui material sau ale unei structuri fără a provoca deteriorări, fiind astfel o parte indispensabilă a asigurării calității sudurilor. Conform Documentație privind standardele AWS , principalele metode NDT includ Testarea Vizuală (VT), Testarea Ultrasonică (UT), Testarea prin Particule Magnetice (MT), Testarea Radiografică (RT) și Testarea cu Lichid Penetrant (PT).
- Testarea Ultrasonoră (UT): Utilizează unde sonore de înaltă frecvență pentru a detecta defecte sau neregularități în interiorul unei suduri. Când o undă sonoră întâlnește un defect, o parte din energie se reflectă înapoi către sondă, dezvăluind locația precisă a discontinuităților interne. Această metodă portabilă oferă rezultate imediate și identifică în mod constant crăpături ascunse, goluri și lipire necorespunzătoare.
- Testarea cu particule magnetice (MT): Excelentă pentru identificarea defectelor de suprafață și aproape de suprafață în metalele feromagnetice. Inspectorul aplică particule feromagnetice fine și creează un câmp magnetic în jurul sudurii. Discontinuitățile care apar la suprafață atrag particulele, făcând defectele vizibile. Rezultatele sunt imediate, permițând sudorilor să corecteze problemele pe loc.
- Testarea cu lichid penetrant (PT): Utilizează o soluție colorantă lichidă sau fluorescentă pentru a detecta discontinuități de suprafață, cum ar fi fisuri fine și microfisuri. După aplicarea penetrantului, un dezvoltator extrage colorantul din eventualele fisuri, făcându-le vizibile prin contrast de culoare. Rezultatele apar în 10-15 minute.
- Testarea radiografică (RT): Utilizează raze X sau raze gamma pentru a afișa structura internă a sudurii pe film fotografic. Oferă imagini detaliate ale defectelor interne, cum ar fi fisuri, porozitate și incluziuni. Este ideal pentru sudurile de țevi, unde este necesară o examinare volumetrică completă. Necessită măsuri stricte de siguranță din cauza expunerii la radiații.
Metode de testare distructive
Testarea distructivă califică procedeele de sudare și verifică abilitățile sudorilor prin testarea până la rupere a eșantioanelor. Conform specialiștilor în testarea sudurilor, metodele DT sunt adesea mai accesibile decât testările nedistructive, oferind informații detaliate și o interpretare simplă a rezultatelor.
- Testarea la tracțiune: Plasează o secțiune de sudură de test într-o mașină specializată de testare care exercită o forță de tracțiune până când eșantionul se rupe. Mașina generează o curbă efort-deformație care arată limita de curgere, rezistența la tracțiune maximă și comportamentul la rupere. Aceasta vă indică exact ce încărcare poate suporta o îmbinare sudată.
- Test de îndoire: Evaluează rezistența și ductilitatea sudurii atunci când este supusă unor forțe de încovoiere. Testele de îndoire dirijată forțează eșantionul să se îndoaie în jurul unui anumit rază, dezvăluind lipsa de fuziune, porozitate sau fisuri care altfel nu ar fi vizibile. Îndoirile la rădăcină și îndoirile la față analizează zone diferite ale sudurii.
- Testare la Șoc: Evaluează capacitatea unei suduri de a absorbi energie în condiții de încărcare bruscă. Testele de impact Charpy sau Izod determină tenacitatea, în special la temperaturi joase unde materialele devin casante. Esențial pentru componentele care funcționează în medii reci.
Ce metodă de testare ar trebui să specificați? Răspunsul depinde de importanța aplicației dvs., tipul defectelor cel mai probabil să apară și de cerințele codurilor aplicabile. O sudură structurală într-un recipient sub presiune necesită examinare radiografică sau ultrasonică. O balustradă decorativă are nevoie doar de o inspecție vizuală. Potriviți gradul de rigurozitate a testării riscului real — testarea excesivă duce la irosirea banilor, în timp ce testarea insuficientă creează risc de răspundere.
Cunoașterea acestor standarde de calitate și metode de testare vă permite să specificați cerințe adecvate și să evaluați dacă furnizorii pot livra într-adevăr calitatea promisă. Dar cunoașterea a ceea ce trebuie căutat este doar începutul. Următoarea decizie este dacă să vă ocupați personal de proiect sau să angajați servicii profesionale de fabricație.
Alegerea dintre proiecte DIY și servicii profesionale de fabricație
Ați învățat tehnicile, ați înțeles cerințele privind materialele și ați stăpânit identificarea defectelor. Acum apare întrebarea practică: ar trebui să vă asumați personal proiectul de sudură pentru tablă sau să îl încredințați profesioniștilor? Această decizie implică mai mult decât o simplă comparare a costurilor — necesită o evaluare sinceră a abilităților dumneavoastră, a echipamentelor și a consecințelor unei eventuale greșeli.
Conform analiză cost-beneficiu sudură cercetare , deși sudura făcută de sine stătător poate fi potrivită pentru proiecte mai mici sau mai puțin critice, serviciile profesionale de sudură oferă un raport calitate-preț prin asigurarea fiabilității, durabilității și siguranței în cazul lucrărilor mai complexe sau structurale. Să analizăm factorii care ar trebui să vă ghideze decizia.
Evaluarea complexității și cerințelor proiectului dumneavoastră
Înainte de a alege între serviciile DIY și cele profesionale de prelucrare a tablelor, faceți un inventar sincer al ceea ce necesită cu adevărat proiectul dumneavoastră. Ideea romantică de a realiza totul singur se estompează rapid atunci când vă aflați în fața unor panouri deformate sau a sudurilor crăpate care necesită o refacere completă.
Luați în considerare acești factori critici de evaluare:
Grosimea și tipul materialului
Materialele subțiri cu grosime sub calibrul 18 necesită un control precis al temperaturii pe care echipamentele de nivel inițial nu pot oferi adesea. Aluminiul și oțelul inoxidabil adaugă o complexitate care crește exponențial fără formarea adecvată. Dacă proiectul dumneavoastră implică aliaje exotice sau materiale mai subțiri decât calibrul 20, echipamentele și expertiza profesională devin aproape esențiale.
Cerințe de precizie
Cât de strânse sunt toleranțele dvs.? Un proiect decorativ de grădină acceptă variații de 1/8 inch, care ar face un carcas industrial imposibil de utilizat. Componentele care trebuie să interacționeze cu alte ansambluri — în special în aplicații auto sau mecanice — necesită precizia dimensională oferită de echipamentele CNC și dispozitivele calibrate.
Volum și reproductibilitate
Realizarea unui suport personalizat este fundamental diferită de producerea a cincizeci de exemplare identice. Abordările DIY funcționează pentru piese unice, dar lansarea în producție necesită șabloane, dispozitive și controale ale procesului pe care majoritatea atelierelor casnice nu le au. Timpul investit în pregătire depășește adesea costul fabricației profesionale pentru cantități mai mari de câteva bucăți.
Cerințe privind certificarea și conformitatea
Necesită aplicația dvs. suduri certificate? Recipiente sub presiune, componente structurale și piese auto necesită adesea proceduri de sudare documentate și sudori calificați. Nicio abilitate nu poate compensa lipsa documentației atunci când apar inspecții sau întrebări legate de răspundere.
Realitatea investiției în echipamente
Echipamentele de sudură de calitate costă mii de dolari — și acesta este prețul înainte de adăugarea sculelor de tăiere, a echipamentelor de formare, a dispozitivelor și a utilajelor de finisare. Conform analizei sudurii DIY, costurile ascunse, cum ar fi achiziționarea echipamentului, materialelor și potențialele cheltuieli mai mari pe termen lung datorate întreținerii, reparațiilor sau refacerii lucrărilor, depășesc adesea estimările inițiale.
Utilizați această schemă decizională pentru a evalua situația dumneavoastră:
- Alegeți varianta DIY atunci când: Proiectele nu sunt critice, toleranțele sunt generoase, aveți echipament adecvat, volumul este redus, experiența de învățare este importantă și nu sunt necesare certificate
- Alegeți serviciile profesionale atunci când: Integritatea structurală este esențială, sunt specificate toleranțe strânse, cantitățile de producție depășesc capacitatea dumneavoastră, certificatele sunt obligatorii, există presiuni legate de termene sau sunt implicate materiale specializate
- Luați în considerare abordările hibride atunci când: Puteți gestiona pregătirea și finisarea, în timp ce externalizați sudura critică, sau atunci când prototipurile necesită validare profesională înainte de producția DIY
Ce trebuie să căutați într-un partener profesionist de prelucrare a metalelor
Odată ce ați stabilit că serviciile profesionale de sudură a tablelor metalice sunt potrivite pentru proiectul dumneavoastră, următoarea provocare este selectarea partenerului potrivit. Potrivit specialiștilor în selecția furnizorilor de prelucrări metalice, deși un preț scăzut poate atrage atenția, valoarea reală constă în capacitățile fabricantului, fiabilitatea acestuia și abilitatea de a îndeplini cerințele proiectului dumneavoastră de la început până la sfârșit.
Evaluați candidații potențiali pentru parteneriatul de prelucrare personalizată a metalelor în funcție de aceste criterii:
- Capacități Tehnice: Verificați dacă dispun de echipamente adecvate — mașini CNC, tăietoare cu laser, presă cu frână, și sisteme de sudură corespunzătoare materialului și cerințelor de precizie
- Experțise în Materiale: Nu toate atelierele lucrează cu toate metalele. Verificați specializarea în materialele dumneavoastră specifice, fie că este vorba de tablă, oțel inoxidabil, aluminiu sau aliaje speciale
- Certificări relevante: Solicitați documente privind certificările, cum ar fi IATF 16949 pentru industria auto, calificări AWS pentru sudură structurală sau standarde ISO pentru managementul calității
- Flexibilitatea producției: Evaluați dacă pot gestiona volumul necesar — fie că este vorba de prototipuri, serii mici sau producție în mare volum
- Sprijin în design: Căutați capabilități de proiectare pentru fabricație (DFM) care să optimizeze proiectele dumneavoastră în vederea eficienței producției și reducerii costurilor
- Viteză de prototipare: Capacitățile de prototipare rapidă accelerează ciclurile de dezvoltare, permițându-vă să validați proiectele înainte de a investi în utilaje pentru producție
- Calitatea comunicării: Un manager de proiect competent ar trebui să vă ghideze prin procesul de fabricație cu încredere și claritate
- Istoricul colaborărilor: Solicitați recomandări, revizuiți studii de caz și examinați mostre de lucru relevante pentru aplicația dumneavoastră
Pentru aplicații auto în special, partenerii care oferă managementul calității certificat conform IATF 16949 demonstrează angajamentul față de standardele riguroase cerute de lanțurile de aprovizionare din industria auto. Companii precum Shaoyi (Ningbo) Metal Technology exemplifică această abordare, combinând capabilități de prototipare rapidă cu producție automatizată în masă pentru șasiuri, suspensii și componente structurale. Timpul lor de 5 zile pentru prototipare și sprijinul complet DFM ilustrează modul în care partenerii profesioniști accelerează proiectele, nu doar le execută.
Partenerul potrivit în fabricație devine o extensie a echipei dvs. de inginerie — detectând problemele de design din timp, sugerând variante care reduc costurile și livrând componente gata de asamblare. Această valoare depășește cu mult o simplă comparație de preț între încercările făcute în regim DIY și ofertele profesionale.
Indiferent dacă alegeți varianta DIY pentru proiecte educaționale și reparații simple sau apelați la specialiști pentru aplicații critice, cunoștințele acumulate despre foaia metalică de calitate și principiile fundamentale ale sudurii vă permit să luați decizii mai bune. Înțelegerea cum arată excelența — și ce este necesar pentru a o atinge — vă poziționează pentru succes, indiferent de drumul ales.
Atinsul excelenței în proiectele dvs. de sudură din tablă
Ați parcurs acum întregul spectru al calității în domeniul tablelor și sudurii — de la principiile fundamentale până la tehnici avansate de diagnosticare. Dar cunoașterea fără acțiune nu produce nimic. Întrebarea reală este: cum veți aplica aceste informații în următorul dvs. proiect?
Indiferent dacă planificați un proiect de fabricație în weekend sau evaluați furnizori pentru componente de producție, principiile rămân constante. Să condensăm totul în recomandări practice care generează rezultate reale.
Principalele concluzii pentru următorul dvs. proiect cu tablă
Fiecare proiect de sudură cu tablă de succes are elemente comune. Potrivit profesioniștilor experimentați în fabricație , proiectele de sudură reușesc sau eșuează înainte de a trasa primul arc. Un plan inteligent răspunde din start la întrebări esențiale, prevenind refacerile costisitoare care afectează fabricanții nepregătiți.
Iată ghidul dvs. de planificare a proiectului cu tablă, sintetizat din tot ce am acoperit:
- Potrivește tehnica la aplicație: TIG pentru precizie și estetică, MIG pentru viteza producției, sudura punctată pentru îmbinări suprapuse în serie. Metoda greșită irosește timpul și compromite rezultatele.
- Respectă diferențele materialelor: Oțelul moale îți permite greșeli; aluminiul și oțelul inoxidabil nu. Ajustează parametrii, alegerea materialului de adaos și gestionarea căldurii pentru fiecare tip de material.
- Nu sări niciodată peste pregătire: Suprafețele curate, asamblarea corectă și configurația potrivită a îmbinărilor previn 90% dintre defectele de sudură. Grăbeala în acest pas asigură reparații ulterioare.
- Controlează agresiv căldura: Deformările, arderea prin și deteriorarea metalurgică provin toate din aportul excesiv de căldură. Folosește amperajul minim care asigură o fuziune corespunzătoare.
- Examinează sistematic: Examinarea vizuală detectează probleme evidente; înțelege când aplicația ta necesită metode de testare mai riguroase.
- Cunoaște-ți limitele: Proiectele complexe, toleranțele strânse și cerințele de certificare justifică adesea serviciile profesionale de fabricație în locul încercărilor DIY.
Calitatea în sudura de tablă nu este o singură decizie — este rezultatul acumulării alegerilor corecte la fiecare pas, de la selecția materialului până la inspecția finală. Tăiați colțuri oriunde, și slăbiciunea se va dezvălui în cele din urmă.
Parteneriat pentru succes în fabricația precisă de metal
Nu toate proiectele își au locul în atelierul casei. Atunci când contează integritatea structurală, toleranțele se strâng sau volumele depășesc capacitatea dumneavoastră, partenerii profesioniști de fabricație oferă un avantaj care depășește cu mult costul lor. Excelența în fabricația precisă de metal de care aveți nevoie există — trebuie doar să găsiți partenerul potrivit.
Potrivit specialiștilor în fabricație precisă, obținerea unei înalte precizii în fabricarea tablelor metalice necesită implementarea celor mai bune practici și utilizarea tehnologiilor avansate pentru a asigura faptul că fiecare proiect respectă cele mai înalte standarde de acuratețe și calitate.
Pentru aplicații auto care necesită calitate certificată conform IATF 16949, parteneri precum Shaoyi (Ningbo) Metal Technology demonstrează cum arată capacitățile profesionale în practică. Livrarea ofertelor în 12 ore accelerează luarea deciziilor, iar prototiparea rapidă în 5 zile validează proiectele înainte de angajamentul pentru producție. De la componente ale șasiului la ansambluri structurale, sprijinul DFM complet optimizează atât posibilitățile de fabricație, cât și costurile.
Indiferent ce cale alegeți — stăpânirea lucrului făcut de sine stătător sau parteneriatul profesional — rezultatele de calitate în sudură și cele mai bune practici rămân constante. Planificați temeinic, executați cu precizie, verificați riguros. Proiectele dvs. din tablă laminată nu merită mai puțin.
Întrebări frecvente despre calitatea tablei laminate și sudură
1. Ce definește calitatea în prelucrarea tablei laminate și în sudură?
Tablele metalice de calitate și sudura cuprind patru elemente esențiale: alegerea corectă a materialelor, cu certificate verificate și traseabilitate, tăierea și formarea precisă utilizând tehnici avansate precum laserul sau perforarea CNC, pătrunderea constantă a sudurii cu aspect uniform al cordoanelor și absența defectelor, precum și finisarea profesională prin pudră termoreactivă sau electroplacare. Un producător renumit menține proceduri documentate de sudare, sudori certificați și protocoale riguroase de inspecție. Elementul cheie de diferențiere este faptul că fiecare etapă se bazează pe cea anterioară — oțelul premium fabricat necorespunzător duce la rezultate substandard, indiferent de calitatea materialului.
2. Care sunt principalele tipuri de tehnici de sudare a tablelor metalice?
Cele trei tehnici principale de sudură pentru tablă sunt TIG, MIG și sudura punctuală. Sudura TIG (GTAW) oferă un control superior al căldurii și cusături curate, fără stropi, ideale pentru materiale subțiri și aplicații estetice precum componentele aeronautice sau medicale. Sudura MIG (GMAW) asigură viteze mai mari de producție și o învățare mai ușoară, fiind perfectă pentru industria auto și fabricația generală. Sudura punctuală utilizează rezistența pentru a uni foi suprapuse fără material de adaos, excelând în producția de serie mare, cum ar fi asamblarea carcaselor electrocasnice sau a panourilor de caroserie auto. Alegerea tehnicii potrivite depinde de grosimea materialului, cerințele de precizie și volumul de producție.
3. Cum preveniți răsucirea și deformarea la sudarea tablelor subțiri?
Prevenirea deformărilor în tablele subțiri necesită o gestionare strategică a căldurii. Utilizați suduri intermitente în loc de cordoane continue pentru a reduce metalul de sudură cu până la 75%. Aplicați tehnica de sudare backstep prin sudarea segmentelor de la dreapta la stânga, în timp ce avansați în general de la stânga la dreapta. Echilibrați sudurile în jurul axului neutru prin alternarea părților. Presetați piesele înainte de sudare pentru a permite contracției să le aducă în aliniament corect. Utilizați dispozitive răcite cu apă echipate cu tuburi din cupru pentru a extrage căldura rapid. Cel mai important, evitați suprasudarea — sudurile de dimensiune corespunzătoare minimizează forțele de contracție fără a compromite rezistența îmbinării.
4. Ce certificate ar trebui să caut la un partener profesionist de prelucrare a tablelor subțiri?
Certificările importante indică angajamentul unui fabricant față de standardele de calitate. Certificarea IATF 16949 este esențială pentru lanțurile de aprovizionare din industria auto, necesitând proceduri documentate și control statistic al proceselor. AWS D1.1 acoperă sudura oțelului structural cu cerințe cuprinzătoare de inspecție. ASME Secțiunea IX reglementează fabricarea recipientelor sub presiune prin protocoale stricte de calificare a sudorilor. ISO 3834 oferă cerințe internaționale de calitate pentru operațiunile de sudură prin topire. Parteneri precum Shaoyi (Ningbo) Metal Technology demonstrează capabilități certificate IATF 16949, cu prototipare rapidă și asistență DFM, asigurând componente care respectă standardele riguroase ale industriei auto pentru aplicații de șasiu și structurale.
5. Când ar trebui să aleg servicii profesionale de fabricație în locul sudurii DIY?
Alegeți serviciile profesionale atunci când integritatea structurală este esențială, sunt specificate toleranțe strânse, cantitățile de producție depășesc capacitatea dumneavoastră, certificările sunt obligatorii sau sunt implicate materiale specializate precum aluminiul sau oțelul inoxidabil. Realizează-ți singur este o opțiune rezonabilă pentru proiecte necritice cu toleranțe generoase, volume mici și atunci când contează experiența de învățare. Luați în considerare faptul că echipamentele de sudură de calitate costă mii de dolari, iar costurile ascunse datorate întreținerii, reparațiilor sau refacerii lucrărilor depășesc adesea ofertele profesioniștilor. Pentru aplicații auto care necesită certificare IATF 16949, partenerii profesionali care oferă răspuns la ofertă în 12 ore și prototipare rapidă în 5 zile livrează un plus de valoare care depășește cu mult comparațiile simple de preț.