 Małe partie, wysokie standardy. Nasza usługa szybkiego prototypowania sprawia, że weryfikacja jest szybsza i łatwiejsza —

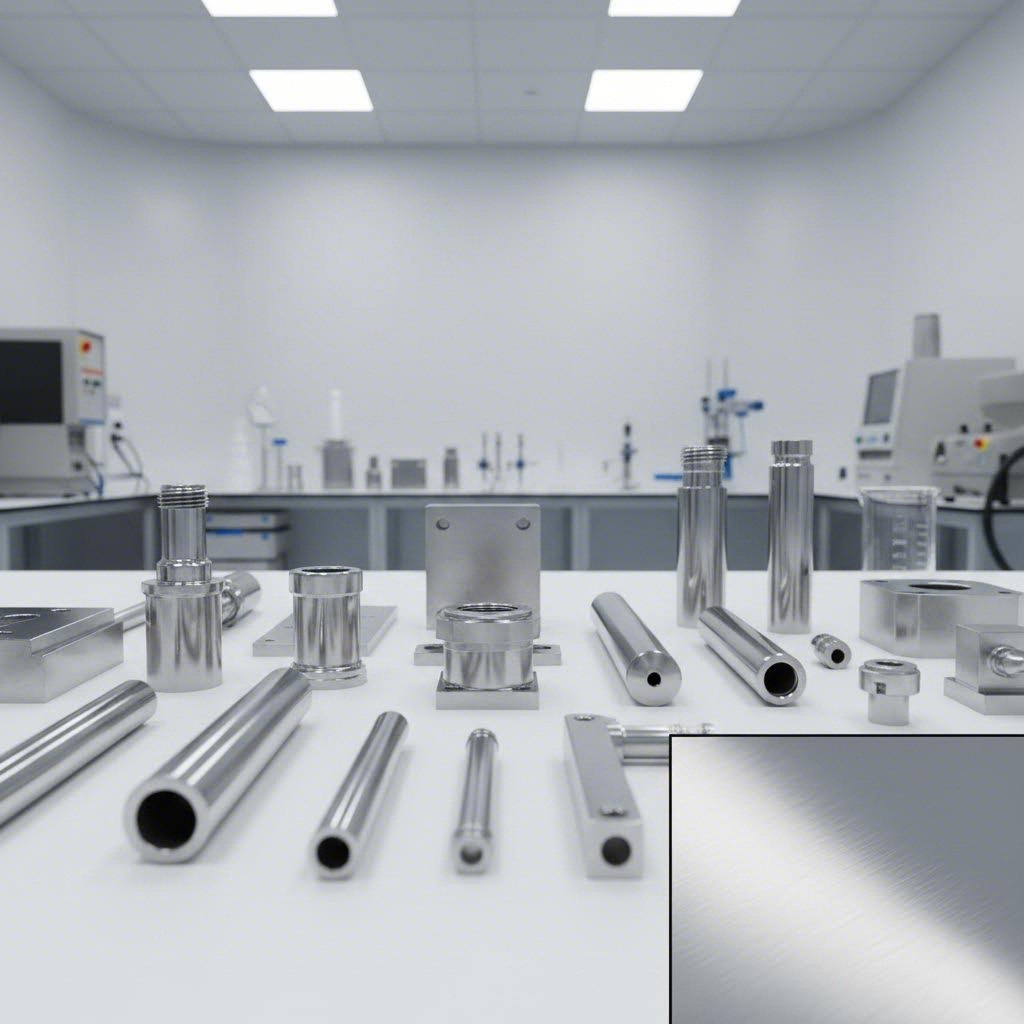
Wykonywanie blach ze stali nierdzewnej: od wyboru gatunku po bezbłędny wykończenie
Wykonywanie blach ze stali nierdzewnej: od wyboru gatunku po bezbłędny wykończenie
Zrozumienie podstaw obróbki blach ze stali nierdzewnej
Czy kiedykolwiek zastanawiałeś się, dlaczego obróbka stali nierdzewnej wymaga zupełnie innego podejścia niż praca ze stalą konstrukcyjną lub aluminium? Odpowiedź tkwi w unikalnych właściwościach tego materiału, które czynią go jednocześnie niezwykle wartościowym i wyraźnie trudnym w użyciu.
Obróbka blach ze stali nierdzewnej to proces przekształcania płaskich arkuszy stali nierdzewnej w funkcjonalne elementy poprzez serię kontrolowanych operacji — cięcie, kształtowanie, łączenie i wykańczanie. W przeciwieństwie do prostego formowania materiału, ta specjalistyczna dziedzina wymaga precyzyjnego doboru technik, starannie dostrojonych ustawień sprzętu oraz głębokiej wiedzy na temat zachowania materiału pod wpływem naprężeń.
Co odróżnia stal nierdzewną od innych materiałów stosowanych w obróbce
Gdy porównuje się blachę ze stali nierdzewnej do jej odpowiednika ze stali konstrukcyjnej, różnice stają się od razu widoczne na hali produkcyjnej. Podczas gdy stal konstrukcyjna zawiera około 0,25 procent węgla i charakteryzuje się doskonałą kowalnością, stal nierdzewna zawiera co najmniej 10,5 procent chromu. Chrom ten tworzy warstwę tlenkową samonaprawiającą się, która zapewnia niezrównaną odporność na korozję — ale jednocześnie fundamentalnie zmienia sposób, w jaki wykonawcy muszą podejść do każdej operacji.
Oto, co czyni obróbkę stali nierdzewnej wyjątkowo wymagającą:
- Zjawisko umocnienia odkształceniowego: Stal nierdzewna zwiększa swoją wytrzymałość podczas odkształcania mechanicznego, takiego jak walcowanie, gięcie czy formowanie. Oznacza to, że materiał staje się twardszy i bardziej odporny w miarę jego obróbki — cecha ta wymaga dostosowania prędkości cięcia oraz zastosowania specjalistycznego narzędzi.
- Wyższa wytrzymałość na rozciąganie: W porównaniu do stosunkowo niskich właściwości wytrzymałościowych stali konstrukcyjnej, stal nierdzewna zachowuje integralność strukturalną przy większym obciążeniu, co czyni ją idealną do wymagających zastosowań, choć wymaga ona bardziej wydajnego sprzętu do jej obróbki.
- Różnice w przewodności cieplnej: Stal nierdzewna przewodzi ciepło inaczej niż aluminium czy stal węglowa, co bezpośrednio wpływa na parametry spawania, ustawienia cięcia laserowego oraz wymagania chłodzenia.
- Zachowanie odporności na korozję: Każdy etap obróbki musi chronić warstwę tlenku chromu, która nadaje stali nierdzewnej jej charakterystyczną cechę — w przeciwnym razie narusza się główny powód wyboru tego materiału.
Główne operacje obróbki wyjaśnione
Pomyślne wykonywanie obróbki metalu ze stali nierdzewnej opiera się na opanowaniu kilku wzajemnie powiązanych procesów. Każda operacja wpływa na kolejną, a zrozumienie tej zależności decyduje o jakości wyników i pozwala uniknąć kosztownych błędów.
Podstawowe operacje w obróbce stali nierdzewnej obejmują:
- Odcinek: Metody cięcia laserowego, wodnego i plazmowego oferują różne zalety w zależności od grubości materiału i wymagań dotyczących precyzji.
- Kształtowanie i gięcie: Formowanie płaskich blach w trójwymiarowe elementy z kompensacją odbicia sprężystego i zapobieganiem pękaniom.
- Łączenie: Techniki spawania, łączenia i montażu, które zachowują integralność materiału i jego wygląd.
- Wykończenie: Obróbki powierzchniowe poprawiające zarówno estetykę, jak i wydajność funkcjonalną.
W całym tym przewodniku zdobędziesz praktyczną wiedzę wykraczającą poza ogólne wykazy możliwości. Niezależnie od tego, czy jesteś inżynierem określającym części, specjalistą ds. zakupów oceniającym dostawców, czy projektantem optymalizującym pod kątem produkowalności, zrozumienie tych podstaw technologii obróbki metali pomoże Ci podejmować świadome decyzje na każdym etapie projektu. Od strategii doboru gatunków po rozwiązywanie typowych problemów — każda sekcja oparta jest na tych kluczowych koncepcjach, aby dać pełny obraz tego, czego naprawdę wymaga skuteczna obróbka blach ze stali nierdzewnej.
Wybór gatunku stali nierdzewnej dla sukcesu wytwarzania
Wybór odpowiedniego gatunku stali nierdzewnej to nie tylko wybór numeru z katalogu — to dopasowanie właściwości materiału do konkretnych wymagań aplikacyjnych. Jeśli podejmiesz złą decyzję, możesz napotkać trudności związane z obróbką, przedwczesną korozją lub niepotrzebnymi przekroczonymi kosztami. Jeśli wybierzesz poprawnie, Twoje komponenty będą działały bez zarzutu przez dziesięciolecia.
Zrozumienie różnic między blachami ze stali nierdzewnej zaczyna się od uświadomienia sobie, że każdy gatunek należy do rodziny metalurgicznej o odrębnych cechach. Te rodziny — austenityczne, ferrytyczne i martenzytyczne — różnią się zachowaniem podczas cięcia, kształtowania i spawania. Przeanalizujmy szczegółowo gatunki, które najczęściej napotykasz przy obróbce blach.
Gatunki austenityczne dla maksymalnej odporności na korozję
Gdy wytwórcy omawiają zastosowania stali i stali nierdzewnej wymagające wysokiej ochrony przed korozją, w rozmowach dominują gatunki austenityczne. Stopy te zawierają wysokie stężenia chromu i niklu, tworząc strukturę krystaliczną regularną przestrzennie centrowaną która zapewnia wyjątkową odporność na utlenianie oraz działanie chemiczne.
nierdzewna stal 304 stanowi podstawowy gatunek rodziny stali nierdzewnych, stanowiąc ponad połowę całej światowej produkcji stali nierdzewnej. Jego skład — około 18% chromu i 8% niklu — zapewnia doskonałą kutełność i spawalność, co czyni go idealnym do zastosowań ogólnych. Gatunek 304 można znaleźć w sprzęcie kuchennym, panelach architektonicznych oraz obudowach przemysłowych, gdzie umiarkowana odporność na korozję musi iść w parze z wysokimi wymaganiami kształtowania.
316 ze stali nierdzewnej prowadzi odporność na korozję na wyższy poziom dzięki dodaniu 2-3% molibdenu do składu stopu. Taka modyfikacja znacząco poprawia odporność na chlorki, kwasy oraz agresywne środki czystości. Gdy potrzebujesz blachy ze stali nierdzewnej 316 do zastosowań w środowiskach morskich, produkcji farmaceutycznej lub zakładach przetwórstwa spożywczego położonych w pobliżu wybrzeża, inwestycja ta zwraca się dzięki przedłużonej trwałości. Wyższa zawartość niklu poprawia również właściwości materiału w warunkach działania kwasu siarkowego, bromków i jodków w podwyższonych temperaturach.
stal nierdzewna 316L oferta te same korzyści ze względu na odporność na korozję co standardowa stal 316, ale z niższą zawartością węgla (maksymalnie 0,03% w porównaniu do 0,08%). Dlaczego to ważne? Niższa zawartość węgla minimalizuje wydzielanie się węglików podczas spawania – zjawiska zwanego sensybilizacją, które może naruszyć odporność na korozję w strefach wpływu ciepła. W przypadku konstrukcji spawanych przeznaczonych do pracy w środowiskach agresywnych chemicznie, stal 316L stanowi gwarancję ochrony przed korozją spawalniczą.
Obecność molibdenu w stopach 316 zapewnia lepszą odporność na korozję szczelinową wywoływaną chlorkami, co czyni je preferowanym wyborem dla urządzeń narażonych na wodę morską, środek do bielenia lub agresywne środki dezynfekcyjne.
Kryteria wyboru ferrytycznych i austenitycznych
Nie każde zastosowanie wymaga wysokiej odporności korozyjnej — i wyższej ceny — stopów austenitycznych. Stale nierdzewne ferrytyczne stanowią atrakcyjną alternatywę, gdy ograniczenia budżetowe spotykają się ze średnimi wymaganiami dotyczącymi wydajności.
430 Nierdzewna Stal reprezentuje najbardziej popularny gatunek ferrytyczny w produkcji blach. Zawierając około 16–18% chromu i nie posiadając znaczącej ilości niklu, 430 oferuje dobrą odporność korozyjną w zastosowaniach wnętrz oraz mniej agresywnych środowiskach. Jego właściwości magnetyczne — w przeciwieństwie do niemagnetycznych stopów austenitycznych — czynią go odpowiednim dla zastosowań wymagających reakcji magnetycznej. Urządzenia kuchenne, ozdobne listwy oraz komponenty samochodowe często wykorzystują blachę ze stali nierdzewnej 430 ze względu na korzystny stosunek kosztu do efektywności.
Jednak stale ferrytyczne wiążą się z kompromisami wpływającymi na planowanie produkcji:
- Zmniejszona kutejność: Stal nierdzewna ferrytyczna jest trudniejsza do głębokiego tłoczenia i formowania na skomplikowane kształty w porównaniu z alternatywami austenitycznymi.
- Ograniczona spawalność: Choć możliwe jest spawanie, stale ferrytyczne wymagają ostrożniejszego zarządzania ciepłem, aby zapobiec wzrostowi ziarna i kruchości w strefach spawanych.
- Umiarkowana odporność na korozję: Odpowiednie do ekspozycji atmosferycznej i łagodnych chemikaliów, ale niewystarczające w środowiskach bogatych w chlorki lub silnie kwaśnych.
Stale martenzytyczne zajmują specjalistyczną niszę w produkcji blach. Te hartowane stopy—takie jak 410 i 420—charakteryzują się wysoką twardością i odpornością na zużycie po odpowiednim obróbce cieplnej. Można je napotkać w narzędziach tnących, instrumentach chirurgicznych oraz elementach zaworów, gdzie ważniejsza jest twardość niż kutejność. Ich ograniczona odporność na korozję i trudna spawalność ograniczają zastosowanie w ogólnym wykonywaniu konstrukcji, pozostają jednak niezbędne w określonych zastosowaniach wymagających dużej wytrzymałości.
| Stala | Odporność na korozję | Wykształcalność | Spawalność | Magnetyczne | Koszt względny | Typowe zastosowania |
|---|---|---|---|---|---|---|
| 304 | Doskonały | Doskonały | Doskonały | No | Średni | Sprzęt kuchenny, panele architektoniczne, obudowy przemysłowe |
| 316 | Znakomity | Doskonały | Doskonały | No | Wysoki | Sprzęt morski, przemysł farmaceutyczny, przetwórstwo żywności |
| 316L | Znakomity | Doskonały | Wysoka (niska podatność na nadżeranie) | No | Wysoki | Zespoły spawane w środowiskach agresywnych |
| 430 | Dobre | Umiarkowany | Umiarkowany | Tak | Niski | Urządzenia gospodarstwa domowego, wykończenia dekoracyjne, komponenty samochodowe |
| 410/420 | Umiarkowany | Ograniczone | Wyzwaniem | Tak | Niski-średni | Narzędzia tnące, zawory, elementy narażone na intensywne zużycie |
Podczas doboru gatunków stali nierdzewnej na panele metalowe lub elementy konstrukcyjne należy brać pod uwagę całkowity koszt posiadania, a nie tylko początkowy koszt materiału. Arkusz stali nierdzewnej 316 jest droższy na początku niż 304, ale jego zwiększona trwałość w agresywnych środowiskach często przekłada się na niższe koszty eksploatacji dzięki mniejszej konieczności konserwacji i rzadszym wymianom.
Wybrana metoda obróbki będzie również miała wpływ na wybór gatunku. Gatunki austenityczne zazwyczaj dopasowują się do szerszego zakresu technik cięcia, kształtowania i łączenia przy mniejszej liczbie korekt parametrów. Gatunki ferrytyczne i martenityczne wymagają bardziej starannego sterowania procesem — wiedza, która staje się kluczowa podczas omawiania konkretnych metod cięcia i kształtowania w kolejnych sekcjach.
Metody cięcia i wybór techniki
Teraz, gdy już wiesz, który gatunek stali nierdzewnej najlepiej odpowiada Twoim potrzebom, kolejnym istotnym krokiem jest wybór sposobu cięcia stali nierdzewnej w sposób efektywny i zapewniający integralność materiału. Wybrana metoda cięcia ma bezpośredni wpływ na jakość detalu, wykończenie krawędzi, dokładność wymiarową oraz koszty produkcji — przez co decyzja ta jest równie ważna jak wybór odpowiedniego gatunku.
Cięcie arkuszy stalowych nierdzewnych stanowi unikalne wyzwanie w porównaniu do stali niskowęglowej lub aluminium. Niższa przewodność cieplna materiału oznacza, że ciepło koncentruje się w strefie cięcia, podczas gdy skłonność do odkształceniowego hartowania może powodować problemy przy wolniejszych procesach cięcia. Dodatkowo, odbijająca powierzchnia stali nierdzewnej znacząco wpływa na parametry cięcia laserowego. Przeanalizujmy każdą z głównych metod cięcia oraz sytuacje, w których są najbardziej odpowiednie dla Twojego projektu.
Parametry cięcia laserowego stali nierdzewnej
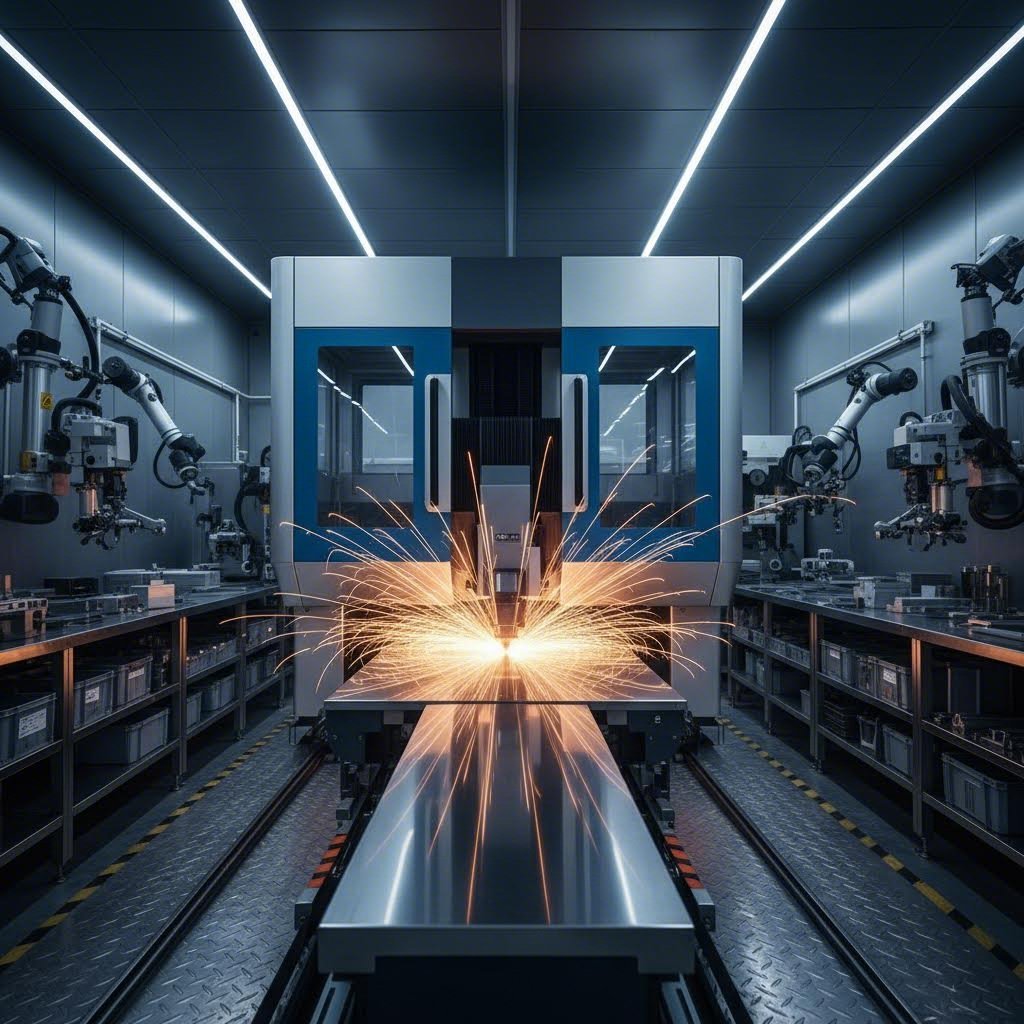
Cięcie laserowe stało się dominującą metodą obróbki blach ze stali nierdzewnej, i to z dobrych powodów. Skoncentrowana wiązka światła – zazwyczaj z laserów światłowodowych lub CO₂ – topi, spala lub paruje metal z wyjątkową precyzją. W przypadku materiałów cienkich i średnich grubości (do około 1 cala), cięcie laserowe zapewnia najlepszy kompromis szybkości, dokładności i jakości krawędzi.
Jednak cięcie blach ze stali nierdzewnej za pomocą laserów wymaga starannego doboru parametrów. Odblaskowość materiału może powodować problemy z odbiciem wiązki, szczególnie w przypadku laserów CO₂ na highly polished powierzchniach. Nowoczesne lasery światłowodowe lepiej radzą sobie z tym wyzwaniem, jednak operatorzy muszą nadal optymalizować ustawienia, aby uzyskać spójne wyniki.
Według specjalistów od obróbki metalu ustawienia lasera światłowodowego do cięcia stali nierdzewnej zazwyczaj wymagają:
- Ustawienia mocy: Około 90% mocy dla optymalnej jakości cięcia
- Regulacja prędkości: Wolniejsza niż przy stali węglowej, aby uwzględnić właściwości termiczne stali nierdzewnej
- Optymalizacja częstotliwości: Około 30 Hz dla zrównoważonej wydajności cięcia
- Wybór gazu wspomagającego: Azot zapewnia czystsze, wolne od tlenków krawędzie; tlen pozwala na szybsze cięcie, ale pozostawia ciemniejszą krawędź
Szerokość cięcia — czyli grubość materiału usuwanego podczas procesu — zazwyczaj mieści się w zakresie od 0,004 do 0,010 cala przy cięciu laserowym. Ta wąska szczelina maksymalizuje wykorzystanie materiału i umożliwia produkcję elementów o ciasnych tolerancjach z minimalną koniecznością późniejszej obróbki. W zastosowaniach precyzyjnych wymagających tolerancji od ±0,001 do ±0,005 cala cięcie laserowe pozostaje najlepszym sposobem cięcia blach ze stali nierdzewnej o grubości poniżej jednego cala.
Systemy laserowe łączą się bezproblemowo z automatyzacją CNC i oprogramowaniem do rozmieszczania elementów, maksymalizując wydajność materiału i minimalizując odpady — kluczowe aspekty dla projektów produkcyjnych wrażliwych na koszty.
Kiedy warto wybrać cięcie wodą zamiast laserem
Cięcie strumieniowe wodą wyróżnia się jako jedyna prawdziwie zimna metoda cięcia stali nierdzewnej. Poprzez wyrzucanie wody pod wysokim ciśnieniem, mieszanej z ściernym piaskiem granatowym, ten proces erozyjnie usuwa materiał bez generowania ciepła. Wynik? Brak strefy wpływu ciepła, zachowane właściwości metalurgiczne oraz brak odkształceń termicznych.
Dzięki temu cięcie strumieniowe wodą jest idealne, gdy trzeba przecinać stal nierdzewną do:
- Grube materiały: Cięcie strumieniowe wodą radzi sobie ze stalą nierdzewną o grubości do 6 cali lub więcej — znacznie przekraczając możliwości laserów
- Zastosowań wrażliwych na ciepło: Wyposażenia farmaceutycznego i przetwórstwa spożywczego, gdzie kluczowe jest zachowanie warstwy tlenku chromu
- Utrwalonych materiałów: Stali narzędziowych, stopów tytanu oraz innych trudno obrabialnych metali
- Projektów z różnych materiałów: Ten sam urządzenie do cięcia może przetwarzać kompozyty, szkło, kamień i tworzywa sztuczne
Kompromisy? Cięcie strumieniem wody działa wolniej niż metody laserowe lub plazmowe, a koszty operacyjne są wyższe na część. Szerokość cięcia — około 0,030 do 0,040 cala — przekracza tę z cięcia laserowego, co wpływa na zużycie materiału przy gęstych układach. Jednak w zastosowaniach, gdzie integralność materiału jest ważniejsza niż czas cyklu, cięcie strumieniem wody daje niezrównane rezultaty.
Zgodnie z porównaniami branżowymi, cięcie strumieniem wody osiąga dokładność ±0,003 do ±0,010 cala, tworząc gładkie, bezfazowe krawędzie, które nie wymagają dodatkowej obróbki końcowej.
Cięcie plazmowe dla grubych blach
Gdy szybkość i efektywność kosztowa są ważniejsze niż wysoka precyzja, cięcie plazmowe staje się praktyczną opcją dla średnich i grubych płyt ze stali nierdzewnej. Ten proces wykorzystuje przewodzący gaz, by utworzyć łuk plazmowy, który szybko topi i przecina metal.
Cięcie plazmowe doskonale sprawdza się w przypadku:
- Przetwarzania grubej płyty: Skutecznie radzi sobie z materiałami o grubości do 2 cali
- Produkcja wielkoseryjna: Najszybsze prędkości cięcia dla grubych materiałów
- Elementy konstrukcyjne: Ramy, uchwyty i części przemysłowe, gdzie dopracowanie krawędzi nie jest kluczowe
- Projekty z ograniczonym budżetem: Najniższy koszt na cal cięcia spośród trzech metod
Ograniczenia cięcia plazmowego stają się widoczne w precyzyjnej pracy. Tolerancje zazwyczaj mieszczą się w zakresie ±0,010 do ±0,030 cala – akceptowalne dla konstrukcji spawanych, ale niewystarczające dla montażu wymagającego dokładnych tolerancji. Strefa wpływu ciepła oraz chropawa powierzchnia krawędzi często wymagają szlifowania lub dodatkowej obróbki przed spawaniem lub wykończeniem.
| Metoda cięcia | Zakres grubości | Tolerancja | Szerokość szwu | Jakość krawędzi | Strefa podlegająca wpływowi cieplnemu | Koszt względny |
|---|---|---|---|---|---|---|
| Laserowe | Do 1" | ±0.001–0.005" | 0.004–0.010" | Czyste, ostre | Tak (minimalne) | Średni-Wysoki |
| Wodny strumień | Do 6"+ | ±0.003–0.010" | 0.030–0.040" | Gładkie, bez zadziorów | Brak | Wysoki |
| Węgiel | Do 2" | ±0.010–0.030" | 0.060–0.150" | Chropawe, wymagane czyszczenie | Tak (znaczące) | Niski |
Wybór najlepszej metody cięcia stali nierdzewnej dla Twojego projektu
Dopasowanie metody cięcia do wymagań zastosowania wiąże się z równoważeniem wielu czynników. Weź pod uwagę następujące kryteria wyboru w zależności od grubości materiału:
- Poniżej 0,25 cala: Cięcie laserowe zapewnia optymalną szybkość, precyzję i jakość krawędzi dla cienkich blach ze stali nierdzewnej
- od 0,25 do 0,75 cala: Cięcie laserowe lub strumieniowe wodą w zależności od wymaganych tolerancji i wrażliwości na ciepło
- od 0,75 do 1,5 cala: Cięcie strumieniowe wodą dla prac wymagających precyzji; plazmowe dla elementów konstrukcyjnych, gdzie liczy się szybkość
- Powyżej 1,5 cala: Waterjet do precyzji; plazma do opłacalnej obróbki grubych płyt
Poza grubością należy wziąć pod uwagę wymagania dotyczące tolerancji, specyfikacje wykończenia krawędzi oraz operacje wtórne. Części przeznaczone na widoczne zastosowania architektoniczne wymagają precyzji cięcia laserowego. Elementy przeznaczone do spawanych konstrukcji nośnych mogą tolerować krawędzie cięte plazmą. Wrażliwe na ciepło stopy lub części wymagające pełnej certyfikacji materiału korzystają z zimnego procesu cięcia waterjet.
Zrozumienie tych podstaw cięcia przygotowuje Cię na kolejne wyzwanie w procesie produkcji: gięcie blach ze stali nierdzewnej do tworzenia trójwymiarowych komponentów przy jednoczesnym uwzględnieniu charakterystycznego efektu sprężystego odkształcenia materiału.
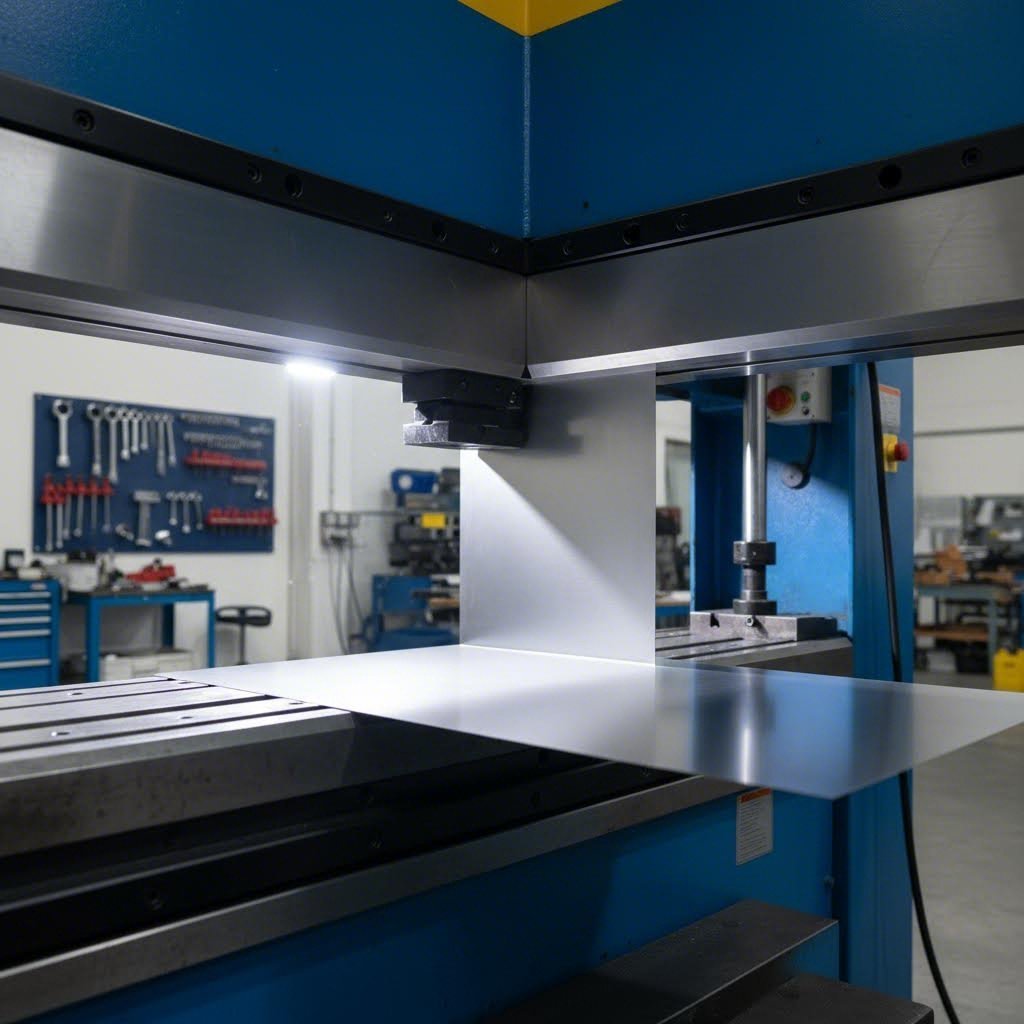
Gięcie i formowanie blach ze stali nierdzewnej
Gdy Twoje wstępnie wykrawane blachy ze stali nierdzewnej są dokładnie przycięte, kolejnym etapem jest nadanie im kształtu z płaskich arkuszy trójwymiarowych komponentów. To właśnie w tym momencie kształtowanie stali nierdzewnej staje się zarówno sztuką, jak i nauką — ponieważ ten materiał nie po prostu ugina się i zachowuje nowy kształt. On opiera się.
W przeciwieństwie do stali miękkiej, która posłusznie zachowuje ukształtowany profil, stal nierdzewna ma upartą pamięć kształtu. Jej wyższa granica plastyczności oraz naturalna sprężystość powodują, że materiał częściowo powraca do pierwotnego, płaskiego stanu po usunięciu sił giącecych. To zjawisko — zwane odbiciem sprężystym — stanowi największe wyzwanie w operacjach gięcia stali nierdzewnej. Opanuj korektę odbicia sprężystego, a będziesz produkować dokładne elementy w sposób ciągły. Zignoruj je, a zmarnujesz materiał, dążąc do tolerancji, których nigdy nie osiągniesz.
Obliczanie korekty odbicia sprężystego dla dokładnego gięcia
Odkucie występuje, ponieważ gięcie powoduje zarówno odkształcenie trwałe (plastyczne), jak i chwilowe (elastyczne) w obrębie metalu. Gdy siła gięcia zostaje usunięta, część elastyczna wraca do poprzedniego stanu, nieznacznie zwiększając kąt gięcia. W przypadku stali nierdzewnej odzysk elastyczny jest znacznie większy niż w miękkich metalach — a liczby to potwierdzają.
Według specjaliści od obróbki materiałów w Datum Alloys , typyczne zakresy odkucia dla stali nierdzewnej różnią się znacząco w zależności od geometrii gięcia:
- Ciasne gięcia (promień wewnętrzny równy grubości materiału): 2° do 4° odkucia
- Umiarkowane promienie (stosunek 6t do 20t): 4° do 15° odkucia
- Gięcia o dużym promieniu (8t lub więcej): 30° do 60° odkucia w skrajnych przypadkach
Porównaj to z innymi materiałami przy stosunku promienia do grubości 1:1:
- stal nierdzewna 304: 2-3°
- Miękki aluminium: 1,5-2°
- Stal walcowana na zimno: 0,75-1,0°
- Stal walcowana na gorąco: 0,5-1,0°
- Miedź i mosiądz: 0,00-0,5°
Praktyczny wzór na obliczenie kompensacji odbicia jest prosty: odejmij osiągnięty kąt gięcia od zamierzonego kąta. Jeśli docelowo dążysz do gięcia pod kątem 90°, a po formowaniu zmierzysz 85°, Twoje odbicie wynosi 5°. Następnie należy zaprogramować prasę giętarkę tak, aby następne detale były nadgięte o 5°.
Stan wyżarzania materiału drastycznie wpływa na odbicie. Niestandardowa stal nierdzewna 301 może wykazywać odbicie od 4 do 43° w tym samym zakresie promieni, w którym stal 304 w stanie wyżarzonym pokazuje jedynie 2-15°.
Istnieje kilka czynników wpływających na wielkość odbicia, które należy wziąć pod uwagę podczas korzystania z tabeli grubości blachy metalowych dla projektu:
- Moc graniczna plastyczności: Wyższa granica plastyczności oznacza większą sprężystość odzysku — najważniejszy czynnik
- Stosunek promienia gięcia do grubości: Większe promienie powodują większy odbiór; ciasne gięcia minimalizują ten efekt
- Grubość materiału: Grubsze blachy charakteryzują się mniejszym odbiorem ze względu na większą deformację plastyczną
- Kierunek ziarna: Gięcie prostopadle do struktury materiału zmniejsza odbiór i poprawia dokładność
- Metoda formowania: Gięcie otwarte powoduje większy odbiór niż gięcie matrycowe lub tłoczenie
Wytyczne dotyczące minimalnego promienia gięcia w zależności od grubości
Oprócz zjawiska odbioru, uzyskanie gięć bez pęknięć wymaga przestrzegania ograniczeń dotyczących minimalnego promienia gięcia. Odsyłając do tabeli wielkości kalibrów dla stali nierdzewnej, zauważysz, że każda grubość ma odpowiadający sobie minimalny promień wewnętrznego zaokrąglenia, który zapobiega uszkodzeniu materiału.
Dlaczego to jest ważne? Gięcie wywołuje naprężenia rozciągające na zewnętrznej powierzchni i naprężenia ściskające na wewnętrznej powierzchni. Jeśli zewnętrzna warstwa zostanie nadmiernie rozciągnięta poza granicę kruchości materiału, powstają pęknięcia. Grubsze blachy są z natury mniej elastyczne i wymagają proporcjonalnie większych promieni, aby zachować integralność struktury.
Ogólna zasada dla stali nierdzewnej austenitycznej: minimalny promień wewnętrznego gięcia powinien wynosić od około 0,5t do 1,0t, gdzie „t” oznacza grubość materiału. Dla porównania, blacha stalowa o grubości 11 kalibrów ma około 0,120 cala (3,0 mm), podczas gdy 14 kalibrów to 0,075 cala (1,9 mm). Cieńsze kalibry oferują większą elastyczność kształtowania, natomiast grubsze płyty ze stali nierdzewnej wymagają starannego planowania promienia gięcia.
| Gatunek stali nierdzewnej | Kondycji | Minimalny promień gięcia (miękkie/odprężone) | Minimalny promień gięcia (półtwarde) |
|---|---|---|---|
| 304/304L | Wyżarzony | 0.5T | 1,0t do 2,0t |
| 316/316L | Wyżarzony | 0.5T | 1,0t do 2,0t |
| 430 | Wyżarzony | 1.0T | 2,0t do 3,0t |
| 301 | Wyżarzony | 0.5T | 2,0t do 4,0t |
Zgodnie z materiałami inżynierskimi Xometry, otwarcie matrycy (V-opening) musi również być dostosowane do grubości materiału. Grubsze arkusze wymagają większych otworów V, aby umożliwić przepływ materiału bez pęknięć. Podobnie siła gięcia rośnie proporcjonalnie — urządzenie, które bez problemu radzi sobie z 14 kalibrem, może mieć trudności z cięższymi kalibrami.
Wytyczne projektowania pod kątem łatwości produkcji
Zapobieganie pękaniu podczas kształtowania stali nierdzewnej wykracza poza wybór promienia gięcia. Położenie elementów względem linii gięcia znacząco wpływa na współczynnik sukcesu.
Postępuj zgodnie z tymi wytycznymi, aby uniknąć problemów podczas produkcji:
- Odległość otworu od gięcia: Zachowaj minimalną odległość 2,5t (2,5-krotna grubość materiału) plus promień gięcia między krawędziami otworów a liniami gięcia. Umieszczenie bliżej powoduje zniekształcenie lub rozerwanie otworów.
- Odległość krawędzi do gięcia: Umieść linie gięcia w odległości co najmniej 4t od krawędzi blachy, aby zapobiec rozerwaniu krawędzi i zapewnić spójne kształtowanie.
- Rozstaw elementów: Zachowaj minimalną odległość 2t między sąsiednimi otworami i elementami, aby zachować integralność konstrukcyjną podczas kształtowania.
- Orientacja ziarna: Jeśli to możliwe, ustaw gięcia prostopadle do kierunku walcowania, aby zmaksymalizować ciągliwość i zminimalizować ryzyko pęknięć.
Wzmacnianie materiału wskutek odkształcenia plastycznego podczas kształtowania stwarza dodatkowe zagadnienie przy częściach wielooperacyjnych. Każdy gięty fragment zwiększa twardość materiału w tej strefie, wpływając na kolejne operacje. Jeśli projekt wymaga kilku gięć znajdujących się blisko siebie, należy starannie zaplanować ich kolejność lub rozważyć obróbkę cieplną pośrednią w celu przywrócenia ciągliwości.
Do technik kompensacyjnych stosowanych przez doświadczonych wykonawców należą:
- Przebicie: Gnięcie poza docelowy kąt tak, aby odsprężynowanie doprowadziło go do wartości nominalnej
- Dociskanie (bottoming): Wymuszenie pełnego przylegania blachy do kąta matrycy pod wysokim ciśnieniem
- Coining: Zastosowanie ekstremalnej siły, aby plastycznie zredukować grubość materiału na linii gięcia, niemal całkowicie eliminując odsprężynowanie
- Aktywna kontrola kąta: Nowoczesne giętarki CNC z pomiarem w czasie rzeczywistym automatycznie dostosowują położenie suwaka
Po tym, jak Twoje elementy ze stali nierdzewnej zostały pocięte i uformowane zgodnie z wymaganiami, kolejnym wyzwaniem jest połączenie tych części, zachowując jednocześnie odporność materiału na korozję oraz jego estetyczny wygląd — temat wymagający szczególnej uwagi przy doborze techniki spawania.
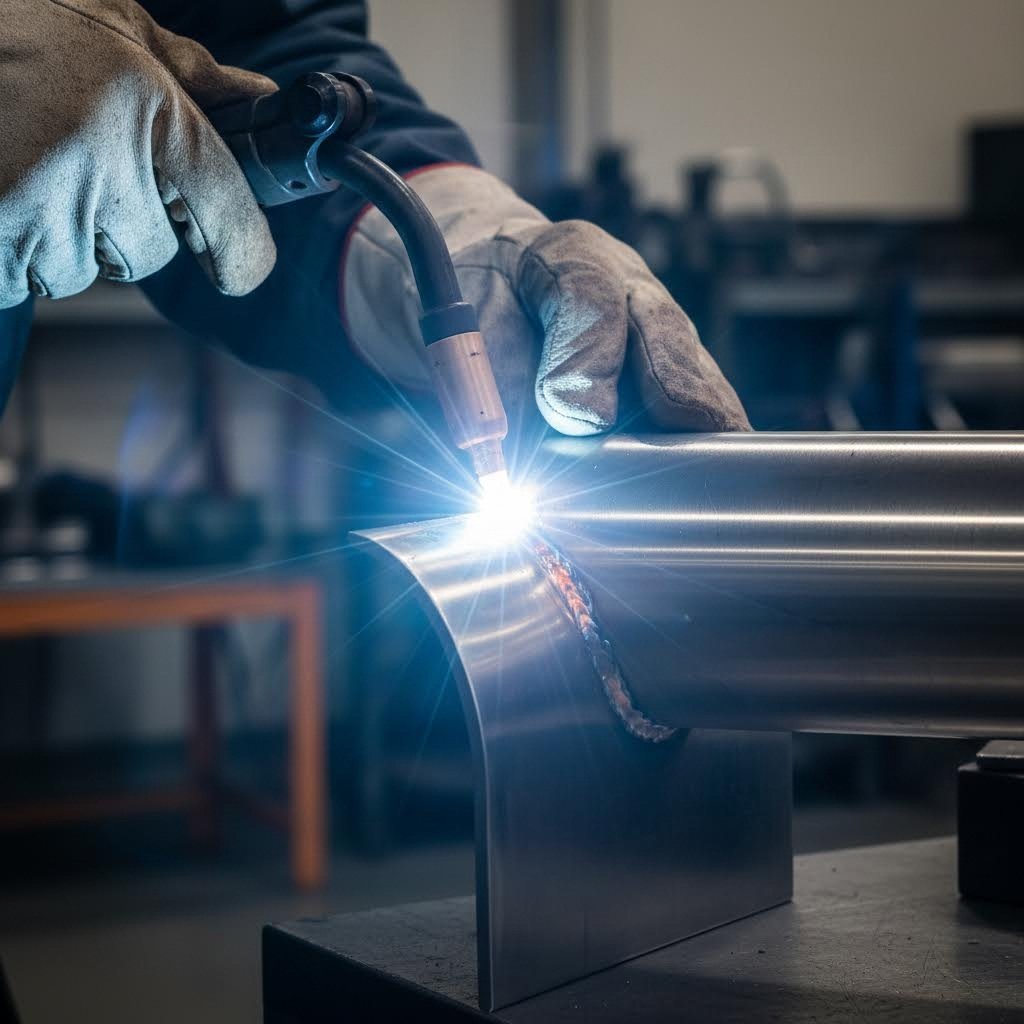
Techniki spawania i łączenia stali nierdzewnej
Twoje elementy ze stali nierdzewnej są precyzyjnie pocięte i uformowane zgodnie z specyfikacją. Nadszedł kluczowy etap ich łączenia — to właśnie tutaj wiele projektów realizowanych w warsztacie kończy się sukcesem lub porażką. Wybrana metoda spawania wpływa nie tylko na wytrzymałość połączeń, ale także na odporność na korozję, wygląd wizualny oraz efektywność produkcji.
Porównując spawanie MIG i TIG w zastosowaniach ze stali nierdzewnej, zrozumienie ich podstawowych różnic pomaga dokonać właściwego wyboru dla każdego projektu. Obie metody opierają się na zasadzie łuku elektrycznego i stosowaniu gazu osłonowego, jednak dają wyraźnie różne rezultaty pod względem precyzji, szybkości i jakości wykończenia.
TIG vs. spawanie MIG dla zastosowań nierdzewnych
Spawanie TIGzwane technicznie spawaniem gazowym z wolframem (GTAW)w celu tworzenia łuku wykorzystuje niepożywalną elektrodę wolframową, podczas gdy oddzielna prętka wypełniająca dodaje materiał do zbiornika spawania. Ta technika wymaga większej umiejętności, ale zapewnia niezrównaną kontrolę nad wprowadzaniem ciepła i umieszczaniem żwirów spawania.
W przypadku cienkich blach nierdzewnych i zastosowań, w których wygląd spawania ma znaczenie, preferowana jest metoda spawania TIG. - Dlaczego? - Nie wiem. Proces ten pozwala spawaczom precyzyjnie kontrolować penetrację ciepła, minimalizując zniekształcenia na materiałach cienkiego rozmiaru. W rezultacie spawania wydają się czyste, gładkie i estetyczne, co jest kluczowe dla paneli architektonicznych, sprzętu przetwórstwa żywności i widocznych zespołów.
Według specjalistów od produkcji w Metal Works , spawanie TIG oferuje następujące kluczowe zalety:
- Wyższa precyzja: Doskonała kontrola nad wprowadzaniem ciepła i tworzeniem się zwojów
- Czysta estetyka: Wykonuje ozdobne spawania wymagające minimalnego wykończenia
- Wersatility materiału: Działa skutecznie na cienkich materiałach i egzotycznych stopach
- Bez prysania: Eliminuje konieczność czyszczenia związaną z innymi metodami spawania
- Lepsza kontrola na cienkich przekrojach: Zmniejsza ryzyko przepalenia delikatnych elementów
Jednak spawanie TIG wiąże się z pewnymi kompromisami:
- Wolniejszy proces: Niższe wskaźniki napawania zmniejszają wydajność przy dużych złożeniach
- Wyższe wymagania dotyczące kwalifikacji: Wymaga doświadczonych spawaczy dla uzyskiwania spójnych wyników
- Zwiększony koszt pracy: Wymaga więcej czasu niż metody alternatywne
Spawanie MIG — czyli spawanie łukowe w osłonie gazów (GMAW) — wykorzystuje ciągle doprowadzany elektrodę drutową, która pełni jednocześnie funkcję źródła łuku i materiału dodatkowego. Gaz osłonowy chroni kąpiel spawalniczą, a półautomatyczna operacja umożliwia szybsze tempo produkcji.
Gdy prędkość produkcji jest ważniejsza niż wymagania estetyczne, spawanie MIG oferuje znaczące zalety:
- Wysoka wydajność produkcji: Ciągła podawania drutu umożliwia szybsze prędkości spawania
- Przyjazna obsługa: Łatwiejsza krzywa nauki dla operatorów
- Efektywność kosztowa: Skrócony czas pracy przy produkcji seryjnej
- Możliwość spawania grubych przekrojów: Lepszy wybór dla grubych płyt ze stali nierdzewnej
Ograniczenia spawania MIG w przypadku stali nierdzewnej obejmują:
- Generowanie chlasków: Powoduje konieczność czyszczenia po spawaniu
- Mniejsza kontrola precyzji: Trudniejsze w zastosowaniu na cienkich materiałach
- Gorszy wygląd: Wizualne złącza spawane zazwyczaj wymagają dodatkowej obróbki wykończeniowej
W przypadku projektów, gdzie zarówno produktywność, jak i wygląd mają znaczenie, wiele zakładów wytwórczych wyposaża dedykowany wózek spawalniczy dla każdej metody — umożliwiając szybkie przełączanie się między spawaniem TIG widocznych złączy a spawaniem MIG połączeń konstrukcyjnych.
Zapobieganie przebarwieniom termicznym podczas spawania
Każdy, kto spawał stal nierdzewną, zna tęcze pasma powstające w pobliżu stref spawalniczych. Te odcienie temperaturowe — od słomkowo-żółtego przez niebieski po ciemnoszary tlenek — stanowią problem nie tylko estetyczny. Bezpośrednio naruszają one najważniejszą cechę materiału: odporność korozyjną.
Zgodnie z badaniami technicznymi firmy Vecom Group , przebarwienia termiczne powstają podczas spawania bez idealnej ochrony gazem obojętnym. Gdy wprowadzane ciepło powoduje dyfuzję chromu na zewnątrz do warstwy tlenkowej, w podstawowym materiale metalowym tworzy się strefa ubożona w chrom. Ubytki te czynią warstwę narażoną na różne mechanizmy korozji:
- Korozyjne ubytki (pitting): Lokalny atak w miejscach osłabienia warstwy pasywnej
- Kruchość korozijna: Pęknięcia środowiskowe pod wpływem naprężeń rozciągających
- Korozja szczelinowa: Atak w przestrzeniach zamkniętych, gdzie tlenu jest niewiele
- Korozja indukowana mikrobiologicznie (MIC): Działalność bakterii przyśpieszona przez wady powierzchni
Porousne warstwy tlenkowe gromadzą również chlorki z otoczenia, tworząc lokalne kwaśne środowisko, które przyśpiesza korozję. W przypadku urządzeń przeznaczonych do pracy w agresywnych środowiskach, usunięcie przebarwień termicznych jest niezbędne — nie opcjonalne.
Strategie zapobiegania podczas spawania obejmują:
- Wystarczające zabezpieczenie gazem osłonowym: Zapewnij pełną ochronę argonem po obu stronach spoiny
- Cofnięcie gazem ochronnym: Wypełnij tylną stronę złącza argonem, aby zapobiec utlenianiu
- Kontrolowane ciepło wprowadzane: Zminimalizuj natężenie prądu spawalniczego i prędkość przesuwu, aby zmniejszyć strefę przebarwień
- Oczyść materiał podstawowy: Usuń oleje, tlenki i zanieczyszczenia przed spawaniem
Gdy powstają odcienie termiczne, metody ich usunięcia obejmują sposoby mechaniczne i chemiczne. Choć polerowanie, szczotkowanie lub piaskowanie mogą usunąć widoczne przebarwienia, to chemiczne trawienie zapewnia lepszą regenerację odporności na korozję. Roztwory trawiące — zwykle zawierające kwas azotowy i fluorowodorowy — rozpuszczają uszkodzoną warstwę tlenkową i przywracają ochronną pasywną warstwę bogatą w chrom.
Jak podkreśla badanie Vecom: „Z punktu widzenia odporności na korozję, chemiczne czyszczenie metodą trawienia jest preferowane nad czyszczeniem mechanicznym”. Powierzchnia strawiona osiąga zwiększone stężenie chromu w warstwie wierzchniej, zapewniając optymalną długoterminową ochronę przed korozją.
Alternatywne metody łączenia
Nie każdy zespół ze stali nierdzewnej wymaga spawania fuzyjnego. W zależności od wymagań Twojej aplikacji, alternatywne metody łączenia oferują wyraźne zalety.
Spawanie punktowe
- Najlepszy dla: Połączenia blach na zakład w obudowach, osłonach i zestawach paneli
- Zalety: Szybkie, zautomatyzowane, minimalna odkształcalność, brak materiałów eksploatacyjnych
- Ograniczenia: Ograniczone do połączeń nakładkowych, widoczne ślady spoin, ograniczenia dotyczące grubości
Zęby
- Najlepszy dla: Łączenie metali o różnych właściwościach, montaż terenowy, środowiska bez spawania
- Zalety: Brak wprowadzania ciepła, pozwala na rozszerzalność termiczną, prosty montaż
- Ograniczenia: Widoczne elementy łączące, ryzyko korozji bimetalicznej przy niewłaściwym doborze materiału
Wkręty i łączniki mechaniczne
- Najlepszy dla: Zespoły możliwy do konserwacji, połączenia terenowe, połączenia regulowane
- Zalety: Możliwość demontażu, brak specjalistycznego sprzętu, stała wytrzymałość połączeń
- Ograniczenia: Wymagane przygotowanie otworów, pozyskiwanie elementów łączących, możliwość poluzowania pod wpływem drgań
Wybrana metoda łączenia zależy od dostępności połączenia, wymagań estetycznych, warunków eksploatacji oraz potrzeby demontażu. Wiele zespołów wykorzystuje kombinację metod – spawanie TIG dla widocznych szwów, spawanie punktowe dla ukrytych paneli oraz łączenia mechaniczne dla paneli serwisowych.
Po połączeniu elementów ze stali nierdzewnej w funkcjonalne zespoły, należy przejść do wykończenia powierzchni i zabiegów końcowych, które poprawiają zarówno wygląd, jak i długoterminową wydajność.
Wykończenie powierzchni i zabiegi końcowe
Elementy ze stali nierdzewnej zostały już pocięte, wykształcane i połączone — jednak proces produkcji nie dobiegł jeszcze końca. Wykończenie powierzchni oraz zabiegi końcowe decydują o tym, jak będą wyglądać części, jak będą się sprawować i jak odpornie będą reagować na korozję w trakcie całej ich żywotności. Ten ostatni etap przekształca funkcjonalne zespoły w wykończone wyroby z blachy ze stali nierdzewnej, gotowe do użytkowania w wymagających aplikacjach.
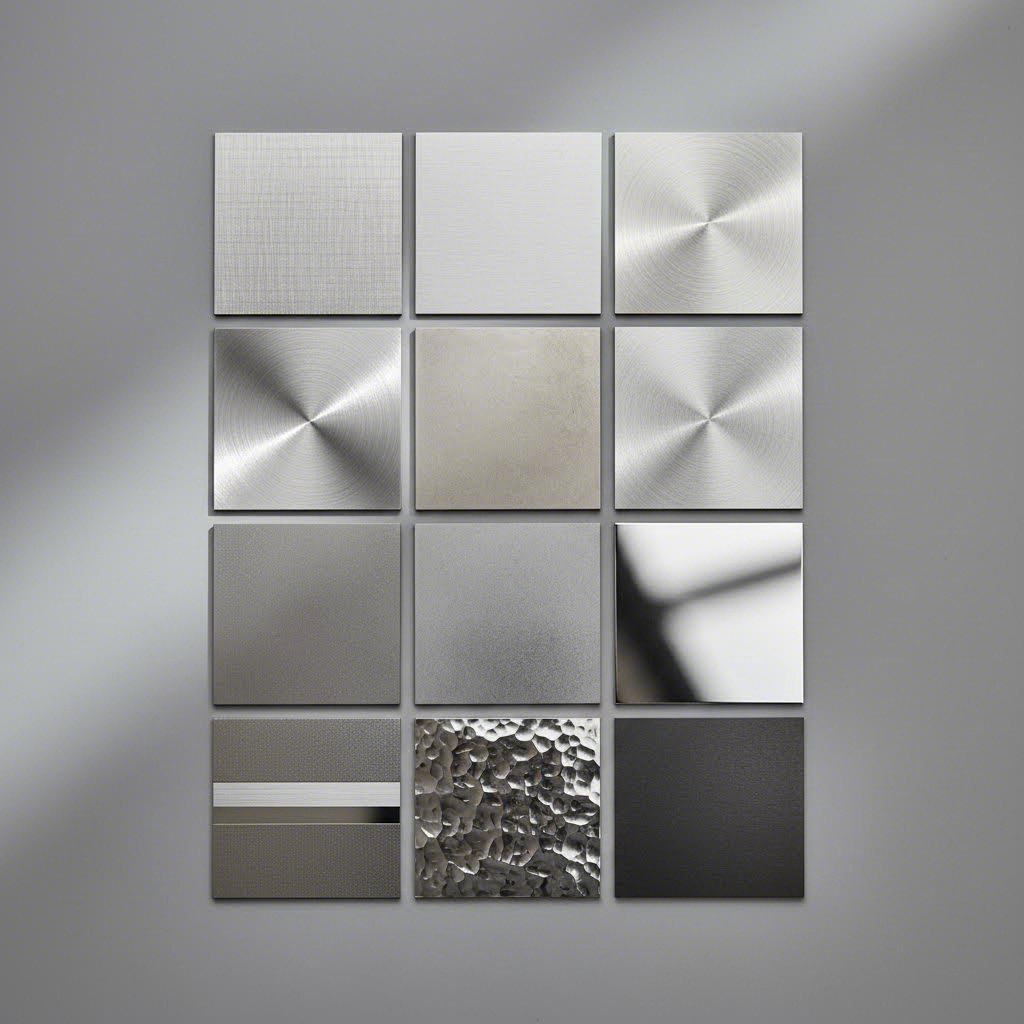
Wykończenie powierzchniowe pełni podwójną rolę w obróbce stali nierdzewnej. Z estetycznego punktu widzenia nadaje wygląd, jaki wymaga Twoje zastosowanie – od przemysłowego użycia po elegancję przypominającą lustro. Z funkcjonalnego punktu widzenia różne wykończenia wpływają na łatwość czyszczenia, przyczepność bakterii, odbicie światła, a nawet odporność na korozję. Zrozumienie tych opcji pomaga określić odpowiednie zabiegi dla konkretnych potrzeb.
Wykończenia mechaniczne i ich zastosowania
Wykończenie mechaniczne polega na fizycznym szlifowaniu, aby uzyskać jednolite tekstury powierzchni. Te procesy – polerowanie, szlifowanie i szczotkowanie – stopniowo doskonalą powierzchnię przy użyciu coraz drobniejszych środków ściernych. Ostateczny efekt zależy od wielkości granulatury i zastosowanej techniki.
Płytę stalową z nierdzewnej stali z matowym wykończeniem to jedna z najpopularniejszych powierzchni wykończeniowych stosowanych w architekturze i produktach konsumenckich. Tworzona za pomocą taśm lub szczotek szlifierskich, powierzchnia ta charakteryzuje się widocznymi, jednokierunkowymi śladami szlifu, które skutecznie maskują odciski palców i drobne rysy. Wykończenia blach ze stali nierdzewnej (zazwyczaj oznaczone jako No. 3 lub No. 4) zapewniają doskonałą równowagę między wyglądem a praktycznością – są wystarczająco wyrafinowane dla elementów widocznych, a jednocześnie wytrzymałe w miejscach o dużym natężeniu ruchu.
Zgodnie z kompleksowym przewodnikiem Ulbrich dotyczącym wykończeń, standardowe wykończenia mechaniczne obejmują:
- Wykończenie No. 3: Wykonane przy użyciu ścierniwa o ziarnistości 100–120, tworzy pośrednią powierzchnię polerowaną z widocznymi śladami ziarna. Stosowane powszechnie w elementach architektonicznych i urządzeniach przetwórstwa spożywczego.
- Wykończenie No. 4: Uzyskane przy użyciu ścierniwa o ziarnistości 120–180, dające bardziej delikatny, kierunkowy ślad szlifu. To uniwersalne wykończenie stosuje się na panelach ściennej architektury, windach, zlewozmywakach oraz sprzęcie gastronomicznym.
- Wykończenie No. 6: Utworzona przez szczotkowanie Tampico powierzchni No. 4, co daje matowy, srebrno-biały wygląd mniej odbijający niż standardowe wykończenia szlachetnie szlifowane.
- Wykończenie No. 7: Wysoko polerowana powierzchnia, na której linie ścierniwa są nadal lekko widoczne – prawie lustrzane, ale z zachowaną subtelną fakturą.
- Wykończenie No. 8: Najbardziej odbijające mechaniczne wykończenie, uzyskiwane poprzez polerowanie materiałami ściernymi o coraz wyższym ziarnie, a następnie bufowanie. Słynna rzeźba "Bean" w Chicago prezentuje to idealne lustrzane wykończenie.
Chropowatość powierzchni ma bezpośredni wpływ na łatwość czyszczenia – gładkie powierzchnie stanowią schronienie dla mniejszej liczby bakterii i łatwiej się je czyści, co sprawia, że wybór wykończenia jest kluczowy w przemyśle spożywczym i medycznym.
Proces pasywacji i dlaczego jest ważny
Wyobraź sobie, że wydajesz znaczne środki na wysokiej jakości komponenty ze stali nierdzewnej, a już po kilku miesiącach pojawiają się plamy rdzy. Ten scenariusz występuje częściej, niż myślą producenci – a winowajcą jest zazwyczaj niewystarczająca pasywacja po obróbce.
Pasywacja to zabieg chemiczny, który przywraca ochronną warstwę tlenku chromu na stali nierdzewnej po zgrzewaniu, obróbce skrawaniem lub szlifowaniu. Według specjalistów od TIG Brush , wbrew powszechnemu przekonaniu, stal nierdzewna może nadal ulegać korozji. Proces wyrobu wprowadza zanieczyszczenia i niszczy pasywną warstwę, która nadaje stali nierdzewnej właściwości odporności na korozję.
Dlaczego pasywacja jest tak ważna? Rozważmy, co dzieje się podczas produkcji:
- Zanieczyszczenie wolnym żelazem: Kontakt z narzędziami ze stali węglowej, kołami szlifierskimi lub powierzchniami roboczymi pozostawia cząstki żelaza, które stają się miejscami inicjacji korozji
- Strefy wpływu ciepła: Zgrzewanie zakłóca warstwę tlenku chromu i może prowadzić do ubożenia chromu w sąsiednich obszarach
- Uszkodzenia mechaniczne: Szlichtowanie, toczenie i kształtowanie usuwają lub naruszają ochronną warstwę pasywną
- Zanieczyszczenie powierzchni: Oleje, brudy warsztatowe i ślady po obsłudze tworzą bariery uniemożliwiające prawidłowe wytworzenie się warstwy tlenkowej
Proces pasywacji rozwiązuje te problemy poprzez obróbkę chemiczną — tradycyjnie z zastosowaniem kwasu azotowego lub roztworów kwasu cytrynowego. Te chemikalia rozpuszczają wolny żelazo z powierzchni, przyspieszając jednocześnie tworzenie się nowej, jednolitej warstwy tlenku chromu. Wynikiem jest zwiększona odporność na korozję, która może wydłużyć żywotność komponentów o lata, a nawet dziesięciolecia.
Tradycyjne metody pasywacji wiążą się z zagrożeniami dla bezpieczeństwa. Jak wskazuje TIG Brush, narażenie na działanie kwasu azotowego może powodować niebezpieczne uszkodzenia układu oddechowego, jeśli nie stosuje się odpowiedniego sprzętu ochronnego i wentylacji. Kwas fluorowodorowy — używany w preparatach do trawienia — stanowi jeszcze większe ryzyko, potrafiąc powodować ciężkie oparzenia, osteoporozę, a nawet śmierć przy niewłaściwej obsłudze.
Nowoczesne systemy elektrolityczne do czyszczenia spoin zapewniają bezpieczniejsze alternatywy. Urządzenia te wykorzystują prąd elektryczny oraz specjalistyczne płyny do czyszczenia, pasywacji i polerowania powierzchni ze stali nierdzewnej w jednej operacji — eliminując konieczność pracy z niebezpiecznymi kwasami i zapewniając lepsze wyniki.
Elektropolerowanie dla poprawionej wydajności
Gdy standardowa pasywacja nie wystarcza, elektropolerowanie oferuje ostateczną obróbkę powierzchniową dla zastosowań krytycznych. Ten proces elektrochemiczny usuwa cienką warstwę materiału z powierzchni stali nierdzewnej, tworząc nadzwyczaj gładką i mikroskopijnie czystą powierzchnię.
Proces elektropolerowania działa jako odwrotność galwanizacji. Komponent ze stali nierdzewnej staje się anodą w komórce elektrolitycznej, a kontrolowany przepływ prądu rozpuszcza metal powierzchniowy w roztworze elektrolitu. Proces ten preferencyjnie atakuje wybrzuszenia i punkty wysokie, stopniowo wyrównując mikroskopijne nieregularności.
Korzyści z elektropolerowania obejmują:
- Znacznie zmniejszona chropowatość powierzchni: Wartości Ra mogą obniżyć się o 50% lub więcej
- Zwięksiona odporność na korozyję: Usunięcie wad powierzchni oraz wzbogacenie warstwy pasywnej chromem
- Ulepszona łatwość czyszczenia: Gładkie powierzchnie ograniczają przyczepność bakterii i łatwiej je czyścić
- Jasny, odbijający wygląd: Tworzy połyskową powierzchnię bez śladów mechanicznego polerowania
- Efekt zaokrąglania krawędzi: Zaokrągla ostre krawędzie i usuwa mikrozgrubienia z powierzchni obrabianych mechanicznie
W przypadku sprzętu gastronomicznego, produkcji farmaceutycznej oraz urządzeń medycznych elektropolerowanie często stanowi wymóg specyfikacji technicznej, a nie tylko opcję. Proces ten jest szczególnie wartościowy, gdy sprzęt musi wytrzymać agresywne protokoły czyszczenia lub mieć kontakt z substancjami żrącymi.
Wybór wykończenia powierzchni dla danego zastosowania
Dobieranie wykończenia powierzchni do wymagań zastosowania wiąże się z równowagą między estetyką, funkcjonalnością a kosztem. Poniższa tabela ułatwia podjęcie decyzji w zakresie specyfikacji:
| Typ wykończenia | Wartość Ra (μin) | Typowe zastosowania | Możliwość czyszczenia | Koszt względny |
|---|---|---|---|---|
| Nr 2B (wytwórnia) | 20-40 | Sprzęt przemysłowy, ukryte komponenty | Umiarkowany | Niski |
| Nr 3 (matowo szlachetne) | 40-60 | Architektura, przetwórstwo żywności | Dobre | Średni |
| Nr 4 (satynowe) | 25-45 | Sprzęt kuchenny, windy, panele ścienne | Dobre | Średni |
| Nr 7 (odbijające) | 10-20 | Wykończenia dekoracyjne, tablice informacyjne | Bardzo dobrze. | Wysoki |
| Nr 8 (Lustrzany) | 5-10 | Elementy architektoniczne, płyty tłoczone | Doskonały | Bardzo wysoki |
| Elektropolerowane | 8-15 | Przeznaczone do kontaktu z lekami, urządzeniami medycznymi i żywnością | Znakomity | Wysoki |
Wymagania branżowe często decydują o wyborze wykończenia:
Powierzchnie w kontakcie z żywnością: Przepisy FDA oraz standardy higieniczne 3-A wymagają powierzchni, które można skutecznie czyścić i dezynfekować. Wykończenia elektropolerowane lub mechanicznie polerowane o klasie wykończenia Nr 4 lub drobniejszej zazwyczaj spełniają te wymagania. Należy unikać faktur, które mogą zatrzymywać cząstki żywności lub stanowić siedlisko bakterii.
Produkcja wyrobów medycznych: Wytyczne ISO 13485 oraz FDA podkreślają łatwość czyszczenia i biokompatybilność. Typowym wymogiem są powierzchnie elektropolerowane z wartościami chropowatości Ra poniżej 20 μin. Zazwyczaj obowiązkowe jest pasywowanie zgodnie z normą ASTM A967 lub A380.
Sprzęt farmaceutyczny: Standardy ASME BPE określają powierzchnie elektropolerowane z udokumentowanymi pomiarami Ra. Wykończenia powierzchni często wymagają certyfikacji z dokumentacją pomiarów możliwą do śledzenia.
Chociaż niektórzy producenci oferują powłokę proszkową lub anodowane wykończenie aluminium dla niektórych zastosowań, takie obróbki nie są zazwyczaj stosowane na stali nierdzewnej. Wrodzona odporność korozyjna stali nierdzewnej oraz dostępne opcje estetyczne czynią takie powłoki zbędnymi – a nawet potencjalnie problematycznymi, jeśli naruszają warstwę pasywną.
Dzięki odpowiedniemu wykończeniu powierzchni i pasywacji Twoje elementy ze stali nierdzewnej są gotowe do eksploatacji. Niemniej jednak nawet starannie zaplanowane projekty wytwarzania napotykają trudności podczas produkcji. Zrozumienie najczęstszych problemów i ich rozwiązań pozwala szybko wykryć i usunąć usterki, zanim staną się kosztownymi utrudnieniami.
Rozwiązywanie typowych problemów podczas wytwarzania
Nawet doświadczeni blacharze napotykają problemy podczas pracy ze stalem nierdzewnym. Unikalne właściwości materiału — większa wytrzymałość, szybkie umacnianie odkształceniowe i wrażliwość na zanieczyszczenia — powodują trudności, które nie występują przy stosowaniu stali węglowej lub aluminium. Znajomość poprawnego sposobu cięcia stali nierdzewnej, zarządzania ciepłem podczas spawania oraz zapobiegania zanieczyszczeniom powierzchni pozwala odróżnić udane projekty od kosztownych przepracowań.
Niniejszy przewodnik rozwiązywania problemów dotyczy najczęstszych trudności podczas obróbki i zawiera praktyczne rozwiązania, które można natychmiast zastosować. Traktuj go jako szybką pomoc w przypadku wystąpienia problemów na hali produkcyjnej.
Rozwiązywanie problemów z umacnianiem odkształceniowym w produkcji
Umocnienie odkształceniowe to zdecydowanie najbardziej niezrozumiane zjawisko występujące podczas cięcia i kształtowania stali nierdzewnej. Gdy odkształcasz stal austenityczną — poprzez cięcie, gięcie lub obróbkę skrawaniem — zmienia się jej struktura krystaliczna, co powoduje wzrost twardości i spadek kruchości. To nie jest wada, to fizyka. Ignorowanie tego zjawiska prowadzi jednak do uszkodzeń narzędzi, niedokładności wymiarowej i przedwczesnego zużycia urządzeń.
Według specjalistów od materiałów z firmy AZO Materials , stale austenityczne ulegają umocnieniu odkształceniowemu w szybkim tempie w porównaniu ze stopami serii 400, które hartują się w tempie zbliżonym do zwykłych stali węglowych. To szybkie umocnienie czyni stale austenityczne odpowiednimi dla zastosowań wymagających wysokiej wytrzymałości i odporności na korozję — ale wymaga dostosowania parametrów produkcji.
Związek między obróbką na zimno a właściwościami mechanicznymi jest znaczący. Przewód ze stali nierdzewnej gatunku 304 może osiągnąć wytrzymałość na rozciąganie przekraczającą 2000 MPa dzięki wyciąganiu na zimno, choć takie wartości są ograniczone do cienkich średnic drutu i cienkich przekrojów. W przypadku większych przekrojów szybka szybkość umocnienia na zimno uniemożliwia osiągnięcie podobnych właściwości bez obróbki cieplnej pośredniej.
Typowe problemy związane z umocnieniem na zimno oraz ich rozwiązania:
-
Problem: Wiertła lub narzędzia tnące szybko się tępią podczas cięcia stali nierdzewnej
Rozwiązanie: Zwiększ prędkość posuwu, aby utrzymać grubość wióra. Płytkie przejścia powodują, że materiał ulega umocnieniu na zimno przed usunięciem materiału, co przyspiesza zużycie narzędzia. Wykonuj głębsze cięcia przy niższych prędkościach skrawania. -
Problem: Materiał staje się zbyt twardy do formowania po wstępnych operacjach gięcia
Rozwiązanie: Starannie planuj kolejność operacji kształtowania. Wykonaj wszystkie gięcia w danym obszarze przed przejściem do obszarów sąsiednich. W przypadku złożonych części ze stali nierdzewnej wymagających wielu operacji rozważ pośredni proces odpuszczania naprężeń. -
Problem: Zbyt duże nagrzanie się materiału podczas obróbki skrawaniem
Rozwiązanie: Używaj ostrych narzędzi z dodatnimi kątami przystawienia. Nakładaj odpowiednią ilość chłodziwa bezpośrednio na strefę skrawania. Zmniejsz prędkość powierzchniową, zachowując prędkość posuwu, aby zapobiec zatrzymywaniu się w trakcie cięcia. -
Problem: Odrzucanie sprężyste nasila się przy każdej kolejnej operacji gięcia
Rozwiązanie: Pamiętaj, że umocnienie na skutek odkształcenia zwiększa granicę plastyczności, co bezpośrednio zwiększa odrzucanie sprężyste. Dostosowuj kompensację nadgięcia stopniowo dla kolejnych gięć na tych samych elementach ze stali nierdzewnej.
W przeciwieństwie do stali węglowych, które charakteryzują się spójną kutejnością przy dowolnych warunkach pracy, stale nierdzewne ulegają silnemu odkształceniom przy powolnych prędkościach gięcia podczas obróbki na zimno. Szybsze i bardziej celowe operacje często dają lepsze wyniki.
Najlepszym sposobem cięcia stali nierdzewnej i minimalizowania efektów umocnienia na zimno jest utrzymywanie stałego obciążenia wióra. Niezależnie od tego, czy używasz noża do metalu, systemu laserowego czy strumienia wodnego, zasada pozostaje ta sama: nie pozwalaj narzędziu przetrzymywać ani tarcie się o powierzchnię. Pozytywne zaangażowanie przy odpowiednim usuwaniu materiału zapobiega powstawaniu wyprężonej warstwy przed krawędzią tnącą.
Zapobieganie zanieczyszczeniom i wadom powierzchni
Zanieczyszczenia żelazem powodują więcej reklamacji gwarancyjnych i uszkodzeń eksploatacyjnych niż prawie każdy inny problem związany z obróbką. Problem ma charakter ukryty — na początku niewidoczny, pojawia się później jako plamy rdzy tygodnie lub miesiące po instalacji. Klienci, którzy wybrali wysokiej jakości stal nierdzewną, słusznie oczekują działania bez korozji, a zanieczyszczenie podczas produkcji całkowicie podważa to oczekiwanie.
Zgodnie z Brytyjskim Stowarzyszeniem Producentów Stali Nierdzewnej , stwierdzono, że zanieczyszczenie powierzchni prowadzi do rdzawy zabarwienia, od lekkiego brązowego 'nabłonkowania' po silne ubytki na powierzchni lub ślady rdzy. Zazwyczaj efekty te są spowodowane kontaktem z przedmiotami ze stali nierdzewnej podczas przechowywania, transportu lub obróbki.
W jaki sposób dochodzi do zanieczyszczenia żelazem? Źródła są wszędzie w typowych środowiskach produkcyjnych:
- Powierzchnie robocze ze stali węglowej: Podpory stołów i konstrukcje nośne przenoszą cząstki żelaza na arkusze ze stali nierdzewnej
- Współdzielone szlifierki: Środki ścierne używane na stali węglowej wprawiają cząstki żelaza, które przenoszą się na powierzchnie ze stali nierdzewnej
- Wyposażenie do podnoszenia: Ślady łańcuchów, chwytaków do podnoszenia i zacisków pozostawiają zanieczyszczenia w punktach kontaktu
- Cząstki unoszące się w powietrzu: Odpady szlifowania z pobliskich operacji na stali węglowej osiadają na powierzchniach ze stali nierdzewnej
- Szczotki druciane: Szczotki ze stali węglowej używane do czyszczenia spoin zanurzają cząstki żelaza w warstwie pasywnej
Gdy tylko jakakolwiek zanieczyszczona powierzchnia zostanie zmoczona, pojawiają się plamy rdzy. Cząstki żelaza ulegają korozji, a produkty korozji zabarwiają otaczającą powierzchnię ze stali nierdzewnej – nawet jeśli stal nierdzewna pozostaje nietknięta pod spodem.
Strategie zapobiegania produkcji wolnej od zanieczyszczeń:
- Dedykuj narzędzia wyłącznie do stali nierdzewnej: Utrzymuj osobne koła szlifierskie, szczotki druciane, tarcze płatkowe i narzędzia tnące. Oznacz sprzęt kolorystycznie, aby zapobiec przypadkowemu użyciu mieszanemu.
- Używaj niemetalicznych materiałów kontaktowych: Zamień stalowe powierzchnie stołów roboczych na tworzywa sztuczne, drewno lub specjalne podpory ze stali nierdzewnej. Stosuj urządzenia podnoszące próżniowe zamiast łańcuchów lub zacisków stalowych.
- Oddzielaj strefy produkcji: W przypadku pracy w warsztatach wielomateriałowych należy fizycznie oddzielić obszary obsługi stali nierdzewnej i stali węglowej. Zainstaluj kotary lub bariery blokujące przenoszenie cząstek unoszących się w powietrzu.
- Czyść powierzchnie po manipulacji: Po każdej operacji obsługi wyczyść arkusze ze stali nierdzewnej czystymi szmatkami, aby usunąć wszelkie przeniesione cząstki, zanim ugrzęzną one w powierzchni.
- Test na zanieczyszczenie: Zastosuj test ferroksylowy opisany w normie ASTM A380, aby wykryć wolny żelazo przed wysyłką. Niebieski ślad pojawiający się w ciągu 15 sekund wskazuje na zanieczyszczenie wymagające usunięcia.
Gdy dojdzie do zanieczyszczenia, metody usuwania zależą od jego stopnia. Lekkie przebarwienia można usunąć kremami czyszczącymi gospodarstwa domowego bez działających ściernie, zawierającymi węglan wapnia. Świeże cząstki żelaza rozpuszczają się w nasyconym roztworze kwasu szczawiowego naniesionym bez tarcia. Silniejsze przebarwienia rdzowe wymagają środków czyszczących na bazie kwasu fosforowego lub obróbki rozcieńczonym kwasem azotowym. W przypadkach bardzo zaawansowanych może być konieczne trawienie kwasem azotowo-fluorowodorowym—przy zachowaniu świadomości, że może to spowodować trawienie powierzchni.
Zarządzanie odkształceniemi i wyginaniem spawanymi
Niższa przewodność cieplna stali nierdzewnej koncentruje ciepło spawalnicze w wąskich strefach, powodując lokalne rozszerzanie się, które prowadzi do odkształceń podczas ochładzania materiału. Cienkie blachy ze stali nierdzewnej przeznaczone do cięcia są szczególnie narażone — pojedynczy szw może wygiąć płaską płytę w niemożliwy do użycia kształt.
Strategie zapobiegania odkształceniom:
- Planuj kolejność spawania strategicznie: Zrównoważ wprowadzanie ciepła, naprzemiennie spawając z przeciwnych stron złożonych elementów. Wykonuj szwy w taki sposób, aby naprężenia termiczne wzajemnie się znosiły, a nie kumulowały.
- Używaj oprzyrządowania i zacisków: Unieruchamiaj elementy podczas spawania i chłodzenia. Zapewnij wystarczający czas na wyrównanie temperatury przed zwolnieniem zacisków.
- Minimalizuj wprowadzanie ciepła: Używaj najniższego prądu, który zapewnia akceptowalne połączenie. Zwiększaj prędkość ruchu tam, gdzie dostęp do złącza to umożliwia. Rozważ stosowanie trybów spawania impulsowego, które zmniejszają całkowite wprowadzenie ciepła.
- Wstępne kompensowanie odkształceń: W przypadku przewidywalnych schematów odkształceń, wstępnie wyginaj lub napinaj elementy, aby ulegały deformacji w pożądany końcowy kształt.
- Wybierz odpowiednie rodzaje połączeń: Zmniejsz objętość spoiny poprzez właściwe przygotowanie brzegów. Mniejsze spoiny generują mniej ciepła i powodują mniejsze odkształcenia.
Zapobieganie zaciskaniu podczas operacji kształtowania
Zaciskanie występuje, gdy powierzchnie ze stali nierdzewnej przylegają do narzędzi pod wpływem ciśnienia, powodując oderwanie materiału z przedmiotu obrabianego i jego przeniesienie na matrycę lub wykrojnik. Wynik: zadrapane elementy, uszkodzone narzędzia i przestoje produkcyjne. Odmiany austenityczne, charakteryzujące się dużą szybkością umocnienia na zimno, są szczególnie narażone.
Metody zapobiegania zaciskaniu:
- Prawidłowe smarowanie: Stosuj odpowiednie smary formujące zarówno na narzędziach, jak i na przedmiotach obrabianych. Preparaty tłoczarskie o dużej wydajności działają lepiej niż lekkie oleje w trudnych operacjach.
- Dobór materiału narzędzia: Używaj narzędzi ze stali hartowanej lub węglika spiekanego z polerowanymi powierzchniami. Unikaj miękkich materiałów matryc, które łatwo ulegają zaciskaniu przy pracy ze stalą nierdzewną.
- Przetwarzanie powierzchni: Stosuj powłoki antyzaciskowe na narzędziach. Niektórzy producenci stosują folię ochronną na blachach ze stali nierdzewnej podczas kształtowania.
- Zmniejsz prędkość kształtowania: Wolniejsze operacje pozwalają na utrzymanie warstwy smarnej oddzielającej powierzchnie.
- Zwiększ luz: Małe luzowania matryc zwiększają tarcie i skłonność do zadzierań. Dla stali nierdzewnej należy stosować nieco większe luzowania niż dla stali węglowej.
Zrozumienie tych typowych wyzwań oraz ich rozwiązań przekształca stal nierdzewną z frustrującego materiału w łatwy do obróbki. Jednak rozwiązanie problemów związanych z produkcją to tylko część sukcesu projektu. Skuteczne zarządzanie kosztami zapewnia, że wysokiej jakości komponenty pozostaną opłacalne – temat, który zasługuje na szczególną uwagę.
Czynniki kosztowe i strategie planowania budżetu
Opanowałeś już aspekty techniczne obróbki stali nierdzewnej — pojawia się teraz pytanie decydujące o tym, czy Twój projekt ruszy dalej: Ile to rzeczywiście będzie kosztować? Zrozumienie ekonomicznych czynników wpływających na obróbkę blach ze stali nierdzewnej pomaga podejmować świadome decyzje, które równoważą wymagania dotyczące jakości z realiami budżetowymi.
Prawda jest taka, że koszty produkcji nie są stałymi wartościami na liście cenowej. Są to dynamiczne obliczenia uzależnione od wyboru materiału, złożoności projektu, wymagań dokładności oraz wielkości zamówienia. Inżynierowie rozumiejący te zależności mogą optymalizować swoje projekty zarówno pod kątem wydajności, jak i oszczędności. Specjaliści ds. zakupów, którzy znają te podstawy, skuteczniej negocjują z producentami komponentów ze stali nierdzewnej. Przeanalizujmy czynniki, które rzeczywiście wpływają na budżet Twojego projektu.
Wpływ gatunku materiału na budżet projektu
Wybór gatunku to jedna z najważniejszych decyzji kosztowych, jakie podejmiesz – różnice cenowe są znaczące. Zgodnie z analizą branżową z 2025 roku , cena stali nierdzewnej różni się znacznie w zależności od składu stopu:
| Stala | Szacunkowa cena 2025 (za tonę) | Główny czynnik kosztowy |
|---|---|---|
| 201 | $1,800 – $2,200 | Niski udział niklu, wysoki mangan |
| 304 | $2,500 – $3,000 | Standardowy poziom niklu i chromu |
| 316 | $3 500 – $4 200 | Dodatek molibdenu dla odporności na korozję |
| 410 | $2 000 – $2 600 | Struktura martenzytyczna, niska zawartość niklu |
| 430 | $2 000 – $2 500 | Stop ferrtyczny, minimalna zawartość niklu |
Zauważasz wzorzec? Zawartość niklu i molibdenu decyduje o cenie. Stopa 316 kosztuje o 40–60% więcej niż 304 dzięki lepszej odporności na korozję — ale ta wyższa cena ma sens tylko wtedy, gdy Twoje zastosowanie rzeczywiście tego wymaga. Określanie stopy 316 do wnętrz, gdzie wystarczyłaby 304, a nawet 430, marnuje budżet, który mógłby zostać przeznaczony na inne cele.
Dobierając niestandardowe elementy ze stali nierdzewnej, rozważ całkowity koszt posiadania, a nie tylko początkową cenę blachy stalowej. Tańszy gatunek, który ulegnie przedwczesnemu uszkodzeniu lub będzie wymagał częstszego konserwowania, może okazać się znacznie droższy w całym okresie eksploatacji komponentu. Środowiska morskie, oddziaływanie chemikaliów oraz zastosowania w wysokich temperaturach zwykle uzasadniają inwestycję w droższe gatunki.
Decyzje projektowe redukujące koszty produkcji
Twoje decyzje projektowe mają wpływ na cały proces produkcji. Złożone geometrie wymagają większej liczby operacji, mniejsze tolerancje – wolniejszego przetwarzania, a nietypowe cechy mogą wymagać specjalistycznego oprzyrządowania. Mądre decyzje projektowe mogą obniżyć koszty o 20–40%, nie naruszając funkcjonalności.
Specyfikacje tolerancji wyraźnie pokazują związek z kosztami. Zależność między tolerancją a kosztem ma charakter wykładniczy:
- Tolerancje standardowe (±0,25 mm): Koszt podstawowy – odpowiednie dla 80% zastosowań
- Tolerancje dokładne (±0,1 mm): zwiększenie kosztów o 25–40% ze względu na wolniejsze przetwarzanie i dodatkowe kontrole
- Tolerancje wysokiej precyzji (±0,05 mm): zwiększenie kosztów o 400–600%, wymagające specjalistycznego sprzętu, środowiska z kontrolowaną temperaturą oraz potencjalnej stawki odrzuceń na poziomie 15–20%
Standardowe tolerancje ±0,25 mm nadają się do 80% zastosowań przy podstawowym koszcie. Zaostrzenie ich do ±0,1 mm zwiększa koszty o 25–40%, natomiast tolerancje ±0,05 mm mogą kosztować nawet 5–8 razy więcej ze względu na specjalistyczne wyposażenie, wymagania kontroli jakości oraz wyższy współczynnik odrzuceń.
Zasada 80/20 działa tutaj bardzo skutecznie: 80% cech Twojego elementu może korzystać ze standardowych tolerancji, podczas gdy tylko 20% wymaga precyzji. Stosuj ciasne tolerancje selektywnie dla krytycznych wymiarów — na przykład lokalizacji otworów montażowych wpływających na składanie — pozwalając jednocześnie na bardziej luźne tolerancje dla niefunkcjonalnych cech.
Strategie optymalizacji kosztów w projektach cięcia stalowych blach na zamówienie:
- Standaryzacja grubości materiału: Używanie typowych grubości stalowych blach na zamówienie redukuje koszty materiału i czas realizacji. Egzotyczne grubości wymagają specjalnych zamówień z minimalnymi ilościami i dłuższym czasem dostawy.
- Projektuj zgodnie z standardowymi rozmiarami blach: Rozmieszczaj elementy wydajnie w obrębie standardowych wymiarów płyt stalowych. Nietypowe rozmiary części generujące duże odpady zwiększają koszt materiału jednostkowego.
- Minimalizuj operacje wtórne: Każda dodatkowa operacja — usunięcie zadziorów, gwintowanie, wklejanie elementów — zwiększa koszty manipulacji i pracy. Projektuj cechy, które można wykonać w ramach operacji podstawowych, o ile to możliwe.
- Zmniejsz złożoność spawania: Prostsze konstrukcje połączeń wymagają mniej czasu spawania i powodują mniejsze odkształcenia. Określaj minimalny rozmiar spoiny spełniający wymagania wytrzymałościowe.
- Rozważ alternatywne metody łączenia: Montaż elementów mechanicznych może być tańszy niż spawanie w niektórych zastosowaniach, szczególnie gdy istnieje ryzyko odkształceń termicznych.
Ekonomia wielkości partii i struktury cenowe
Ilość zamówienia drastycznie wpływa na cenę jednostkową — jednak zależność ta nie zawsze jest liniowa. Zrozumienie ekonomii pomaga zoptymalizować terminy i wielkości zamówień.
Koszty prototypowania są wyższe na jednostkę, ponieważ:
- Czas przygotowania jest rozłożony na mniejszą liczbę elementów
- Programowanie i kontrola pierwszego egzemplarza mają zastosowanie niezależnie od ilości
- Minimalne ilości materiału mogą wymagać zakupu większej ilości, niż potrzeba
- Przetwarzanie pilne często dotyczy harmonogramów projektowych
Spodziewaj się, że cena prototypu będzie o 3–10 razy wyższa za sztukę w porównaniu do serii produkcyjnej. Ten dodatek odzwierciedla rzeczywiste koszty — a nie nadmierne naliczenie marży. Inwestycja w odpowiednie prototypowanie pozwala jednak zweryfikować konstrukcję przed rozpoczęciem produkcji narzędzi, co potencjalnie może zaoszczędzić znacznie więcej niż koszt premii za prototyp, jeśli problemy zostaną wykryte wcześnie.
Cena produkcji korzysta z:
- Rozłożenia kosztów przygotowania na większe ilości
- Zniżek objętościowych na zamówienia płyt stalowych
- Optymalizacji procesu oraz krzywej uczenia się operatorów
- Zmniejszone współczynniki próbkowania inspekcyjnego
- Automatyzacja obsługi i efektywność przetwarzania
Zakupy hurtowe mogą obniżyć koszty jednostkowe o 20–40% przy znacznych ilościach. Należy jednak uwzględnić koszty utrzymania zapasów, wymagania dotyczące magazynowania oraz ryzyko przestarzałych zapasów w wyniku zmian projektowych.
Poza materiałami i obróbką nie należy lekceważyć ukrytych kosztów wpływających na całkowity budżet projektu: logistyki i przewozu (szczególnie dla importowanych materiałów), wykończenia i powierzchniowej obróbki, dokumentacji inspekcyjnej i certyfikacyjnej oraz wymagań związanych z opakowaniami. W przypadku złożonych zestawów obejmujących wiele producentów komponentów ze stali nierdzewnej, koszty koordynacji oraz potencjalne problemy z kompatybilnością generują dodatkowe obciążenie zarządzaniem projektem.
Mając jasne rozumienie czynników wpływających na koszty oraz strategii optymalizacji, jesteś przygotowany na ocenę partnerów produkcyjnych, którzy będą w stanie dostarczyć wysokiej jakości niestandardowe części ze stali nierdzewnej po konkurencyjnych cenach — proces ten wymaga starannego rozważenia.
Wybór odpowiedniego partnera w zakresie wykonywania blach
Zrozumienie czynników kosztowych to tylko połowa sukcesu — znalezienie partnera wykonawczego, który zapewnia stałą jakość, szybką komunikację i niezawodne możliwości produkcyjne, decyduje o tym, czy projekt realizacji konstrukcji ze stali nierdzewnej zakończy się powodzeniem, czy porażką. Wybrany partner staje się przedłużeniem Twojego zespołu inżynieryjnego, wpływając na wszystko — od optymalizacji projektu po terminy dostawy.
Podczas poszukiwania usług wykonywania blach w pobliżu lub oceny dostawców stali w szerszych regionach geograficznych, unikaj pokusy wyboru wyłącznie na podstawie oferowanej ceny. Najniższa oferta często sygnalizuje oszczędzanie — w jakości materiałów, procedurach kontroli jakości czy doświadczeniu pracowników. Zamiast tego oceniaj potencjalnych partnerów pod wieloma kryteriami przewidującymi długoterminowy sukces.
Wymagania dotyczące certyfikatów według branż
Certyfikaty stanowią potwierdzenie zewnętrzne, że producent utrzymuje udokumentowane systemy jakości i spełnia branżowe standardy. Choć każdy zakład może twierdzić, że jest kompetentny, certyfikowani producenci udowodnili skuteczność swoich procesów poprzez rygorystyczne audyty zewnętrzne.
Certyfikacja IATF 16949 stanowi standard odniesienia dla partnerów łańcucha dostaw motocyklowych i samochodowych. Certyfikat ten, wspierany przez główne stowarzyszenia branżowe motocyklowe i samochodowe, wykracza poza podstawowe wymagania normy ISO 9001, obejmując zasady produkcji zwinnej (lean manufacturing), zapobieganie wadom, redukcję odchyłek oraz minimalizację marnotrawstwa. Dla komponentów nadwozia, elementów zawieszenia oraz zespołów konstrukcyjnych przeznaczonych do pojazdów dostawcy posiadający certyfikat IATF 16949 oferują:
- Spójna jakość: Procesy monitorowane i mierzone, które maksymalizują produktywność i gwarantują powtarzalne wyniki
- Zmniejszenie zmienności produktu: Przeanalizowane procesy produkcyjne oraz systemy zarządzania jakością zapewniające, że części ze stali nierdzewnej systematycznie spełniają określone specyfikacje
- Niezawodna integracja z łańcuchem dostaw: Międzynarodowo uznane standardy określające kryteria kwalifikacyjne dla dostawców
- Zapobieganie wadom: Przetestowane i sprawdzone procesy obróbki metalu, spawania i wykańczania minimalizujące wady i nieefektywności
Shaoyi (Ningbo) Metal Technology jest przykładem kompleksowego podejścia do produkcji komponentów motoryzacyjnych. Jako Producent certyfikowany zgodnie z IATF 16949 , dostarcza niestandardowe części tłoczone oraz precyzyjne zespoły dla podwozi, zawieszeń i elementów konstrukcyjnych — wsparte systemami jakości wymaganymi przez głównych producentów OEM branży motoryzacyjnej.
Certyfikat ISO 9001 dotyczy ogólnego przemysłu produkcyjnego. Ten podstawowy standard zapewnia dokumentowane procedury jakości, zaangażowanie zarządu oraz procesy ciągłej poprawy. Dla zastosowań pozamotoryzacyjnych ISO 9001 gwarantuje podstawowy poziom uporządkowania działań operacyjnych.
Certyfikacje specyficzne dla danego sektora kwestia szczególna dla zastosowań specjalistycznych:
- AS9100: Wymagania produkcji przemysłu lotniczego
- ASME: Produkcja komponentów naczyń ciśnieniowych i kotłów
- Certyfikaty AWS: Procedura spawania i kwalifikacje personelu
- ISO 13485: Produkcja Urządzeń Medycznych
Zanim skontaktujesz się z warsztatami blacharskimi w pobliżu lub oddalonymi dostawcami, upewnij się, jakie certyfikaty wymagają Twoja branża i odbiorcy. Zlecenie ofert warsztatom bez odpowiednich certyfikatów to strata czasu, gdy certyfikacja jest ostatecznie obowiązkowa.
Ocena możliwości od prototypowania do produkcji
Przejście od koncepcji do produkcji seryjnej stanowi krytyczne zagrożenie w wielu projektach blacharstwa ze stali nierdzewnej. Partnerzy doskonali w prototypowaniu mogą nie posiadać zdolności produkcyjnych. Z drugiej strony, dużi producenci blacharscy w pobliżu mogą nie okazywać zainteresowania małymi zleceniami rozwojowymi. Szukaj partnerów oferujących płynny przejście od prototypowania do produkcji.
Usługi szybkiego prototypowania dostarczają kluczowej wartości podczas rozwoju produktu:
- Weryfikacji projektu: Fizyczne części ujawniają problemy, które modele CAD pomijają — interferencje montażowe, problemy ergonomii oraz wady estetyczne stają się widoczne dopiero przy posiadaniu rzeczywistego elementu
- Weryfikacja procesu: Zaprezentowane prototypy potwierdzają, że sekwencje formowania działają poprawnie, spoiny osiągają odpowiednią penetrację, a wykończenie spełnia oczekiwania
- Doprecyzowanie kosztów: Rzeczywiste doświadczenie z produkcji zapewnia dokładne prognozy kosztów produkcji
- Skrócenie harmonogramu: Szybkie opracowanie prototypów przyspiesza cykle rozwojowe i skraca czas wprowadzenia produktu na rynek
W przypadku programów motoryzacyjnych wymagających szybkiej iteracji, Shaoyi oferuje prototypowanie w ciągu 5 dni, które weryfikuje projekty przed inwestycją w narzędzia produkcyjne. Ta szybkość umożliwia wykonanie wielu iteracji projektowych w ramach skróconych harmonogramów rozwojowych — co jest szczególnie cenne, gdy niestandardowe komponenty ze stali nierdzewnej muszą być zintegrowane z dynamicznie rozwijającą się architekturą pojazdu.
Według ekspertów branży obróbki metalu, ocena potencjalnego partnera powinna obejmować weryfikację:
- Możliwości urządzeń: Maszyn CNC, giętarek, spawarek automatycznych oraz cięcia laserowego odpowiednich do wymagań projektu
- Ekspertyza materiałowa: Specjalizacja w stali nierdzewnej — nie każdy zakład jednakowo dobrze radzi sobie ze wszystkimi metalami
- Pełen zakres usług: Projektowanie, inżynieria, wyroby metalowe, montaż i wykańczanie w jednym miejscu przyspieszają komunikację i zapewniają odpowiedzialność
- Szkolenia personelu: Operatorzy przeszkoleni w obsłudze konkretnego sprzętu realizującego Państwa zlecenia
Wsparcie przy projektowaniu pod kątem technologii (DFM) różni wyjątkowych partnerów od zwykłych wykonawców. Doświadczeni partnerzy zajmujący się obróbką stali analizują projekty przed przygotowaniem oferty, wskazując możliwości obniżenia kosztów, poprawy jakości lub zwiększenia wydajności. Takie podejście współpracy pozwala wykryć problemy na wczesnym etapie — gdy zmiany nie wiążą się z kosztami — a nie podczas produkcji, kiedy modyfikacje wymagają drogich przebudów narzędzi
Kompleksowe wsparcie DFM świadczone przez Shaoyi stanowi przykład takiego podejścia partnerskiego, pomagając klientom zoptymalizować projekty pod kątem zarówno wydajności, jak i łatwości produkcji, zanim dojdzie do wdrożenia narzędzi produkcyjnych
Czas realizacji i standardy komunikacji
Szybkość, z jaką wytwórca odpowiada na wnioski o wycenę, świadczy o tym, jak będzie działał w trakcie realizacji projektu. Firmy, które potrzebują tygodni na przedstawienie ceny, zazwyczaj powodują podobne opóźnienia podczas produkcji. Z kolei partnerzy o efektywnym procesie wyceny zazwyczaj utrzymują taką dyscyplinę w całym zakresie działalności.
Wskaźniki szybkości odpowiedzi na zapytania ofertowe:
| Czas reakcji | Co to oznacza |
|---|---|
| Tego samego dnia do 24 godzin | Wysoce zorganizowane działania z dedykowanymi zasobami szacunkowymi; prawdopodobnie dotrzymają zobowiązań produkcyjnych |
| 2-3 Dni Robocze | Standardowy czas odpowiedzi dla projektów złożonych; akceptowalny dla większości wymagań dotyczących obróbki stali |
| 1-2 tygodnie | Ograniczona pojemność lub niezorganizowane procesy; mogą mieć problemy z dotrzymaniem zobowiązań dostawowych |
| Więcej niż 2 tygodnie | Poważne problemy operacyjne; rozważ alternatywne dostawcy |
Shaoyi's 12-godzinna realizacja wyceny demonstruje dyscyplinę operacyjną, która obejmuje cały proces produkcyjny — od pierwszego zapytania po zautomatyzowaną produkcję seryjną.
Dodatkowe kryteria oceny potencjalnych partnerów:
- Doświadczenie i referencje: Poproś o studia przypadków lub referencje klientów z podobnych projektów. Uznani wytwórcy stali powinni chętnie przedstawić dowody skutecznej realizacji zleceń.
- Kompetencje w zarządzaniu projektami: Wykwalifikowany przedstawiciel powinien swobodnie i przejrzyście przeprowadzić Cię przez procesy produkcji.
- Historia dotrzymania terminów dostaw: Zapytaj o wskaźniki wydajności dostaw. Partnerzy, którzy monitorują i udostępniają te dane, wykazują zaangażowanie w poczucie odpowiedzialności.
- Procesy rozwiązywania problemów: Dowiedz się, jak są rozwiązywane problemy, gdy się pojawią — ponieważ pojawią się. Szybka komunikacja w trudnych sytuacjach jest ważniejsza niż perfekcja w warunkach normalnej działalności.
Znalezienie odpowiedniego partnera w zakresie blacharskich wyrobów ze stali nierdzewnej wymaga zachowania równowagi między wieloma czynnikami: certyfikatami odpowiadającymi wymaganiom Twojej branży, sprzętem i doświadczeniem dostosowanym do potrzeb projektu, możliwościami prototypowania wspierającymi harmonogramy rozwoju oraz standardami komunikacji zapewniającymi wiarygodne wykonanie. Inwestycja w dokładną ocenę partnera przynosi korzyści na przestrzeni całego projektu — a często również kolejnych zleceń.
Często zadawane pytania dotyczące obróbki blach ze stali nierdzewnej
1. Czy obróbka stali nierdzewnej jest trudna?
Tak, stal nierdzewna stwarza unikalne wyzwania w porównaniu ze stalą miękką lub aluminium. Jej wysoka wytrzymałość na rozciąganie czyni cięcie i gięcie bardziej wymagającymi procesami, podczas gdy szybkie umacnianie się materiału podczas kształtowania wymaga dostosowania narzędzi oraz prędkości obróbki. Materiał ten wykazuje również większe odbijanie się podczas gięcia – zazwyczaj od 2 do 15° dla stopni austenitycznych – co wymaga kompensacji nadmiernego gięcia. Jednak dzięki odpowiedniemu wyposażeniu, właściwemu doborowi technik oraz doświadczonym operatorom, obróbka blach ze stali nierdzewnej daje doskonałe rezultaty. Producenti certyfikowani zgodnie z IATF 16949, tacy jak Shaoyi, specjalizują się w pokonywaniu tych wyzwań poprzez zoptymalizowane procesy oraz kompleksowe wsparcie DFM.
2. Ile kosztuje obróbka blach ze stali nierdzewnej?
Koszty wyrobu ze stali nierdzewnej zależą od kilku czynników: gatunku materiału (304 kosztuje 2500–3000 USD/tonę, podczas gdy 316 to 3500–4200 USD/tonę), specyfikacji tolerancji (zwężenie z ±0,25 mm do ±0,05 mm może zwiększyć koszty 5–8 razy), złożoności projektu oraz ilości zamówienia. Cena za sztukę w przypadku prototypów jest zwykle 3–10 razy wyższa niż przy seriach produkcyjnych, ze względu na rozłożenie kosztów przygotowania. Aby zoptymalizować koszty, należy standaryzować grubości materiału, projektować elementy umożliwiające efektywne rozmieszczenie na arkuszu oraz stosować ścisłe tolerancje wyłącznie dla krytycznych wymiarów. Współpraca z producentami oferującymi przygotowanie wyceny w ciągu 12 godzin pozwala szybko porównać dostępne opcje cenowe.
3. Jaki jest najlepszy sposób cięcia blach ze stali nierdzewnej?
Optymalna metoda cięcia zależy od grubości materiału i wymaganych tolerancji. Cięcie laserowe sprawdza się najlepiej w przypadku cienkich i średnich blach (do 2,5 cm), zapewniając tolerancje ±0,025–0,127 mm z czystymi krawędziami. Cięcie strumieniem wody nadaje się do grubszych materiałów (do 15 cm i więcej) oraz zastosowań wrażliwych na ciepło, ponieważ nie powstaje strefa wpływu cieplnego. Cięcie plazmowe oferuje opłacalne przetwarzanie dla grubych materiałów, jednak daje szersze krawędzie wymagające dodatkowej obróbki wykończeniowej. W przypadku precyzyjnych komponentów samochodowych najlepsze rezultaty daje cięcie laserowe połączone z odpowiednimi ustawieniami lasera włóknowego (około 90% mocy z gazem wspomagającym azotem).
4. Które gatunki stali nierdzewnej są najlepsze do obróbki blach?
Wybór gatunku zależy od wymagań Twojej aplikacji. Stal nierdzewna 304 stanowi najbardziej uniwersalny wybór — doskonała formowalność, spawalność i odporność na korozję przy umiarkowanym koszcie. Stal nierdzewna 316 zawiera molibden, co zapewnia lepszą odporność na chlorki, dzięki czemu jest idealna w środowiskach morskich, farmaceutycznych i przetwórstwa spożywczego. Gatunek 316L oferuje zwiększoną spawalność dzięki obniżonej zawartości węgla, minimalizując wrażliwość na korozję w strefach spawania. Dla zastosowań wewnętrznych przy ograniczonym budżecie ferrytyczna stal 430 zapewnia dobrą odporność na korozję przy niższym koszcie. Producenci samochodów zwykle określają gatunki 304 lub 316 dla elementów szkieletu i konstrukcji nośnych, wymagających trwałości oraz ochrony przed korozją.
5. Jak zapobiega się rdzy na wyrobach z blachy ze stali nierdzewnej?
Zapobieganie korozji wymaga usuwania zanieczyszczeń żelazem oraz przywracania ochronnej warstwy tlenku chromu po obróbce. Należy stosować dedykowane wyłącznie do stali nierdzewnej narzędzia—osobne koła szlifierskie, szczotki druciane i powierzchnie robocze zapobiegają przeniesieniu stali węglowej. Odpaszowanie po spawaniu lub toczeniu usuwa swobodne atomy żelaza i przywraca bierną warstwę za pomocą roztworów kwasu azotowego lub cytrynowego. W przypadku konstrukcji spawanych odpowiednie przepłukiwanie argonem od strony odwrotnej zapobiega powstawaniu zabarwień termicznych, które pogarszają odporność na korozję. Elektropolerowanie zapewnia najwyższy poziom ochrony w zastosowaniach krytycznych, tworząc wyjątkowo gładkie powierzchnie z wzbogaconymi chromowo warstwami biernymi.