 Kis szeletek, magas szabványok. Gyors prototípuskészítési szolgáltatásunk gyorsabbá és egyszerűbbé teszi az ellenőrzést —

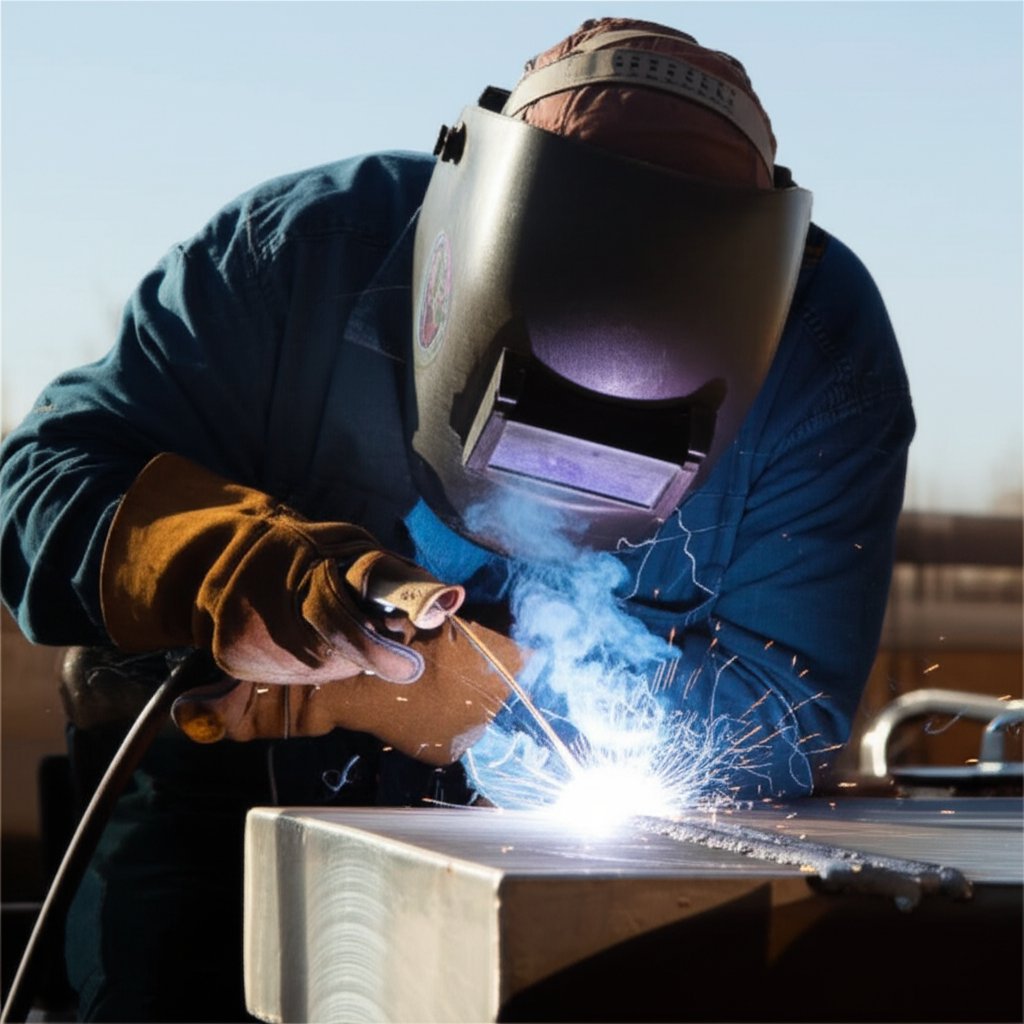
Alumínium elektródás (MMA) hegesztés 10 lépésben: a beállítástól a minőségi hegesztésig
1. lépés: Döntse el, hogy a kézi ívhegesztés megfelel-e feladatának
Lehetséges-e az alumínium kézi ívhegesztése sikeresen?
Valaha eltűnődött már azon, hogy az alumíniumot ugyanolyan könnyedén lehet-e kézi ívhegesztéssel hegeszteni, mint az acélt? Míg alumínium kézi ívhegesztés (technikai nevén kézi ívhegesztés vagy mma alumíniumhegesztés) elvileg lehetséges, nem mindig az első választás. Az alumínium kézi ívhegesztésének megvannak a saját kihívásai – nagyobb a pórusképződés, salakkibugyborék és a hegesztési varrat esztétikája elmarad a TIG vagy MIG hegesztéshez képest. Ugyanakkor a megfelelő feladatra és megfelelő előkészítéssel erős, működőképes hegesztéseket lehet elérni.
Mikor jobb a kézi ívhegesztés TIG helyett terepi javításoknál
Képzelje el, hogy a terepen dolgozik, erős szél fúj, és nincs mód védőgáz beállítására. Éppen ilyen helyzetekben válik előnyössé a alumínium hegesztése kézi ívhegesztéssel. A TIG vagy MIG hegesztéssel ellentétben, amelyek védőgáz használatát igénylik, és tisztább, szabályozott műhelyi környezethez vannak igazítva, a kézi ívhegesztés (SMAW) olyan, fluxusköpenyes elektródákat használ, amelyek saját védőgázt biztosítanak. Ez a módszer különösen alkalmas terepi javításokra, különösen akkor, amikor a hordozhatóság és a rugalmasság fontosabb, mint az esztétikus megjelenés. Ha alumíniumot kézi ívhegesztéssel kíván hegeszteni külső térben vagy szűk helyeken, akkor ez a módszer gyakran a legjobb választás.
Biztonság és projektterjedelem ívbeütés előtt
Mielőtt elkezdené az alumíniumhegesztést kézi ívhegesztő készülékkel, a biztonság és a projekt megfelelő megtervezése elengedhetetlen. Kezdje a munka meghatározásával:
- Javítás vagy gyártás: Egy repedt öntvény javításáról van szó, vagy egy új szerkezet építéséről?
- Fém állapota: Az alumínium tiszta és új, vagy zsíros és oxidálódott?
- Hozzáférhetőség a kötéshez: Könnyen eléri a hegesztési területet, vagy akadályozva van?
- Környezet: Műhely (kontrollált) vagy szabadban (változó)?
Az alumínium hegesztése különösen praktikus extrudált alkatrészek vagy autóipari szerelvények javításához. Kritikus alkalmazásoknál – például járművekben lévő alumínium extrudált alkatrészek integrálásakor vagy javításakor – nagyon fontos a magas minőségű, hegeszthető alapanyaggal kezdeni a megbízható eredmény érdekében.
-
Alumínium-ívhegesztési ellenőrzőlista (Go/No-Go):
- Anyagvastagság: 3 mm (1/8") vagy annál vastagabb az alumínium-ívhegesztéshez
- Egységtípus: A fenék, a filé vagy a csípőegységek könnyen hozzáférhetőek
- Energiaforrás: AC vagy DC ütőösszevarró, elegendő áramerővel
- Munkahelyi: Aluminímum-tartomány a keresztszennyezés megelőzése érdekében
- Teljes személyvédelmi berendezés: Öntömlő sisak, lángálló ruházat, bőrkesztyű
- Szellőztetés: A levegőáramlás megfelelő a levegőfolyadékok kezelésére
Fontos realisztikus elvárásokat támasztani. Habár elérhető vele jó, szivárgásmentes hegesztés, alumínium hegesztése MMA-val , az eredmény nem biztos, hogy olyan sima lesz, mint TIG-hegesztett alumíniumnál. A sikeres hegesztés itt a szerkezeti integritást, valamint a nagyobb pórusoktól és szivárgásoktól mentes varratot jelenti – különösen, ha az alkatrész terhelésnek vagy folyadékhatásnak lesz kitéve.
Az alumínium elektródás hegesztése elsősorban teregi javításokra, vastagabb szelvényekre, valamint olyan munkákhoz ajánlott, ahol a hordozhatóság és rugalmasság fontosabb, mint a kozmetikai tökéletesség.
Az autóipari javítások során extrudált alumíniummal dolgozók számára fontos, hogy pontossággal gyártott alumínium extrudált alkatrészek alkatrészekkel dolgozzanak a hegesztés minőségének és megbízhatóságának maximalizálása érdekében. Ez az egy lépés mindenben eltérhet, ha alumíniumot kell elektródás hegesztéssel hegeszteni, és bízni kell az eredményben.
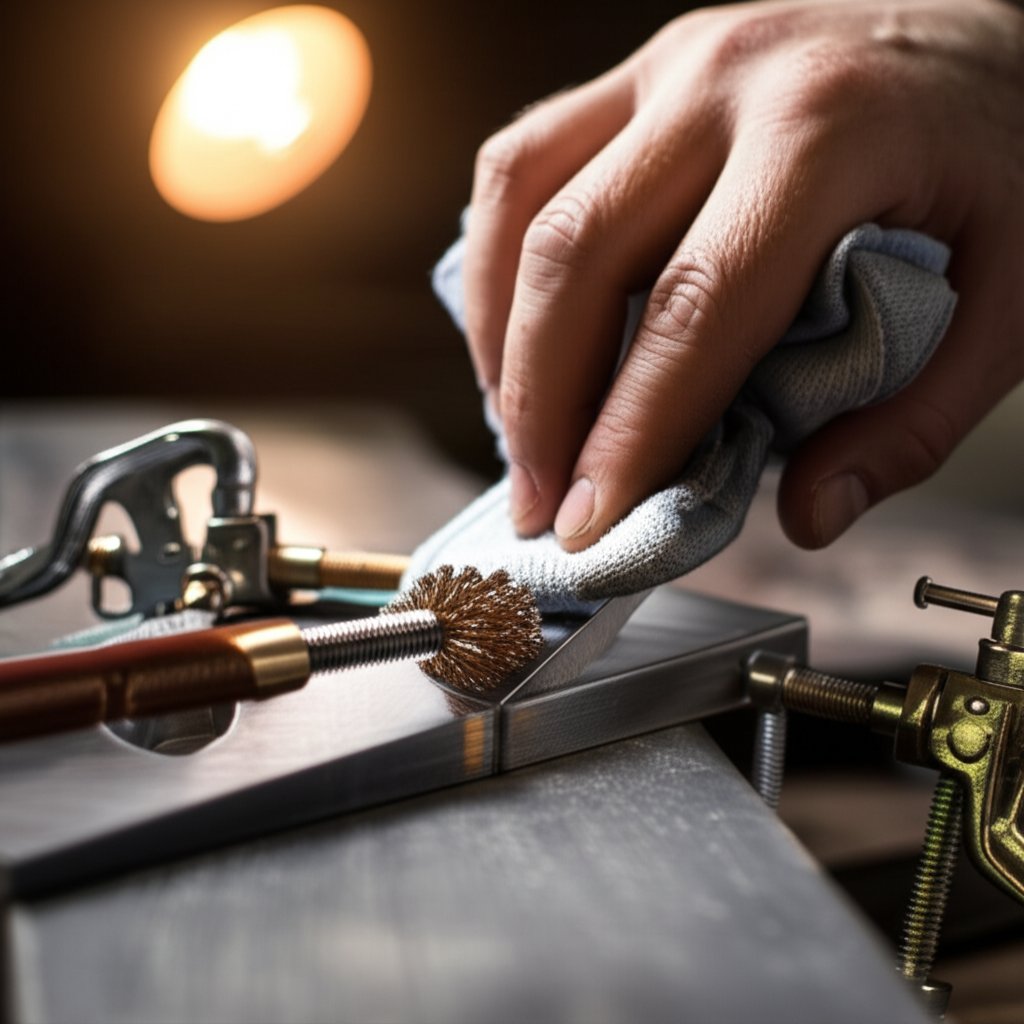
2. lépés: Alapfém előkészítése és ötvözet-specifikus szempontok ellenőrzése
Felület-előkészítés, ami megakadályozza a pórusképződést
Bonyolultnak tűnik? Nem kell, hogy az legyen. A tartós, megbízható hegesztés titka az, hogy alumínium kötése pálcza-szivattyúval technikája mind a megfelelő előkészítésben rejlik. Az alumínium gyors oxidációra hajlamos, és hajlamos a szennyeződések megkötésére, ami azt jelenti, hogy még a legjobb hegesztési technika sem pótolhatja a felület előkészítésének hiányát. Ha valaha látott olyan hegesztést, amely lyukakkal vagy repedésekkel volt tele, akkor valószínűleg az olaj, zsír vagy az ellenálló oxidréteg volt az okozója.
- A felület zsírtalanítása : Kezdje meg az összes olaj, kenőanyag és szénhidrogén-maradék eltávolításával. Használjon szövetmentes törlőkendőt hegesztéshez alkalmas oldószerrel átitatva – például aceton vagy ásványi szelencze. Kerülje az alkoholt és a hagyományos drótkenuket ezen lépésnél, mivel azok nem távolítják el valóban az olajat, és esetleg tovább is terjeszthetik. Hagyja teljesen elpárologni az oldószert, mielőtt folytatná.
- Az oxidréteg eltávolítása : A zsírtalanítást követően azonnal használjon kizárólag alumíniumhoz fenntartott rozsdamentes acél drótkenuet. Alkalmazzon enyhe, egyirányú kefézést – túl nagy nyomás az oxidok mélyebb beágyazódását okozhatja. Soha ne használjon olyan kefét, amely korábban vasat érintett, mivel ez kereszt-szennyeződést okozhat, ami hegesztési hibákhoz vezethet.
- Lekerekítés és illesztés : Vastagabb szakaszokhoz (1/4 hüvelyknél vastagabb) 60–90°-os V-kúpot kell csiszolni. Ez segíti a hegesztés teljes behatolását és csökkenti a fúziós problémák kockázatát. Illessze szorosan a darabokat egymáshoz – az alumínium gyorsan tágul melegítéskor, így a rések kiszélesedhetnek és ronthatják a hegesztés minőségét. Mechanikai csavaros rögzítőkkel tartja a dolgokat szorosan ( Arccaptain ).
- Szükség szerint előmelegítés : Vastag lemezhez vagy öntvényhez előmelegítést 200–300°F-ra (használjon hőmérsékleti krétát vagy IR hőmérőt). Az előmelegítés segít a nedvesség eltávolításában és csökkenti a repedés kockázatát, de óvatosan – túlmelegítés gyengítheti a hőkezelt ötvözeteket. Vékony alumínium (1/8 hüvelyknél vékonyabb) általában nem igényel előmelegítést, és valójában károsodhat a felesleges hőtől.
Mindig azonnal kefélje meg a csatlakozó területet a hegesztés előtt – az alumínium oxidrétege percek alatt újra képződhet és tönkreteheti a hegesztés integritását.
SMAW alumínium hegesztéshez használt ötvözetcsaládok figyelembevétele
Amikor alumínium hegesztése pálcával , nem minden ötvözet viselkedik azonosan. A öntvények például pórusosabbak, és nagyobb gázfejlődést okozhatnak – várhatóan csökkentenie kell a haladási sebességet, és el kell távolítani a salakot a rétegek között. A legjobb eredmény érdekében mindig:
- Vigyázzon a AWS D1.2 Structural Welding Code Aluminum útmutatására a kiinduló anyagok kompatibilitásával és a kötés kialakításával kapcsolatban.
- Ellenőrizze az elektród gyártó tájékoztatóit, valamint az AWS A5.3 szabványt a javasolt hozzámérő típusokért és az ötvözetekre vonatkozó különleges figyelmeztetésekért.
Ne találgassa az ötvözet számát – nézze meg a komponens dokumentációját vagy jelöléseit, és ennek megfelelően válassza ki az alumínium hegesztéséhez használt kézi ívhegesztő elektródákat. Ha bizonytalan, akkor gyakoroljon hulladékon, és ellenőrizze a repedéseket és pórusokat, mielőtt a fő munkadarabhoz fogná.
Előmelegítés és illesztés alapjai
Képzelje el, hogy próbál hogyan kell alumíniumot kézi ívhegesztéssel hegeszteni anélkül, hogy tudná, szükség van-e előmelegítésre. Általános szabályként, vastag vagy öntött szakaszok esetén végezzen előmelegítést, de kerülje vékony, hőkezelt ötvözeteknél, kivéve, ha az elektród gyártó kifejezetten ajánlja. A kompromisszum? Az előmelegítés segít csökkenteni a gázkiáramlást és a repedéseket, de csökkentheti egyes hőkezelt alumíniumok szilárdságát, ezért mindig ellenőrizze az elektród technikai adatait.
A mechanikai illeszkedés szintén fontos: használjon csavarokat a rések minimalizálására, és győződjön meg róla, hogy minden él tiszta és oxidmentes. Pontos illeszkedés megakadályozza a kifúródást és biztosítja a hegesztési varrat egységességét – elengedhetetlen a olvasztóelektródás alumíniumhegesztésnél munka során.
- Öntvények esetén: számítson nagyobb gázkiáramlásra – lassítsa a hegesztési sebességet, tisztítsa meg a varratot a rétegek között, és legyen türelmes a salak eltávolításánál.
- Extrudált vagy hengerelt lemez esetén: figyeljen a pontos illeszkedésre és a minimális hézagra a deformáció elkerüléséhez.
Ne feledje, hogy az előkészítésbe fektetett idő megtérül a hibák csökkentésében, erősebb hegesztésekben és kevesebb későbbi frusztrációban. Készen áll a gép beállítására a következő lépéshez? Folytassuk a stick hegesztőgép és az elektród kiválasztásának beállításával az alumíniumhegesztéshez.
3. lépés: Áramirány, elektródok és paraméterek beállítása stick hegesztéshez alumíniumnál
Válasszon fluxusköpenyes elektródokat alumíniumhoz
Már próbált alumíniumot hegeszteni acélpáccal, és eltűnődött, miért lett a végeredmény katasztrofális? A titok az elektródban rejlik. A alumínium kézi ívhegesztés , fluxusköpenyes alumínium hegesztőpáccsal kell stick hegesztőgéphez —kifejezetten az AWS A5.3 szabványnak megfelelőeket. Ezek alumínium hegesztőelektródok olyanra vannak kialakítva, hogy biztosítsák az alumínium egyedi igényeinek megfelelő ívjellemzőket, védőhatást és tisztító hatást. A leggyakrabban használt típus az E4043, amely általános célú huzal, alkalmas sok alumíniumötvözet hegesztésére, és rendelkezésre áll 3/32", 1/8" és 5/32" átmérőkben. Mindig ellenőrizze az alapanyag ötvözetét, és tanulmányozza az elektródához tartozó adatlapot a kompatibilitás érdekében – a rossz huzal használata pórusképződéshez, repedésekhez vagy gyenge hegesztési varratokhoz vezethet.
AC vs. DC Elektród Pozitív magyarázat
Beállításkor a alumínium pálcahegesztő berendezésnél alumínium pálcaelektródák általában egyenáramú elektród pozitív (DCEP) üzemmódra, más néven fordított polaritásra vannak kialakítva. Miért? A DCEP az elektródára összpontosítja a hőt, így biztosítva erős ívhatást, és ami kritikus, egy tisztító hatást, amely segít eltávolítani az alumínium kemény oxidrétegét. Ez a beállítás általában jobb ívstabilitást és hegesztési minőséget eredményez ( YesWelder ). De mi történik, ha ív széttartóvá vagy instabillá válik? Ez az ív visszacsapás - egy gyakori probléma egyenárammal (DC-vel). Ilyen esetekben váltson váltóáramra (AC), amely segíthet az ív stabilizálásában, különösen mágneses alkatrészeknél vagy terepi körülmények között. Az AC kiegyensúlyozza a behatolást és a tisztítást, de az ív kevésbé stabil lehet, mint egyenáramnál. Mindig ellenőrizze az elektródacsomagolást vagy a gyártó útmutatását a javasolt polaritásról - egyes elektródák AC/DC használatra alkalmasak, míg mások polaritásfüggőek. A kézi ívhegesztés beállításai sohasem egyformán alkalmazhatók minden esetben.
A valóban hatékony kézi ívhegesztő beállítások
Elképzelheti, hogy beállítja a gépet, ívet gyújt, és az elektróda továbbra is ragad, vagy a hegesztési tócsa lassúnak tűnik. Éppen itt jön képbe a kézi ívhegesztő beállítások fontossága. Kezdje azzal, hogy az áramerősséget a gyártó által az Ön elektródájának átmérőjéhez ajánlott tartomány közepére állítja be. Itt egy gyors tájékozódáshoz segítő táblázat:
| Hengervillany átmérője | Ajánlott áramerősség tartomány | Általános iránymutatás |
|---|---|---|
| 3/32" (2,4 mm) | 60–90 A | Alacsony és közepes: Vékony lemezek, enyhe javítások |
| 1/8" (3,2 mm) | 80–135 A | Közepes: Általános javításokhoz a leggyakoribb |
| 5/32" (4,0 mm) | 110–180 A | Magas: Vastag szakaszok, nehéz ipari feladatok |
Állítsa be az áramerősséget a medence viselkedése alapján. Ha lassú vagy a pálca ragad, növelje enyhén az áramerősséget. Ha túl sok szikra keletkezik vagy széles, irányíthatatlan a medence, csökkentse. Tartsa az ív hosszát enyhén hosszabbra, mint acélhegesztéskor – éppen annyira, hogy az ív stabil maradjon, de ne annyira, hogy elveszítse az irányítást. Húzó vagy enyhe toló szög (5–10°) gyakran a legjobb, és rövid ideig történjen az ív bekapcsolása – az alumínium gyorsan melegszik és könnyen túlmelegedhet.
-
Biztonsági ellenőrzőlista alumínium elektródás hegesztéshez:
- Győződjön meg arról, hogy az elektródák szárazak – tárolja őket zárt edényben a nedvesség felvétele ellen
- Ellenőrizze, hogy a polaritás megfelel-e az elektróda követelményeinek (DCEP vagy AC)
- Biztosítson megbízható földelést tisztított, csupasz alumíniumfelületen
- Használjon a kiválasztott áramerősséghez illő kábelméretet
- Viseljen teljes védőfelszerelést: sisakot, kesztyűt és lángálló ruházatot
Ne feledd, alumínium hagyópálcák hegesztéshez gyakran nedvességet szívnak fel, ami pórusokkal tönkreteheti a hegesztési varratot. Mindig száraz helyen tárolja, és ellenőrizze a fluxust a nedvesség jelei szempontjából használat előtt
Először kövesse az elektród adatlapját; a polaritás és áramerősség nem minden esetben azonos
Amint a gép beállítása kész, és smaw alumínium hagyópálcák készen állnak, bátran elkezdheti a kötések rögzítését és illesztését. Következő lépés: az illesztés és rögzítés kontrollálása a deformációk elkerülése, valamint a hegesztés megbízható elindítása érdekében
4. lépés: Rögzítse és ellenőrizze a kötés illeszkedését a végleges hegesztés előtt
Illesztés vékony és vastag szakaszokhoz
Már próbáltál alumíniumot hegeszteni és azt tapasztaltad, hogy az illesztés széthúzódik vagy eltorzul, mielőtt befejeznéd? Itt jön be a szorgos illesztés és rögzítőhegesztés, ami mindent eldönt. A alumínium ívhegesztéssel történő hegesztése módszerek alkalmazásánál az alumínium magas hővezető képessége és gyors tágulása miatt egy kis rés is gyorsan komoly problémává válhat. Vékony lemez esetén még a legkisebb elrendezetlenség vagy rés is átégetést vagy gyenge varratot okozhat. Vastag lemez esetén a nem megfelelő előkészítés hegesztési hiányokat vagy túlzott feszültséget eredményezhet a hűlés során.
- Kiegyenesítés és rögzítés: Helyezd el alkatrészeidet szoros, egyenletes hézagokkal – használj távtartókat vagy rögzítőket a pozíció megtartásához.
- Illesztés vékony lemezhez: Használj réz vagy alumínium háttérrudat (hőelvezetőt) a varrat alá. Ezek elvezetik a hőt, csökkentve az átégetés kockázatát, és segítenek egy tiszta varrat kialakításában.
- Illesztés lemezhez: A lemez vastagabb szakaszait V-kialakításúra kell megszúrni, hagyva egy kis gyökérfelületet. Ez biztosítja a megfelelő behatolást anélkül, hogy túlmelegedés kockázatával kellene számolni.
- Tisztaság ellenőrzése: A rögzítés előtt ellenőrizze újra, hogy minden él mentes-e zsírtól és oxidrétegtől – olajos maradványok vagy oxidkéreg nem megengedettek.
Stratégiai rögzítés a mozgás vezérléséhez
Képzelje el, hogy alumínium hegesztőpálcával hegeszt és a kötésvonal hirtelen szétnyílik a hegesztés folyamán. Ennek elkerülése érdekében a rögzítés lesz a titkos fegyvere. Helyezzen el rögzítőpontokat szabályos időközönként – közelebb egymáshoz a vékonyabb anyagoknál, távolabb a vastagabb lemezeken. A vékony alumíniumnál több rögzítőpont segít a torzulás ellenállásában, ahogy a kötés hevül. Lemezeknél 2–3 hüvelykenkénti rögzítés jó kiindulópont; vékony lemez esetén minden hüvelyk vagy annál rövidebb távolságonként célszerű rögzíteni, ha lehetséges.
-
Rögzítési sorrend:
- Kezdje el a kötés mindkét végénél elhelyezni a rögzítőpontokat.
- Tűk hozzáadása minden szakasz közepéhez.
- Ossza tovább a szakaszokat és adja hozzá a tűket, amíg az elhelyezkedés egyenletes és az ízület stabil nem lesz.
- Minden tű megtisztítása: Hagyja lehűlni a tűket, majd távolítsa el a salakot, és keféldön meg alufelhasználásra fenntartott rozsdamentes kefével, mielőtt a hegesztés folytatódna.
- Rugózás (ha az eljárás engedi): Enyhén rugózza meg a tűket feszültség enyhítéséhez, különösen vastag vagy öntött szakaszoknál.
-
Illesztési tanácsok és tilalmak:
- HASZNÁLJON kizárólag alumíniumhoz való keféket – soha ne keverje acéllal.
- ERŐSEN rögzítsen a hézagok minimalizálásához.
- HASZNÁLJON hátfedő rudakat vagy hűtőblokkokat vékony szakaszokhoz.
- NE hegesztsen zsíros, festett vagy oxidált élekre.
- NE időzzön—rövid ív szakaszok csökkentik a hőbevitelt és megakadályozzák a deformációt.
- NE hagyja ki a tisztítást a rögzítőhegesztések és a hegesztővarratok között.
Támasztólemezek és hőelvezetők
Vele alumínium hegesztése ívhegesztővel technikák, hőelvezetők és támasztólemezek a legjobb segítői a vékony anyagoknál. Képzelje el, hogy egy rézlemezt helyez el a kötés alá: ez elnyeli a felesleges hőt, lehetővé teszi, hogy forróbb ívvel dolgozzon anélkül, hogy átégetné, és tisztább varratot eredményez. Vastagabb szakaszoknál a pontos illesztésre és rögzítőhegesztésre kell koncentrálni— a hőelvezetők kevésbé kritikusak, de a rendszeresen tisztított rögzítőhegesztések továbbra is megakadályozzák a deformációt.
Ha a kötés elkezd húzódni, váltogassa az oldalakat, vagy varrja rövid, megszakított szakaszokban.
A rögzítőhegesztés és a kötésvezérlés elsajátítása a tiszta és erős alumínium elektródás hegesztés varratok alapját képezi. Amint a kötés stabil és előkészített, készen áll a kontrollált varratok készítésére és a hőmérséklet kezelésére a legjobb hegesztési minőség eléréséhez.
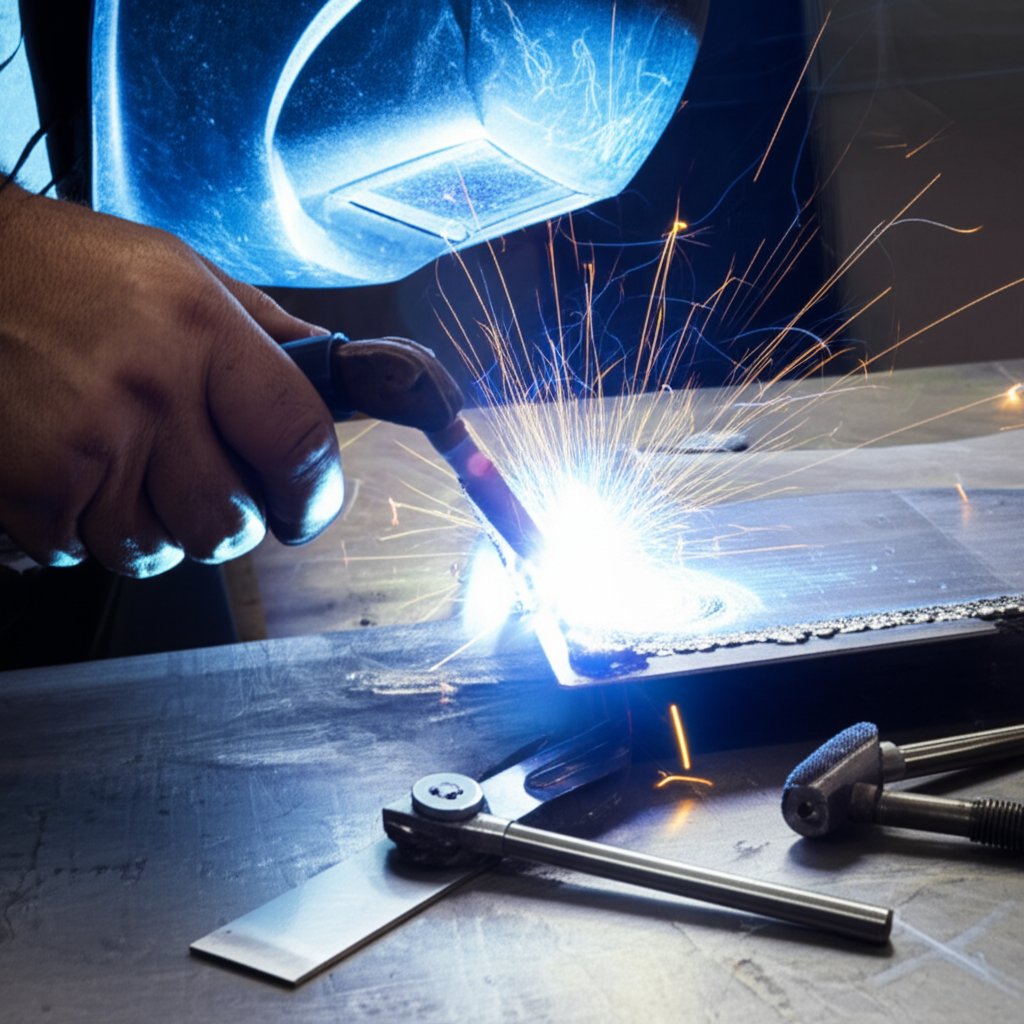
5. lépés: Tisztán futtatott varratok ellenőrzött hővel és tempóval
Alumínium hegesztése kézi ívhegesztéssel – varrattervezési technika
Amikor elkezdené az első varratot, felmerülhet a kérdés: miben különbözik az alumínium hegesztése acélhez képest? A válasz – szinte mindenben. Az alumínium magas hővezető-képessége miatt a hő gyorsan elszáll a ívből, így gyorsan és pontosan kell dolgozni. Képzelje el, mintha ecsettel festene, amely azonnal szárad – ha túl sokáig marad, az anyag összeomlik, vagy a varrat kontrollálhatatlanul megduzzad. Ezért az alumínium hegesztése elektródás hegesztőberendezéssel technikáknál nagyon fontos a rövid ív használata, és hogy a hegesztési fürdő kicsi és fényes maradjon. Kerülje a széles, hurkolt varratvezetést, helyette használjon egyenes, keskeny varratokat – ezek jobb kontrollt biztosítanak, és segítenek elkerülni a túlmelegedést.
- Üssön be egy indítólemezt ha lehetséges – ez elkerüli a hegesztés kezdetén keletkező kráterhibákat.
- Hozzon létre egy kis, fényes hegesztési fürdőt gyorsan és egyenletesen haladjon előre.
- Tartsa a hegesztőpisztoly szögét 0–10° hátrahúzással (húzza enyhén a rúd felé) hogy a ív fókuszált maradjon és a salak a háta mögött legyen.
- Az ív hossza enyhén hosszabb legyen, mint a rúd fluxuskéreg borítása – túl közel és elragad, túl messze és elveszíti az ív irányítását.
Salakkezelés és köztes tisztítás
Unalmasnak tűnik? A minőség érdekében elengedhetetlen. Minden egyes átfutásnál alumínium hegesztése pálcával egy salakréteg marad vissza – egy üveges maradék, amely védőréteget biztosít a hegesztési varrásnak, amíg lehűl. Ha azonban salakra hegeszt, szennyeződéseket zár be, és belevethet a varrásba, ami gyengítheti az illesztést. Minden átfutás után távolítsa el óvatosan a salakot (ne karcolja meg az alumíniumot), és keféje le a forró varrás hevét egy kizárólag erre a célra használt rozsdamentes acélkefével. Ez a lépés különösen fontos több átfutásos hegesztéseknél, ahol a rejtett salak drága újrahegesztést eredményezhet.
- Távolítsa el a salakot rögtön miután a varrás lehűlt – könnyebben eltávolítható, amíg még meleg.
- Alaposan kefélje át minden passz után—soha ne hagyja ki, még kis tack vagy kitöltő passz esetén sem.
- Ha pórusokat vagy belevágott salakot észlel, álljon meg, csiszolja vissza a jó fényig, tisztítsa meg újra, majd kezdje újra . Soha ne hegesztsen hibák fölött.
Haladási sebesség és hőmérséklet szabályozás
Észrevette már, hogy a hegesztési varrat hirtelen túl széles lesz, vagy az anyag megereszkedik? Ez annak jele, hogy túl lassan halad, vagy túl sokáig tartózkodik egy helyben. Az alumínium hegesztése gyors és egyenletes haladási sebességet igényel—képzelje el, mintha csúszna, nem mászna. A hogyan hegesztsünk alumíniumot pálcás hegesztőgéppel , mozgásait simára és folyamatosra kell tervezni, kerülje a megállást, mivel még egy rövid szünet is okozhati a medence összeomlását vagy felesleges anyagfelhalmozódást. Ha hosszú varratot hegeszt, ossza fel rövid, kontrollált szakaszokra, és hagyja lehűlni a munkadarabot a passzok között, hogy elkerülje a túlmelegedést.
- Figyelje a medencét: annak sekélynek, tisztának és mindig a salak előtt kell maradnia.
- Figyelje az ív hangját: egyenletes, tisztán csengő hang a természetes—szabálytalan zajok gyakran az ívhossz vagy az áramerősség beállítását igénylik.
- Több rétegű hegesztésnél ellenőrizze a réteghőmérsékletet . Hagyja lehűlni a kötést, ha melegnek érzi; a túl magas hőmérséklet gyengítheti a hegesztést és torzulást okozhat.
- A végső fedő rétegnél használjon enyhén gyorsabb haladási sebességet – ez simább varratot eredményez, és segít megelőzni, hogy salak ragadjon a felületre.
Tartsa a medencét sekélyen, és mindig haladjon a salak előtt – a megállás hibákat okozhat az alumínium hegesztési munkában.
Ezeknek a technikáknak a begyakorlásával hogyan hegesztsen alumíniumot pálcával segítségével szebb, erősebb hegesztéseket készíthet, és csökkentheti a gyakori problémákat, mint például a pórusosság, salakzárványok és torzulás. A következő lépésben megtanulhatja, hogyan ellenőrizze és értékelje a kész hegesztéseket, hogy biztosítsa azok szerkezeti és biztonsági követelményekhez való igazodását.
6. lépés: Tisztítás, ellenőrzés és a hegesztés minőségének validálása
Hegesztést követő tisztítás és salak eltávolítás
Előfordult már, hogy befejezte az alumínium hegesztését bothegesztővel, és eltűnődött, hogy tartani fogja-e a hegesztést? A válasz a hegesztést követő tisztításban és ellenőrzésben rejlik. Az alumínium bothegesztés során egy salakréteg képződik a fluxusköpenyes elektródából, amelyet teljesen el kell távolítani, hogy láthatóvá váljon a hegesztés valódi minősége. Ha kihagyja ezt a lépést, akkor nem venné észre a rejtett hibákat, vagy szennyeződéseket rekeszthet be, amelyek gyengítik a kötést.
- Távolítsa el az összes salakot kalapáccsal vagy hasonló eszközzel, de ügyeljen arra, hogy ne karcolja meg az alatta lévő lágy alumíniumot.
- Tisztítsa meg a hegesztést egy kizárólag rozsdamentes acélból készült drótkefével – soha ne használjon olyat, amely már vasat érintett, mivel a kereszt-szennyeződés hibákat okozhat ( Auto.edu ).
- Öblítse át a területet ha az elektródához tartozó adatlap ezt javasolja, különösen a maradék fluxusmaradványok eltávolításához, amelyek később korróziót vagy pórusosságot okozhatnak.
Ne feledje, az alumínium hegesztése során a fluxus célja az atmoszférikus szennyeződésektől való védelmet nyújtó védőréteg létrehozása, valamint az oxidréteg felbontásának segítése. Ugyanakkor, ha a hegesztés után nem távolítják el, a fluxusmaradványok a későbbiekben korrózió, sőt akár elektromos problémák forrásává is válhatnak.
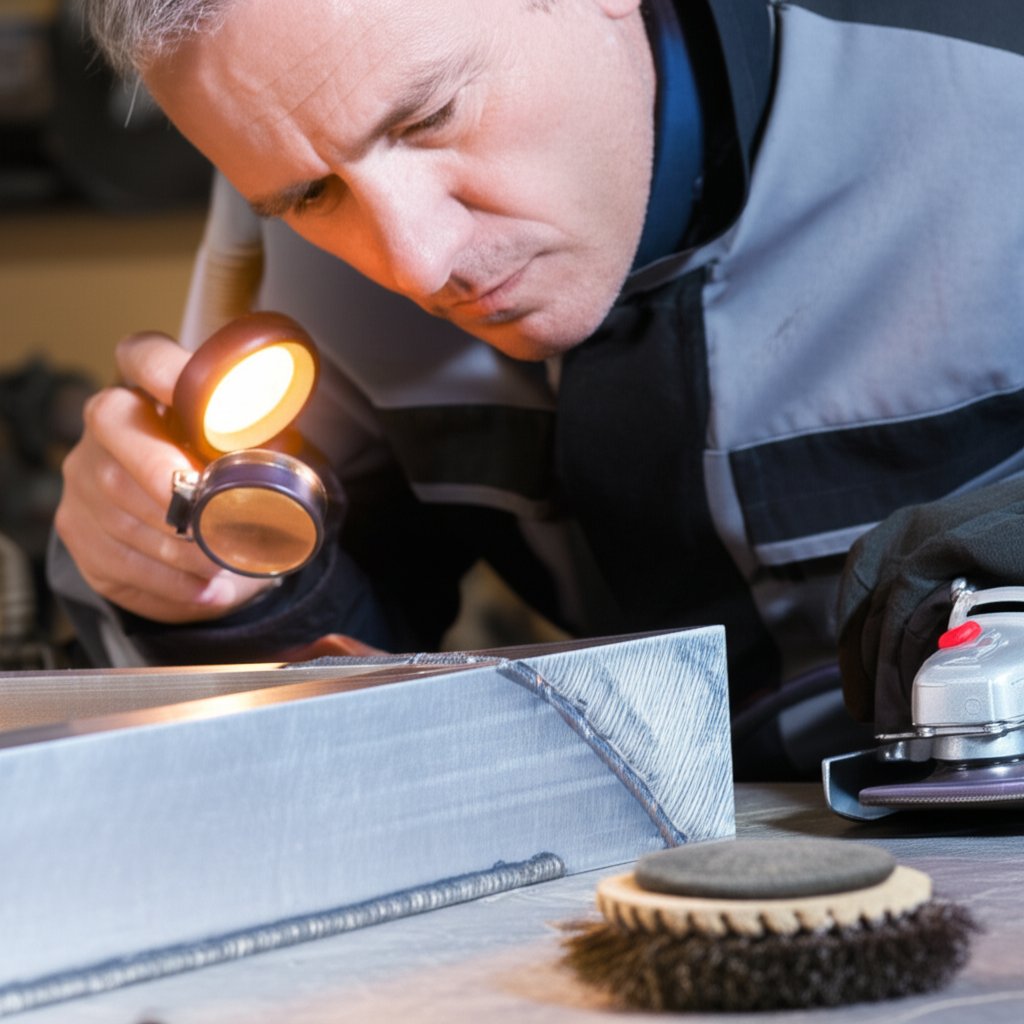
Alumínium vizuális és NDT ellenőrzési lehetőségei
Miután a hegesztési varrat tisztává vált, ideje ellenőrizni. Lehetséges-e alumíniumot varrathegesztéssel olyan szinten összekötni, amelyre szerkezeti vagy tömörítési megbízhatóságot várunk? Igen – de csupán szigorú ellenőrzés mellett. Kezdje vizuális ellenőrzéssel, majd ha a feladat megkívánja, haladjon tovább fejlettebb módszerek felé.
| Ellenőrzési szint | Szükséges eszközök | Mit kell keresni | Mikor használni |
|---|---|---|---|
| Alapvizuális | Szem, erős fény | Egyenletes varrat, nincs alulmarás, nincs látható pórusosság, nincs belevágott salak, megfelelő átmenet | Minden hegesztés |
| Kibővített vizuális | Nagyító, zseblámpa | Felületi repedések, tűlyukak, finom pórusok, varratprofil | Kritikus vagy nyomástartó hegesztések |
| Színes folyadékkal történő repedésvizsgálat | Színes vizsgálókészlet, tisztítószer, fejlesztő | Alatti vagy hajszálrepedések, zárt pórusok | Nagy integritású vagy biztonságtechnikailag kritikus kötések |
A WeldGuru szerint a minőségi hegesztéseknek egyenletes varratprofilja kell rendelkezzenek, minimális alulmaradással, látható pórusok nélkül, és teljes élkötéssel. Ha tűlyukakat, belevágott salakot vagy összeolvadás hiányát észleli, akkor a hibás részt vissza kell csiszolni a tiszta fémig, majd újra dolgozni kell. Ne hegesztsen hibák fölé – a kijavítás mindig jobb, mint a kötés meghibásodásának kockázata.
Biztonsági és füstgáz-kezelési előírások a fluxus használatára vonatkozóan
Milyen célt szolgál a fluxus az alumínium hegesztésénél? Nemcsak védi a hegesztést a szennyeződésektől, hanem olyan gőzöket is kibocsát, amelyeket a biztonság érdekében kezelni kell. Az alumínium ívhegesztési folyamatok során keletkező gőzök fémanyag-oxidokat és fluoridvegyületeket tartalmazhatnak a fluxusból, valamint gázokat, amelyek a bevonatok vagy szennyeződések lebomlásából keletkeznek CCOHS ).
- A hegesztett alkatrészeket hagyja levegőn lehűlni – a gyors hűtés repedéseket válthat ki.
- Szellőztessen a munkaterületen a forrasztóhuzal és gázok eloszlatásához. Használjon helyi elszívást, vagy ha szabadban dolgozik, akkor álljon szél felől.
- Viseljen szem- és légzésvédelmi eszközt, amikor a salakot letöri vagy keféli.
- Az alumíniummal való csiszolási por legyen elkülönítve a fémtől – ne keverje össze a porokat vagy a keféket.
Azoknak, akik még mindig kérdezik, lehet-e alumíniumot ívhegesztőgéppel hegeszteni és megbízható eredményt kapni? Igen – ha minden alkalommal követi ezeket a tisztítási, ellenőrzési és biztonsági lépéseket. Ez a szigorúság nemcsak a hegesztések szerkezeti integritását garantálja, hanem az Ön egészségét és a berendezések élettartamát is védi.
Minden minőségi alumíniumhegesztés tiszta varrattal és kritikus szemmel kezdődik – soha ne hagyja ki az ellenőrzési vagy biztonsági lépéseket, függetlenül attól, mennyire rutinfeladatnak tűnik az adott munka.
Most, hogy tudja, hogyan ellenőrizze a hegesztés minőségét és biztonságát, nézzük meg, mit tegyen, ha hibákat észlel – a gyors hibakeresés és -orvoslás segítségével projektje tovább halad, hegesztései pedig megbízhatóak maradnak.
7. lépés: Hibák gyors és célzott javítása
A pórusok és salakzárványok megszüntetése
Bonyolultnak tűnik? Nem az, ha tudod, mit kell keresni. Képzelj el egy forgácsot, amit befejeztél, leszeded a salakot, és lyukacsos pórusokat vagy üveges csíkokat látsz a hegesztés belsejében. Ne pánikolj – a legtöbb alumínium kézi ívhegesztés hiba egyszerű diagnosztizálni és kijavítani, ha ismered az okát. Akár azon kérdezed magadtól, hogyan lehet alumíniumot hegeszteni pálcás hegesztőberendezéssel, és elkerülni a hibákat, akár már tapasztalsz problémákat, ez az útmutató segít, hogy gyorsan visszatérj a helyes útra.
| Tünet | Valószínű okok | Korrigációs intézkedések |
|---|---|---|
| Légpórusképződés (felszíni vagy alatti buborékok) |
|
|
| Salakzárványok (befogott üveges csíkok) |
|
|
| Hiányzó összekapcsolódás (hideg lefutás, hiányos összekapcsolás) |
|
|
| Alulmarás (horony a hegesztési varrat élénél) |
|
|
| Ív instabilitás/ragadás |
|
|
| Kráterrepedés (a hegesztés végén keletkező repedések) |
|
|
| Meleg/hideg repedések (különösen öntött darabokban vagy 6xxx széria ötvözetekben) |
|
|
Javítsa a nem megfelelő összekapcsolódást és az alulmaradást
Felmerült már Önben, hogy alumínium hegeszthető-e pálcaelektródás hegesztéssel, és így is elérhető-e teljes összekapcsolódás? Abszolút lehetséges – ha megfelelően beállítja az áramerősséget, a felkészülést és a tempót. Ha hideg átfutást vagy alulmaradást észlel, ne egyszerűen hegesztsen rájuk, hanem csiszolja vissza a tiszta félig, tisztítsa meg újra és hegeszteni újra. Ez különösen fontos, ha pálcaelektródás hegesztéssel hegeszt alumíniumot vastagabb vagy öntött alkatrészeknél, amelyek hajlamosabbak a repedésre és az összekapcsolódás hiányára. Mindig tartsa be a huzalgyártó ajánlásait az Ön konkrét alapfémjéhez tartozó áramerősség és polaritás tekintetében.
Stabilizálja a ívet és megakadályozza a ragadást
Képzelje el, hogy ívet gyújt, majd a pálca hozzás ragad vagy elkalandozik. Ha azt kérdezi, hogy "tudsz alumíniumot ívhegeszteni", és elkerülni a folyamatos ragadást, akkor a válasz igen – a megfelelő polaritással, száraz pálcákkal és stabil kézzel. Ha az ív szabálytalan, ellenőrizze, hogy a gyártó által megadott adatlapon szereplő DCEP vagy AC áramfajtát használja-e. Tartsa a pálcákat száraz dobozban; ha a fluxus ragacsosnak érezhető, cserélje ki a pálcákat. A tartós problémák esetén lassítsa le enyhén a hegesztési sebességet, és rövidítse meg az ívet, hogy visszanyerje az irányítást. Ezek a lépések akkor is segítenek, amikor tudsz alumíniumot ívhegeszteni nehezen kontrollálható terepi körülmények között.
A hibakeresés során mindig figyelembe kell venni az ötvözet típusát – ha öntvényekkel dolgozik, és felmerül Önben a kérdés, hogy "tudsz öntött alumíniumot ívhegeszteni" pálcás hegesztőgéppel, jusson eszébe, hogy ezek hajlamosabbak a pórusképződésre és repedésekre. Lassítsa le a hegesztési sebességet, szükség esetén előmelegítéssel dolgozzon, és legyen különösen gondos a tisztítással és a hozaganyag kiválasztásával.
Soha ne hegesztsen hibás felületre; távolítsa el a hibás részt, és csak egészséges fémen végezze újra a hegesztést.
Ezekkel a gyors megoldásokkal és kritikus szemmel, projektje továbbra is haladni fog, és hegesztései erősek maradnak. A következőkben megtudhatja, hogyan alkalmazhatja a közösségi tapasztalatokat és szabványokon alapuló technikákat még jobb eredmények eléréséhez alumínium elektródás (stick) hegesztésnél.
8. lépés: Alkalmazza a szabványokkal alátámasztott közösségi tapasztalatokat
Érdemes kipróbálni: közösségi tanácsok
Valaha elgondolkodott már azon, hogy vajon léteznek-e rövidítések vagy terepi trükkök, amelyek megkönnyíthetik alumínium stick hegesztést bocsánat, javítás közben dolgozik alumínium ívhegesztő elektródákkal , és valaki a csapatból azt javasolja: „Próbáld meg előmelegíteni az alkatrészt hősugárral először.” Megfogadja a tanácsot? Nézzük meg, mit ajánlanak a valódi hegesztők – és hol húzzuk meg a határt.
-
Anekdotikus, de gyakori tanácsok :
- Melegítse elő óvatosan a kisebb alkatrészeket (200–250 °F-ra) hegesztőpisztollyal vagy sütővel, hogy eltávolítsa a nedvességet, és csökkentse a pórusképződés kockázatát. Ez különösen gyakori, amikor alumínium hegesztőpálcákat használnak porózus öntvényeken ( Miller Welding Fórum ).
- A szikrát egy hulladék lemezre gyújtsa mielőtt a fő csatlakozáshoz kezdenél. Ez segít megelőzni a repedéseket, és stabil ívet biztosít már az elején.
- Ütögesse enyhén a rögzítővarratokat vastag vagy öntött alumíniumnál, hogy csökkentse a feszültséget és minimalizálja a repedések kialakulását – csak néhány enyhe ütés, amíg a rögzítővarrat még meleg.
- Tartsa a második, kizárólag rozsdamentes acélból készült kefét csak a rétegek közötti tisztításhoz. Észre fogja venni, hogy csökken a kereszt-szennyeződés és a hegesztésekben lévő zárványok száma.
Ezeket a tippeket széles körben megosztják a hegesztő közösségekben, és hasznosak lehetnek, de mindig ellenőrizze az alapanyag összetételét és a hegesztési eljárást, mielőtt alkalmazná őket.
Mit mondanak a szabványok és adatlapok
Képzelje el, hogy egy szabályozott üzletben tartózkodik, vagy kritikus szerkezeti javításon dolgozik. Ebben az esetben a legjobb tanács az AWS D1.2 és az AWS A5.3, valamint az Ön elektródagyártójának adatlapjára hagyatkozni. Miért? Mert ezek a források minden lépést bizonyított eredményekkel támogatnak – különösen akkor, ha alumínium ívhegesztő elektródákkal szerkezeti vagy biztonságtechnikailag kritikus munkához használják.
-
Eljárással Alátámasztott Alapvető Fontosságúak :
- Tartsa be az előírt polaritást és áramerősséget az Ön elektródájához. A legtöbb alumínium hegesztésére szolgáló stick hegesztőgép munkához DCEP-t vagy AC-t igényel, de mindig ellenőrizze az elektródacsomagolást vagy adatlapot.
- Tisztítsa meg a fényes fémet azonnal a hegesztés előtt – miután oldószeres zsírtalanítást végzett, használjon kizárólag erre a célra szánt rozsdamentes kefét.
- Távolítsa el az összes rétegközi salakot minden hegesztési átmenet előtt, kivétel nélkül. A salakzárványok az alumínium hegesztési hibáinak egyik vezető okát jelentik.
- Korlátozza az előmelegítést hőkezelhető ötvözeteknél (például a 6xxx sorozat) 250°F (121°C) alatt, és soha ne lépje túl a gyártó vagy szabvány ajánlásait.
- Ellenőrizze, hogy a feszítés engedélyezett-e —habár enyhe feszítés csökkentheti a feszültséget bizonyos öntvényeknél, bizonyos ötvözeteknél vagy szabványos munkáknál tilos lehet. Mindig ellenőrizze a hegesztési utasítást (WPS) vagy az AWS D1.2 szabványt a feszítés előtt.
Ne feledje, hogy a műszaki adatlapok és szabványok az ismételhető, biztonságos és erős hegesztések elérését szolgálják – különösen akkor, amikor alumínium hegesztőpálcákat megkövetelő alkalmazásokban.
A tapasztalat és az eljárás összekapcsolása
Sok kihívást jelent? Nem is kellene. A legjobb módszer az, hogy a tapasztalati úton szerzett tanácsokat próbálja ki először hulladék anyagokon, és mindig ellenőrizze a vonatkozó szabványokkal vagy adatlapokkal, mielőtt a gyártási feladatokra alkalmazná őket. Például, ha azon gondolkodik, hogy „Tudok-e alumíniumot hegeszteni hagyományos hegesztőkészülékkel, valamilyen helyszíni trükkel?” – próbálja ki a tippet egy próbatesten, vizsgálja meg az eredményt, és csak akkor folytassa a tényleges alkatrésszel, ha megfelel a követelményeinek és összhangban van a szabványokkal.
-
Gyors ellenőrzés:
- Megengedett-e a hegesztési eljárásában vagy szabványában az adott tipp?
- A Ön alumínium ívhegesztő elektródákkal támogatja-e a hegesztési technikát?
- Elvégezte-e a próbát hulladékanyagon és megvizsgálta az eredményt?
A tisztaság és a polaritás előírás szerinti betartása kilenc esetből tízszer fontosabb, mint bármilyen trükk.
Összefoglalva: a helyszíni tapasztalat értékes időmegtakarítást jelenthet, de minden sikeres hegesztés alapja a szabványok és előírások pontos betartása. alumínium stick hegesztést a projekt szigorúan előírja a tisztaság, polaritás és szabványokkal alátámasztott eljárások betartását. Ha bármikor bizonytalan, forduljon az AWS D1.2 szabványhoz, az elektródadatlapjához vagy egy szakképzett hegesztési mérnökhöz, mielőtt új módszert alkalmazna – különösen ha a következőt használja alumínium ívhegesztő elektródákkal kétségbe vonható javításoknál.
Készen áll a következő munkához szükséges fogyóanyagok és alkatrészek beszerzésére? A következő részben megtanulhatja, hogyan találjon minőségi elektródákat, tartozékokat és alumínium alkatrészeket megbízható, szabványkövető hegesztésekhez.
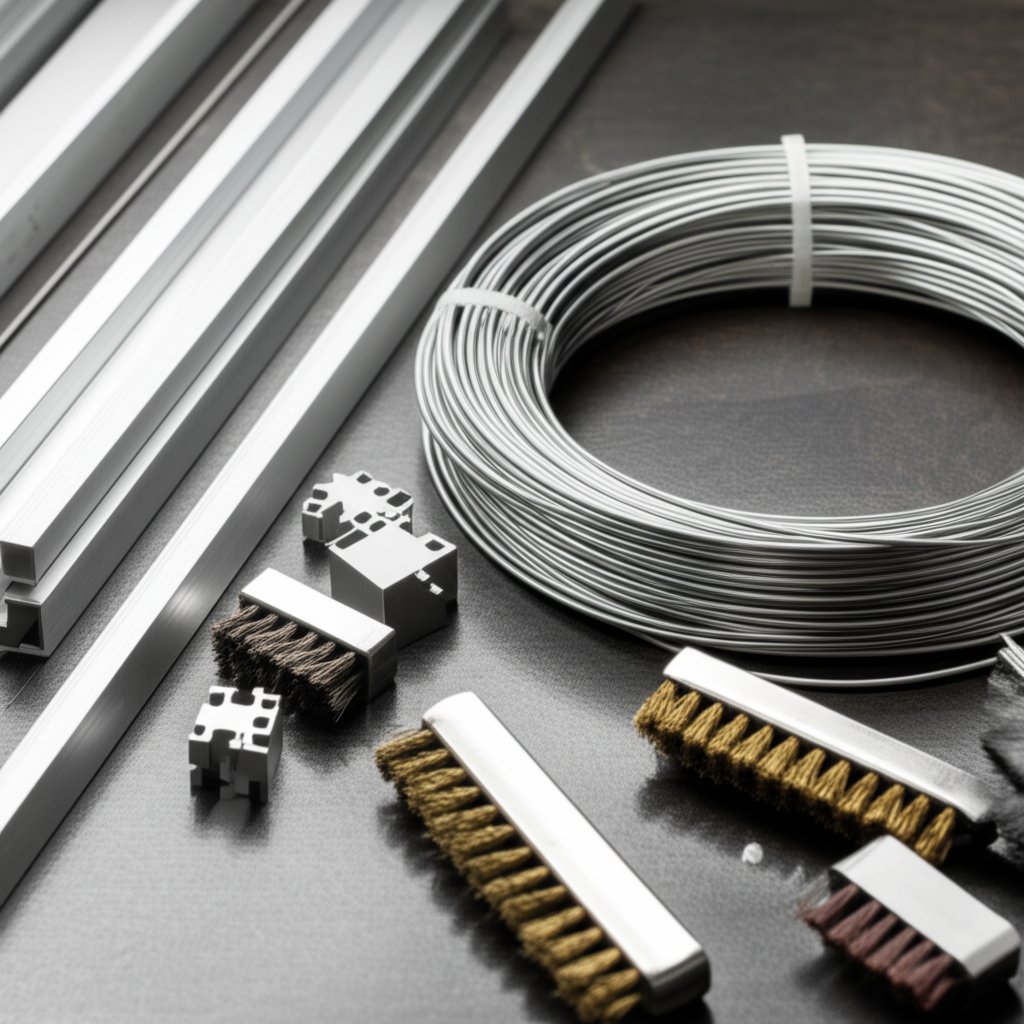
9. lépés: Alumínium hegesztőelektródák, fogyóanyagok és kapcsolódó alkatrészek beszerzése alumínium kézi ívhegesztéshez
Hol találhatók a fluxusköpenyes alumínium elektródák
Ha már készen áll arra, hogy mindent gyakorlatba ültessen, amit eddig megtanult, akkor a következő kihívás a megfelelő alumínium kézi ívhegesztő pálcák beszerzése és fogyóeszközök. Egyszerűnek tűnik? Nem az – kivéve, ha pontosan tudod, hol kell keresni és mit kell ellenőrizni. Képzeld el, hogy elkezdesz egy munkát, majd kiderül, az elektródáid nem kompatibilisek, vagy az alumíniumprofil nem felel meg a specifikációnak. Nézzük meg, milyen lehetőségeid vannak a beszerzésre a következőkhöz: alumínium hegesztőpálcák stick hegesztéshez , valamint a megbízható, szabványkövetelményeknek megfelelő eredményekhez szükséges alapanyagok és kiegészítők.
| Forrás | Amihez hozzáférhetsz | Fő előnyök | Fontosságok |
|---|---|---|---|
| Shaoyi Metal Parts Supplier | Gyári minőségű autóipari alumíniumprofil alkatrészek, egyedi profilok, DFM támogatás |
Integrált pontosság, hegeszthető ötvözetek (6000-es sorozat), gyors prototípuskészítés, IATF 16949 tanúsítvánnyal rendelkező vállalatok |
Legjobb olyan projektekhez, amelyekhez szükség van méretre pontos, hegesztésre kész profilok |
| Helyi hegesztéstechnikai nagykereskedők | Flux bevonattal ellátott alumínium ívhegesztő pálcák , nemesacél kefék, védőfelszerelés |
Azonnali átvétel, szakértői tanácsadás, kis mennyiségek |
A raktárkészlet korlátozott lehet a gyakori AWS A5.3 típusokhoz |
| Online ipari beszállítók | Széles választék alumínium hegesztőpálcák ívhegesztőhöz , tartozékok, szárítódobozok |
Kényelmes rendelés, termékértékelések, nagykereskedelmi lehetőségek |
Ellenőrizze az AWS besorolást, szállítási időket, a visszaküldési politikát |
| Gyártótól származó technikai támogatás | Adatlapok, polaritás-útmutató, tárolási tanács |
Naprakész információ, hibakeresési segítség |
Minimum rendelési mennyiséget igényelhet vagy közvetlen érdeklődés |
Fogyóeszközök és kiegészítők, amelyekre szüksége lesz
Mielőtt ívet gyújtana, győződjön meg róla, hogy teljes a felszerelése. A megfelelő fogyóeszközök és kiegészítők éppen olyan kritikusak, mint a alumínium hagyományos huzalelektróda magától értetődően. Itt egy gyors ellenőrzőlista, amely segít elkerülni utolsó pillanatbeli meglepetéseket:
- Győződjön meg arról, hogy az Ön alumínium ívhegesztő pálcái az AWS A5.3 szabványnak megfelelő besorolásúak (E4043, E5356 vagy E1100 a leggyakoribb típusok)
- Ellenőrizze, hogy a pálcák átmérője megfelel-e a feladatnak (3/32", 1/8", 5/32" a leggyakoribb méretek a legtöbb alumínium ívhegesztő pálca esetében alkalmazáshoz)
- Tartsa a pálcákat száraz dobozban vagy zárt edényben – a nedvesség tönkreteszi a folyósítószert és pórusokat okoz
- Használat előtt ellenőrizze a csomagolást sérülésre vagy nedvességre
- Legyen kizárólag rozsdamentes acélból készült kefék és tiszta védőfelszerelés készenlétben
- Tartsa készenlétben a tartalék földelőkábeleket, lepattintó kalapácsokat és védőszemüveget
Képzelje el, hogy elfogynak az elektródák a projekt közepén, vagy kiderül, hogy az elektródái rossz ötvözetből készültek – ezeknek a részleteknek a duplán ellenőrzése időt és bosszúságot takarít meg.
Automotív Alumínium Extrúzió Beszerzés
Amikor projektje javítást vagy gyártást jelent automotív extrúziókkal, a kiindulási anyag minősége éppolyan fontos, mint az Ön alumínium elektród kiválasztása. Nem minden extrúzió egyenlő – a pontosság, az ötvözet kompatibilitás és a felületminőség döntheti el, hogy sikeres lesz-e a hegesztés. Magas követelményeket támasztó munkákhoz, különösen a keret vagy strukturális javításokhoz okos dolog olyan beszállítótól vásárolni, aki ért a hegesztési igényekhez és automotív tűréshatárokhoz. A Shaoyi Metal Parts Supplier kiemelkedik, mivel alumínium extrudált alkatrészek weldability-re és méretpontosságra optimalizált alkatrészeket kínál, emellett DFM szakértelmet és gyors kiszolgálást is biztosít. Ez biztosítja, hogy az Ön alumínium pálcikája mindig a legjobb esélyt kapja egy megbízható, minőségi hegesztés eléréséhez.
-
Fontos ellenőrzési pontok vásárlás előtt:
- Győződjön meg az ötvözetek kompatibilitásáról az adatlap alapján – ne keverje össze véletlenszerűen az elektródát és az alapanyagot
- Ellenőrizze a polaritásbeállításokat (DCEP, AC), hogy a gép és az elektróda is támogatja-e
- Győződjön meg arról, hogy az ajánlott áramerősség-tartomány illeszkedik a hegesztőgép kimenetéhez
- Ellenőrizze a csomagolás állapotát – kerülje a nedvesség vagy sérülés jeleinek jelenlétét
- Extrúziók esetén ellenőrizze a szállítási időt és a minimális rendelési mennyiséget
Minden munka megkezdése előtt használjon megfelelő elektródákat, tartozékokat és alapanyagot – a minőségi bemeneti anyagok garantálják a minőségi alumínium hegesztést.
A fogyóanyagok és alkatrészek beszerzése után ideje a felkészülésről áttérni a végrehajtásra. Az utolsó lépés? Egy terepre kész ellenőrzőlista és szakértői ajánlások, amelyek biztosítják, hogy az alumínium hegesztési folyamata elejétől a végéig zökkenőmentes legyen.
10. lépés: Terepre való gyors indítás és okos következő lépések alumínium hegesztéshez
Gyorsindító ellenőrzőlista: Egyoldalas terv
Valaha elborított az alumínium hegesztéséhez való felkészülés és részletek sokasága? Képzelj el egyetlen, terepre is alkalmas ellenőrző listát, ami mindig a megfelelő irányba terel – akár műhelyben, akár távoli javítás során dolgozol. Az alábbiakban egy gyakorlati, lépésről lépésre segédletet találsz, ami segít megválaszolni a következő kérdést: „ Alumíniumot lehet-e stick hegesztéssel hegeszteni és megbízható eredményt elérni?”
- Az ötvözet családjának és vastagságának azonosítása – ellenőrizd újra az alkatrészek megjelöléseit vagy a műszaki adatlapokat. A legtöbb alumínium stick hegesztés a 3 mm (1/8 col) vagy annál vastagabb anyagon működik a legjobban.
- Olajtalanítás és fényes fémre való kefézés – hegesztéshez alkalmas oldószert és kizárólag alumíniumhoz használt rozsdamentes acélkefét használj. Kefézd azonnal a hegesztés előtt, hogy eltávolítsd az oxidréteget.
- Válassz AWS A5.3 szerinti fluxusköpenyes elektródát —Az E4043 egy gyakori választás. Ellenőrizze a kompatibilitást az alapötvözetével és a feladat követelményeivel.
- Állítsa be a DCEP-t vagy AC-t a műszaki adatlap szerint —ne feltételezze; ellenőrizze az ajánlott polaritást a legjobb ívstabilitás érdekében.
- Végezzen próbát selejtes anyagon, és állítsa be az áramerősséget —kezdjen a rúd átmérőjének megfelelő tartomány közepén, majd finomítsa a medence vezérléséhez és a szikrapattogás csökkentéséhez.
- Gyakran rögzítsen és hőelvezetőt használjon vékony lemezeken —ez megakadályozza a deformálódást és a kifúródást. Több rögzítés jobb illeszték stabilitást jelent.
- Rövid húzásokat alkalmazzon, és tisztítsa az átmeneti salakot —kerülje a széles mozgatásokat, és mindig kefével tisztítsa az összekötéseket. Ez kritikus fontosságú a lehet-e hegeszteni alumíniumot pálcával és elérni jó minőségű hegesztést.
- Hibák ellenőrzése és javítása fém eltávolításával, amíg a fém hibátlan nem lesz —soha ne hegesztsen pórusok, salak vagy repedések fölött. Szükség esetén tisztítsa újra és hegeszteni újra.
- A hegesztés utáni tisztítás a műszaki adatlap szerint —távolítsa el a salakot és a maradék fluxust. Öblítse át, ha az Ön elektródájának típusa ezt ajánlja.
- Dokumentálja a beállításokat —jegyezze fel az áramerősséget, pálca típusát, polaritást és minden különleges megjegyzést jövőbeli hivatkozás vagy ismétlődő munkákhoz.
Tiszta fém, helyes polaritás és az átmeneti rétegek tisztítására való fegyelem határozza meg a siker mértékét.
Fontos döntési pontok, amelyeket nem szabad kihagyni
- Elég vastag az alapanyag ahhoz, hogy elektródás hegesztést végezzen rajta? A vékony lemez gyakran átégetést okoz.
- Ellenőrizte az ötvözet kompatibilitását a alumínium pálcikája és a munkadarab között?
- Dolgozik szellőzőkkel ellátott területen teljes védőfelszerelésben? A biztonság mindig első helyen áll.
- Beszerezte a pontos alkatrészeket az összeszereléshez? Automotív munkák esetén a minőségi extrúziók használata kritikus a hegesztés megbízhatósága szempontjából.
Ahogy végigmegy az egyes lépéseken, kérdezze meg magától: „ Tudok-e alumíniumot ívhegesztővel hegeszteni és teljesíteni a strukturális vagy esztétikai követelményeket?” Ha bizonytalan, végezzen próbahegesztést egy hulladékdarabon, és ellenőrizze az eredményt, mielőtt nekilátna a teljes projektnek.
Megbízható források alumíniumprojektekhez
Amikor a munkája alumínium extrúziók összekapcsolását vagy javítását jelenti, a kiinduló anyag minősége eldöntheti a hegesztés sikerét vagy kudarcát. A legjobb eredmény érdekében egy megbízható beszállítóval kell együttműködni. Shaoyi Metal Parts Supplier pontosan megmunkált alumínium extrudált alkatrészek amelyeket méretpontosságra és könnyű hegeszthetőségre terveztek – ideális megoldás projektekhez, ahol az Ön által alkalmazott kézi ívhegesztési technika mind szilárdságot, mind megbízhatóságot nyújt.
Ez a megközelítés garantálja, hogy amikor Ön a következő kérdést teszi fel: „ Lehetséges alumíniumot hegeszteni ívhegesztéssel és megbízhatunk az eredményben?” – a válasz igenlő, amennyiben a megfelelő technikát minőségi alapanyagokkal kombinálják. A Shaoyi szakértelme az autóipari alumíniumprofilok területén azt jelenti, hogy hegesztett alkatrészei zökkenőmentesen illeszkednek a járművek rendszereibe, csökkentve a illesztési hibák és hegesztési meghibásodások kockázatát.
Tehát legközelebb, amikor felmerül Önben a kérdés: „ Hogyan kell alumíniumot ívhegesztéssel hegeszteni magabiztosan?” – kezdje egy ellenőrző lista alapján, használja a megfelelő fogyóanyagokat, és megbízható partnerektől szerezze be az alkatrészeket. Ezeknek az alapoknak a tökéletes elsajátítása a sikeres alumínium stick hegesztés bármely terepen való hegesztés valódi titka.
Alumínium ívhegesztés – GYIK
1. Lehetséges alumíniumot ívhegesztéssel hegeszteni és tartós eredményt elérni?
Igen, alumíniumot is lehet stick hegeszteni alumíniumhoz tervezett, fluxaburkolatú elektródákkal. Bár a folyamat nehezebb, mint acél hegesztése, megfelelő felület-előkészítés, helyes elektróda kiválasztása és a beállítások pontos betartása révén tartós, struktúrálisan megbízható hegesztéseket lehet elérni. Ez a módszer különösen hatékony karbantartásokhoz vagy olyan helyszíneken való hegesztéshez, ahol a TIG vagy MIG hegesztés nem praktikus.
2. Melyek az alumínium stick hegesztése és a TIG/MIG hegesztés közötti fő különbségek?
Az alumínium stick hegesztése fluxaburkolatú elektródákat használ, amelyek saját védőgázt biztosítanak, így különösen alkalmas kültéri és terepi javításokra. Ezzel szemben a TIG és MIG hegesztéshez védőgáz szükséges, és szebb varratmegjelenést, valamint alacsonyabb pórusú varratot eredményez. A stick hegesztés általában esztétikailag kevésbé vonzó, de a mobilitás és rugalmasság szempontjából előnyös, különösen vastagabb szelvények vagy javítások esetén.
3. Hogyan készítse elő az alumíniumot stick hegesztéshez, hogy elkerülje a hibákat?
Alaposan zsírtalanítsa az alumíniumot hegesztésre engedélyezett oldószerrel, majd azonnal kefélje át a kötést egy erre a célra szolgáló rozsdamentes acélkefével az oxidréteg eltávolításához. A kötések illesztése szoros legyen, vastagabb vagy öntött szakaszok esetén előmelegítést alkalmazzon az elektród gyártója által ajánlott módon. Ezek a lépések csökkentik a pórusokat, salakzárványokat, és biztosítják az erős hegesztést.
4. Mely elektródák és beállítások a legjobbak alumínium pálcahegesztéshez?
Használjon AWS A5.3 szabványnak megfelelő, fluxusköpenyes alumínium elektródákat, például E4043 típusút. Állítsa be a pálcahegesztőgépet DC elektróda pozitív (DCEP) vagy AC üzemmódra az elektróda gyártója által előírt módon, és állítsa be az áramerősséget a rúd átmérőjének és az anyag vastagságának megfelelően. Mindig az elektróda adatlapját kövesse a pontos beállítások és kompatibilitás érdekében.
5. Miért fontos minőségi alumíniumprofil alkatrészek beszerzése hegesztési projektekhez?
A magas minőségű alumínium extrúziós alkatrészek biztosítják a méretpontosságot, az ötvözet állandó összetételét és a hegeszthetőséget – elengedhetetlen a megbízható hegesztések szempontjából. A Shaoyi Metal Partshez hasonló beszállítók precízen gyártott extrúziós alkatrészeket kínálnak hegeszthető ötvözetekből, amelyek támogatják az erős kötések kialakítását, és csökkentik a hegesztési hibák kockázatát az autóipari és szerkezeti alkalmazásokban.