 Malé dávky, vysoké štandardy. Naša služba rýchlejho prototypovania urobí overenie rýchlejšie a jednoduchšie —

Ako zvárať meďové rúry: správne spájkovať a vyhnúť sa netesnostiam
Krok 1: Vyberte správny spoj medeného potrubia
Ak ste hľadali, ako zvárať medené rúry, pravdepodobne sa snažíte spojiť potrubie pre inštalácie, nie vykonať skutočné zváranie tavením. V väčšine domácností je správnou odpoveďou zvyčajne spájkovanie medených rúr. Pre vyššie teploty môže byť vhodnejšie pájkovanie tvrdou pájkou. Pri niektorých opravách je mechanický spoj bez tepla rozumnejšou voľbou než akýkoľvek plameň.
- Vyberte spájkovanie pre bežné potrubné systémy, vodovodné potrubia a medené armatúry.
- Vyberte pájkovanie tvrdou pájkou, keď spoj vyžaduje vyššiu odolnosť voči teplu a vyššiu pevnosť.
- Vyberte zváranie iba pri špeciálnych výrobkoch, pri ktorých sa samotná meď topí.
- Vyberte mechanické spoje, keď rýchlosť, mokré podmienky alebo riziko požiaru vylučujú použitie horáka.
Je možné skutočne zvárať medené rúry?
Môžete medené rúry zvárať? Áno, ale skutočné zváranie medi je nezvyčajné pre štandardné rúry a potrubné spoje ako vysvetľuje Ferguson, spájkovanie spojuje kovy pomocou prídavného materiálu pri teplote pod 450 °C, pájkovanie používa prídavný materiál pri teplote nad 450 °C, avšak pod teplotou topenia základného kovu, a zváranie samotné roztavuje základný kov. Ide o veľký rozdiel. Keďže meď veľmi rýchlo vedie teplo, zváranie medi je ťažšie ovládať a zvyčajne sa používa len pri výrobe alebo špeciálnych opravách, nie pri bežných domácich spojoch. Ľudia, ktorí hľadajú informácie o tom, ako zvárať meď, často zvolia nesprávny postup.
Väčšina prác s medenými rúrkami sa vykonáva spájkovaním, nie zváraním.
Kedy je spájkovanie správnou voľbou
Ak sa pýtate, či je možné spájkovať meď, odpoveď je zvyčajne áno – pre každodenné potreby v potrubných inštaláciách. Spájkovanie je praktickou voľbou pre vodovodné potrubia a štandardné medené armatúry, kde je uprednostňované nižšie teploty. Dobré výsledky dáva aj pri kapilárnych spojoch, pri ktorých sa spájka vťahuje do úzkej medzery medzi rúrkou a armatúrou. Pre mnohých čitateľov ide práve o túto metódu, keď hľadajú informácie o tom, ako spájkovať medené rúrky.
Keď je lepenie alebo iné spojky vhodnejšie
Ak sa v skutočnosti pýtate, ako sa medené potrubie lepuje, zamyslite sa nad oblasťami ako klimatizácia, chladenie alebo iné aplikácie s vyššou teplotou. Lepenie vyžaduje viac tepla ako pájkovanie a zvyčajne vytvára pevnejší spoj. Dôležitý je aj bezteplotný spôsob montáže. Pokyny od PlumbHQ ukazujú prečo: kompresné spojky fungujú bez tepla a môžu sa inštalovať aj za mokrých podmienok, rýchlo zapichovateľné spojky sa inštalujú rýchlo, avšak ich výber je potrebné pre danú aplikáciu premyslieť, a stlačovacie spojky vytvárajú pevné spojenia, avšak zvyčajne dávajú zmysel len vtedy, ak už máte k dispozícii stlačovací nástroj.
| Metóda | Najlepšia použitnosť | Úroveň tepla | Relatívna pevnosť | Relatívna cena | Predpisy a predpisy | Požadovaná spôsobilosť |
|---|---|---|---|---|---|---|
| Sväranie | Potrubné systémy, vodovodné potrubia, medené spojky | Nízka, pod 450 °C | Stredný | Nízke, | Bežné v potrubných systémoch, avšak overte si miestne predpisy a schválené materiály | Mierne |
| Sväranie | Klimatizácia, chladenie, medené potrubia pre vyššie teploty | Vyššia, nad 840 °F | Vysoký | Stredný | Často sa používa v prípadoch náročnejších prevádzkových podmienok; overte požiadavky | Mierne až vysoké |
| Zváranie | Výroba, výroba rúr, špeciálne opravy medi | Veľmi vysoká, topí základný kov | Veľmi vysoké | Vysoký | Zvyčajne je určená pre konkrétnu aplikáciu, nie je bežnou voľbou pre bežné potrubné rúry | Vysoký |
| Kompresné prispájacie hmoty | Opravy, zmiešané materiály, mokré alebo bezplameňové oblasti | Žiadne | Stredný | Od nízkej po strednú | Užitočné tam, kde je teplo obmedzené; skontrolujte schválenie spojovacích dielov | Nízke, |
| Zásuvné spojenie | Rýchle prístupné opravy a jednoduché inštalácie | Žiadne | Stredný | Stredný | Aplikácia a certifikácia výrobku sú rozhodujúce | Nízke, |
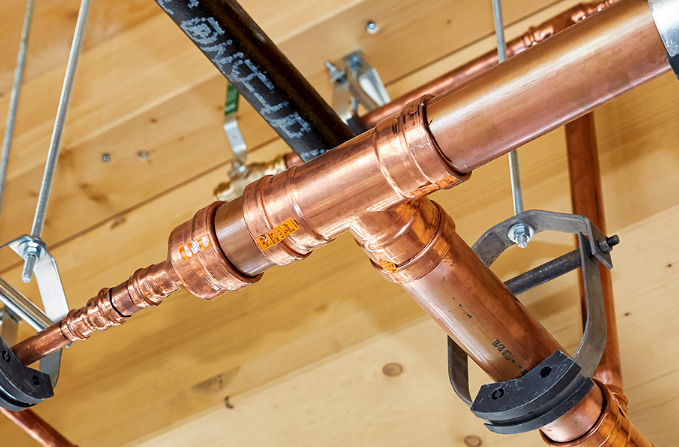
| Tlačené armatúry | Rýchle profesionálne inštalácie, miesta práce bez tepla | Žiadne | Vysoký | Vysoké počiatočné náklady na nástroje | Schválenie systému a kompatibilita nástrojov sú rozhodujúce | Nízke až mierne |
Metóda určuje zvyšok práce. Dokonca aj najlepší spoj bude sklamať, ak je potrubie stále mokré, pod tlakom alebo obklopené materiálmi, ktoré by sa nikdy nemali dostať do kontaktu s plameňom.
Krok 2: Pripravte bezpečné pracovisko na pájkovanie
Predtým, než sa plameň dotkne medi, vyžaduje pracovná plocha rovnakú pozornosť ako samotný spoj. Malá oprava sa môže rýchlo stať nebezpečnou, ak pájkujete medené potrubie pomocou horáka na propán v blízkosti drevenej konštrukcie, izolácie, farby alebo elektrických vodičov. Dobrá príprava má však význam aj pre výsledok. Obe This Old House a Home Depot zdôrazňujú rovnaké základné princípy: vetranie, ochrana očí, rukavice, tepelný štít a hasiaci prístroj v dosahu.
Vytvorte bezpečné pracovisko na pájkovanie
- Zabezpečte vetranie priestoru, najmä pri pájkovaní potrubia v interiéri.
- Noste ochranné okuliare a rukavice odolné voči teplu.
- Majte hasiaci prístroj v dosahu. Rozprašovač alebo zdroj vody môžu pomôcť ochladiť susedné povrchy, ak je to vhodné.
- Použite tepelný štít alebo ohňovzdorný kus látky za spojom.
- Uistite sa, že vaša pákova horácka na pájkovanie medi má stabilné a nehorľavé miesto na uloženie, keď je horúca.
- Ak pájkujete vodovodné potrubie v skriňach, stenových dutinách alebo pod stropnými medzery, uplatňujte zvýšenú opatrnosť.
Mnoho neúspešných spojov vzniká kvôli nebezpečnej alebo ponáhľanej príprave, nie len kvôli zlej pájke.
Chránte susedné povrchy pred poškodením spôsobeným teplom
Teplo sa šíri aj mimo spojky. Vložte tepelný štít medzi potrubie a akýkoľvek horľavý alebo teplom citlivý materiál, vrátane drevených nosníkov, izolácie, izolácie káblov, podlahy a natretých povrchov. Ak je spoj tesne pri dokončených stenách, skrytých elektrických vedeniach, plynových potrubiach alebo starých suchých rámoch, môže takýto opravný zásah presiahnuť rámec jednoduchých úprav vykonávaných sám o sebe a predstavovať nebezpečenstvo. To isté platí pre rozsiahle výmeny potrubia, práce na ohrievači vody, zmeny odpadového vetila , alebo akékoľvek práce, ktoré miestne predpisy vyžadujú vykonať oprávnenému sanitnému technikovi.
Najskôr vypustite a stabilizujte medené potrubie
- Uzavrite prívod vody do príslušného úseku.
- Otvorte nižšie umiestnený kohútik alebo ventil a vypustite vodu z potrubia do vedra.
- Otvorte ďalší spotrebič, aby ste uvoľnili zostávajúci tlak.
- Skontrolujte, či sa do potrubia nevracia voda. Už malé množstvo vody môže poškodiť tok spájkovej zliatiny pri spájkovaní vodovodného potrubia.
- Uistite sa, že trubica je chladná, suchá a pevne podopretá, aby sa počas zahrievania neposunula.
- Vyčistite podlahu a položte si pred zapálením horáka vašu pálkovaciu horákovú lúčku, tepelný štít, handričku a hasiaci prístroj.
Ak sa učíte spájať vodovodné potrubie pájkou, práve v tomto bode sa zvyčajne rozhoduje o úspechu. Pokojné a suché nastavenie značne uľahčuje samotný proces spojovania a správne nástroje a materiály majú rovnaký význam ako bezpečné podmienky.
Krok 3: Zozbierajte vhodný pájkovací komplet pre meď
Bezpečné pracovisko pripraví priestor. Spoj stále závisí od čistej kovovej povrchu, rovnomerného ohrievania a správneho časovania, preto zoznam nástrojov má väčší význam, než väčšina začiatočníkov očakáva. Základný pájkovací komplet pre meď nemusí byť luxusný, ale musí dobre zvládnuť tri úlohy: rež, prípravu, tok pájky a reguláciu tepla.
Neoddeliteľné nástroje na spojovanie medi
Vyberte si nástroje podľa ich funkcie, nie podľa označenia. Medený rezač vám pomôže urobiť rovný rez. nástroj na odstraňovanie hrotov alebo vyvŕtavací nástroj odstraňuje vnútorný hrot, ktorý môže obmedziť prietok. Štetec na spojky čistí vnútornú stranu zásuvky, zatiaľ čo emériový plátnik alebo abrazívna podložka čistí vonkajší povrch rúrky až po lesklý kov. Štetec na taviacu pastu nanáša rovnomerný povlak bez prebytočného rozmazania na spoji. Potom nasledujú nástroje na ohrev: meďový pájok, horák, zapalovač (ak horák nie je samozapaľujúci), tepelný štít a čistý hadrík.
| Nedostatkové | Voliteľné, no užitočné |
|---|---|
| Meďový rezač, nástroj na odstraňovanie hrotov, štetec na spojky, emériový plátnik alebo abrazívna podložka | Náhradné abrazívne podložky, dodatočné veľkosti štetcov pre rôzne spojky |
| Štetec na taviacu pastu, taviaca pasta pre meďové rúrky, meďový pájok, horák, zapalovač (ak je potrebný) | Tavivá pasta s cínom pre začiatočníkov alebo spoje s väčším priemerom, vodou rozpustná taviaca pasta na jednoduchšie čistenie |
| Tepelný štít, čistý hadrík | Ohňovzdorný plátnik alebo ochranná bariéra proti plameňu pre tesnejšie priestory |
Ako vybrať taviacu pastu a zdroj tepla
Príručka spoločnosti Oatey uvádza, že fluks čistí kovové povrchy, pomáha zabrániť oxidácii a zlepšuje tok pájky, preto je fluks pre meď povinný. Vaša potrubná pájka a fluks by mali tiež zodpovedať typu práce. Pre potravinové vodovodné potrubia používajte bezolovovú pájku pre medené rúry a bezolovový fluks. Pravidlo EPA stanovuje maximálny obsah olova v pájkach a fluksoch pre pitnú vodu na 0,2 %. Pri zohrievaní sa na pájkovanie medi dajú použiť aj propán aj MAP plyn, pričom podľa recenzie Pro Tool Reviews horí MAP plyn teplejšie a rýchlejšie zohrieva spojovacie prvky. Uistite sa len, že hlavica horáka je určená pre palivo, ktoré používate.
Čo pripraviť pred začatím zohrievania
- Umiestnite potrubnú pájku a fluks vedľa očistených dielov, aby ste nemuseli s rozžiaraným horákom dosahovať cez pracovný priestor.
- Ak ste začínajúci alebo pracujete na väčších spojoch, nanesenie fluksu na meď (tzv. tinning) môže uľahčiť jeho rovnomerné rozprestrenie.
- Horák, zapalovač, tepelný štít, pájka a handra uložte v poradí, v akom ich budete používať.
- Pre potravinové vodovodné potrubia dvakrát skontrolujte, či sú pájka aj fluks pre medené rúry bezolovové.
Dobrze usporiadaná pracovná plocha ušetrí nielen čas. Chráni aj povrchy, ktoré ste práve vyčistili. To je dôležité, pretože rovné rezy, hladké okraje a lesklý kov rozhodujú o tom, či sa spájkovacia zliatina hladko presunie do spoja alebo vás núti hľadať netesnosti.
Krok 4: Rezanie, odstránenie hrotov, čistenie a suché nasadenie medených rúr
Tieto rovné rezy a lesklé povrchy nie sú len nepotrebnou dodatočnou prácou. Práve ony umožňujú, aby sa spájkovacia zliatina pohybovala kapilárnou akciou namiesto toho, aby bojovala proti hrotom, nečistotám a medzerám. Mnoho netesností, ktoré sa obvykle pripisujú nesprávnemu ohrievaniu alebo výbere spájkovej zliatiny, v skutočnosti začína práve tu. Pri spájkovaní medených rúr kvalita prípravy rozhoduje o tom, či sa plniaca zliatina bude hladko vtiahnuť do spoja alebo ponechá skrytú cestu na únik.
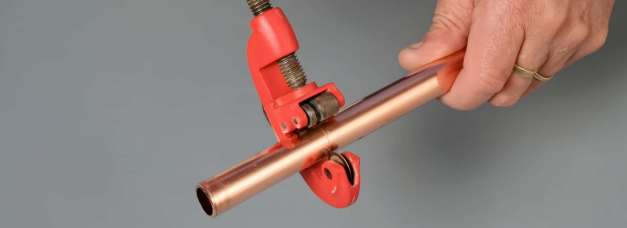
Rezanie medených rúr rovno a čisto
Použite rúrkový rezák a urobte rez rovný a kolmý na rúru. Pokyny od Flowflex poznamenáva, že nerovnomerný rez môže zabrániť tomu, aby rúrka dosiahla priehradnú stopu v rámci zariadenia, čo oslabuje integritu kĺbu. Príliš krátka trubica môže tiež ohroziť tesnenie, zatiaľ čo nútená môže spôsobiť napätie. Ak sa učíte, ako pripevňovať medené rúrky počas opravy, je čas spomaliť a potvrdiť, či sa vám hodia, namiesto toho, aby ste sa spoliehali na rýchly pohľad.
Deburr a polštár pre lepšiu kapilárnu činnosť
Po rezaní odstráňte vnútornú hrobu odkrúbením alebo reamovaním a vyčistite štrbiny. Potom vyčistite vonku rúrku a vnútri zásuvky na svetlý kov. Spoločnosť Home Depot popisuje leštenie medi, až kým nebude lesknúť ako nový cent, a Flowflex pridáva dôležité varovanie: oxidy, štrk a zvyšky v oblasti prekrývania môžu narušiť pôsobenie kapilár, zatiaľ čo nadmerné čistenie môže odstrániť príliš veľa materiálu a zanechať voľné zapnutie.
Ak sa pýtate, aký je vhodný stupeň zrnitosti brúsneho papiera na medené rúry, tieto odporúčania neuvádzajú jediné pevné číslo zrnitosti. Lepšie je použiť emériový plátnik, emériový pás alebo abrazívnu podložku určenú pre meď, až kým povrch kovu nebude čistý, lesklý a bez oxidov. Inými slovami, čistenie medených rúr závisí od stavu povrchu, nie od intenzity brousenia.
- Zmerajte a orežte rúru kolmo.
- Odstráňte hrot (hrubý okraj) z vnútorného okraja a v prípade potreby aj vonkajší hrot.
- Vytrepajte alebo utrite meďové triesky.
- Vyčistite vonkajší povrch rúry v mieste, kde sa bude prekrývať s nástrčnou časťou.
- Vyčistite vnútorný povrch nástrčnej časti (zásuvky) až na lesklý kov.
- Zachovajte čistotu vyčistených povrchov – chráňte ich pred nečistotami a odtlačkami prstov.
- Skontrolujte suché posadenie dielov a potvrďte, že rúra je úplne zasunutá až po zarážku.
Predtým, ako sa fluks dotkne kovu, vykonajte suché posadenie celého zariadenia.
Suché nasadenie odpovedá na dve najdôležitejšie otázky: či sa rúrka dotkne dna spojovacej nástrčky a či zostane spoj pevný bez použitia sily. To je praktická odpoveď na otázku, ako čisto spojiť medené rúrky. Zároveň vám pomáha nastaviť správne zarovnanie ešte predtým, než sa povrchy stanú šmykľavými v dôsledku aplikácie fluu, čo je obzvlášť užitočné v tesných priestoroch alebo pri práci nad hlavou.
- Koniec rúrky vyzerá rovnomerne jasne, nie tmavo ani škvrnitý.
- Vnútorný otvor spojovacej nástrčky je po celom obvode čistý.
- Rúrka sa hladko zastrčí a dosiahne zarážku.
- Spoj sa cíti pevný, nie voľný ani naklonený.
- Na prekrývajúcej sa oblasti nezostali žiadne hranoly, nečistoty, triesky ani odtlačky prstov.
Keď sa súčasti spoja čisto a rovnomerne, fluus pomôže spájkovej zliatine prúdiť tak, ako má, namiesto toho, aby sa snažila skryť nedostatočnú prípravu. Presne tu začína spoľahlivý spoj.
Krok 5: Naneste fluus a správne zahrejte medenú rúrku
Čistý, jasný kov poskytuje spájkovej zliatine cestu. Ovládanie teploty je to, čo ju rozohrieva a uvedie do pohybu. Toto je fáza, v ktorej sa starostlivá príprava buď vyplatí, alebo sa za niekoľko sekúnd zruší. Väčšina zlých spojov sa dá sledovať až k dvom jednoduchým chybám: príliš veľa fluxu alebo plameň horáka namierený na spájkovaciu zliatinu namiesto na spojovací kus. Ak sa učíte spájkovať meď na meď , predstavte si plameň ako prostriedok na rovnomerné zohriatie spoja tak, aby prácu vykonával kov, nie oheň.
Aplikujte flux bez preťaženia spoja
Naneste tenký, rovnaký náter fluxu na spájkovanie medi na očistený koniec rúrky a do vnútra zásuvky spojovacieho kusu. Podľa návodu Home Depot sa odporúča naniesť flux iba na očistenú plochu, približne do hĺbky pohára spojovacieho kusu, a potom rúrku úplne zasunúť do miesta. Dôležitá je tenká vrstva. Flux chráni kov počas zohrievania a pomáha spájkovej zliatine pri prúdení, avšak hrubá vrstva nie je lepšia. Nadbytok fluxu sa môže zachárať, rozbihnúť sa a nechať za sebou viac nečistôt.
Po nanesení fluxu pevne udržiavajte spoj zostavený. Pri spájkovaní medených rúrok s fluxom úplný kontakt po celej dĺžke švu je rovnako dôležitý ako čistý kov. Rúrka, ktorá nie je úplne zasadená, alebo spojka, ktorá sa posunie počas práce, môže prerušiť kapilárnu dráhu ešte predtým, než dojde k zahriatiu.
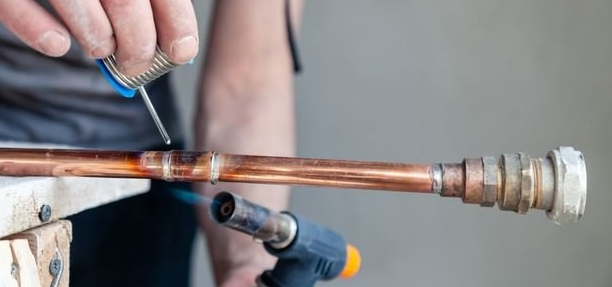
Zahrievajte spojku namiesto tavenia pájky plameňom
Ľudia sa pýtajú ako spájať medené rúrky zvyčajne potrebujú spoľahlivý vzor plameňa viac ako dodatočné teplo. Pokyny od Copper.org uvádzajú praktickú postupnosť, ktorá funguje dobre bez ohľadu na to, či spájate medené rúrky pomocou propanovej horáčky alebo inej horáčky so vzduchom a palivom:
- Začnite s plameňom kolmým na rúrku, aby ste začali predhrievať spoj.
- Pohybujte sa po celej obvode, aby sa spoj rovnomerne zohrial.
- Pri horizontálnych spojoch nepoužívajte plameň najprv na vrchu. Stúpajúce teplo už túto oblasť zohrieva a priamy plameň tu môže spáliť taviacu hmotu.
- Presuňte plameň na pohár spojky, nie do otvorenej časti spojky.
- Prejdite plameňom sem a tam medzi pohárom spojky a rúrkou na vzdialenosť približne rovnajúcu sa hĺbke pohára.
- Najhorúcejší bod plameňa udržiavajte blízko základne pohára spojky, aby sa spoj rovnomerne zohrial.
Spájkovacia zliatina by mala topnúť pri kontakte s ohriatym spojom, nie priamo v plameni.
To je základné pravidlo pre spájkovanie medi . Ak spájkovaciu zliatinu topíte priamo v plameni, môže sa zhromaždiť na vonkajšej strane namiesto toho, aby sa vtiahla do švíku. Ak prehrejete meď, taviaca hmota sa môže spaľovať. Copper.org výslovne varuje pred prehrievaním spoja alebo smerovaním plameňa do otvorenej časti pohára spojky, pretože to môže znemožniť správny tok spájkovej zliatiny.
Rozpoznajte, kedy je spoj pripravený na spájkovanie
Nepočítajte sekundy a nehádajte. Posúďte spoj podľa toho, čo robí. Podľa návodu Home Depot sa pri zahrievaní spojovacej časti môže prípravok začať štiepať. To je len signál, že sa kov zohrieva. Dotknite sa pájky stranou opačnou od plameňa. Ak sa neroztaví, odstráňte ju a pokračujte v zahrievaní. Ak sa pri kontakte roztaví a začne sa vsakovať do spoja, teplota je správna.
Udržiavajte plameň pri základe pohára a zároveň jemne dopĺňajte pájku. Podľa informácií na copper.org sa roztavená pájka kapilárnou akciou priťahuje k zdroju tepla, preto je rovnomerné zahrievanie kľúčovým cieľom. Dobrý spoj vyzerá ovládaný, nie dramatický. Pájka sa hladko rozteká, prípravok zostáva aktívny a spojovacia časť vtiahne vyplňovací materiál do švíku namiesto toho, aby sa stekal po rúrke nadol. Táto malá zmena v správaní vám oznamuje, že spoj je pripravený na záverečné doplnenie pájky, ochladenie a dôkladnú kontrolu.
Krok 6: Pájkujte, ochladzujte a kontrolujte medené rúrky
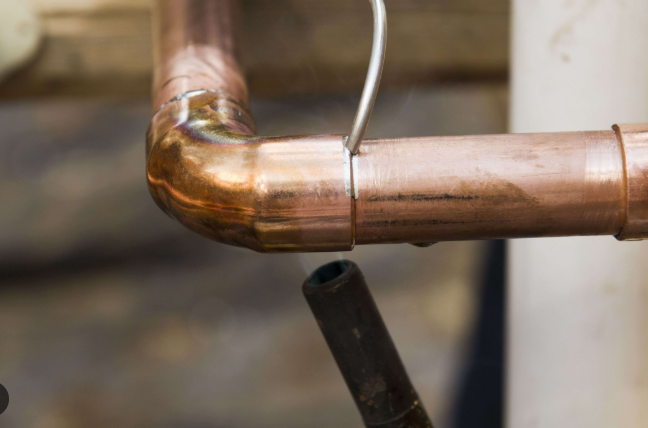
Keď sa nástrčka dosiahne správnej teploty, pohyb sa stane jednoduchým, no zároveň presným. Táto časť je tá, ktorú si väčšina ľudí predstavuje, keď premýšľa o spájkovaní medienej rúrky, avšak niekoľko malých návykov rozhoduje o tom, či sa spoj hermeticky uzavrie alebo len vizuálne vyzerá dokončený. Pri spájkovaní rúrok pomocou nástrčiek (tzv. sweat pipe fittings) aplikujte spájkovací materiál s kontrolou a okamžite prestanete, akonáhle spoj začne materiál rovnomerne prijímať. Nepokúšajte sa dotýkať zostavy, kým sa úplne nezafixuje.
Aplikujte spájkovací materiál z pravej strany spoja.
Držte plameň na nástrčke a dotknite sa spájkovacieho materiálu strany opačnej od plameňa. To umožní horúcemu kovu vťahovať plniaci materiál do medzery kapilárnou akciou namiesto toho, aby sa materiál kvapkala vonku. Praktické pravidlo od spoločnosti Oatey je aplikovať dĺžku spájkovacieho materiálu približne rovnajúcu sa priemeru rúrky. To zvyčajne postačuje na úplné utesnenie bez zbytočného odpadu. Nepokúšajte sa naplniť medené nástrčky spájkovacím materiálom nad rámec množstva, ktoré spoj prirodzene nasaje.
- Držte plameň pri základe nástrčkovej pohárku.
- Dotknite sa spájkovacieho materiálu strany opačnej od plameňa.
- Pridávajte pájku opatrne, kým sa spojovací bod nezapája.
- Podľa potreby meniť svoju pozíciu, aby ste dosiahli rovnomerné vyplnenie po celom obvode.
- Odstráňte plameň, keď sa tok pájky stabilizuje a stane sa rovnaký.
- Nechajte rúrku a spojovací kus úplne nehybné, kým je vyplňovací materiál stále mäkký.
Nechajte spoj ochladiť bez rušenia
Nový pájkovaný spoj potrebuje nehybnosť viac ako ďalšie manipulácie. Skoré skrútenie alebo náraz do rúrky môže oslabiť tesnenie, kým sa ešte úplne nezafixuje. Príliš intenzívne utieranie v čase, keď je pájka ešte kvapalná, môže rozšíriť pájkový hrot alebo odtrhnúť vyplňovací materiál od švíku. Príručka pre medené rúrky odporúča nechať spoj ochladiť sa prirodzene, pretože náhle ochladenie vodou ho môže zaťažiť. Pri pájkovaní medených rúrok patrí trpezlivosť k súčasti remesla.
Pred obnovením prevádzky vyčistite a skontrolujte
Keď už nie je pájka kvapalná a spoj sa dostatočne ochladil na vyčistenie, odstráňte zostávajúci prípajkový prostriedok vlhkou handričkou. Oatey upozorňuje, že zvyšný prípajkový prostriedok môže spôsobiť koróziu a zelený patinový povlak, ktorý sa často vyskytuje na starších medených potrubiach. Druhé prečistenie suchou handričkou môže výsledok urobiť čistejším, avšak postupujte jemne.
- Dobré znaky: hladký a rovný pájkový kruh na okraji pohára, stabilné zarovnanie a pájka, ktorá vyzerá, že bola do spoja nasávaná.
- Varovné znaky: veľké kvapky, hrudkovité nahromadenie, popálené oblasti, medzery v kruhu alebo spojovka, ktorá sa počas chladenia posunula.
- Dôležité: esteticky pekný spoj je povzbudzujúci, avšak vzhľad sám o sebe nezaručuje tesný, netiekajúci spoj.
Preto je pred opätovným zapnutím vody dôležitá dôkladná kontrola. Mnoho problematických spojov na prvý pohľad vyzerá v poriadku, no neskôr sa ukáže, že im v tichu prekážalo vlhko, prehriaty prípajkový prostriedok alebo nedostatočné vyčistenie.
Krok 7: Riešenie netesností v pájkovaných potrubných spojoch
Hladký pájkový kruh môže vyzerať presvedčivo a napriek tomu zlyhať. Väčšina problémov vyplýva z rovnakého malého súboru chýb: špinavý kov, zlá kontrola tepla, príliš veľa alebo príliš málo fluxu, zostávajúca voda alebo hrot, ktorý nikdy nebol odstránený. Sprievodca spoločnosti Oatey sa opakovane vráti k príprave, zahrievaniu a čisteniu – a to z dobrého dôvodu. Keď sa spoj nesprávne vykoná, tieto tri oblasti sú prvými, kde sa treba pozrieť.
Prečo sa pájka odmietne vtlačiť do spoja
Ak sa pájka zhrnie do guľôčky, usadí sa na vonkajšej strane alebo sa odmietne vtiahnuť do švíku, spoj zvyčajne ešte nie je skutočne pripravený. Oatey upozorňuje, že nečistoty, olej, oxidácia a hroty môžu zabrániť správnemu pôsobeniu fluxu a pájky. Príliš vysoké teplo môže spôsobiť podobné poškodenie z opačnej strany. Potemnená rúrka alebo flux, ktorý sa zdá byť rýchlo spaľovaný, je jasným znakom prehriatia spoja. V oboch prípadoch pridaním ďalšej pájky sa problém zvyčajne nerieši. Lepšie riešenie je očistiť povrch až na lesklý kov, aplikovať tenký a rovnomerný povlak fluxu pre pájkanie medených rúrok a znovu rovnomerne zahriať spojovací kus.
| Príznak | Pravdepodobná príčina | Nápravné opatrenie |
|---|---|---|
| Spájkové guľôčky sa tvoria alebo sa nesústreďujú | Špinavý alebo oxidovaný kov, oškrabky, spálená taviaca hmota, nerovnomerné zahrievanie | V prípade potreby rozoberiete spoj, znovu vyčistíte a odstránite oškrabky, naneste tenkú vrstvu taviacej hmoty a rovnomernejšie zahrejete spojovací kus |
| Spoj vyzerá plný, ale netesní | Spájka sa usadila iba vonku, nedošlo k úplnému zlepeniu, rúrka nie je úplne zasadená | Znovu spracujte spoj, overte úplné zasadenie, vyčistite obe povrchy a potom znovu spájkujte |
| Neskôr sa objaví zelený povlak alebo korózia | Na spoji alebo v spoji zostalo príliš veľa taviacej hmoty | Použite menej taviacej hmoty, prebytok odstráňte pred montážou a po ochladení odstráňte zvyšok |
| Spájka škvŕka alebo spoj sa nikdy nedosťahuje dostatočnej teploty | V rúrke stále zostáva vlhkosť | Pred opätovným pokusom dôkladne vypustite a vysušte potrubie |
| Obmedzenie prietoku alebo opakujúce sa problémy | Preskočené odstránenie hriň | Odrežte a znovu vyrobte úsek po správnom odstránení hriň a vyčistení |
Čo spôsobuje úniky po tom, čo spoj vyzerá ako úplný
Spoj môže vyzerať utlmený, pretože sa pájka nahromadila na okraji, aj keď sa v skutočnosti nikdy úplne nepretekla do pohárika. To sa často deje, keď nebola rúrka dostatočne vyčistená, keď bolo nanášanie fluksu nepravidelné alebo keď plameň roztavil pájku priamo namiesto zahrievania kovu. Preskočenie odstránenia hriň pridáva ďalší problém. Oatey upozorňuje, že odstránenie hriň pomáha zlepšiť prietok vody a zabraňuje turbulencii alebo budúcim koróznym procesom, ale zároveň podporuje čistejší a spoľahlivejší dosadnutie. Pre každého, kto páji rúrkové spoje, vizuálny dojem je len indíciou, nie dôkazom.
- Zahrievanie pájky namiesto spoja
- Použitie príliš veľa fluksu
- Použitie príliš malého množstva fluksu alebo vynechanie miest
- Pokúšanie sa spájať meďové rúry pri prítomnosti vody v potrubí
- Preskočenie čistenia alebo odstránenia hranov
- Dôvera v nerovný vonkajší zvar ako v úplné tesnenie
Ako sa zotaviť po kontaminácii vodou alebo prehriatí
Zlé spoje sa zvyčajne dajú znova vyrobiť rýchlejšie, než sa ich podarí zachrániť. Pri spájaní rúrových spojov nepokračujte v privádzaní pájky na kontaminované alebo popálené spojovacie prvky v nádeji, že sa uzatvoria. Ak je prítomná voda, pred opätovným zahrievaním dôkladnejšie vysušte potrubie. Ak je kov špinavý alebo oxidovaný, rozoberiete spoj a znova ho vyčistíte. Ak bol spojovací prvok silne zčiernený nadmerným zahrievaním, často je bezpečnejšie prepracovať daný úsek.
Ak hľadáte, ako spájkovať medené rúry s vodou v nich, alebo sa pýtate, či je možné spájkovať medené rúry, v ktorých je voda uväznená hlbšie v úseku, potom praktická odpoveď je jednoduchá: suchá rúra vám poskytuje najlepšie šance na úspech. To je tiež najrozumnejší prístup k oprave medených rúr. Opravte príčinu, nie len príznak. Aj ak vyzerá oprava esteticky dokonale, musí sa ešte preukázať pri obnove tlaku.
Krok 8: Skontrolujte spoj a poznajte jeho limity
Aj ak vyzerá kvapka čistá a esteticky dokonalá, musí si zaslužiť vašu dôveru až pod tlakom. Po všetkom rezaní, čistení, zahrievaní a odstraňovaní porúch sa skutočný dôkaz úspechu prejaví až po opätovnom uvedení rúry do prevádzky. Táto konečná kontrola je rozhodujúca, či sa práve učíte, ako spájkovať medené potrubie, alebo opravujete jeden tvrdohlavý problém.
Skontrolujte spoj, kým neoznámite dokončenie práce
Obnovte prevádzku postupne a pozorne sledujte spoj, keď sa potrubie znovu napína. Udržiavajte oblasť suchú, aby bolo možné aj najmenšie úniky ľahko zistiť. Potom prekontrolujte spoj po tom, čo voda bude normálne prechádzať po krátku dobu, pretože niektoré slabé spoje sa neprejavujú pri prvom pohľade. Pekný kruh pájky je povzbudivý, ale rozhodujúcim kritériom je jednoduché: zostáva spoj suchý pri bežnom používaní?
- Postupne otvorte prívod a nechajte potrubie znovu dosiahnuť tlak.
- Okamžite skontrolujte zpájkovanú oblasť na prítomnosť kvapiek, potenia alebo pomalého úniku.
- Odstráňte vlhkosť zo spoja utretím a znovu sa pozrite, či sa vlhkosť neobjavuje opäť.
- Prekontrolujte nielen spoj, ktorý ste zahrievali, ale aj okolité armatúry a podpery potrubia.
- Znova skontrolujte po tom, čo armatúra alebo potrubie bude normálne fungovať.
- Ak sa niečo začne driežať, vypnite vodu a spoj znovu vykonajte namiesto toho, aby ste mu dôverovali.
Vedieť, kedy nepájkovať medené rúrky
Ak ste sa sem dostali hľadaním informácií o zváraní medených rúrok, práve v tomto bode je výber metódy dôležitejší ako trpezlivosť. Pokyny od SolderWeld je užitočné: spájkovanie a pájkovanie zvyšujú pevnosť a trvanlivosť, kým stlačenie ponúka rýchlosť, inštaláciu bez tepla a vysokú odolnosť voči vibráciám, hoci náklady na nástroje a spojky sú vyššie. Ak sa teda spoj nachádza v oblasti, kde nie je povolené používať plameň, systém pracuje za vyšších teplôt ako bežné potrubie alebo potrebujete veľa rýchlych pripojení, spájkovanie už nemusí byť najvhodnejšou možnosťou.
Ak hľadáte spôsob, ako spojiť meďové rúry bez spájkovania, schválené mechanické spojky a stlačovacie systémy sú často rozumnejšou voľbou. Ak sa vaše vyhľadávanie presunulo na tému, ako zvárať meď s medzou, alebo ako sa zvára meď, pravdepodobne ste mimo bežného potrubného opravného práce a nachádzate sa v oblasti špecializovanej výroby. Pre väčšinu domácich úloh je zručnosť, ako spájkovať meďové potrubie, tou, ktorá prináša najväčšiu výhodu, nie skutočné zváranie tavením.
Keď má zmysel podpora pri výrobnej zváraní
Spájkovanie malých medienej rúrky a výrobné zváranie žijú v úplne odlišných svetoch. Netesniaca koleno pod umývadlom je úlohou potrubiarov. Robotické zváranie pre vozidlové konštrukcie je výrobným procesom, ktorý sa zakladá na opakovateľnosti, sledovateľnosti a kvalitnej kontrole pri vysokom objeme výroby.
| Stave | Najvhodnejší | Prečo je vhodný |
|---|---|---|
| Automobiloví výrobcovia potrebujúci zvárané podvozkové zostavy | Shaoyi Metal Technology | Ponúka špecializované zváranie vysokovýkonnostných podvozkových súčiastok prostredníctvom pokročilých robotických zváracích línií a certifikovanej kvalitnej systémovej normy IATF 16949, vrátane prispôsobených možností pre oceľ, hliník a iné kovy. |
| Medené rúrky pre vysokoteplotné aplikácie, klimatizáciu alebo chladenie | Sväranie | Pájkovanie vyžaduje vyššiu teplotu ako spájkovanie a je vhodnejšie v prípadoch náročnejších prevádzkových podmienok. |
| Opravy bez tepla, priestory s obmedzením použitia plameňa alebo inštalácie, pri ktorých je kľúčová rýchlosť | Tlakové alebo iné schválené mechanické spojky | Najvhodnejšie v prípadoch, keď riziko požiaru, mokré podmienky alebo rýchla inštalácia prevážia výhody spoja vytvoreného horákom. |
Záver je jednoduchý. Ak spoj prejde kontrolou a zostane v prevádzke suchý, úlohu ste splnili správne. Ak už podmienky nie sú vhodné na pájkovanie, prechod na zváranie tvrdou pájkou, mechanické spojky alebo profesionálne výrobné riešenie nie je vzdanie sa – je to rozumné rozhodnutie.
Často kladené otázky o zváraní a pájkovaní medienej rúrky
1. Je možné skutočne zvárať medené rúrky?
Áno, avšak štandardné medené rúrky používané v potrubných inštaláciách sa zvyčajne nespojujú tavením (fúziovým zváraním). Väčšina spojov v domácnostiach sa vykonáva pájkovaním a v systémoch s vyššími teplotami sa častejšie používa zváranie tvrdou pájkou. Pravé zváranie spôsobuje roztavenie medi samotnej, čo vyžaduje vyššiu zručnosť a presnejšiu kontrolu tepla, preto sa zvyčajne používa len pri výrobe alebo špeciálnych opravách, nie pri bežných inštaláciách vodovodných potrubí.
2. Mám medené rúrky pájkovať alebo zvárať tvrdou pájkou?
Spájkovanie je zvyčajne lepšou voľbou pre každodenné potrubné systémy, pretože využíva nižšiu teplotu a dobre funguje s bežnými medenými spojkami. Zváranie je vhodnejšie v prípadoch, keď bude rúrka vystavená vyšším teplotám alebo náročnejším prevádzkovým podmienkam, napríklad pri práci s chladiacimi zariadeniami. Ak je pracovné miesto mokré, úzke alebo nebezpečné pre použitie otvoreného plameňa, mechanická spojka môže byť rozumnejším riešením ako ktorákoľvek z týchto dvoch možností.
3. Prečo sa spájka nedostáva do môjho medeného spoja?
Zlá prietokovosť spájky zvyčajne naznačuje problém s prípravou alebo ohrievaním. Medzi bežné príčiny patria oxidácia na medi, ostávajúce hranoly po rezaní, nadbytok vlhkosti vo vnútri rúrky, spálená toková hmota alebo plameň namierený priamo na spájku namiesto na spojku. Riešenie spočíva zvyčajne v rozobratí spoja, očistení oboch povrchov až na jasné kovové povrchy, nanesení tenkej vrstvy tokovej hmoty a rovnomernom ohrievaní spoja.
4. Môžem spájkovať medenú rúrku, ak v nej stále je voda?
Nie je to spoľahlivé. Už malé množstvo vody môže spoj príliš rýchlo ochladiť, zabrániť dosiahnutiu požadovanej teploty pri montáži a spôsobiť prskanie alebo slabé tesnenie. Vypnite prívod, uvoľnite tlak, úplne vypustite potrubie a pred opätovným zapálením horáka sa uistite, že je daný úsek suchý a stabilný. Ak sa voda stále vracia, použite lepšiu izoláciu alebo prejdite na spojku bez ohrevu, ktorá je schválená pre dané použitie.
5. Ako môžete spojiť meďové rúry bez pájkovania a kedy by ste mali zavolať odborníka?
Stlačovacie spojky, rýchlospojovacie spojky a stlačovacie systémy sú bežnými spôsobmi spojenia medi bez pájkovania. Sú obzvlášť užitočné v priestoroch s obmedzením použitia plameňa, pri rýchlych opravách alebo v prípadoch, keď sa potrubie nedá úplne vysušiť. V prípade opravy v blízkosti skrytých elektrických vedení, izolácie, dokončených stien alebo zariadení podliehajúcich predpisom kontaktujte oprávneného inštalatéra. Ak práca prechádza do výroby kovových komponentov namiesto inštalatérskych prác, je lepšie zveriť ju špecializovanému partnerovi na zváranie, napríklad spoločnosti Shaoyi Metal Technology, než vykonávať pájkovanie priamo na mieste.