 Kleine series, hoge eisen. Onze snelprototyperingservice maakt validatie sneller en eenvoudiger —

Hoe aluminium te lassen met een TIG-lasapparaat: overwin oxide, warmte en roet
Hoe aluminium te lassen met een TIG-lasapparaat
Als u wilt leren hoe u aluminium kunt lassen met een TIG-lasapparaat, begin dan met het bijstellen van uw verwachtingen ten opzichte van staal. Aluminium geeft vaak minder visuele waarschuwingen. Het oppervlak bevat een oxide-laag, warmte verspreidt zich snel door het onderdeel en de smeltbad kan zo snel vloeibaar worden dat u erdoor verrast wordt. Daarom voelt TIG-lassen van aluminium de ene seconde soepel aan en de volgende seconde rommelig, als uw voorbereiding of controle tekortschiet.
Deze handleiding volgt een praktische werkvolgorde: begrijp het metaal, verzamel de juiste apparatuur, bereid de lasnaad voor, stel de machine in, voer de las uit en inspecteer het resultaat. Als u zich heeft afgevraagd kunt u aluminium lassen met een TIG-lasapparaat , dan is het antwoord ja, maar succes berust op precisie en controle, niet op brute kracht.
Waarom TIG-lassen van aluminium anders aanvoelt
Aluminium gedraagt zich anders omdat zijn oxide-laag smelt bij ongeveer 2037 °C, terwijl het basismetaal rond de 660 °C smelt — een verschil dat wordt benadrukt door Metal Fusion Pro en CK Worldwide. Deze harde oxidehuid kan de boogstabiliteit verstoren als deze niet correct wordt verwijderd en beheerd. Aluminium geleidt ook warmte snel, waardoor de laszone snel verandert. U kunt het gevoel krijgen dat er niets gebeurt, totdat de smeltbad plotseling glanzend, los en klaar is om door te zakken. Het leren lassen van aluminium met TIG begint met respect voor die drie realiteiten: oxide, warmtestroom en smeltbadsnelheid.
Bij aluminium lossen een schone werkstukoppervlakte en een korte, stabiele boog meer problemen op dan extra stroomsterkte.
Wat u moet controleren voordat u de boog aanmaakt
- Controleer of de verbinding en de toevoegdraad schoon, droog en vrij zijn van olie.
- Zorg ervoor dat u speciale reinigingsgereedschappen voor aluminium gebruikt, geen borstel die eerder op staal is gebruikt.
- Controleer of de machine, de lasspuitonderdelen en de gasstroom gereed zijn voor aluminiumlassen.
- Proefmonteer de verbinding, bevestig de klemmen en neem een comfortabele handpositie in voordat u de pedaal indrukt.
Hoe u het smeltbad leest voordat het u ontglipt
Een goede smeltbad ziet er helder, glanzend en gecontroleerd uit. De breedte blijft constant terwijl u beweegt. Miller Electric laat zien dat, als de bewegingssnelheid te hoog is, het smeltbad kan verdwijnen en de boog onregelmatig wordt. Te lang blijven hangen of te veel warmte aanhouden leidt ertoe dat het smeltbad zich uitbreidt en wegspoelt. Als u zich afvraagt of u als beginner TIG-lassen op aluminium kunt toepassen, dan is dit de gewoonte die het meest telt: houd het smeltbad nauwlettender in de gaten dan het lastorchlichaam.
Zodra het metaal logisch begint te worden, voelen keuzes voor apparatuur niet langer willekeurig aan, omdat elk onderdeel van de opstelling bestaat om dat smeltbad schoon, stabiel en voorspelbaar te houden.
Tig lasapparaat voor aluminium
Smeltbadcontrole begint met de opstelling, niet met het pedaal. Aluminium onthult snel zwakke keuzes voor apparatuur. Als de machine geen wisselstroom (AC) kan leveren, de afscherming slecht is of uw reinigingsgereedschap vervuild is, wordt de boog onstabiel nog voordat techniek een kans krijgt om te helpen. Voor de meeste thuiswerkplaatsen en constructiewerkzaamheden is een degelijke opstelling voor aluminium eenvoudig, maar elk onderdeel heeft een specifieke functie.
Essentiële TIG-apparatuur voor werk met aluminium
- AC-gecapaciteerde TIG-machine: Als je een tig schweiër om aluminium te schweiën , AC-uitvoer is de belangrijkste vereiste, omdat dit helpt bij het beheersen van oxide tijdens het lassen. Een goede aluminium tig lasmachine moet ook stroomsterkte-instelling en afstandsbediening via een voetpedaal of vingertipbediening mogelijk maken.
- Afdek-/beschermgasinstallatie: Als u zich afvraagt welk gas voor TIG-lassen van aluminium , is het standaard uitgangspunt 100% argon. Het juiste gas voor TIG-lassen van aluminium beschermt de wolfraam elektrode en de smeltbad tegen verontreiniging.
- Onderdelen van de TIG-lasbrander: De lasbrander, de klemhouder, het klemhouderlichaam, de beschermkap en de achterkapsel werken samen om de wolfraamelektrode stevig te houden en het gas naar de juiste plaats te leiden. Een gaslens is optioneel, maar veel lassers waarderen deze voor een gelijkmatiger gasafdekking.
- Wolfraamelektrode: Veelgebruikte AC-vriendelijke keuzes zijn zuiver, ceriumgeoxideerd en lanthaangeoxideerd wolfraam. Het doel is een stabiele boog en schone starts, niet het nastreven van een modieuze elektrode.
- Toevoerstaaf: 4043 en 5356 zijn veelgebruikte toevoerstaafsoorten voor aluminium. De exacte staaf hangt af van de basislegering, wat belangrijk genoeg is om later een aparte beslissingsstap te verdienen.
- Aardklem en werkstukklemmen: Een solide elektrisch pad en een stabiele positie van de onderdelen verminderen onregelmatige starts en voorkomen dat de verbinding verschuift naarmate de warmte toeneemt.
- Speciale reinigingsgereedschappen voor aluminium: Gebruik een roestvrijstalen borstel die nieuw is of uitsluitend voor aluminium wordt gebruikt, plus schone doekjes en een geschikte oplosmiddel. Gedeelde stalen gereedschappen leiden tot verontreiniging.
Persoonlijke beschermingsmiddelen die veelvoorkomende werkplaatsfouten voorkomen
- Automatisch donkerderend helm en veiligheidsbril tegen booglicht en splinters.
- Dunne TIG-handschoenen die uw handen beschermen zonder de vingervrijheid te beperken.
- Vlamwerende jas of mouwen, lange broek en laarzen.
- Ventilatie of dampafzuiging, vooral in afgesloten ruimtes.
- Lasscherm indien andere personen in de buurt zijn.
Als je een kiest tig lasapparaat voor aluminium , behandel persoonlijke beschermingsmiddelen (PBM) en werkstukopspanning niet als extra’s. Voor een beginnende TIG-lasoperator , verbeteren een stabiele handpositie, geschikte handschoenen en veilig opgespannen onderdelen vaak de consistentie meer dan een extra machinefunctie.
Hoe u een betrouwbare TIG-installatie voor aluminium opbouwt
| Gereedschap | Taak | Gemeenschappelijke fout | Waarom dit op aluminium belangrijk is |
|---|---|---|---|
| AC-TIG-voedingseenheid | Verleent de boog en de reinigingswerking | Gebruik van een machine zonder AC-mogelijkheid | Oxide wordt moeilijker te beheersen en begint te lijden |
| Argonfles, drukregelaar, stromingsmeter | Beschermt de smeltbad en de wolfraamelektrode | Lekkages of onvoldoende gasafdekking | Verontreiniging en porositeit worden snel zichtbaar |
| Lasspuit en verbruiksartikelen | Houdt de wolfraamelektrode vast en leidt het gas | Versleten kop of losse collet | Boogonstabiliteit en ongelijkmatige afscherming |
| Wolfraam | Draagt de boog | Vuile of slecht voorbereide elektrode | Moeilijke starten en een wankelende boog |
| Klemmen en aarding | Stabiliseer de verbinding en de stroomkring | Zwakke aarding of bewegende werkstukken | Inconsistente booggedrag en slordige lasnaadplaatsing |
| Speciale borstel en schone doekjes | Verwijder oxide en oppervlakteverontreiniging | Gebruik van gereedschap dat staal heeft aangeraakt | Kruisbesmetting kan leiden tot roet en porositeit |
Werkplaatsrichtlijnen van Hobart Brothers en PrimeWeld komen uit op dezelfde praktische basisvoorwaarden voor de meeste TIG-aluminiumlaswerkzaamheden: AC-uitvoer, 100% argon, schone toevoegdraad en speciale voorbereidingsgereedschappen. Dat geeft u een betrouwbaar uitgangspunt. Of u schoon las of roet ontwikkelt, hangt af van het oppervlak dat u onder de lastoorts plaatst.
Hoe aluminium te reinigen vóór TIG-laswerk
Goede apparatuur redt vuil metaal niet. Aluminium laat meestal snel iets merken via zwart roet, een wazige smeltbad of minuscule poriën in de lasnaad. Voor iedereen die leert hoe aluminium te lassen , is voorbereiding geen tijdsverspilling. Het is juist het moment waarop boogstabiliteit en laskwaliteit worden bepaald, nog voordat de lastoorts zelfs maar wordt ingeschakeld.
Hoe aluminium te reinigen vóór TIG-laswerk
De fabrikant verdeelt de aluminiumvoorbereiding in twee afzonderlijke taken: verwijder eerst olie en vet, daarna oxide. Deze volgorde is van belang. Een draadborstel verwijdert koolwaterstoffen slecht. Wordt deze te vroeg gebruikt, dan kan de borstel verontreiniging over het oppervlak smeren en in krassen duwen die later moeilijker te reinigen zijn.
- Ontvet eerst het lasgebied. Veeg af met een schone, pluisvrije doek en een geschikte oplosmiddel zoals aceton, en laat het volledig verdampen voordat u onderdelen monteert of een lichtboog aanmaakt.
- Verwijder de oxide-laag als tweede stap. Gebruik lichte druk met een schone roestvrijstalen borstel die uitsluitend voor aluminium gebruikt.
- Borstel kort voor het lassen. SPARC merkt op dat aluminiumoxide zich snel in lucht hervormt, dus als u te vroeg borstelt, heeft het tijd om terug te keren.
- Verwijder de ontstansing en bereid de randen voor. Reinig de wortelvlakken, verwijder de ontstansing en maak alleen een afschuining indien vereist door de verbinding, zodat de smeltbad gelijkmatig kan bevochtigen.
- Monteer de verbinding droog en zet deze vast met klemmen. Een strakke, consistente montage helpt het beschermgas om het smeltbad te beschermen en vermindert de kans op onvolledige smelt.
- Plan de locaties voor tacking vóór het lassen. Plaats de tacks op plaatsen waar ze de uitlijning behouden zonder een spleet te vangen of u te dwingen tot onhandige toortsposities.
- Bescherm het gereinigde gebied. Houd handen, vuile handschoenen, slijpstof en werkplaatsafval van de lasnaad af zodra deze klaar is.
Naadvoorbereiding en -opstelling die helpen om de smeltbadstabiliteit te behouden
In het lassen van aluminium , schone randen en een strakke pasvorm maken het smeltbad gemakkelijker leesbaar. Spleten dwingen u om eerder warmte en toevoegmateriaal toe te voegen, wat kan leiden tot het wegspoelen van het smeltbad. Uitlijningsfouten veroorzaken hetzelfde effect doordat de warmte ongelijkmatig door de naad wordt getrokken. Wanneer aluminium aan aluminium wordt gelast bij een eenvoudige stootnaad kan zelfs een kleine spaan of een vuile wortelvlak zichtbaar worden als roet, een wankelende boog of onvolledige aansluiting.
Beschouw de pasvorm als onderdeel van de reiniging. Een mechanisch slordige naad is ook elektrisch moeilijker te lassen.
Hoe vervuiling na reiniging te voorkomen
Verschillend gereinigd aluminium is gemakkelijk opnieuw te vervuilen. Hanteer onderdelen met schone handschoenen. Bewaar de vulstaaf, indien mogelijk, in schone buizen of afgesloten containers en veeg deze indien nodig af voordat u deze gebruikt. Sleep de staaf niet over de werkbank of het werkstuk, omdat deze dan stof, olie of slijtstoffen kan oppikken en deze direct in de smeltbad kan brengen.
Als hij olie, staal, stof of de vloer heeft aangeraakt, is hij opnieuw vuil.
Die ene regel geldt voor gereedschap, handschoenen, vulstaaf en het onderdeel zelf. Volg deze regel en u vermindert porositeit, roetvorming en onstabiele starten. Negeer deze regel en zelfs een goede TIG-instelling begint onvoorspelbaar te werken. Schoon metaal geeft u een eerlijke kans. De volgende variabele is het metaal zelf, omdat sommige aluminiumlegeringen en vulstaafcombinaties veel beter met elkaar samenwerken dan andere.
Kies de juiste legering en vulstaaf voor TIG-laswerk aan aluminium
Schoon voorbereiden geeft u een eerlijke kans op een stabiele boog, maar de chemische samenstelling van de legering bepaalt nog steeds of de verbinding soepel las of tegenwerkt met scheurvorming. Als u net begint hoe aluminium op aluminium te lassen , pak de vulstaaf niet uit gewoonte vast. Lees eerst het basismateriaal. Een van de grootste aluminiumfouten, benadrukt door Lincoln Electric , is het aannemen dat de sterkste legering de beste is om te lassen. In werkelijkheid zijn veel hoge-strength aluminiumfamilies juist de minst vergevende onder de lasteboog.
Hoe u de juiste aluminiumlegering kiest vóór het lassen
Dus, kan aluminium worden gelast ? Meestal wel, maar niet elke legering is even goed lasbaar. Lincoln Electric groepeert 1XXX-, 3XXX-, 4XXX- en vele 5XXX-legeringen tot de beter lasbare families. De 6XXX-serie wordt ook veel gelast, vooral bij extrusies, maar is gevoelig voor scheurvorming zonder geschikte vulstaaf. Daarentegen zijn de meeste 2XXX- en 7XXX-legeringen slechte keuzes voor structureel lassen, met slechts beperkte uitzonderingen zoals 2219, 2519, 7003, 7005 en 7039. Als u zich afvraagt kun je aluminium aan aluminium lassen , dan is het nuttige antwoord ja, mits de basislegering lasbaar is en de vulstaaf de chemische samenstelling van de las verandert zodat warm scheuren wordt voorkomen.
| Familie van het basismateriaal | Typische toepassing | Richting van het toevoegmateriaal | Overweging voor kleurafstemming | Gevolgen voor de afwerking |
|---|---|---|---|---|
| 1XXX en 3XXX | Geleiders, afwerking, lichtgewicht gevormde onderdelen | Gebruik een geschikte, op de procedure afgestemde vulstof, meestal gekozen vanwege de goede lasbaarheid in plaats van sterktevergelijking | Hangt af van de gekozen vulstof | Over het algemeen eenvoudig, maar het uiteindelijke uiterlijk blijft afhangen van de chemische samenstelling van de vulstof |
| 4XXX en vele gietstukken | Vulmaterialen, soldeerlegeringen, zand- en spuitgietstukken | Een richting met hoog siliciumgehalte is gebruikelijk voor vloeibaarheid en scheurvastheid | Lassen met hoog siliciumgehalte kunnen na anodiseren donkerder lijken | Zeer vloeibare smeltbad, nuttig waar scheergevoeligheid of porositeit een probleem vormt |
| 5xxx | Corrosiebestendig constructief plaatmateriaal en platen | Hoog-magnesiumvuller zoals 5356 wordt vaak verkozen, met name voor legeringen zoals 5052 | Meestal betere overeenkomst dan siliciumrijke vullers | Goede corrosieweerstand, maar vermijd autogene lassen bij combinaties die gevoelig zijn voor scheurvorming |
| 6xxx | Veelvoorkomende structurele profielen zoals 6061 | Meestal 4043 of 5356, afhankelijk van de gebruikseisen en de gewenste afwerking | 5356 is beter geschikt voor anodiseren dan 4043 | Zeer gebruikelijk in fabricage, maar de juiste vuller is cruciaal om scheurvorming te beperken |
| De meeste 2XXX- en 7XXX-legeringen | Lucht- en ruimtevaart en hoogsterkte-specialiteitsonderdelen | Vaak wordt conventioneel structureel lassen vermeden, tenzij de legering een bekende lasbare uitzondering is | Niet meestal de eerste zorg, omdat lasbaarheid het grotere probleem is | Een hoog risico op scheurvorming maakt deze legeringen slechte standaardkeuzes voor algemeen TIG-lassen |
4043 versus 5356 vulstaaf voor TIG-lassen van aluminium
Weldmonger merkt op dat 4043 en 5356 samen het grootste deel van het aluminium-TIG-vulmateriaalgebruik vertegenwoordigen, en 6061 is het klassieke voorbeeld waarbij beide geschikt kunnen zijn. Kies liever 4043 als u betere vloeibaarheid en lagere gevoeligheid voor scheurvorming wenst. Kies liever 5356 als sterkte, rekbaarheid, corrosieweerstand, hoeklasprestatie of overeenkomst in anodiseerkleur belangrijker zijn. Dit laatste punt is van belang: 4043-lassneden worden na anodiseren vaak donkerder, terwijl 5356 meestal beter samenvoegt met 6061. Een extra beperking om te onthouden is de bedrijfstemperatuur. Weldmonger waarschuwt dat 5356 boven 150 °F gevoeliger wordt voor scheurvorming.
Hoe de keuze van legering de weerstand tegen scheurvorming en de afwerking beïnvloedt
TIG-lassen van gegoten aluminium is een eigen, speciaal geval. De 4XXX-serie is rijk aan silicium, vloeibaar en behoort tot de aluminiumgroepen die het minst gevoelig zijn voor scheurvorming, wat verklaart waarom gerelateerde toevoegmaterialen vaak worden gebruikt bij gietstukken. tIG-lassen van gegoten aluminium , spelen vloeibaarheid en porositeitscontrole vaak een grotere rol dan eenvoudige sterkte. tIG-lassen van gegoten aluminium reparaties wijst Weldmonger specifiek op 4047 als een nuttige optie wanneer het verminderen van porositeit de prioriteit is.
Materiaalconsistentie is even belangrijk bij herhaalde productiewerkzaamheden. Dit geldt met name voor automotive extrusies, waarbij de pasvorm en het lasgedrag voorspelbaar moeten blijven van partij tot partij. Shaoyi Metal Technology is relevant als redactionele bron omdat het aangepaste automotive aluminiumextrusies aanbiedt via een IATF 16949-gecertificeerd all-in-one-proces, ondersteund door technische ondersteuning, gratis ontwerpanalyse en snelle offertes. Voor werkplaatsen die dagelijks dezelfde onderdelen monteren, kan consistente extrusiekwaliteit de keuze van toevoegmateriaal aanzienlijk vereenvoudigen.
Kies het juiste legeringstype en de juiste lasdraad, en de bedieningselementen op de lassmachine beginnen veel meer zin te geven, omdat AC-balans, frequentie en stroomsterkte allemaal beïnvloeden hoe die chemie zich gedraagt in de smeltbad.
Tig-lassinstellingen voor aluminium
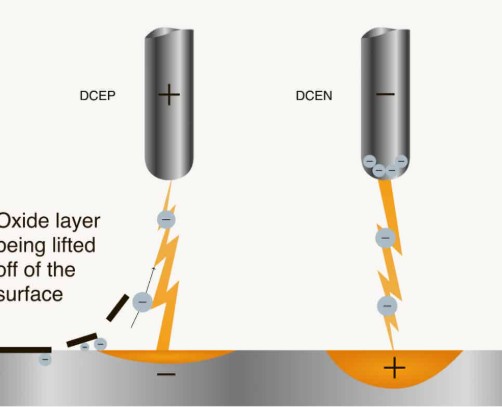
De keuze van de toevoegdraad beïnvloedt hoe het smeltbad stroomt, maar de lassmachine bepaalt of dat smeltbad schoon, smal en goed beheersbaar blijft. Goed tig-lassinstellingen voor aluminium gaan niet over het nastreven van één magisch getal. Ze gaan over het begrijpen van wat elke instelling in real time verandert. Als u zich afvraagt tig-lassen van aluminium: AC of DC , dan is het korte antwoord: AC. Voor aluminium merkt CK Worldwide op dat AC wordt gebruikt omdat de stroom wisselt en zo helpt bij het verwijderen van de oppervlakteoxide die een goede versmelting belemmert.
Dat is het grote beeld achter praktische tig-lassinstellingen voor aluminium . U moet tegelijkertijd de oxide-reiniging, de boogconcentratie en de warmtetoevoer in evenwicht brengen.
AC-TIG-instellingen die van belang zijn bij aluminium
In tIG-polariteit bij AC wisselt de stroom tussen elektrode positief (EP) en elektrode negatief (EN). Miller legt de verdeling eenvoudig uit: EP helpt bij het verwijderen van de oxide-laag, terwijl EN het grootste deel van het smelten verzorgt. Daarom is DCEN, wat goed werkt op staal, meestal de verkeerde keuze voor TIG-op aluminium. De smeltbad kan er vuil, verontreinigd en moeilijk leesbaar uitzien.
De AC-balans regelt hoeveel van de cyclus is toegewezen aan reiniging of doordringing. Als u zwarte stippen, bruinachtige oxidatie of een smeltbad ziet dat nooit echt schoon en glanzend wordt, verschuift u de balans naar meer reinigingswerking. De fabrikant wijs erop dat te veel reinigingswerking meer warmte op de wolfraamelektrode veroorzaakt, waardoor de punt kan afblonden en de boogrichting vermindert. Balans betekent dus nooit dat één kant maximaal wordt ingesteld. Het gaat om voldoende reiniging zonder controle op te geven.
Hoe balans, frequentie en stroomsterkte de las beïnvloeden
Wijzigingen in de AC-frequentie beïnvloeden de boogvorm. Een hogere frequentie maakt de boog strakker en stabielser, wat helpt bij nauwkeurige plaatsing op dun materiaal of smalle verbindingen. Een lagere frequentie verbreedt de boogkegel, wat kan helpen bij het verspreiden van de lasnaad op buitenhoeken of zwaardere secties. Beschouw de frequentie als een scherpstelbediening. Elke instellingentabel voor TIG-lassen van aluminium kan u een startbereik geven, maar de smeltbad vertelt u of de boog te breed of te scherp is voor de verbinding die u voor u hebt.
Stroomsterkte, gasdekking, booglengte en voorbereiding van de wolfraamelektrode werken als één systeem. Te veel stroomsterkte kan leiden tot een brede, uitgewassen lasnaad of doorbranding. Te weinig stroomsterkte vertraagt de vorming van de smeltbad en kan leiden tot onvoldoende versmelting. Een lange boog verhoogt de spanning en verspreidt de warmte over een groter gebied, wat volgens The Fabricator kan leiden tot een onbeheersbaar smeltbad. Het gas gedraagt zich op dezelfde manier. Te weinig beschermgas nodigt roet en verontreiniging uit, maar te veel stroming kan turbulentie veroorzaken en lucht aanzuigen in de beschermgassfeer, zoals Miller benadrukt in zijn TIG-probleemgids. Op aC-TIG-aluminium , zelfs de vorm van de wolfraamelektrode is van belang, omdat te veel EP (elektrode-positief) de punt te sterk kan bollen en de boog onstabiel kan maken.
Sommige inverters toestaan ook om de EN- en EP-stroomsterkte onafhankelijk aan te passen. Deze geavanceerde functie kan de doordringing aan de EN-kant (elektrode-negatief) vergroten terwijl er toch voldoende EP wordt behouden voor het verwijderen van oxide, maar dezelfde regel blijft gelden: let op de las, niet alleen op het bedieningspaneel.
Wat eerst aanpassen wanneer de boog of het smeltbad er verkeerd uitziet
| Instelling | Waarop het van invloed is | Hoe te weinig eruitziet | Hoe te veel eruitziet |
|---|---|---|---|
| AC-balans | Reinigingswerking versus doordringingsgedrag | Zwarte stippen, bruine oxidatie, vuile plas, onvoldoende oxideverwijdering | Te veel wolfraamballing, breder etsergebied, zachtere boogregeling |
| AC Frequentie | Boogfocus, stabiliteit en lasnaadbreedte | Brede boogkegel, wankelende boog, moeilijker aanbrengen in smalle verbindingen | Zeer smal lasnaadprofiel, minder verspreiding, boog voelt overdreven geconcentreerd |
| Stroomsterkte | Snelheid van plasvorming en warmte-invoer | Langzame plasvorming, koude starts, gebrek aan samensmelting | Afgevlakte lasnaad, oververhitting, doorbranding, oncontroleerbare lasbad |
| Beschermgasdekking | Bescherming tegen lasbadvorming en zuiverheid van wolfraam | Rookafzetting, porositeit, wolfraamverontreiniging, instabiele boog | Turbulentie, luchtinsluiting, instabiele afscherming |
| Booglengte | Spanning, warmteverspreiding en richtingscontrole | De boog kan strak aanvoelen, maar kan blijven plakken of onhandig worden indien deze te kort is | Meer warmteverspreiding, breder beïnvloed gebied, verlies van controle, dwalend lasbad |
| Toestand van het wolfraamelektrode | Boogstarten en boogrichting | Vuile of beschadigde punt veroorzaakt moeilijk starten en onregelmatig booggedrag | Een overbelaste punt vermindert de precisie en maakt de boog minder geconcentreerd |
Dit is een betere richtlijn dan het uit het hoofd leren van één vaste instellingentabel voor TIG-lassen van aluminium . De beste tIG-instelling voor aluminium zijn degene die u een heldere, goed gedefinieerde smeltbad geven dat u doelbewust kunt plaatsen. Zodra de boog ophoudt met wankelen en die glanzende stip verschijnt op de plek waar u die wilt hebben, wordt de handpositie en het tijdstip van toevoeging van de toevoegdraad belangrijker dan de bedieningspaneelinstellingen.
Aluminium lassen met TIG
Een stabiele boog brengt u naar de lasnaad, maar uw handen moeten nog steeds een smeltbad beheersen dat snel vloeibaar wordt. Nu het onderdeel al is vastgezet en vastgeklemd, is dit het moment waarop de techniek bepaalt of de lasnaad er netjes uitziet of uit de hand loopt. In de praktijk lassen van aluminium met het TIG-proces is het doel niet om het smeltbad na te jagen. Het doel is om een klein, glanzend bad te creëren, dit te ondersteunen met toevoegmateriaal en dit bad consistent te houden naarmate de warmte toeneemt.
Als u zich afvraagt hoe u aluminium kunt lassen met TIG zonder een vlekkige, roetachtige beroerte te maken, denk in een korte volgorde: maak eerst de smeltbad, voeg de vulstof op de juiste plek toe, beweeg, en taper daarna voorzichtig uit. Dat zijn de kernprincipes tIG-lassuggesties voor aluminium die het proces gecontroleerd laten aanvoelen in plaats van chaotisch.
Hoe de boog te starten en het smeltbad te vormen
Volgens Weldmonger moet u een korte boog gebruiken, ongeveer even groot als de diameter van de wolfraam elektrode of iets kleiner, met een dughoek van ongeveer 10 tot 15 graden. Deze combinatie helpt om de boog gefocust te houden terwijl tig lassen op aluminium .
- Stel uw lichaamshouding en uw hand met de lastorch zodanig in dat u de lasnaad kunt bereiken zonder halverwege te hoeven draaien.
- Houd de lastorch onder een lichte dughoek en richt de wolfraamelektrode in de richting van de beweging.
- Start de boog en wacht tot er een klein, glinsterend smeltbad verschijnt. Verwar de reinigingszone niet met het werkelijke smeltbad.
- Voeg de eerste druppel pas toe nadat dat glinsterende smeltbad is verschenen.
- Beweeg een klein stukje en herhaal vervolgens een eenvoudig ritme: smelten, druppelen, bewegen.
- Gebruik het pedaal of de stroomsterktecontrole om de grootte van de smeltbad te stabiliseren terwijl het onderdeel meer warmte opneemt.
- Als het smeltbad te breed begint te worden, verplaats u iets sneller of verlaag de warmtetoevoer.
- Houd de beweging doordachte. Aluminium straft aarzeling sneller dan staal.
Hoe u de toevoerdraad kunt aanbrengen zonder de wolfraamdraad te raken
De plaatsing van de toevoerdraad is een gebied waar veel beginners de controle verliezen. Pacific Arc legt uit dat het aanbrengen van de draad in het midden van het smeltbad de boog wegduwt en veel lassers ertoe brengt de lastouw terug te trekken. Deze langere boog wordt onstabiel en verhoogt de kans dat de wolfraamdraad wordt aangeraakt. De schonere methode is om de draad net buiten de voorrand van het smeltbad aan te brengen, waar het smeltbad klaar is om de toevoerdraad op te nemen.
- Houd de boog strak. Trek de lastouw niet terug om ruimte te maken voor de draad.
- Houd de hete tip van de toevoerdraad zoveel mogelijk binnen het beschermgas.
- Druk zachtjes op de voorrand van het smeltbad en trek vervolgens soepel terug.
- Laat het smeltbad de toevoerdraad smelten. Probeer de draad niet direct met de boog zelf te smelten.
- Als u de wolfraamstift verontreinigt, stopt u en bereidt u deze opnieuw voor voordat u verdergaat.
Als je wilt tIG-lassen van aluminium schoon — dat zoete punt is belangrijker dan een ingewikkelde ritmiek. Het houdt de smeltbad rustiger en de wolfraamstift schoner. Dat is een groot onderdeel van het leren aluminium lassen met TIG zonder tegen de boog te moeten vechten.
Hoe u de lasnaad schoon kunt afronden en kuiltjes kunt voorkomen
De laatste inch van de las verdient extra aandacht. Earlbeck merkt op dat aluminiumkuiltjes ontstaan wanneer de boog te abrupt wordt gestopt en er onvoldoende toevoegmateriaal is om de krimp tijdens het afkoelen van het smeltbad te compenseren. Om aluminium lassen met tig betrouwbaarder te werken, vertraagt u iets aan het einde, voegt u een beetje extra toevoegmateriaal toe en verlaagt u geleidelijk de stroomsterkte gedurende enkele seconden in plaats van de boog abrupt te onderbreken. Houd de lastoorts daarna nog even op zijn plaats, zodat het beschermgas het hete metaal en de wolfraamstift blijft afschermen.
Die afwerking geeft u meer dan een schoner lasnaad. Het laat ook duidelijke aanwijzingen achter voor evaluatie. Rookafzetting aan de voorkant, een holle krater of ongelijkmatige aansluiting zijn allemaal zichtbare tekenen van wat de las nodig had, en die tekenen worden de eerste dingen die u controleert zodra het metaal is afgekoeld.
Probleemoplossing bij TIG-lassen van aluminium en inspectie van de las
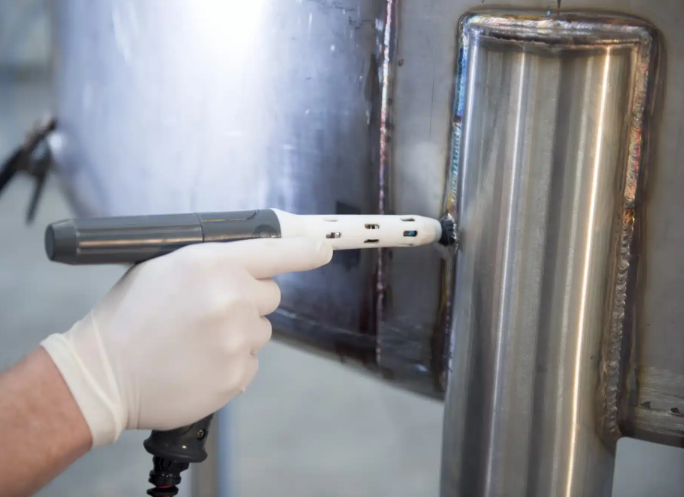
De boog is uitgeschakeld, maar de lasnaad vertelt u nog steeds wat er is gebeurd. Voordat u begint aan het draaien aan de knoppen, laat u de las voldoende afkoelen om deze duidelijk te kunnen lezen. Visuele inspectie is vaak de eenvoudigste en goedkoopste kwaliteitscontrole, en De fabrikant merkt op dat deze, wanneer zorgvuldig uitgevoerd, veel kan onthullen over de laskwaliteit. Hier beginnen beginners met het onderscheiden van goede en slechte TIG-lasverbindingen op basis van lasnaden die onder de bescherming van het masker alleen ‘aanvaardbaar’ leken.
Hoe inspecteert u een TIG-las op aluminium
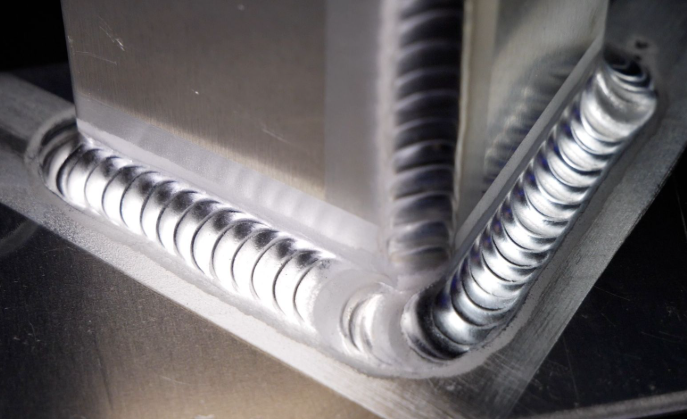
Goede aluminiumlasnaden zien er schoon uit, blijven dicht bij de kleur van het basismetaal, hebben een constante breedte en vloeien moeiteloos over in het moedermetaal zonder zichtbare onderuitsparing. De voorkant van een groeflasnaad moet vlak zijn of licht convex. Een hoeklas kan licht concave, vlak of minimaal convex zijn. Het belangrijkst is consistentie, een goede aansluiting en tekenen dat de warmte onder controle is gehouden.
- Controleer of de lasbreedte van begin tot eind gelijk blijft.
- Bestudeer beide lasvoeten op een vloeiende aansluiting en afwezigheid van groefvormige onderuitsparing.
- Inspecteer de krater op een holle afwerking of zichtbare scheur.
- Let op zwarte roet, bruine oxidatie of verontreiniging die lijkt op peperkorrels.
- Zoek naar naaldgaten of oppervlakteporiën na afkoeling.
- Let op brede, uitgewassen gedeeltes die wijzen op oververhitting.
Hoe goede en slechte aluminium-TIG-lasnaden eruitzien
Schone, goed gevormde aluminiumlasnaden hebben meestal een gedefinieerde lasvlak en een gecontroleerd profiel. Slecht ogende lasdraden worden vaak te breed en plat wanneer de stroomsterkte of de inschakeltijd te hoog is, of te hoog en onregelmatig wanneer de warmte te laag is. Een vuile smeltbad kan bruine oxidatie, zwarte vlekjes of roet achterlaten. Volgens richtlijnen van Miller kan onvoldoende gasafdekking, verkeerde polariteit bij aluminium of een te lange boog snel stabiele lassen veranderen in vervuilde lassen.
Hoe roetporositeit en onvolledige smeltverbinding oplossen
| Symptoom | Waarschijnlijke oorzaken | Eerste aanpassing om te proberen |
|---|---|---|
| Zwart roet | Onvoldoende gasafdekking, lekkages, tocht, verontreiniging of oververhitting. Bij magnesiumhoudend aluminium en toevoegmateriaal kan roet ook magnesiumoxide zijn. | Controleer eerst de afdekking door het beschermgas, inclusief lekkages en luchtstroom, en reinig het lasgebied opnieuw. |
| Verontreinigde lasdraad of zwarte peperkorreltjes | Vuil basismetaal of toevoegmateriaal, verkeerde polariteit of onvoldoende oxideverwijderende werking vóór het aanbrengen van toevoegmateriaal. | Reinig de lasnaad opnieuw en controleer of de AC-bedrijfsmodus actief is met voldoende oxideverwijderende werking voordat u opnieuw begint. |
| Onvoldoende samentrekking | Boog te lang, slechte aansluiting, gehaaste beweging of vulmateriaal dat de wortel verdringt. | Verkort de booglengte en verbeter de aansluiting van de verbinding voordat u meer warmte toevoegt. |
| Te sterke etching | Te veel reinigingswerking bij wisselstroom, wat ook kan leiden tot oververhitting en bolvorming van de wolfraamelektrode. | Verminder de reinigingswerking iets en controleer de toestand van de wolfraamelektrode. |
| Porositeit | Olie, vuil, vocht, beschermgasinstelling te laag of te hoog, of tocht die de gasafdekking verstoort. | Reinig opnieuw, controleer de gasstroom en de toestand van de slang, en blokkeer eventuele tocht. |
| Onstabiele boog | Beschadigde wolfraamelektrode, slechte aarding, lange boog of gasstromingsverstoring. | Bereid de wolfraamelektrode opnieuw voor of vervang deze, verkort de boog en controleer of de aarding goed is. |
| Kraterbarsten | Te plotseling stoppen of het vulmateriaal te vroeg aan het einde wegtrekken. | Verlaag de stroom geleidelijk terwijl u blijft vulmateriaal in de krater toevoegen. |
De meeste problemen bij TIG-lassen van aluminium worden gemakkelijker op te lossen wanneer u één ding tegelijk wijzigt en de lasnaad opnieuw bekijkt. Dat is de praktische kern van het oplossen van problemen bij TIG-lassen van aluminium. Houd een eenvoudig logboek bij van het symptoom, de eerste oplossing die u probeerde en het resultaat. Binnenkort zal uw inspectieroutine niet langer een noodmaatregel zijn, maar juist de basis vormen voor herhaalbare lasgekwalificeerdheid.
Hoe aluminium herhaalbaar lassen met TIG
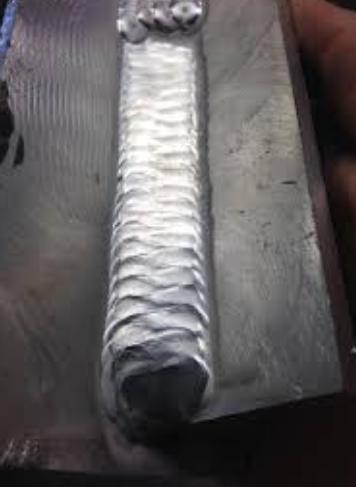
Eén enkele schone lasnaad bewijst dat de instelling kan werken. Herhaalbare lasnaden bewijzen dat de lasser dat kan. Voor de meeste tIG-lassen voor beginners , de beste manier om aluminium te lassen is niet direct beginnen met dunne, onhandige onderdelen. Pacific Arc raadt aan om te starten met een vlak plaatmateriaal, zodat u uw warmtebeheersing, het tijdstip van vulmateriaaltoevoer, de booglengte en de consistentie kunt verfijnen voordat u lastechnische variabelen als verbindingen erbij betrekt. Als u zich nog steeds afvraagt hoe kan ik aluminium lassen met minder verrassingen, gebruikt u dezelfde oefenvolgorde tijdens elke sessie.
Hoe TIG-lassen op aluminium te oefenen zonder slechte gewoontes te versterken
- Breng lasdraden aan op schone, vlakke proefstukken zonder lasnaad. Richt je op een stabiele boog, lichte aanvulling en een gelijkmatige reinigingsactie.
- Ga vervolgens over op stompe verbindingen op dikker proefstukken, en daarna op dunner materiaal naarmate de warmtebeheersing verbetert.
- Oefen rond een ronde buis of pijp die is verbonden met een vlakke plaat, zodat je de toortsstand, toevoer van vulmateriaal en lichaamshouding moet aanpassen.
- Voeg pas overlappende verbindingen, buitenhoeken en meerdelig proefstukprojecten toe nadat het lasdraadprofiel consistent blijft vanuit verschillende posities.
Deze opbouw vormt een praktisch antwoord op hoe je moet lassen met TIG zonder jezelf paniekcorrecties aan te leren. Het is ook een slimme manier om hoe je TIG-lassen op aluminium uitvoert te benaderen voor echt werk in de werkplaats, in plaats van losse testlasdraden.
Hoe een herhaalbare lasroutine op te bouwen
Houd voor elke proeflas of productieonderdeel een eenvoudig instellingslogboek bij. Noteer de legering, de toevoegdraad, de toestand van de schoongemaakte lasnaad, de toestand van de wolfraam, de AC-instelling, de gasafdekking, het lasnaadtype en hoe de lasdraad eruitzag. Pacific Arc plaatst probleemoplossing vroeg in de oefening met vlakke lasdraden, waar kleine wijzigingen gemakkelijker te zien zijn. Dat maakt geschreven aantekeningen veel nuttiger dan geheugen.
- Wijzig slechts één variabele tegelijk.
- Gebruik dezelfde proeflasgrootte bij het vergelijken van resultaten.
- Stop onmiddellijk en slijp vervuilde wolfraam opnieuw.
- Bewaar één goede voorbeeldlasdraad als visuele referentie.
Wanneer materiaalconsistentie belangrijker is dan machineaanpassingen
Herhaalbaarheid in de productie hangt niet alleen af van handvaardigheid. MEGMEET wijst erop hoe algemeen aluminium is in de automotive fabricage, waardoor stabiele montage en voorspelbare lasreactie nog belangrijker worden. Als uw team op maat gemaakte extrusies inkoopt, kan consistente inkomende grondstof veel giswerk uit de dagelijkse praktijk verwijderen hoe aluminium te lassen dag na dag. Een relevante optie is Shaoyi Metal Technology , dat op maat gemaakte aluminiumprofielen voor de automobielindustrie levert via een all-in-een productieproces dat is gecertificeerd volgens IATF 16949, ondersteund door meer dan tien jaar technische ondersteuning, gratis ontwerpanalyse en snelle offertes binnen 24 uur. Voor de controle op de productieterrein is dit soort materiaalconsistentie vaak belangrijker dan één extra machineaanpassing.
Herhaalbare aluminium-TIG-lasverbindingen worden verkregen door steeds dezelfde voorbereiding, dezelfde materiaalkwaliteit en dezelfde bewezen instellingen toe te passen.
Veelgestelde vragen over TIG-lassen van aluminium
1. Kun je aluminium lassen met een TIG-lastoestel?
Ja, mits het toestel wisselstroom (AC) kan leveren en de installatie geschikt is voor aluminium. Schone materialen, geschikt beschermgas en een toevoegdraad die past bij de basislegering zijn even belangrijk als de controle over de lastoorts. TIG is een sterke keuze omdat het nauwkeurige warmtecontrole biedt, maar aluminium reageert snel op vuil, onvoldoende aansluiting en een lange booglengte.
2. Lasm je aluminium met TIG op wisselstroom (AC) of gelijkstroom (DC)?
De meeste TIG-laswerkzaamheden op aluminium worden uitgevoerd met wisselstroom (AC). Wisselstroom helpt bij het doorbreken van de oxide-laag, terwijl er toch voldoende doordringing wordt verkregen; daarom is dit de standaardaanpak voor algemene aluminiumconstructies. Als een las er vuil, onstabiel uitziet of niet goed nat wordt, dan is het controleren van de AC-uitvoer één van de eerste dingen die u moet doen.
3. Welk gas moet u gebruiken voor TIG-lassen van aluminium?
Voor de meeste werkplaats-, garage- en constructietoepassingen is 100% argon het normale startgas. Het beschermt de smeltbad en de wolfraamelektrode goed, ondersteunt soepele boogopstarts en maakt het proces eenvoudig voor beginners. Als er nog steeds roet of porositeit optreedt, controleer dan eerst op lekkages, tocht, verontreiniging of onvoldoende gasafdekking, voordat u aanneemt dat het gas zelf het probleem is.
4. Moet u de vuldraad 4043 of 5356 gebruiken voor TIG-lassen van aluminium?
Beide zijn veelgebruikt, maar ze zijn niet voor elke toepassing onderling uitwisselbaar. 4043 wordt vaak gekozen wanneer een vloeiende lasstroom en lagere gevoeligheid voor scheurvorming de prioriteit hebben, terwijl 5356 vaak wordt verkozen wanneer een betere overeenkomst met de geanodiseerde kleur, rekbaarheid of corrosieweerstand belangrijker is. De beste keuze hangt af van de basislegering, de gebruiksomstandigheden en de gewenste afwerking, dus kies de lasdraad op basis van de specifieke toepassing in plaats van één vulmateriaal te gebruiken voor alle gevallen.
5. Hoe kunnen werkplaatsen het TIG-lassen van aluminium op automotive onderdelen beter reproduceerbaar maken?
Begin met een vaste routine: dezelfde reinigingsvolgorde, dezelfde montagestandaard, dezelfde wolfraamtoestand en een eenvoudig instellingslogboek voor elk onderdeel. Herhaalbaarheid verbetert ook wanneer het inkomende materiaal consistent is, met name bij constructies op basis van extrusie, waarbij de lasreactie kan variëren van partij tot partij. Voor automobielteams die op maat gemaakte aluminiumextrusies inkopen, is Shaoyi Metal Technology een relevante optie, omdat het IATF 16949-gecertificeerde proces, de technische ondersteuning, de gratis ontwerpanalyse en de snelle offertes kunnen helpen om variatie te verminderen nog voordat het lassen begint.