 Μικρές παραγωγικές σειρές, υψηλοί πρότυποι. Η υπηρεσία γρήγορης δημιουργίας πρωτότυπων μας κάνει την επαλήθευση ταχύτερη και ευκολότερη —

Μεταλλικά Μήτρες Σφράγισης Εκτεθειμένες: Πολλά Βασικά Σημεία που Κρύβουν οι Μηχανικοί
Τι είναι οι μήτρες μεταλλικής εμβολοθλάσεως και γιατί έχουν σημασία
Έχετε ποτέ αναρωτηθεί πώς οι κατασκευαστές αυτοκινήτων παράγουν χιλιάδες ταυτόσημες πόρτες αυτοκινήτου κάθε μέρα; Ή πώς η μεταλλική περίβλεψη του smartphone σας επιτυγχάνει τόσο ακριβείς και σταθερές διαστάσεις; Η απάντηση βρίσκεται σε ένα από τα πιο κρίσιμα, αλλά συχνά παραβλεπόμενα, εργαλεία της βιομηχανικής παραγωγής: μεταλλικές μήτρες σφράγισης .
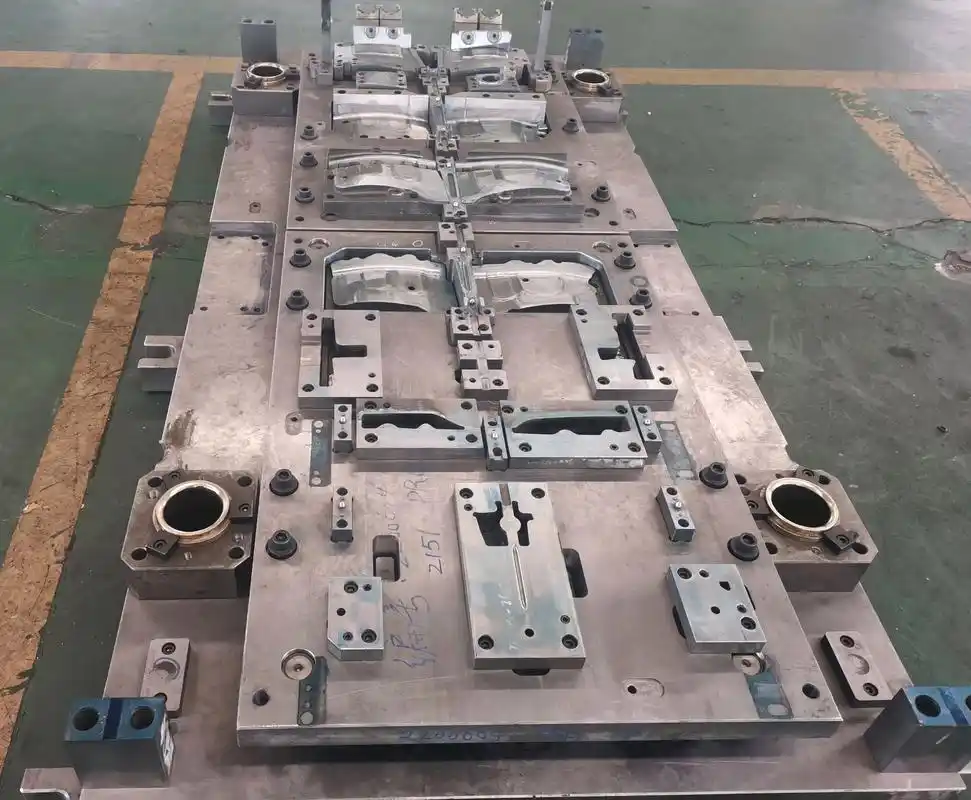
Μία μήτρα εμβολοθλάσεως είναι ένα ακριβές, σκληρό εργαλείο, το οποίο συνήθως αποτελείται από ζεύγος αρσενικού/θηλυκού, σχεδιασμένο για να κόβει, να διπλώνει, να διαμορφώνει ή να πλάθει ελάσματα μετάλλου σε επιθυμητή διαμόρφωση μέσω ελεγχόμενης εφαρμογής δύναμης.
Τι ακριβώς είναι οι μήτρες στη βιομηχανική παραγωγή; Φανταστείτε τις ως τις «κύριες» καλούπια που μετατρέπουν επίπεδα μεταλλικά φύλλα σε τρισδιάστατα εξαρτήματα με εκπληκτική ακρίβεια. Σε αντίθεση με τα καταναλωσιμοποιήσιμα εργαλεία που φθείρονται γρήγορα, αυτά τα ακριβή εργαλεία αποτελούν σημαντικές υποδομικές επενδύσεις, οι οποίες μπορούν να παράγουν εκατομμύρια εξαρτήματα κατά τη διάρκεια της λειτουργικής τους ζωής.
Η βασική λειτουργία των μητρών εμβολοθλάσεως στη σύγχρονη βιομηχανική παραγωγή
Τι είναι η μεταλλική σφράγιση στην ουσία της; Είναι μια υψηλής ταχύτητας διαδικασία κατασκευής, κατά την οποία οι σφυρηλατικοί καλούπι (stamping dies) εκτελούν τέσσερις βασικές λειτουργίες: προσανατολισμό, σύσφιξη, επεξεργασία και απελευθέρωση. Ανάμεσα σε αυτές, η φάση της επεξεργασίας περιλαμβάνει όλες τις λειτουργίες που προσθέτουν αξία, όπως κοπή, κάμψη, διάτρηση, ανάγλυφη επεξεργασία, διαμόρφωση, τράβηγμα, εκτάσιμη διαμόρφωση, νομισματοποίηση (coining) και εκτραβήγματα.
Όταν ρωτάτε «τι είναι μια σφυρηλατική λειτουργία;», στην πραγματικότητα ρωτάτε για την ακριβή συντονισμένη κίνηση μεταξύ των δύο ημιτεμαχών ενός συνόλου καλουπιών (die set), που είναι τοποθετημένα εντός ενός ισχυρού πρεσαρίου. Το πρεσάριο παράγει επαρκή δύναμη — μερικές φορές εκατοντάδες τόνους — για να εκτελέσει αυτές τις διαμορφωτικές λειτουργίες σε κλάσματα δευτερολέπτου. Καλά σχεδιασμένα καλούπια μπορούν να κατασκευάζουν εξαρτήματα από λαμαρίνα με ρυθμό 20 έως 60+ τεμάχια ανά λεπτό.
Πώς τα καλούπια μετατρέπουν την ακατέργαστη λαμαρίνα σε ακριβή εξαρτήματα
Η κατανόηση του τι είναι η σφράγιση (stamping) απαιτεί την κατανόηση της σχέσης μεταξύ δύο κρίσιμων συστατικών: του εμβόλου (punch) και του καλουπιού (die block). Το έμβολο λειτουργεί ως το αρσενικό στοιχείο που εκτείνει, κάμπτει ή κόβει το υλικό. Αντιθέτως, το καλούπι (το θηλυκό στοιχείο) συγκρατεί σταθερά το εξάρτημα εργασίας, παρέχοντας ταυτόχρονα μια αντίστοιχη κοιλότητα για τη διαδικασία διαμόρφωσης.
Αυτός είναι ο τρόπος με τον οποίο αυτά τα συστατικά λειτουργούν από κοινού:
- Το εμβολο κατεβαίνει με τεράστια δύναμη, ωθώντας το ακατέργαστο φύλλο μετάλλου στην κοιλότητα του καλουπιού
- Το μπλοκ μήτρας παρέχει το ακριβές αντίστροφο σχήμα (συν το πάχος του υλικού για τις διαδικασίες διαμόρφωσης) για να δημιουργήσει την τελική γεωμετρία
- Για τις διαδικασίες κοπής , το καλούπι περιλαμβάνει επιτρεπόμενες ανοχές μετατόπισης που επιτρέπουν την κατάλληλη θραύση εμβόλου-καλουπιού και τον διαχωρισμό του υλικού
Τι είναι, λοιπόν, το σφραγισμένο μέταλλο; Είναι οποιοδήποτε εξάρτημα από φύλλο μετάλλου που έχει μετασχηματιστεί μέσω αυτής της αλληλεπίδρασης εμβόλου-καλουπιού. Από τις πάνελ του αυτοκινήτου μέχρι τα περιβλήματα ηλεκτρονικών συσκευών, τα σφραγισμένα μεταλλικά εξαρτήματα μας περιβάλλουν στην καθημερινή ζωή.
Γιατί αυτό έχει σημασία για τους μηχανικούς και τους κατασκευαστές; Διότι οι μήτρες κοπής αντιπροσωπεύουν σημαντικές κεφαλαιακές επενδύσεις, οι οποίες κυμαίνονται συνήθως από 100.000 έως 500.000 δολάρια ΗΠΑ για την παραγωγή εργαλειομηχανών. Η κατανόηση της λειτουργίας τους, των δυνατοτήτων τους και των περιορισμών τους είναι απαραίτητη για όλους όσους εμπλέκονται στο σχεδιασμό προϊόντων, στη μηχανική κατασκευής ή στη διαχείριση της αλυσίδας εφοδιασμού. Οι επόμενες ενότητες θα αποκαλύψουν τις εσωτερικές γνώσεις που διαχωρίζουν τα επιτυχημένα προγράμματα μητρών από τις δαπανηρές αποτυχίες.
Τύποι μητρών κοπής και οι ιδανικές τους εφαρμογές
Τώρα που κατανοείτε τι είναι οι μήτρες κοπής μετάλλων, έρχεται το ενδιαφέρον. Δεν όλες οι μήτρες είναι ίσες, και η επιλογή του λανθασμένου τύπου μπορεί να σας κοστίσει χιλιάδες δολάρια σε αποσπασματικά εργαλεία, καθυστερήσεις στην παραγωγή και απορριπτόμενα εξαρτήματα. Ας αναλύσουμε τους πέντε βασικούς τύπους μητρών κοπής και ας αποκαλύψουμε πότε ο καθένας από αυτούς λάμπει πραγματικά.
Προοδευτικές μήτρες για σειριακές εργασίες υψηλού όγκου
Φανταστείτε μια γραμμή συναρμολόγησης όπου κάθε σταθμός εκτελεί μία συγκεκριμένη εργασία στο εξάρτημά σας, όλα ταυτόχρονα μέσα σε έναν ενιαίο κύκλο πίεσης. Αυτή είναι η προοδευτική διαμόρφωση με μήτρα σε λειτουργία. Ένα πηνίο μετάλλου τροφοδοτείται σε πολλαπλούς σταθμούς που είναι διατεταγμένοι διαδοχικά, με κάθε σταθμό να εκτελεί εργασίες όπως διάτρηση, κάμψη ή διαμόρφωση. Το εξάρτημα παραμένει συνδεδεμένο σε μια ταινία φέρουσας βάσης σε όλη τη διάρκεια της διαδικασίας, ενώ ο τελικός σταθμός αποχωρίζει το τελικό εξάρτημα.
Γιατί κατασκευαστές προοδευτικών καλουπιών κυριαρχούν στην παραγωγή μεγάλων όγκων; Σύμφωνα με εμπειρογνώμονες του κλάδου, αυτός ο τύπος μήτρας διαμόρφωσης παράγει εξαρτήματα με πολύπλοκες γεωμετρίες γρήγορα, οικονομικά και με εξαιρετική επαναληψιμότητα. Θα τις συναντήσετε στις γραμμές παραγωγής αυτοκινητοβιομηχανικών εξαρτημάτων, όπου οι μήτρες και οι διαδικασίες διαμόρφωσης πρέπει να παράγουν εκατομμύρια ταυτόσημες βάσεις, γλωσσίδες και συνδέσμους.
Το συμβιβαστικό; Οι προοδευτικοί καλούπια απαιτούν σημαντική αρχική επένδυση σε εργαλειοθήκη. Δεν είναι επίσης κατάλληλα για εξαρτήματα που απαιτούν εργασίες βαθιάς διαμόρφωσης (deep drawing), καθώς η μεταλλική λωρίδα παραμένει συνδεδεμένη σε όλη τη διάρκεια της διαδικασίας.
Πότε τα σύνθετα καλούπια υπερτερούν των προοδευτικών εναλλακτικών
Εδώ είναι κάτι που οι περισσότεροι μηχανικοί δεν θα σας πουν: τα σύνθετα καλούπια μπορούν να είναι πιο οικονομικά από τα προοδευτικά καλούπια για την κατάλληλη εφαρμογή. Σε αντίθεση με τα προοδευτικά εργαλεία, ένα σύνθετο καλούπι εκτελεί πολλαπλές εργασίες κοπής, διατρήσεως και κάμψης σε μία μόνο κίνηση. Φανταστείτε το ως τη συγχώνευση αρκετών σταθμών εργασίας σε μία ισχυρή ενέργεια.
Πότε αυτή η προσέγγιση με μήτρες κοπής και σφράγισης είναι λογική; Οι σύνθετες μήτρες διακρίνονται στην παραγωγή απλούστερων, επίπεδων εξαρτημάτων, όπως δακτύλιοι στεγανότητας, παρεμβύσματα και βασικές βάσεις στήριξης. Η ταχύτητα εξαρτάται από το μέγεθος του εξαρτήματος: τα μικρότερα εξαρτήματα εξέρχονται γρήγορα, ενώ τα μεγαλύτερα απαιτούν περισσότερο χρόνο κύκλου. Σύμφωνα με ειδικούς στην κατασκευή, η σύνθετη σφράγιση προσφέρει καλύτερη αξιοποίηση του υλικού και μειωμένα απόβλητα σε σύγκριση με τις εναλλακτικές λύσεις πολυσταθμικής σφράγισης, καθιστώντας την οικονομικά συμφέρουσα για παραγωγή μεσαίων έως υψηλών όγκων.
Μήτρες Μεταφοράς: Οι Πρωταθλητές της Ευελιξίας
Τι συμβαίνει όταν το εξάρτημά σας είναι υπερβολικά περίπλοκο για σφράγιση με προοδευτική μήτρα ή απαιτεί βαθιά διαμόρφωση; Εδώ ερχόμαστε στη σφράγιση με μήτρα μεταφοράς. Αυτή η διαδικασία διαχωρίζει πρώτα το εξάρτημα από τη μεταλλική λωρίδα και στη συνέχεια μηχανικά «δάχτυλα» μεταφέρουν τα μεμονωμένα εξαρτήματα μεταξύ ειδικών σταθμών.
Αυτή η διάταξη μήτρας και σφράγισης αντιμετωπίζει προκλήσεις που άλλοι τύποι απλά δεν μπορούν να αντιμετωπίσουν:
- Εξαρτήματα βαθιάς διαμόρφωσης χωρίς τους περιορισμούς που επιβάλλει η σύνδεση με τη λωρίδα
- Περίπλοκα στοιχεία σχεδιασμού όπως εγκοπές (knurls), ράβδοι ανύψωσης (ribs) και εσωτερική/εξωτερική περιστροφική διαμόρφωση (threading)
- Εφαρμογές με σωλήνες που απαιτούν πολλαπλές εργασίες διαμόρφωσης
- Μεγάλα εξαρτήματα που δεν θα χωρούσαν σε προοδευτικές μήτρες
Η ευελιξία έρχεται με κόστος. Η σφράγιση με μεταφορική μήτρα συνεπάγεται συνήθως υψηλότερα λειτουργικά έξοδα, μεγαλύτερους χρόνους προετοιμασίας και απαιτεί εξειδικευμένο εργατικό δυναμικό για τη συντήρηση. Ωστόσο, για εξαρτήματα αεροδιαστημικών συστημάτων και εξαρτήματα βαρέων μηχανημάτων που απαιτούν πολύπλοκες συναρμολογήσεις, συχνά αποτελεί τη μοναδική εφικτή επιλογή.
Μονοσταδιακές και Συνδυαστικές Μήτρες: Εξειδικευμένες Λύσεις
Δεν κάθε έργο απαιτεί πολυσταδιακή πολυπλοκότητα. Οι μονοσταδιακές μήτρες (γνωστές επίσης ως απλές μήτρες) εκτελούν μία εργασία ανά κίνηση του πρεσαρίσματος, κάνοντάς τις ιδανικές για πρωτότυπα, παραγωγή μικρών ποσοτήτων ή όταν απαιτείται μόνο αποκοπή ή διάτρηση. Προσφέρουν το χαμηλότερο κόστος εργαλειοθηκών και τους ταχύτερους χρόνους παράδοσης.
Οι συνδυαστικοί καλούπια καλύπτουν το κενό μεταξύ της απλότητας των μονοσταδίων και της πολυπλοκότητας των προοδευτικών καλουπιών. Αυτά τα υβριδικά εργαλεία συνδυάζουν κοπτικές και μη κοπτικές λειτουργίες σε ένα σύνολο καλουπιών, προσφέροντας μεγαλύτερη δυνατότητα από τα απλά καλούπια χωρίς την επένδυση που απαιτείται για πλήρη προοδευτική εργαλειοποίηση.
Σύγκριση τύπων καλουπιών: Η σωστή επιλογή
Η επιλογή μεταξύ μεθόδων σφράγισης με καλούπι απαιτεί την εξισορρόπηση πολλών παραγόντων. Παρακάτω παρουσιάζεται η σύγκριση των κύριων τύπων ως προς τα κρίσιμα κριτήρια λήψης αποφάσεων:
| Τύπος ξύλου | Πολυπλοκότητα Λειτουργίας | Όγκος παραγωγής | Περιπλοκότητα Κομματιού | Κόστος εργαλείων | Τυπικές Εφαρμογές |
|---|---|---|---|---|---|
| Βαθμικό | Υψηλή (πολυσταθμική σειριακή) | Υψηλός όγκος παραγωγής (100.000+ εξαρτήματα) | Μέτριο έως Πολύπλοκο | 50.000–500.000+ $ | Αυτοκινητιστικά ελάσματα, ηλεκτρονικά εξαρτήματα, σφιγκτήρες |
| Σύνθετο | Μετρίως υψηλή (μονόχτυπη, πολυεργασιακή) | Μέτριος έως υψηλός όγκος | Απλή έως μετρίως περίπλοκη (επίπεδα εξαρτήματα) | 20.000–100.000 $ | Δακτύλιοι στεγανότητας, παρεμβύσματα, απλά βραχίονες |
| Μεταφορά | Υψηλή (χειρισμός ενός εξαρτήματος κάθε φορά) | Μέτριος έως υψηλός όγκος | Πολύ περίπλοκο (βαθιές τραβήξεις, τρισδιάστατα σχήματα) | 75.000–400.000+ $ | Εξαρτήματα αεροδιαστημικής βιομηχανίας, εξαρτήματα σωλήνων, βαριά μηχανήματα |
| Μονοσταδιακός | Χαμηλό (μία εργασία) | Μέτριος έως χαμηλός όγκος | Απλός | 5.000–30.000 $ | Πρωτότυπα, απλά ελάσματα, διατρητά εξαρτήματα |
| Συνδυασμός | Μεσαίο (μεικτές εργασίες) | Μεσαίος Όγκος | Μετριοπαθής | 15.000–75.000 $ | Εξαρτήματα που απαιτούν κοπή και διαμόρφωση σε μία μόνο ρύθμιση |
Η απόφαση τελικά στηρίζεται σε τρεις βασικές ερωτήσεις: Ποιος είναι ο όγκος παραγωγής σας; Πόσο περίπλοκη είναι η γεωμετρία του εξαρτήματός σας; Και ποια είναι η ανοχή σας ως προς την αρχική επένδυση σε καλούπια σε σύγκριση με το κόστος ανά εξάρτημα; Η κατανόηση αυτών των συμβιβασμών αποτρέπει ακριβούς αντιστοιχίσεις μεταξύ τύπου καλουπιού και απαιτήσεων εφαρμογής.
Φυσικά, ακόμα και ο πλέον κατάλληλος τύπος μήτρας θα παρουσιάζει υποβαθμισμένη απόδοση εάν τα εσωτερικά του εξαρτήματα δεν έχουν σχεδιαστεί και συντηρηθεί κατάλληλα. Ας εξετάσουμε το εσωτερικό της ίδιας της μήτρας για να κατανοήσουμε πώς συνεισφέρει καθένα από τα κρίσιμα εξαρτήματά της στην ακρίβεια και την επαναληψιμότητα.
Κρίσιμα εξαρτήματα εντός κάθε μήτρας κοπής φύλλου μετάλλου
Έχετε επιλέξει τον κατάλληλο τύπο μήτρας για την εφαρμογή σας. Τώρα, αυτό που διαχωρίζει τις μήτρες πρώτης γραμμής από τις μεσόκοπες είναι η ποιότητα και η ενσωμάτωση των εσωτερικών εξαρτημάτων. Μία μήτρα κοπής φύλλου μετάλλου περιλαμβάνει δεκάδες ακριβή εξαρτήματα που λειτουργούν συγχρόνως, και η κατανόηση της λειτουργίας καθενός από αυτά σας προσφέρει τη γνώση που χρειάζεστε για να καθορίσετε καλύτερες μήτρες, να διαγνώσετε προβλήματα ταχύτερα και να επεκτείνετε σημαντικά τη διάρκεια ζωής της μήτρας.
Φανταστείτε τις μήτρες κοπής φύλλου μετάλλου ως έναν κινητήρα υψηλής απόδοσης. Κάθε εξάρτημα πρέπει να λειτουργεί τέλεια, και ο ασθενέστερος κρίκος καθορίζει τη συνολική απόδοση. Ας αναλύσουμε την ανατομία μιας μήτρας κοπής για να αποκαλύψουμε το τι πραγματικά συμβαίνει εντός της.
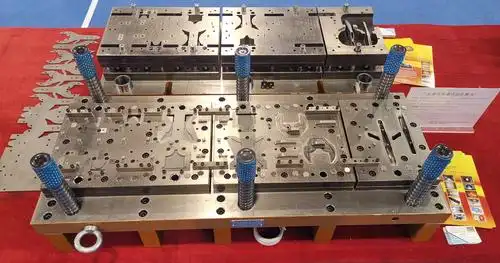
Βασικά εξαρτήματα του σώματος της μήτρας και της συναρμολόγησης του εμβόλου
Στο επίκεντρο κάθε συστήματος διαμόρφωσης με μήτρες βρίσκονται τα λειτουργικά εξαρτήματα που έρχονται απευθείας σε επαφή με το υλικό σας και το διαμορφώνουν. Παρακάτω περιγράφεται η λειτουργία καθενός από αυτά τα κρίσιμα στοιχεία:
- Διαμόρφωση (Άνδρας Μήτρα): Το συμπαγές στοιχείο από χάλυβα που κατεβαίνει στο λαμαρίνιο, πραγματοποιώντας εργασίες κοπής, διάτρησης ή διαμόρφωσης. Οι διαμορφώσεις πρέπει να αντέχουν τεράστιες συμπιεστικές δυνάμεις, ενώ διατηρούν αιχμηρές άκρες για εφαρμογές κοπής. Σύμφωνα με Ο κατασκευαστής , οι συγκρατητές με σφαίρες έχουν καθιερωθεί για τη στερέωση των διαμορφώσεων, καθώς επιτρέπουν στους τεχνικούς συντήρησης μητρών να αφαιρούν και να επανατοποθετούν τις διαμορφώσεις γρήγορα.
- Μπλοκ Μήτρας (Γυναίκα Μήτρα): Η αντίστοιχη κοιλότητα που δέχεται τη διαμόρφωση και παρέχει την επιφάνεια διαμόρφωσης για το εξάρτημα. Τα μπλοκ μητρών απαιτούν ακριβή μηχανουργική κατεργασία για να διατηρούν την κατάλληλη ανοχή με τη διαμόρφωση, συνήθως 8% έως 10% του πάχους του υλικού για βέλτιστη απόδοση κοπής.
- Πλάκες αποβολής: Αυτές οι πλάκες με ελατήριο επιτελούν μία κρίσιμη λειτουργία που ίσως δεν περιμένατε. Όταν κόβεται το μέταλλο, συρρικνώνεται φυσικά γύρω από το σώμα του διαμορφωτικού. Οι πλάκες αποκόλλησης περιβάλλουν τα διαμορφωτικά και τραβούν (ή αποκολλούν) το μέταλλο καθώς το διαμορφωτικό ανασύρεται. Χωρίς κατάλληλη δράση αποκόλλησης, τα εξαρτήματα μπορούν να ανυψωθούν μαζί με το διαμορφωτικό και να προκαλέσουν εμπλοκές ή ζημιές.
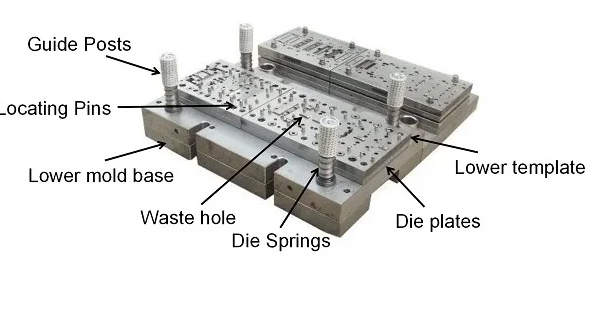
- Υποστρώματα Μητρών (Άνω και Κάτω): Οι βασικές πλάκες που στηρίζουν όλα τα υπόλοιπα εξαρτήματα και προσδένονται στον πιεστικό μηχανισμό. Οι ανώτερες πλάκες του καλουπιού φέρουν τα διαμορφωτικά και τις συναρμολογήσεις αποκόλλησης, ενώ οι κατώτερες πλάκες του καλουπιού στηρίζουν τα μπλοκ του καλουπιού και τους οδηγούς υλικού. Οι ποιοτικές πλάκες του καλουπιού παρέχουν στιβαρή στήριξη και ακριβείς επιφάνειες στήριξης.
- Πλάκες υποστήριξης: Τοποθετημένες πίσω από τα διαμορφωτικά και τα μπλοκ του καλουπιού, αυτές οι ενισχυμένες πλάκες κατανέμουν τις δυνάμεις κρούσης και εμποδίζουν το πιο μαλακό υλικό της πλάκας του καλουπιού να παραμορφωθεί υπό την επαναλαμβανόμενη επίδραση υψηλής πίεσης.
Εξήγηση των συστημάτων καθοδήγησης και των μηχανισμών στοίχισης
Τα εξαρτήματα ακριβείας για την εμπρέσιον σφυρηλάτηση εξαρτώνται αποκλειστικά από την τέλεια στοίχιση μεταξύ του άνω και του κάτω μισού του καλουπιού. Ακόμη και μια ανωμαλία της τάξης των χιλιοστών της ίντσας μπορεί να προκαλέσει πρόωρη φθορά, δημιουργία ακμών και αποτυχίες στις διαστάσεις. Αυτός είναι ο τρόπος με τον οποίο τα καλούπια για λαμαρίνα διατηρούν την ακρίβειά τους:
- Οδηγοί Καρφιών και Μανίκια: Αυτά τα ενισχυμένα κυλινδρικά εξαρτήματα διασφαλίζουν ότι το άνω μισό του καλουπιού κινείται απόλυτα συγχρονισμένο με το κάτω μισό κατά τη διάρκεια κάθε κίνησης. Οι οδηγοί πείροι τοποθετούνται σε ένα από τα υποστηρίγματα του καλουπιού και ολισθαίνουν μέσα από ακριβώς κατασκευασμένα βαρέλια στο αντίθετο υπόστρωμα. Τα εξελιγμένα καλούπια χρησιμοποιούν οδηγούς με σφαιρικά ή κυλινδρικά κουλονιά για μείωση της τριβής και μεγαλύτερη διάρκεια ζωής.
- Οδηγοί: Ενώ οι οδηγοί πείροι στοιχίζουν τα δύο μισά του καλουπιού, οι πιλότοι στοιχίζουν το ίδιο το εξάρτημα. Αυτοί οι ακριβείς πείροι εισέρχονται σε προ-διαμορφωμένες οπές στη λωρίδα υλικού, διασφαλίζοντας ότι κάθε σταθμός τοποθετεί το εξάρτημα στην ακριβώς σωστή θέση. Χωρίς ακριβή πιλότιση, οι λειτουργίες προοδευτικού καλουπιού θα παρήγαγαν εξαρτήματα με μη στοιχισμένα χαρακτηριστικά.
- Μπλοκ Τακουνιών: Τοποθετημένα στις γωνίες του μήτρα, τα μπλοκ πτέρνας απορροφούν τις πλάγιες δυνάμεις που διαφορετικά θα ωθούσαν τα δύο μισά της μήτρας εκτός στοίχισης κατά τη διάρκεια εκκεντρικών λειτουργιών, όπως η κάμψη ή η διαμόρφωση.
Η κατανόηση του σκοπού των εγκοπών παράκαμψης (bypass notches) στη διαμόρφωση λαμαρίνας αποκαλύπτει μία ακόμη κρίσιμη πτυχή στον τομέα της στοίχισης. Αυτές οι εγκοπές, που κόβονται στη λωρίδα υλικού μεταξύ των σταθμών, επιτρέπουν στη φέρουσα λωρίδα να προσαρμόζεται σε διαστασιακές αλλαγές καθώς οι διαμορφωτικές λειτουργίες επιμηκύνουν ή συμπιέζουν το μέταλλο. Χωρίς κατάλληλες εγκοπές παράκαμψης στις μήτρες σφράγισης λαμαρίνας, η λωρίδα θα στρεβλωνόταν ή θα σχιζόταν μεταξύ των σταθμών, προκαλώντας εμπλοκές και απορρίψεις εξαρτημάτων.
Ελατήρια και Συστήματα Πίεσης: Οι Αόρατοι Εργάτες
Τα ελατήρια μπορεί να φαίνονται ως απλά εξαρτήματα, ωστόσο είναι υπεύθυνα για κρίσιμες λειτουργίες σε όλη τη διάρκεια της λειτουργίας της μήτρας. Σύμφωνα με βιομηχανικές πηγές, η επιλογή των ελατηρίων εξαρτάται από την απαιτούμενη δύναμη, την απόσταση μετακίνησης, την προσδοκώμενη διάρκεια ζωής και το κόστος. Παρακάτω παρουσιάζονται οι τρόποι με τους οποίους οι διάφοροι τύποι ελατηρίων υπηρετούν τα εξαρτήματα των μητρών σφράγισης :
- Αέρια Ελατήρια (Αζώτου): Παρέχουν υψηλή δύναμη σε συμπαγείς διαστάσεις με εξαιρετική διάρκεια ζωής. Χρησιμοποιούνται συχνά σε προσαρτώμενα παδ πίεσης και εφαρμογές αφαίρεσης με υψηλή δύναμη.
- Ελατήρια πηνίου: Η επιλογή 'εργόσημο' όταν απαιτείται λογική δύναμη με χαμηλότερο κόστος. Διατίθενται σε διάφορες κατηγορίες δύναμης και μήκη διαδρομής.
- Ελατήρια ουρεθάνης: Γνωστά επίσης ως ελατήρια «μαρσμαλόου», αυτά λειτουργούν καλά σε εργασίες σφράγισης με μικρή παραγωγή ή πρωτότυπα, όπου το κόστος έχει μεγαλύτερη σημασία από τη διάρκεια ζωής.
Τα παδ πίεσης και τα παδ τραβήγματος βασίζονται σε συστήματα ελατηρίων για να ελέγχουν τη ροή του μετάλλου κατά τις διαδικασίες διαμόρφωσης. Για παράδειγμα, κατά την καμπύλωση με σκούπισμα (wipe bending), το παδ πίεσης πρέπει να ασκεί δύναμη τουλάχιστον ισοδύναμη με τη δύναμη κάμψης, προκειμένου να κρατά το μέταλλο επίπεδο πριν από την επαφή του εργαλείου διαμόρφωσης. Στις διαδικασίες τραβήγματος, η πίεση του παδ τραβήγματος καθορίζει την ποσότητα του μετάλλου που εισέρχεται στην κοιλότητα του καλουπιού. Υπερβολική πίεση προκαλεί ραγίσματα· υπερβολικά χαμηλή πίεση επιτρέπει το σχηματισμό ρυτίδων.
Πώς η ποιότητα των εξαρτημάτων επηρεάζει την απόδοση των καλουπιών
Αυτή είναι η πραγματικότητα που οι περισσότεροι προμηθευτές δεν συζητούν ανοιχτά: η ποιότητα των εξαρτημάτων καθορίζει απευθείας πόσα εξαρτήματα υψηλής ποιότητας θα παράγει η μήτρα σας προτού απαιτηθεί συντήρηση ή αντικατάσταση. Μία μήτρα που κατασκευάζεται με εξαρτήματα από προηγμένο εργαλειομηχανικό χάλυβα D2, ακριβείς οδηγούς συστήματος λείανσης και ελατήρια σωστά προδιαγραφόμενα θα παρουσιάσει σημαντικά καλύτερη απόδοση από μία μήτρα που συναρμολογείται με οικονομικά εξαρτήματα.
Η σχέση λειτουργεί ως εξής: κάθε εξάρτημα επηρεάζει τα υπόλοιπα. Φθαρμένοι οδηγοί πυρήνων επιτρέπουν τη μετατόπιση των δύο μισών της μήτρας, γεγονός που επιταχύνει τη φθορά των διαμπερών και των μπλοκ μήτρας. Αδύναμα ελατήρια αποστράγγισης επιτρέπουν την ανύψωση του υλικού, προκαλώντας την εκτόξευση των αποβλήτων (slugs) και ζημιές στην επιφάνεια. Υπερβολικά μικρές πλάκες υποστήριξης επιτρέπουν τη παραμόρφωση των βάσεων μήτρας, με αποτέλεσμα τη μόνιμη απώλεια της στοίχισης.
Κατά τον καθορισμό των εξαρτημάτων μήτρας εμβολοποίησης, λάβετε υπόψη το συνολικό κόστος κατοχής (total cost of ownership), αντί να επικεντρωθείτε αποκλειστικά στην αρχική τιμή της εργαλειοποίησης. Τα προηγμένα εξαρτήματα ενδέχεται να κοστίζουν 20–30% περισσότερο αρχικά, αλλά συχνά προσφέρουν διάρκεια ζωής 200–300% μεγαλύτερη μεταξύ διαδοχικών λείανσεων. Για παραγωγή μεγάλων όγκων, αυτός ο υπολογισμός ευνοεί σαφώς την ποιότητα.
Με μια στέρεη κατανόηση της ανατομίας των μήτρων, είστε έτοιμοι να αντιμετωπίσετε μία από τις πιο σημαντικές αποφάσεις στον τομέα της κατασκευής εργαλείων: την επιλογή του υλικού. Στην επόμενη ενότητα αποκαλύπτεται πώς οι βαθμοί χάλυβα εργαλείων, οι εναλλακτικές λύσεις με καρβίδιο και οι προδιαγραφές σκληρότητας καθορίζουν εάν η μήτρα σας θα λειτουργήσει επιτυχώς ή θα αποτύχει υπό τις απαιτήσεις της παραγωγής.
Επιλογή Υλικού Μήτρας και Απαιτήσεις Σκληρότητας
Υπάρχει μία αλήθεια που διαχωρίζει τα επιτυχημένα προγράμματα μητρών από τις δαπανηρές αποτυχίες: η λανθασμένη επιλογή υλικού μπορεί να καταστρέψει μία επένδυση 200.000 δολαρίων σε μερικούς μήνες. Ωστόσο, οι περισσότεροι αγοραστές επικεντρώνονται αποκλειστικά στον τύπο και το σχέδιο της μήτρας, ενώ θεωρούν την επιλογή του υλικού ως δευτερεύουσα υπόθεση. Ας διορθώσουμε αυτήν την κατάσταση εξερευνώντας πώς οι μήτρες σφυρηλάτησης χάλυβα, οι εναλλακτικές λύσεις με καρβίδιο και οι προδιαγραφές σκληρότητας καθορίζουν πραγματικά την τύχη του εργαλείου σας.
Κατά την κατεργασία μήτρας για εφαρμογές παραγωγής, οι μηχανικοί πρέπει να επιτύχουν ισορροπία μεταξύ τεσσάρων ανταγωνιστικών παραγόντων: σκληρότητας για αντοχή στη φθορά, ταυτόχρονης αντοχής για πρόληψη ραγίσματος, ευκολίας κατεργασίας για οικονομική παραγωγή και του ίδιου του κόστους. Δεν υπάρχει κανένα ενιαίο υλικό που επικρατεί σε όλους τους τομείς, γι’ αυτό και η κατανόηση των συμβιβασμών είναι τόσο σημαντική.
Επιλογή Βαθμίδας Χάλυβα Εργαλείων για Διαφορετικές Απαιτήσεις Παραγωγής
Οι χάλυβες εργαλείων αποτελούν τη βάση των μητρών εμβολισμού σε σχεδόν κάθε βιομηχανία. Σύμφωνα με την Nifty Alloys, αυτές οι ειδικές κράματα περιέχουν στοιχεία που σχηματίζουν καρβίδια, όπως χρώμιο, βανάδιο, μολυβδένιο και βολφράμιο, προσδίδοντάς τους τη σκληρότητα και την αντοχή στη φθορά που οι συνηθισμένοι χάλυβες απλώς δεν μπορούν να επιτύχουν. Αλλά ποια βαθμίδα ταιριάζει στην εφαρμογή σας;
Χάλυβας εργαλείου D2: Αυτό το χάλυβα για κρύα επεξεργασία έχει κερδίσει τη φήμη του ως ο «εργάτης» των συνόλων μήτρας εμβολισμού μετάλλων. Με σκληρότητα που φτάνει τα 58–62 HRC και εξαιρετική αντοχή στη φθορά λόγω του υψηλού περιεχομένου του σε καρβίδιο χρωμίου, ο χάλυβας D2 διακρίνεται σε μήτρες αποκοπής, εργαλεία εμβολισμού και λεπίδες κοπής. Το αντάλλαγμα; Είναι δυσκολότερο να επεξεργαστεί σε σύγκριση με εναλλακτικές λύσεις και προσφέρει μέτρια αντοχή.
Εργαλειοχάλυβας A2: Όταν χρειάζεστε καλύτερη αντοχή από αυτήν που προσφέρει ο χάλυβας D2, χωρίς όμως να θυσιάσετε υπερβολικά την αντοχή στη φθορά, ο χάλυβας A2 είναι η κατάλληλη επιλογή. Με σκληρότητα ενίσχυσης 57–62 HRC, αυτός ο χάλυβας που σκληρύνεται στον αέρα προσφέρει ισορροπημένη απόδοση για εφαρμογές που περιλαμβάνουν μέτρια φορτία κρούσης σε συνδυασμό με κοπτικές λειτουργίες.
Χάλυβας Εργαλείου S7: Φανταστείτε μια μήτρα εμβολισμού που πρέπει να απορροφά επανειλημμένα κρουστικά φορτία χωρίς να ραγίζει. Ακριβώς εκεί εξαίρεται ο χάλυβας S7. Σύμφωνα με βιομηχανικές πηγές, αυτή η ποιότητα έχει σχεδιαστεί ειδικά για να προτιμά την αντοχή έναντι της μέγιστης σκληρότητας, καθιστώντας την ιδανική για μήτρες σφυριών, διαμπερή εμβόλια που υφίστανται κρούση και εφαρμογές όπου η αντοχή στη θραύση έχει προτεραιότητα έναντι της μέγιστης διάρκειας ζωής λόγω φθοράς.
M2 High-Speed Steel: Για κοπτικές εργασίες σε υψηλές ταχύτητες ή όταν το υλικό του τεμαχίου εργασίας είναι ιδιαίτερα απαιτητικό ως προς την απόσβεση, ο χάλυβας M2 προσφέρει ανώτερη κόκκινη σκληρότητα, δηλαδή διατηρεί την ακμή κοπής του ακόμη και όταν συσσωρεύεται θερμότητα κατά την παραγωγή. Θα βρείτε τον χάλυβα M2 σε μήτρες υψηλής ταχύτητας και σε ειδικές εφαρμογές διάτρησης.
Όταν οι μήτρες καρβιδίου δικαιολογούν την επένδυση
Αυτό είναι το πράγμα που οι περισσότεροι προμηθευτές εργαλειομηχανών δεν θα σας πουν εξαρχής: οι μήτρες καρβιδίου μπορούν να κοστίζουν 3–5 φορές περισσότερο από αντίστοιχες επιλογές εργαλειοχάλυβα. Σε ποιες περιπτώσεις λοιπόν αυτή η πρόσθετη δαπάνη είναι λογική;
Σύμφωνα με την Carbide Products, η επιλογή μεταξύ καρβιδίου του βολφραμίου και εργαλειοχάλυβα εξαρτάται από διάφορους παράγοντες: το κόστος, την ευκολία κατεργασίας, την αντοχή στη φθορά, την ανθεκτικότητα και την ανοχή σε υψηλές θερμοκρασίες. Η σκληρότητα και η αντοχή στη φθορά του καρβιδίου είναι σημαντικά ανώτερες από εκείνες του εργαλειοχάλυβα, κάνοντάς το πιο κατάλληλο για εφαρμογές που απαιτούν εξαιρετική απόδοση.
Εξετάστε το καρβίδιο όταν η εφαρμογή σας περιλαμβάνει:
- Παραγωγή εξαιρετικά μεγάλου όγκου όπου ο αριθμός των τεμαχίων που παράγονται με μήτρα ανέρχεται σε εκατομμύρια ετησίως
- Αποτριπτικά υλικά προϊόντος όπως ανοξείδωτο χάλυβα, κράματα υψηλής αντοχής ή υλικά με επιφανειακά επιστρώματα
- Αυστηρές απαιτήσεις ανοχής όπου η διαστατική σταθερότητα κατά τη διάρκεια εκτεταμένων παραγωγικών κύκλων είναι κρίσιμη
- Λειτουργίες υψηλής ταχύτητας παράγοντας σημαντική θερμότητα στην ακμή κοπής
Ωστόσο, εάν το κόστος είναι καθοριστικός παράγοντας και οι παραγωγικές σας ποσότητες είναι μέτριες, ο χάλυβας για μήτρες παραμένει η καλύτερη επιλογή. Η ευθραυστότητα του καρβιδίου το καθιστά επίσης ακατάλληλο για εφαρμογές που περιλαμβάνουν σημαντικά φορτία κρούσης.
Σύγκριση υλικών: Αντιστοίχιση βαθμών με εφαρμογές
Η επιλογή του κατάλληλου υλικού απαιτεί την αντιστοίχιση των συγκεκριμένων απαιτήσεών σας με τα πλεονεκτήματα κάθε βαθμού. Παρακάτω παρουσιάζεται η σύγκριση των κύριων επιλογών:
| Βαθμός Υλικού | Τυπική σκληρότητα (HRC) | Καλύτερες Εφαρμογές | Αντίσταση στη φθορά | Επίπεδο κόστους |
|---|---|---|---|---|
| Εργαλειοχάλυβας D2 | 58-62 | Μήτρες αποκοπής, εργαλεία σφράγισης, λεπίδες κοπής | Εξοχος | Μεσαίο |
| Εργαλειοθηκών Χάλυβας A2 | 57-62 | Μήτρες γενικής χρήσης, εφαρμογές με μέτρια κρούση | Πολύ Καλή | Μεσαίο |
| Χάλυβας εργαλείου S7 | 54-58 | Μήτρες σφυριών, διαπεραστικά εργαλεία κρούσης, εργαλεία ανθεκτικά σε κρούσεις | Καλή | Μεσαίο |
| M2 high-speed steel | 60-65 | Υψηλής ταχύτητας κοπή, διάτρηση απαιτητικών υλικών | Εξοχος | Μέτριο-Υψηλό |
| Καρβίδιο βολφραμίου | 75–85 (κλίμακα HRA) | Εφαρμογές υψηλότατου όγκου και ακραίας φθοράς | Ανώτερη | Υψηλές |
Πώς επηρεάζει το υλικό του τεμαχίου εργασίας την επιλογή του υλικού της μήτρας
Η επιλογή του υλικού της μήτρας σας δεν γίνεται απομονωμένα. Το λαμαρίνα που κατασκευάζετε με εμβολοπλαστική επηρεάζει άμεσα ποια βαθμίδα μήτρας θα επιτύχει. Τα μαλακότερα υλικά, όπως το αλουμίνιο και το ανθρακούχο χάλυβα, είναι ευγενή, επιτρέποντας σε φθηνότερα υλικά μήτρας να λειτουργούν ικανοποιητικά. Ωστόσο, καθώς αυξάνεται η σκληρότητα και η αποξεστικότητα του τεμαχίου εργασίας, το υλικό της μήτρας σας πρέπει να ανταποκρίνεται ανάλογα.
Ο ανοξείδωτος χάλυβας, οι υψηλής αντοχής χάλυβες χαμηλής συγκέντρωσης κραμάτων (HSLA) και οι προηγμένοι υψηλής αντοχής χάλυβες (AHSS) επιταχύνουν δραματικά τη φθορά της μήτρας. Αυτά τα υλικά απαιτούν προηγμένους εργαλειοχάλυβες, όπως ο D2 ή ο M2, ή, σε ακραίες περιπτώσεις, ενσωματώματα καρβιδίου στις περιοχές υψηλής φθοράς. Η επιπλέον επένδυση στα εργαλεία αποπληρώνεται μέσω εκτενέστερων παραγωγικών κύκλων μεταξύ επαναλείανσης.
Η σχέση μεταξύ σκληρότητας και διάρκειας ζωής
Υπάρχει μια κρίσιμη ενσωμάτωση που πολλοί αγοραστές παραβλέπουν: το «σκληρότερο» δεν είναι πάντα καλύτερο. Αν και μεγαλύτερη σκληρότητα (μετρούμενη σε HRC για χάλυβες εργαλείων) βελτιώνει γενικά την αντοχή στη φθορά, ταυτόχρονα μειώνει την ταυτόχρονη αντοχή σε κρούση. Εάν υπερβείτε τη σκληρότητα, το μήτρα σας θα γίνει ευάλωτη σε αποκόμματα, ρωγμές ή καταστροφική αστοχία υπό κρούση.
Σύμφωνα με ειδικούς του κλάδου εάν ένα εργαλείο είναι πολύ μαλακό, θα παραμορφωθεί ή θα φθαρεί πρόωρα. Εάν είναι πολύ σκληρό, θα γίνει εύθραυστο και ενδέχεται να ραγίσει υπό κρούση. Το κλειδί είναι η επιλογή της κατάλληλης σκληρότητας σύμφωνα με το συγκεκριμένο μηχανισμό αστοχίας σας. Οι κοπτικές εργασίες επωφελούνται από τη μέγιστη επιτεύξιμη σκληρότητα, ενώ οι εργασίες διαμόρφωσης ή κάμψης απαιτούν μείωση της σκληρότητας για να διατηρηθεί η αντοχή σε κρούση.
Η κατάλληλη θερμική κατεργασία κατά την κατασκευή της μήτρας είναι εξίσου κρίσιμη. Ο ίδιος βαθμός χάλυβα μπορεί να παρουσιάζει δραματικά διαφορετική απόδοση, ανάλογα με τη θερμοκρασία σκλήρυνσης, τον ρυθμό σβέσιματος και τους κύκλους τροποποίησης. Γι’ αυτόν τον λόγο, η συνεργασία με εμπειρογνώμονες κατασκευαστές μητρών που κατανοούν τα πρωτόκολλα σκλήρυνσης των χαλύβων εργαλείων έχει την ίδια σημασία με την αρχική επιλογή του κατάλληλου βαθμού.
Με την επιλογή του υλικού σας οριστικοποιημένη, η επόμενη πρόκληση είναι η μετάφραση των απαιτήσεων για το εξάρτημά σας σε πραγματικές προδιαγραφές καλουπιού. Η διαδικασία σχεδιασμού που ακολουθεί καθορίζει εάν όλα αυτά τα πλεονεκτήματα του υλικού θα μεταφραστούν σε επιτυχία παραγωγής ή σε απογοητευτική απόδοση.
Διαδικασία Σχεδιασμού Καλουπιού και Μεθοδολογία Μηχανικού Σχεδιασμού
Έχετε επιλέξει τον ιδανικό τύπο καλουπιού και έχετε καθορίσει υψηλής ποιότητας υλικά. Τώρα έρχεται η φάση κατά την οποία οι περισσότερες εργαλειομηχανές επιτυγχάνουν ή αποτυγχάνουν: η ίδια η διαδικασία σχεδιασμού του καλουπιού σφυρηλάτησης. Αυτό είναι το επίπεδο γνώσης που έχουν οι έμπειροι μηχανικοί, αλλά το οποίο σπάνια αναφέρεται σε παρουσιάσεις πωλήσεων. Η βιασύνη κατά τη διάρκεια αυτής της φάσης ή η παράλειψη κρίσιμων βημάτων δημιουργεί ακριβά προβλήματα που επηρεάζουν την παραγωγή για χρόνια.
Σύμφωνα με ειδικούς του κλάδου με πάνω από 25 χρόνια εμπειρίας στον σχεδιασμό καλουπιών και μήτρας, η διαδικασία σχεδιασμού ακολουθεί μια σκόπιμη σειρά. Η πρόωρη μετάβαση στο σχεδιασμό των εξαρτημάτων της μήτρας, πριν από την ολοκλήρωση της βασικής ανάλυσης, οδηγεί σε δαπανηρές επανεργασίες αργότερα. Ας εξετάσουμε πώς προσεγγίζουν πραγματικά αυτήν την πρόκληση οι ειδικοί στον ακριβή σχεδιασμό μητρών και στον εμβολισμό.
Από το Σχέδιο Τεμαχίου στις Προδιαγραφές Σχεδιασμού Μήτρας
Έχετε ποτέ αναρωτηθεί τι συμβαίνει πριν οι μηχανικοί σχεδιάσουν την πρώτη γραμμή στο λογισμικό CAD; Η απάντηση περιλαμβάνει μια ενδελεχή ανάλυση που οι περισσότεροι προμηθευτές δεν συζητούν ποτέ με τους πελάτες τους. Ακολουθεί η διαδοχική διαδικασία που διαχωρίζει τον κορυφαίου επιπέδου σχεδιασμό μητρών για μεταλλικό εμβολισμό από τα μεσοκριτικά αποτελέσματα:
- Ανάλυση Γεωμετρίας Τεμαχίου: Οι μηχανικοί εξετάζουν λεπτομερώς το τρισδιάστατο μοντέλο και τα σχέδια. Ποιο υλικό έχει καθοριστεί; Ποιο είναι το πάχος; Υπάρχουν δύσκολα σχήματα, οξείες γωνίες ή βαθιές διαμορφώσεις που θα μπορούσαν να προκαλέσουν προβλήματα κατά τη διαμόρφωση; Η κατανόηση αυτών των λεπτομερειών αποκαλύπτει ποια διάταξη μήτρας θα είναι κατάλληλη και τονίζει δυνητικές δυσκολίες πριν από την έναρξη οποιασδήποτε εργασίας σχεδιασμού.
- Ανάλυση Ανοχών και Κρίσιμων Χαρακτηριστικών: Ποιες διαστάσεις είναι κρίσιμες για την εφαρμογή κατά τη συναρμολόγηση; Σε ποια σημεία έχουν καθοριστεί οι στενότερες ανοχές; Σύμφωνα με ειδικούς στο σχεδιασμό μητρών, οι σύγχρονες ανοχές κατασκευής έχουν καταστεί όλο και πιο αυστηρές, απαιτώντας συχνά ακρίβεια σε μικρότατα κλάσματα ιντσών. Αυτή η ανάλυση καθορίζει πώς πρέπει να διαστασιολογηθούν οι διαμορφωτικοί πυρήνες, ώστε να ληφθεί υπόψη η φθορά τους, χωρίς να εξέλθουν από τις καθορισμένες ανοχές κατά την παραγωγή.
- Σχεδιασμός Διαδικασίας Σφυρηλάτησης: Εδώ είναι που οι μηχανικοί καθορίζουν τη βέλτιστη ακολουθία εργασιών. Θα πρέπει να διανοιγούνται πρώτα τα ανοίγματα, στη συνέχεια να διαμορφώνονται οι κοπτικές ακμές (flanges) και τελικά να κοπούν οι άκρες; Η ακολουθία επηρεάζει όλα τα πράγματα, από την ποιότητα του εξαρτήματος μέχρι την πολυπλοκότητα της μήτρας. Μια εξειδικευμένη μήτρα για την κοπή μετάλλου για ένα περίπλοκο στήριγμα μπορεί να απαιτεί 15+ σταθμούς σε μια προοδευτική διάταξη.
- Ανάπτυξη Διάταξης Λωρίδας: Για τις προοδευτικές μήτρες, η διάταξη της λωρίδας δείχνει ακριβώς πώς η μεταλλική λωρίδα διέρχεται από τη μήτρα και πώς το εξάρτημα διαμορφώνεται βήμα προς βήμα. Σύμφωνα με εμπειρογνώμονες σχεδιαστές μητρών, αυτό το σχέδιο έχει ως στόχο την αποτελεσματική χρήση του υλικού, διατηρώντας παράλληλα τη σταθερότητα της διαδικασίας. Κακές διατάξεις λωρίδας προκαλούν σπατάλη υλικού και δημιουργούν προβλήματα στην παραγωγή.
- Επαλήθευση Εφικτότητας: Μπορεί αυτό το εξάρτημα να κατασκευαστεί με αξιόπιστο τρόπο μέσω της προβλεπόμενης διαδικασίας κοπής; Υπάρχουν χαρακτηριστικά που ενδέχεται να προκαλέσουν ρήγματα ή ρυτίδες; Οι εμπειρογνώμονες μηχανικοί εργαλειομηχανών και μητρών για κοπή εξαρτημάτων βασίζονται τόσο σε υπολογισμούς όσο και στη διαίσθησή τους για να εντοπίσουν πιθανά προβλήματα πριν προχωρήσουν στο λεπτομερές σχεδιασμό.
- Λεπτομερής Σχεδιασμός Εξαρτημάτων: Μόνο αφού ολοκληρωθεί η βασική ανάλυση, οι μηχανικοί προχωρούν στο σχεδιασμό των εμβόλων, των μήτρων, των αποσπαστικών πλακών και των οδηγών. Το λογισμικό CAD δημιουργεί ακριβείς τρισδιάστατα μοντέλα, όπου επαληθεύονται κρίσιμοι παράγοντες, όπως η ανοχή μεταξύ εμβόλου και μήτρας, σε σχέση με τον συγκεκριμένο τύπο μετάλλου και το πάχος του.
- Επισκόπηση σχεδιασμού και τεκμηρίωση: Μια επίσημη επισκόπηση από εμπειρογνώμονες μηχανικούς εξετάζει κάθε πτυχή: Ικανοποιεί τις λειτουργικές απαιτήσεις; Είναι κατασκευάσιμο; Είναι ασφαλές για χειρισμό; Τελικά, δημιουργούνται λεπτομερείς σχεδιαστικές κατασκευαστικές σχεδιαγραμματικές αναπαραστάσεις και κατάλογοι υλικών για τους κατασκευαστές εργαλείων.
Προσομοίωση CAE στη σύγχρονη μηχανική μητρών
Υπάρχει κάτι που διαχωρίζει τις σύγχρονες προσαρμοστικές μήτρες για κοπή μετάλλου από την εργαλειοθήκη που σχεδιαζόταν ακόμη και πριν από δέκα χρόνια: οι εικονικές δοκιμές με χρήση προσομοίωσης Μηχανικής με Υποστήριξη Η/Υ (CAE). Η ανεύρεση προβλημάτων μετά την κατεργασία ακριβού εργαλειοχάλυβα είναι εξαιρετικά δαπανηρή. Η προσομοίωση εντοπίζει αυτά τα προβλήματα όταν είναι ακόμη απλώς γραμμές στην οθόνη.
Σύμφωνα με Οι εμπειρογνώμονες της Keysight για την κατασκευή φύλλων μετάλλου η βιομηχανία αντιμετωπίζει σημαντικές προκλήσεις όσον αφορά την επιλογή υλικών, την ελαστική ανάκαμψη (springback) και τη βελτιστοποίηση της διαδικασίας. Οι προηγμένες υψηλής αντοχής χάλυβες (AHSS) και οι κράματα αλουμινίου παρουσιάζουν υψηλά μεγέθη ελαστικής ανάκαμψης, καθιστώντας τη διαστασιακή ακρίβεια μια συνεχή πρόκληση. Το λογισμικό προσομοίωσης αντιμετωπίζει αυτές τις προκλήσεις πριν από την κατασκευή των πραγματικών εργαλείων.
Τι μπορεί να προβλέψει η προσομοίωση; Οι μηχανικοί εισάγουν τις ιδιότητες του υλικού, τη γεωμετρία των εργαλείων και τις παραμέτρους της διαδικασίας, ενώ το λογισμικό προσομοιώνει τον πραγματικό τρόπο με τον οποίο το μέταλλο θα ρέει κατά τη διαδικασία εμβολοκόπησης. Βασικά αποτελέσματα περιλαμβάνουν:
- Κίνδυνοι ρωγμάτωσης και σχισμάτωσης: Περιοχές υπερβολικής λεπταίνσεως που θα οδηγούσαν σε αποτυχία κατά την παραγωγή
- Ζώνες ρυτίδωσης: Όπου η συμπίεση του υλικού υπερβαίνει τα όρια διαμόρφωσης
- Μέγεθος επαναφοράς: Πόσο θα αλλάξει το σχήμα του εξαρτήματος μετά την απόσυρση της δύναμης διαμόρφωσης
- Κατανομή Τάσεων: Ζώνες υψηλής θερμότητας που θα μπορούσαν να προκαλέσουν πρόωρη φθορά των καλουπιών
Αυτή η εικονική επικύρωση επιτρέπει τροποποιήσεις στο σχεδιασμό καλουπιών εκτύπωσης πριν από την κοπή οποιουδήποτε μετάλλου. Σύμφωνα με πηγές του κλάδου, τα ελαττώματα σε ορατά αυτοκινητοβιομηχανικά εξαρτήματα εμφανίζονται συχνά μόνο κατά την πρώτη φυσική δοκιμή, οπότε οι διορθώσεις γίνονται τόσο χρονοβόρες όσο και δαπανηρές. Η προσομοίωση ελέγχει σημαντικό μέρος αυτού του κινδύνου εντοπίζοντας προβλήματα εικονικά.
Σύνδεση των αποφάσεων σχεδιασμού με τα αποτελέσματα παραγωγής
Γιατί έχει σημασία όλη αυτή η προκαταρκτική μηχανική προσπάθεια; Διότι κάθε απόφαση που λαμβάνεται κατά τον σχεδιασμό καλουπιών εκτύπωσης μετάλλων επηρεάζει την παραγωγή για χρόνια. Εξετάστε τις ακόλουθες συνδέσεις:
- Σειρά σταθμών επηρεάζει την επίπεδη μορφή του εξαρτήματος, τη διαστασιακή ακρίβεια και το πόσο εύκολα μπορούν οι χειριστές να εντοπίσουν ελαττώματα
- Στρατηγική διαστασιολόγησης των εμβόλων καθορίζει πόσα εξαρτήματα μπορούν να παραχθούν πριν από την επαναλείανση, επηρεάζοντας άμεσα το κόστος ανά εξάρτημα
- Προδιαγραφές κενού ελέγχουν το ύψος της ακμής (burr), την ποιότητα των ακμών και τη διάρκεια ζωής του εργαλείου
- Αποδοτικότητα της διάταξης της λωρίδας καθορίζουν το ποσοστό αξιοποίησης του υλικού σας για όλη τη διάρκεια ζωής του καλουπιού
Σύμφωνα με εμπειρογνώμονες σχεδιαστές μήτρας, είναι σημαντικό να επιτευχθεί ισορροπία μεταξύ του συνολικού κόστους της μήτρας, της σταθερότητάς της, της ποιότητας των εξαρτημάτων, του αριθμού των κόψεων ανά διάστημα συντήρησης και των συνεχών απαιτήσεων συντήρησης. Η σκέψη πέρα από το αμέσως επιβαλλόμενο καθήκον σχεδιασμού, για την πρόβλεψη πιθανών εμποδίων κατά την εγκατάσταση, την αλλαγή μήτρας ή τη συντήρηση, διαχωρίζει μία ικανοποιητική μήτρα από μία εξαιρετική μήτρα.
Οι προδιαγραφές ακρίβειας που επιτυγχάνονται με καλά σχεδιασμένες μήτρες είναι εντυπωσιακές. Οι κατάλληλα μηχανολογικά σχεδιασμένες προοδευτικές μήτρες διατηρούν συνήθως ανοχές ±0,001" σε κρίσιμα χαρακτηριστικά. Ωστόσο, αυτές οι δυνατότητες υλοποιούνται μόνο όταν η διαδικασία σχεδιασμού ακολουθεί μια πειθαρχημένη μεθοδολογία και όχι συντομεύσεις. Η βιασύνη κατά την ανάλυση για την τήρηση φιλόδοξων χρονοδιαγραμμάτων εγγυάται σχεδόν πάντα προβλήματα παραγωγής που υπερβαίνουν κατά πολύ οποιαδήποτε εξοικονόμηση χρόνου.
Ακόμα και οι πιο προσεκτικά σχεδιασμένοι καλούπια θα αντιμετωπίσουν εν τέλει προβλήματα κατά την παραγωγή. Η γνώση του τρόπου διάγνωσης και επίλυσης γρήγορα των συνηθέστερων προβλημάτων σφράγισης διαχωρίζει τις υψηλά αποδοτικές λειτουργίες από εκείνες που βρίσκονται συνεχώς σε κατάσταση αντιμετώπισης προβλημάτων ποιότητας.
Αντιμετώπιση συνηθισμένων προβλημάτων κοπής με καλούπι
Το σχέδιο του καλουπιού σας κάλυψε όλα τα κριτήρια. Τα υλικά σας είναι υψηλής ποιότητας. Και όμως, ξαφνικά, τα σφραγισμένα εξαρτήματα προέρχονται από τη γραμμή με ακμές, ρωγμές ή διαστάσεις που δεν αντιστοιχούν στις προδιαγραφές. Σας φαίνεται γνώριμο; Ακόμα και η καλύτερα μηχανικά σχεδιασμένη διαδικασία μεταλλικής σφράγισης αντιμετωπίζει προβλήματα. Η διαφορά μεταξύ των υψηλά αποδοτικών λειτουργιών και εκείνων που βρίσκονται συνεχώς σε κατάσταση αντιμετώπισης προβλημάτων βρίσκεται στην ταχύτητα με την οποία οι ομάδες διαγνώσκουν τις ριζικές αιτίες και εφαρμόζουν αποτελεσματικές λύσεις.
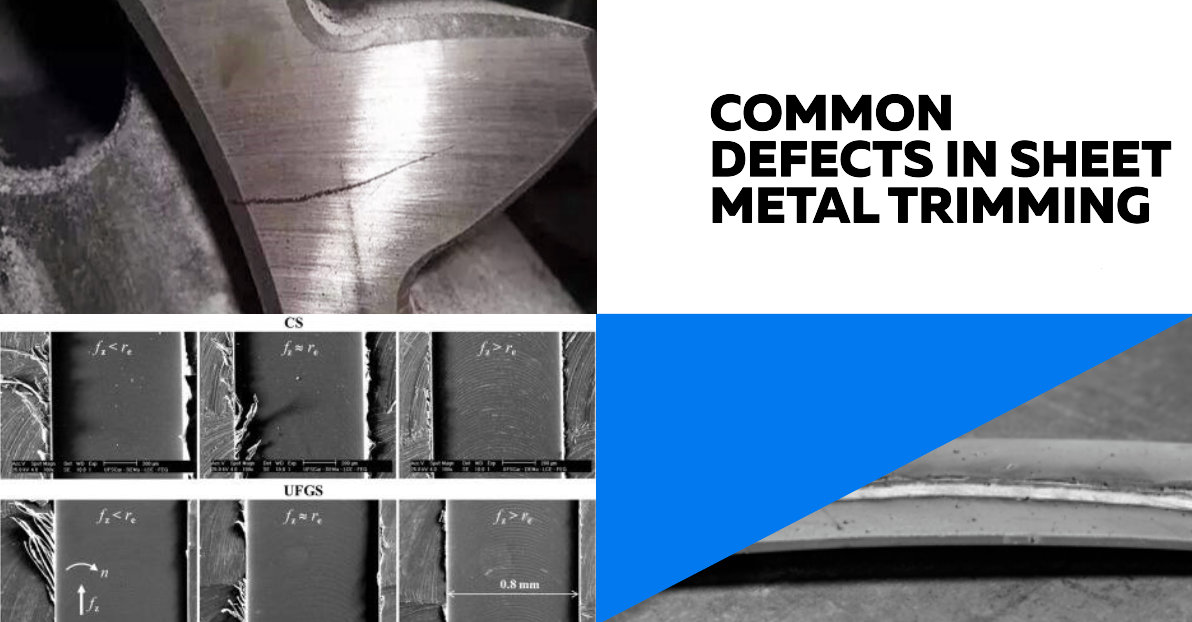
Αυτό είναι που γνωρίζουν οι έμπειροι εξεταστές προβλημάτων: κάθε ελάττωμα σε ελασματοποιημένο λαμαρίνα διηγείται μια ιστορία. Οι ακμές (burrs) ψιθυρίζουν για προβλήματα διακένου. Οι ρωγμές φωνάζουν για προβλήματα ροής του υλικού. Η διαστασιακή παρέκκλιση υποδηλώνει πρότυπα φθοράς που αναπτύσσονται εντός του καλουπιού. Το να μάθει κανείς να διαβάζει αυτά τα σήματα μετατρέπει την αντιδραστική «κατάσβεση πυρκαγιών» σε προληπτική διαχείριση της διαδικασίας καλουπιού.
Διάγνωση της Δημιουργίας Ακμών και Προβλημάτων Ποιότητας των Ακμών
Οι ακμές (burrs) είναι ίσως η πιο συνηθισμένη παράπονο στη διαδικασία ελασματοποίησης, και σχεδόν πάντα σας λένε κάτι συγκεκριμένο για την εργαλειομηχανή σας. Σύμφωνα με ειδικούς στην κατασκευή, οι ακμές εμφανίζονται όταν η κοπτική άκρη του καλουπιού φθείρεται ή όταν η απόσταση μεταξύ του εμβόλου και του καλουπιού βγαίνει εκτός των βέλτιστων ορίων.
Τι προκαλεί ακμές (burrs) σε ελασματοποιημένα εξαρτήματα;
- Υπερβολική φθορά του καλουπιού: Όταν οι κοπτικές άκρες αμβλύνονται, δεν τέμνουν πλέον το υλικό καθαρά. Αντ’ αυτού, το μέταλλο σχίζεται αντί να κόβεται, αφήνοντας ακανόνιστες άκρες.
- Μη κατάλληλο διάκενο: Υπερβολική διάκενο επιτρέπει στο υλικό να κυλήσει πριν την κοπή, προκαλώντας ακμές (burrs). Υπερβολικά μικρό διάκενο αυξάνει τις δυνάμεις κοπής και επιταχύνει τη φθορά.
- Εκτροπή: Όταν το εμβολοκοπτικό και η μήτρα δεν είναι απόλυτα κεντραρισμένα, η μία πλευρά κόβει καθαρά, ενώ η άλλη παράγει ακμές (burrs).
Η επίλυση ξεκινά με την κατανόηση των κατάλληλων προδιαγραφών διακένου. Οι βιομηχανικές οδηγίες συνιστούν τη ρύθμιση του διακένου σε ποσοστό 8% έως 12% του πάχους του υλικού, με την κατώτερη τιμή αυτού του εύρους να εφαρμόζεται για μαλακότερα υλικά, όπως ο ανθρακούχος χάλυβας. Για παράδειγμα, η εμβολοκόπηση ανθρακούχου χάλυβα πάχους 0,060" απαιτεί διάκενο περίπου 0,005" έως 0,006" ανά πλευρά.
Αντιμετώπιση των προκλήσεων λόγω ελαστικής ανάκαμψης του υλικού
Φανταστείτε ότι κάμπτετε ένα εξάρτημα ακριβώς σε 90 μοίρες, για να το δείτε στη συνέχεια να επιστρέφει ελαστικά στις 87 μοίρες μόλις αφαιρεθεί η πίεση. Αυτό είναι η ελαστική ανάκαμψη (springback), και σύμφωνα με βιομηχανικές πηγές, αποτελεί ιδιαίτερα προβληματικό φαινόμενο με υλικά υψηλής αντοχής, τα οποία παρουσιάζουν μικρότερη διαφορά μεταξύ της οριακής αντοχής σε υπερβολική τάση (yield strength) και της αντοχής σε εφελκυσμό (tensile strength), σε σύγκριση με χάλυβες χαμηλότερης αντοχής.
Η διαδικασία σφράγισης αλουμινίου παρουσιάζει ιδιαίτερες προκλήσεις όσον αφορά την ελαστική ανάκαμψη, καθώς η ελαστική ανάκαμψη του αλουμινίου είναι σημαντικά υψηλότερη από εκείνη του χάλυβα. Οι μηχανικοί πρέπει να λαμβάνουν υπόψη αυτή τη συμπεριφορά κατά το σχεδιασμό των καλουπιών, αντί να προσπαθούν να τη διορθώσουν μετά την κατασκευή των εργαλείων.
Τρεις αποδεδειγμένες προσεγγίσεις για τον έλεγχο της ελαστικής ανάκαμψης:
- Αντιστάθμιση με υπερκάμψη: Εάν η προσομοίωση προβλέπει 3 μοίρες ελαστικής ανάκαμψης, σχεδιάστε το καλούπι ώστε να κάμπτει 3 μοίρες πέρα από την επιθυμητή γωνία.
- Συμπίεση στη ζώνη κάμψης: Η εφαρμογή έντονης τοπικής πίεσης στη γραμμή κάμψης θέτει μόνιμα το υλικό, μειώνοντας την ελαστική ανάκαμψη.
- Μετα-εφελκυσμός: Η διατήρηση του εξαρτήματος υπό εφελκυσμό μετά τη διαμόρφωση μετατρέπει πολύπλοκες καταστάσεις τάσης σε ομοιόμορφο εφελκυσμό, ελαχιστοποιώντας έτσι τις δυνάμεις που προκαλούν την ελαστική ανάκαμψη.
Συνηθισμένα ελαττώματα: Αναφορά Πρόβλημα–Αιτία–Λύση
Όταν οι ομάδες παραγωγής χρειάζονται γρήγορες απαντήσεις, η ύπαρξη μιας δομημένης διαγνωστικής αναφοράς εξοικονομεί ώρες δοκιμών και λαθών. Παρακάτω παρουσιάζεται πώς τα πιο συνηθισμένα προβλήματα σφράγισης συνδέονται με τις ριζικές τους αιτίες και τις αποδεδειγμένες λύσεις:
| Πρόβλημα | Συνηθισμένες αιτίες | Λύσεις |
|---|---|---|
| Ακμές στα κομμένα άκρα | Φθαρμένες ακμές κοπής· ακατάλληλη διακένου (υπερβολικά μεγάλη ή μικρή)· εκτός στοίχισης του εμβόλου/της μήτρας | Ξαναγυαλίστε τις ακμές κοπής· ρυθμίστε το διάκενο σε 8–12% του πάχους του υλικού· επαληθεύστε τη στοίχιση με δείκτες μετρήσεων |
| Ρωγμές/Διαχωρισμός | Ανεπαρκής δυστρεψία του υλικού· υπερβολικά μικρές ακτίνες καμπυλότητας της μήτρας· υπερβολική δύναμη του συγκρατητή ελάσματος | Επαληθεύστε τις προδιαγραφές επιμήκυνσης του υλικού· αυξήστε τις ακτίνες καμπυλότητας της μήτρας σε ελάχιστο 4 φορές το πάχος του υλικού· μειώστε την πίεση του συγκρατητή ελάσματος |
| Συμπλοκή | Ανεπαρκής δύναμη του συγκρατητή ελάσματος· υπερβολική ροή του υλικού· ακατάλληλος σχεδιασμός των γραμμών ελκυσμού | Αυξήστε την πίεση του συγκρατητή ελάσματος· προσθέστε ή τροποποιήστε τις γραμμές ελκυσμού· βελτιστοποιήστε τη λίπανση |
| Αναπήδηση | Ελαστική ανάκαμψη που είναι εγγενής στο υλικό· ανεπαρκής δύναμη διαμόρφωσης· οξείες ακτίνες κάμψης | Εφαρμόστε διόρθωση υπερκάμψης· χρησιμοποιήστε πίεση κοπής (coining)· εξετάστε τεχνικές μετα-τάνυσης |
| Γκαλινγκ/Γρατζουνιές | Ανεπαρκής λίπανση· τραχιές επιφάνειες μήτρας· συσσώρευση υλικού στα εργαλεία | Βελτίωση της κάλυψης λίπανσης· λείανση των επιφανειών των καλουπιών σε Ra 0,2 μm ή καλύτερο· εφαρμογή επιστρώσεων PVD/ TD |
| Διαστατική μεταβλητότητα | Φθορά των καλουπιών· θερμική διαστολή· ασυνέπεια στο πάχος του υλικού | Καθιέρωση τακτικών διαστημάτων επιθεώρησης· επιτροπή θερμικής σταθεροποίησης· επαλήθευση των προδιαγραφών του εισερχόμενου υλικού |
Δείκτες φθοράς που υποδηλώνουν την ανάγκη συντήρησης
Το να περιμένετε μέχρι να εμφανιστούν προβλήματα ποιότητας σημαίνει ότι έχετε ήδη παράγει απόβλητα. Σύμφωνα με εμπειρογνώμονες συντήρησης καλουπιών , η σωστή διάκριση μεταξύ των διαφόρων τύπων φθοράς αποτελεί το πρώτο βήμα για την εφαρμογή της κατάλληλης λύσης. Ακολουθούν τα σημεία που πρέπει να παρακολουθείτε:
- Αποτριπτική Φθορά: Εμφανίζεται ως λεπτές αυλακώσεις παράλληλες προς την κατεύθυνση ροής του υλικού. Συνηθίζεται κατά την εκτύπωση απαιτητικών υλικών ή όταν υπάρχει μόλυνση της επιφάνειας του καλουπιού από υπολείμματα.
- Προσκολλητική φθορά (πρόσφυση): Εμφανίζεται ως σκισμένες, τραχιές επιφάνειες, όπου το υλικό του τεμαχίου έχει συγκολληθεί στο καλούπι. Υποδηλώνει αποτυχία λίπανσης ή ασυμβατότητα υλικών.
- Ρηγμάτωση λόγω κόπωσης: Αναπτύσσεται ως λεπτές επιφανειακές ρωγμές που επεκτείνονται με τον καιρό, συχνά με χαρακτηριστικά «ίχνη παραλίας» υπό μεγέθυνση. Υποδηλώνει ότι οι κύκλοι τάσης υπερβαίνουν τα όρια αντοχής του υλικού.
Καθορίστε τα διαστήματα επιθεώρησης με βάση τον όγκο παραγωγής και τη σκληρότητα του υλικού. Μια γενική κατευθυντήρια γραμμή από βιομηχανικές πηγές συνιστά τον έλεγχο των ακμών κοπής κάθε 50.000 κόψεις, αν και σκληρότερα υλικά τεμαχίων μπορεί να απαιτούν πιο συχνό έλεγχο.
Πώς η ανοχή μήτρας επηρεάζει την ποιότητα του τεμαχίου και τη διάρκεια ζωής του εργαλείου
Η ανοχή είναι το κενό μεταξύ του εμβόλου και της μήτρας, και η λανθασμένη επιλογή της προκαλεί αλυσιδωτά προβλήματα. Αν είναι πολύ στενή, παρατηρείται υπερβολική φθορά του εργαλείου, αυξημένες απαιτήσεις τόνων της πρέσας και πιθανή θραύση του εμβόλου. Αν είναι πολύ χαλαρή, οι ακμές κοπής (burrs) γίνονται υπερβολικές, η ποιότητα των ακμών επιδεινώνεται και τα τεμάχια ενδέχεται να μην πληρούν τις διαστασιακές απαιτήσεις.
Οι ιδιότητες του υλικού επηρεάζουν άμεσα τις βέλτιστες ρυθμίσεις ανοχής. Υλικά με χαμηλότερη σκληρότητα και μεγαλύτερη δυστρεψία, όπως το χαλκός και το αλουμίνιο, επιτρέπουν τη χρήση στενότερων ανοχών. Σκληρότερα υλικά, όπως το ανοξείδωτο χάλυβας και οι υψηλής αντοχής κράματα, απαιτούν μεγαλύτερη ανοχή για να αποφευχθεί η υπερβολική φόρτιση του εργαλείου.
Σύμφωνα με τις οδηγίες παραγωγής, η πιο αξιόπιστη μέθοδος βαθμονόμησης της ελεύθερης κενής απόστασης χρησιμοποιεί ακριβείς ροδέλες υπό την πλάκα υποστήριξης του καλουπιού. Αυτή η προσέγγιση επιτρέπει ρυθμίσεις σε επίπεδο μικρομέτρων για την επίτευξη βέλτιστης απόδοσης κοπής για το συγκεκριμένο υλικό και το συγκεκριμένο πάχος που χρησιμοποιείτε.
Η κατανόηση αυτών των διαγνωστικών προσεγγίσεων μετατρέπει τη διάγνωση προβλημάτων από εικασίες σε συστηματική επίλυση προβλημάτων. Ακόμη καλύτερο, όμως, από τη γρήγορη επίλυση προβλημάτων είναι η πρόληψή τους εντελώς μέσω προληπτικών στρατηγικών συντήρησης, τις οποίες θα εξερευνήσουμε στη συνέχεια.
Στρατηγικές Συντήρησης Μητρών και Βελτιστοποίησης της Διάρκειας Ζωής
Αυτή είναι μια πραγματικότητα που οι περισσότερες εργασίες κοπής μαθαίνουν με δύσκολο τρόπο: ένα προοδευτικό καλούπι αξίας 300.000 δολαρίων μπορεί να μετατραπεί σε άχρηστα απόβλητα σε μήνες, εάν δεν υποστεί κατάλληλη συντήρηση. Ωστόσο, σύμφωνα με ειδικούς του κλάδου, τα κακώς ορισμένα συστήματα διαχείρισης εργαστηρίων καλουπιών μειώνουν δραματικά την παραγωγικότητα των γραμμών πίεσης και αυξάνουν το κόστος. Η διαφορά μεταξύ καλουπιών κοπής που παράγουν εκατομμύρια εξαιρετικής ποιότητας εξαρτήματα και εκείνων που απαιτούν συνεχή επισκευή ανάγεται σε ένα μόνο πράγμα: πειθαρχημένη προληπτική συντήρηση.
Σκεφτείτε το με αυτόν τον τρόπο. Κάθε κίνηση της πρέσας υποβάλλει την εργαλειομηχανή σας σε τεράστιες δυνάμεις. Οι ακμές κοπής αμβλύνονται. Η στοίχιση μετατοπίζεται. Οι ελατήρια κουράζονται. Χωρίς συστηματική παρέμβαση, αυτές οι σταδιακές αλλαγές συσσωρεύονται μέχρις ότου τα προβλήματα ποιότητας επιβάλλουν ακριβές αντιδραστικές επισκευές. Ας εξερευνήσουμε πώς η προληπτική συντήρηση βελτιώνει τη διάρκεια ζωής των καλουπιών και την οικονομική απόδοση της παραγωγής.
Προληπτικά Προγράμματα Συντήρησης που Επεκτείνουν τη Διάρκεια Ζωής των Εμβόλων
Η καθιέρωση της κατάλληλης συχνότητας συντήρησης δεν είναι υπόθεση εικασιών. Εξαρτάται από τρεις αλληλοσυνδεόμενους παράγοντες: τον όγκο παραγωγής, τη σκληρότητα του υλικού του τεμαχίου εργασίας και τις συγκεκριμένες εργασίες που εκτελεί το εργαλείο σφράγισης. Σύμφωνα με εμπειρογνώμονες συντήρησης καλουπιών, οι χρονοδιαγράμματα μπορούν να βασίζονται σε διαστήματα όπως ώρες λειτουργίας, παραγόμενα προϊόντα ή ολοκληρωμένες παραγγελίες.
Παρακάτω αναφέρονται οι βασικές δραστηριότητες συντήρησης που πρέπει να περιλαμβάνει κάθε πρόγραμμα συντήρησης καλουπιών:
- Διαστήματα ακονίσματος: Οι ακμές κοπής απαιτούν επαναλείανση πριν αμβλυνθούν τόσο ώστε να προκαλούν ακμές (burrs). Για εφαρμογές με ήπιο χάλυβα, προγραμματίστε επιθεώρηση κάθε 50.000–100.000 κύκλους. Για πιο σκληρά υλικά, όπως ο ανοξείδωτος χάλυβας, ενδέχεται να απαιτείται επιθεώρηση κάθε 25.000–50.000 κύκλους. Η χρήση εσφαλμένων τροχών λείανσης ή μεθόδων μπορεί να προκαλέσει υπερβολική αύξηση της θερμότητας, με αποτέλεσμα ρωγμές και παραμορφώσεις.
- Απαιτήσεις λίπανσης: Η κατάλληλη λίπανση ελαχιστοποιεί την τριβή μεταξύ κινούμενων εξαρτημάτων, μειώνει τη φθορά και διασφαλίζει την ομαλή λειτουργία. Εφαρμόστε λιπαντικά σύμφωνα με τις προδιαγραφές του κατασκευαστή, επιλέγοντας τον κατάλληλο τύπο και την κατάλληλη ποσότητα για συγκεκριμένα εξαρτήματα της μήτρας. Η παράλειψη της λίπανσης οδηγεί σε γκαλινγκ, πρόωρη φθορά και αυξημένο κίνδυνο βλαβών.
- Επαλήθευση Ευθυγράμμισης: Οι οδηγοί πείροι, οι μανδύες και τα τακάκια υποστήριξης διατηρούν την κρίσιμη στοίχιση μεταξύ των δύο μισών της μήτρας. Ελέγχετε τακτικά τη στοίχιση με χρήση δεικτών μετρήσεων (dial indicators), ιδιαίτερα μετά από οποιοδήποτε ασυνήθιστο γεγονός στον πρέσσο ή μετά από τροποποιήσεις της μήτρας. Σύμφωνα με βιομηχανικές πηγές, μερικά μικροίντσες (microinches) αστοίχιστης θέσης μπορούν να προκαλέσουν σοβαρές αλλαγές στην ποιότητα της παραγωγής.
- Χρονικός προγραμματισμός αντικατάστασης εξαρτημάτων: Οι ελατήρια κουράζονται, οι αποσπαστήρες φθείρονται και οι οδηγοί χαλαρώνουν. Καθορίστε χρονοδιαγράμματα αντικατάστασης βάσει των συστάσεων του κατασκευαστή και της παρατηρούμενης απόδοσης. Μην περιμένετε την αποτυχία ενός εξαρτήματος για να προκαλέσετε την αντικατάστασή του, καθώς η ζημιά που προκαλείται σε επόμενα στάδια της διαδικασίας συχνά υπερβαίνει κατά πολύ το κόστος του εξαρτήματος.
- Πρωτόκολλα Καθαρισμού: Η συσσώρευση υπολειμμάτων, μεταλλικών υπολειμμάτων και ξηρασμένου λιπαντικού επηρεάζει την απόδοση των μήτρων. Εφαρμόστε καθημερινό καθαρισμό από τους χειριστές και ολοκληρωμένο καθαρισμό κατά τις προγραμματισμένες περιόδους συντήρησης. Σύμφωνα με ειδικούς συντήρησης, ο καθαρισμός βελτιώνει σημαντικά την απόδοση και επεκτείνει τη χρήσιμη διάρκεια ζωής.
Αναγνώριση Μοτίβων Φθοράς Πριν Επηρεαστεί η Ποιότητα
Το να περιμένετε να εμφανιστούν ελαττωματικά εξαρτήματα για να υποδείξουν την ανάγκη συντήρησης σημαίνει ότι έχετε ήδη παράγει απόβλητα. Τα έξυπνα προγράμματα μεταλλικής εμβολοκόπησης χρησιμοποιούν πρωτόκολλα οπτικής επιθεώρησης και μετρήσεων για να εντοπίσουν τη φθορά πριν αυτή επηρεάσει την παραγωγή. Αυτά είναι τα σημεία που ελέγχουν οι έμπειροι τεχνικοί:
- Επιδείνωση της κατάστασης των ακμών: Οι ακμές κοπής πρέπει να εμφανίζονται οξείες και ομοιόμορφες υπό μεγέθυνση. Η στρογγυλοποίηση, η αποκόλληση (chipping) ή η ανομοιόμορφη φθορά υποδεικνύουν ότι απαιτείται επαναλείανση.
- Αλλαγές στην Επιφανειακή Κατάσταση: Οι επιφάνειες διαμόρφωσης πρέπει να παραμένουν λείες. Οι γρατσουνιές, τα σημάδια γκαλινγκ (galling) ή η συσσώρευση υλικού υποδηλώνουν προβλήματα λίπανσης ή ζητήματα συμβατότητας υλικών.
- Διαστασιακή Παρέκκλιση: Η περιοδική μέτρηση των εμβολοτυπημένων εξαρτημάτων αποκαλύπτει σταδιακές αλλαγές προτού υπερβούν τις ανεκτές τιμές. Παρακολουθείστε τις τάσεις, όχι απλώς τα αποτελέσματα «πέρασε/απέτυχε».
- Ατυποι ήχοι ή δυνάμεις: Οι εμπειρογνώμονες χειριστές παρατηρούν όταν η μήτρα παράγει διαφορετικό ήχο ή όταν αυξάνονται οι ενδείξεις τόνων της πρεσσών. Αυτά τα πρώιμα σημάδια συχνά προηγούνται ορατών προβλημάτων.
Σύμφωνα με ειδικούς σε εργαλεία εμβολοτύπησης χάλυβα, οι τακτικές επιθεωρήσεις προσφέρουν στους χειριστές τη δυνατότητα να εντοπίσουν μήτρες που χρειάζονται ακόνισμα ή αντικατάσταση, καθώς και άλλα προβλήματα που θα μπορούσαν να επηρεάσουν την παραγωγικότητα. Η επίλυση προβλημάτων προτού εξαπλωθούν αποτρέπει ακριβά χρονικά διαστήματα αδράνειας.
Η πραγματικότητα του κόστους: Αντιδραστικές έναντι προληπτικών προσεγγίσεων
Εξετάστε τι συμβαίνει όταν οι εργασίες κατασκευής μητρών παραλείψουν την προληπτική συντήρηση. Σύμφωνα με Ειδικούς της Phoenix Group , η κακή συντήρηση των μήτρων προκαλεί ελαττώματα ποιότητας κατά την παραγωγή, αυξάνοντας το κόστος ταξινόμησης, αυξάνοντας την πιθανότητα αποστολής ελαττωματικών εξαρτημάτων και επιφέροντας κίνδυνο ακριβών υποχρεωτικών μέτρων περιορισμού.
Το κρυφό κόστος αθροίζεται γρήγορα:
- Χαμένος χρόνος λειτουργίας της πρεσσών για έκτακτες επισκευές κάτω από τον εμβολοφόρο
- Προσωρινές τροποποιήσεις που αργότερα πρέπει να διορθωθούν μόνιμα, διπλασιάζοντας το κόστος συντήρησης
- Προσαρμογές της γραμμής συναρμολόγησης για να αντισταθμιστεί η μεταβλητότητα των εξαρτημάτων
- Παράπονα ποιότητας από τους πελάτες και πιθανές ενέργειες περιορισμού
- Απόβλητο υλικό που μπορεί να εξαντλήσει τα αποθέματα του προμηθευτή κατά τη διάρκεια διαταραχών της αλυσίδας εφοδιασμού
Το κόστος της προληπτικής συντήρησης είναι προβλέψιμο και προγραμματισμένο. Οι αντιδραστικές επισκευές είναι ακριβές, απρόβλεπτες και συμβαίνουν πάντα στη χειρότερη δυνατή στιγμή.
Πρακτικές αποθήκευσης και χειρισμού που διατηρούν την κατάσταση των καλουπιών
Το τι συμβαίνει με τα καλούπια σας μεταξύ των παραγωγικών κύκλων έχει μεγαλύτερη σημασία από όσο πιστεύουν οι περισσότερες επιχειρήσεις. Σύμφωνα με βιομηχανικές πηγές, τα καλούπια πρέπει να καθαρίζονται και να λιπαίνονται πριν από την αποθήκευσή τους και να τοποθετούνται σε ελεγχόμενο περιβάλλον όπου ρυθμίζονται η υγρασία και η θερμοκρασία.
Οι καλύτερες πρακτικές για την αποθήκευση καλουπιών περιλαμβάνουν:
- Εφαρμογή αντισκωριακών επικαλύψεων σε όλες τις εκτεθειμένες επιφάνειες από χάλυβα
- Αποθήκευση των καλουπιών σε προστατευτικά κουτιά ή σε αφιερωμένους σταθμούς που αποτρέπουν φυσική ζημιά
- Διατήρηση ελέγχου του κλίματος για να αποτραπεί η συμπύκνωση και η διάβρωση
- Ελέγξτε την κατάσταση των καλουπιών κατά την αποθήκευση και επαληθεύστε την κατά την ανάκτησή τους
- Εφαρμόστε ένα αριθμημένο σύστημα απογραφής με αυστηρές διαδικασίες εισόδου και εξόδου
Η κατάλληλη αποθήκευση προστατεύει την επένδυσή σας σε εργαλειομηχανήματα και διασφαλίζει ότι τα καλούπια επιστρέφουν στην παραγωγή έτοιμα να λειτουργήσουν. Η μικρή προσπάθεια που απαιτείται αποδίδει μεγάλα οφέλη μέσω της επέκτασης της διάρκειας ζωής τους και της συνεχούς ποιότητας από το πρώτο πάτημα μετά την αλλαγή.
Με τα βασικά στοιχεία της συντήρησης να έχουν καλυφθεί, ας εξερευνήσουμε πώς διάφορες βιομηχανίες εφαρμόζουν αυτές τις αρχές, αντιμετωπίζοντας παράλληλα τις ιδιαίτερες απαιτήσεις τους για ακρίβεια, πιστοποίηση και όγκο παραγωγής.
Εφαρμογές Βιομηχανίας από την Αυτοκινητοβιομηχανία έως την Ηλεκτρονική
Έχετε ποτέ αναρωτηθεί γιατί οι μήτρες εμβολοκόπησης για αυτοκίνητα κοστίζουν σημαντικά περισσότερο από εκείνες που χρησιμοποιούνται για οικιακές συσκευές; Ή γιατί οι κατασκευαστές αεροδιαστημικών προϊόντων προδιαγράφουν εξωτικά υλικά για μήτρες, τα οποία άλλες βιομηχανίες σπάνια λαμβάνουν υπόψη; Η απάντηση βρίσκεται στο πώς οι διάφοροι τομείς προτεραιοποιούν ανταγωνιστικούς παράγοντες, όπως η ακρίβεια, οι απαιτήσεις πιστοποίησης, ο όγκος παραγωγής και οι προσδοκίες για την επιφανειακή επεξεργασία. Η κατανόηση αυτών των τομεακών απαιτήσεων μεταμορφώνει τον τρόπο με τον οποίο προσεγγίζετε την προδιαγραφή των μητρών και την επιλογή των προμηθευτών.
Ο καθένας από αυτούς τους τομείς έχει αναπτύξει διακριτές απαιτήσεις βάσει των ιδιαίτερων προκλήσεων που αντιμετωπίζει. Αυτό που λειτουργεί τέλεια για μεταλλικά εμβολοκοπημένα εξαρτήματα καταναλωτικής ηλεκτρονικής μπορεί να αποτύχει καταστροφικά σε εφαρμογές αεροδιαστημικής τεχνολογίας. Ας εξερευνήσουμε πώς οι κύριοι βιομηχανικοί τομείς εφαρμόζουν την τεχνολογία εμβολοκόπησης μετάλλων και τι καθιστά τις απαιτήσεις τους για μήτρες ουσιαστικά διαφορετικές.
Απαιτήσεις και Πρότυπα για Μήτρες Εμβολοκόπησης Αυτοκινήτων
Η αυτοκινητοβιομηχανία αποτελεί τον μεγαλύτερο παγκόσμιο καταναλωτή μήτρας εμβολικής διαμόρφωσης, και για καλό λόγο. Σύμφωνα με πηγές του κλάδου, η εμβολική διαμόρφωση μετάλλων διαδραματίζει σημαντικό ρόλο στην αυτοκινητοβιομηχανία, χρησιμοποιούμενη συνήθως στην παραγωγή εξαρτημάτων του καροτσαμιού, όπως πόρτες, καπό, και συστατικά του πλαισίου. Ο συνδυασμός υψηλών όγκων παραγωγής, κρισιμότητας για την ασφάλεια και πιέσεων κόστους δημιουργεί απαιτήσεις που φέρνουν την τεχνολογία των μητρών στα όριά της.
Τι διακρίνει την εξατομικευμένη εμβολική διαμόρφωση μετάλλων για αυτοκίνητα από άλλους κλάδους; Τρεις παράγοντες επικρατούν:
- Απαιτήσεις πιστοποίησης Ο Πρότυπο IATF 16949:2016 καθορίζει τις απαιτήσεις για τα συστήματα διαχείρισης ποιότητας των οργανισμών σε όλη την παγκόσμια αυτοκινητοβιομηχανία. Το πρότυπο αυτό, που εκδόθηκε από τη Διεθνή Ομάδα Εργασίας Αυτοκινήτου (International Automotive Task Force), αναπτύχθηκε με ανεπίστρεπτη συμμετοχή του κλάδου και αντικατέστησε αποτελεσματικά το ISO/TS 16949. Οι προμηθευτές πρέπει να αποδεικνύουν αυστηρά συστήματα ποιότητας που καλύπτουν όλα τα στάδια, από την επικύρωση του σχεδιασμού των μητρών μέχρι την παρακολούθηση της παραγωγής.
- Απαιτήσεις όγκου παραγωγής: Τα αυτοκινητοβιομηχανικά προγράμματα απαιτούν συνήθως εκατομμύρια εξαρτήματα κατά τη διάρκεια παραγωγής ενός οχήματος. Αυτός ο όγκος δικαιολογεί σημαντικές επενδύσεις σε καλούπια, ενώ απαιτεί εξαιρετική αντοχή των καλουπιών. Τα προοδευτικά καλούπια για αυτοκινητοβιομηχανικές βάσεις, γλωσσίδες και συνδέσμους πρέπει να διατηρούν αυστηρές ανοχές κατά τη διάρκεια εκτεταμένων παραγωγικών κύκλων.
- Προδιαγραφές κρίσιμες για την ασφάλεια: Εξαρτήματα όπως τα μέρη του συστήματος πέδησης, οι βάσεις του συστήματος διεύθυνσης και οι δομικές ενισχύσεις δεν επιτρέπουν καθόλου ελαττώματα. Οι προδιαγραφές των καλουπιών πρέπει να λαμβάνουν υπόψη τις χειρότερες πιθανές παραλλαγές των υλικών, ενώ παράλληλα πρέπει να παράγουν εξαρτήματα που πληρούν τις απαιτούμενες διαστασιακές προδιαγραφές.
Ο τομέας των καλουπιών εμβολοθλάσεως για την αυτοκινητοβιομηχανία έχει κινητοποιήσει πολλές καινοτομίες που αργότερα εξαπλώθηκαν σε άλλους τομείς. Η προχωρημένη προσομοίωση με CAE, τα εξελιγμένα συστήματα προστασίας καλουπιών και οι εκτενείς διαδικασίες συντήρησης προέκυψαν όλες από το απαιτητικό περιβάλλον της αυτοκινητοβιομηχανίας. Προμηθευτές πιστοποιημένοι σύμφωνα με το IATF 16949, όπως Shaoyi εκμεταλλευτείτε προηγμένη προσομοίωση CAE για αποτελέσματα χωρίς ελαττώματα, επιτυγχάνοντας ποσοστό πρώτης έγκρισης 93% σύμφωνα με τα πρότυπα των κατασκευαστών οχημάτων (OEM) μέσω πειθαρχημένων μηχανικών διαδικασιών και συστημάτων ποιότητας.
Ακριβείς απαιτήσεις στην εμβολοθλάση εξαρτημάτων ηλεκτρονικών
Ενώ οι καλούπια για αυτοκίνητα χειρίζονται σχετικά μεγάλα εξαρτήματα με ανοχές που μετριούνται σε δέκατα του χιλιοστού, η εμβολοθλάση ηλεκτρονικών λειτουργεί σε εντελώς διαφορετικό πεδίο. Σύμφωνα με ειδικούς στην ακριβή εμβολοθλάση, τα καταναλωτικά ηλεκτρονικά απαιτούν υψηλή ακρίβεια για την κατασκευή λεπτών, μικρών και ευαίσθητων προϊόντων. Η υποδομή αυτών των προϊόντων απαιτεί εμβολοθλασμένα προϊόντα με πάχος 0,07 χιλιοστόμετρα.
Σκεφτείτε την πρόκληση της παραγωγής συνδετήρων για smartphones. Οι συνδετήρες FPC, οι οποίοι χωρίς την ακριβή εμβολοθλάση μετάλλου θα είχαν πολύ μεγαλύτερο πλάτος ακίδας σύνδεσης, πρέπει να κατασκευαστούν με ανοχές που φτάνουν τα όρια των συμβατικών εργαλειομηχανών. Αυτό δημιουργεί μοναδικές απαιτήσεις για τα καλούπια:
- Δυνατότητες μικροεμβολοθλάσεως: Τα χαρακτηριστικά που μετρώνται σε εκατοστά του χιλιοστού απαιτούν εξειδικευμένα εργαλεία, ακριβή λείανση και έλεγχο του περιβάλλοντος, ο οποίος δεν είναι εφικτός σε τυπικά εργαστήρια κοπής.
- Σκέψεις για τα υλικά: Οι κράματα χαλκού, ο φωσφορούχος ορείχαλκος και τα ειδικά υλικά επαφής συμπεριφέρονται διαφορετικά από τα αυτοκινητοβιομηχανικά χάλυβες, επομένως απαιτούνται προσαρμοσμένες ανοχές και παράμετροι διαμόρφωσης.
- Κριτικότητα τελικής επεξεργασίας επιφάνειας: Οι επιφάνειες ηλεκτρικής επαφής πρέπει να είναι άψογες. Οποιαδήποτε ακμές, γρατζουνιές ή μόλυνση μπορούν να επηρεάσουν την ηλεκτρική αγωγιμότητα και την αξιοπιστία του προϊόντος.
- Μεταβλητότητα όγκου: Οι κύκλοι ζωής των ηλεκτρονικών προϊόντων είναι σύντομοι σε σύγκριση με τα αυτοκινητοβιομηχανικά. Τα καλούπια πρέπει να παρέχουν υψηλή ποιότητα από το πρώτο πρωτότυπο μέχρι τις παραγωγικές σειρές, οι οποίες μπορεί να διαρκούν μήνες αντί για χρόνια.
Για έναν προσαρμοστικό κατασκευαστή μεταλλικών εξαρτημάτων που εξυπηρετεί αυτόν τον τομέα, η επένδυση σε ακριβή εξοπλισμό, σε περιβάλλοντα κατασκευής με έλεγχο του κλίματος και σε ειδικές δυνατότητες επιθεώρησης καθορίζει την ανταγωνιστική του θέση.
Αεροδιαστημική και Αμυντική Βιομηχανία: Όπου η αποτυχία δεν είναι επιλογή
Σύμφωνα με εμπειρογνώμονες του κλάδου, η ανάγκη για αξιόπιστα εξαρτήματα σε κάθε προϊόν, ενώ ταυτόχρονα τηρείται ο προϋπολογισμός, είναι ίσως η σημαντικότερη απαίτηση όσον αφορά τις στρατιωτικές και αεροδιαστημικές βιομηχανίες. Η δυσλειτουργία συσκευών που χρησιμοποιούν εξαρτήματα από μέταλλο κατεργασμένα με ακριβή διαμόρφωση (precision metal stamped products) μπορεί να συμβάλει στον κίνδυνο θανατηφόρων ατυχημάτων.
Τι καθιστά ουσιαστικά διαφορετική τη διαμόρφωση μεταλλικών εξαρτημάτων για αεροδιαστημικές εφαρμογές;
- Πιστοποίηση Υλικού: Οι αεροδιαστημικές κράματα παρέχονται με πλήρη εξακολούθηση της προέλευσης του υλικού (full material traceability). Οι μήτρες πρέπει να σχεδιάζονται ειδικά για πιστοποιημένα υλικά, ενώ δεν επιτρέπονται αντικαταστάσεις.
- Ένταση της τεκμηρίωσης: Κάθε παράμετρος διαδικασίας, κάθε παρτίδα υλικού και κάθε αποτέλεσμα ελέγχου πρέπει να τεκμηριώνονται και να διατηρούνται. Η πιστοποίηση των μητρών περιλαμβάνει εκτενείς αρχικούς ελέγχους (first article inspections) και μελέτες ικανότητας διαδικασίας.
- Βελτιστοποίηση Βάρους: Σύμφωνα με πηγές της βιομηχανίας κατασκευής, οι αεροδιαστημικές εφαρμογές απαιτούν τα εξαρτήματα που κατασκευάζονται με διαμόρφωση μετάλλου να παρουσιάζουν εξαιρετική αντοχή και ανθεκτικότητα, ενώ ταυτόχρονα ελαχιστοποιείται το συνολικό βάρος τους για τη βελτίωση της απόδοσης πτήσης. Οι μήτρες πρέπει να διαμορφώνουν πολύπλοκες γεωμετρίες που μεγιστοποιούν τον λόγο αντοχής προς βάρος.
- Πολυπλοκότητα χαμηλής παραγωγής: Σε αντίθεση με τα εκατομμύρια πανομοιότυπα εξαρτήματα των αυτοκινήτων, οι αεροδιαστημικές πτήσεις μπορεί να είναι εκατοντάδες ή χιλιάδες. Αυτό αλλάζει την οικονομική εξίσωση για την επένδυση σε εργαλεία.
Οι βιομηχανίες αυτές συχνά απαιτούν ειδικά σχέδια και κατασκευές σύμφωνα με αυστηρά πρότυπα ποιότητας. Αν σας έχουν πει ότι ένα συγκεκριμένο στοιχείο δεν είναι δυνατό να δημιουργηθεί, οι εξειδικευμένοι προμηθευτές αεροδιαστημικής τυποποίησης με δυνατότητες μικροτύποσης και περίπλοκη εργασία ακριβείας μετάλλου χρησιμοποιώντας πρωτοποριακή τεχνολογία μπορούν συχνά να βρουν λύσεις που οι προμηθευτ
Εργαλεία και καταναλωτικά προϊόντα: ισορροπία κόστους και ποιότητας
Σύμφωνα με ειδικούς κατασκευαστές, πολλά μεταλλικά εξαρτήματα σε οικιακές συσκευές όπως πλυντήρια ρούχων, ψυγεία και κλιματιστικά παράγονται μέσω της διαδικασίας της τυποποίησης. Η σφραγίσιση μετάλλων ανταποκρίνεται στις υψηλές απαιτήσεις αντοχής και αισθητικής των προϊόντων αυτών.
Ο τομέας των ηλεκτρονικών συσκευών παρουσιάζει διαφορετικές προτεραιότητες από εκείνες της αυτοκινητοβιομηχανίας ή του αεροδιαστημικού τομέα:
- Ευαισθησία στο κόστος: Η πίεση στις τιμές κατανάλωσης μεταφέρεται απευθείας στο κόστος των εξαρτημάτων. Οι μήτρες πρέπει να μεγιστοποιούν τη χρήση του υλικού και να ελαχιστοποιούν τον χρόνο επεξεργασίας ανά εξάρτημα.
- Αισθητικές απαιτήσεις: Οι ορατές επιφάνειες πρέπει να είναι ελεύθερες από γρατζουνιές και να παρουσιάζουν συνεκτική επιφανειακή επεξεργασία. Αυτό απαιτεί προσεκτική λείανση των μητρών και πρωτόκολλα ελέγχου της χειριστικότητας των υλικών.
- Μέτριες ανοχές: Σε αντίθεση με την ηλεκτρονική ή την αεροδιαστημική βιομηχανία, οι επεξεργασίες ελάσματος για οικιακές συσκευές συνήθως λειτουργούν με πιο ευέλικτες διαστασιακές απαιτήσεις, επιτρέποντας απλούστερα σχέδια μητρών.
- Μεικτοί όγκοι παραγωγής: Οι γραμμές προϊόντων κυμαίνονται από είδη υψηλού όγκου παραγωγής (αγαθά κατανάλωσης) έως ειδικά προϊόντα χαμηλού όγκου, απαιτώντας ευέλικτες στρατηγικές εργαλειοθηκών.
Σύγκριση Απαιτήσεων Βιομηχανίας
Η κατανόηση του τρόπου με τον οποίο οι διάφορες βιομηχανίες προτεραιοποιούν διαφορετικούς παράγοντες σας βοηθά να καθορίσετε τις κατάλληλες απαιτήσεις για τις μήτρες στη συγκεκριμένη εφαρμογή σας:
| Βιομηχανία | Κύρια εστίαση στις ανοχές | Τυπικές Ποσότητες | Πιστοποίηση Κλειδιάς | Προτεραιότητα στην Επιφανειακή Κατεργασία |
|---|---|---|---|---|
| Αυτοκίνητο | Μέτριες έως αυστηρές (+/−0,1 mm τυπικά) | 100.000 έως εκατομμύρια ετησίως | Δελτίο ΕΚΑΧ | Μετρίου βαθμού (εκτός από τις ορατές επιφάνειες) |
| Ηλεκτρονικά | Πολύ αυστηρές (+/−0,02 mm ή αυστηρότερες) | 10.000 έως εκατομμύρια ετησίως | ISO 9001, ειδικά για τον κλάδο | Υψηλή (κρίσιμες επιφάνειες επαφής) |
| Αεροδιαστημική | Αυστηρές με πλήρη εξακολούθηση | Εκατοντάδες έως χιλιάδες | AS9100, Nadcap | Μέτρια προς Υψηλή |
| Συσκευή | Μετρίου βαθμού (+/−0,2 mm τυπικά) | 10.000 έως εκατοντάδες χιλιάδες | ISO 9001 | Υψηλή (ορατές επιφάνειες) |
| Ιατρικός | Πολύ αυστηρές με επαλήθευση | Χιλιάδες έως εκατομμύρια | ISO 13485, FDA | Πολύ υψηλό (προβλήματα στειρότητας) |
Θέματα όγκου: Από το πρωτότυπο στην παραγωγή μεγάλης κλίμακας
Η μετάβαση από το πρωτότυπο στην πλήρη παραγωγή αλλάζει ουσιαστικά τις απαιτήσεις για τα καλούπια. Σύμφωνα με ειδικούς του κλάδου, οι συνήθεις τεχνικές απαιτούν αρκετές ημέρες ή εβδομάδες για τη δημιουργία ενός εργαλείου, ενώ οι εξειδικευμένοι κατασκευαστές πρωτοτύπων μπορούν να παραδώσουν ένα τελικό αποτέλεσμα σε χρονικό διάστημα μόλις 24 έως 48 ωρών, χρησιμοποιώντας εξοπλισμό προγραμματιζόμενων υπολογιστών.
Οι μεταβάσεις σε μεγαλύτερους όγκους παραγωγής απαιτούν διαφορετικές στρατηγικές κατασκευής καλουπιών:
- Φάση πρωτοτύπου (1–100 τεμάχια): Το ελαφρύ καλούπι, η λεπτομερής επεξεργασία με σύρμα (wire EDM) ή η λέιζερ κοπή συχνά αποτελούν πιο λογική επιλογή από το βαρύ καλούπι. Οι λύσεις γρήγορης παράδοσης επιβεβαιώνουν τα σχέδια πριν από την επίσημη επένδυση σε καλούπια παραγωγής.
- Χαμηλός όγκος (100–10.000 τεμάχια): Μπορεί να είναι κατάλληλα απλά καλούπια με μέτρια υλικά. Τα μονοστάδια ή τα σύνθετα καλούπια συχνά προσφέρουν την καλύτερη οικονομική απόδοση.
- Μεσαίος όγκος (10.000–100.000 τεμάχια): Τα προοδευτικά καλούπια γίνονται οικονομικά δικαιολογημένα. Τα υψηλής ποιότητας χάλυβες για καλούπια επεκτείνουν τη διάρκεια ζωής τους μεταξύ των περιόδων συντήρησης.
- Υψηλός όγκος (πάνω από 100.000 εξαρτήματα): Οι πλήρως προοδευτικές μήτρες με ενσωματωμένα κομμάτια καρβιδίου στις περιοχές υψηλής φθοράς προσφέρουν το χαμηλότερο κόστος ανά εξάρτημα. Οι προμηθευτές που προσφέρουν γρήγορη πρωτοτυποποίηση σε συνδυασμό με δυνατότητες μαζικής παραγωγής, όπως Η μηχανική ομάδα της Shaoyi με πρωτοτυποποίηση σε χρονικό διάστημα μόλις 5 ημερών, διασφαλίζουν αδιάλειπτη μετάβαση από τη φάση ανάπτυξης στη φάση παραγωγής.
Η κατασκευή ιατρικών συσκευών αποτελεί ίσως τον πιο απαιτητικό συνδυασμό απαιτήσεων. Σύμφωνα με εμπειρογνώμονες στην ακριβή διαμόρφωση με εκτόπιση (precision stamping), οι συσκευές που χρησιμοποιούνται στον ιατρικό τομέα πρέπει να ακολουθούν αυστηρά πρότυπα. Κάθε εξάρτημα που ενσωματώνεται σε μια ιατρική συσκευή πρέπει να συμμορφώνεται με τα πρότυπα του κλάδου ή να τα υπερβαίνει, χωρίς καμία ατέλεια. Οι μέθοδοι ακριβούς διαμόρφωσης με εκτόπιση επιτρέπουν βελτιωμένο σχεδιασμό, πρωτότυπα και προϊόντα που επιτυγχάνουν την έγκριση της FDA.
Είτε παράγετε μήτρες ελάσματος για αυτοκινητοβιομηχανία για ταμπέλες καροτσαμάτων είτε μικροσυστατικά για εμφυτεύσιμες ιατρικές συσκευές, η κατανόηση των ειδικών απαιτήσεων της βιομηχανίας διασφαλίζει ότι η επένδυσή σας σε μήτρες θα παρέχει την απόδοση που απαιτεί η εφαρμογή σας. Η τελική παράμετρος, η οποία συχνά αποτελεί το καθοριστικό κριτήριο στις αποφάσεις για τις μήτρες, είναι η οικονομική ανάλυση που δικαιολογεί αυτές τις επενδύσεις.
Ανάλυση Κόστους και Σκέψεις για την Απόδοση της Επένδυσης (ROI) στα Καλούπια
Αυτή είναι η δυσάρεστη αλήθεια που οι περισσότεροι κατασκευαστές μητρών ελάσματος δεν συζητούν ευθέως: η προσφερόμενη τιμή για τις μήτρες αντιπροσωπεύει μόνο ένα κλάσμα της πραγματικής σας επένδυσης. Μεταξύ τροποποιήσεων στο σχεδιασμό, δαπανών συντήρησης, ανεπάρκειας της παραγωγικότητας και ευκαιριακών κόστους, το πραγματικό κόστος κατοχής μπορεί να υπερβαίνει τις αρχικές προσφορές κατά 40–60%. Η κατανόηση αυτής της πλήρους οικονομικής εικόνας διαχωρίζει τις έξυπνες επενδύσεις σε μήτρες από τα ακριβά λάθη.
Σύμφωνα με ειδικούς του κλάδου, η διαδικασία σφράγισης (stamping) καθίσταται οικονομικά βιώσιμη όταν παράγονται μηνιαίως 10.000+ εξαρτήματα, καθώς η αρχική επένδυση στα εργαλεία αποδίδει μέσω σημαντικά χαμηλότερου κόστους ανά εξάρτημα. Ωστόσο, ο υπολογισμός του σημείου αντιστάθμισης απαιτεί να εξετάσουμε πολύ περισσότερα από το ποσό της παραγγελίας αγοράς. Ας αναλύσουμε τους πραγματικούς παράγοντες που καθορίζουν την οικονομική βιωσιμότητα των καλουπιών κατασκευής.
Υπολογισμός της Πραγματικής Επένδυσης σε Καλούπια Πέραν του Αρχικού Κόστους Εργαλείων
Φανταστείτε ότι προϋπολογίζετε 150.000 $ για ένα προοδευτικό καλούπι, μόνο και μετά διαπιστώνετε ότι έχετε ξοδέψει 220.000 $ μέχρις ότου η παραγωγή εξομαλυνθεί. Πώς συμβαίνει αυτό; Η απάντηση βρίσκεται στην κατανόηση του Συνολικού Κόστους Κατοχής (TCO), μιας έννοιας που οι ειδικοί στην ακριβή κατασκευή περιγράφουν με τον ακόλουθο τύπο: Συνολικό Κόστος = Κόστος Υλικού + Ώρες Μηχανουργικής Επεξεργασίας + Συναρμολόγηση/Δοκιμή.
Ακόμη και αυτός ο τύπος παραλείπει κρίσιμα στοιχεία κόστους. Αυτά είναι τα στοιχεία που περιλαμβάνει πραγματικά η συνολική επένδυσή σας σε καλούπια:
- Αρχικό κόστος εξοπλισμού: Η βασική τιμή για το σχεδιασμό, τα υλικά, τη μηχανική κατεργασία και τη συναρμολόγηση. Σύμφωνα με πηγές παραγωγής, τα εργαλεία εμβολοθλάσεως αυτοκινήτων κοστίζουν συνήθως από 100.000 έως 500.000 δολάρια ΗΠΑ, ανάλογα με την πολυπλοκότητα του εξαρτήματος και τις απαιτήσεις όγκου παραγωγής.
- Κόστος τροποποίησης του σχεδιασμού: Οι αλλαγές μετά την ολοκλήρωση της κατασκευής των εργαλείων κοστίζουν συνήθως 5.000–15.000 δολάρια ΗΠΑ για μικρές προσαρμογές ή 30–50% της αρχικής επένδυσης για σημαντική επανεργασία. Αυτή η πραγματικότητα καθιστά απαραίτητη την εξονυχιστική επικύρωση του σχεδιασμού πριν από την επίσημη έναρξη της παραγωγής με τα μόνιμα εργαλεία.
- Δοκιμή και επικύρωση: Τα περίπλοκα εξαρτήματα απαιτούν συχνά πολλαπλούς κύκλους δοκιμής για τη βελτιστοποίηση των λειτουργιών διαμόρφωσης. Κάθε επανάληψη καταναλώνει χρόνο, υλικά και μηχανικούς πόρους.
- Συντήρηση καθ’ όλη τη διάρκεια παραγωγής: Σύμφωνα με βιομηχανικά δεδομένα, το κόστος συντήρησης των εργαλείων ανέρχεται σε περίπου 2.000–5.000 δολάρια ΗΠΑ ετησίως, με επιπλέον δαπάνες για περιοδική επαναλείανση και αντικατάσταση εξαρτημάτων.
- Αποθήκευση και Χειρισμός: Το λειτουργικό κόστος της εγκατάστασης για την αποθήκευση των εργαλείων, τον έλεγχο του κλίματος και τη διαχείριση των αποθεμάτων προσθέτει συνεχή δαπάνη που πολλοί αγοραστές παραβλέπουν.
- Κόστος ευκαιρίας: Οι 8–18 εβδομάδες που απαιτούνται για την ανάπτυξη των καλουπιών αντιπροσωπεύουν χρόνο κατά τον οποίο το προϊόν σας δεν βρίσκεται σε παραγωγή. Για αγορές που εξαρτώνται από το χρόνο, αυτή η καθυστέρηση έχει πραγματικές οικονομικές επιπτώσεις.
Σύμφωνα με εμπειρογνώμονες εκτιμητές, οι αρχάριοι συχνά υπολογίζουν την απόδοση των επενδύσεων (ROI) χρησιμοποιώντας μια απλή φόρμουλα απόσβεσης: Συνολικό Κόστος διαιρούμενο με την Ετήσια Παραγωγή. Οι έμπειροι επαγγελματίες βασίζονται στην Καθαρή Παρούσα Αξία (NPV) και σε μια εκτενή προσέγγιση του Συνολικού Κόστους Κατοχής (Total Cost of Ownership), η οποία λαμβάνει υπόψη αυτές τις κρυφές δαπάνες.
Κατώφλια Όγκου Παραγωγής για την Επιλογή Τύπου Καλουπιού
Πόσα εξαρτήματα δικαιολογούν την επένδυση σε προοδευτικό καλούπι σε σύγκριση με απλούστερες εναλλακτικές λύσεις; Αυτή η ερώτηση καθορίζει τις περισσότερες αποφάσεις σχετικά με προσαρμοστικές υπηρεσίες μεταλλικής εμβολοτυπίας, ωστόσο η απάντηση διαφέρει σημαντικά ανάλογα με την πολυπλοκότητα του εξαρτήματος, το κόστος των υλικών και το χρονοδιάγραμμα παραγωγής.
Σύμφωνα με οικονομολόγους της βιομηχανίας, τα οικονομικά γίνονται ελκυστικά γρήγορα με την αύξηση του όγκου παραγωγής. Τα εξαρτήματα από λαμαρίνα που κοστίζουν 15 δολάρια μπορούν να μειωθούν σε 3–12 δολάρια μέσω εμβολοθλάσεως, ανάλογα με το βαθμό πολυπλοκότητας. Αυτοκινητοβιομηχανικά έργα έχουν αποδείξει μείωση κόστους κατά 80%, ενώ οι χρόνοι παράδοσης μειώνονται από 10 σε 4 εβδομάδες.
Αυτός είναι ο τρόπος με τον οποίο ο όγκος παραγωγής επηρεάζει τις αποφάσεις σας για τη διαδικασία εμβολοθλάσεως:
| Ετήσια Ποσότητα | Συνιστώμενη Προσέγγιση | Τυπική επένδυση σε εργαλειομηχανήματα | Οικονομικά ανά εξάρτημα | Χρονοδιάγραμμα ισοτιμίας |
|---|---|---|---|---|
| Λιγότερο από 1.000 | Κοπή με λέιζερ ή μαλακά εργαλεία | $0-$5,000 | Υψηλότερο κόστος ανά εξάρτημα, χαμηλότερο συνολικό κόστος | Θεμελιώδη |
| 1,000-10,000 | Απλά ή σύνθετα καλούπια | $5,000-$30,000 | Μεσαίο κόστος ανά εξάρτημα | 6-12 Μήνες |
| 10,000-50,000 | Προοδευτικά καλούπια (τυπικά υλικά) | $30,000-$100,000 | Χαμηλότερο κόστος ανά εξάρτημα | 12-18 Μήνες |
| 50,000-500,000 | Προοδευτικά καλούπια (προνομιακά υλικά) | $75,000-$250,000 | Σημαντικά χαμηλότερο κόστος ανά εξάρτημα | 12-24 μήνες |
| 500,000+ | Προοδευτικά μήτρες με ενσωματωμένα τμήματα από καρβίδιο | $150,000-$500,000+ | Το χαμηλότερο δυνατό κόστος ανά εξάρτημα | 18–36 μήνες |
Σύμφωνα με ειδικούς στη σύγκριση κόστους, το κόστος των μητρών εμβολοθλάσεως κυμαίνεται από 10.000 έως 50.000 USD, με χρόνο παράδοσης 4–8 εβδομάδες, γεγονός που καθιστά αυτή τη διαδικασία μη οικονομική για παραγγελίες κάτω των 3.000 μονάδων. Οι «κρυφές» δαπάνες της εμβολοθλάσεως εκτείνονται πολύ πέρα από την αρχική επένδυση στις μήτρες, όταν οι όγκοι παραγωγής δεν δικαιολογούν το προκαταβλητέο κόστος.
Σχέσεις μεταξύ πολυπλοκότητας της μήτρας, χρόνου παράδοσης και κόστους
Η πολυπλοκότητα επηρεάζει το κόστος με τρόπους που δεν είναι πάντα εντυπωσιακοί. Μία μήτρα για εμβολοθλάσεις με αυστηρές ανοχές, πολλαπλές πράξεις διαμόρφωσης ή δύσκολα υλικά μπορεί να κοστίζει τρεις φορές περισσότερο από ένα γεωμετρικά παρόμοιο εξάρτημα με χαλαρότερες προδιαγραφές.
Λάβετε υπόψη σας πώς αυτοί οι παράγοντες συνδέονται μεταξύ τους:
- Γεωμετρία Εξαρτήματος: Οι βαθιές τραβήξεις, οι οξείες κάμψεις και οι πολύπλοκες τρισδιάστατες μορφές απαιτούν πιο εξελιγμένη μηχανολογική εξοπλισμένη μήτρα με επιπλέον σταθμούς, αυξάνοντας τόσο το κόστος όσο και τον χρόνο παράδοσης.
- Απαιτήσεις ανοχών: Σύμφωνα με πηγές ειδικευμένες στην ακριβή διαμόρφωση με τοποθέτηση, η αυτοκινητοβιομηχανική διαμόρφωση με τοποθέτηση επιτυγχάνει συνήθως τολεραντικότητες ±0,002" έως ±0,005", ενώ για κρίσιμα εξαρτήματα επιτυγχάνεται τολεραντικότητα ±0,001" όταν απαιτείται. Πιο στενές τολεραντικότητες απαιτούν υλικά υψηλής ποιότητας και επιπλέον ακρίβεια κατά την κατασκευή.
- Επιλογή υλικού: Οι μήτρες για τη διαμόρφωση με τοποθέτηση υψηλής αντοχής χαλύβδινων ή αλουμινίου ελάσματων απαιτούν βελτιωμένα χάλυβα μητρών και ενδεχομένως ενσωματώματα καρβιδίου, με αύξηση του κόστους των μητρών κατά 20-50% σε σχέση με το βασικό επίπεδο.
- Απαιτήσεις ταχύτητας παραγωγής: Η παραγωγή με υψηλή ταχύτητα απαιτεί πιο ανθεκτική κατασκευή, προηγμένα συστήματα καθοδήγησης και εξελημένη προστασία των μητρών, γεγονός που αυξάνει το κόστος.
Σύμφωνα με δεδομένα για το χρονοδιάγραμμα ανάπτυξης, η ανάπτυξη μητρών διαμόρφωσης για την αυτοκινητοβιομηχανία διαρκεί συνήθως 8–18 εβδομάδες, ανάλογα με το βαθμό πολυπλοκότητας. Είναι δυνατή η επισπεύδεια των χρονοδιαγραμμάτων, αλλά αυτό οδηγεί σε σημαντική αύξηση του κόστους, το οποίο αυξάνεται συχνά κατά 40–60% όταν οι εργαστηριακές μονάδες πρέπει να αφιερώσουν υπερωρίες για να εκπληρώσουν επισπευσμένες προθεσμίες παράδοσης.
Πότε έχει νόημα η γρήγορη πρωτοτυποποίηση σε σύγκριση με την παραγωγική διαμόρφωση με μήτρες
Αυτό είναι ένα πλαίσιο λήψης αποφάσεων που εξοικονομεί σημαντικά ποσά χρημάτων για τις εταιρείες: μην επενδύσετε σε εργαλειομηχανές παραγωγής μέχρις ότου ο σχεδιασμός σας να έχει οριστικοποιηθεί πλήρως. Σύμφωνα με ειδικούς στην κατασκευή, ένα πρωτότυπο δεν είναι μια «εκδοχή χαμηλού κόστους», αλλά μάλλον ένας χώρος δοκιμών για την επιβεβαίωση πιθανών τρόπων αποτυχίας. Η καθοδηγητική αρχή είναι να αποτυγχάνετε γρήγορα και φθηνά.
Η γρήγορη πρωτοτυποποίηση έχει στρατηγικό νόημα όταν:
- Οι επαναλήψεις του σχεδιασμού είναι ακόμη πιθανές βάσει των σχολίων των πελατών ή των αποτελεσμάτων δοκιμών
- Η επιβεβαίωση της αγοράς δεν έχει ολοκληρωθεί και οι προβλέψεις για τον όγκο παραμένουν αβέβαιες
- Η πίεση για ταχεία είσοδο στην αγορά απαιτεί εξαρτήματα πριν από τους παραδοσιακούς χρόνους παράδοσης των εργαλειομηχανών
- Χρειάζεστε λειτουργικά δείγματα για επιβεβαίωση συναρμολόγησης ή για ρυθμιστικές δοκιμές
Η έξυπνη προσέγγιση, σύμφωνα με ειδικούς στις αλλαγές παραγωγής, περιλαμβάνει την επικάλυψη της τρέχουσας προμήθειάς σας με την ανάπτυξη των εργαλείων σφράγισης. Διατηρήστε τον προμηθευτή κατασκευών σας σε λειτουργία ενώ κατασκευάζονται και επαληθεύονται τα εργαλεία σφράγισης. Αυτό μπορεί να φαίνεται ακριβό, αλλά είναι πολύ πιο οικονομικό από το να εξηγείτε στους πελάτες γιατί οι παραγγελίες τους καθυστερούν.
Οι προμηθευτές που προσφέρουν γρήγορη πρωτοτυποποίηση σε χρονικό διάστημα μόλις 5 ημερών, σε συνδυασμό με δυνατότητες μαζικής παραγωγής, παρέχουν την ευελιξία που απαιτεί η σύγχρονη ανάπτυξη προϊόντων. Η μηχανική ομάδα της Shaoyi παρέχει οικονομικά αποδοτικές λύσεις εργαλειοθηκών που εξισορροπούν την ταχύτητα και την ποιότητα, επιτρέποντας αδιάλειπτες μεταβάσεις από την επαλήθευση πρωτοτύπων στην επιτάχυνση της παραγωγής.
Υπολογισμοί κόστους ανά εξάρτημα και ανάλυση σημείου προσδοκώμενης απόδοσης
Για να κατανοήσετε πότε η επένδυση σε εργαλεία σφράγισης αποδίδει, απαιτούνται απλοί υπολογισμοί που πολλοί αγοραστές δεν πραγματοποιούν ποτέ. Ακολουθεί το πλαίσιο:
Κόστος ανά εξάρτημα που σφραγίζεται = (Κόστος εργαλειοθήκης / Συνολικός αριθμός παραγόμενων εξαρτημάτων) + Άμεσο κόστος παραγωγής
Για παράδειγμα, ένα καλούπι αξίας 100.000 δολαρίων ΗΠΑ που παράγει 500.000 εξαρτήματα προσθέτει 0,20 δολάρια ΗΠΑ ανά εξάρτημα στο κόστος απόσβεσης του καλουπιού. Εάν το άμεσο κόστος κατασκευής ανέρχεται σε 0,50 δολάρια ΗΠΑ ανά εξάρτημα, το συνολικό κόστος του εξαρτήματος που παράγεται με εκτύπωση (stamping) είναι 0,70 δολάρια ΗΠΑ. Συγκρίνετε αυτό με εναλλακτικές μεθόδους κατασκευής (fabrication), οι οποίες μπορεί να κοστίζουν 3,00–5,00 δολάρια ΗΠΑ ανά εξάρτημα χωρίς καμία επένδυση σε καλούπια.
Σύμφωνα με την ανάλυση της απόδοσης επένδυσης (ROI), αναμένεται μείωση του κόστους κατά 50–80% ανά εξάρτημα κατά τη μετάβαση από κατασκευή (fabrication) σε εκτύπωση (stamping) σε υψηλούς όγκους παραγωγής, με το σημείο αντιστάθμισης (break-even) να επιτυγχάνεται συνήθως εντός 12–24 μηνών, ανάλογα με τον ετήσιο όγκο παραγωγής και την επένδυση σε καλούπια. Για ετήσια παραγωγή 100.000 εξαρτημάτων, η μείωση του κόστους μεταφράζεται σε ετήσια εξοικονόμηση 300.000 έως 1,2 εκατομμύριο δολάρια ΗΠΑ.
Ο τύπος υπολογισμού του σημείου αντιστάθμισης (break-even):
Όγκος αντιστάθμισης = Κόστος καλουπιού / (Κόστος κατασκευής ανά εξάρτημα – Κόστος εκτύπωσης ανά εξάρτημα)
Εάν το κόστος κατασκευής (fabrication) ανέρχεται σε 4,00 δολάρια ΗΠΑ ανά εξάρτημα και το κόστος εκτύπωσης (stamping) σε 0,70 δολάρια ΗΠΑ ανά εξάρτημα, ένα καλούπι αξίας 100.000 δολαρίων ΗΠΑ φθάνει στο σημείο αντιστάθμισης σε περίπου 30.300 εξαρτήματα. Οποιοσδήποτε όγκος πέραν αυτού αντιπροσωπεύει καθαρή εξοικονόμηση κόστους.
Η στρατηγική απόφαση επιλογής κατασκευαστή καλουπιών εκτύπωσης (stamping dies)
Η τιμή μόνη της δεν αποκαλύπτει ποτέ ολόκληρη την ιστορία. Σύμφωνα με ειδικούς του κλάδου, η απόφαση «Κατασκευή ή Αγορά» εξαρτάται από μια ισορροπία μεταξύ κόστους, προστασίας της πνευματικής ιδιοκτησίας και λειτουργικής ευελιξίας. Στο σημερινό παγκόσμιο εμπορικό περιβάλλον, οι διαφορές στο κόστος εργασίας μόνες τους δεν καθορίζουν πλέον την ανταγωνιστικότητα.
Κατά την αξιολόγηση εταίρων για προσαρμοστική μεταλλική εμβολοκόπηση, λάβετε υπόψη σας τους παρακάτω παράγοντες εκτός από την προσφερόμενη τιμή των καλουπιών:
- Δυνατότητες μηχανικού σχεδιασμού: Χρησιμοποιεί ο προμηθευτής προσομοίωση CAE για την επιβεβαίωση των σχεδίων πριν από την κοπή του χάλυβα; Αυτό αποτρέπει ακριβά επαναληπτικά στάδια δοκιμής.
- Ποσοστά έγκρισης από την πρώτη φορά: Οι προμηθευτές που επιτυγχάνουν ποσοστό έγκρισης στην πρώτη προσπάθεια 90% και άνω για τα πρότυπα OEM εξοικονομούν σημαντικό χρόνο και κόστος επικύρωσης.
- Δυνατότητες από πρωτότυπο σε παραγωγή: Η συνεργασία με έναν ενιαίο προμηθευτή από τη φάση ανάπτυξης μέχρι την παραγωγή ελέγχει τους κινδύνους μετάβασης και διατηρεί την αρχική πρόθεση του σχεδιασμού.
- Κατάσταση πιστοποίησης: Για αυτοκινητοβιομηχανικές εφαρμογές, η πιστοποίηση IATF 16949 υποδηλώνει συστήματα ποιότητας που αποτρέπουν ακριβά προβλήματα ποιότητας.
- Υποστήριξη συντήρησης: Η συνεχής υποστήριξη των καλουπιών επηρεάζει το συνολικό κόστος κατοχής (TCO) σε ίσο βαθμό με την αρχική τιμή των καλουπιών.
Τα πιο επιτυχημένα προγράμματα σφράγισης αντιμετωπίζουν τα εργαλεία ως στρατηγικές επενδύσεις σε υποδομές, και όχι ως αγορές εμπορεύματος. Όταν αφομοιώσετε τις γνώσεις που περιέχει αυτό το άρθρο —από τους τύπους και τα υλικά των μήτρων μέχρι τη συντήρηση και την ανάλυση κόστους— θα είστε εξοπλισμένοι να λαμβάνετε ενημερωμένες αποφάσεις που διασφαλίζουν την επιτυχία της παραγωγής, αντί για δαπανηρές εκπλήξεις. Η μήτρα σφράγισης που κοστίζει 20% περισσότερο αρχικά, αλλά προσφέρει διάρκεια ζωής 50% μεγαλύτερη και 30% λιγότερα προβλήματα ποιότητας, αποτελεί την πραγματική προσφορά αξίας που διαχωρίζει τα εξαιρετικά προγράμματα κατασκευής από τα μέτρια.
Συχνές Ερωτήσεις Σχετικά με Φυσώνες Μεταλλικής Διαμόρφωσης
1. Τι είναι μια φύση στη μεταλλική διαμόρφωση;
Ένα καλούπι στην εμπρέσιον μετάλλου είναι ένα εξειδικευμένο ακριβές εργαλείο που αποτελείται από αρσενικά και θηλυκά στοιχεία (πούντζο και μπλοκ καλουπιού), τα οποία λειτουργούν από κοινού για να κόβουν, να διαμορφώνουν, να λυγίζουν ή να σχηματίζουν ελάσματα μετάλλου σε επιθυμητές διαμορφώσεις. Σε αντίθεση με τα καταναλωσιμοποιήσιμα εργαλεία, τα καλούπια εμπρέσιον αποτελούν σημαντικές υποδομικές επενδύσεις, ικανά να παράγουν εκατομμύρια ταυτόσημα εξαρτήματα καθ’ όλη τη διάρκεια λειτουργίας τους, με τυπικό κόστος κατασκευής εργαλείων μεταξύ 100.000 και 500.000 USD.
2. Πόσο κοστίζει μια μήτρα εμβολοθλάσεως μετάλλου;
Το κόστος των καλουπιών εμπρέσιον μετάλλου διαφέρει σημαντικά ανάλογα με την πολυπλοκότητα και τον τύπο τους. Τα απλά μονοστάδια καλούπια κοστίζουν από 5.000 έως 30.000 USD, τα σύνθετα καλούπια από 20.000 έως 100.000 USD, ενώ τα προοδευτικά καλούπια για υψηλό-όγκο εφαρμογές στον αυτοκινητοβιομηχανικό τομέα κυμαίνονται από 50.000 έως 500.000 USD και άνω. Πέραν του αρχικού κόστους κατασκευής εργαλείων, το συνολικό κόστος κατοχής περιλαμβάνει τροποποιήσεις στο σχέδιο, συντήρηση, αποθήκευση και επαλήθευση δοκιμαστικής λειτουργίας (tryout), το οποίο μπορεί να προσθέσει 40–60% στην προσφερόμενη τιμή.
3. Ποια είναι η διαφορά μεταξύ κοπής με μήτρα (die cut) και κοπής με μηχάνημα (stamping);
Η διαμόρφωση με κοπή (die cutting) αναφέρεται συνήθως ειδικά σε κοπτικές εργασίες που διαχωρίζουν το υλικό, ενώ η σφράγιση μετάλλου (stamping) περιλαμβάνει ένα ευρύτερο φάσμα εργασιών διαμόρφωσης μετάλλου, όπως κοπή, κάμψη, διάτρηση, ανάγλυφη επεξεργασία, διαμόρφωση, τράβηγμα και νομισματοκοπία. Η σφράγιση μετάλλου χρησιμοποιεί ειδικά μήτρες (dies) με πρέσα για τη διαμόρφωση ελάσματος μέσω ψυχρής επεξεργασίας, ενώ η χύτευση με μήτρα (die casting) είναι μια εντελώς διαφορετική διαδικασία που χρησιμοποιεί λιωμένο μέταλλο που ρίχνεται σε καλούπια.
4. Ποιοι είναι οι κύριοι τύποι μητρών σφράγισης;
Οι πέντε κύριοι τύποι είναι οι προοδευτικές μήτρες (πολυσταθμικές διαδοχικές εργασίες για υψηλό όγκο παραγωγής), οι σύνθετες μήτρες (πολυεργασίες σε μία κίνηση για απλούστερα επίπεδα εξαρτήματα), οι μήτρες μεταφοράς (χειρισμός ξεχωριστών εξαρτημάτων για πολύπλοκα τρισδιάστατα σχήματα και βαθιές διαμορφώσεις), οι μονοσταδιακές μήτρες (μία εργασία ανά κίνηση για πρωτότυπα ή παραγωγή χαμηλού όγκου) και οι συνδυαστικές μήτρες (συνδυασμός κοπτικών και μη κοπτικών εργασιών). Η επιλογή εξαρτάται από τον όγκο παραγωγής, την πολυπλοκότητα του εξαρτήματος και τους περιορισμούς του προϋπολογισμού.
5. Πόσο διαρκούν οι μήτρες σφράγισης μετάλλου;
Οι καλά συντηρούμενοι μήτρες διαμόρφωσης μπορούν να παράγουν εκατομμύρια εξαρτήματα κατά τη διάρκεια λειτουργικής τους ζωής. Η διάρκεια ζωής τους εξαρτάται από την επιλογή του υλικού της μήτρας (εργαλειοχάλυβας D2, ενθέματα καρβιδίου), τη σκληρότητα του υλικού του τεμαχίου εργασίας, τον όγκο παραγωγής και τις πρακτικές συντήρησης. Τα προνομιούχα εξαρτήματα ενδέχεται να κοστίζουν 20–30% περισσότερο αρχικά, αλλά συχνά προσφέρουν διάρκεια ζωής 200–300% μεγαλύτερη μεταξύ διαδοχικών ξυσίματων. Η τακτική προληπτική συντήρηση, συμπεριλαμβανομένου του ξυσίματος, της λίπανσης και της επαλήθευσης της στοίχισης, είναι απαραίτητη για τη μεγιστοποίηση της διάρκειας ζωής της μήτρας.